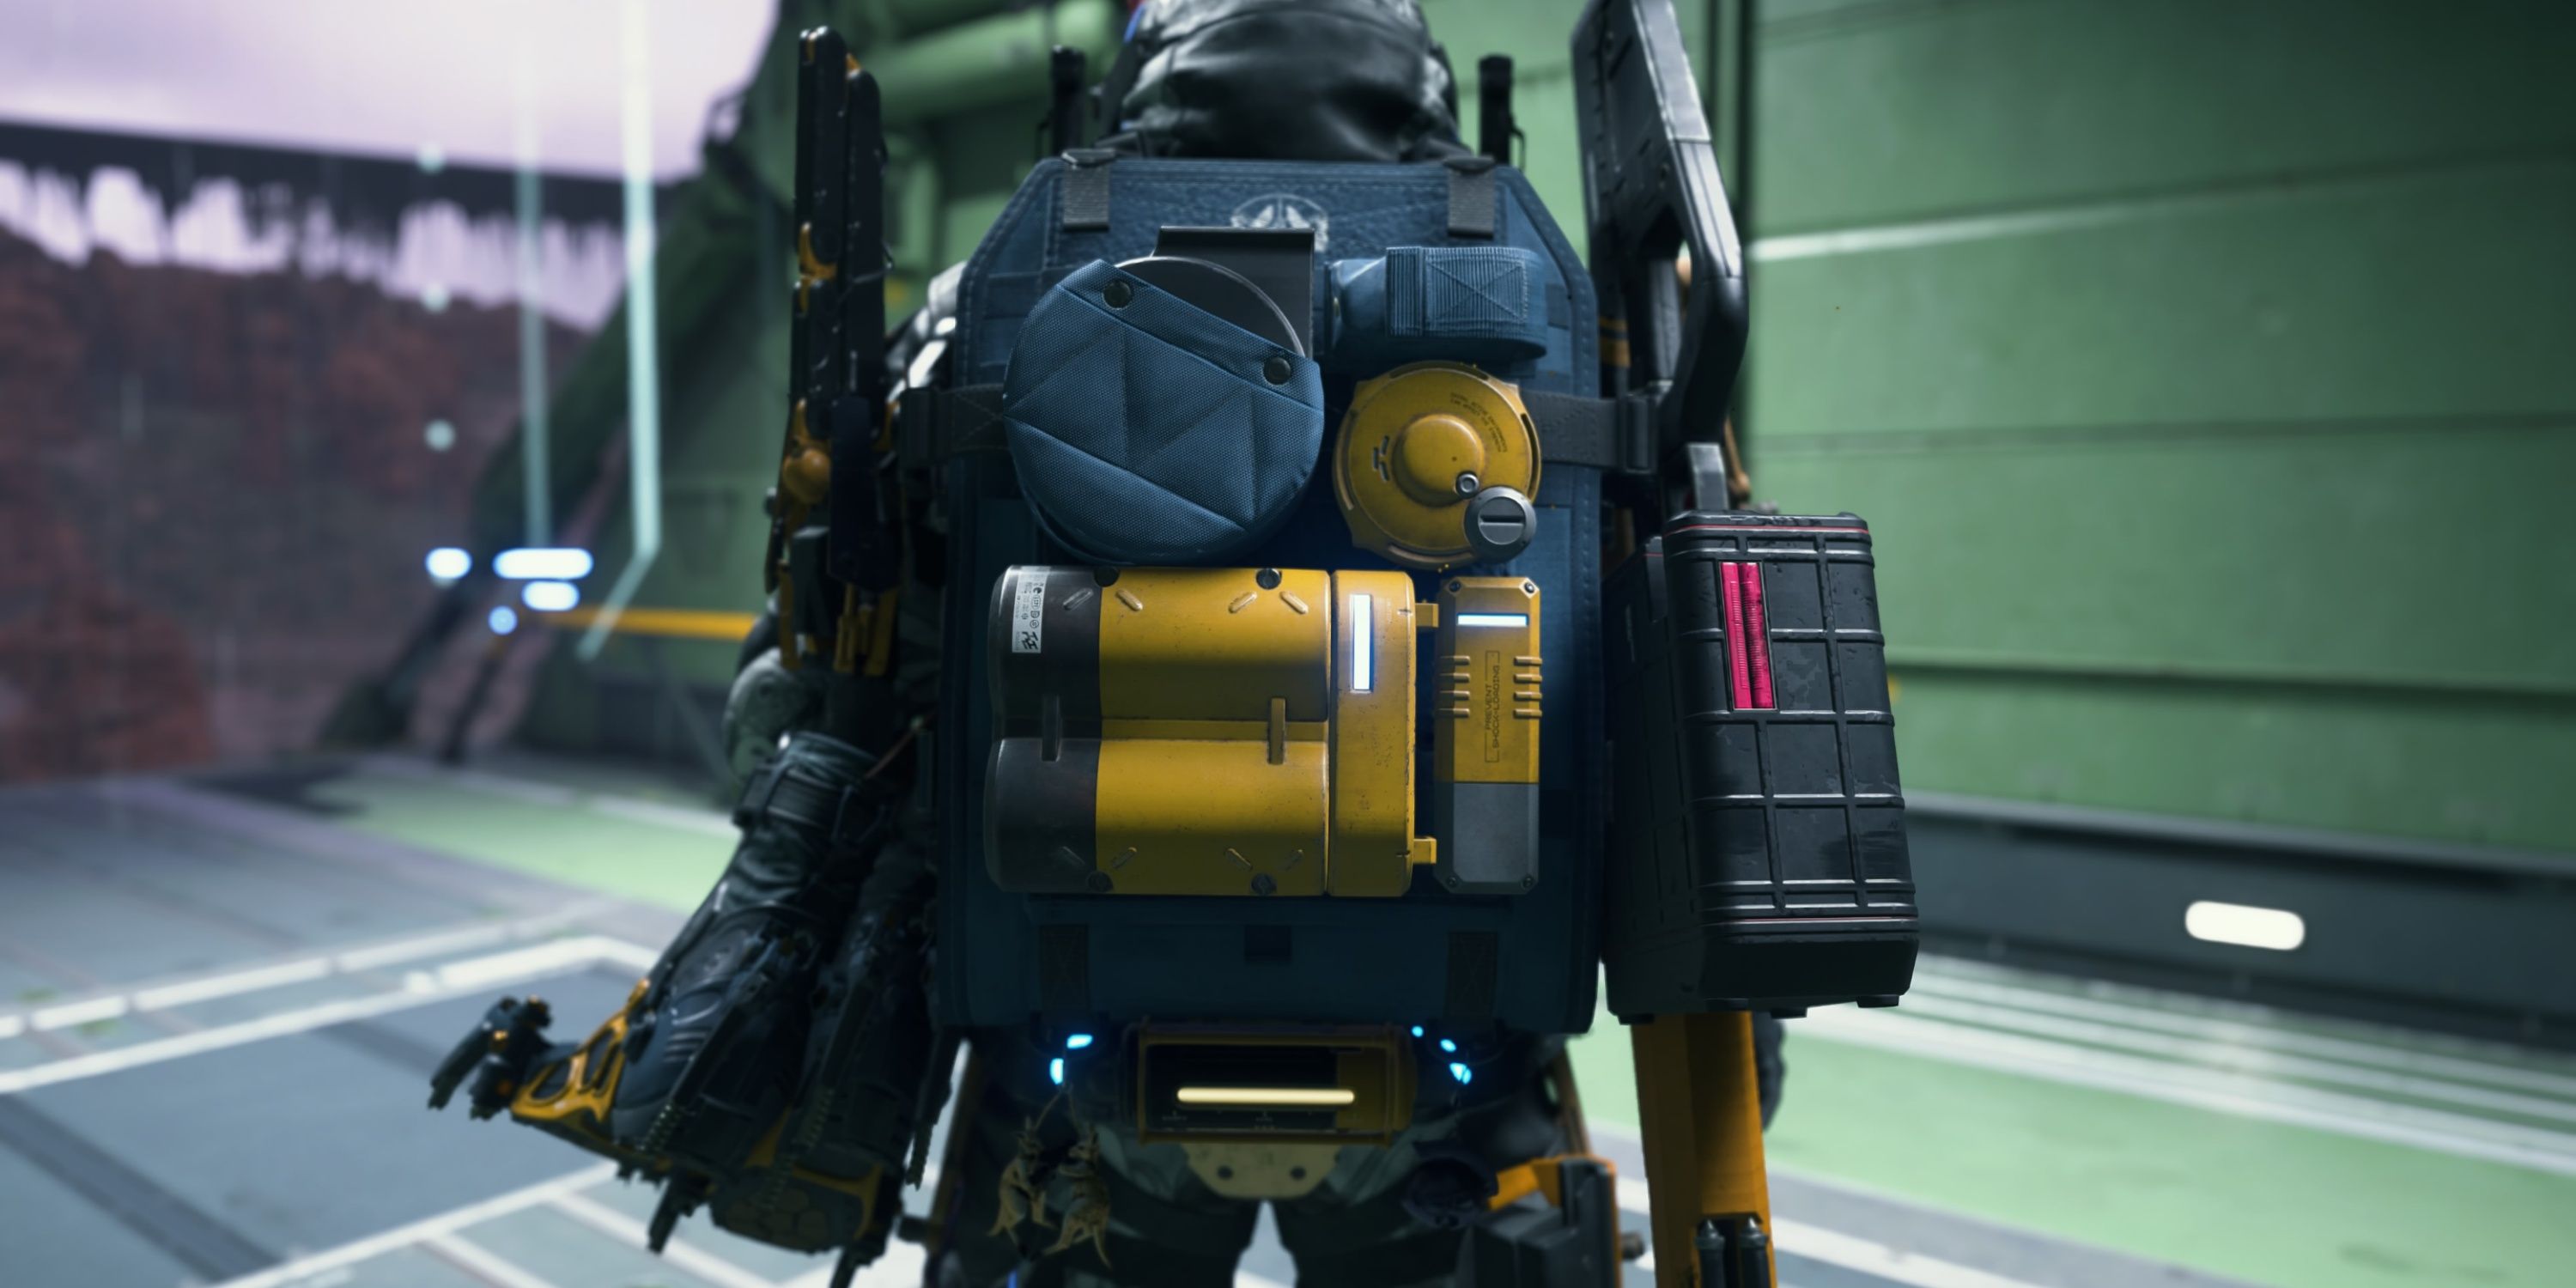
In Death Stranding 2, for Sam to successfully bring Australia together through the Chiral Network, he must ensure that his pack stays in top shape. His pack serves as a vital lifeline because it not only carries a lot of supplies but also subtly enhances his skills.
In simpler terms, Sam has the opportunity to significantly enhance their backpack with various upgrades. These upgrades include features that boost Sam’s abilities and add-ons for enhanced player comfort in Death Stranding 2. To fully customize your backpack, explore the options provided below.
All Backpack Components in Death Stranding 2
How to Get All Backpack Upgrades in Death Stranding 2
21 distinct backpack components can be unveiled in the game ‘Death Stranding 2’, offering Sam individual enhancements. Once unlocked, these improvements can be added to Sam’s pack (as long as there is space available). The benefits range from lighter cargo loads, additional ammo, and durable battery packs for skeletons. Here’s a breakdown of each component, its function, and how to acquire them:
This version maintains the original information while being more concise and easier to read.
| Component | Effects | How to Get |
|---|---|---|
| Grenade Pouch | Store a single thrown weapon, protecting it from timefall. Using a grenade pouch saves you having to carry thrown weapons as cargo. | Connect the Government’s Base to the Chiral Network in Main Order 9. |
| Large Grenade Pouch | Stores three thrown weapons, protecting it from timefall. Using a grenade pouch saves you having to carry thrown weapons as cargo. | Reach Level 4 with the Ghost Hunter (connected via the Chronobiologist in Sub Order 109). |
| Utility Pouch | Stores four blood bags, protecting them from timefall. Using a utility pouch saves you having to carry blood bags individually. | Reach Level 3 with the Northern Environmental Observatory (connected via West Fort Knot in Main Order 16). |
| Chiral Antigravity Device | Decreases a backpack’s overall weight, increasing Sam’s cargo carrying capacity. The more antigravity devices you equip, the greater the weight-reduction effect. | Reach Level 2 with the Government’s Base (connected via Main Order 9). |
| Spare Ammo Container | Additional ammunition storage that increases the amount of ammo Sam can carry for all his weapons. Using additional ammo containers will further increase Sam’s ammo capacity. | Connect the Government’s Base to the Chiral Network in Main Order 9. |
| Large Spare Ammo Container Lv1 | Additional ammunition storage that significantly increases the amount of ammo Sam can carry for all his weapons. Using additional ammo containers will further increase Sam’s ammo capacity. | Reach Level 3 with the Government’s Base (connected via Main Order 9). |
| Large Spare Ammo Container Lv2 | Additional ammunition storage. Its capacity is the same as the Lv1 version, but it takes up less space. Using additional ammo containers will further increase Sam’s ammo capacity. | Reach Level 5 with the Government’s Base (connected via Main Order 9). |
| Back Protector | Armor that protects Sam’s back from gunfire. It will shatter after taking enough damage. | Connect the Government’s Base to the Chiral Network in Main Order 9. |
| Electric Shock Absorber | A device that reduces the amount of damage taken from electrical attacks. The energy from incoming attacks is absorbed and used to recharge Sam’s battery. | Reach Level 2 with the Western Environmental Observatory (connected via Main Order 10 from the Government’s Base). |
| Auto-Resuscitation Device | Automatically revives Sam when he loses consciousness. The device takes time to reinitialize after each use, so play it safe after being revived. | Reach Level 4 with the Motherhood (connected via Main Order 26 from the Data Scientist). |
| Solar Generator | Uses solar power to charge Sam’s battery. It is most effective during daylight hours and less effective at night or in the rain. Equipping multiple generators increases their charging speed. | Reach Level 2 with Rainbow Valley (connected via Main Order 14 from West Fort Knot). |
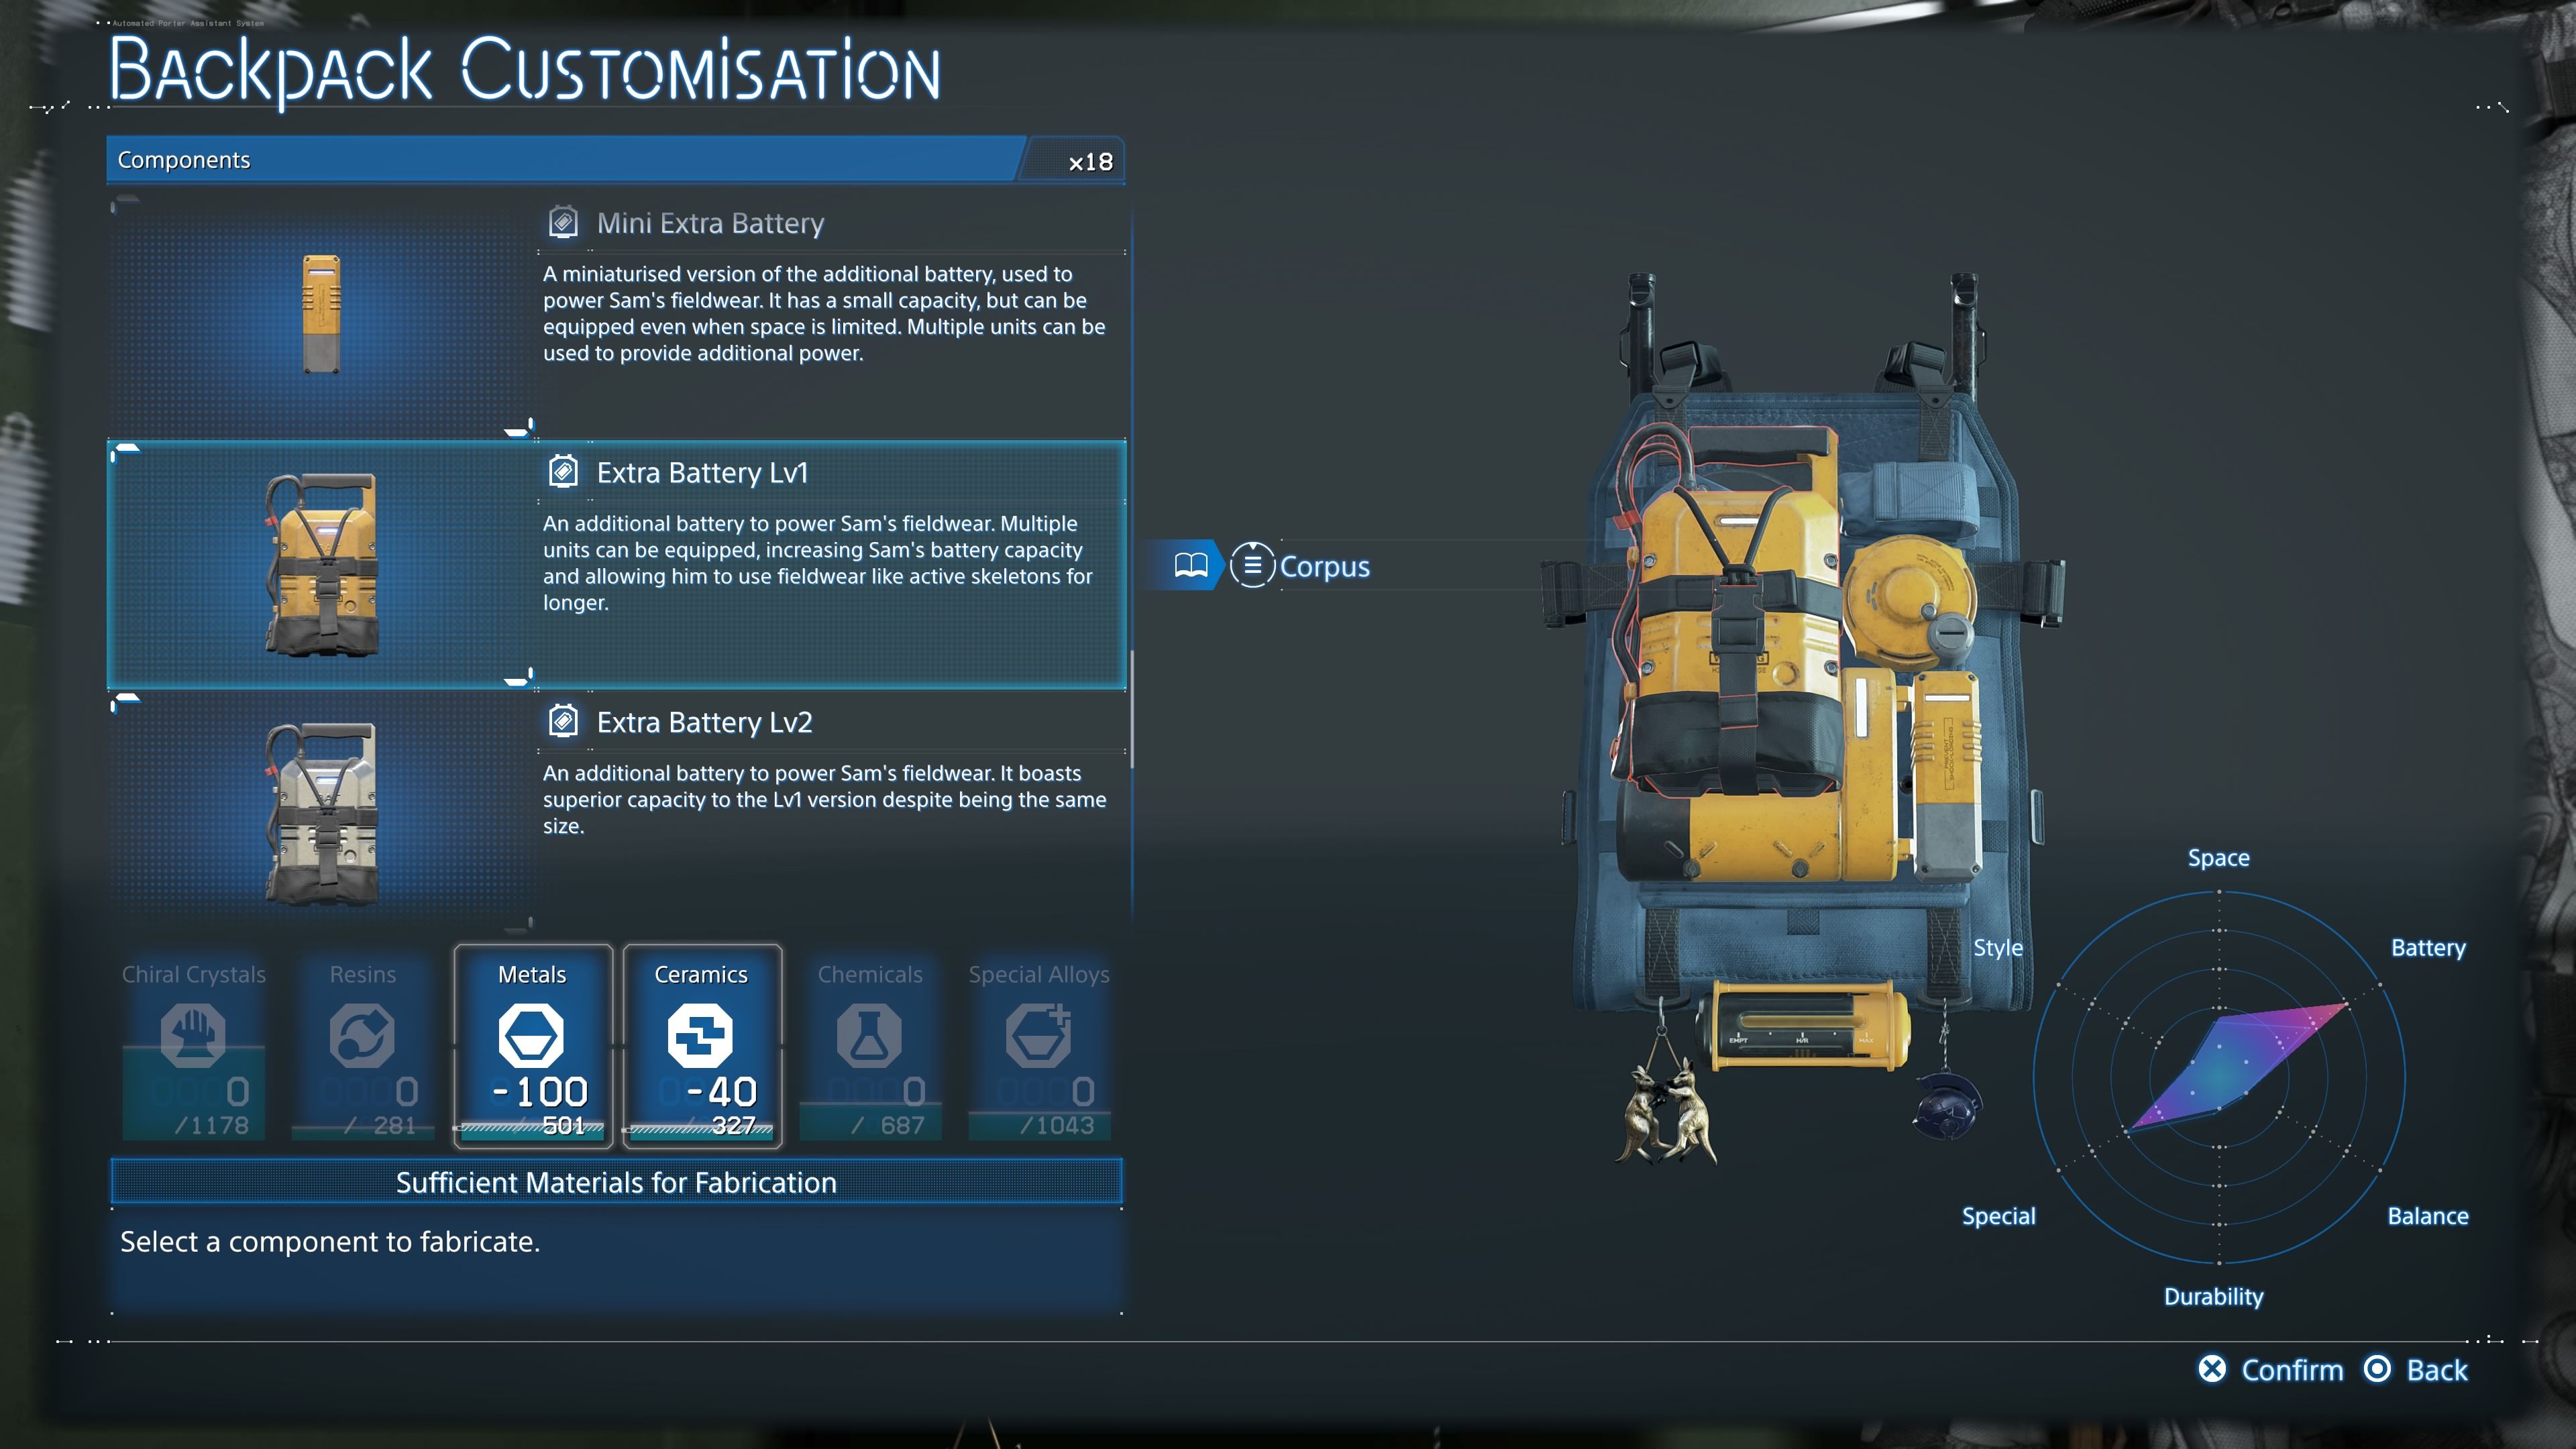
| Mini Extra Battery | A miniaturized version of the additional battery, used to power Sam’s fieldwear. It has a small capacity, but can be equipped even when space is limited. Multiple units can be used to provide additional power. | Reach Level 3 with Rainbow Valley (connected via Main Order 14 from West Fort Knot). |
| Extra Battery Lv1 | An additional battery to power Sam’s fieldwear. Multiple units can be equipped, increasing Sam’s battery capacity and allowing him to use fieldwear like active skeletons for longer. | Connect Heartman’s Lab to the Chiral Network with Main Order 23 from the Dowser. |
| Extra Battery Lv2 | It boasts a superior capacity to the Lv1 version despite being the same size. | Reach Level 2 with Heartman’s Lab (connected via Main Order 23 from the Dowser). |
| Extra Battery Lv3 | It boasts a superior capacity to the Lv2 version despite being the same size. | Reach Level 3 with Heartman’s Lab (connected via Main Order 23 from the Dowser). |
| Extra Battery Lv4 | It has the same capacity as the Lv3 version but takes up less space. | Reach Level 4 with Heartman’s Lab (connected via Main Order 23 from the Dowser). |
| Stabilizer Lv1 | A battery-powered balance recovery unit fitted with posture-correcting Vernier thrusters. The unit will activate automatically to stabilize the user should they lose their balance. The stabilizer also contains its own battery, so equipping one will increase Sam’s overall battery capacity. | Reach Level 2 with Eastern Environmental Observatory (connected via Main Order 38 from the Adventurer). |
| Stabilizer Lv2 | Functionally is identical to the Lv1 version, but the unit now takes up less space. | Reach Level 3 with Eastern Environmental Observatory (connected via Main Order 38 from the Adventurer). |
| Stabilizer Lv3 | Functionally is identical to the Lv2 version, with additional thrusters to soften the impact of jumping from great heights. | Reach Level 4 with Eastern Environmental Observatory (connected via Main Order 38 from the Adventurer). |
| Backpack Cover | Protects cargo in your backpack from timefall, and prevents it from becoming dislodged due to heavy falls and other such impacts. | Reach Level 2 with the Fisherman (connected via Sub Order 116 from F5 East Distribution Center). |
| Backpack Cover Lv2 | More durable than the Lv1 version. | Reach Level 4 with the Fisherman (connected via Sub Order 116 from F5 East Distribution Center). |
All Backpack Accessories in Death Stranding 2
How to Get All Backpack Charms in Death Stranding 2

In Death Stranding 2, there are distinctive add-ons referred to as backpack accessories. These can be attached to the base of Sam’s backpack. There are a total of 8 such accessories in the game, and they each offer Sam a minor enhancement or boost to gameplay. These benefits range from combating BTs, MULEs, and generally improving Sam’s everyday life. Here is an explanation of each backpack accessory for players to choose the one that best suits them:
1. Anti-BT Charm: Protects Sam from BT attacks.
2. MULE Repellent: Deters MULE groups.
3. Comfort Charm: Increases Sam’s speed and reduces fatigue.
4. Resource Gatherer: Boosts the amount of resources Sam can collect.
5. Stealth Charm: Improves Sam’s stealth ability.
6. Healing Charm: Speeds up Sam’s healing process.
7. Long-Range Communicator: Allows Sam to communicate over longer distances.
8. Durability Charm: Extends the lifespan of Sam’s equipment.
| Charm | Effects | How to Get |
|---|---|---|
| Cryptobiote | Wearing this will make cryptobiotes less wary of Sam, lowering the likelihood of them fleeing when he approaches. | Connect the Chronobiologist to the Chiral Network in Main Order 31 from East Fort Knot. |
| Electrobiote | Your battery will last a tiny bit longer with this accessory attached to your backpack. | Reach Level 4 with Rainbow Valley (connected via Main Order 14 from West Fort Knot). |
| Chiral Tea | Attaching it to your backpack will boost stamina. | Reach Level 2 with the Chronobiologist (connected via Main Order 14 from West Fort Knot). |
| Love Knot | Said to make porters who are generous with their Likes appear. | Reach Level 3 with the Chronobiologist (connected via Main Order 14 from West Fort Knot). |
| Porter | Allows you to see other porters’ locations when looking at your map. | Reach Level 4 with the Bokka in Mexico (connected by finding lost cargo near Ciudad Nudo del Norte (C1)). |
| Quokka | Animals are less likely to run away if you have this attached to your backpack. | Reach Level 4 with the Animal Shelter (connected via Main Order 15 from the Rainbow Valley). |
| Bell | It wards off evil, making it easier to escape gazers and watchers. It is also said to prevent batteries from momentarily cutting out when entering a BT area. | Reach Level 4 with the Northern Environmental Observatory (connected via West Fort Knot in Main Order 16). |
| Boxing Kangaroos | Fills you with a fighting spirit, allowing you to deal more damage with your melee attacks. | Reach Level 4 with the F2 South Distribution Center (connected via Northern Environmental Observatory in Main Order 19). |
Read More
- All Skyblazer Armor Locations in Crimson Desert
- One Piece Chapter 1180 Release Date And Where To Read
- All Shadow Armor Locations in Crimson Desert
- How to Get the Sunset Reed Armor Set and Hollow Visage Sword in Crimson Desert
- Cassius Morten Armor Set Locations in Crimson Desert
- Grime 2 Map Unlock Guide: Find Seals & Fast Travel
- All Golden Greed Armor Locations in Crimson Desert
- How to Beat Stonewalker Antiquum at the Gate of Truth in Crimson Desert
- Amber Alert Secrets & CDs In Crime Scene Cleaner Act 2
- USD RUB PREDICTION
2025-07-06 00:54