Caution: The details ahead in this guide may reveal significant plot points and key characters in the game, specifically the names of all major bosses. Proceed at your own risk if you wish to avoid spoilers.
In Metal Gear Solid Delta: Snake Eater, the bosses are exceptionally intriguing and pose a challenge. Each boss in this installment of the series comes with a special feature that tests your quick thinking and demands you to apply the game’s mechanics creatively. However, these unique challenges can sometimes leave players puzzled until they successfully decipher the appropriate strategy.
In the game Metal Gear Solid Delta: Snake Eater, a total of nine bosses await you. If you’re playing consistently, expect a fresh boss battle approximately every two to three hours. Interestingly, it is possible to overcome each boss without resorting to lethal force. The game offers unique incentives for those who choose the path of peace, even though other options are available. Here’s a guide on how to vanquish every boss in Metal Gear Solid Delta: Snake Eater.
All MGS Delta Bosses in Order

These are the bosses that you’ll face in Metal Gear Solid Delta: Snake Eater:
- Ocelot
- The Pain
- The Fear
- The End
- The Fury
- The Sorrow
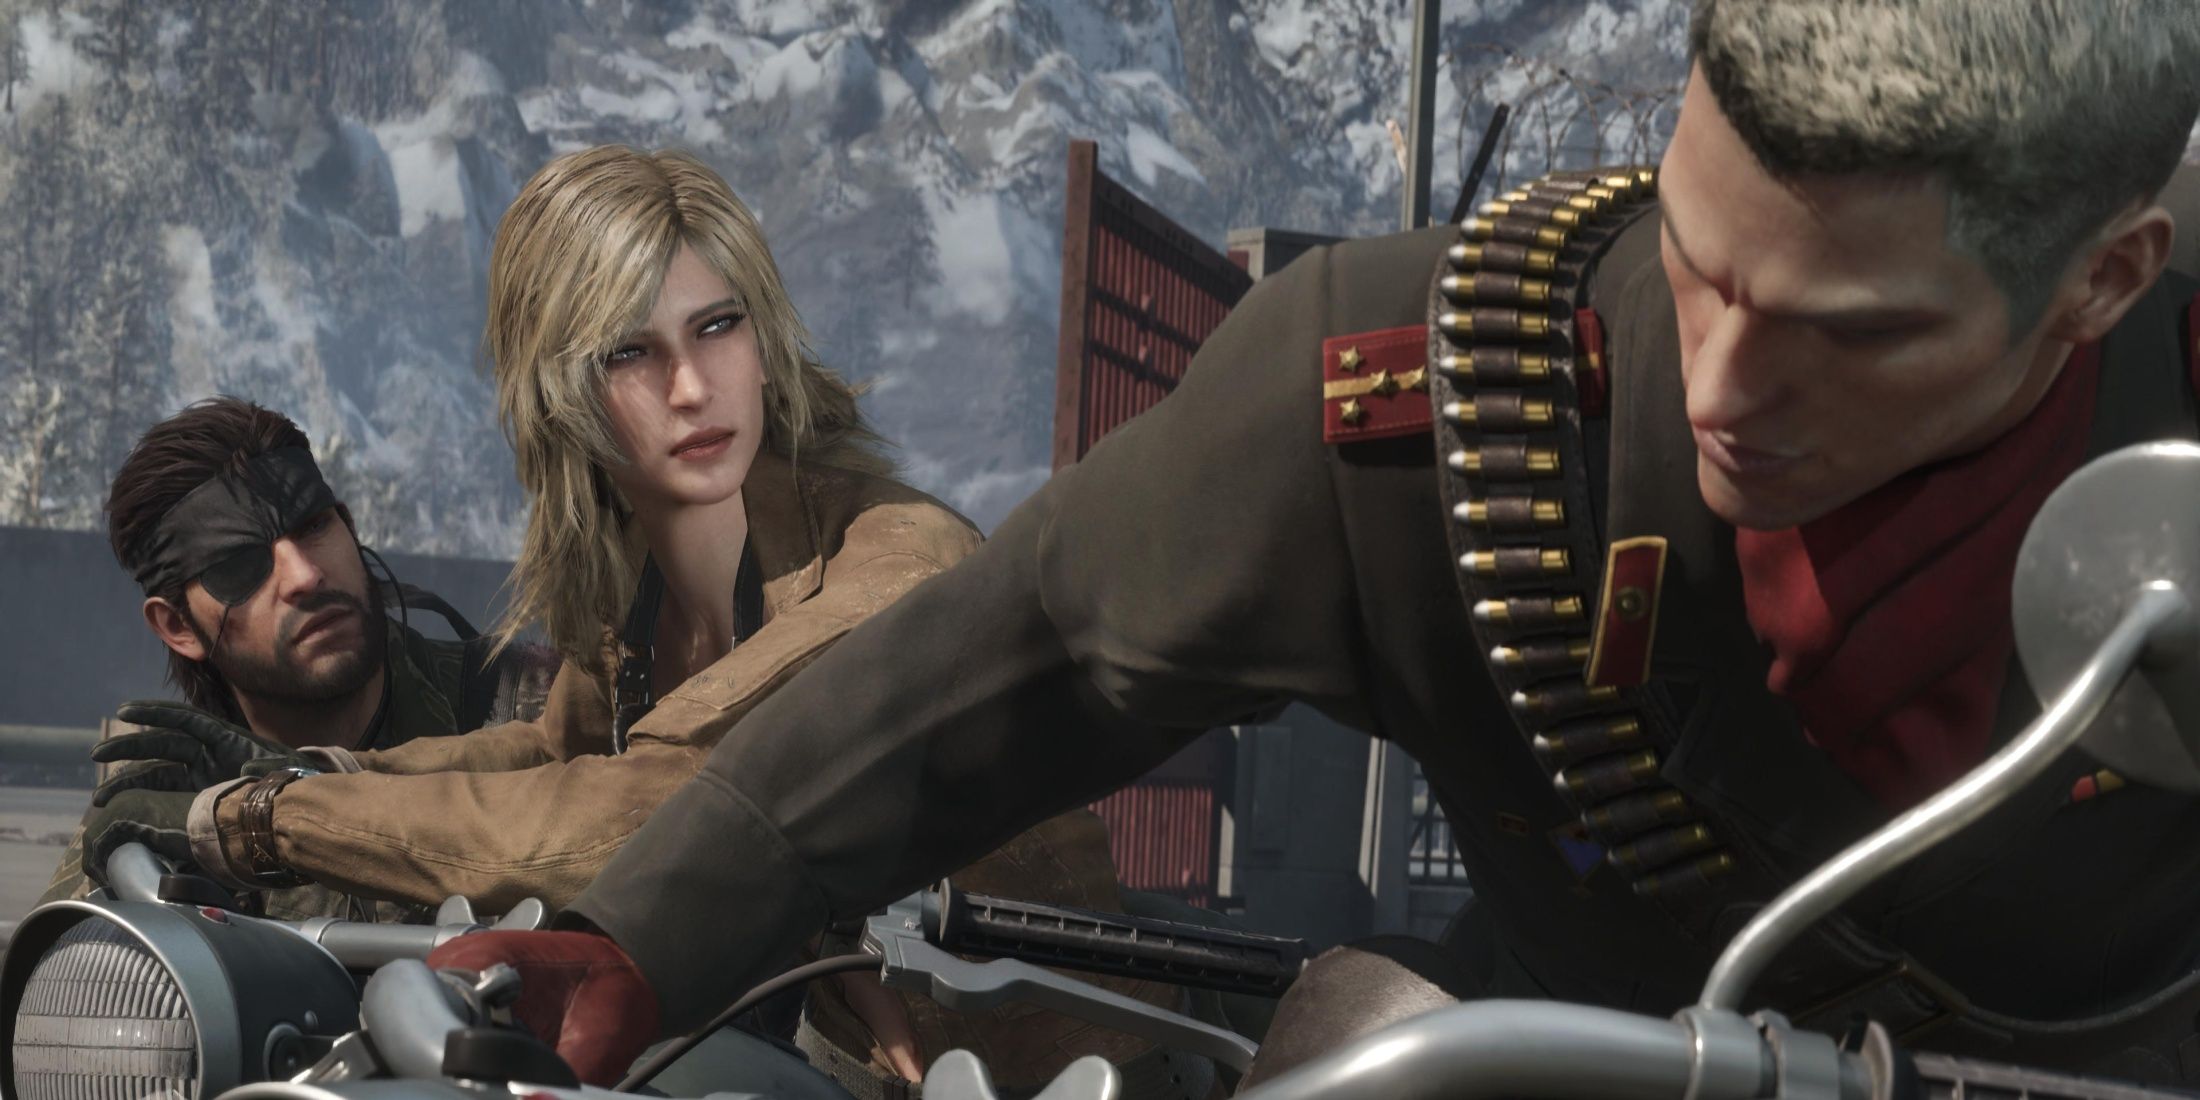
- Volgin
- The Shagohod
- The Boss
In Operation Snake Eater, all the bosses that appear won’t present any challenges during the Virtuous Mission prologue. For each of these bosses in MGS Delta, there are multiple tactics to employ, and if you prefer an easier route, there are even techniques referred to as “cheesing” them available.
Ocelot
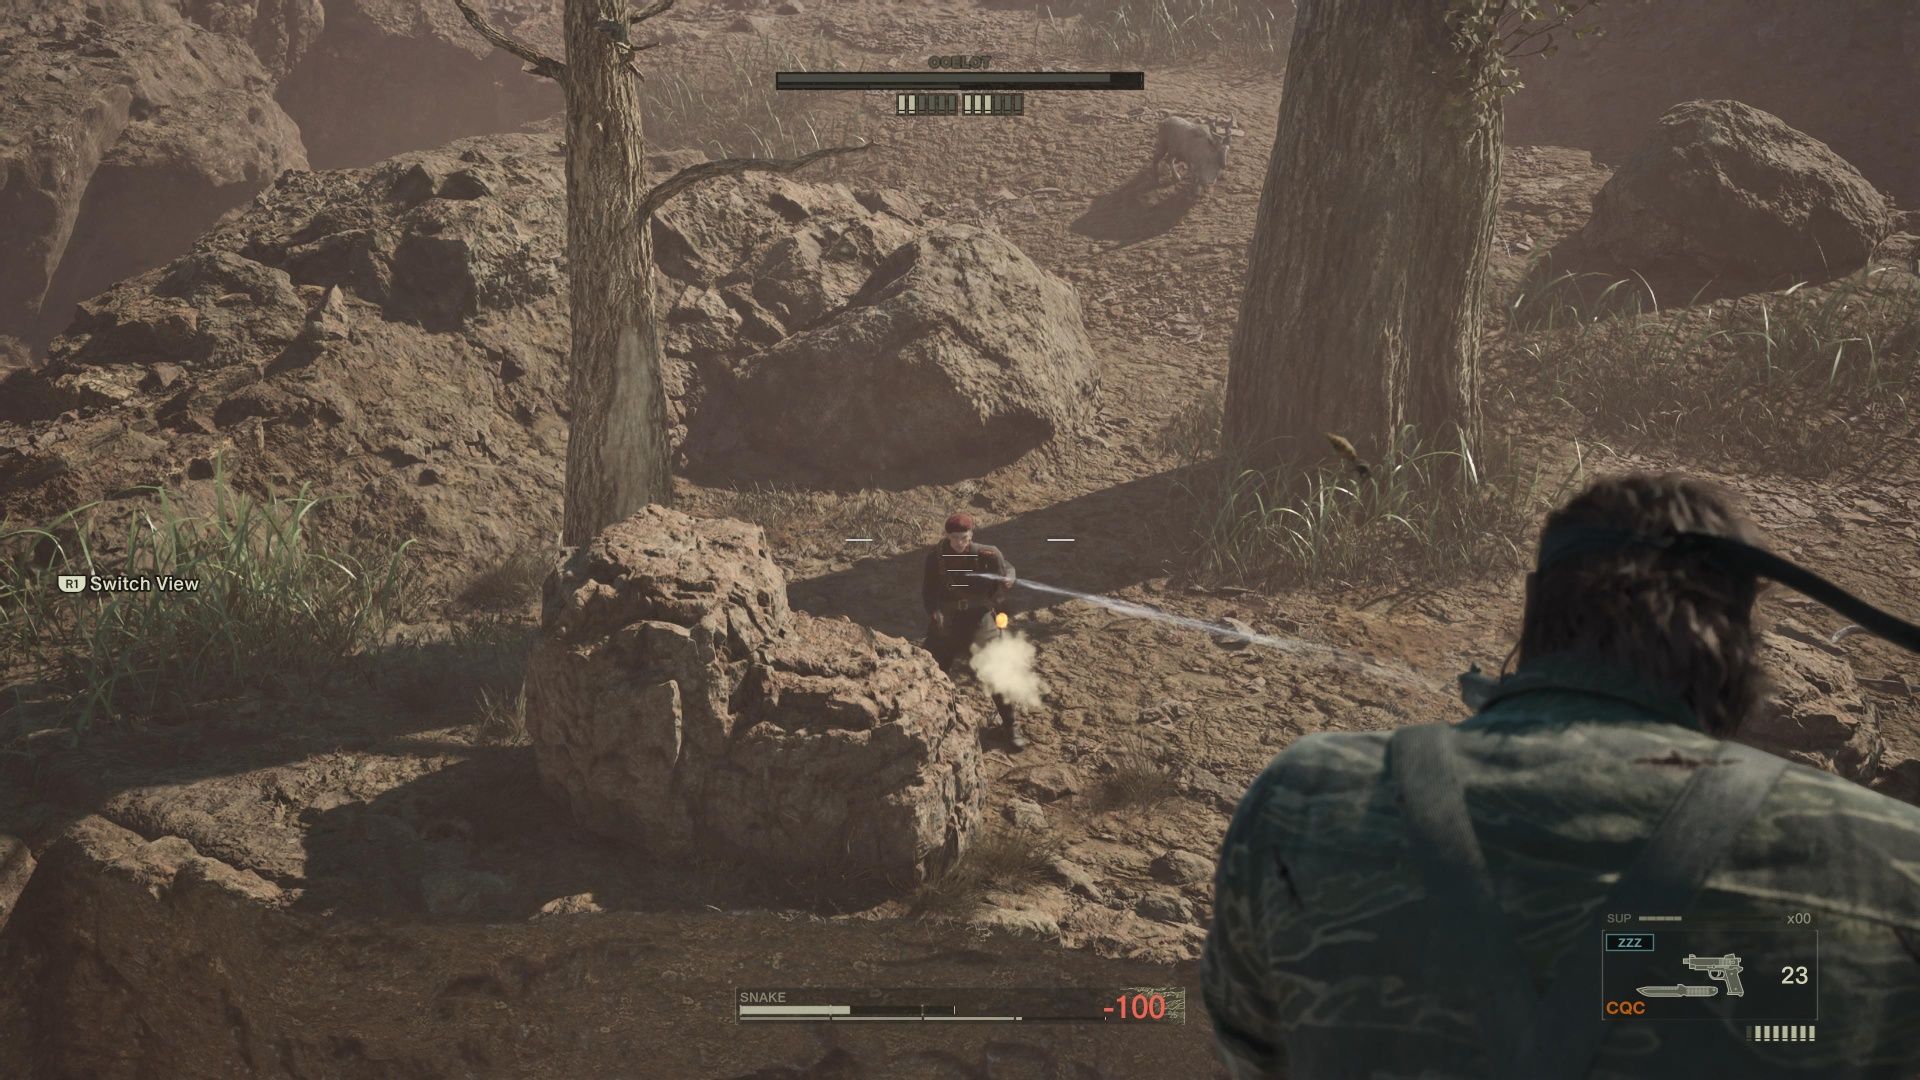
In the game “Metal Gear Solid Delta: Snake Eater”, you’ll initially battle the significant antagonist, Ocelot, for the first time. This confrontation takes place in a traditional western-style showdown, stretched over a vast canyon.
During gameplay, Ocelot will persistently dash from one protective spot to another, firing at you with his revolvers as he moves. Your most effective strategy for causing damage to Ocelot is during his reloading periods. He tends to reload his weapons out in the open, and you can exploit this by employing grenades or tamed creatures to drive him out of his hiding spots and force him into the open.
In addition, there are beehives suspended from tree limbs that can be used to stun Ocelot. Be aware he might counterattack with another beehive, so apply some Bug Juice to fend off the wasps. To gather more health supplies or ammo, scuttle around your part of the arena, where additional resources are hidden. If you’re struggling to get a shot off, consider climbing the tree on your right to gain a strategic advantage.
If you defeat Ocelot nonlethally, you’ll receive the Animals Camo as a reward.
The Pain
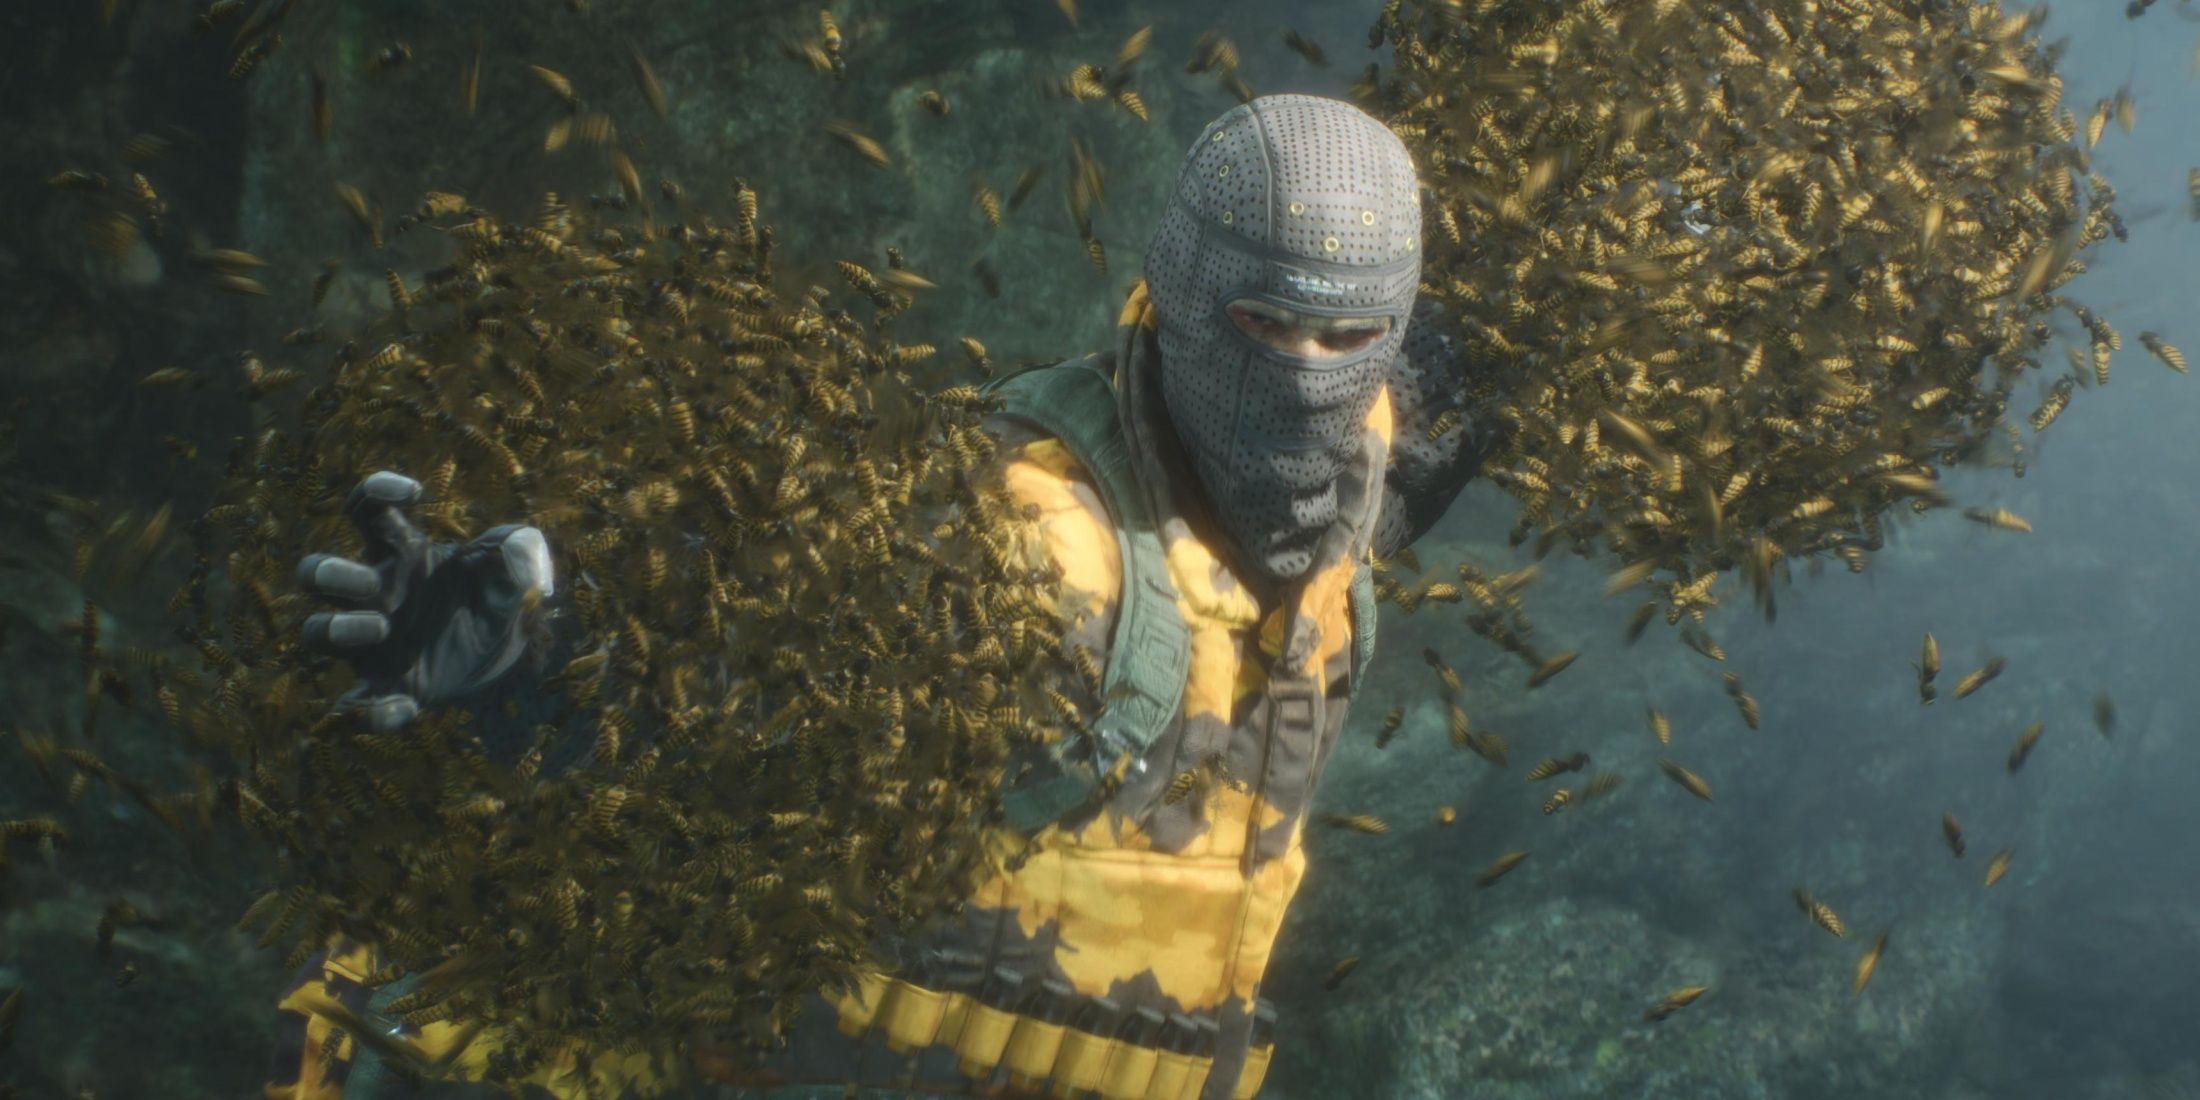
Right after your fight with Ocelot, you’ll come across a challenging foe, who might be referred to as the “Bee-focused Boss.” Despite his name, dealing with him can be quite frustrating (no pun intended). However, there are some simple strategies you can use to defeat him.
You can use Bug Juice to reduce the effectiveness of The Pain’s hornets.
A good tactic when dealing with The Pain is to swim underwater to throw him off your trail, then resurface from behind for an unhindered strike. In battle, he’ll don bee armor for protection, but sustained gunfire should break it down. Prolonged direct confrontation may provoke him to attack with swarms of bees, making a head-on approach perilous. Also, watch out as The Pain may generate false images of himself, so pay close attention to determine the authentic one.
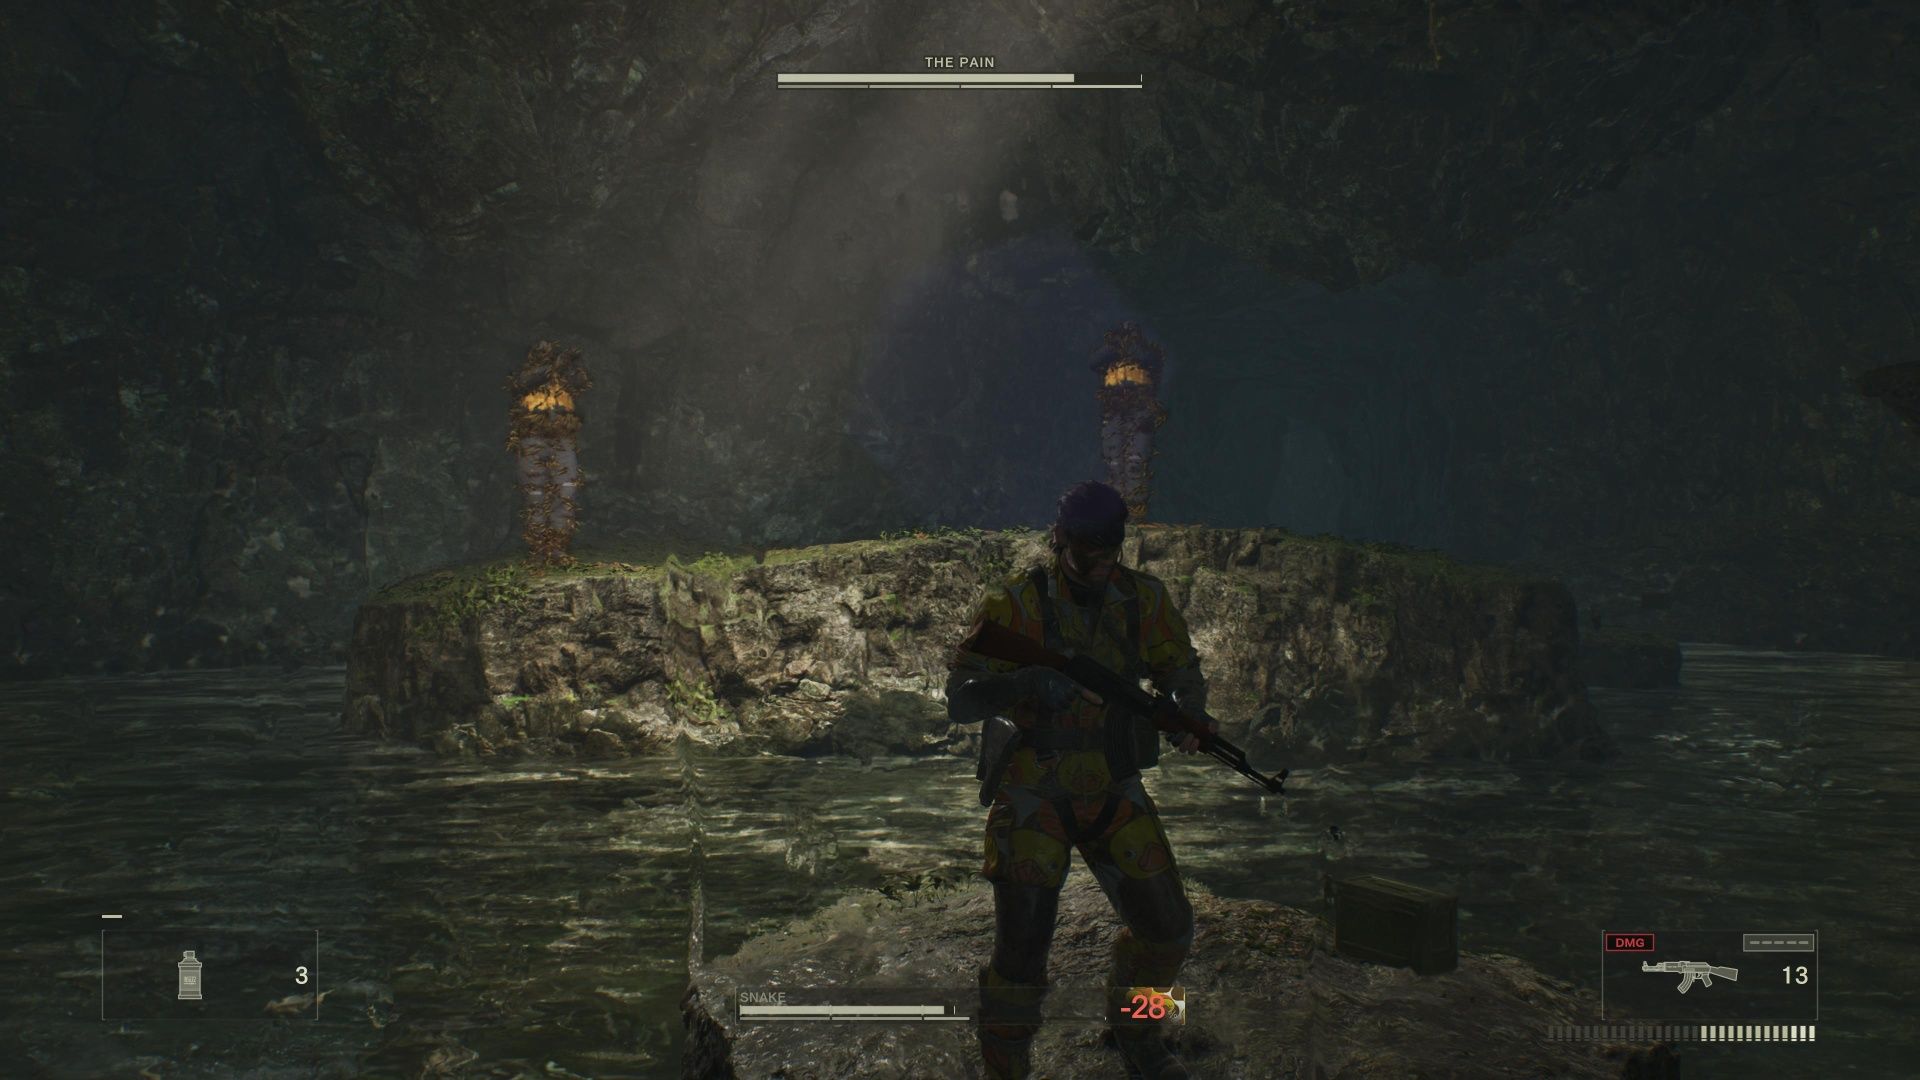
It’s advisable not to rely on grenades during your encounter with The Pain. While grenades might seem like a viable option for getting past his bee armor, he can direct his hornets to capture the grenade and bring it back to you instead. Around mid-fight, The Pain will commence using bullet bees against you. These bees cause ongoing damage if they contact you, but fortunately, they can be removed with a knife, sparing your limited healing supplies.
If you defeat The Pain non-lethally, you’ll receive the Hornet Stripes Camo as a reward.
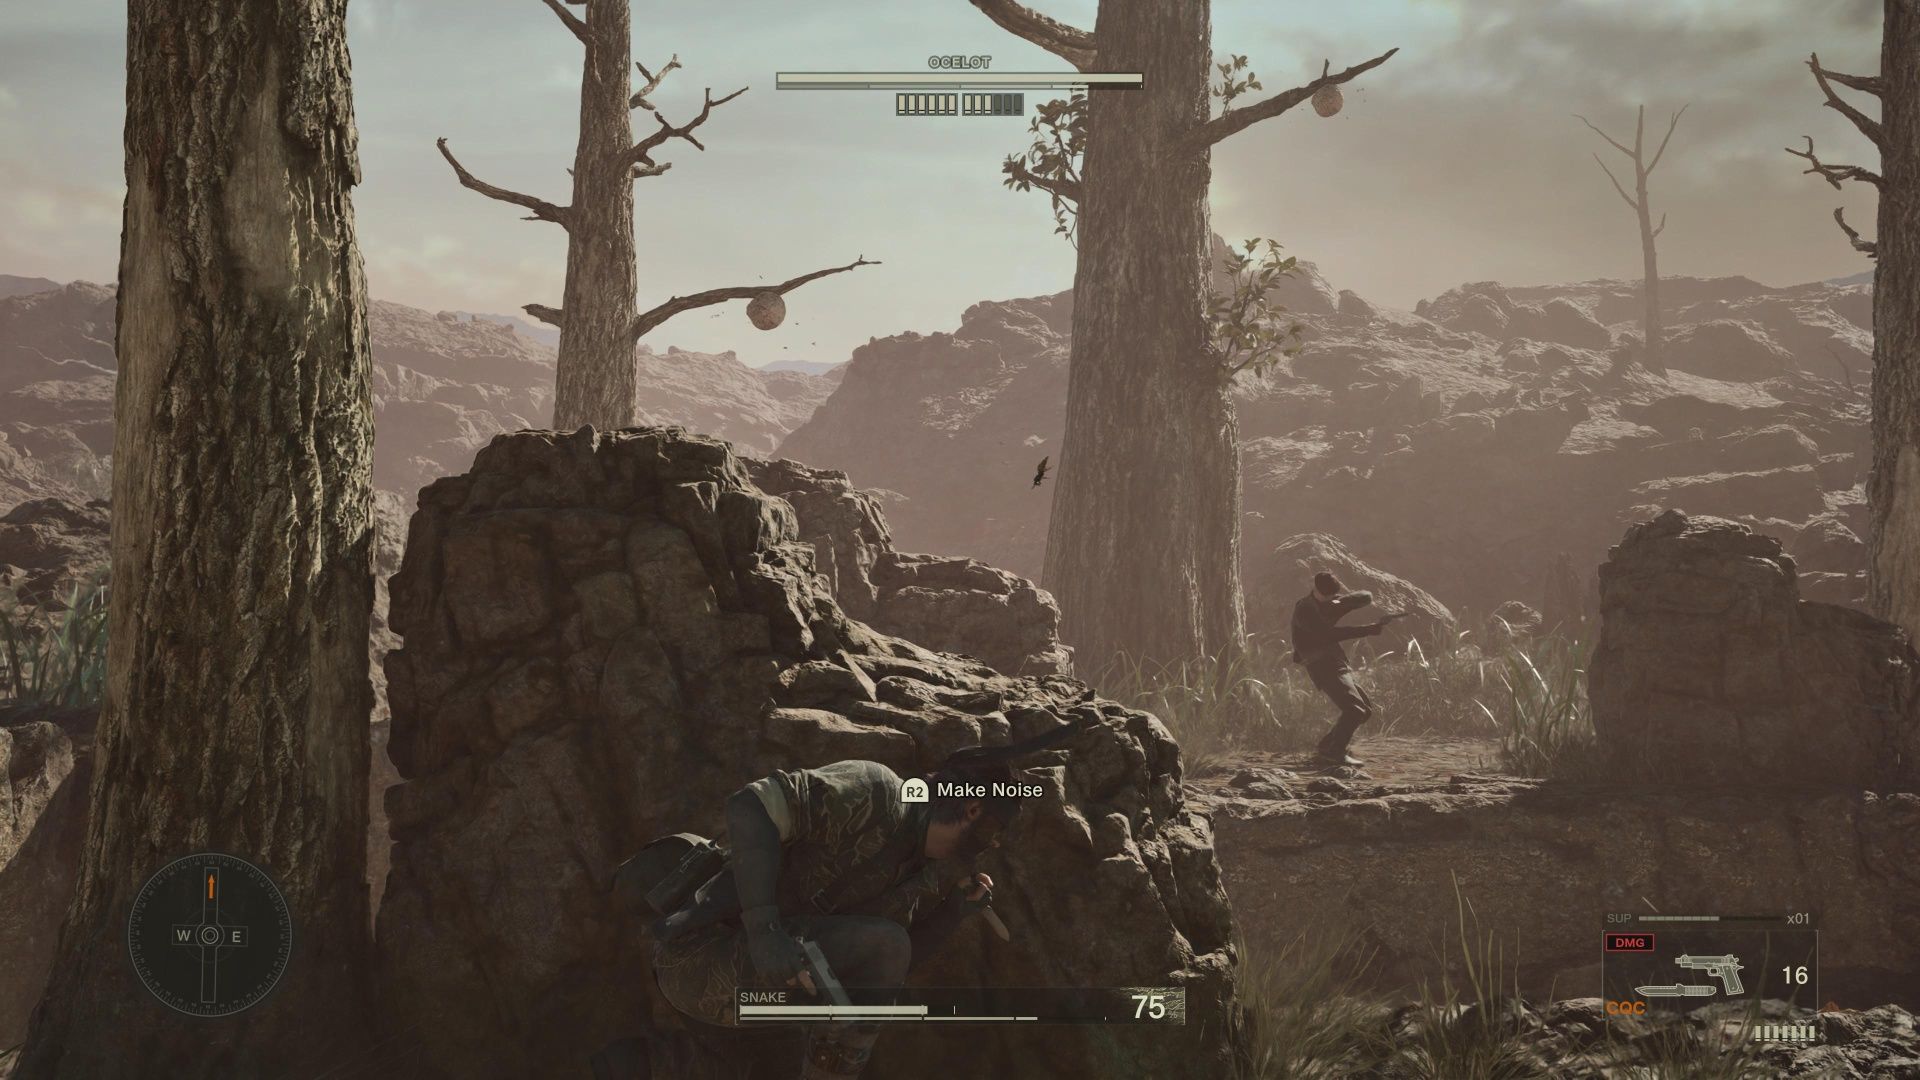
The Fear
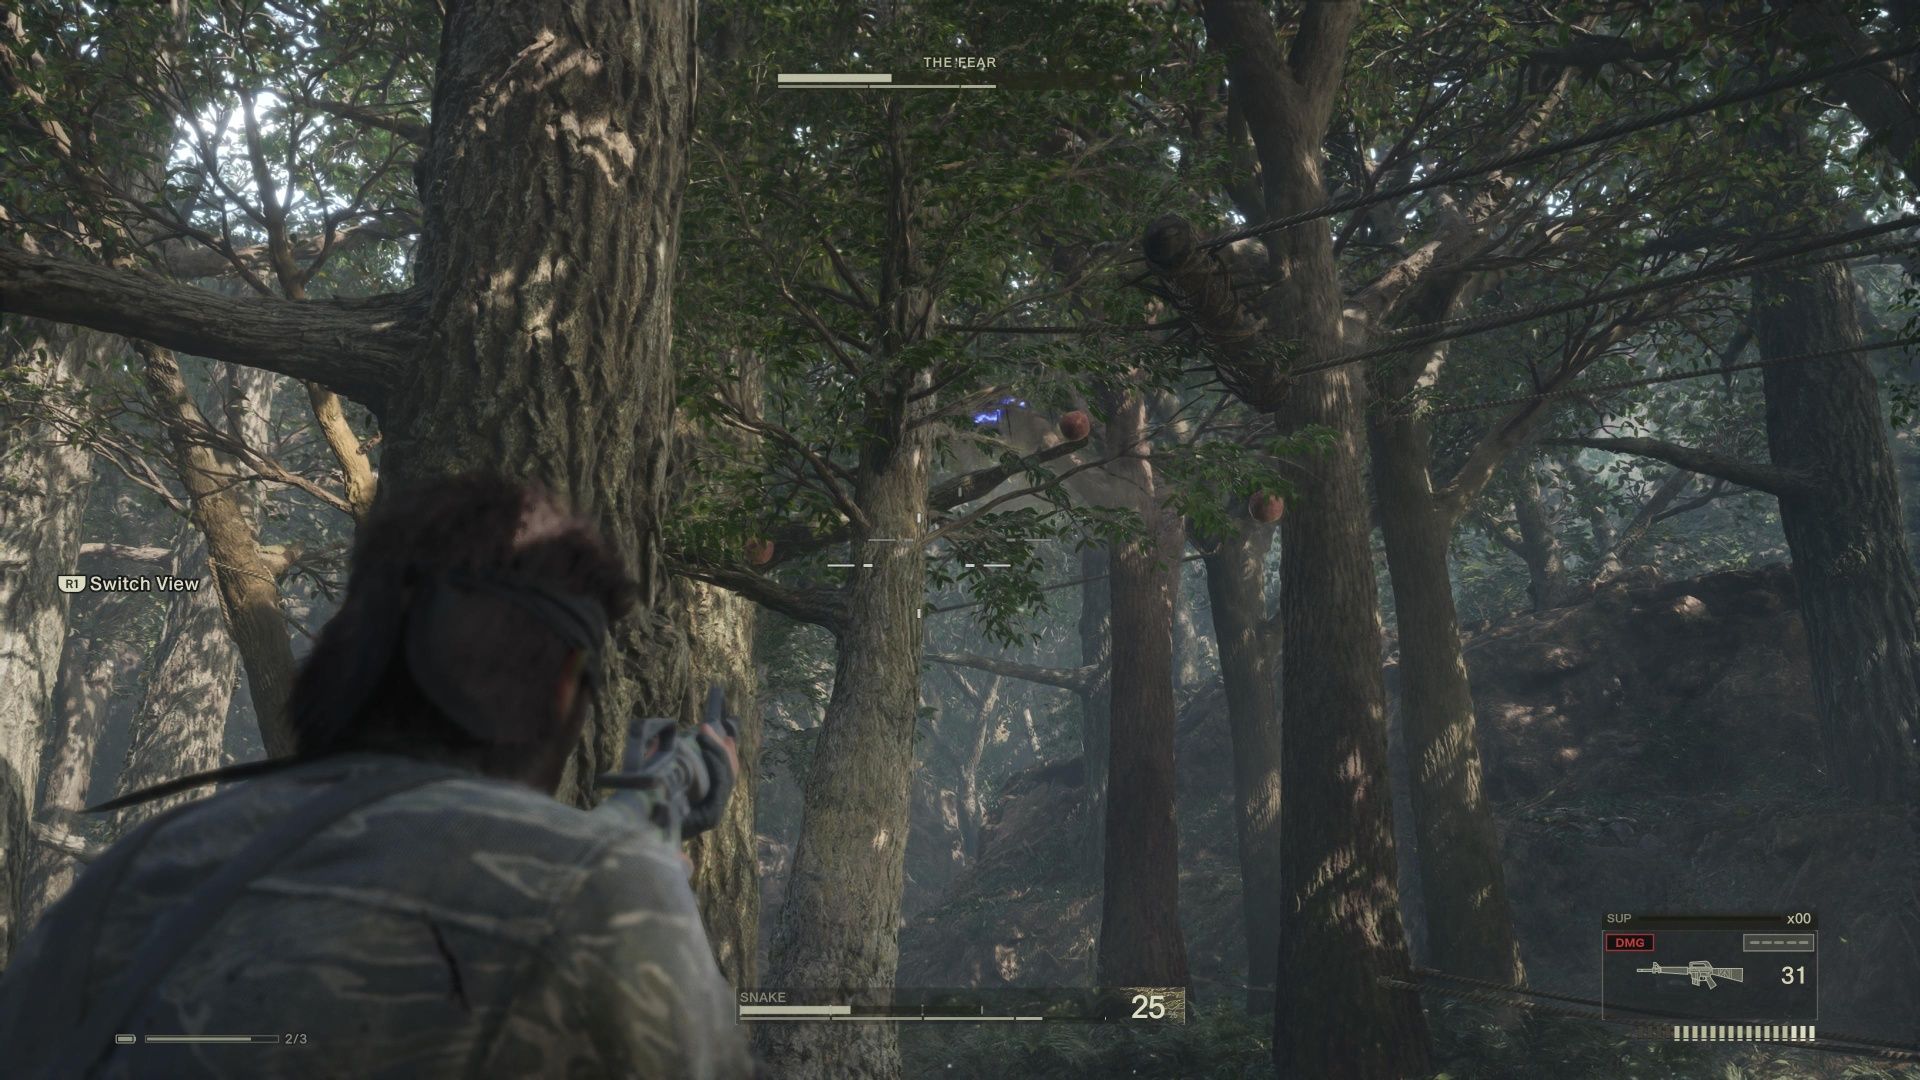
In “Metal Gear Solid Delta: Snake Eater”, The Fear is one of the members in the Cobra Unit that you’ll encounter. He moves swiftly between trees and attacks with poisonous crossbow bolts. This battle can give you quite a headache if you’re not properly prepared, but with the right equipment, The Fear can be effectively dealt with.
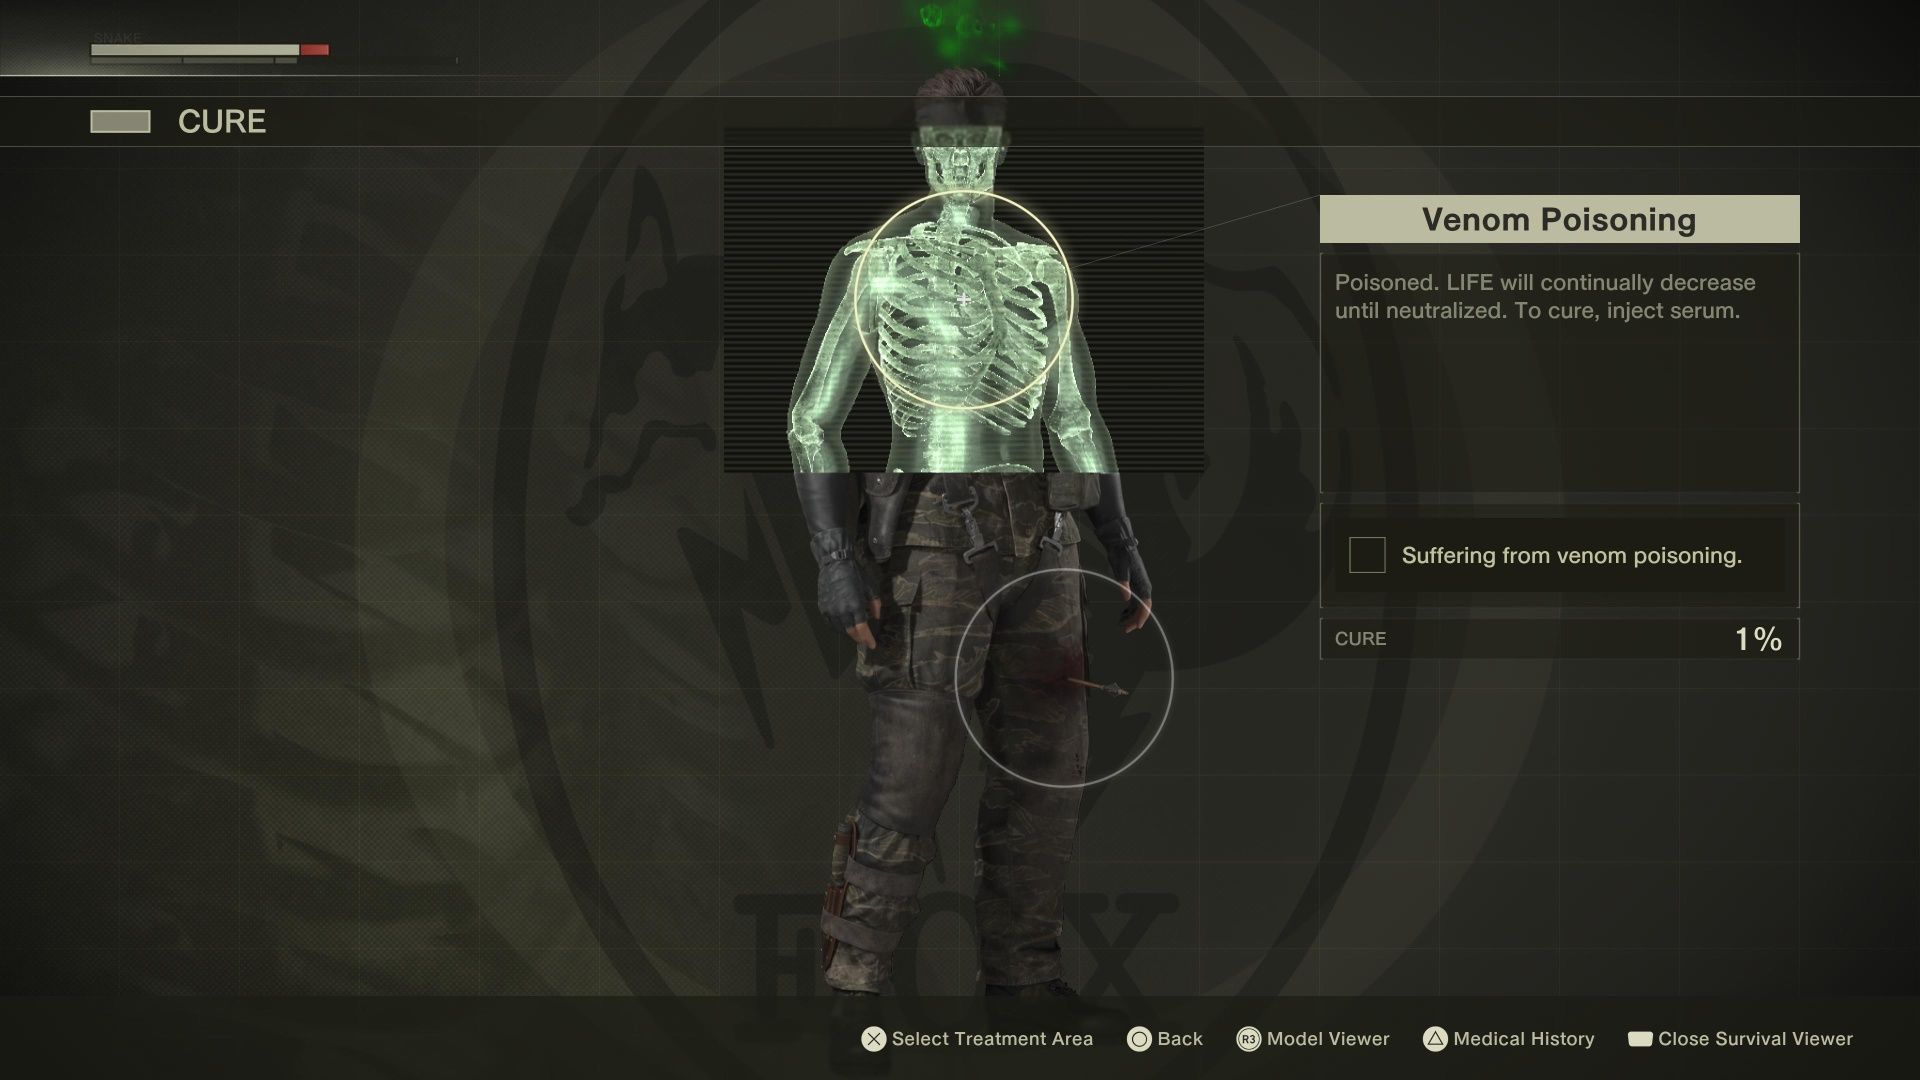
Immediately when the battle starts, pull up the healing interface to extract the crossbow bolt and counteract the poison. The enemy known as The Fear will keep firing these bolts at you during the fight, so remember to carry out this action if you’re hit again.
Whenever the Fear grows weary, it will descend from its perch in search of sustenance. Instead of killing it, consider throwing spoiled or toxic food on the ground for it to consume.
Every now and then, the Fear will tire and descend to find something to eat. Rather than shooting it, try dropping rotten or poisonous food to make it think that’s what it found.
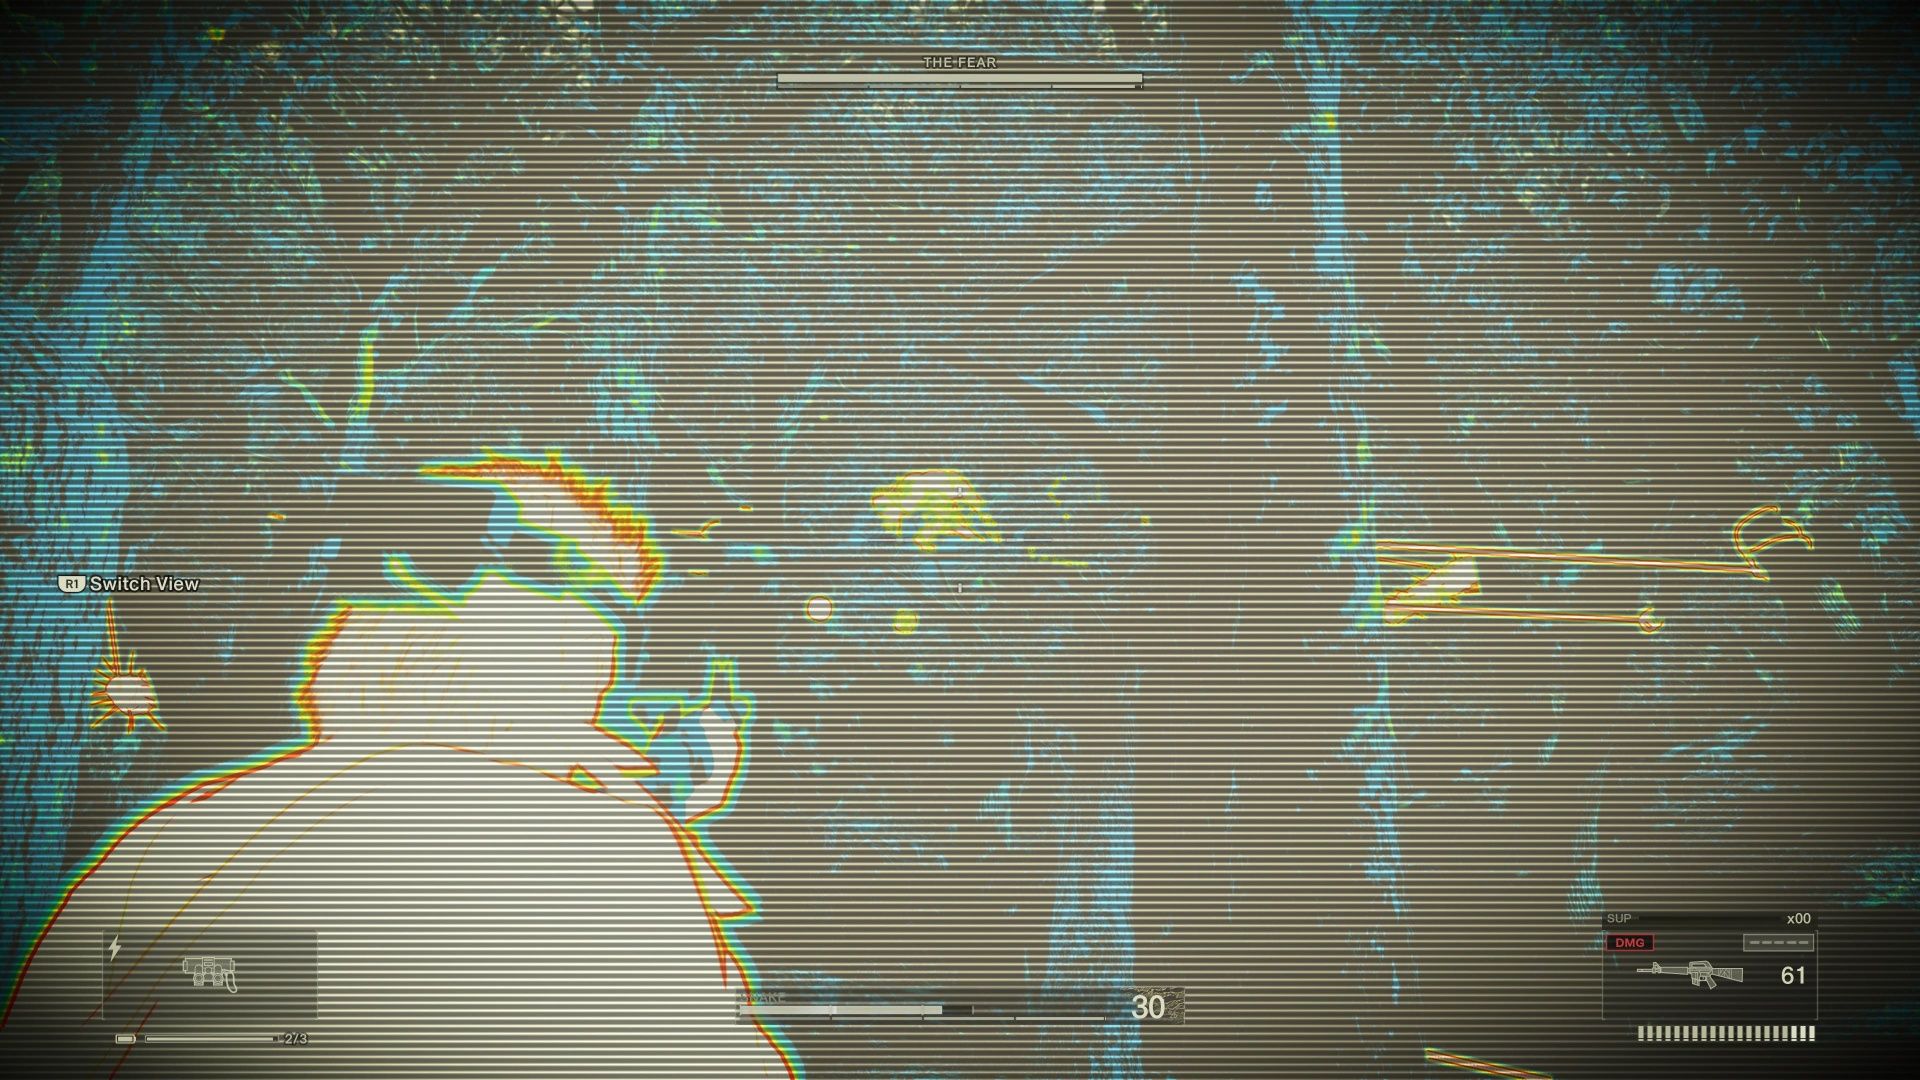
As a fan, I’d advise keeping your camera aimed skyward during the battle, as The Fear is agile enough to leap from tree branch to tree branch. Also, keep tabs on him to avoid losing sight of him. If you’re equipped with Thermal Goggles, remember they render his stealth ineffective. However, even without them, be mindful of the traps scattered throughout this forested area. Watch out for tripwires and continue firing at The Fear whenever he perches on a tree branch.
If you defeat The Fear non-lethally, you’ll receive the Spider Camo as a reward.
The End
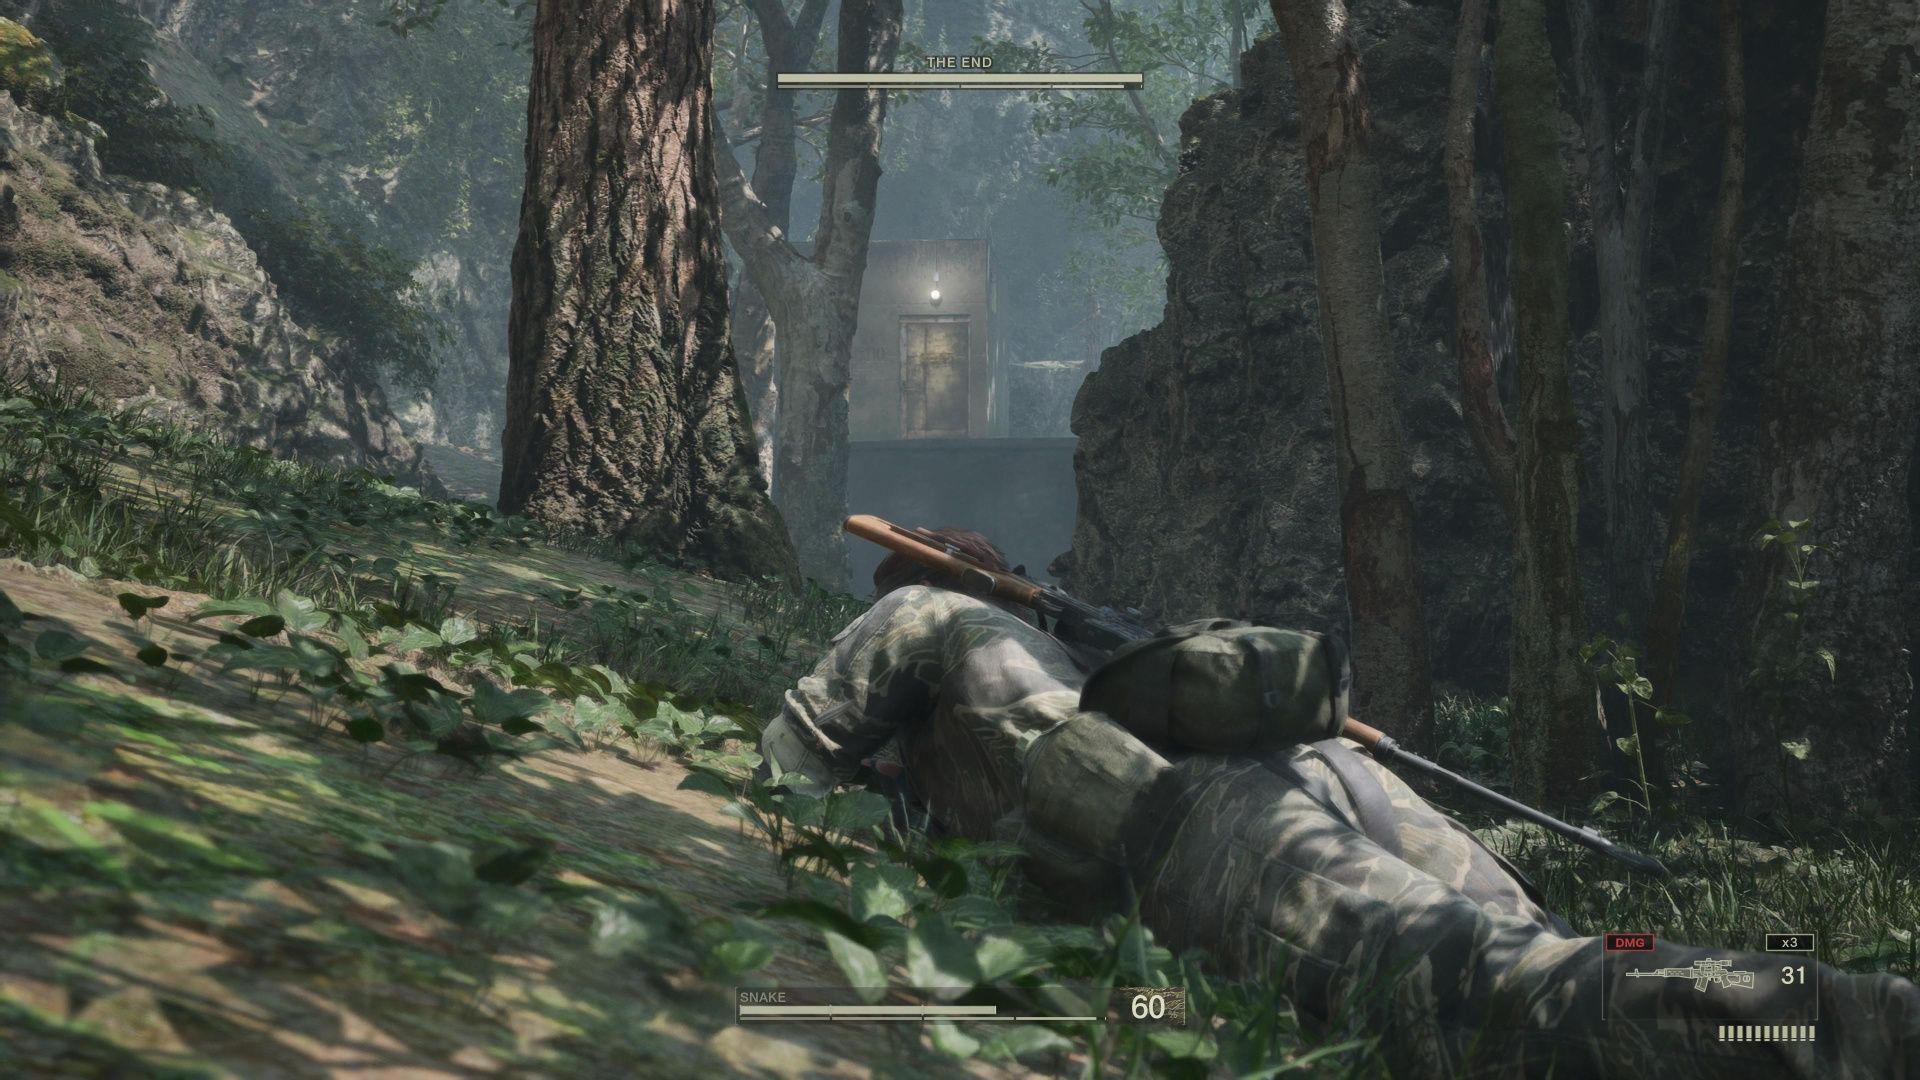
In Metal Gear Solid Delta: Snake Eater, I encountered the third member of the Cobra Unit, who goes by “The End.” Unlike my previous adversaries, this time around he doesn’t use live ammunition. Instead, he fires tranquilizer darts at me! If my stamina depletes and I lose consciousness, I’m whisked back to Graniny Gorki. What a unique challenge!
In this battle against The End’s boss, the fight unfolds across three distinct zones within Sokrovenno. His position in the forest will frequently change, making him a hidden marksman. Therefore, the key strategy for this battle is to locate him before he has the chance to spot you. If you hear The End speaking or notice his scope shining, it’s time to take cover immediately.
The Survival Viewer map shows all of the possible sniping spots where The End can set up.
To overcome The End effectively, maintain a low profile and pinpoint his position using the Thermal Goggles and Directional Mic. Once you’ve located him, you can either engage with the SVD or cautiously move closer to employ another weapon. If you approach The End stealthily enough, you can apprehend him much like taking down a regular guard. In such an instance, he will drop the Moss Camo pattern as a reward for your success.
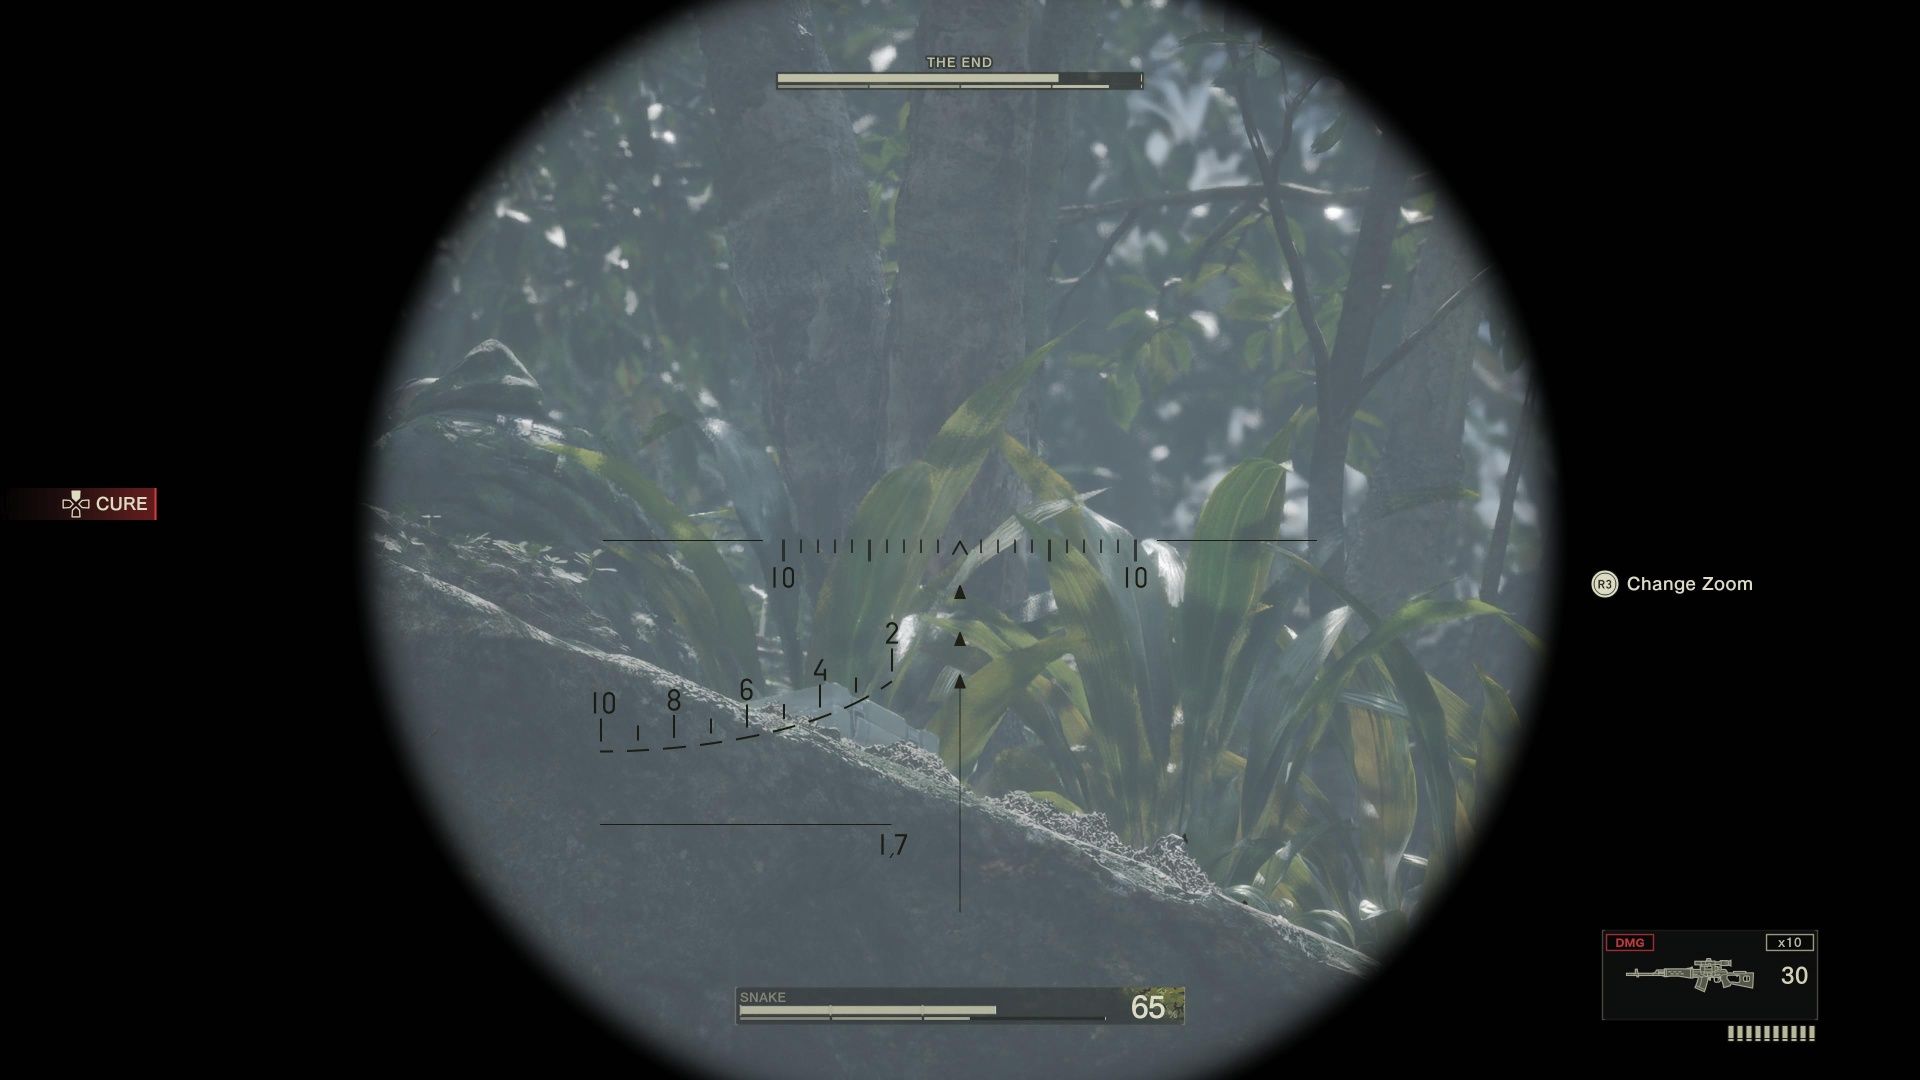
When The End moves to a fresh hideout for his ambush, he’ll inadvertently leave a trail of distinct tracks, which can guide you to him. With Thermal Goggles, these tracks become more noticeable, but even without them, you can still discern the prints with careful observation. Just remember not to mistake them for your own footprints.
Should you manage to subdue The End without causing harm, he’ll give you his Mosin Nagant rifle as a prize – it discharges tranquilizing bullets!
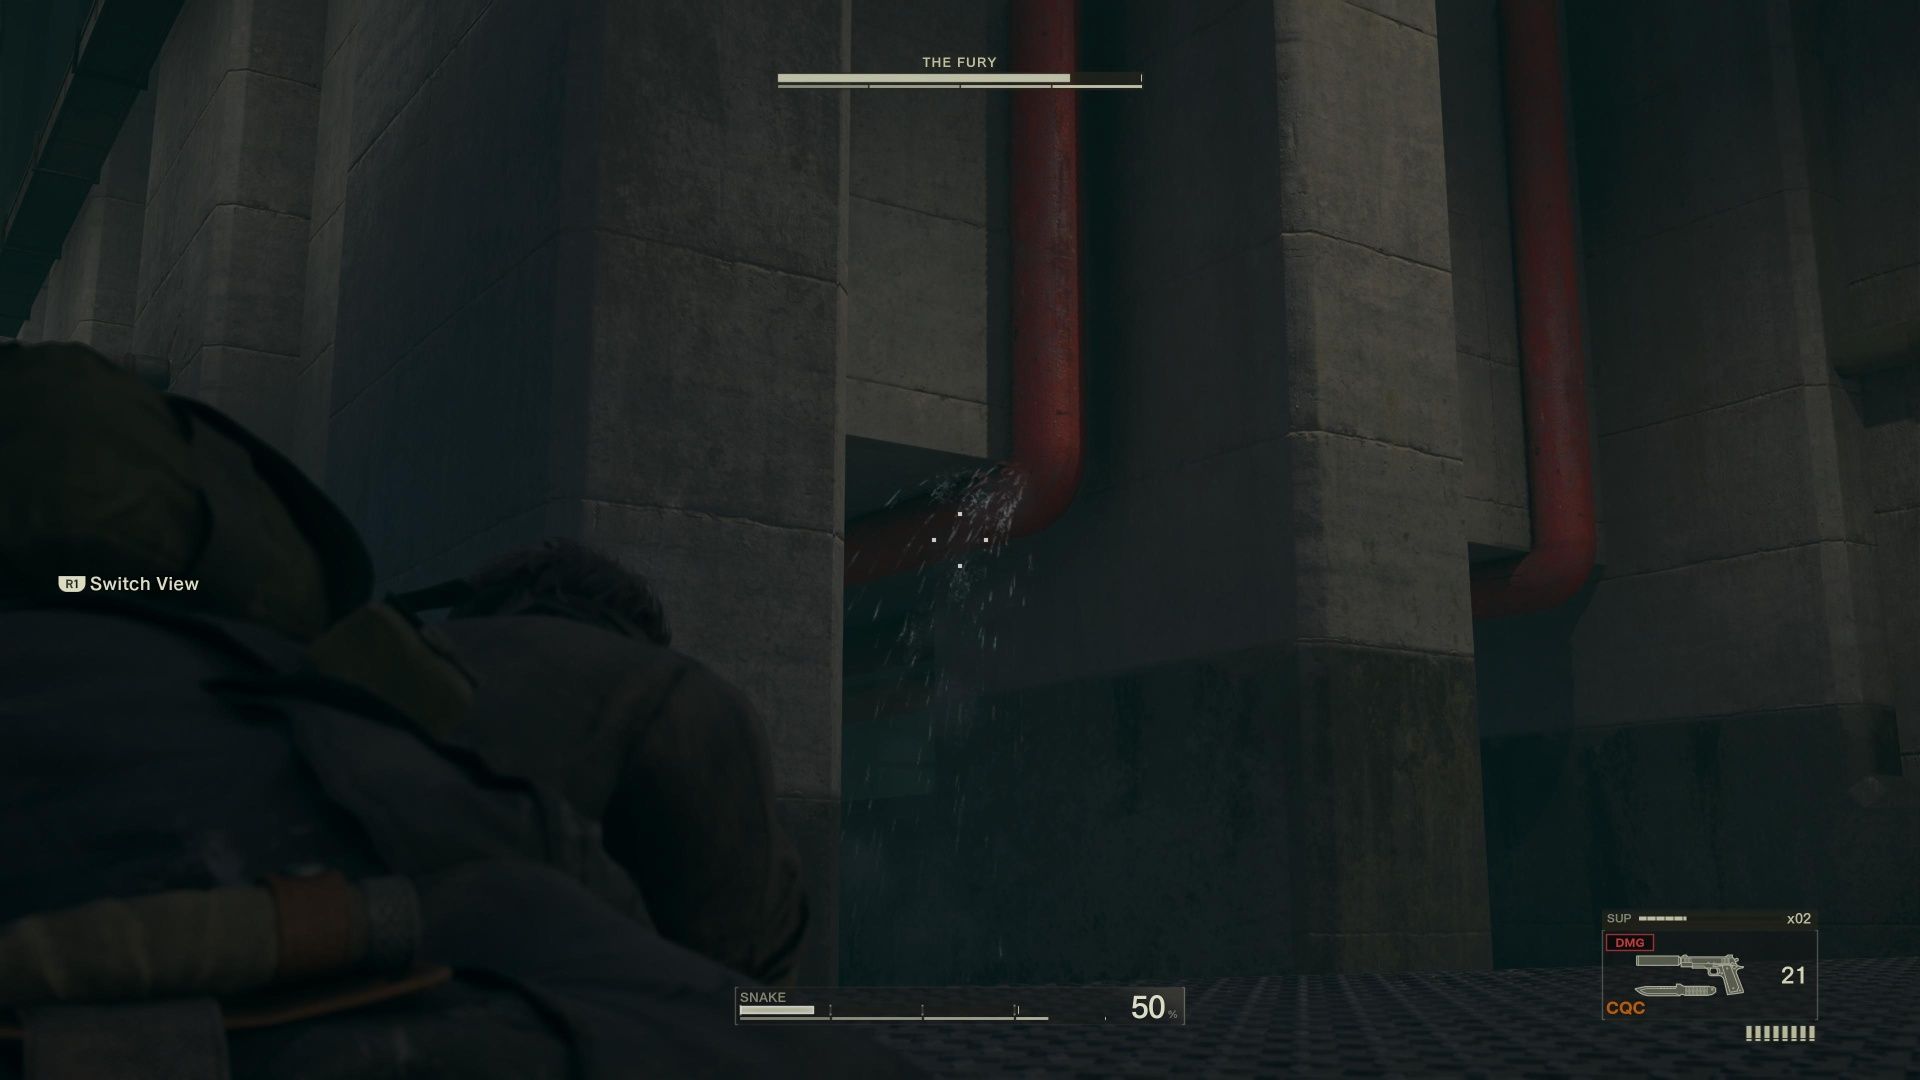
The Fury
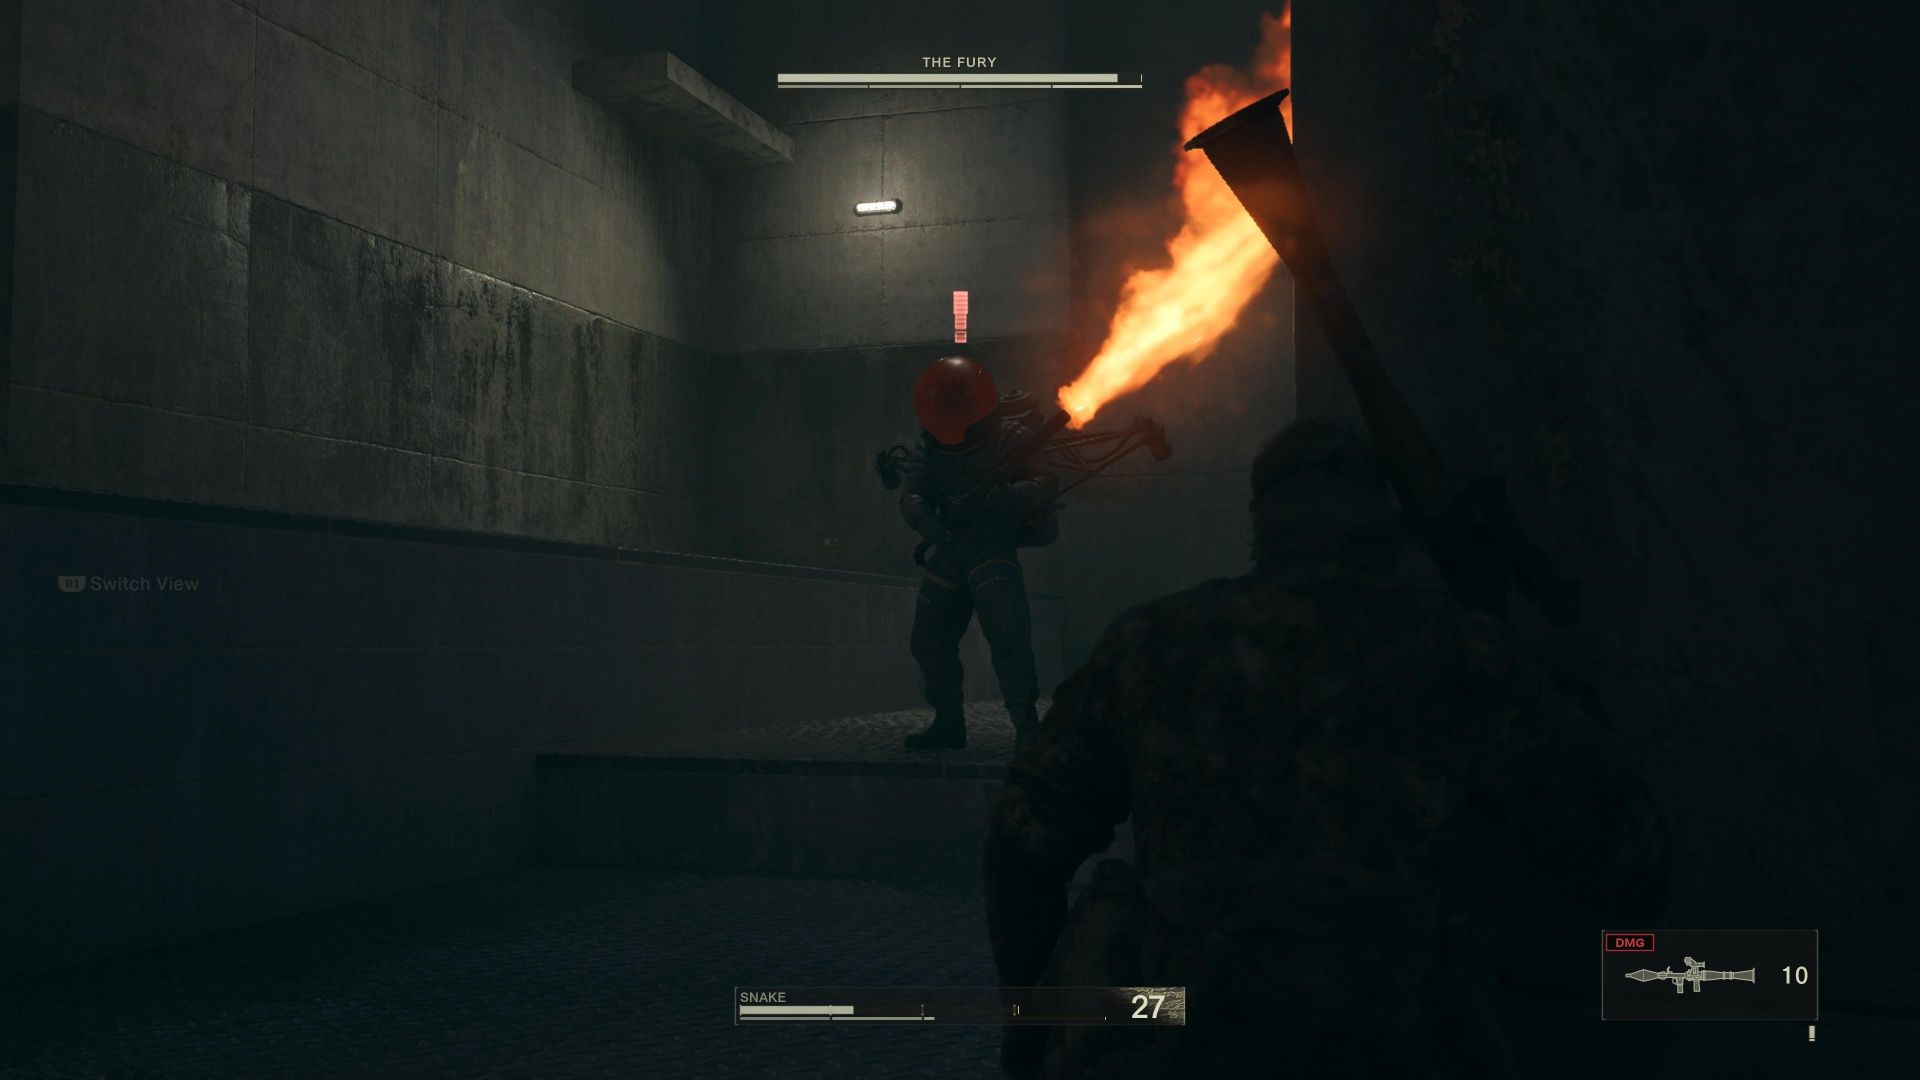
Upon reaching the other side of the mountains following the well-known ladder ascent in the latter part of “Metal Gear Solid Delta: Snake Eater”, you’ll come face to face with The Fury. This new round of hide-and-seek finds The Fury exhibiting a significantly more aggressive demeanor compared to The End.
In this setting, the battle unfolds amidst a narrow, poorly lit maze of concrete passageways. The Fury moves back and forth along these corridors, using his flamethrower and jetpack to swiftly traverse from one end of the arena to another. Should The Fury detect you, it’s just a few moments before you find yourself enveloped in flames.
To dodge The Fury’s assaults, weave your way through the openings in the walls as a means of transitioning to various corridors. Maintain a low profile and make use of appropriate camouflage designs to evade detection. Utilize the Thermal Vision Goggles to attempt spotting The Fury from a distance, but bear in mind that his flames might complicate this process. You can aim for the red water pipes suspended from the ceiling to extinguish the fires.
Should you manage to creep near The Fury undetected and swiftly strike him with your knife, it would puncture his armor, causing him to sustain increased damage from any attack thereafter.
Because The Fury’s flamethrower is quite powerful, it’s advisable to fire at him sparingly and then move back to a safe spot. The intense fire can be overwhelming, especially if he has set other parts of the arena ablaze. Scattered throughout the arena are explosive barrels that you can use to deal significant damage to The Fury. By repeating this strategy of brief attacks followed by retreat, The Fury will eventually be defeated.
If you defeat The Fury non-lethally, you’ll receive the Fire Camo as a reward.
The Sorrow
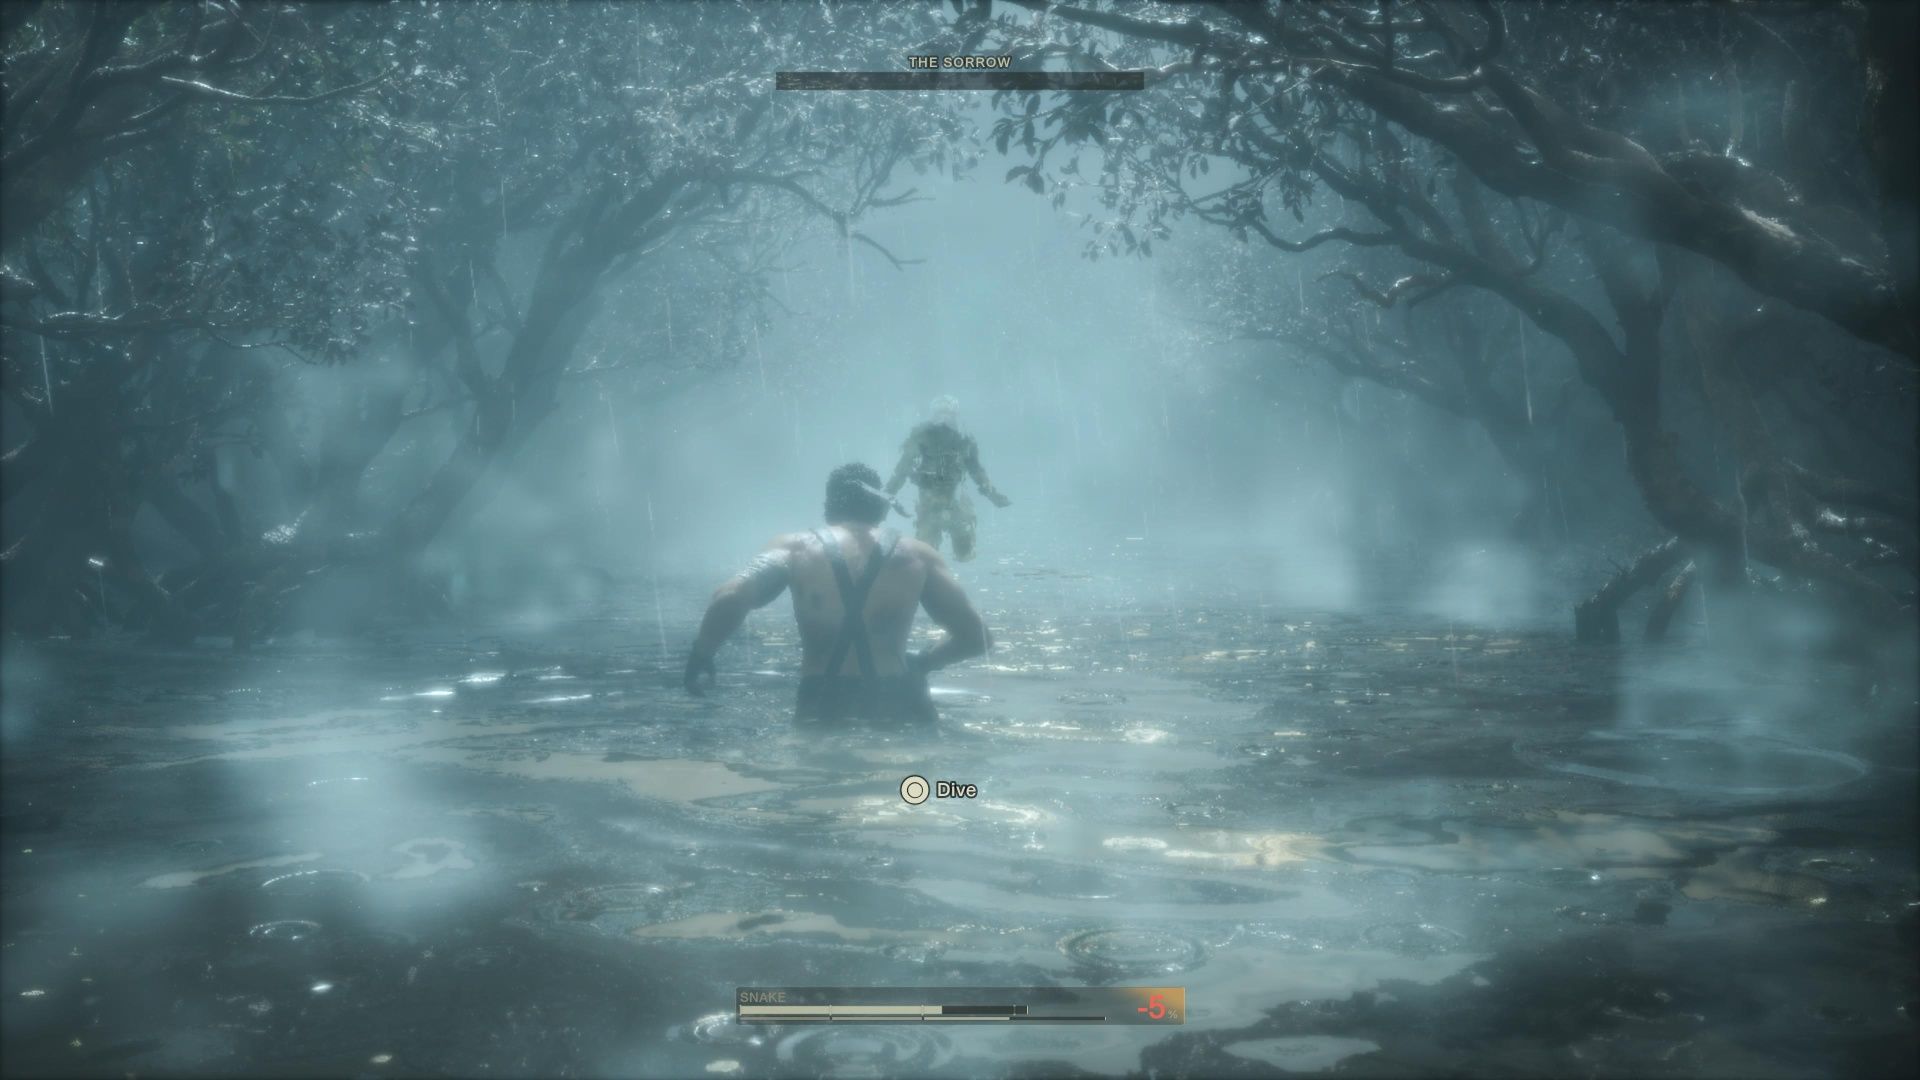
In “Metal Gear Solid Delta: Snake Eater,” The Sorrow stands out as an exceptionally distinct boss due to the absence of traditional combat. Instead, The Sorrow guides you along a river and confronts you with the spirits or ghosts of every individual you have previously killed throughout your gameplay.
As a fellow game enthusiast, if you’ve opted for a non-deadly approach, this encounter will be brief. However, should you choose otherwise, the river ahead promises to be quite an adventure. This boss battle is rather straightforward – simply navigate through the water and steer clear of the ghostly apparitions. Regrettably, your weapons won’t have any effect on them, so save your ammo for another day.

Every now and then, The Sorrow may emit a spectral beam at you. To avoid getting hit, quickly swim underwater for a few moments. At the end of the river, you’ll come across The Sorrow’s lifeless body. If you touch it, Snake will perish. Instead of proceeding without caution, opt to use a Revival Pill from your inventory to resurrect and finish the encounter.
You’ll get the Spirit Camo as a reward for making it to the end of The Sorrow’s river.
Volgin
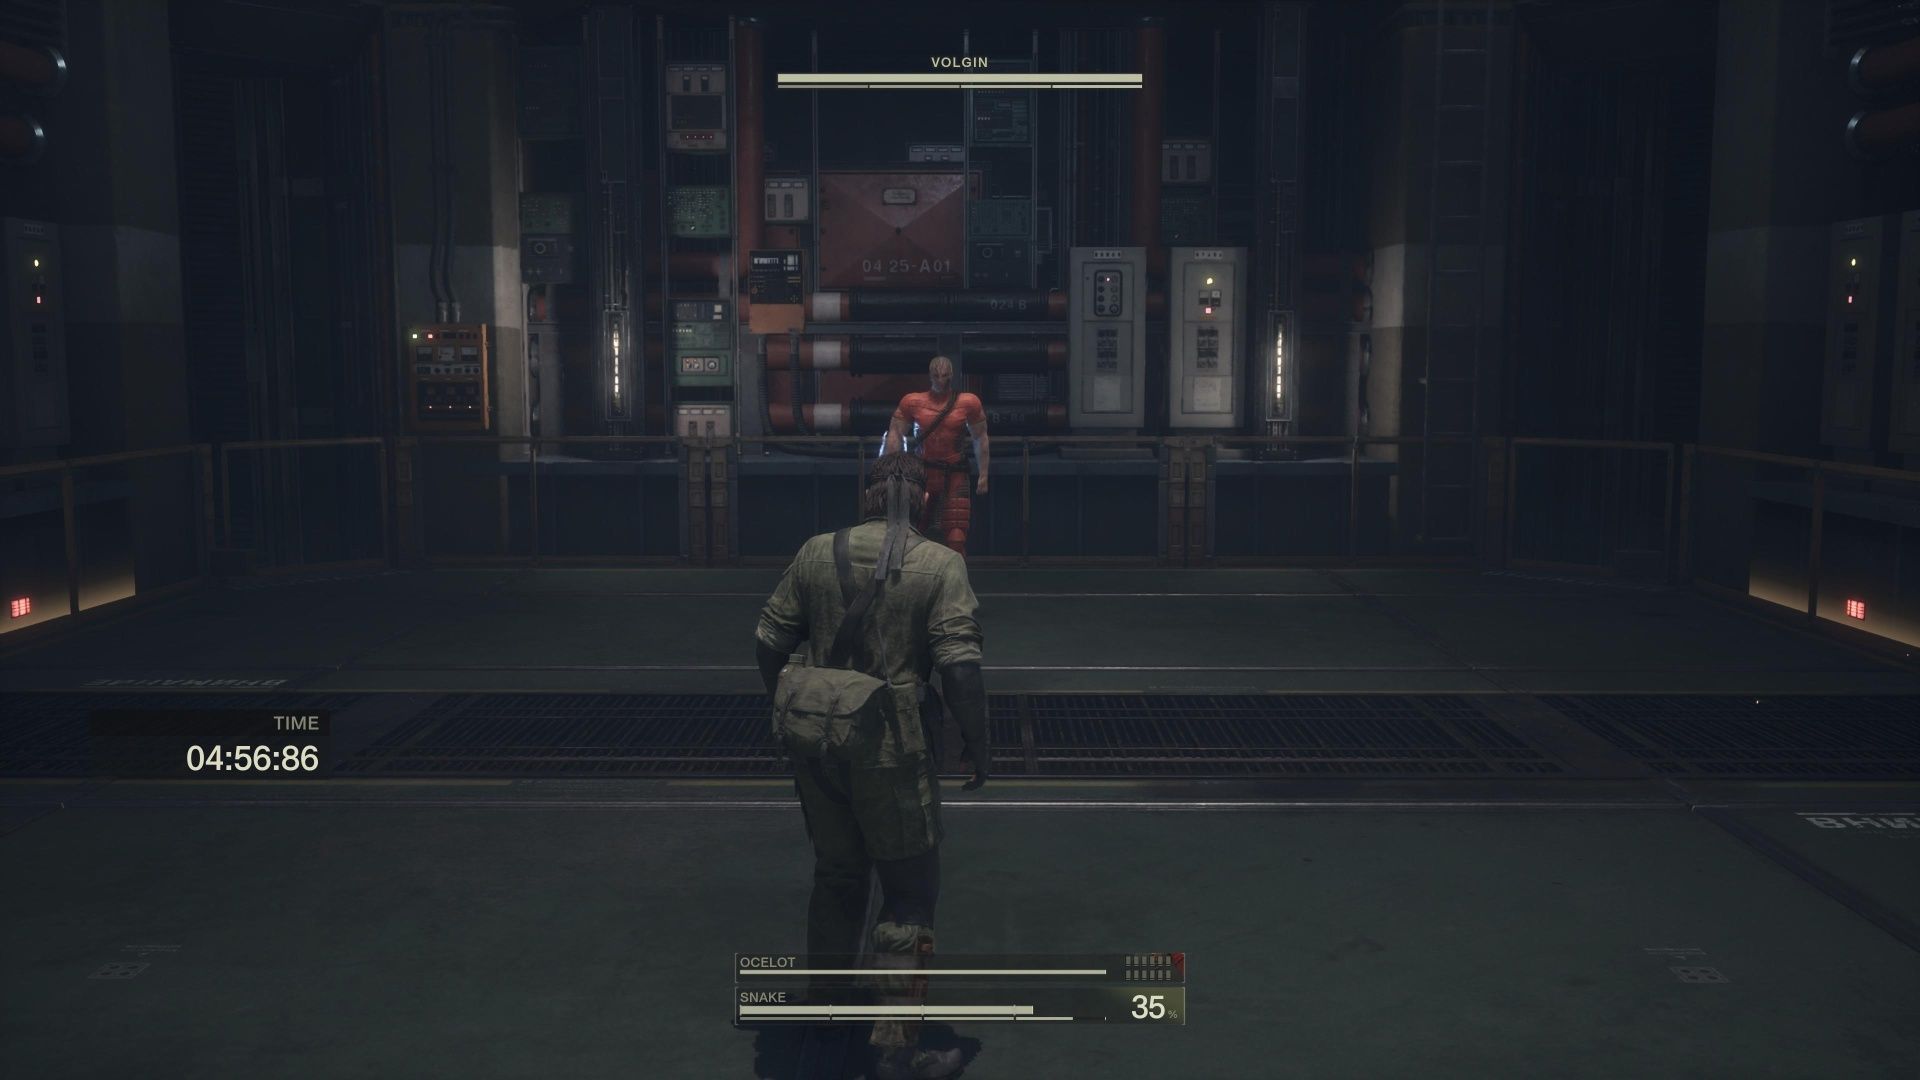
Fighting Colonel Volgin proves challenging as you are confined in a limited space with him, and his electromagnetic abilities render many of your weapons useless. To inflict damage on him, you must use strategic placement instead. The clock is ticking since there’s only a short span before the facility detonates.
In this scenario, bullets can harm Volgin from both sides and behind. To ensure success, wait for him to execute an electric attack that immobilizes him, then circle around and attack from behind. Alternatively, if you manage to get close enough, a CQC slam could knock him down, providing an opportunity to inflict additional damage.

Should you don the Raikov Mask during the fight, it may momentarily disorient Volgin, leaving him more susceptible to attacks for a brief period.
During the battle, Volgin may occasionally shout at Ocelot and this could give you a chance to inflict more damage. Additionally, he’ll periodically recharge his powers near an electricity station in the corner. Take advantage of this by attacking him when his back is turned for some effortless damage.
So long as you continually dodge Volgin’s recurring electric assaults by employing Close Quarters Combat (CQC) to bring him down, you shouldn’t encounter many issues in this battle. Frequently use Snake’s combat roll to evade incoming harm, and consider going prone to slip under most of Volgin’s attacks too.
If you defeat Volgin non-lethally, you’ll receive the Cold War Camo as a reward.
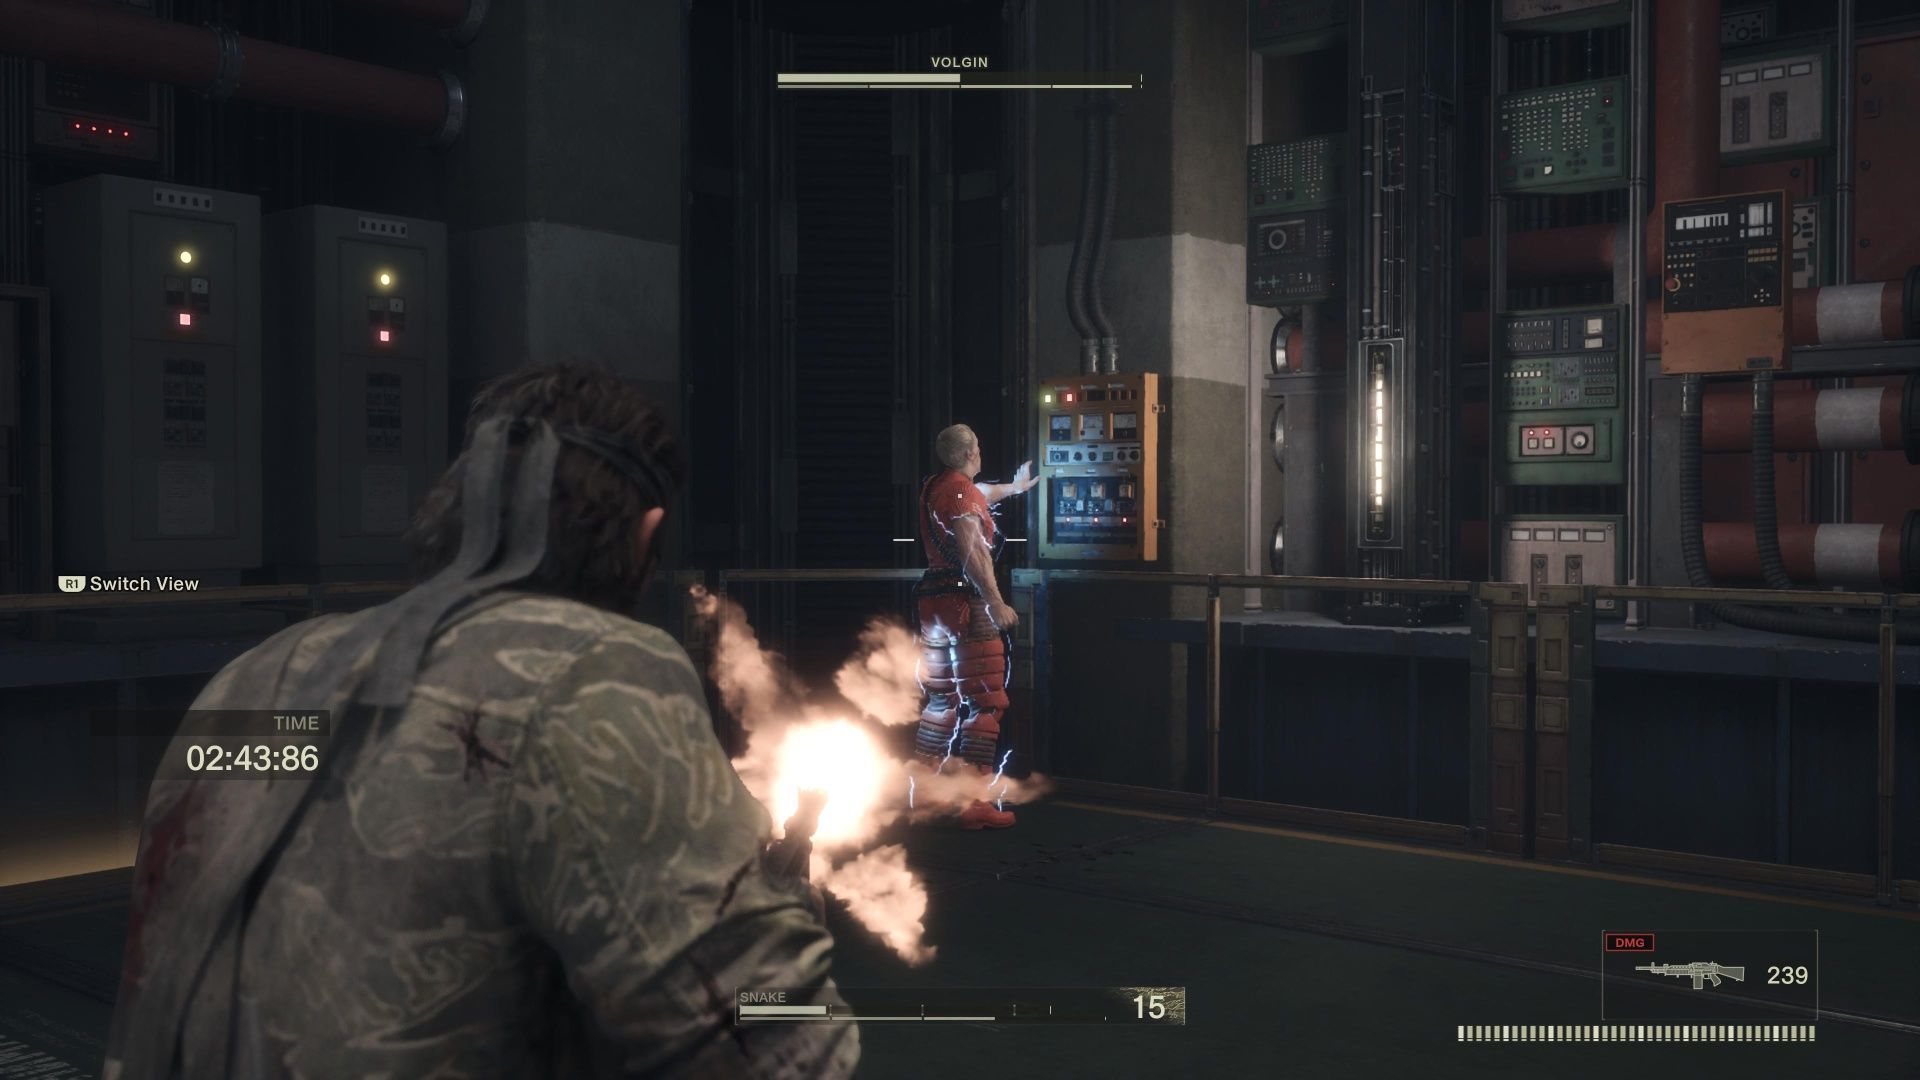
Shagohod
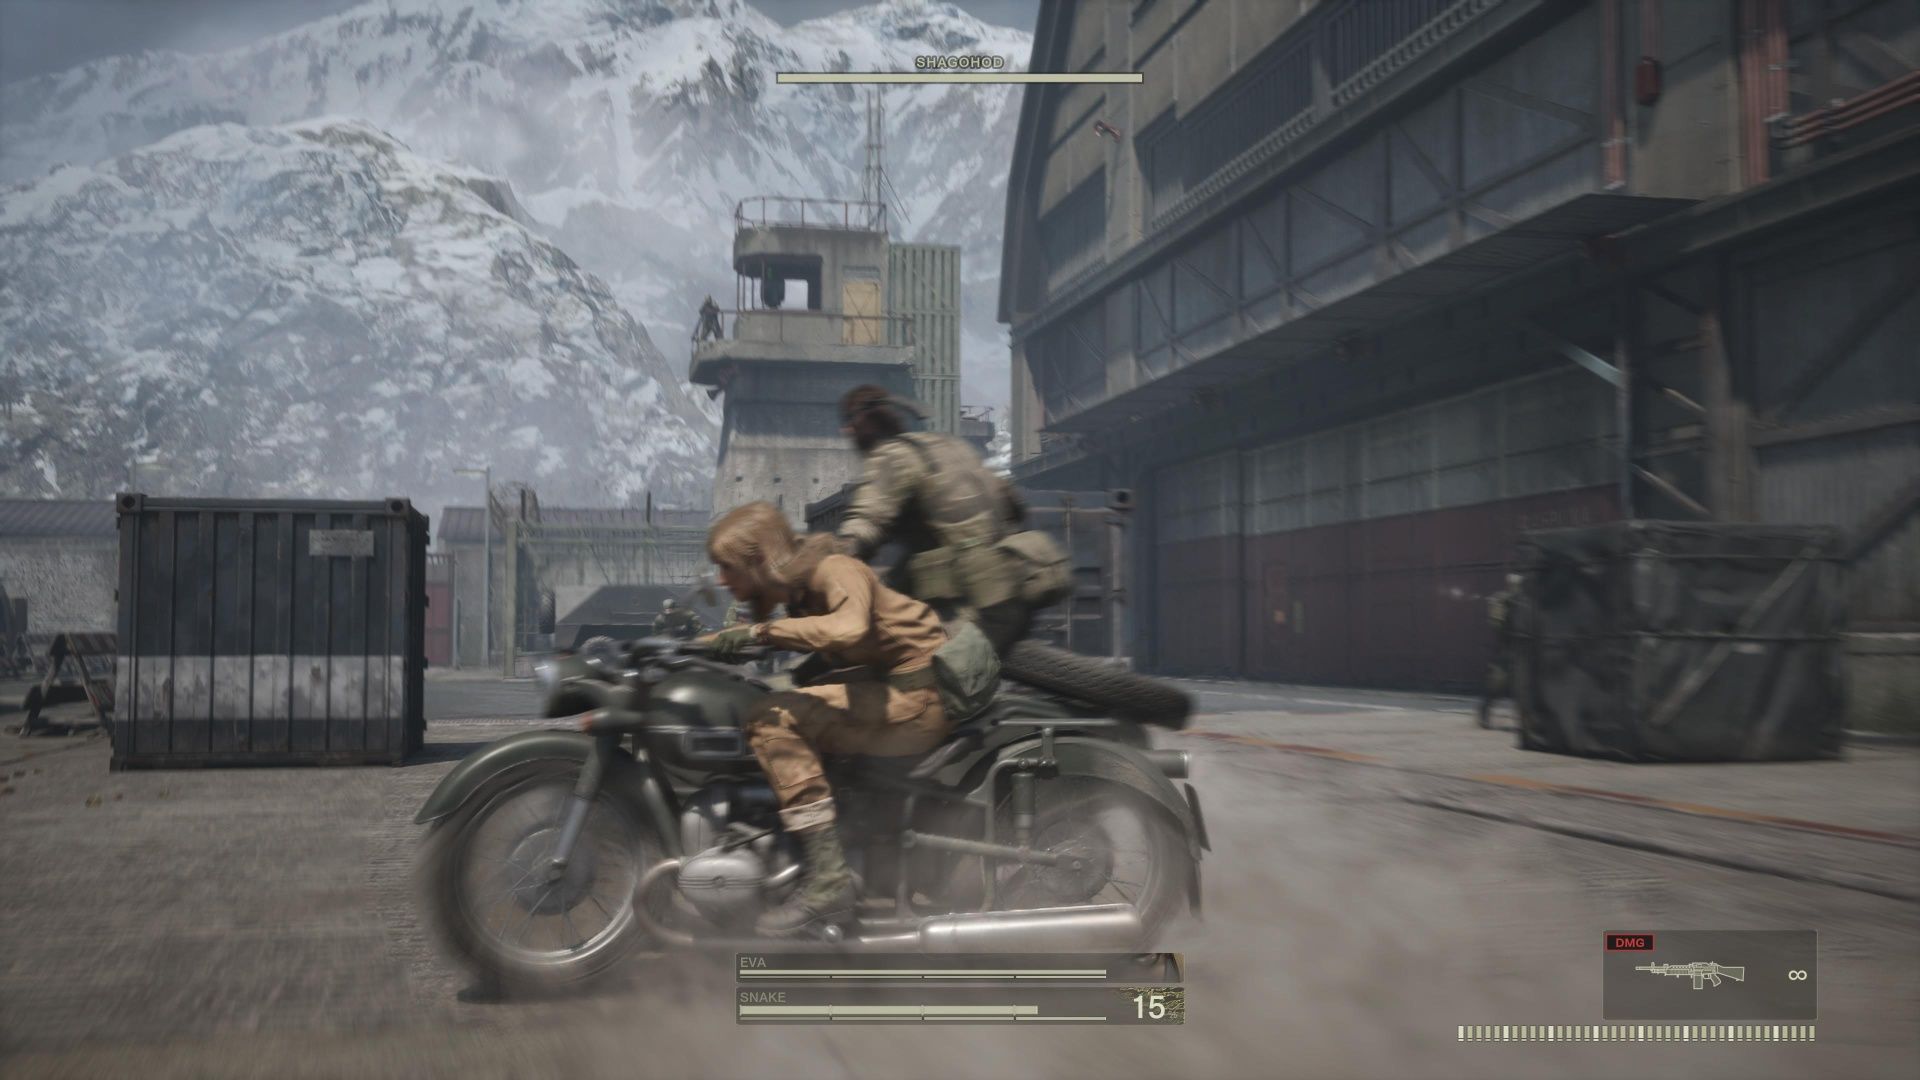
In Metal Gear Solid Delta: Snake Eater, overcoming the Shagohod marks one of the main objectives towards the end of the game. This prolonged battle unfolds across multiple stages, and throughout much of it, you’ll have to wait until the final section before taking any significant action. During the pursuit sequence, which is entirely pre-scripted, your primary focus should be on firing at the guards while EVA drives.
In due time, you’ll find yourself in a combat arena, facing off against the Shagohod one-on-one. To disable the Shagohod, you should aim to fire your RPG at its treads. Once the tank is stationary, target its central core to inflict damage. Keep attacking until enough damage is dealt and Volgin will exit the tank, ready for another confrontation.
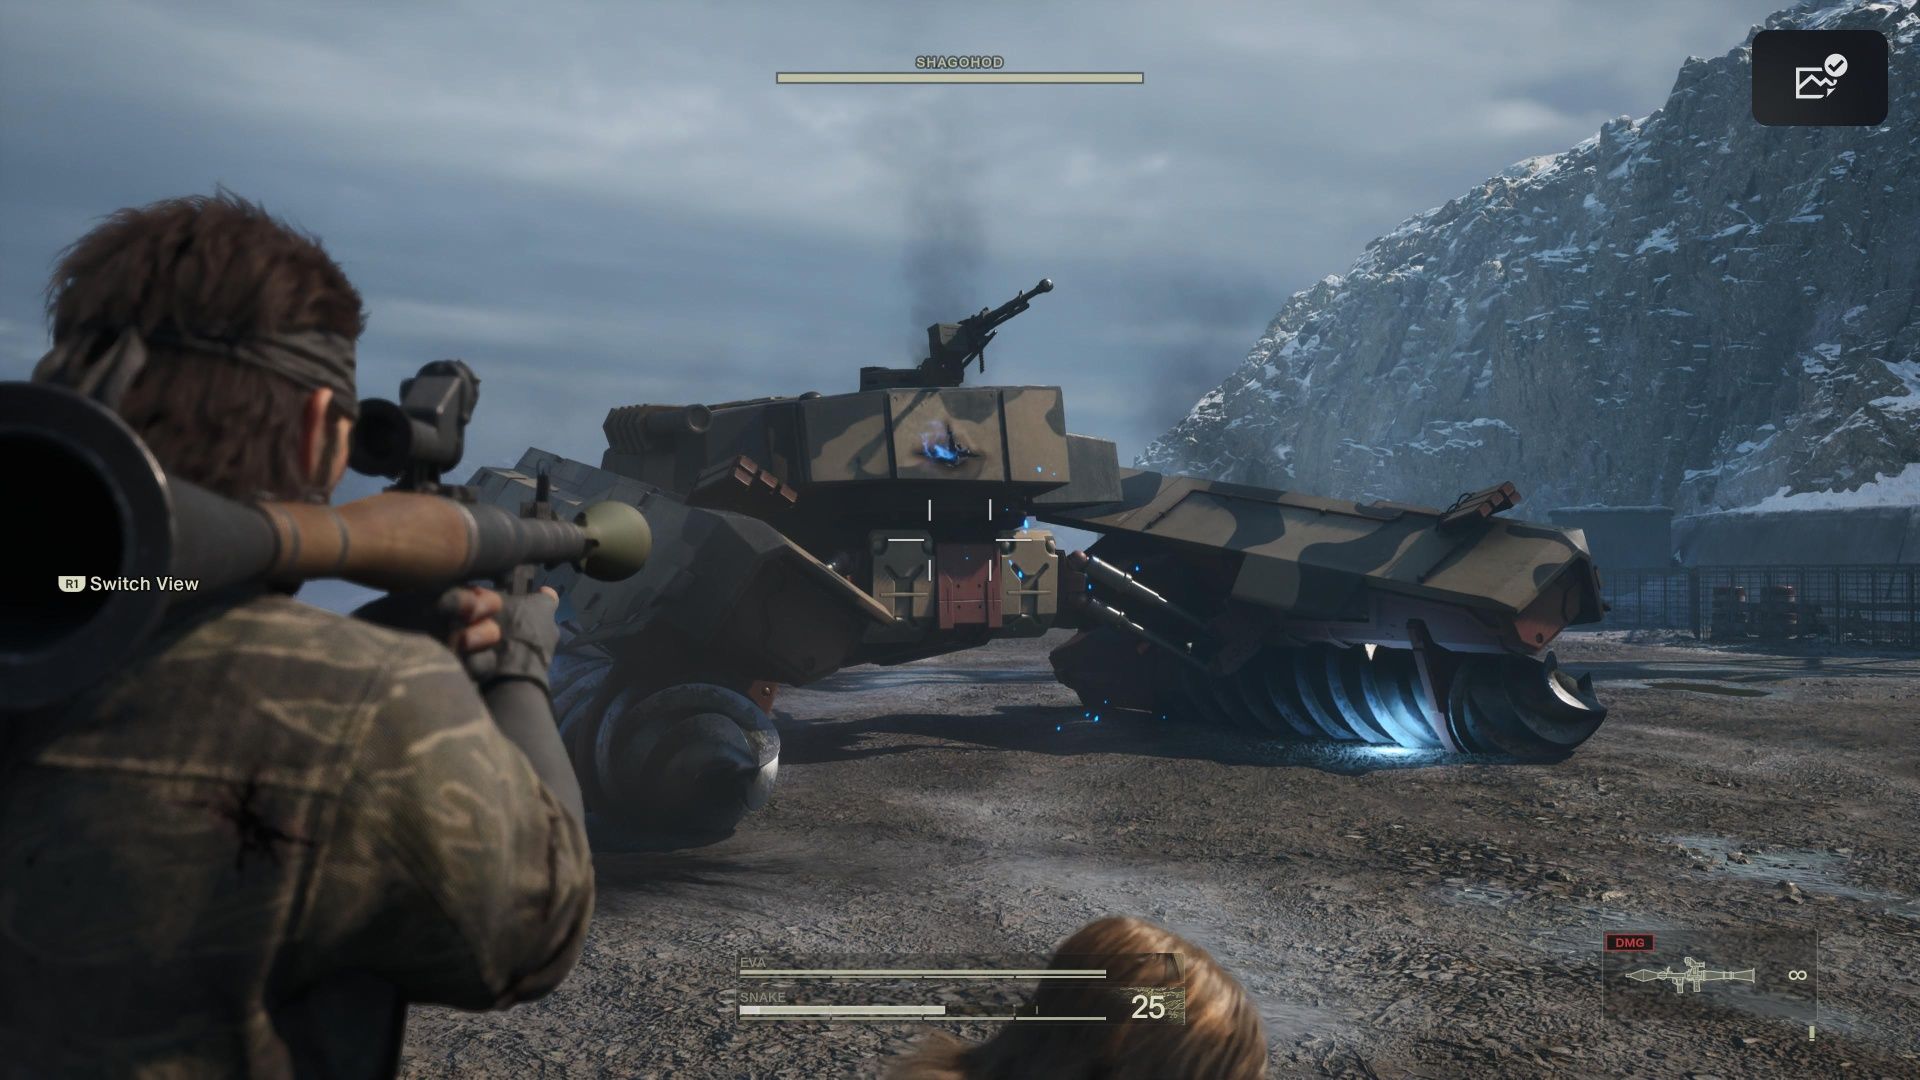
Utilize the RPG to immobilize the Shagohod’s tracks, and afterwards, take down Volgin with the SVD (or any weapon of your preference).
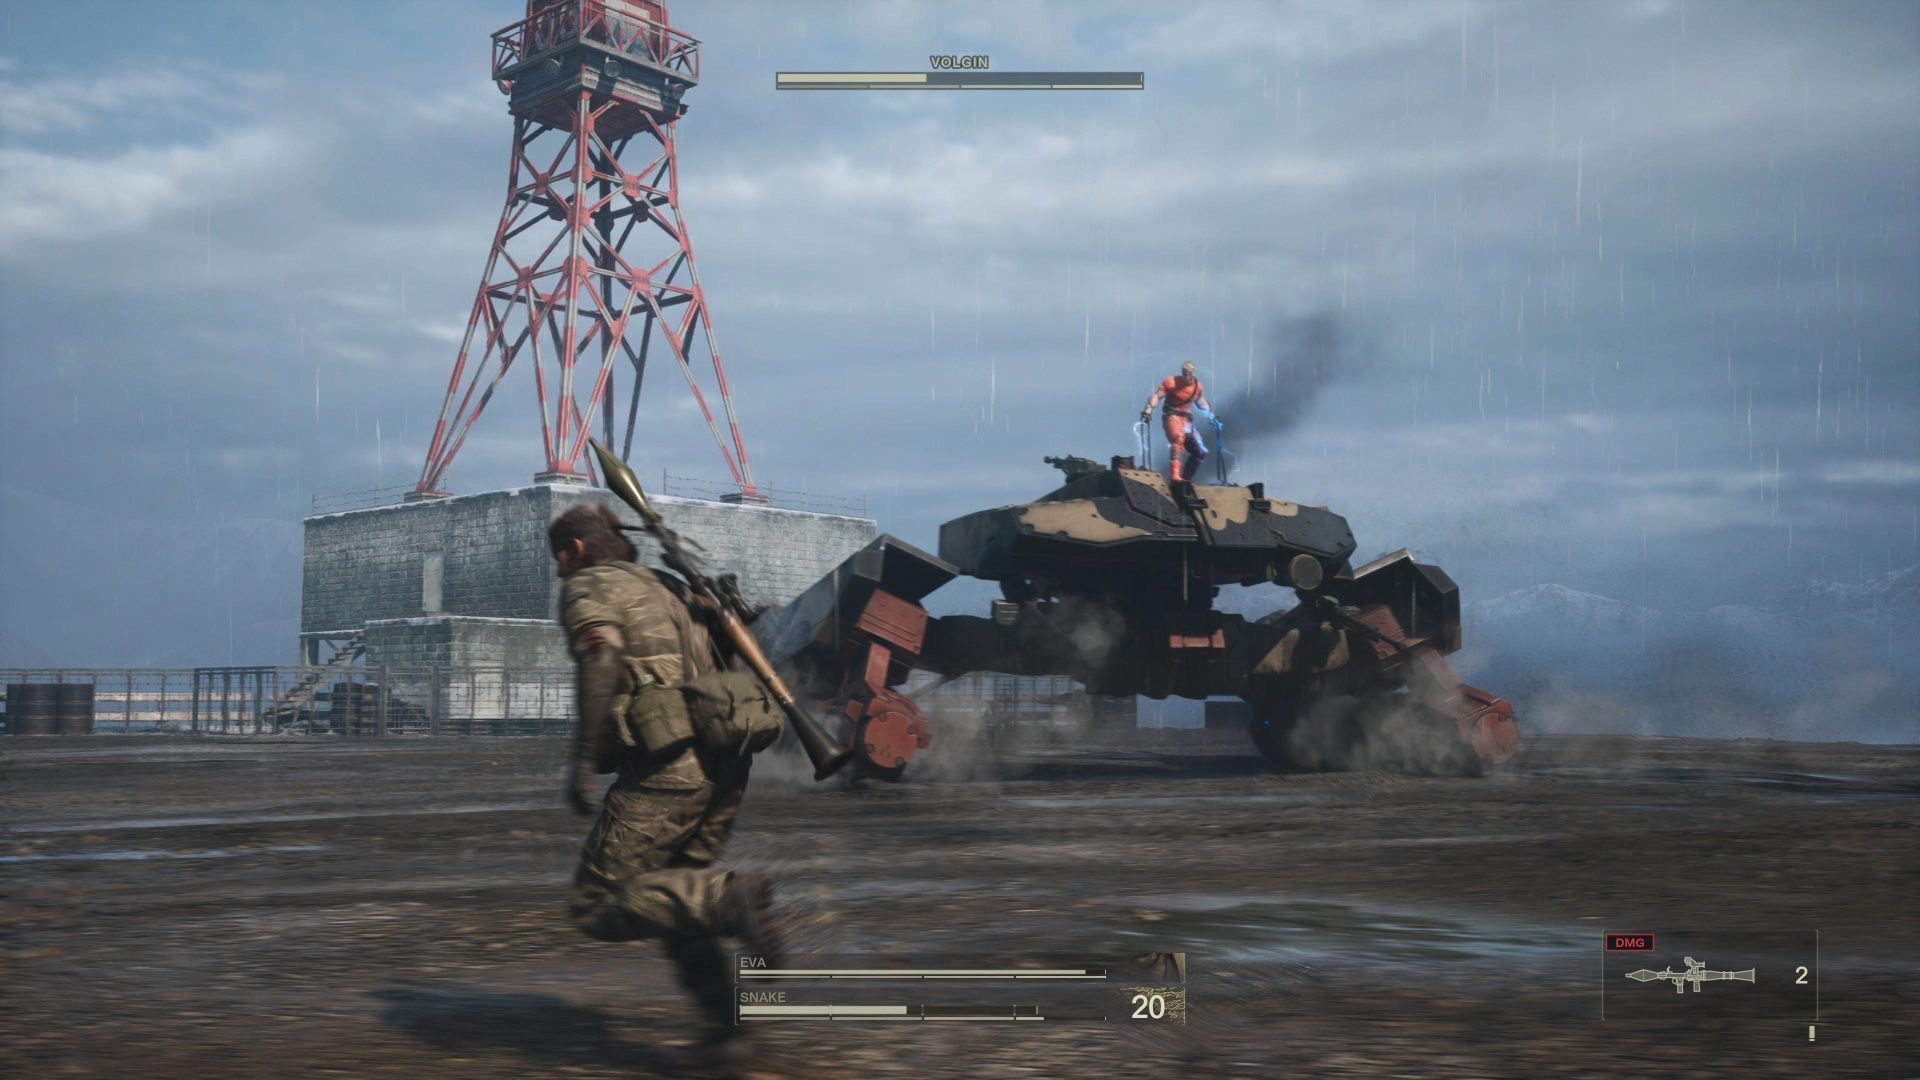
If Volgin aims at you rather than EVA, dodge to the side to avoid his incoming attacks. Volgin occasionally launches missiles too, but you can shoot them down before they hit you. Keep in mind that there are no non-lethal rewards during this battle, so feel free to use your preferred firearms aggressively.
The Boss
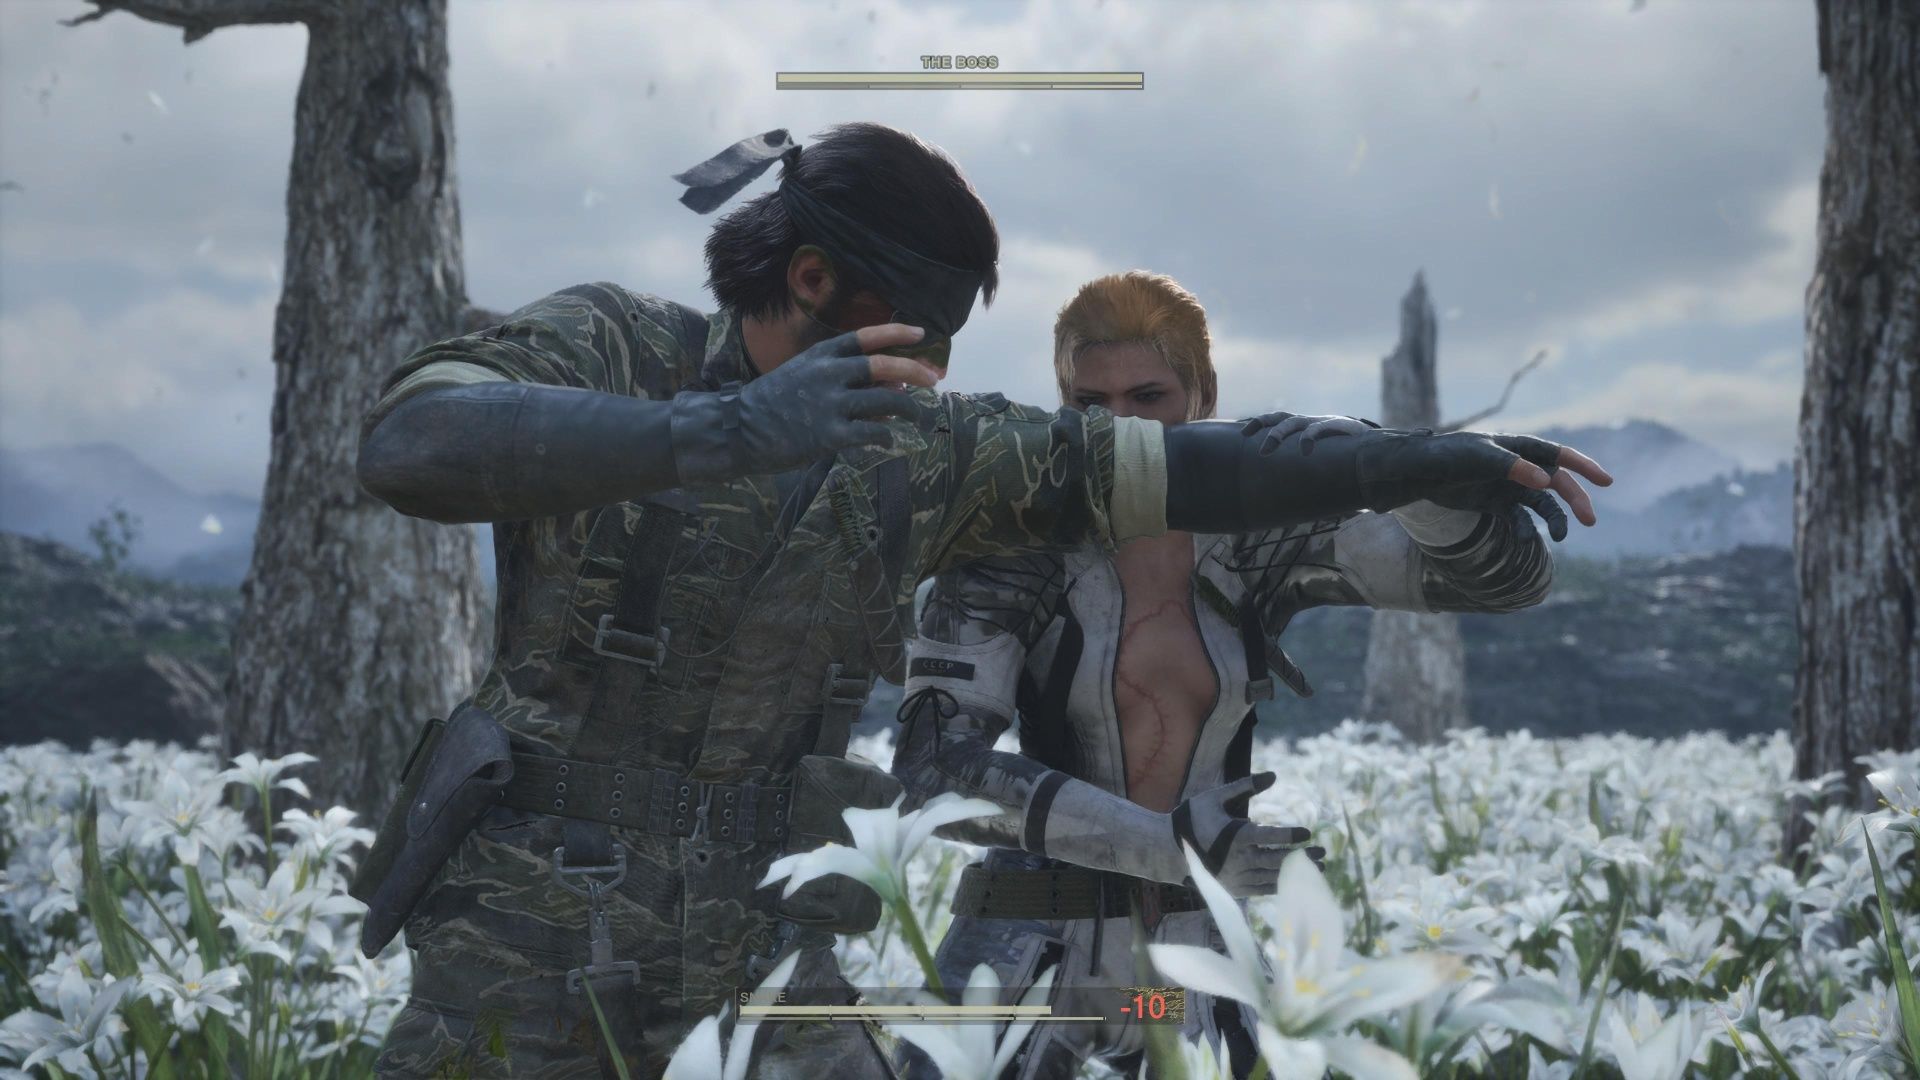
In the game Metal Gear Solid Delta: Snake Eater, The Boss stands as the ultimate adversary. Unlike the previous foes you’ve faced, The Boss presents a significantly greater threat in this hide-and-seek style game.
In a field blanketed with white blooms, it’s best to don the Snow Camouflage to blend in and remain unnoticed. To deal damage to The Boss, you must stay hidden until she’s oblivious of your presence. Cautiously move among the flowers until she loses sight of you, then seize a moment to fire when it’s safe. If you can strike her repeatedly while she’s vulnerable, she will be knocked down, providing an opportunity for you to retreat and regroup.
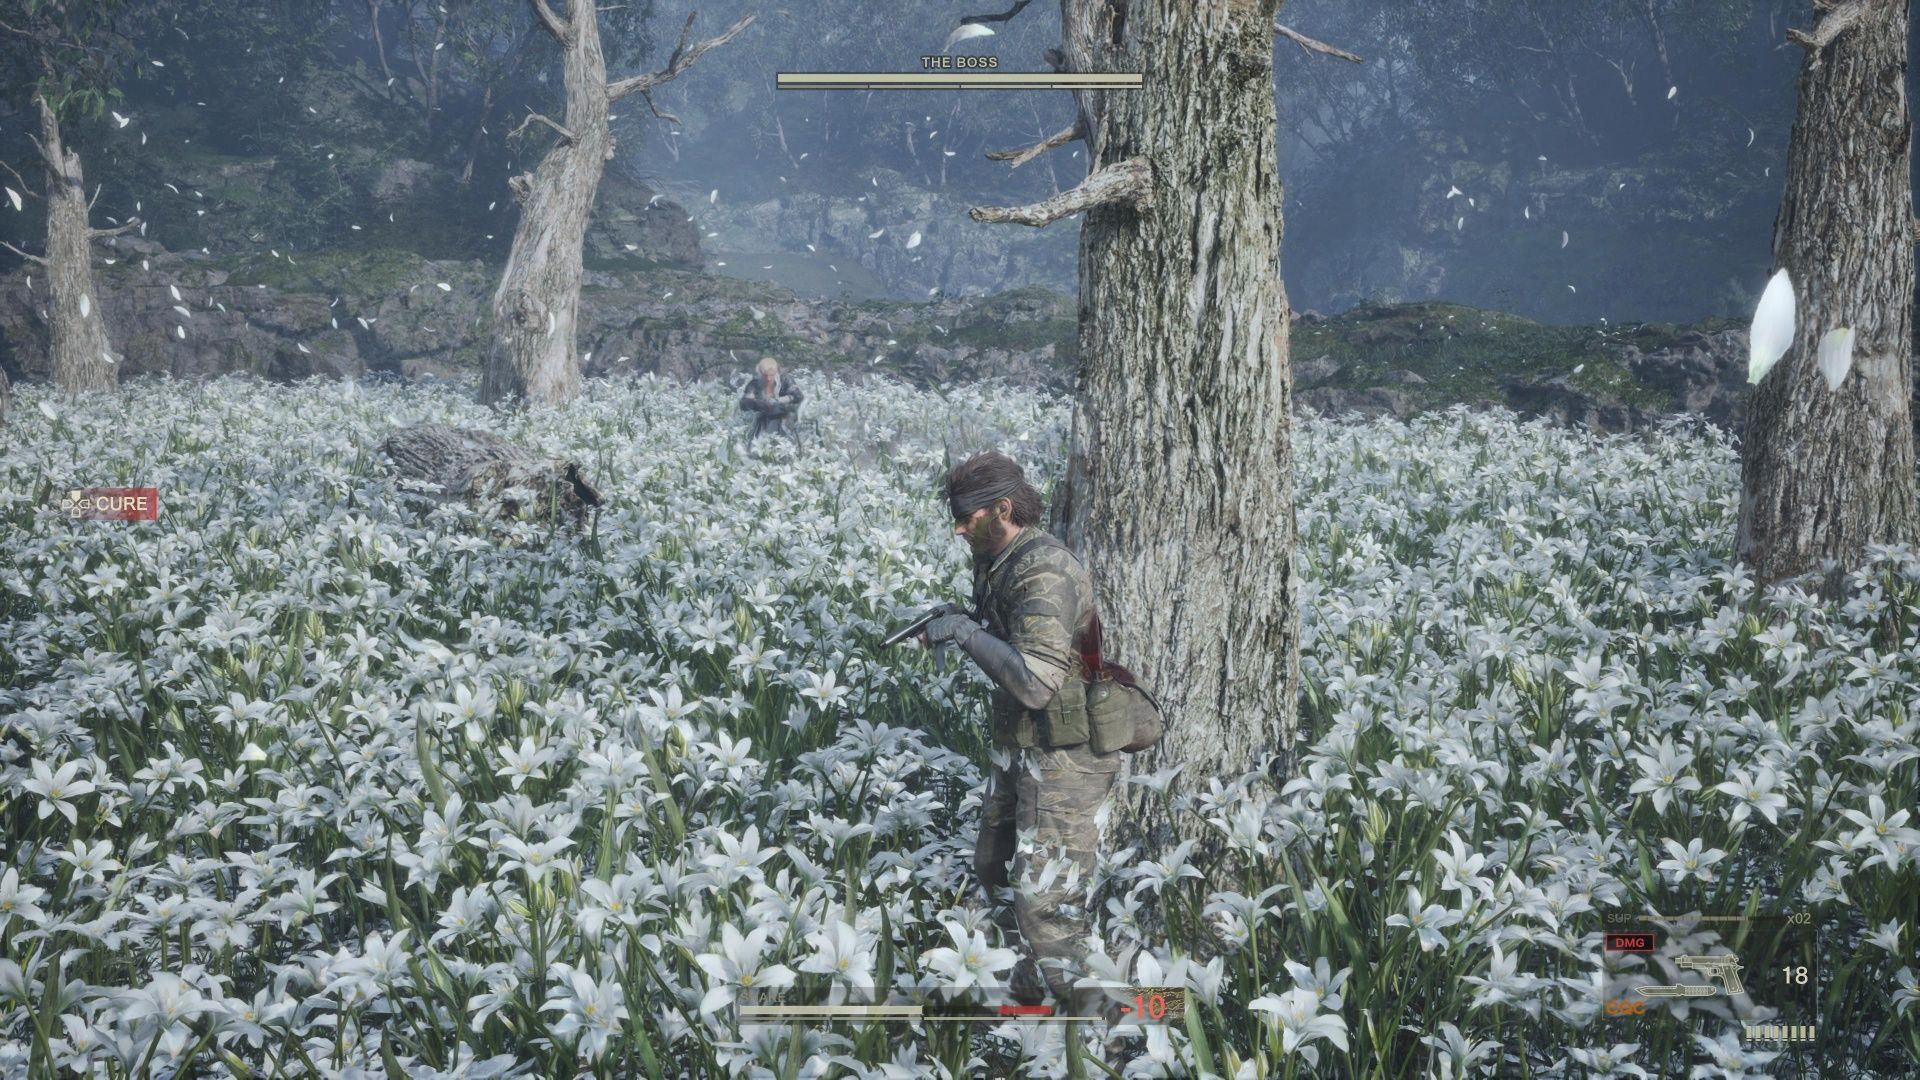
You might come across three distinctly named snakes moving around near the logs within the arena. If you have difficulty seeing them, use your Thermal Goggles for better visibility!
As a gamer, I’ve got to warn you – if The Boss spots me, she’s gonna charge right at me for an up-close-and-personal takedown. It’s pretty much unavoidable, but
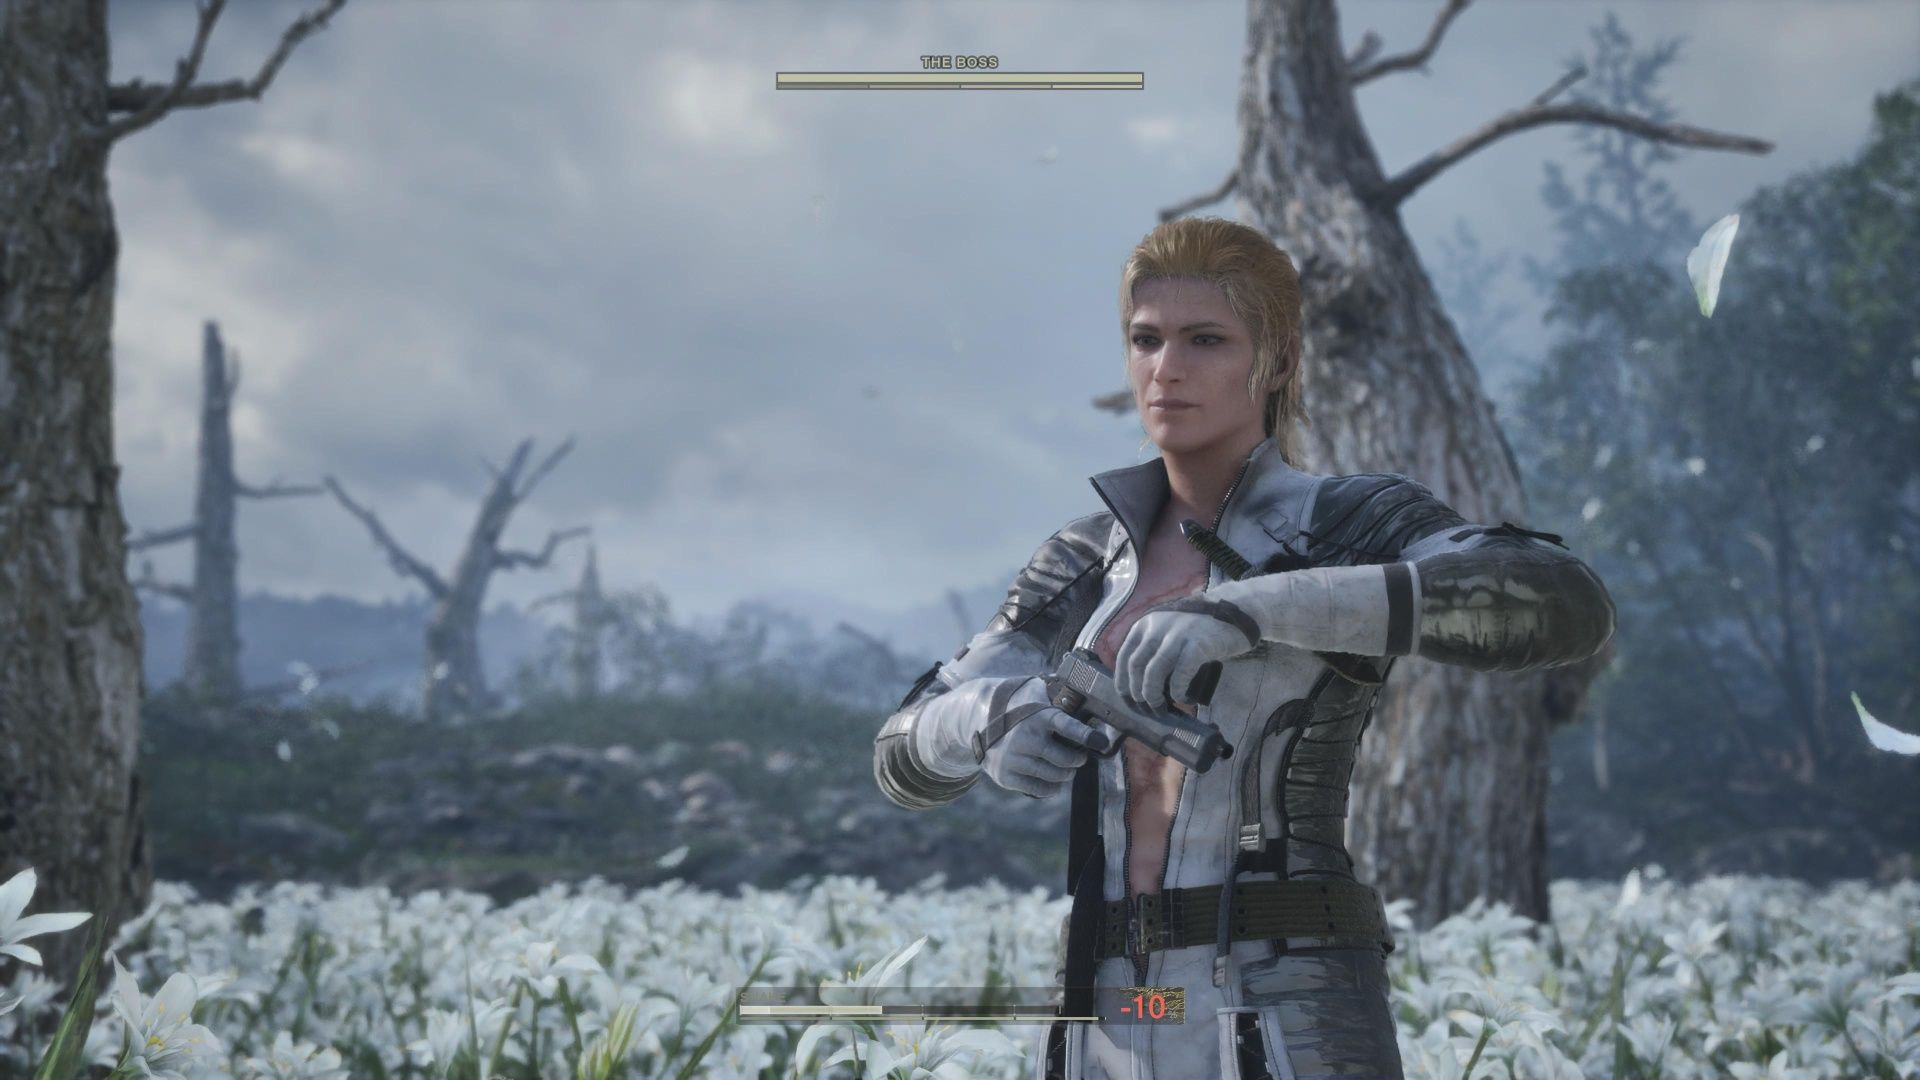
To triumph over The Boss, maintain stealth by moving covertly across the battlefield. Use your Thermal Goggles and Directional Mic to keep tabs on her location. Noticeably, she often hides around trees when searching for you, and will scatter flower petals as she moves to a new spot. Although this fight comes with a time limit, it’s fairly lenient, so there’s no need to rush.
If you defeat The Boss non-lethally, you’ll get the Snake Camo as a reward.
Once you’ve triumphed over The Boss, you’ll find yourself right at the end of “Metal Gear Solid Delta: Snake Eater”! Although the story comes to an end with the closing credits, there are still some fun features left for you to explore. For instance, the classic duel between Snake and Monkey in a mini-game reappears, as well as the multiplayer experience offered by Fox Hunt mode.
Read More
- Violence District Killer and Survivor Tier List
- All Data Pad Locations (Week 1) Destiny 2
- Cogheart & Cogwork Heart Guide (How To Get & Use) In Silksong
- Great Taste of Pharloom Quest In Silksong (Rasher, Crustnut, Muckmaggot, Nectar, Mossberry)
- Pale Oil Location (Pinmaster’s Oil Quest) In Silksong
- Trail’s End Quest (Shakra’s Location) In Silksong
- Top 8 UFC 5 Perks Every Fighter Should Use
- How to Cheese Moorwing in Silksong – Easy Boss Fight Skip
- Prestige Perks in Space Marine 2: A Grind That Could Backfire
- Abyss Map Location (& How To Reach It) In Silksong
2025-08-27 03:00