
I definitely don’t consider myself a speedrunner – the idea actually makes me pretty anxious. The pressure of a timer and the need for perfect execution aren’t my style. But despite that, something about it was so appealing that it convinced even me to try. My initial playthrough took around 30 hours, so the challenge of completing it in just five felt incredibly daunting.
You might be surprised how easy this actually is, even if you’re not confident in your abilities. With a good guide and a little practice, I think you can beat my time! Let’s go over the route I took so we can unlock this achievement quickly.
This guide isn’t about speedrunning or getting the absolute fastest time. I was aiming for a completion time of under five hours, and that’s what this focuses on. If you just want to finish the game, this guide will help you do it.
Starting Tips
Before we begin, I suggest you finish the game first – all the way to the end. Mastering the later, tougher fights in Silksong will significantly improve your skills, making the early battles much easier when you start a new playthrough.
Honestly, even though there’s a timer, I learned it’s way better to take my time. I tried rushing once, and all it did was make me mess up more. So now I focus on playing carefully instead of quickly.
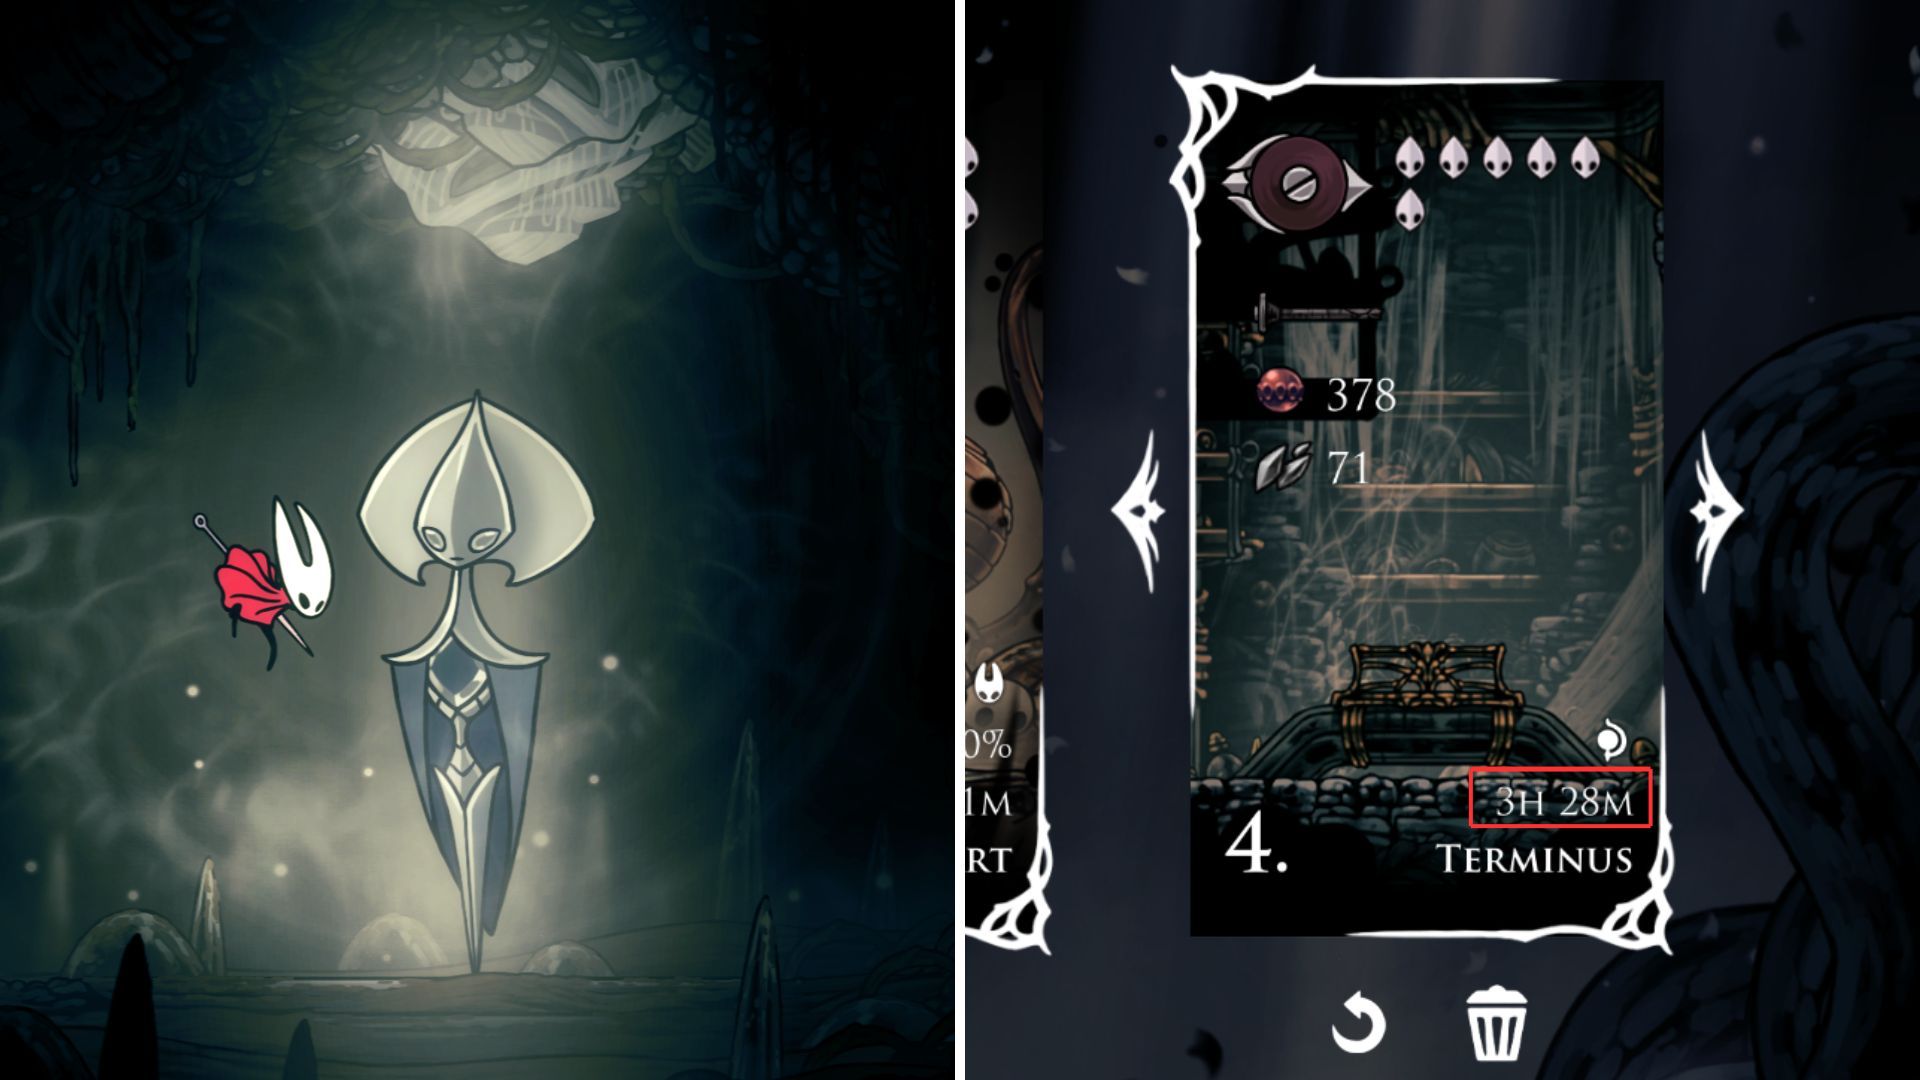
Even though staying alive is important, I finished the game in 3 hours and 28 minutes after dying several times. Don’t get discouraged by deaths – learn from them and try again. Just remember this is about speed, not completing the game without dying.
This guide prioritizes safety and comfort over speed. While top players might skip extra items to achieve the fastest times, we recommend bringing a few helpful things – like an extra mask – to make the run more manageable and give you a little more leeway if things go wrong.
Moss Grotto to the First Bell
Let’s begin! If you need to check this guide while playing, just pause the game – it will stop the timer, giving you time to read.
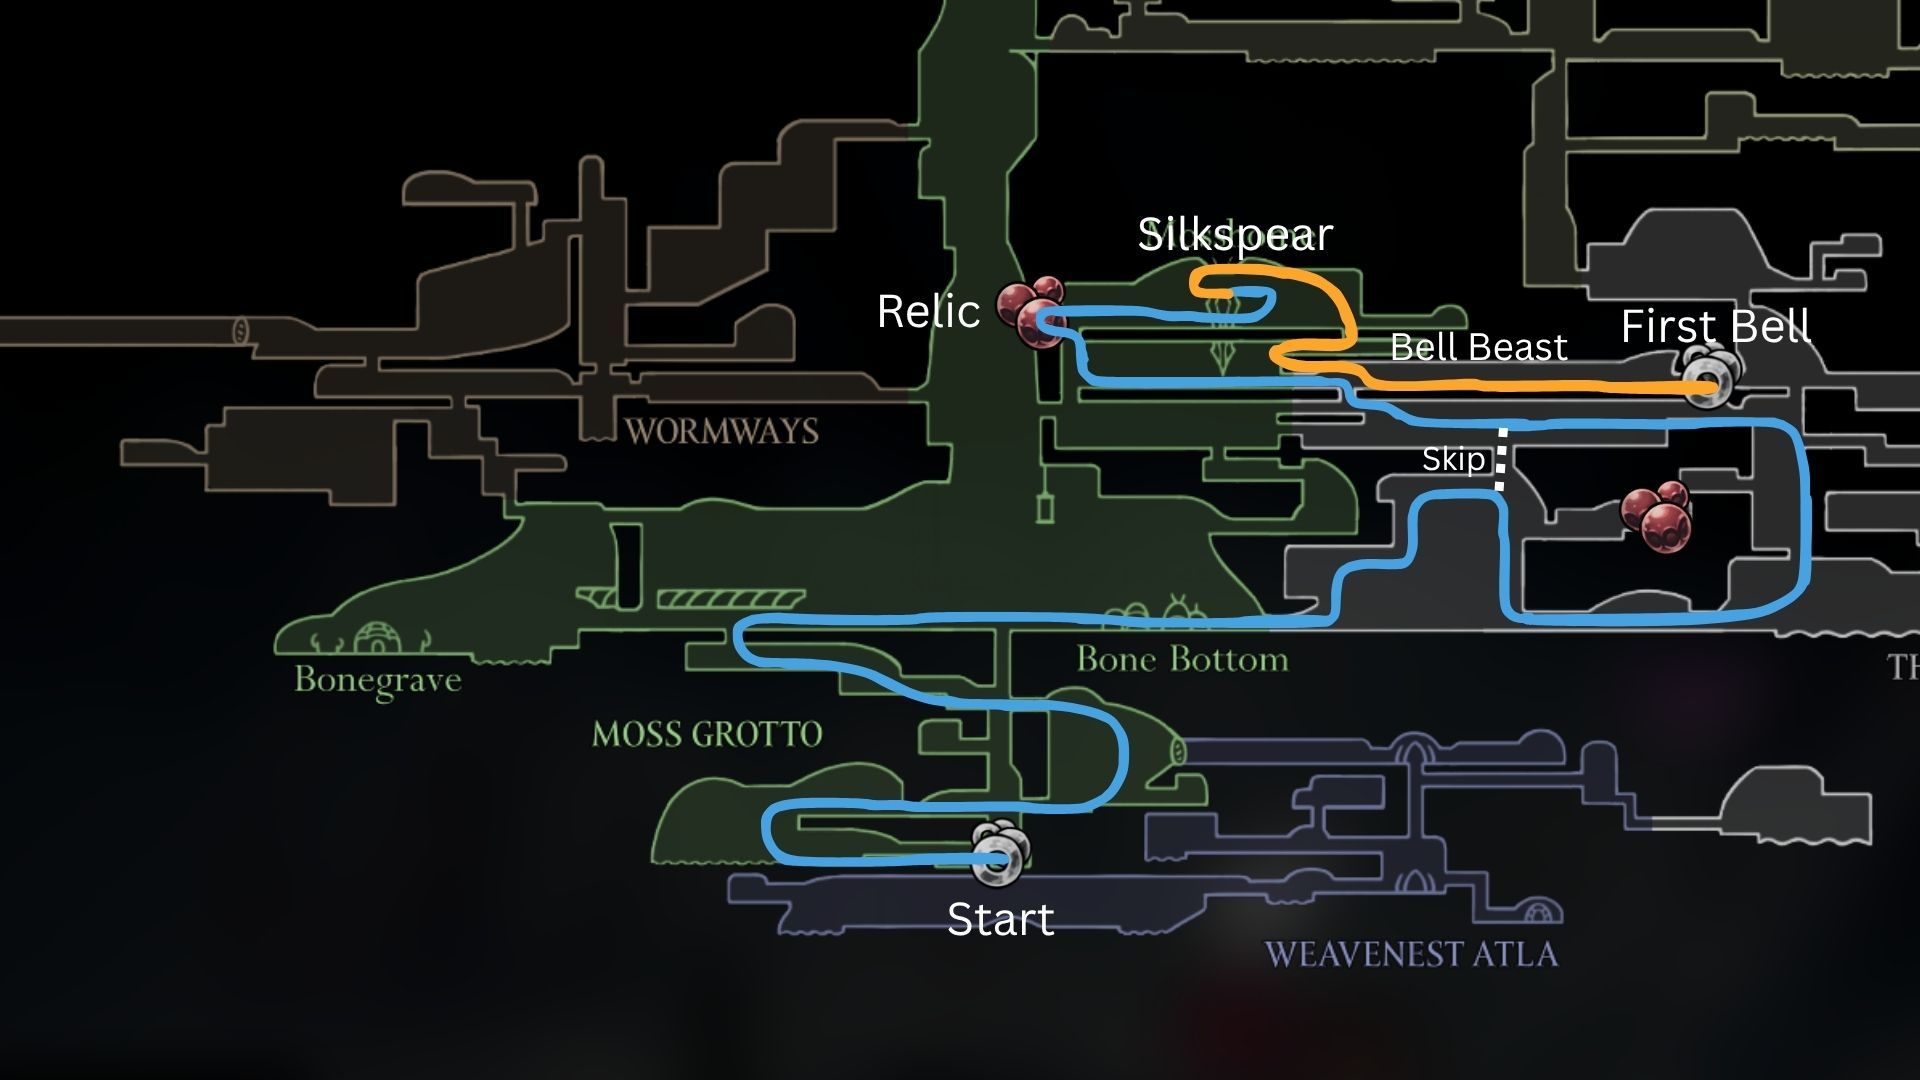
First, stick to the blue path, and then switch to the orange one to avoid getting lost.
Start your journey in the Moss Grotto and complete the initial tutorial. You don’t need to focus on advanced techniques like down slashes just yet. Once you’ve defeated the Moss Mother, you’ll find yourself in Bone Bottom.
Don’t worry about the town – go straight into The Marrow. Follow the path upwards and around until you see a white dotted line on your map. You can skip a section here by attracting one of the flying enemies, but it can be difficult to pull off.
Go forward and destroy the wall on the right, marked by the rosary symbol on your map. Then, navigate through the arena, heading down and to the right, circling back until you find Shakra.
Head upwards and to the west, through Moss Home. In the northwestern section, near the next rosary symbol, you’ll find a wall you can break. Behind it is a Choral Commandment, which will reward you with 180 rosaries later in the game.
Pick up the item and return the way you came, following the orange line this time. Once you’ve done that, you can ring the first bell and continue on to the Deep Docks.
As soon as you hit the lever, leave the room and go back in the skip the bell animation.
First Bell to the Second Bell
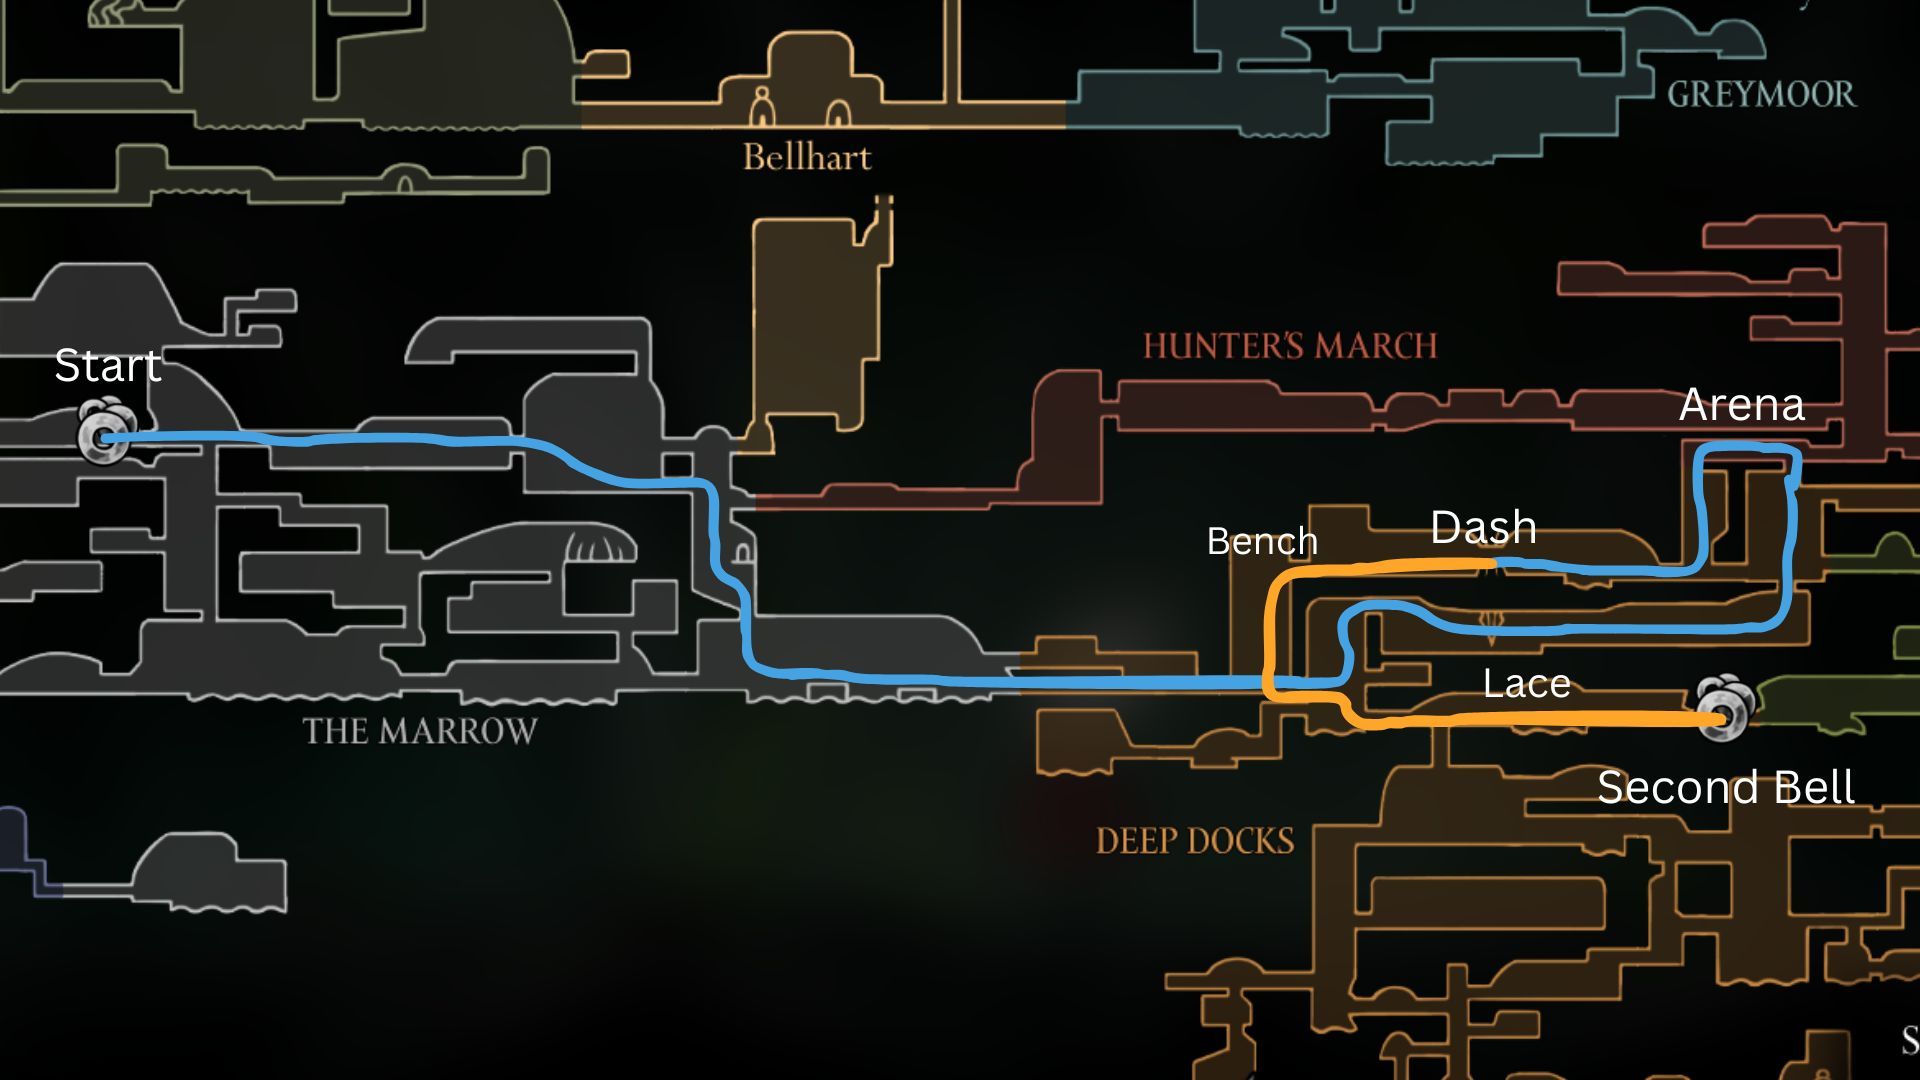
Continue east until you reach the tall, vertical chamber. This chamber opens into the Hunter’s March. You can drop down into it and enter the room to rest on a bench and pick up the Straight Pin, but it’s not required.
Continue east through the Deep Docks until you find a tall, vertical area. You can reach the top and move forward by either using the platforms or bouncing on the head of the flying creature. Once you’re up there, follow the long hallway, which will lead you to the Hunter’s March and a challenging arena battle.
Don’t hesitate to use your Silkspear often – it’s as effective as three regular attacks. Next, go southwest to unlock the dash ability. Again, just follow the orange path. There’s a bench nearby if you need it, but this area is pretty easy, so you shouldn’t need it.
Take down Lace and ring the Second Bell, using that bell skip tech we talked about before.
Second Bell to the Third Bell
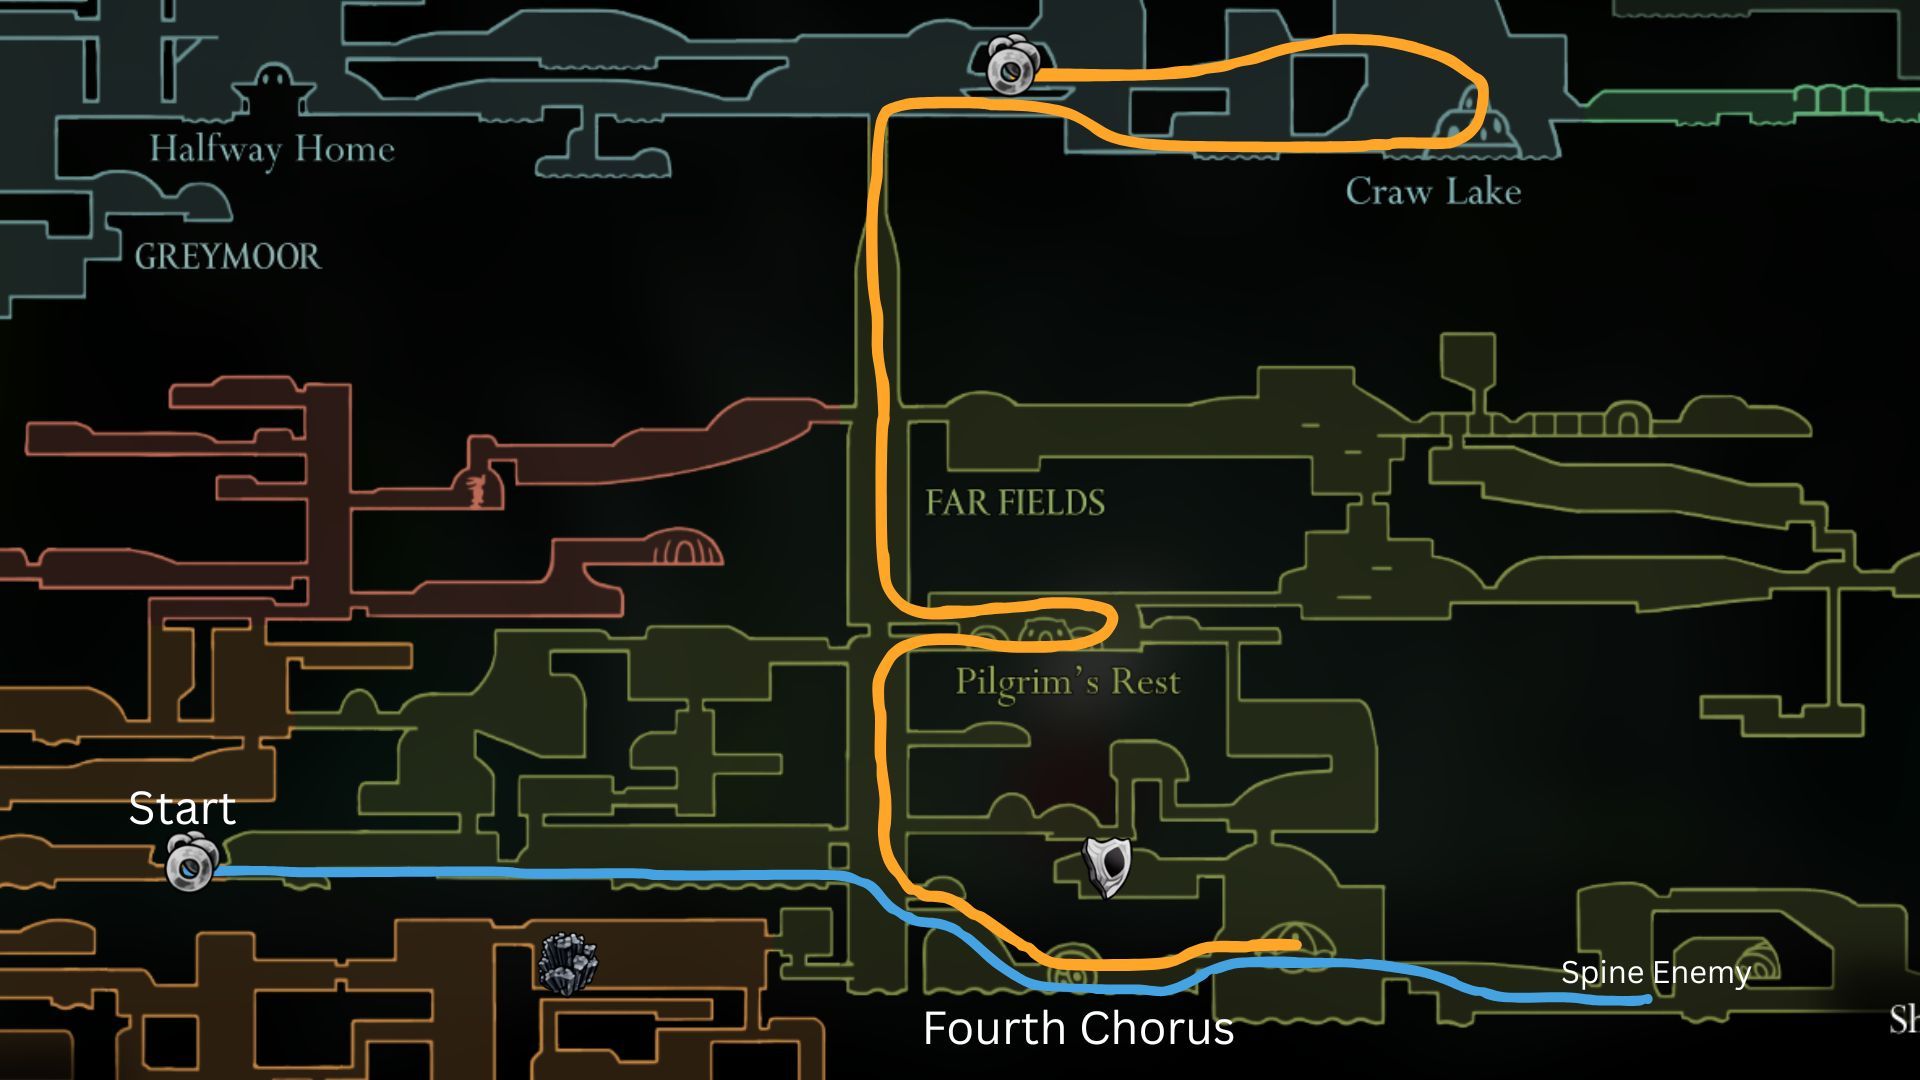
Continue heading east through the Far Fields until you find a tall, vertical chamber. This chamber is the entrance to Greymoor, but before you go up, turn southeast to find the Seamstress. Rest on the bench there and start the Flexile Spines Wish.
Down at the lowest level of the tall room, head west to find a secret area. Inside, you can get the Warding Bell and some Craftmetal – it’s a little further to the left. Make sure to grab these items either before or after you complete the Flexile Spine Wish.
Continue heading east until you encounter the spiky enemy just before moving to the next area. Defeat it to collect its spines, then exit and return to the room to make it reappear. Gather enough spines, and then restart the game – you’ll find yourself inside the Seamstress’s house.
- Optional: Go to the top of this room and collect the Mask Piece located on the map.
After leaving the Seamstress, head west and defeat the enemy. Alternatively, you can avoid the fight by quickly running to the left and using healing technology to reach the platform on the west side, but be warned: it’s a difficult jump!
Start by rising upwards from the vertical chamber, using the rising air currents. Then, travel east towards Pilgrim’s Rest and circle around. Continue gaining altitude until you break through into Greymoor.
Head east and defeat the arena at the top of Craw Lake. Once you’ve gathered the rosaries and freed the balloons, you’ll be able to get to the Third Bell.
Third Bell to Bellhart
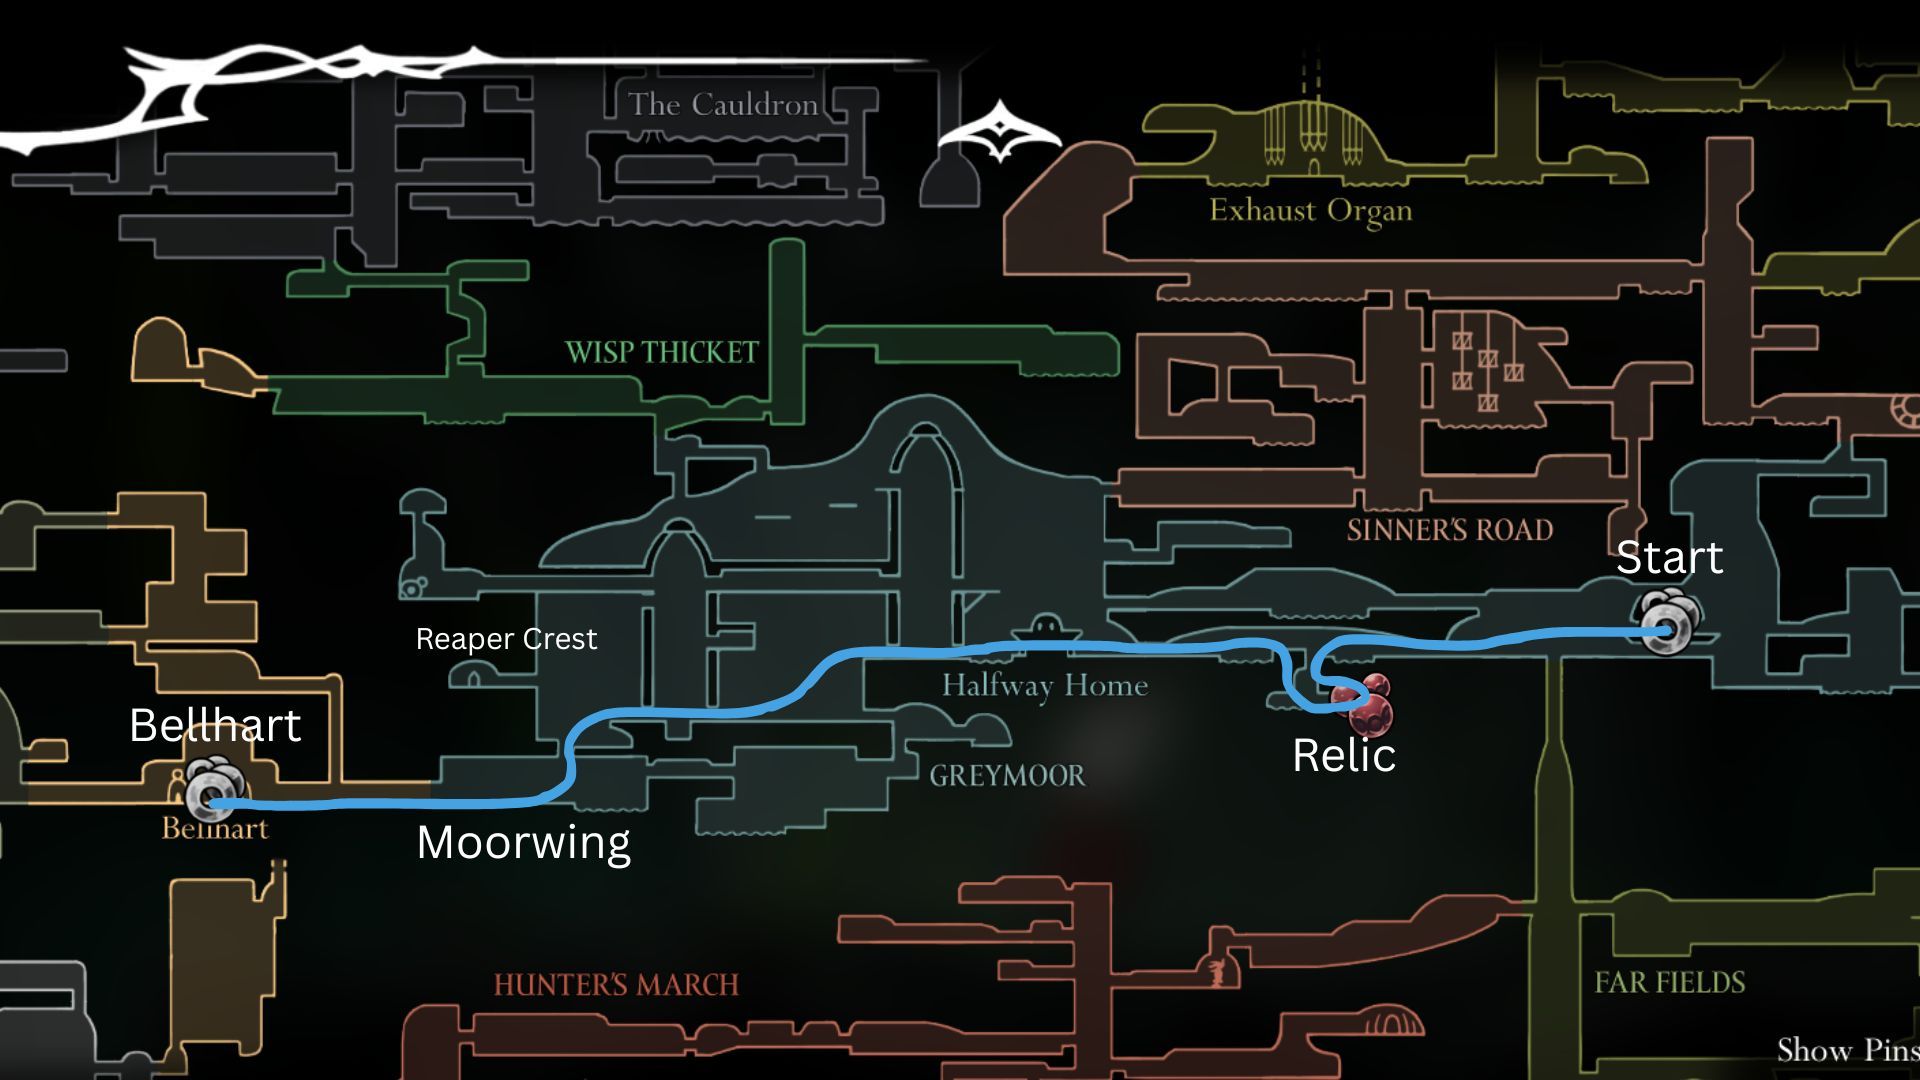
Go west, beyond the hole in the floor. In the next room, swim underwater and descend into a hidden chamber to find a Bone Scroll relic. Obtaining this relic will reward you with 90 rosaries in Bellhart.
Climb up and over the Halfway Home – feel free to take a break inside if you need to. After that, head left and complete the small arena. Continue westward, descending towards Moorwing. You can pick up the Reaper Crest if you like, but it’s generally considered one of the weaker crests. Instead, focus on mastering the default crest, as it’s surprisingly powerful when used effectively.
Moorwing was originally much stronger, but has been weakened in recent updates. Defeat it now and move on to Bellhart.
Bellhart to the Final Bell

Enter Shellwood and quickly run through the first area. In the second area, look under the “Widow Bench” sign – you’ll find a small arena. Silkspear is a great weapon to use here because it can damage several enemies at once.
Head west, then down the hallway and press the button to open the big door between the rooms. After that, go west again and up through the room with the pogo stick.
- Optional: If you grabbed the previous one, you can grab another Mask Shard shown on the map here.
Once you head east, use a Taunt Skip to avoid the Sister Splinter boss fight – this is especially helpful when playing in Steel Soul mode. Then, pick up the item and keep going east to reach the upper part of Bellhart.
Just so you know, whenever you unlock a character upgrade – like Cling Grip or Clawline – it’s saved automatically as if you’d rested at a checkpoint.
It’s a good idea to unlock the Widow Bench before attempting this boss, as it’s unlikely you’ll beat it on your first try. Fortunately, the walk back after failing is quick, so you won’t waste much time.
Activate the fourth bell, then return to Bellhart. While you’re there, improve your Needle, trade in your relics for rosaries, and unlock the Bell Beast station. Don’t skip these steps – they’re crucial!
Continue heading west, following the orange line, and go up through the next tall room. The fifth and final bell is located to your right.
Instead of continuing after Widow, you can take Sinner’s Road and defeat Phantom through the Mist. However, this route is very difficult and unpredictable unless you’re familiar with it.
Optional Extra Content for Smooth Progression
This step isn’t required, but it will significantly boost your strength and survivability. If you haven’t collected any Mask Shards, you can skip this section.
Start by unlocking the Bell Beast station located east of the fifth bell. Then, head west and carefully descend the large vertical room until you find the entrance guarded by an enemy that spits from the ceiling. Go through the entrance, and break the wall located directly beneath the doorway to find your third Mask Shard.
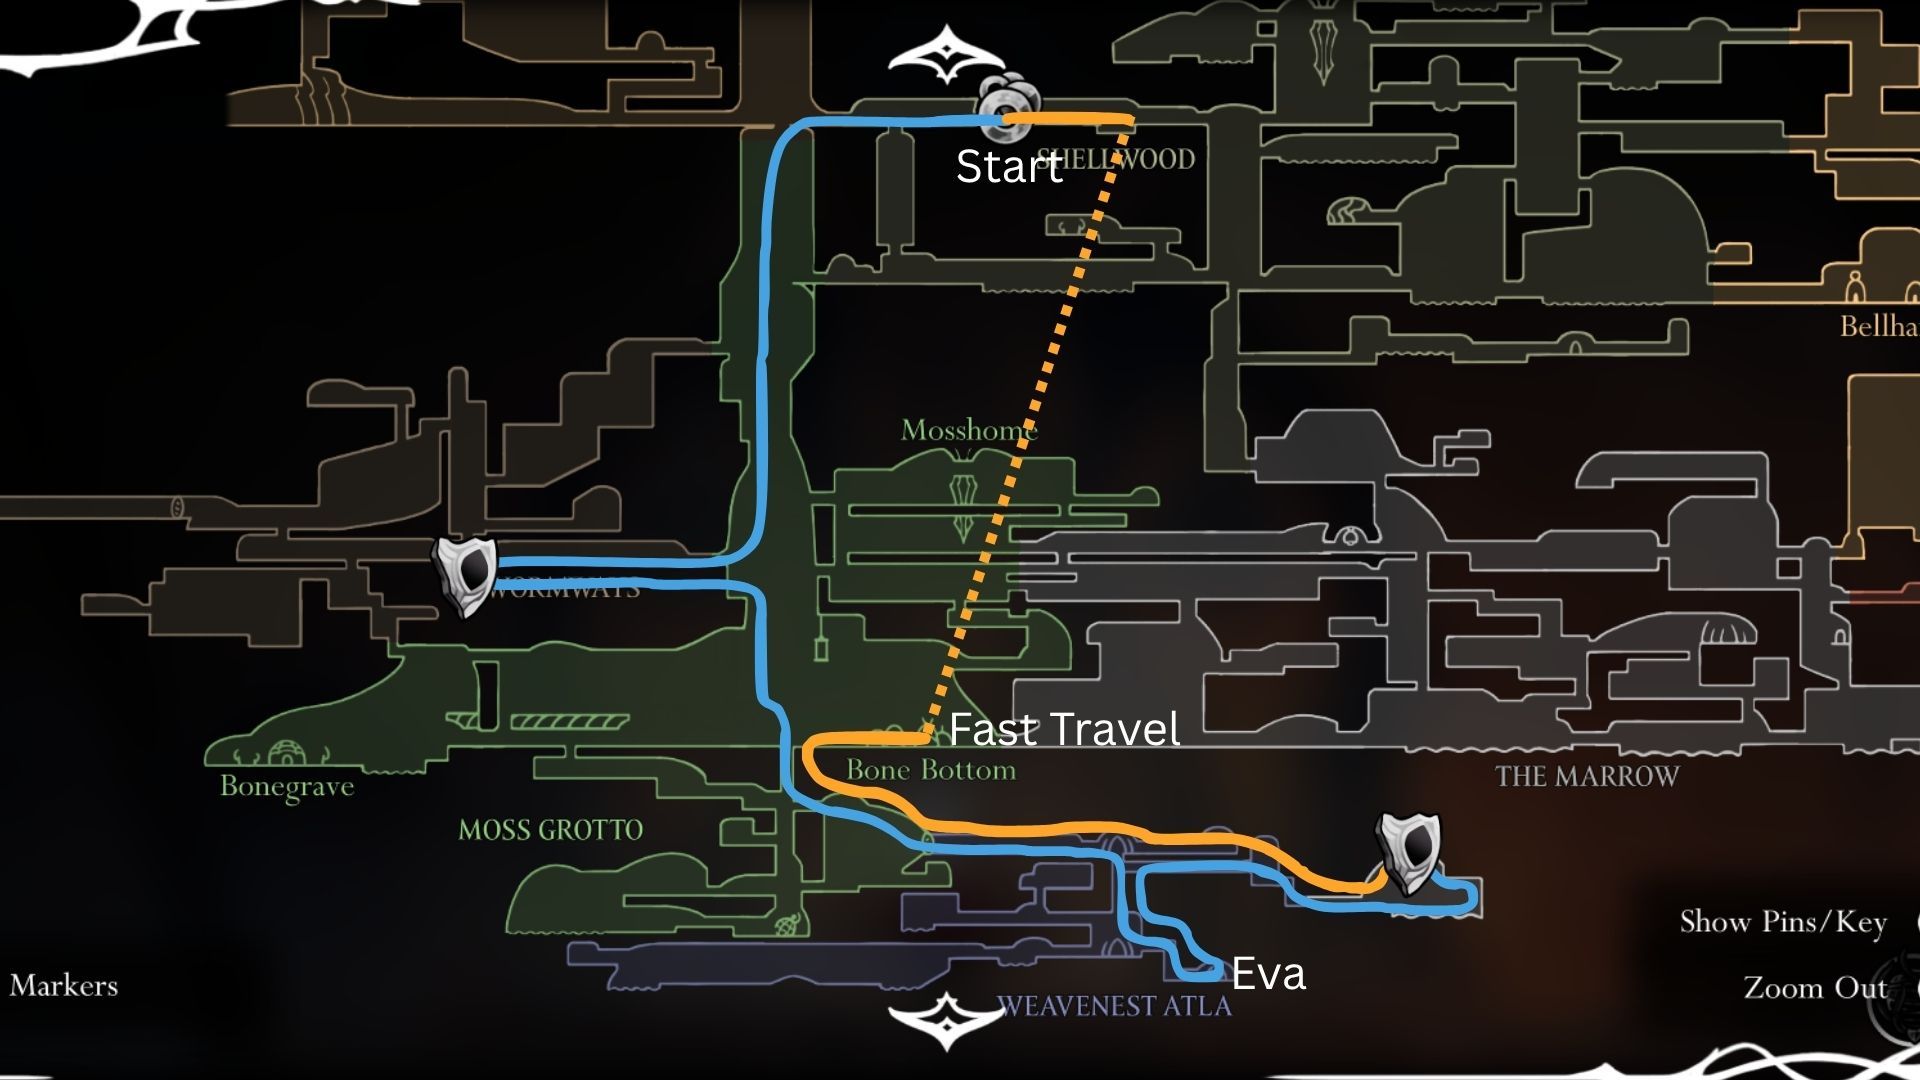
Go all the way back down into the Moss Grotto and open the Needolin door to reach Weavenest Atla. Activate the light platform, then head east to find Eva. She can upgrade your Hunter Crest, which will give you a significant 20% power increase when it’s fully charged.
Return to the shaft, climb upwards, and then head east into the lava room. Bounce off the flying enemies inside to get the last piece of the Run Mask. With all six Mask pieces, your basic attack is now much stronger!
Head back up to Bone Bottom, and then take the bell beast to return to Shellwood.
Shellwood to the Choral Chambers
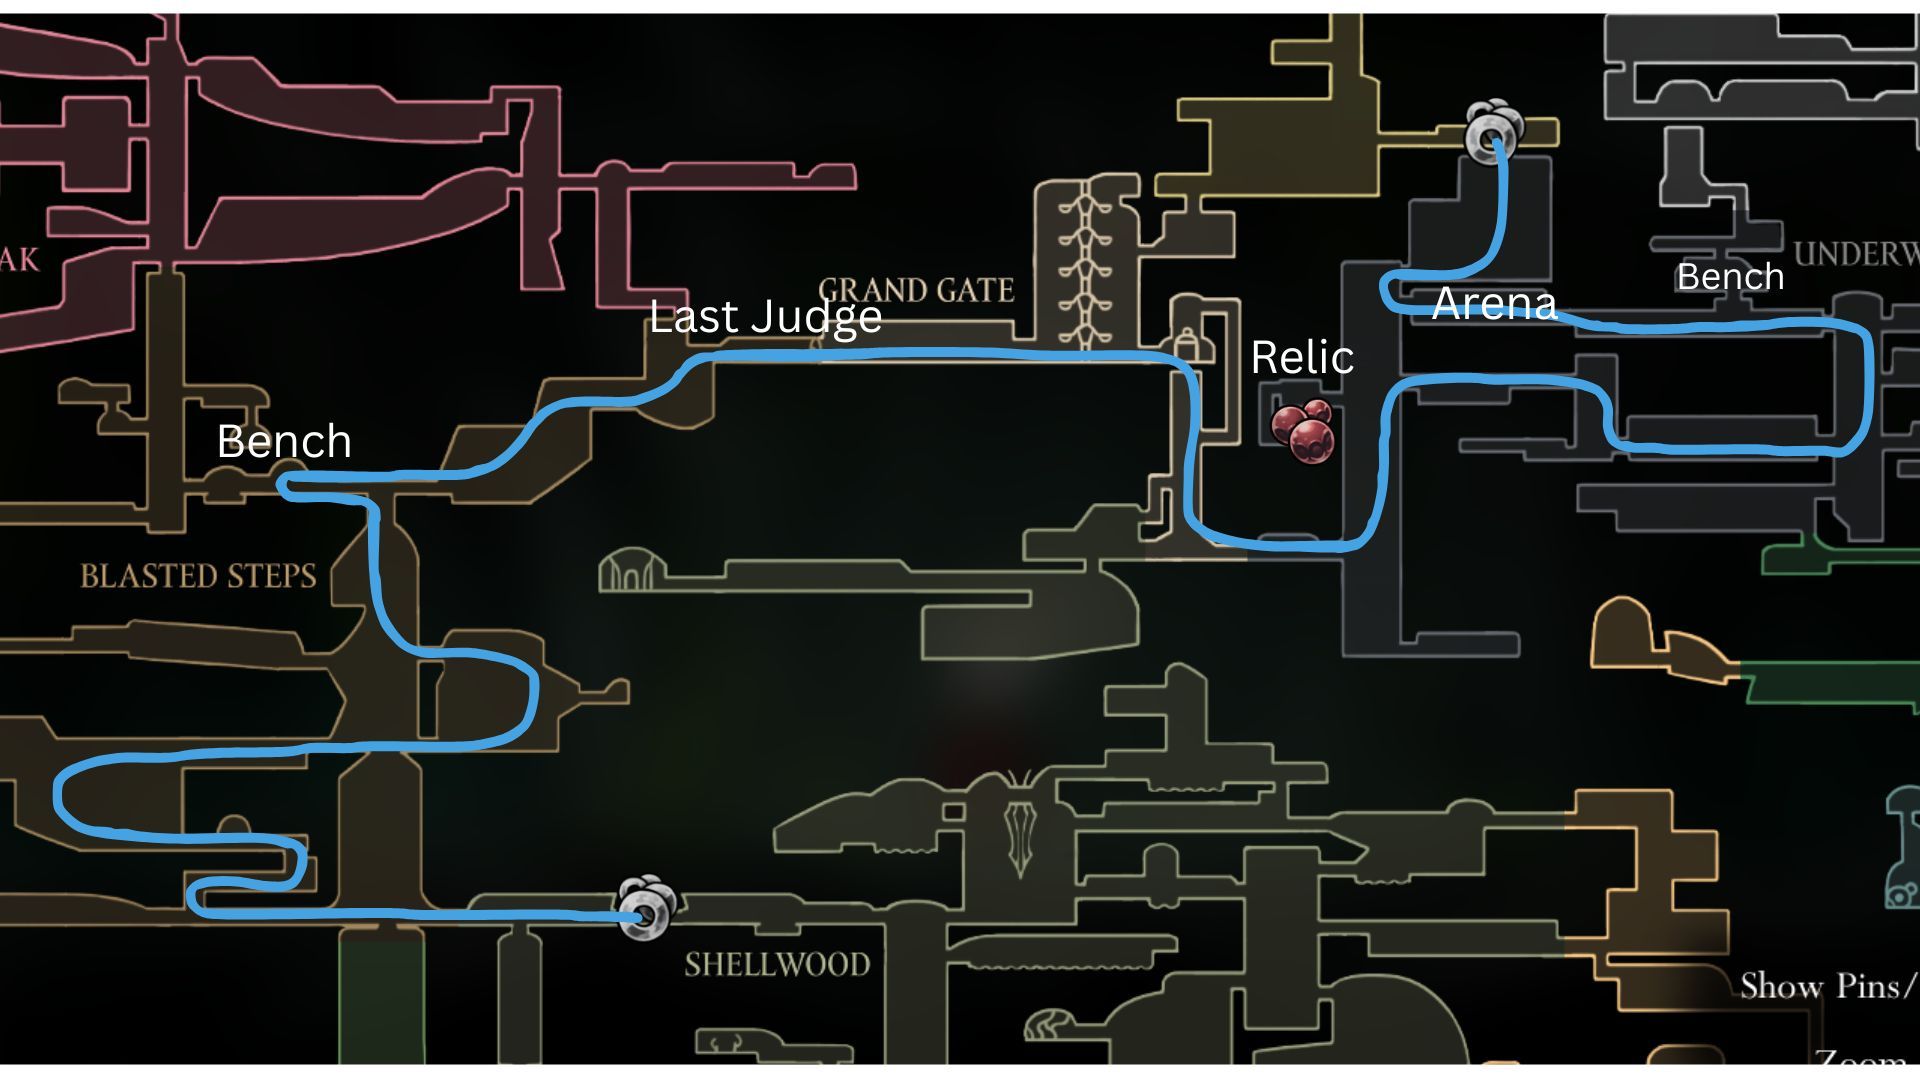
Alright, let’s tackle the Last Judge. It’s much simpler on a return visit, I promise! From Shellwood, head west into the Blasted Steps. Just follow the blue line as it climbs upwards until you get to the bench and Fast Travel point. You’ll find a Memory Locket and some Craftmetal along the way, but don’t worry too much about collecting those right now.
Take a break and then travel east to the area. If you haven’t obtained the Magma Bell, the attacks will be quite strong, so stay far away from the boss. Focus on building up Hunter Crest stacks, and you’ll defeat it quickly.
Enter through the Grand Gate and go down into the Underworks. In the first large chamber, look for a passageway on the left wall where you’ll find a Bone Scroll. Next, head east, then up and back west until you reach the room just before the Arena. In the room above, you can purchase a bench. Continue through the Arena and go up into the Choral Chambers.
Choral Chambers to the Grand Bellway
Once inside the Chambers, head west and then go up until you find the locked door. Continue all the way east to find Lace. After speaking with Lace, enemies will start appearing, but don’t worry about fighting them – just go straight up to the exit at the top right.
Okay, so you just keep going east and you’ll hit this huge room where you need to climb again. There’s this spinning circle thing, climb up that, then head east and you’ll get to Songclave. If you’re not feeling up to facing the Dancers, there’s a bell you can ring and a bench to sit on – it’s a good way to avoid them if you’re not confident!
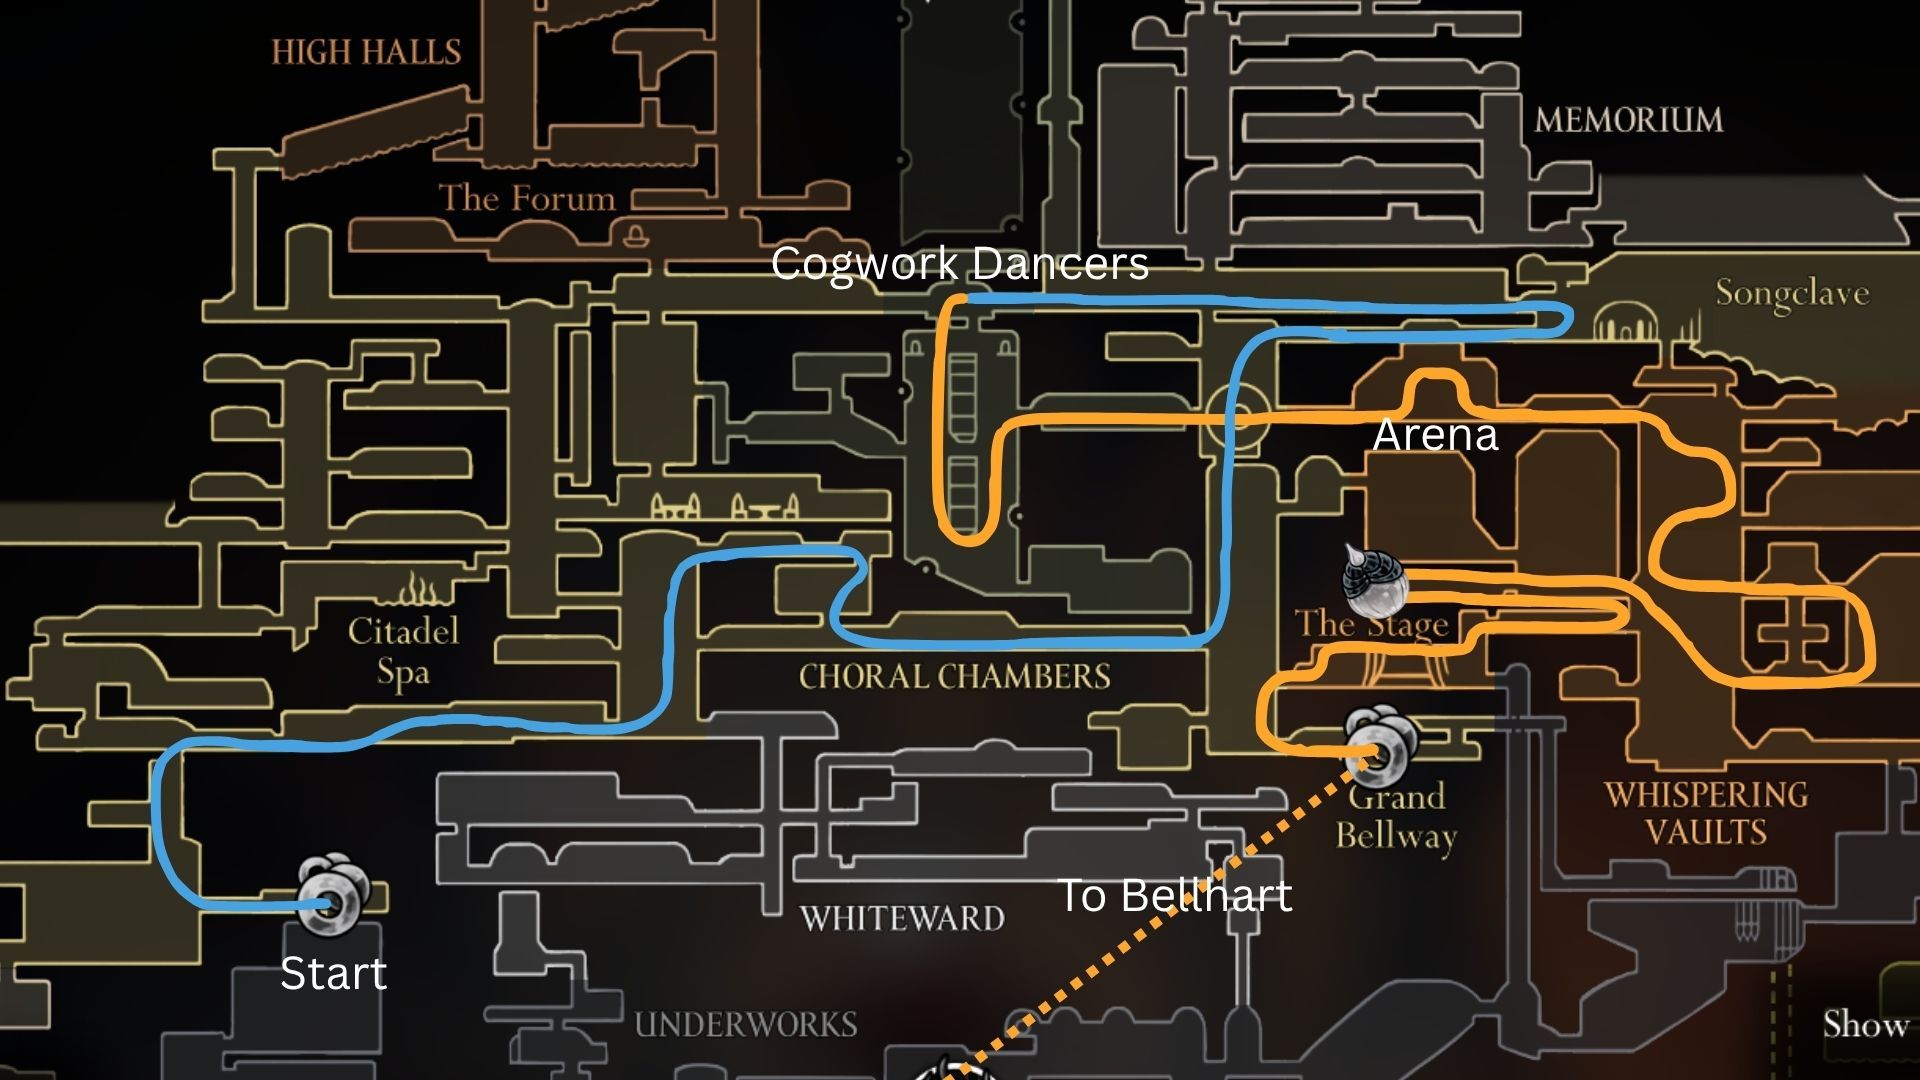
Once you’ve climbed up, go west to reach the boss arena. It’s a fairly simple fight, especially if you’re wearing the Evolved Hunter’s Crest, which will help you avoid taking much damage.
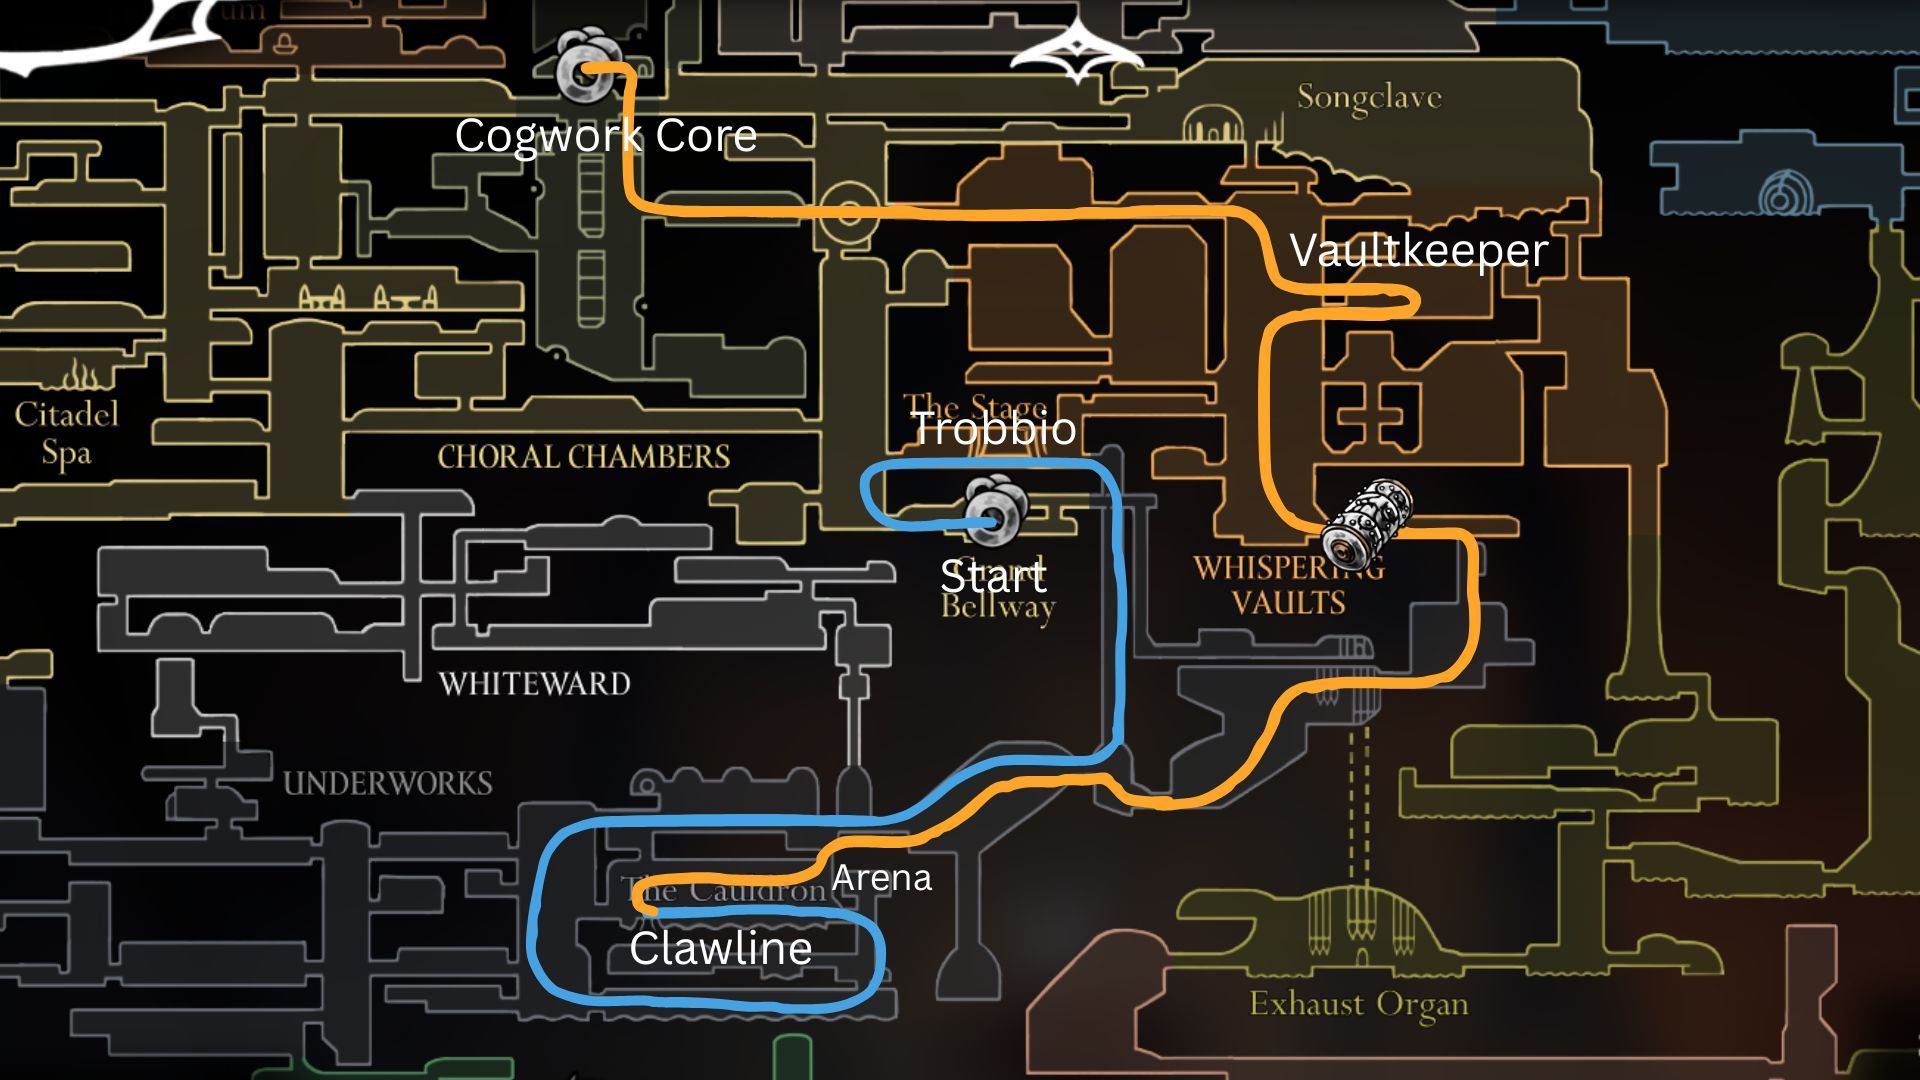
Continue along the orange line, descending into the Cogwork Core and then heading east through the rotating circle. You’ll encounter another Arena battle when you reach the Whispering Vaults.
Next, go down into the tall, open area and circle around. You have the option to create a shortcut from below that you can use later. Then, head west, solve the sliding box puzzle, and grab the Pale Oil.
Return to the tall room and head for the exit on the west side, right below where you are. This will lead you over the stage supports, providing a faster route to the battle with Trobbio.
Before confronting him, first unlock the Bell Beast station. Then, return to Bellhart to submit your relic and improve your Needle. After that, go back to the Grand Bellway.
Grand Bellway to the Cogwork Core
You might hear that you have to go through Whiteward, but it’s often a big time waster.
Okay, let’s move on to Trobbio. Defeat that challenging enemy and then go down into the Underworks. At the very bottom of the elevator, head west to the area marked with a symbol – that’s where you’ll understand why we avoid Whiteward. Continue west, then down the next shaft until you reach the bottom. From there, turn right and carefully make your way through the lava section. Finally, head upwards to grab…
Take the Orange line, going beyond the Arena battle. Then, return the way you came, heading east until you reach the tall elevator shaft you used to descend. Underneath the elevator, you’ll find a path leading east, through some steam pipes, and ultimately upwards to the Sacred Psalm Cylinder.
Return to the Whispering Vaults and use the shortcut you previously unlocked to reach the Vaultkeepers. They will teach you the First Song. Once you have it, go back through the large rotating circle in the Choral Chambers and head up into the Cogwork Core. From there, take the door furthest to the east – it will lead you upwards.
Cogwork Core to the Final Song

Okay, so the Cogwork Core is tough! Seriously, take your time moving through it – you can lose a lot of progress if you rush and mess up. Luckily, my Clawline is perfect for bouncing around all those gears. Once you solve those rotating pillar puzzles, you finally get the Second Song – it’s so satisfying!
Use your glide to descend into the central area until you find the Dancer’s room. Then, head west, bypassing the large enemies, and go down into the southern chamber. Continue descending into the restaurant, then move west. When you enter the next room, head back upwards.
After you climb to the top, continue heading west and take a break on the bench at the end of the hallway. Now it’s time to go up to the High Halls. Ascend through both angled rooms until you reach a tall, vertical shaft. Use your glide ability to carefully descend, dodging the spikes and using your Clawline to open the way forward.
You’ll find a wall you can break open, revealing the Cogfly tool. There’s also a piece of Craftmetal nearby, which you can grab if you want, but it’s not necessary to proceed.
Alright everyone, it’s time to move on. Head to the bench near the Ventrica station and get ready for the High Halls Arena. This section is likely to be the hardest part of the run, as you’ll have very little health – only 5 or 6 points. But don’t stress too much! You can take up to an hour to carefully navigate this challenge and still finish with some time left over.
My main advice is to approach this fight cautiously and avoid rushing in. Use your Silkspear to effectively hit several enemies at once, and if needed, the Trobbio’s Claw Mirror can provide some healing. When facing the final Minibosses, try to position them both on the same side and then lure them into attacking. Ultimately, success comes down to practice and quick reflexes.
Once you’ve defeated the Arena, go on through to claim the Third Song. Hard part over!
High Halls to Grand Mother Silk
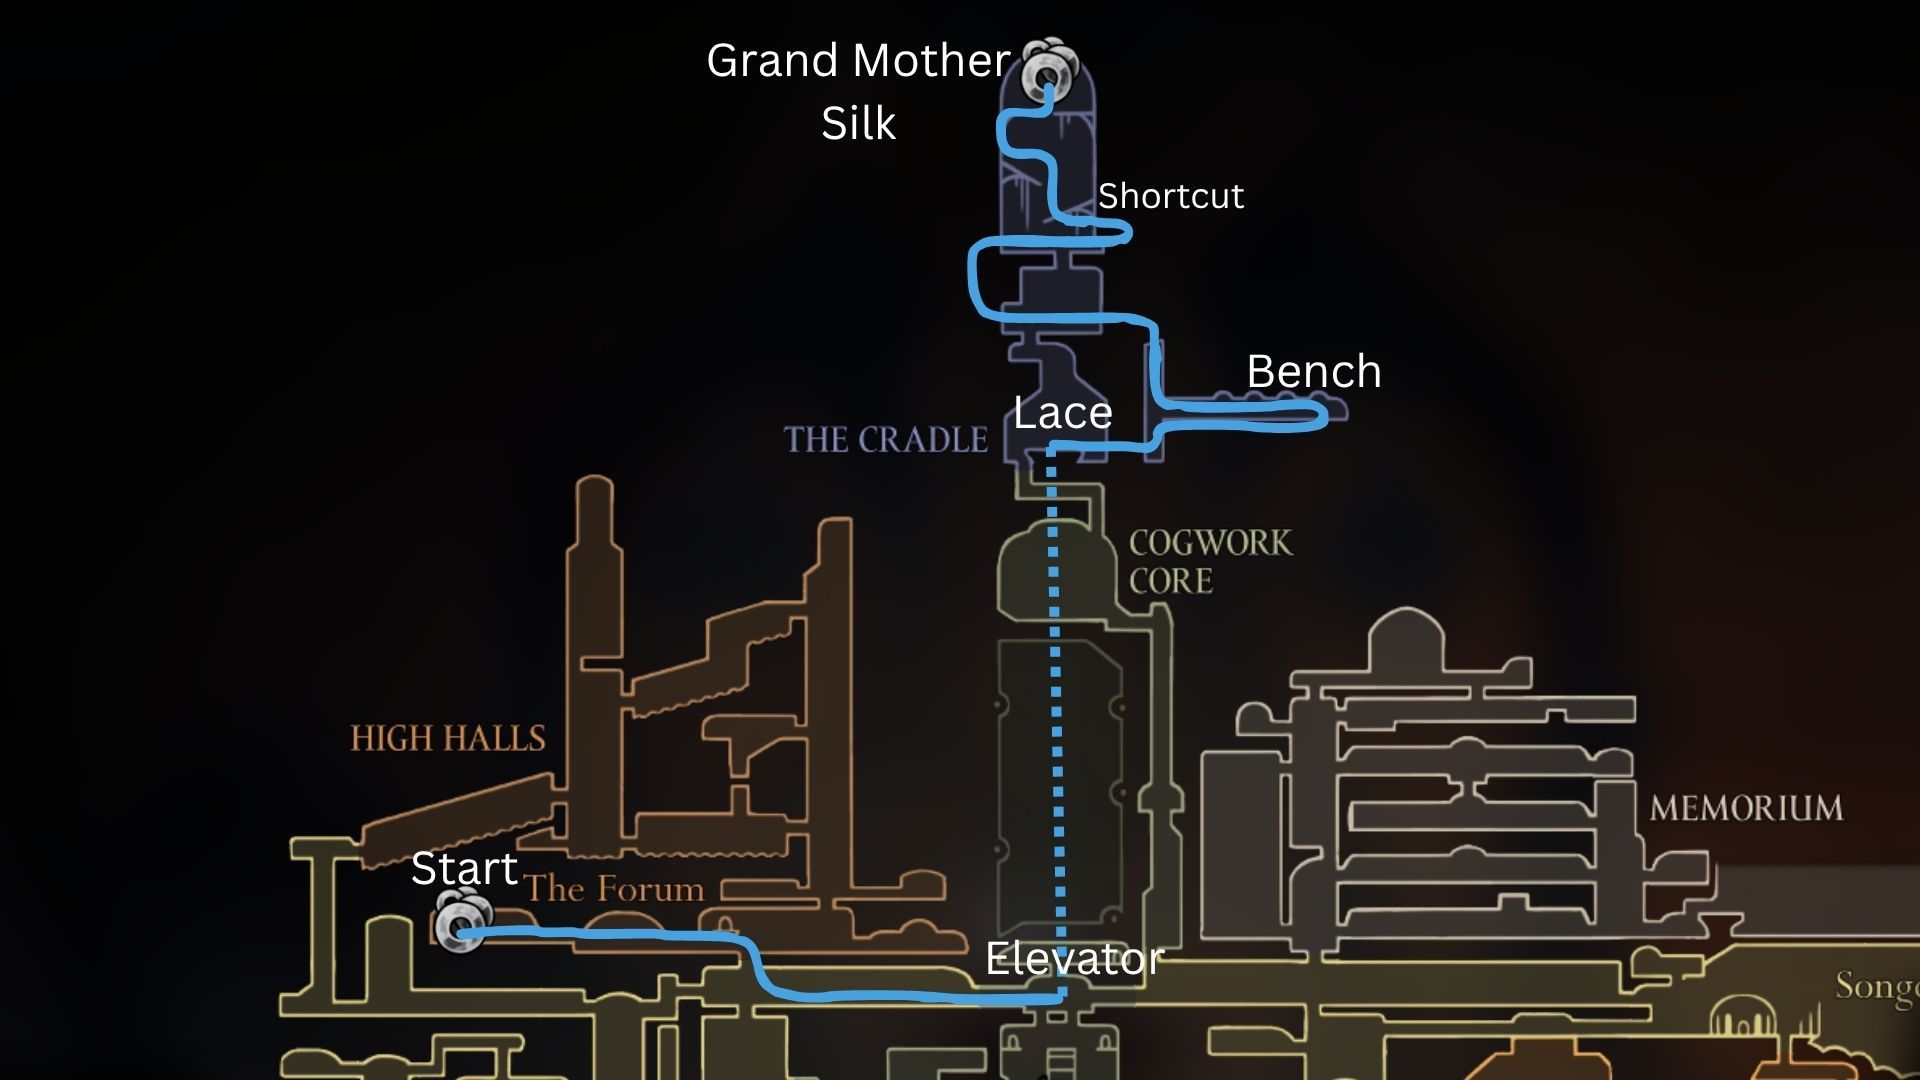
Go back to the long room and unlock the passage that leads down to the Choral Chambers. Then, go to the Dancer’s chamber and play the song – this will activate the elevator.
You can take a break on the bench in the western room before Lace’s battle. After that, go up to the Cradle. Surprisingly, I found this fight more challenging than the Arena one, because Lace is very mobile and deals a lot of damage.
Once the enemy is defeated, you’re free to proceed. Go east to the bench at Ventrica Station and then start climbing. Continue all the way to the left, then up again, until you reach the top room. You can unlock a shortcut back down to the Ventrica Bench if you like, but it’s probably not necessary right now.
You’re now ready for the last challenge. It will be much easier than the Arena and Lace – a simple task compared to those!
Amazing! You finished Silksong in under 5 hours – that’s a fantastic speedrun! You deserve to be really proud of yourself.
Now it’s time for Steel Soul! Are you ready?
Read More
- Console Gamers Can’t Escape Their Love For Sports Games
- Detroit: Become Human Has Crossed 15 Million Units Sold
- Deltarune Chapter 1 100% Walkthrough: Complete Guide to Secrets and Bosses
- 10 Best Indie Games With Infinite Replayability
- Top 8 UFC 5 Perks Every Fighter Should Use
- Top 10 Must-Watch Isekai Anime on Crunchyroll Revealed!
- Best PSP Spin-Off Games, Ranked
- Top 10 Scream-Inducing Forest Horror Games
- Multiplayer Games That Became Popular Years After Launch
- How to Unlock & Visit Town Square in Cookie Run: Kingdom
2025-11-13 16:44