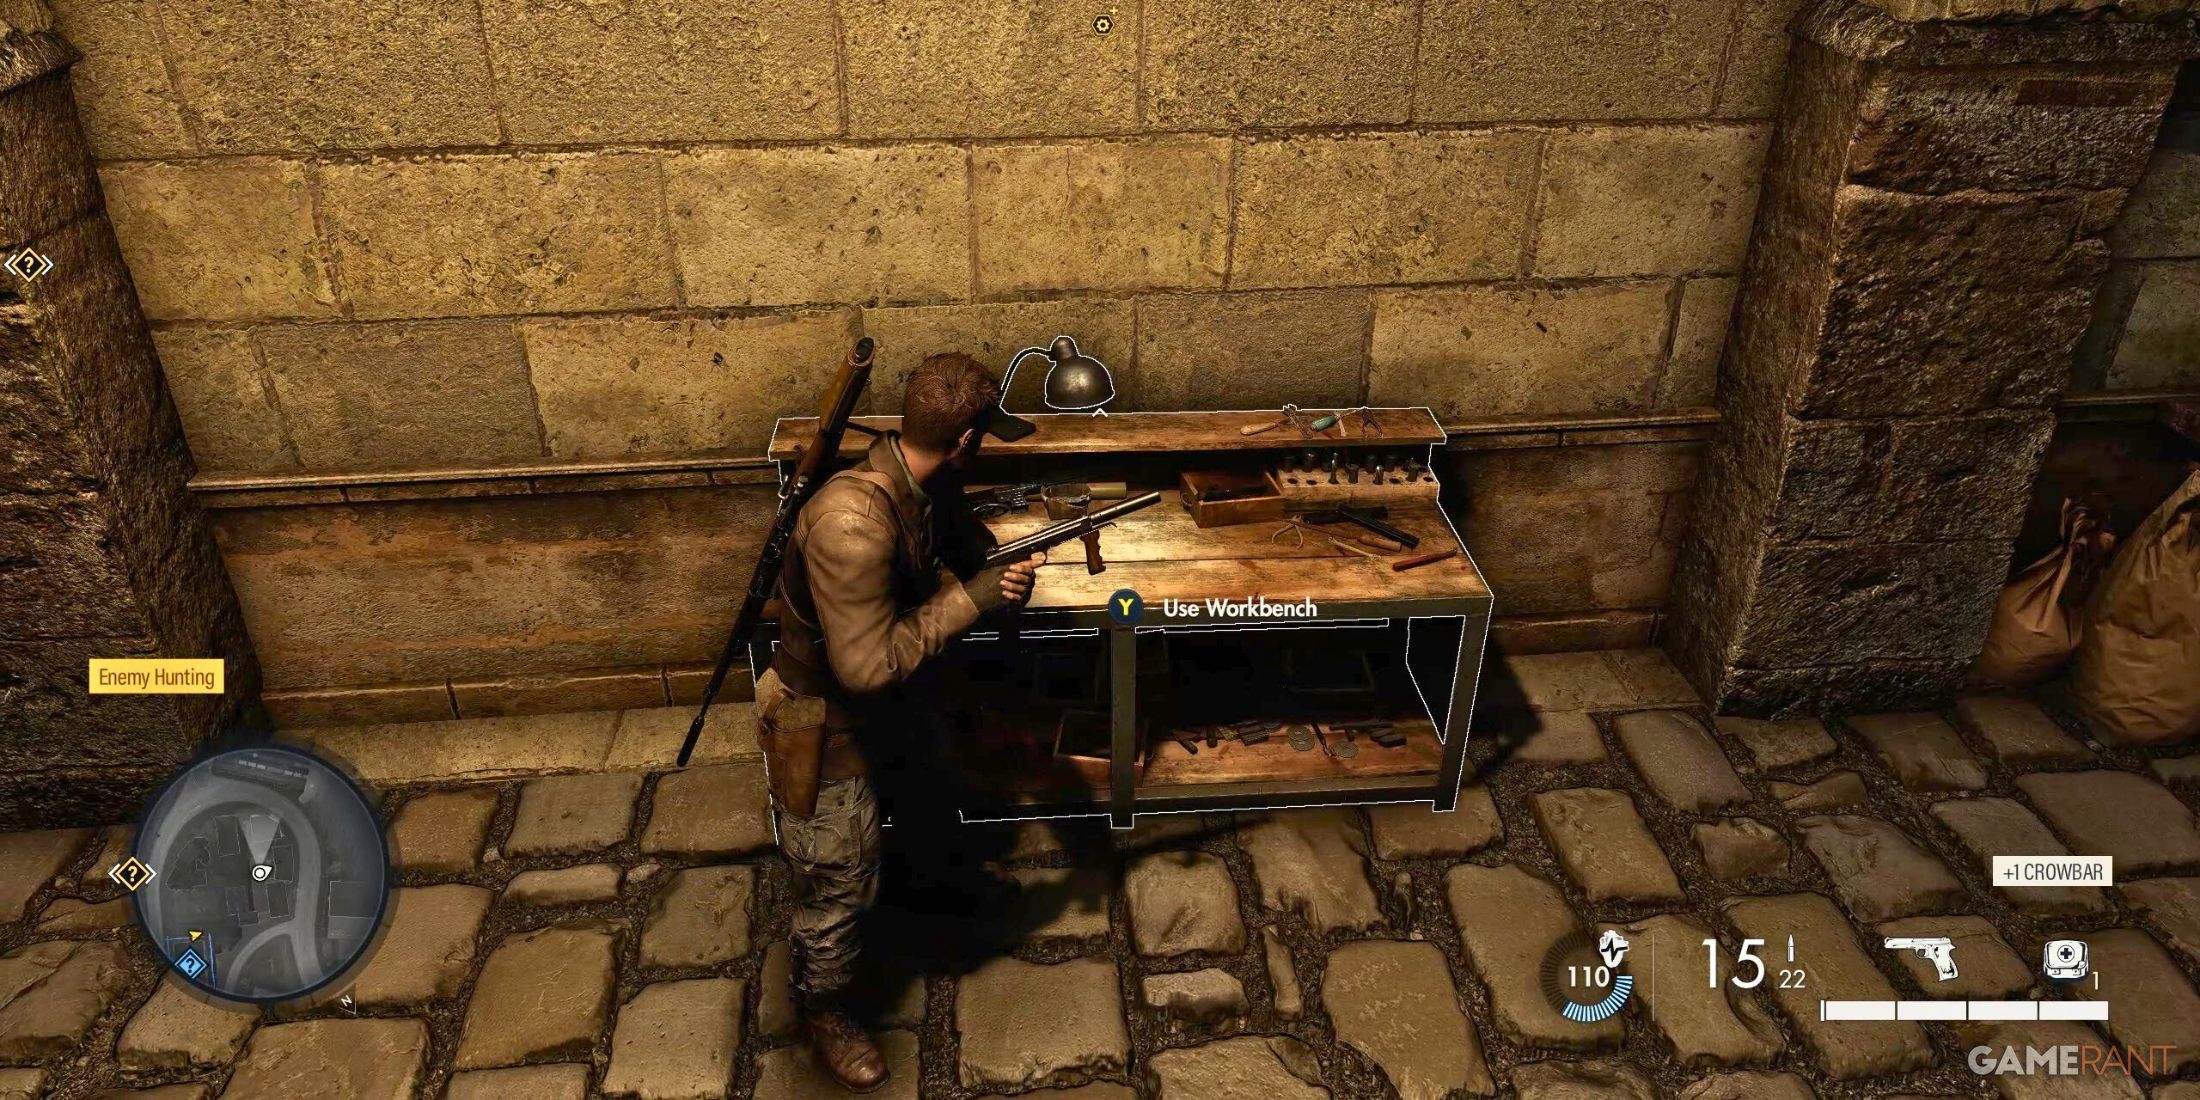
In Sniper Elite: Resistance, there are plenty of workstations where you can acquire a variety of new accessories. These enhancements can boost your magazine capacity, aid in handling, diminish recoil, and much more. Among the most beneficial ones are those that magnify your scope and minimize sound, which makes discovering them a useful tip for players.
If you aim to play Sniper Elite: Resistance at higher difficulty levels later, it would be beneficial to thoroughly understand the game’s stealth mechanics first. There are special challenges focused on stealth that will become accessible once specific Propaganda Posters are removed. Discovering all the workbenches can significantly enhance your gaming experience in Sniper Elite: Resistance.
What Are Workbenches in Sniper Elite: Resistance

The game may not have extensive character personalization options, but it compensates by offering intricate weapon customization. Initially, only one workbench is available for the opening mission, and none for the final main mission. However, throughout the game’s storyline, you will find three workbenches in each of the campaign missions, except for the first and last main missions.
For firearms, you’ve got one for rifles, another for backup weapons, and a third for handguns. Although the Trench Gun doesn’t function like a Submachine Gun (SMG), these workstations where you can upgrade your backup weapons are still commonly called SMG Workbenches. It’s crucial to remember that while these workbenches are essential, players shouldn’t overlook acquiring the necessary skills as well.
To aid readers in finding the maps more conveniently, images featuring Workbench Icons have been included for each map.
Workbench Locations for Behind Enemy Lines
Pistol Workbench
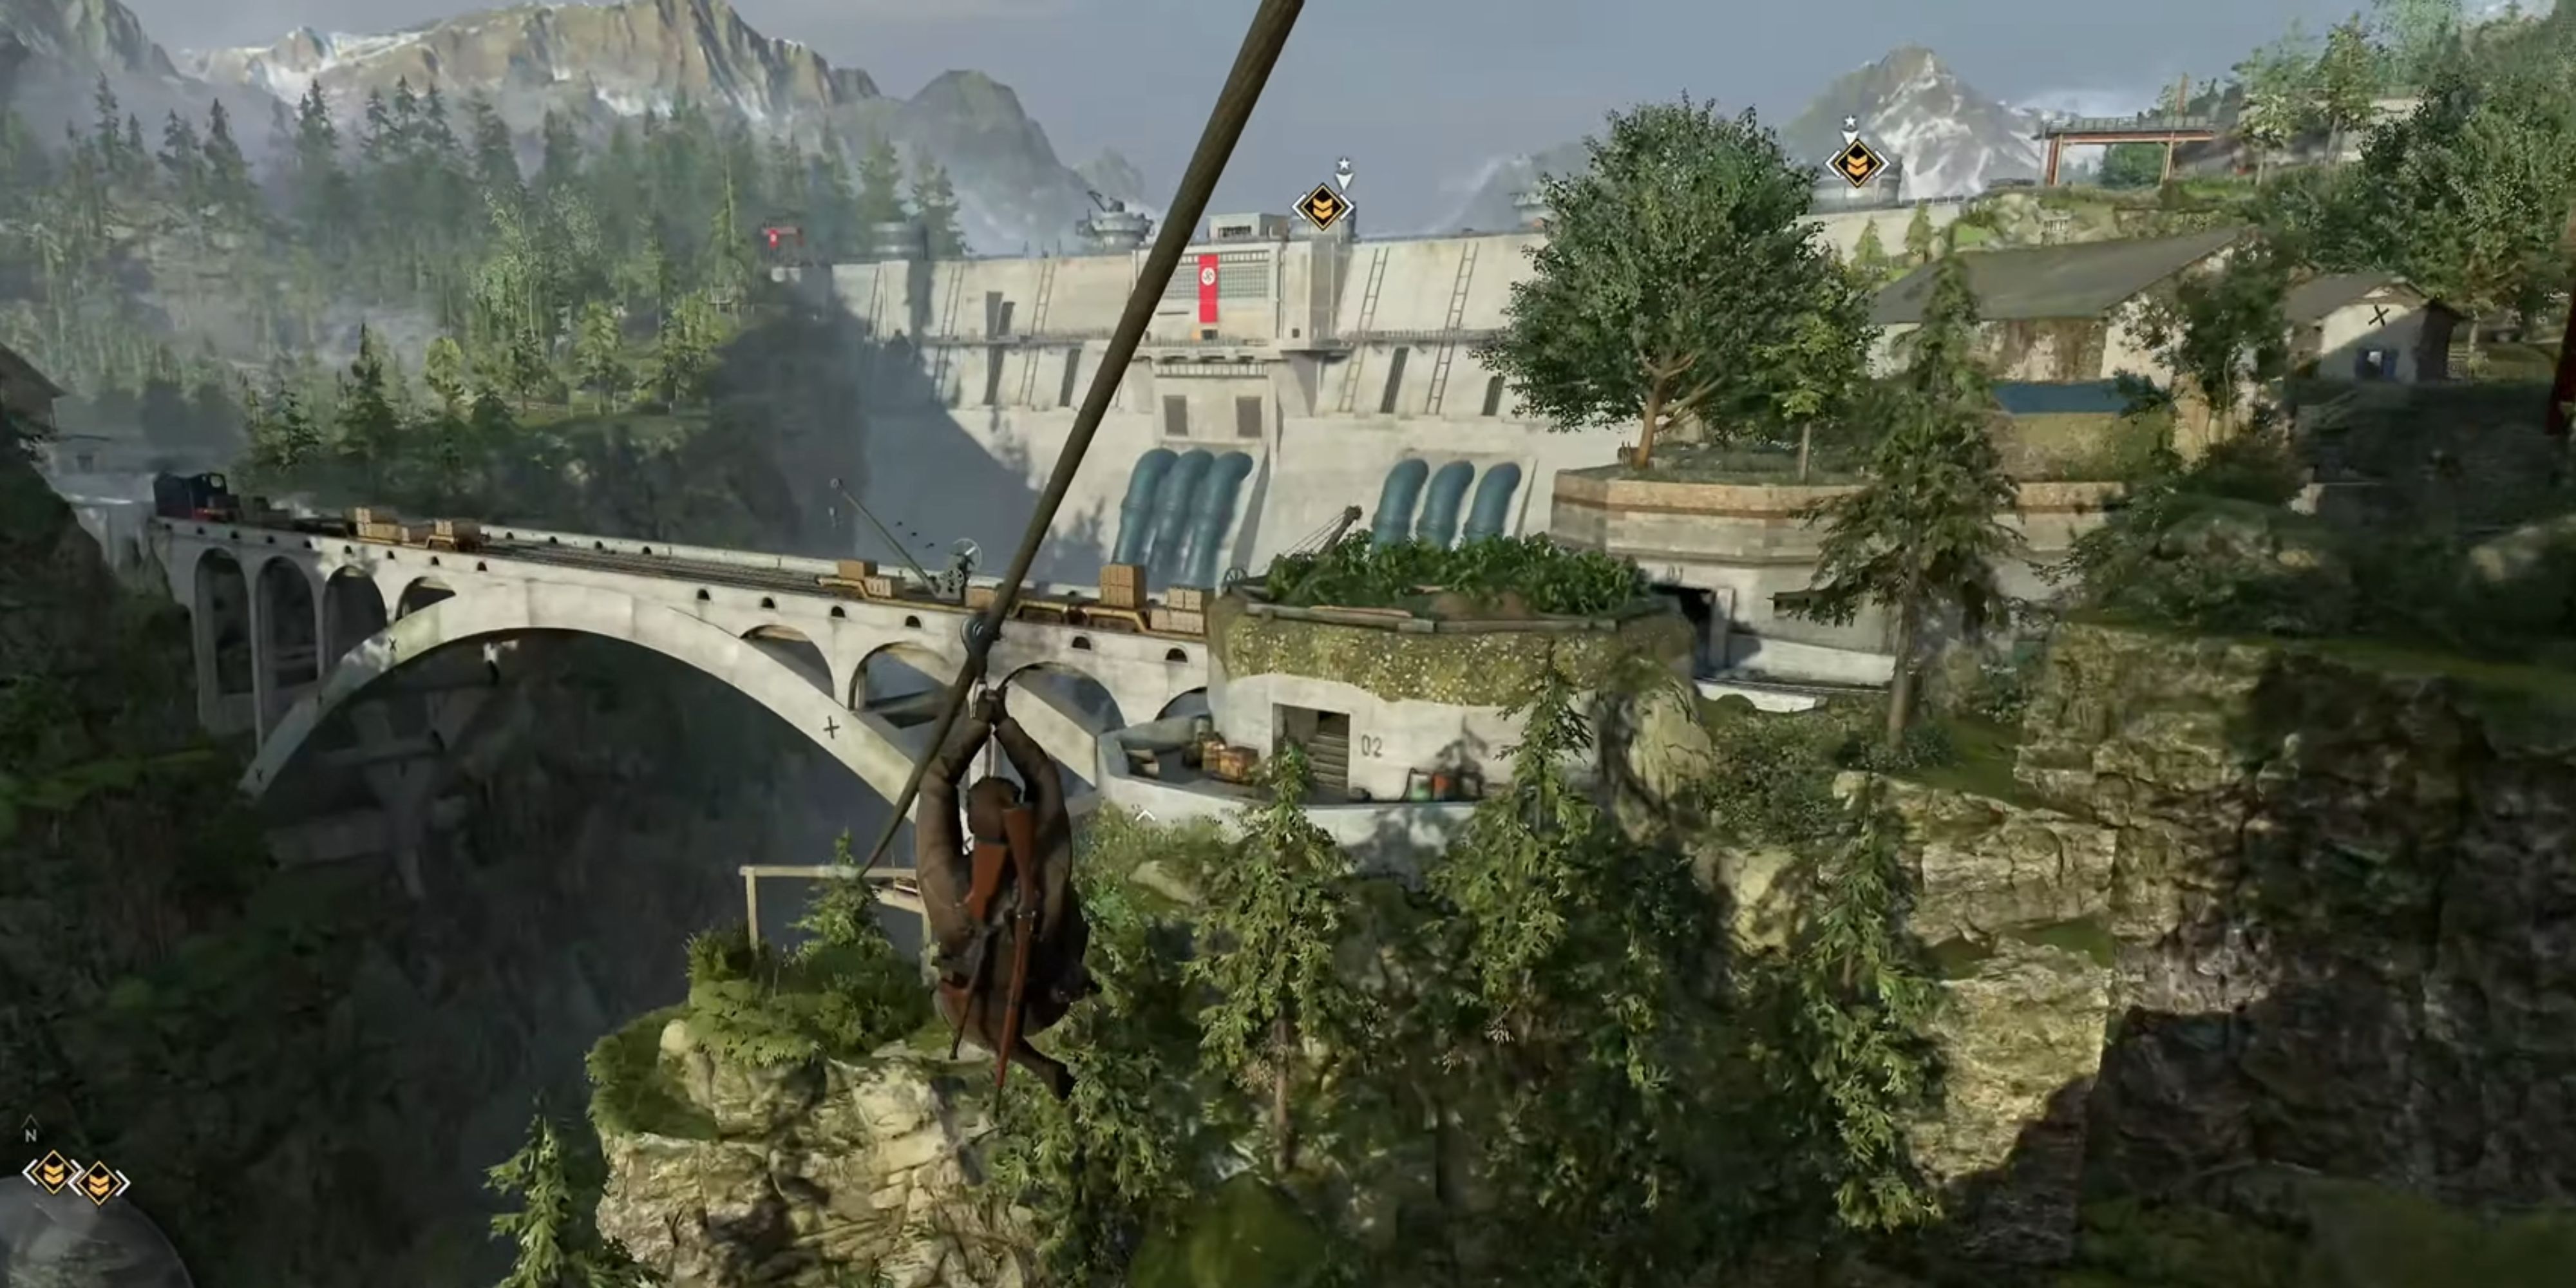
You’ll find just one workbench in this area. To get there, players first move from their starting point and slide along a zipline towards an adversary beneath the bridge. Following that, they must navigate through several locations by climbing up.
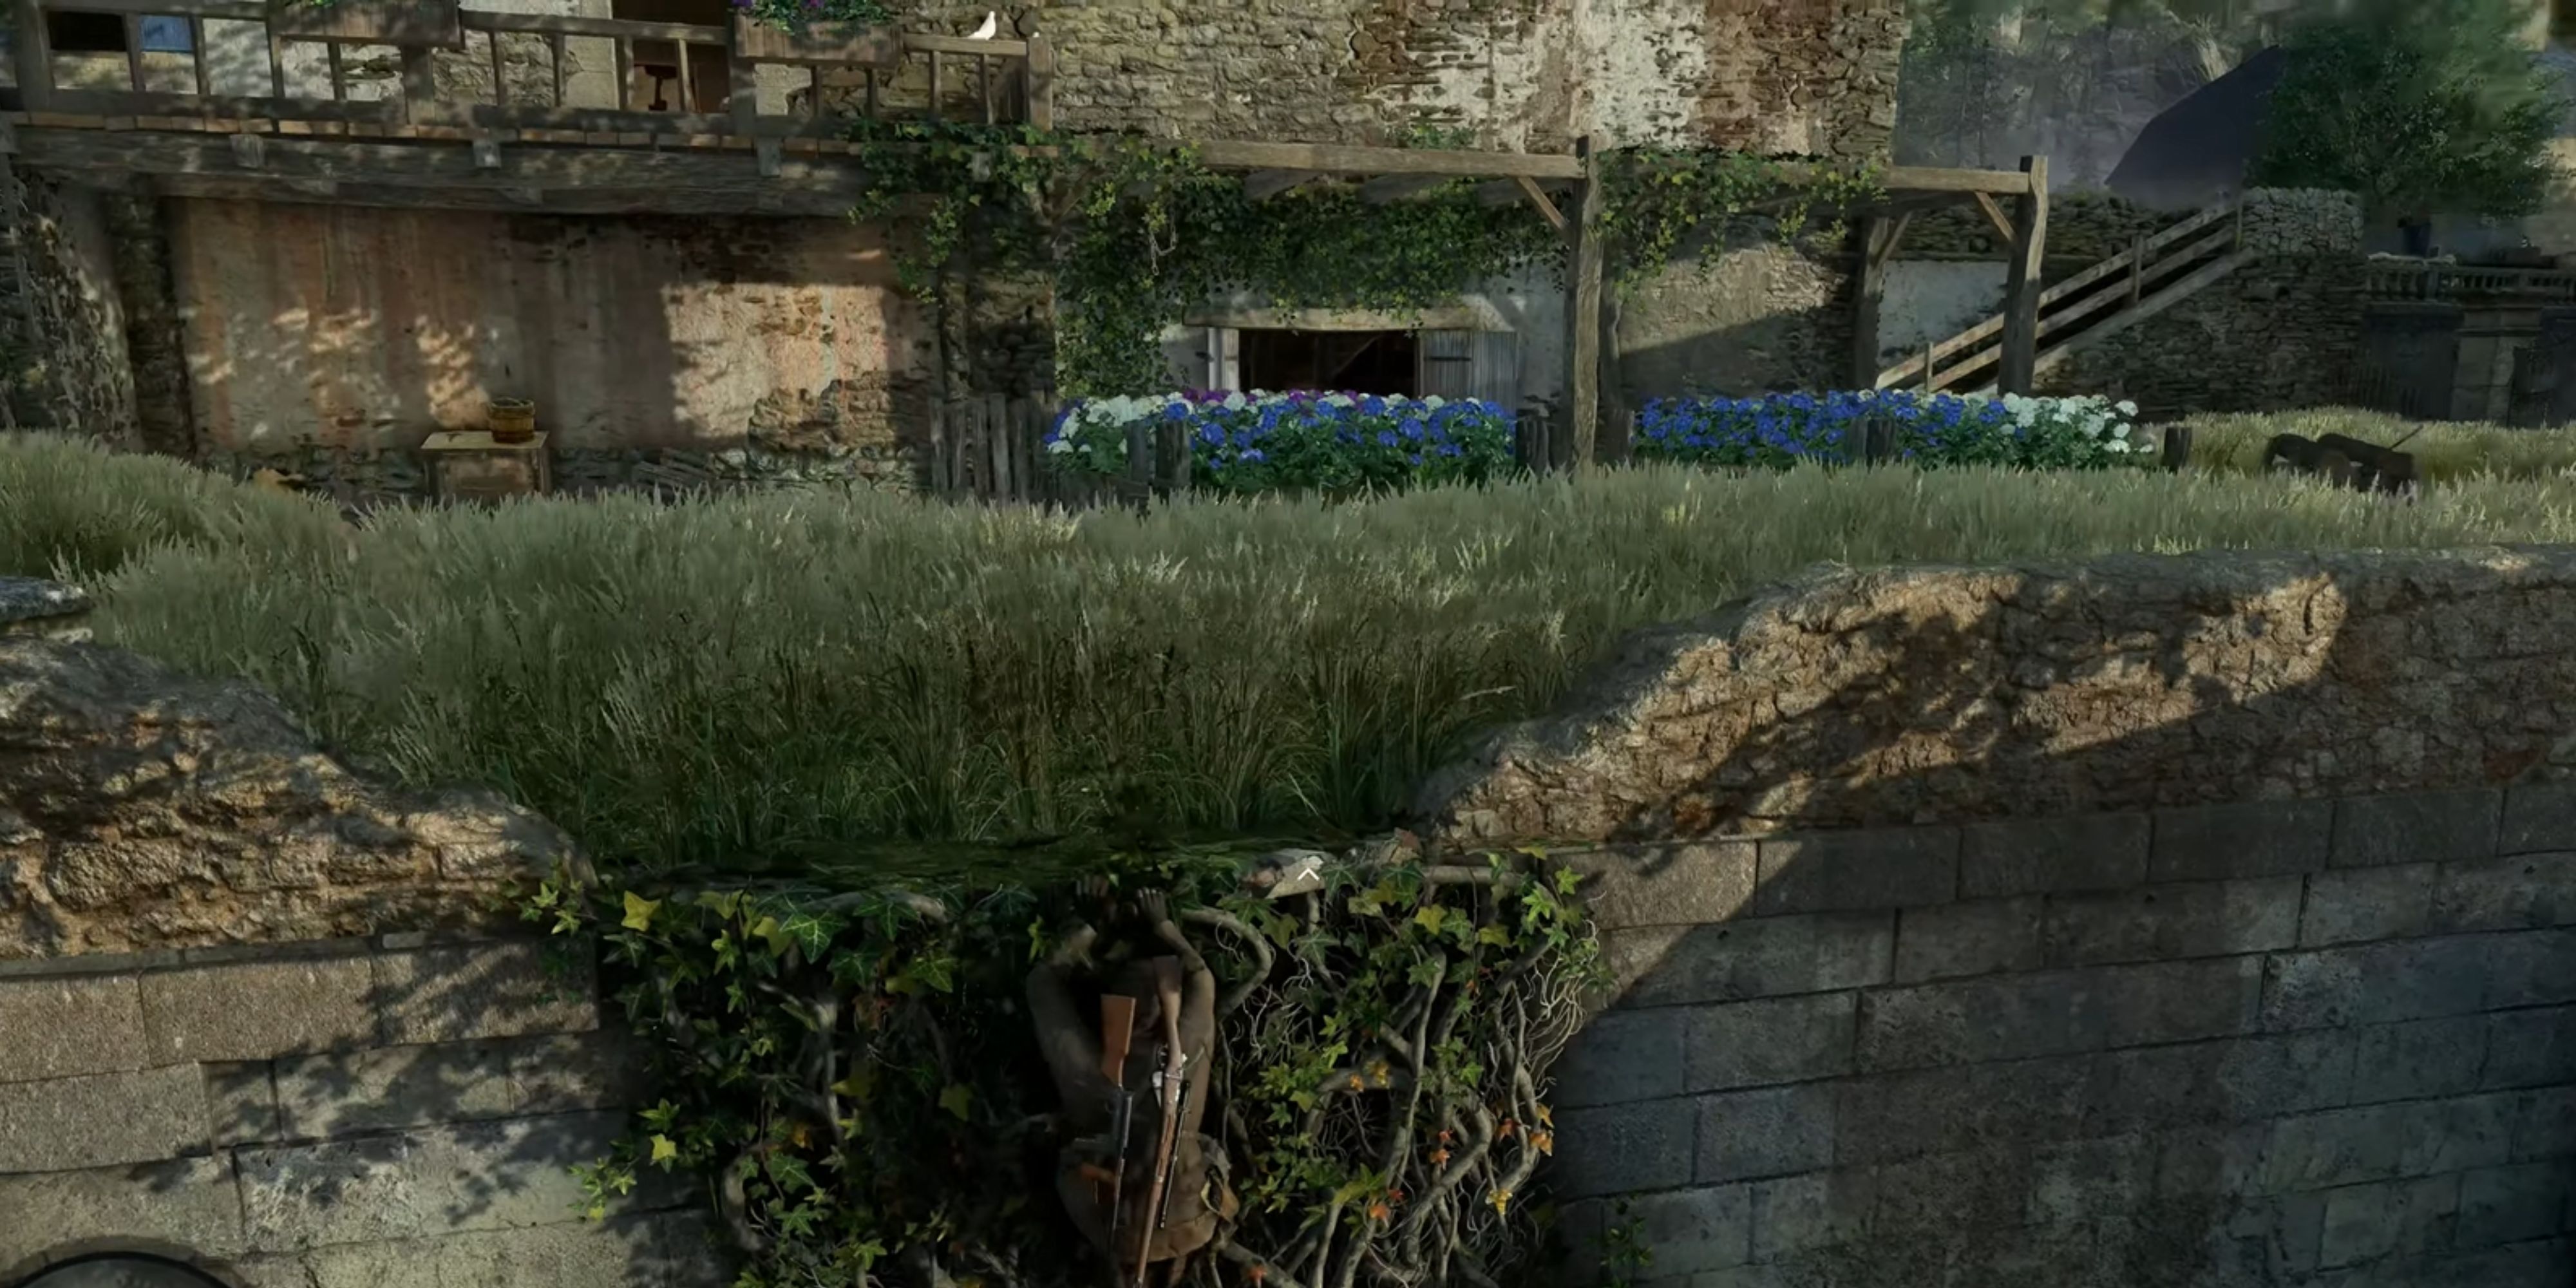
As soon as characters ascend to the initial area with towering grass in the game, they’ll spot a house straight ahead. Enter via the open entrance, then veer left to discover boards blocking the doorframe. Remove these boards to uncover the workbench within the room.
Instead of featuring one expansive, open-world environment for third-person shooting, the game employs multiple compact maps. Consequently, players must restart their missions if they fail to secure all workbenches prior to extraction, as these serve as important starting points.
Workbench Locations for Dead Drop
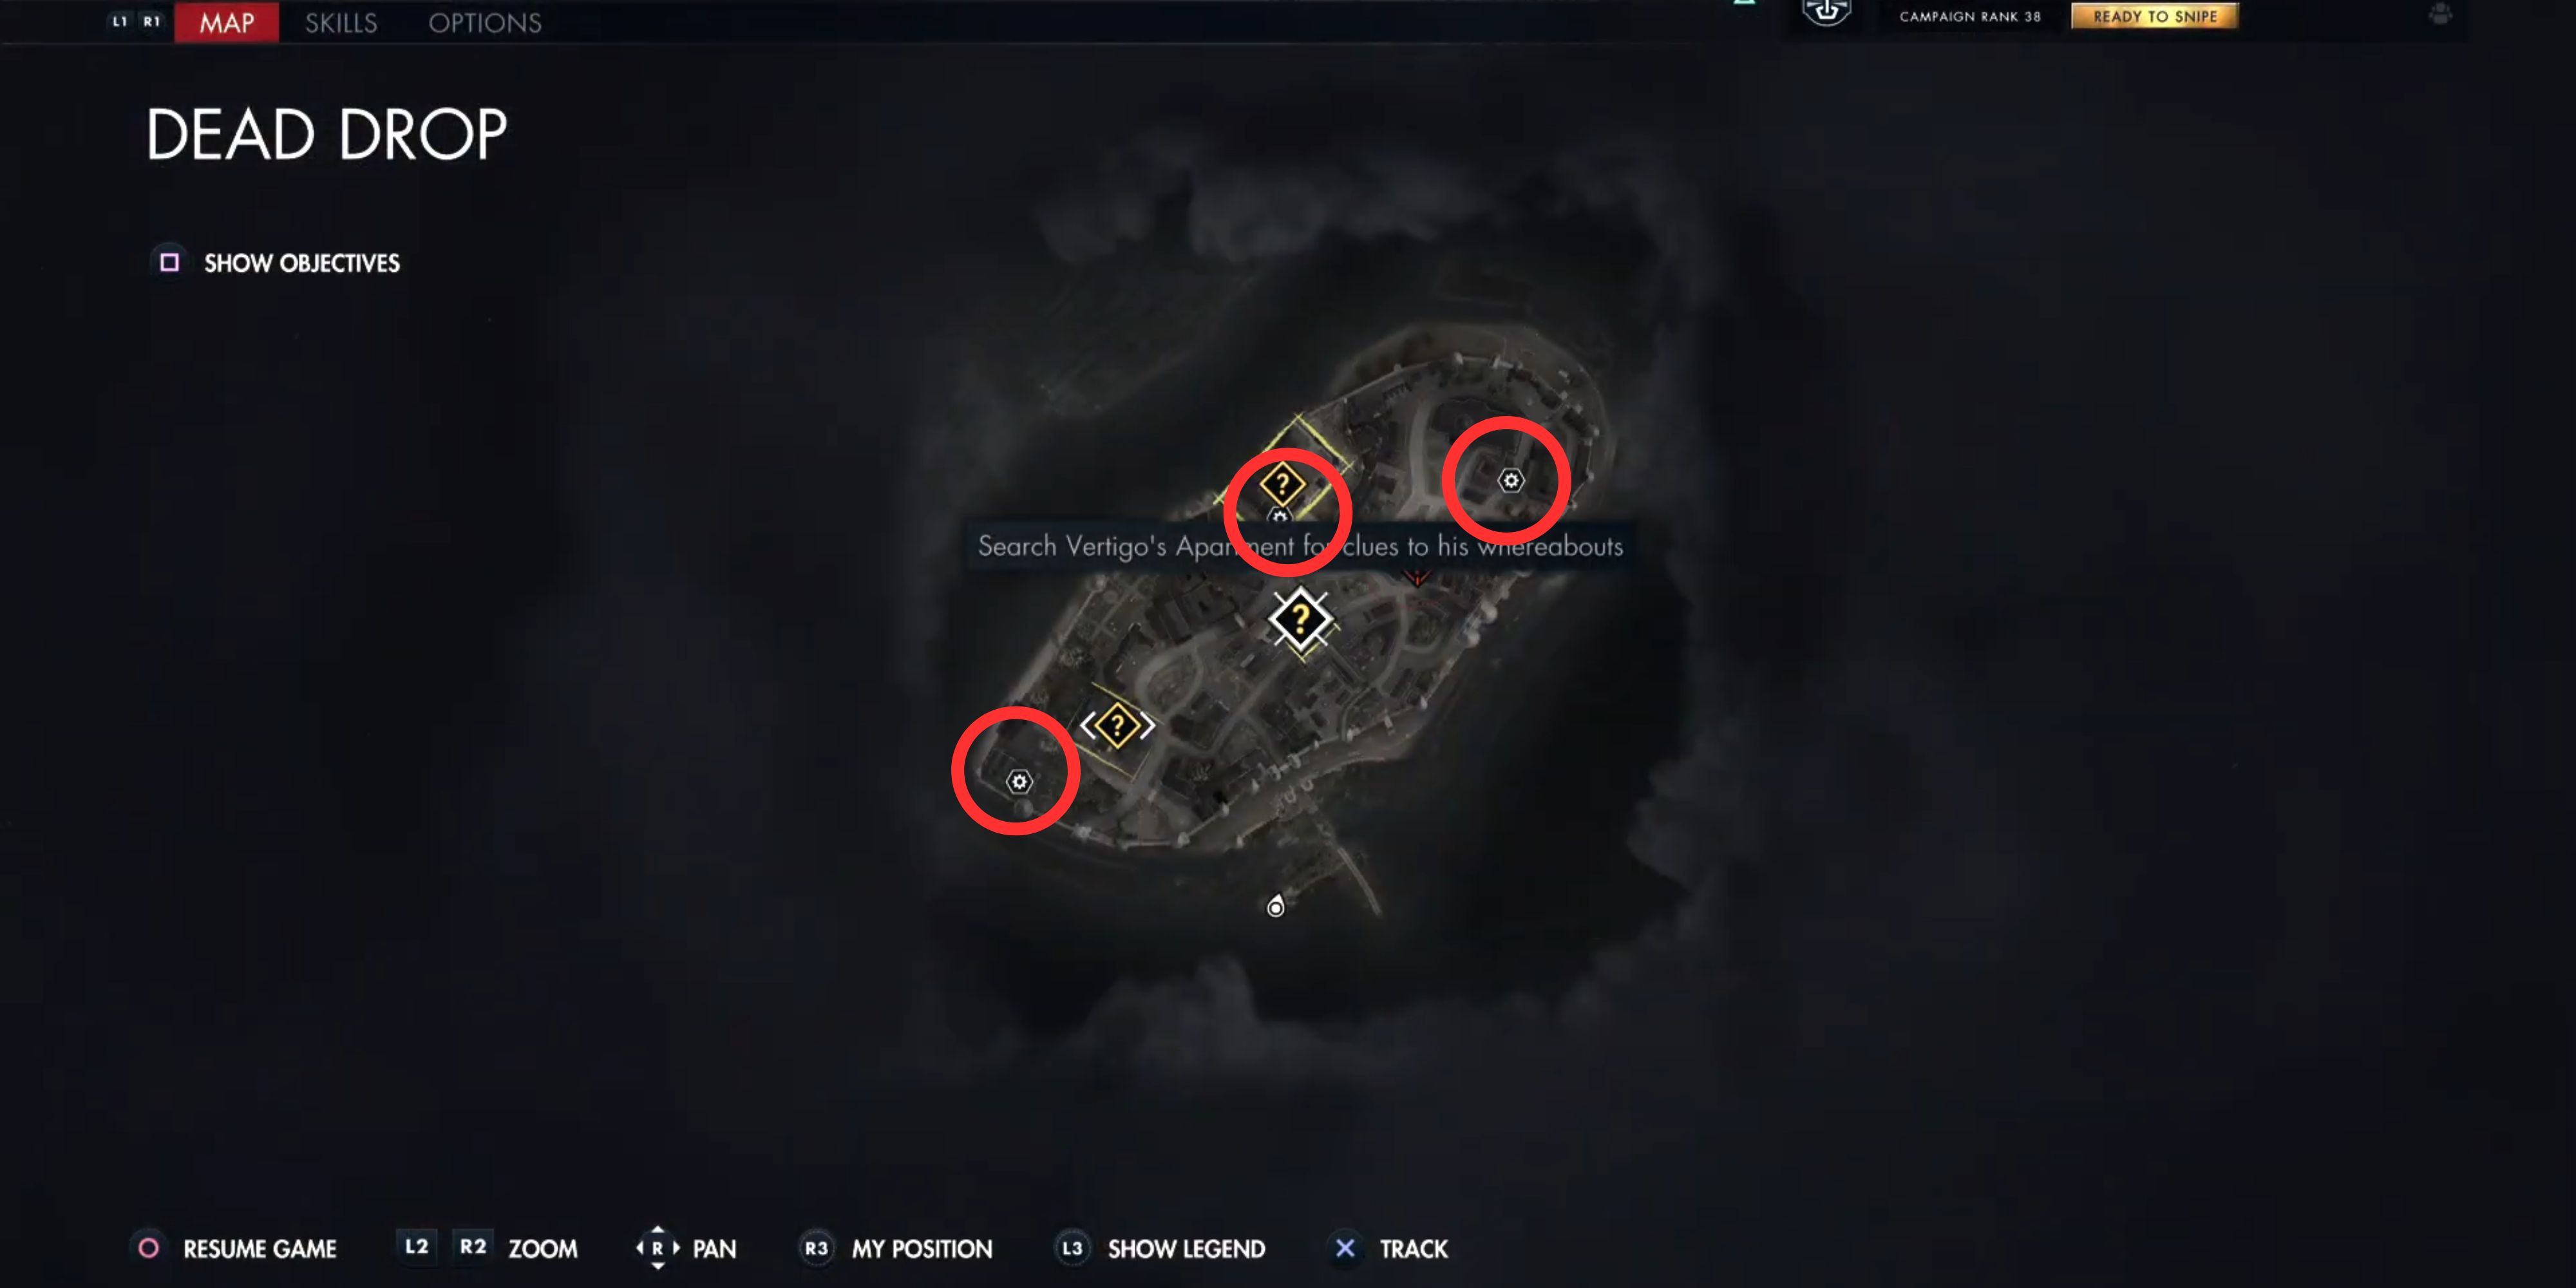
Rifle Workbench
You’ll discover the Rifle Workstation near the western-most workbench icon on your map. It’s located at a higher elevation and is reachable by either climbing the stairs or leaping over some crates. Upon reaching the top, you’ll find the workbench in the room behind a locked gate. This workbench offers players their initial Rifle Silencer, an ideal addition for maintaining stealth.
SMG Workbench
As an enthusiast, I navigate straight towards the central point on the map, where the distinctive workbench icon for my SMG lies. This workbench is tucked away within a room that can be entered by skillfully picking the locks on either gate.
Pistol Workbench
The Pistol Workbench is situated at the upper-right part of the map. To reach it, players should navigate towards the upper-right corner and follow the map edge. Along the way, they’ll come across a staircase that leads under the building where the Workbench symbol appears. Simply put, go to the top right, then run down alongside the border, and you’ll find stairs leading to the Workbench beneath the indicated building.
Delve into the mystery hidden beneath the staircase’s foot, where a secret gate awaits. Unlocking it, I discovered the room adorned with a crafty workbench – a treasure worth unearthing in Mission 2.
Workbench Locations for Sonderzuge Sabotage
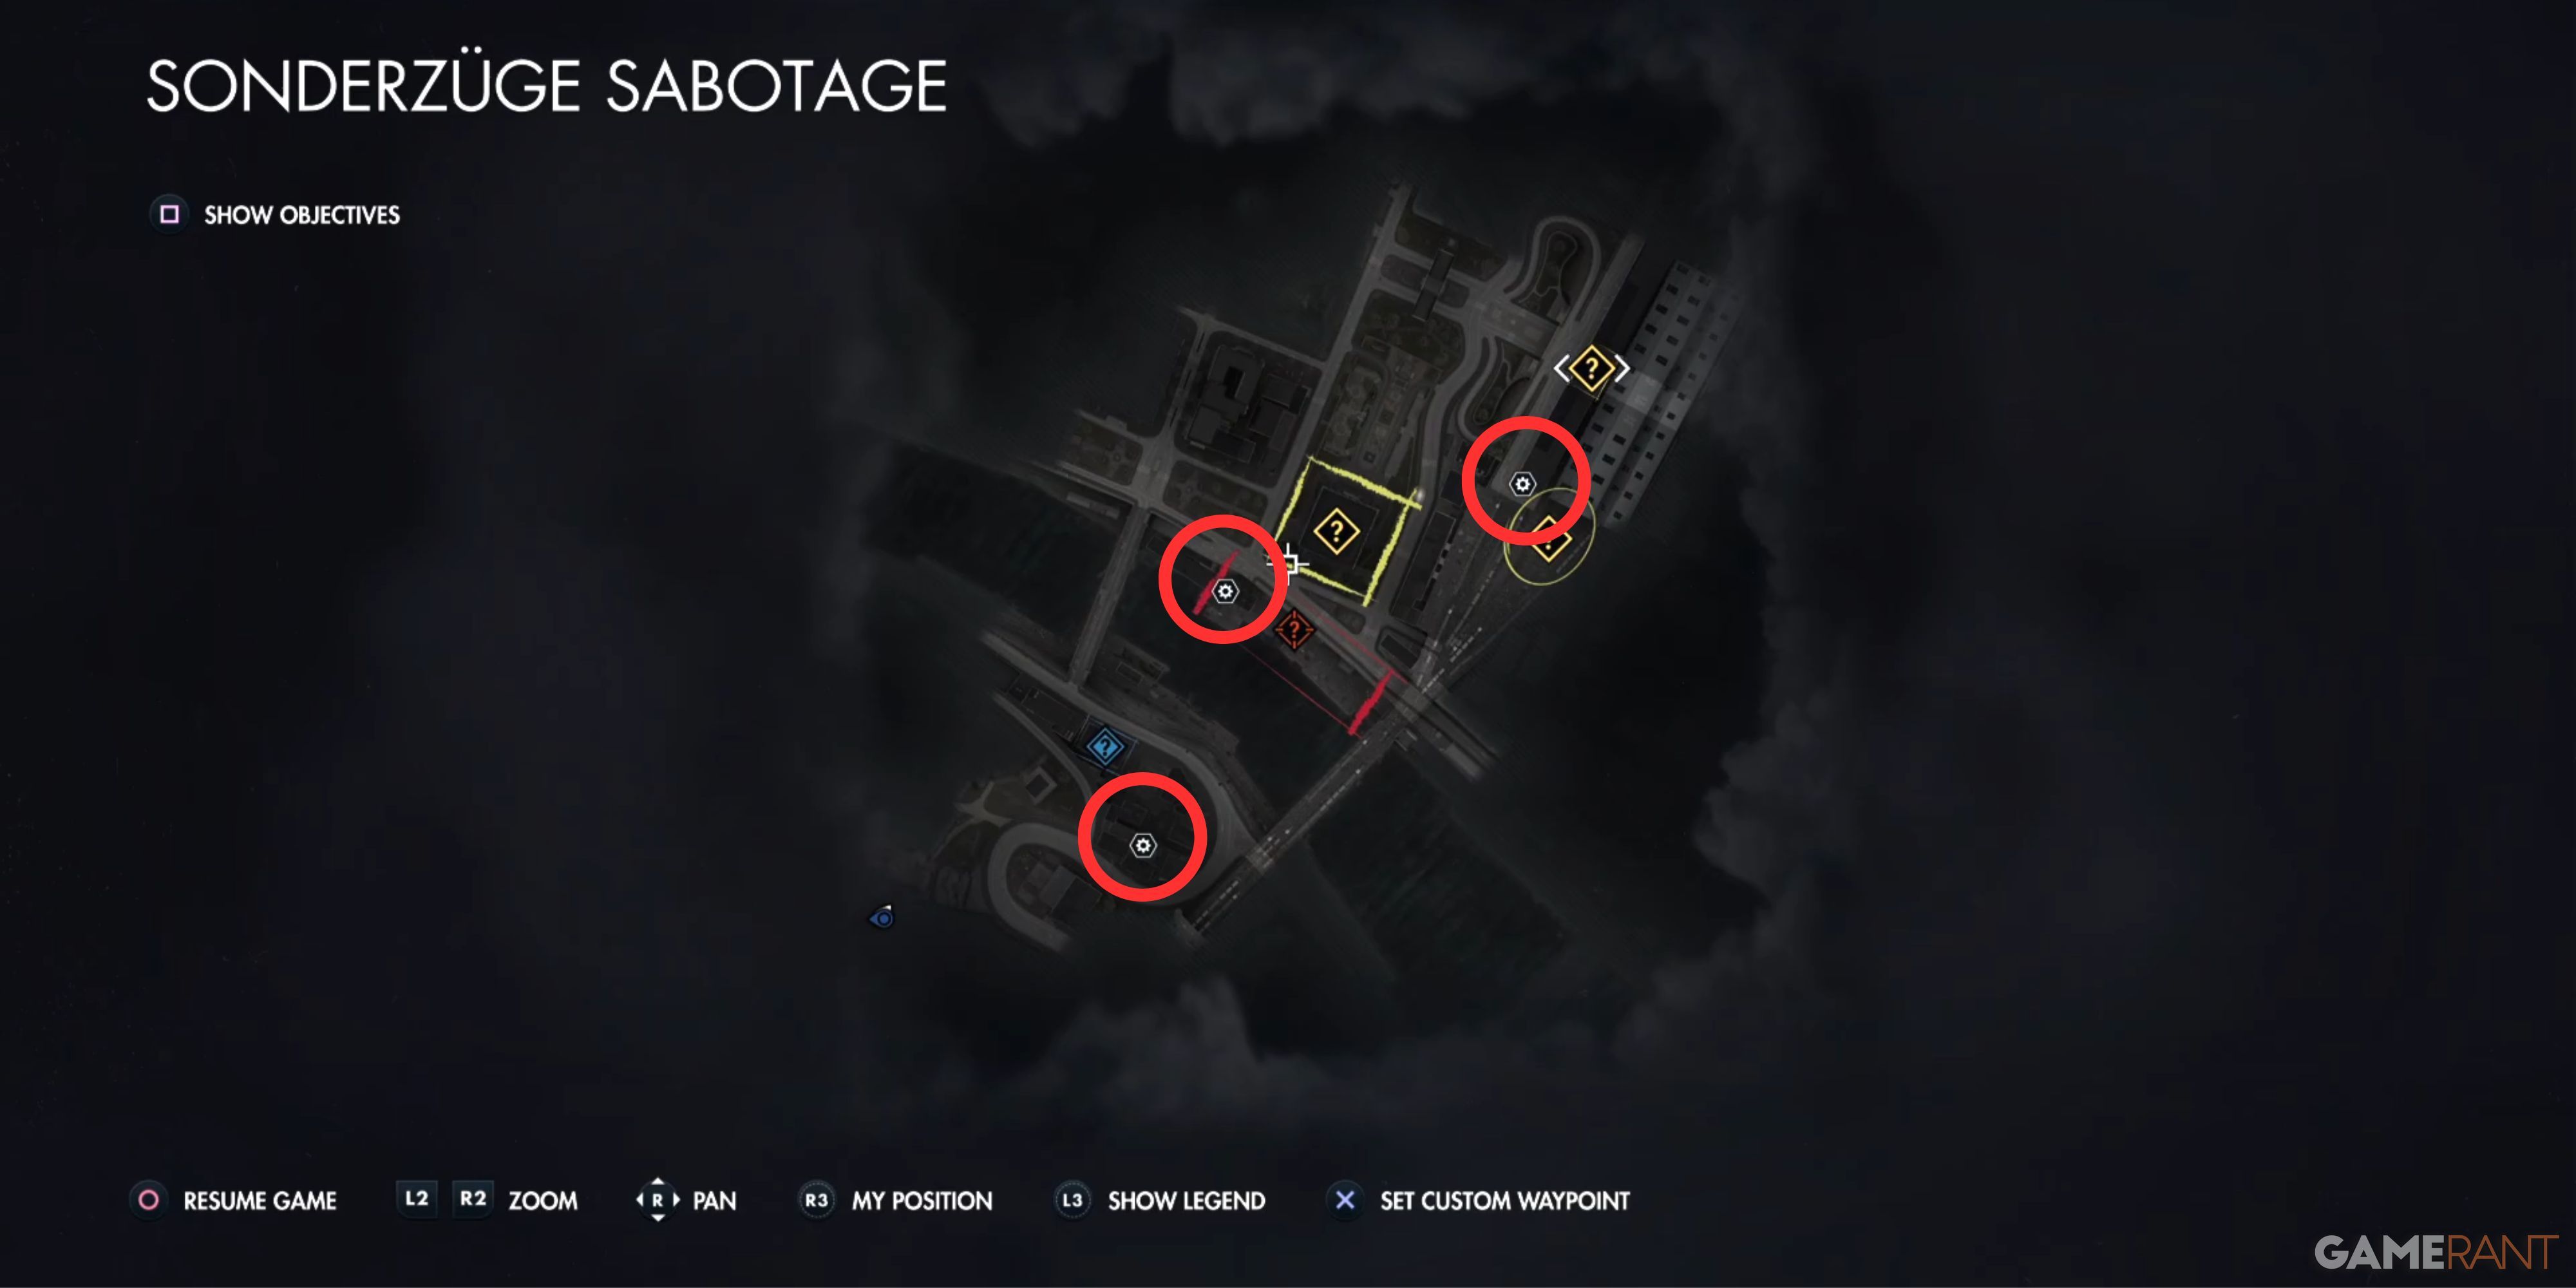
Rifle Workbench
1. Traverse the river via the western bridge, then proceed towards the piers. The workbench can be found within an open-door dockside building.
2. To reach the other side of the river, use the bridge on the west bank, and then move towards the docks. You’ll find the workbench inside a dockhouse with its doors standing wide open.
3. Head to the river’s western end and cross using the bridge. After that, navigate your way to the piers. The workbench is located within an open-door dockside building.
4. Make your way to the west bank of the river, cross over via the bridge, and continue onto the docks. The workbench can be found inside a dockhouse with its doors open.
5. To get to the other side of the river, utilize the western bridge and then go towards the piers. Look for the workbench in an open-door dockside building.
SMG Workbench
Navigate towards the workbench symbol situated near the initial warehouse. Your journey might include descending several steps and encountering numerous adversaries. If this is a cleanup mission for the players, they should adjust the difficulty level to ‘Civilian’ and simply eliminate any enemy firing at them. Players will come across a blue door that can be picked, leading to an SMG Workbench behind it.
Pistol Workbench
Initially, players should head towards the eastern bridge on the map, then proceed across it. After that, they’ll navigate through a railyard. Upon reaching the building at the railyard’s end, they’ll unlock the gate with stairs behind it and climb those stairs to reach the top floor. Following the hallway will lead them to the room containing the final workbench collectible for Mission 3.
Workbench Locations for Collision Course
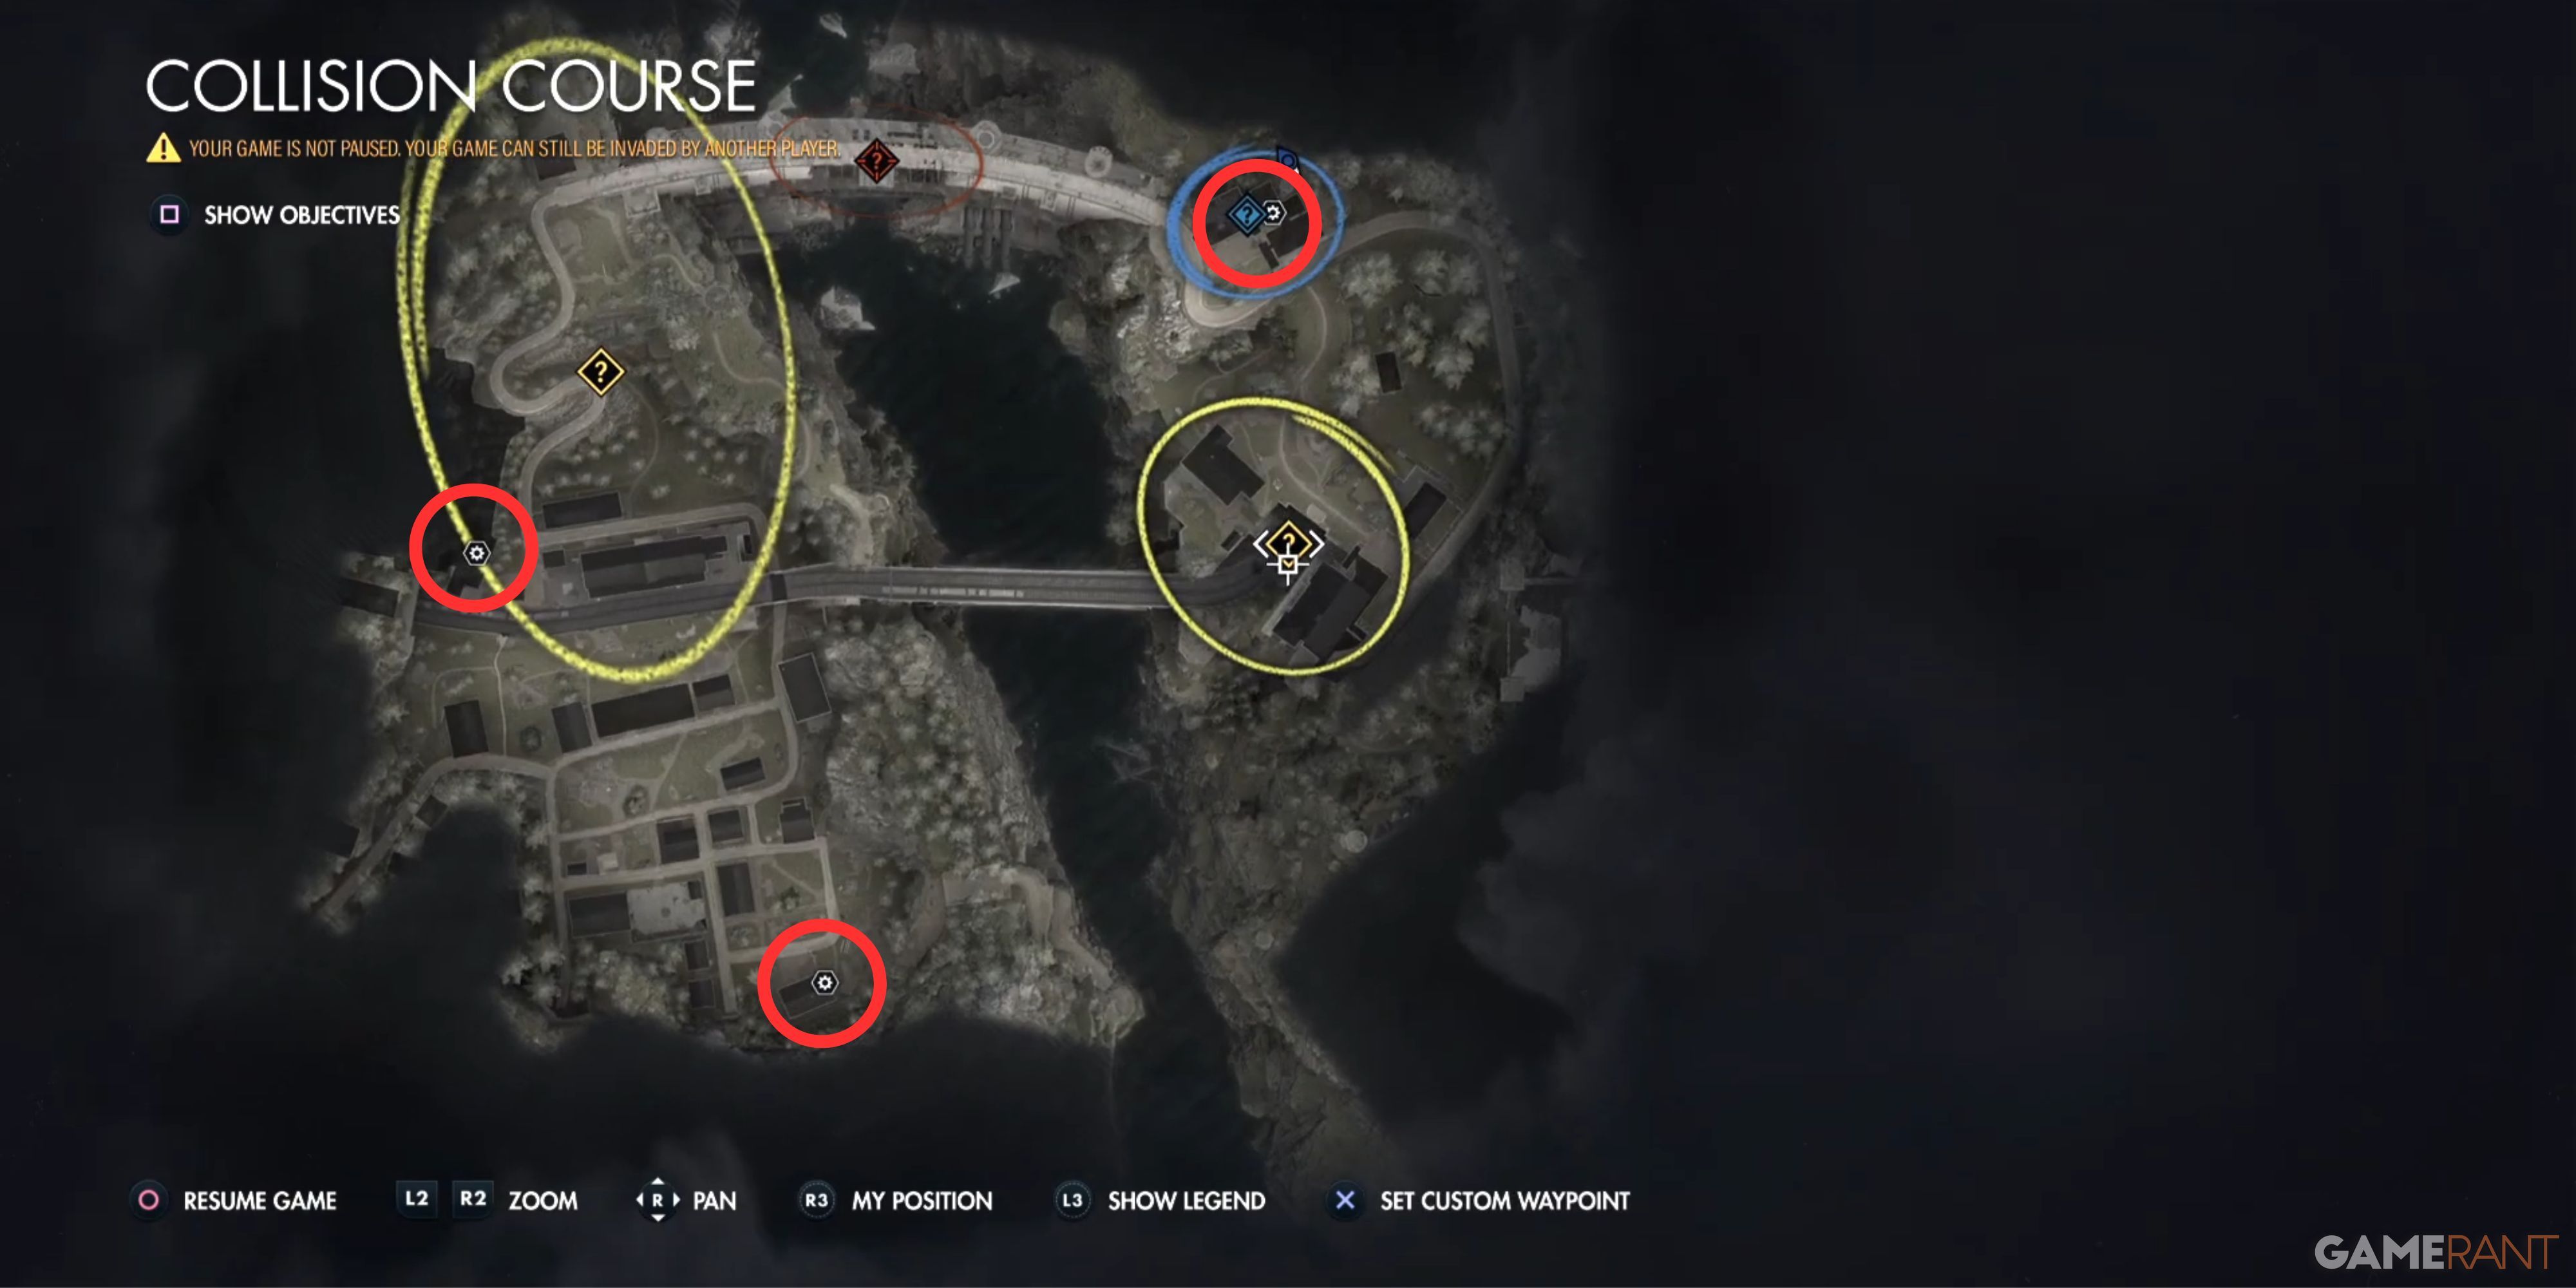
Rifle Workbench
In Mission 4, you’ll come across a Rifle Workbench among other collectibles. To locate it, move towards the dam at the map’s highest point, and look to its right side. Upon entering the building from its base, turn right. You’ll find yourself in an engine room with a lockable door. Pass through this door, and you’ll reach a room housing the workbench you’re seeking.
SMG Workbench
On the left side, right at the center of the map, you’ll find an icon representing the SMG Workbench. After unlocking a gate to your left, you’ll spot a shed with a gaping hole in the ground nearby. Descend the ladder within this hole and traverse the path to reach the workbench.
Pistol Workbench
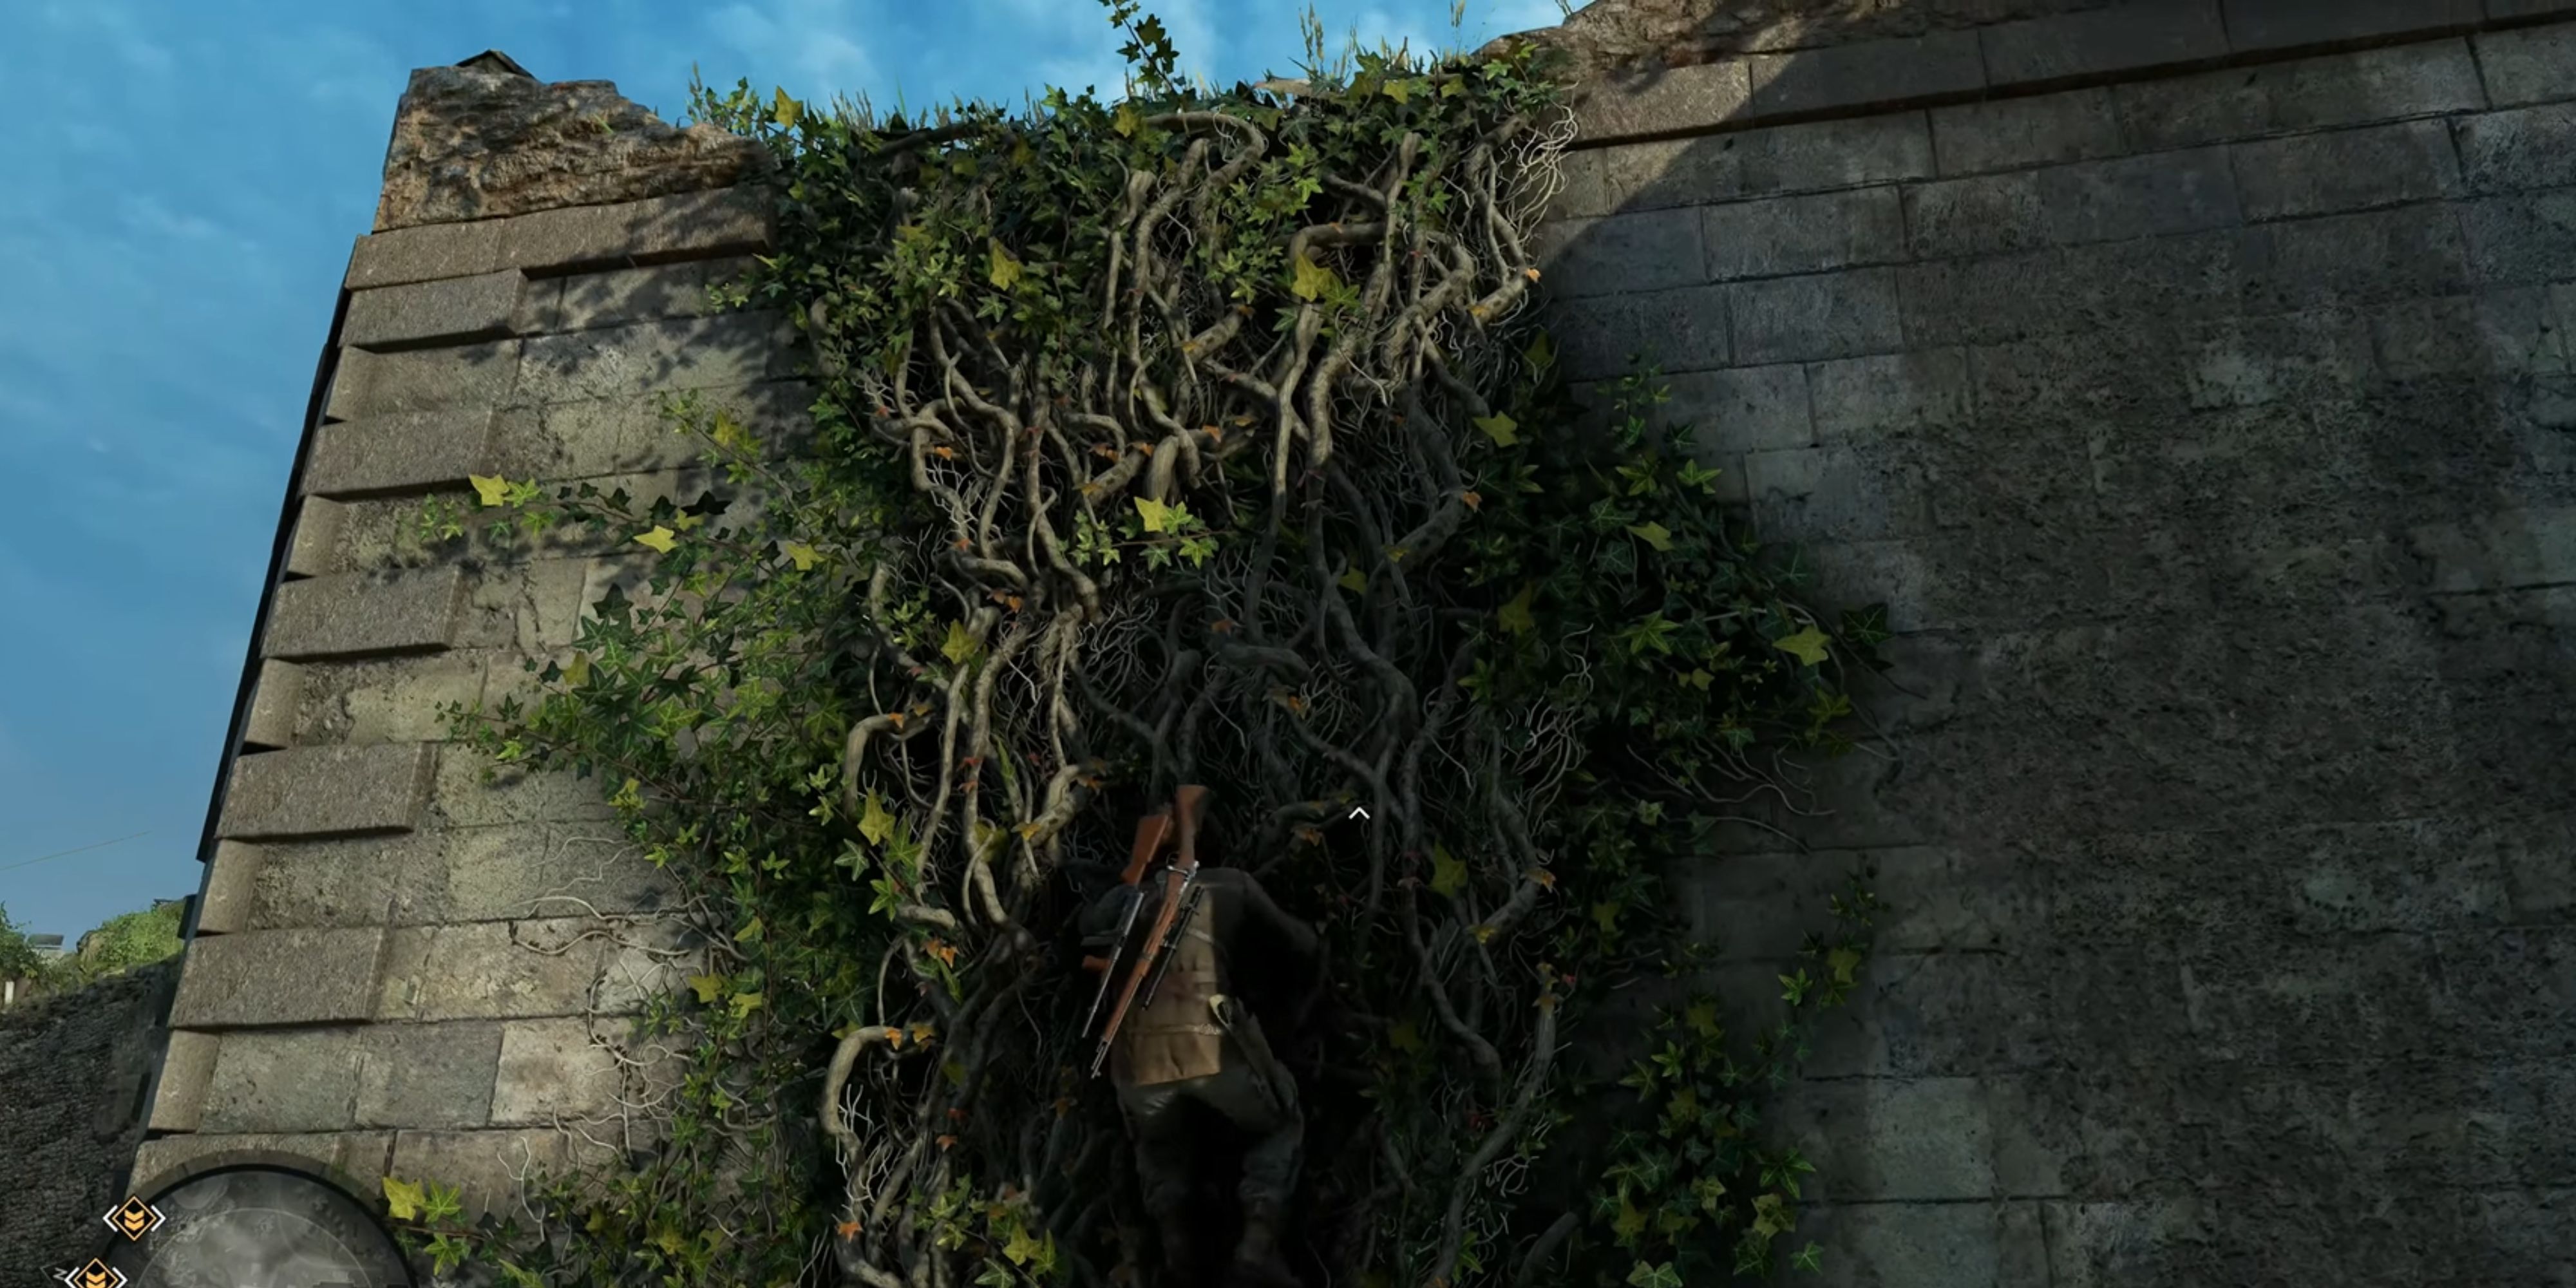
Beginning at your starting location, slide along the zipline and navigate towards the houses located in the southwest region of the map. Upon arrival, you’ll spot a two-story house adorned with vines beneath one of its windows. Use these vines to ascend, then take a right turn to discover a workbench. Interacting with this workbench will reward players with a 6x Pistol Scope.
Workbench Locations for Devil’s Cauldron
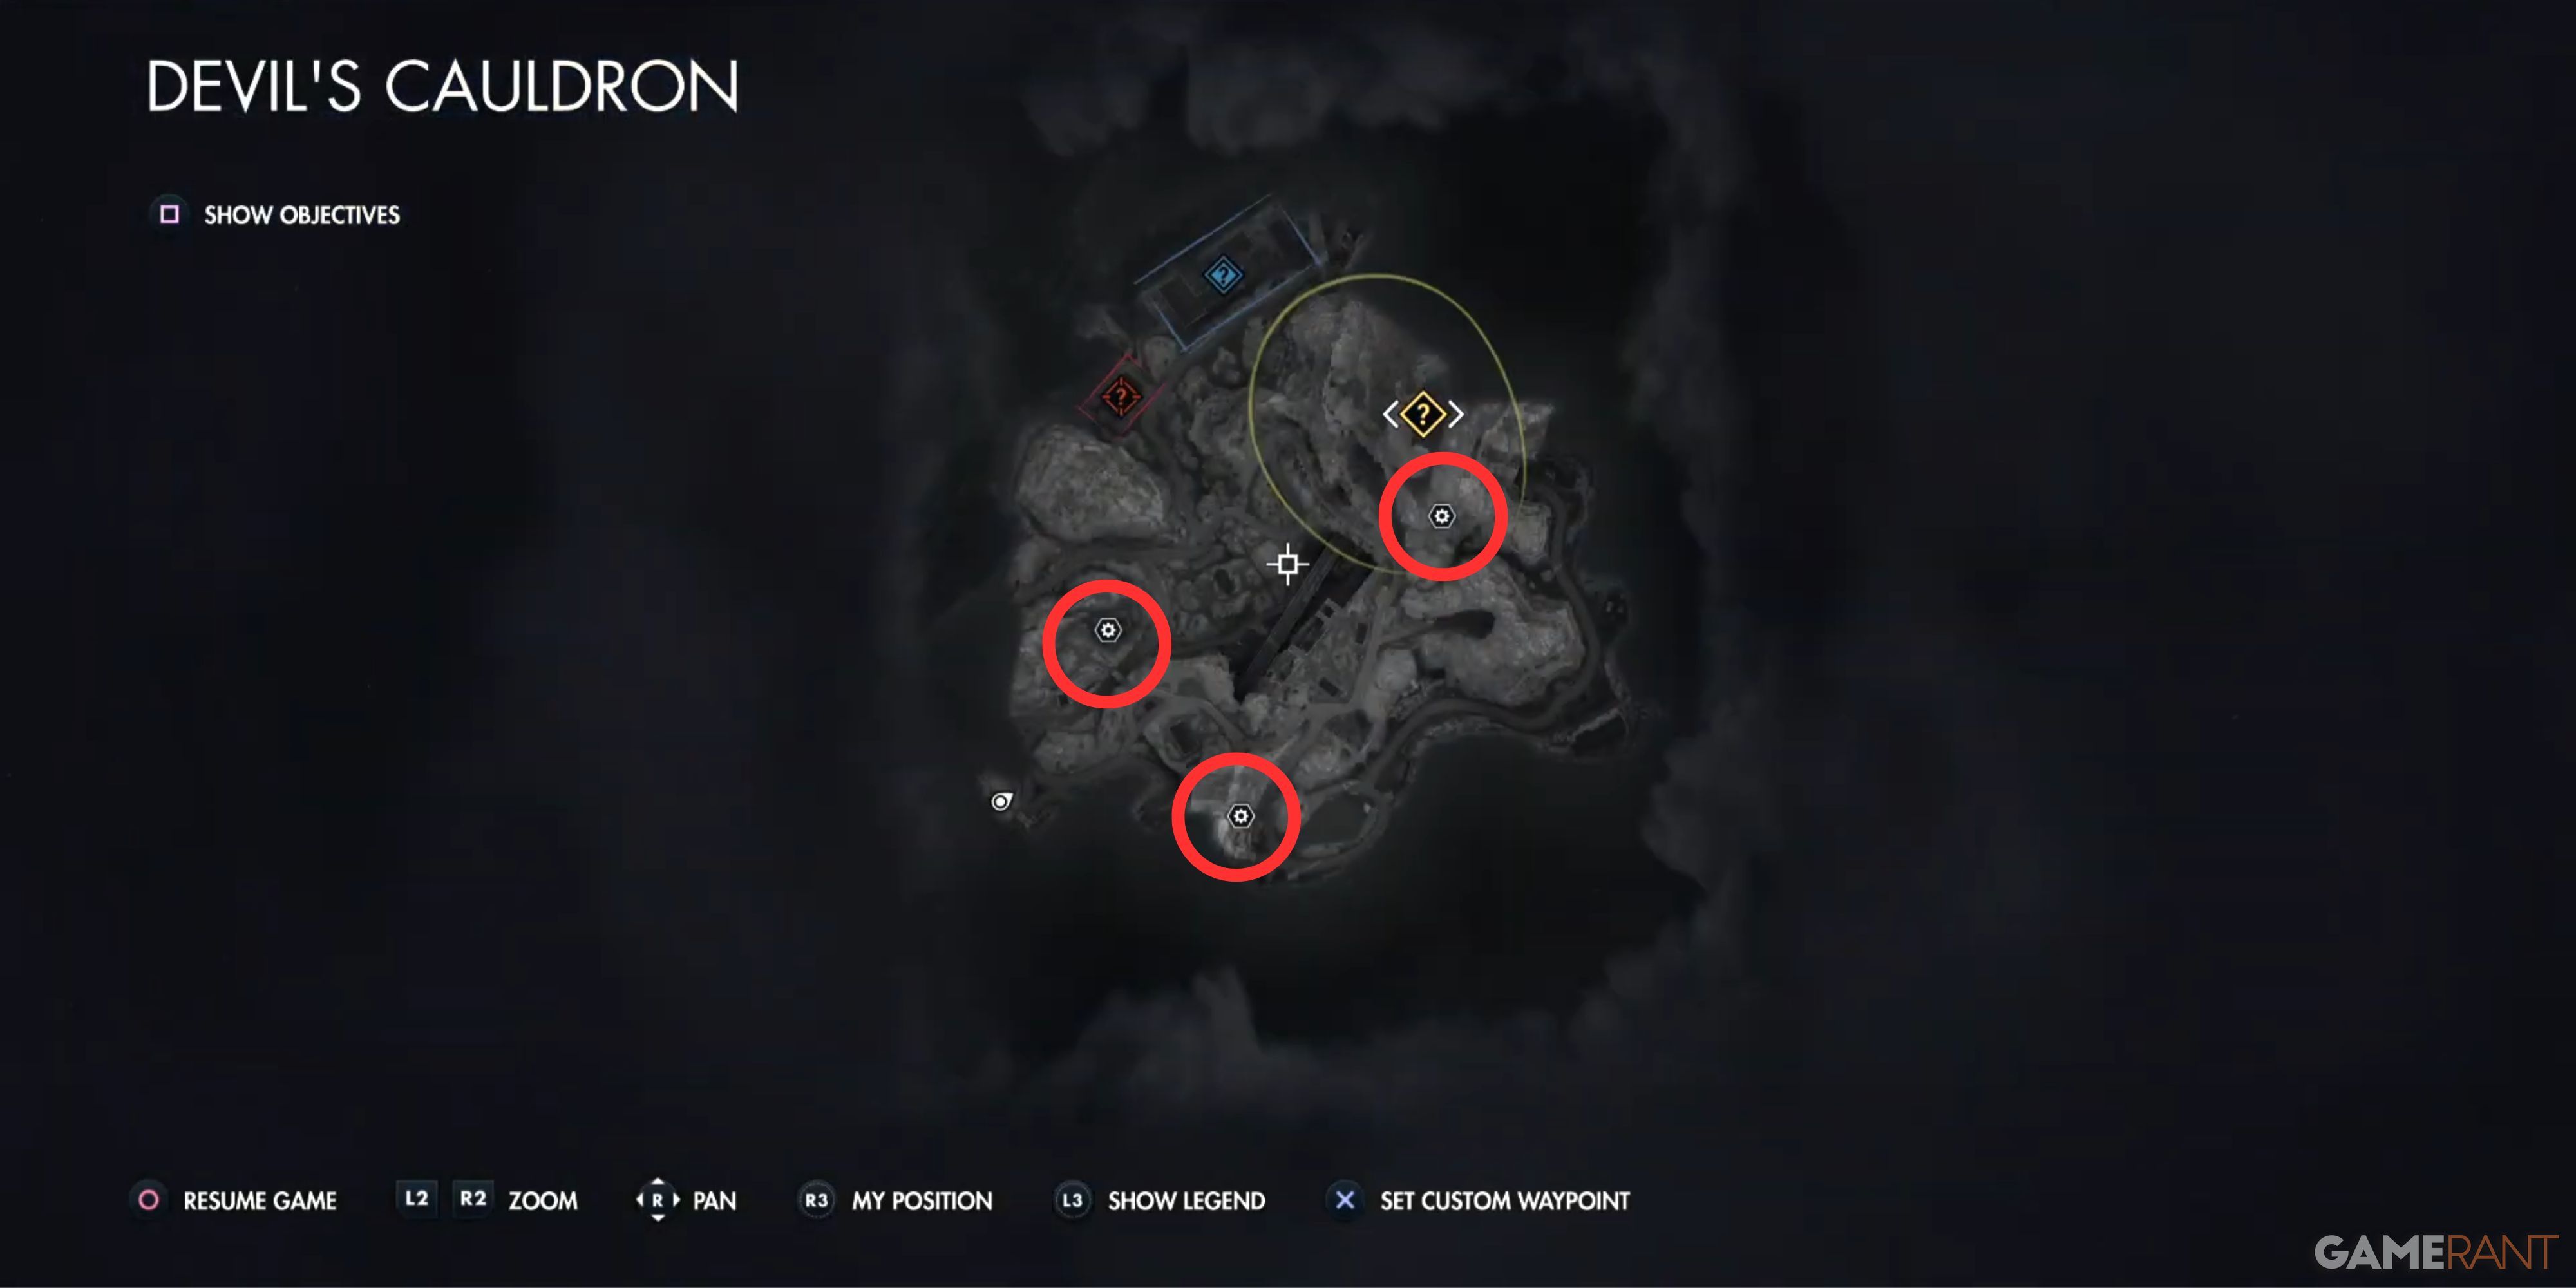
Rifle Workbench
The icon for the westmost workbench is situated at a junction, where two paths meet. There’s a structure with a zipline and a cross at its peak nearby. To locate the Rifle Workbench, enter this building from ground level. Once inside, unlock the wooden door using a lockpick. Descend to the basement to reach the workbench.
SMG Workbench
The last workbench will be situated inside a above-ground fortification, often referred to as a blockhouse. Unlike traditional bunkers, these structures do not descend beneath the ground. Since there’s neither a lock nor a door requiring forced entry, you can easily reach this workbench.
Pistol Workbench
Make your way to the icon resembling a northwest workbench. This spot takes gamers below ground to a hidden bunker – the Factory Armoury. Inside, there’s a sturdy door that can be fortified with an explosive satchel charge. The entrance key for this chamber is carried by an officer, but upon completing the game, players will have a Satchel Charge in their inventory at the start of the level. Once you reach the room, you’ll spot the workbench across from the door.
Workbench Locations for Assault on Fort Rouge
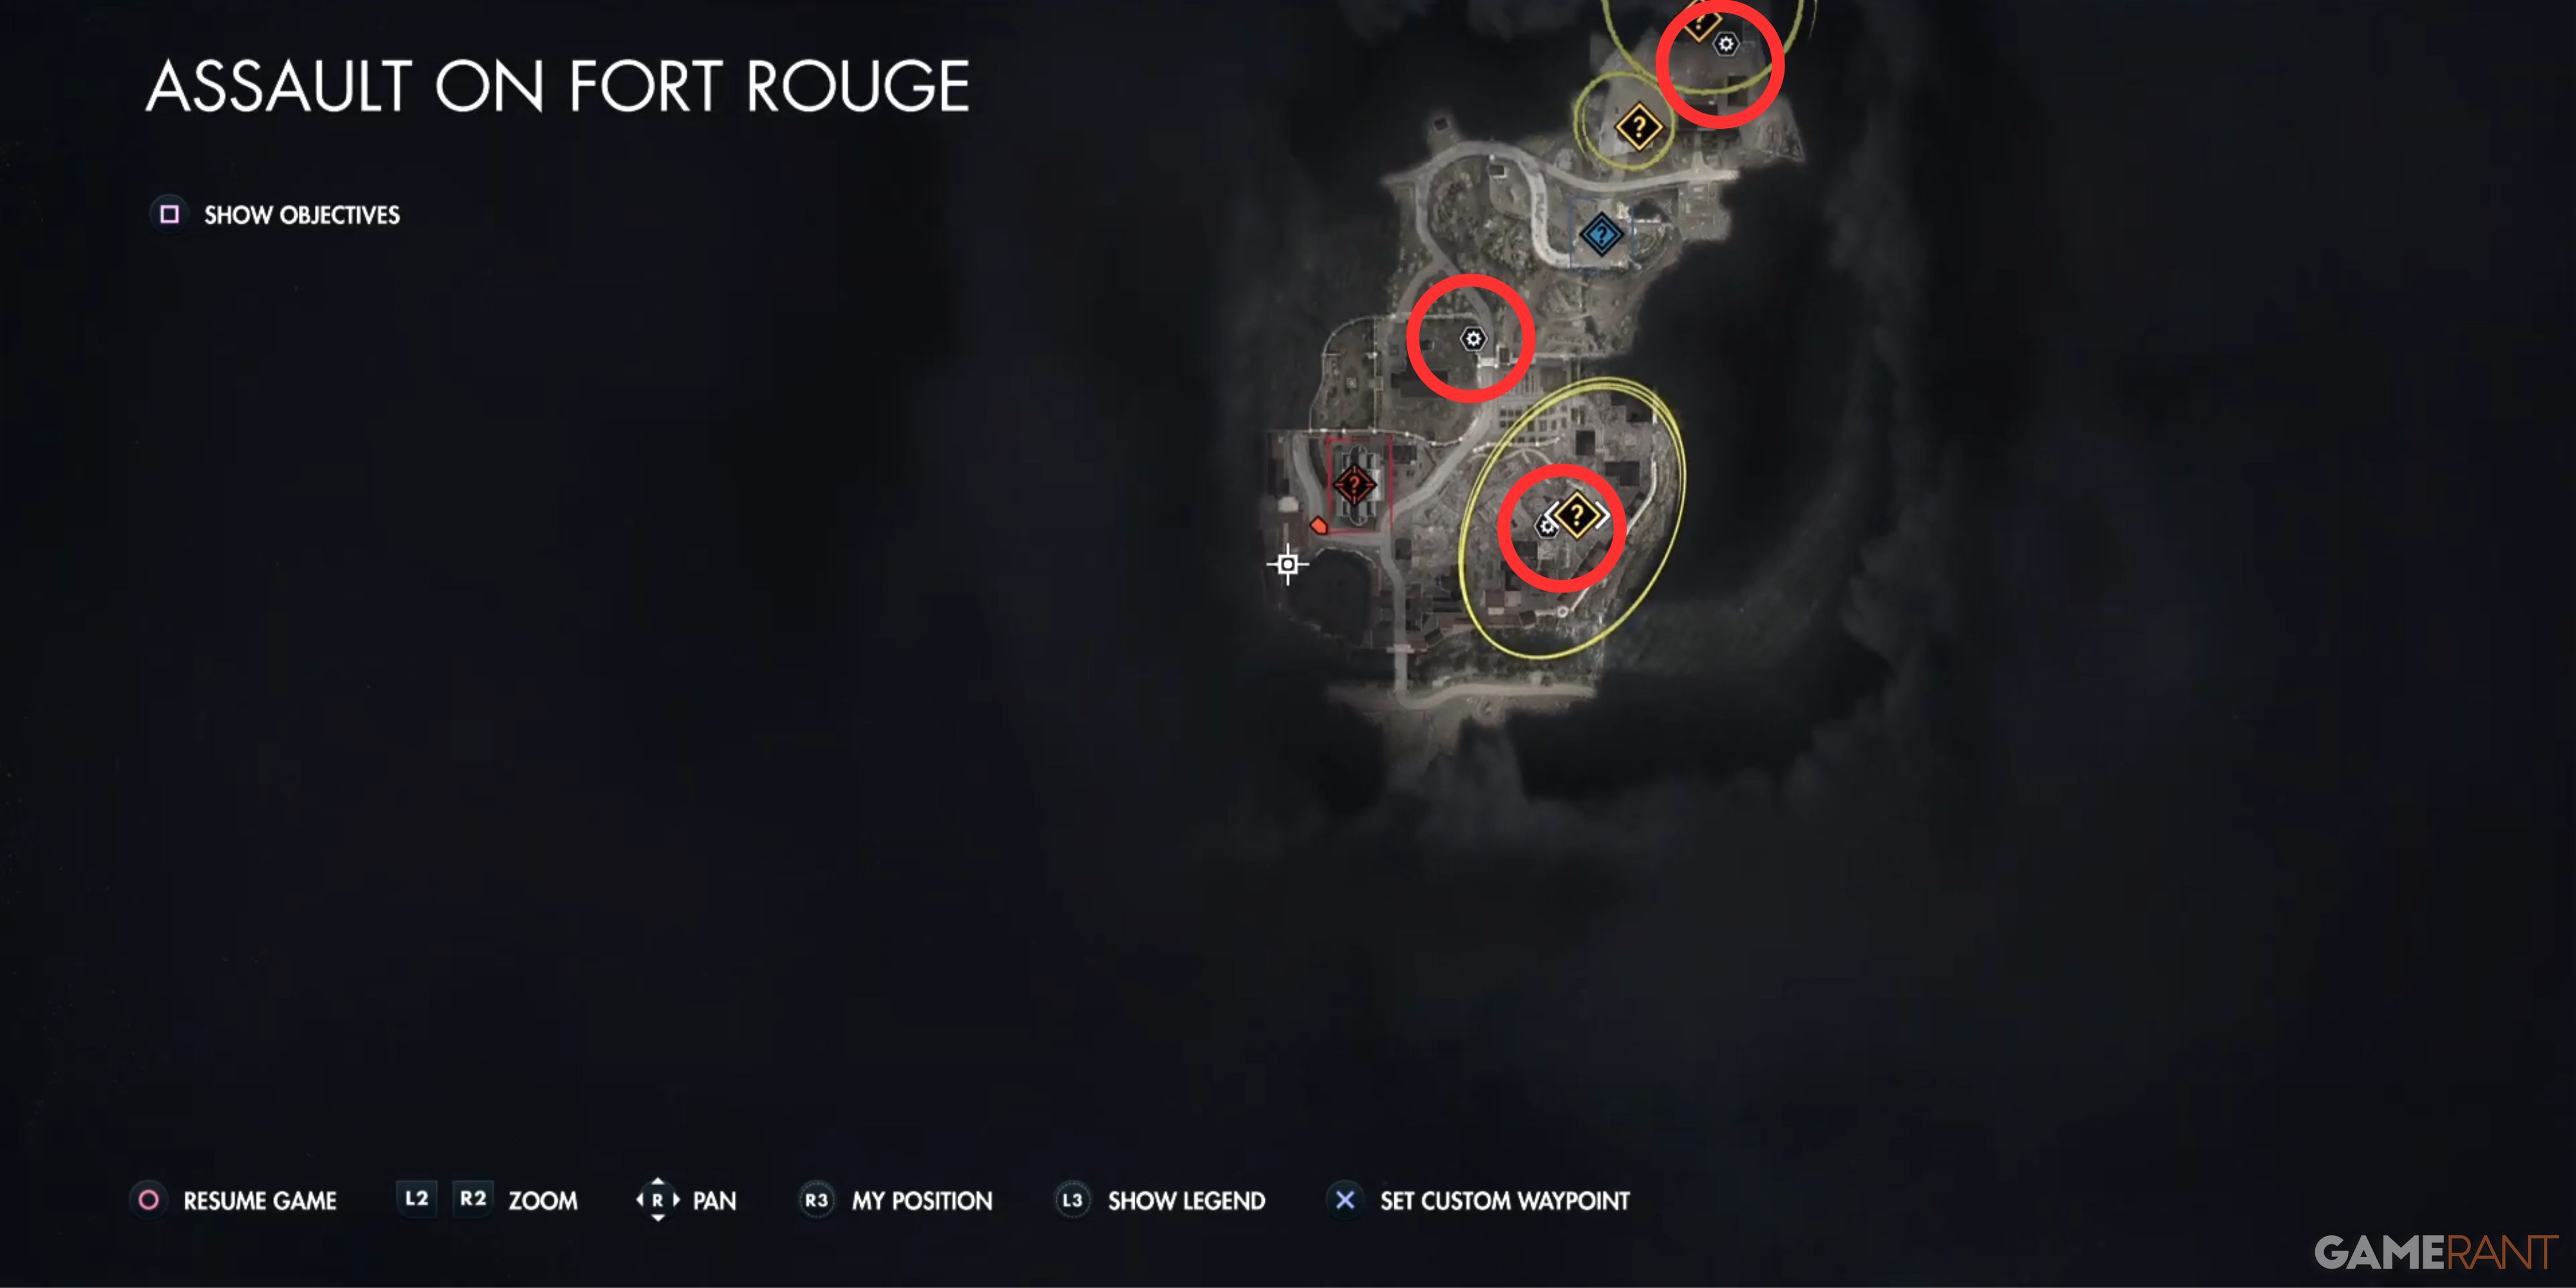
Rifle Workbench
The bench at the most northern point will offer significant challenges due to its strategic importance in accomplishing this mission. As you advance through the mission, you’ll eventually come across an underground facility. Here, keep an eye out for crucial clues like a bottle of wine. Ascend any of the metallic staircases to reach the second level. Maintain contact with the outer wall and move in a counterclockwise direction until you spot a corridor that houses a door needing a satchel charge. Detonate the door and proceed into the room to locate the Rifle Workbench.
SMG Workbench
To reach the workbench located at the southmost point, you’ll need to dig underground and employ a Dynamite Stick (Satchel Charge) to blast open the door first. Once the door is clear, follow the passageway that opens up, and you’ll eventually spot the workbench positioned against the left wall.
Pistol Workbench
In the heart of the map, players are bound to discover the last workstation. Interestingly, there’s a small shed in the graveyard where they can attempt to crack the lock. Inside this shed lies the Pistol Workbench.
Workbench Locations for Lock, Stock, and Barrels
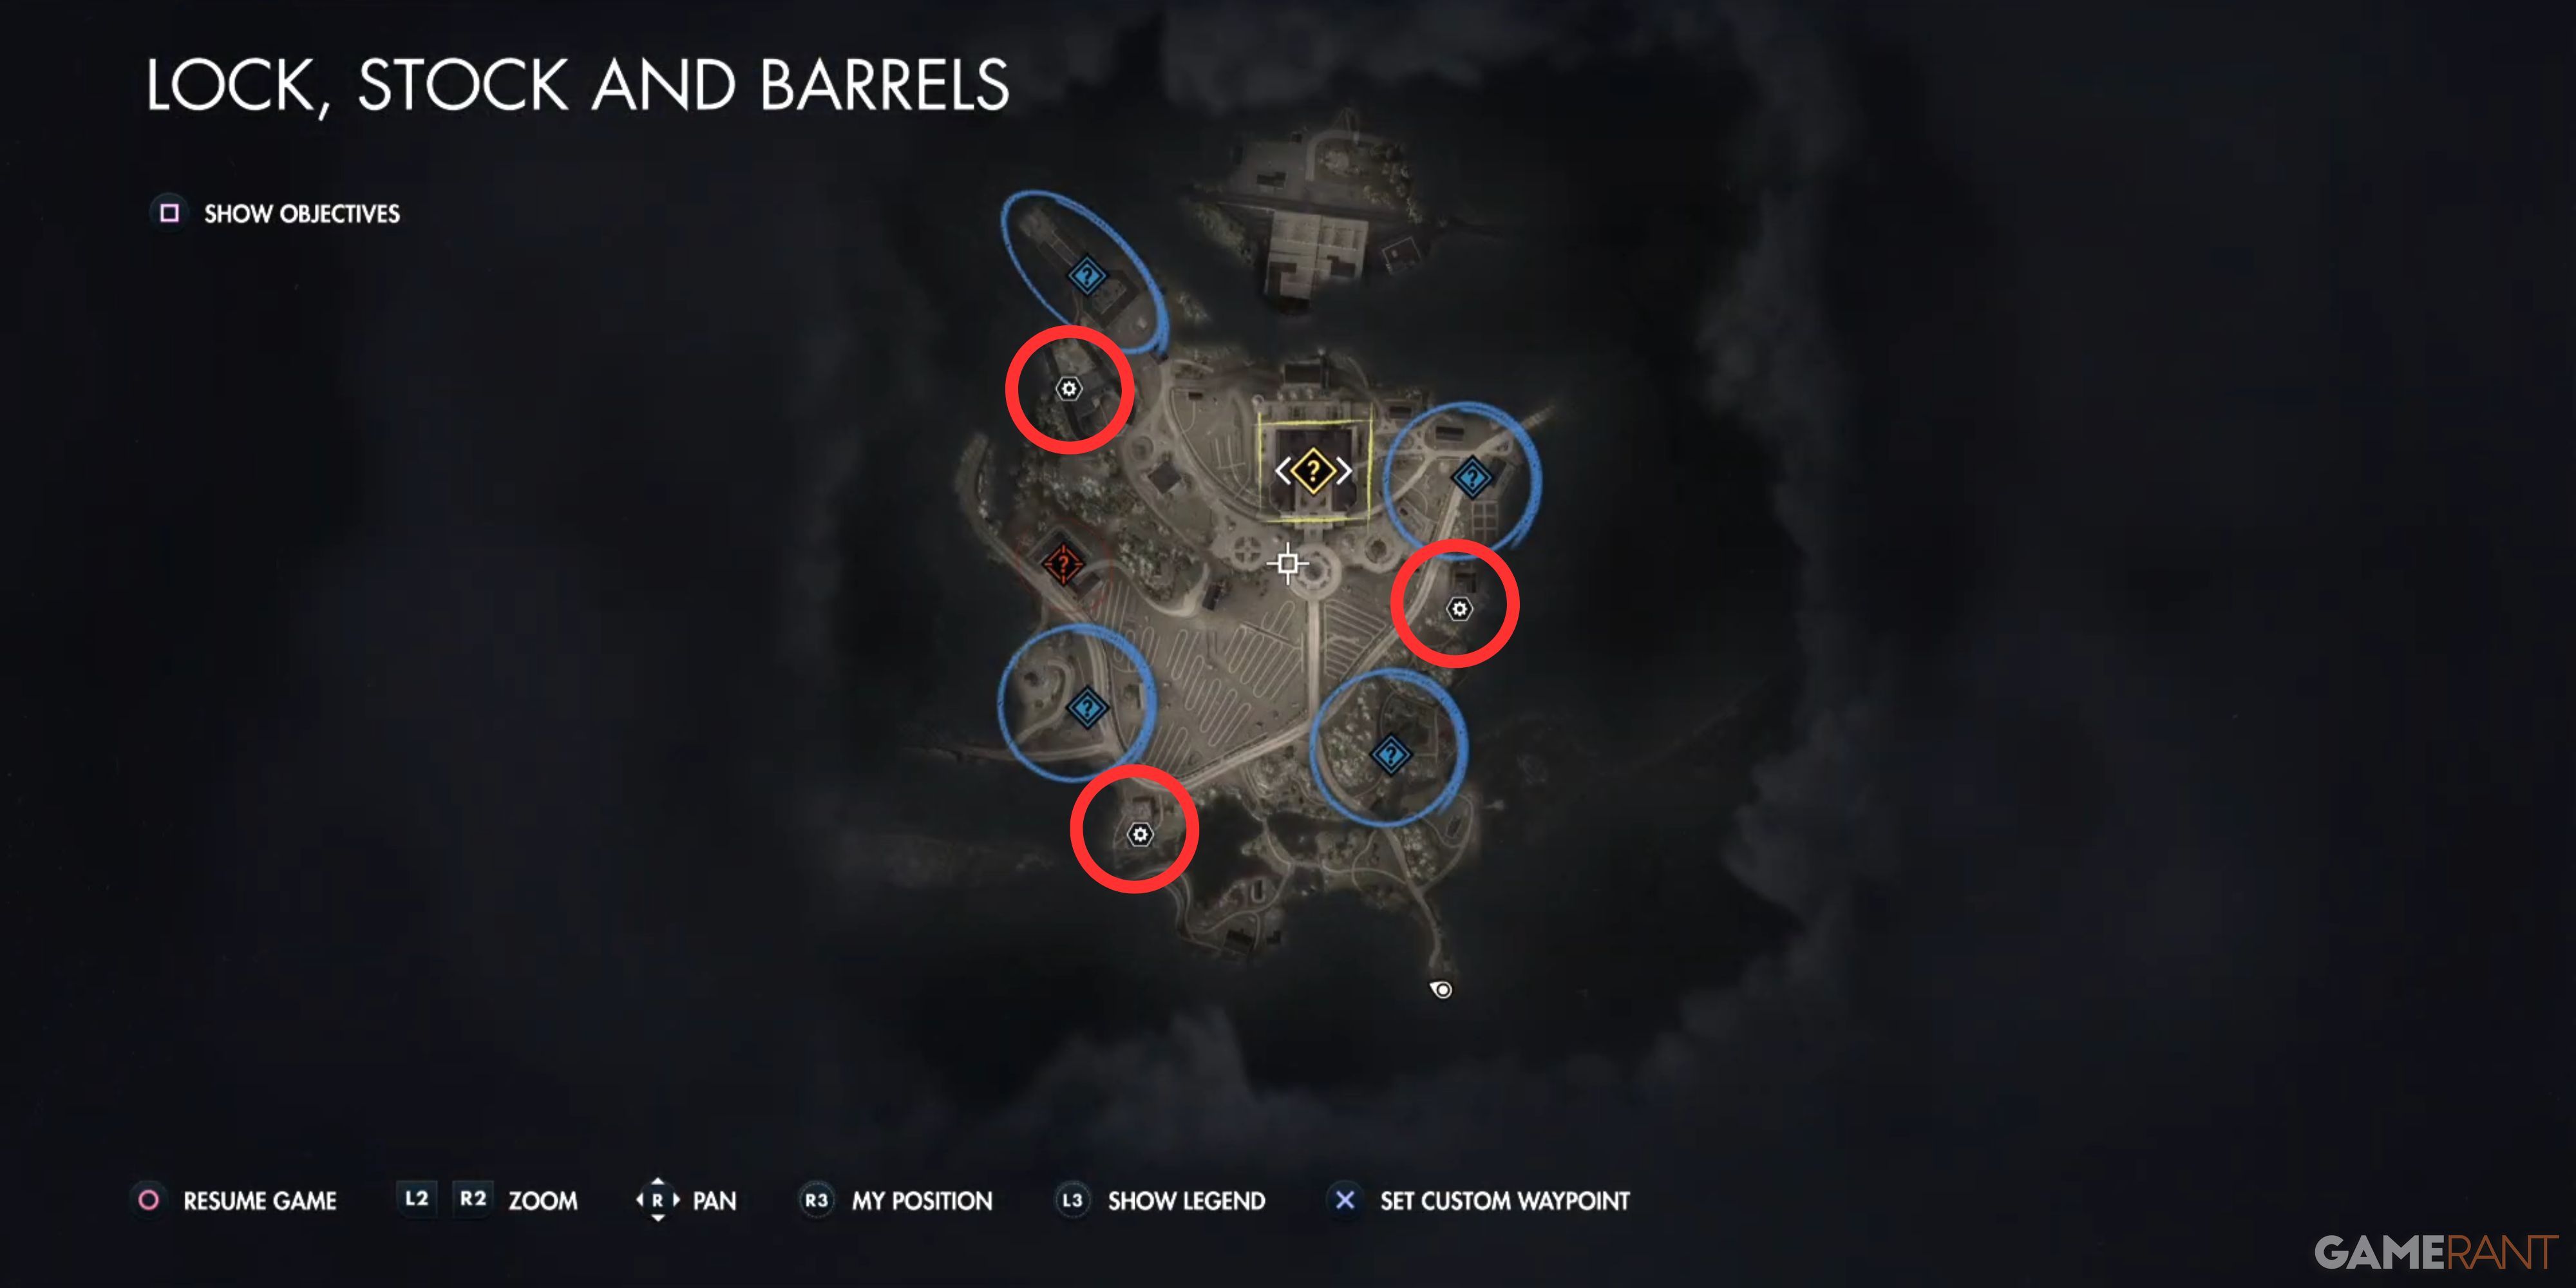
Rifle Workbench
In the house with the waterwheel, you’ll spot the icon for the southwesternmost workbench. To reach the upper floor, look for some handy vines. Inside that very room, players can locate the workbench. Additionally, there’s a Propaganda Poster placed outside this structure.
SMG Workbench
1. In the shed, you’ll find the icon for the workbench located furthest to the east. Inside this same shed, there’s a ladder that ascends to the level housing the SMG Workbench.
2. The workbench icon on the eastern end will be found within a shed. This very shed contains a ladder that climbs up to where the SMG Workbench is situated.
3. The workbench icon, located at the most easterly position, can be found inside a shed. Inside this shed you’ll find a ladder that takes you to the SMG Workbench’s floor level.
4. The icon for the workbench in the farthest east corner will be situated within a shed. This shed contains a ladder that goes up to the level of the SMG Workbench.
5. In the shed, the workbench icon at the eastern edge will be placed. Inside this shed, you’ll find a ladder that leads to the floor where the SMG Workbench is located.
Pistol Workbench
On the northwestern part of the map, there’s a fortified structure known as a blockhouse. Eliminating all the adversaries within this blockhouse is crucial because the officer carrying the essential key is likely to be among them. An alternative method would be to utilize a explosive satchel charge.
Workbench Locations for End of the Line
Rifle Workbench
As an enthusiastic player, I’d guide you towards the distinct workbench icon at the heart of our gaming world. Ascend to the upper level of the colossal structure nearby, then steer yourself towards the northeastern corner. In this area, you’ll stumble upon the Blockhaus Armoury.
Please beware, there are numerous adversaries lurking around here, and the location of the official with the crucial key might not be fresh in your memory due to the intense combat. Keep your eyes peeled for any signs that could lead you to the fallen official’s body, or consider revisiting areas you’ve previously explored. Good luck on your quest!
Fortunately, you can also force open it using a Satchel Charge. Within lies the initial workstation for this task. Players may find it beneficial to eliminate these foes from afar since situations can quickly escalate into high-speed encounters.
SMG Workbench
On your return to this map, you might not see a workbench icon due to a technical issue. To assist you, a red marker has been added. Enter the facility through its grand entrance and proceed towards the enclosed section. Ascend the metallic staircase and jump onto the ledge. Once inside the office, you’ll discover the location of the Rifle Workbench.
Pistol Workbench
As a die-hard fan, I’m excited to share that in Sniper Elite: Resistance, the final workbench you’ll find is symbolized by the easternmost icon on your map. To reach it, scale the vines wrapping around the building’s side, slide along the white-painted beam overhead, and continue climbing up. Carefully pry open the wooden boards when you get there, then descend the ladder to enter the room with the workbench. These new attachments, once acquired, will undoubtedly be a game-changer for Survival Mode!
Read More
- LUNC PREDICTION. LUNC cryptocurrency
- BTC PREDICTION. BTC cryptocurrency
- Should Video Games Explore Morality?
- Hyper Light Breaker early access release date announced
- Naruto: Kishimoto Reveals His Favorite Akatsuki Member
- Christmas Is Over: Bitcoin (BTC) Loses $2 Trillion Market Cap
- LEGO Star Wars: The Skywalker Saga – How to Get All Datacards
- Marvel Rivals Can Earn a Free Skin for Invisible Woman
- IMX PREDICTION. IMX cryptocurrency
- What Borderlands 4 Being ‘Borderlands 4’ Suggests About the Game
2025-02-03 01:45