Once you finish the “Pilgrimage” mission within the game “Oblivion Remastered,” you’ll embark on a sequence of quests to gather the “Crusader’s Relics” and assemble the “Knights of the Nine armor.” This armor set, associated with the “Knights of the Nine” DLC expansion, can be obtained whenever you desire. However, opinions differ on the optimal time for collection. This guide primarily focuses on demonstrating the steps to retrieve the “Crusader’s Relics in Oblivion Remastered,” and complete the “Knights of the Nine” DLC.
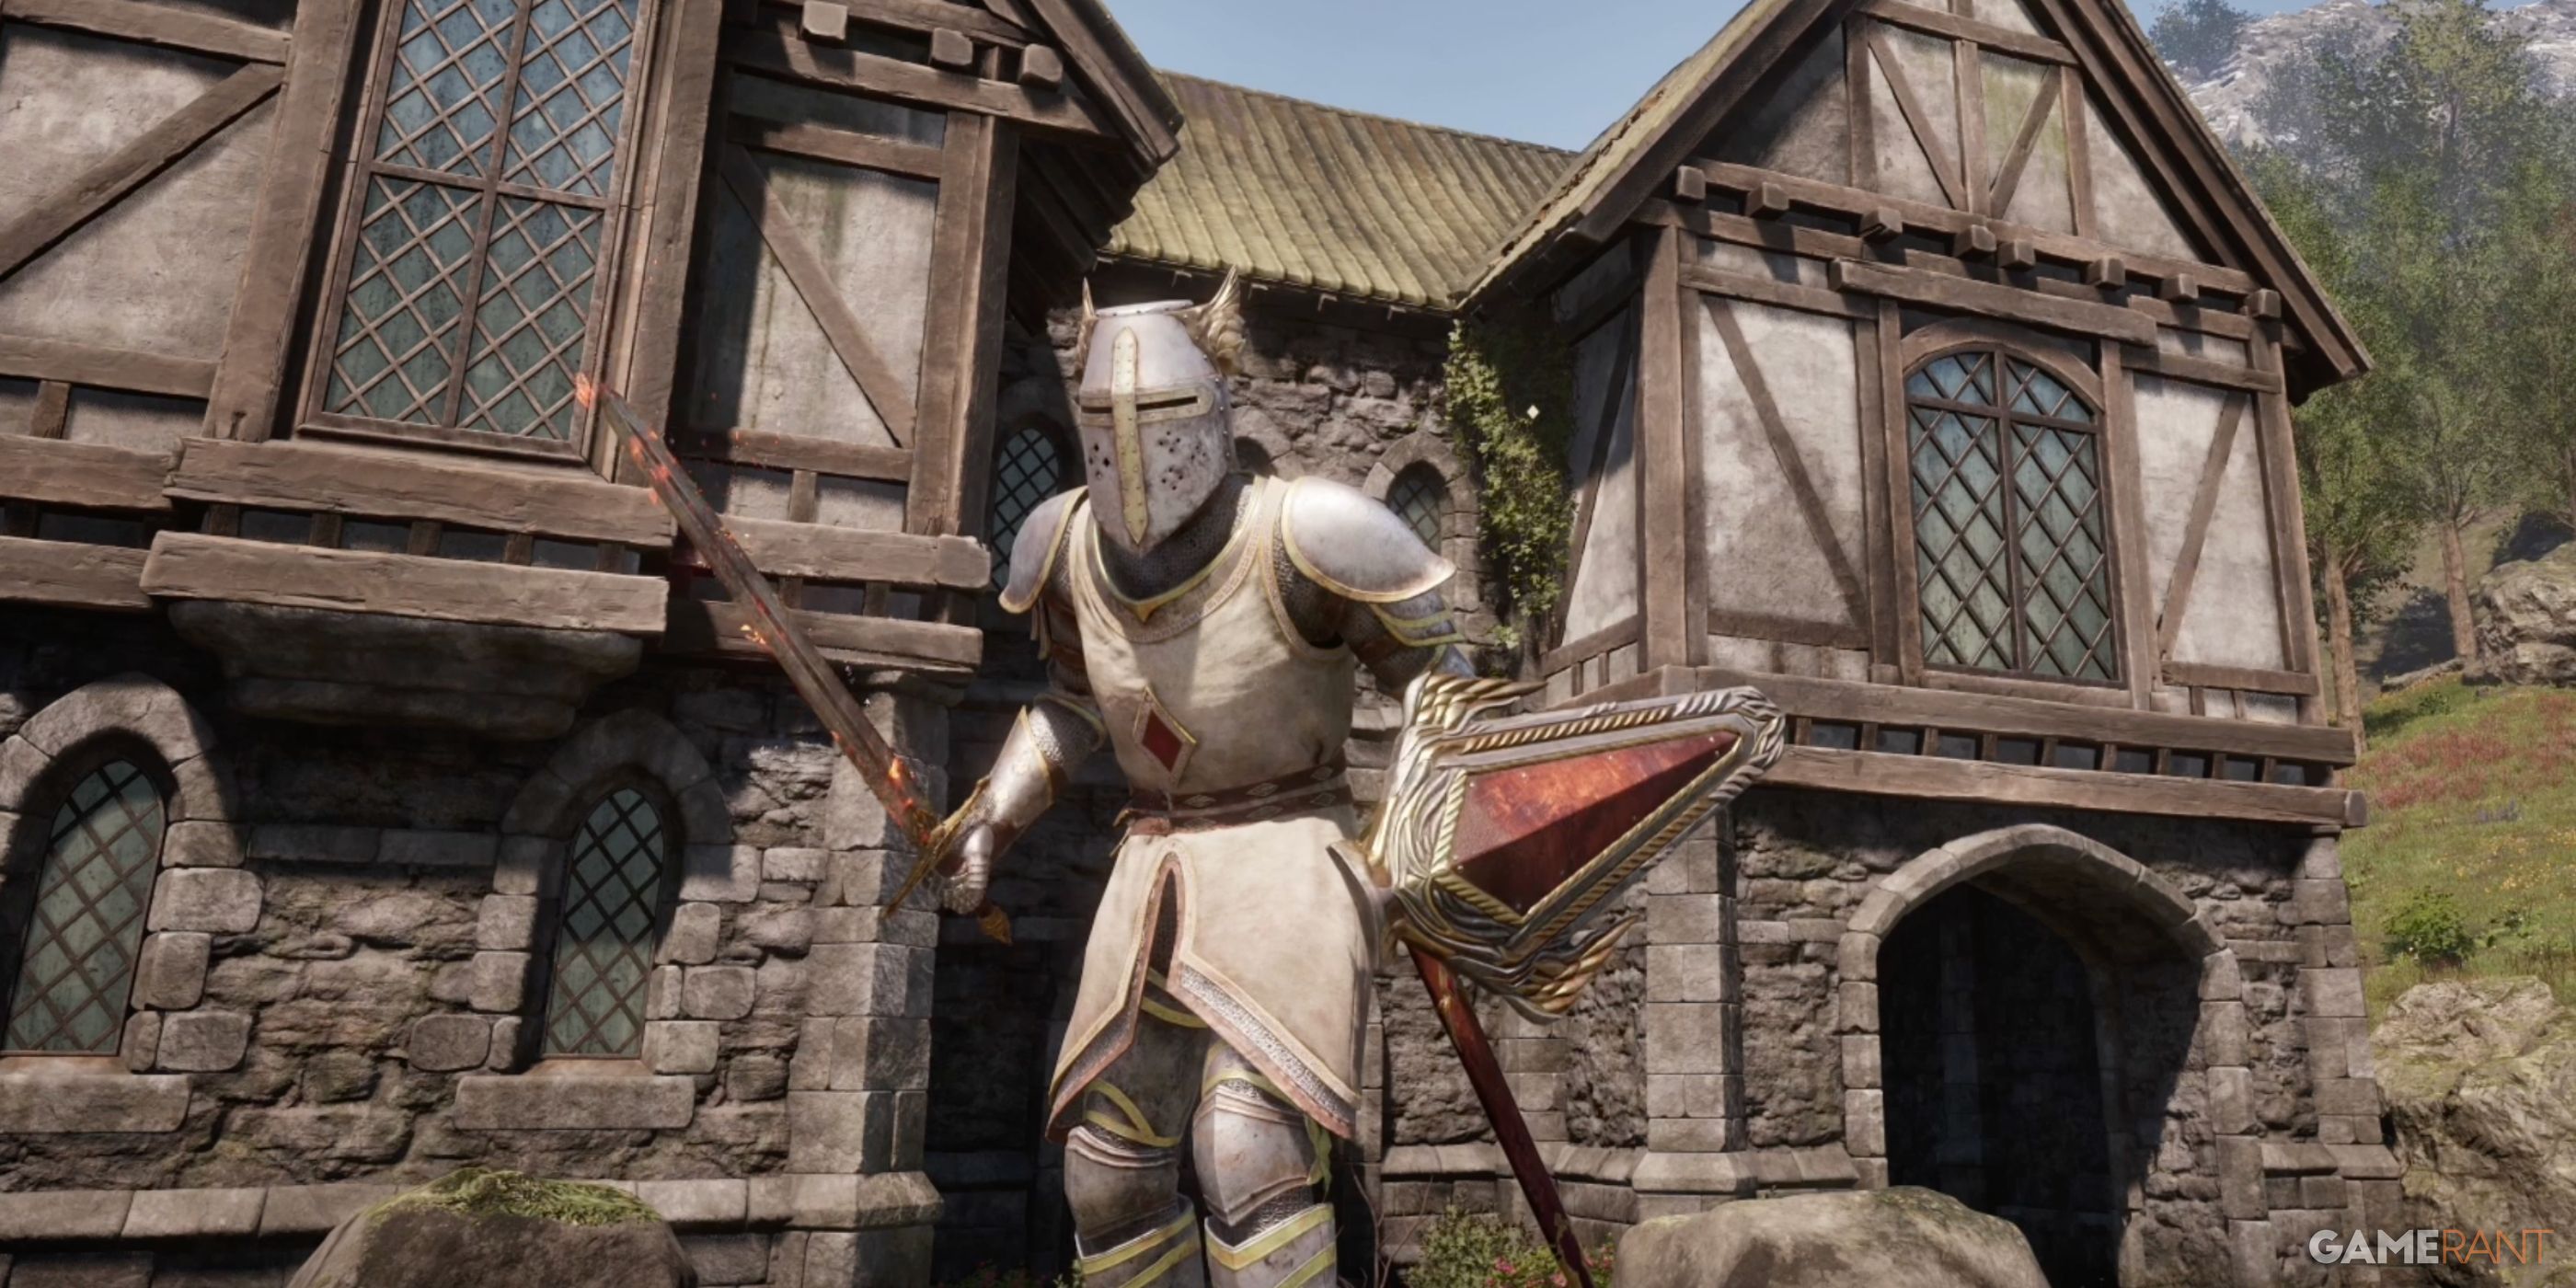
Helm of the Crusader Location – Oblivion Remastered
Shrine of the Crusader Quest Walkthrough:
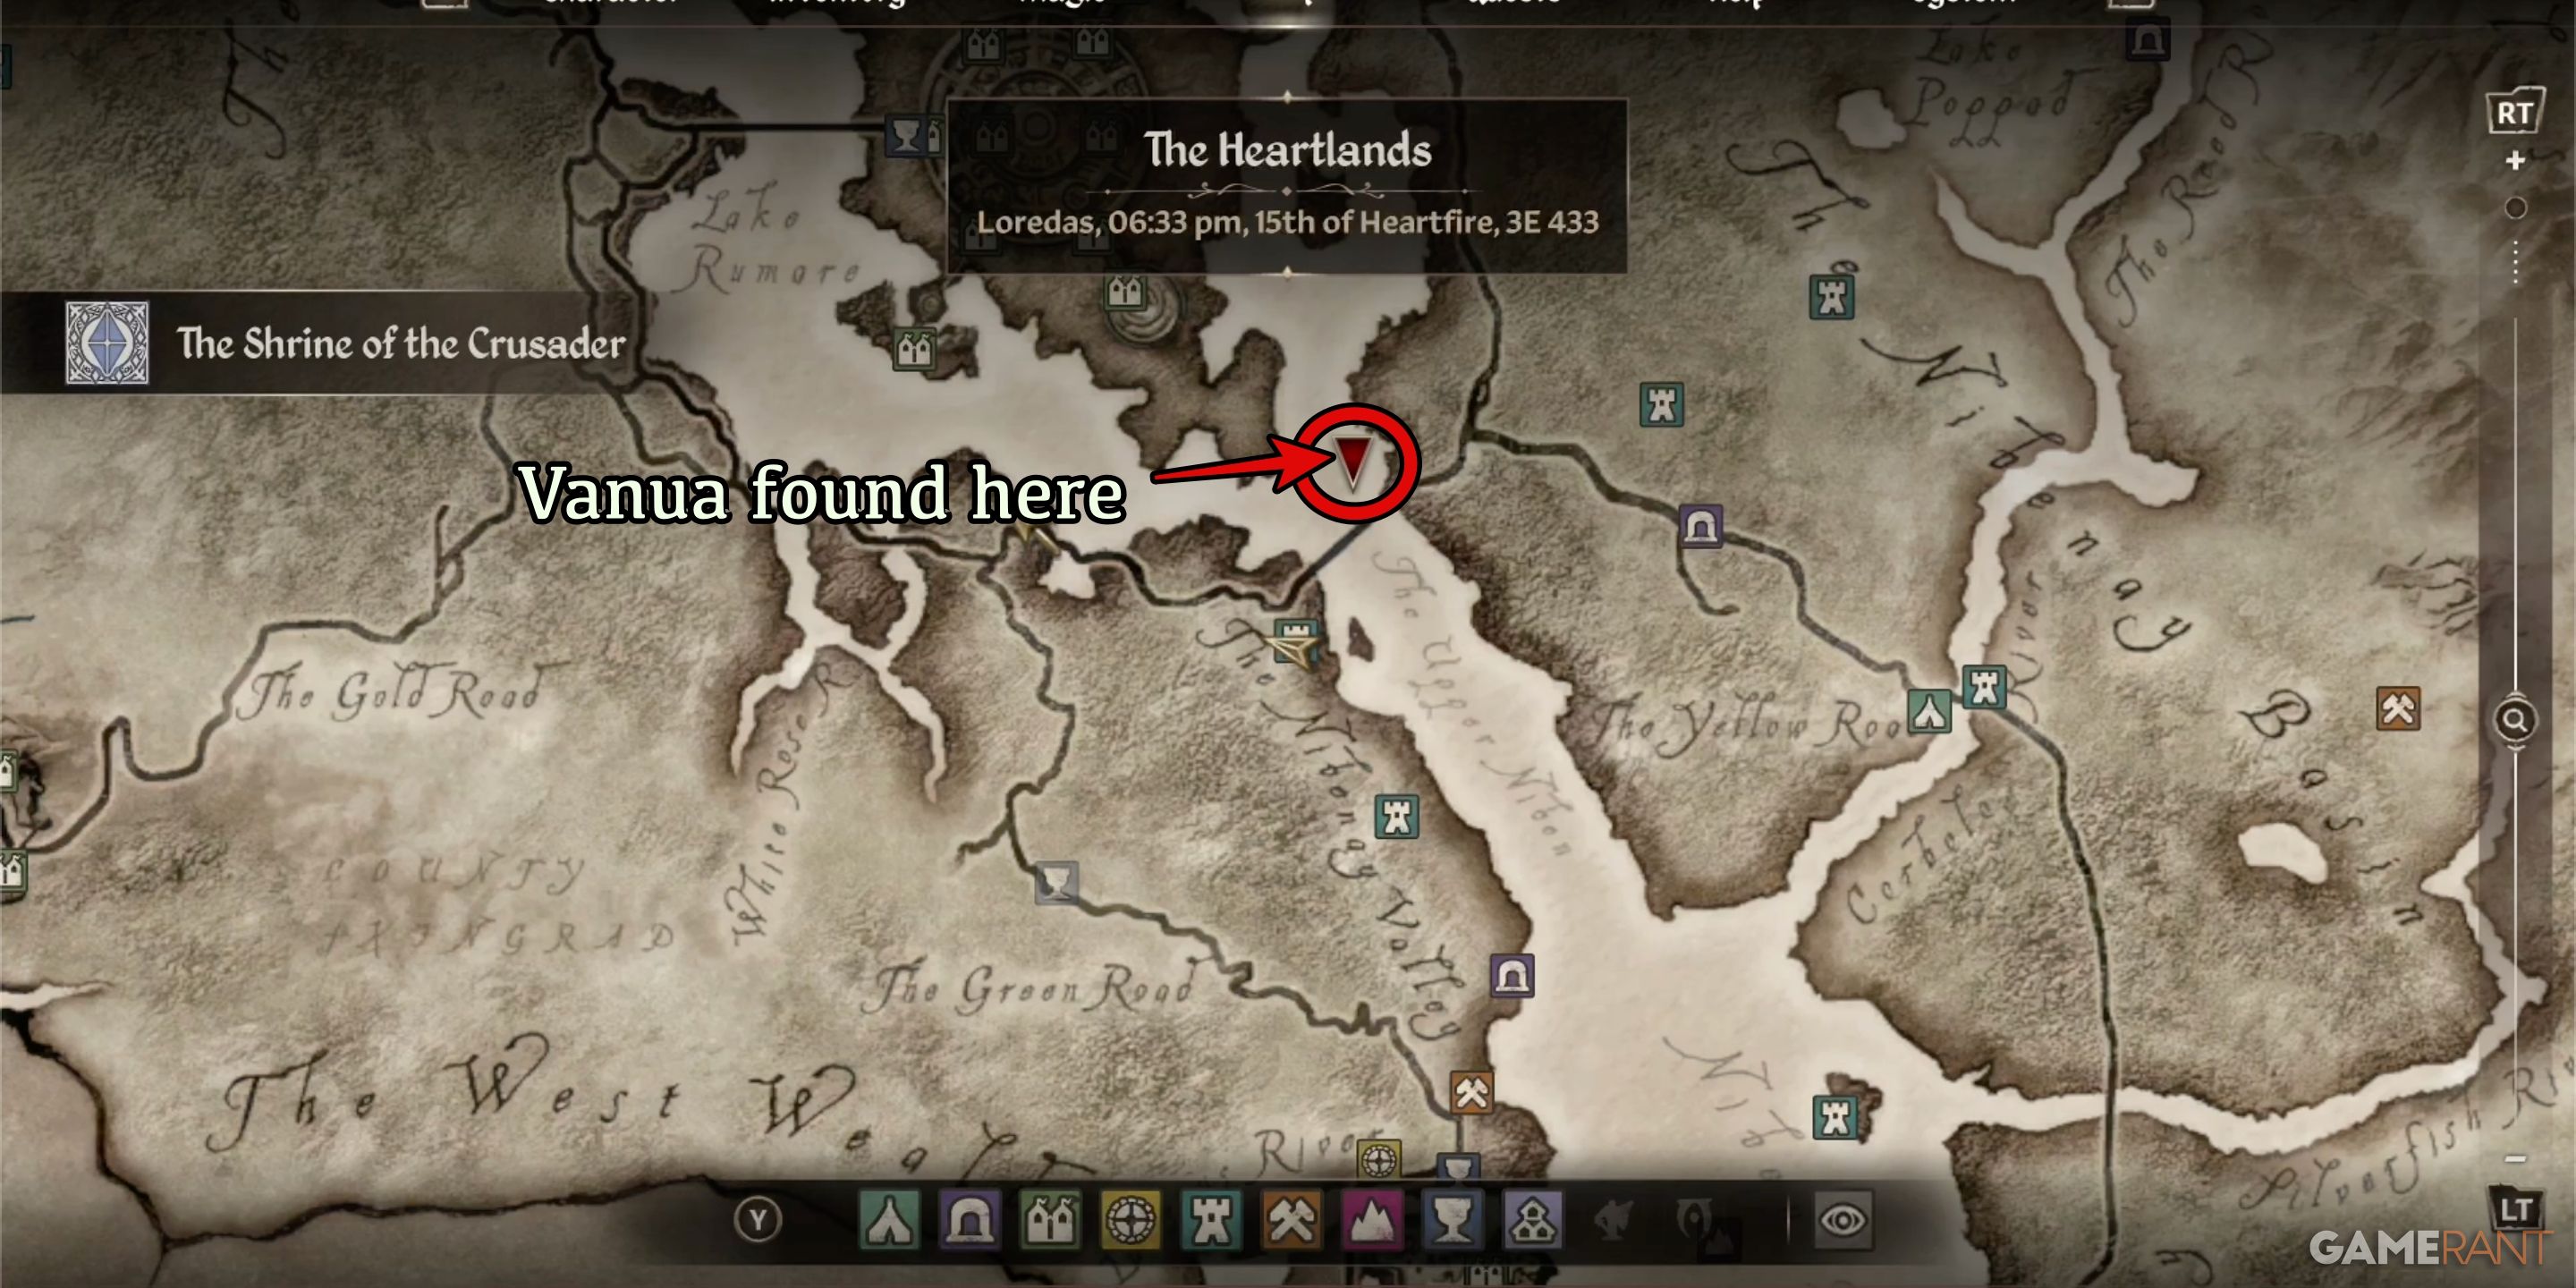
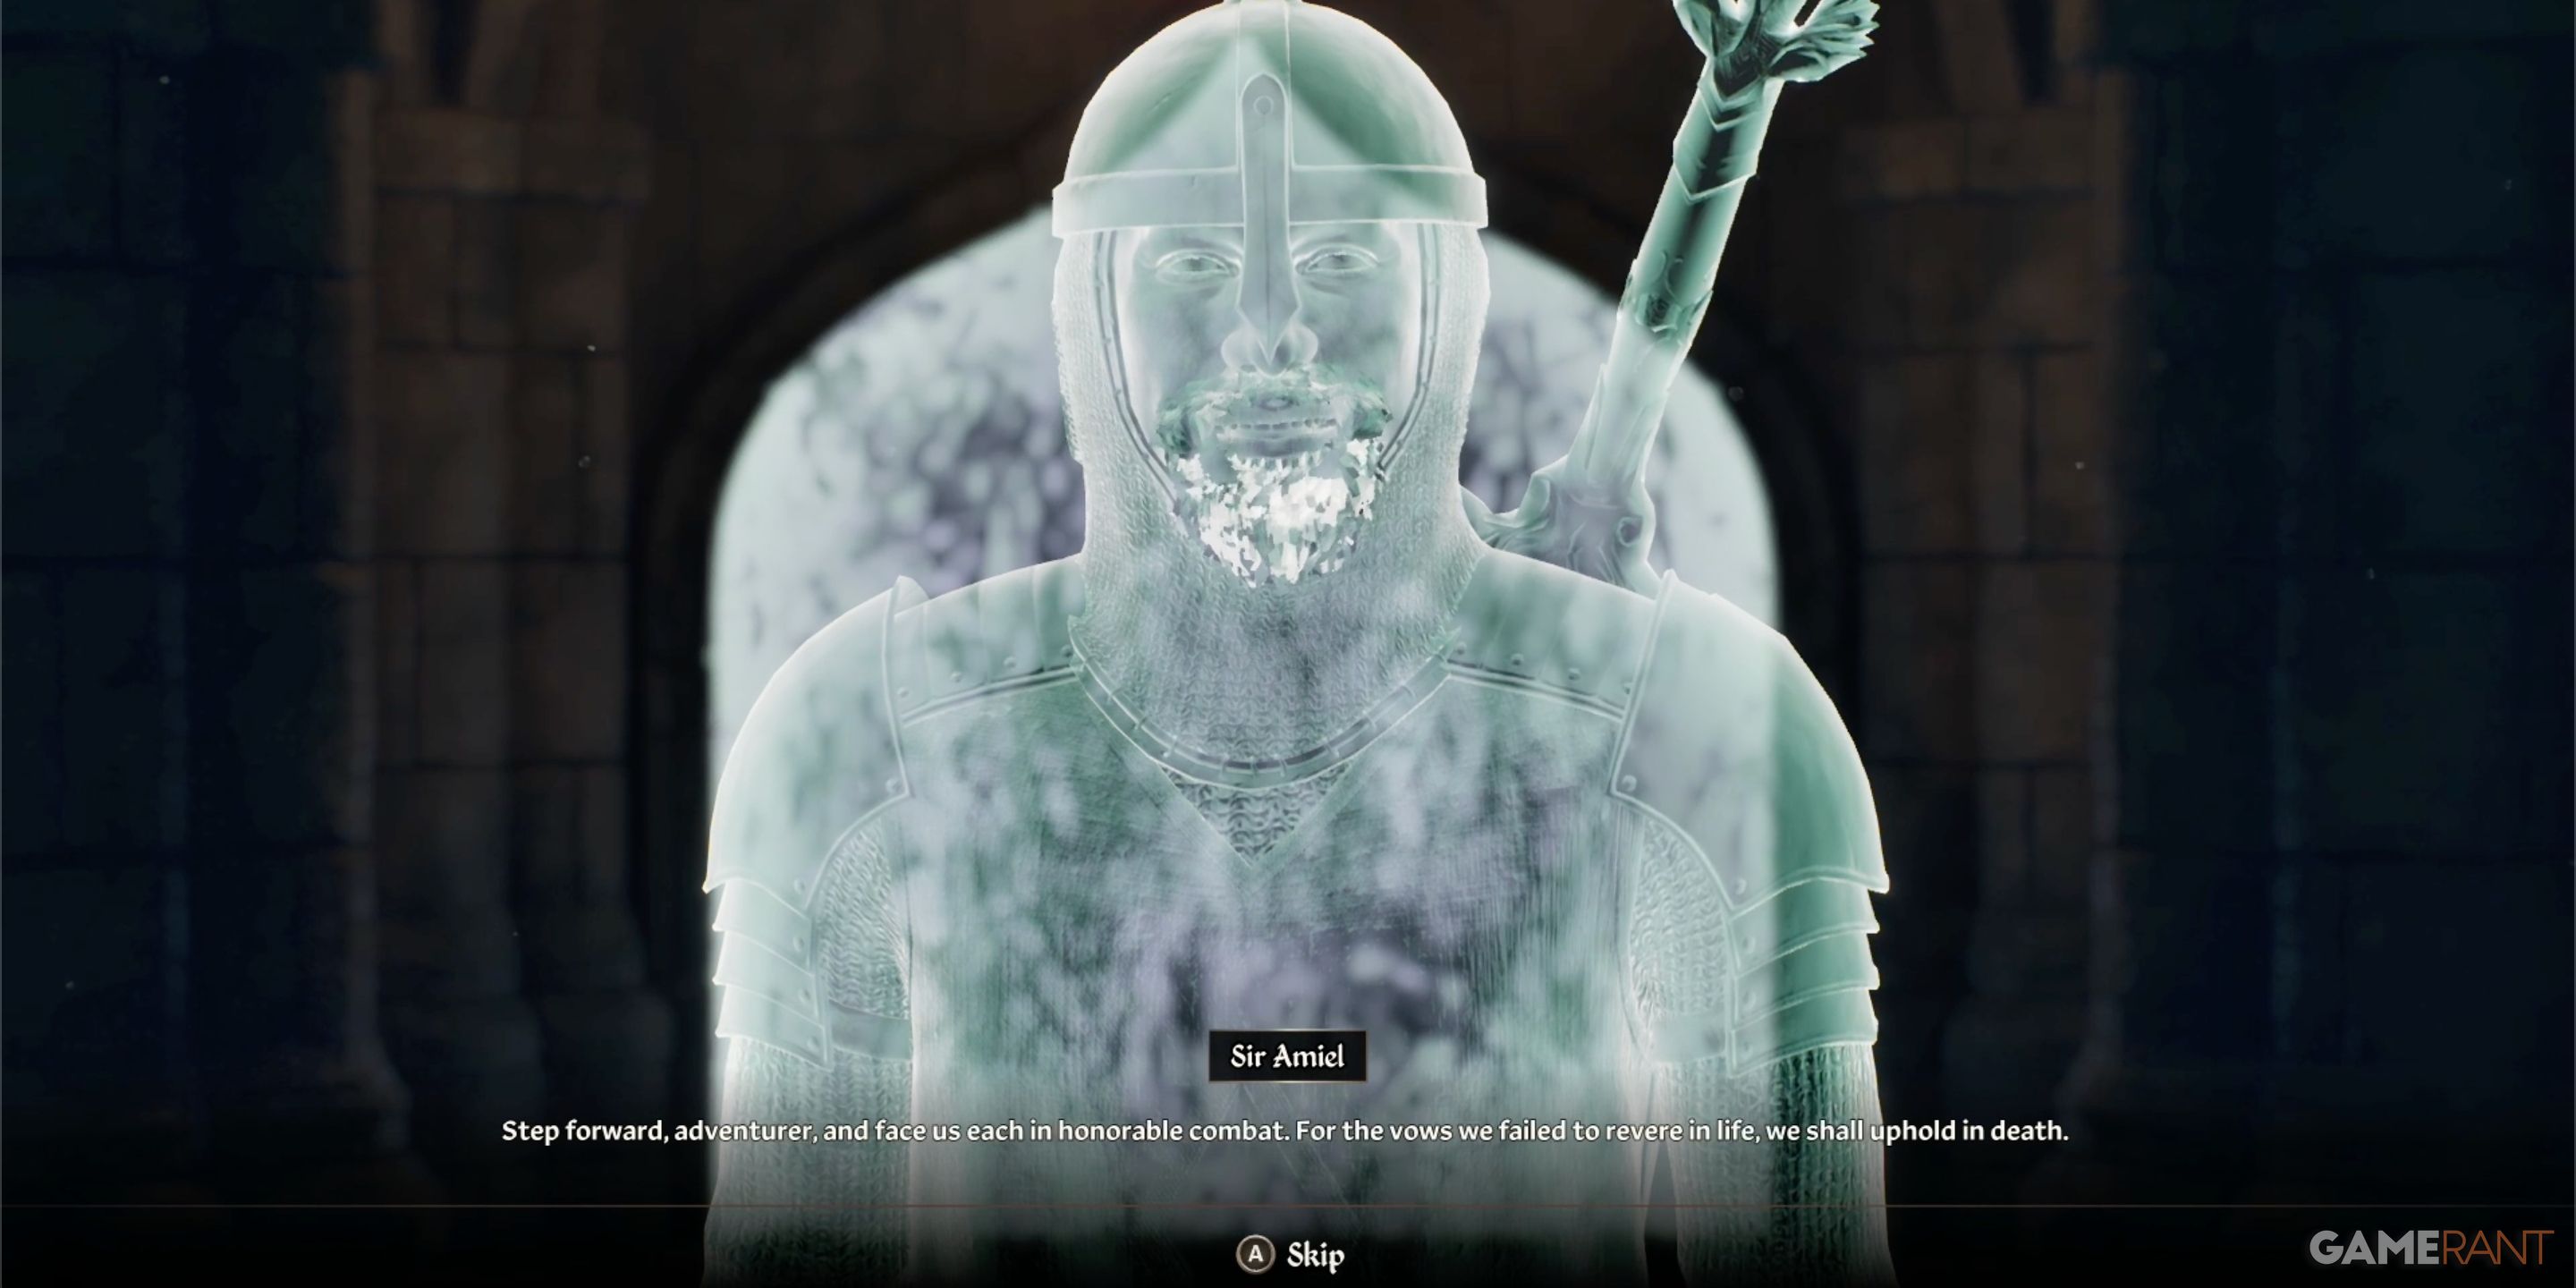
The “Crusader’s Helmet” is the initial Crusader’s relic available, and can be obtained by completing the “Shrine of the Crusader” quest. In this quest, players are required to explore the submerged ruin known as Vanua, where they will find a former member of the Knight of the Nine named Sir Amiel. Tragically, this knight met his end while attempting the same mission you have been assigned.

The access point to Vanua can be located at the bottom of Lake Rumare, specifically on the northeastern side of the bridge that divides the lake from the Upper NIben river. This bridge is positioned in the southeastern corner of the lake. The quest symbol will guide you precisely to the location of the “Vanua’s Door”.
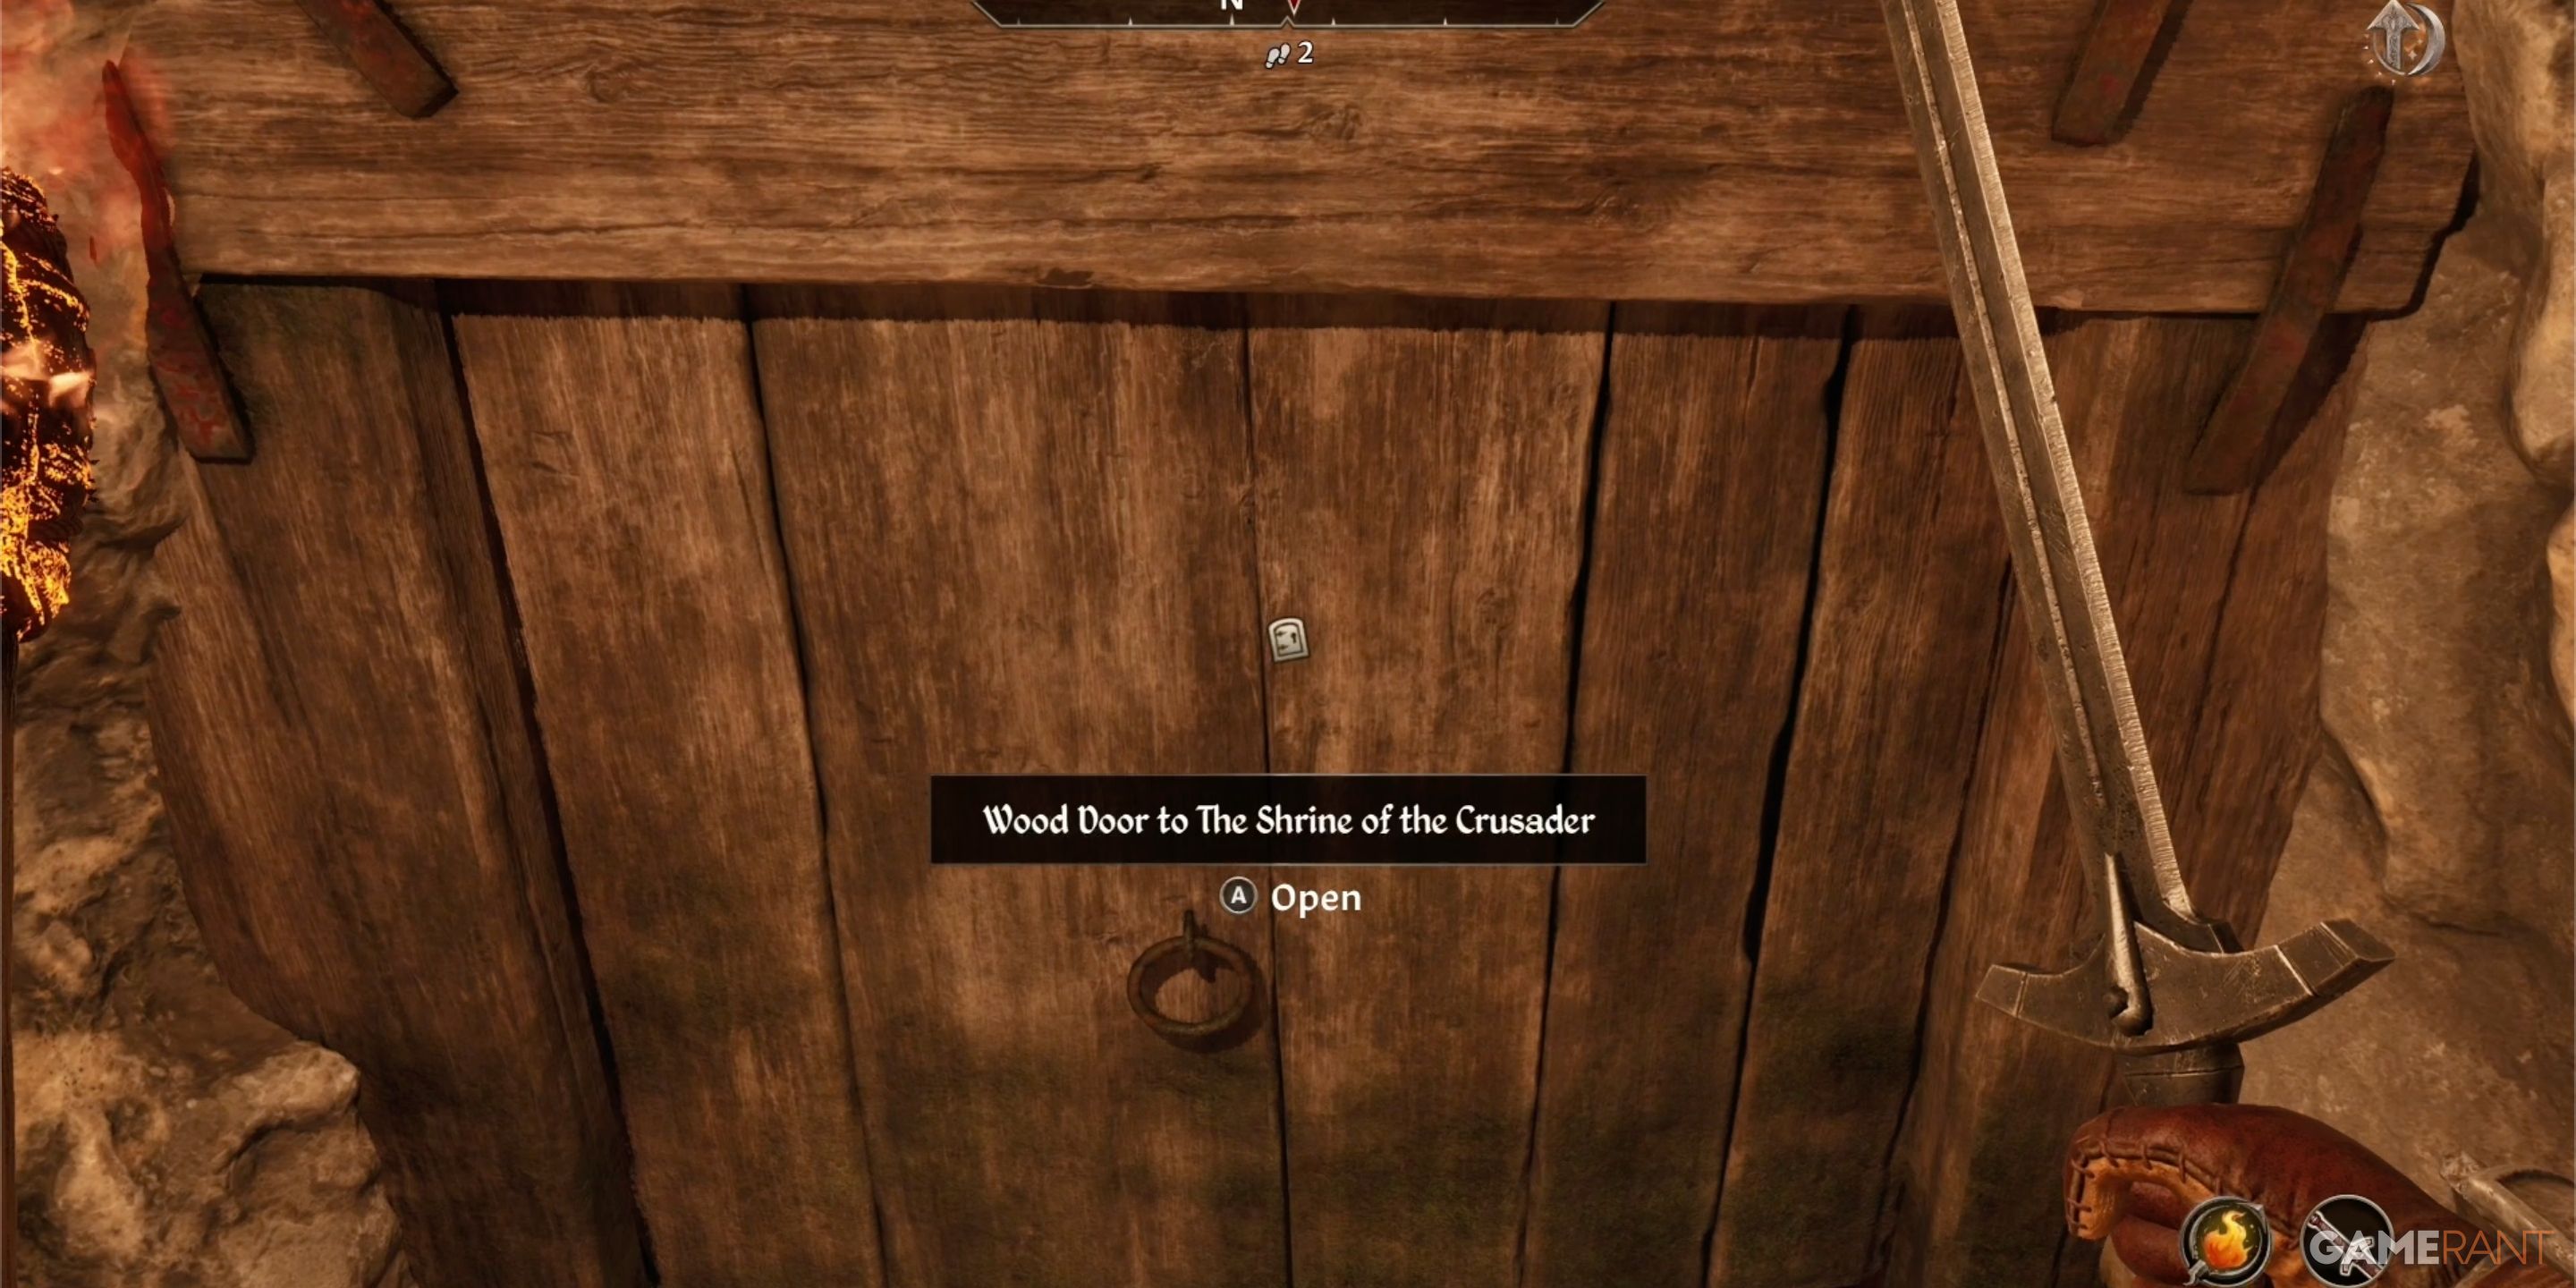
The initial part of these ruins is called Vanua. Following the primary trail will lead you to a compact wooden entrance, which opens up to the Shrine of the Crusader.

Ensure that you remove Sir Amiel’s Ring from his person, as it holds significance within the “Priory of the Nine“. Forgetting the ring would necessitate a return trip to the Shrine of the Crusader to retrieve it.
Or simply:
Remember to get Sir Amiel’s Ring off his body, as it matters for the “Priory of the Nine“. Leaving it behind means you’d need to go back to the Shrine of the Crusader to pick it up.
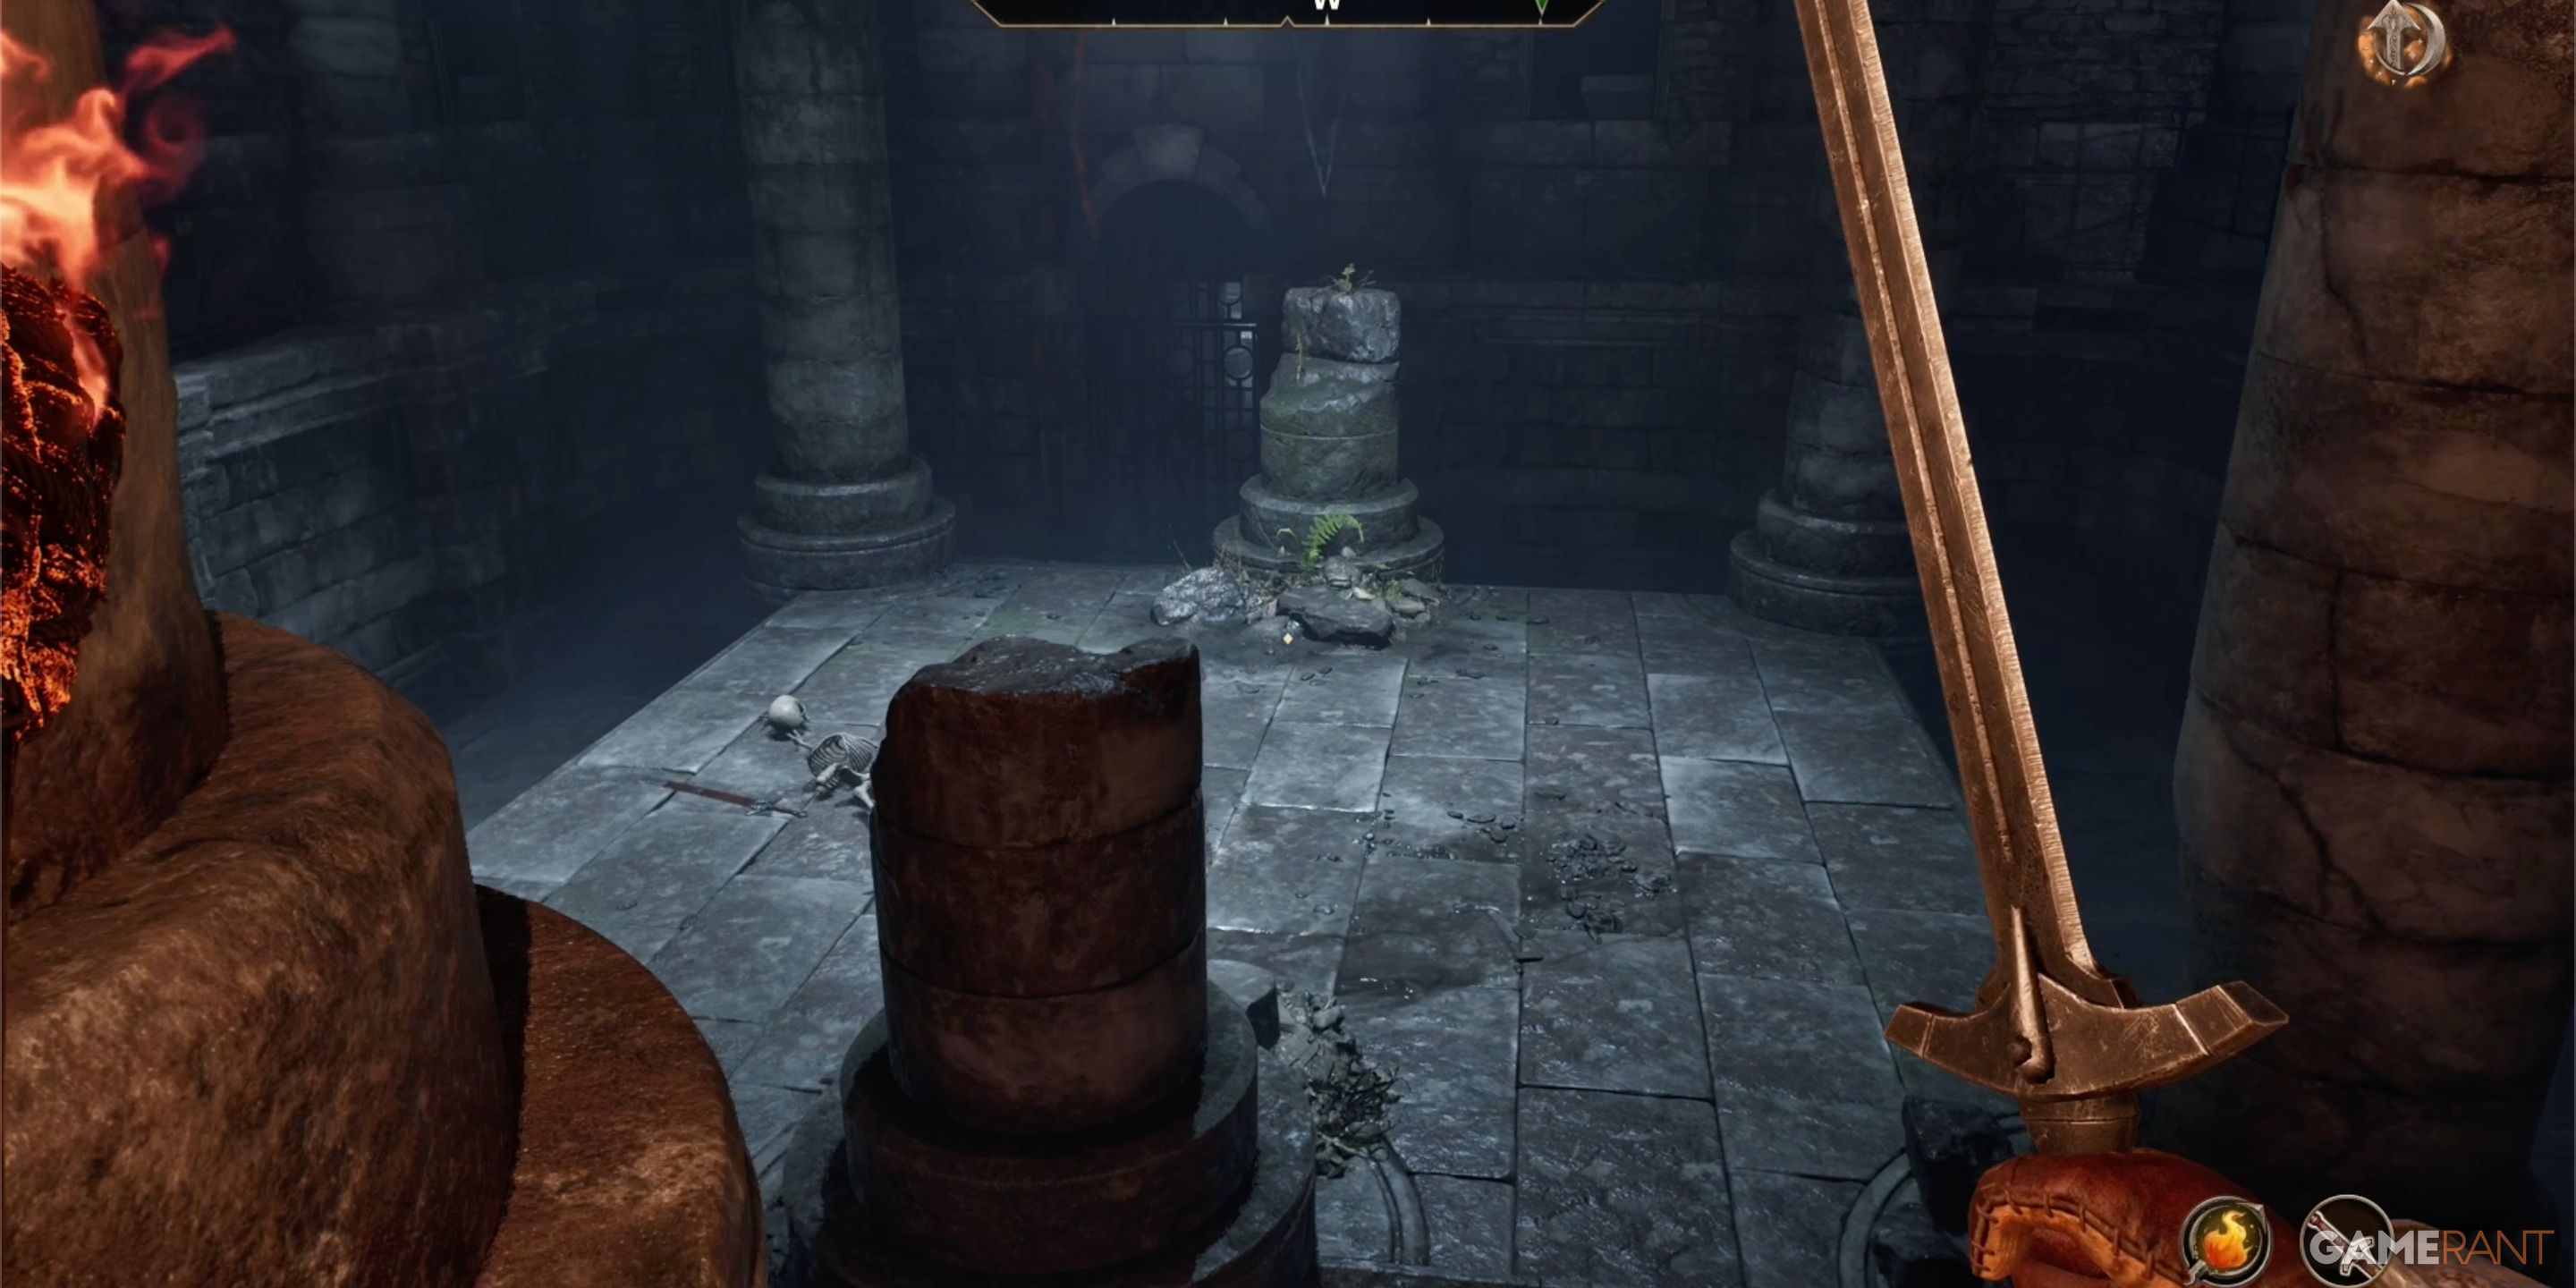
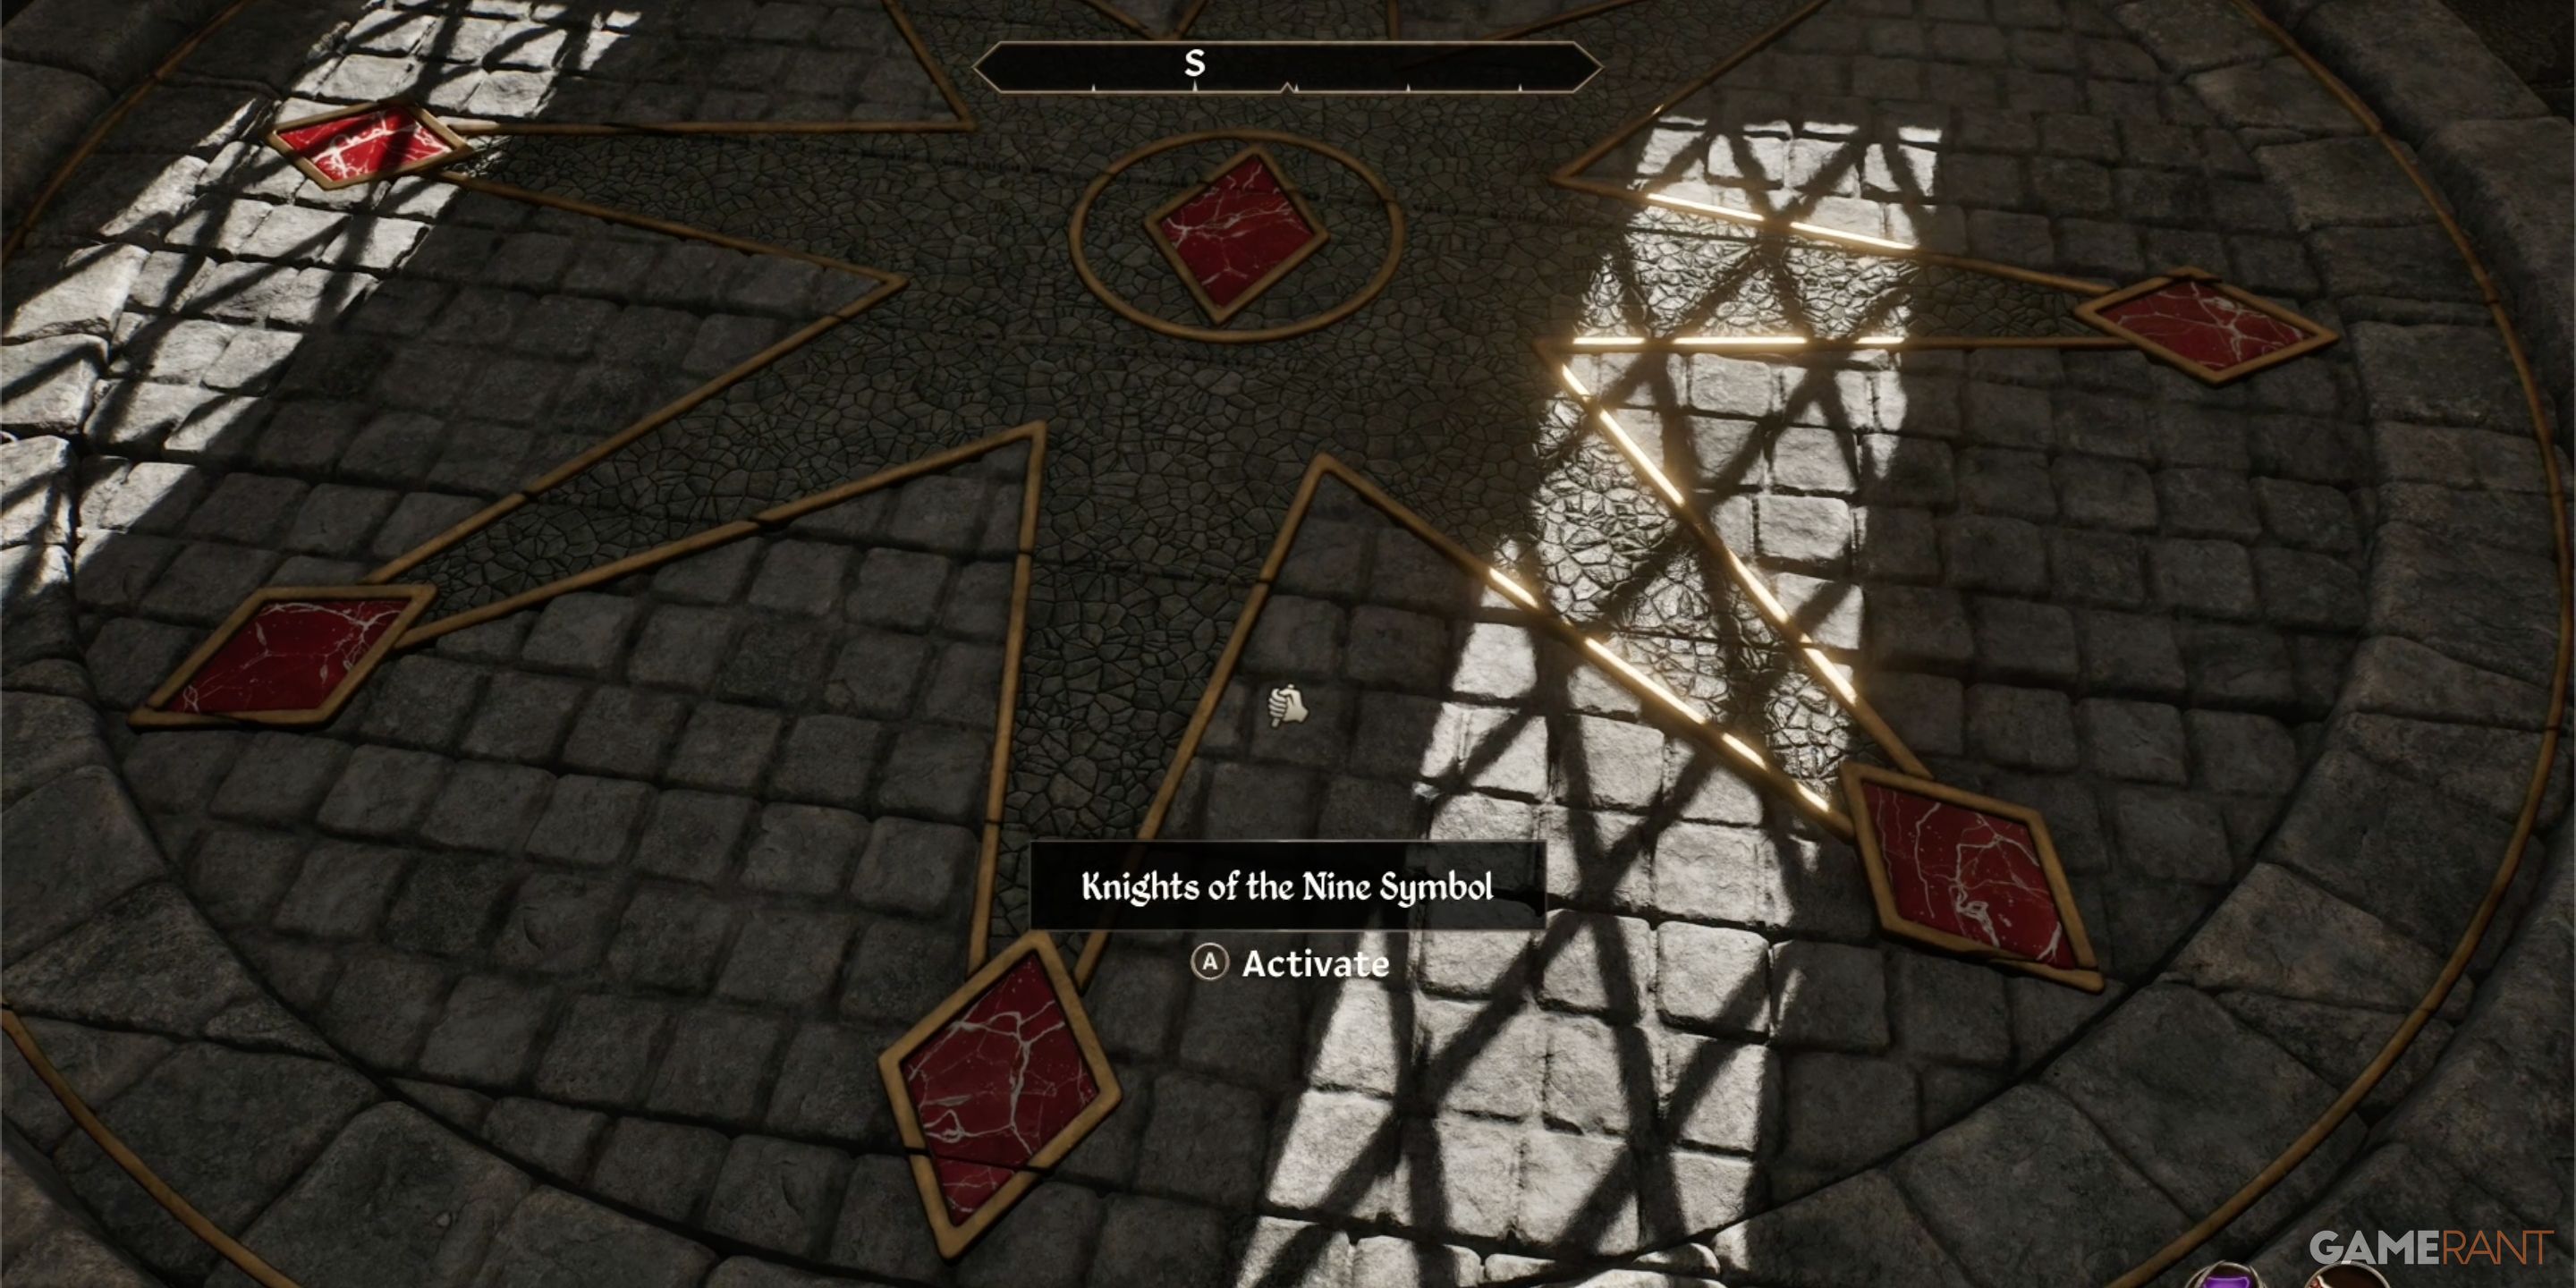
Upon stepping into the Crusader’s Sanctum, you’ll descend into a spacious room with a central square stage supported by old columns. At the heart of the stage lies the desiccated bones of Sir Amiel. On his arm, you’ll spot the Knight’s Nine Shield emblem, which can be picked up. This isn’t the Crusader’s Shield though, that one is discovered later on. Examining Sir Amiel will trigger your next mission, titled “Priory of the Nine.” However, your journey through the Crusader’s Sanctum won’t be concluded until you find the Crusader’s Helm in the final area of the Shrine.
Absolutely do not forget to take Sir Amiel’s Ring when you search his body.
The Lost Catacombs:

After finding Sir Amiel’s corpse within the Crusader Shrine, utilize his key to unlock the western gate. Stick to the primary path until you come across the entrance to the third part of the ruins, known as The Forgotten Catacombs. Be aware that there are numerous skeleton adversaries in this brief stretch of ruin, so tread cautiously as you advance.
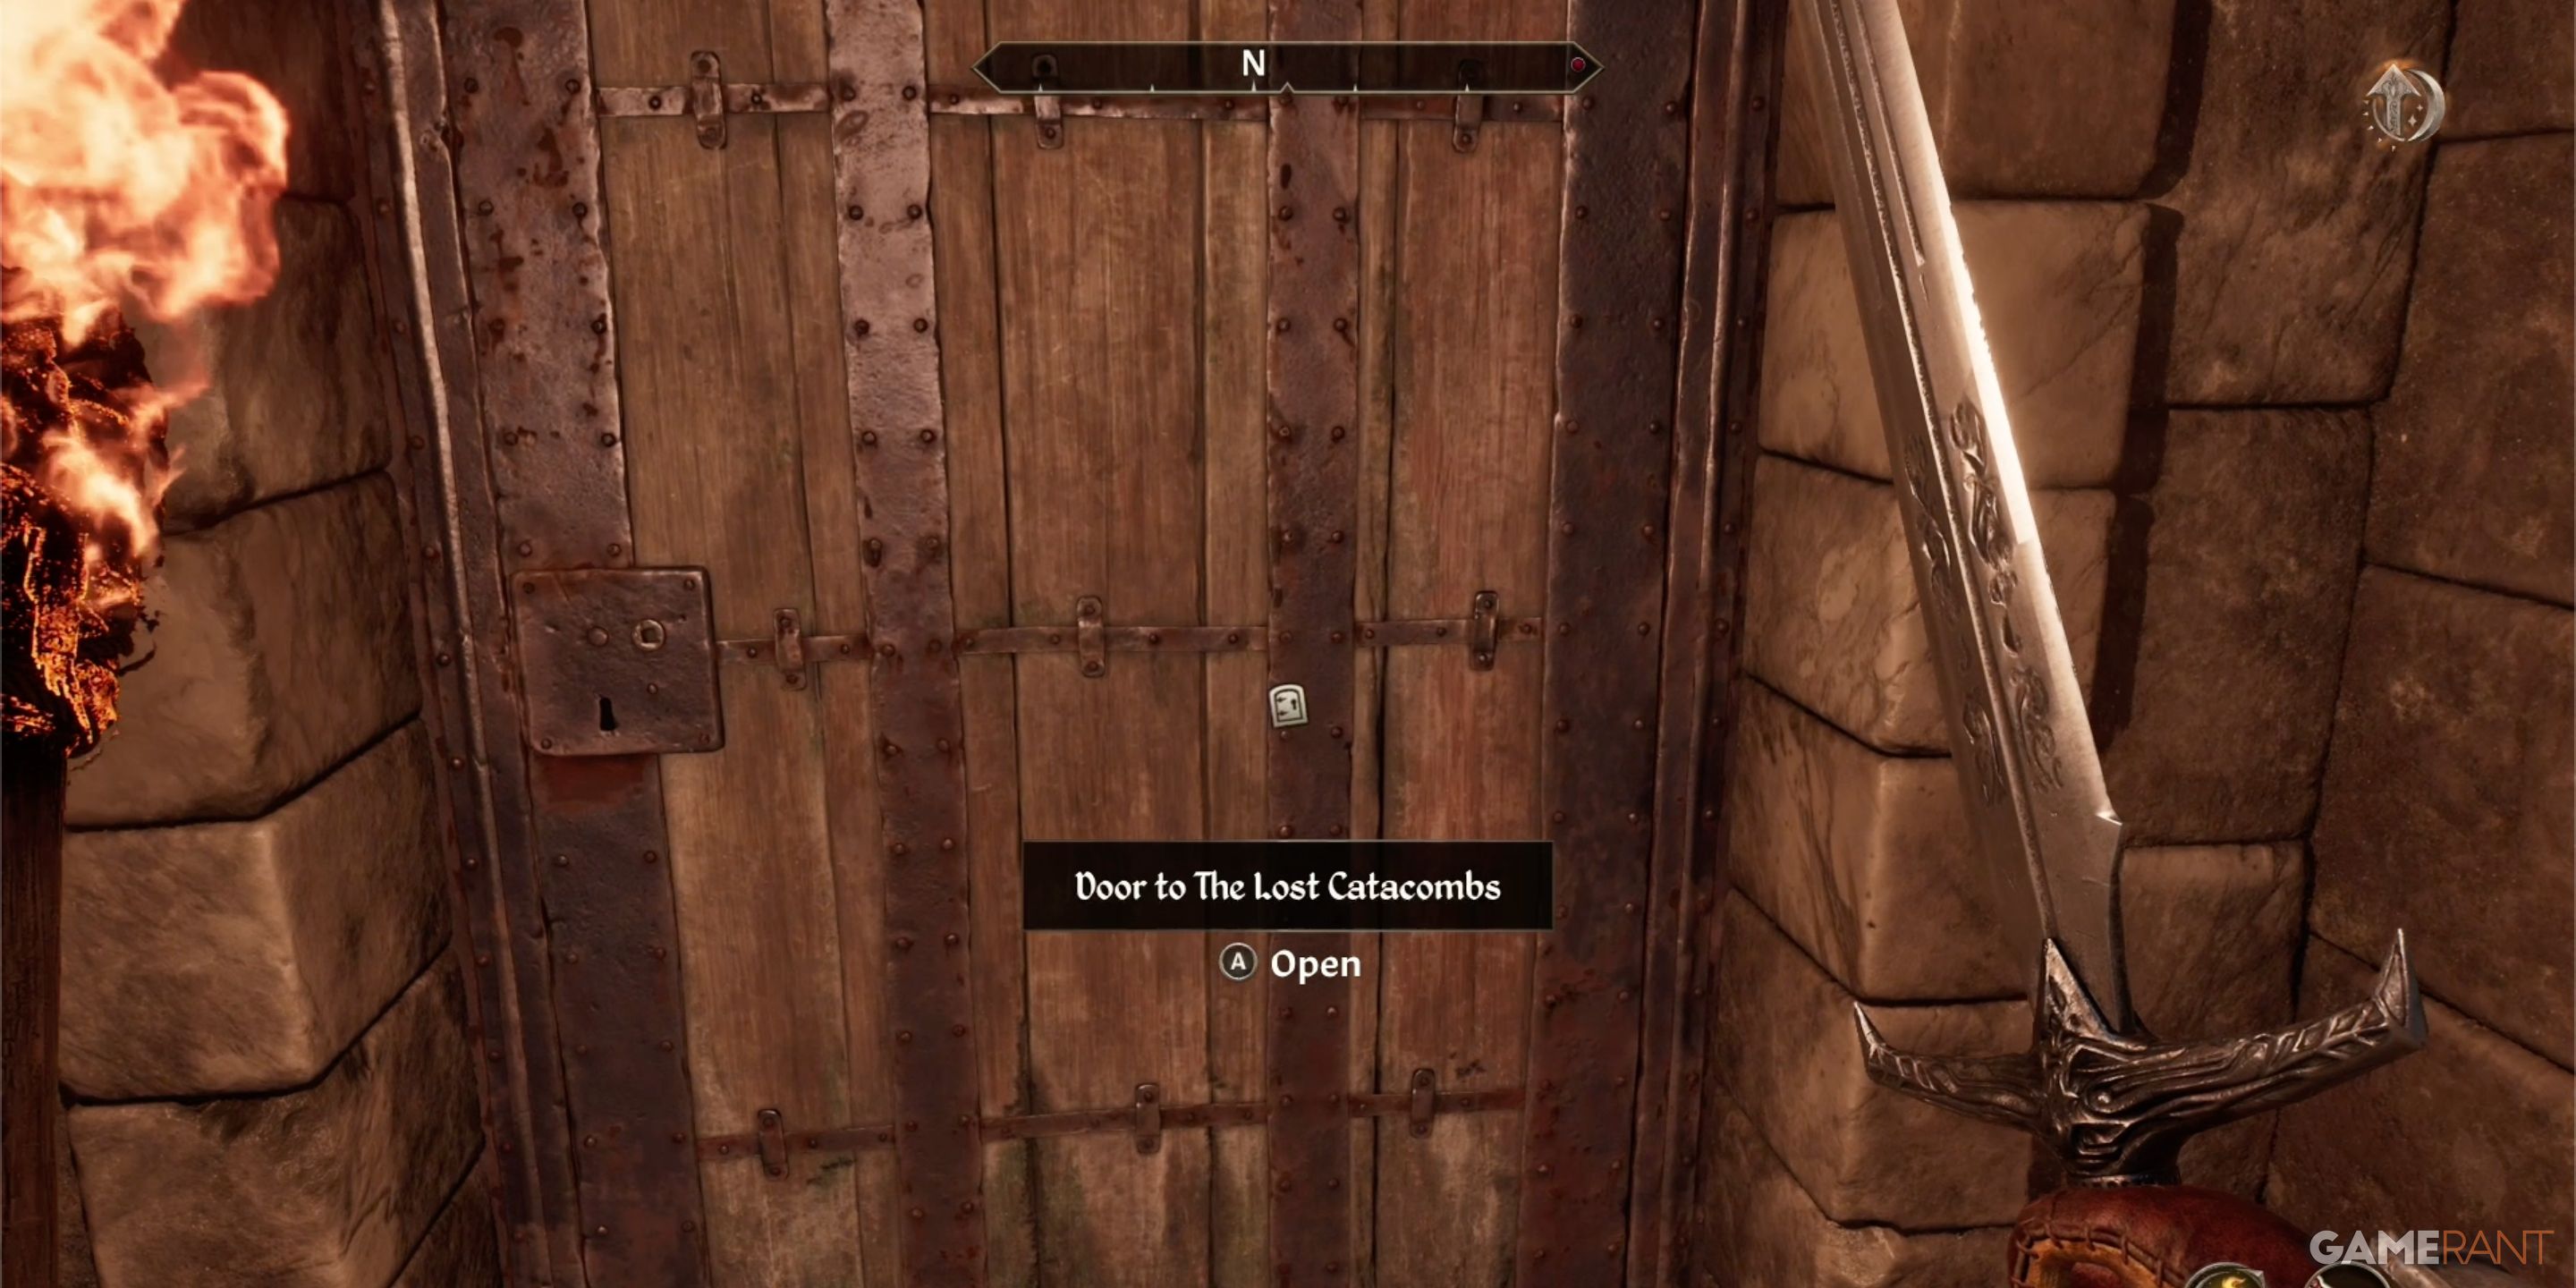
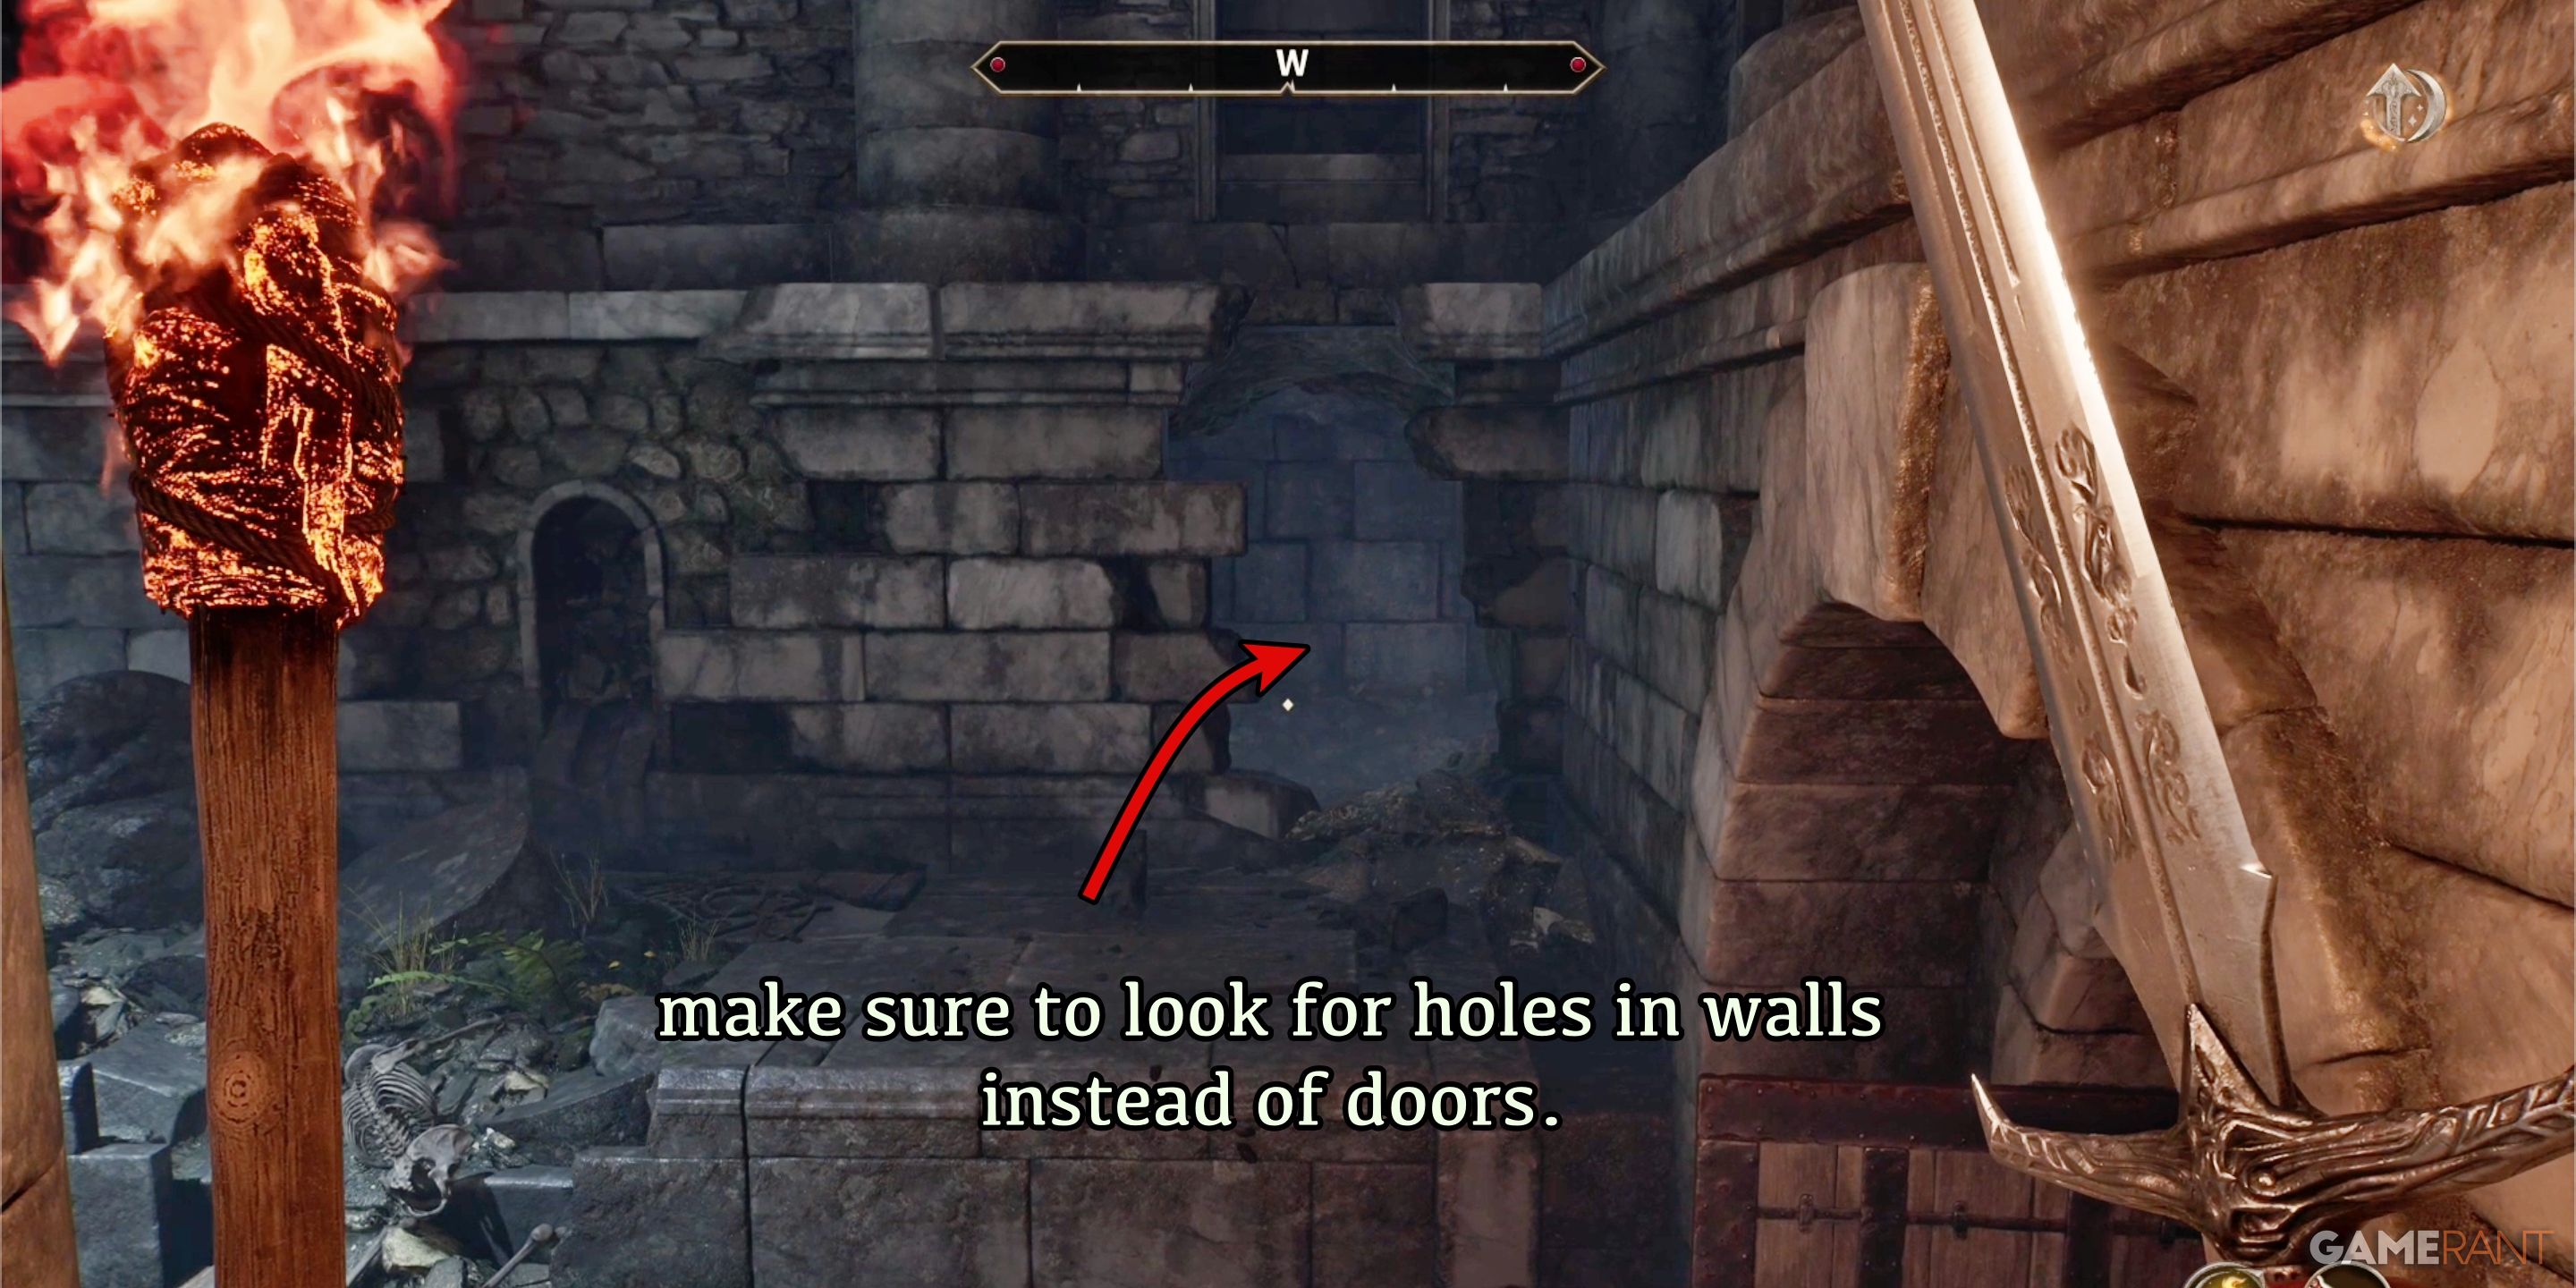
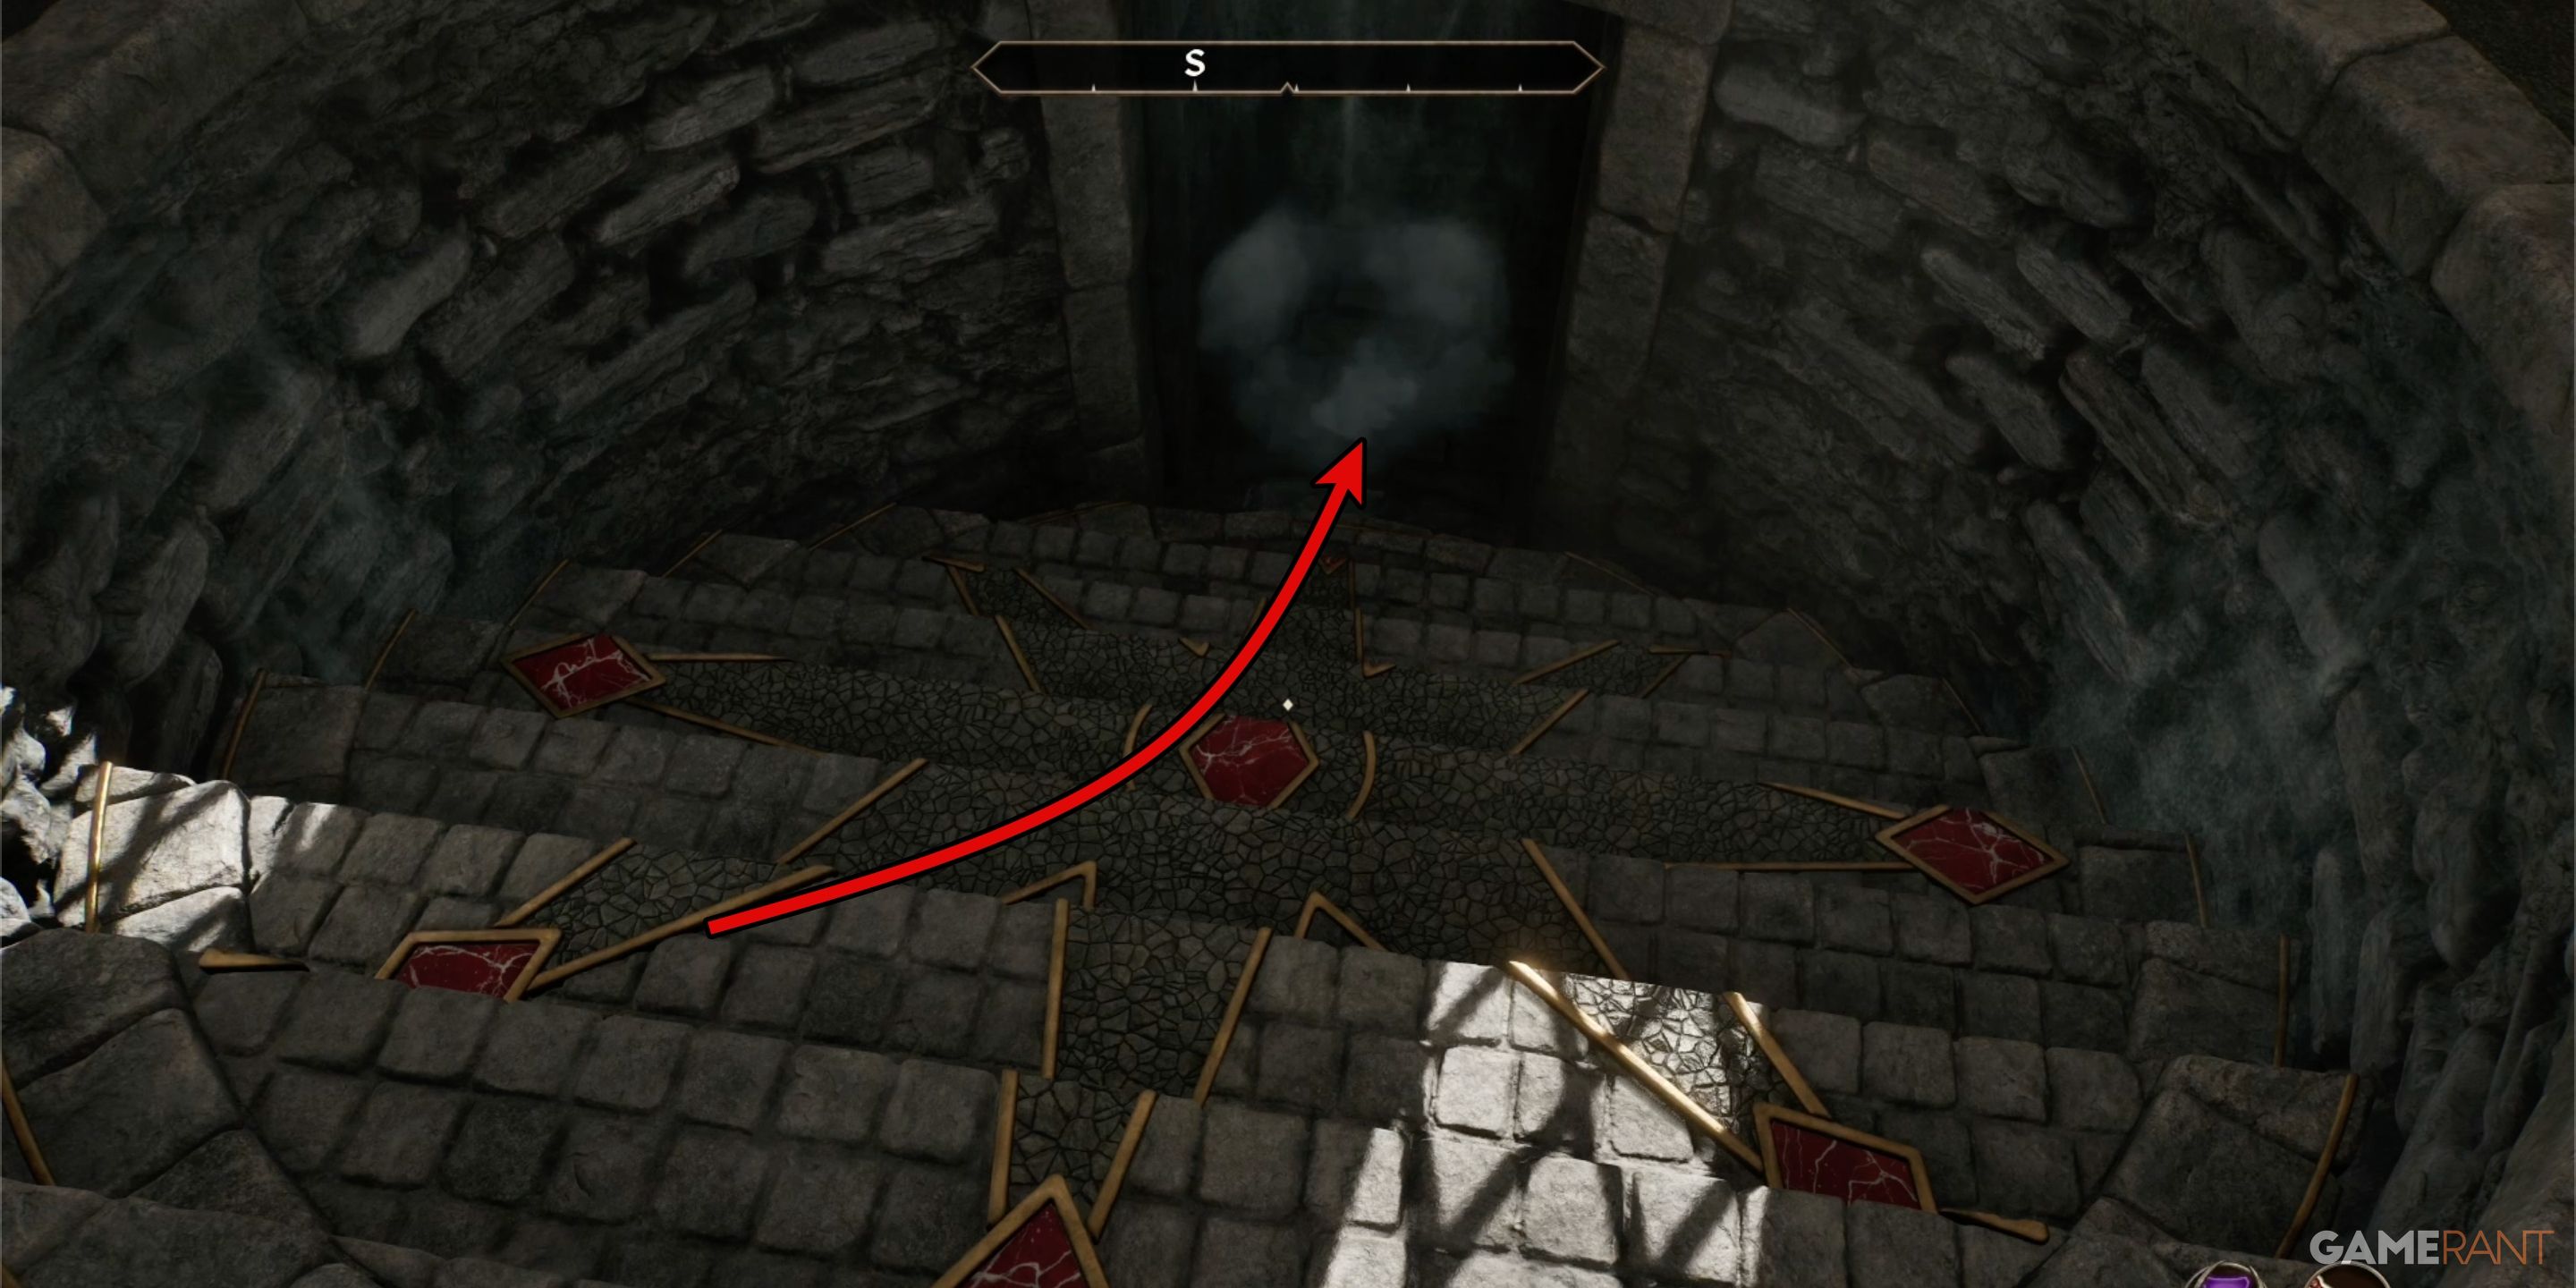
In the Lost Catacombs, you’ll find yourself facing two distinct doors that return you to the Shrine of the Crusader. A simple method to discern which one is correct is by consulting your compass. The quest marker on your compass will guide you; it will display a minimal number of steps when you are approaching the correct door, indicating an easier path.
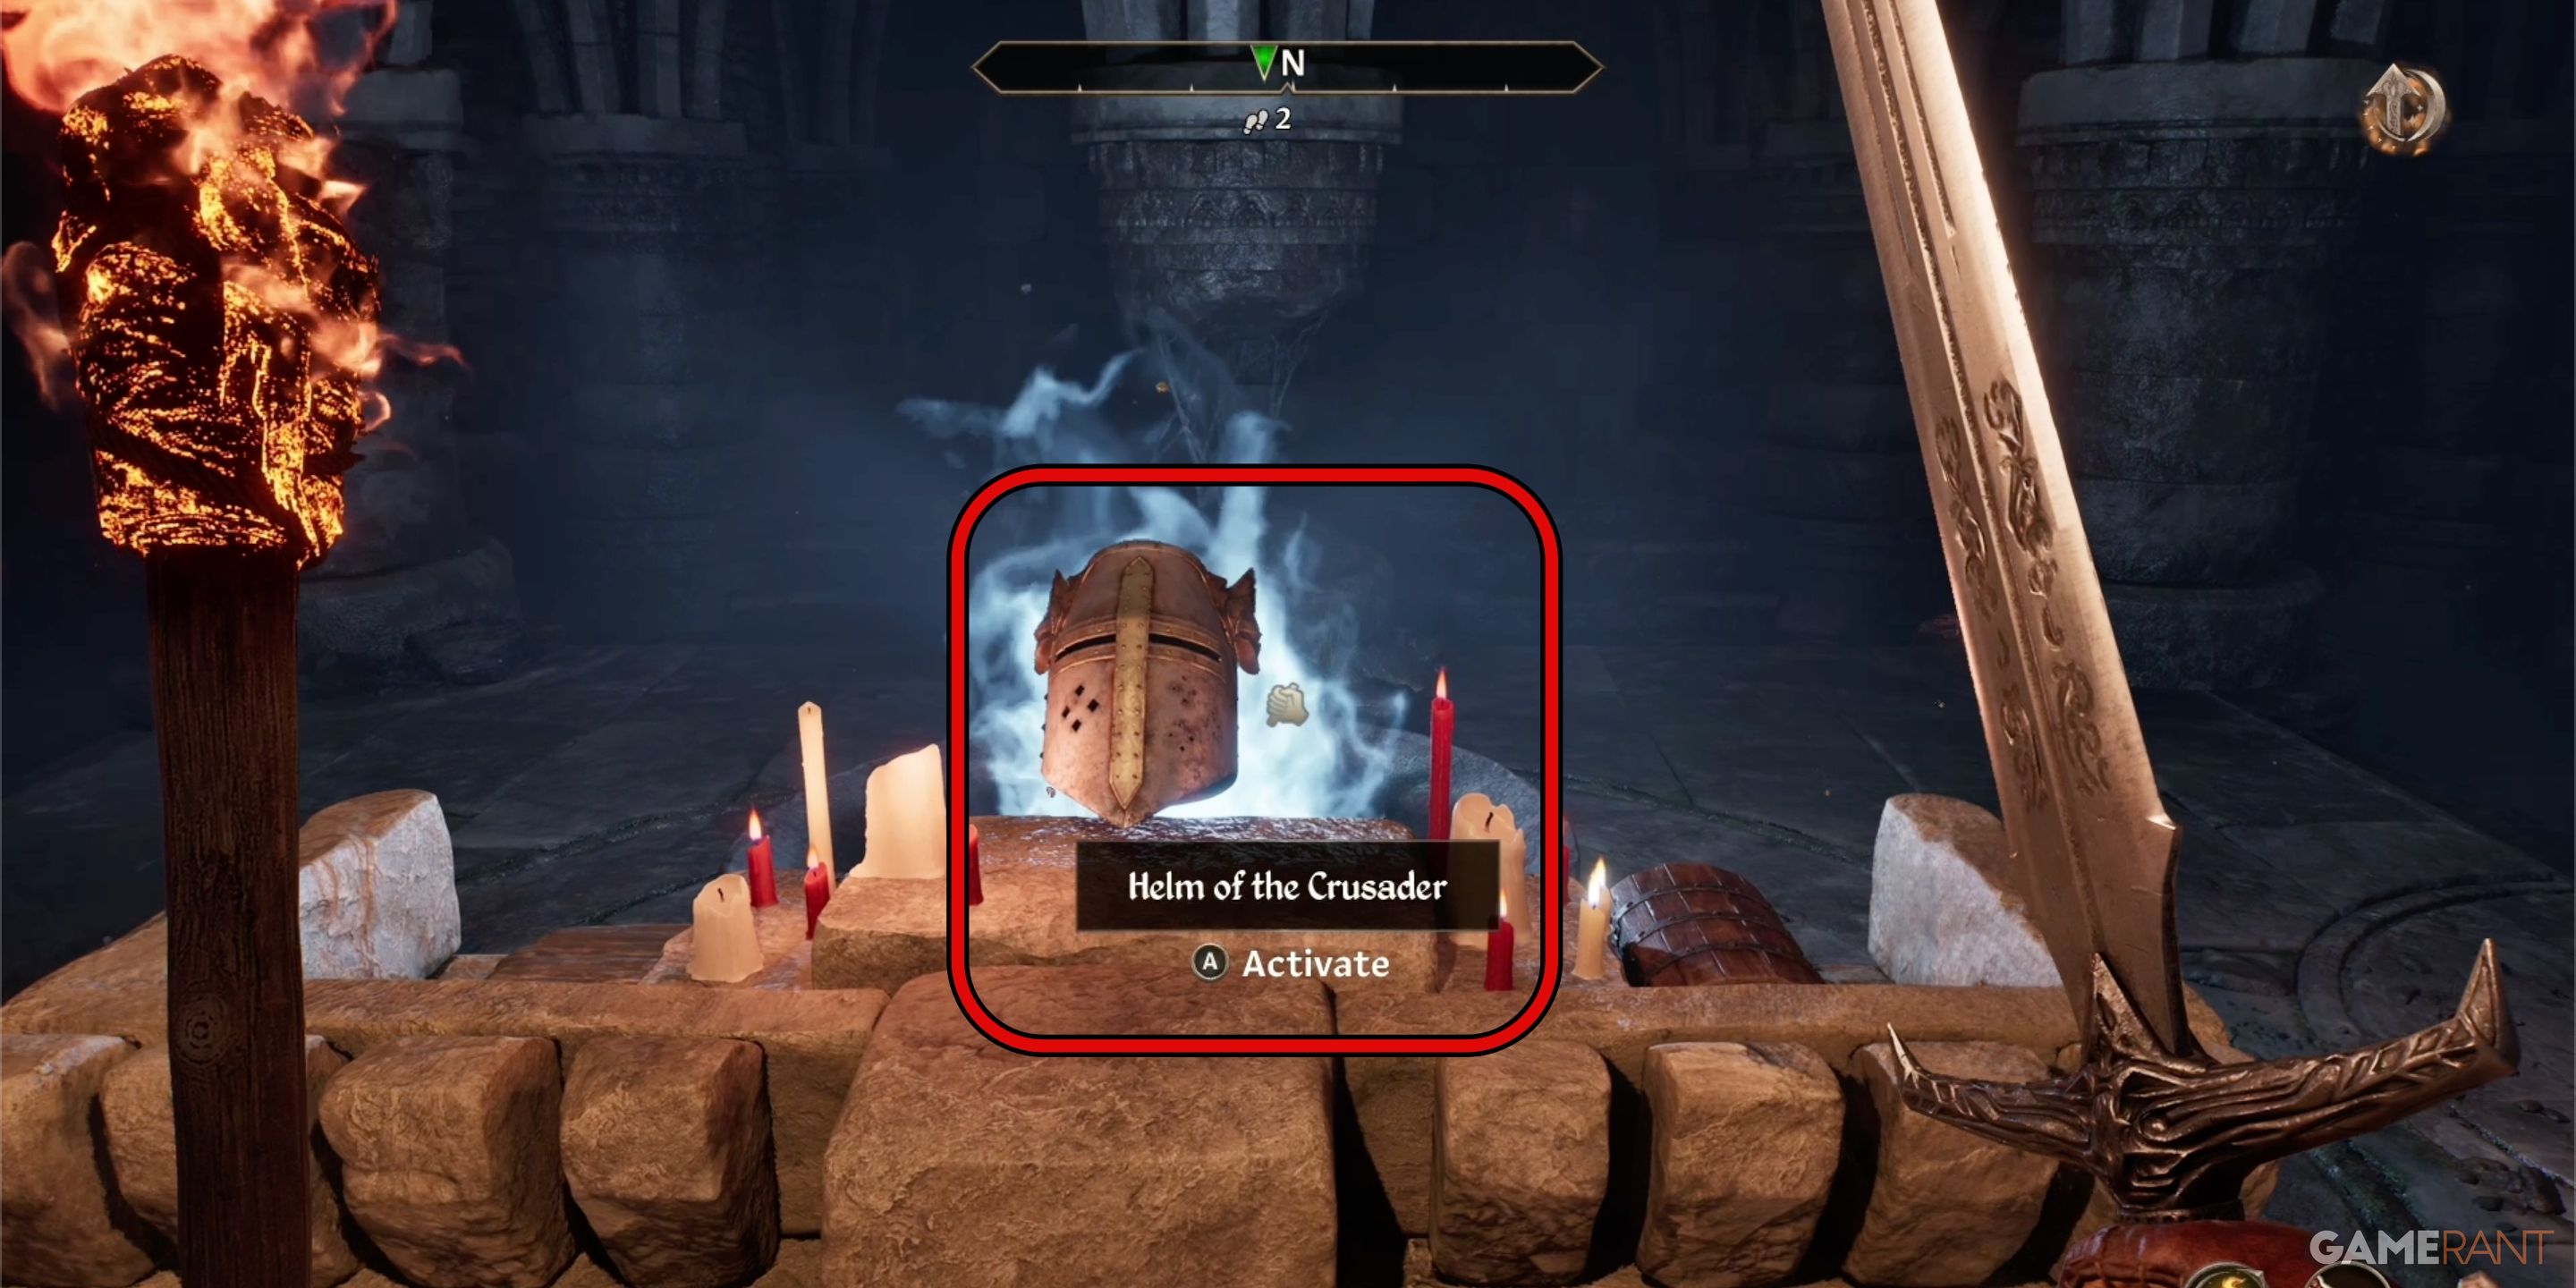
Upon passing through the doorway, you’ll encounter a genuine shrine. Atop a tiny table, suspended over a brazier with flickering blue flames, is the Crusader’s Helm. Grab the helm, then leap down to the lower level to depart from the shrine and advance towards “Priory of the Nine”.
Cuirass of the Crusader Location – Oblivion Remastered
Priory of the Nine Quest Walkthrough:
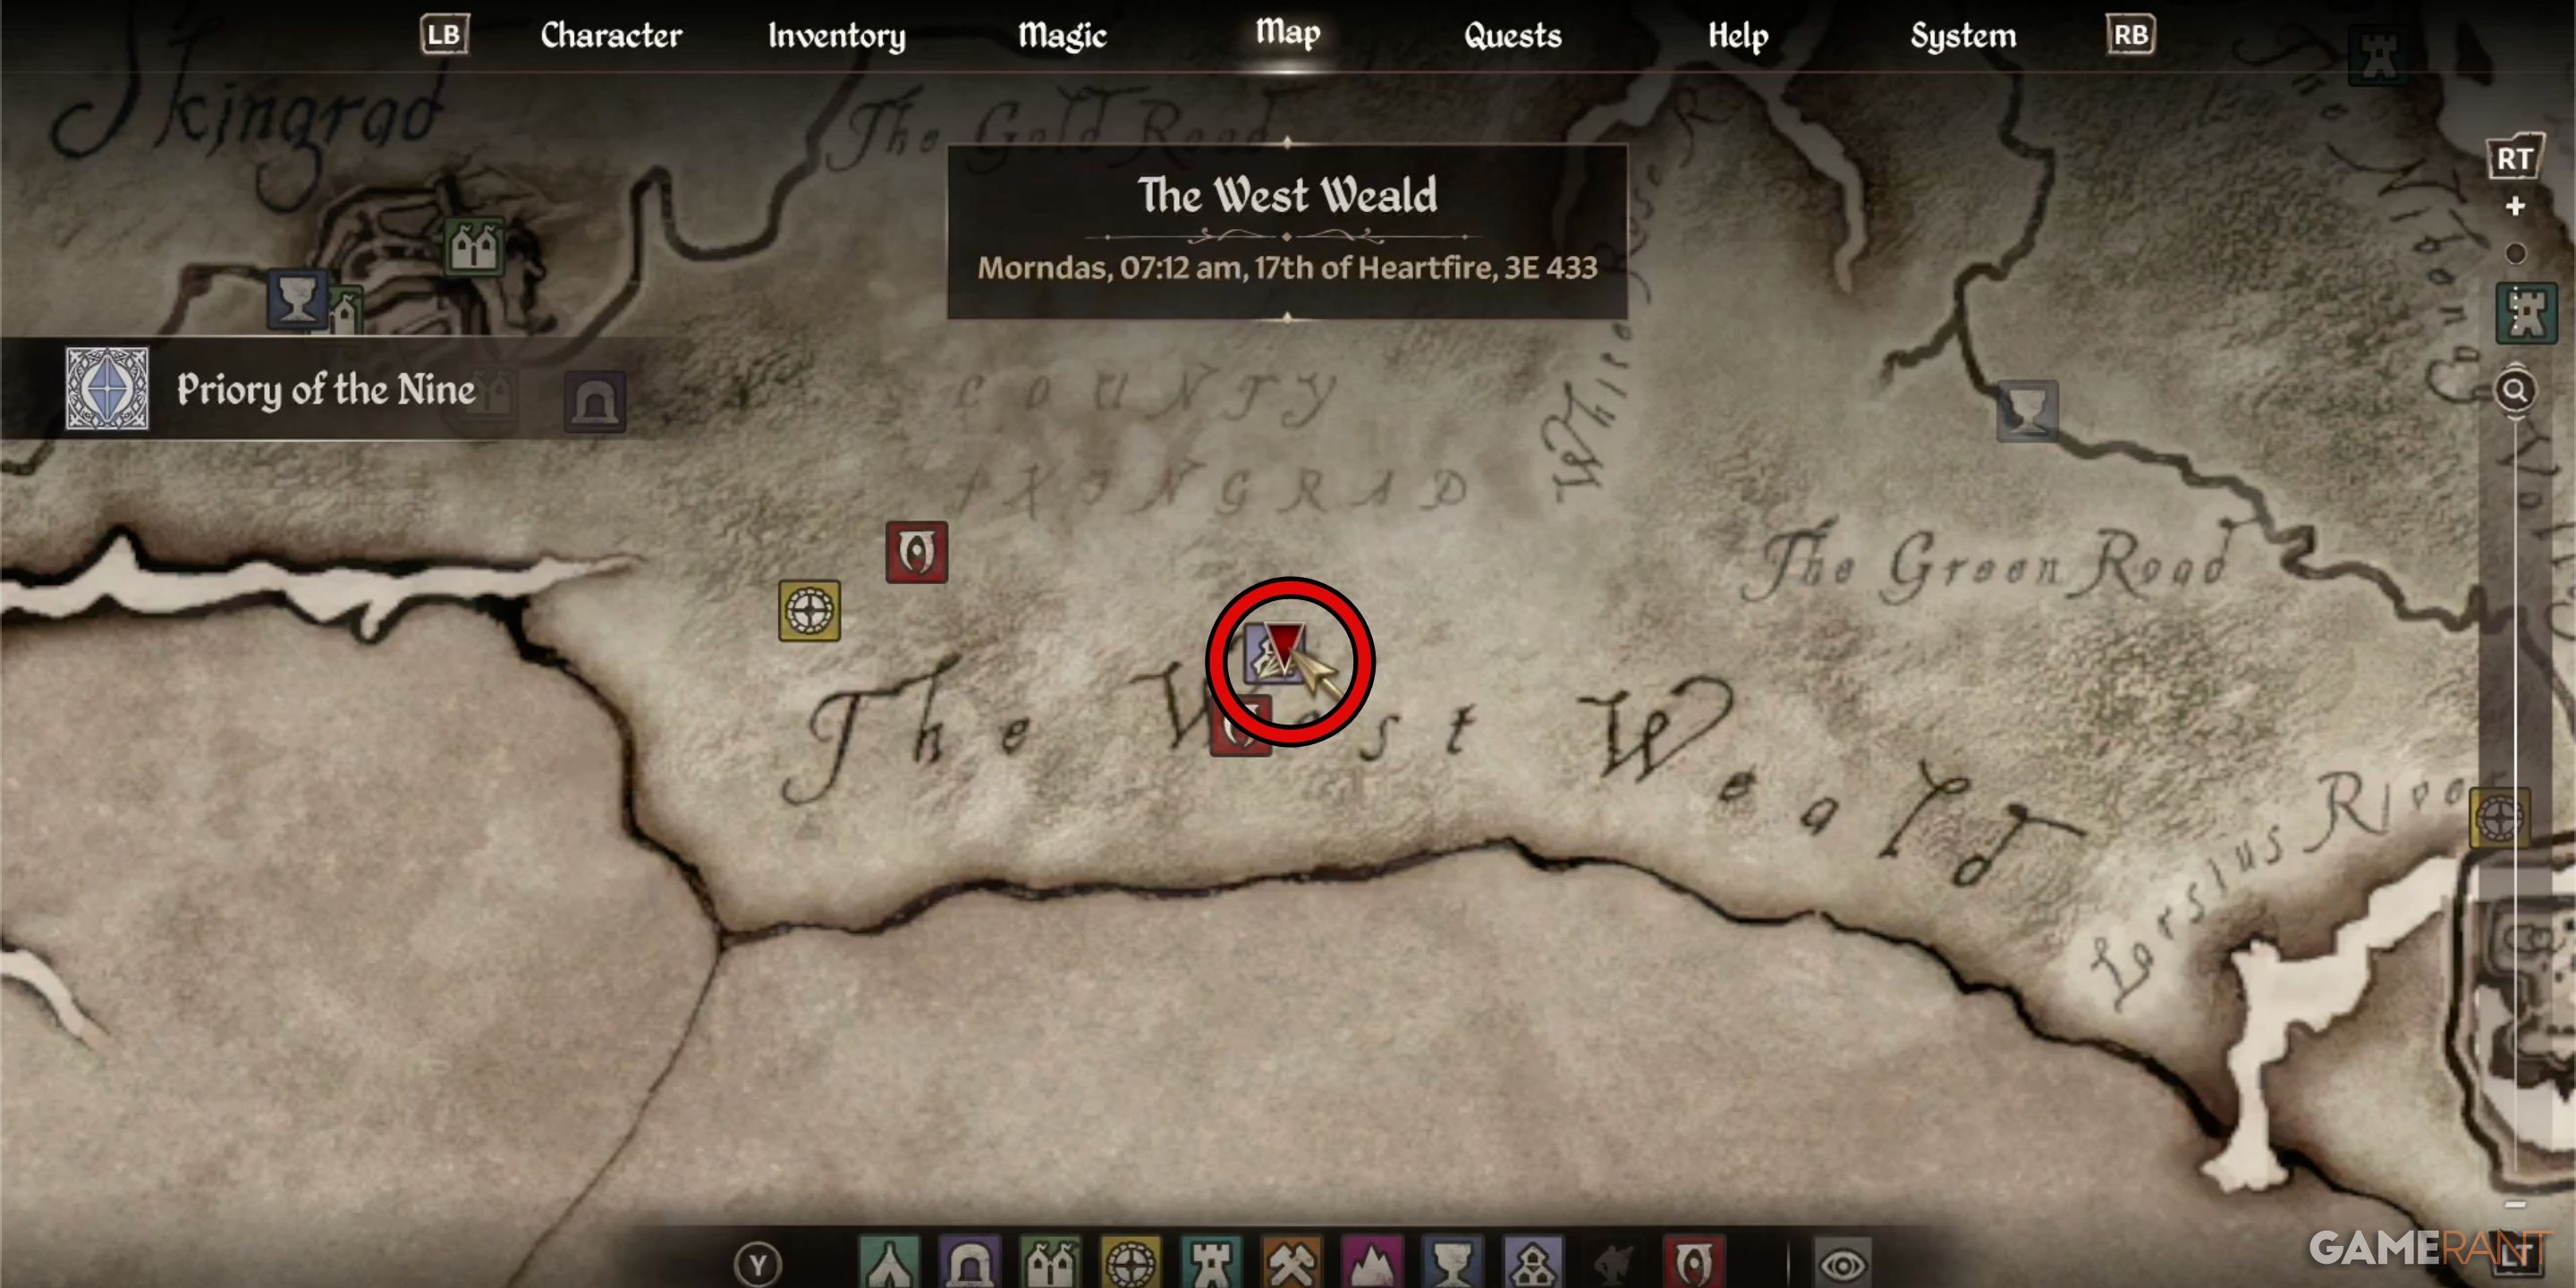
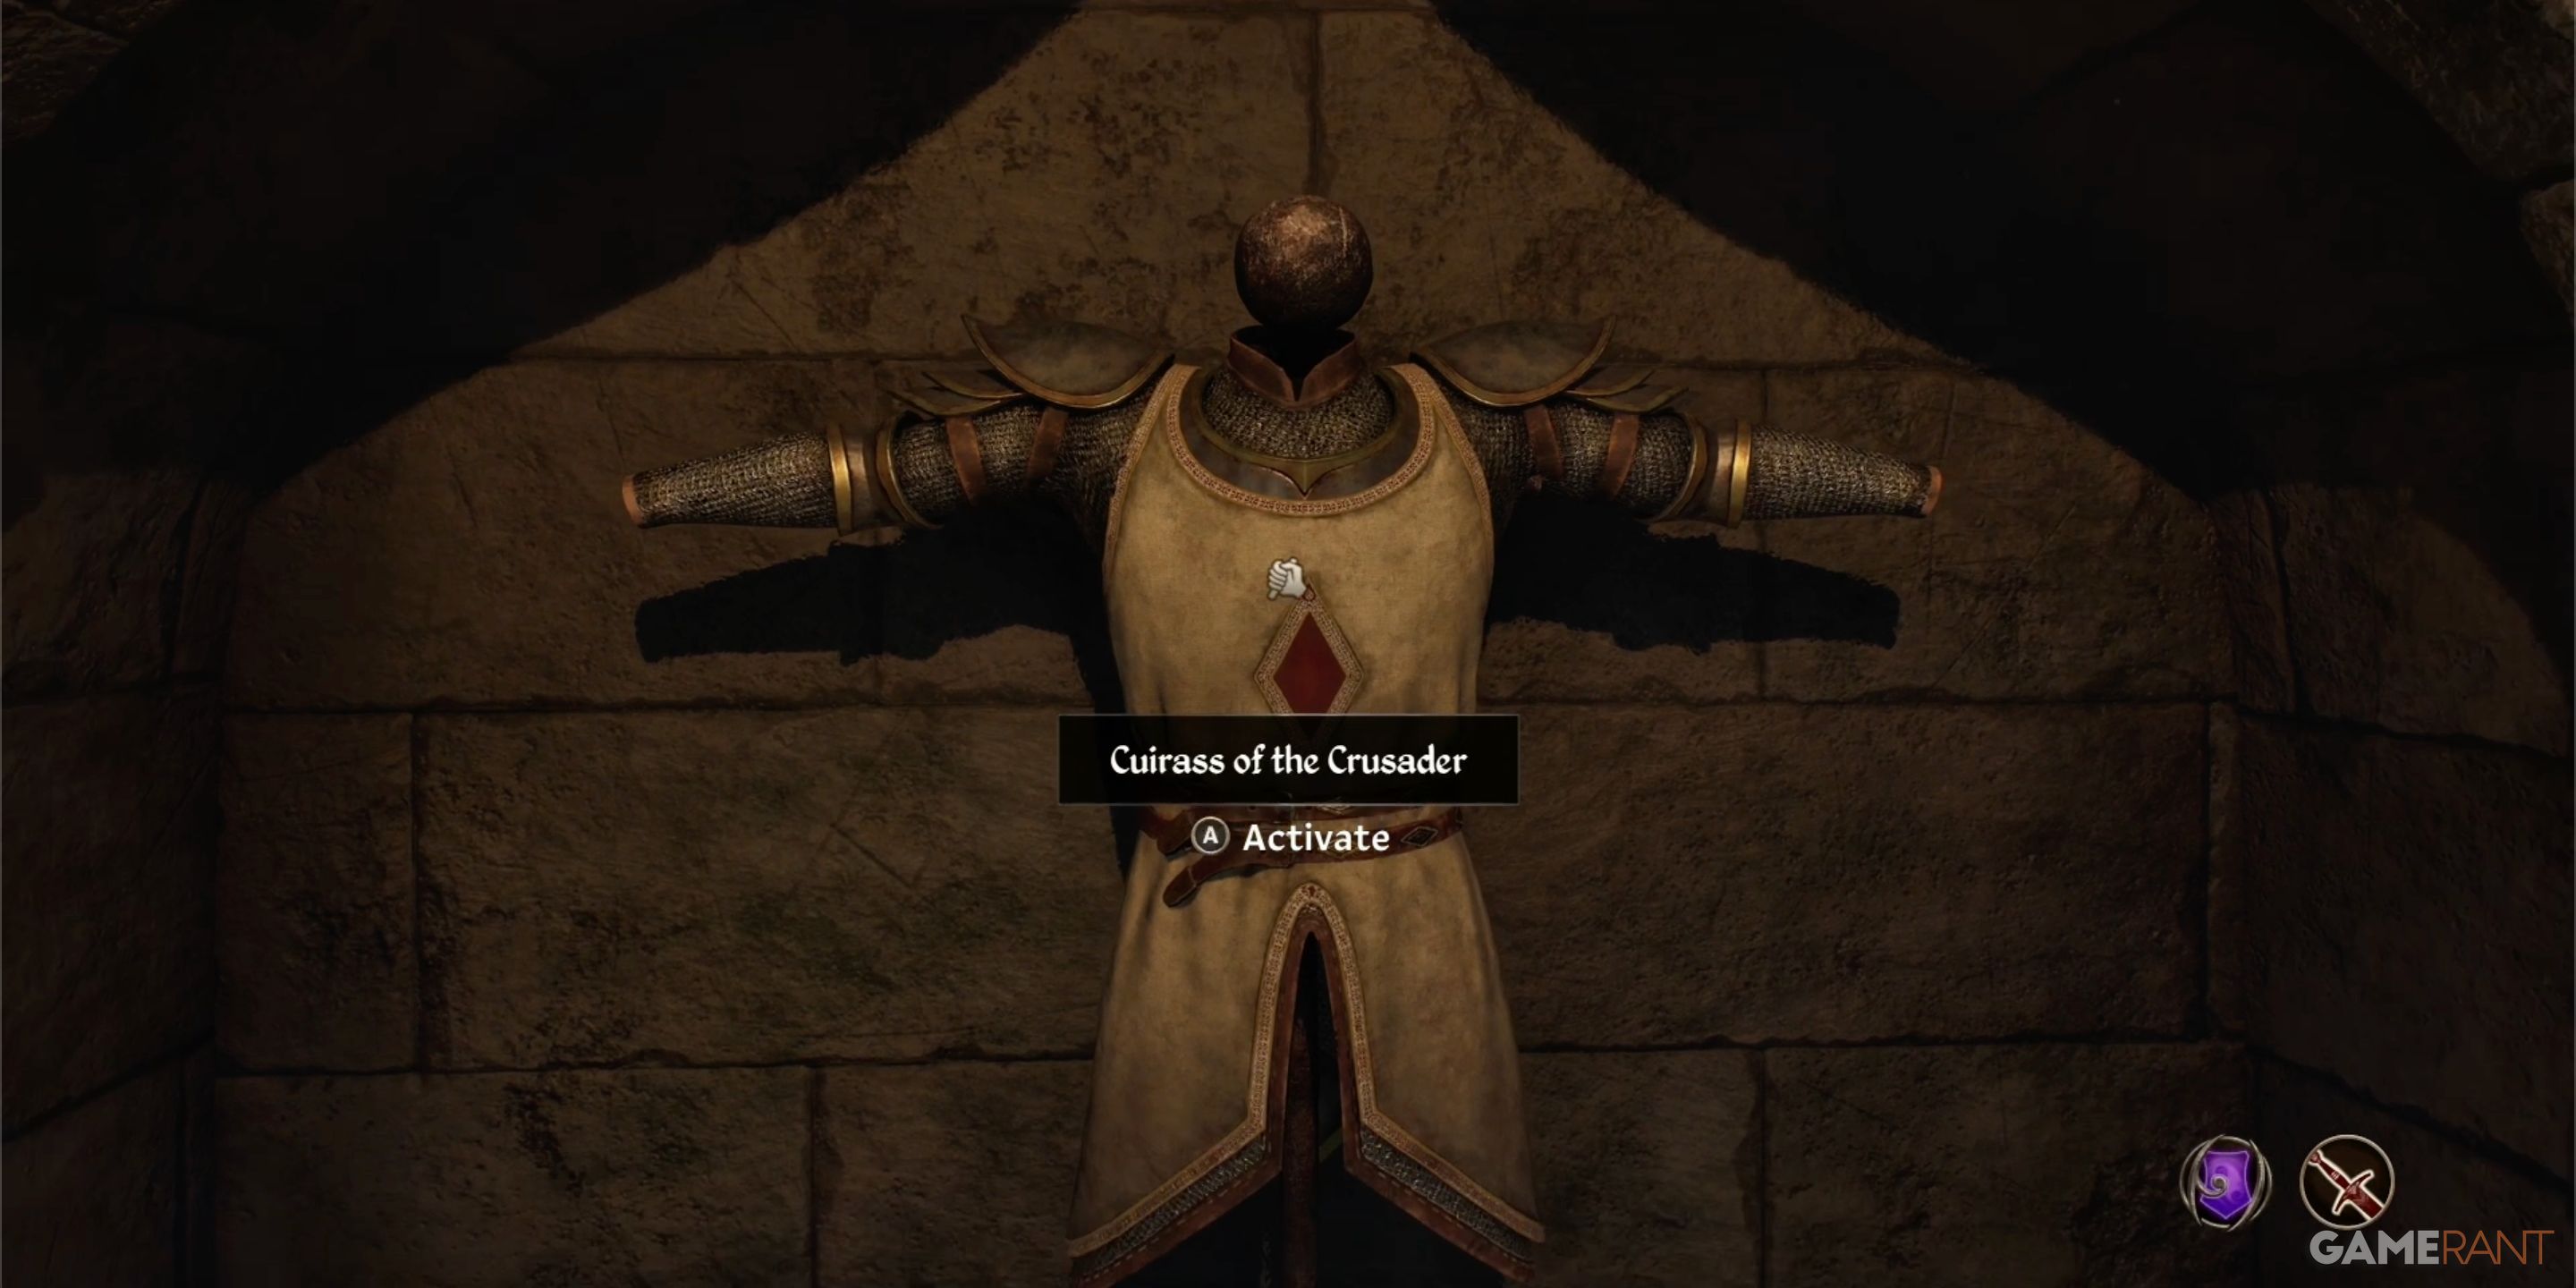
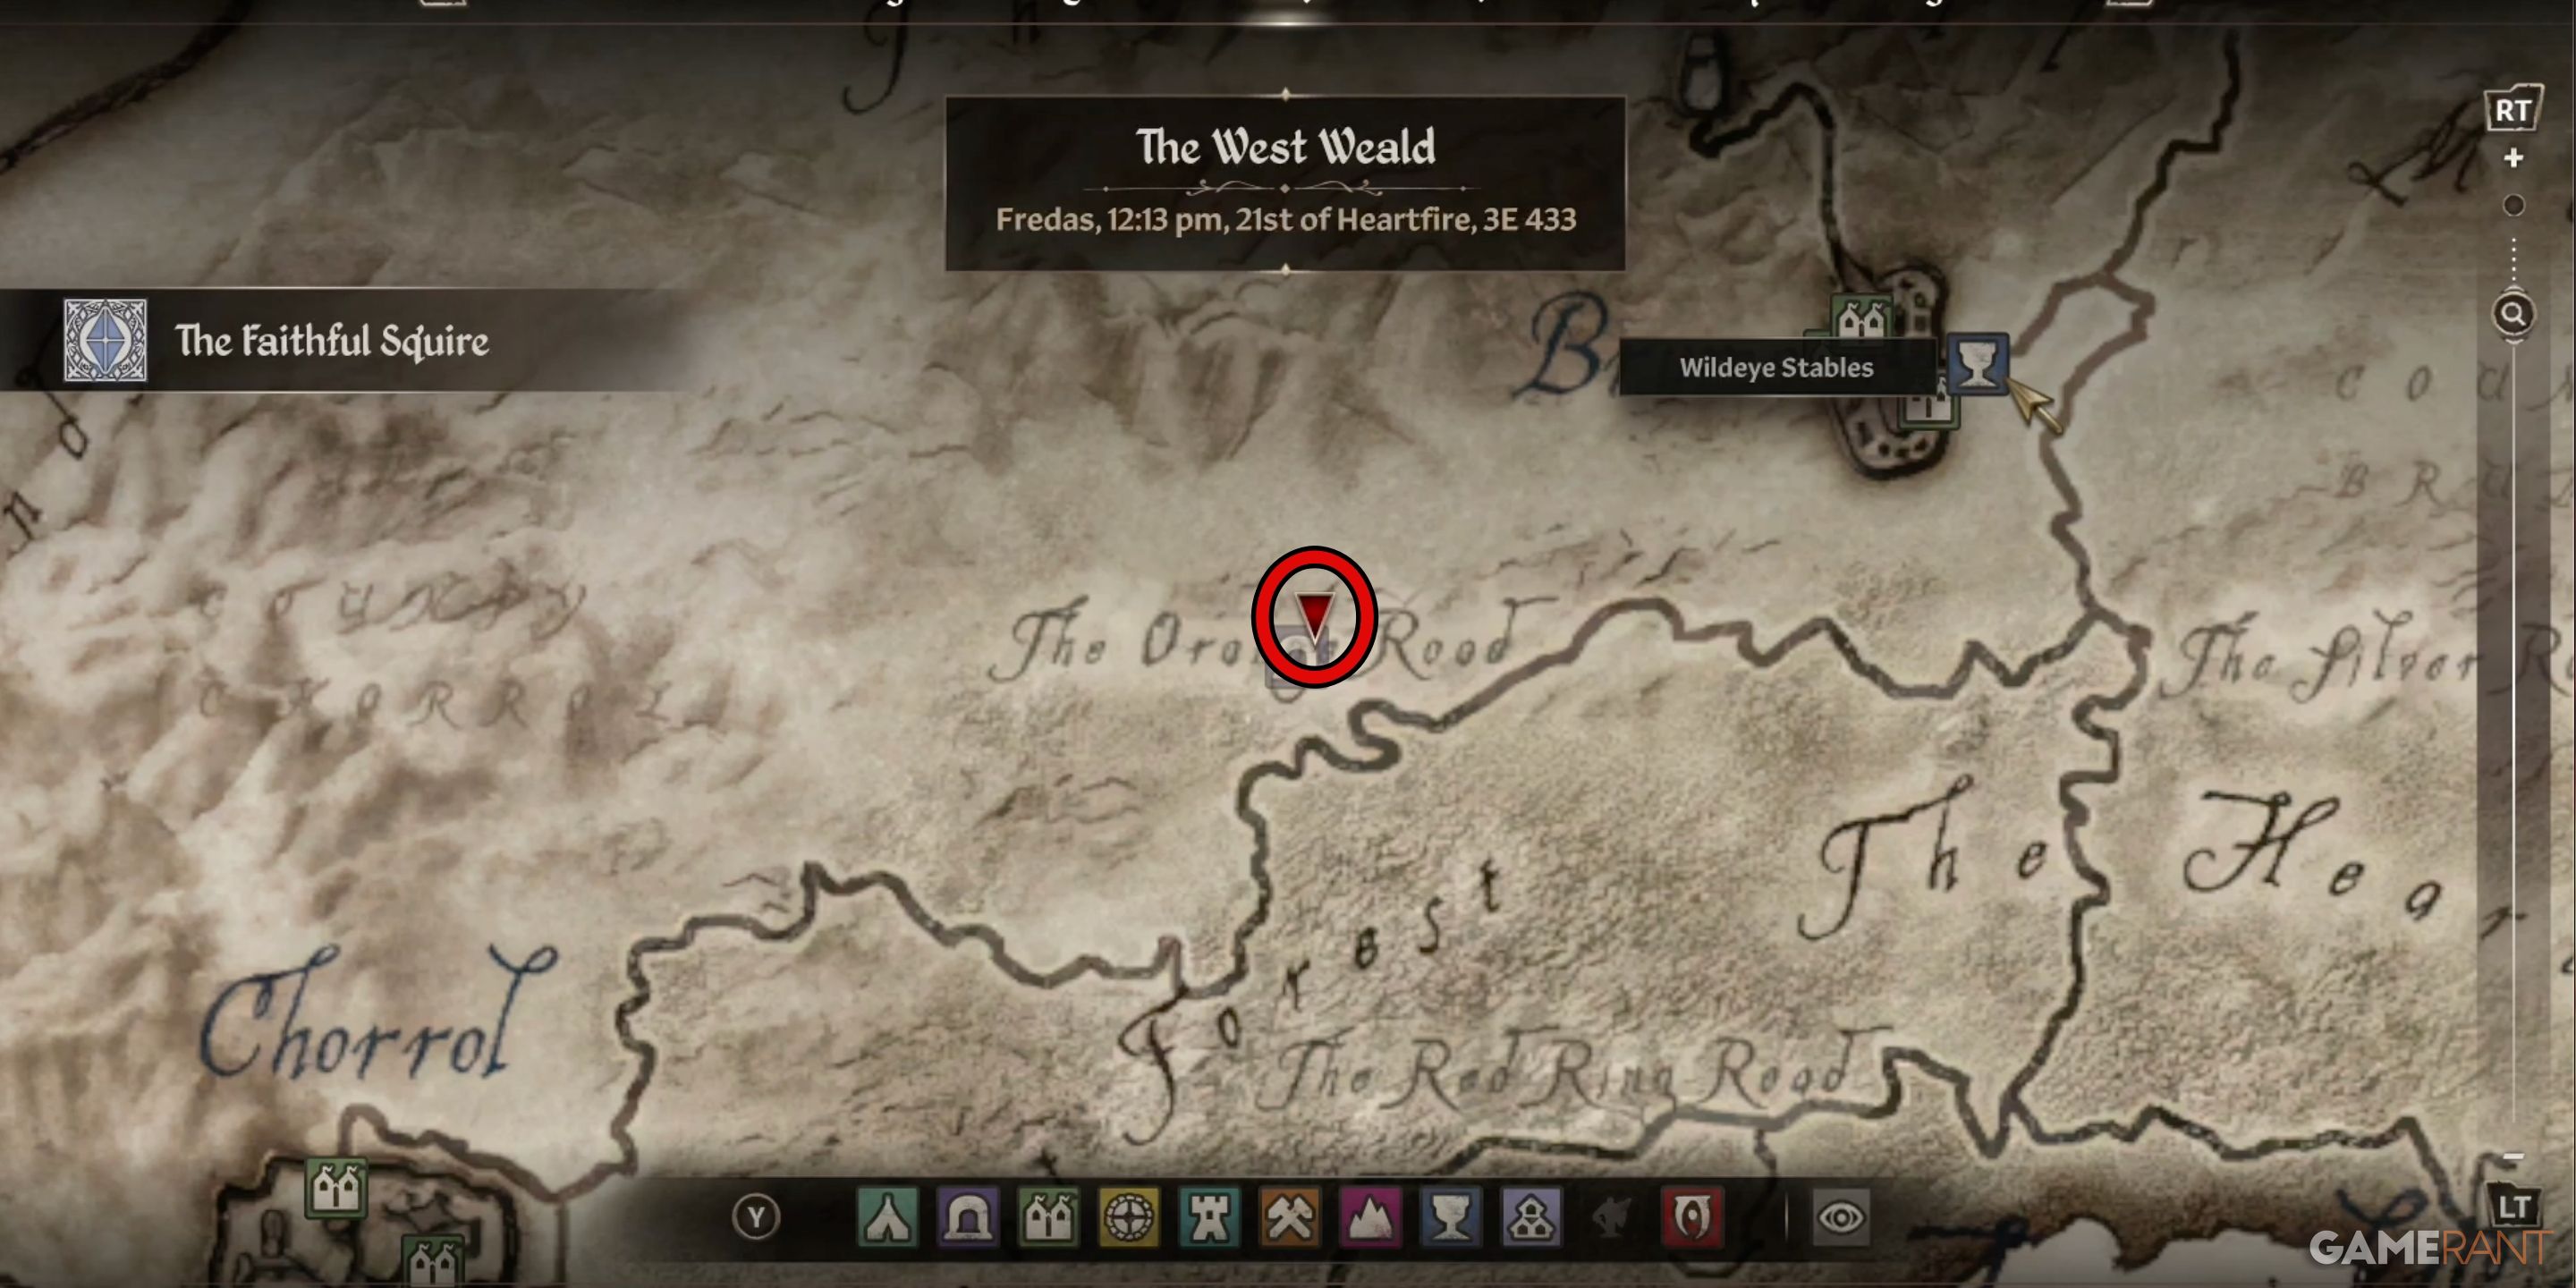
The second relic from the Crusader collection that you can obtain is the Crusader’s Cuirass, a key piece of the set. To get this item, you should make your way to the Priory of the Nine, located east of Skingrad, on the southern border in the West Weald.
Upon entering the priory, make an immediate left turn twice. Once inside, look for a large Knights of the Nine emblem on the floor near the windows. Proceed towards it and choose ‘Activate’ when given the option. The emblem will transform into stairs that lead to a hidden room beneath the priory.
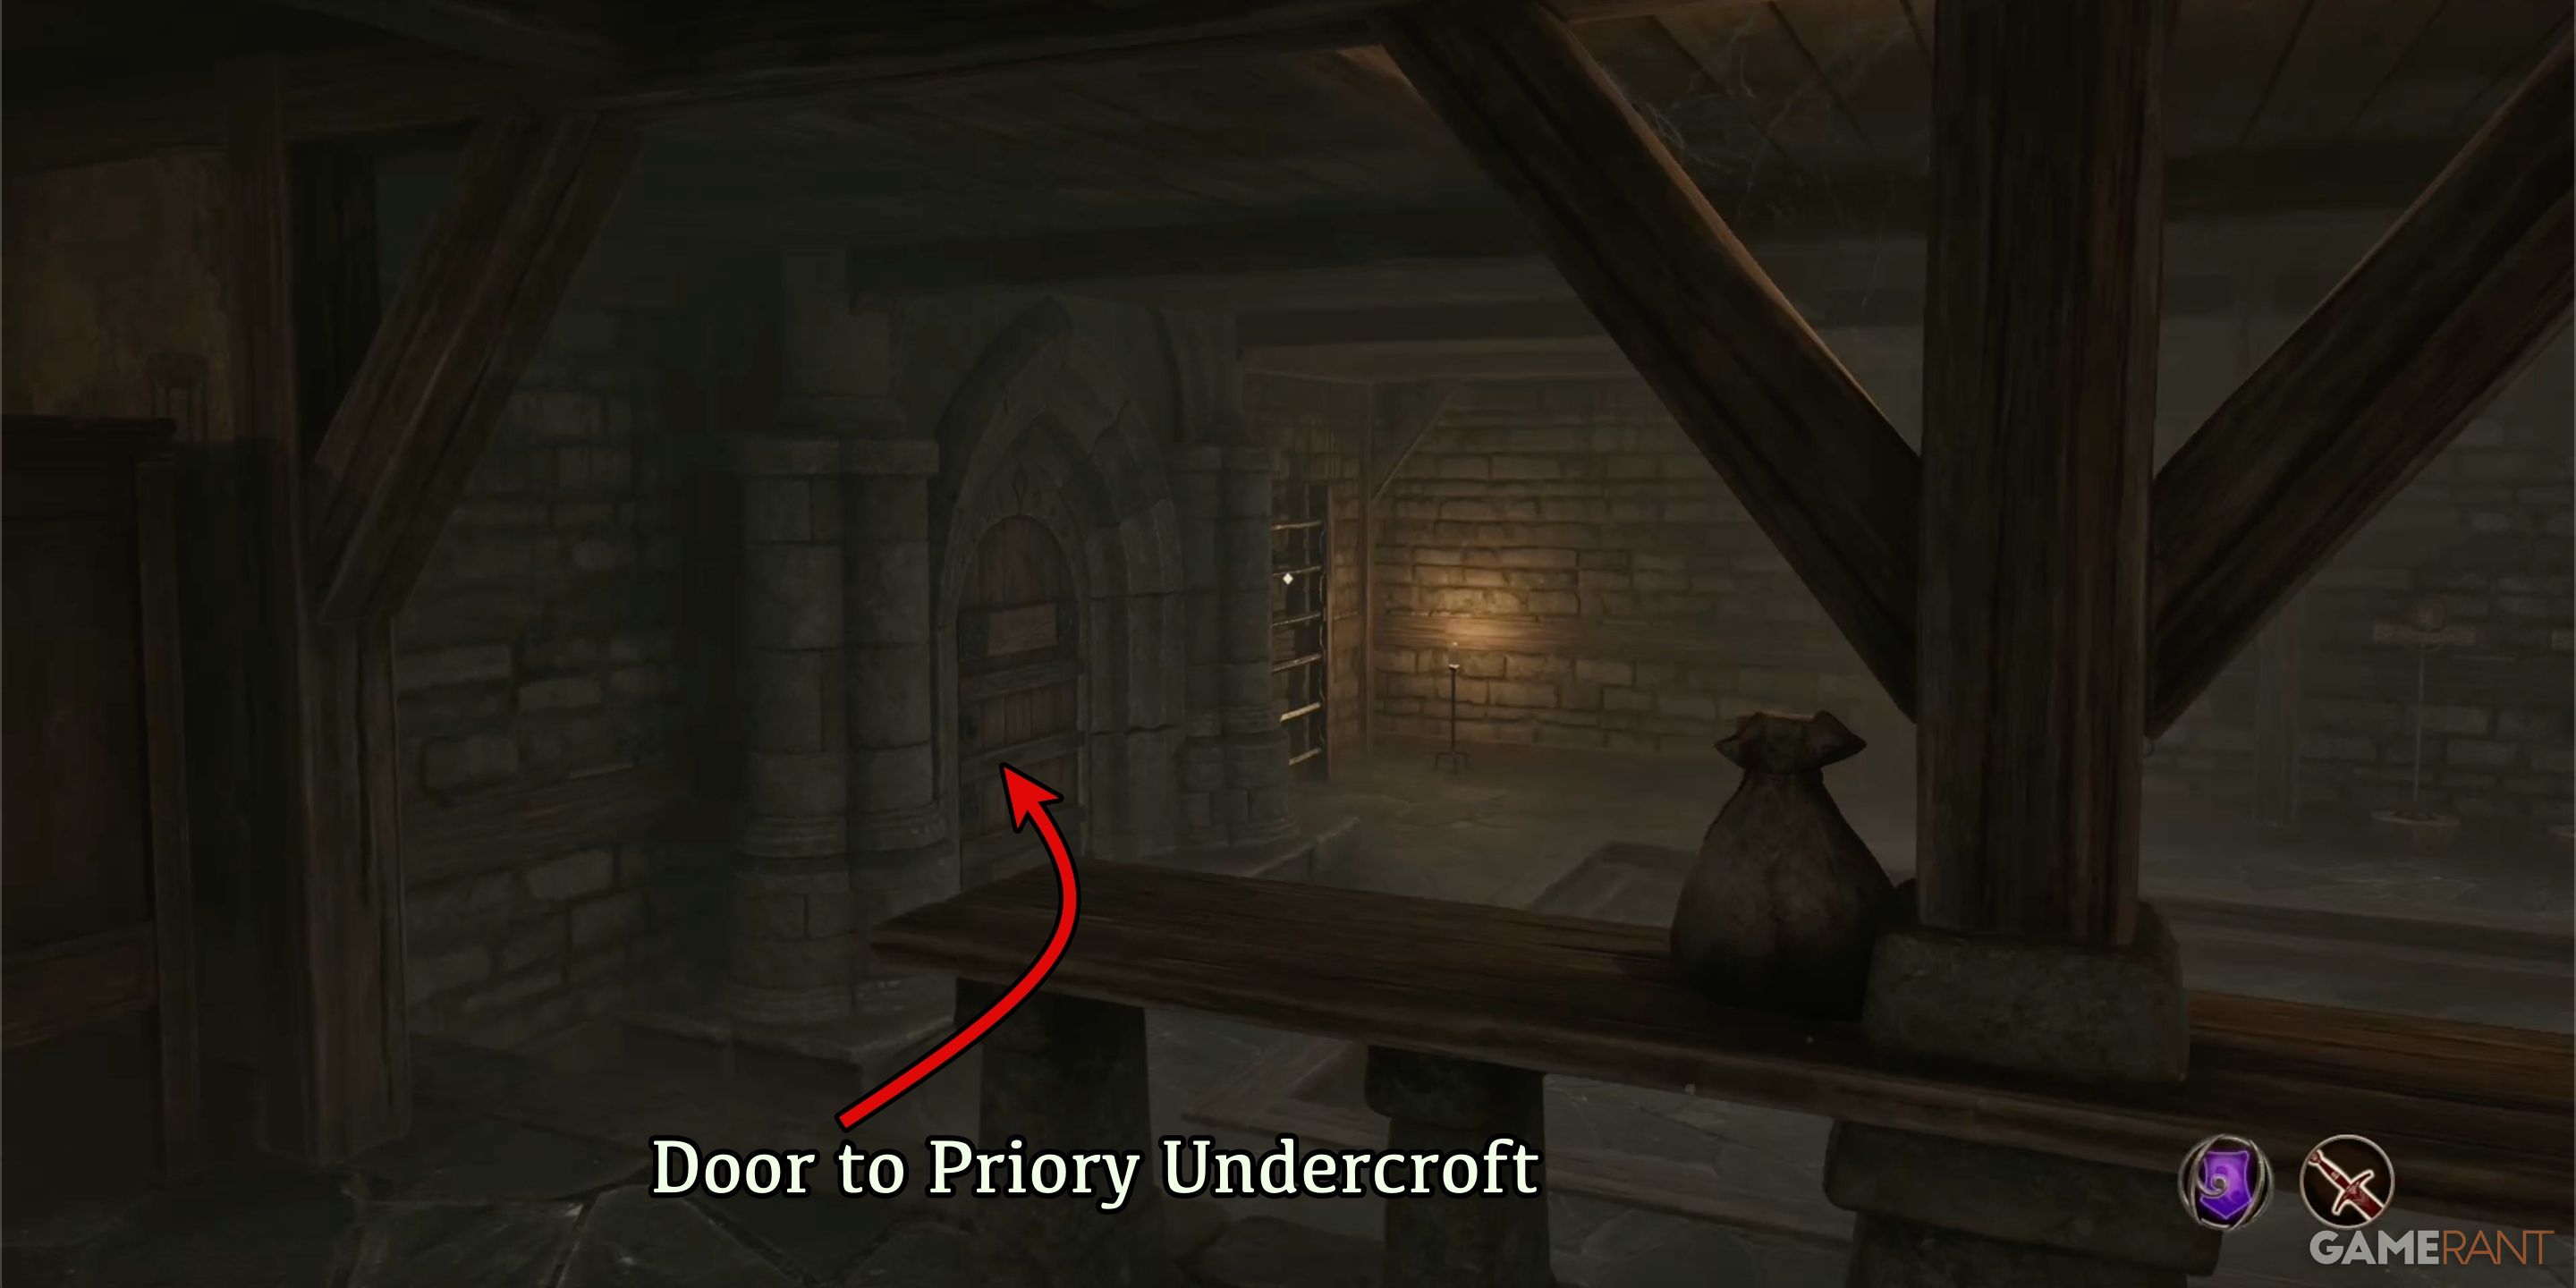
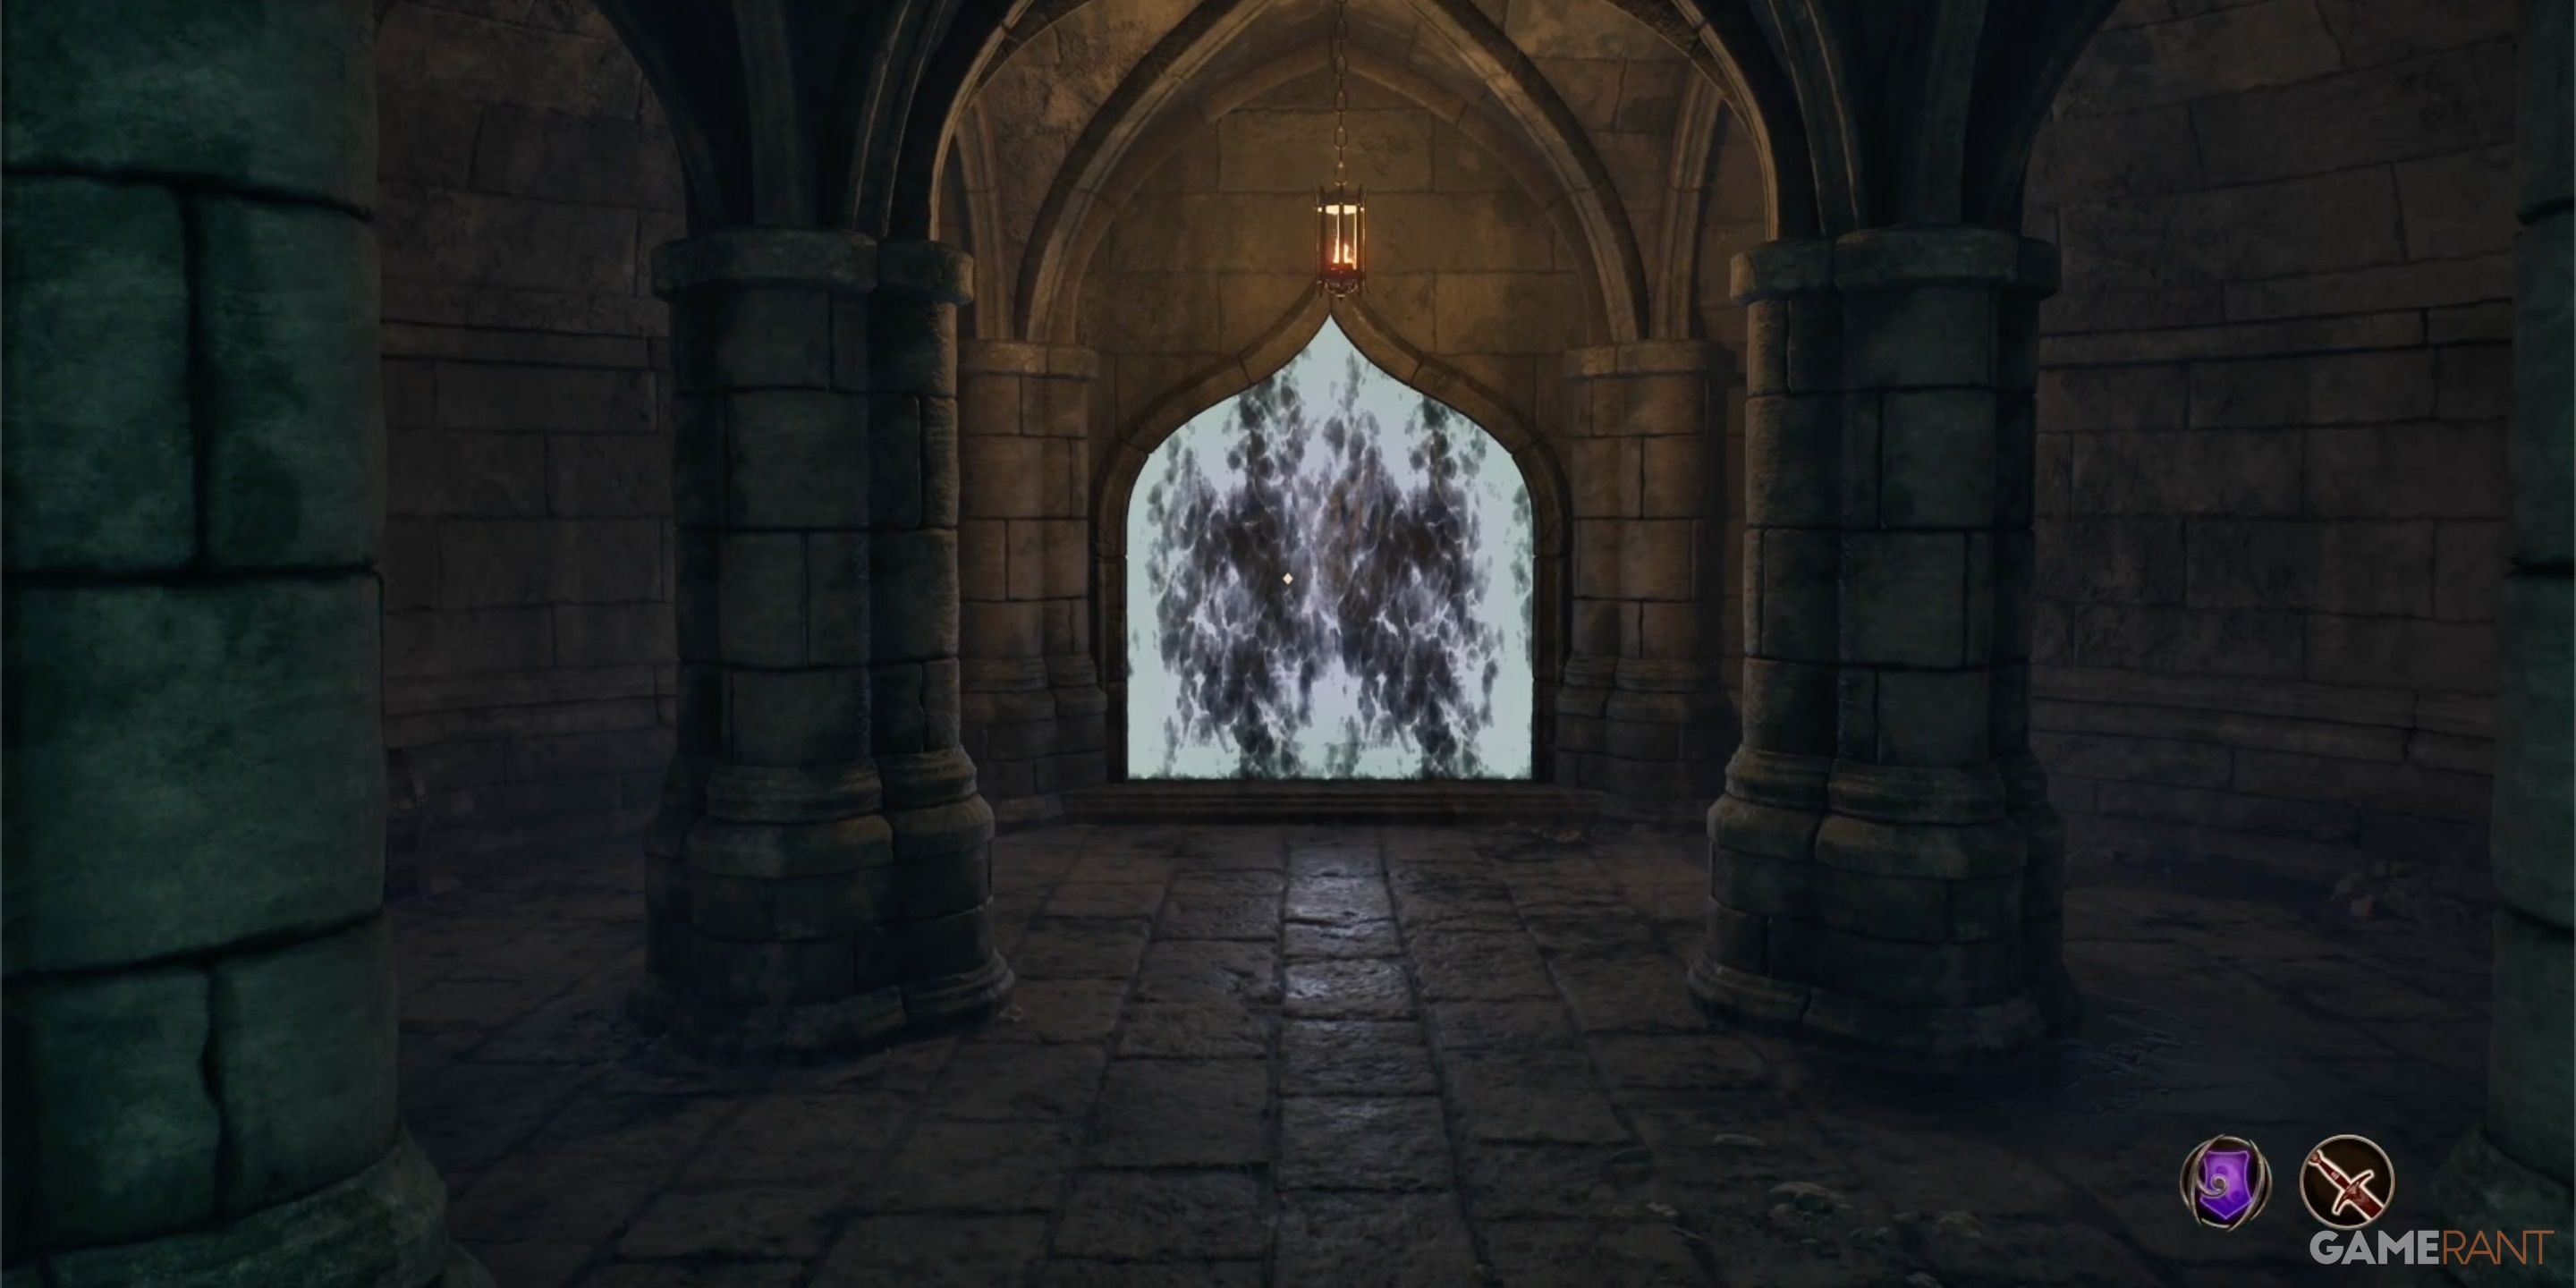
In the lower room, locate the door close to the practice mannequin. This is referred to as the Doorway to Priory Undercroft. Once opened, you’ll gain entry into the clandestine meeting place of the Knights of the Nine. Upon entering, you’ll notice the Cuirass of the Crusader on the wall in front of you, but it will soon be obscured by a mysterious magical obstruction.
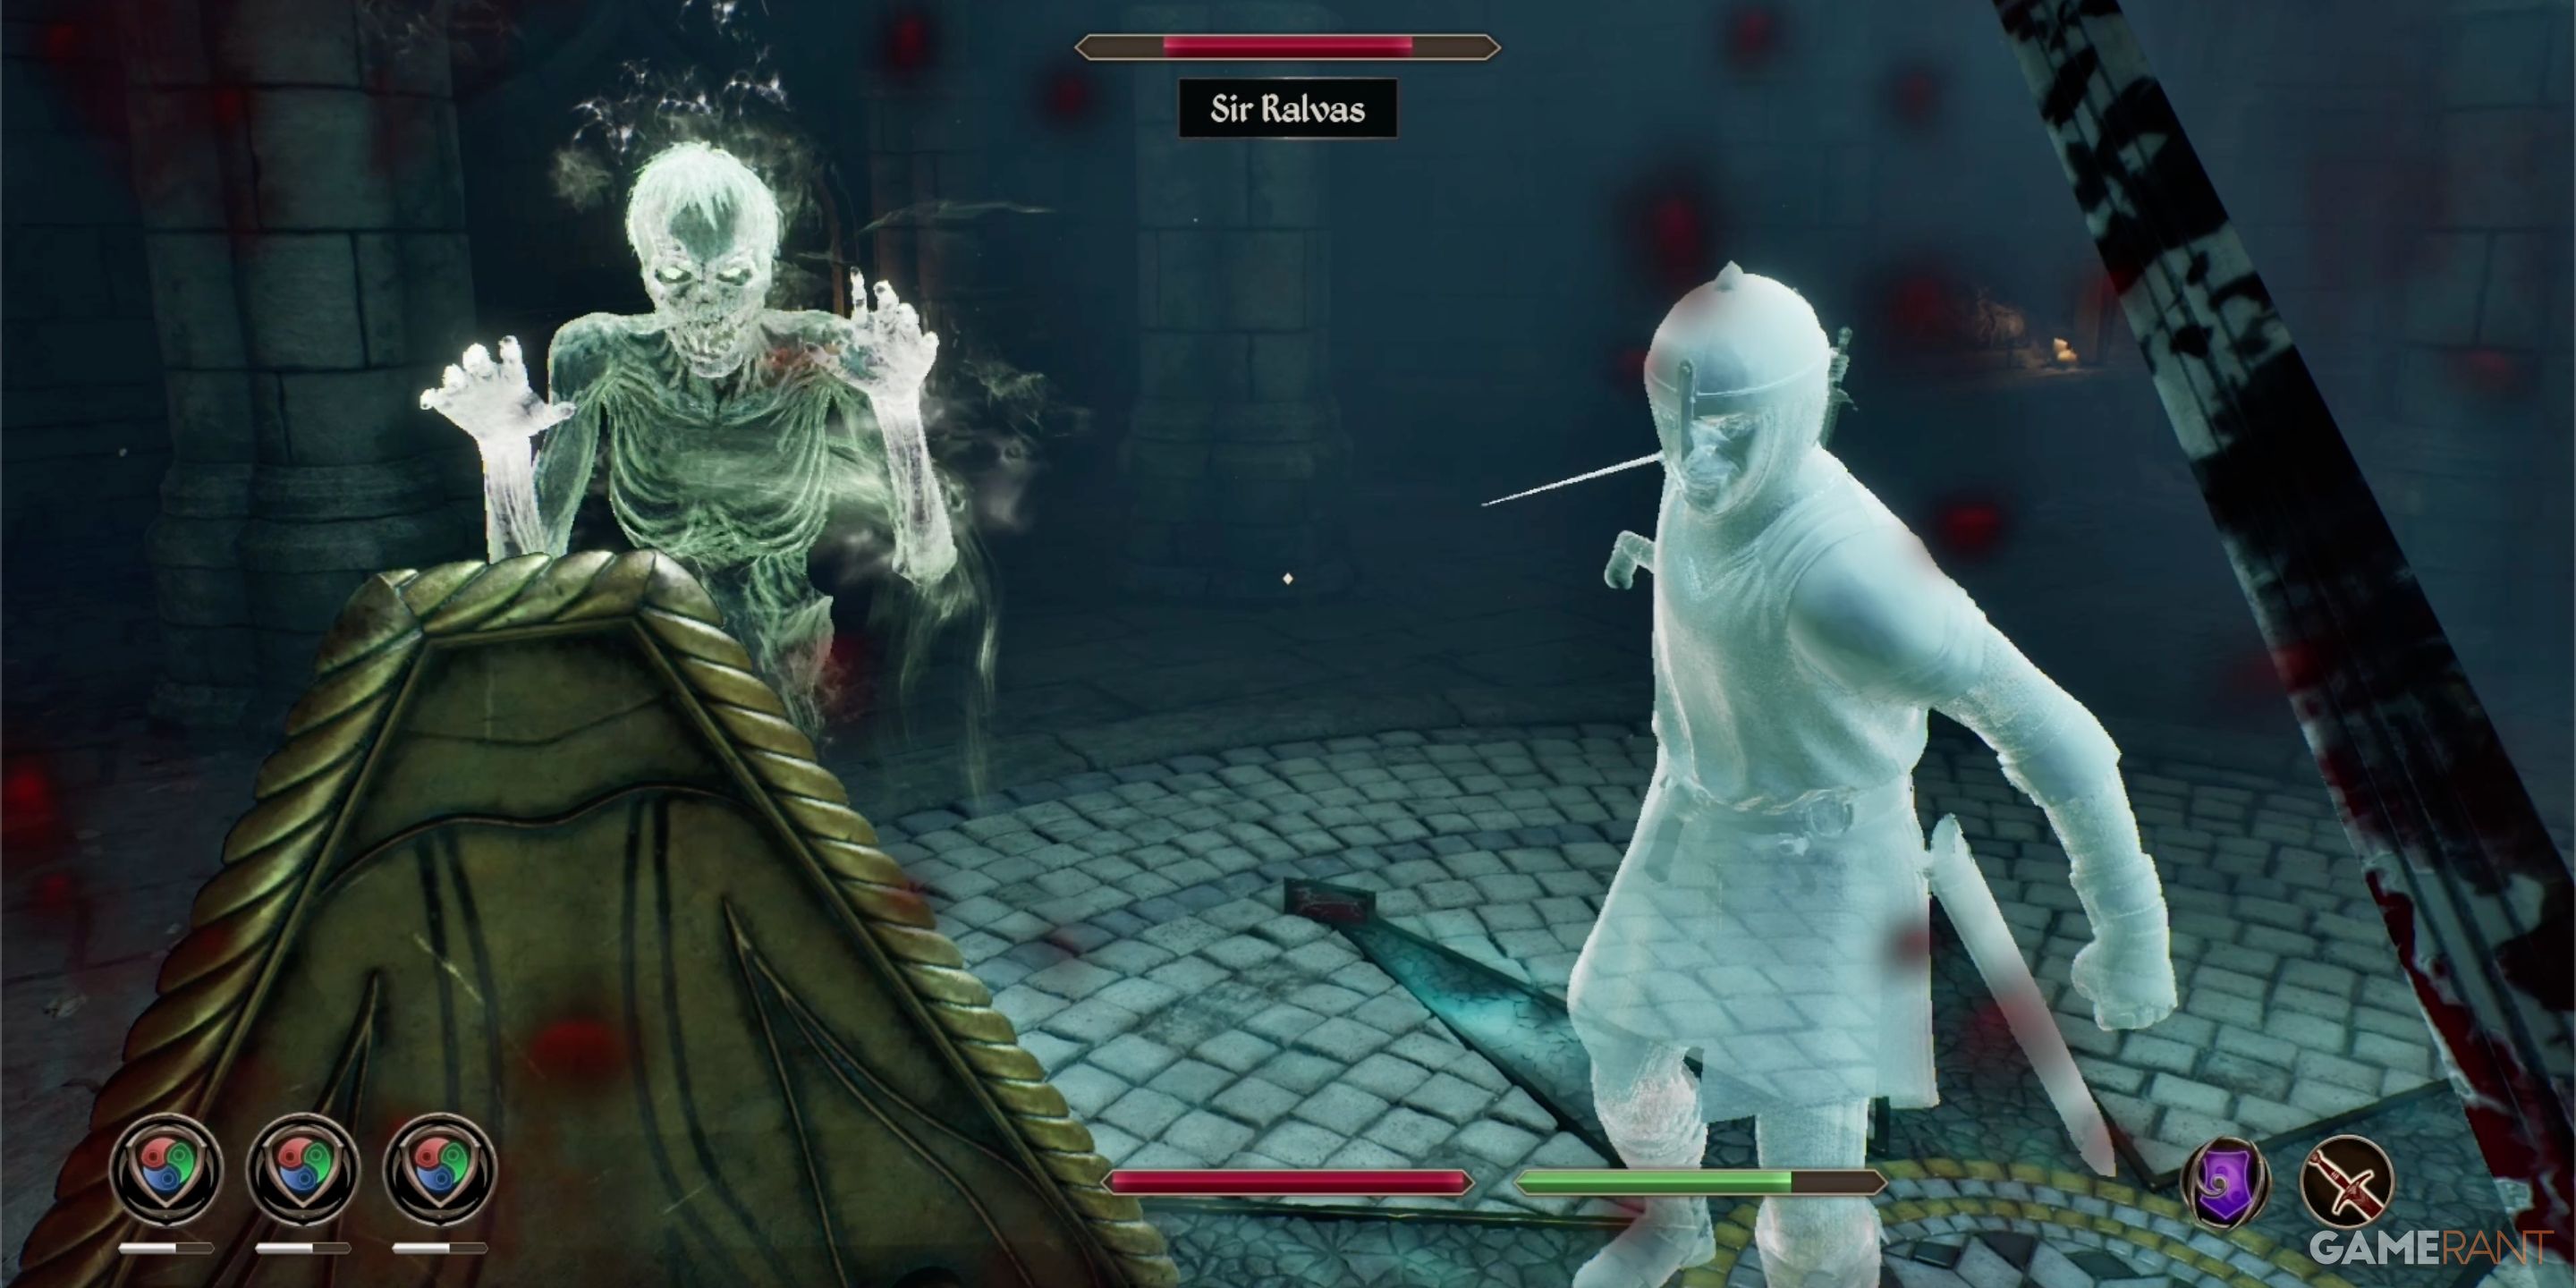

Without warning, the spirits of all past Knights of the Nine assemble a ring within the chamber. Speak with the spirit of Sir Amiel, and he’ll explain that you must engage in individual battles against each Knight to demonstrate your worthiness of the Crusader’s Artifact. After defeating every member, the Cuirass of the Crusader will be yours to claim.
After grabbing the cuirass, chat with each ghost. They’ll give you clues to find the Shield of the Crusader, Boots of the Crusader, Mace of Zenithar, Gauntlets of the Crusader, one by one. Each item comes with its own quest that can be activated. Once you finish the initial set of quests, you’ll get the final quest guiding you to the Greaves of the Crusader and the Sword of the Crusader.
- “Nature’s Fury” – Boots of the Crusader
- “Stendarr’s Mercy” – Gauntlets of the Crusader
- “The Path of the Righteous” – Mace of the Crusader
- “Wisdom of the Ages” – Shield of the Crusader
- Return to the Priory of the Nine
- “The Faithful Squire” – Greaves & Sword of the Crusader
Boots & Gauntlets of the Crusader Location – Oblivion Remastered
Nature’s Fury Quest Walkthrough – Boots of the Crusader:
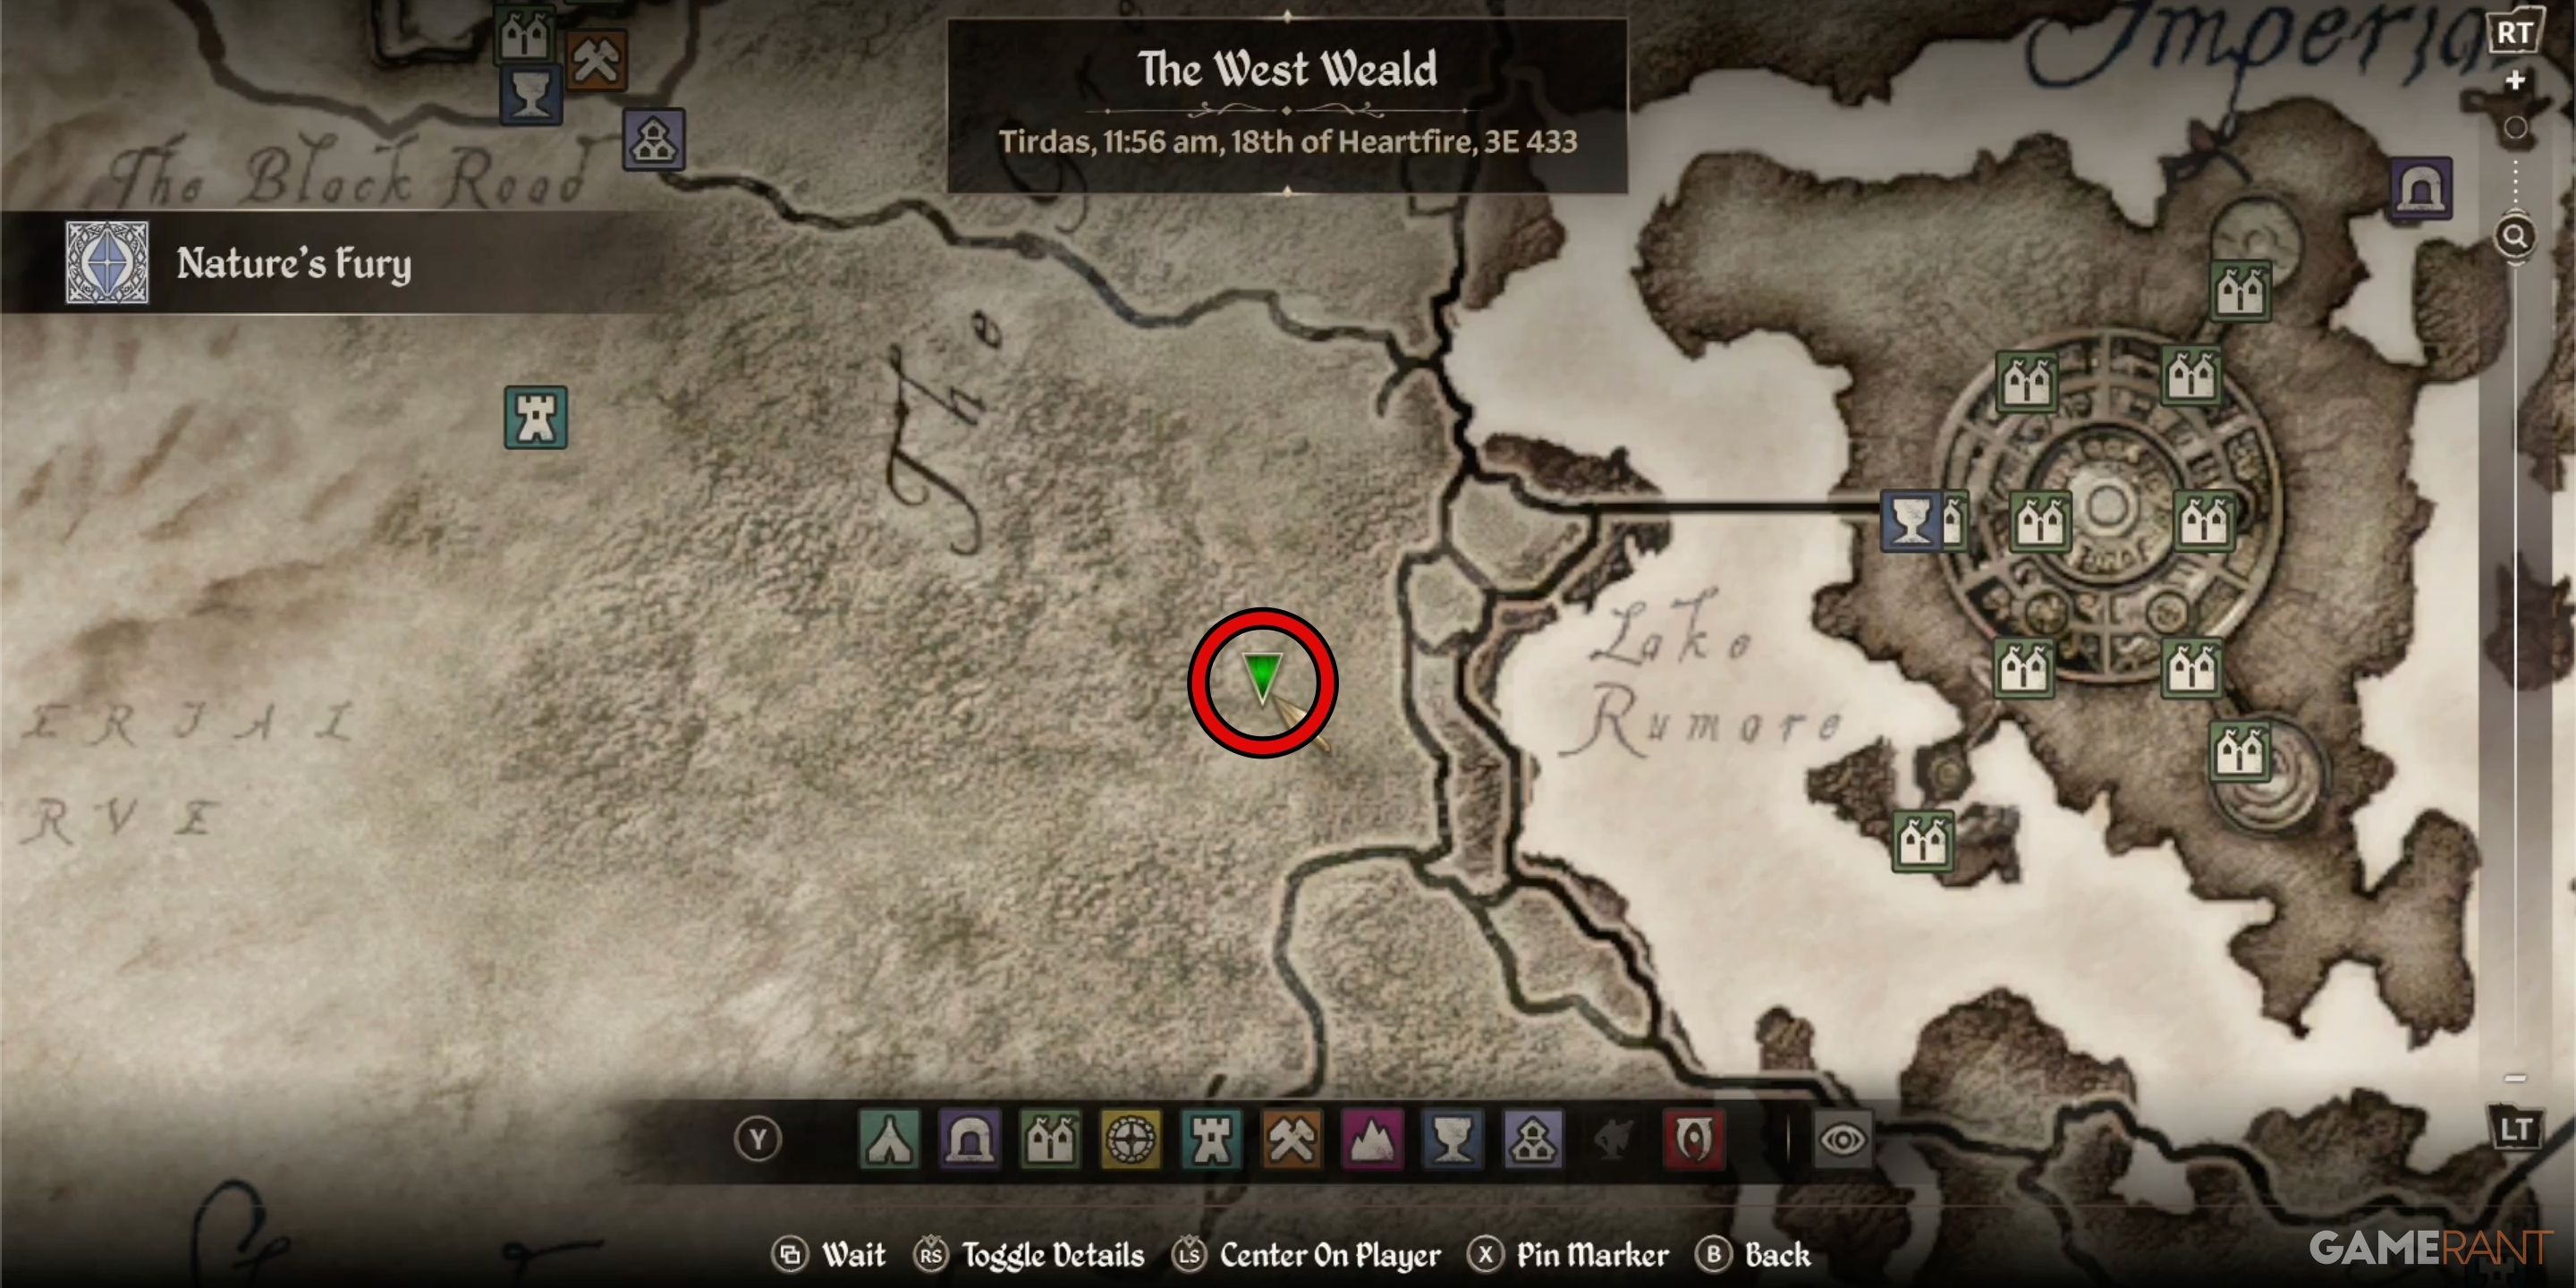
Experience the wrath of Nature leads you to the Sanctuary of Kynareth, a short journey westward from the Imperial City. If this location remains uncharted by you, consider teleporting to Chestnut Handy Stables situated on the city’s western side first, then venture due west towards the quest symbol.
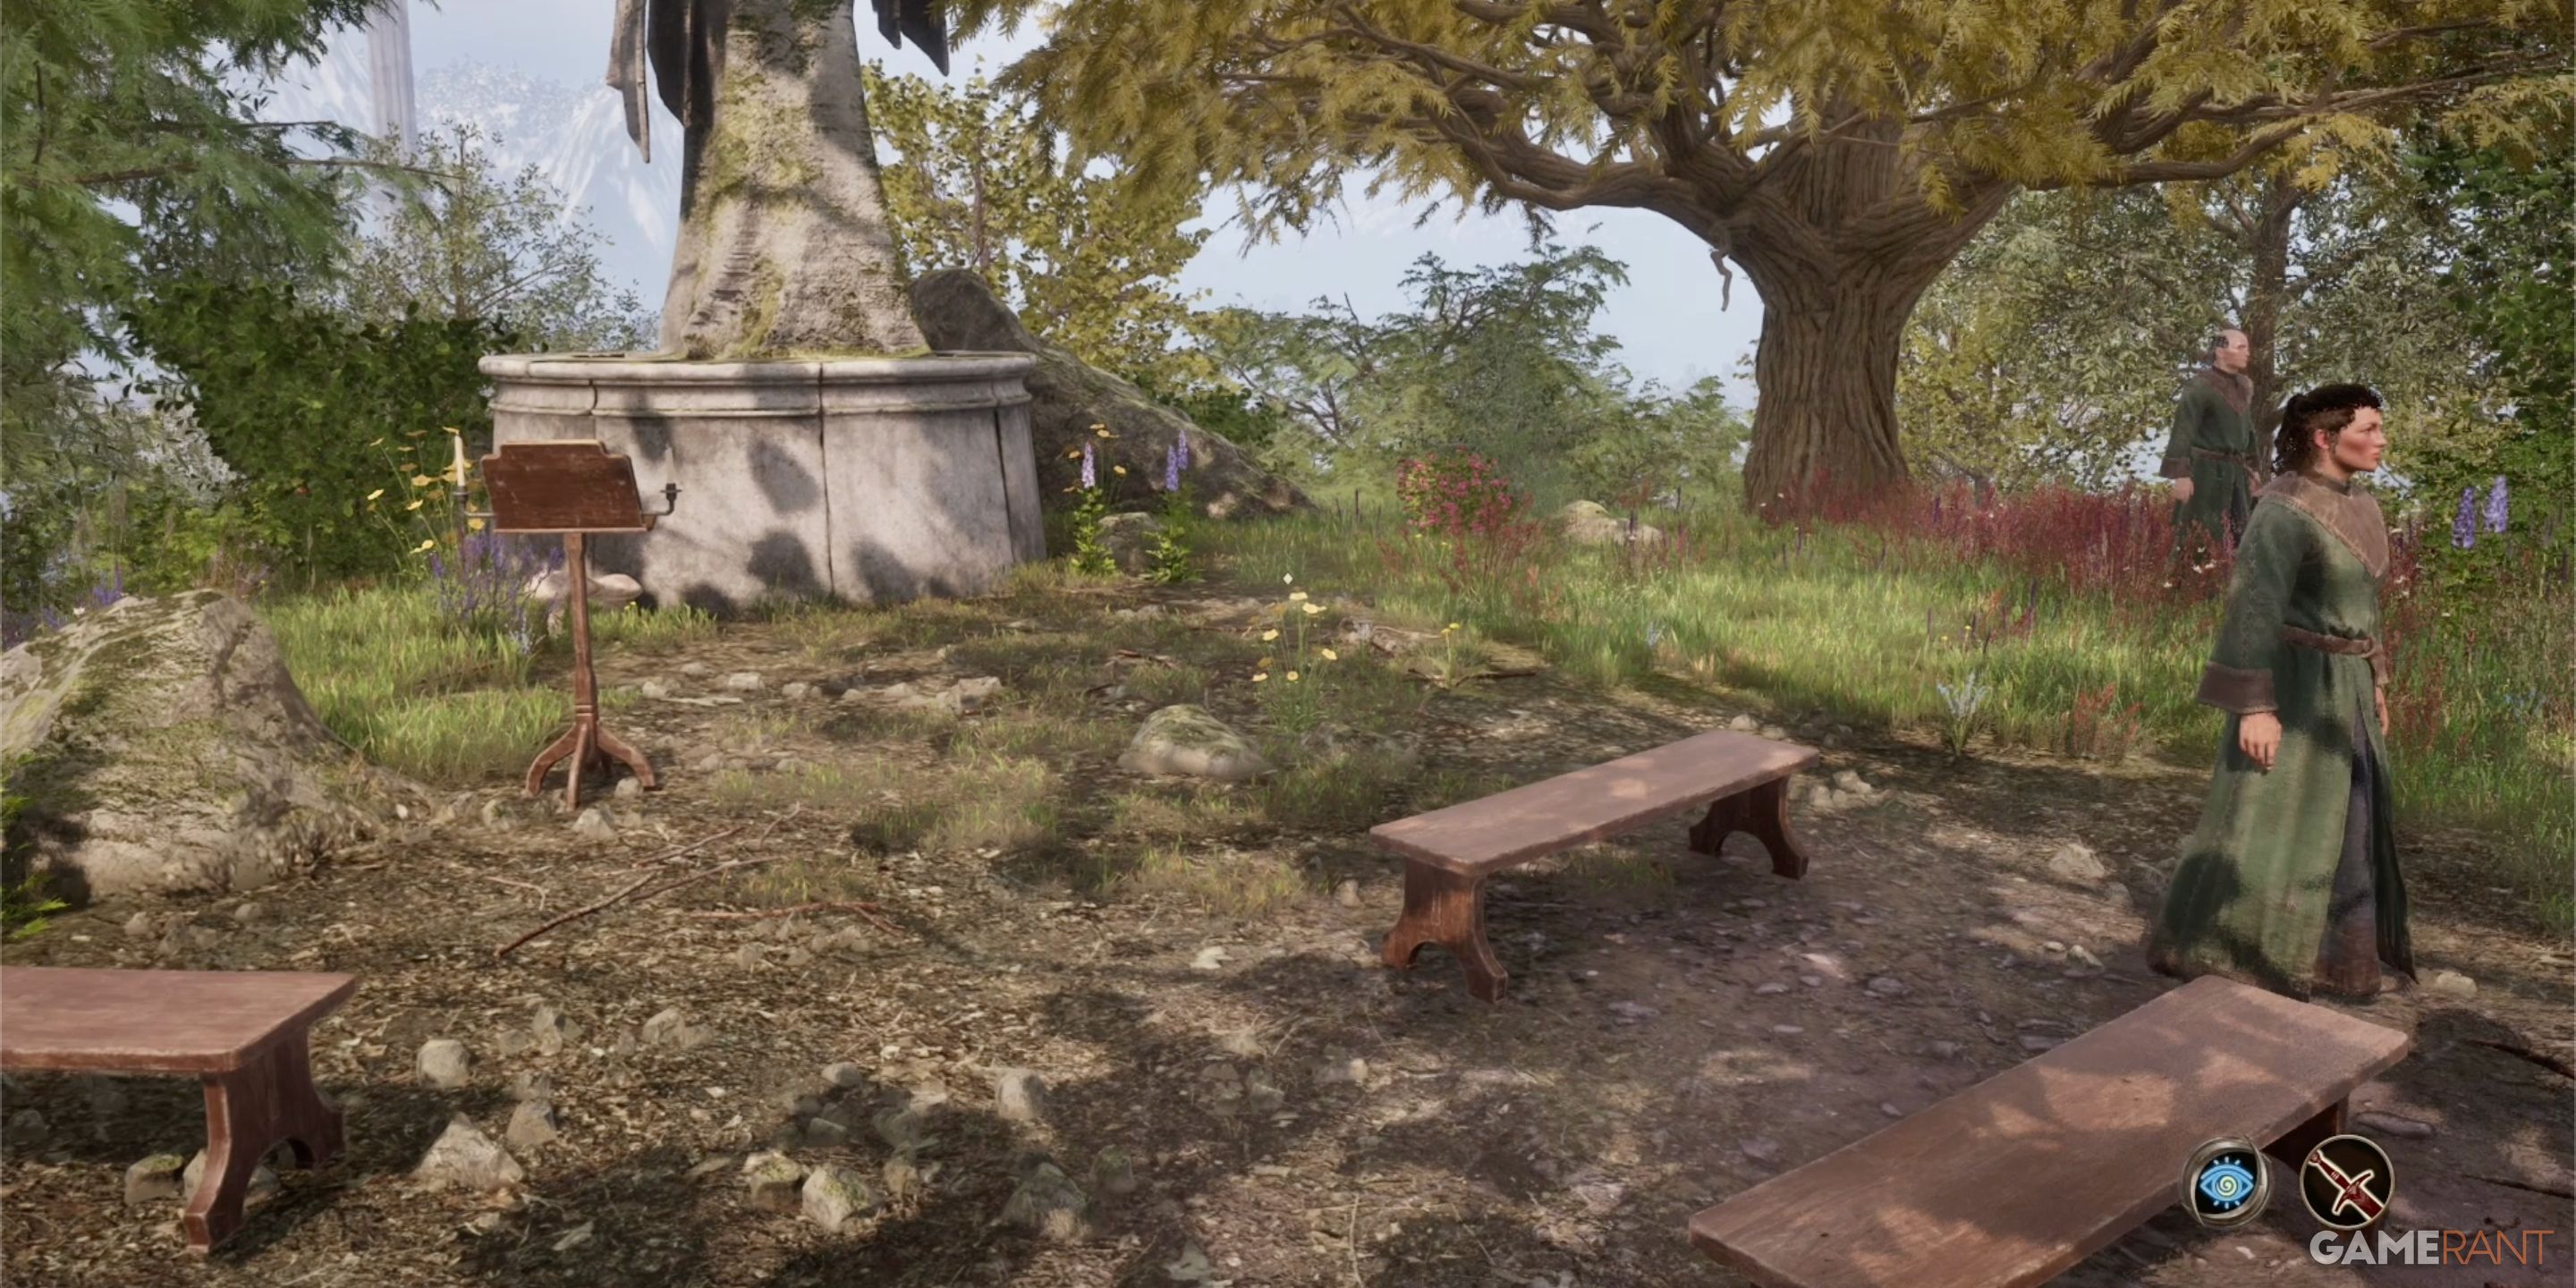
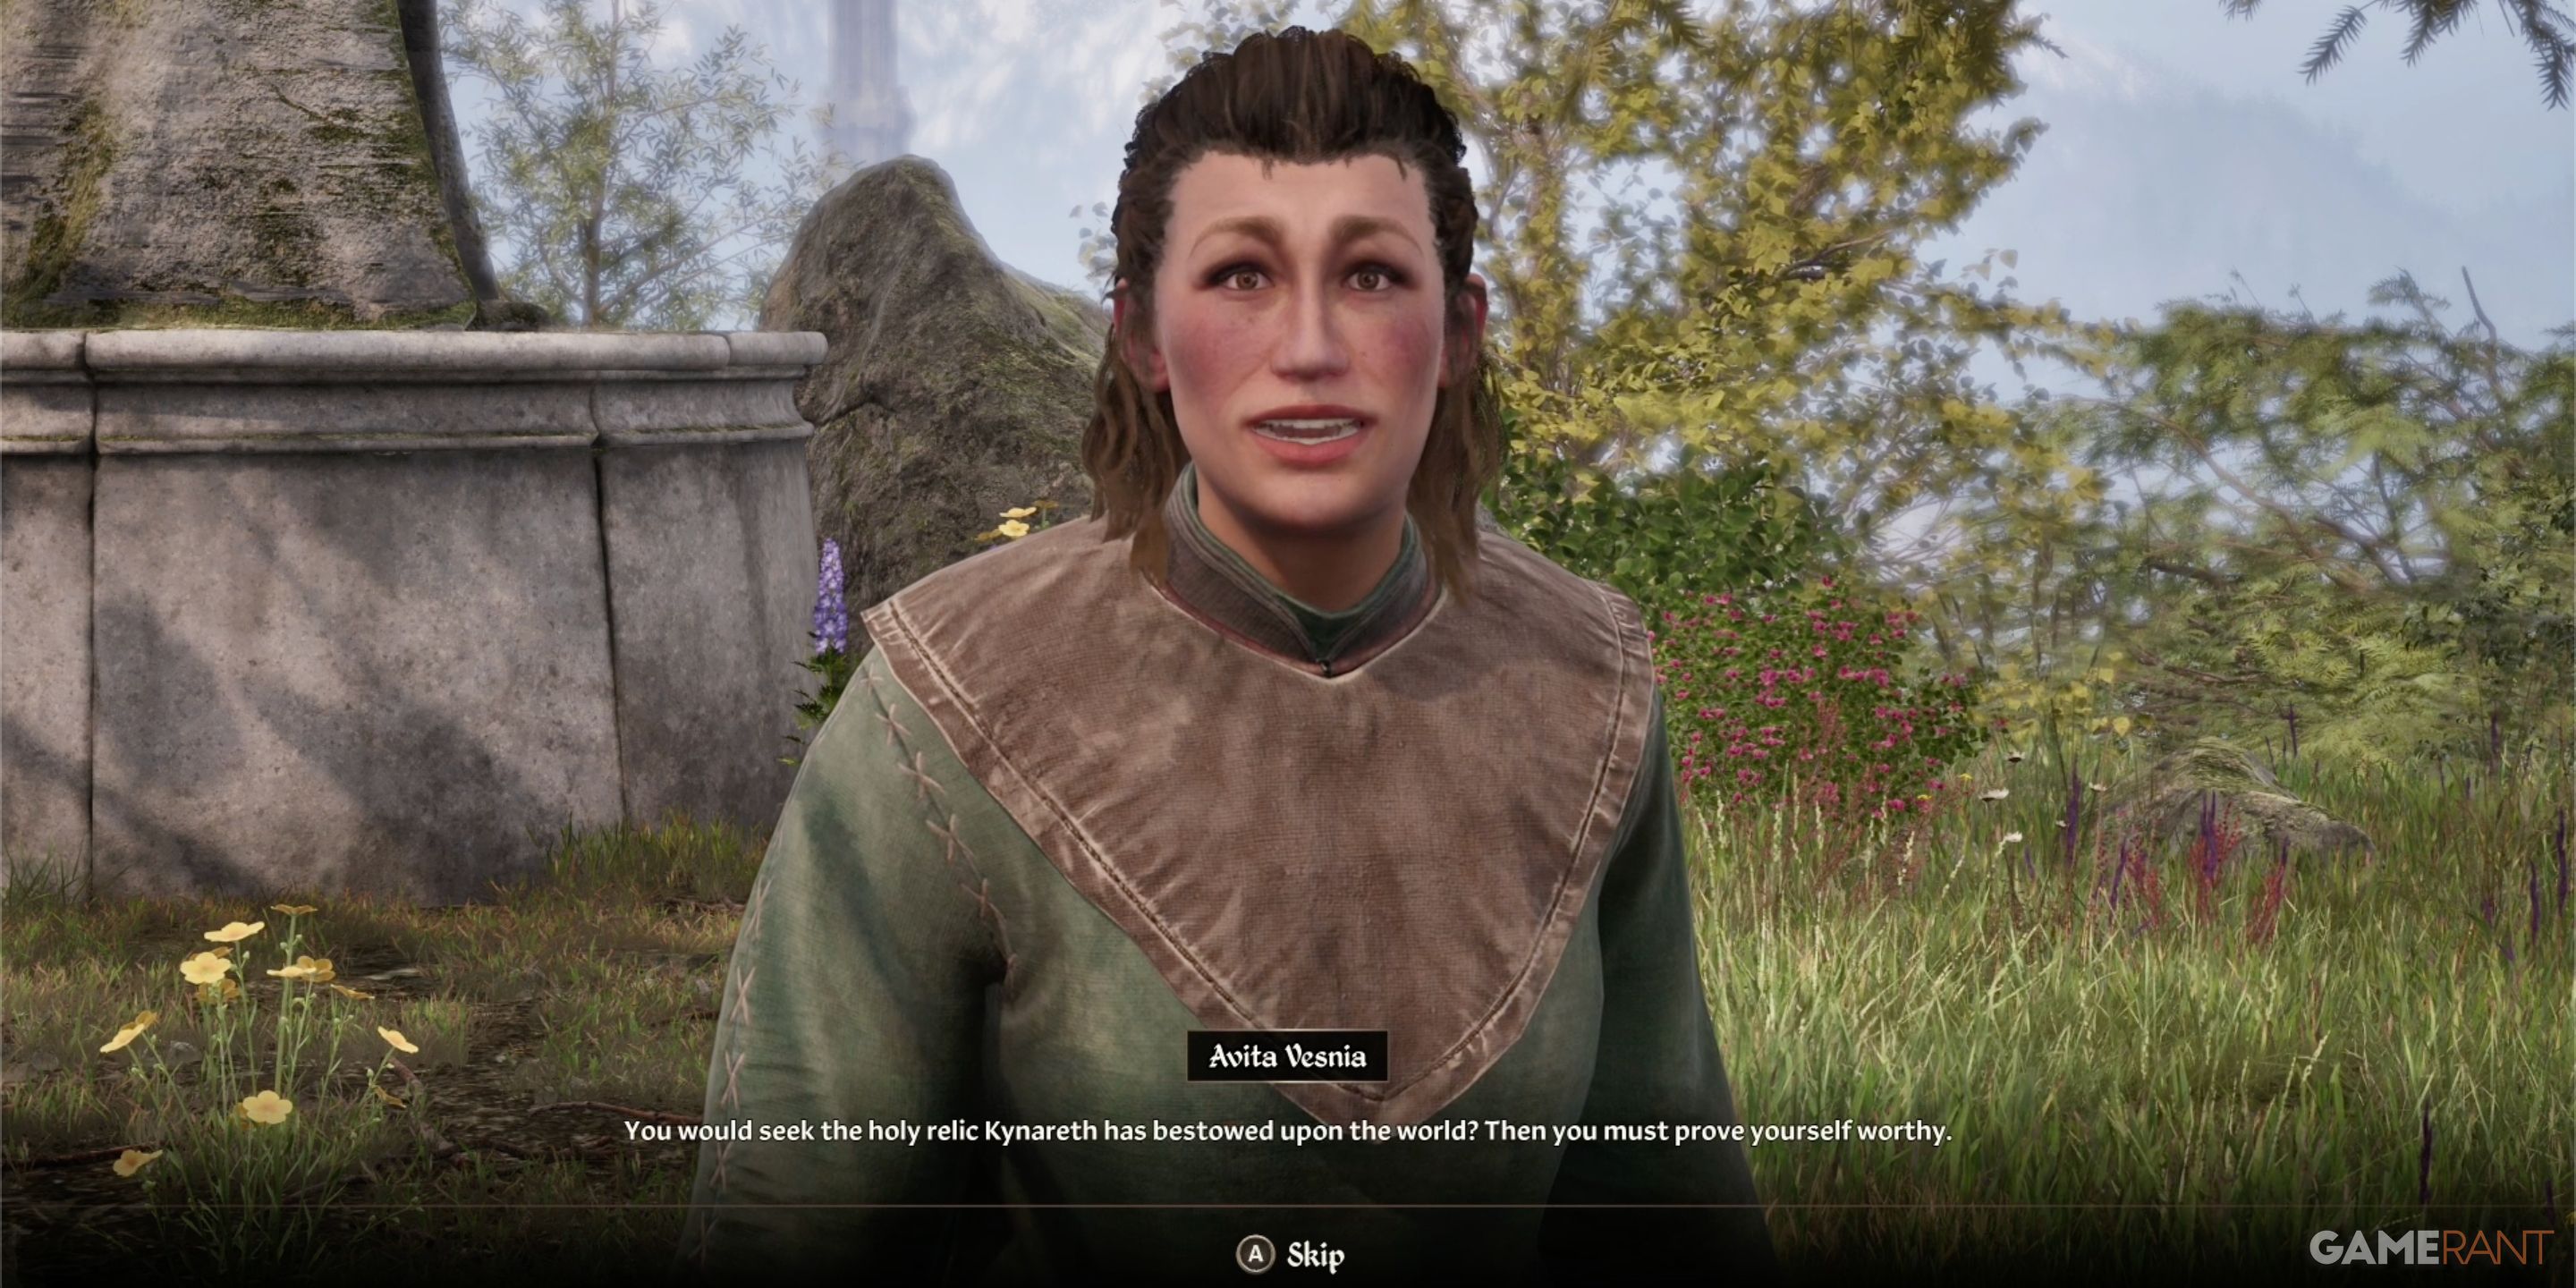
Upon reaching the designated landmark, you’ll encounter numerous attendant figures at a place of reverence. Engage Avita Vesnia, who will inform you about a trial set by Kynareth. She won’t provide many details concerning this test, but encourages you to keep in mind the importance of both ‘fear and respect’ for nature. She instructs you to venture westward into the vast expanse of the Great Forest.
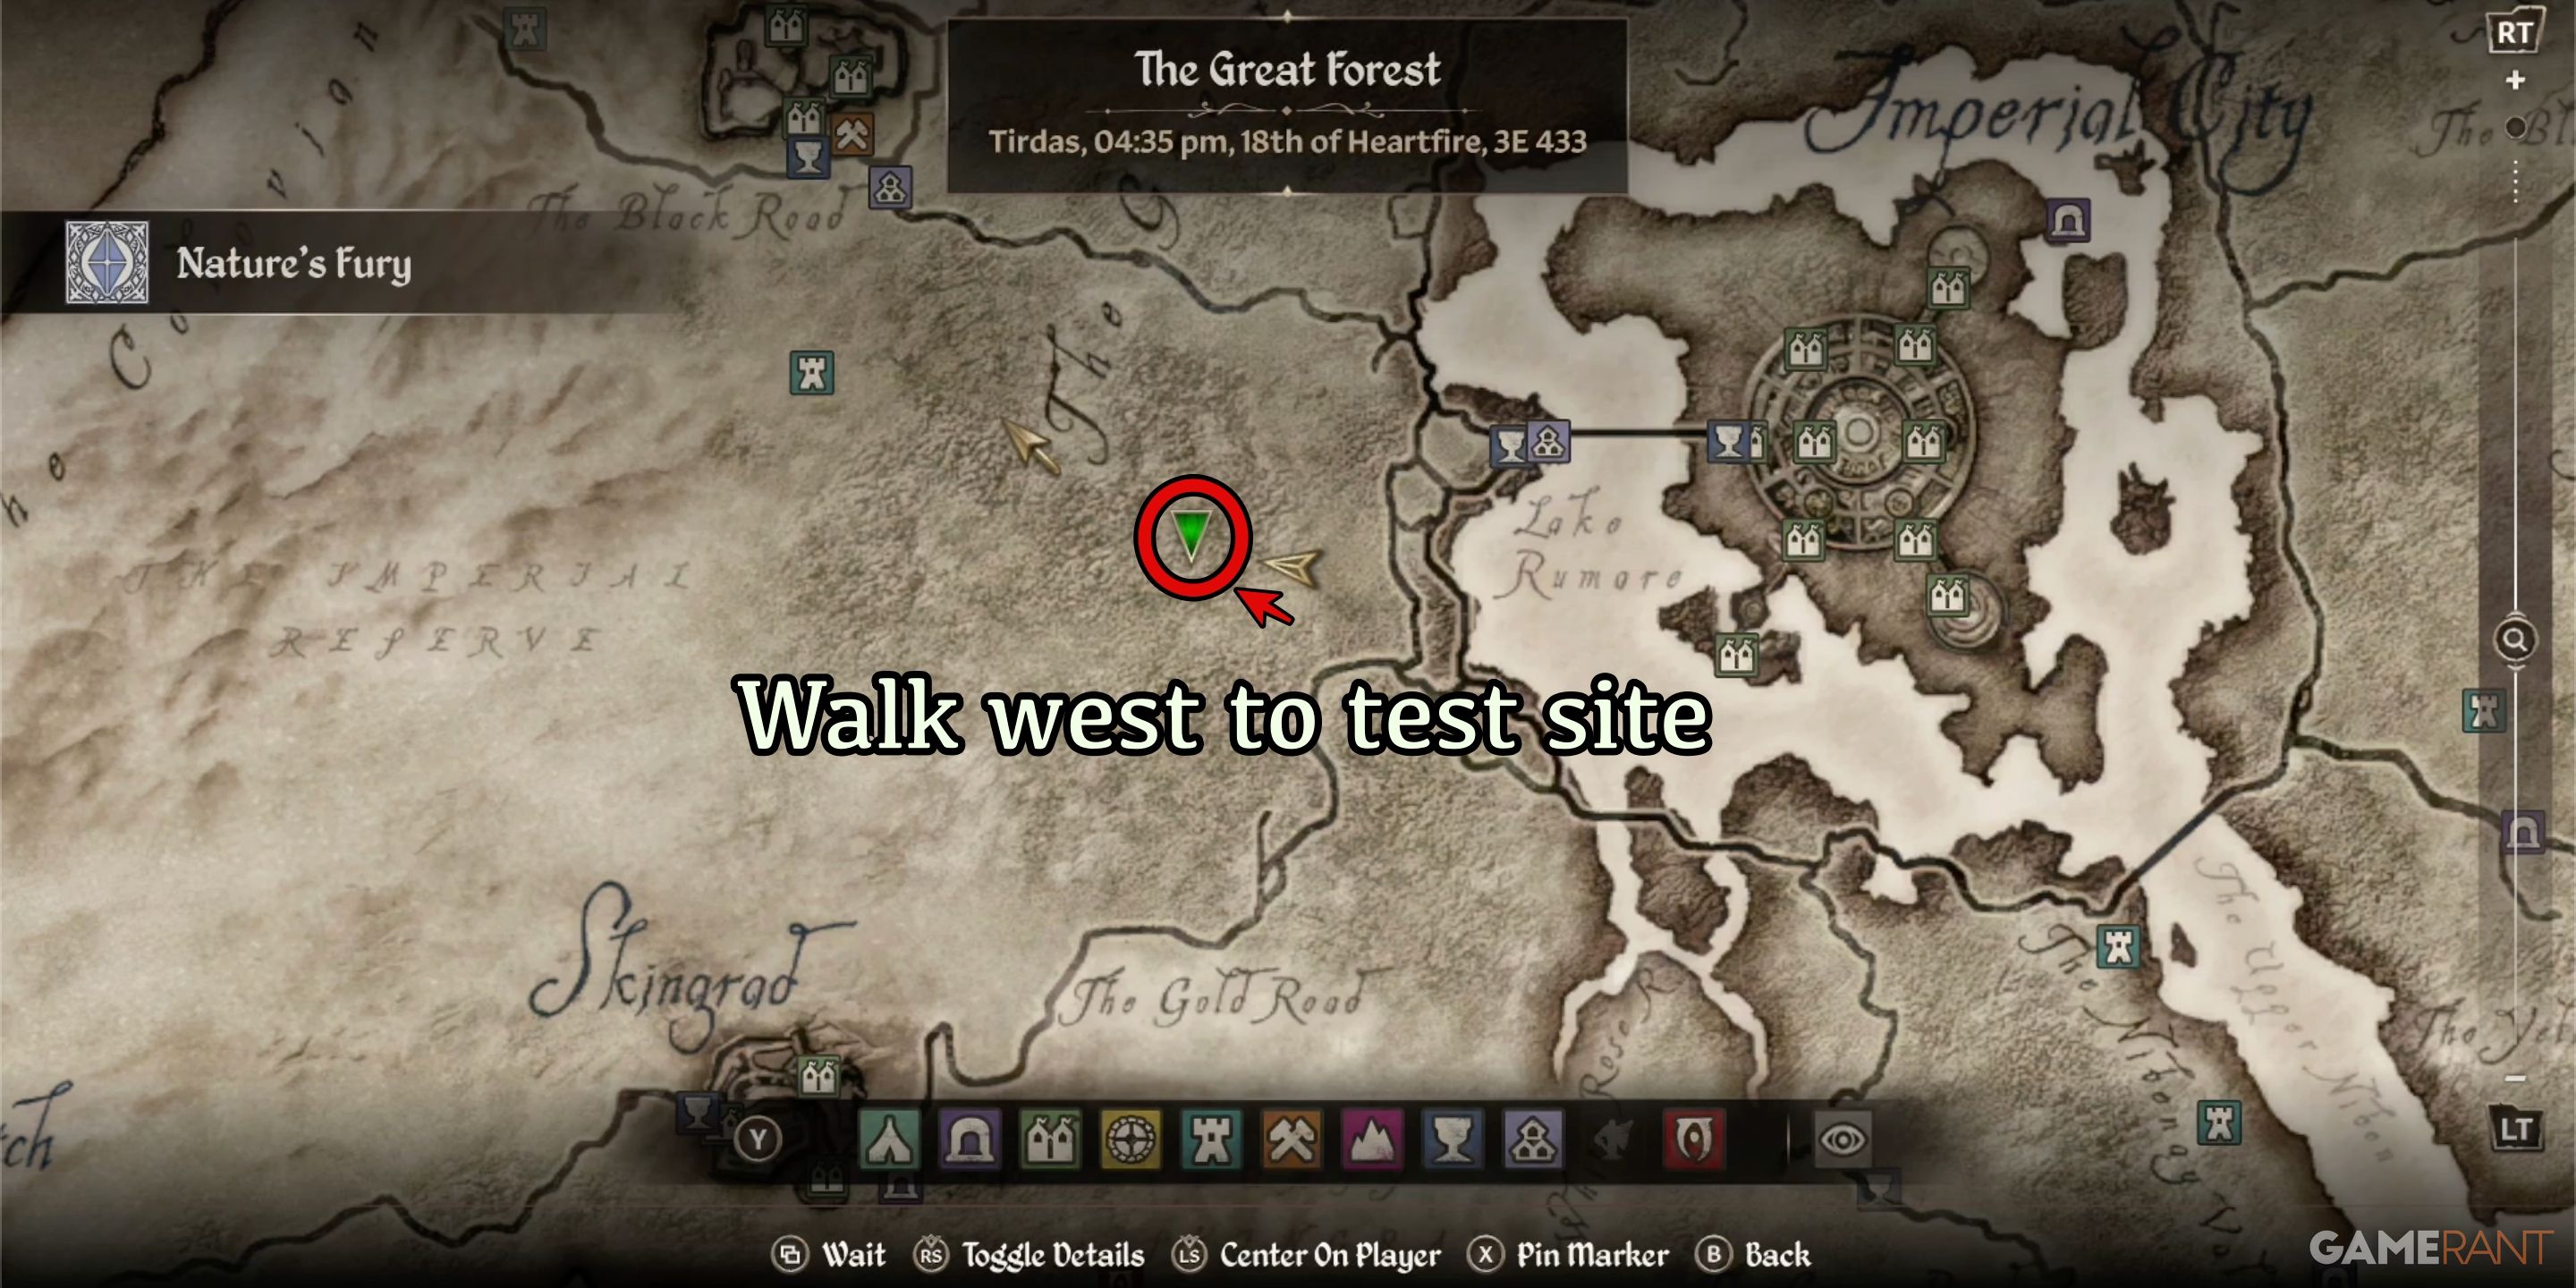
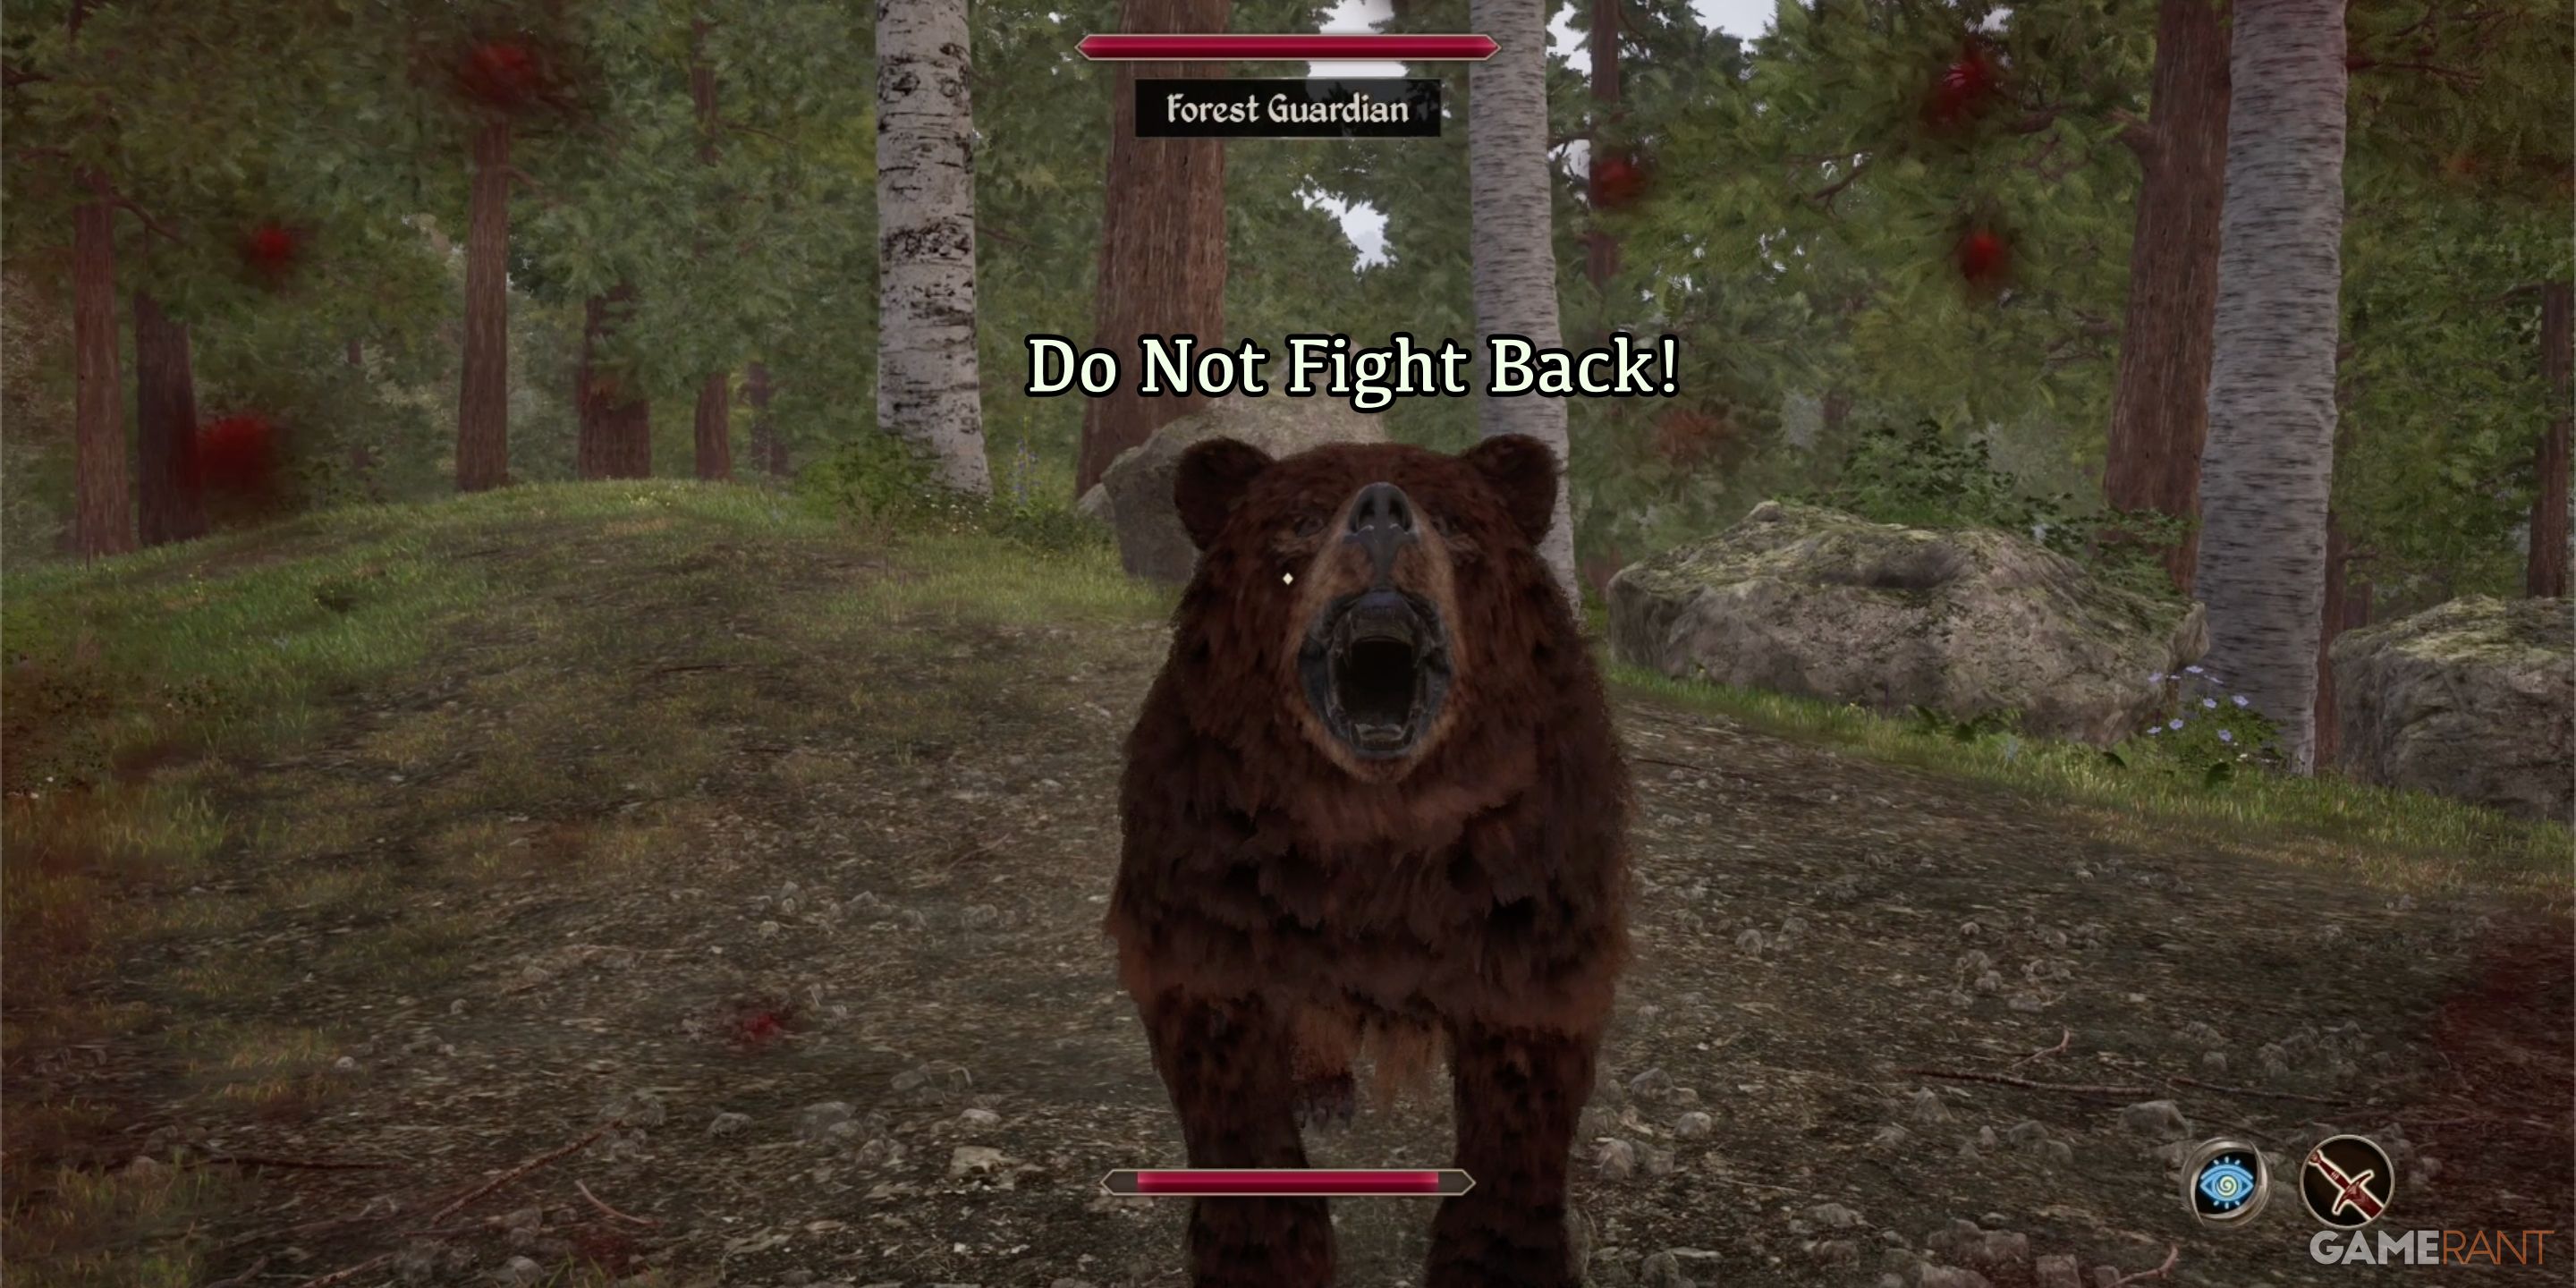
As you advance towards your next mission marker, you’ll come across a serene open space enclosed by towering rocks. A hint for your quest will appear, urging you to stay put and observe what Kynareth has planned. Soon after this indication, a Forest Guardian will materialize before you in the likeness of a bear. It is crucial that you refrain from attacking this bear. Instead, try to evade any potential attack, but be mindful not to take actions that could be perceived as aggressive or hostile.
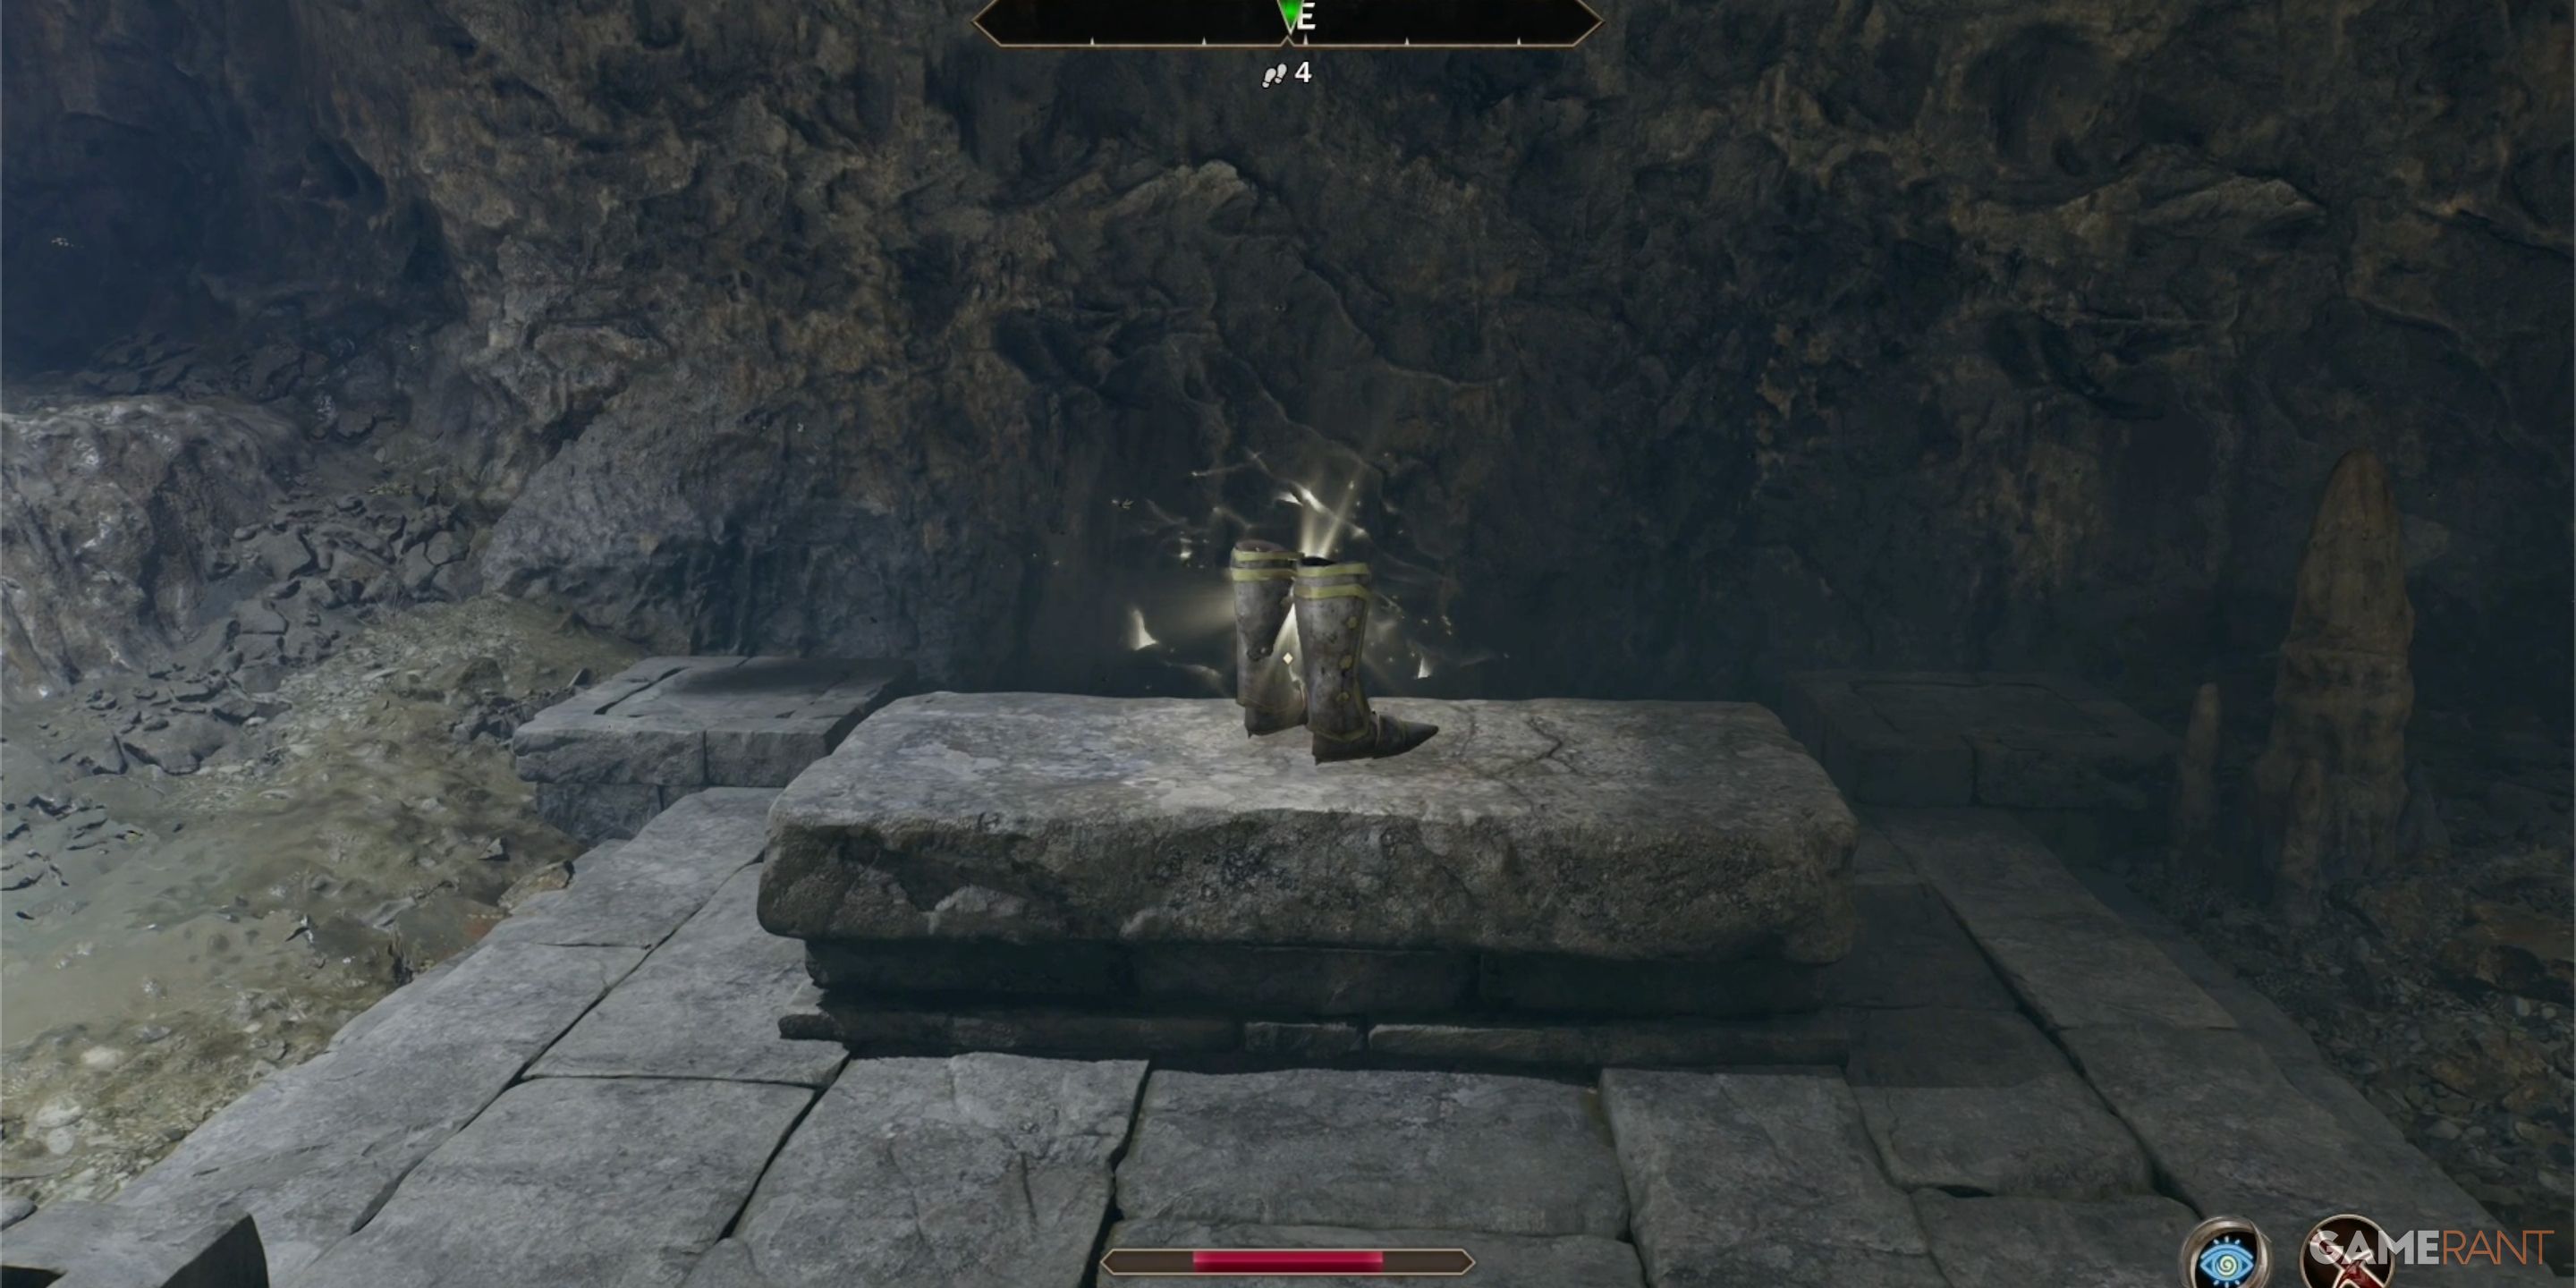
Should you refrain from retaliating, Kynareth will approve, unveiling an entryway within one of the massive boulders – a gateway to a hidden cave. Within this cave lies the Boots of the Crusader.
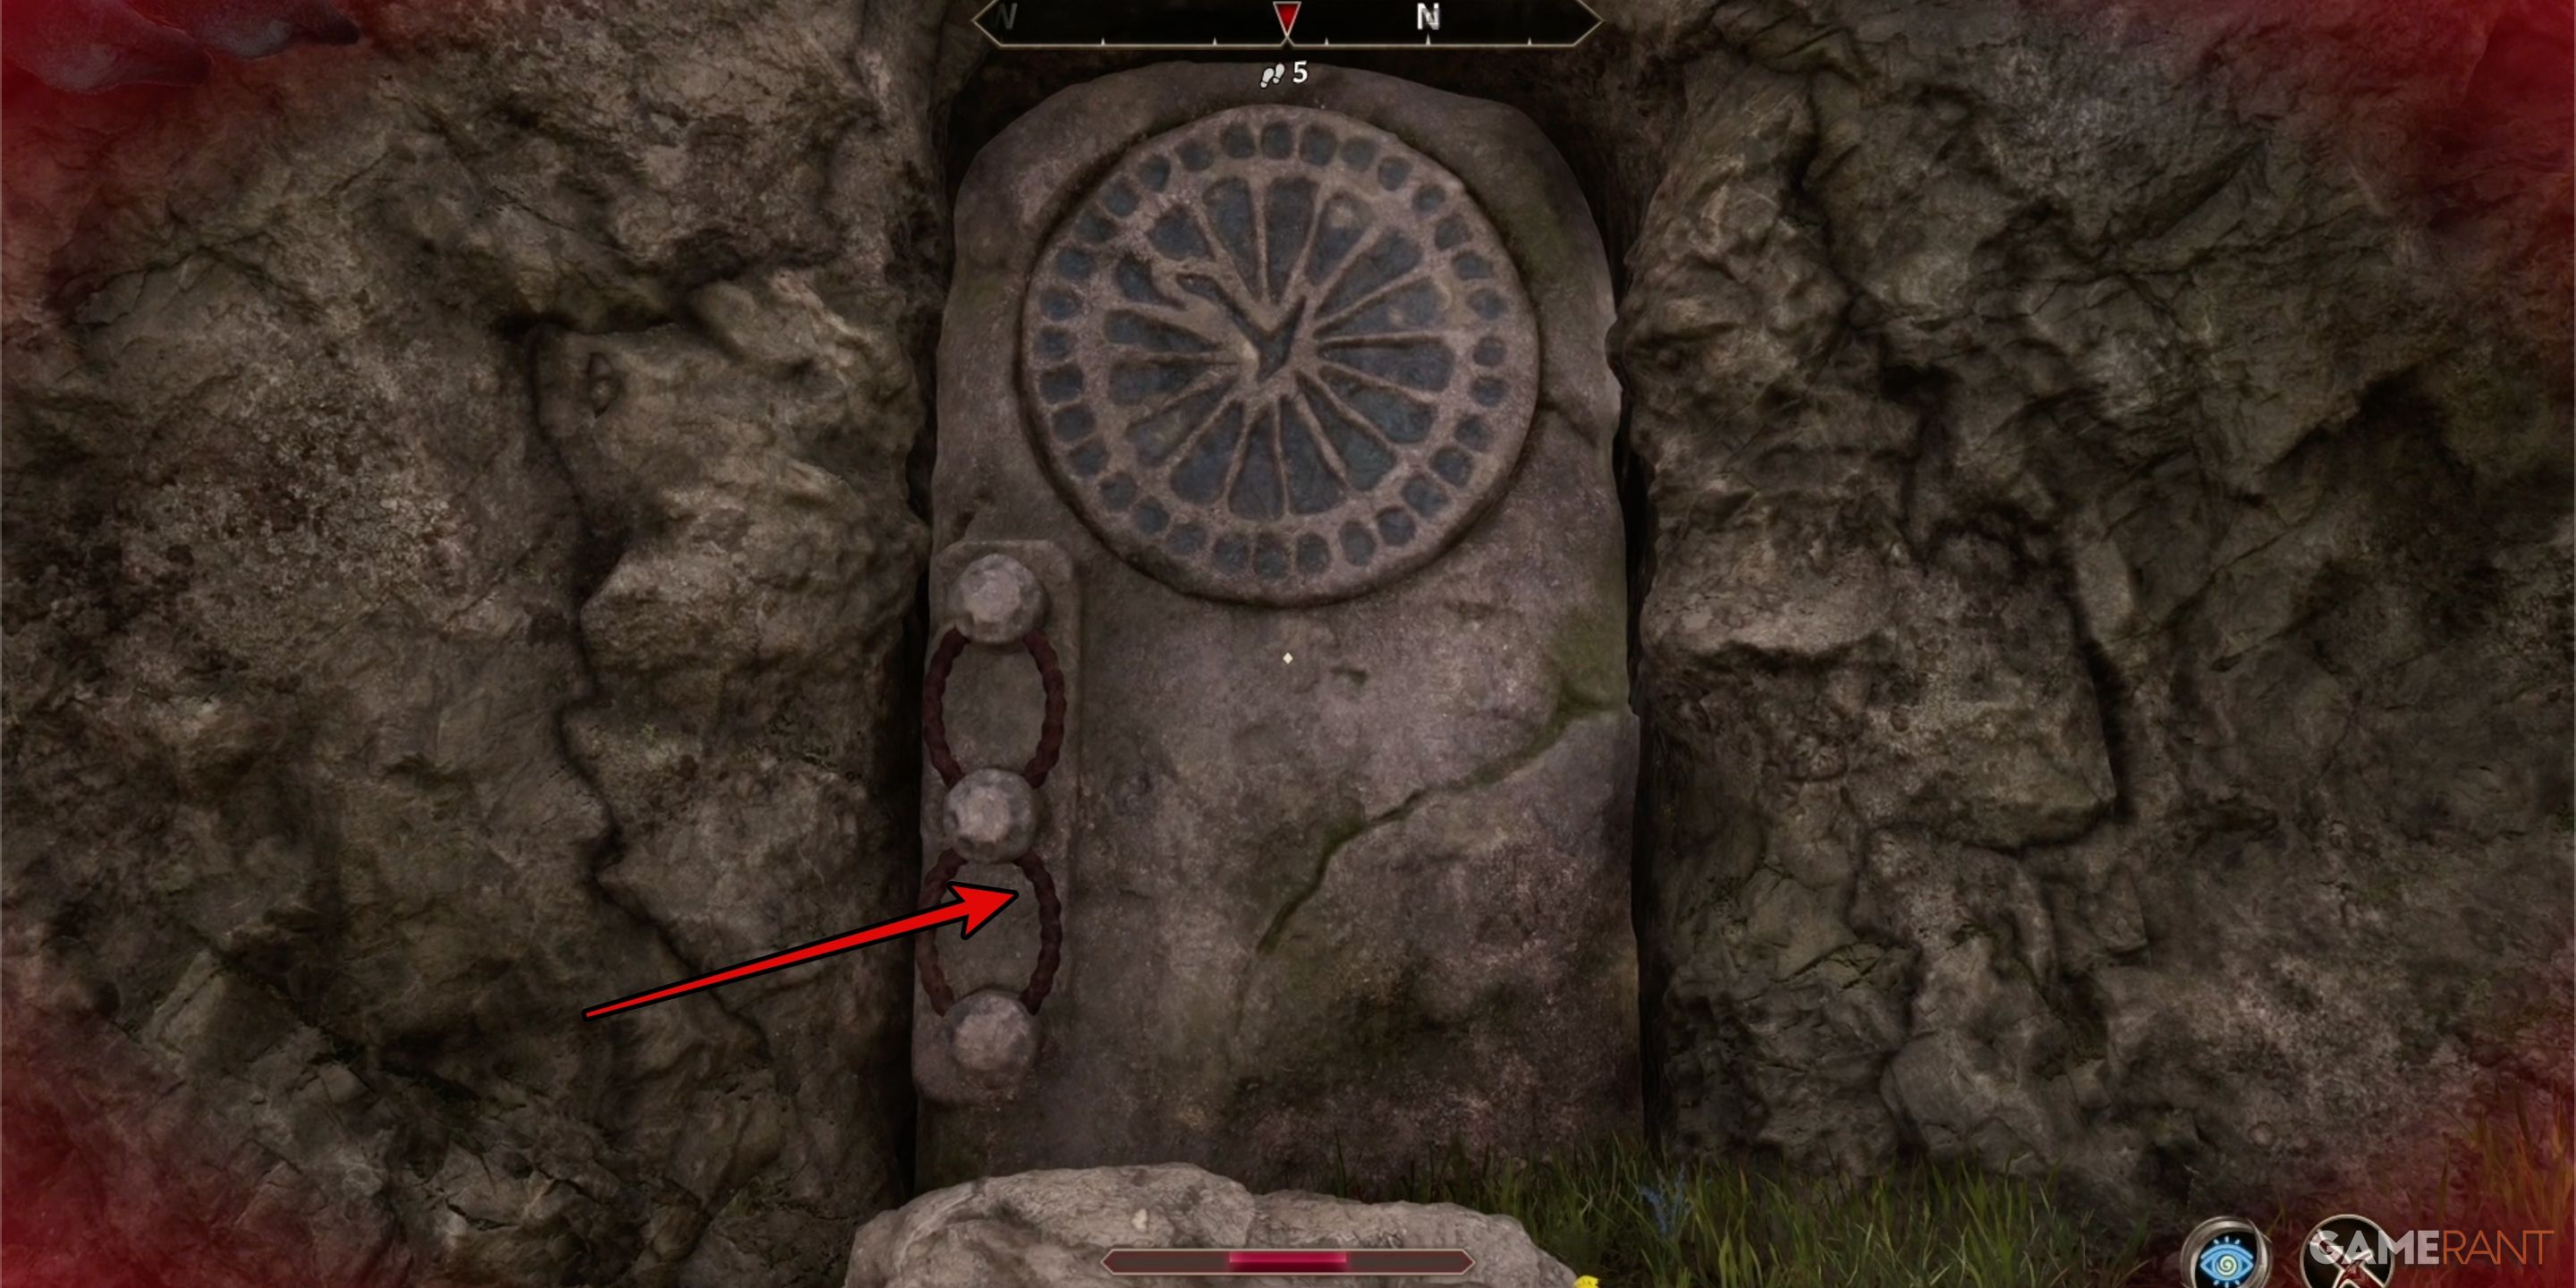
Stendarr’s Mercy – Gauntlets of the Crusader:
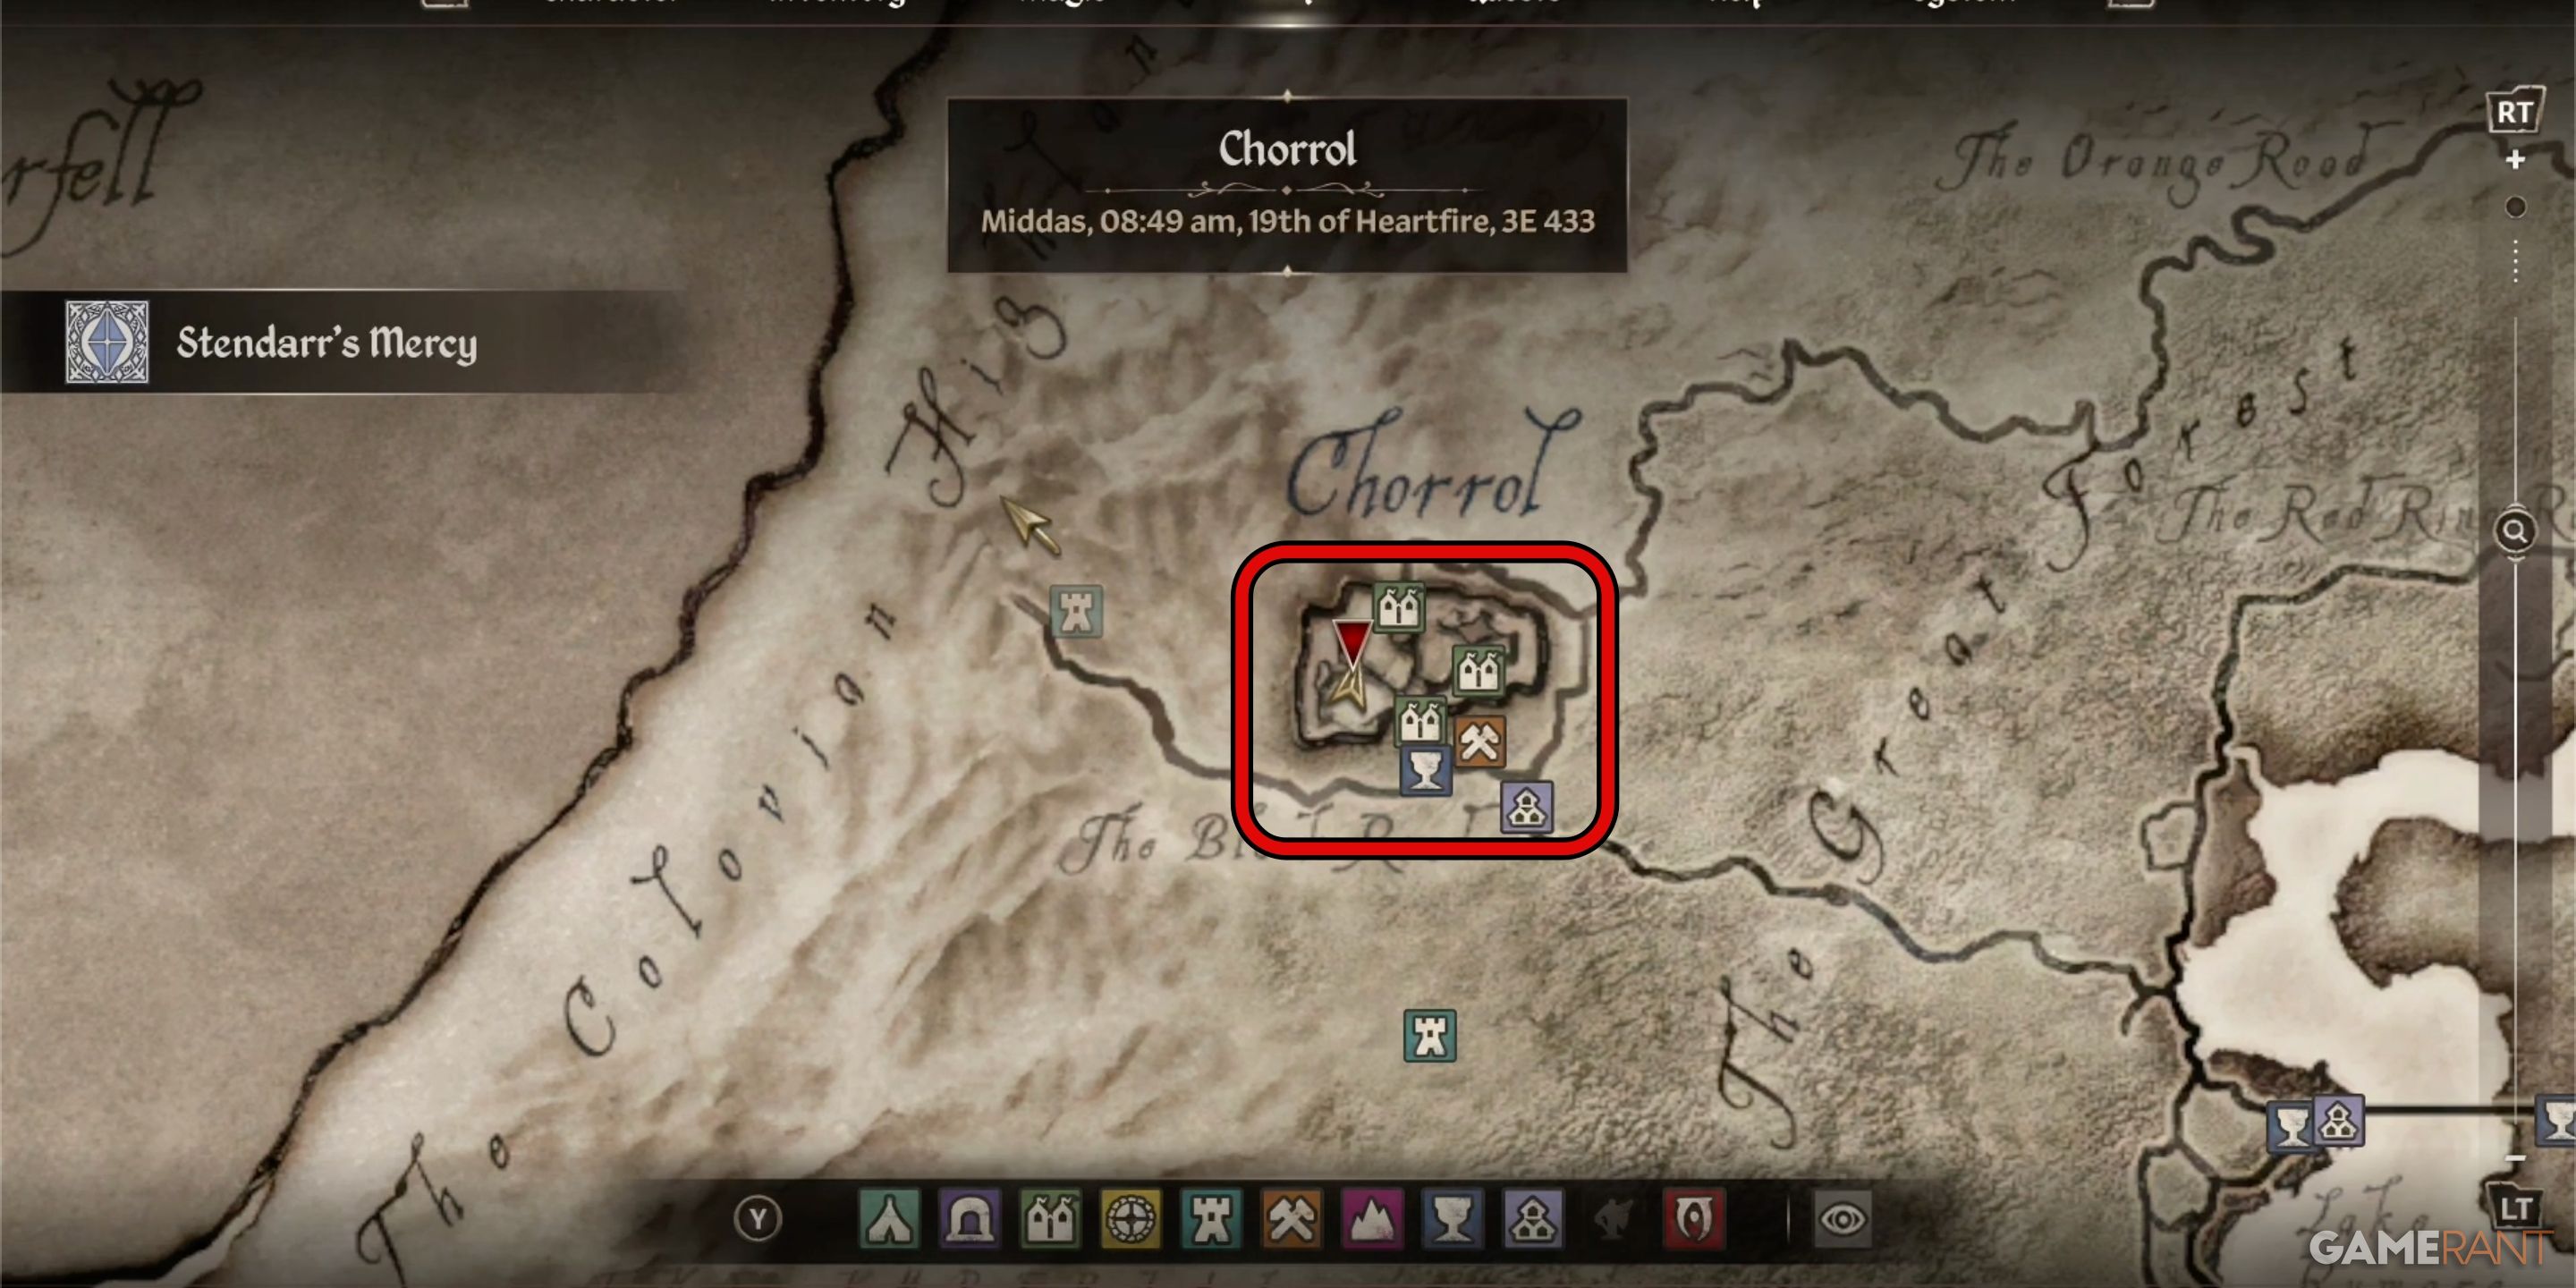
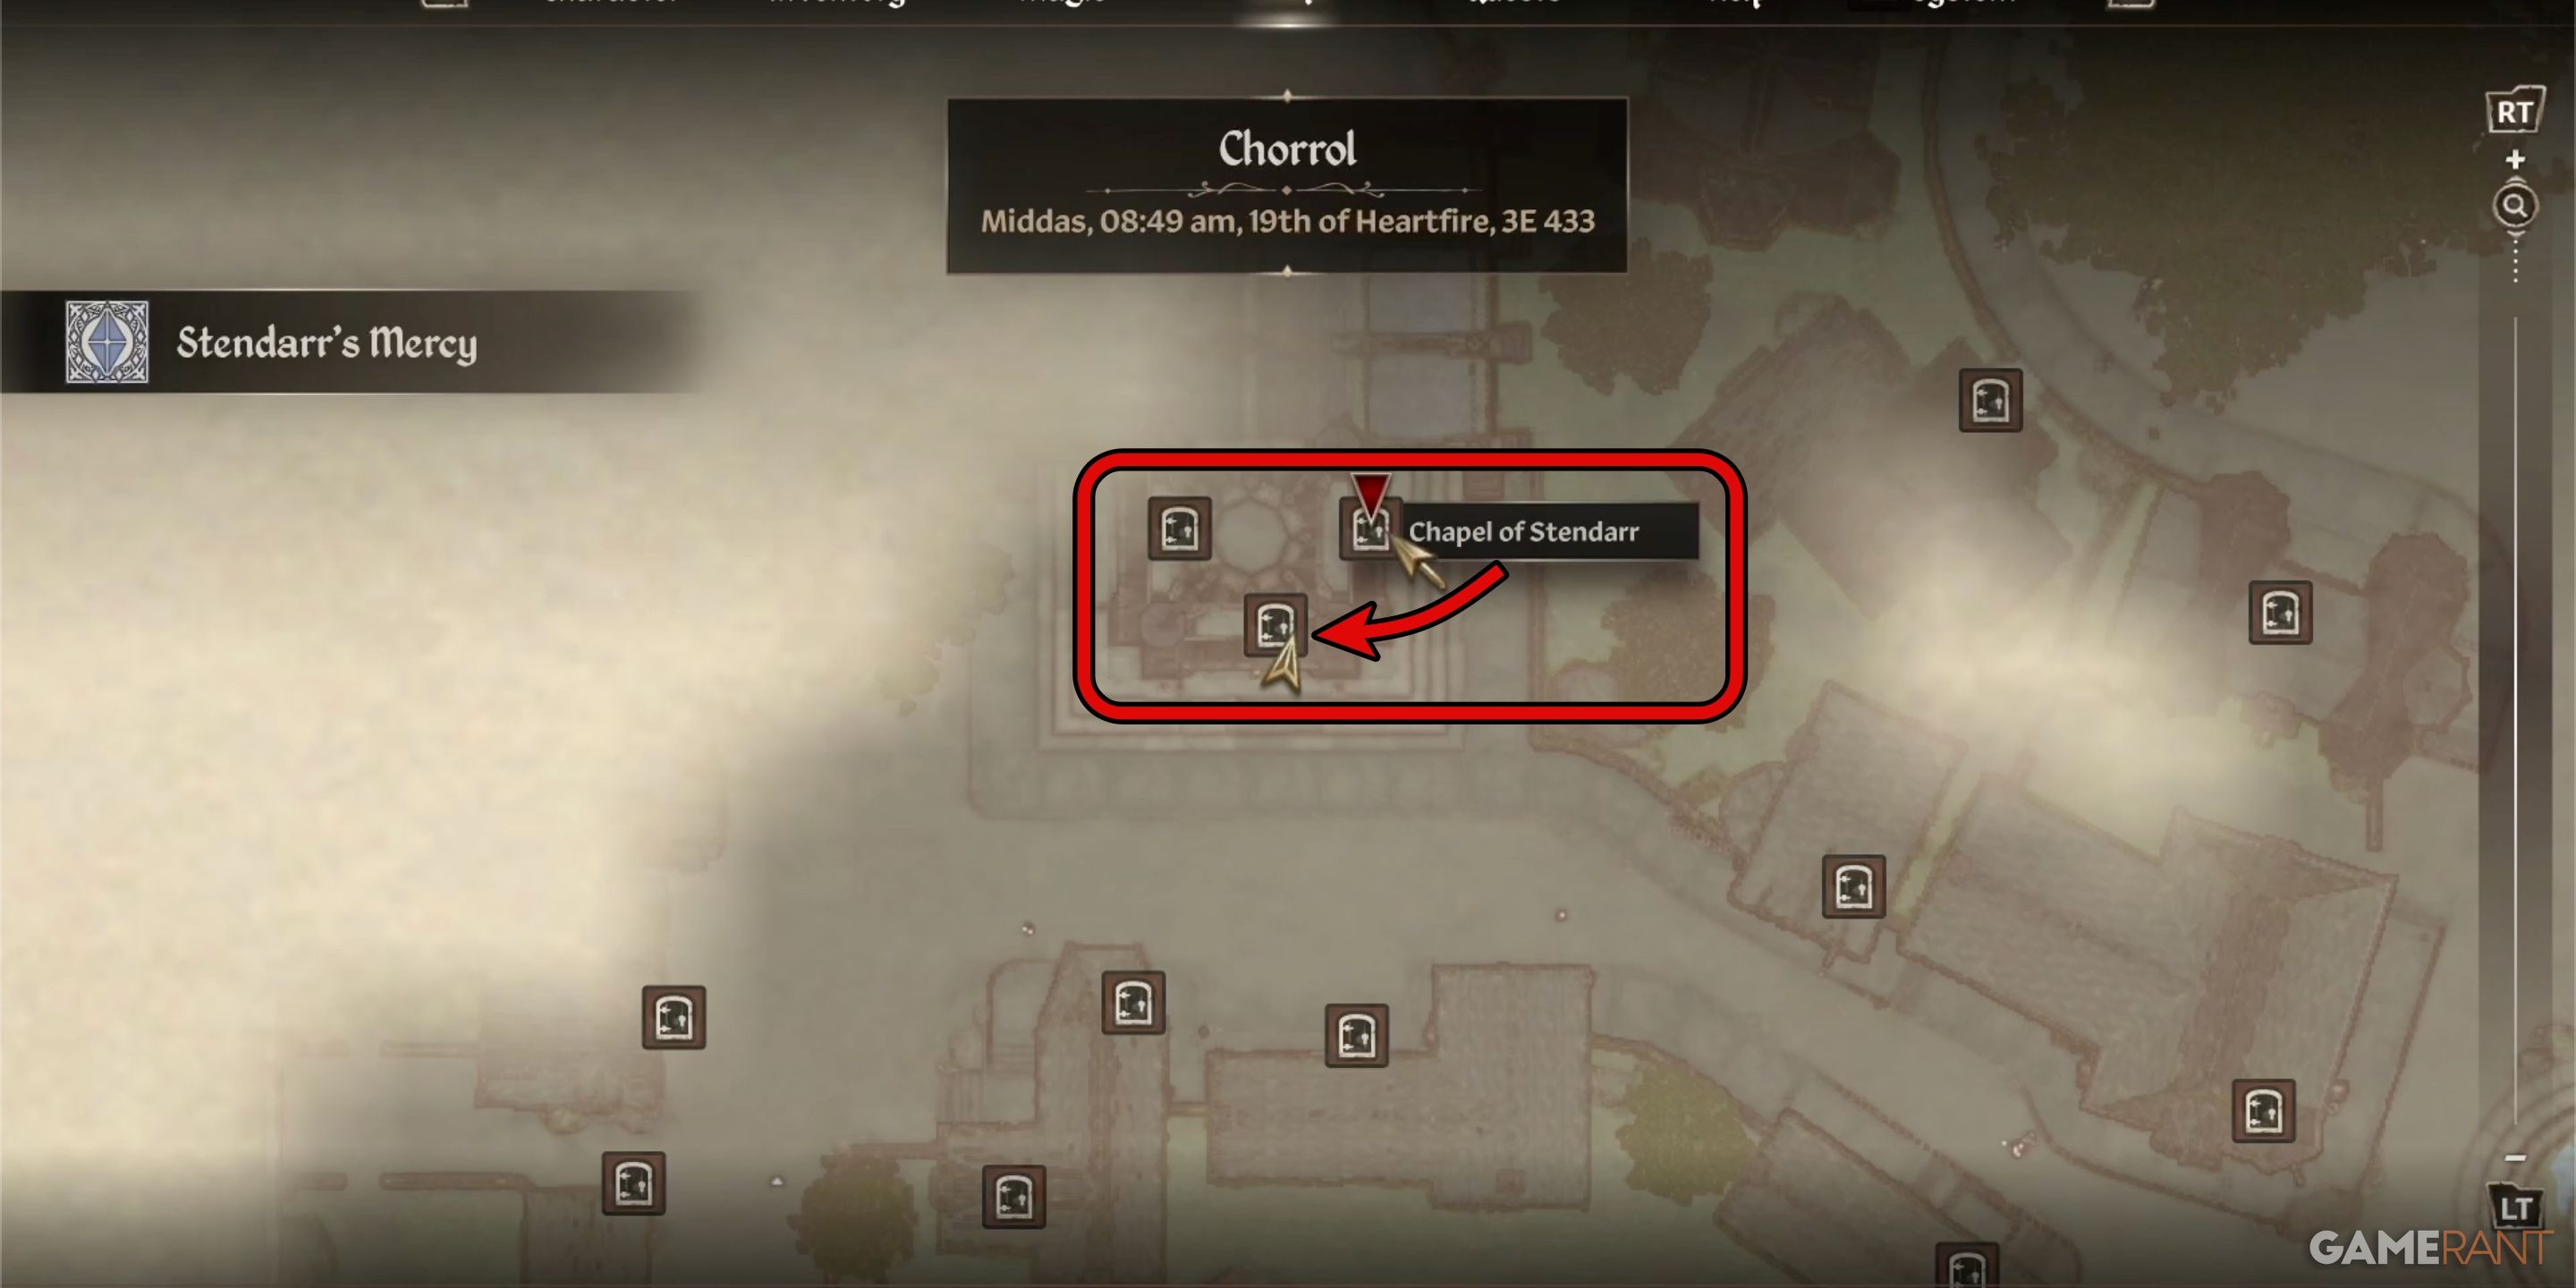
To grab the Crusader’s Gauntlets, you should make your way to the Chapel of Stendarr located in Chorrol. This quest isn’t too time-consuming, but it involves accepting Kellen’s misfortune, a young man who bears an unfortunate curse.
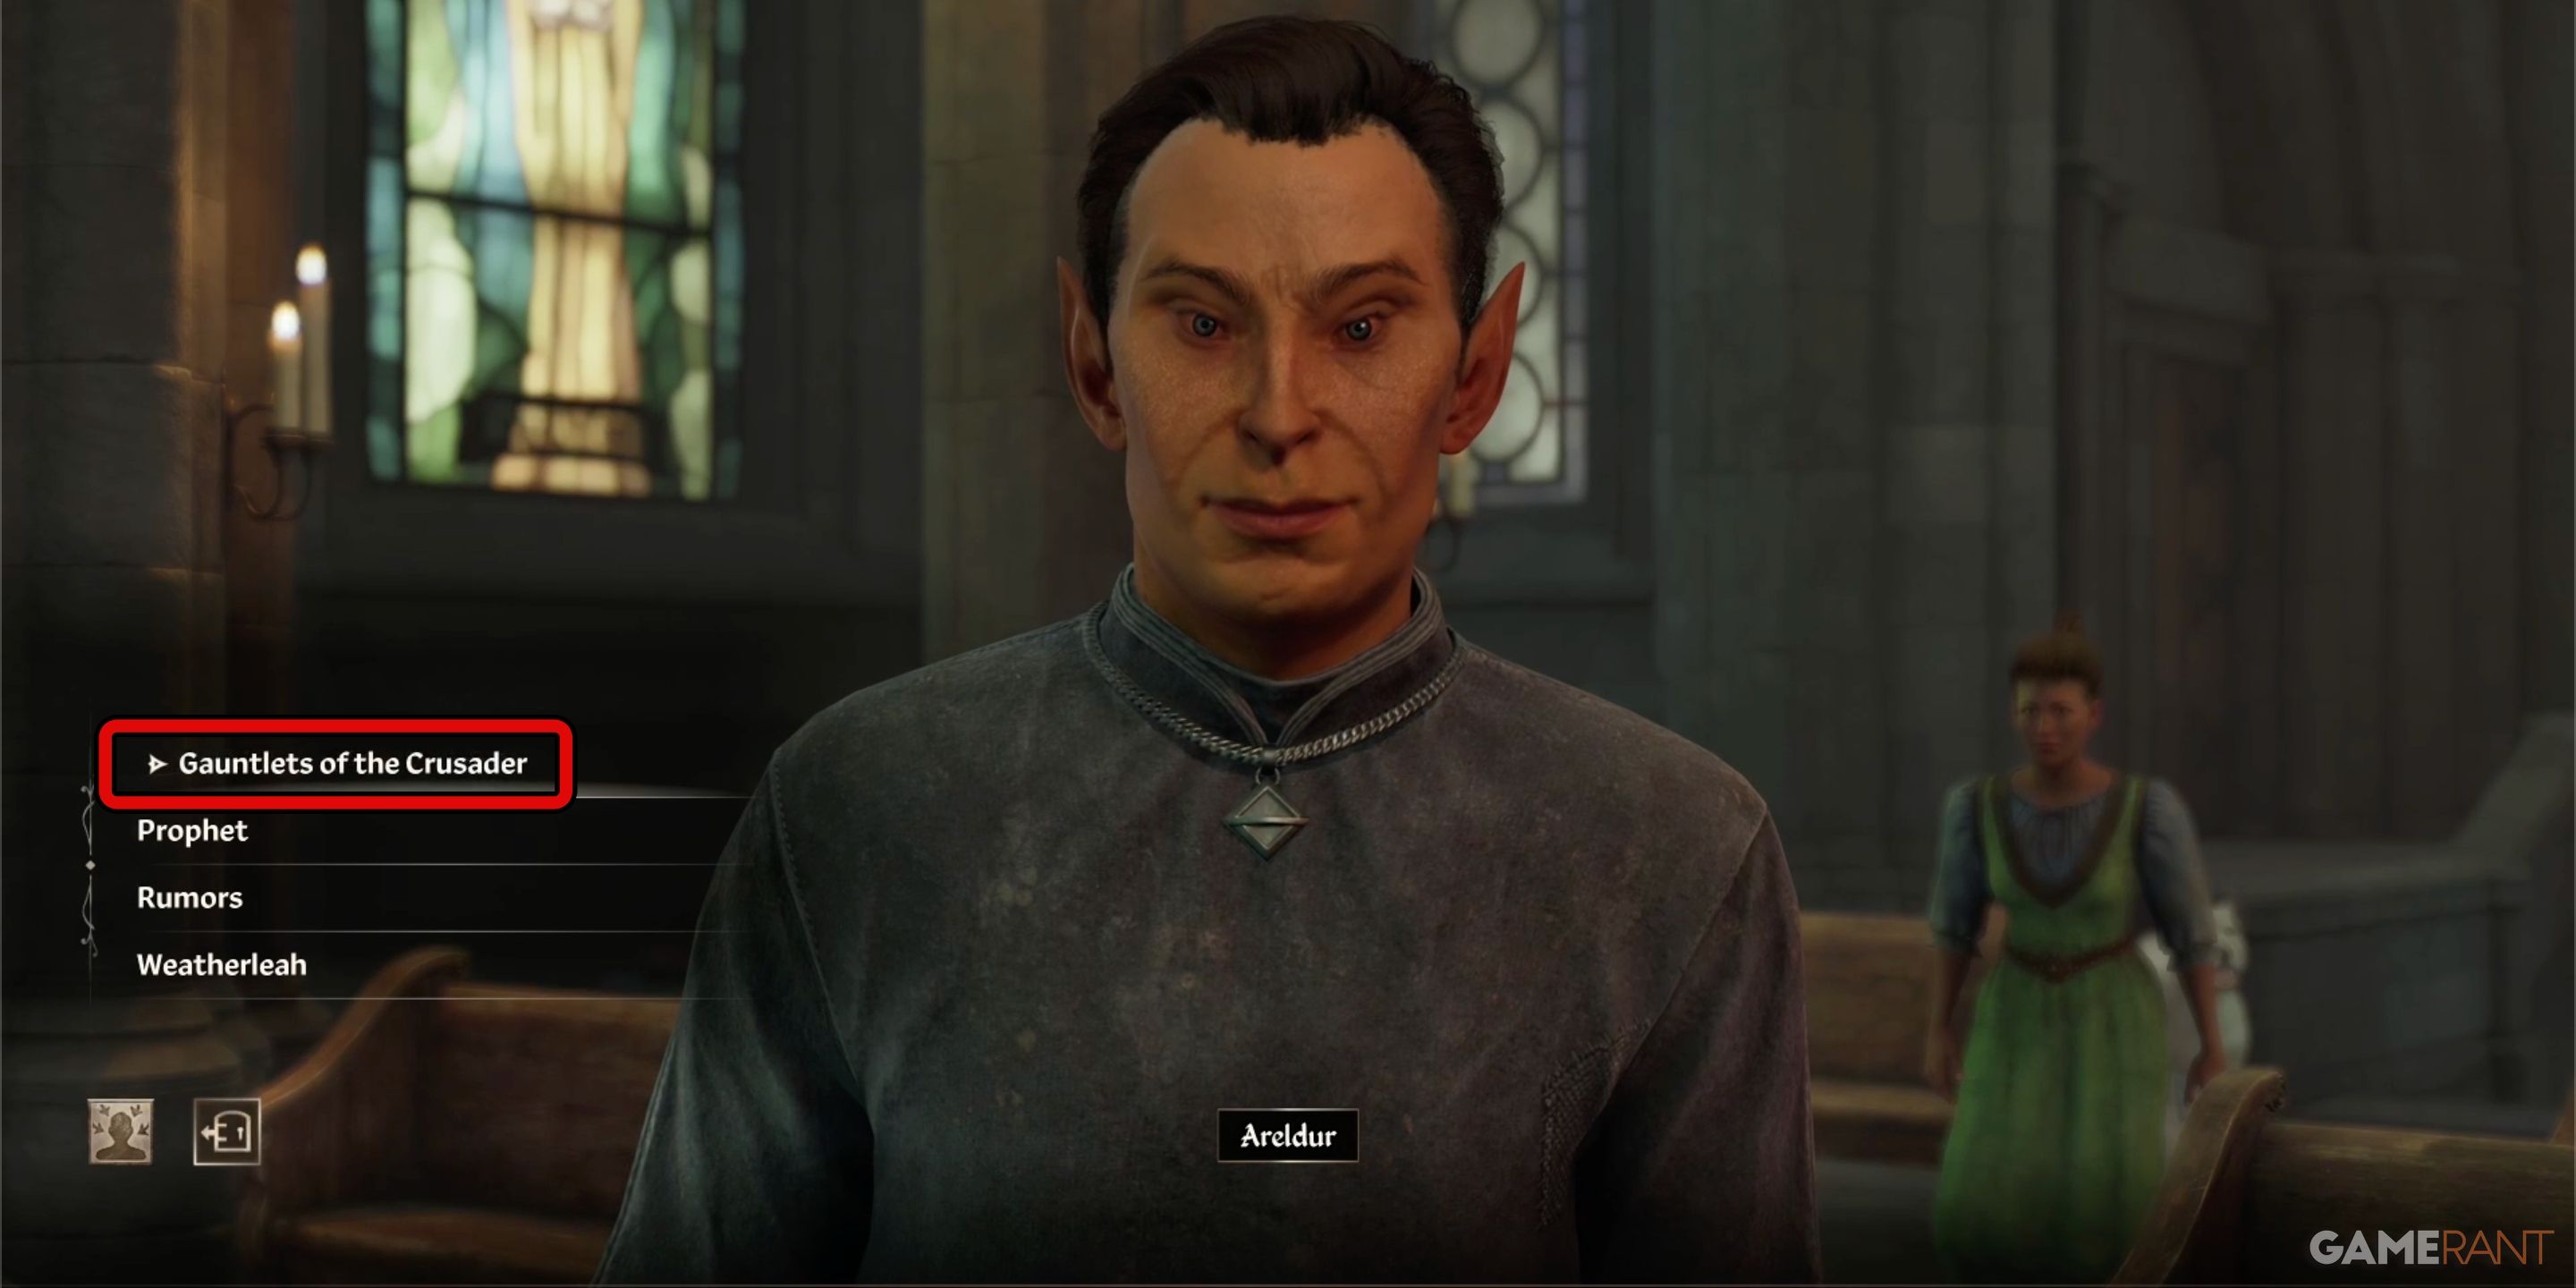
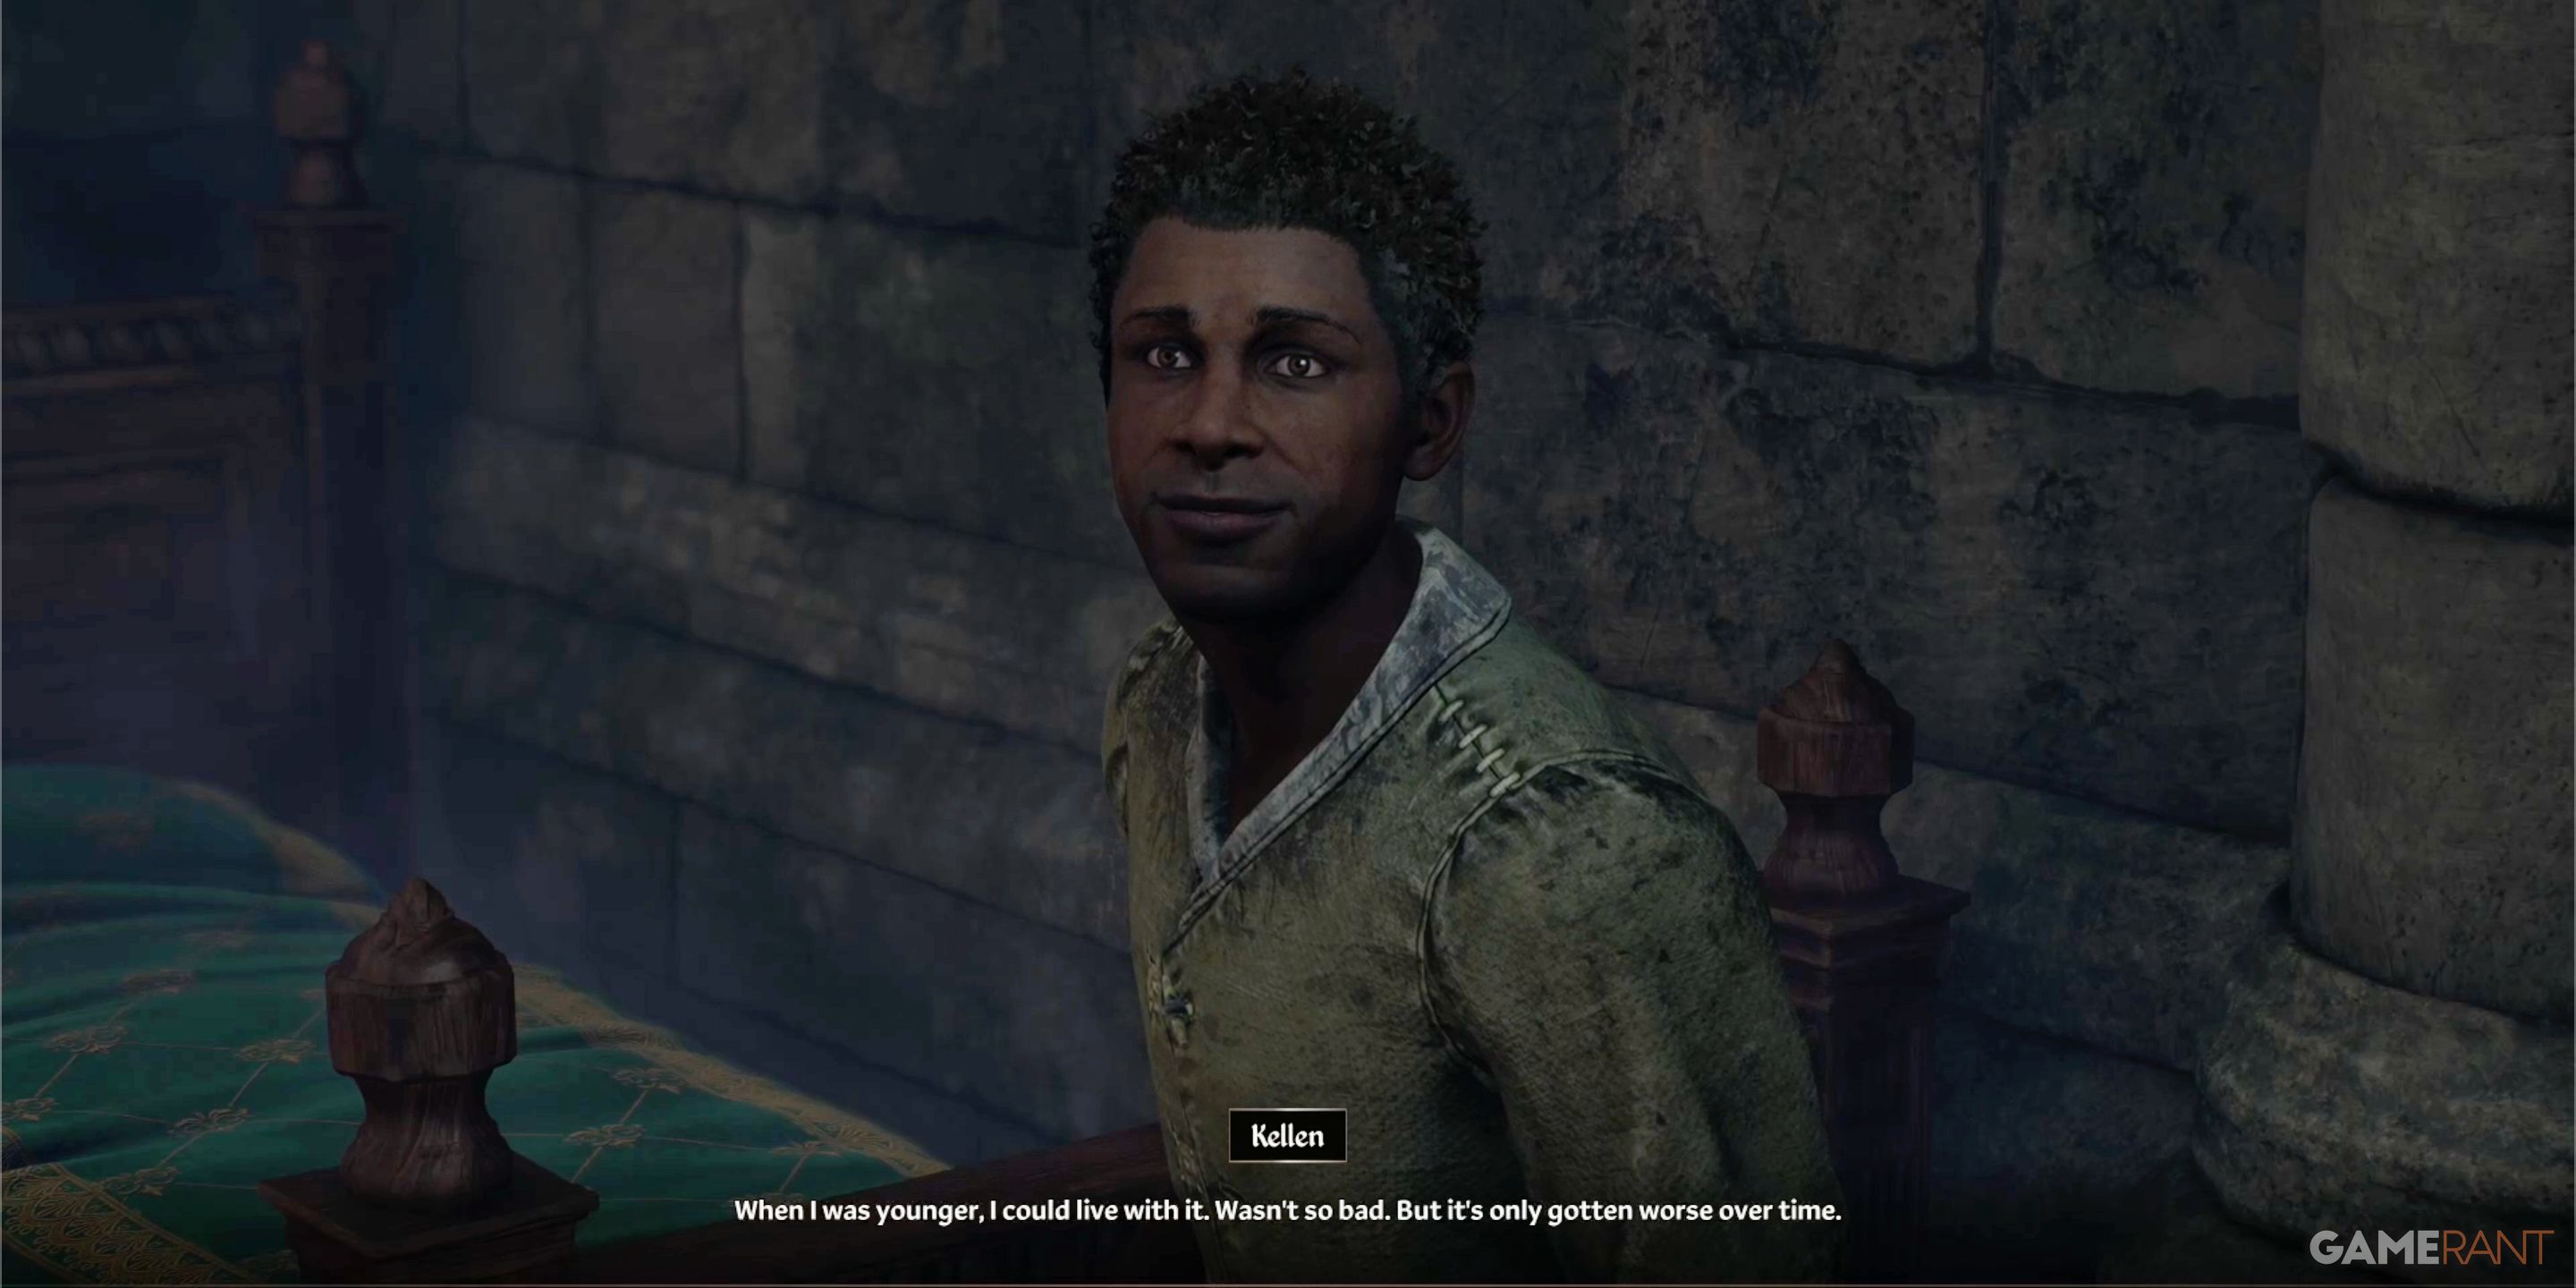
In the Chapel dedicated to Stendarr, you will notice the Crusader’s Gauntlets lying on the floor beyond the main altar. Regrettably, they are under a spell that makes them unbearably heavy to lift. Approach Areldur, the chapel’s priest, for he can provide information about Kellen, an individual linked to the gauntlet’s former owner – a knight who was wearing them when afflicted by the curse. The curse has passed down through the family lineage, and now plagues Kellen himself.
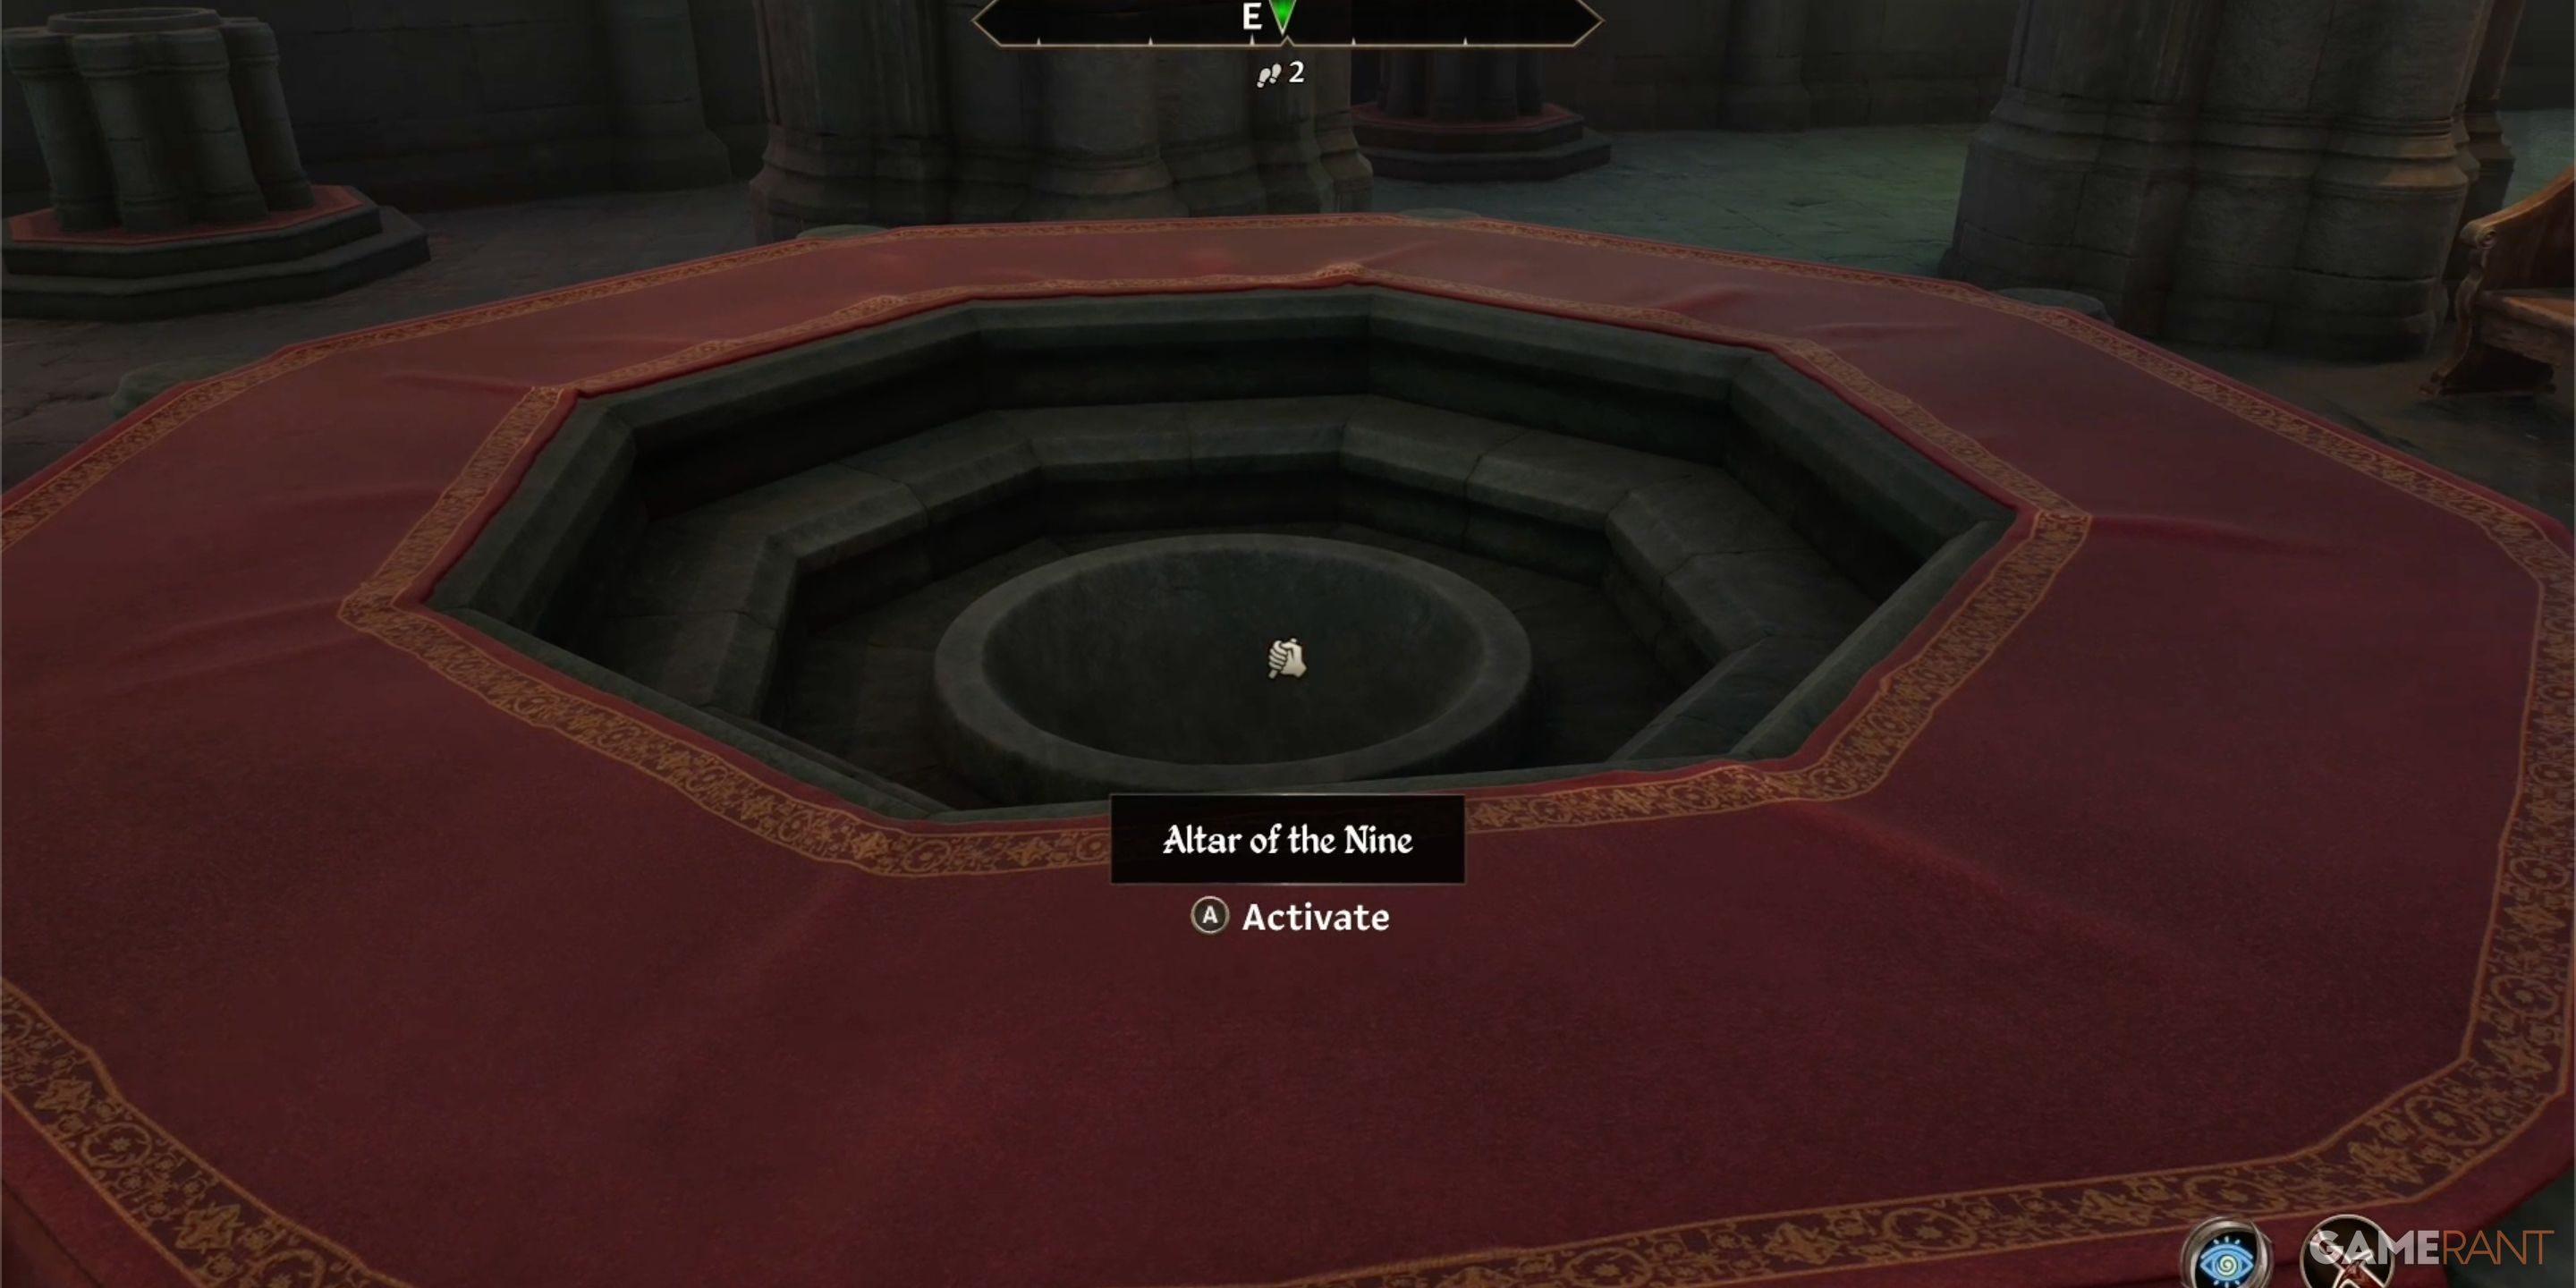
After chatting with Kellen, go back and confront Areldur. He’ll confess that he has knowledge of a method to heal Kellen, but is reluctant to carry it out himself. He reveals that the curse can only be lifted from Kellen if another person assumes it instead. He will guide you through the process. You need to pray at the altar, imploring Stendarr for the ability to rid Kellen of the curse.
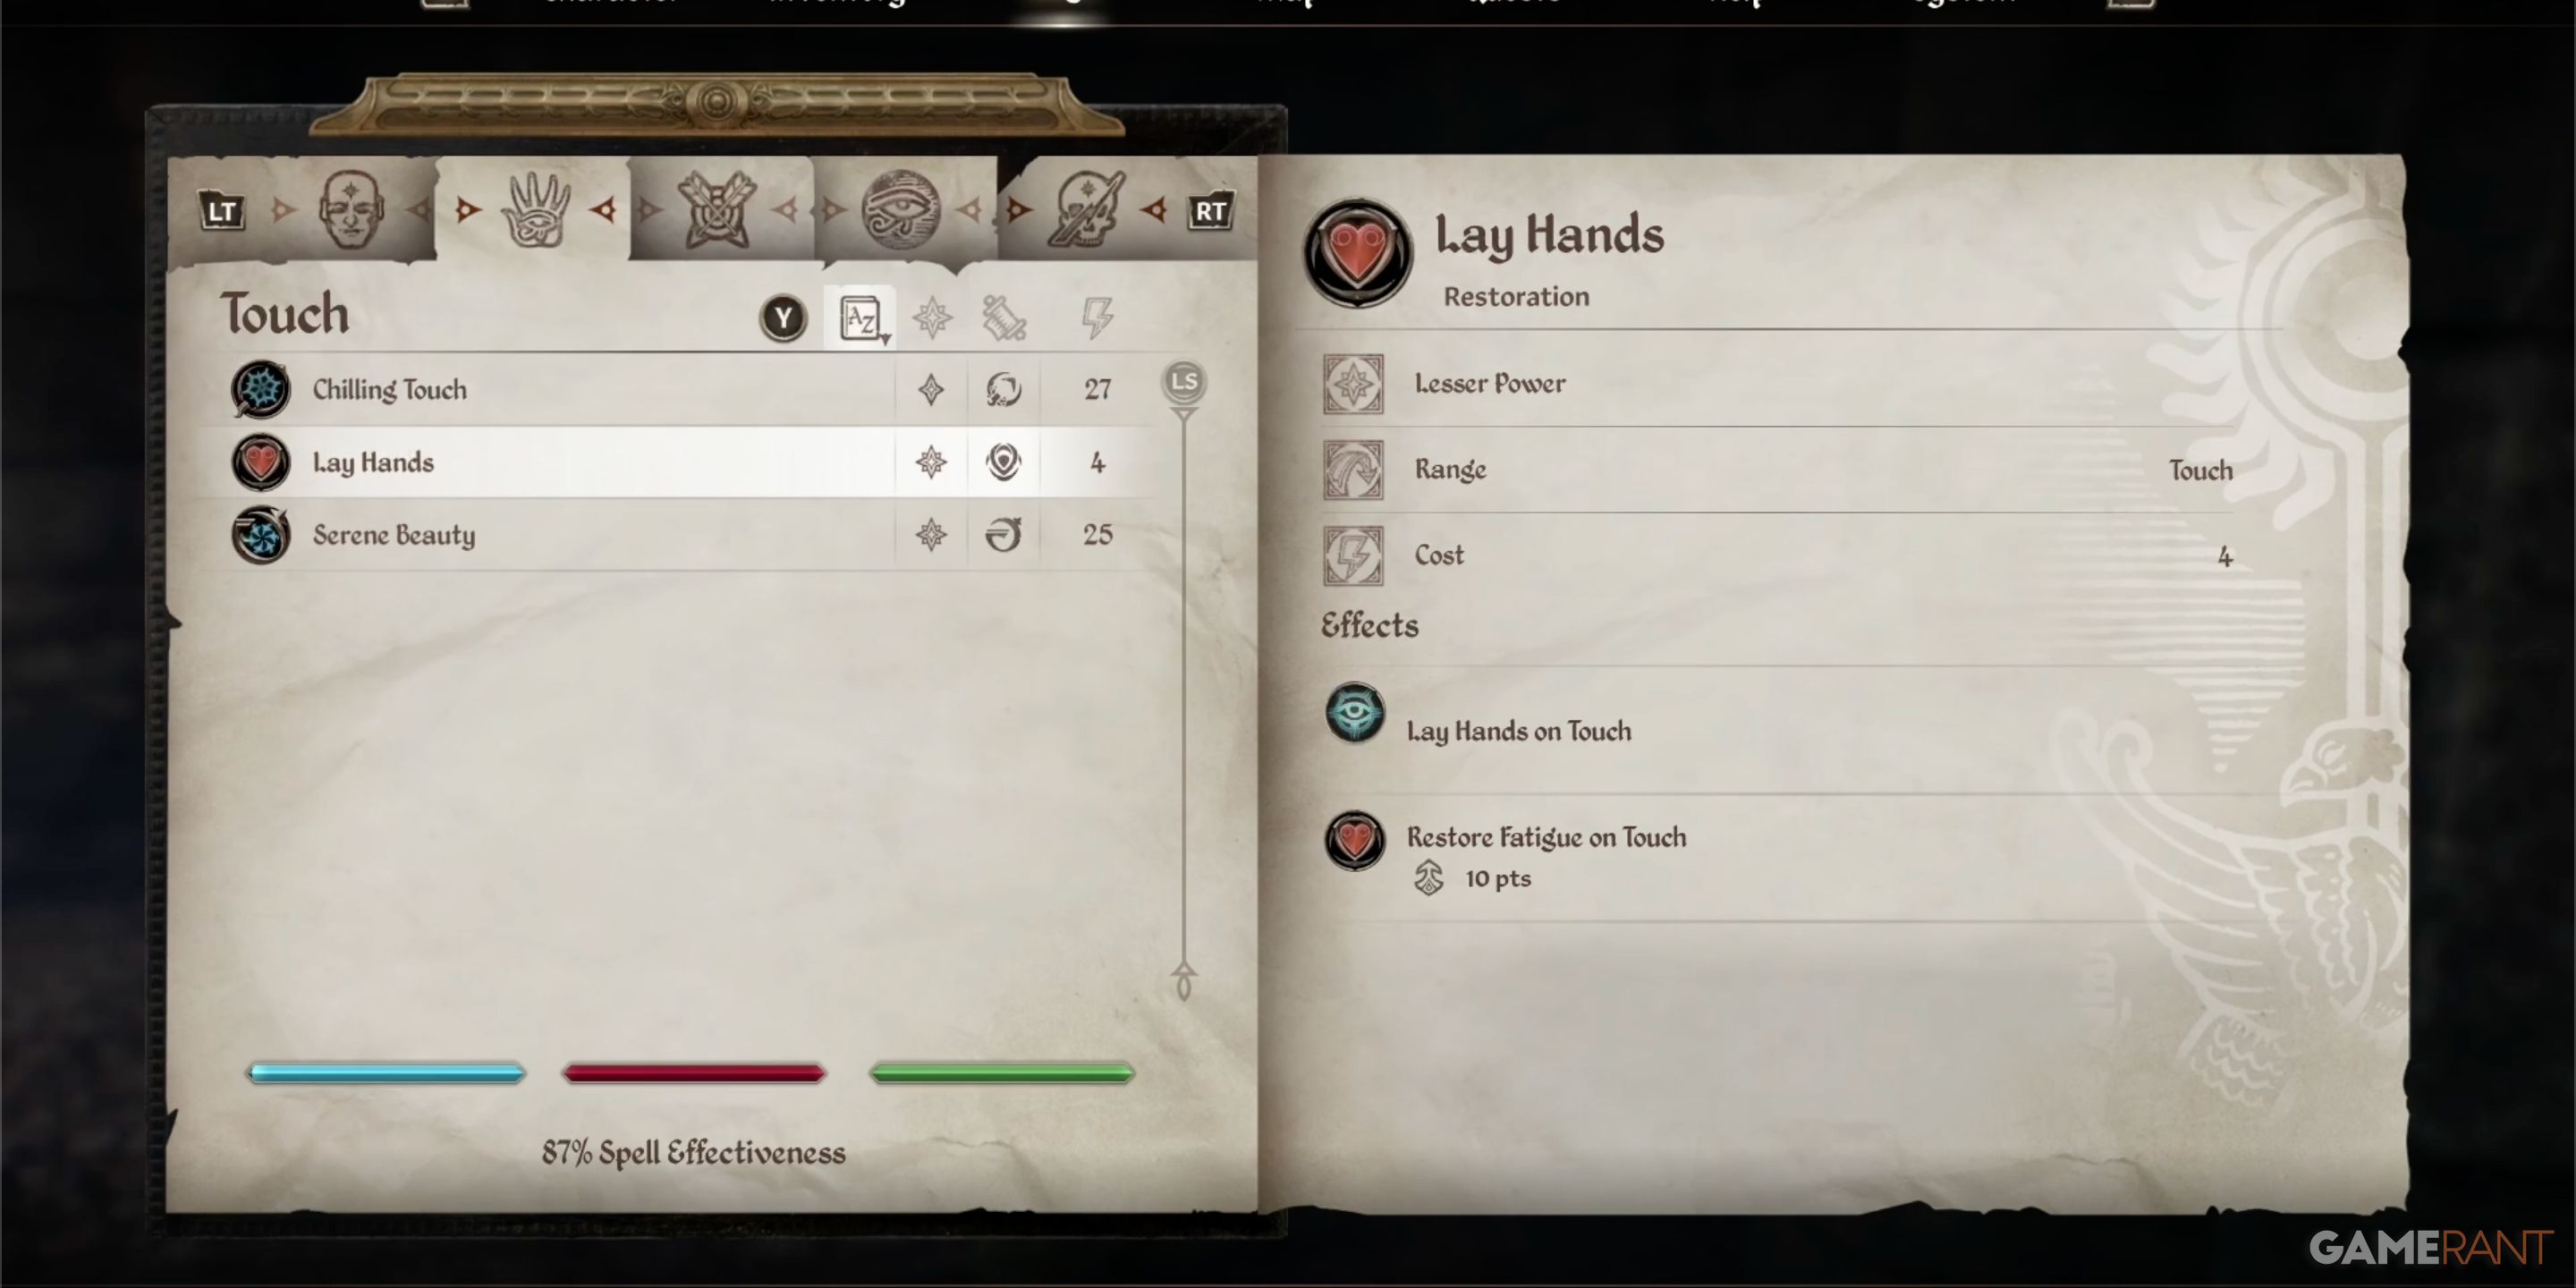
Following your prayer at the altar, Stendarr bestows upon you the ability to cast the “Laying on Hands” spell. This enchantment seems to impact your Energy (or stamina) mysteriously, but for now, rejoin Kellen and perform the Laying on Hands ritual on him. Both you and he will be afflicted by a curse, yet you’ll now have the opportunity to obtain the Crusader’s Gauntlets.
Mace of the Crusader Location – Oblivion Remastered
The Path of the Righteous Quest:
You must collect and equip the Boots of the Crusader before collecting the Mace of the Crusader.
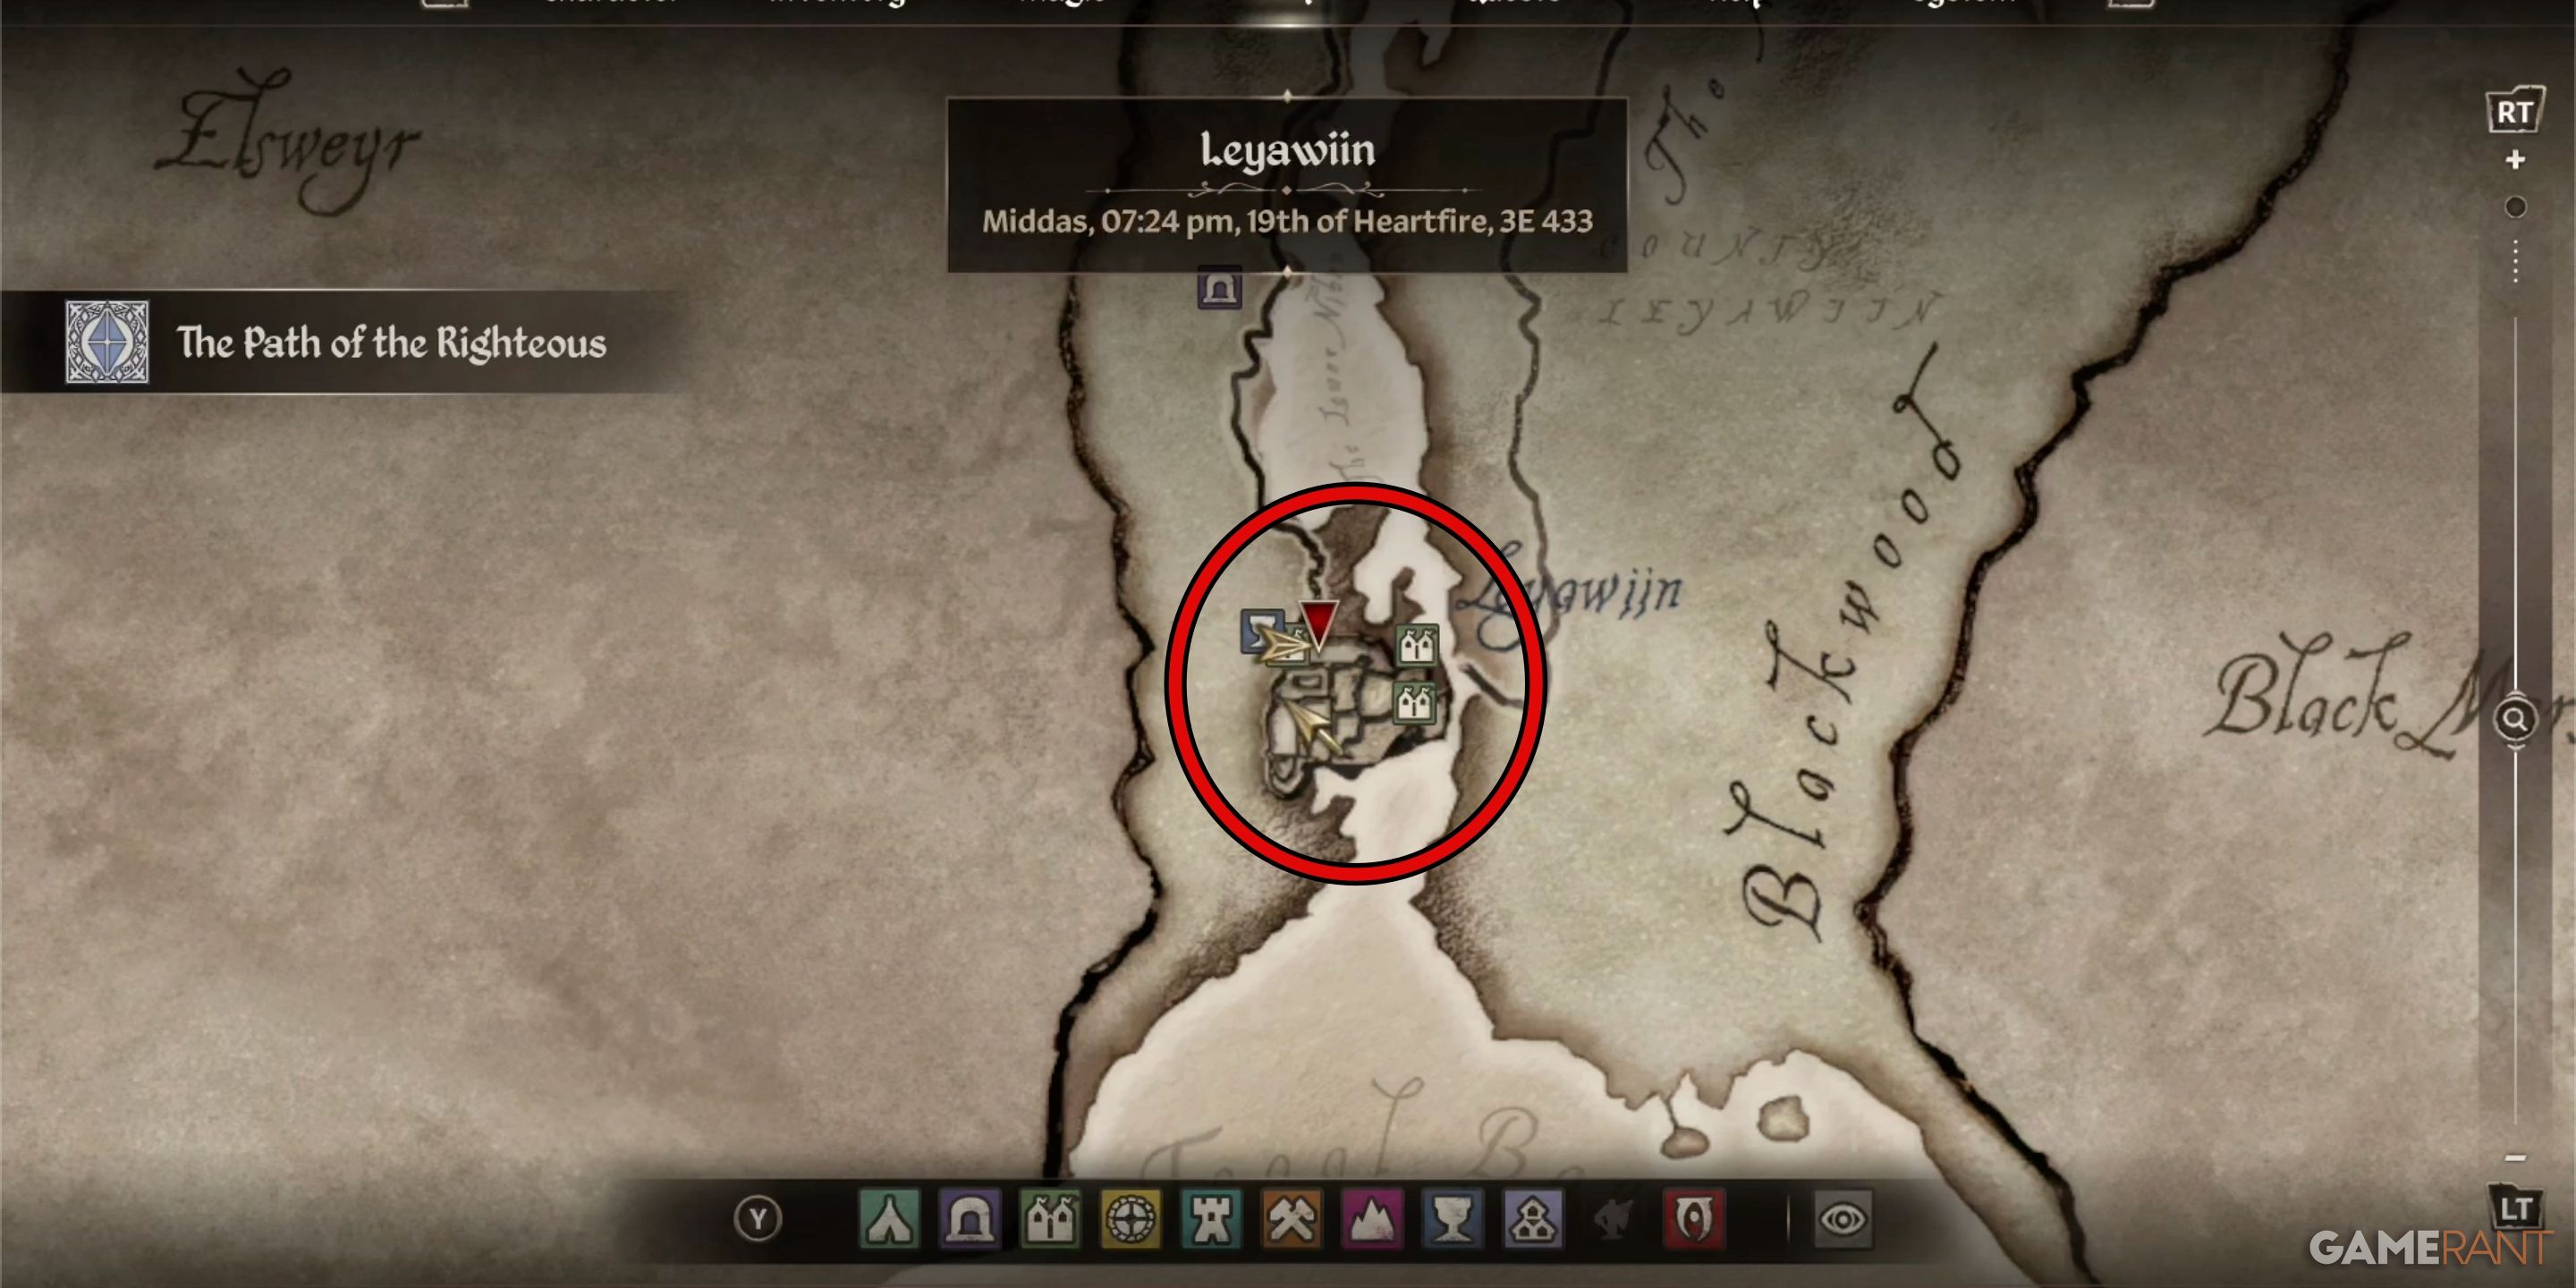
As a gamer, I found that snagging the Mace of Zenithar, also known as the Mace of the Crusader, was a breeze compared to other Crusader’s Relics. Once you’ve got the Crusader’s Boots under your belt, make a beeline for the Grand Chapel of Zenithar nestled in Leyawiin.
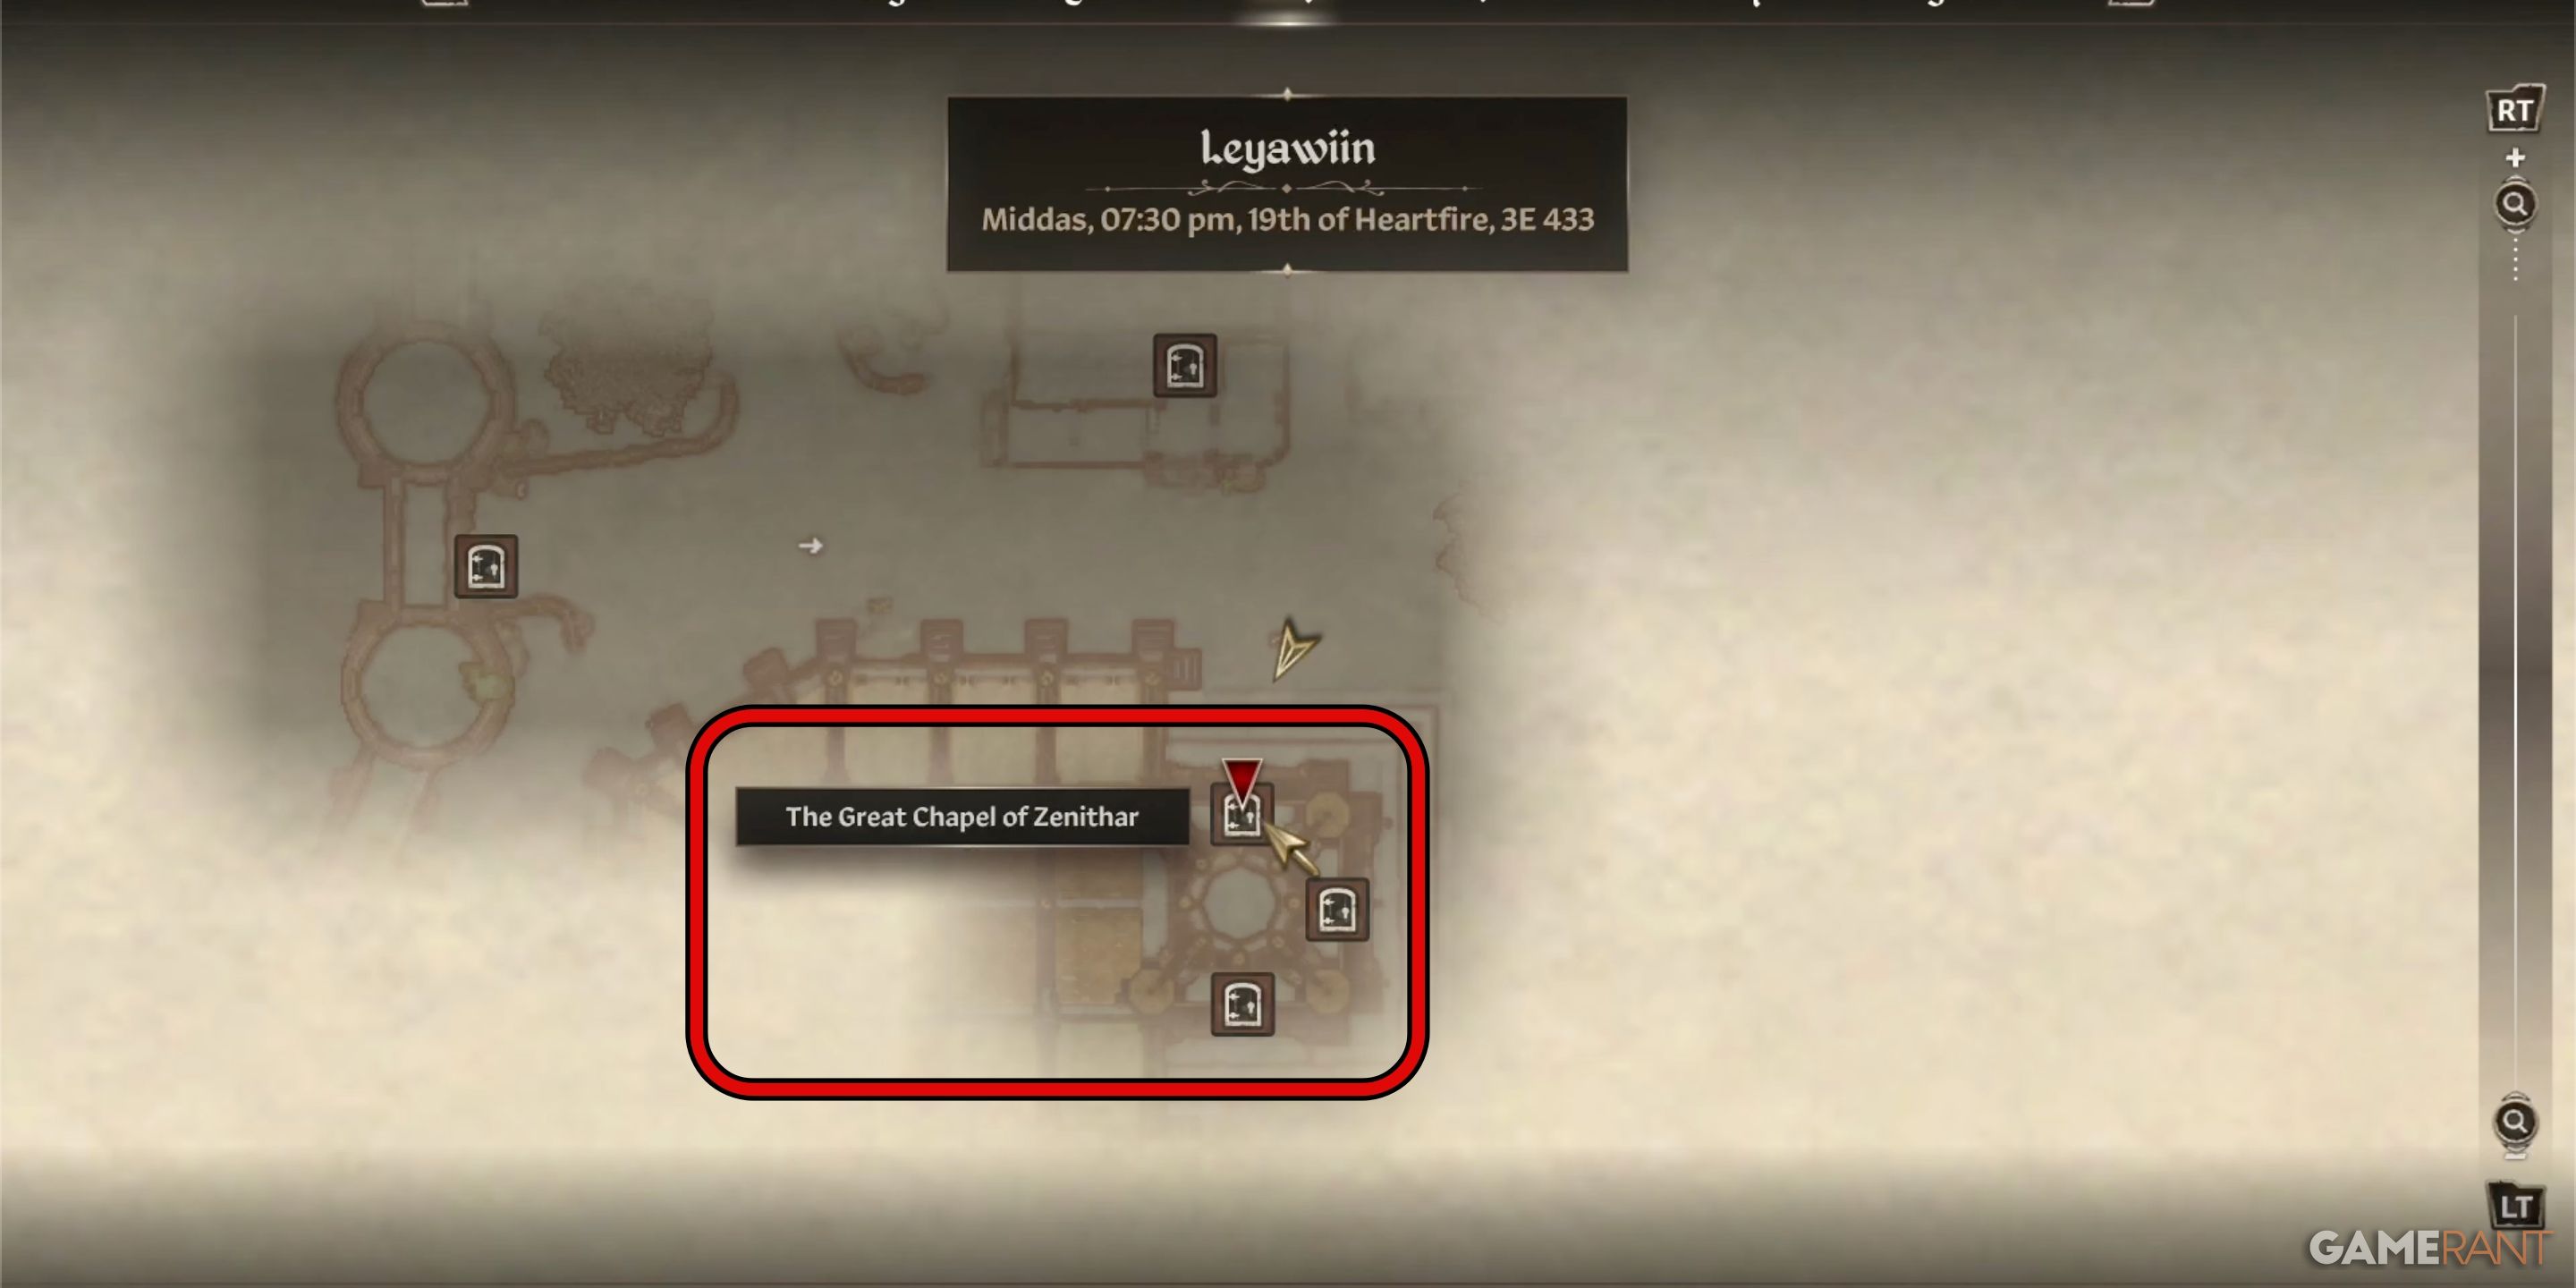
Upon stepping into the chapel, you’ll encounter a guard named Carodus Oholin who will initiate conversation with you. Talk to him to get information on the mace, and then proceed down the stairs towards the Chapel’s Lower Level or Undercroft.
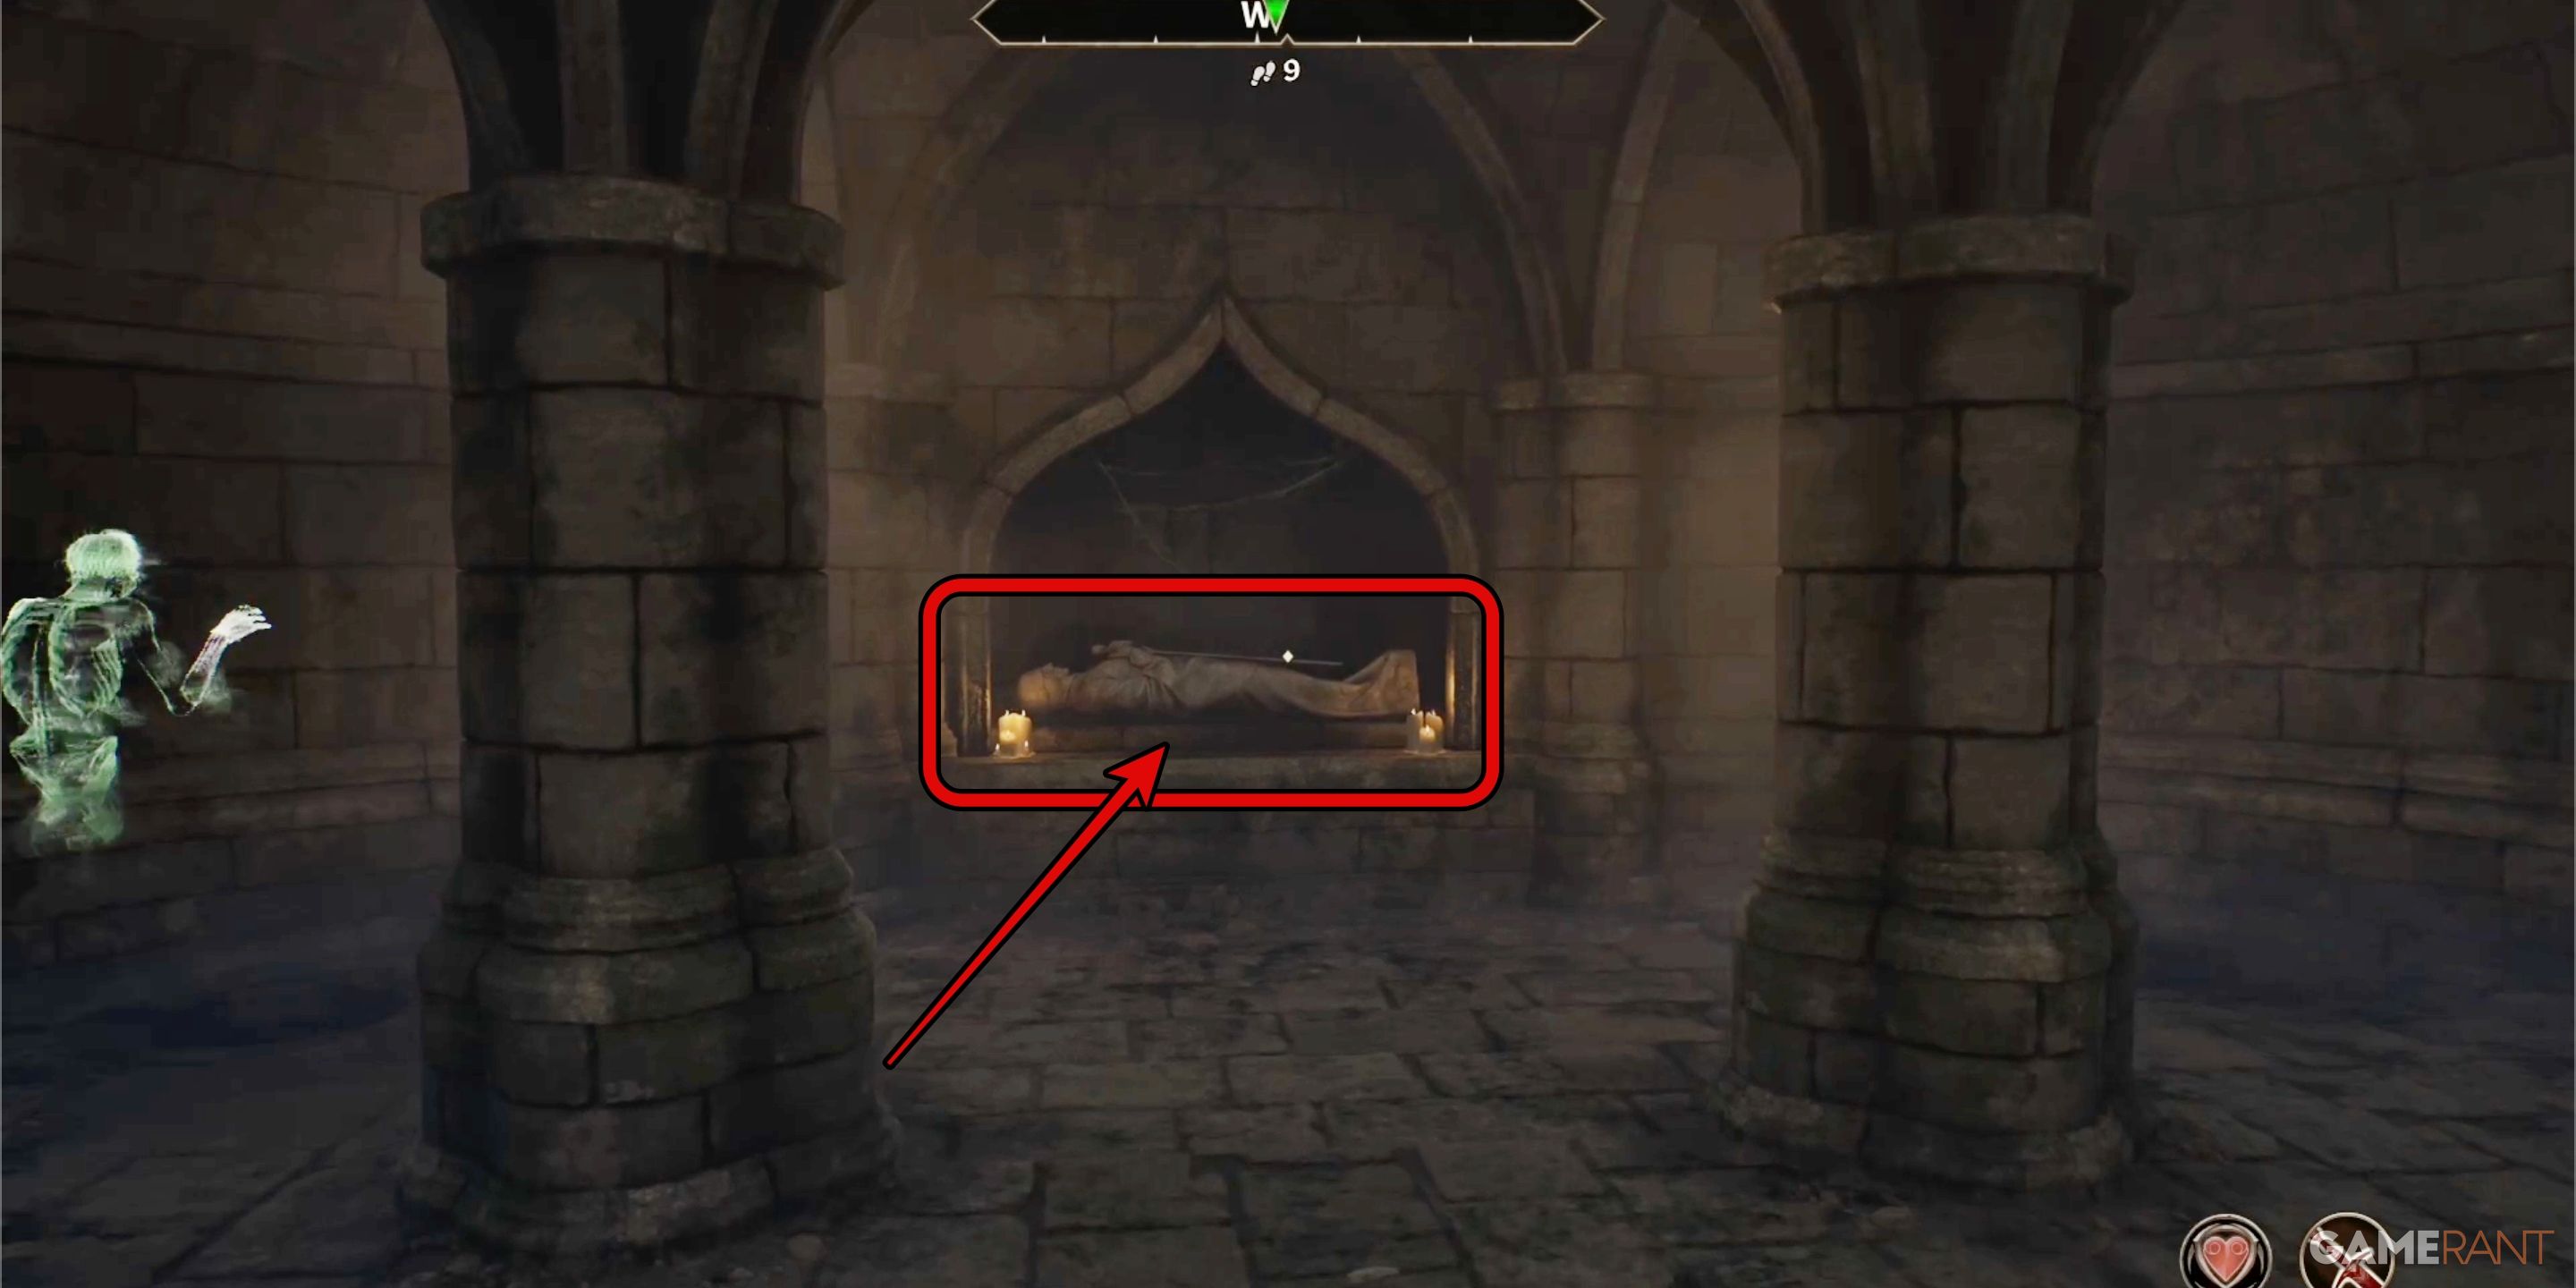
In the Undercroft, make your way to the rear of the chamber and engage with the Tomb of Saint Kaladas. This action will whisk you away to a different dimension, revealing the Mace of the Crusader standing alone atop a central pillar in the heart of an eerie void.
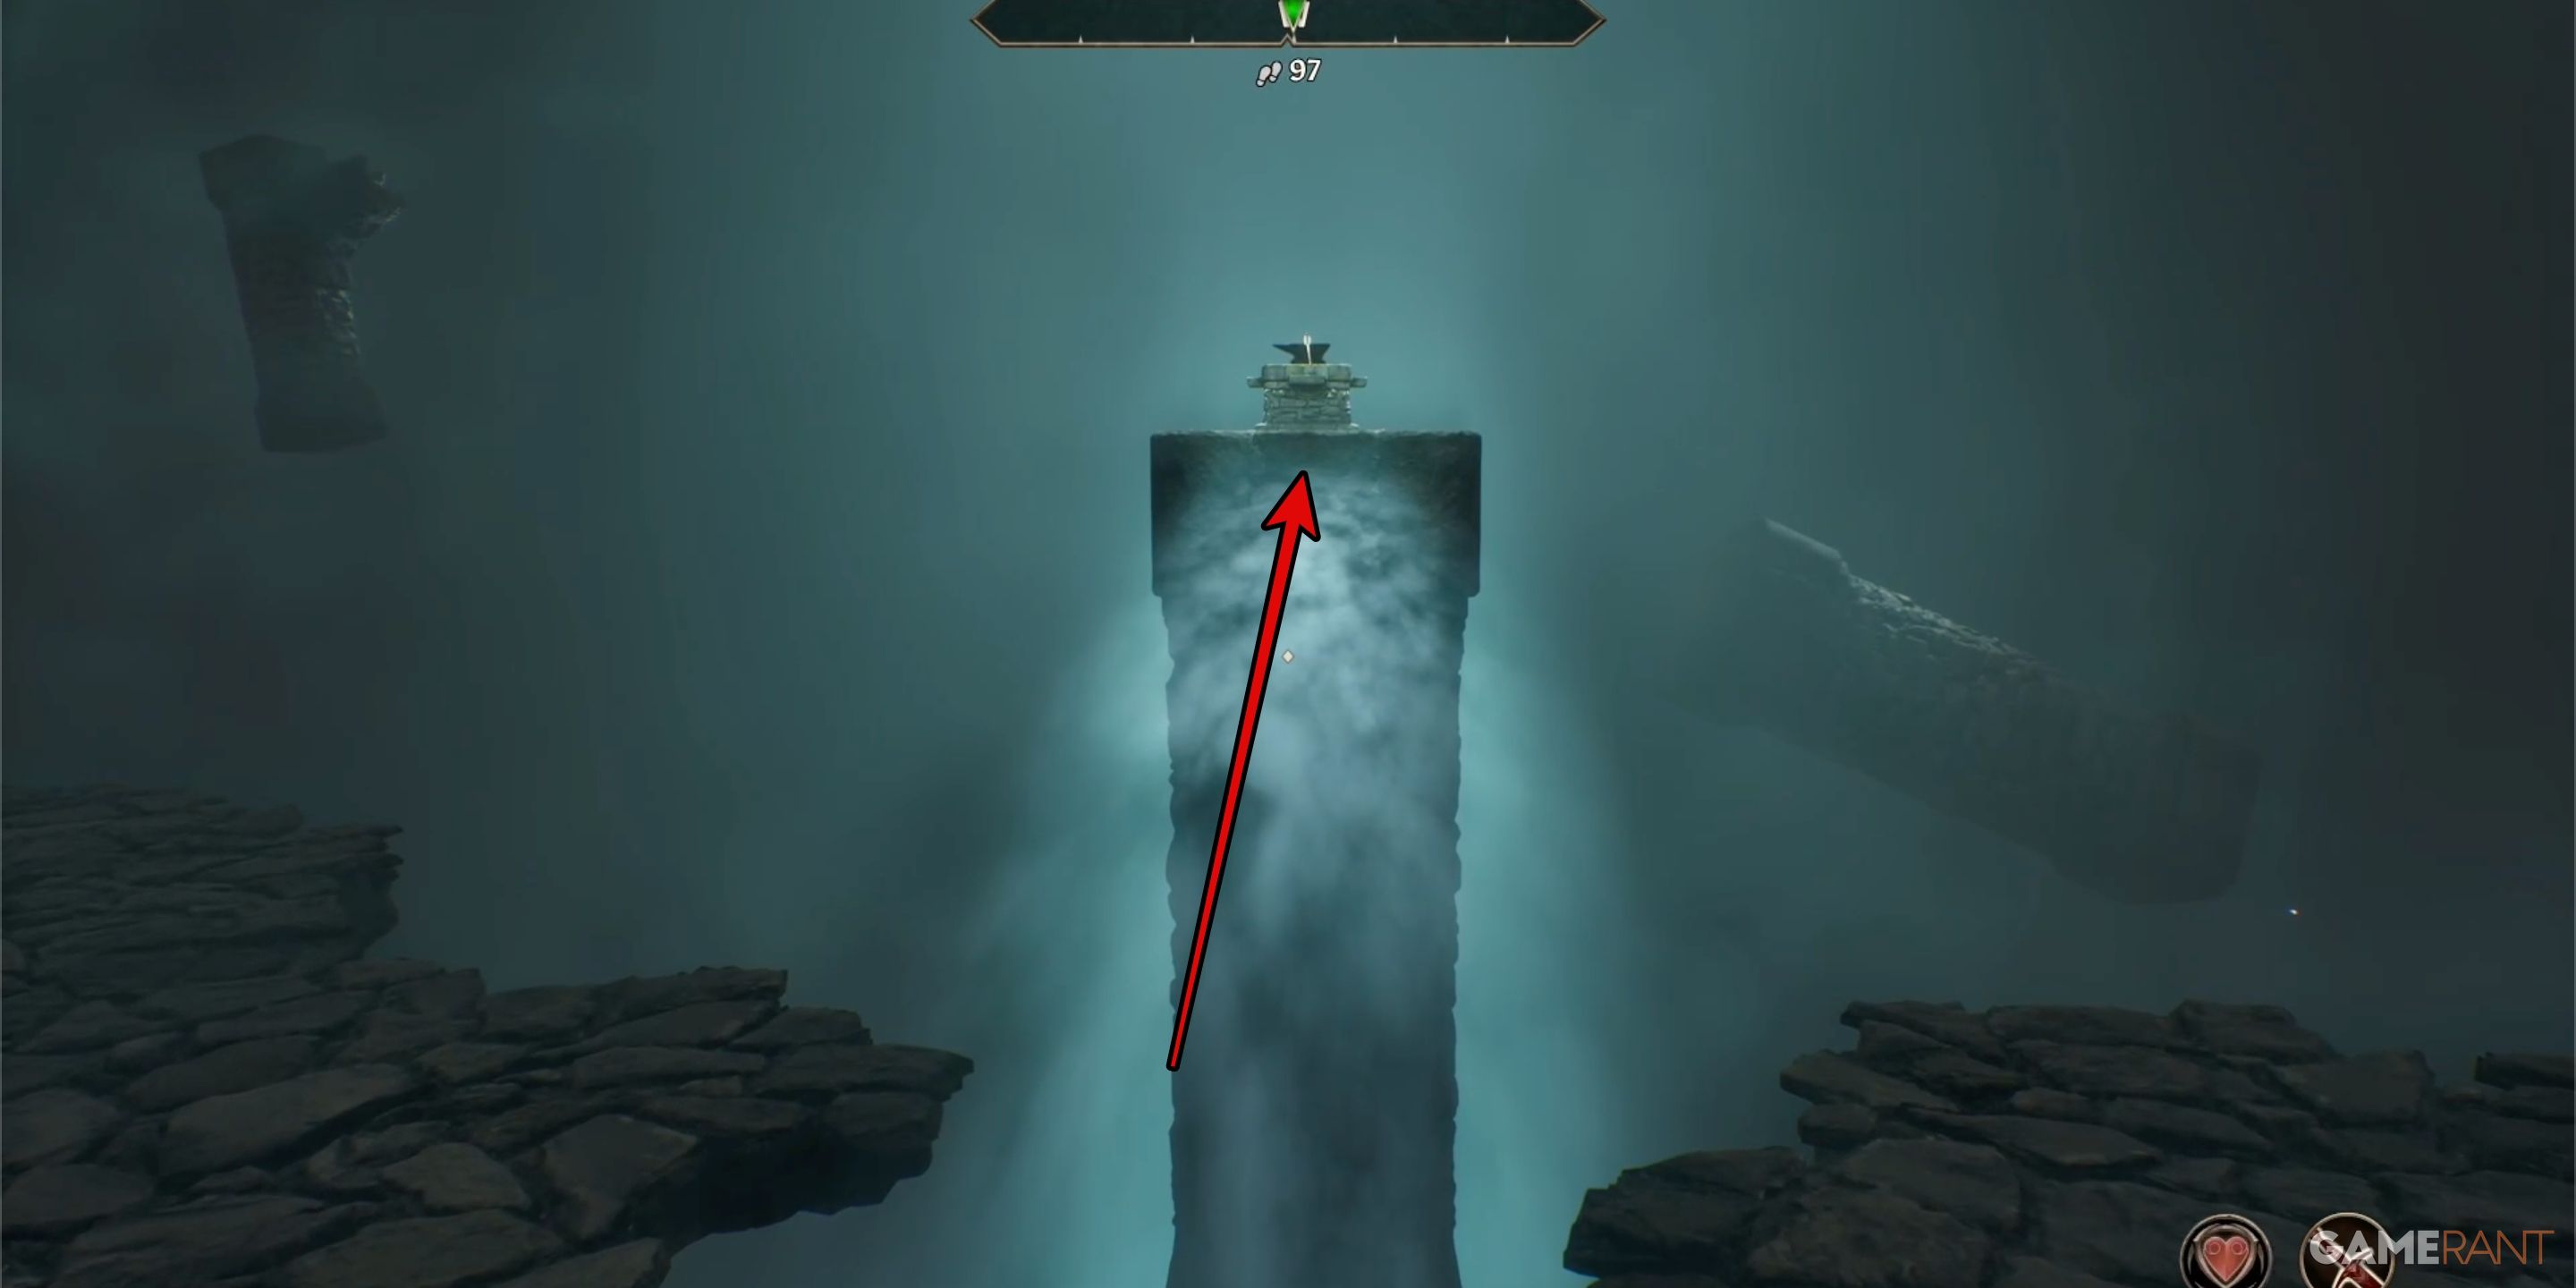
Following a trail of radiant light, you’ll find yourself at the Mace of the Crusader. Put on your Crusader’s Boots and stroll towards it to pick up the Mace of the Crusader.
Or, more casually:
With a beam of light guiding your way, you can reach the Crusader’s Mace. Just slip into your Crusader Boots and take a leisurely walk there to grab the Crusader’s Mace.
Shield of the Crusader Location – Oblivion Remastered
Wisdom of the Ages:
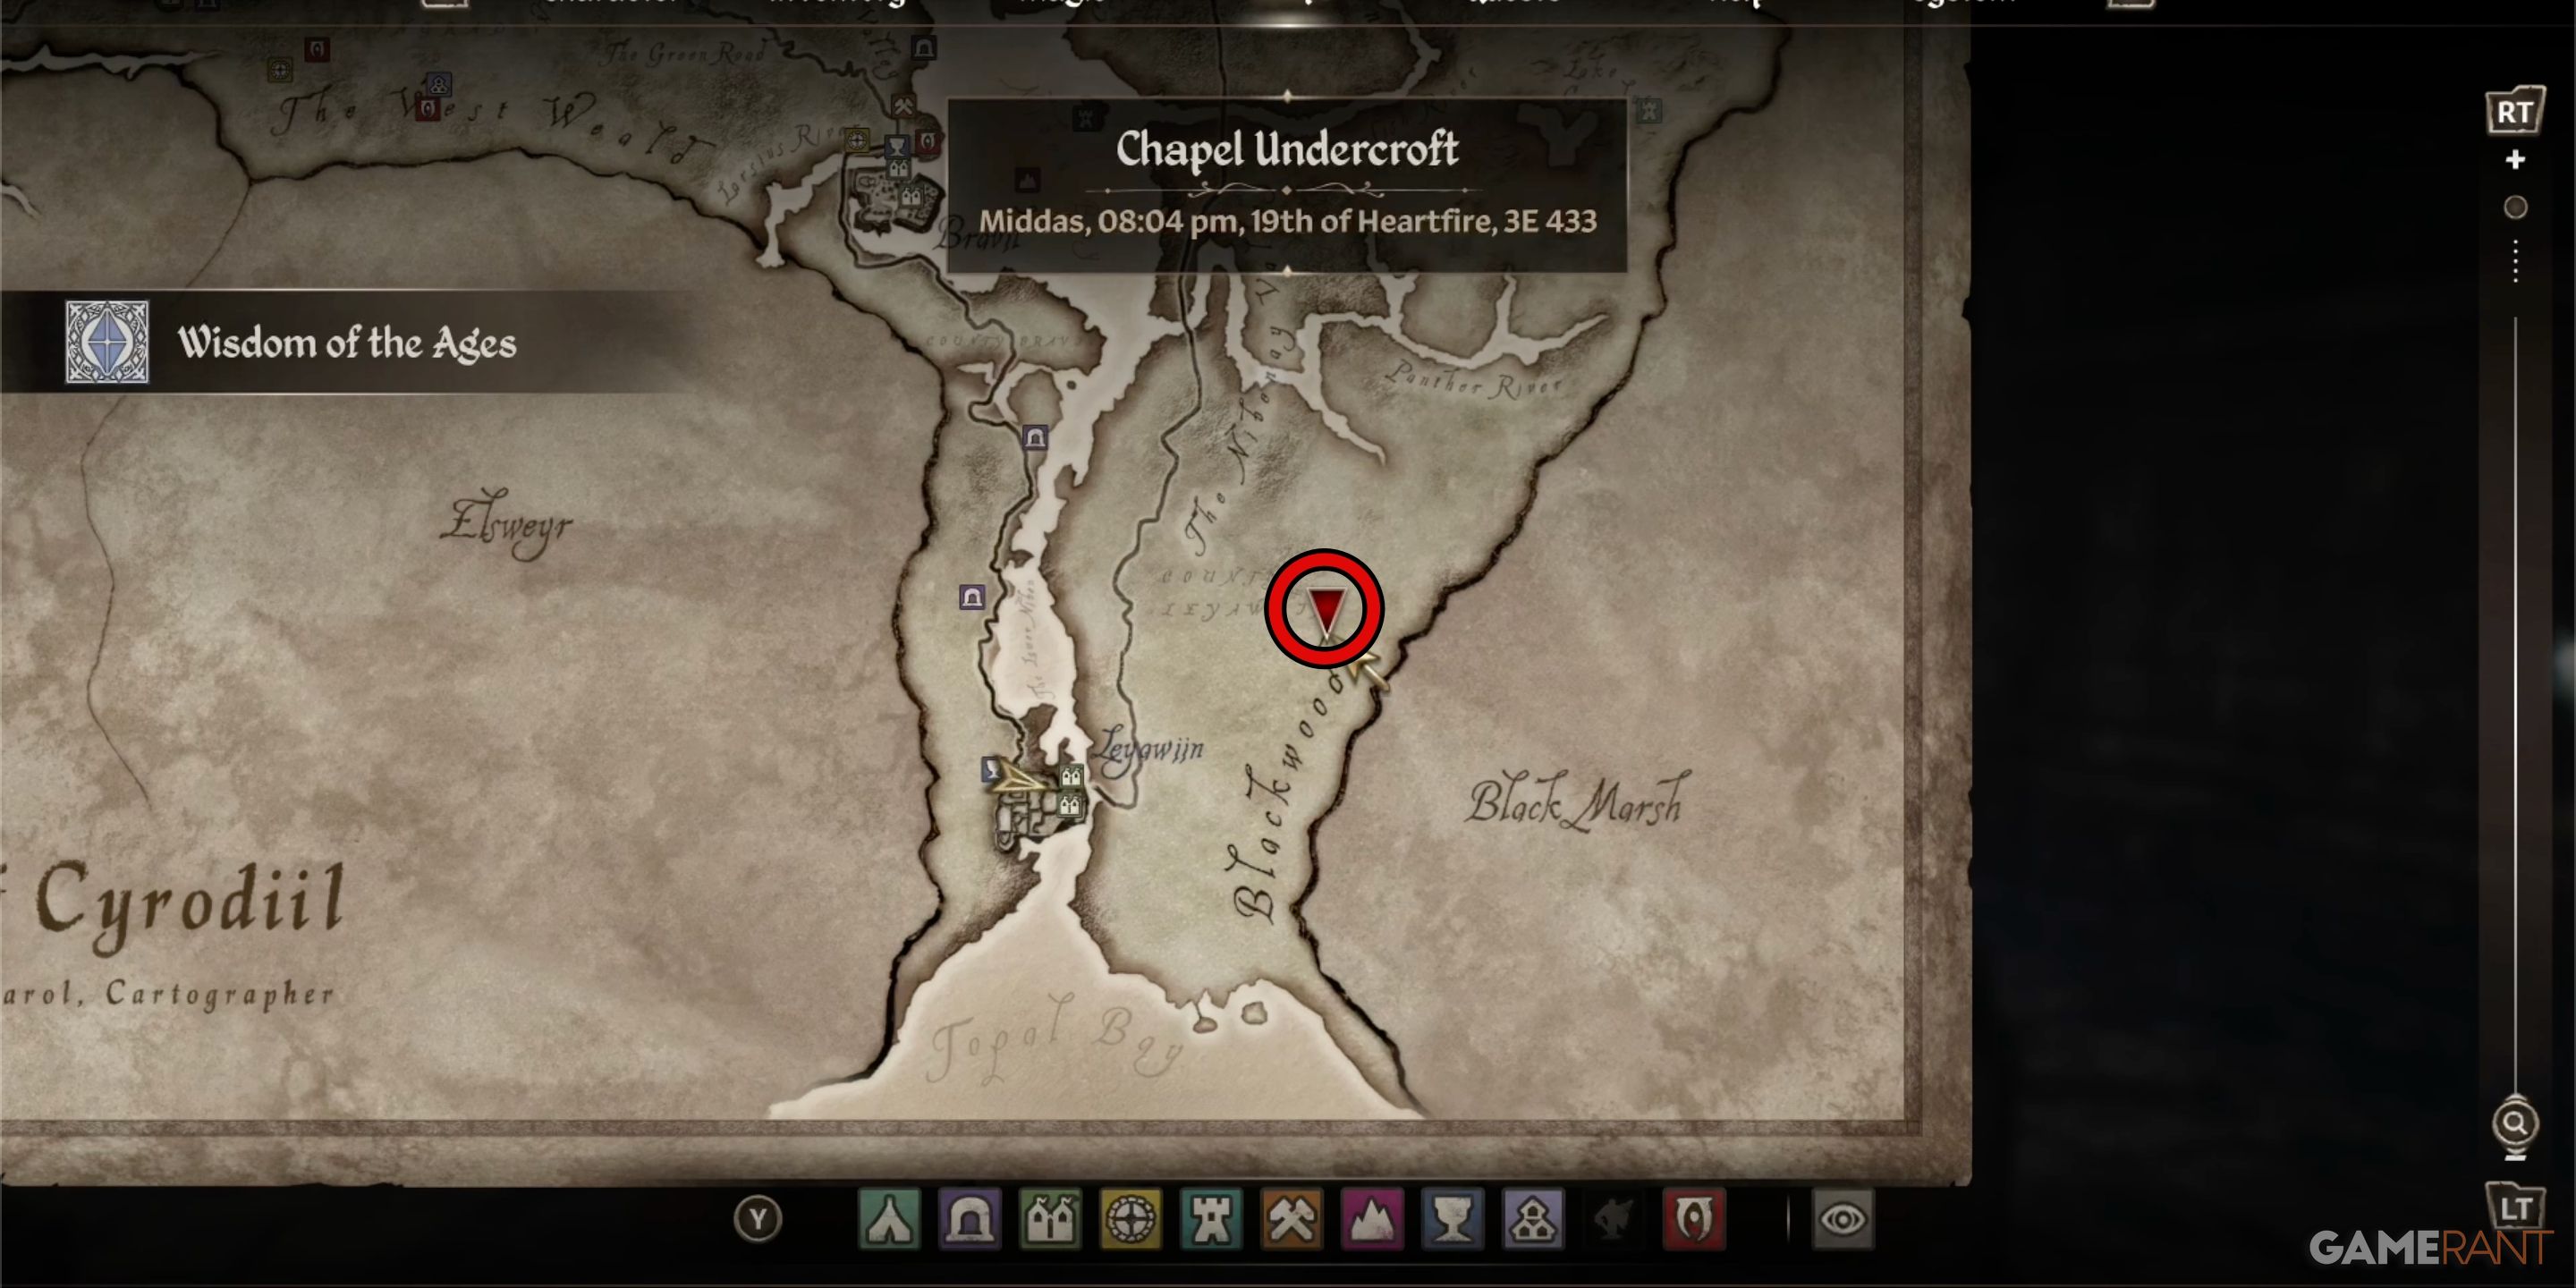
As a gamer, I find myself embarking on an adventure titled “Wisdom of the Ages“. This journey leads me to a nearby fortress called Fort Bulwark, situated northeast of Leyawiin. However, be warned, this place is teeming with powerful Conjurers. So, I’d better gear up and brace myself for an intense battle!
In essence, Fort Bulwark is a vast labyrinth, but it’s not overly complicated to traverse. You’ll encounter crucial moments where special actions are required – we’ll guide you through solving these specific challenges instead of detailing every turn and twist within the fort. Mostly, you can rely on the compass’ quest marker to lead your way.

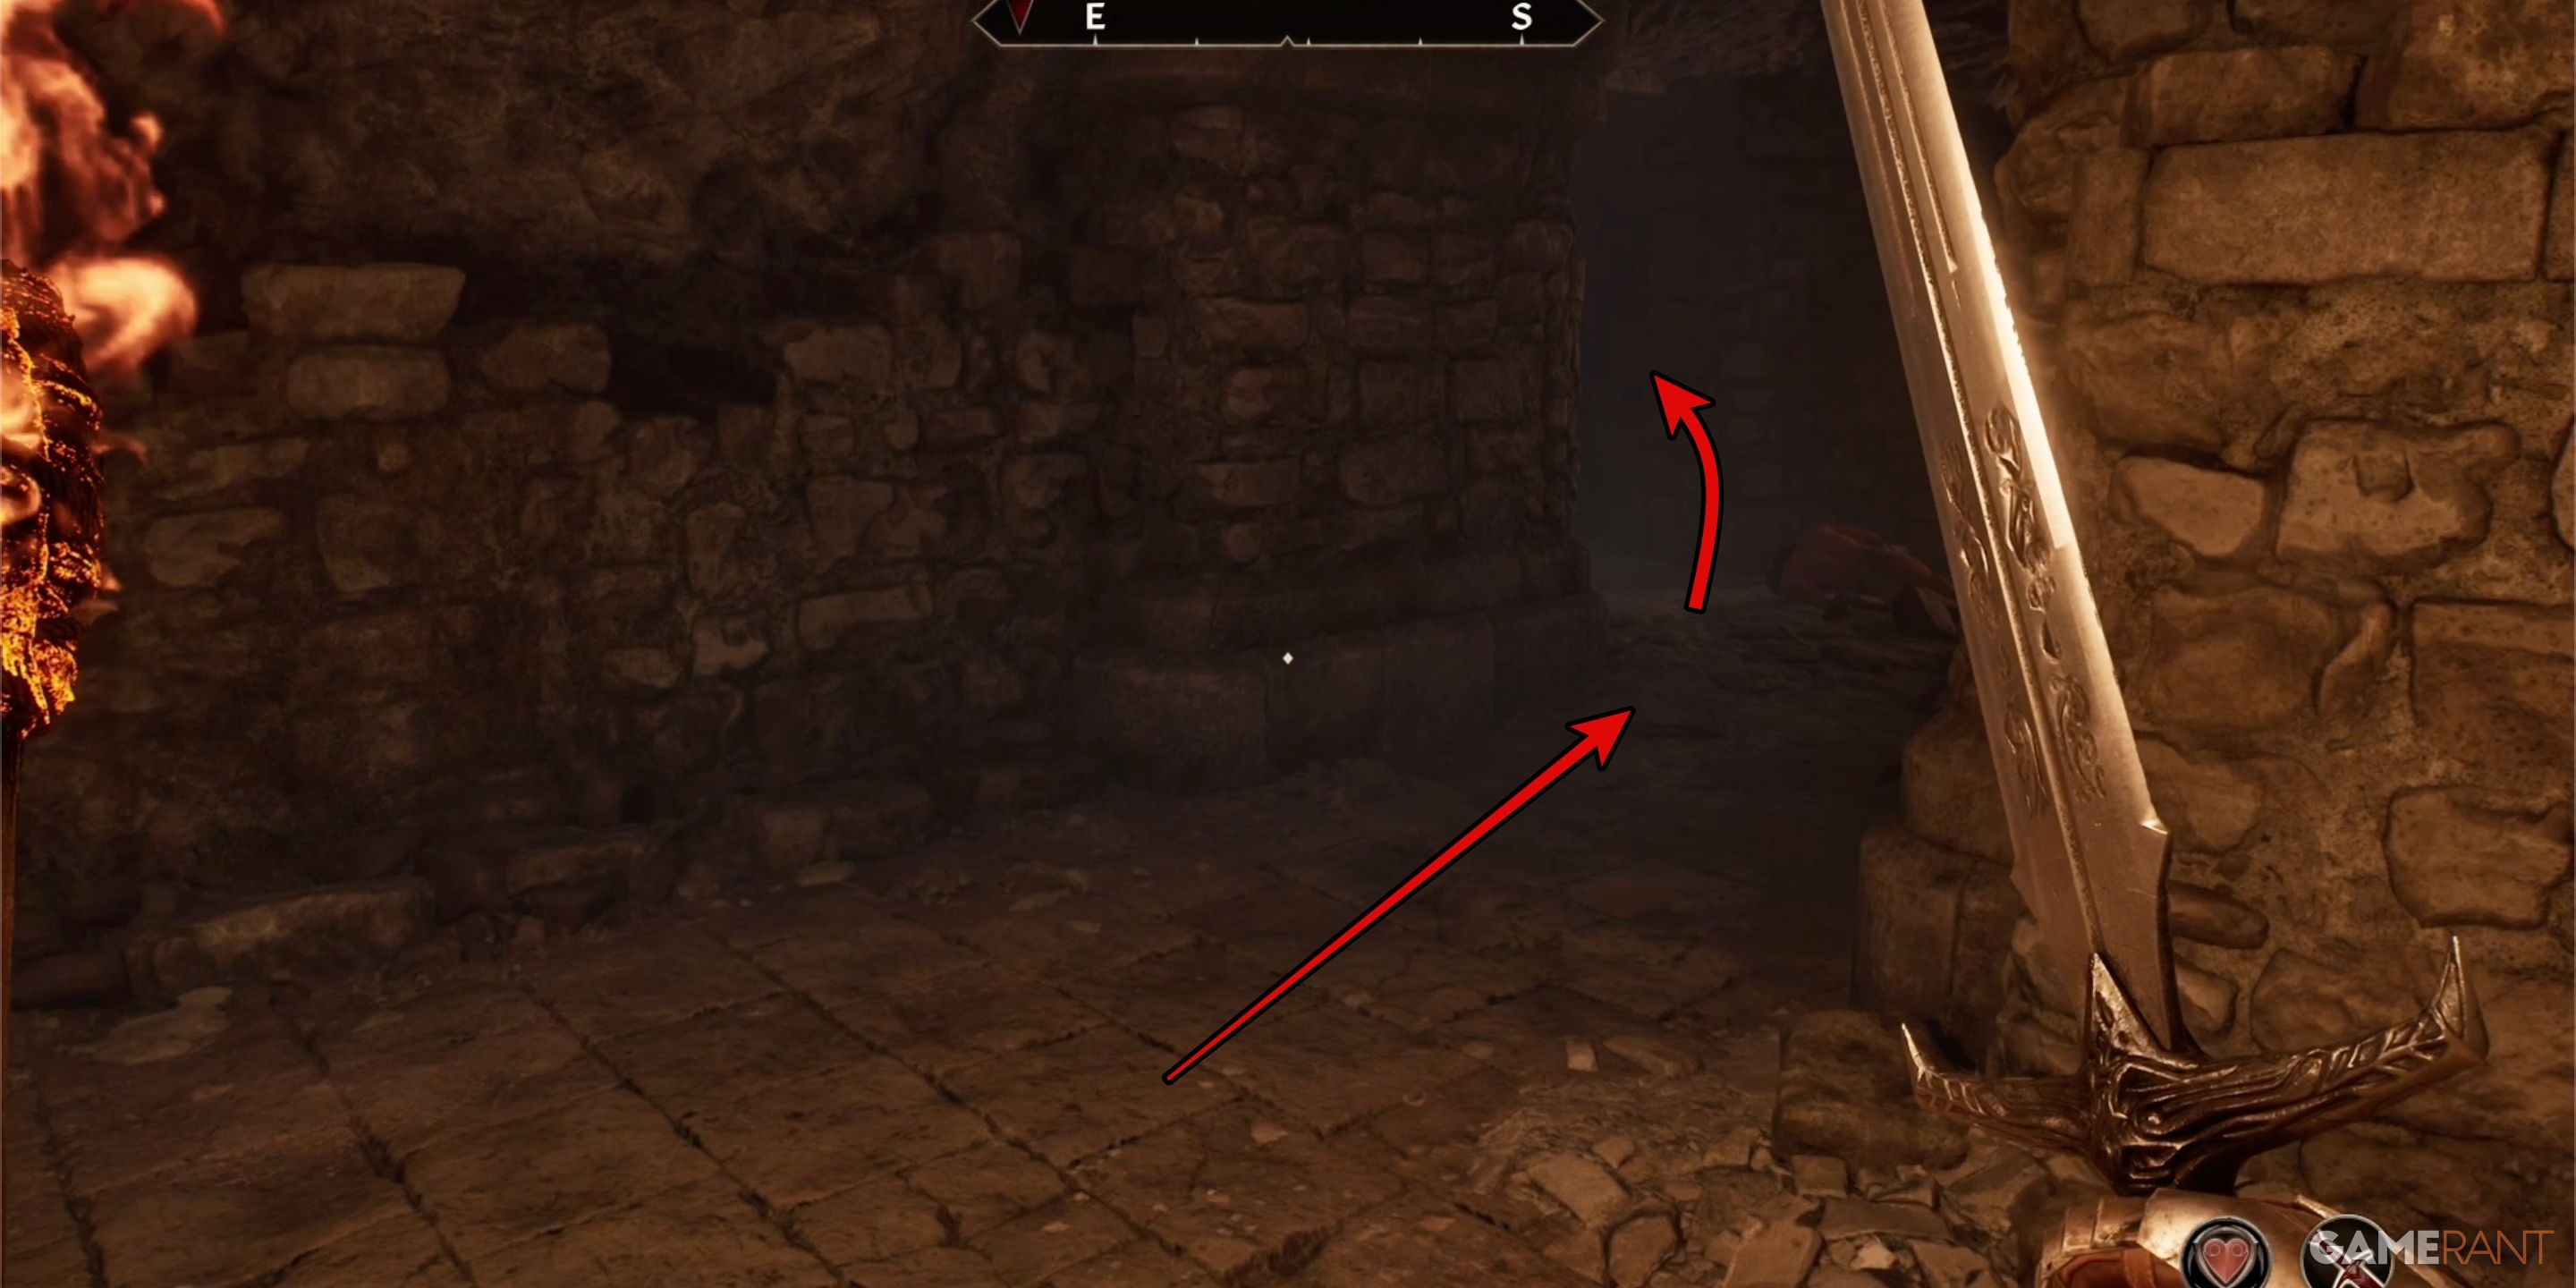
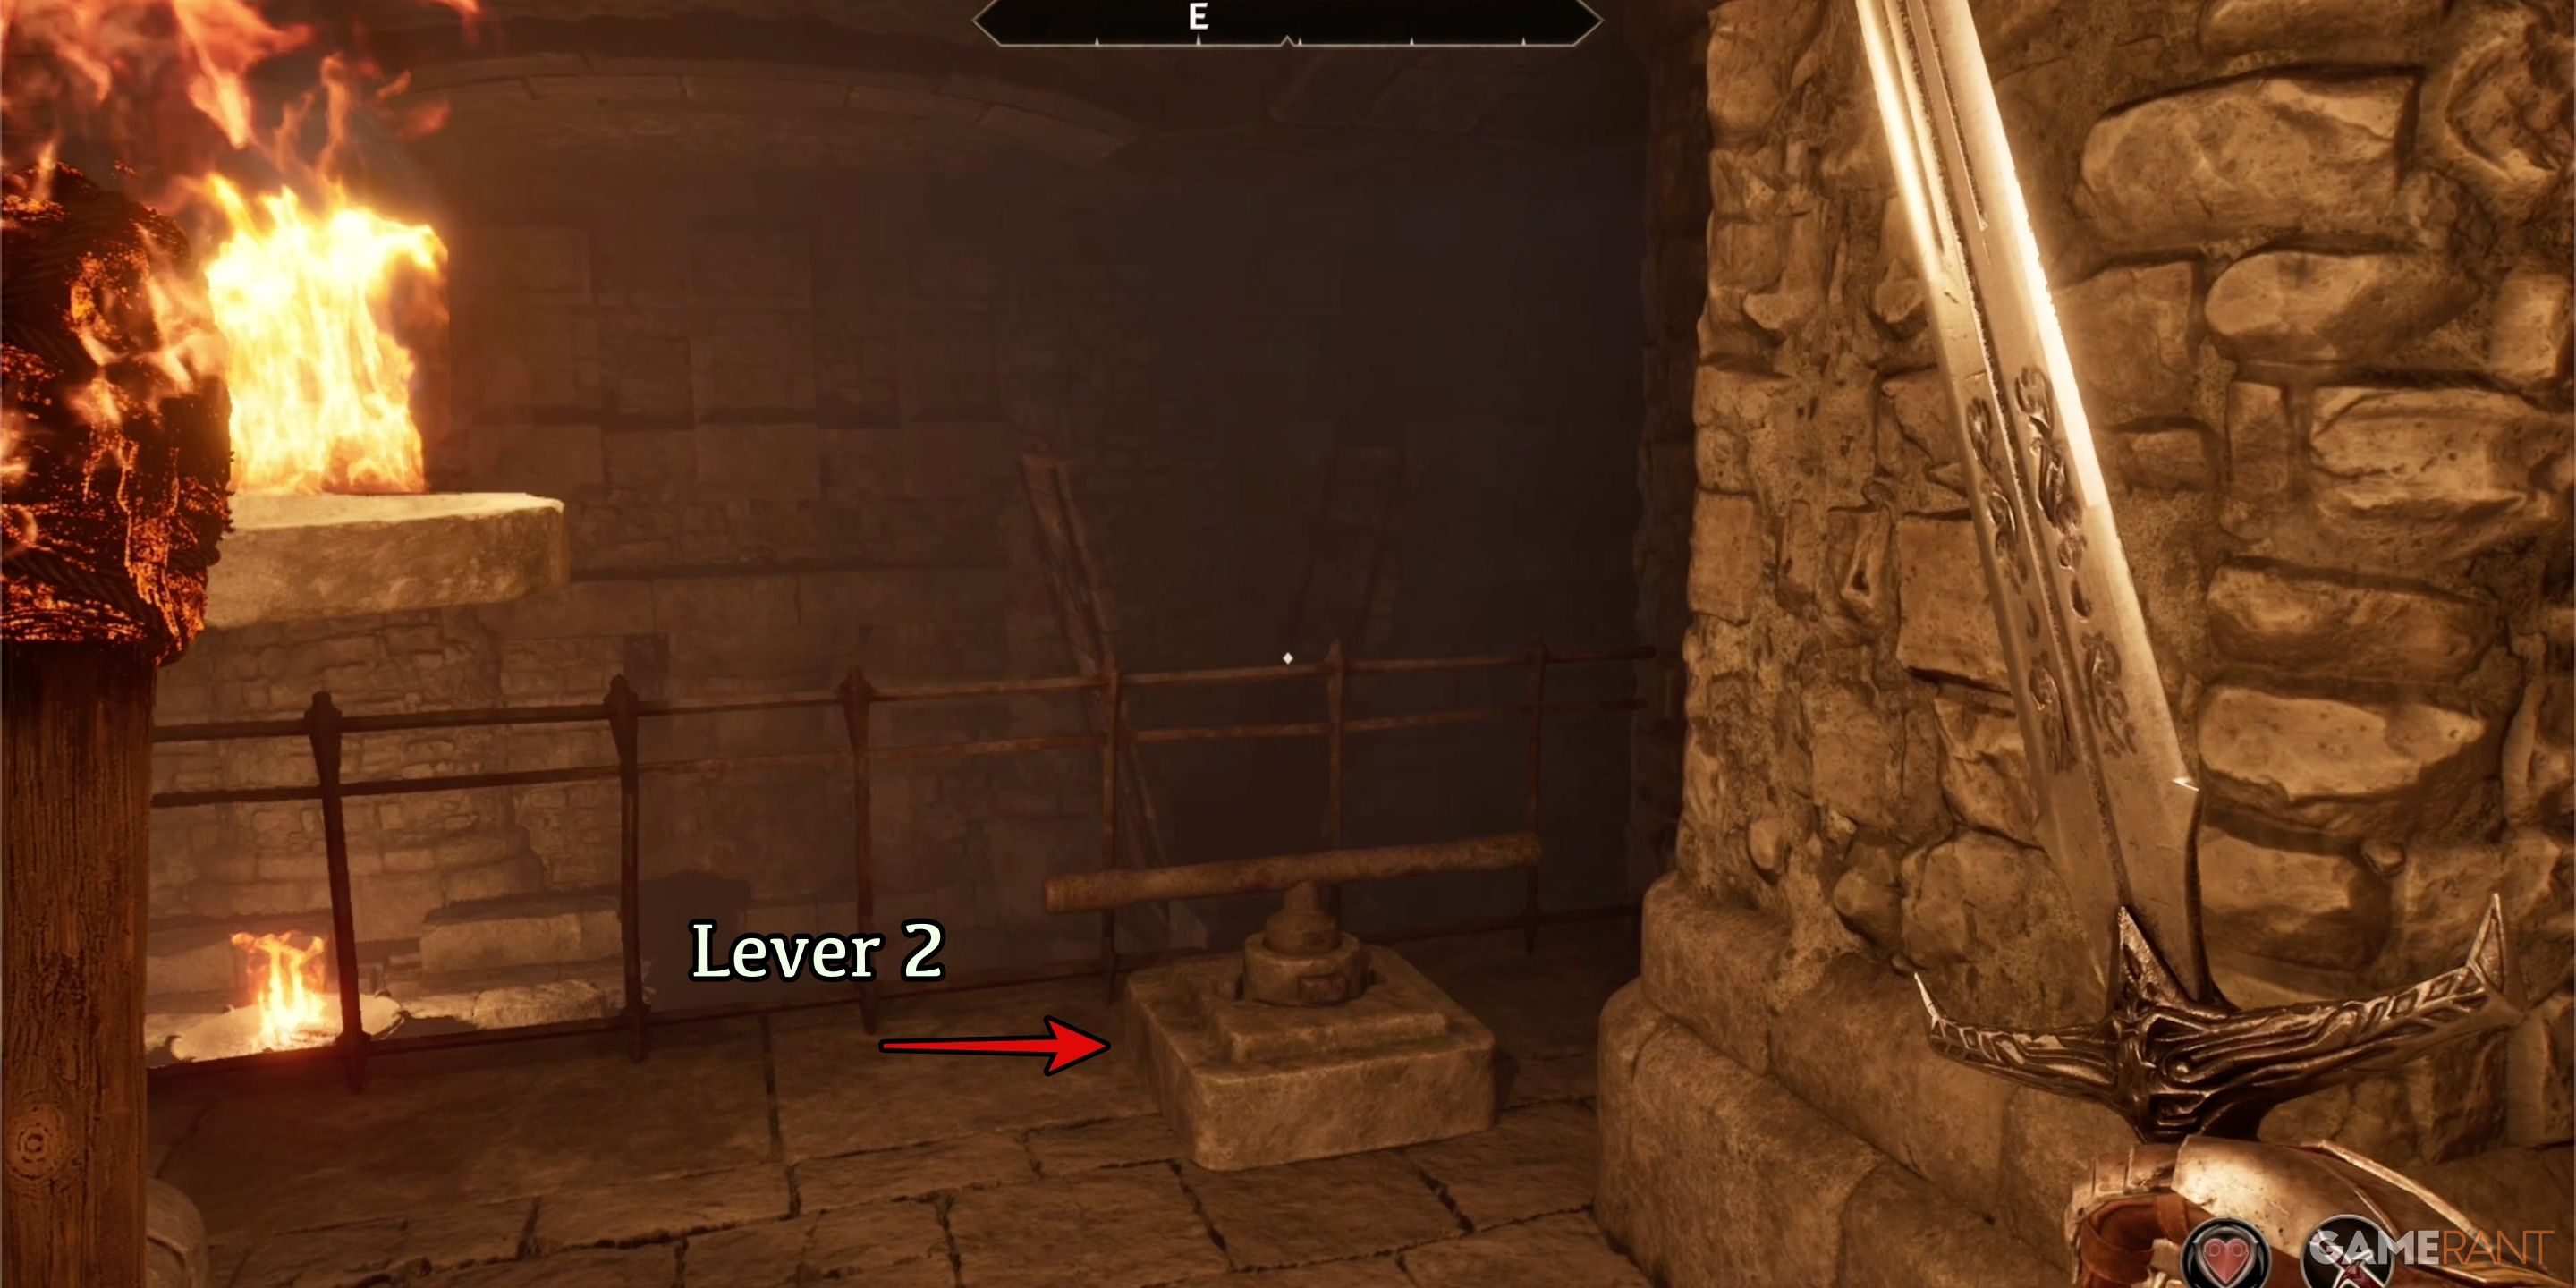
The initial spot isn’t necessarily a puzzle, but rather a hidden lever that might go unnoticed. If you fail to find it, your advancement could come to a halt. Towards the end of the main region, you’ll stumble upon a chamber housing the first Conjurer Adept, who is accompanied by an ordinary Conjurer. Defeat them, then look for the lever situated against the wall within the same chamber once they’ve been vanquished.
As you exit the room, take a left at the fork ahead. Continue along that route until you reach its conclusion, and there you’ll find another switch to pull. Pulling this switch will cause a drawbridge to descend, which you can observe from the switch location itself.
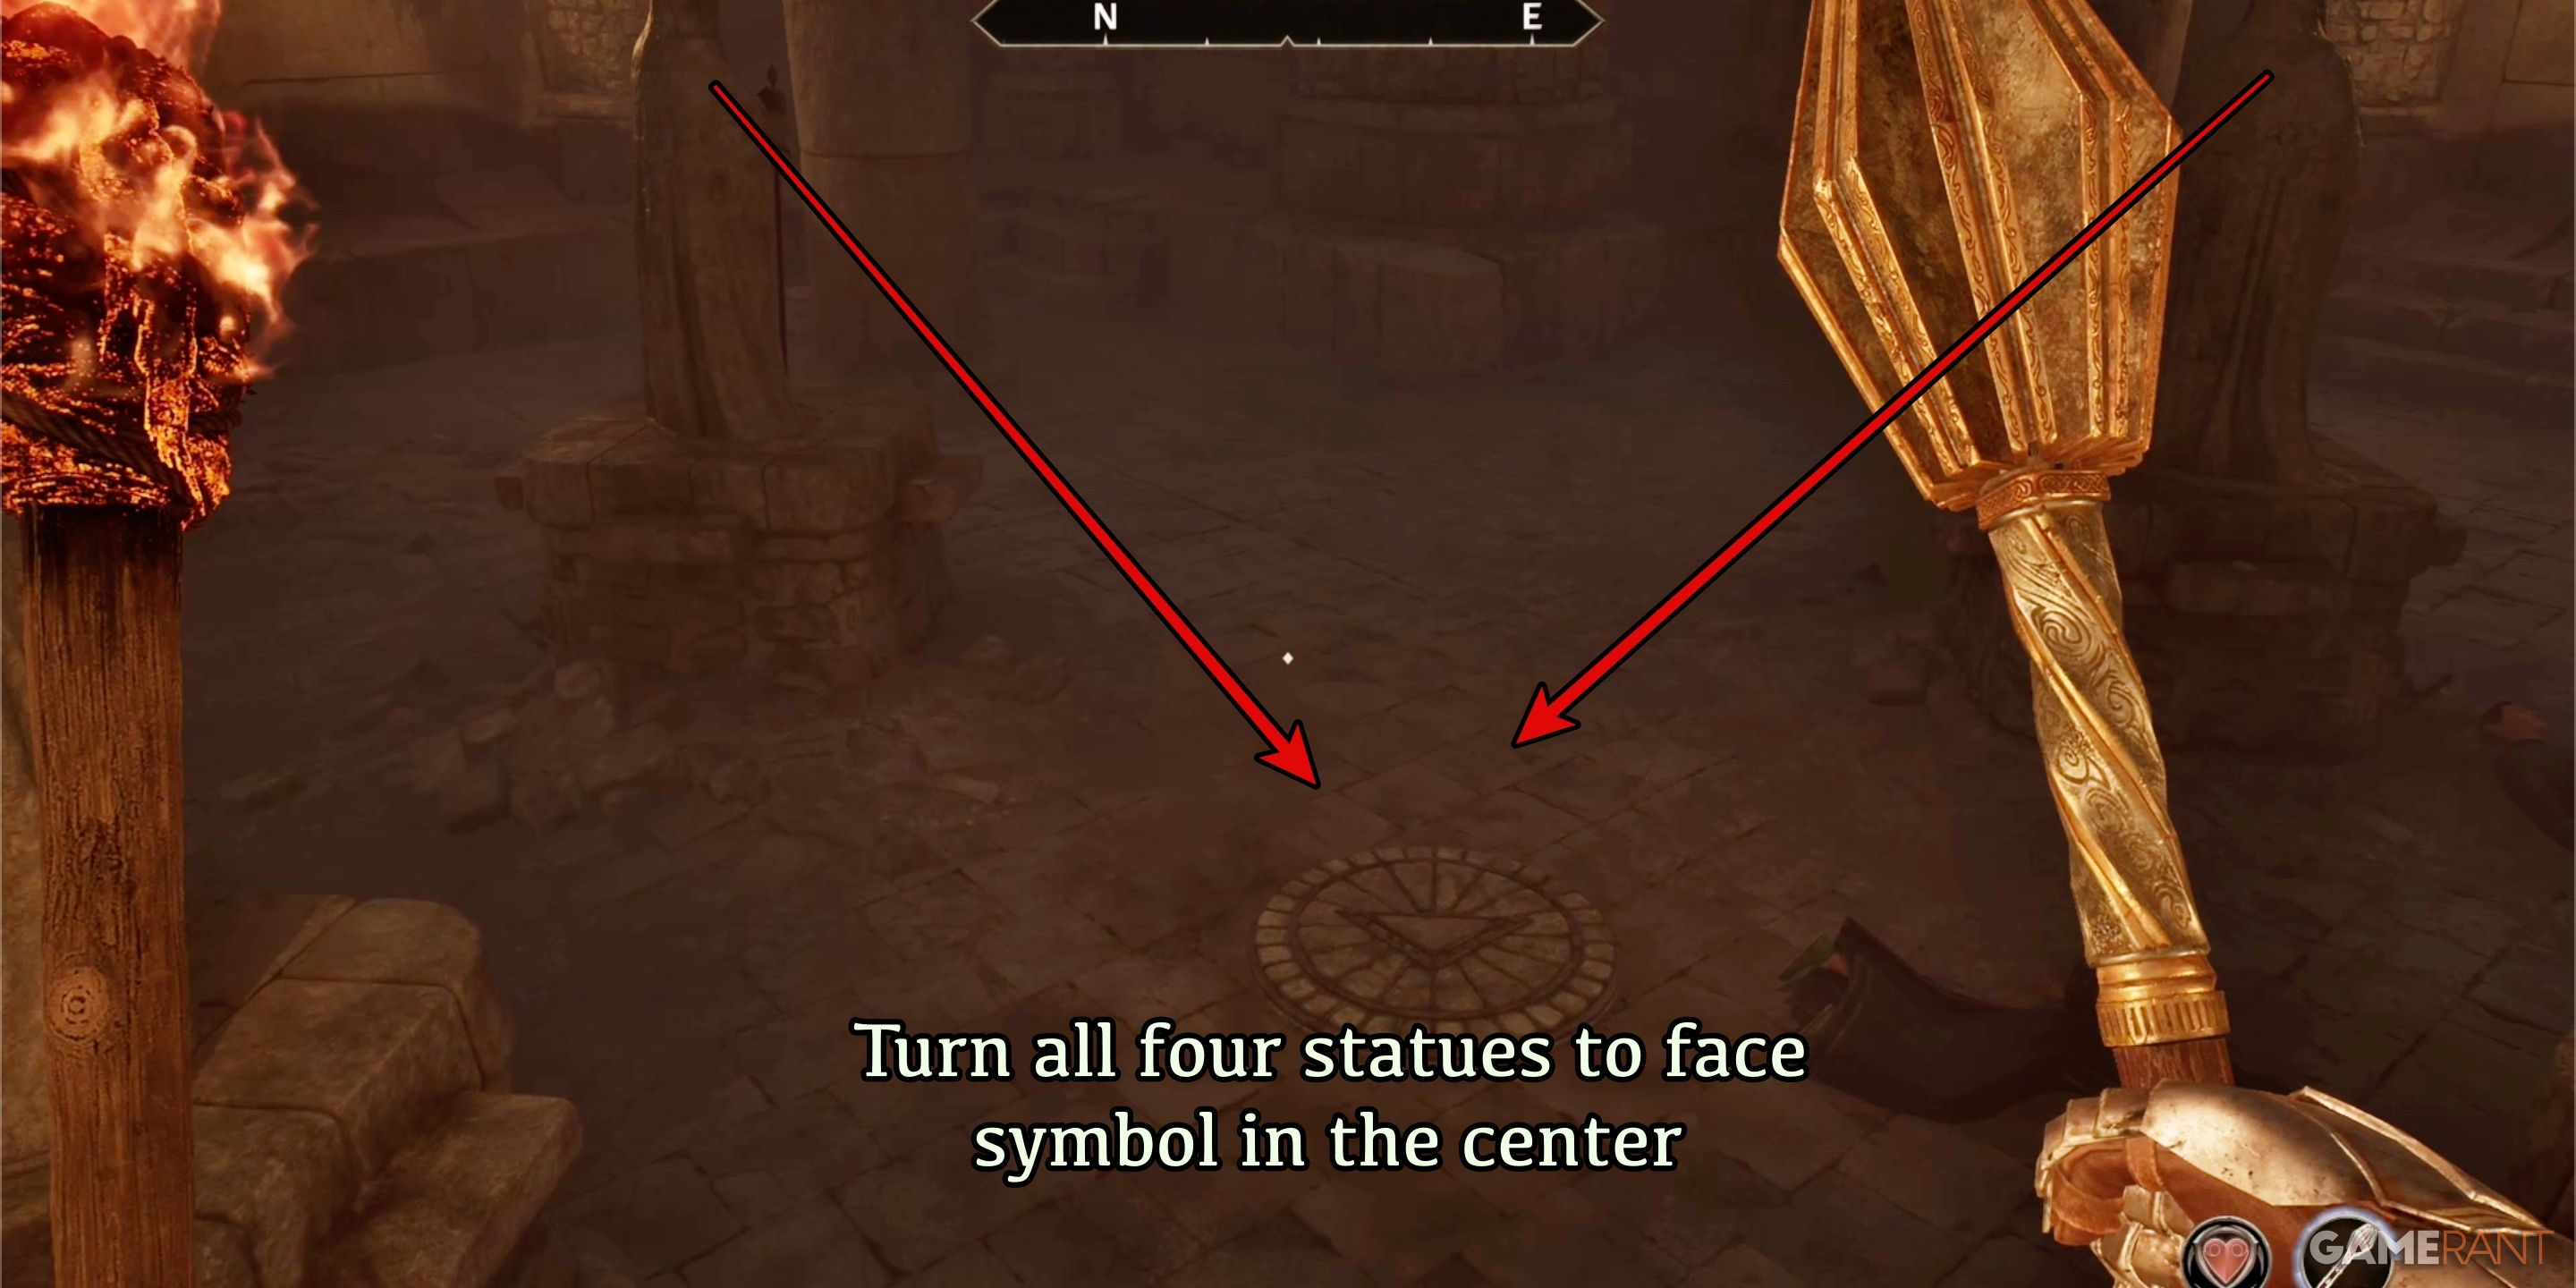
The upcoming destination is the initial challenge-filled room with a puzzle. It’s quite straightforward if you chat with the captive. Rotate all the statues so they point towards the circular centerpiece. Doing so will uncover the path leading to the next stage, which takes you to the concluding area.
In the last room, there’s a challenging puzzle to solve. Here, numerous small boxes are arranged along a wall, and a big one sits in the center of the room. Typically, it’s crucial to observe what appears when you press the button located before the large box. Over time, you need to figure out where each item belongs, which can be quite tricky and took us a long time to manage without a system. I strongly recommend using the following strategy for an easier solution.
In the final area, you’ll encounter a complex riddle. Inside, there are several small boxes adorning one wall, with a larger box in the room’s center. You should pay attention to what appears when touching the button near the large box, and then gradually understand where each item should be placed based on your observation. This task took us quite some time to solve naturally, so I advise using the strategy below for a more straightforward solution.
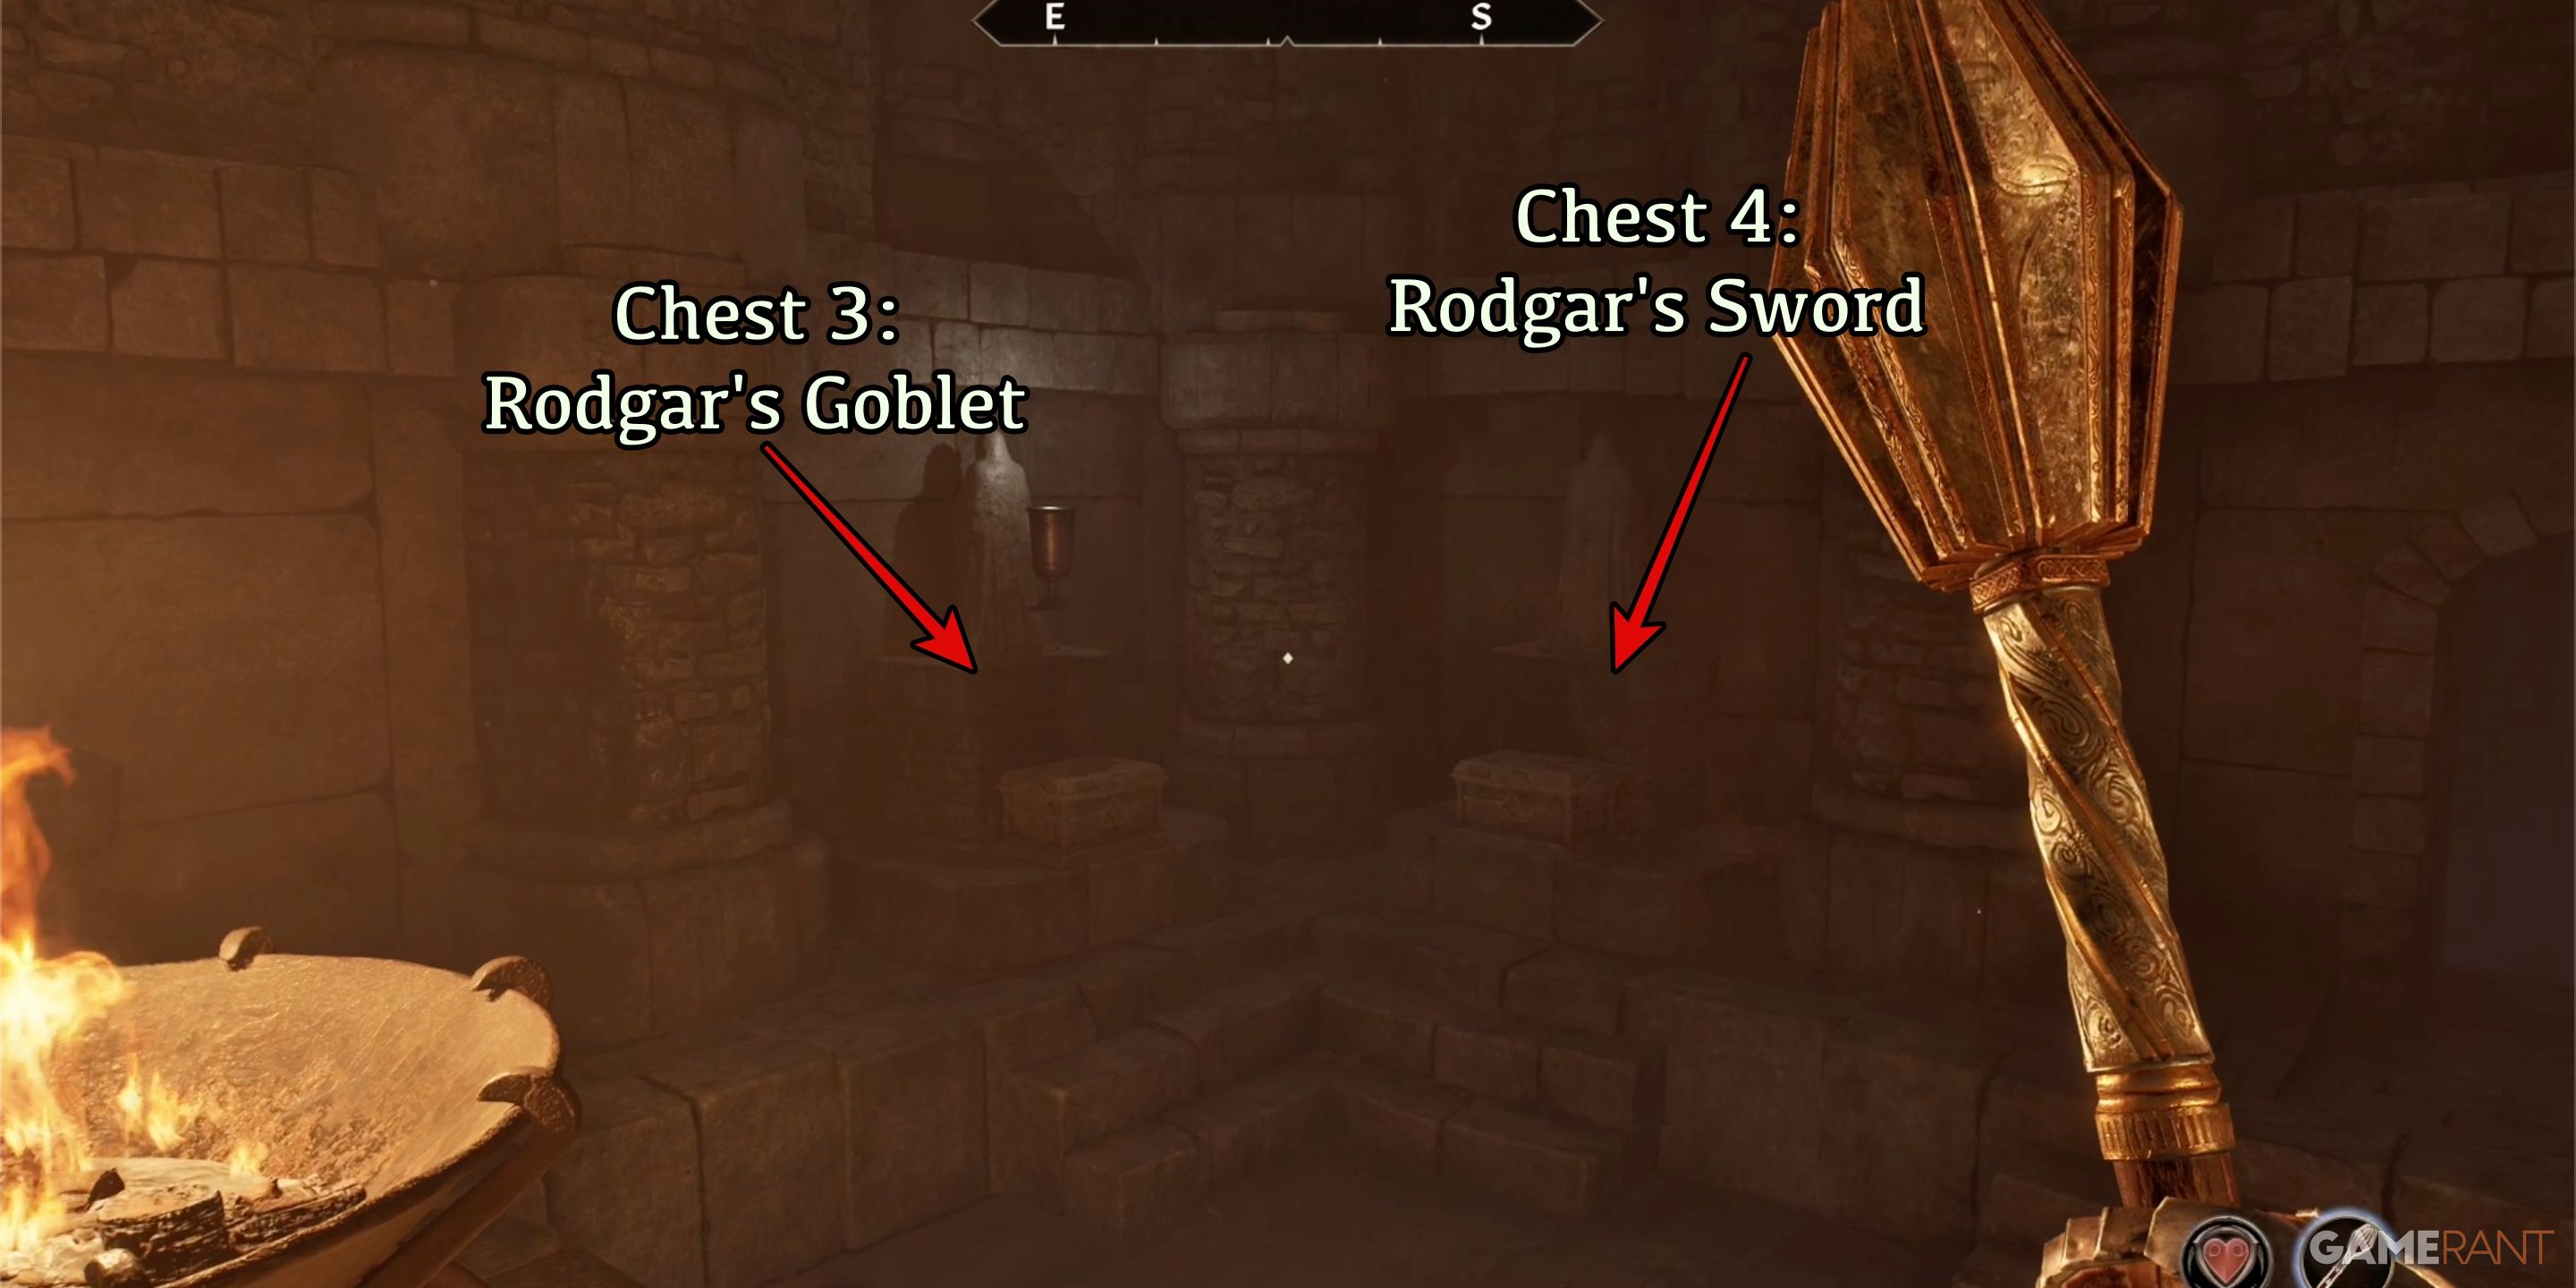
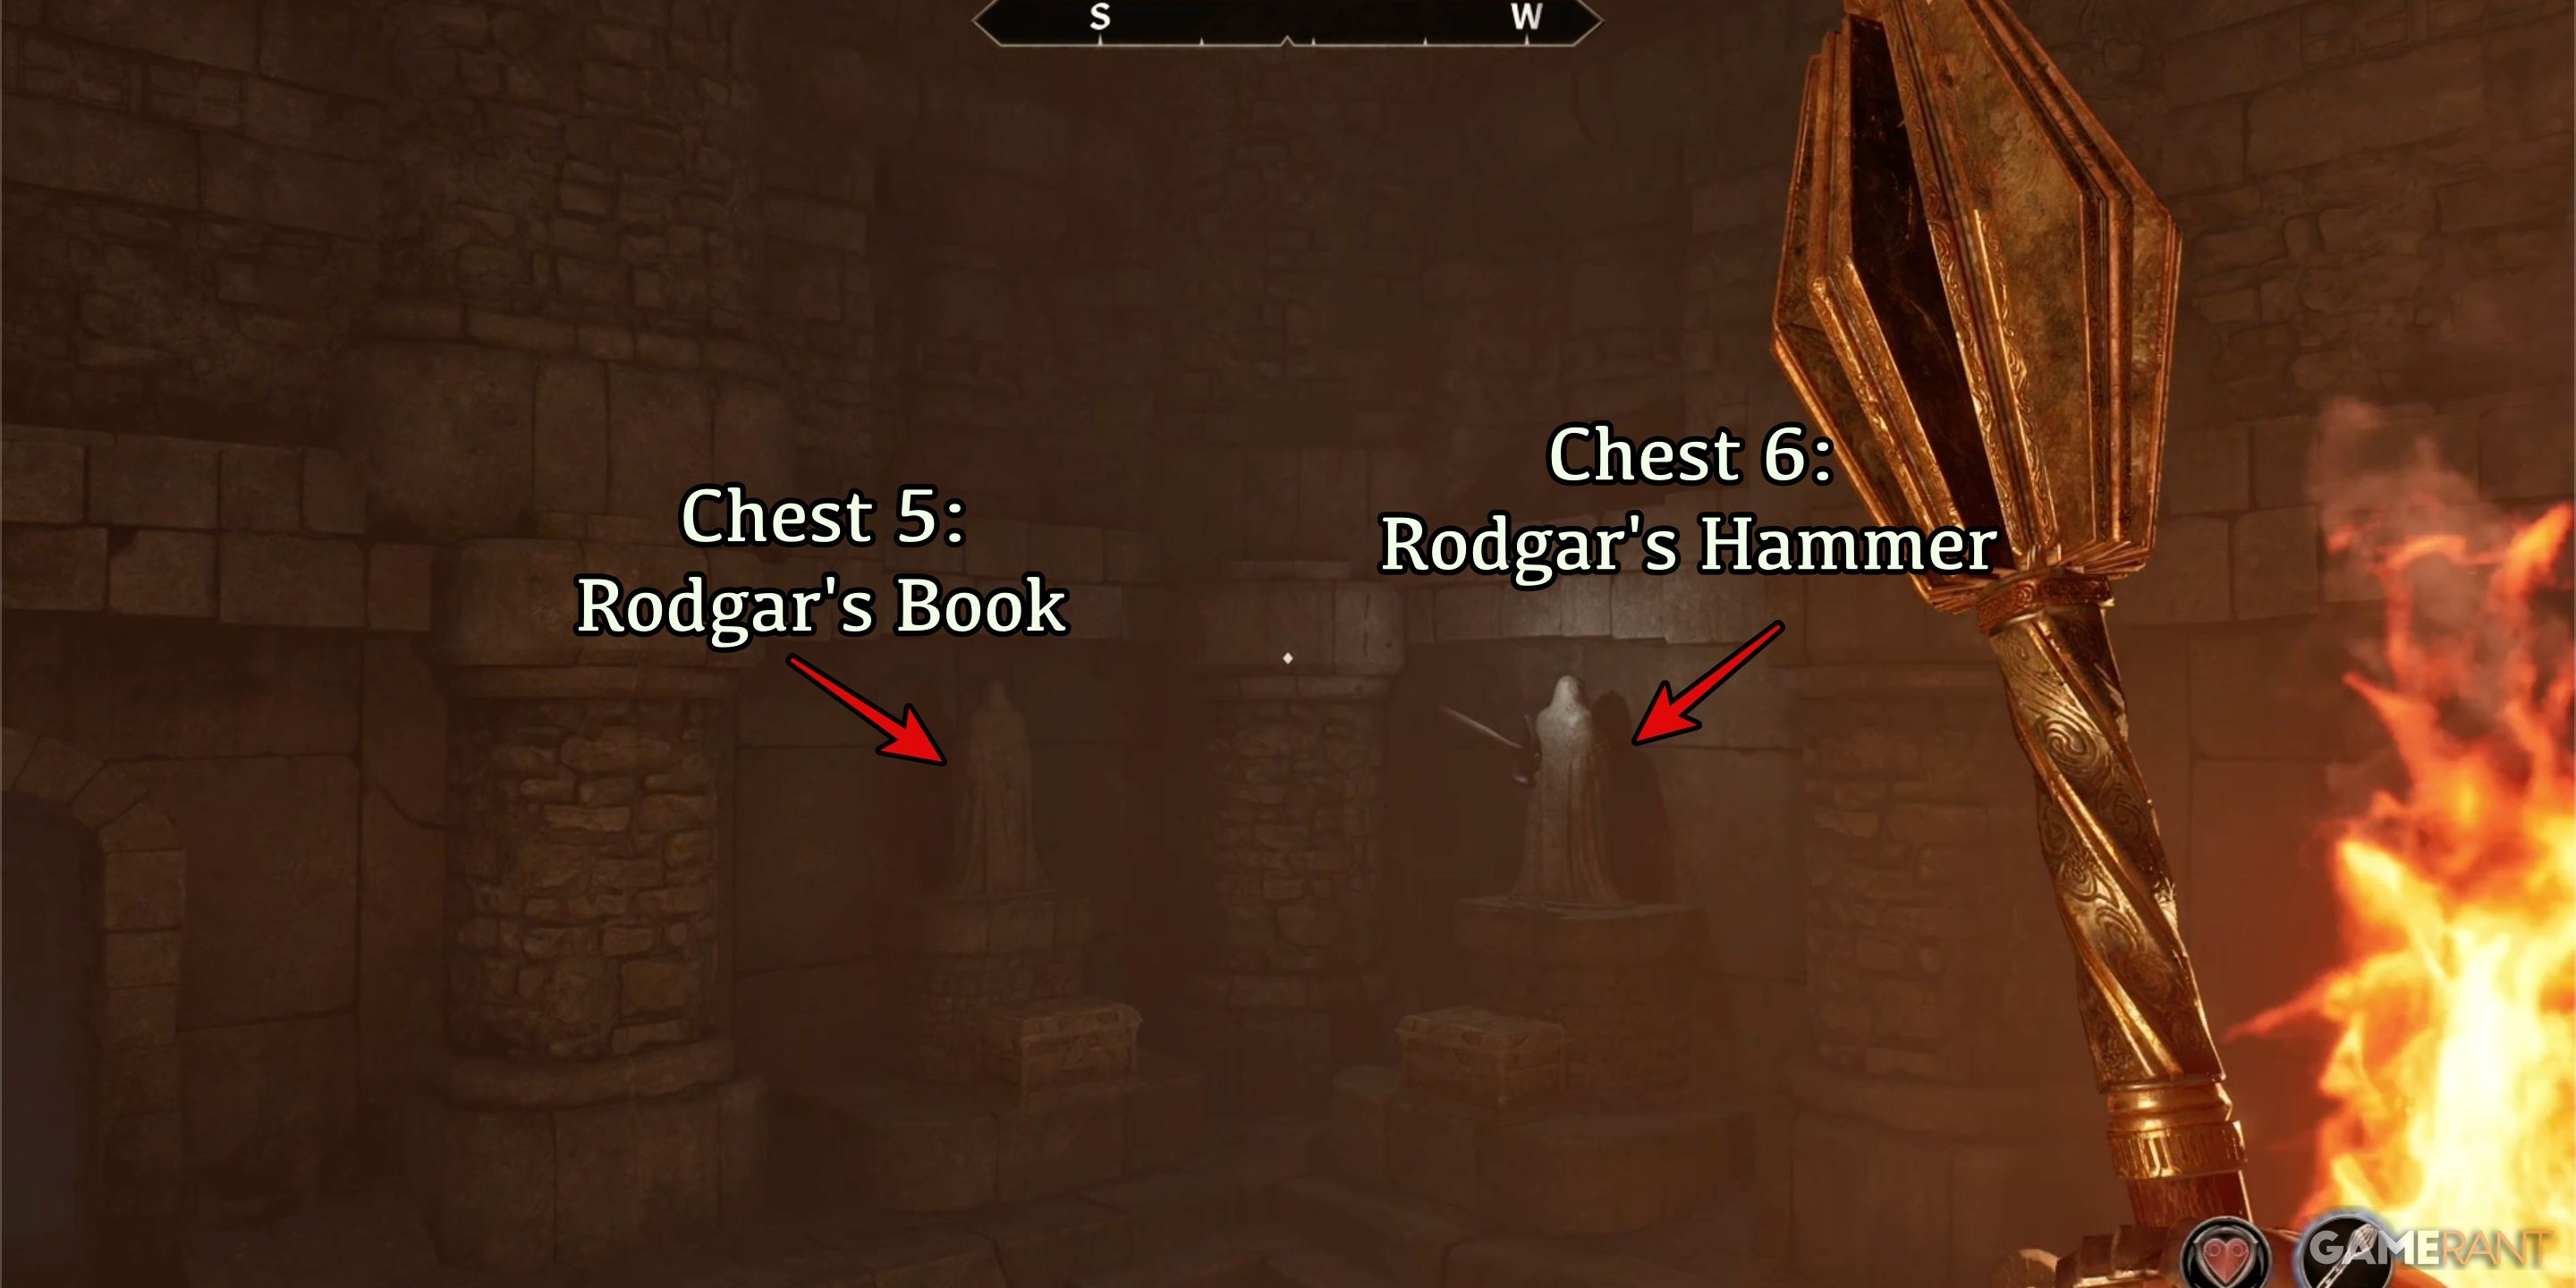
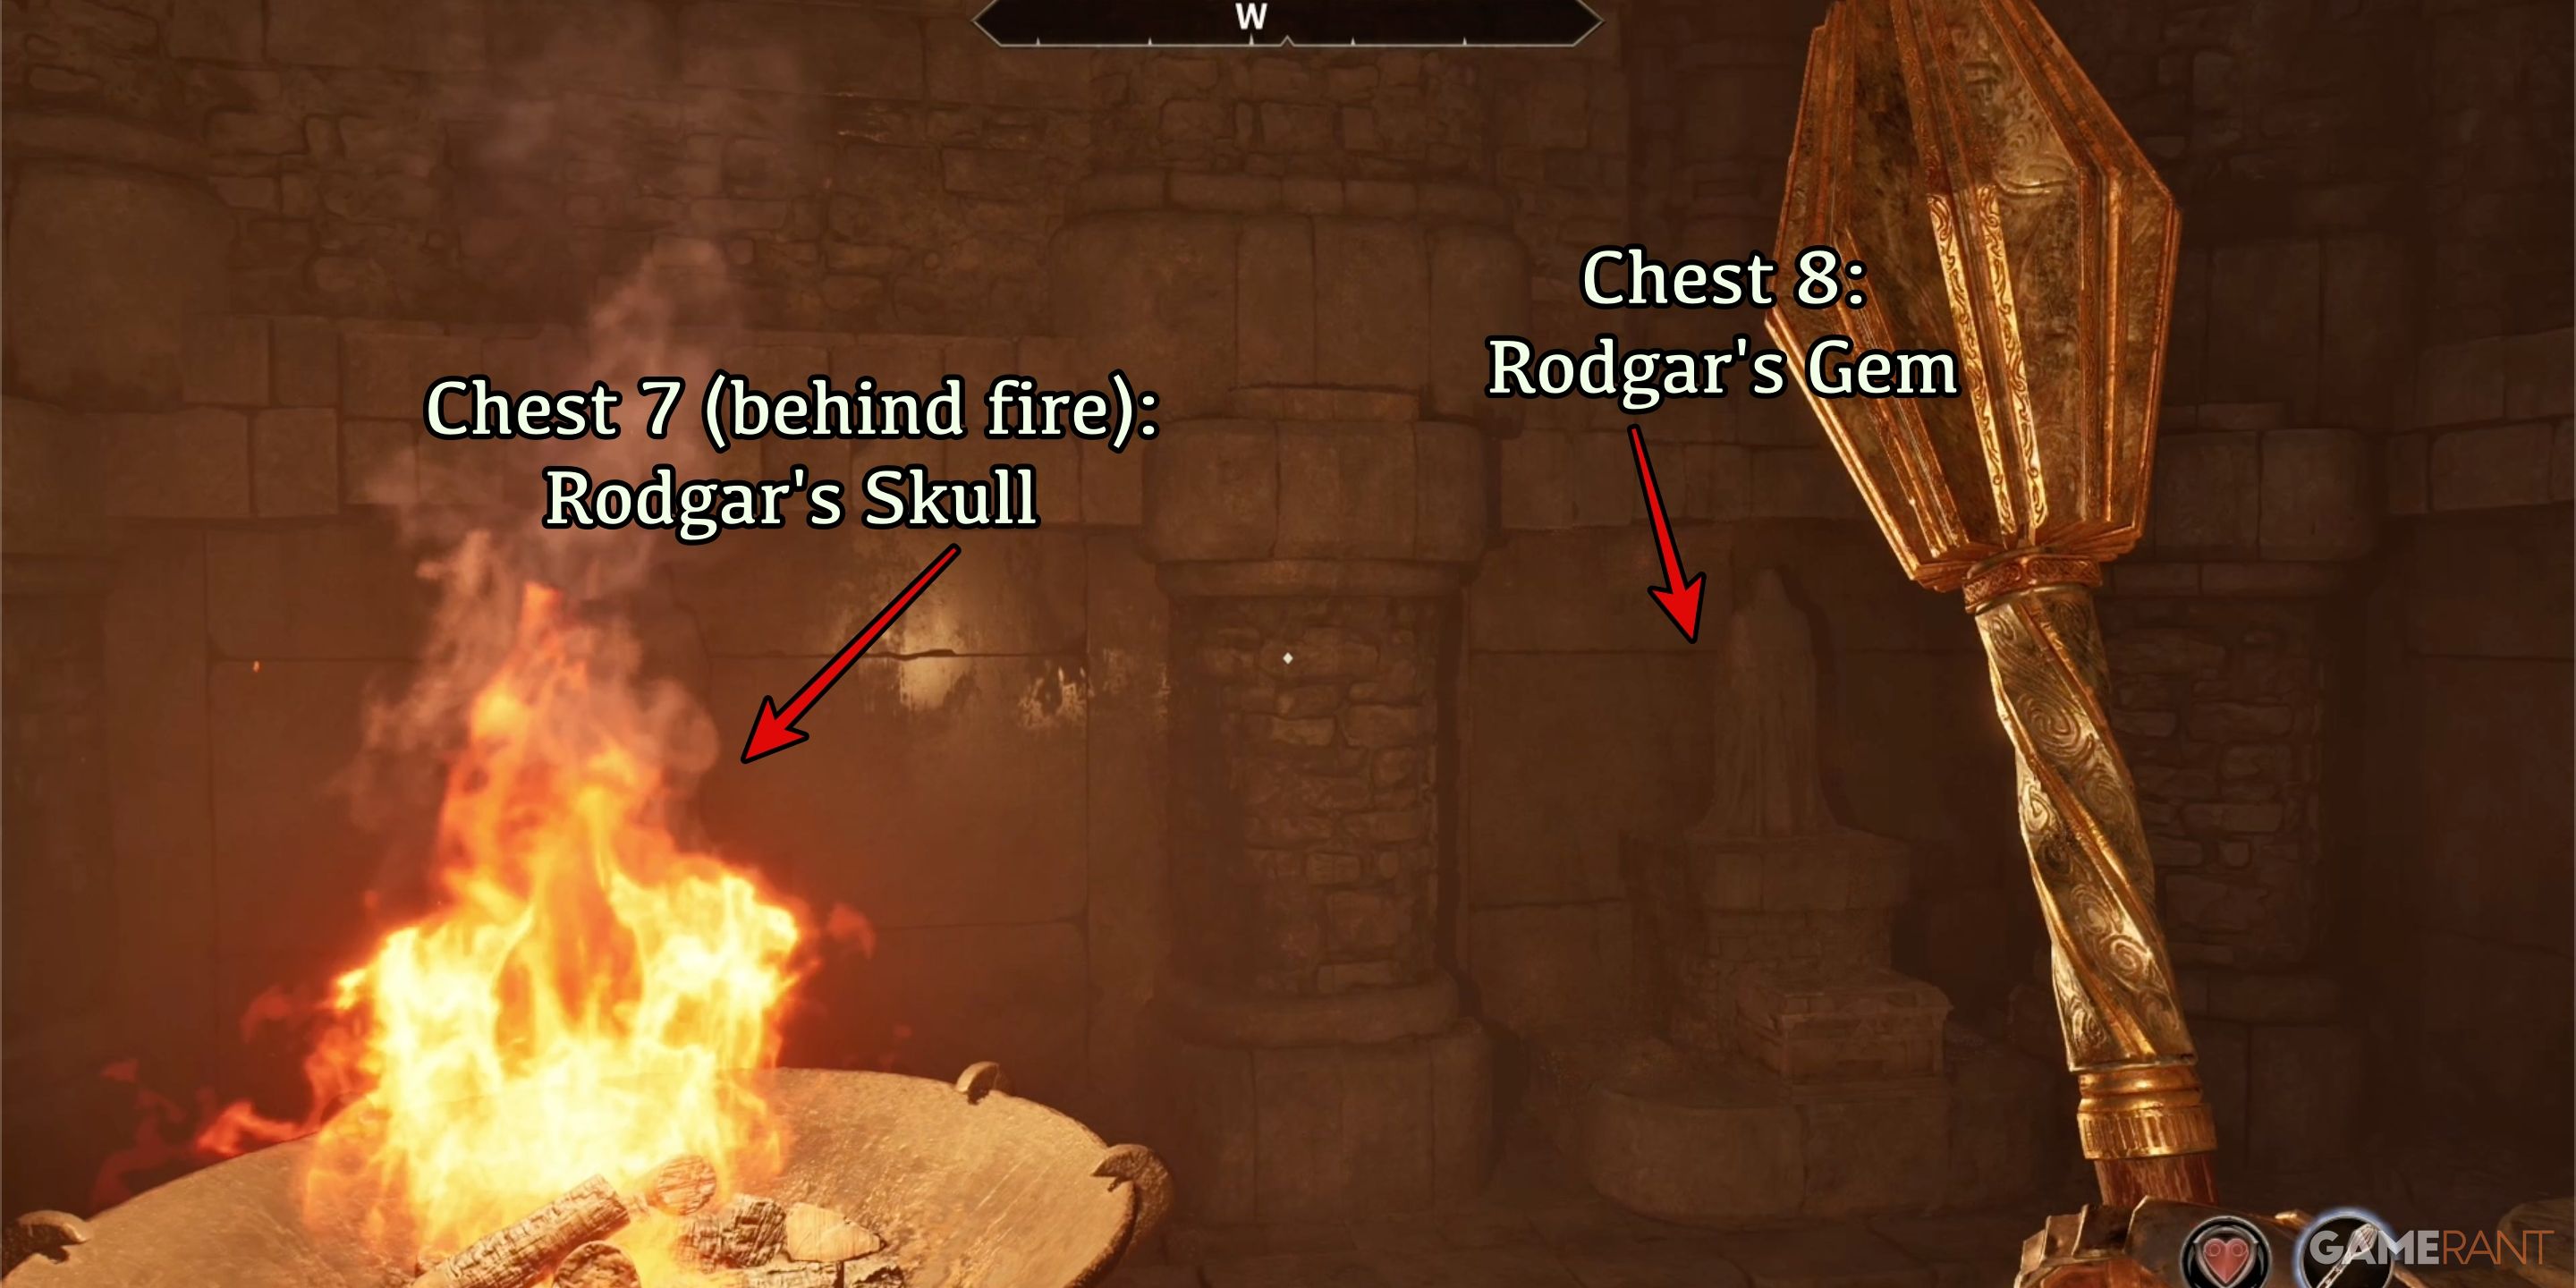
If you have your back towards the big storage box and are facing the exit, we will label the smaller boxes from left to right starting from the first one. There are a total of eight smaller boxes that need items placed in them. You will pick an item from the large storage box one at a time. When the statue above the chest turns around, you’ll know you have placed the correct item in its designated box. Here is the order in which the items should be placed:
1. Small box 1
2. Small box 2
3. Small box 3
4. Small box 4
5. Small box 5
6. Small box 6
7. Small box 7
8. Small box 8
You must place the items in this exact order to complete the task successfully.
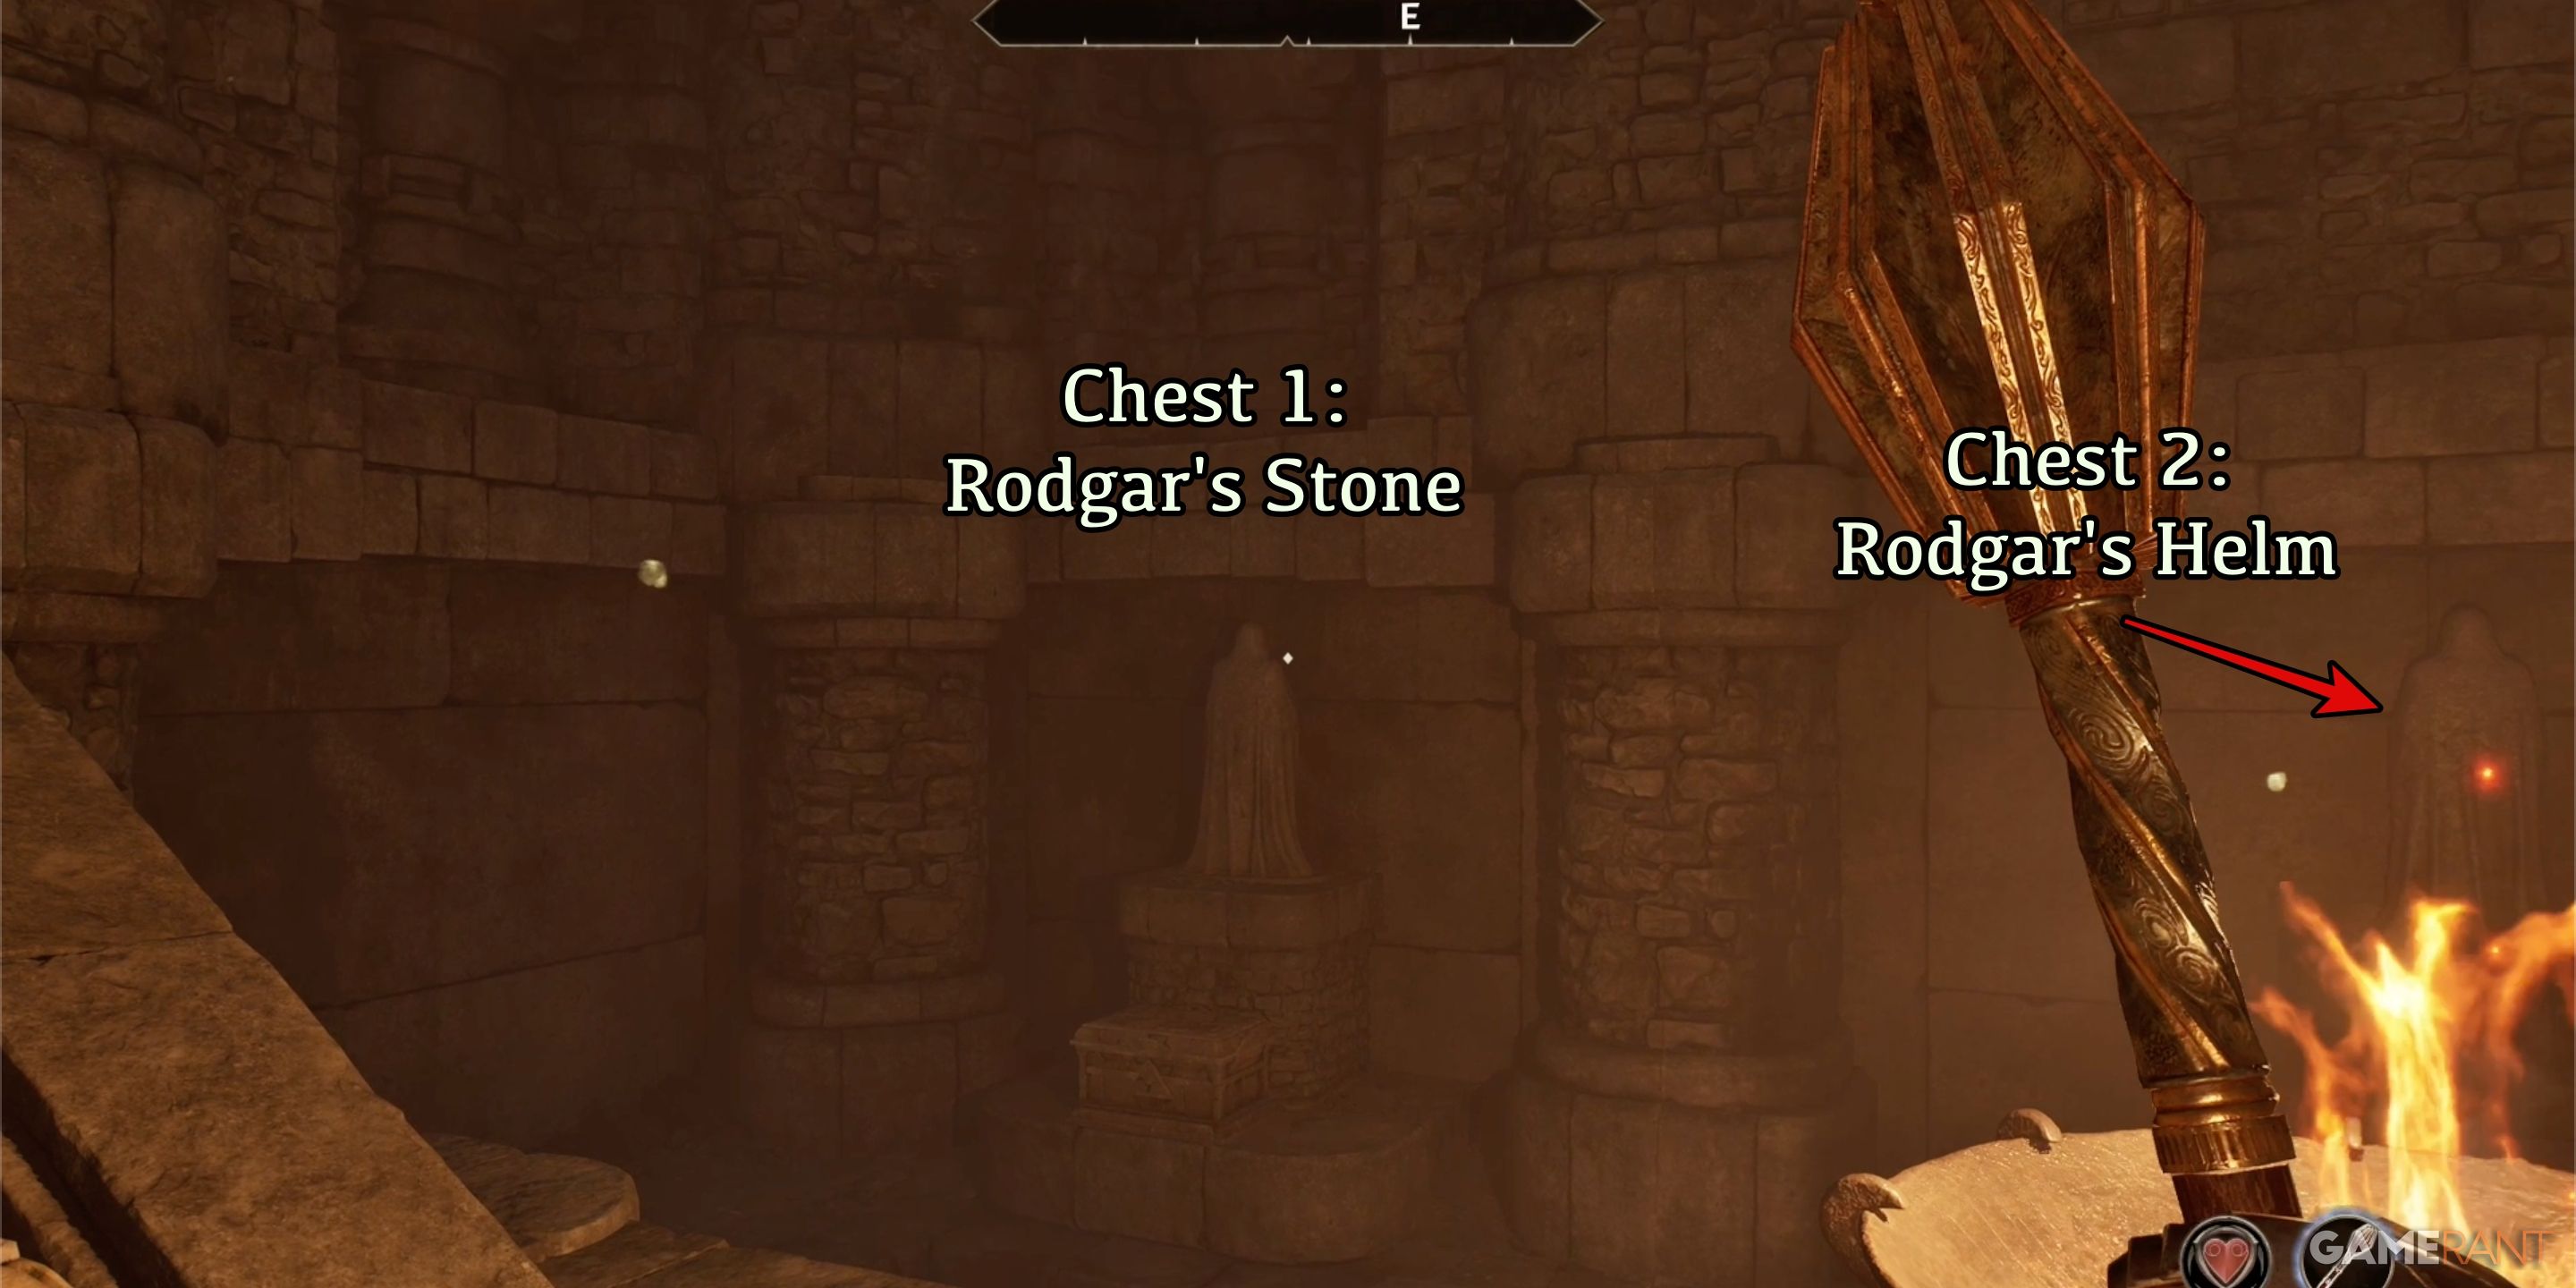
- Chest 1: Rodgar’s Stone
- Chest 2: Rodgar’s Helm
- Chest 3: Rodgar’s Goblet
- Chest 4: Rodgar’s Sword
- Chest 5: Rodgar’s Book
- Chest 6: Rodgar’s Hammer
- Chest 7: Rodgar’s Skull
- Chest 8: Rodgar’s Gem
Greaves & Sword of the Crusader Location – Oblivion Remastered
The Faithful Squire Quest – Greaves & Sword of the Crusader:
In your journey, upon returning to the Priory of the Nine with the earlier six relics, you’ll find yourself face-to-face with a squire named Lathon, who served another knight in pursuit of these same relics. He shares the story of how his late master discovered the Crusader’s Greaves and Sword. On his deathbed, the master breathed his last to make sure Lathon inherited the Greaves.
As a gamer, I’m given the Crusader’s Greaves right here, right now, by Lathon. He warns me with a grave tone that the Sword of the Crusader is cursed – its previous owner was slain by an angry wraith. The only way to lift this curse? Venture into Underpall Cave and retrieve it.
The Underpall Cave can be found near the Orange Road, situated to the northeast of Chorrol. Should you choose to knight Lathon, he’ll join you in your mission to retrieve the sword.
Inside the vast Underpall Cave system, navigation can get tricky, but fear not, as there’s an easy-to-follow path to your destination. Upon entering the cave, you’ll eventually arrive at the grand entrance of Underpall Keep, a colossal subterranean fortress. This immense structure is teeming with ghostly apparitions, zombies, skeletons, and formidable Skeleton Guardians. The latter enemy type, in particular, poses a significant challenge, especially when they congregate in large groups.
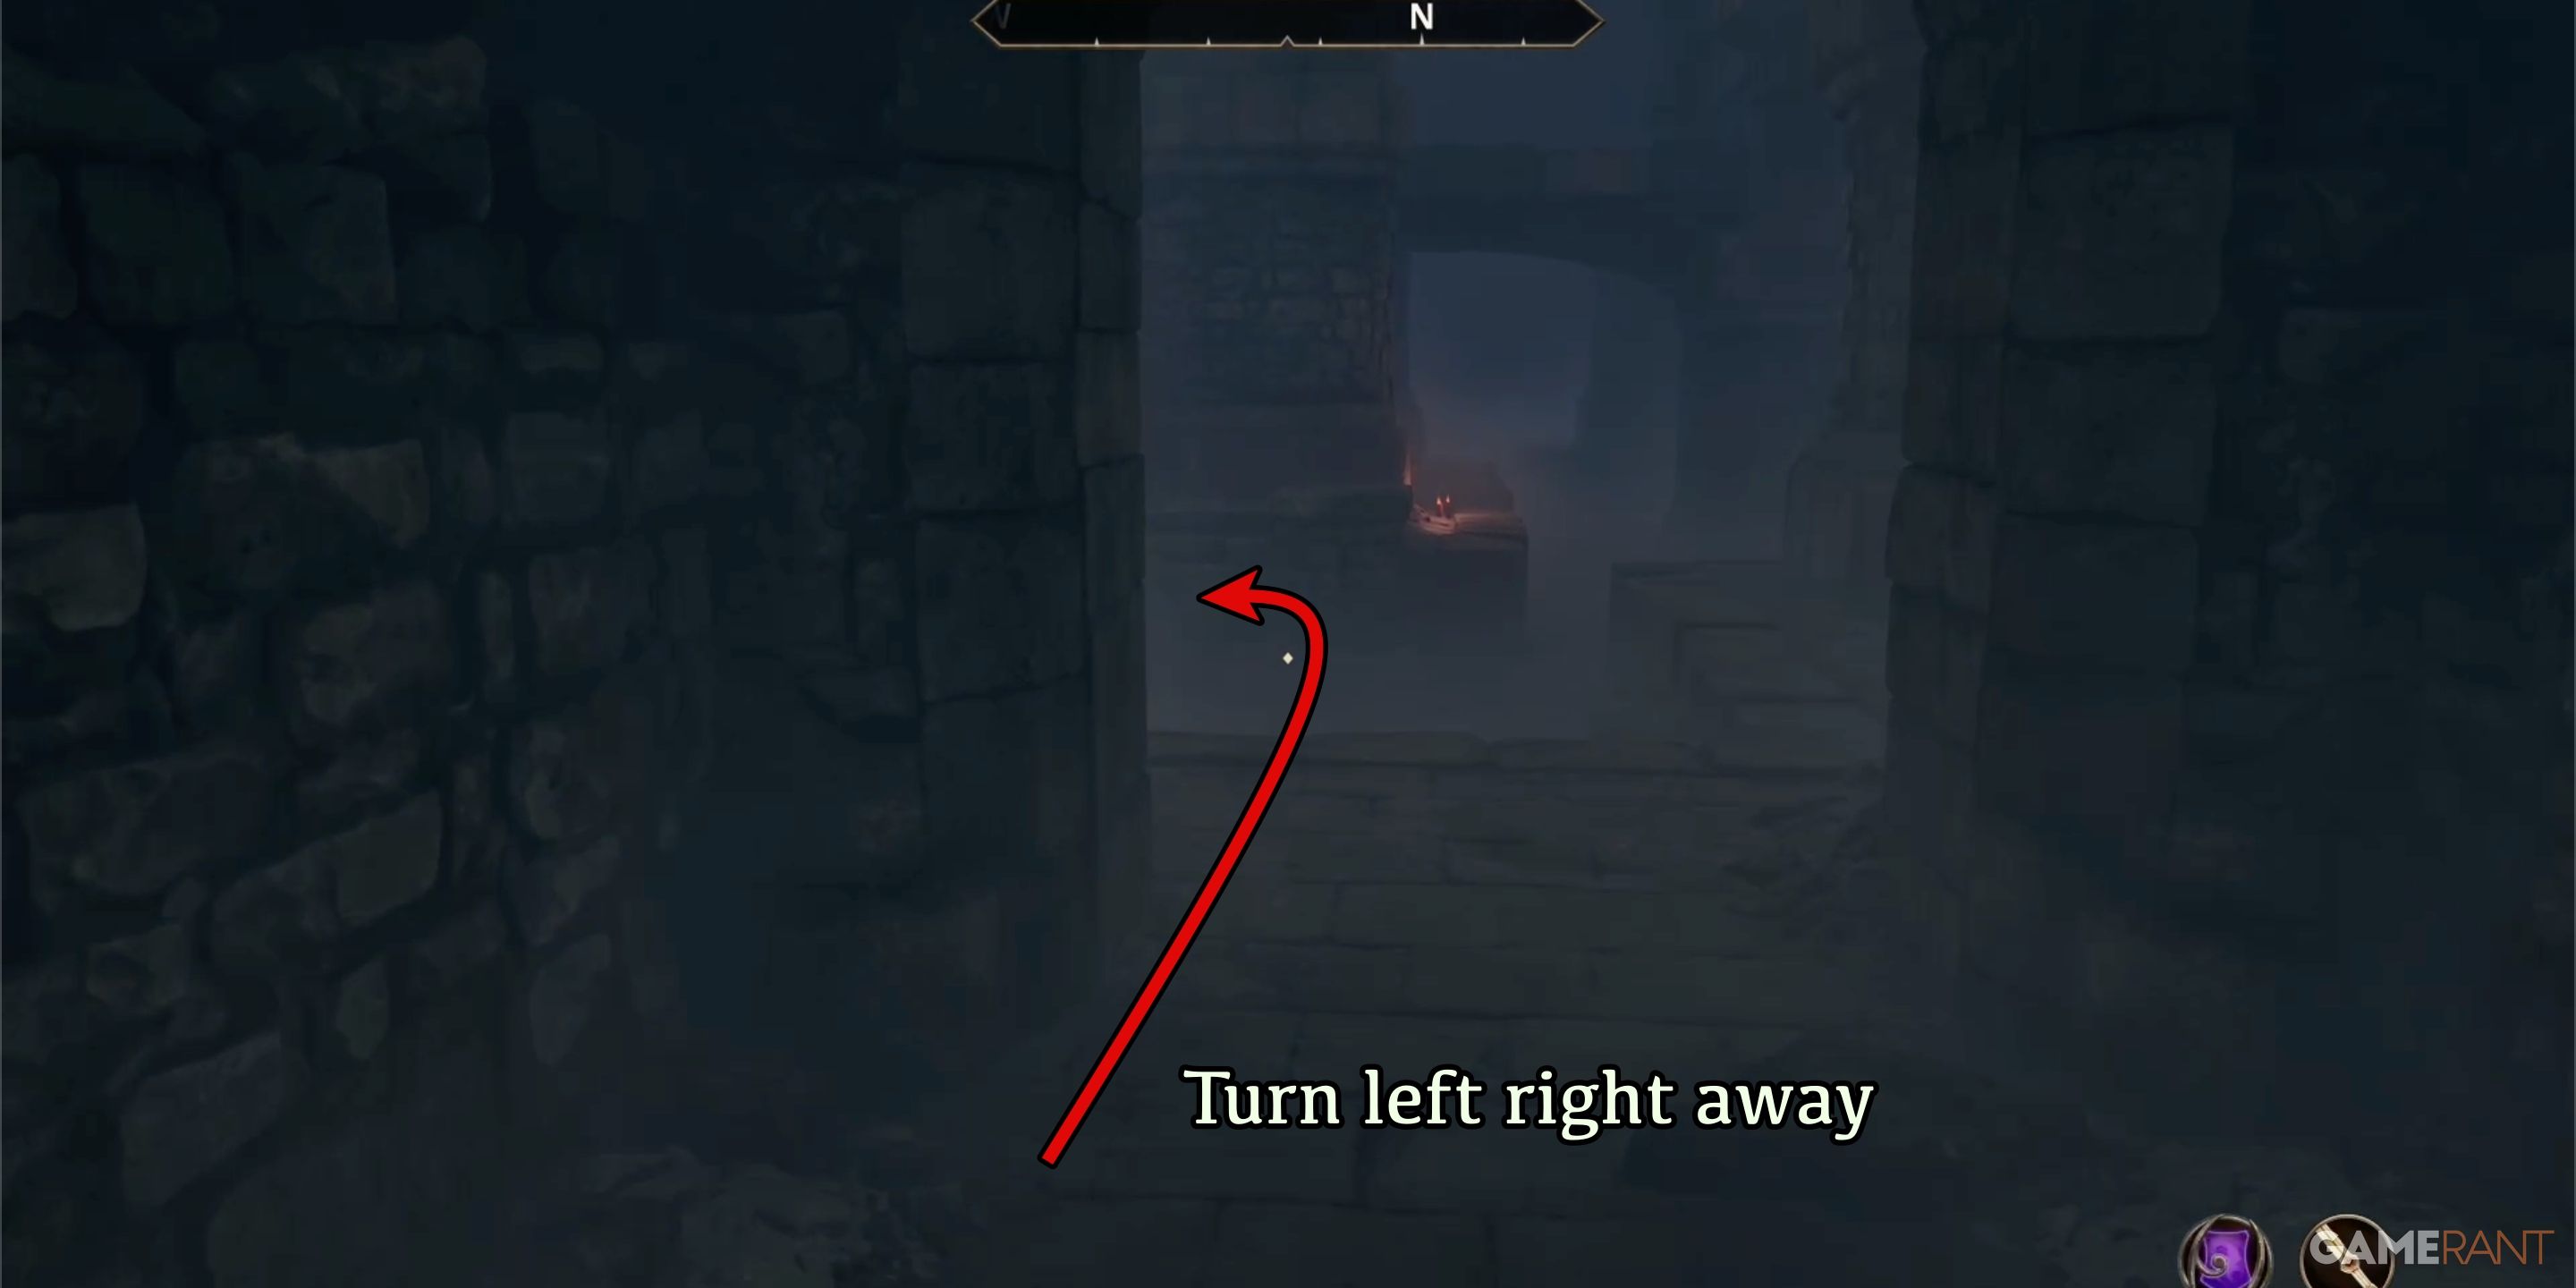
Upon entering Underpall Keep, take an immediate left into the first spacious room, then swiftly turn left again and proceed down the first corridor that appears. This is often where players find themselves bewildered, as they fail to recognize the need for this quick succession of left turns directly after entering the keep.
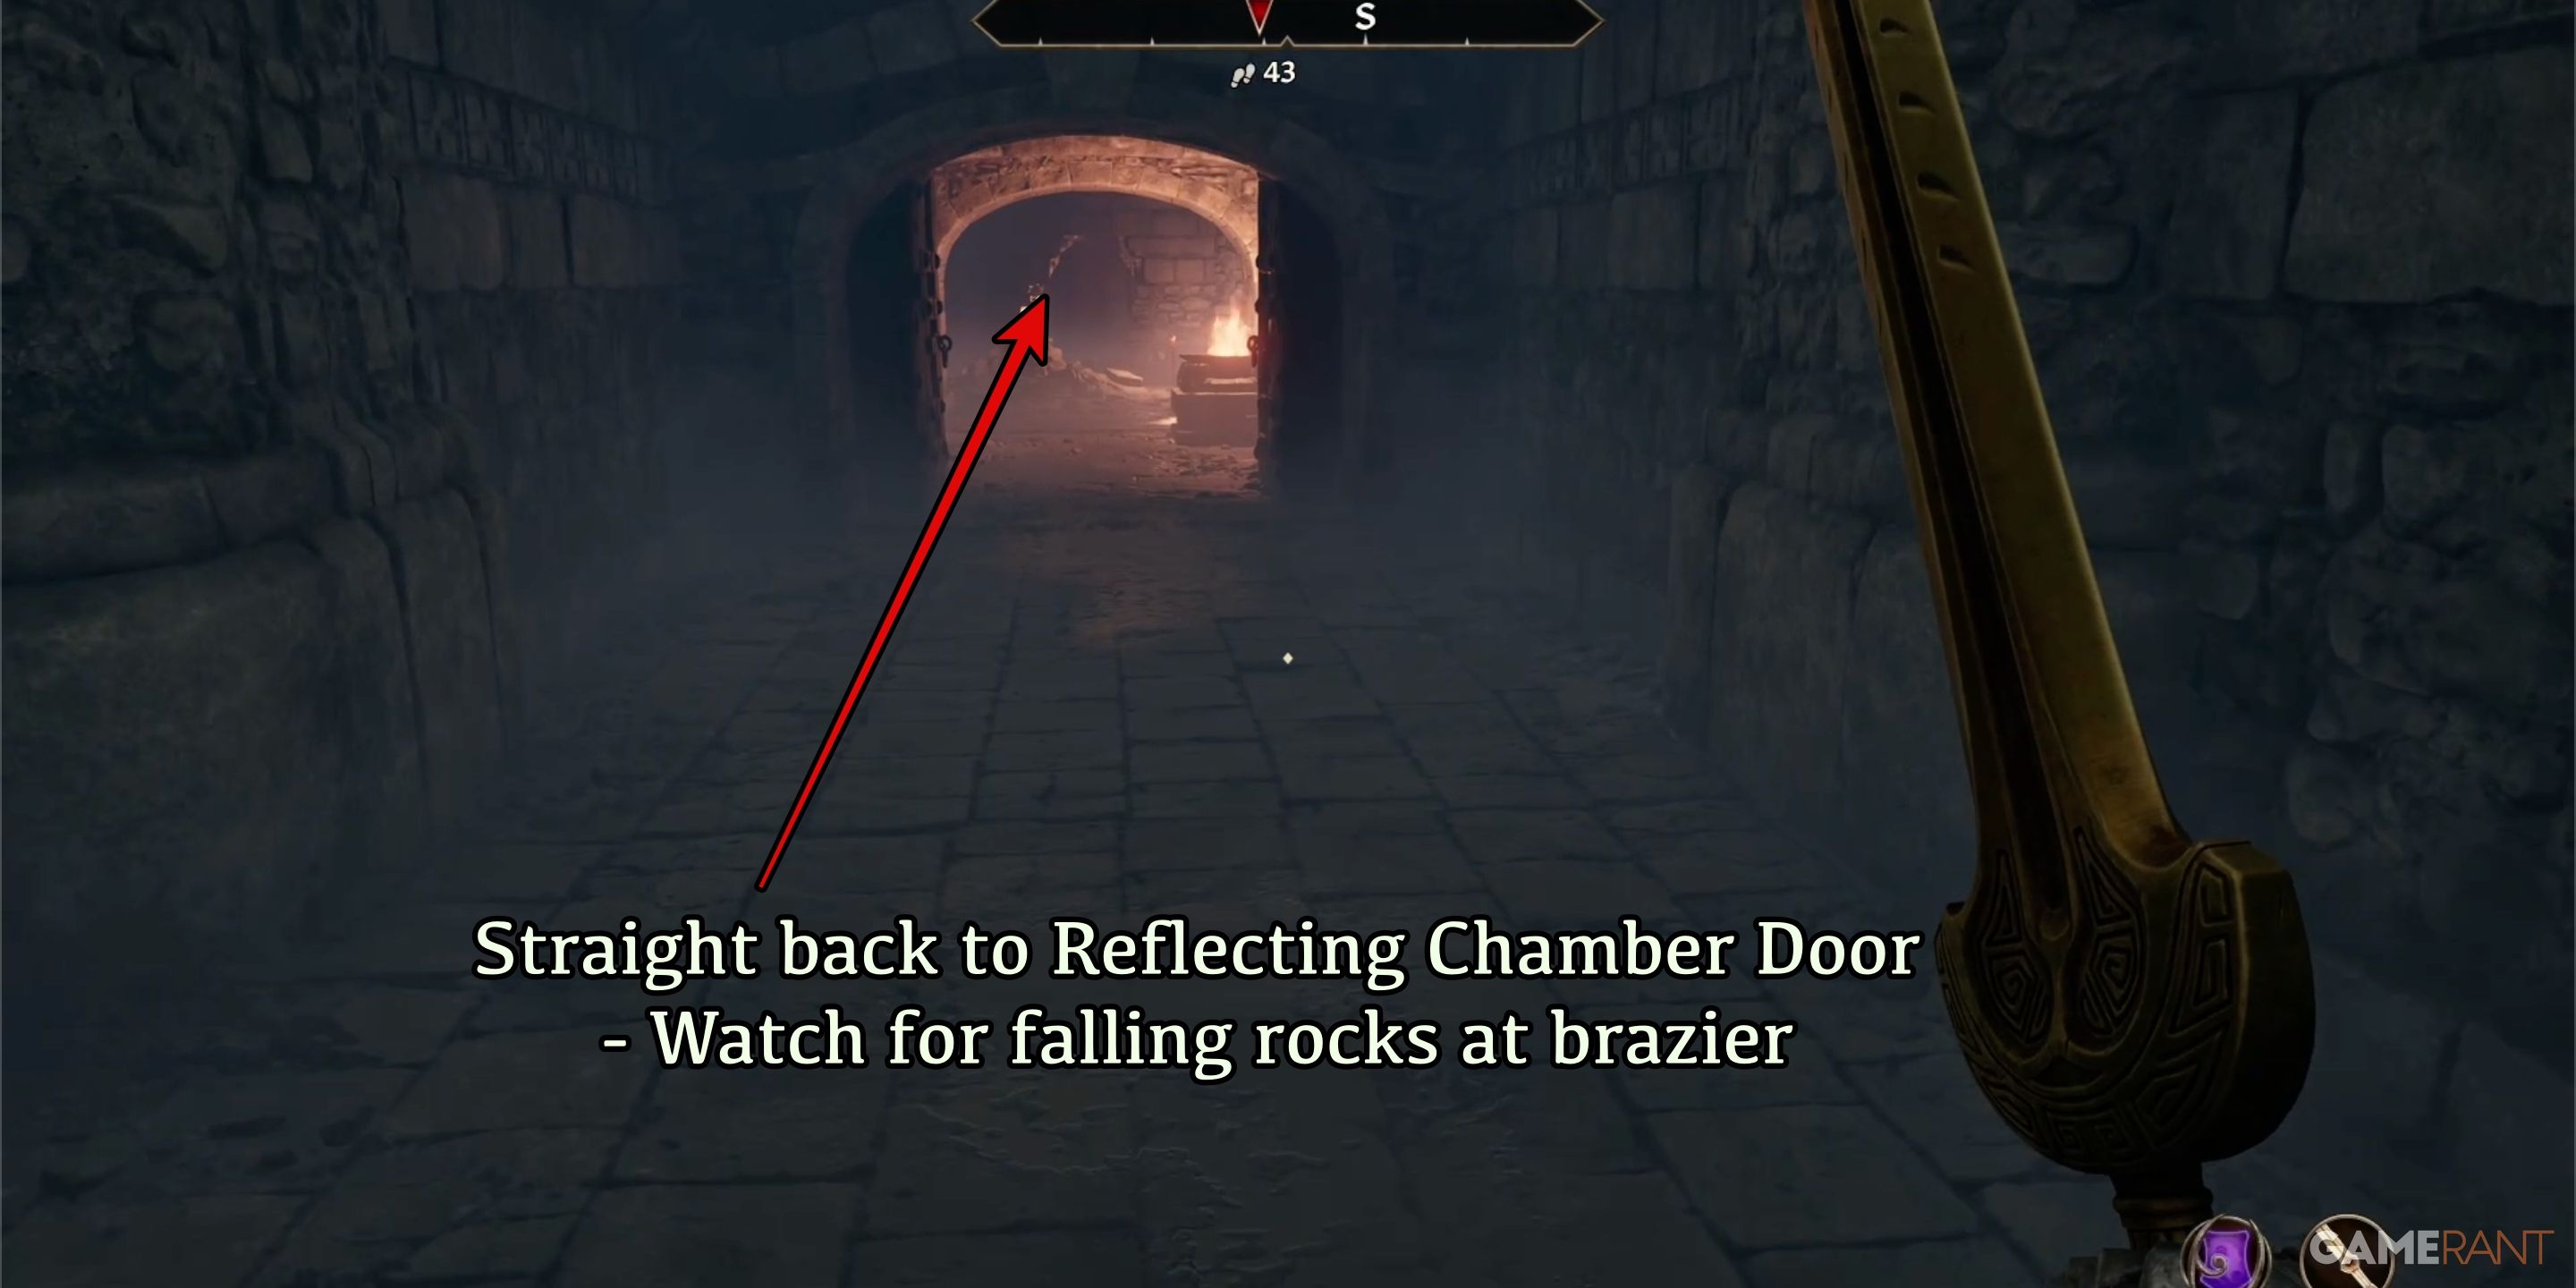
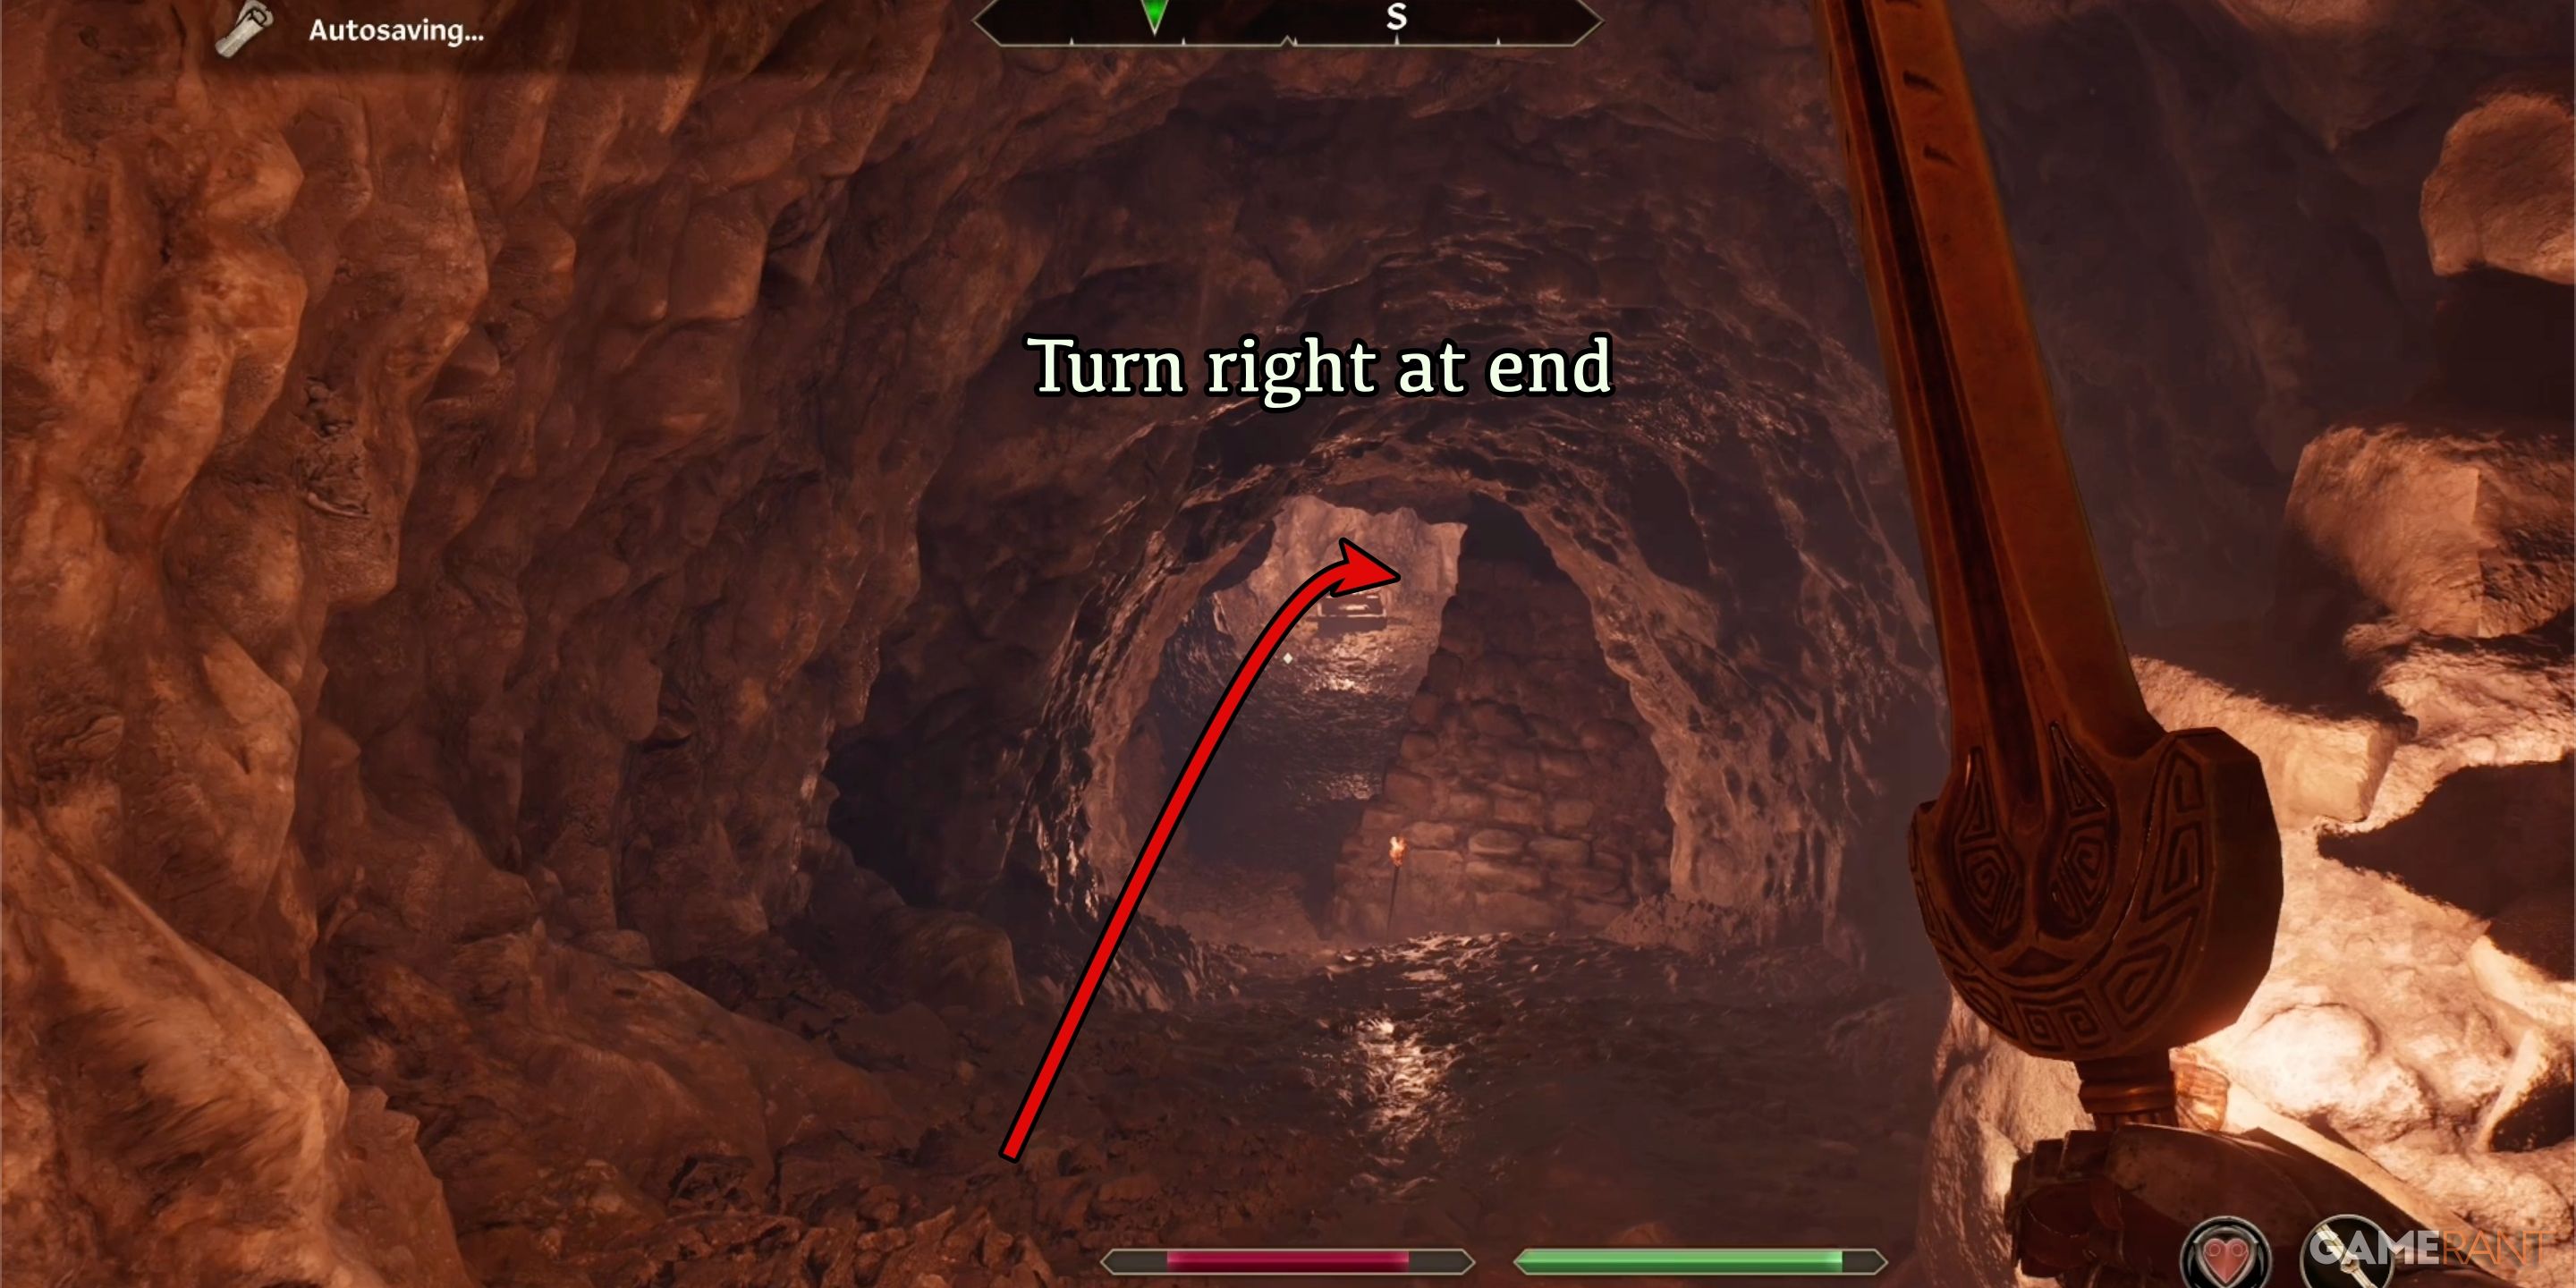
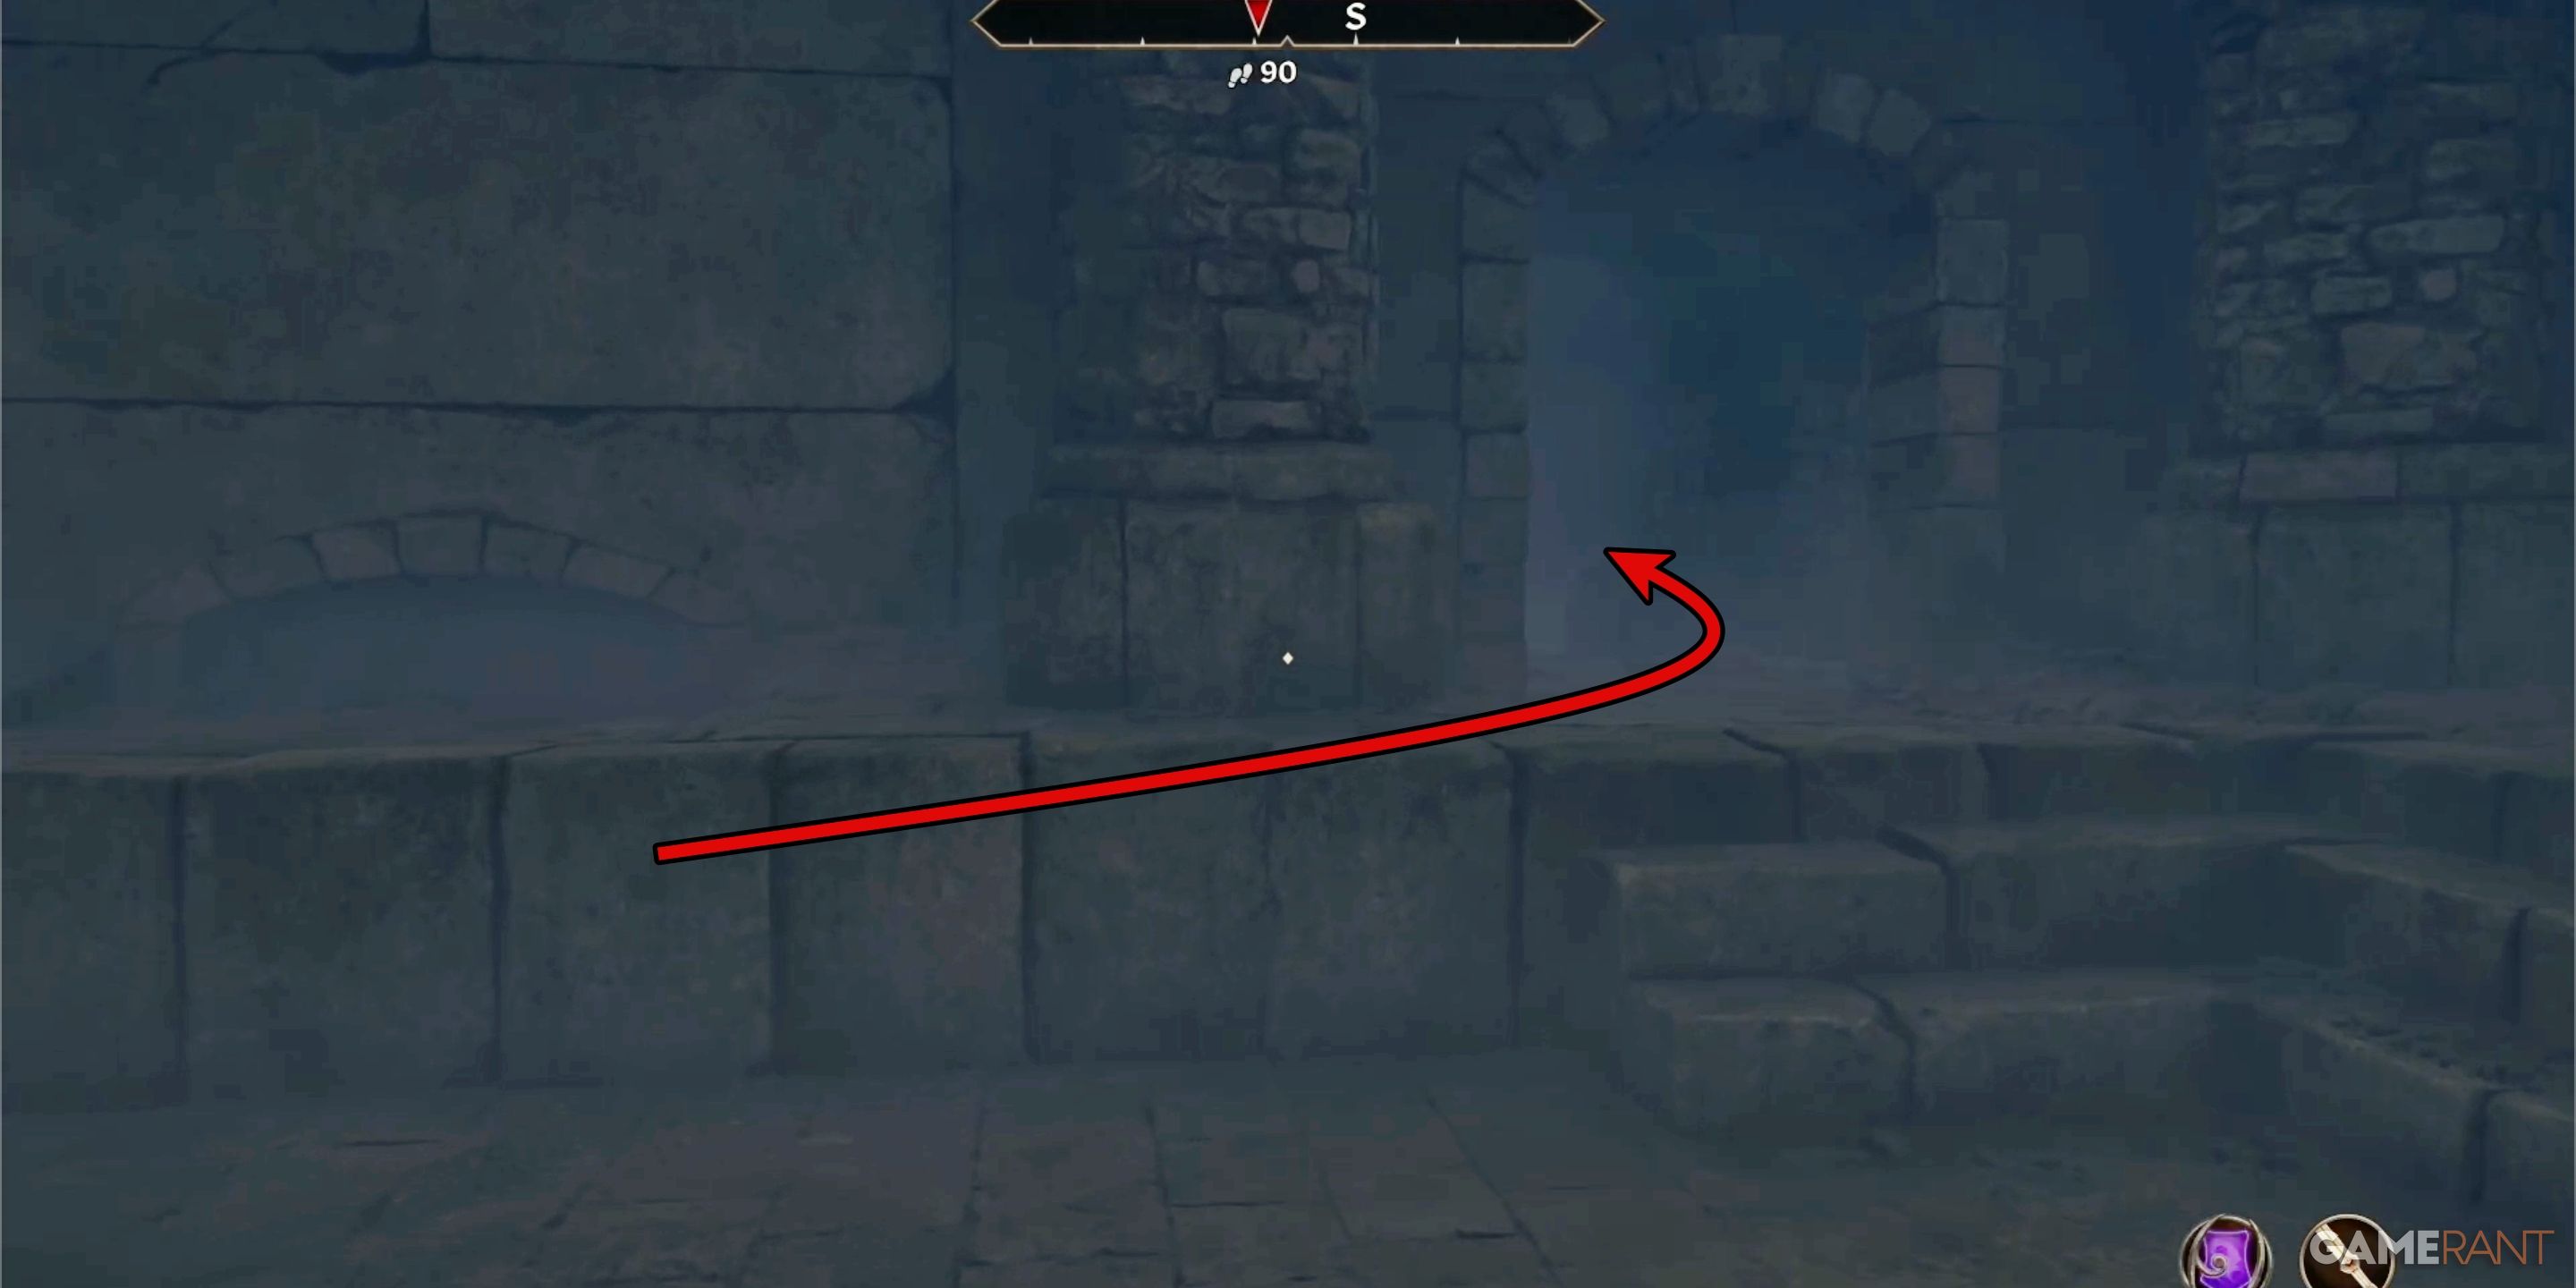
Stepping into the corridor, I follow a straight path ahead that leads me to the Underpall Reflecting Chamber. Beyond the next door, I traverse the lengthy tunnel and take a right turn. Navigating through the intricate network of narrow paths, I soon find myself in an expansive chamber with a vast lake. At the edge of this watery expanse, Lord Berich Vlindrel floats serenely. This is none other than the foe who wields the Sword of the Crusader.
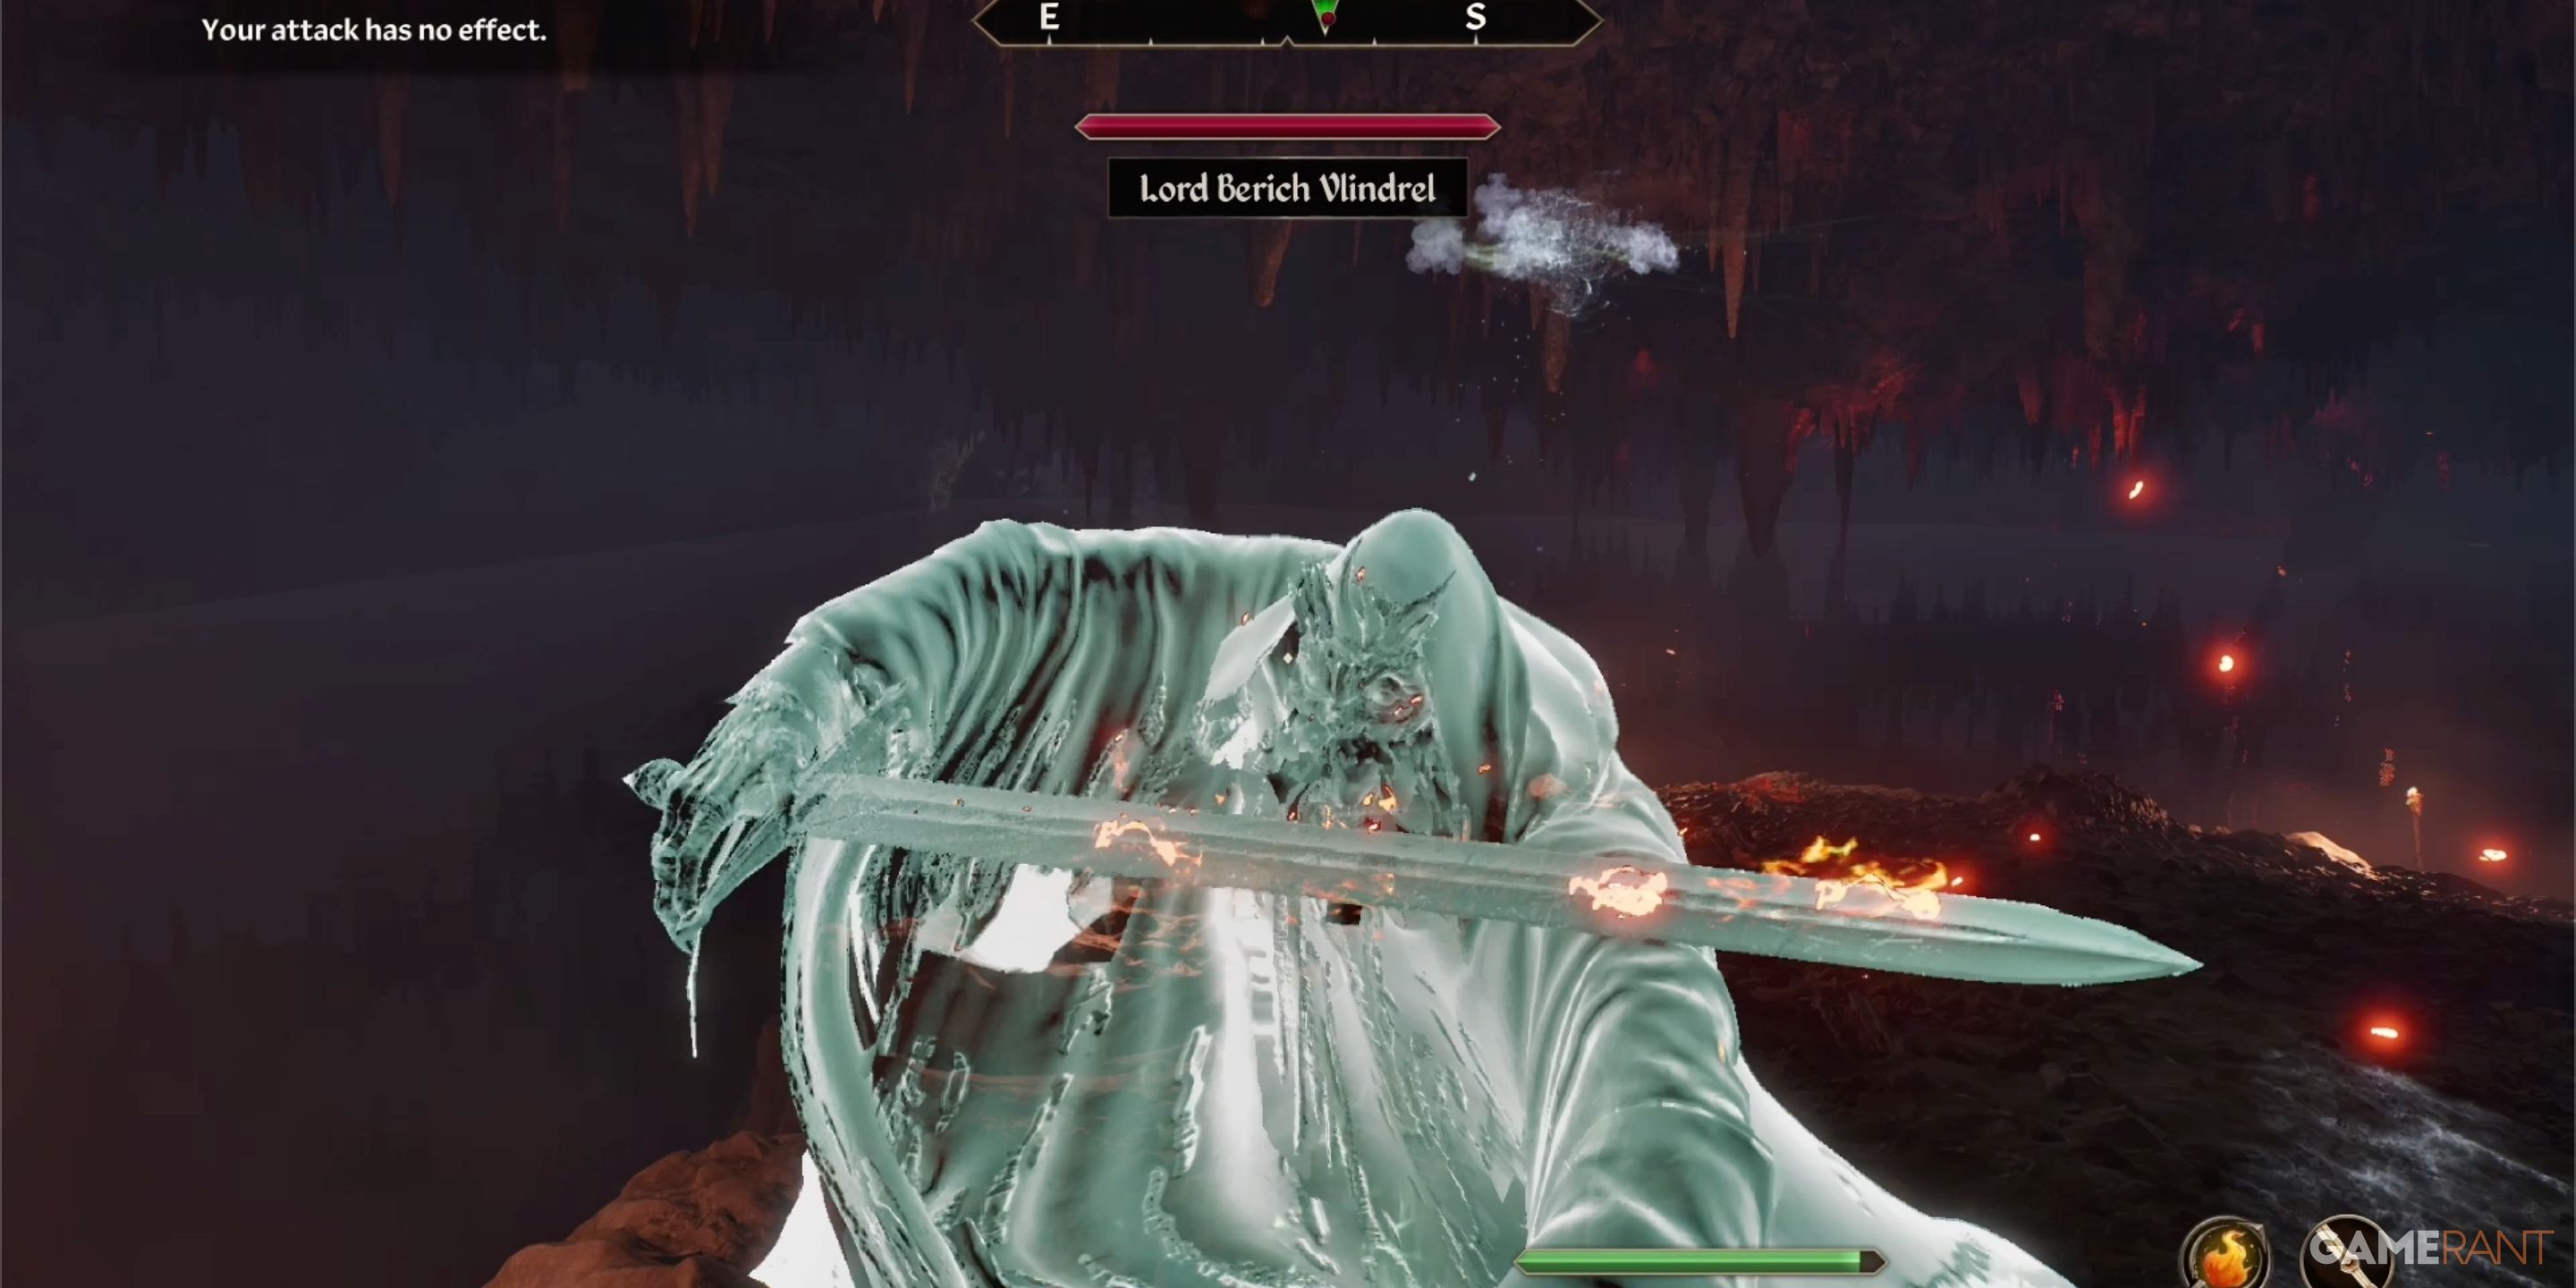
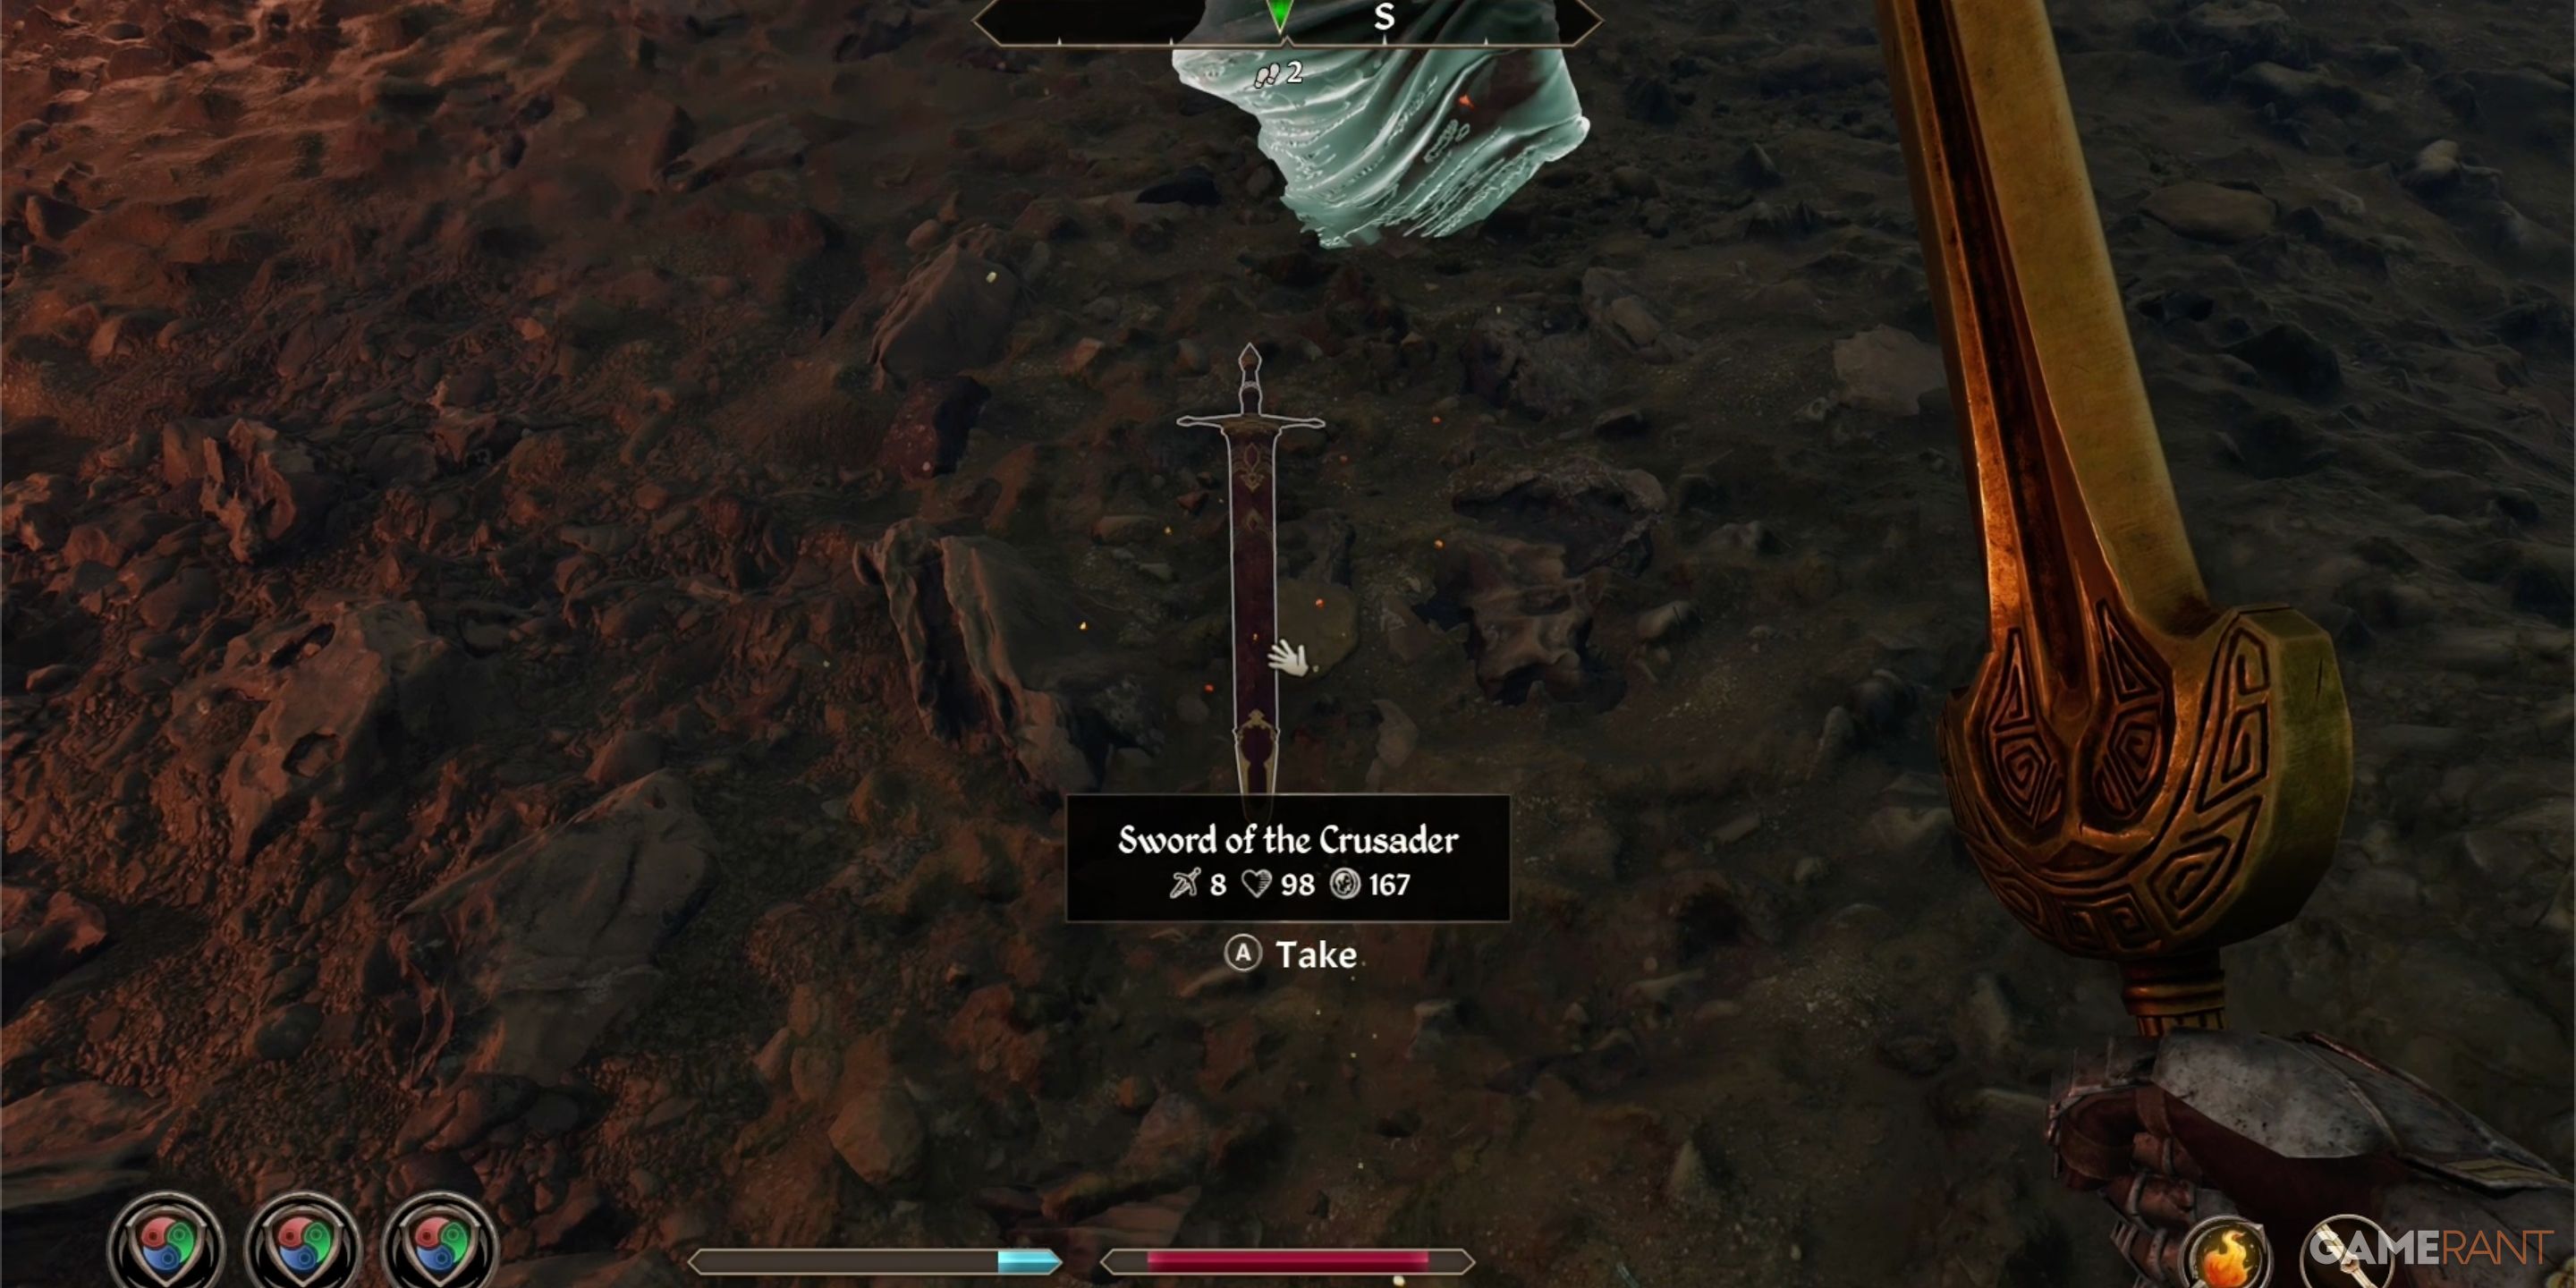
In essence, Vlindrel is not a solid being, making him immune to normal physical attacks. However, an enchanted weapon or magic can harm him. Remarkably, we managed to defeat him swiftly by casting the straightforward Fire Spell. Upon his demise, he will let go of his sword, but it won’t be on his remains – you must retrieve it from where it fell instead.
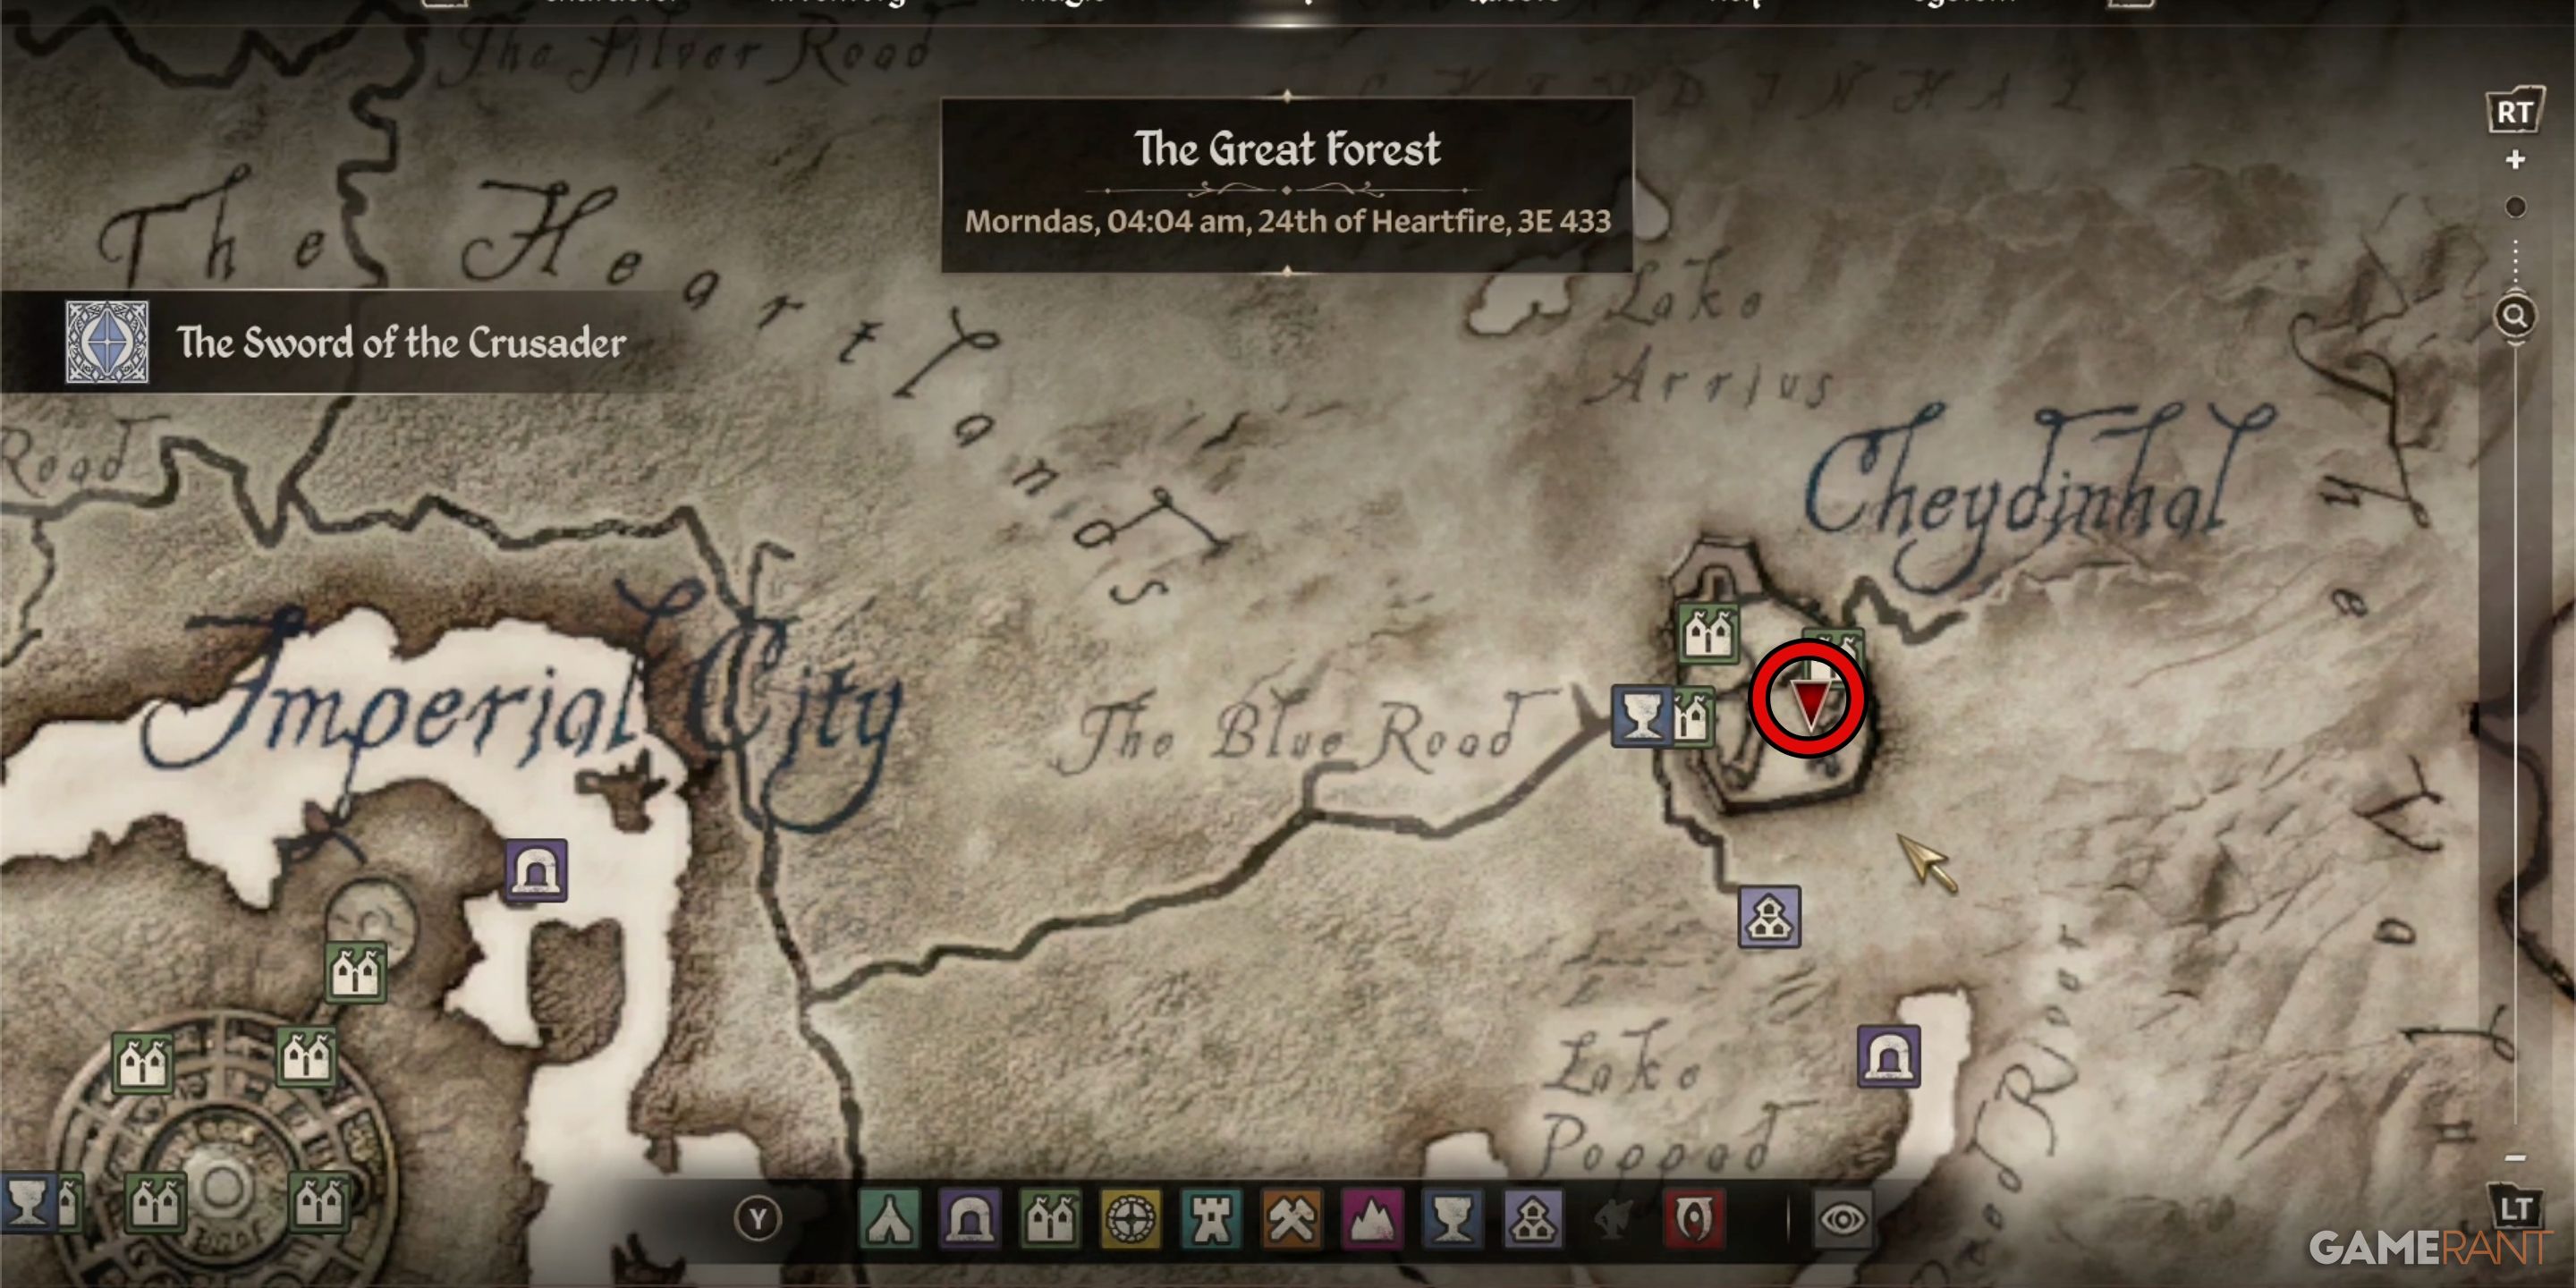

After obtaining the sword, it needs to be re-blessed before you can wield it. You should bring it to the Grand Arkay Chapel in Cheydinhal. Upon arrival, the chapel will be under siege by a group of Aurorans. Overpower them, and then utilize the grand altar situated at the heart of the chapel to re-bless the sword. This action concludes your Crusader’s Relics quest.
Read More
- Forza Horizon 6: Find the Ohtani Treasure Chest Location
- LEGO Batman Legacy of the Dark Knight Batcave Minikits & WayneTech Caches
- Diablo 4 Best Loot Filter Codes
- NTE Drift Guide (& Best Car Mods for Drifting)
- USD RUB PREDICTION
- USD CNY PREDICTION
- Cookie Run Kingdom Timeline of Fate Update Guide
- PS Plus Monthly Games for June 2026 Wish List
- Top 10 Must-Watch Isekai Anime on Crunchyroll Revealed!
- GBP CNY PREDICTION
2025-04-27 14:55