From the Back Gate site of grace, head northwest towards the large doors with a Fire Knight guarding it. Defeat the Fire Knight and approach the doors to trigger an event, leading you to face Commander Gaius. After defeating him, enter the doors and follow the path until you reach a room with a giant tree in the center. Interact with the tree to start a cutscene, then head through the portal that appears. This will take you to the Hidden Path.
As an avid fan of Elden Ring: Shadow of the Erdtree, I can’t contain my excitement about diving into its massive Shadow Keep legacy dungeon. Ever since the initial trailers for the DLC dropped, there’s been a buzzing anticipation surrounding whether this main dungeon would live up to the hype. And let me tell you, the Shadow Keep absolutely delivers!
Shadow Keep Complete Walkthrough: Overview
In “Elden Ring: Elder Tree’s Shadow” or “Elden Ring: Shadow of the Erdtree,” the colossal construct known as Shadow Keep consists of four distinct areas for adventurers to delve into. Just two of these areas align with the primary journey, guiding players towards a particular destination. The unexplored third and fourth regions can only be accessed via a clandestine path initiating at Moorth Ruins. This comprehensive guide will unravel the labyrinthine network of interconnected chambers, passageways, and bridges. Upon completion, you will gain entry to the Ancient Ruins of Rauh and Scaduview/Hinterlands. The four areas encompassing Shadow Keep are:
- Main Gate Plaza
- Specimen Storehouse
- Church District
- Back Gate
As a reminder, entering the Shadow Keep’s main entrance will result in noticeable shifts among the NPCs residing in the Realm of Shadow. A shared theme among these NPCs is their mention of Miqeulla’s ‘charm’ being shattered. This aligns with the warning message you receive when approaching either the front or back entrances to the Shadow Keep. Please be advised that this transformation is irreversible.
How to Reach the Shadow Keep:
As a gamer, I’d advise you not to overlook the importance of preparation before tackling the challenges of the Shadow Keep. The keep lies at the terminus of the northward path from Castle Ensis. Finishing Castle Ensis and vanquishing its boss will reward you with access to Scadu Altus. Although there’s a shortcut available to bypass Castle Ensis, I strongly suggest completing it first – the rewards in terms of items and experience make it an essential stop on your journey. Once you’ve obtained the Shadow Keep map piece from Scadu Altus, it will be clearly marked on your map.
Shadow Keep NPC Quests:
As an avid player, I’ve noticed two intriguing non-player character (NPC) questlines with significant developments occurring within the ominous confines of the Shadow Keep. Keep a keen eye out for these storylines:
- Hornsent Summon Signs: On the bridge with multiple fire pits that look like boats, look for the red and gold summon signs right before the large ramp that leads down to the Main Plaza Gate site of grace shortcut. You’ll have to decide whether you want to help the , or .
- Sir Ansbach and Redmane Knight Freyja: Both and can be found in the Specimen Storehouse, and their quests are intertwined. More details will be given in the walkthrough section.
Shadow Keep Walkthrough: Part 1 – Main Gate Plaza
Defeat the Golden Hippopotamus:
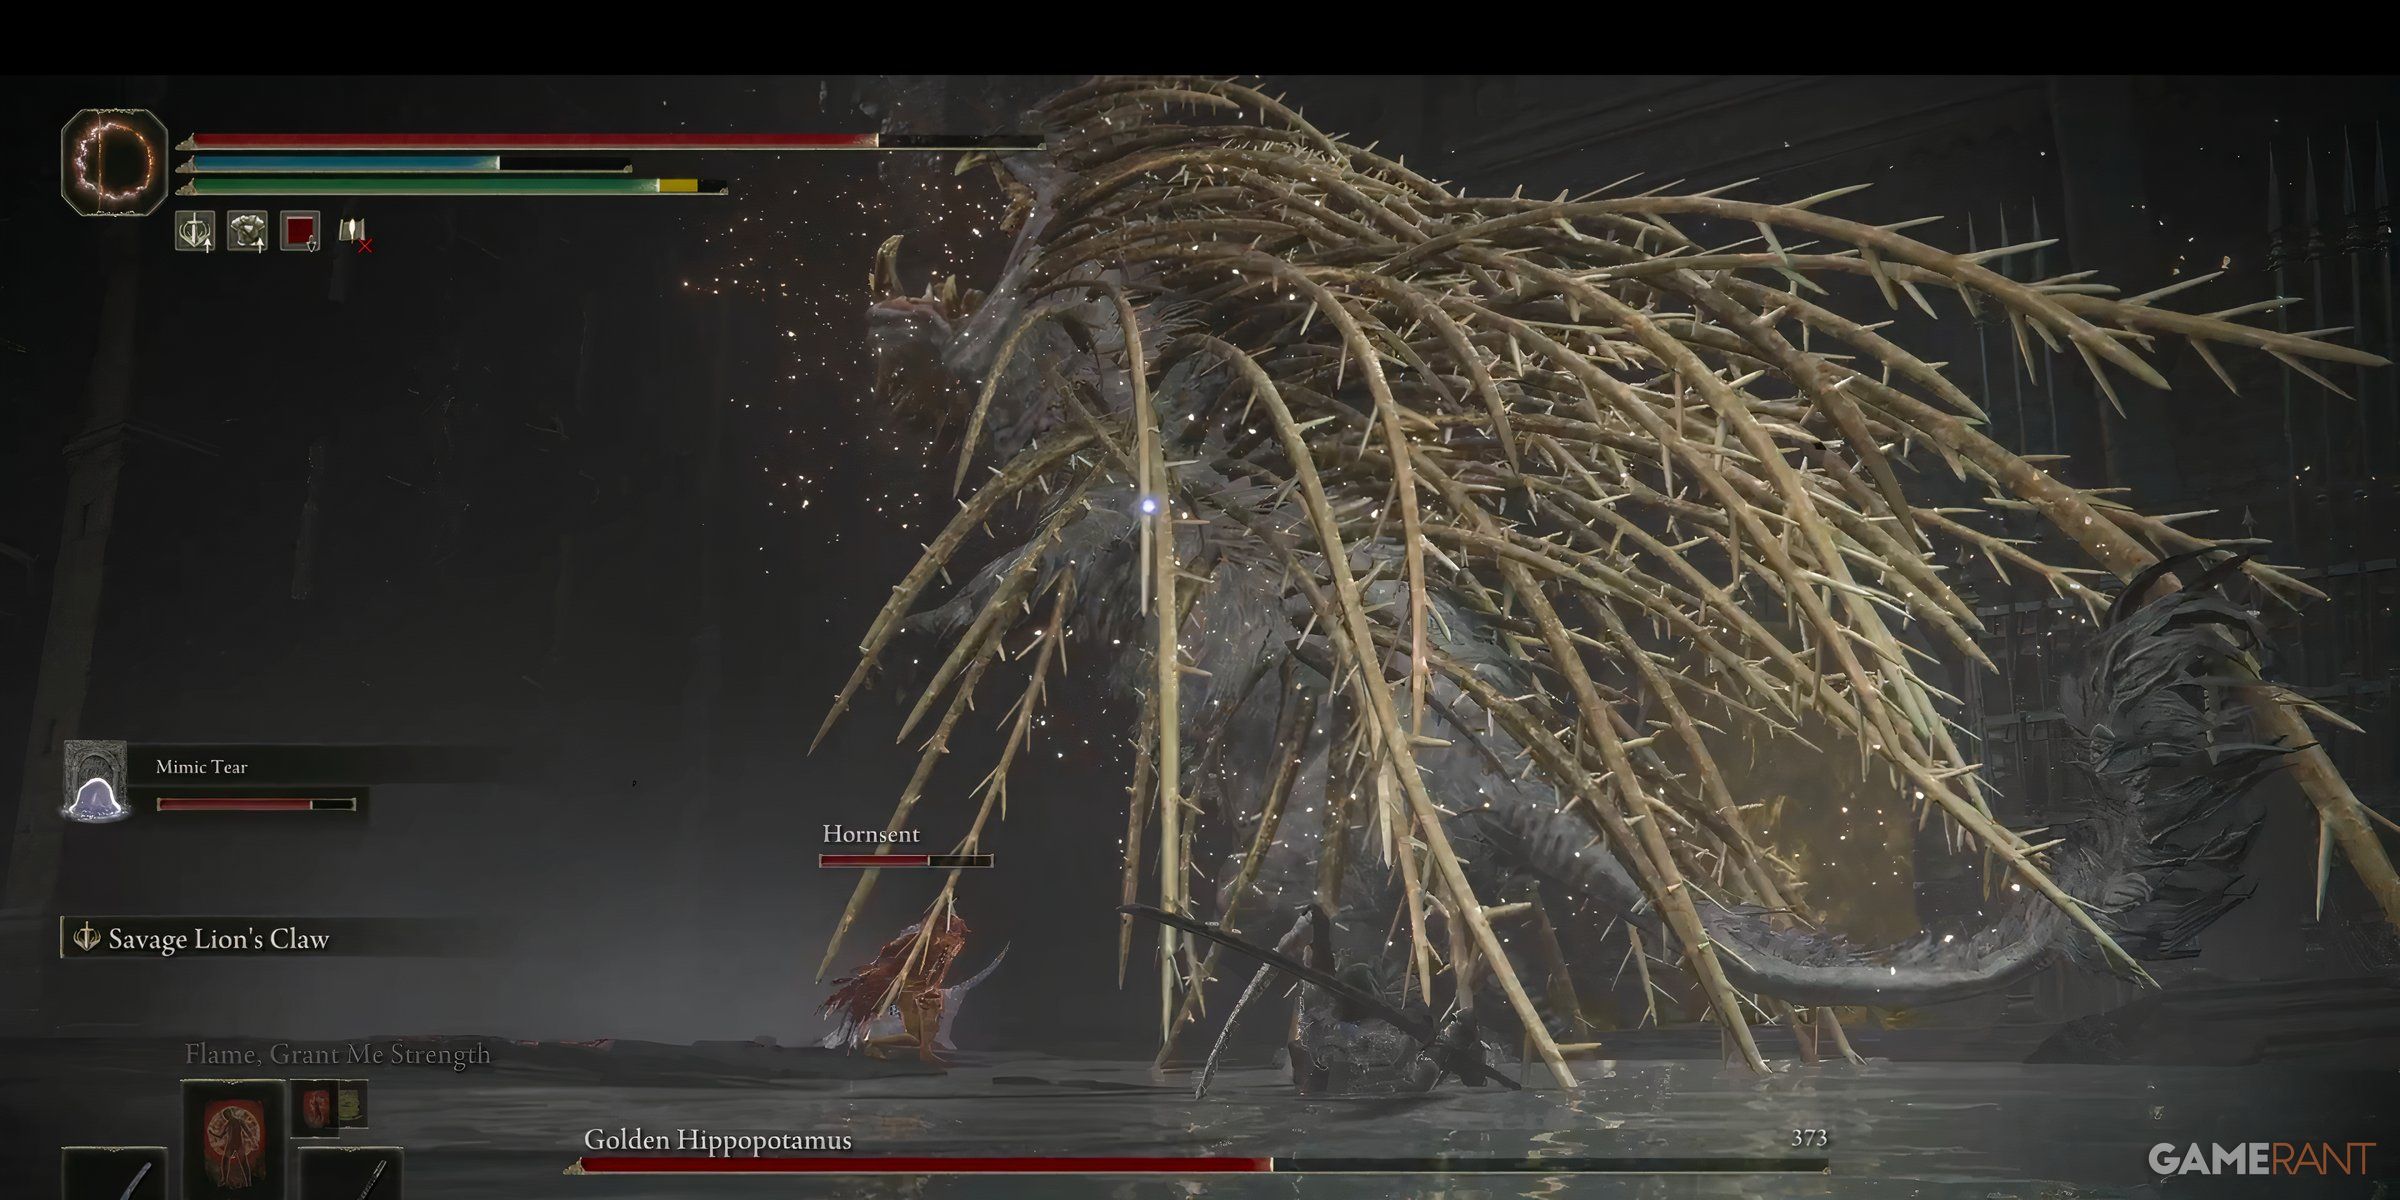
Upon arriving at the Shadow Keep, make your way up the primary elevator. Shortly after, you’ll encounter the challenging battle against the Golden Hippopotamus. Keep an eye out for the golden summon sign to call forth the Hornsent for assistance in this fight. This foe is known for its formidable strength and can quickly defeat even the most experienced Tarnished with a Scadutree Blessing of over ten. If you’re struggling, consult Game Rant’s guide on defeating the Golden Hippopotamus for additional tips. Triumphing in this battle rewards you with two Scadutree Fragments and a substantial 150,000 Runes.
Talisman of Lord’s Bestowal and Shortcut 1:

a single .
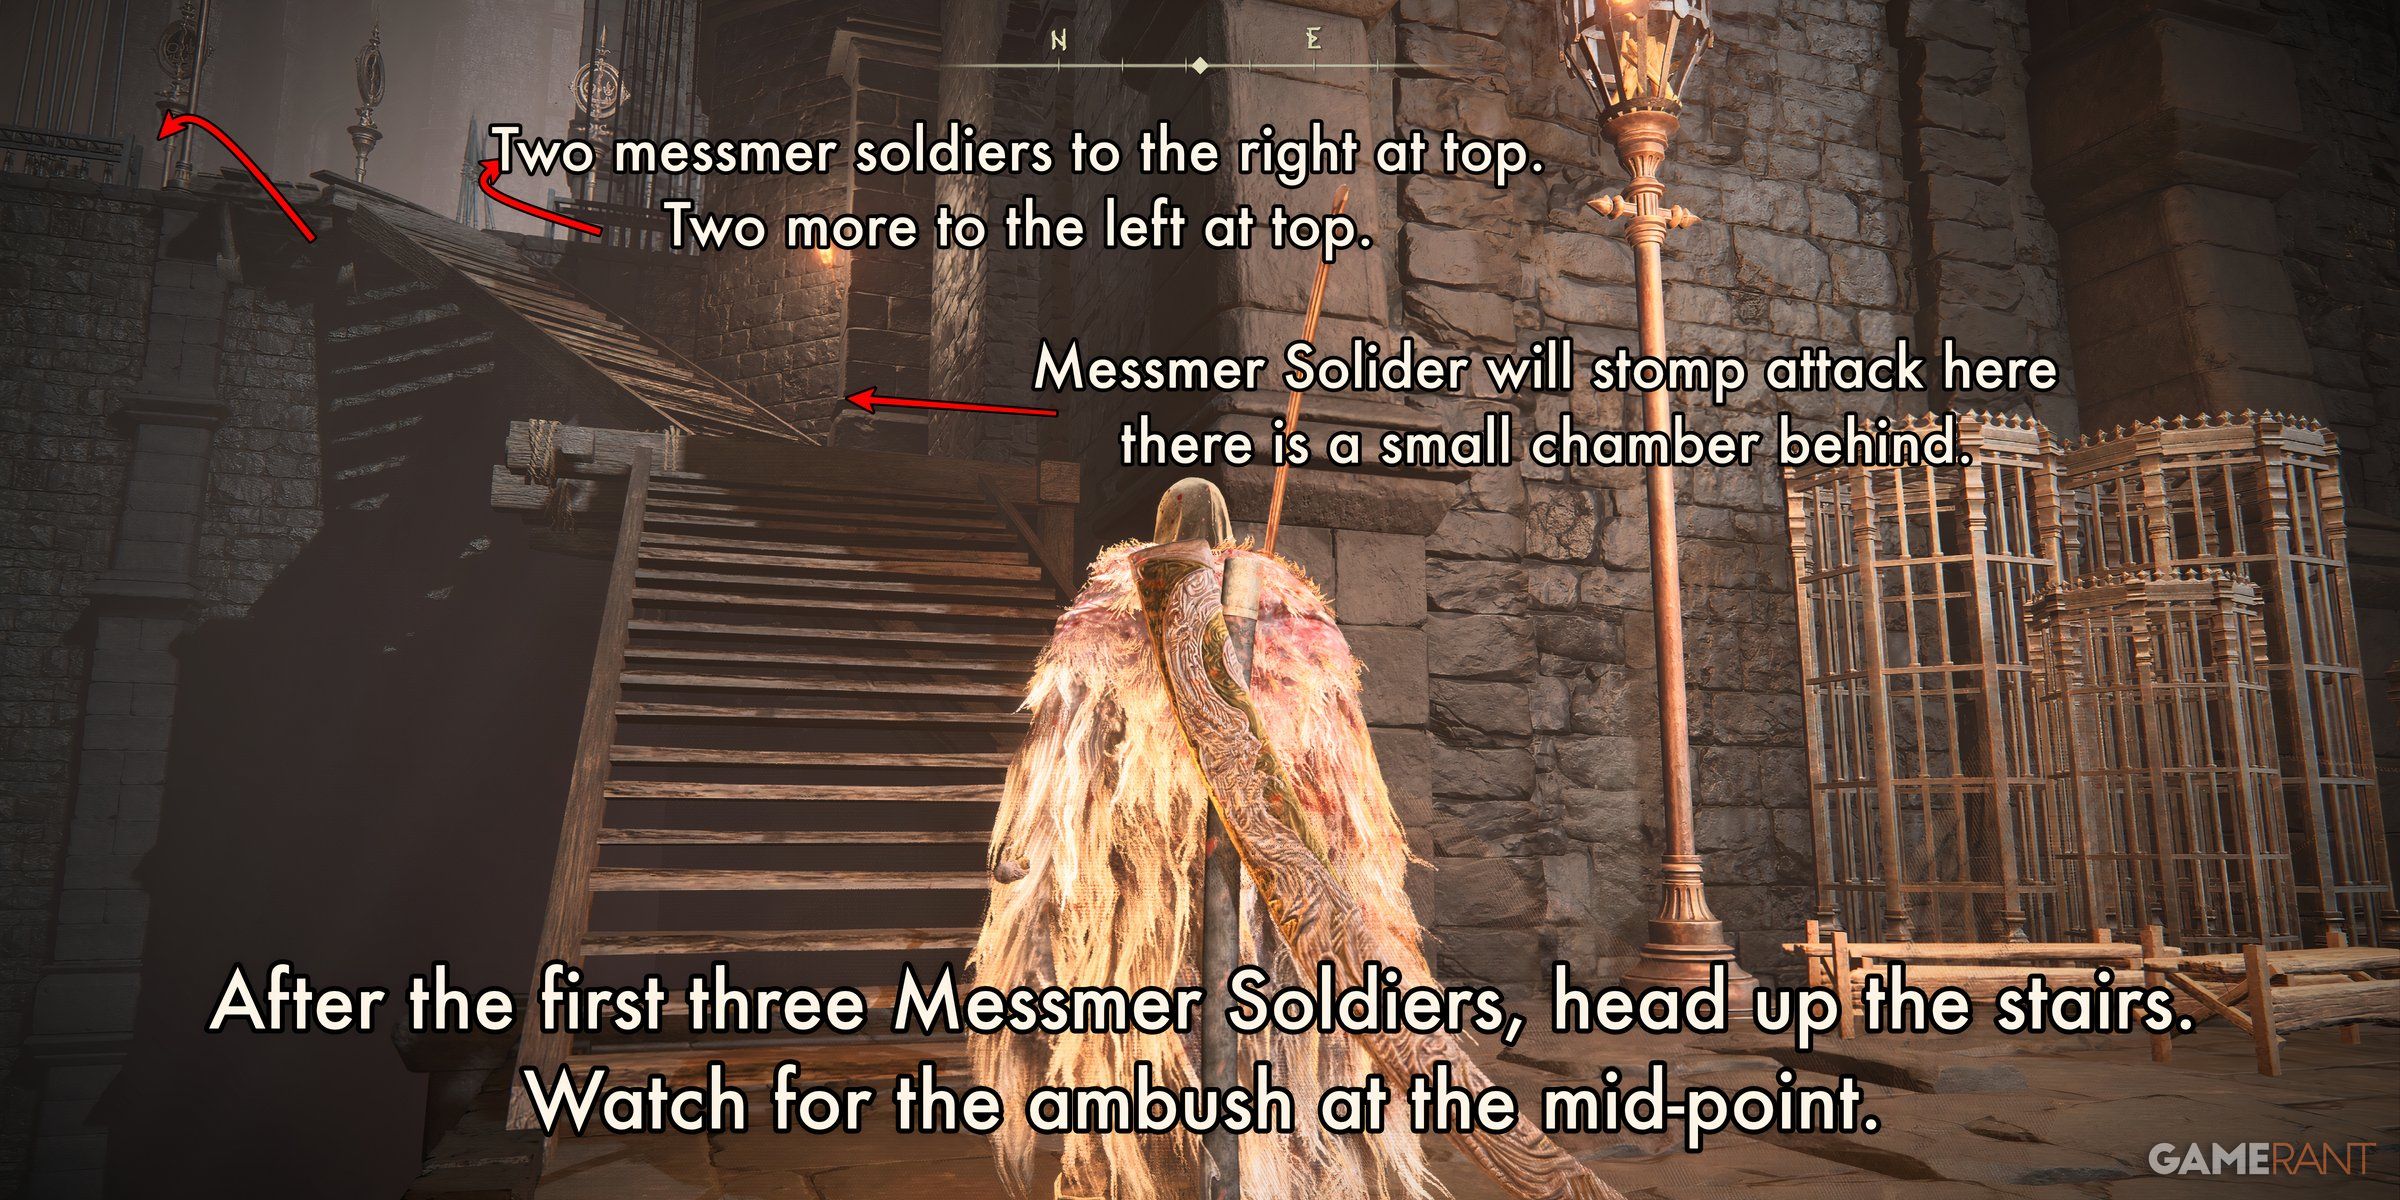
As you ascend the stairs, beware of an ambush by a Messmer Soldier around midway. They will attempt to strike with their area-of-effect stomp attack. By climbing at a deliberate pace, you can provoke this attack while maintaining a safe distance. Upon dispatching that foe, enter its former hiding spot. Inside, you’ll encounter another soldier guarding a window and a corpse yielding 6 units of loot. After eliminating the soldier, examine the window for a grand, golden tree in the distance. For now, though, focus on continuing your climb to the top of the stairs. Once there, be prepared to face two Messmer Soldiers on your right side. Eliminate them promptly and then take care of the pair behind you, standing idly at the edge of the platform. The spot where they once stood holds a dead body containing 7 units of loot.
Make your way up the staircase to reach a spacious room, home to two Black Knights. One is armed with a shield and a longsword, continuously circling around the chamber. The other brandishes a black steel Twinblade and a mace. The second Black Knight stands at the far end of the room from the entrance. Upon defeating them, retrieve a key from the former’s body near the stage, and a potion from the latter’s corpse dangling out the western wall opening. Proceed towards the golden tree next.
As a gamer, when I leave the Black Knight’s chamber, I’ll traverse a tiny bridge next. Halfway across, take a pause and peek to your left. Descend to the ground and snatch up the five loot items from the deceased figure. Now, turn around and march south, then jump off the ledge to land on the plaza with the radiant tree. A horde of Shadow Undead will welcome you there, but pay heed to the menacing Black Knight guarding the western wall. Slain him, and behind his corpse lies another body holding three additional items. Post-victory, approach the golden tree’s base and discover the coveted artifact.
Two different routes are available to leave the courtyard. The initial path lies to the south from the tree, followed by passing through an entrance leading to a wooden walkway overlooking a hidden chamber. Prior to descending into the chamber, don’t forget to retrieve the x2 located near the body. This chamber is identical to the one where you initially encountered the kneeling specter on the main path. Alternatively, you can choose the northeastern route from the tree, which takes you to another chamber featuring a Messmer Soldier and a Black Knight armed with twinblades. Search behind the large weapon rack for a body holding x4. Further north, discover a ladder that grants access to a door. This door opens into the large chamber where you previously faced two Black Knights. Exit the chamber and traverse the small bridge to resume your journey along the main path.
At the conclusion of the short bridge, there’s an option to the left where you’ll encounter a solitary corpse holding an item. Instead, make a U-turn and advance towards the expansive bridge adorned with multiple raised fire pits resembling boats. Cautiously approach as Shadow Militia lie in wait behind several of these “boats,” planning an ambush. Once you reach a substantial staircase on your left, cast a glance to the right. There, you’ll discover a sizable ramp descending to the initial significant shortcut. Traverse this ramp all the way down, encountering more Shadow Militia but nothing too formidable. Near the base of the ramp, you’ll come across another solitary corpse guarding an item. Upon reaching the terminus, open the large door and find yourself back at the Main Gate Plaza site of grace.
Hornsent Summon, Domain of Dragons Painting, and Hidden Path:
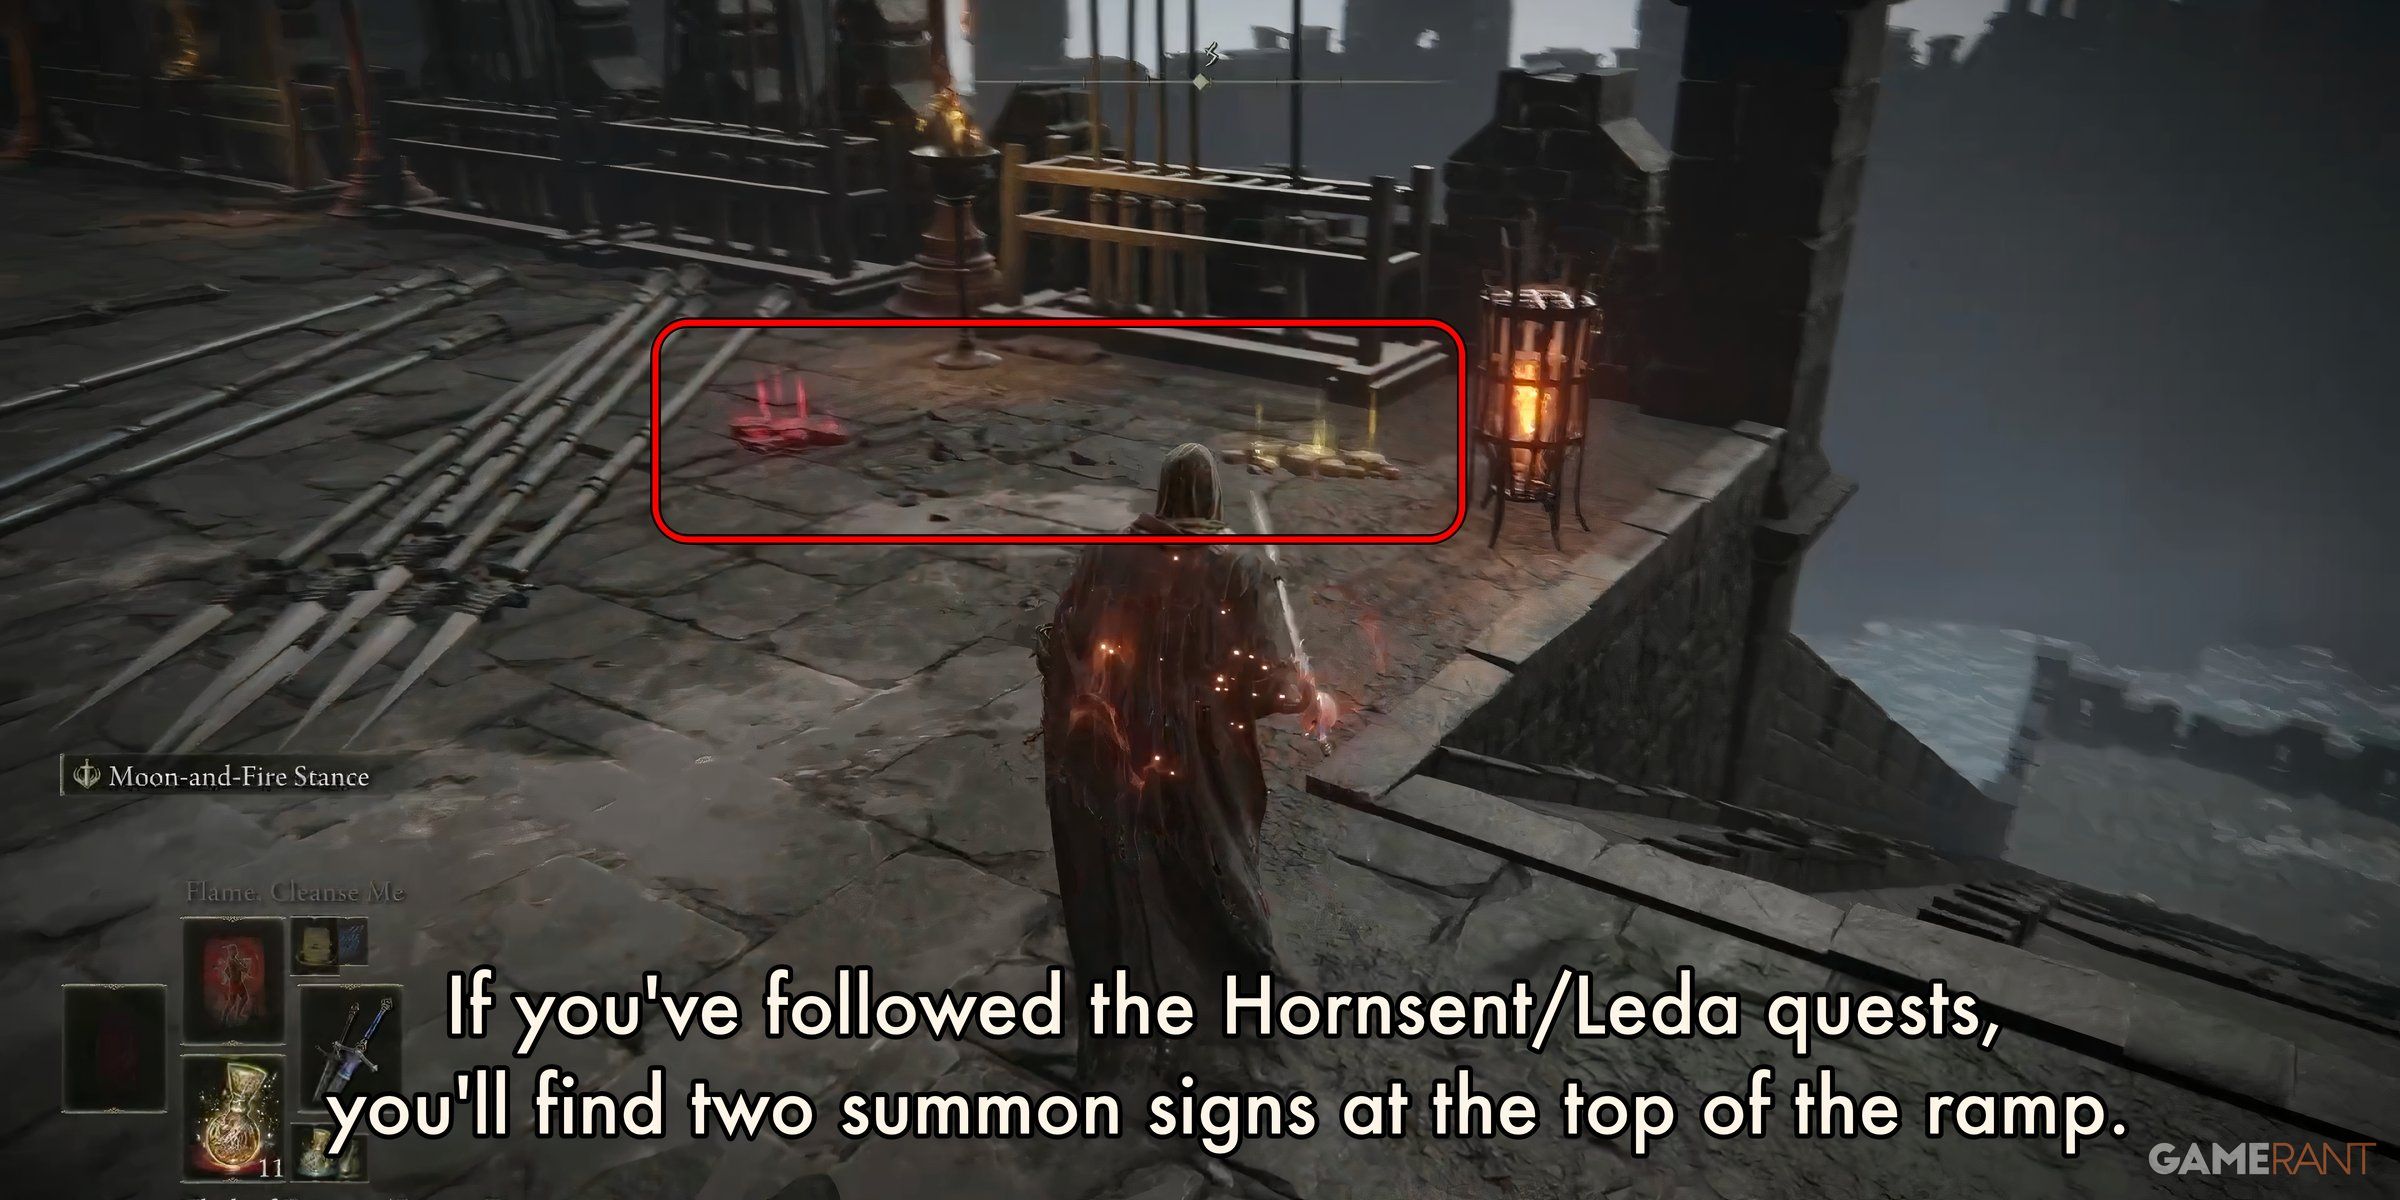
To reach the bridge with the boat pyres once more, utilize the ramp provided. At the summit of this incline, if you’ve successfully finished the Hornsent Quest within SotE, two summoning signs will welcome you. The first, a golden one, enables you to aid the Hornsent in their battle against Needle Knight Leda, granting you the reward of the and Leda’s Rune upon victory. Alternatively, the second, red sign, empowers you to join forces with Leda in her confrontation against the Hornsent, bestowing the Talisman upon your return to speak with her at the Highroad Cross site of grace.
As a fan of the game, I’d advise against killing the Hornsent here in your current playthrough. By sparing his life, you’ll have the opportunity to summon him during the upcoming boss battle with [Boss Name]. This will provide valuable assistance, making the encounter easier for you. However, if you decide to eliminate the Hornsent, keep in mind that it is the sole means of obtaining the Lacerating Crossed-Tree, a rare and powerful item. Ultimately, your decision depends on whether you prioritize acquiring this item or simplifying the boss fight during your initial playthrough.
Following your confrontation with Hornsent, you’ll go back to the bridge’s identical spot. Subsequently, proceed towards the fire-pit bridge’s base. At the bridge’s conclusion, you will stumble upon a corpse holding an item of significance (x3). As you near the end, look for a ladder on the northeastern side that leads to a narrow path beneath the bridge. Tread along the waterway, then maneuver under the small waterfall. Descend the ladder and continue on the trail, eventually reaching a tiny chamber. Upon entering this space, pay attention to the “Domain of Dragons” painting adorning the wall. Once you’ve faced the painting, turn right to discover a concealed doorway’s outline. Interact with the illusionary wall to uncover a secret passage. Follow it to its end, where you will come across a coffin. Engaging with this coffin will grant you access to the lower part of Scadu Altus, thereby expanding a substantial area of the map, and leading you to the Abyssal Woods of Shadow of the Erdtree.
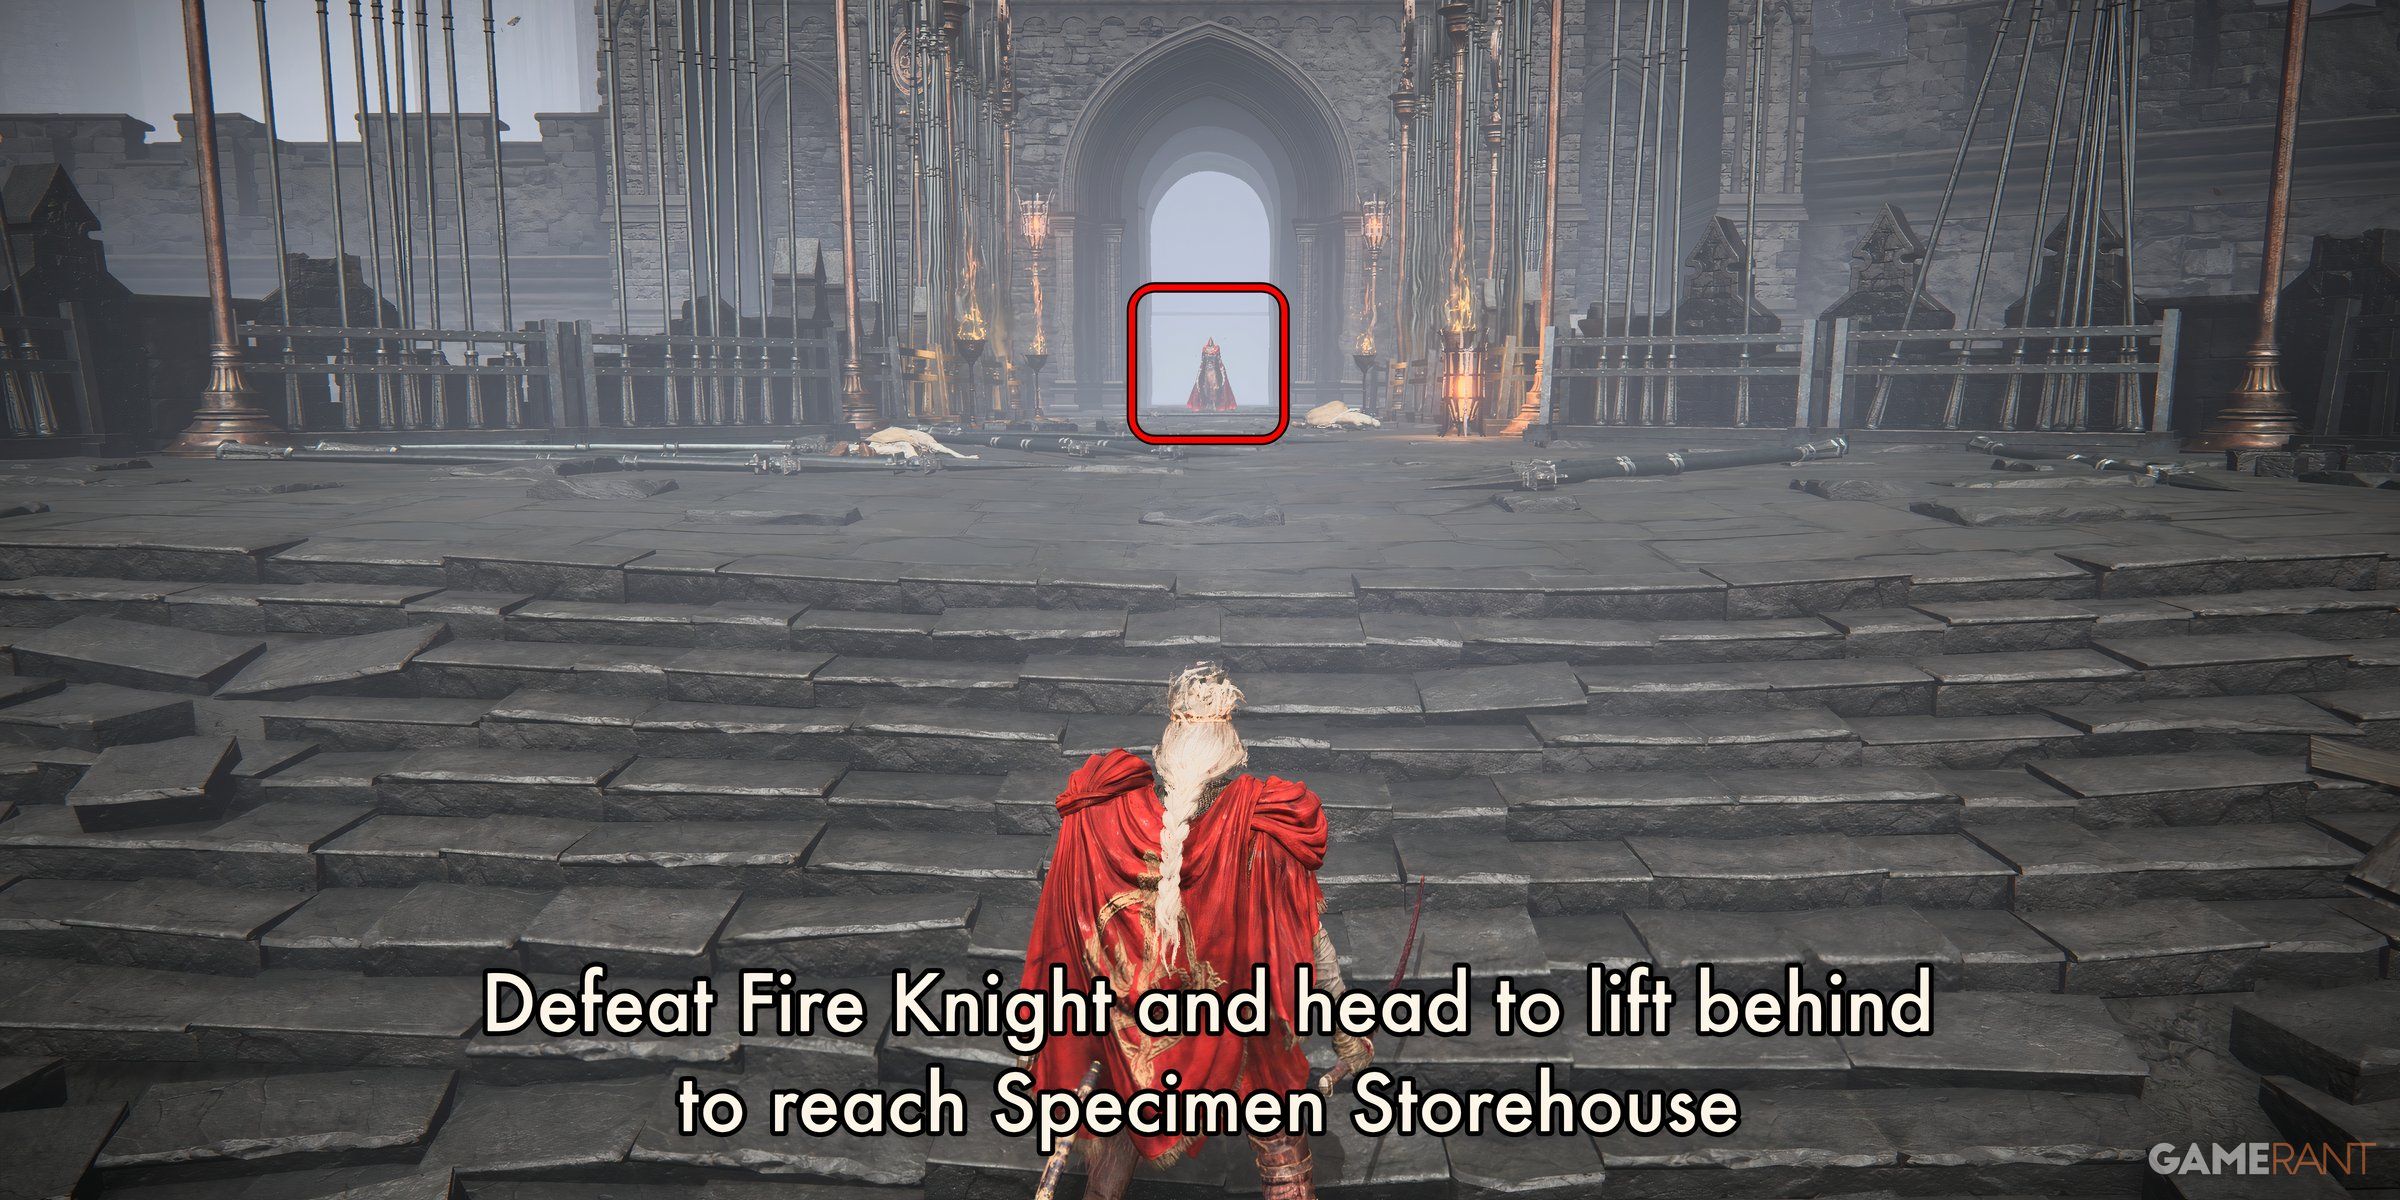
Heading back to the bridge, your options are limited as only the stairway opposite the ramp remains accessible. Make your way up this path, and you’ll come across the initial Fire Knight. Ahead of you lie two corpses, each holding eight items. Overpower the Fire Knight and proceed forward towards the lift. This will transport you to the subsequent significant area within Shadow Keep: the Specimen Depository.
Shadow Keep Walkthrough: Part 2 – Specimen Storehouse
Storehouse, First Floor:
In the vast labyrinth of the Specimen Storehouse, you’ll encounter countless numbers of Shadow Undead and Shadow Militia. Keep in mind that these enemies are ubiquitous throughout the maze-like structure. As for Fire Knights and notable enemy groups, their specific locations will be explicitly mentioned.
Beginning at the first floor of the Storehouse, your objective is to ascend to the fourth level. Keep to the left as you progress, avoiding the large wooden obstacle. A Shadow Militia soldier will emerge from there to challenge you. Ignore a chamber on your left for the moment; this is the route to the Ancient Ruins of Rauh, which we’ll explore later. Proceed down the narrow corridor on the left side of the stone structure. Another Shadow Militia soldier will jump out as you approach the turn at the end. After turning right, you’ll notice a chamber slightly opening up ahead. A set of stairs leads upwards, and a path to your left dead-ends. At the end of this path lies a deceased body holding an item worth four units. Go back and climb the stairs instead.
As you make your way up the stairs, be prepared for one of the Shadow Undead to unleash the Flame Serpent spell. This area is teeming with these adversaries, so take a moment to master the timing. At the top of the stairs, you’ll find a dead body holding an item for you to collect. Then, turn left and then right into the sunken chamber. In this room, you’ll discover another body containing three items, as well as Sir Ansbach in the back right corner, engrossed in studying tablets. Engage him in conversation, but there isn’t much else to do at present. Keep an eye peeled for the “Secret Rite Scroll,” which can be found on higher floors. Continue along the main path for now.

Leaving Ansbach’s room behind, turn right at the next junction. At this point, you will encounter a significant intersection. Taking a right turn from here leads you to a flight of steps and encounters with Shadow Undead and Shadow Militia. This path is the primary route. Alternatively, if you prefer, keep going straight to locate the first Fire Knight on this level. He stands guard over a corpse bearing a reward of x5. Return to the stairs afterwards to ascend to the second floor.
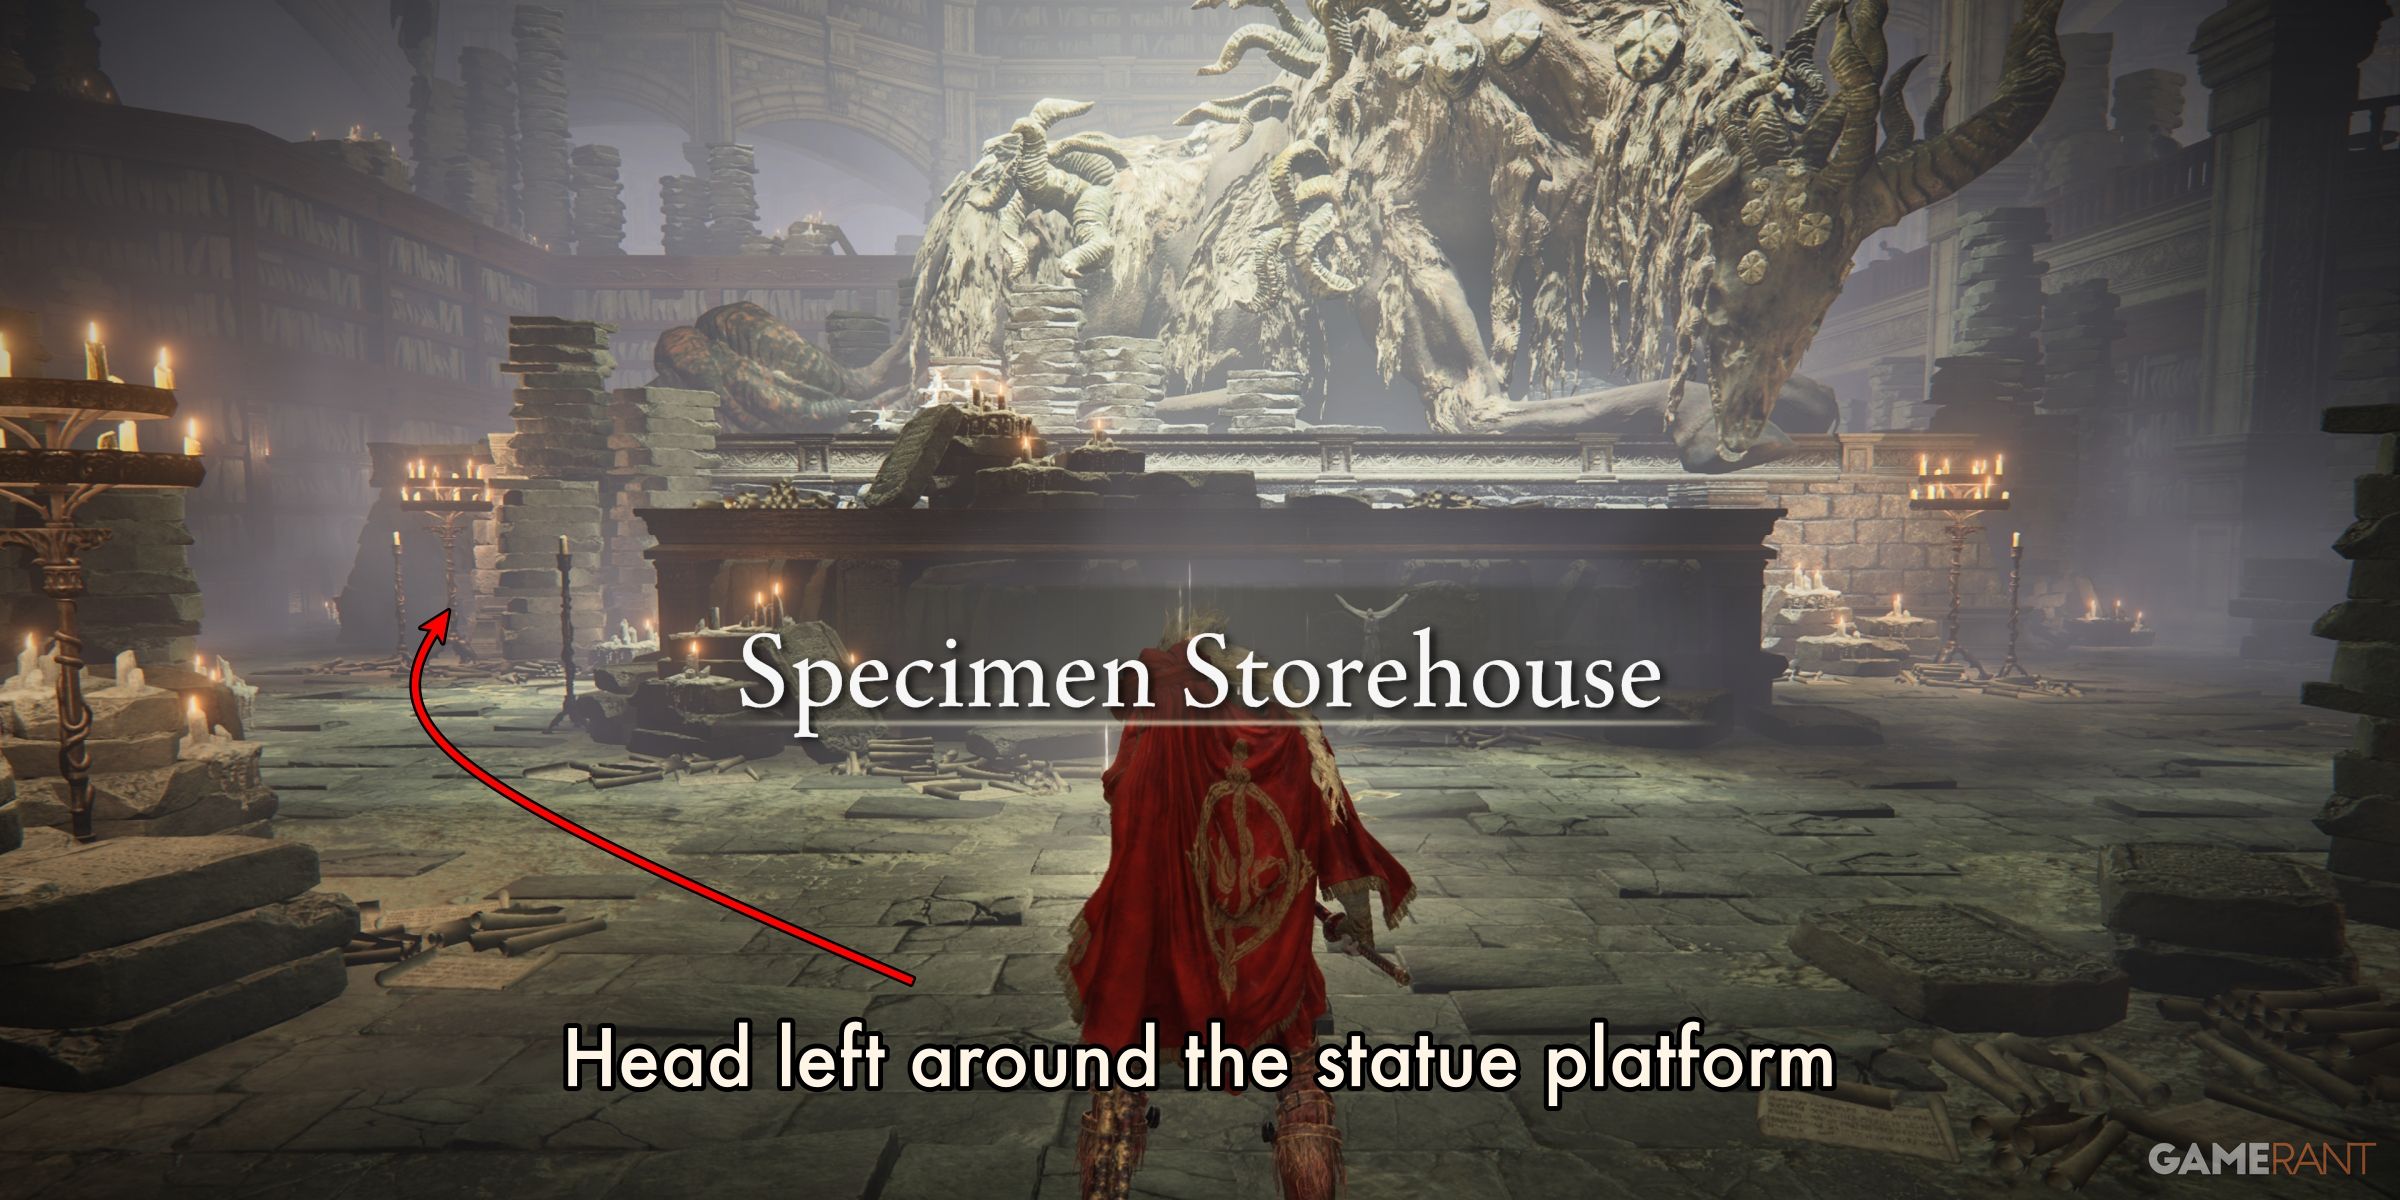
Revered Spirit Ash 1 and Boltdrake Talisman +3:
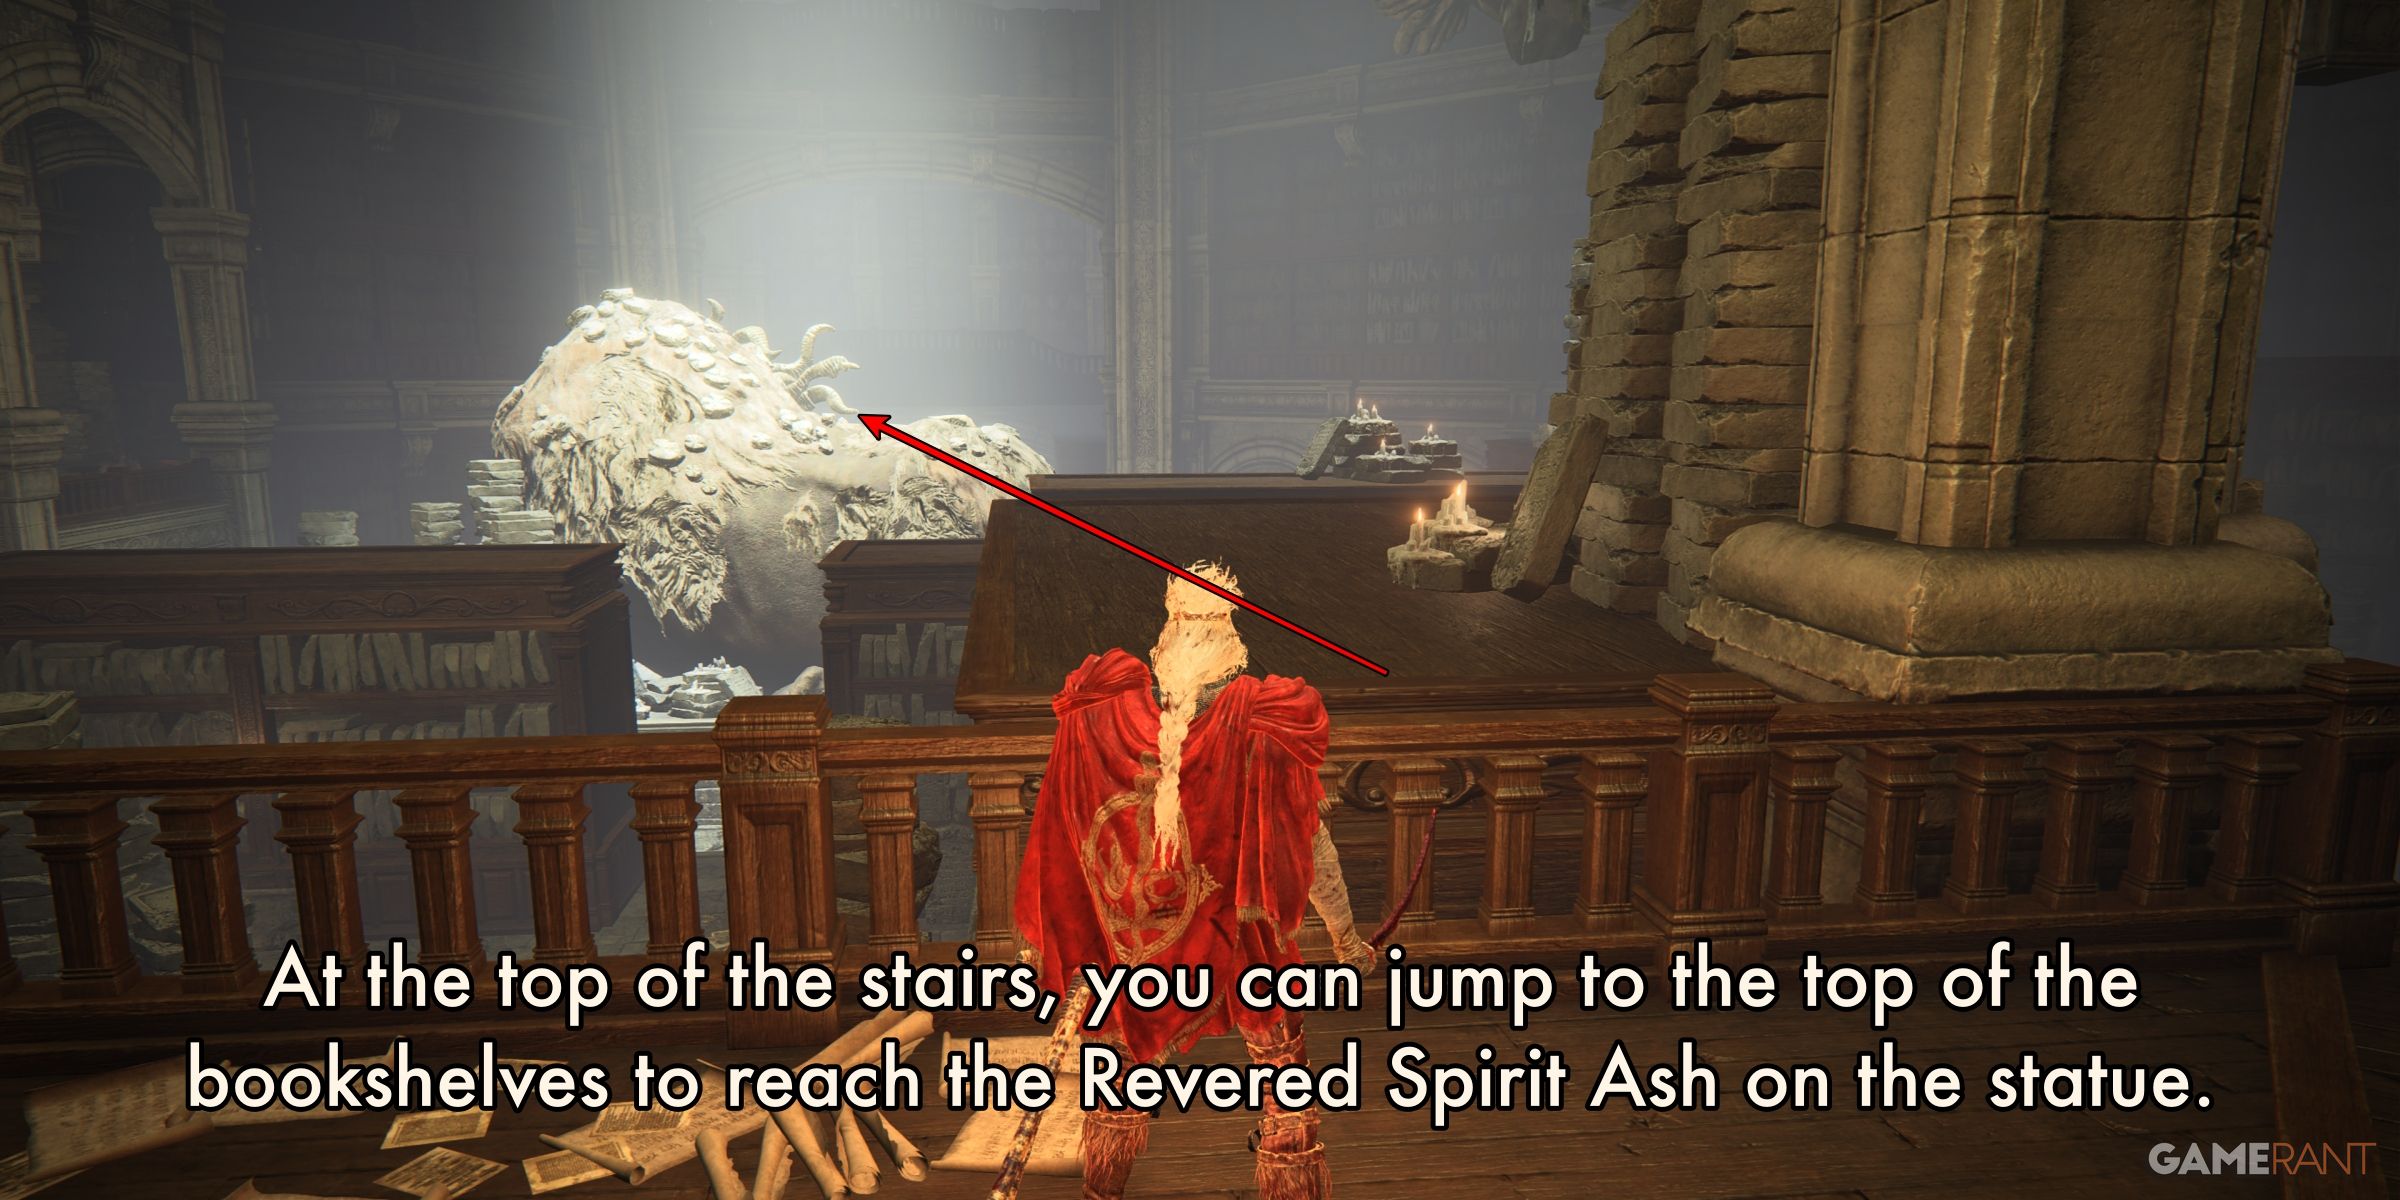
Prior to advancing onto the primary route, feel free to spend some extra time on the first floor and gather two exceptional items located there. Upon ascending the staircase leading to the second level, promptly veer right once you reach the top. You’ll notice an opportunity to leap onto the bookshelves that border the first floor. Traverse from shelf to shelf until you reach the creature situated on the central platform. Your final bound will be towards a slower bookshelf, which is adjacent to the platform. Utilize the piles of tablets to gain access to the beast’s backside. Reach the summit of its head to uncover a hidden treasure. Afterward, return to the second floor and ascend the staircase once more.
At the peak of the staircase, keep to the right side and proceed past the initial set of minor stairs on the left. Go all the way down this passage until a Shadow Undead emerges from an eastern platform, shooting Flame Serpents at you. In response, leap over the railing into the chamber below to avoid its attacks. At the end of one of the two large wooden blocks in the new room, you’ll find a deceased person holding a talisman. Once obtained, head to the northwest wall of the chamber and locate a lever. Activate the lever to lower the barrier ahead and return to the main chamber. Reascend the stairs to resume your journey on the upper floor.
Reaching Storehouse, Fourth Floor:
There are two options for reaching the third floor from the second floor landing: 1) Turn left at the top of the stairs and ascend the larger set of steps that lie directly ahead, accompanied by four additional steps against the wall on your left. Or, 2) Continue right along the pathway and take a left turn up the smaller staircase, which will lead you to the opposite end of the platform and another set of steps leading to the third floor. Note that in the middle section of both staircases, a Fire Knight is stationed.
To reach the third floor, proceed up the staircase with care, turning right once you reach the top. There, you’ll come across a Fire Knight stationed by a railing, gazing out into the chamber. Alternatively, if you opt for the western route, make your way through the chamber entrance where you’ll encounter several Shadow Undead and a guarding a Beast Horn. Afterward, retrace your steps and follow the main path to the east. You’ll discover an item on a deceased body at its conclusion. With this acquired, feel free to proceed to the central area, where the Fire Knight was previously located. Keep in mind that this adversary will face you regardless of your approach, so it’s advisable to charge forward aggressively.
After defeating the Fire Knight, focus your attention towards the focal point of the room. There, you’ll notice various dangling items, among which is one that resembles a human figure. Look closely and you’ll discover a marker indicating an item. Although you can’t retrieve it now, remember its location for later. You’ll be returning to claim the Pearldrake Talisman +3. In the meantime, gather the loot from the fallen adversary on the trail, then proceed southwest past the human feet. At a later stage, you will leap onto those feet and ascend the statue to reach the fourth floor. For those eager to delve deeper into the exploration, continue beyond them.
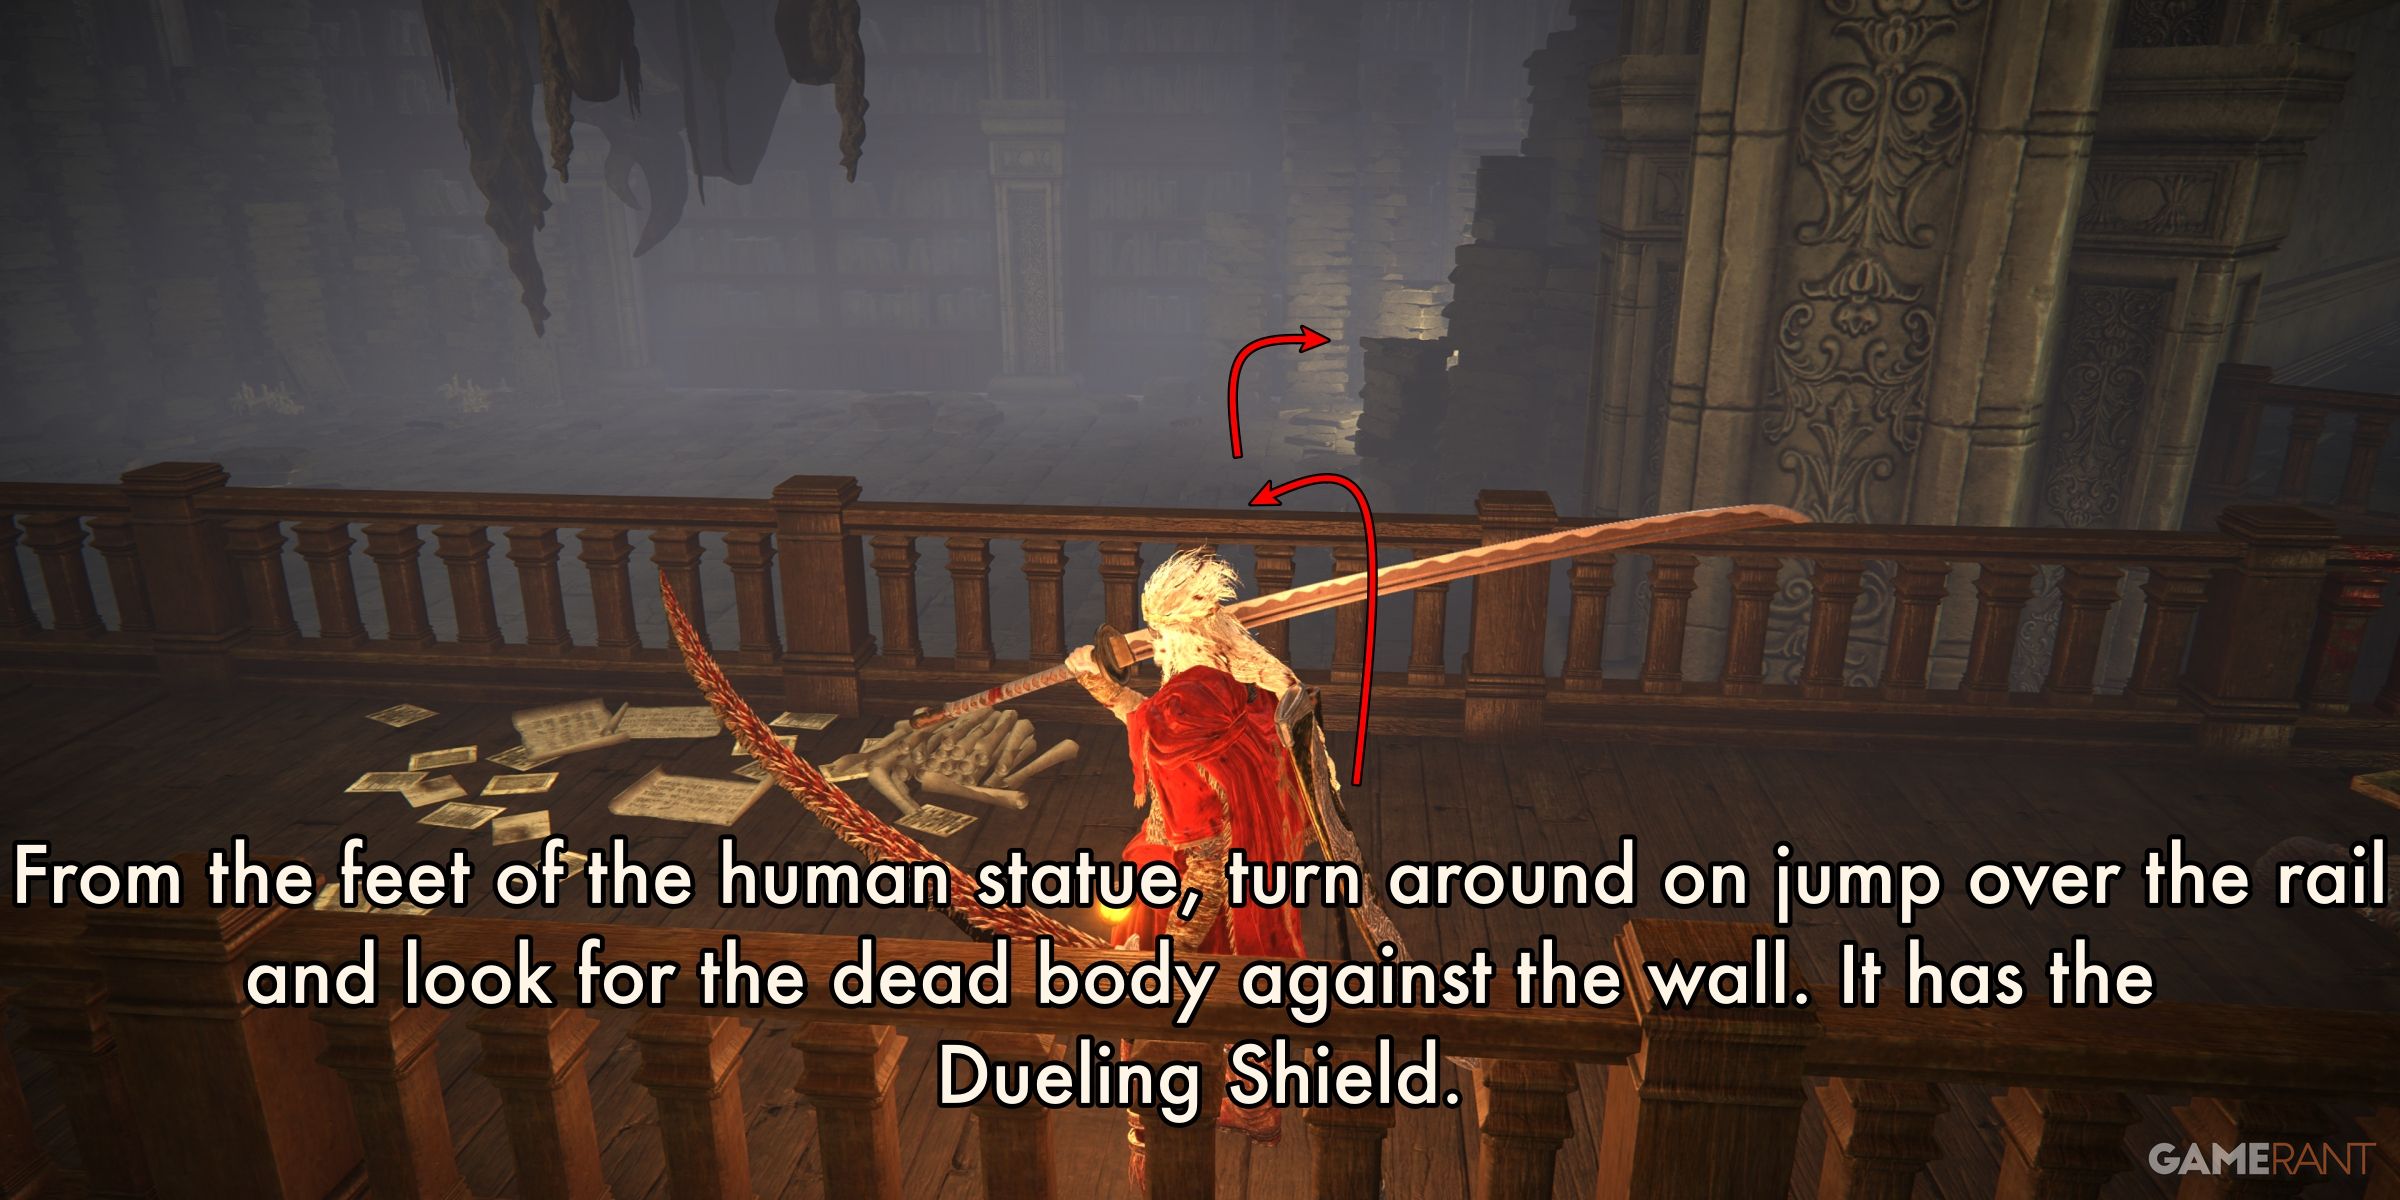
As you continue your journey along the path, you’ll eventually come across a room with a Fire Knight and additional Shadow Undead and Shadow Militia guarding it. Before reaching this chamber, you’ll encounter a deceased body where you can pick up two items. At the far end of the room, you’ll discover another Beast Horn, this time in a quantity of four. Afterward, make your way back to the statue’s base. Prior to advancing to the next level, search for a small concrete ledge situated on the opposite side of the railing. Jump to the ledge and descend to the platform it connects to. Upon arriving at this platform, you’ll find another item against the wall on the right side, which is also a dead body.
Return to the statue suspended above. Jump with care to its base, then ascend its legs and torso. Be cautious and make a leap from its head to the platform up top. Note that there’s a narrow space between the head and the railing, so avoid attempting to walk across it; falling would be fatal. Upon landing, you’ll come across Miquella’s Cross and the Fourth Floor site of grace in the Storehouse.
Now, let’s incorporate the Ancient Ruins of Rauh into our journey on the First Floor. These ruins hold valuable items that can benefit us later, making it a worthwhile detour. Adding this section to our exploration now ensures we have access to Rauh when it becomes necessary in the future.
Path to the Ancient Ruins of Rauh:
As an avid explorer, I’d be happy to guide you through one of the intriguing detours in this captivating world. Heading out from the first floor of the Specimen Storehouse, you’ll find a hidden path that beckons towards the Ancient Ruins of Rauh. Feel free to embark on this adventure before or after completing the rest of the storehouse exploration. Keep in mind that you’ll need to follow this trail eventually for the main storyline, so the choice is yours: explore now or save it for later.
Upon leaving the elevator, I come across a crossroads: straight ahead or right turn. Choosing the right path continues my journey along the main route. If I opt for the left, however, I’ll encounter an unsettling sight at the end of the hallway: a deceased body with an intriguing item nearby. Proceed with caution as you enter the small room; beware of the lurking Warrior Jar that lies in wait to ambush from behind once you’ve turned the corner. After dealing with this unexpected challenge, rejoin the main path.
a descending staircase and what seems like an impasse. A Jar Innards will ascend the stairs once you enter the room. Eliminate it, then explore the dead end. The western wall is, in fact, a false wall. Hit it to disclose another item on a deceased body. Return to the stairs and proceed to the lower level.
As a gamer, I’d describe it like this: At the foot of the stairs, two Jar Innards pop out from their pots. Grab them both and proceed left into the vast chamber. On your left, you’ll come across a stronger variant of a Jar Innard guarding the entrance. He’s accompanied by two Living Jars. To the side of a wooden altar, there’s a bonfire where you can rest if needed. Facing west, I recommend heading to the far end of the room. You’ll encounter more Living Jars and another Jar Innard along the way. Once you make it through the chamber entrance, be prepared for yet another Jar Innard trying to ambush you. Descend either staircase leading out of this room to discover a new large chamber. Here, there are only four Living Jars roaming around. To the west, you’ll find the West Rampart site of grace, which is perfect for healing up before continuing your adventure.
After taking a respite at the site of grace, head westward until you encounter a grand entrance. Initially, it may appear impassable. However, you’ll soon notice a smaller door to its right. Exiting through this door will lead you outside where you’ll find yourself on a vast bridge. As you progress westward, you’ll encounter groups of Giant Bats. The first pair guards the remains of two individuals, each with valuable loot. After dealing with these bats and collecting their offerings, you’ll face an assault from Salza, a miniboss Fire Knight located at the bridge’s end. Eliminating Salza will reward you with a precious incantation. Once claimed, you may revisit the bodies on the bridge, which contain items: 8, 1, 5, and 2.
Enter the chamber after Salza, and you’ll find a single Somber Smithing Stone. Take the elevator up to the top of the tower, and you’ll find the Viaduct Minor Tower site of grace. Return here anytime to access the Ancient Ruins of Rauh.
Storehouse, Fourth Floor:
As you ascend to the fourth floor, don’t forget to pick up the “Storehouse Cross Note” and the “Scadutree Fragment.” These items are situated close to the Storehouse Cross. The note is essential as it indicates a hidden part of the Shadow Keep that cannot be accessed through your current route. For your journey towards Messmer, this information isn’t relevant. However, the flooded Church District holds significant importance in the game and will be discussed in further detail later in this guide.
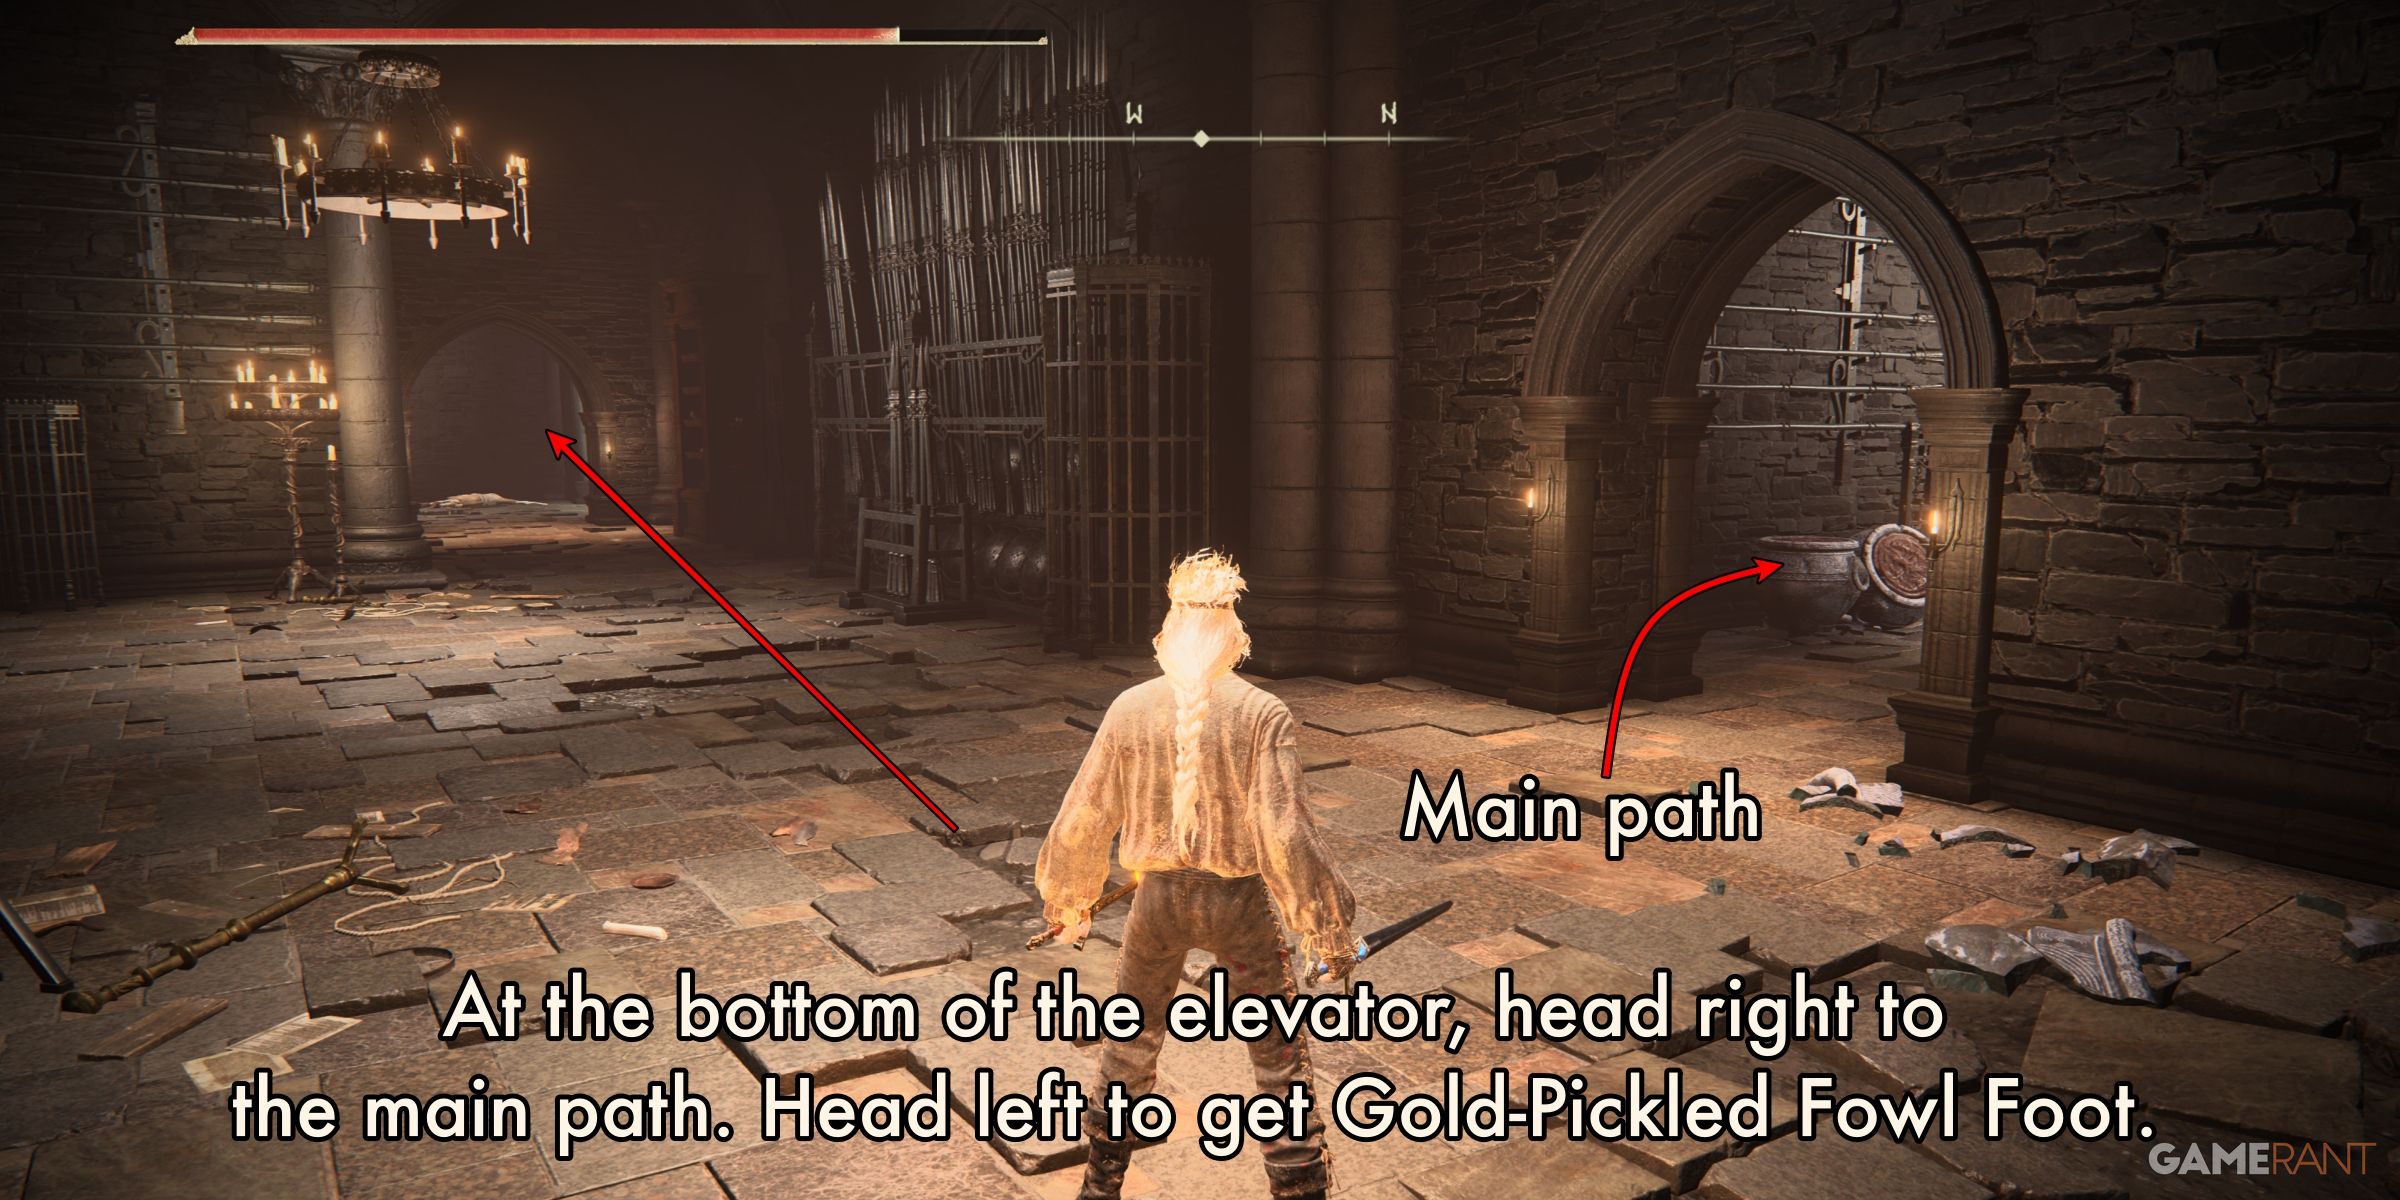
As a dedicated fan of this captivating game, I’d be happy to guide you through the next steps in your adventure! After gathering the essential items and activating the site of grace on the fourth floor of the Storehouse, make your way outside via the sole exit. To your right lies the remains of a fallen comrade, guarding x3 precious items. Turn around and brace yourself for an encounter with a Fire Knight further ahead. Be prepared as this formidable foe will unleash a new ranged attack, sending a powerful blast your way. Swiftly roll to bypass this assault before engaging in combat. Once victorious, proceed to the dead body at the foot of the stairs for x4 more valuable acquisitions.
Instead of going back to Ansbach with the Secret Rite Scroll before locating Freyja on the upper levels of the Specimen Storehouse in our gameplay experience, we followed this sequence: We didn’t hand over the Secret Rite Scroll to Ansbach until after discovering Freyja on the elevated floors. Unfortunately, we couldn’t finish her quest following that approach.
Leaving the chamber behind, make a right turn at the stairs’ end to discover a treasure on a corpse. Retrace your steps and resume your journey along the path. Soon, you’ll encounter a door on your left that connects to the main path. A short distance beyond lies more Giant Bats and two deceased individuals. The first body holds six items, while the second contains three. Instead of continuing straight, enter the newly discovered door.
Freyja and Revered Spirit Ash 2:
In the freshly discovered room, take a left turn and obtain 2 items from a corpse leaning against the wall. Then, go back and move northwest along the passageway. The initial collectible lies to your right, next to a dead body against the wall. Further ahead, you’ll face a Fire Knight. Defeat it and look behind to discover another corpse holding 3 items. Continue your journey northwest, and soon you’ll reach the first set of stairs. Ascend to the summit, gathering the loot from the dead body located at the top. Upon reaching the top of the stairs, consider your next move among the following three possibilities:
- Go straight into the chamber ahead. You’ll encounter a Fire Knight and three pesky Shadow Undead that use Fire Serpent. You’ll first begin to hear Freyja’s voice here, but she is found on a higher floor. Near the Fire Knight, you’ll find a rare crafting material.
- Go up the stairs: At the top of the stairs, you’ll find Redmane Freyja’s chamber to the southwest. Speak with her, and exhaust her dialog. There is a site of grace right in front of her that you can use to return to after traveling back to Ansbach and giving him the Secret Rite Scroll. It’s better to do this after you complete the final step listed in the next bullet point, as you’ll want to return to the first floor for another reason. If you do everything correctly, Ansbach will give you a letter to return to Freyja. After speaking with Freyja, exit the chamber, and you’ll see a dead body with x2. Continue east along the same path, and you’ll see a large horse-like statue hanging from the ceiling. You can jump onto the back of the statue, where you’ll find a . Once done, you can drop from the statue to be further along on the third path.
- Head to the Right of the Stairs: This is the main path. Head to the right of the stairs that lead up to Freyja, or drop to the path from the horse-like statue. Head south to the end of the path where you’ll find a lever. Pull the lever and the entire group of hanging statues in the center of the chamber will move, creating a path forward.
Pearldrake Talisman +3:

After moving the central statues, you can now reach the object that was previously hidden under the human statue’s head. Return to the ground level via Fast-Travel. Proceed to the third floor, returning to the area where the Fire Knight stood with a vacant gaze in the main chamber. Retrieve the Fire Knight once more and then advance westward past the large pile of stone tablets. The statue has been repositioned, enabling you to grab the accessible item and receive .
Reaching Messmer the Impaler:
Go back in time to the area of tranquility close to Freyja’s site. Upon leaving, glance over the edge and locate the long platform you must reach. Descend one level and leap onto the platform jutting out from the center. Continue along the platforms until you come across the final horse-like statue. Climb up its back and jump to the platform that follows. Exit through the western door. Upon leaving, pay attention to the Statue of Marika. Take a right turn and ascend the nearby stairs. At the summit, take a left turn, and you’ll find a bridge leading to a tower on the left and an entrance back into the storehouse on the right. If you venture through the entrance, you’ll encounter some Shadow Undead and a corpse with loot x3. Return outside and cross the bridge instead.
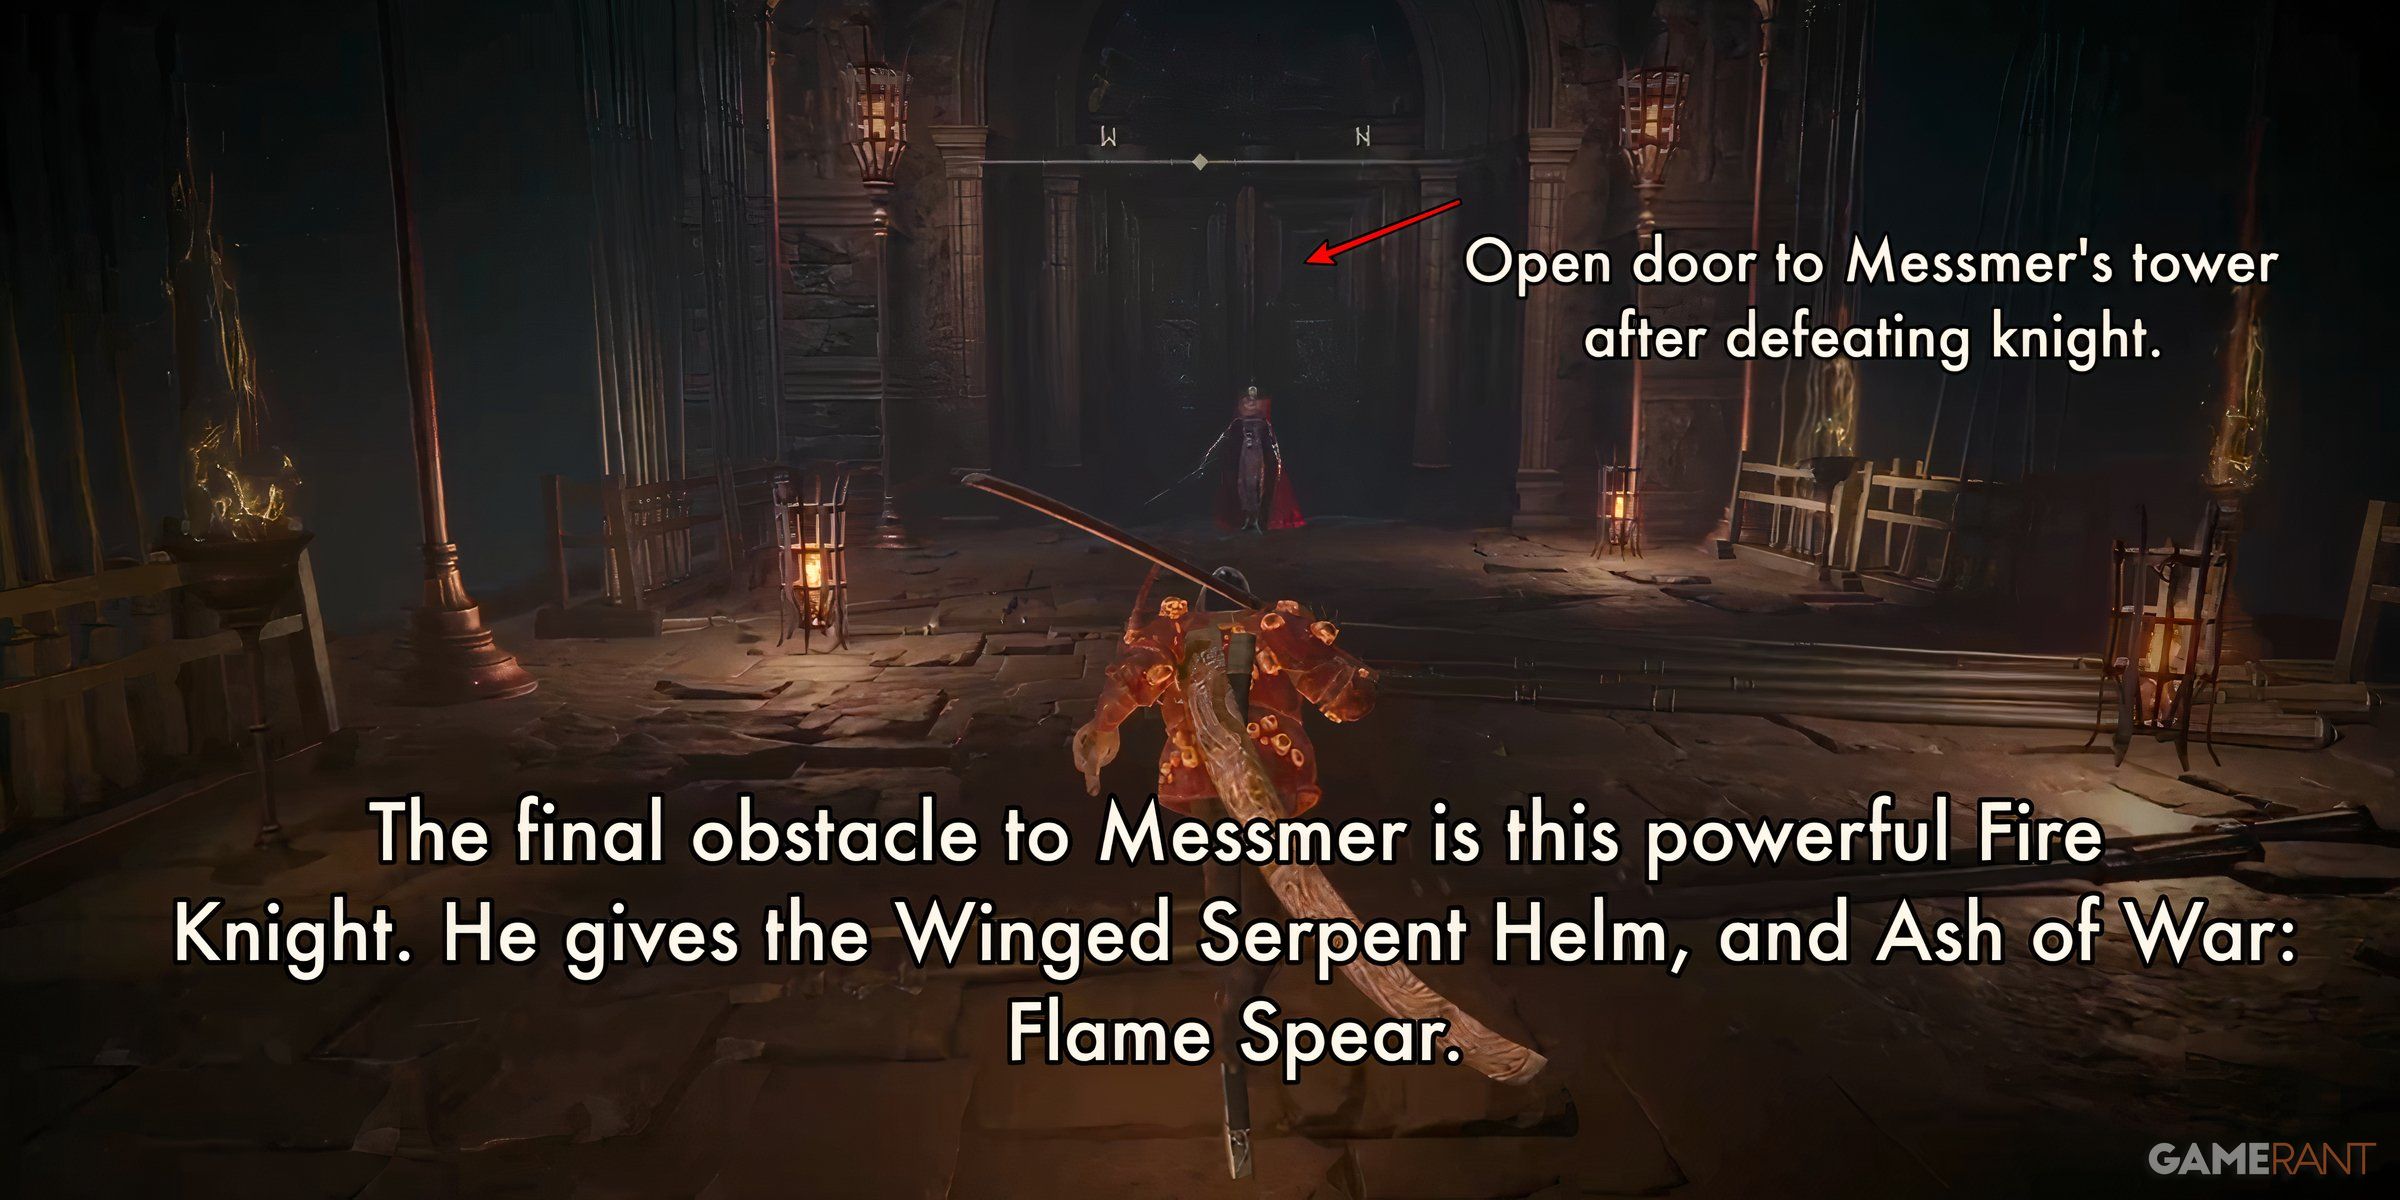
Before reaching Messmer’s tower, there is one last Fire Knight for you to overcome. Triumphing over this knight will reward you with not just one but two significant items. Upon entering the tower, you’ll come across a statue of Marika, headless and bearing an ominous presence. The only task remaining is to unlock the final door leading to Messmer’s Chamber.
Shadow Keep Walkthrough: Messmer the Impaler
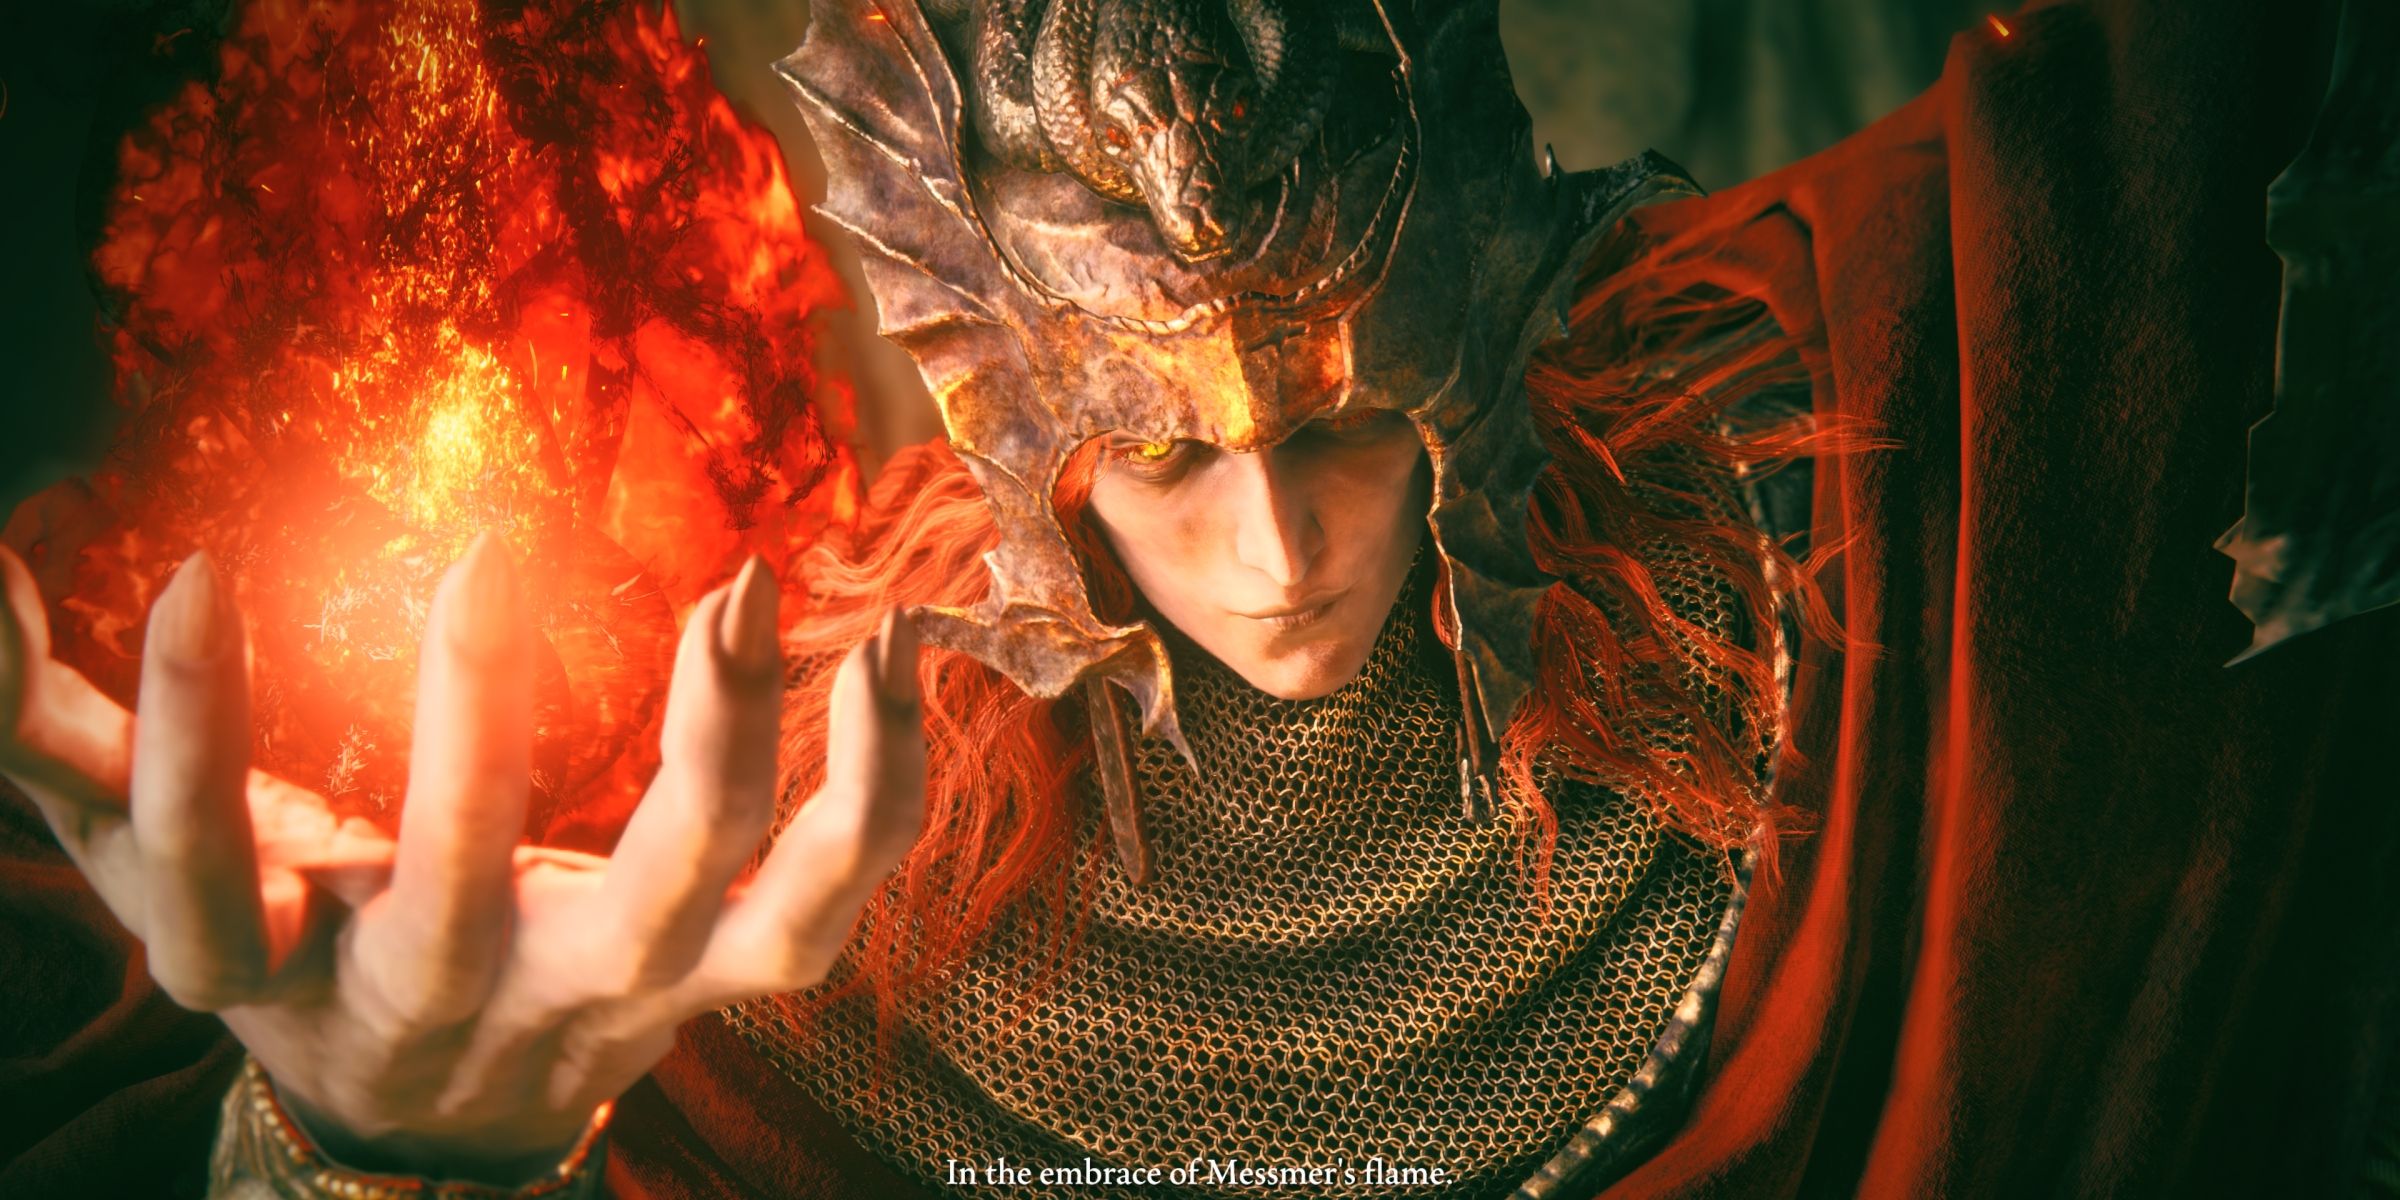
As a devoted fan of Shadow of the Erdtree, I can’t help but reminisce about the unforgettable encounter with Messmer. This battle is more than just a boss fight; it’s a thrilling spectacle. The first phase of the confrontation has Messmer primarily utilizing his spear, making for a formidable foe, especially if you’re fighting him alone. However, if you’ve followed his quest, you can call upon the mighty Hornsent to aid you within the arena itself. Having this summoned ally takes a significant amount of Messmer’s aggression, making the battle more manageable. Additionally, summons like the Mimic Tear or other high-level spirit ashes can be invaluable allies during this encounter, significantly easing the challenge.
In the second phase of Messmer’s battle, things become significantly more chaotic as a colossal serpent joins the fray. Given that Messmer appears vulnerable to bleeding effects, wielding the newly acquired Great Katanas would be an effective strategy. For those finding it difficult to overcome Messmer the Impaler in Shadow Keep’s main boss fight, consider consulting Game Rant’s comprehensive guide on defeating him.
Shadow Keep Walkthrough: Part 3 – Church District
How to Reach the Shadow Keep Church District:
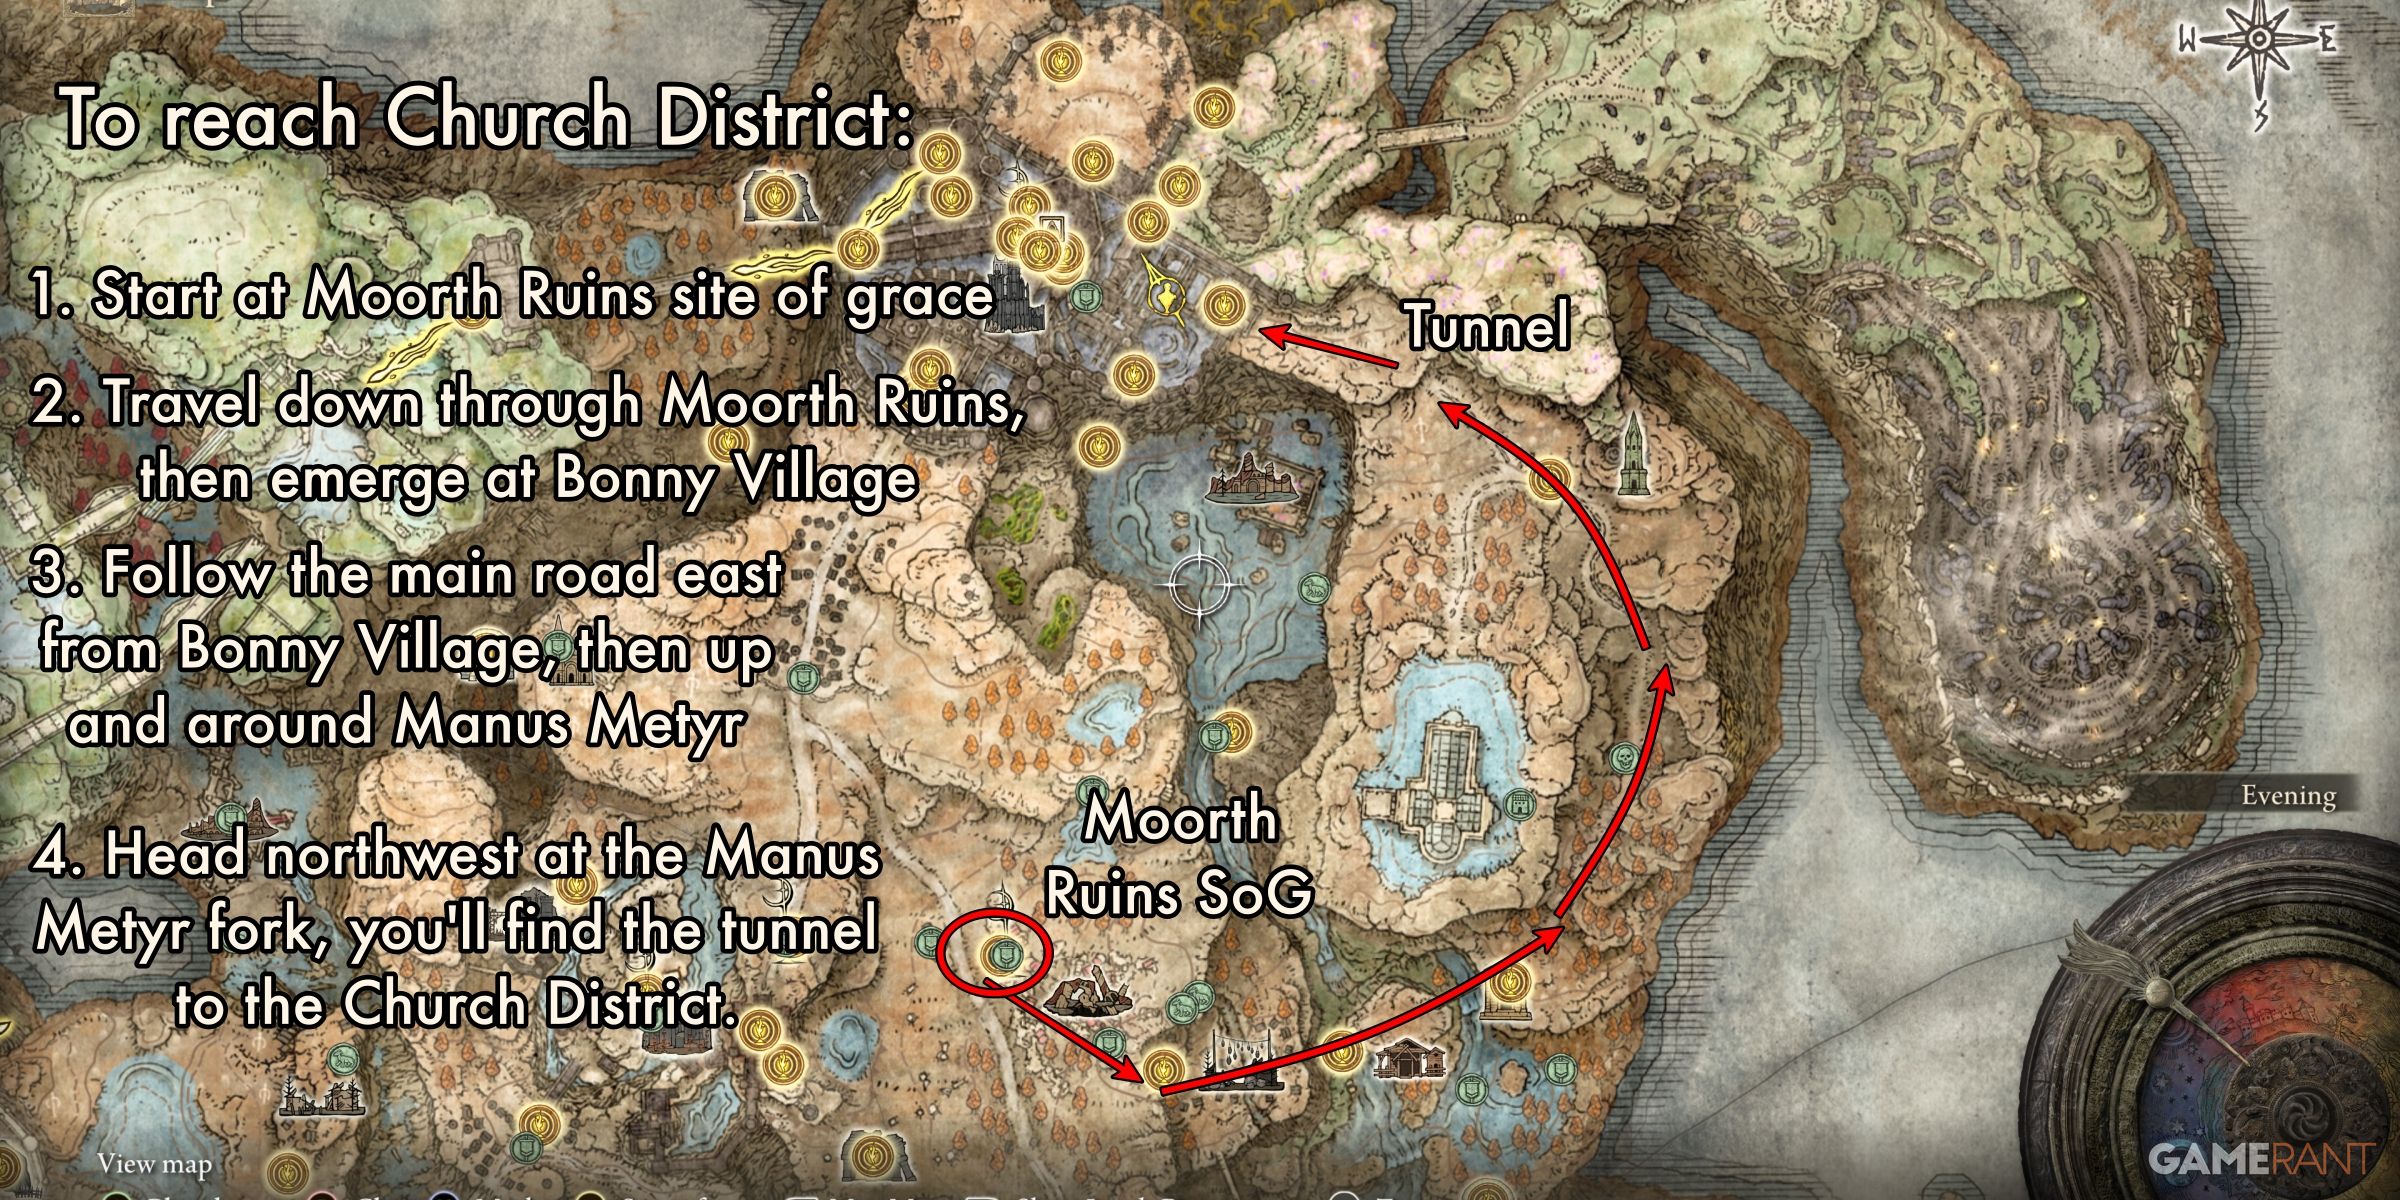
Even though Messmer has been overcome, it doesn’t signify that your journey through the Shadow Keep has come to an end. There is still a significant portion of the complex waiting to be explored, which can only be accessed via the hidden entrance. To gain access to this part, follow these steps:
- Start at the Moorth Ruins site of grace and ride east. Enter the pit in the ground and follow the main path until you reach Bonny Village.
- From bonny village, take the main path northeast, up past the Cathedral of Manus Metyr. Instead of turning south to the cathedral, continue west to the entrance tunnel.
- Make your way through the entrance tunnel, and you’ll emerge at the Shadow Keep Church District.
Empty the Floodwaters:
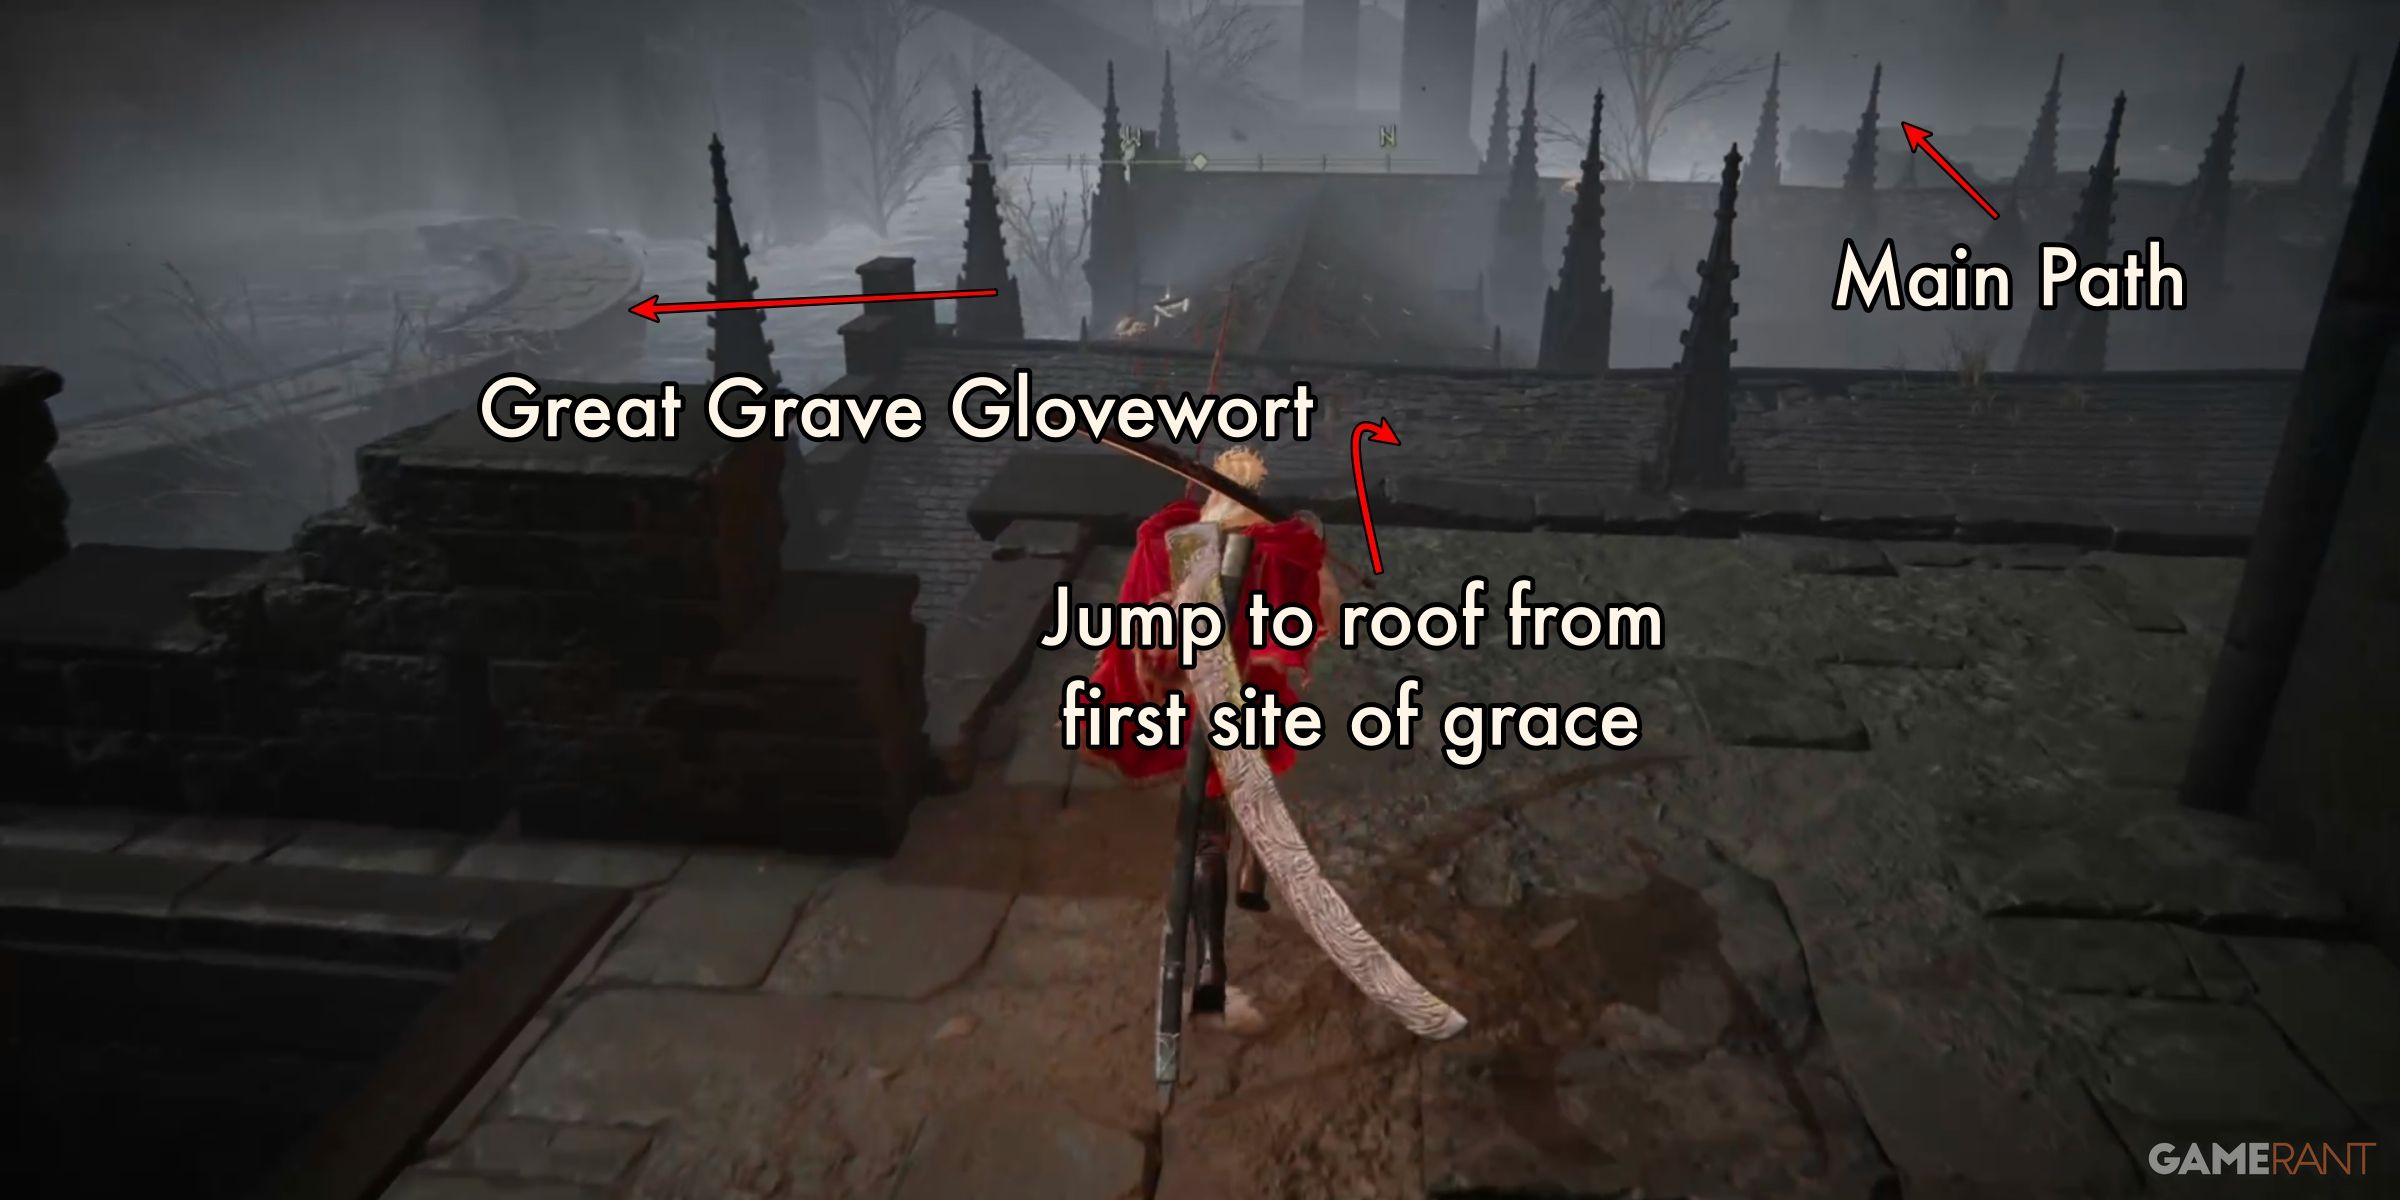
When you initially access the Church District, your first responsibility is to drain the water that inundates the entire lower level. To initiate this chore, leap onto the rooftop of the submerged structure situated opposite the Church District’s Entrance site of grace. Upon reaching the rooftop, you’ll come across the first corpse. This deceased individual will have an item worth double (x2) on them. By circumnavigating the entire roof, you will discover two additional corpses. The second corpse yields an item valued at quadruple (x4), while the third corpse holds an item worth double (x2).
Before venturing onto the primary trail, go to the southern edge of the roof first. Search for a drifting log there, which will take you to a circular construction. Approach the structure and discover additional logs that will help you cross over to the other side. Upon reaching the new location, you’ll encounter an Ulcerated Tree Spirit slumbering beneath the water, who won’t assault you at present. Circumvent the ring-shaped structure and gather the items within. Subsequently, return to the initial rooftops and leap onto the northwestern brick building.
As you approach, you’ll come across a corpse harboring an essential item. Proceed with caution, as you’ll encounter enemies that explode and pursue you. Upon retrieving the item, utilize the bricks in the northeastern corner to climb up to the elevated platform. Beware, more exploding foes will emerge from the ground. Make your way westward towards a large rooftop, and once there, head south to encounter a Fire Knight. Dispatch it and gather the x3 items from the body on the roof. Proceed to the next roof, characterized by pointed steeples in each corner. To locate another corpse, go to the northwestern steeple. Later, search for large stone pillars and paths leading to a chapel across a gap. You’ll need to jump to the pillar and climb the path to reach a hole in the chapel roof.
At the point where you find a gaping hole in the chapel roof above, take a moment to peer inside and locate beams suitable for your descent. Upon landing on one of these beams, shift your focus towards the southern sector of the chamber, keeping an eye out for a floor featuring a significant hole. Make sure to jump through this hole to reach the ground level below. After dropping down, face north or east and circle around the bend to eventually stumble upon the Prayer Room. This room can be accessed using the , though its relevance is primarily limited to the Iris of Grace and Iris of Occultation quests.
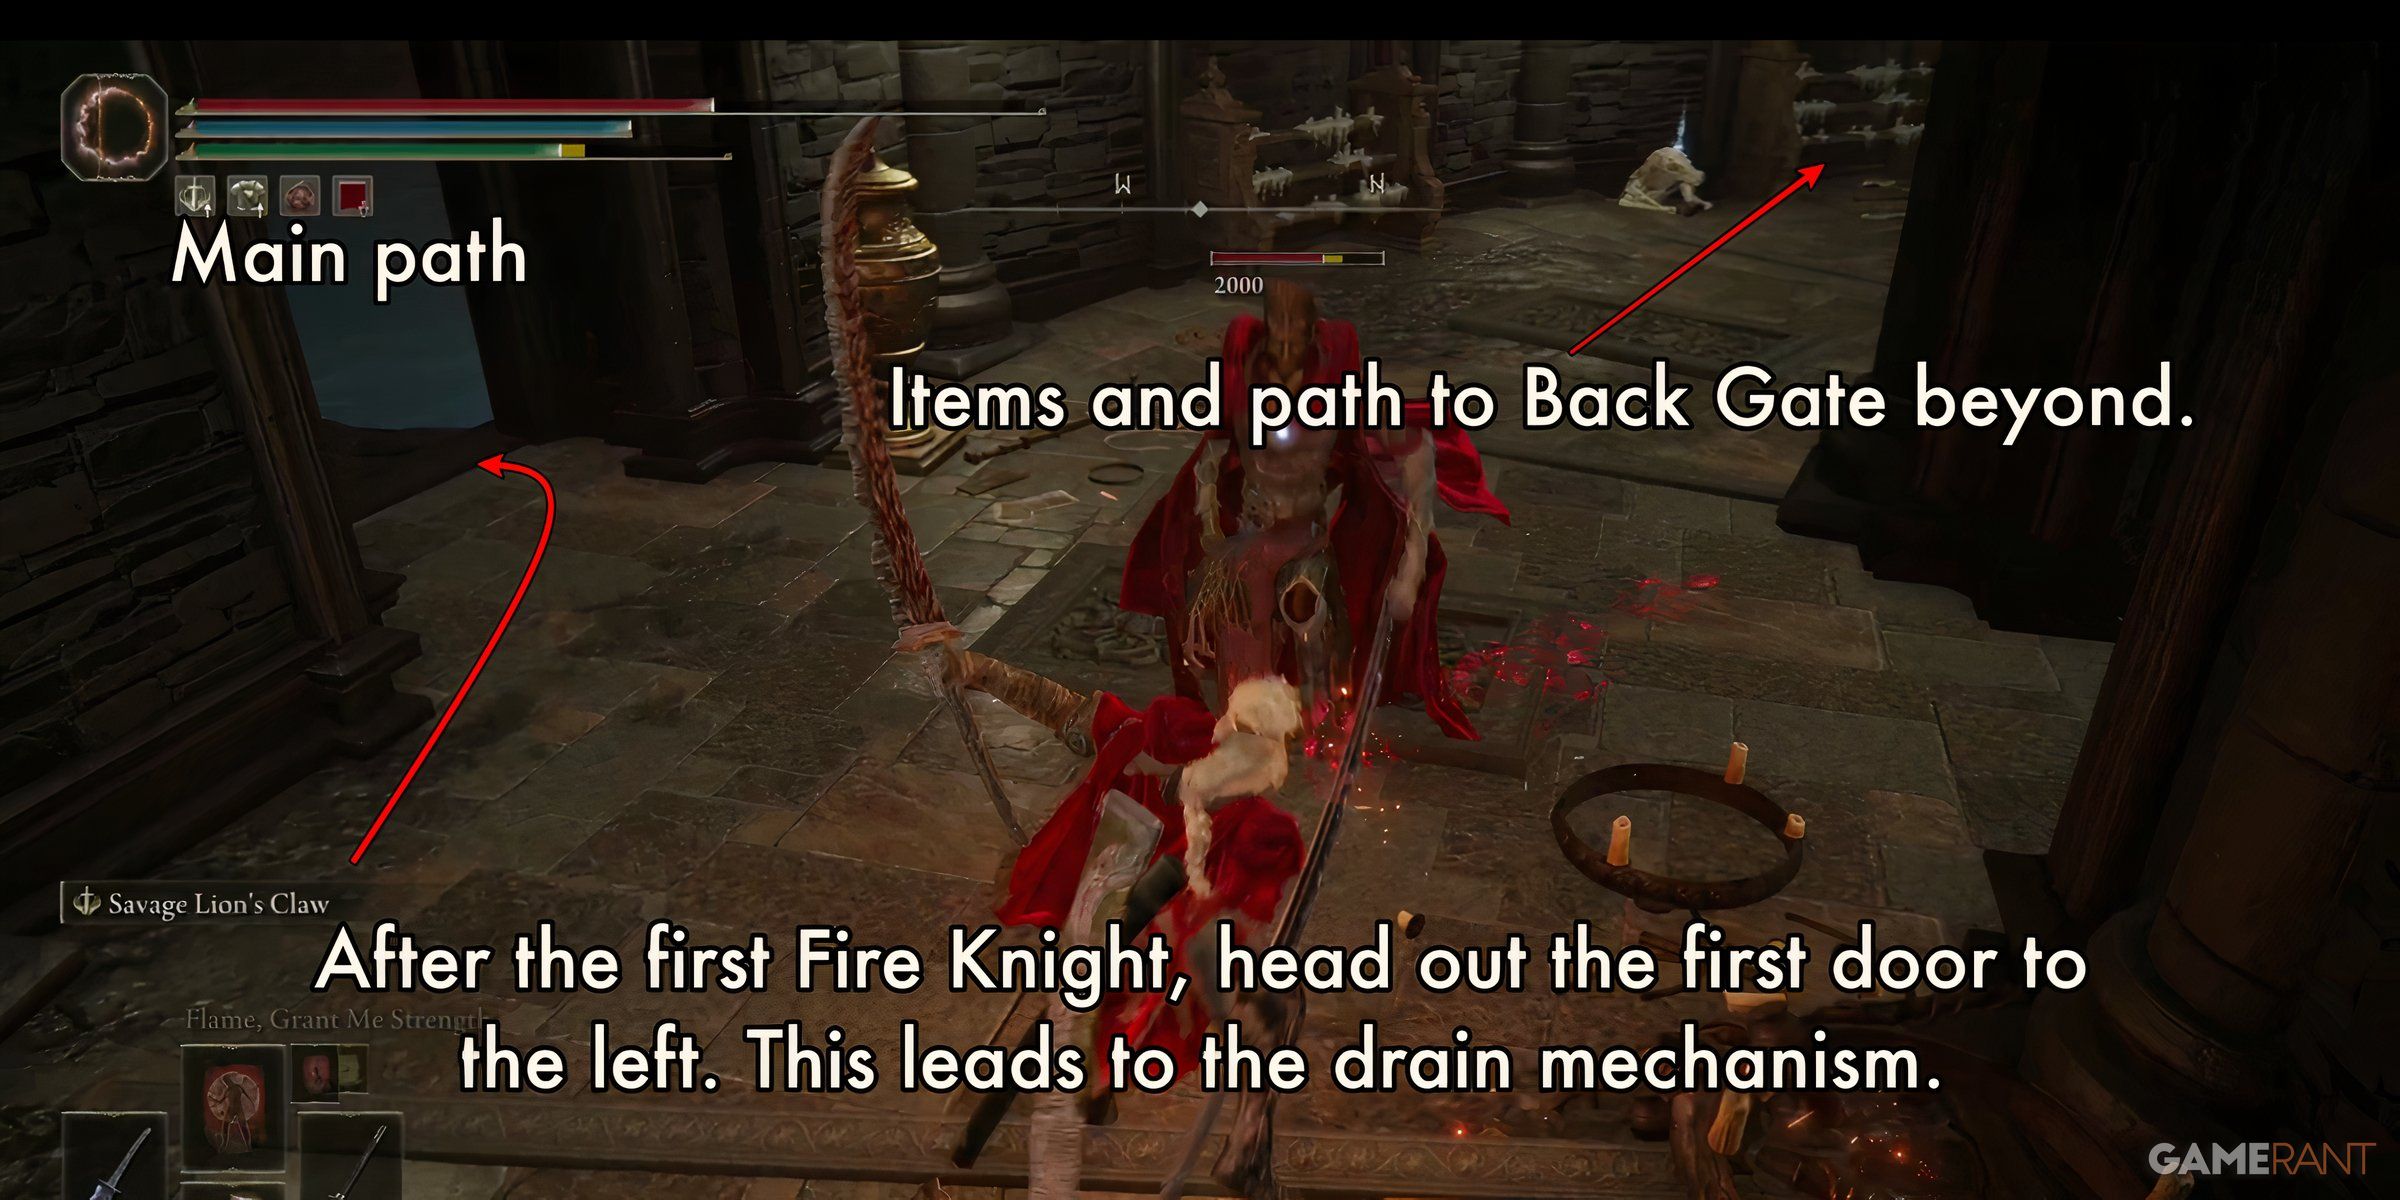
After falling into the hole, head in the northwesterly direction. You’ll come across a corpse on your right with an item. Carry on along the path and you’ll encounter a Fire Knight. Defeat it, then look for the first door on the left after entering the next chamber. This is the main path. If you veer slightly to the right of it, you’ll find double the amount of an item on another corpse. Continue on the corridor and you will face another Fire Knight. At the end of the chamber, there’s a submerged lift that cannot be used at present. For now, take the second exit on the right instead.
Go towards the exit and walk along the path until you reach a spot where you can make a left turn. You’ll face some large bats in this section. Overcome them and carry on climbing the stairs that follow. Up ahead, there’s a gaping hole in the ground. Be sure to leap over it. A couple more giant bats lie in wait further up the path, with a deceased body tucked away in a small nook holding an item of value (x3). Eventually, you’ll arrive at the end of the path where you’ll find a structure. The interior is submerged, so to access the roof and find the mechanism to drain the water, use the ladder situated on the right side of the entrance.
Explore the Sunken Church District – Iris of Occultation and Mantle of Thorns:
After the water has receded, make your way back down the ladder and examine the interior of the structure. You’ll come across a wooden platform which will lead you to the ground level. At the base of the structure, discover a corpse bearing a crucial item. Exit the chamber and venture into the adjacent church on your right. Inside, you’ll stumble upon the Sunken Chapel, serving as a site of grace. Scattered throughout the grounds are various items, though those of significance can be found near the large circular structure with the deceased tree at its center.
To begin your journey, move towards the circular construction’s eastern side, where you’ll encounter a lift. This lift will transport you back to the Church District Entrance. Descend using the lift and turn right upon exiting. Proceed past the initial structure until you come across two fallen bodies with loot indicators nearby. As you draw near, the ground will quake, signaling the emergence of the first of two Ulcerated Tree Spirits. Defeating this adversary grants access to one of the two items in the game.
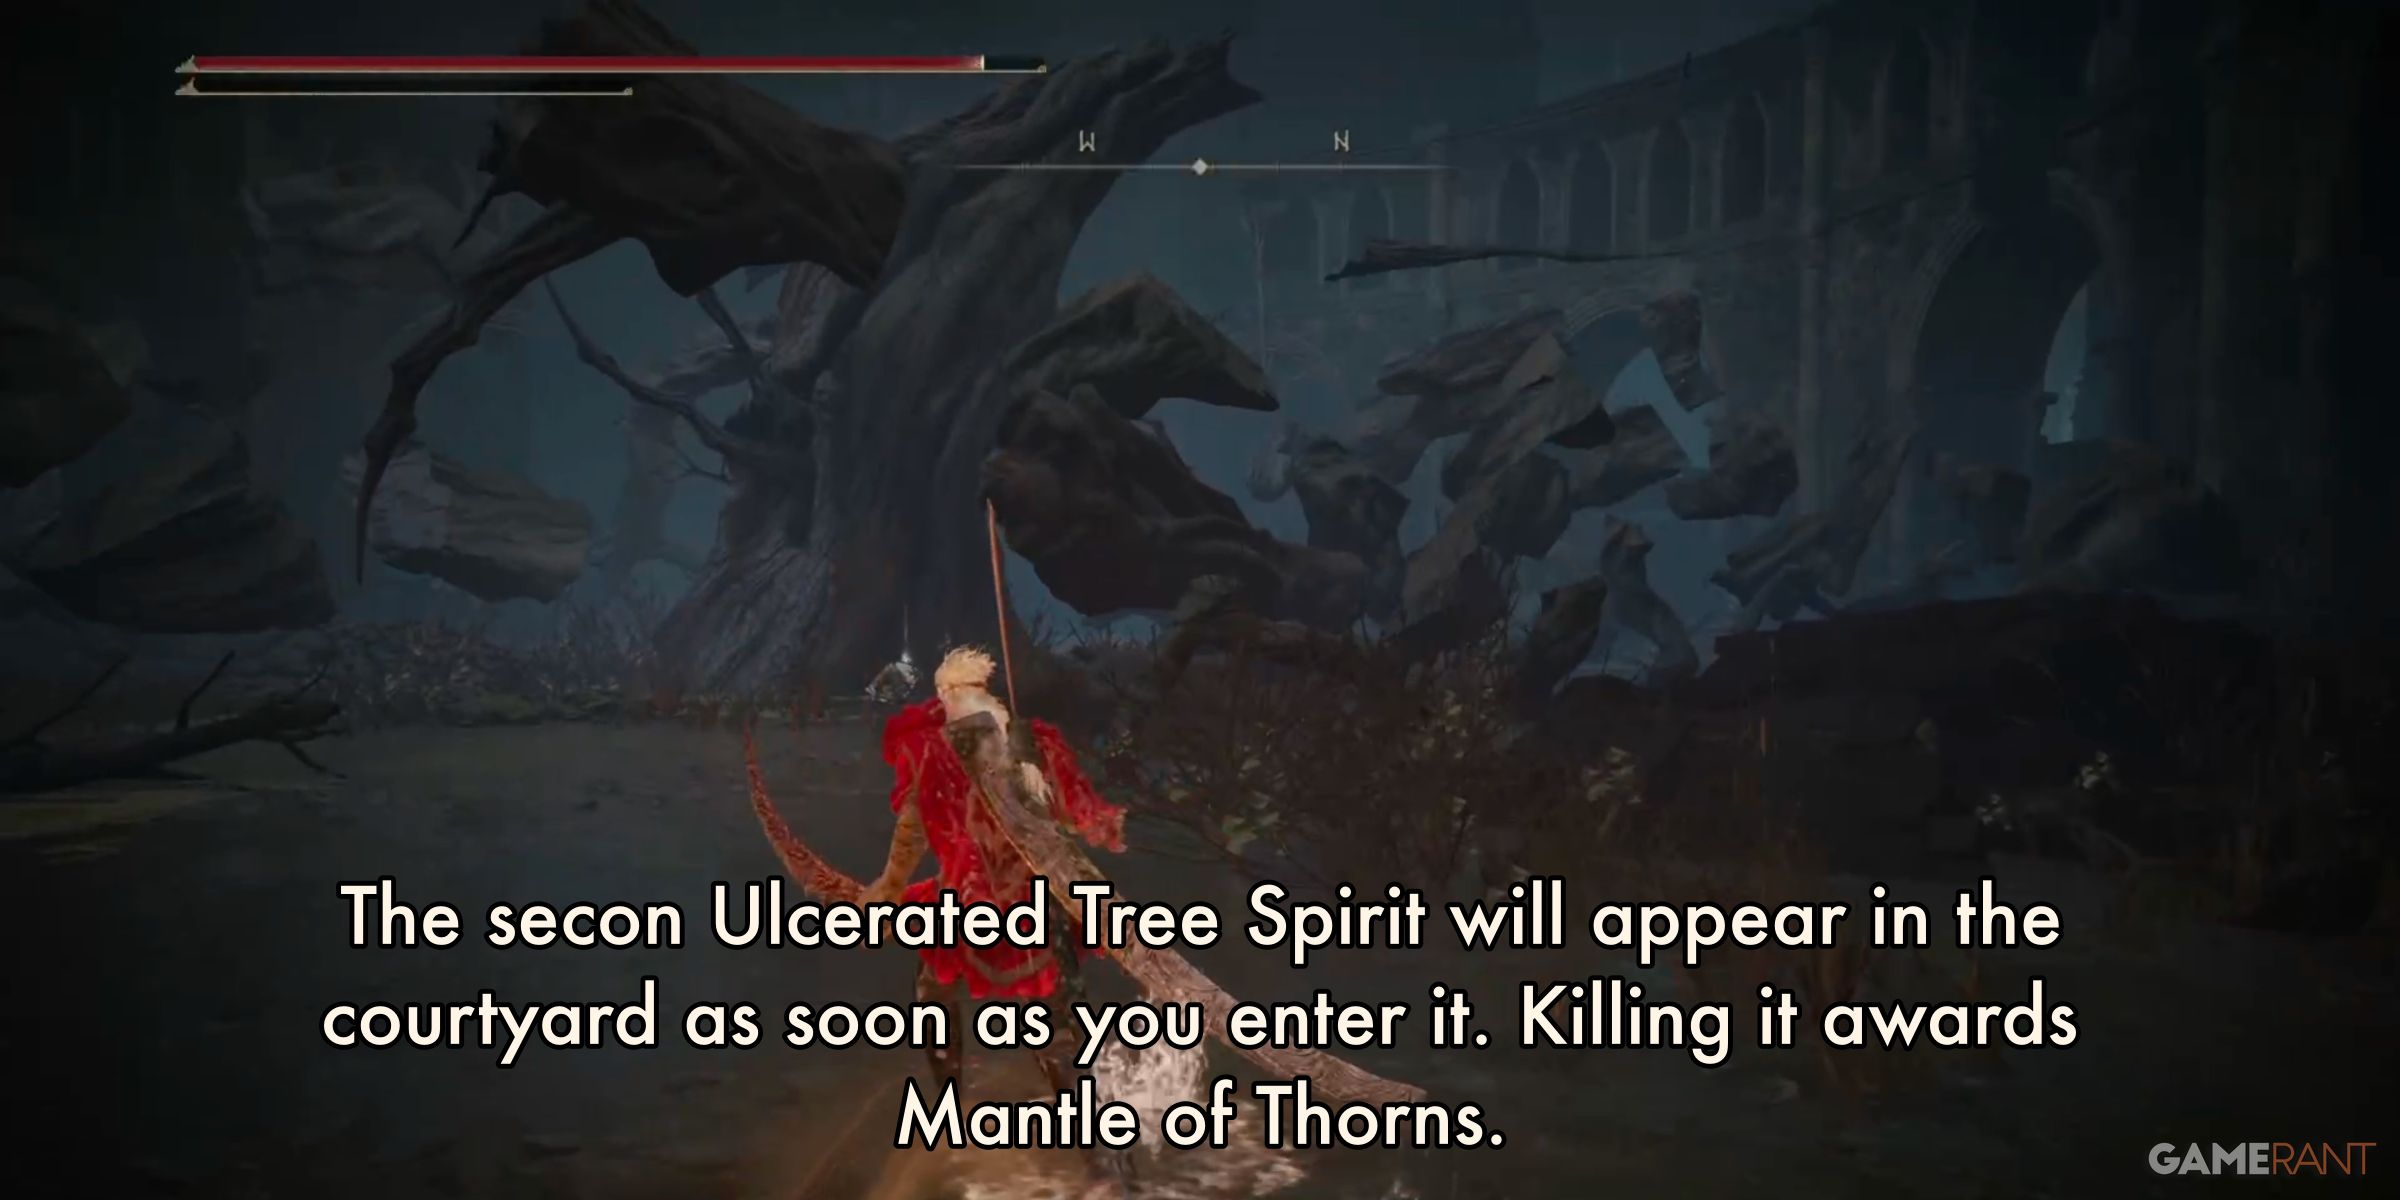
As a devoted fan, I’d recommend paraphrasing it as follows in the first person: “Next, make your way to the courtyard where the colossal dead tree stands. The earth will commence shaking, and the second Ulcerated Tree Spirit will rise up. Defeating this adversary will reward you with a formidable artifact. Be sure to secure the prize from the tree’s base once claimed. Subsequently, head northwest from the tree and enter the church edifice.”
Death Mask Helm, Iris of Grace, and Scadutree Fragment:
Within the church lies a Fire Knight at a distance. Be prepared as this knight has the ability to summon explosive foes during combat. Overcoming it grants you the coveted . Once defeated, make your way northeast and descend the corridor. You’ll encounter a door with two stairways; start by climbing the one on your left to uncover the hidden . After retrieving it, go back to the door and activate the lift. Proceed along the path leading downward, and you’ll come across an altar in front of a headless Marilka Statue. Beyond this statue lies the Scadutree Avatar, a unique boss encounter rewarding a valuable item essential for the DLC’s climactic battle.
Return to the room where you clashed with the Fire Knight. Start from the platform, move towards the exit, and make a left turn roughly halfway through to locate an elevator. This will transport you back to the upper level and lead you to the earlier mentioned flooded chamber, which lies at the end of the first path descended from the church rooftop. The same Fire Knights guard this corridor. Overcome them, seek out the doors located to the southwest. There, you’ll come across a massive statue that is no longer underwater. Climb onto its arms and seize the precious artifact. Be mindful of the valuable item left behind on the lower level at the foot of the statue. You can jump down, retrieve it, then travel back to the upper level by utilizing the same elevator.
Shadow Keep Walkthrough: Part 4 – Back Gate
Reach the Storehouse, Loft:
To reach the hidden area in Shadow Keep, first, go back to the corridor from which you descended onto the roof of the chapel with two Fire Knights. Instead of taking the initial path to the east, opt for the second one on the left, leading northward. You’ll encounter a lift that will bring you back up to the Specimen Storehouse. Upon arrival on the second floor, explore the new platform to find a valuable item and a Site of Grace.
Reaching the summit of the ladder, I come face to face with a Fire Knight guarding the edge. With stealth and precision, I can creep up on him for a surprise attack, knocking him off and dealing a critical blow. Afterward, I head east and ascend the stairs to the next level. Atop the stairs, another Fire Knight emerges from behind me, so I swiftly turn around to face him. Beyond this adversary lies x3 hidden against the wall. Following the path northeast all the way to its end, I discover a dead body harboring an essential item. Upon turning back, I notice a hole in the wall to my left that leads to an outdoor path. Shortly after, I stumble upon x6 and more valuable loot scattered among other dead bodies. Continuing along this path eventually brings me back inside the storehouse.
Storehouse, Loft – Fastest Route:
Wrath from Afar:
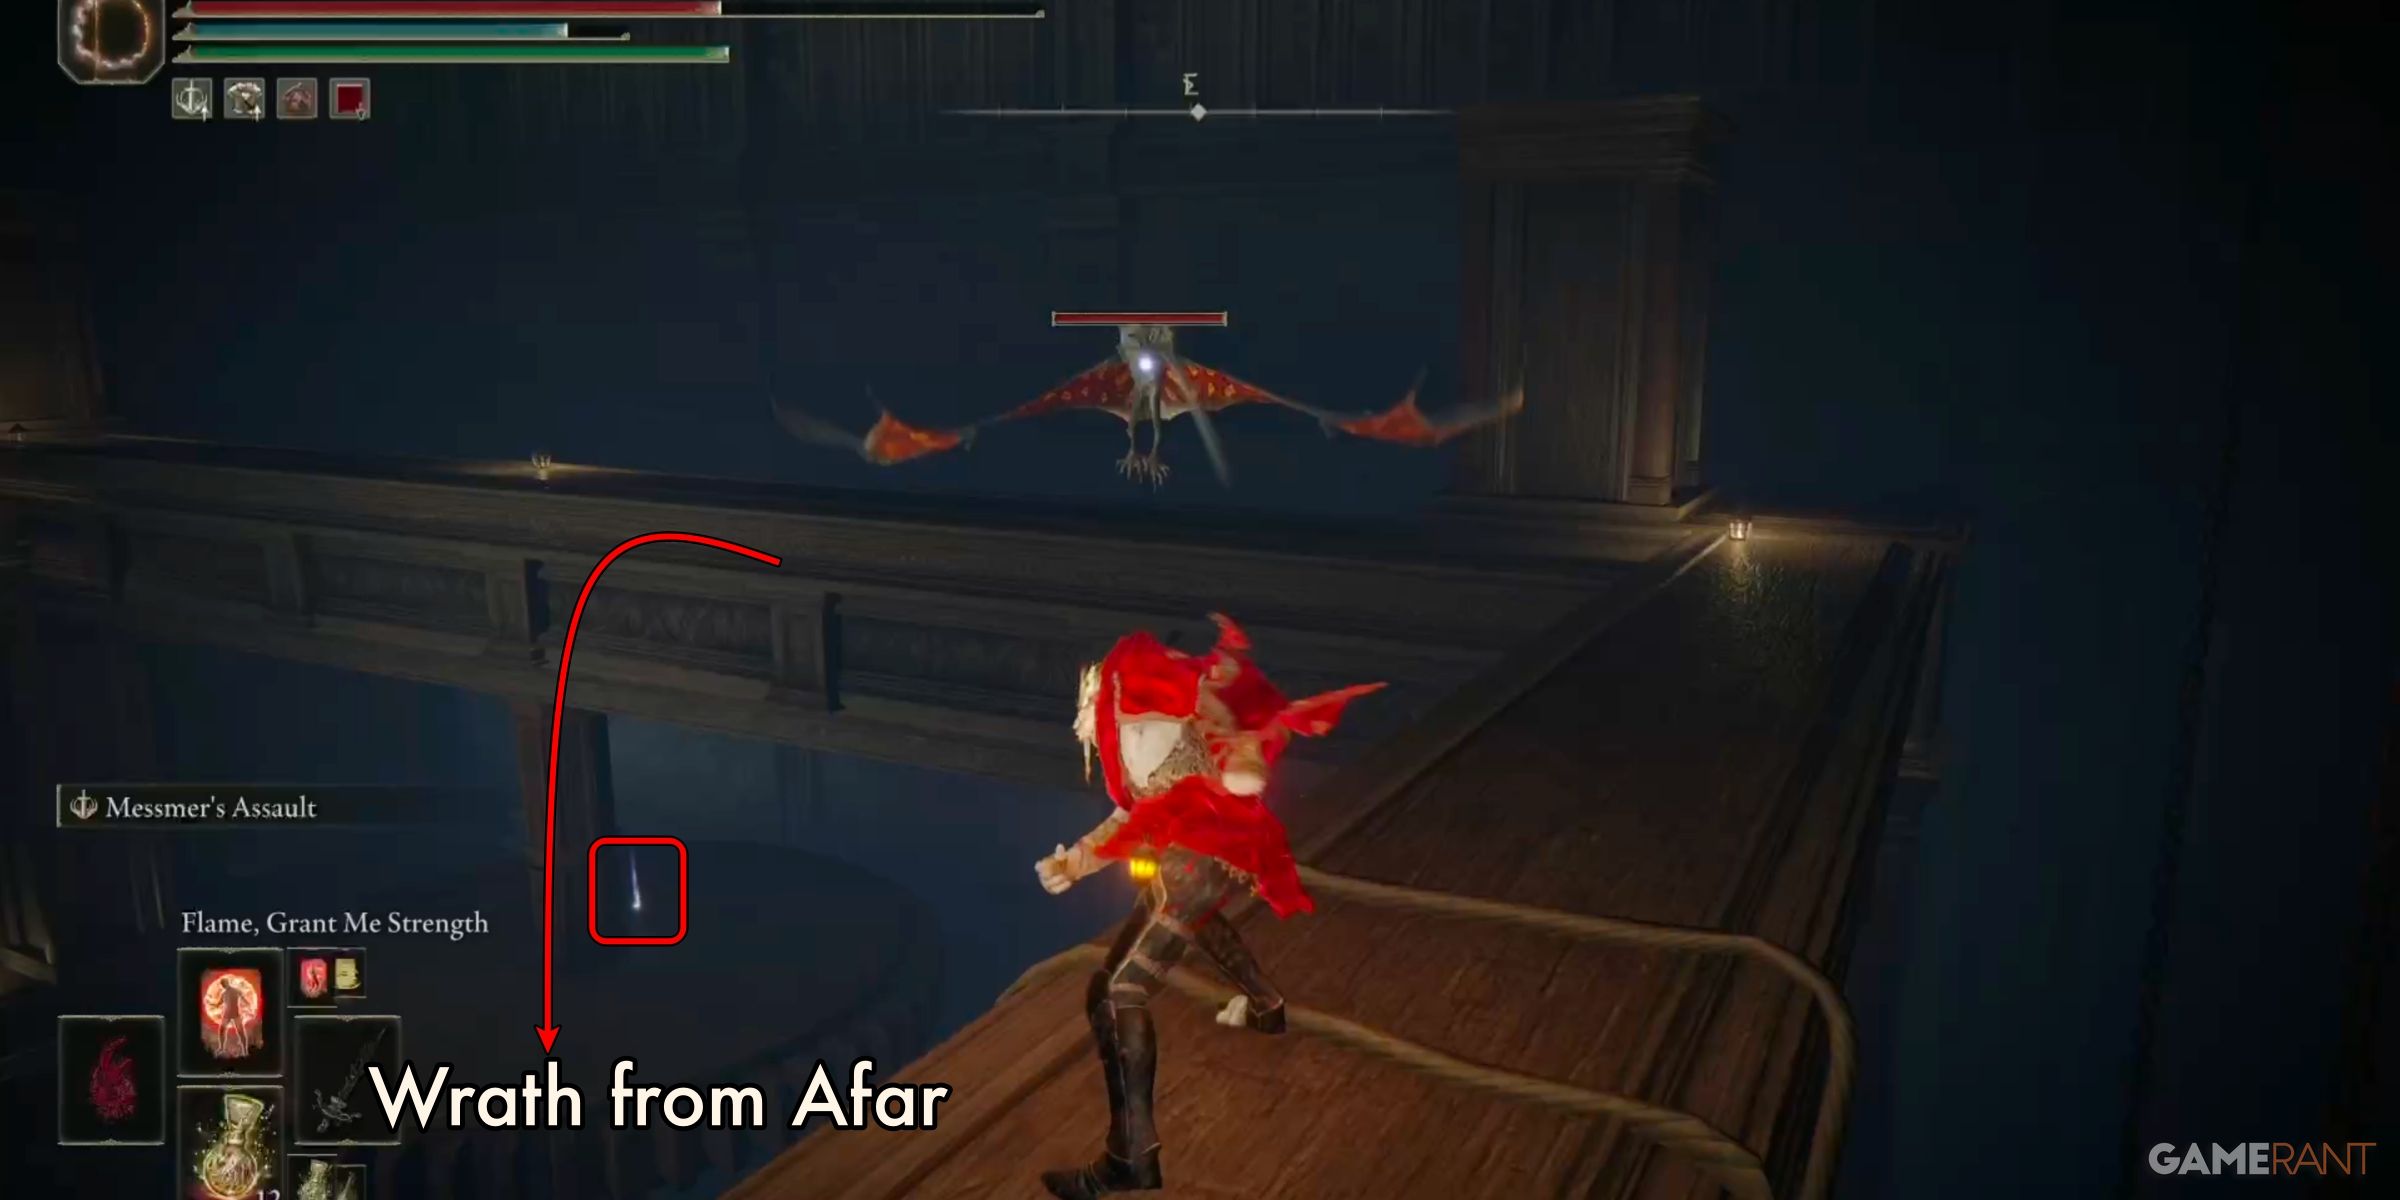
Utilize the Storehouse, Loft’s uppermost recesses. Ascend via the elevator reaching the ceiling beams. Upon exiting, make three left turns successively. Once you reach a beam stretching across, turn right to access the other side. There, awaits a colossal Bat at the center. After crossing the beam, locate a ladder that leads to the next level. You may bypass it to obtain x7 from a corpse nearby. At the summit, head southwest along the beams, keeping an eye to your right as you progress. There, you’ll encounter a dead body attached to a ceiling beam. It holds x4. Continuing southeast, observe a large cog on the lower level and drop down to collect the incantation residing therein.
Exit the Storehouse:
To reach your destination, begin by facing north from the cog and leaping to the closest beam. Make a left turn at the next opportunity, where you’ll find a ladder leading up to the upper level. Beware, as a Fire Knight awaits at the top, ready to hurl projectiles at you. Roll in a straight line through the attack to defeat him. Following the Fire Knight’s demise, locate an elevator and descend to land on a lower platform. Return to the elevator and make a left turn. Prepare for encounters with Giant Bats before spotting another ladder. Descend this ladder and seize the treasure nearby. Proceed north along the beam and utilize the nearby ladder to reach the platform below. The exit will be found to your right. Outside, you’ll come across another wooden elevator. Utilize it to descend, then follow the wooden path to the final lift. At the bottom of this lift, you’ll exit at the Shadow Keep’s Back Gate site of grace.
Commander Gaius and the O Mother Hidden Path:
Read More
- USD ZAR PREDICTION
- SOL PREDICTION. SOL cryptocurrency
- CKB PREDICTION. CKB cryptocurrency
- EUR ILS PREDICTION
- HUDI PREDICTION. HUDI cryptocurrency
- IQ PREDICTION. IQ cryptocurrency
- WELSH PREDICTION. WELSH cryptocurrency
- REF PREDICTION. REF cryptocurrency
- EUR RUB PREDICTION
- Best Turn-Based Dungeon-Crawlers
2024-07-14 12:06