
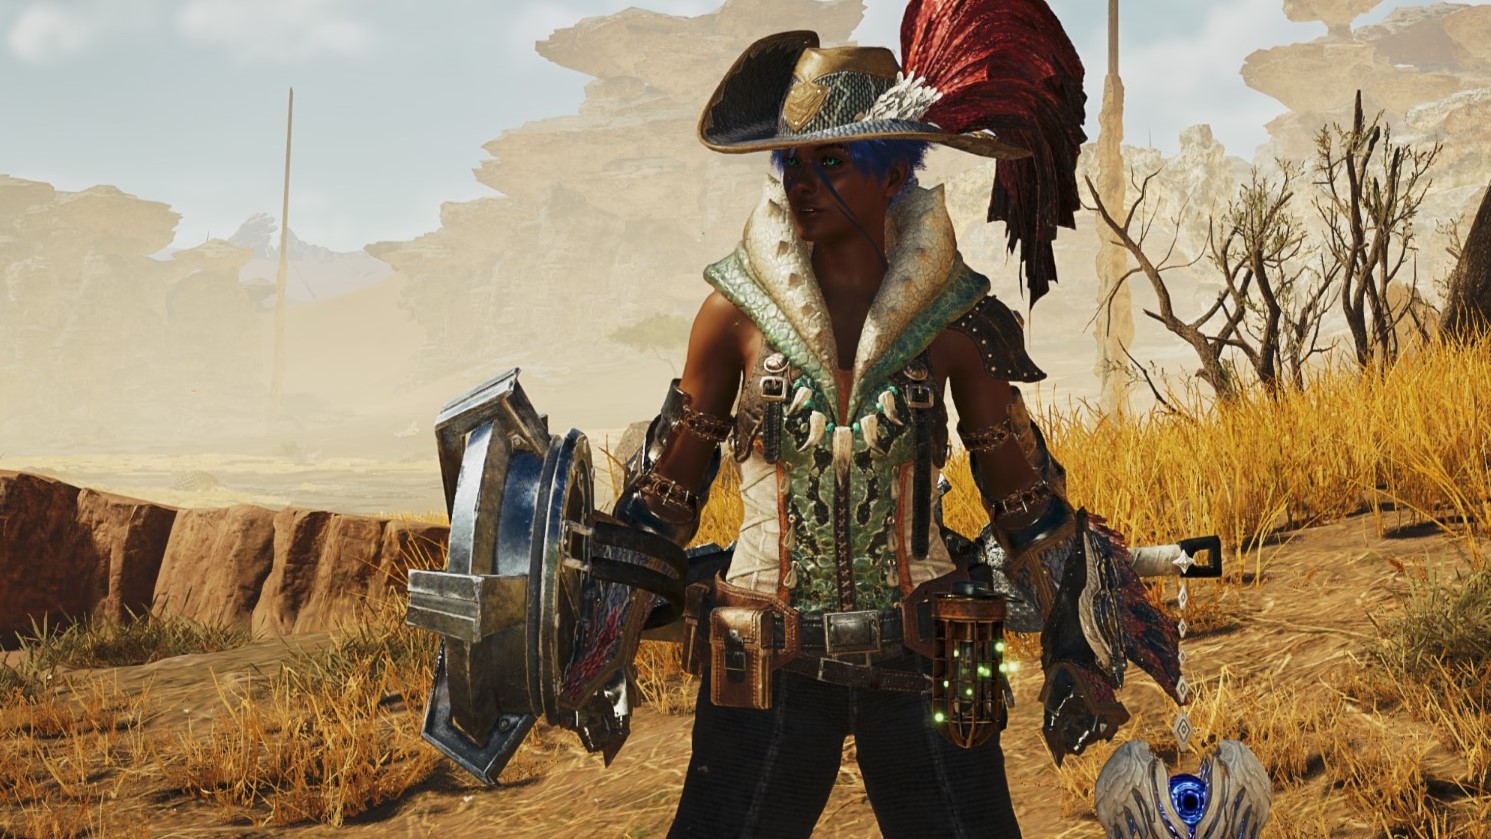
In Monster Hunter, you might assume that the agile Dual Blades or the aerial-focused Insect Glaive are the most mobile weapons. However, I’d like to argue for the stealthy, swift Sword and Shield as the true agile champion of the series. The optimal builds in Monster Hunter Wilds are crafted to keep you moving at all times, allowing you to land rapid combos that accumulate status effects, mount monsters, and execute precise focus attacks – all without disrupting your rhythm.
At a glance, the Sword and Shield might appear straightforward among the intricate techniques required for Charge Blade or Switch Axe builds in Monster Hunter. However, it’s deceptively versatile – beyond its swift combos, it also offers the advantage of defensive maneuvers like blocking and countering enemy attacks with the shield, a feature not found in other weapons. What truly sets Sword and Shield apart in Monster Hunter Wilds is its unique ability to use items without sheathing your blade, a capability exclusive to this weapon alone.
In this guide, I’ll walk you through how I leveraged the special abilities of the Sword and Shield, all while mastering its multiple strike combos. Following that, I’ll share the Low Rank Sword and Shield build I honed during my journey through Monster Hunter World’s campaign. Let’s dive in!
How to play Sword and Shield in Monster Hunter Wilds
To initiate your fundamental combo sequences, use ‘Y’, then end it with ‘Y+B’. Rapidly pressing ‘Y’ four times consecutively will execute the Sword and Shield’s least intensive combo, dealing consistent albeit ordinary damage.
- The great thing about this combo in Wilds: you can also tap a direction along with each Y hit to absolutely dance around monsters and keep landing blows.
- End this basic sequence by pressing Y+B to land the follow-up Spinning Reaper, then Y+B again to finish with the multi-hit Charged Chop.
To temporarily disorient monsters effectively, utilize the forward plus B, B, B combination. This simple series of moves starts with a shield bash (Forward+B) followed by rapid B button presses. While it may not deal high damage, its utility in stunning monsters is significant.
- As with the Y combo above, throw in a Y+B to end with a Charged Chop.
To execute the stunning Perfect Rush combo with your Sword and Shield, first practice getting into the right sequence. By briefly pressing LT + Back + B, jump into a poised backstep position. Continue holding B until you see your character pulse red. At this point, tap Y (while still holding B) to perform a Leaping Slash. If it lands successfully, the Perfect Rush combo will begin. You’ll automatically continue the sequence, hitting three more red-charged beats as you press Y each time. Mastering this move will reward you with a beautiful series of hits in quick succession and a spectacular aerial finisher.
- After the final hit of the chain you’ll launch into the air to follow up with a multi-hit plunging Y+B attack (usually my pick) or a shield bash with B, which can knock a monster off its feet.
- Perfect Rush has some risk: you can’t dodge out of it, but between animations you can hold RT to transition into a block. Stop pressing Y to end the combo early, but with a slow recovery that leaves you vulnerable. You can end Perfect Rush early by pressing Y+B at the end of the chain to transition into a Charged Chop instead of jumping.
- Initiating Perfect Rush is flexible: you can start a backstep from any Sword and Shield combo with Back + B (no need to hold LT), or start it from a guard (hold RT).
An additional adaptable ability that sets the Sword and Shield apart from many other weapons in Monster Hunter Wilds is its capability to execute Focus attacks while airborne, simply by holding LT. Adjust your aim as you descend, then press RT to inflict a precise wound!
- When Focus attacking wounds, use B to deliver a powerful uppercut once you’ve lodged your sword in place. You can press Y instead of B to do a multi-hit downward stab instead, which is useful if you’re near the top of the monster and will get in a lot of hits on the way down, but usually the uppercut is better, as it does big damage and staggers.
Press RT + Y followed by a direction for the Slide Dodge maneuver, which combines mobile attack and evasion in one fluid move. This technique is among the most stylish in your arsenal, ideal for swiftly approaching an enemy to deliver a hit that can be seamlessly continued into a combo using Y, or for avoiding incoming attacks. I frequently employ Slide Dodge to maneuver around a monster as it rotates, enabling me to repeatedly strike its vulnerable spots (gotta chop those tails!).
Timing your RT press perfectly when a monster attacks will safeguard you from harm through a Perfect Guard. Initially in the Wilds, focus more on dodging enemy attacks rather than standing firmly against them for blocking. If timing isn’t precise, you may end up taking some damage. However, as your confidence grows, the Sword and Shield combo will become increasingly effective.
- You can follow a Perfect Guard with Y to deliver a basic counterattack, B to start a B combo, Back + B to backstep into Perfect Rush or Forward + B to do a shield bash (phew, so many options!).
- Guarding multiple times builds up an invisible guard meter that will let you initiate a Power Clash—rapidly tap a button to overpower a monster and knock it on its ass. Non-perfect guards will also build up this meter, but you’ll take some chip damage when hit.
Lastly, keep in mind that you can consume items without needing to stow away your weapon; simply hold down the RT button and then press X to enjoy a perfectly cooked steak or any other item you’re carrying. However, in the Wilds, it would be more advantageous to whistle for your Seikret so it can use an item while making use of its additional mobility.
Best Sword and Shield builds for Low Rank
Initially, this progression of construction emphasizes enhancing the effectiveness of your jumping assaults for mounting monsters, followed by a transition to greater critical hit damage inflicted on vulnerable spots and injuries as you advance in Low Rank.

- First weapon: Quematrice Cuchillo I
Among the initial creatures you’ll encounter in the Wilds is the Quematrice, a formidable-sized fowl offering roughly the same resistance as a small chicken during battle. From its components, you can craft a Sword and Shield that boasts a 5% critical hit (crit) affinity and deals 100 units of fire damage. This equipment enhances your combat effectiveness noticeably compared to the Expedition blade, especially considering that many early monsters are vulnerable to fire, making it an ideal choice for a starting set.
- First armour set: Quematrice Helm, Braces and Greaves, Chatacabra Mail, Leather Belt
Prepare yourself to acquire three pieces of Quematrice armor, along with its weapon, as you’ll find it beneficial in your battle against various monsters. The Quematrice Helm, Braces, and Greaves will provide you with three ranks of Flinch Free, which is useful for maintaining your combos without interruption from minor monster attacks. However, the main advantage lies in activating the Scaling Prowess group skill, enhancing your ability to mount and wound monsters. Given that you’ll be executing numerous jump attacks, this skill will come in handy. The Chatacabra Mail serves as a good starting point, granting you Speed Eating for quicker consumption of items.
The belt you’re using can be whatever you prefer. I suggest the Leather Belt designed specifically for botanists as it’s ideal for collecting herbs. However, if you tend to get hit frequently in combat, consider wearing the Hope Coil; it reduces stun duration by 30%.

- Second weapon: Barina Dague I
Following your battle against Quematrice, you’ll encounter and defeat Lala Barina, the arachnid monster. This victory will help you craft the Barina Dague I, a sword and shield combo that will serve you well throughout Low Rank. The upgrade increases your affinity by 10% and replaces Fire with Paralysis, which complements the SnS’s swift attacks perfectly. After defeating another spider, Nerscylla, you’ll gather the necessary parts to enhance the Barina Dague I into its second form, offering a slight damage boost. This weapon will continue to serve you well throughout the campaign and can be further upgraded for High Rank challenges.
Instead of creating the Balahara Blade II, consider designing the Balahara Blade I instead. This weapon specializes in Water damage, an element that two top predators in the Wilds are particularly vulnerable to. Additionally, it provides a 10% affinity rate, making it a versatile choice. Oh, and let’s not forget, it’s quite robust too!
- Second armour set: Ingot Helm and Coil, Hirabami Mail, Vambraces, Greaves, Blessing Charm talisman
Approaching midway in Low Rank, you’ll encounter the Hirabami – another formidable creature whose armor grants the Scaling Prowess group ability. This makes it an efficient upgrade from Quematrice’s gear: We’ll switch to the Hirabami Mail, Vampraces, and Greaves for the group skill, and add three levels of Evade Window for increased invincibility frames during dodges. On the other hand, the Ingot Helm and Coil will offer a 30% damage reduction when Divine Blessing is triggered, which can be boosted to 50% using a Blessing Charm talisman.

- Third armour set: Ajarkan Mail and Greaves, G. Rathalos Helm and Vambraces, Rey Sandcoil, Blessing Charm talisman
As we approach the end of low rank, let’s consider one last upgrade for our armor to boost our base damage. However, this change comes at the cost of the Scaling Prowess perk. By equipping Ajarkan Mail and Greaves, you’ll gain two levels of Parkbreaker, enhancing your part damage by 20% and also elevating your Focus attack damage. The G. Rathalos Helm and Vambraces will add an additional 10% affinity to your weak point hits, while the Rey Sandcoil’s Constitution skill will provide a small boost to your stamina.
If desired, consider using Guardian Ebony Coil instead of Burst to boost the power of your combos continuously, provided you maintain a steady stream of attacks.
1. MH Wilds: Longsword strategies – Victory through slicing
2. MH Wilds: Greatsword strategies – Grand gestures with the big sword
3. MH Wilds: Bow strategies – Bullseye bashing
4. MH Wilds: Dual Blades strategies – Rapid and relentless
5. MH Wilds: Charge Blade strategies – Malicious potion strikes
6. MH Wilds: Light Bowgun strategies – Fewer turrets, more lethal action
Read More
- Invincible’s Strongest Female Characters
- Top 8 Weapon Enchantments in Oblivion Remastered, Ranked
- MHA’s Back: Horikoshi Drops New Chapter in ‘Ultra Age’ Fanbook – See What’s Inside!
- Nine Sols: 6 Best Jin Farming Methods
- Fix Oblivion Remastered Crashing & GPU Fatal Errors with These Simple Tricks!
- Top 8 UFC 5 Perks Every Fighter Should Use
- How to Reach 80,000M in Dead Rails
- Gold Rate Forecast
- USD ILS PREDICTION
- Master Conjuration Spells in Oblivion Remastered: Your Ultimate Guide
2025-02-27 14:49