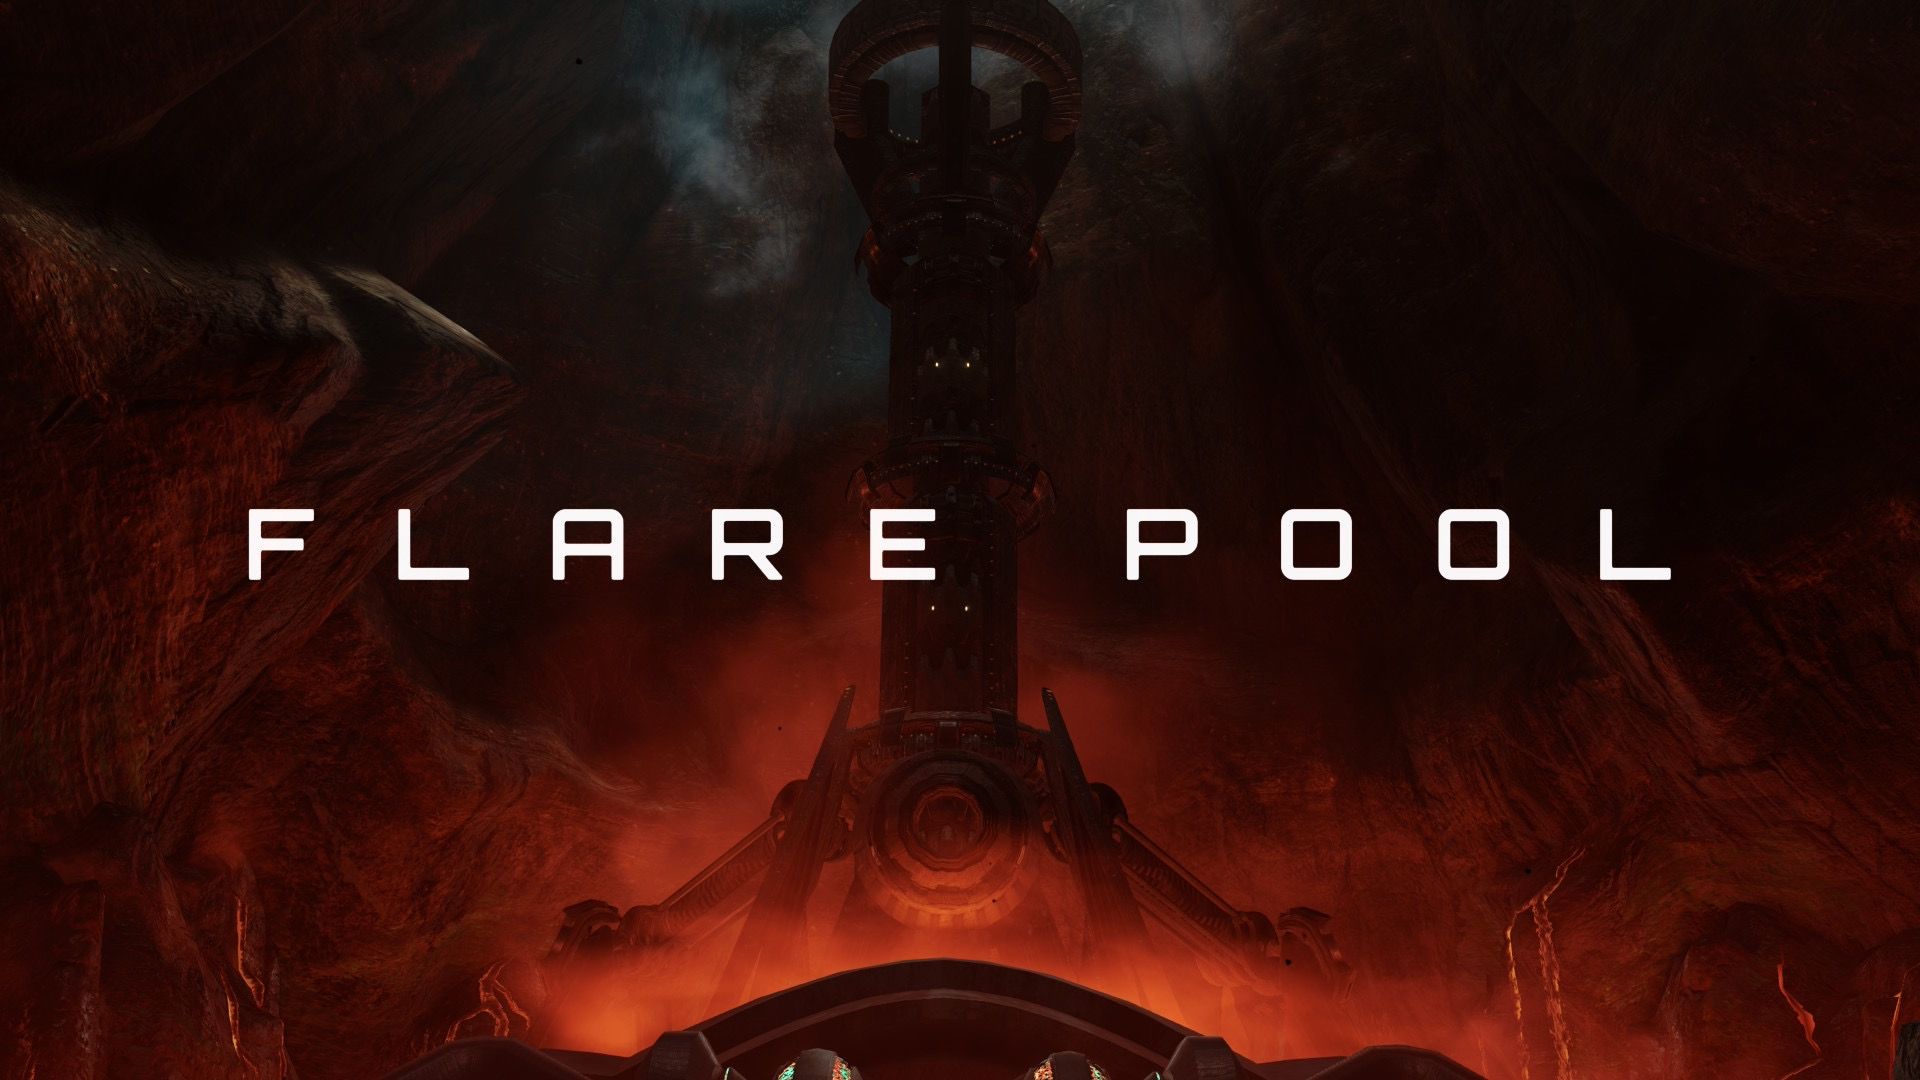
Flare Pool is the fourth major area in Metroid Prime 4: Beyond. This fiery level challenges Samus with lava flows and requires her to upgrade her Vi-O-La scanner. You’ll need to visit Flare Pool at least twice – once to get the Fire Shot upgrade before tackling the Ice Belt dungeon, and again to find everything it holds. A complete playthrough requires at least three visits. This guide will show you how to finish Flare Pool and locate all of its collectibles in Metroid Prime 4’s fire-themed area.
Where to Find the Flare Pool Dungeon in Metroid Prime 4: Beyond
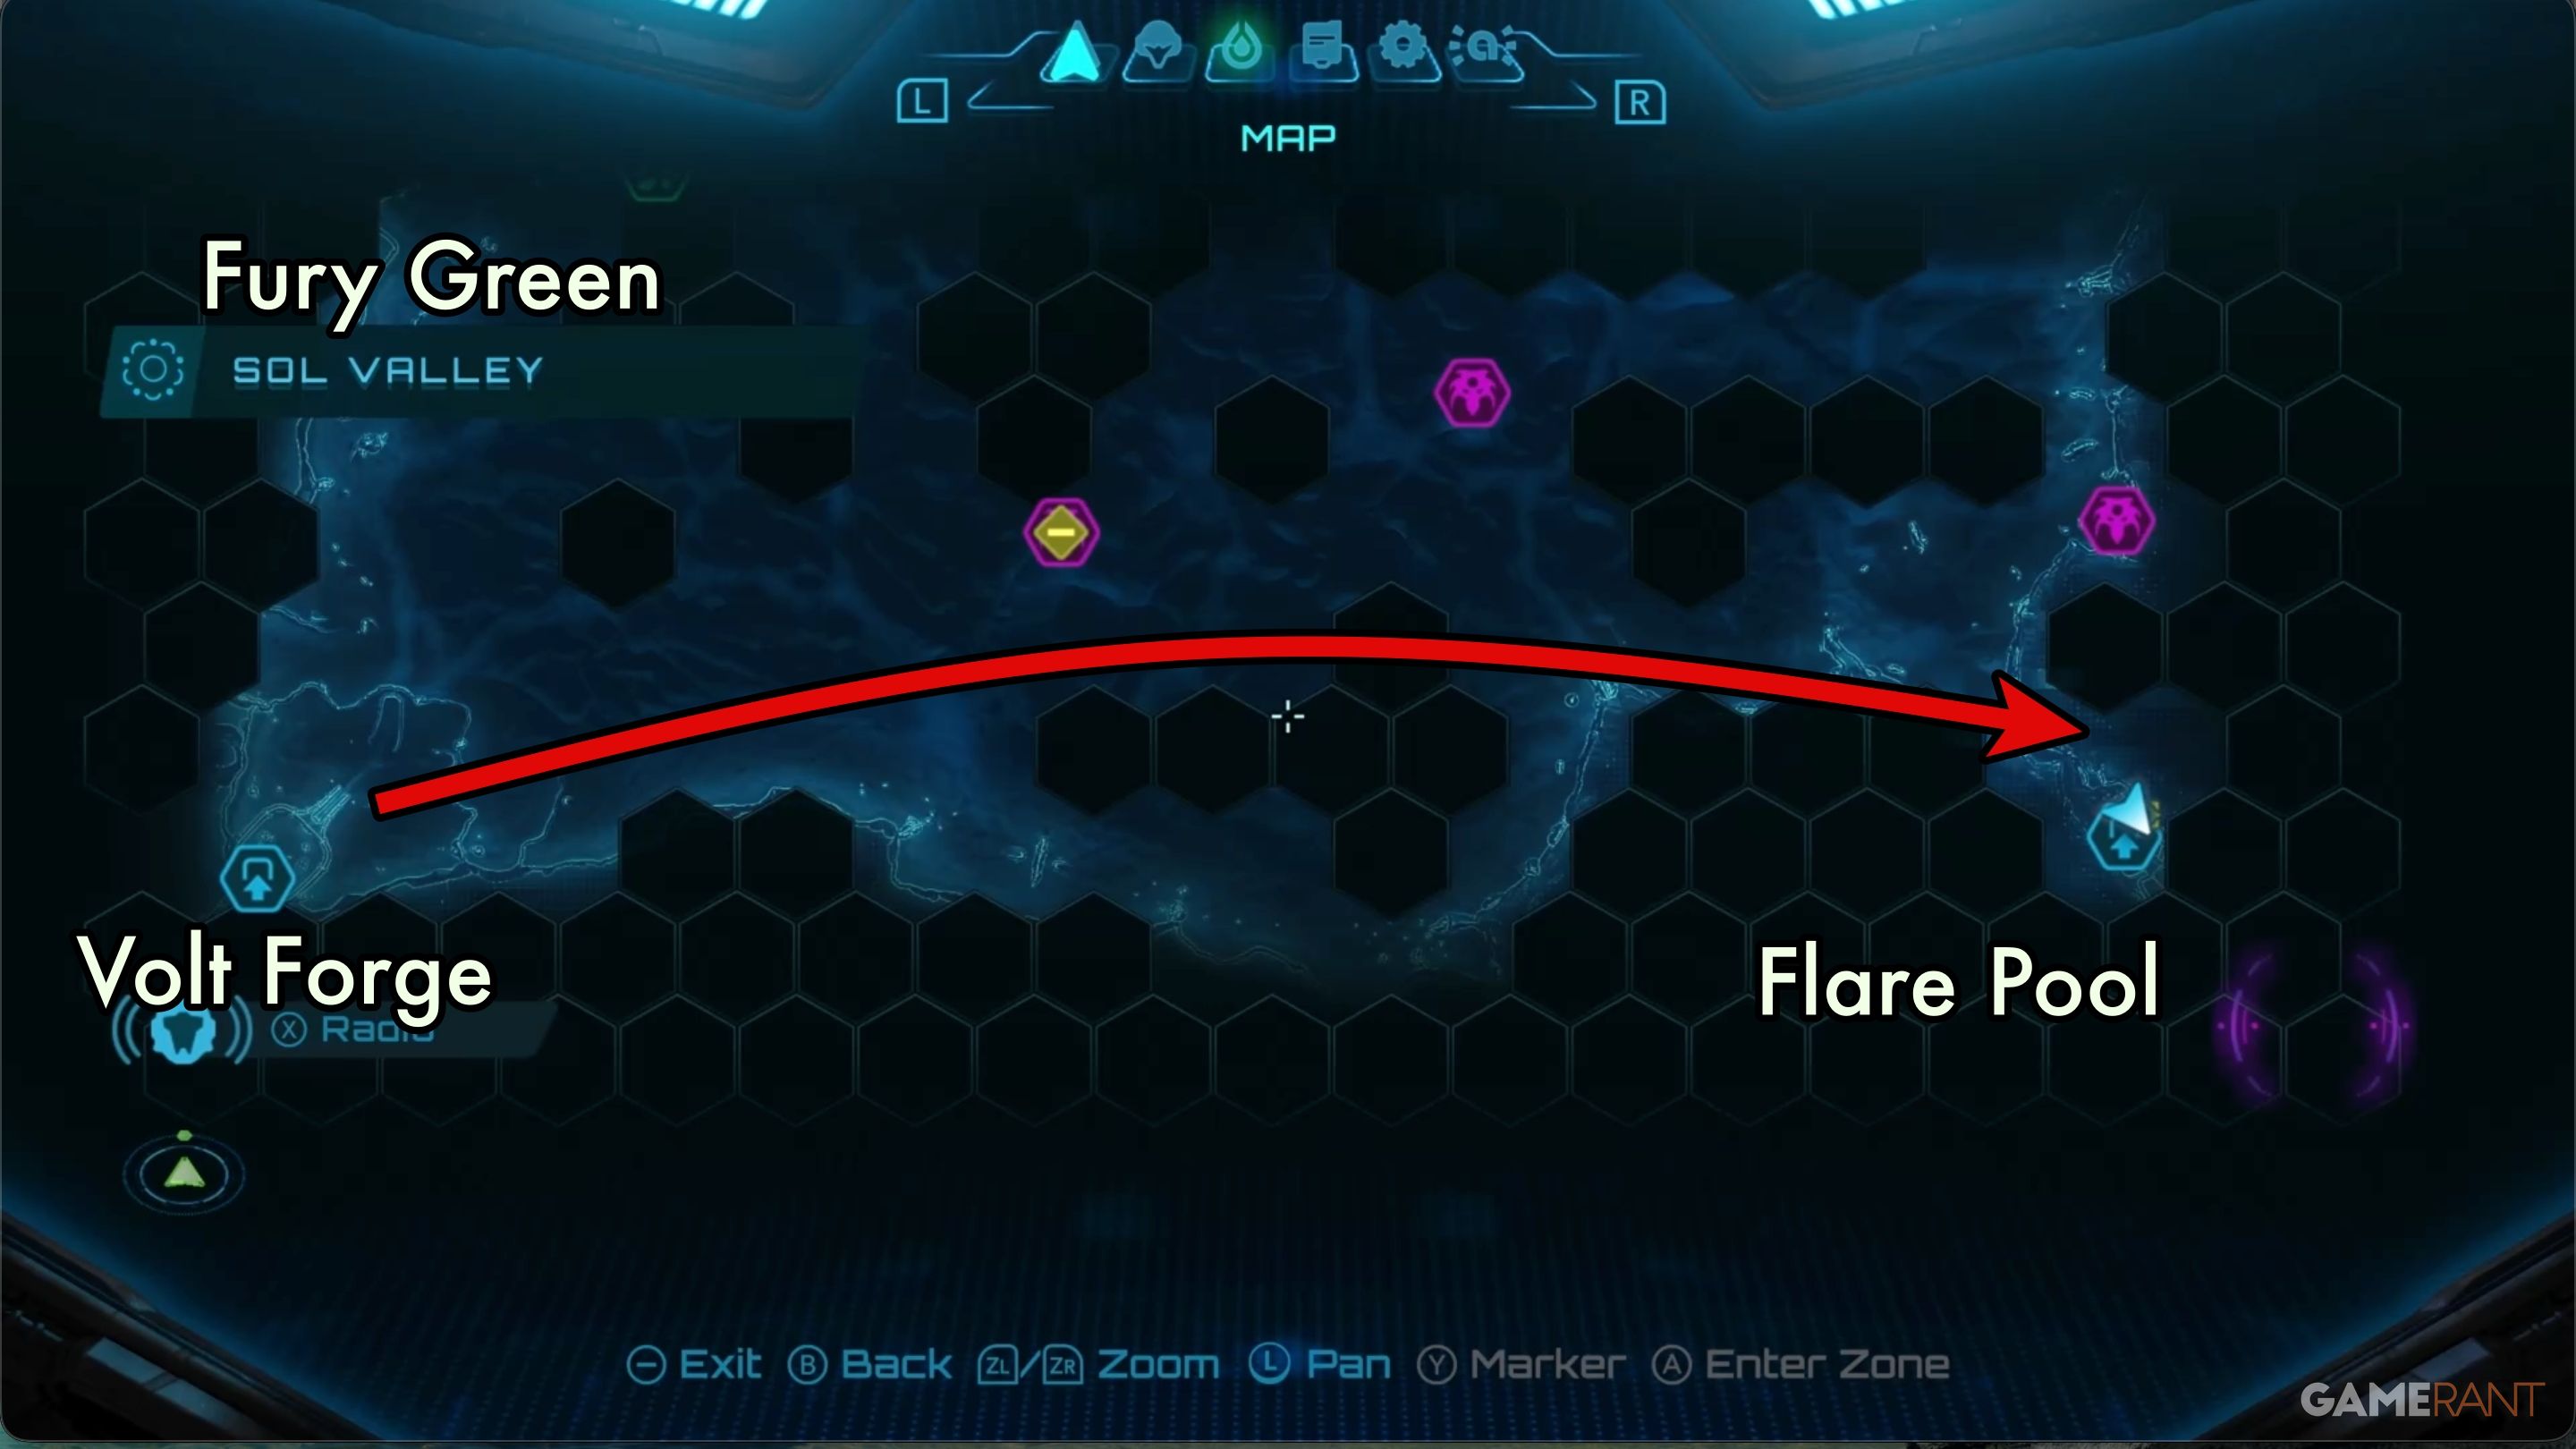
Head Southeast Across the Desert:
Once you’ve finished the Fury Green and Volt Forge dungeons, you might be unsure where to go next. The game seems to give you choices, but there’s really only one logical path. While Ice Belt is the next full dungeon – you can find it in the northwest part of Sol Valley – you won’t be able to progress there after Volt Forge without learning the Fire Shot skill. This means Flare Pool is your only viable option at this point.
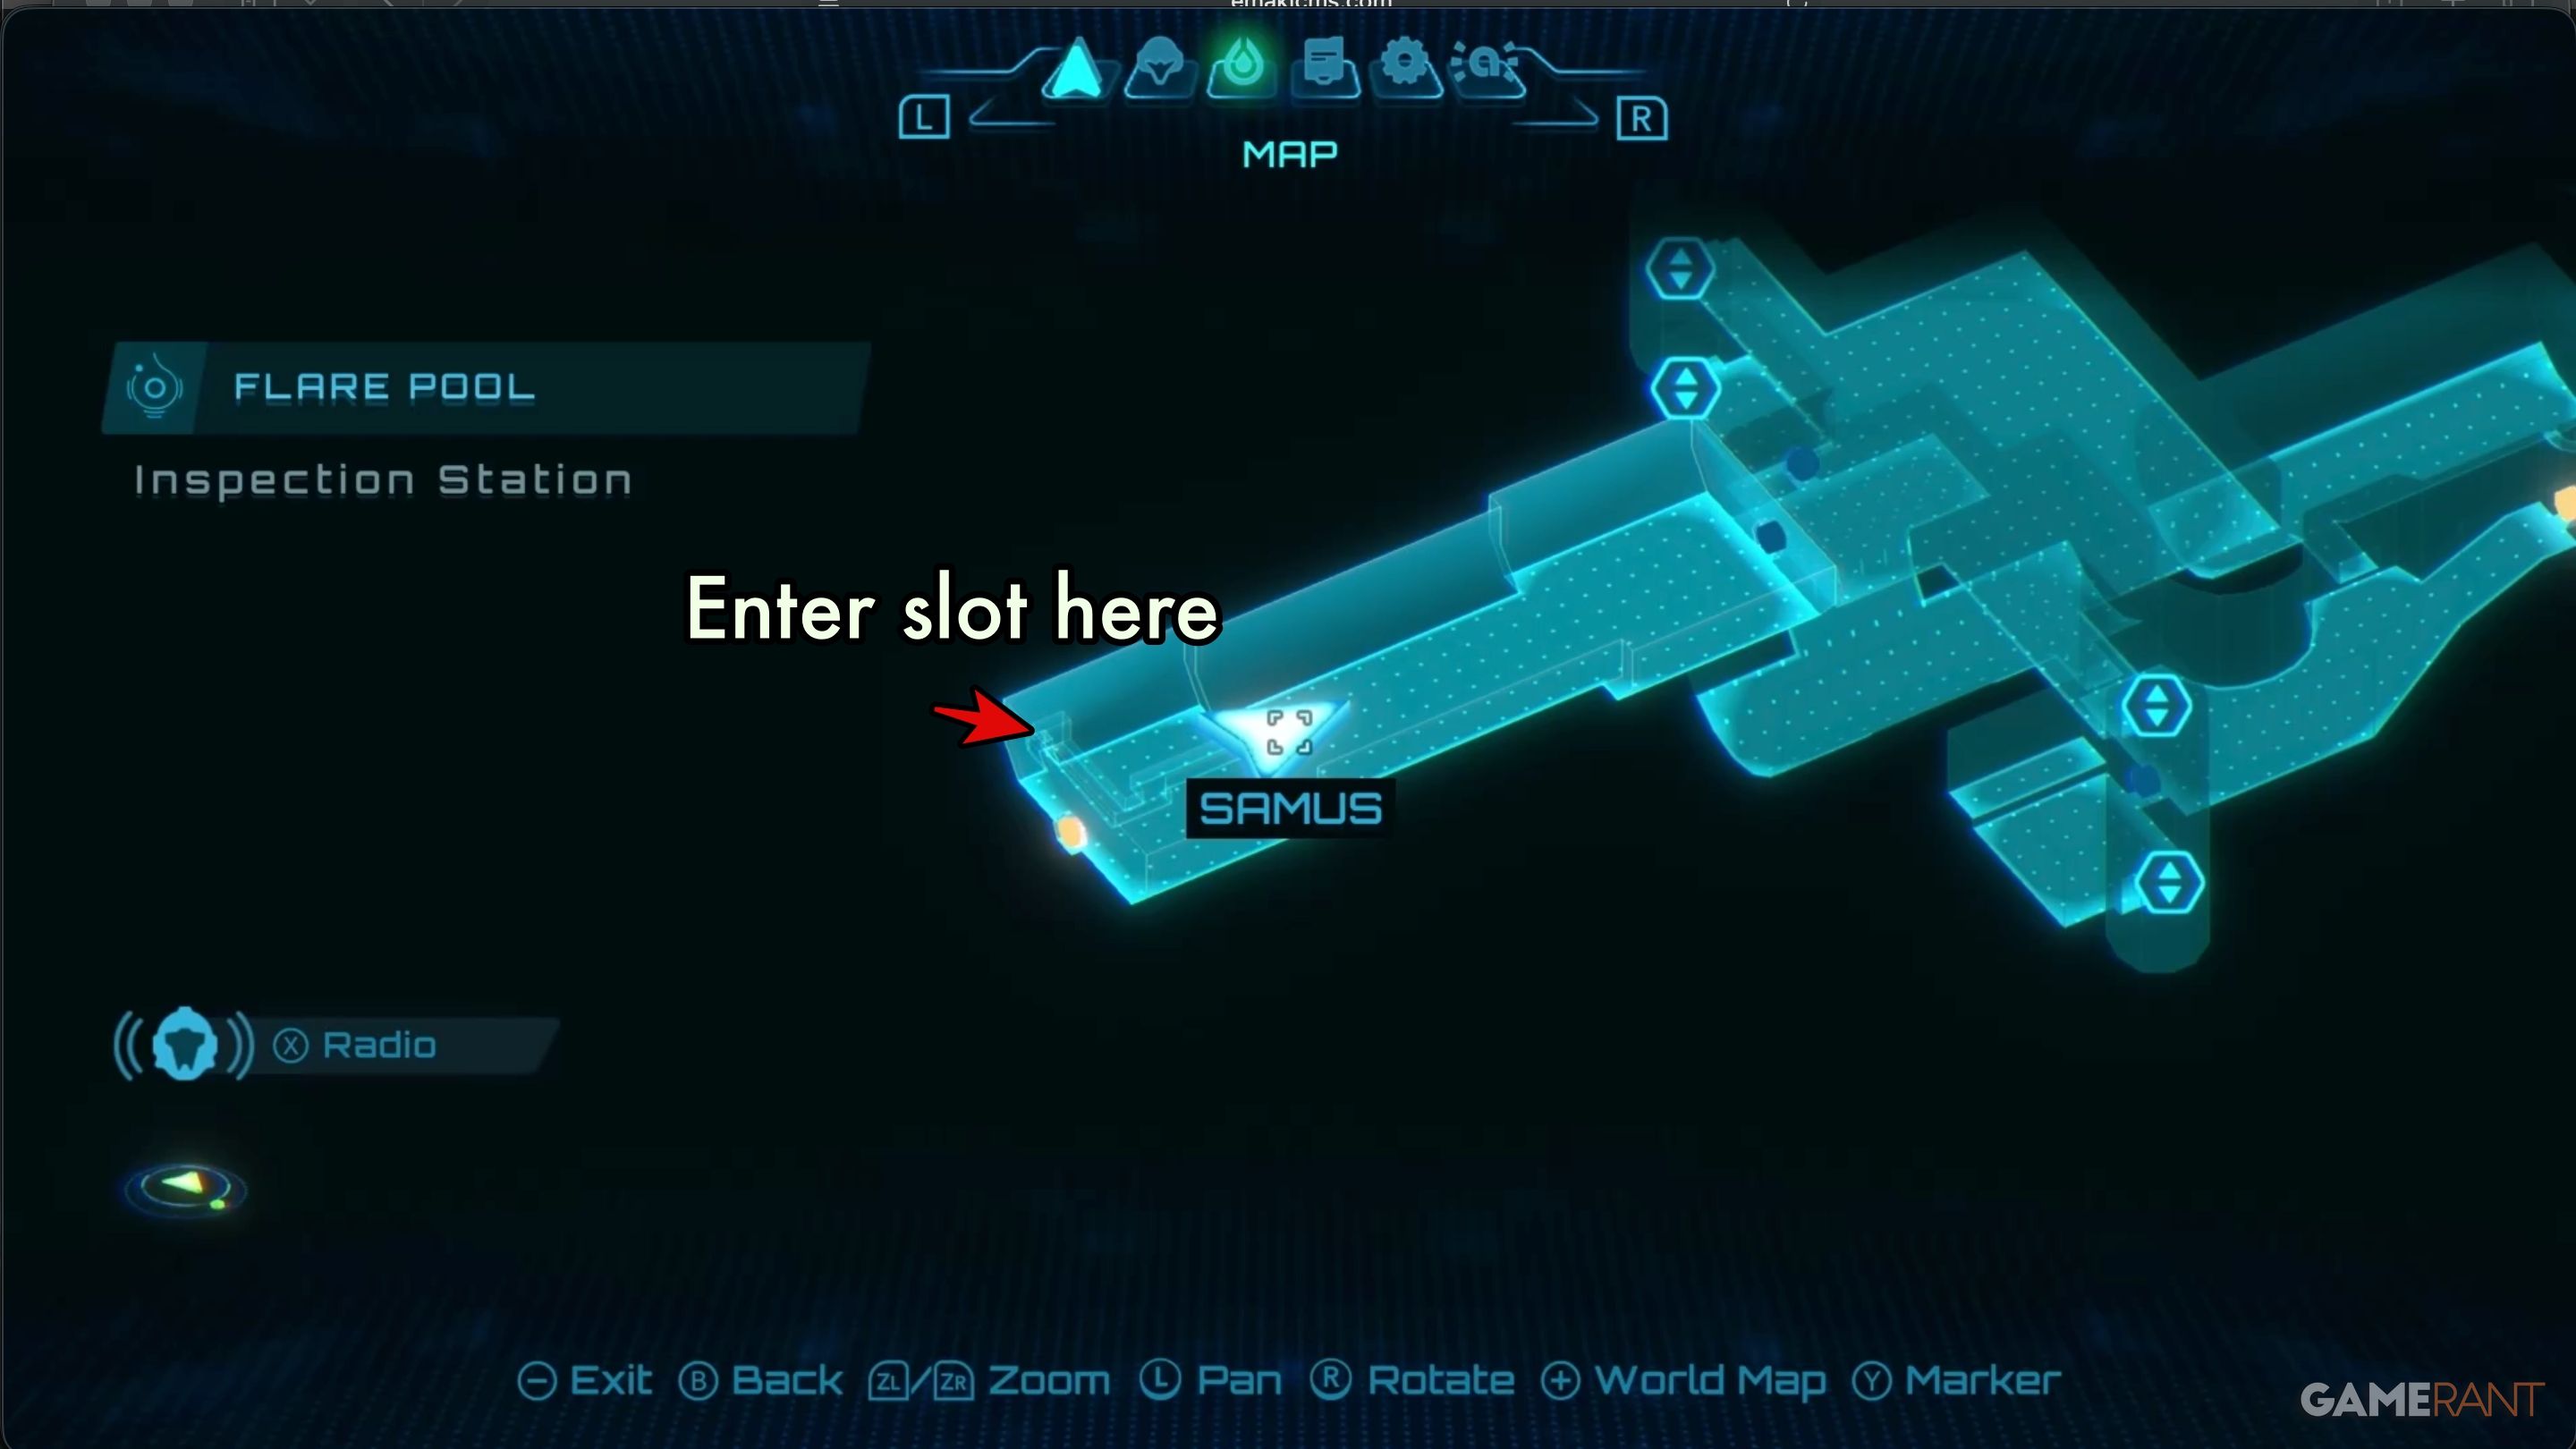
You can find Flare Pool in the southeast corner of Sol Valley. Since you don’t have any elemental weapons yet, there isn’t much to do there right now. You’ll need to visit this location at least twice, so don’t feel pressured to explore everything thoroughly on your first trip.
Don’t forget to gather Green Crystals as soon as you can! You’ll need a lot of them later in the game, so collect every one you find while traveling between Volt Forge and Flare Pool. Starting early will really help!
Flare Pool First Visit – Metroid Prime 4: Beyond
To get 100% completion in the Flare Pool dungeon, you need to find all the items and upgrades, and scan every object you come across. We’ll list all the enemies and items in each area that are necessary to achieve full completion.
Fire Chip & Missile Expansion 1:
You’ll visit Flare Pool after finishing Fury Green and Volt Forge. This first visit will be brief, but essential to continue to the Ice Belt dungeon. You’ll be able to unlock the Fire Shot weapon after this visit, and your main goal is to collect the Fire Chip. There isn’t much else to do there at this stage.
Where to Find the Missile Expansion 1:
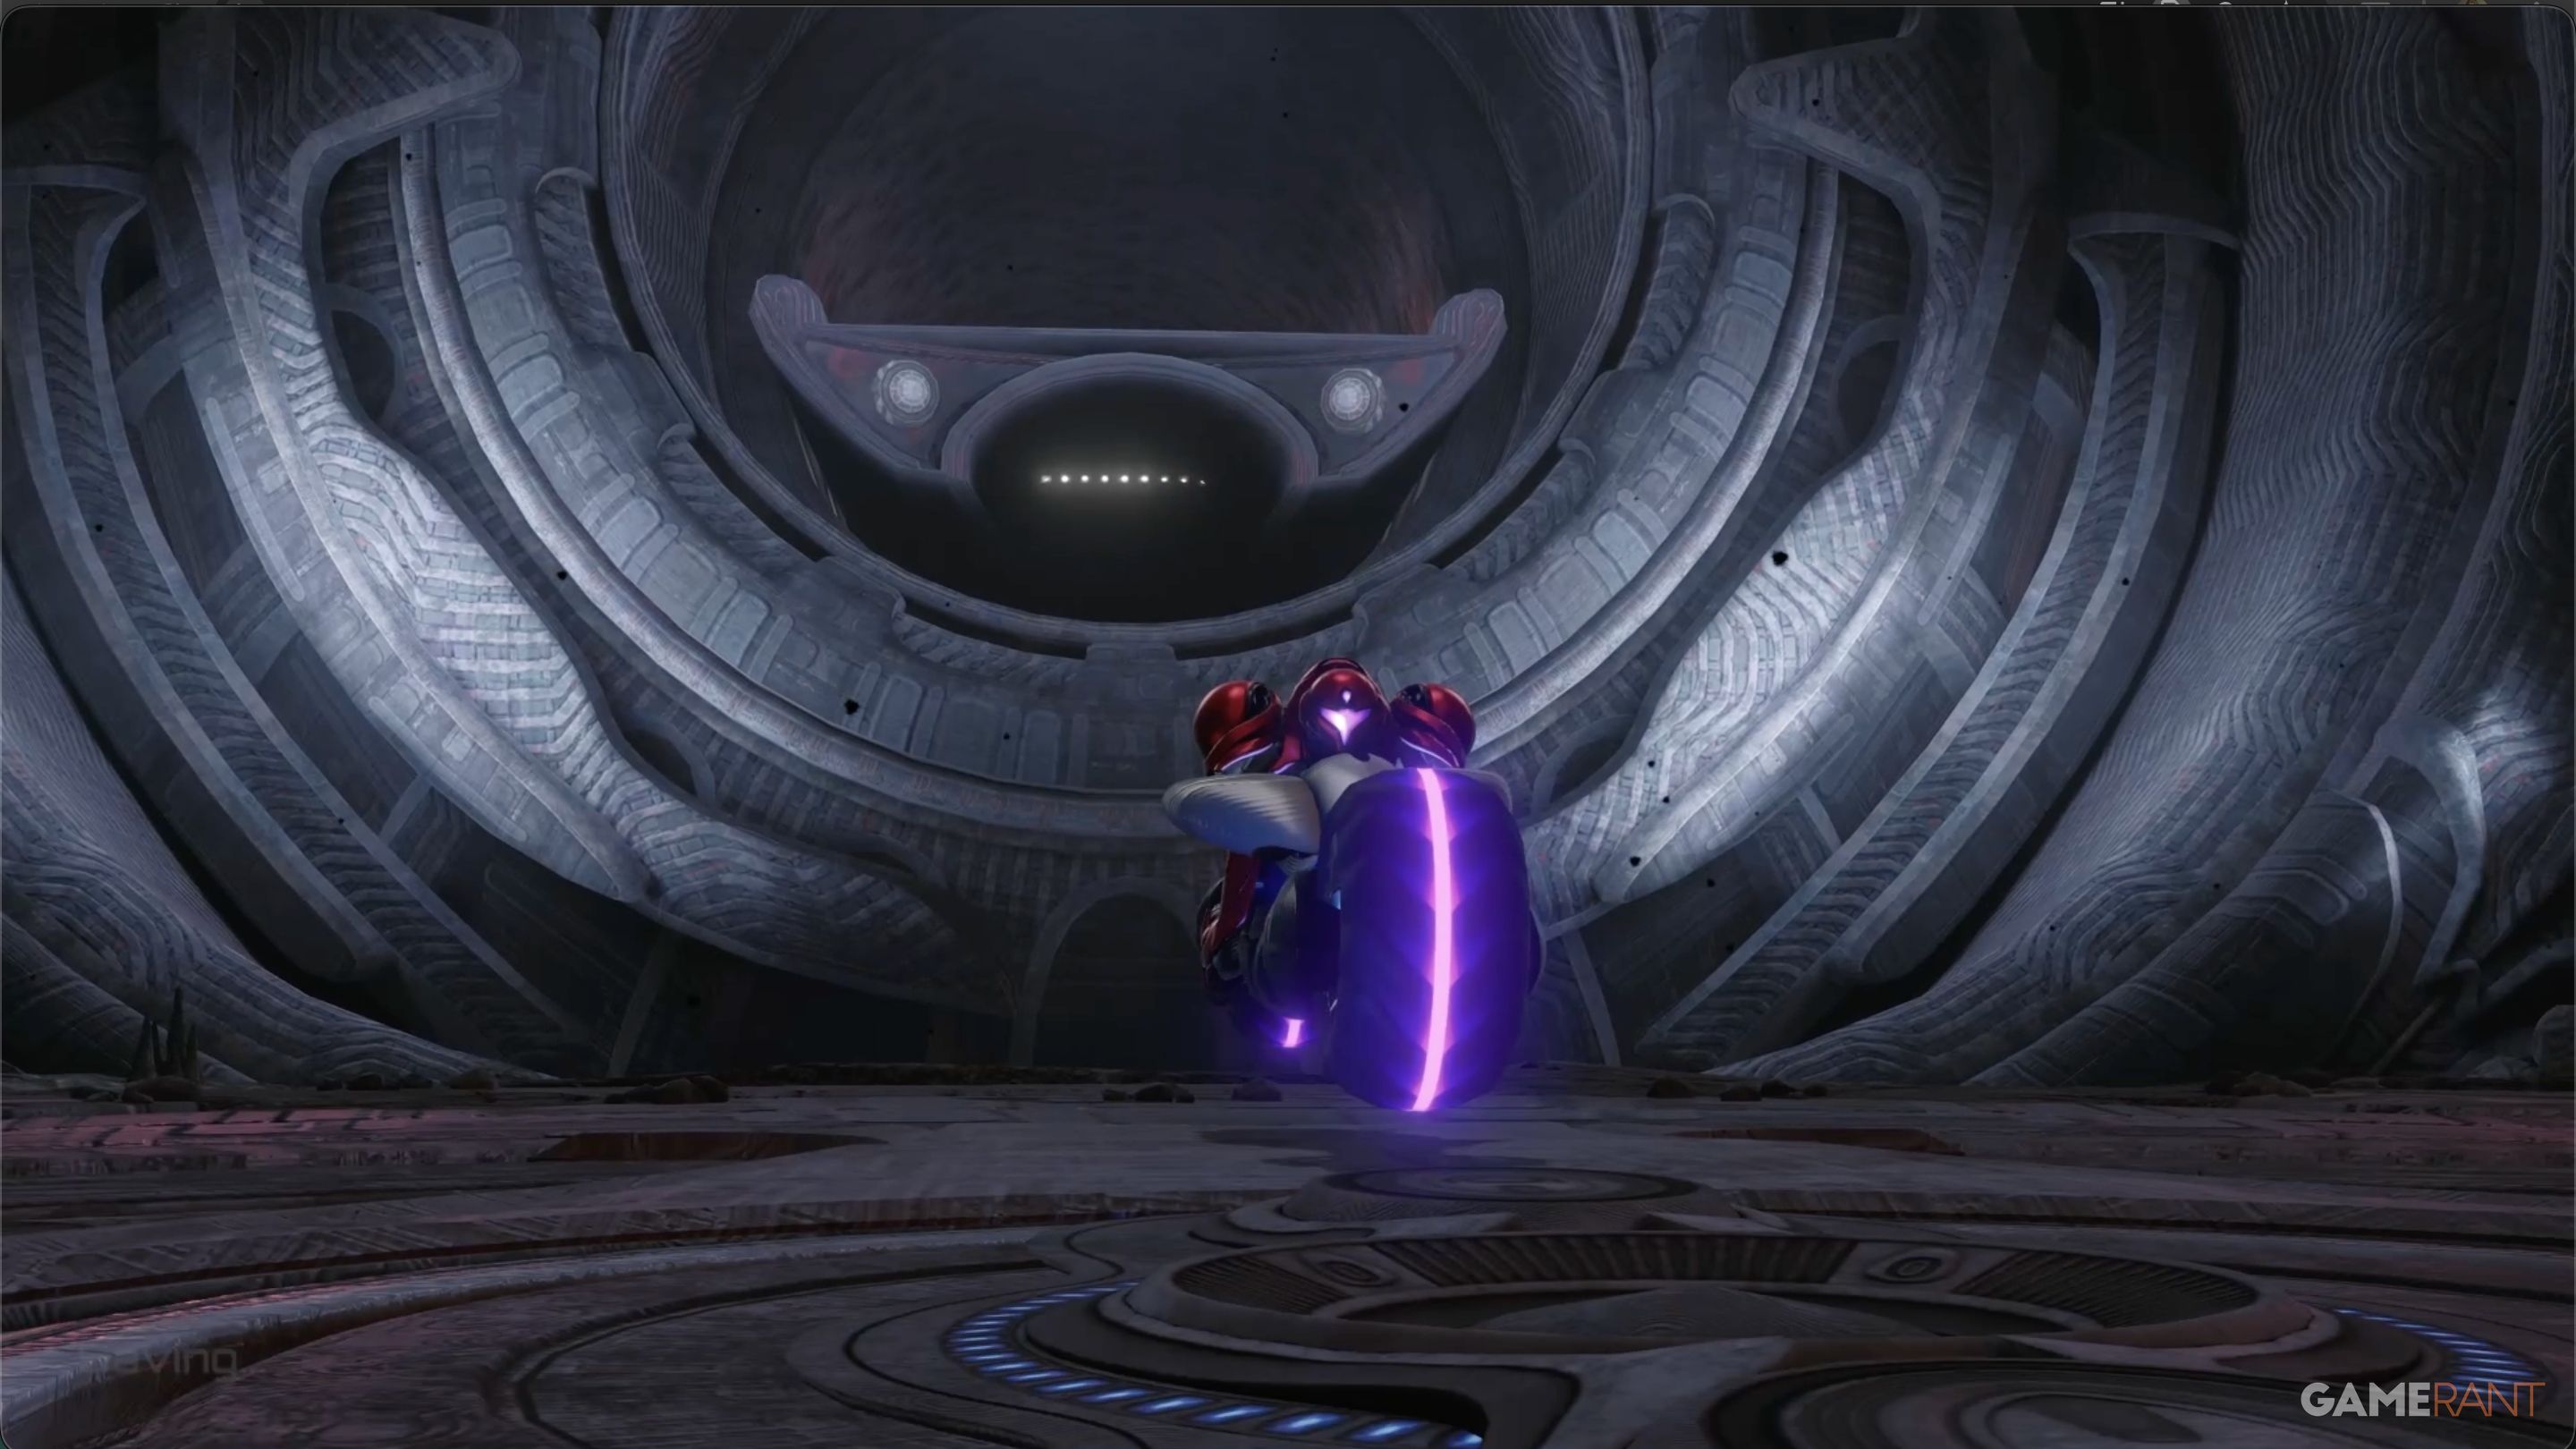
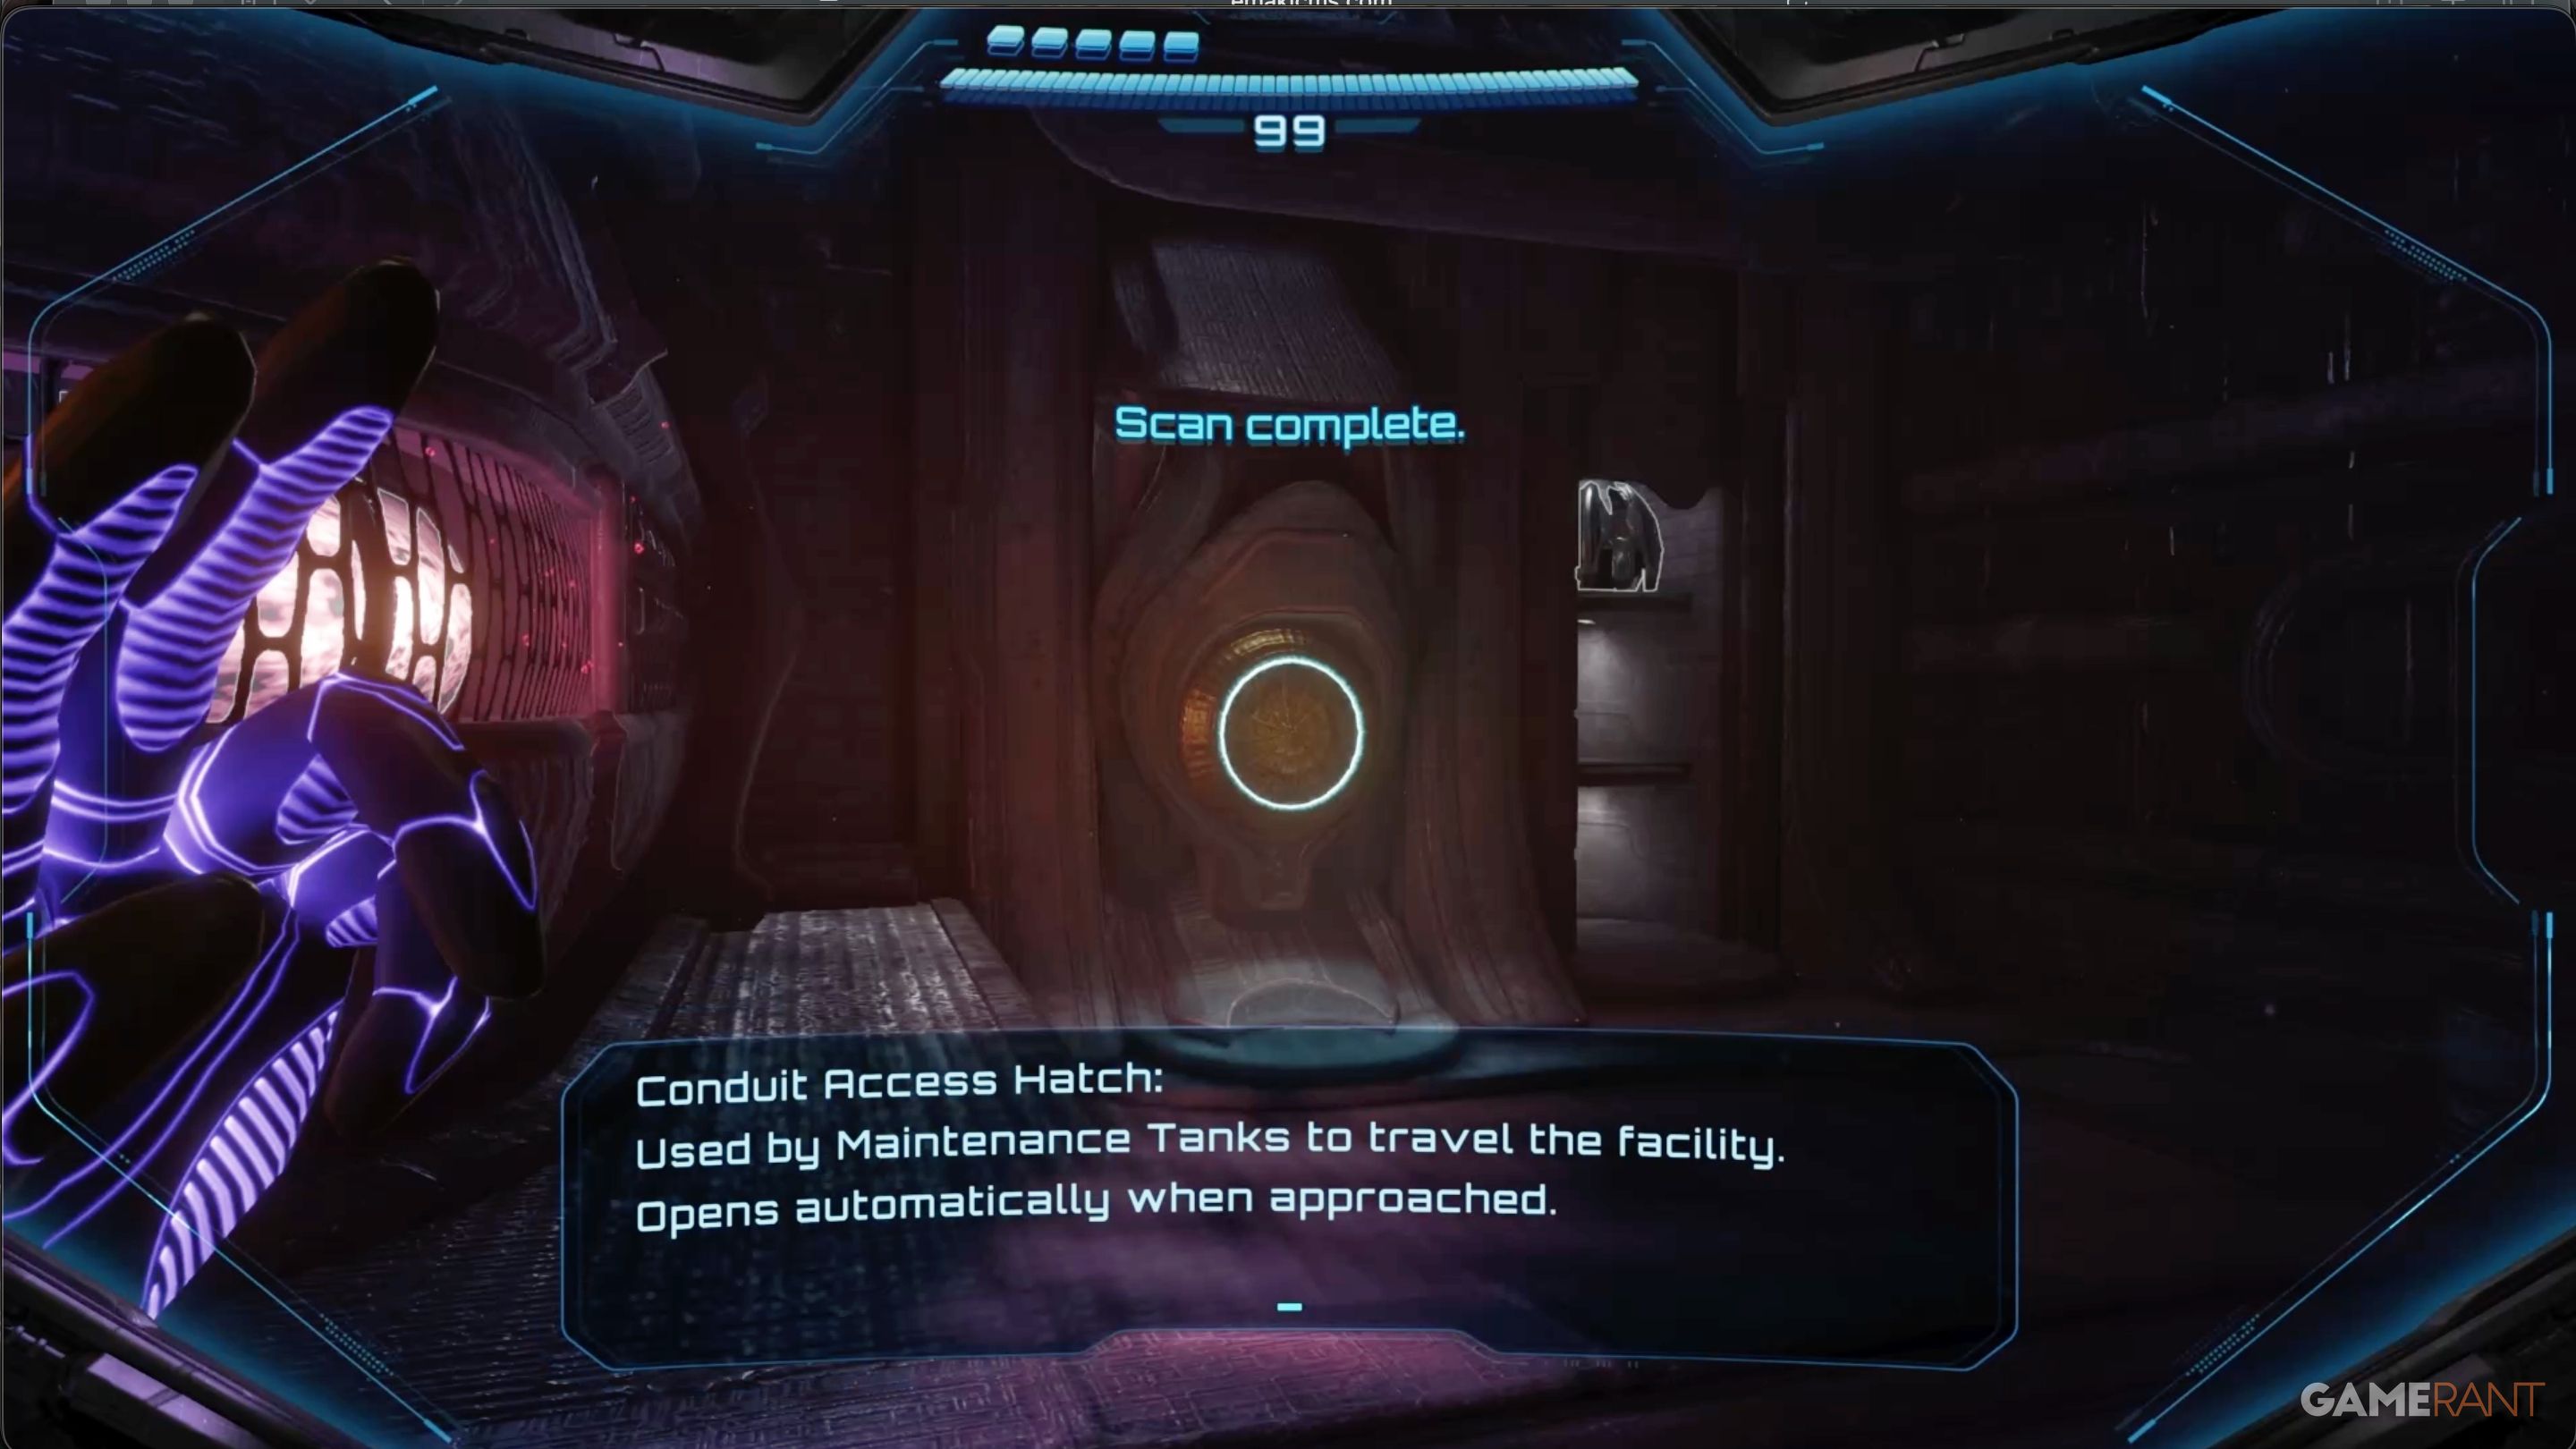
Once you’ve used the Vi-O-La spinner to get into the dungeon’s main entrance, you’ll find yourself in the Volcano Entrance chamber. This is where you’ll first be able to scan creatures.
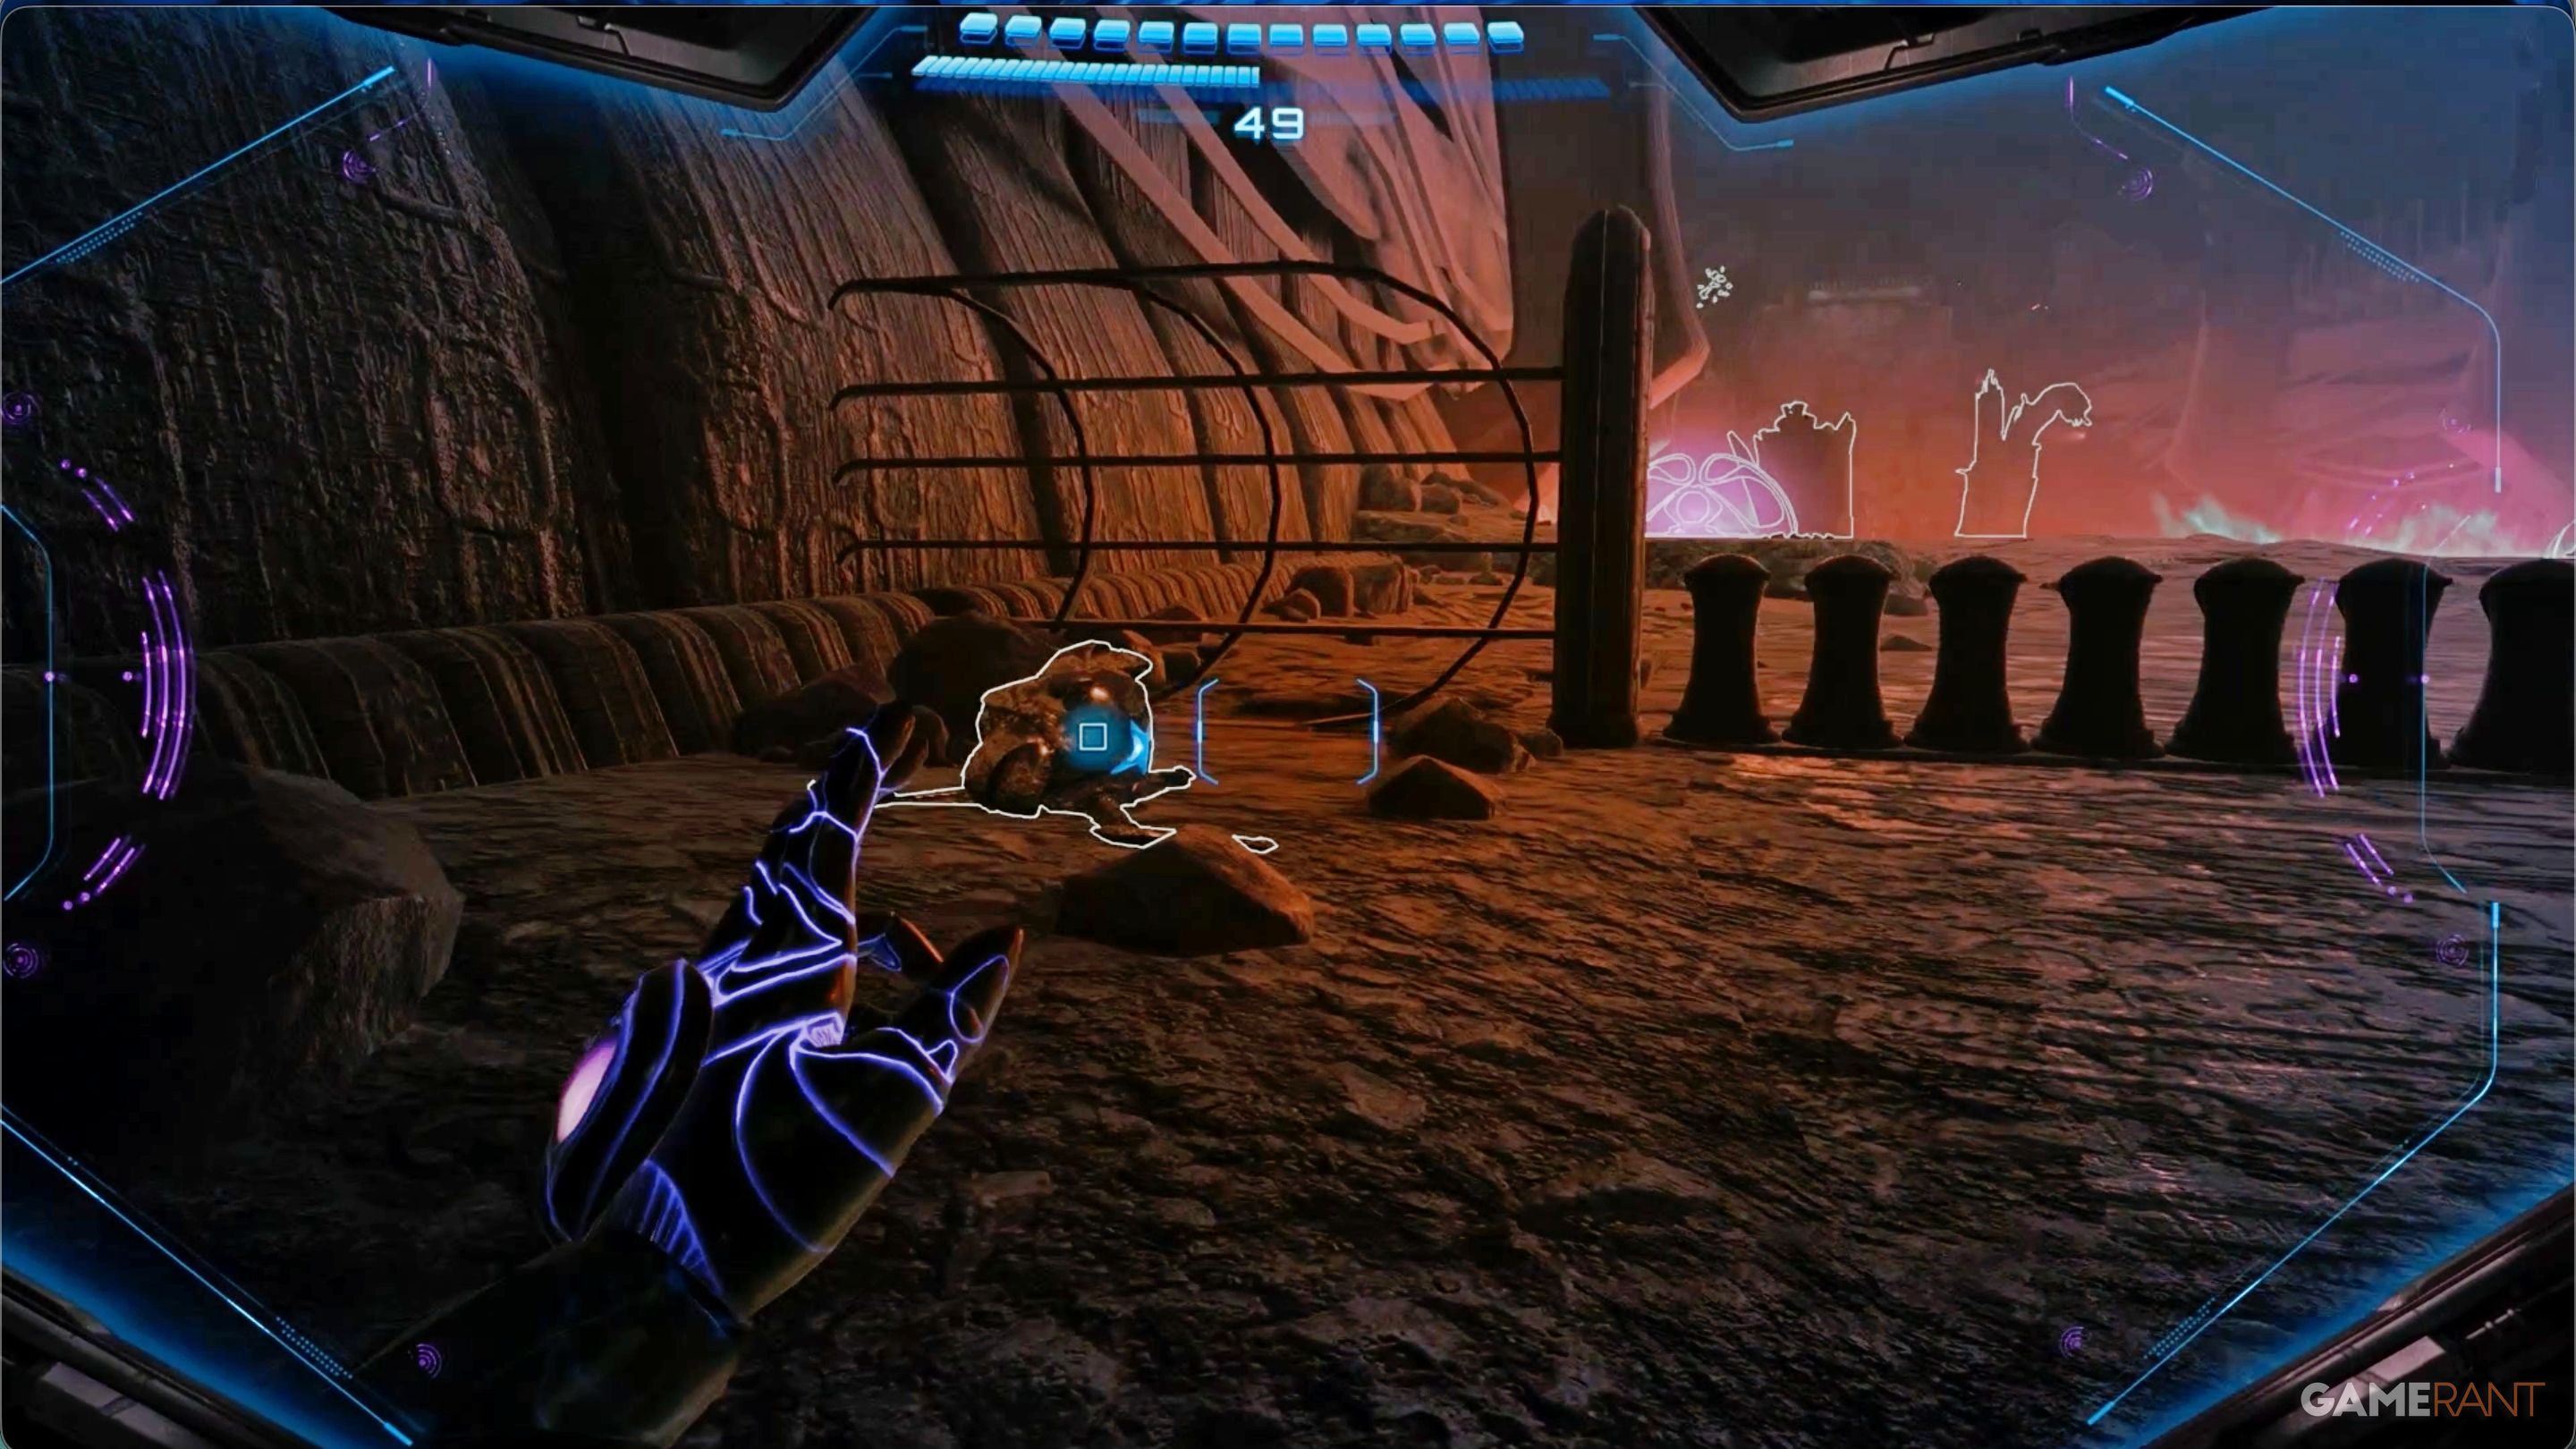
- Vaernan: A small reptile that crawls around the floors of this chamber, and many others in the dungeon.
- Swarm Flyer: A flock of small floating creatures that circle around near the chamber’s ceiling.
- Heatstrap: A small crustacean that clings to the walls of the chamber.
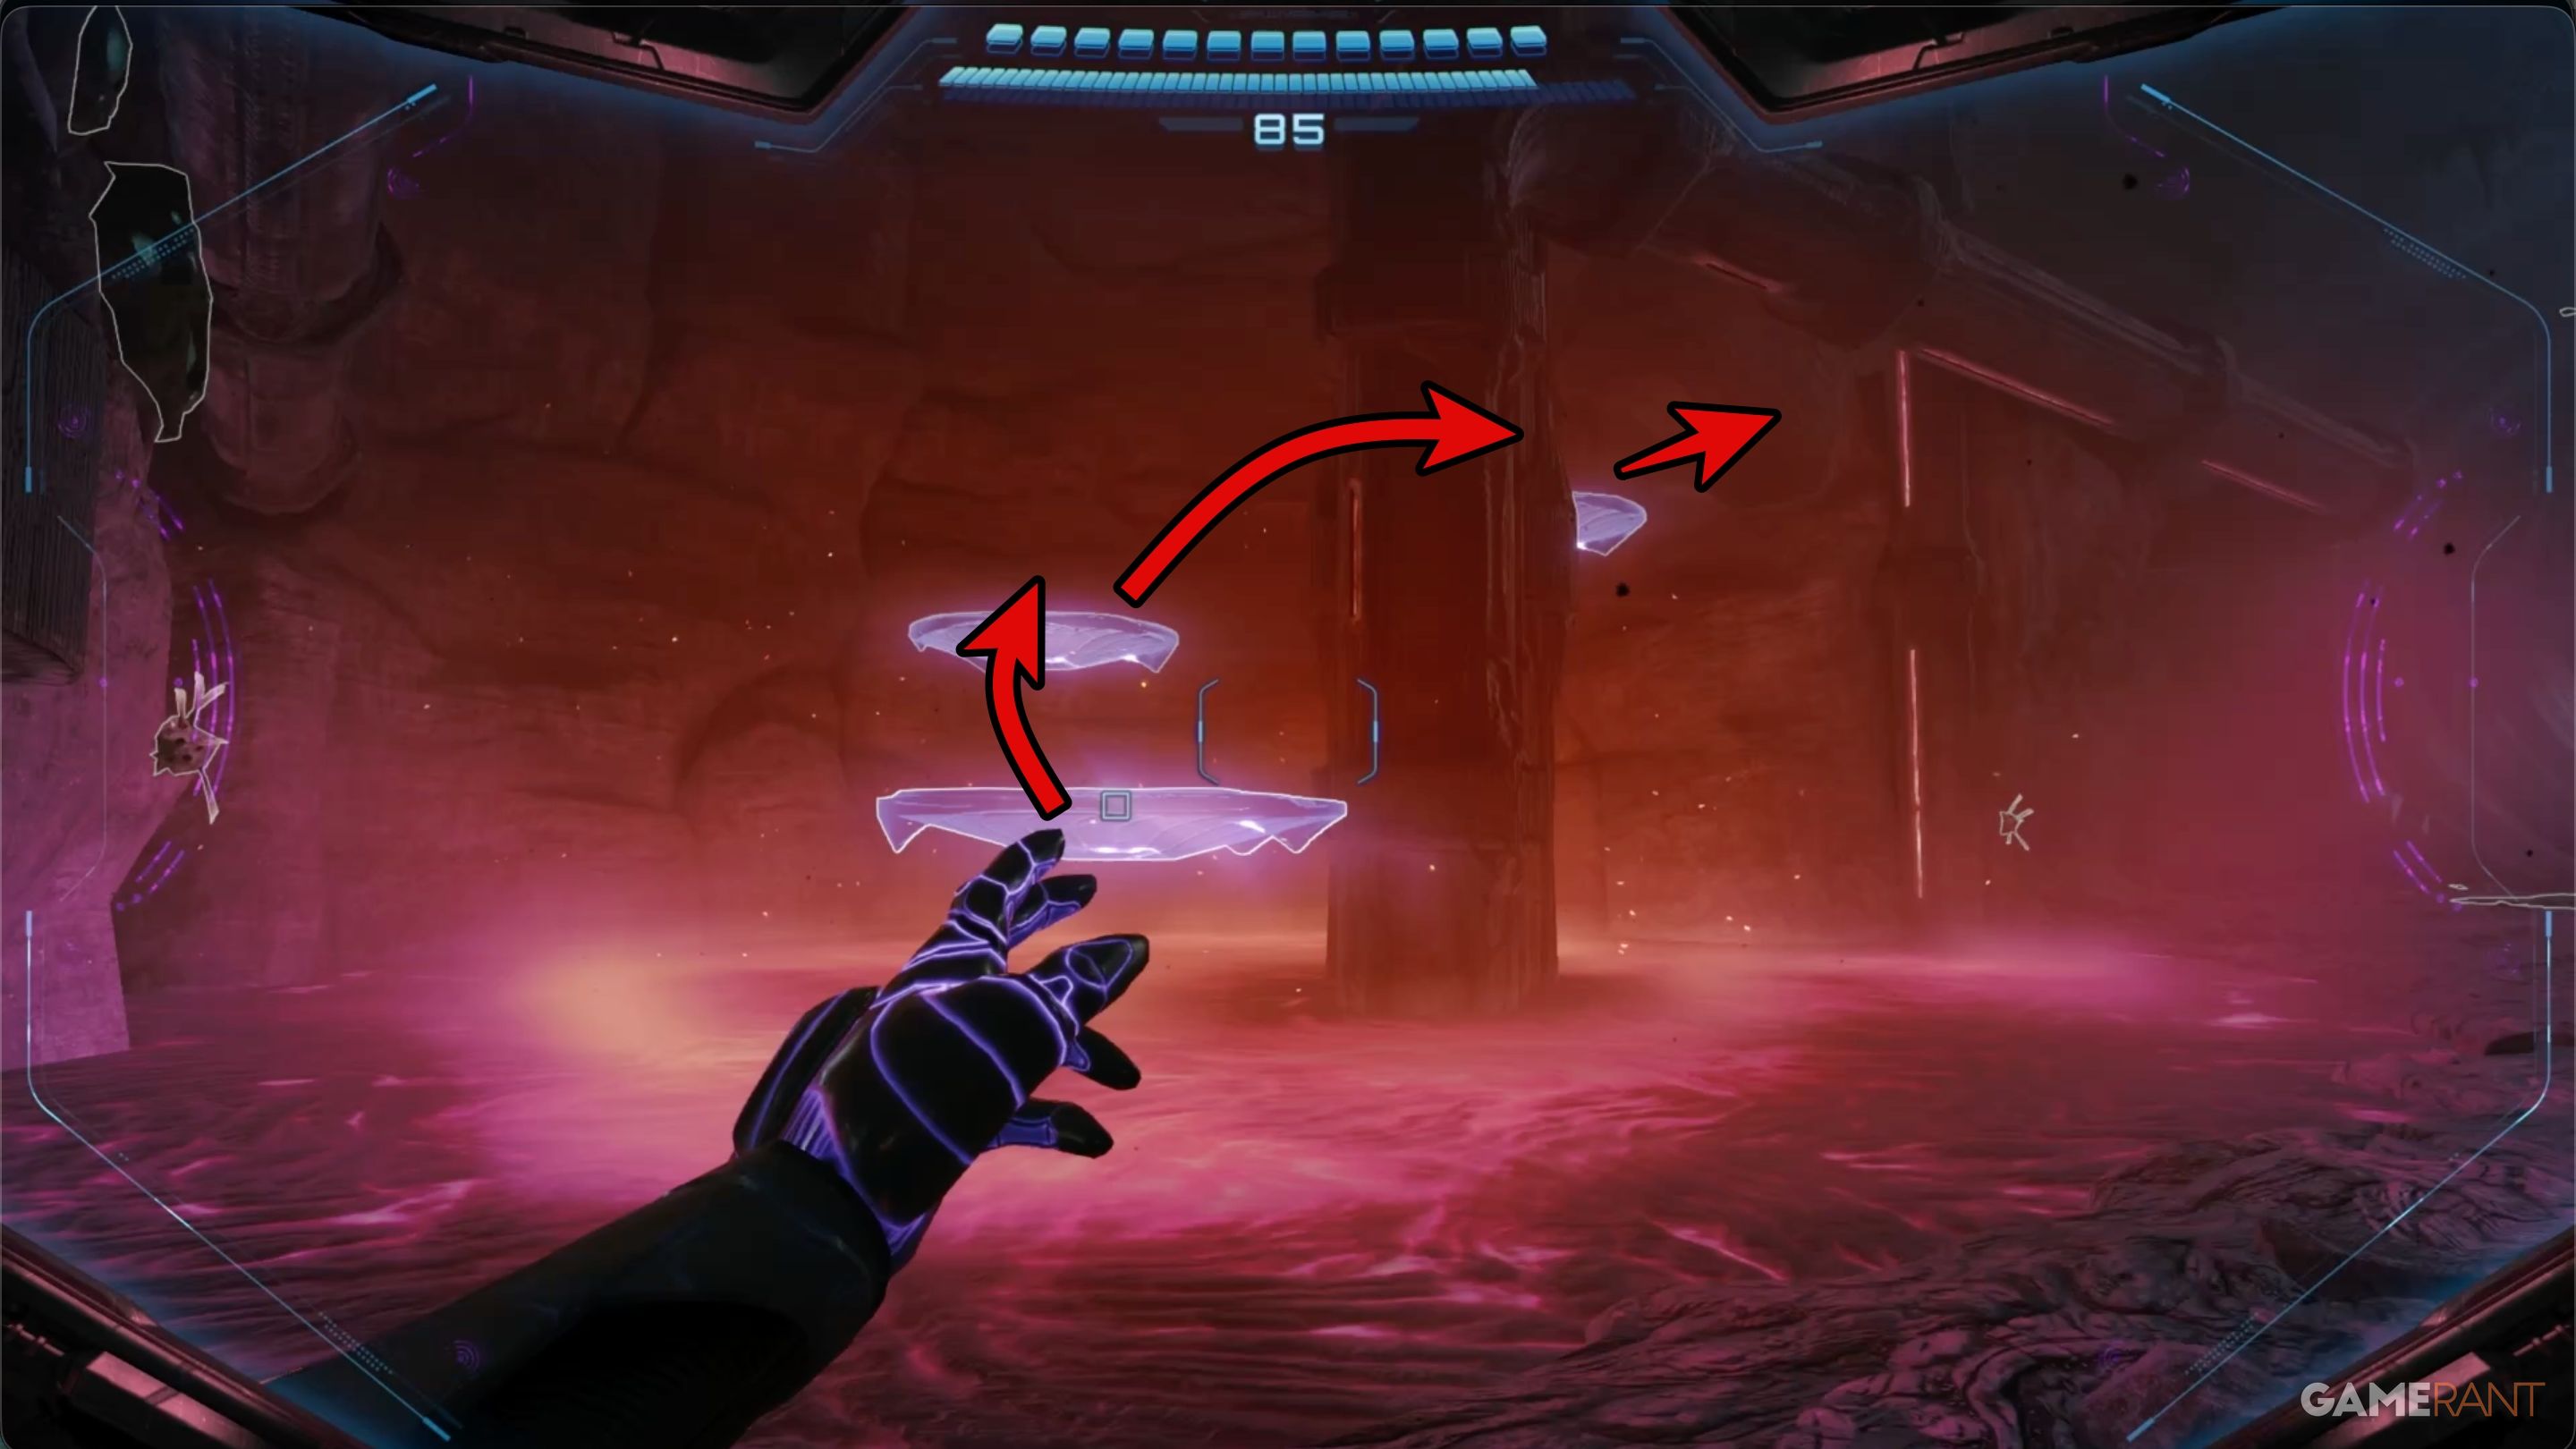
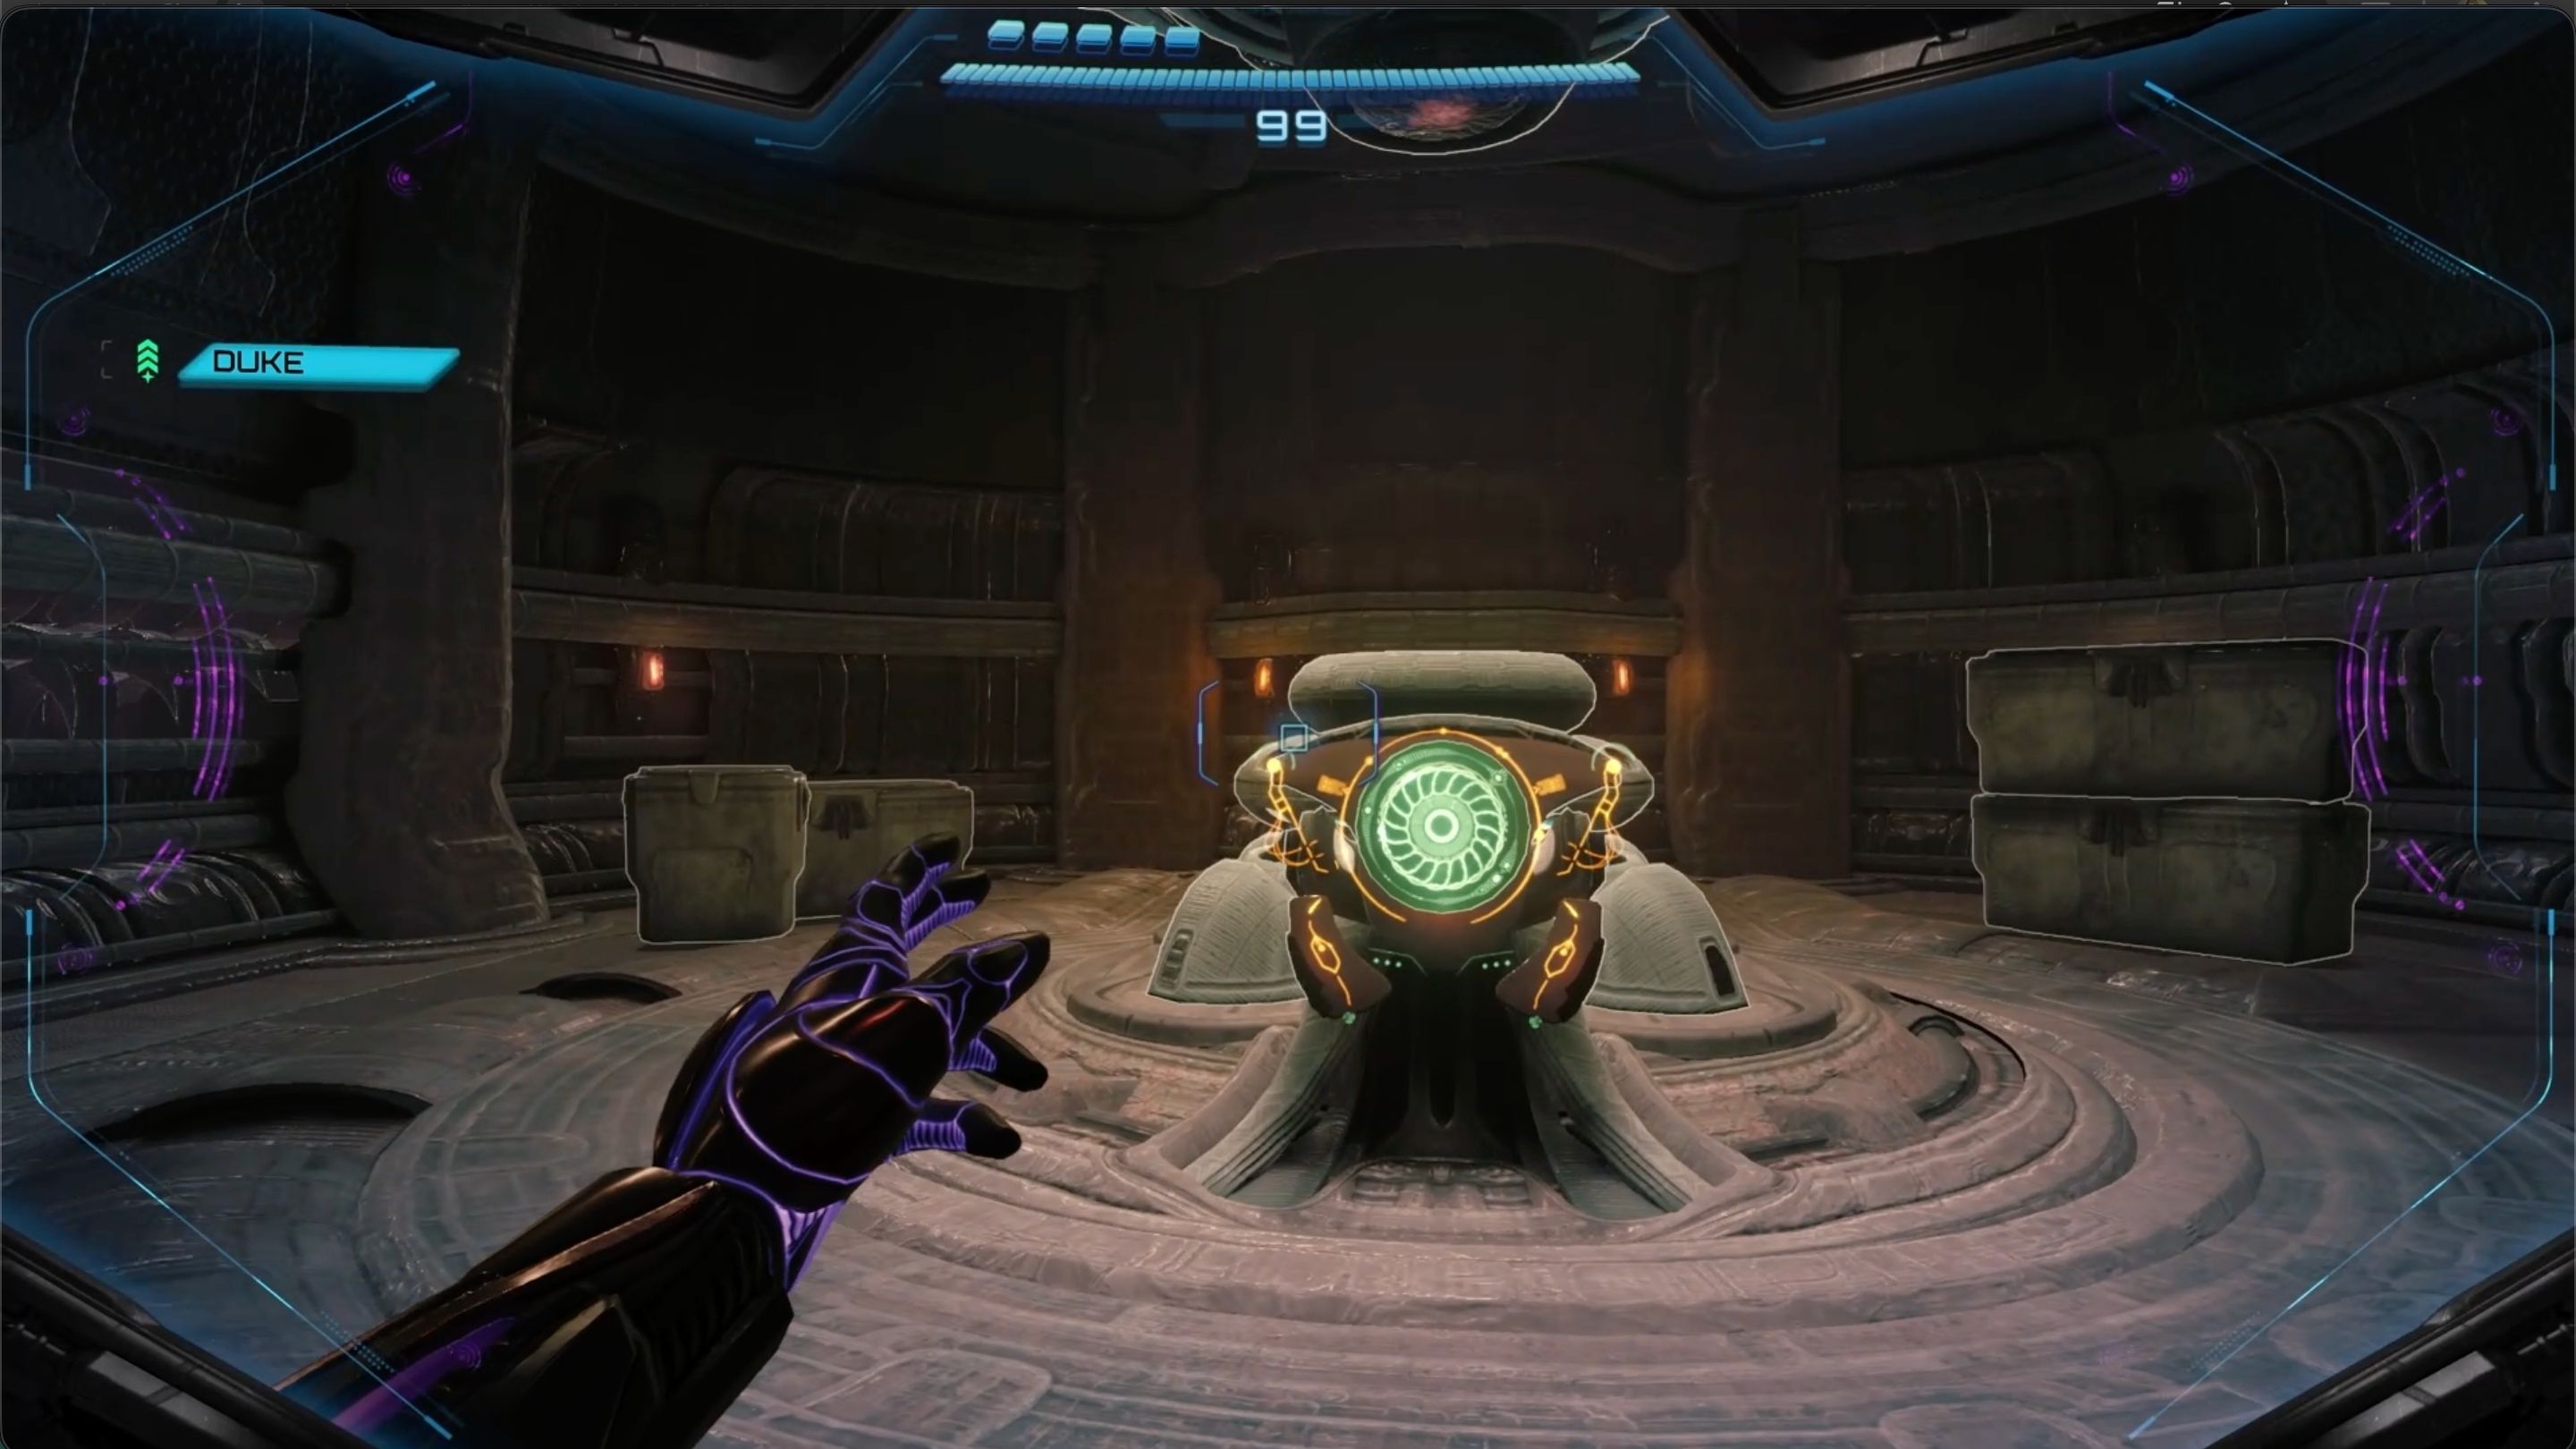
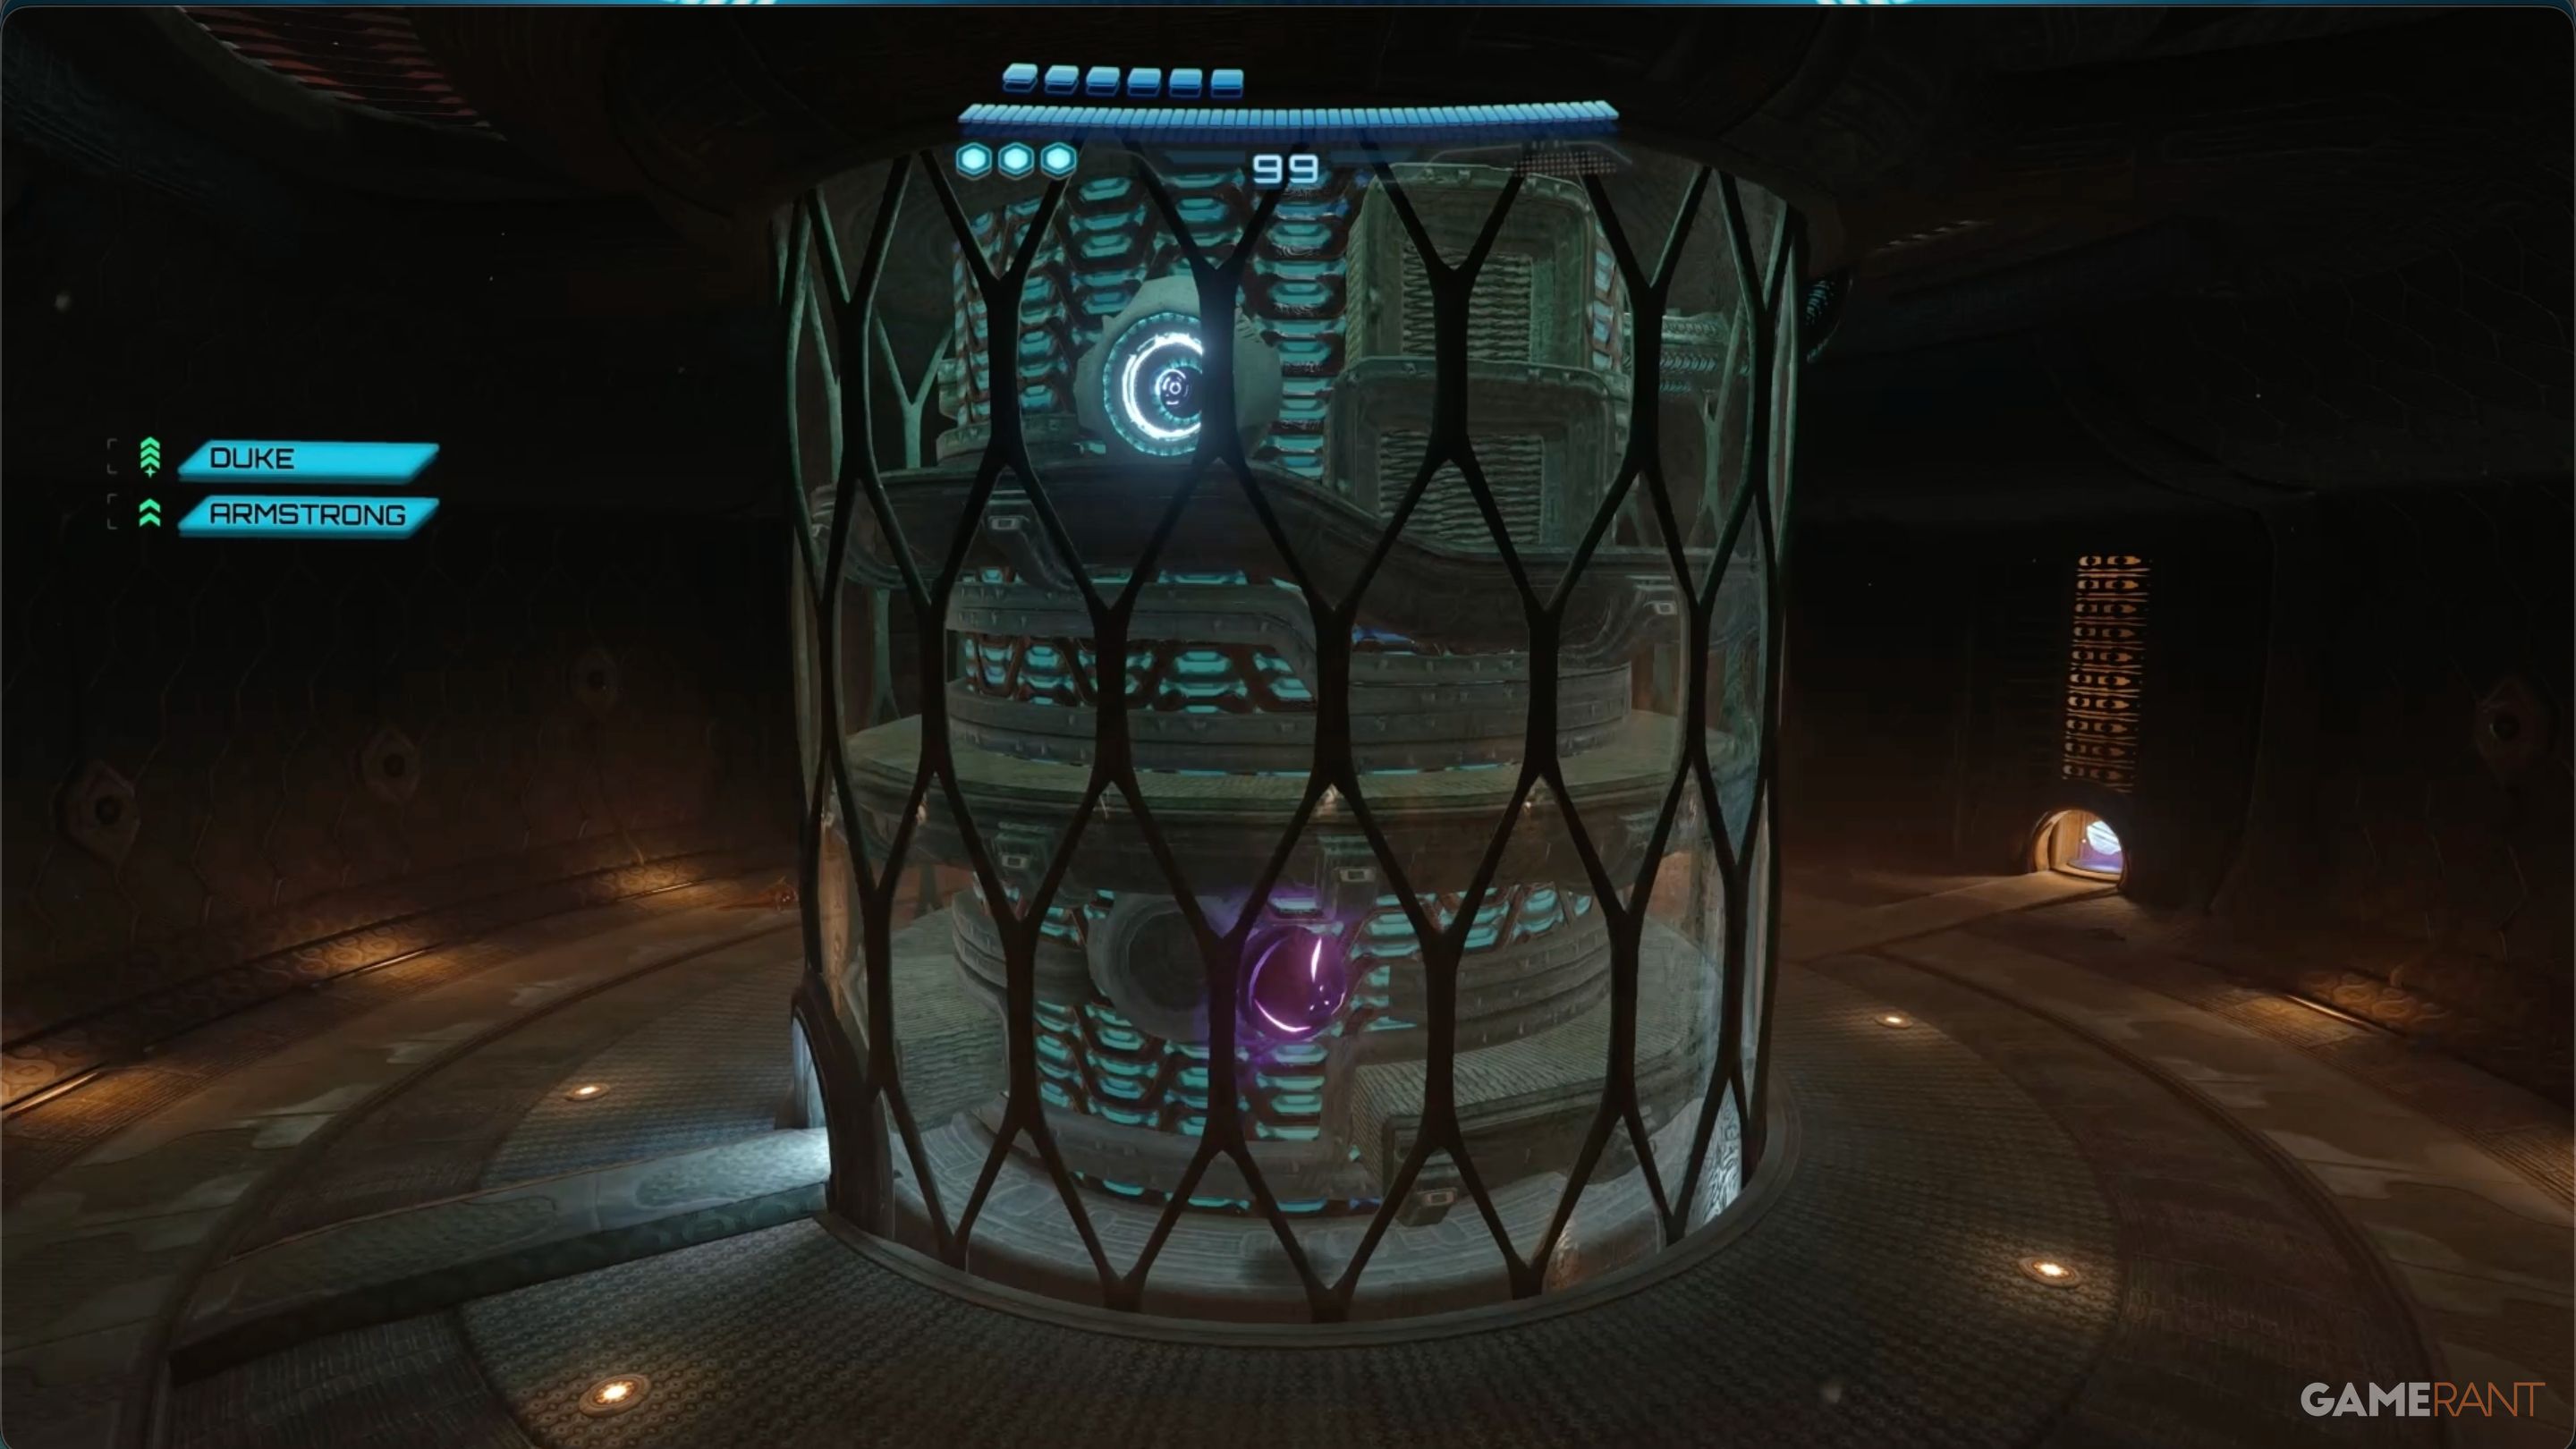
As soon as you enter the room, look to the right. You’ll see a purple glow – that marks a psychic object. Use your visor to scan the glow, and three Psychic Platforms will appear. Then, put on your Psychic Boots and jump across the platforms to reach a small alcove in the rocks.
Where to Get the Fire Chip:
You can now move into the next chamber, which is called Magma Overflow.
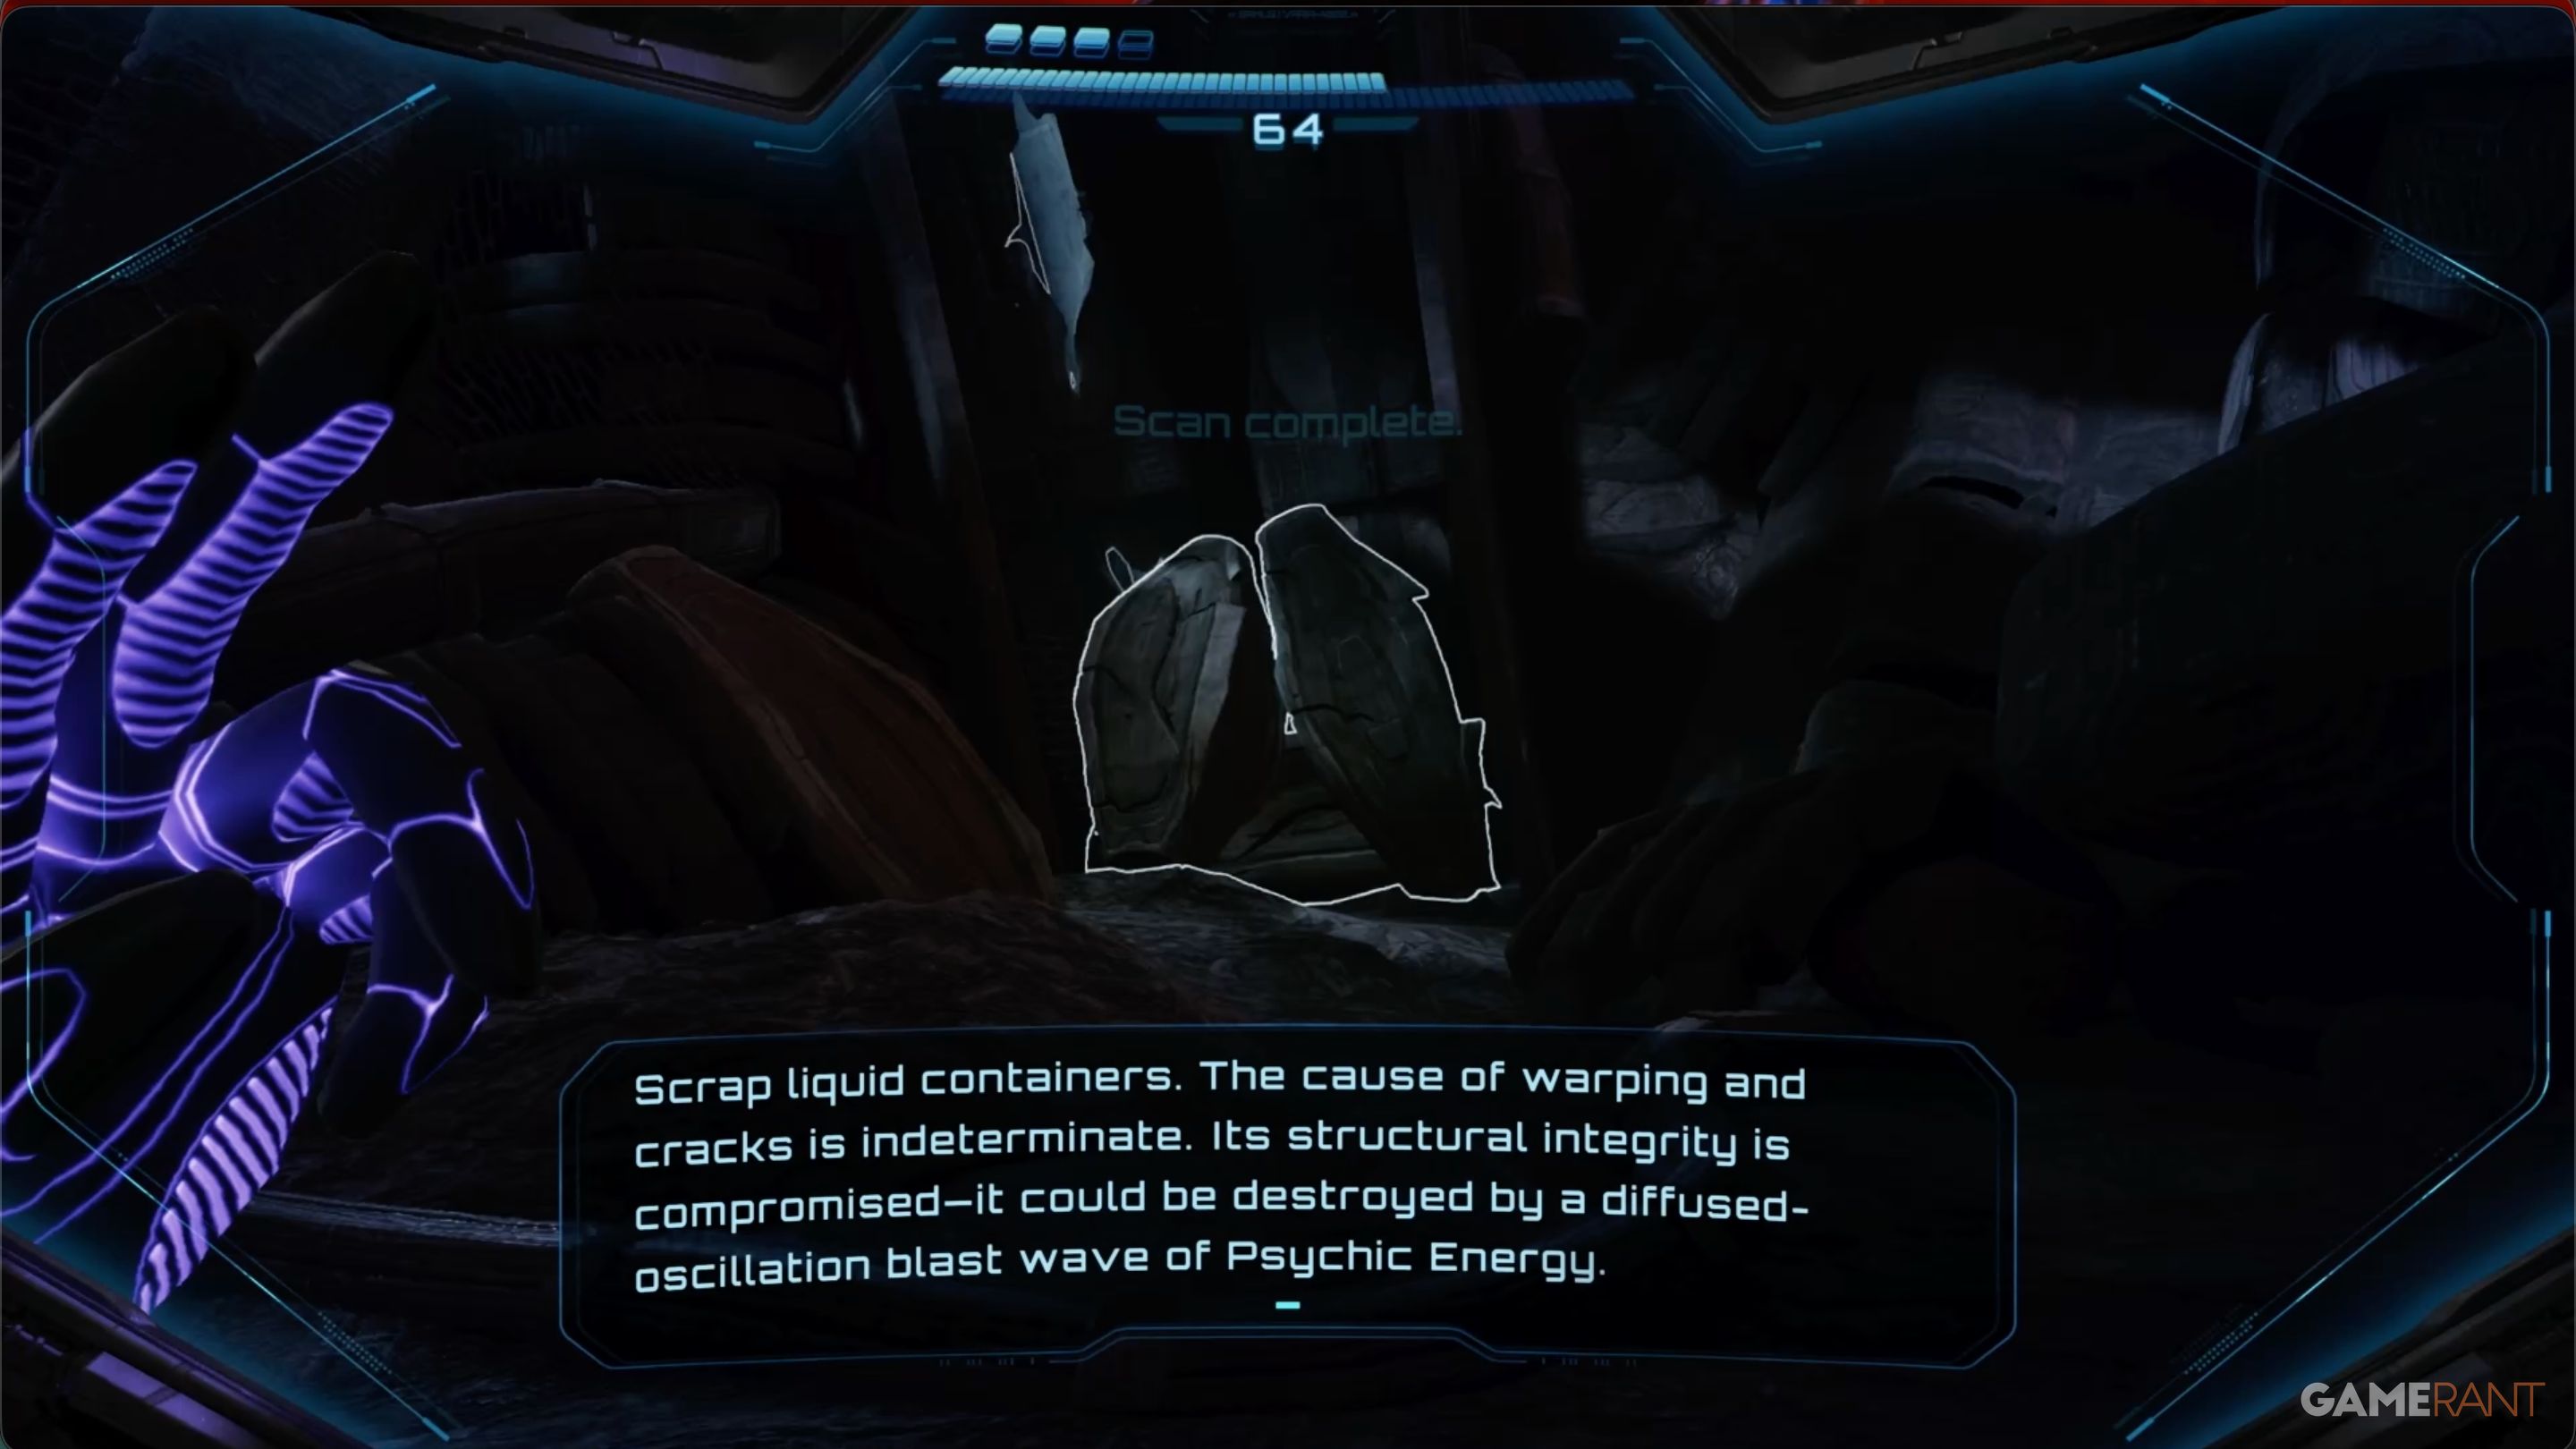
As you approach the end of the Magma Overflow chamber, you’ll notice the Lava Pressure Control Terminal, but you won’t need to use it right away. It requires a Boost Ball to operate, and you’ll understand why later, once you’re outside the facility.
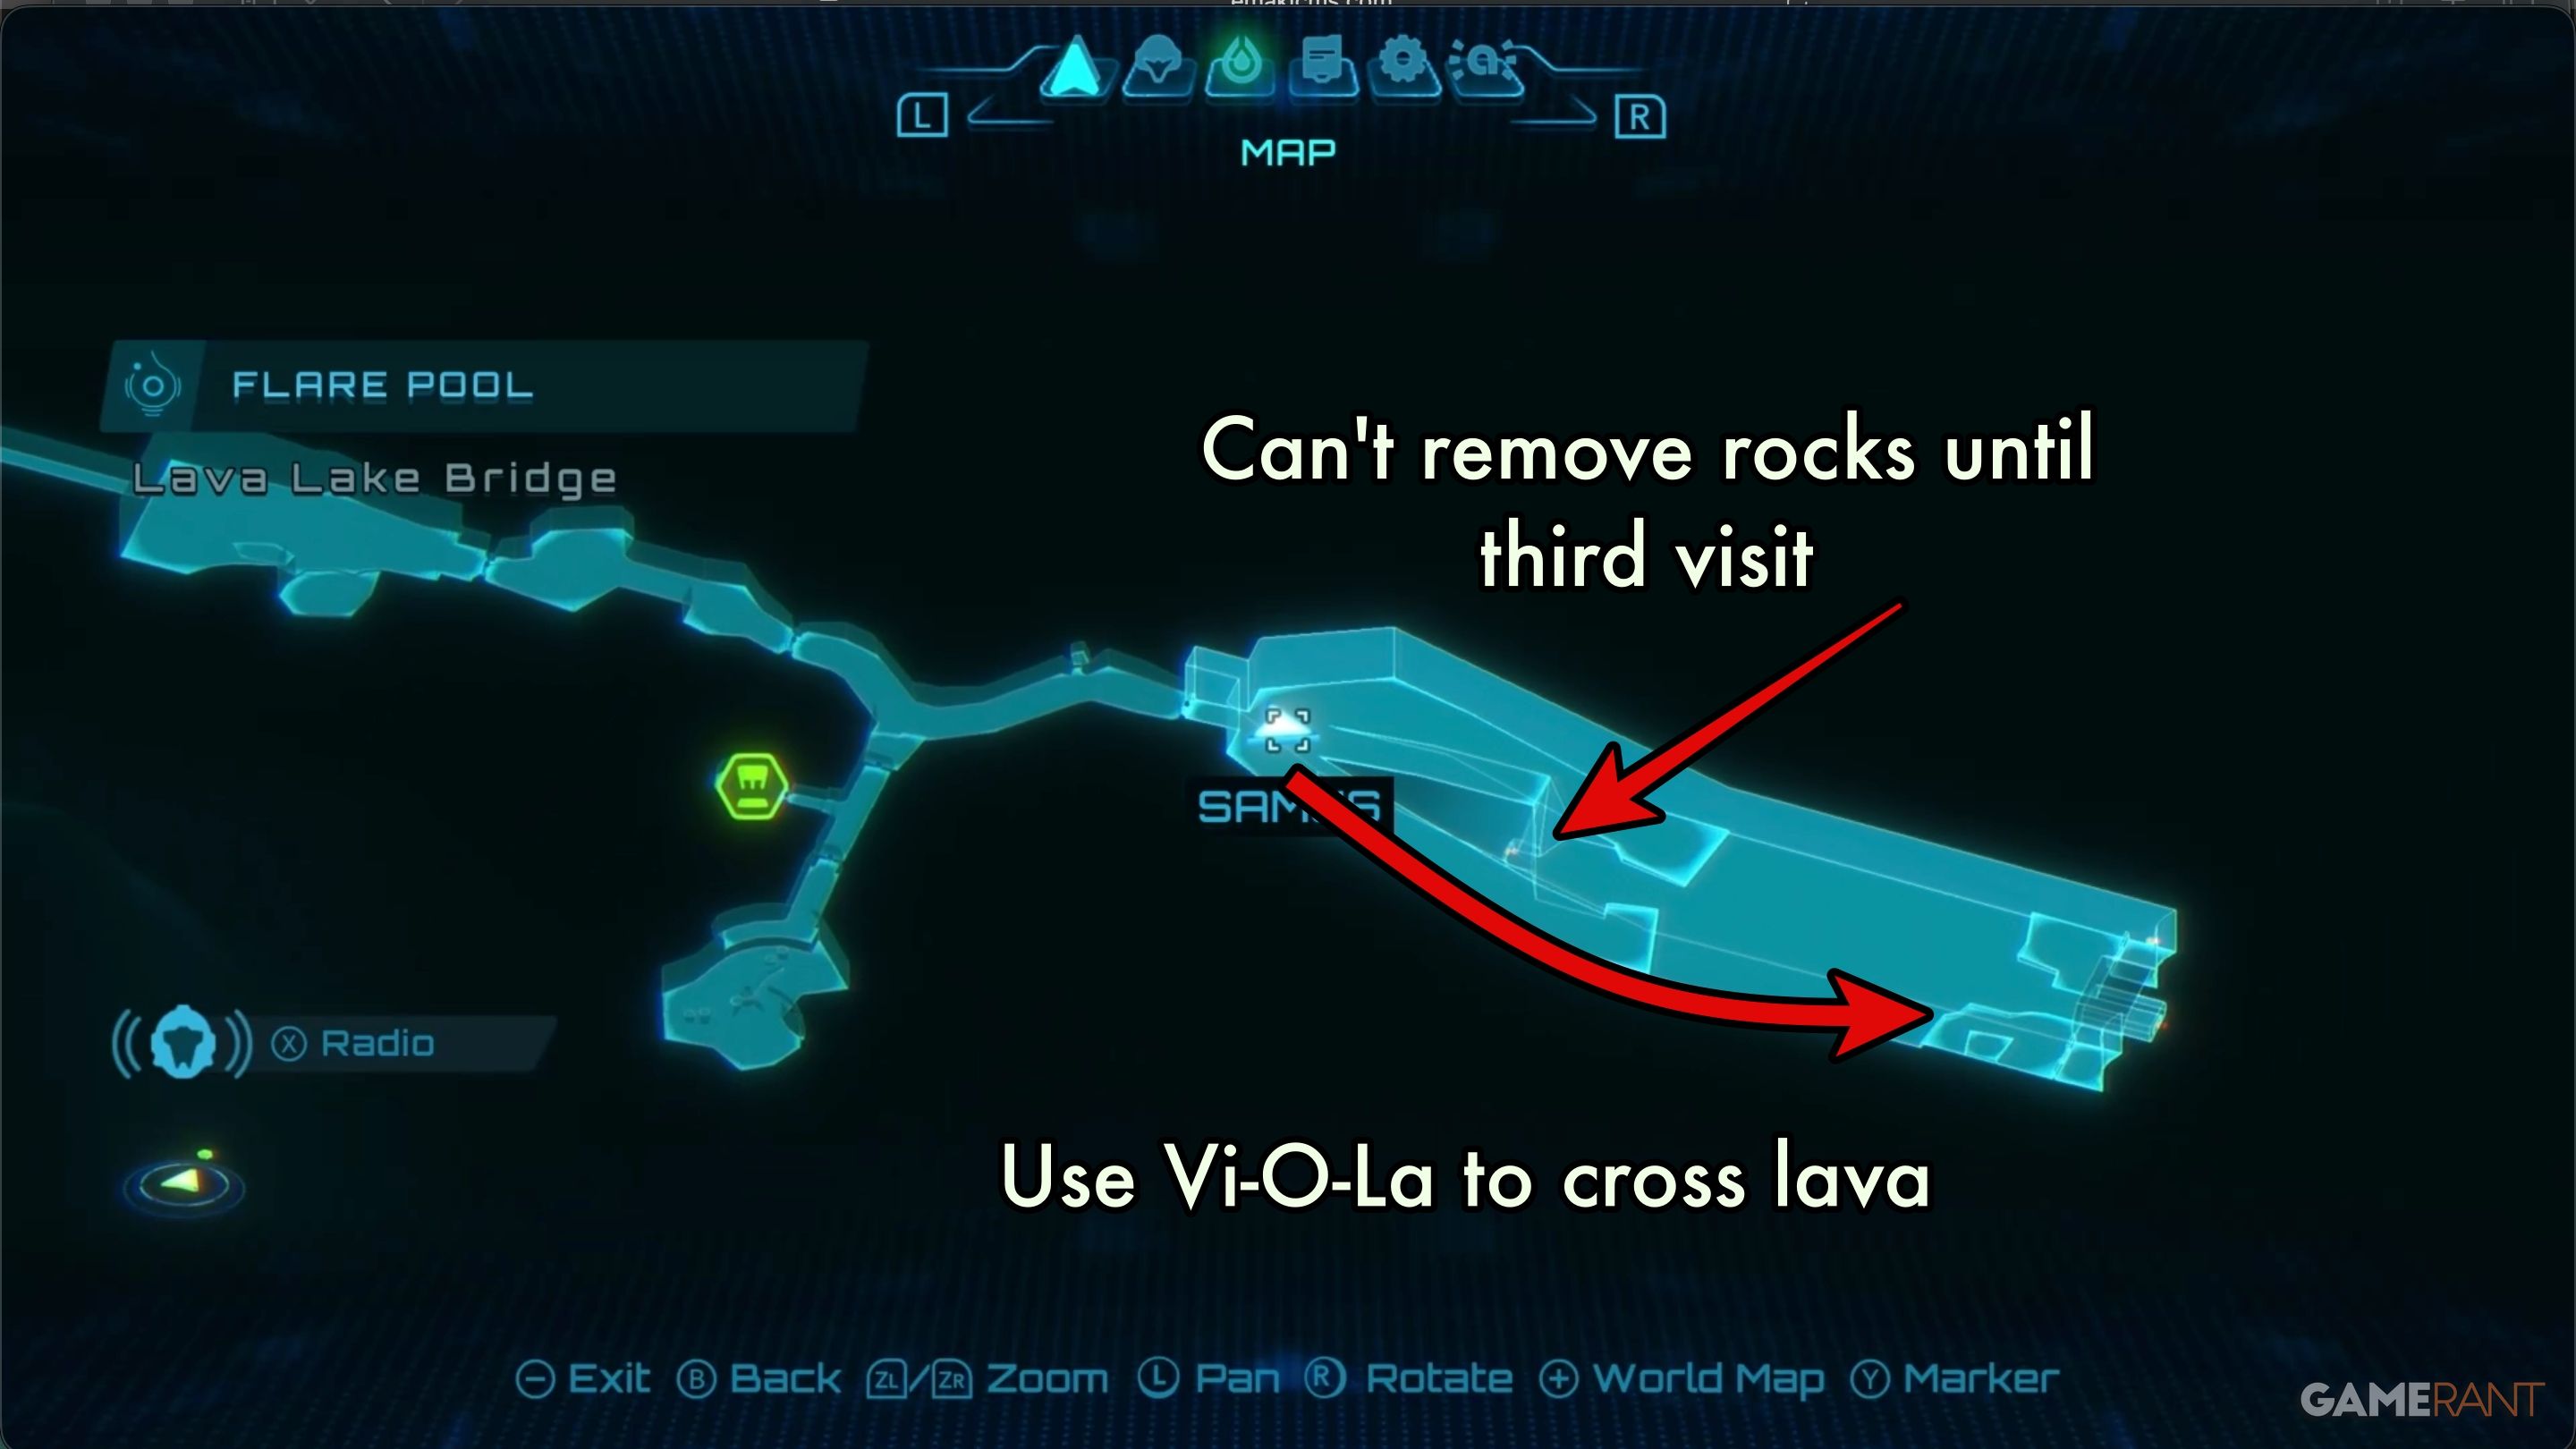
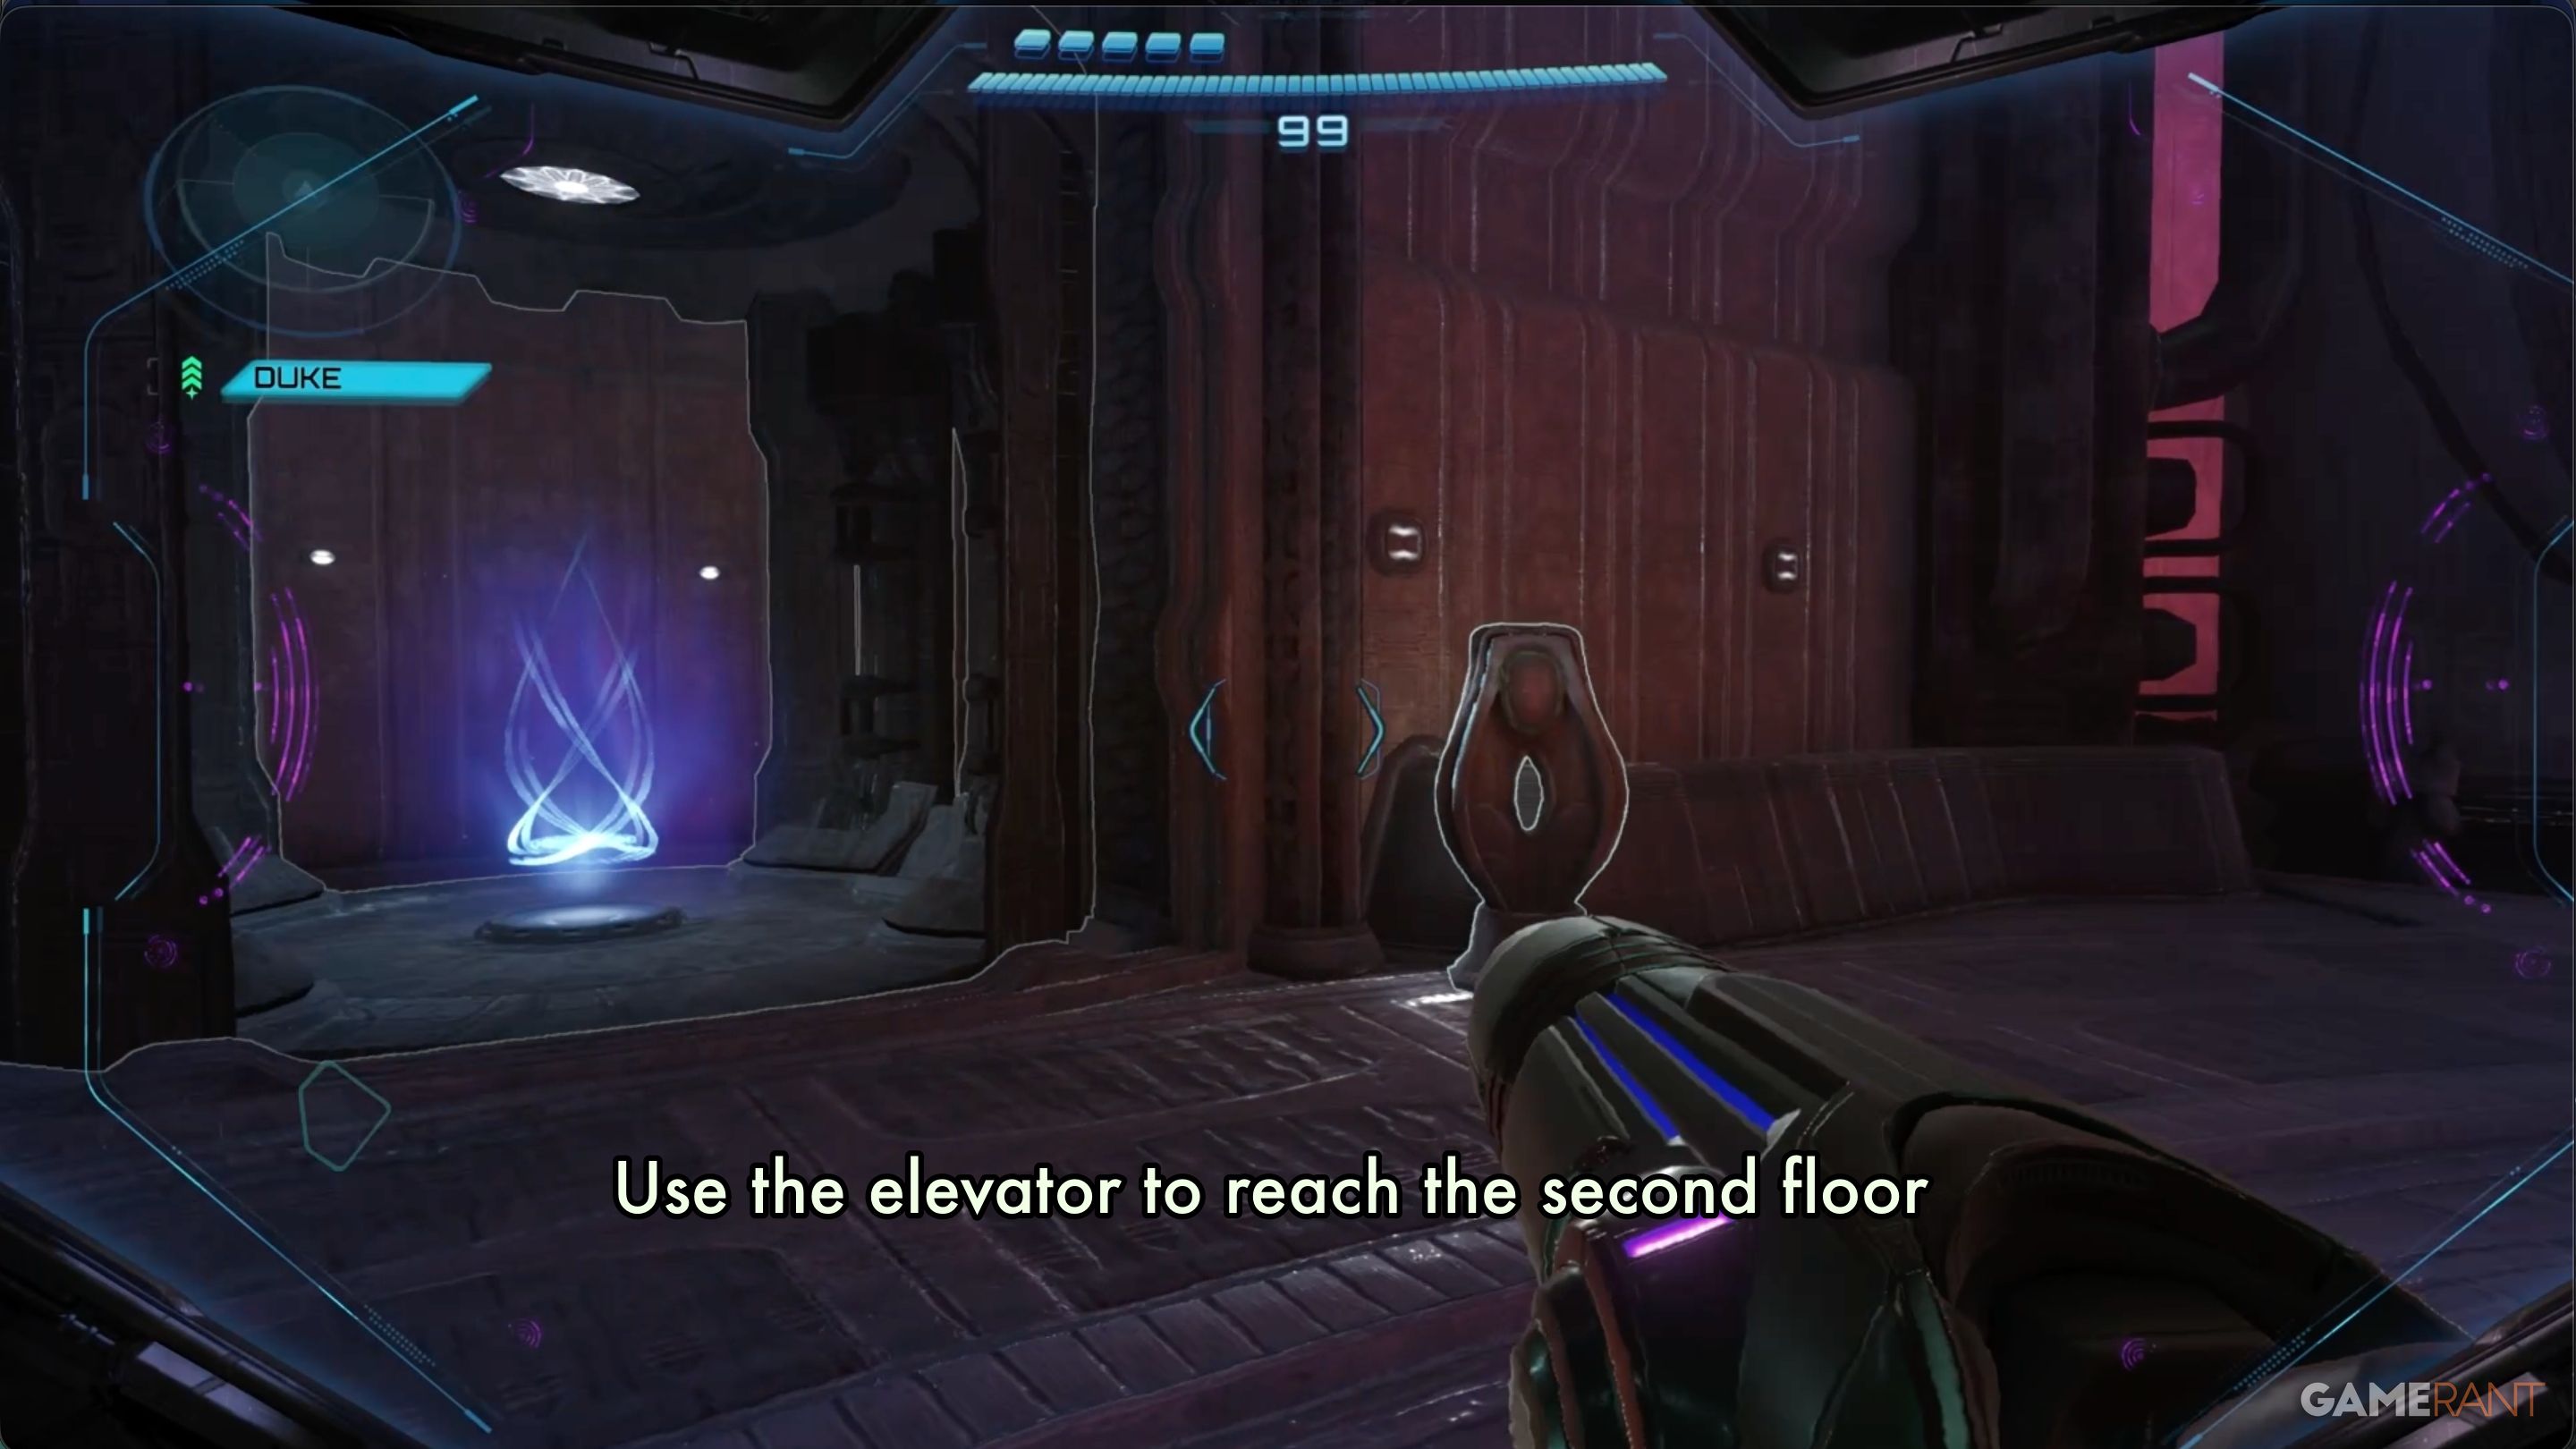
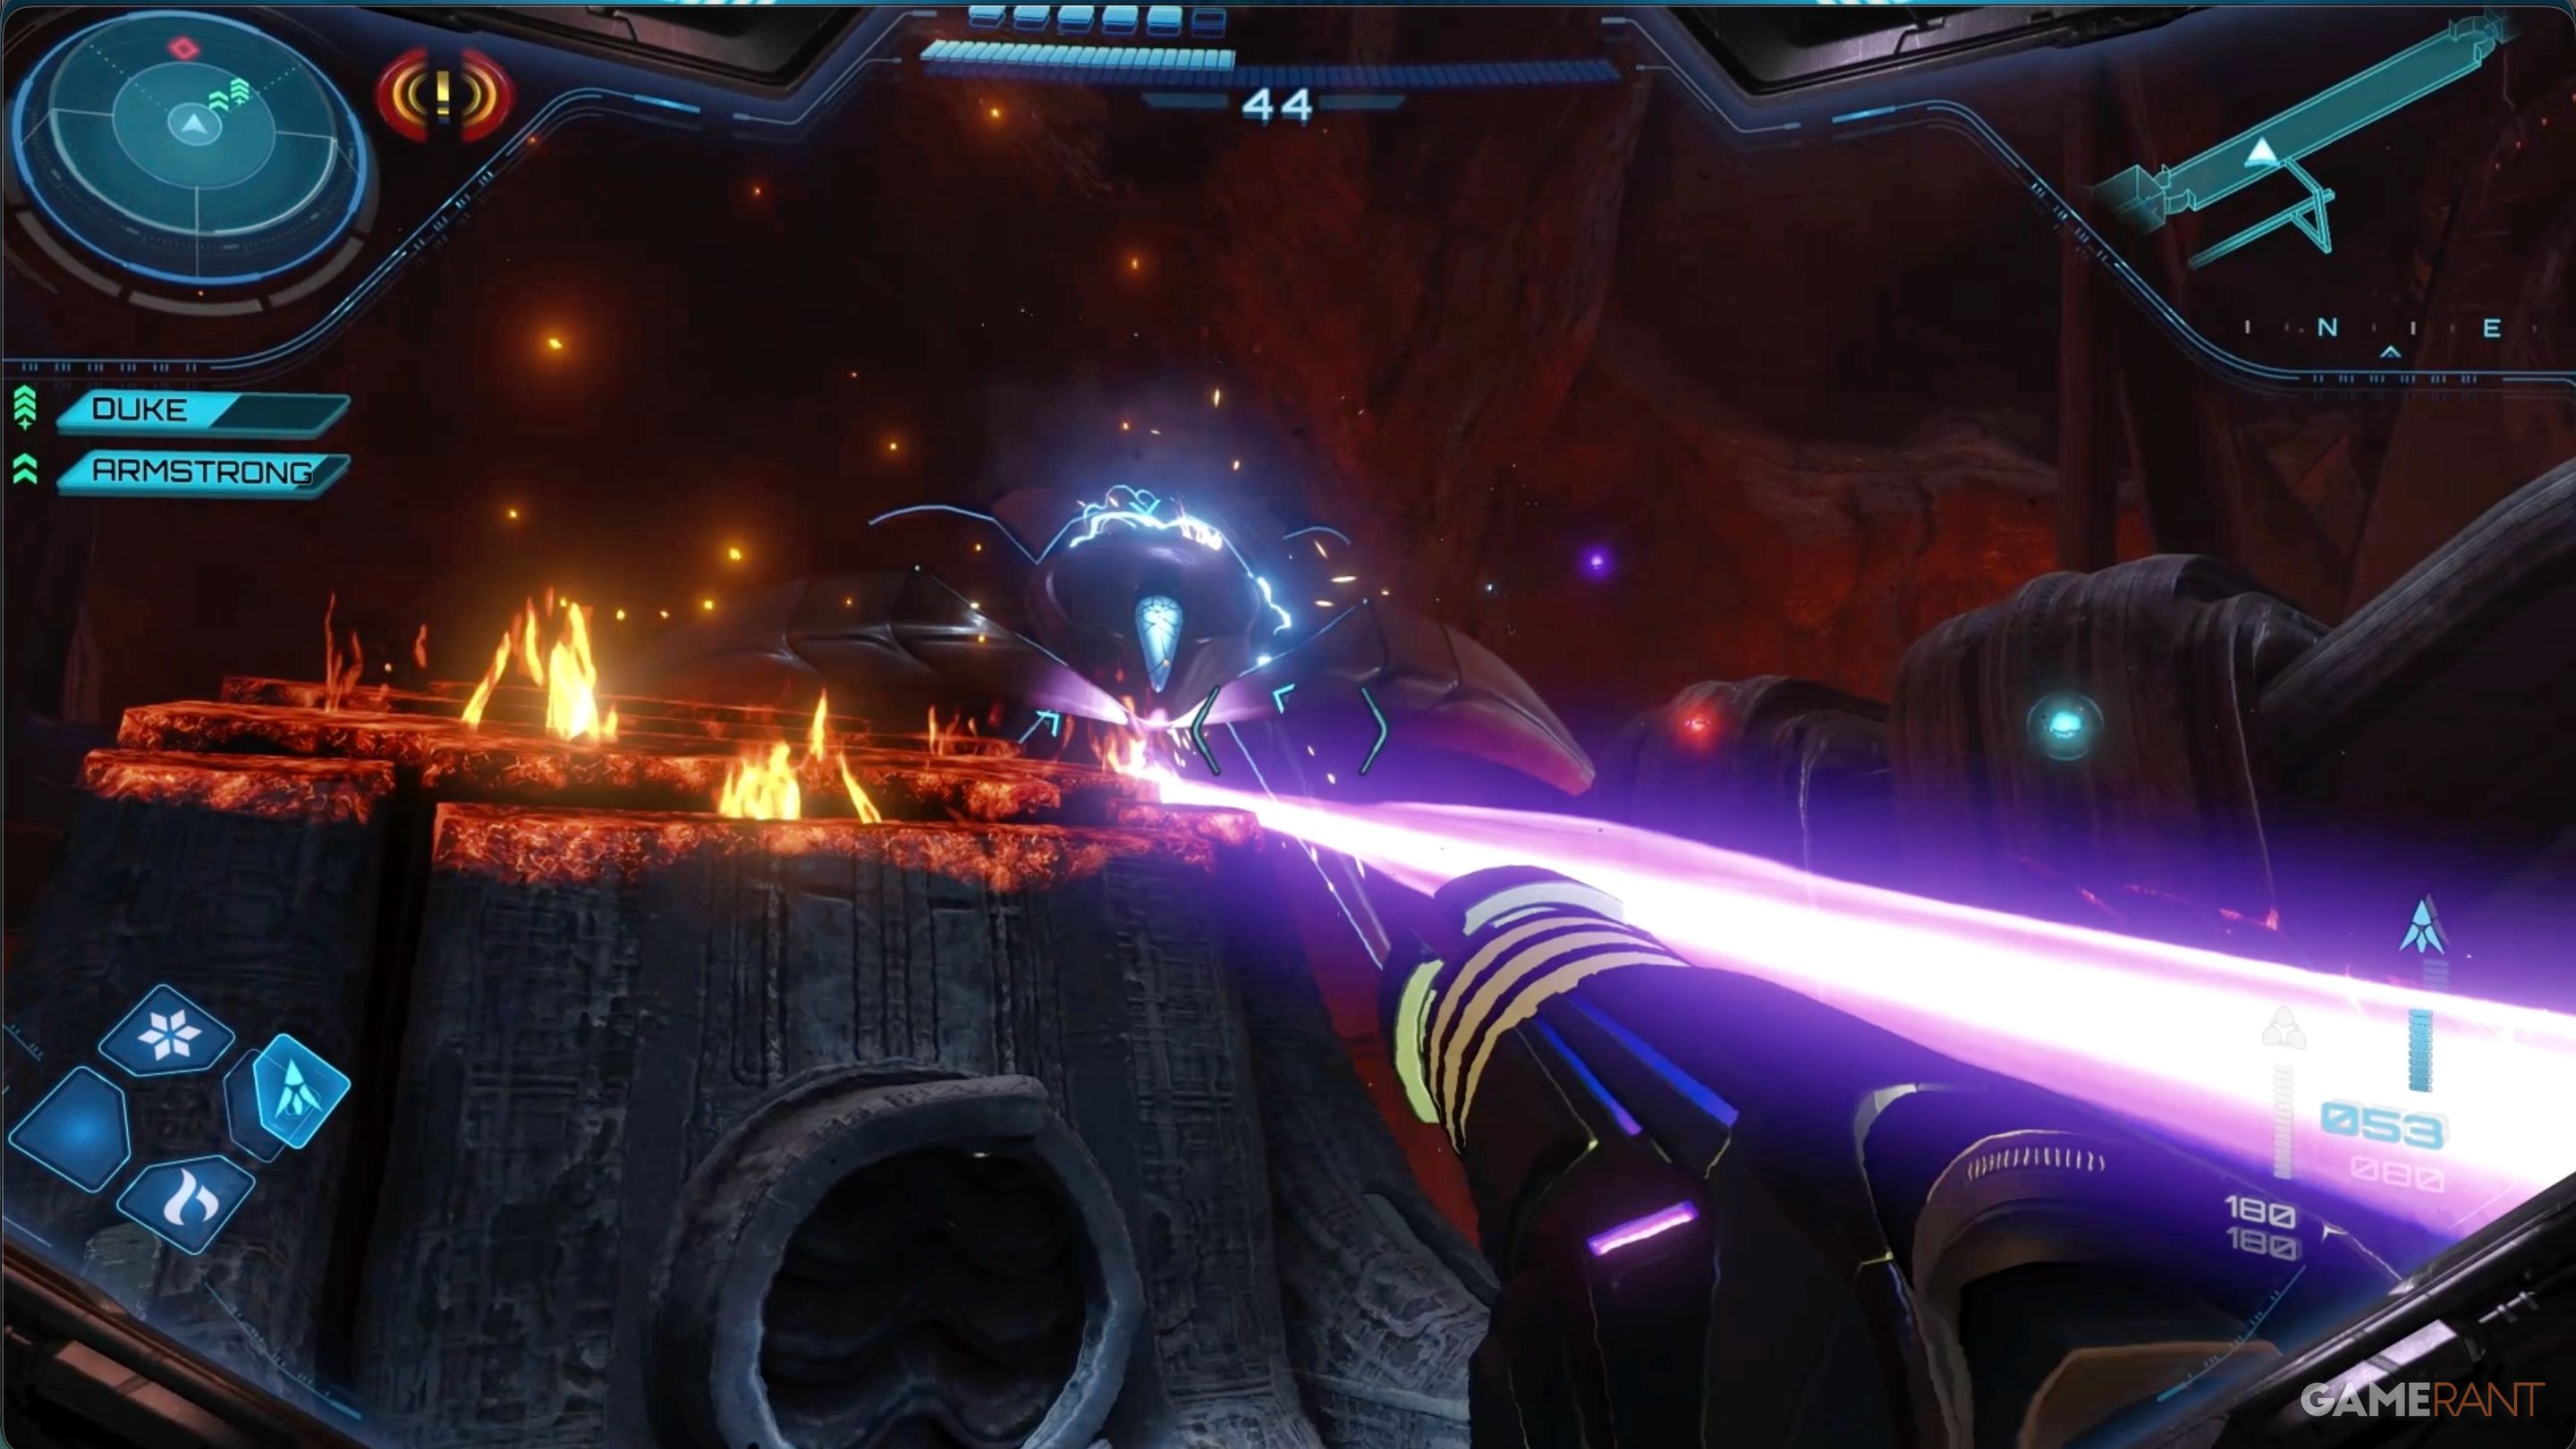
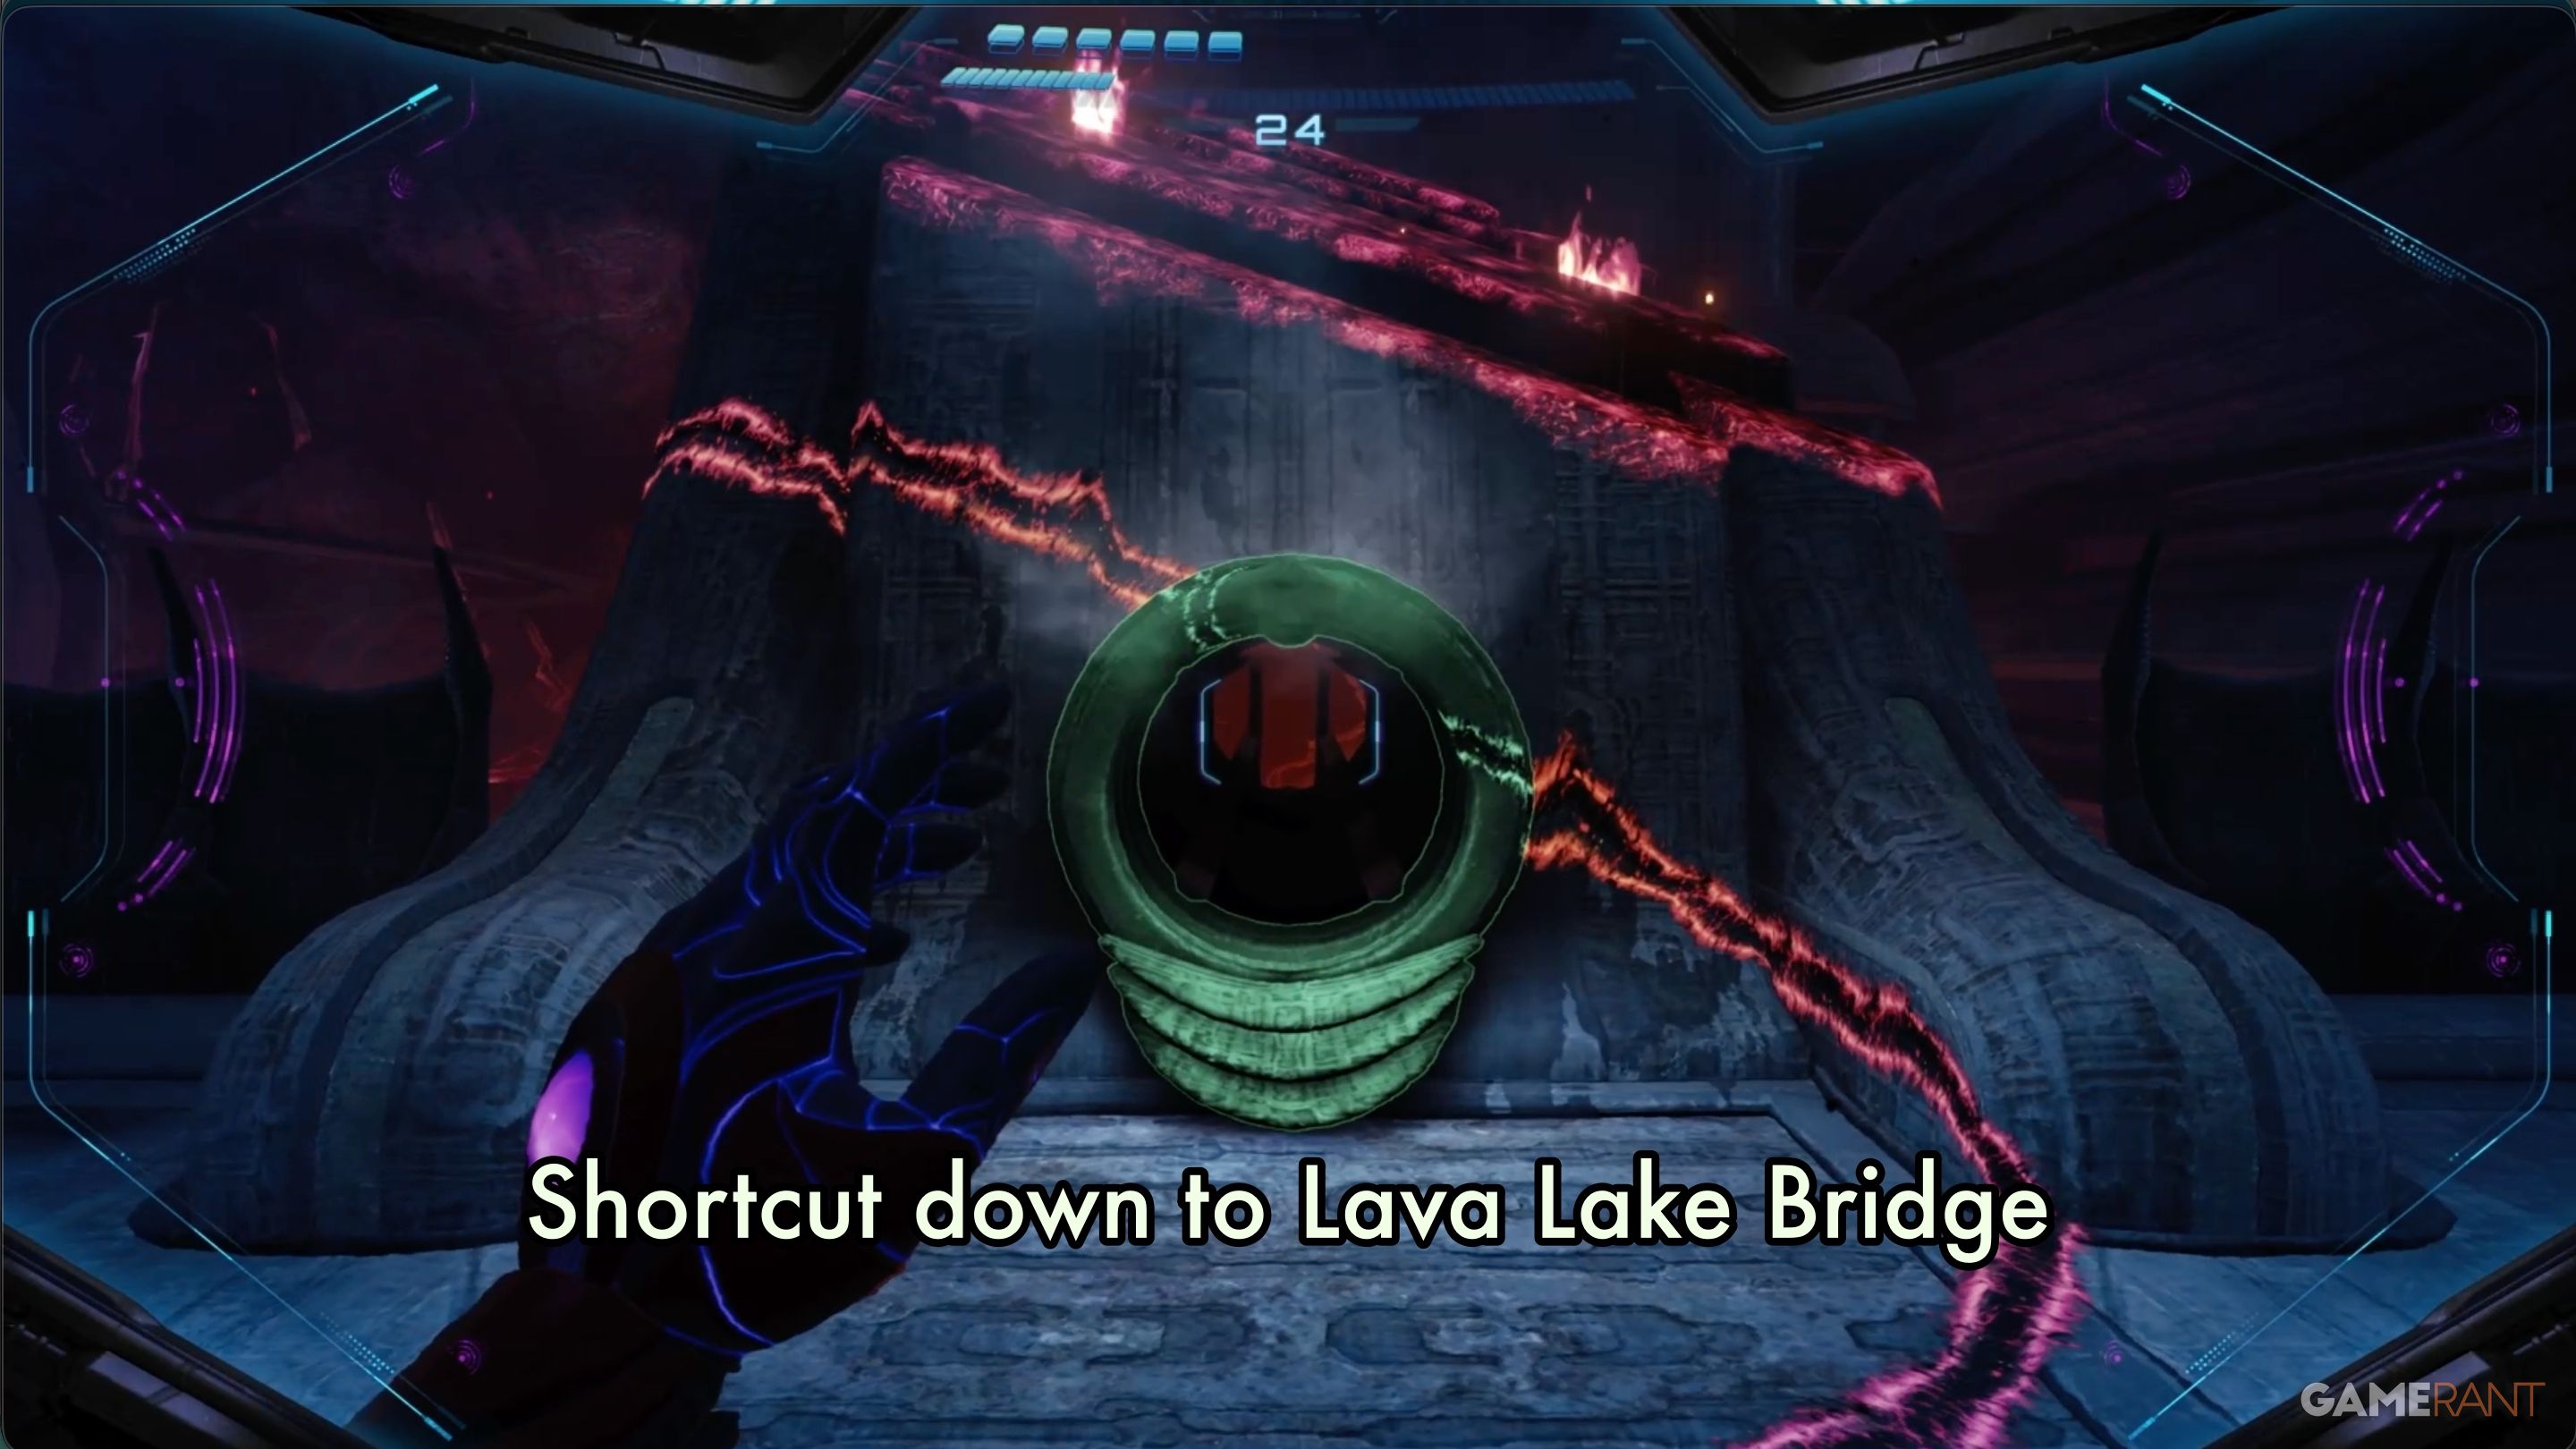
Next, you’ll leave the Magma Overflow chamber and enter the Shoreline Access chamber. You’ll notice a door on your right, but you can’t go in there yet. Your only path forward is to the Lava Lake Bridge chamber. There’s nothing to explore underneath the bridge, so you’ll need to use Vi-O-La to extend it and continue.
After the bridge is finished, cross it using Vi-O-La. As you do, a cutscene will show the bridge collapsing. You’ll need to go back the way you came.
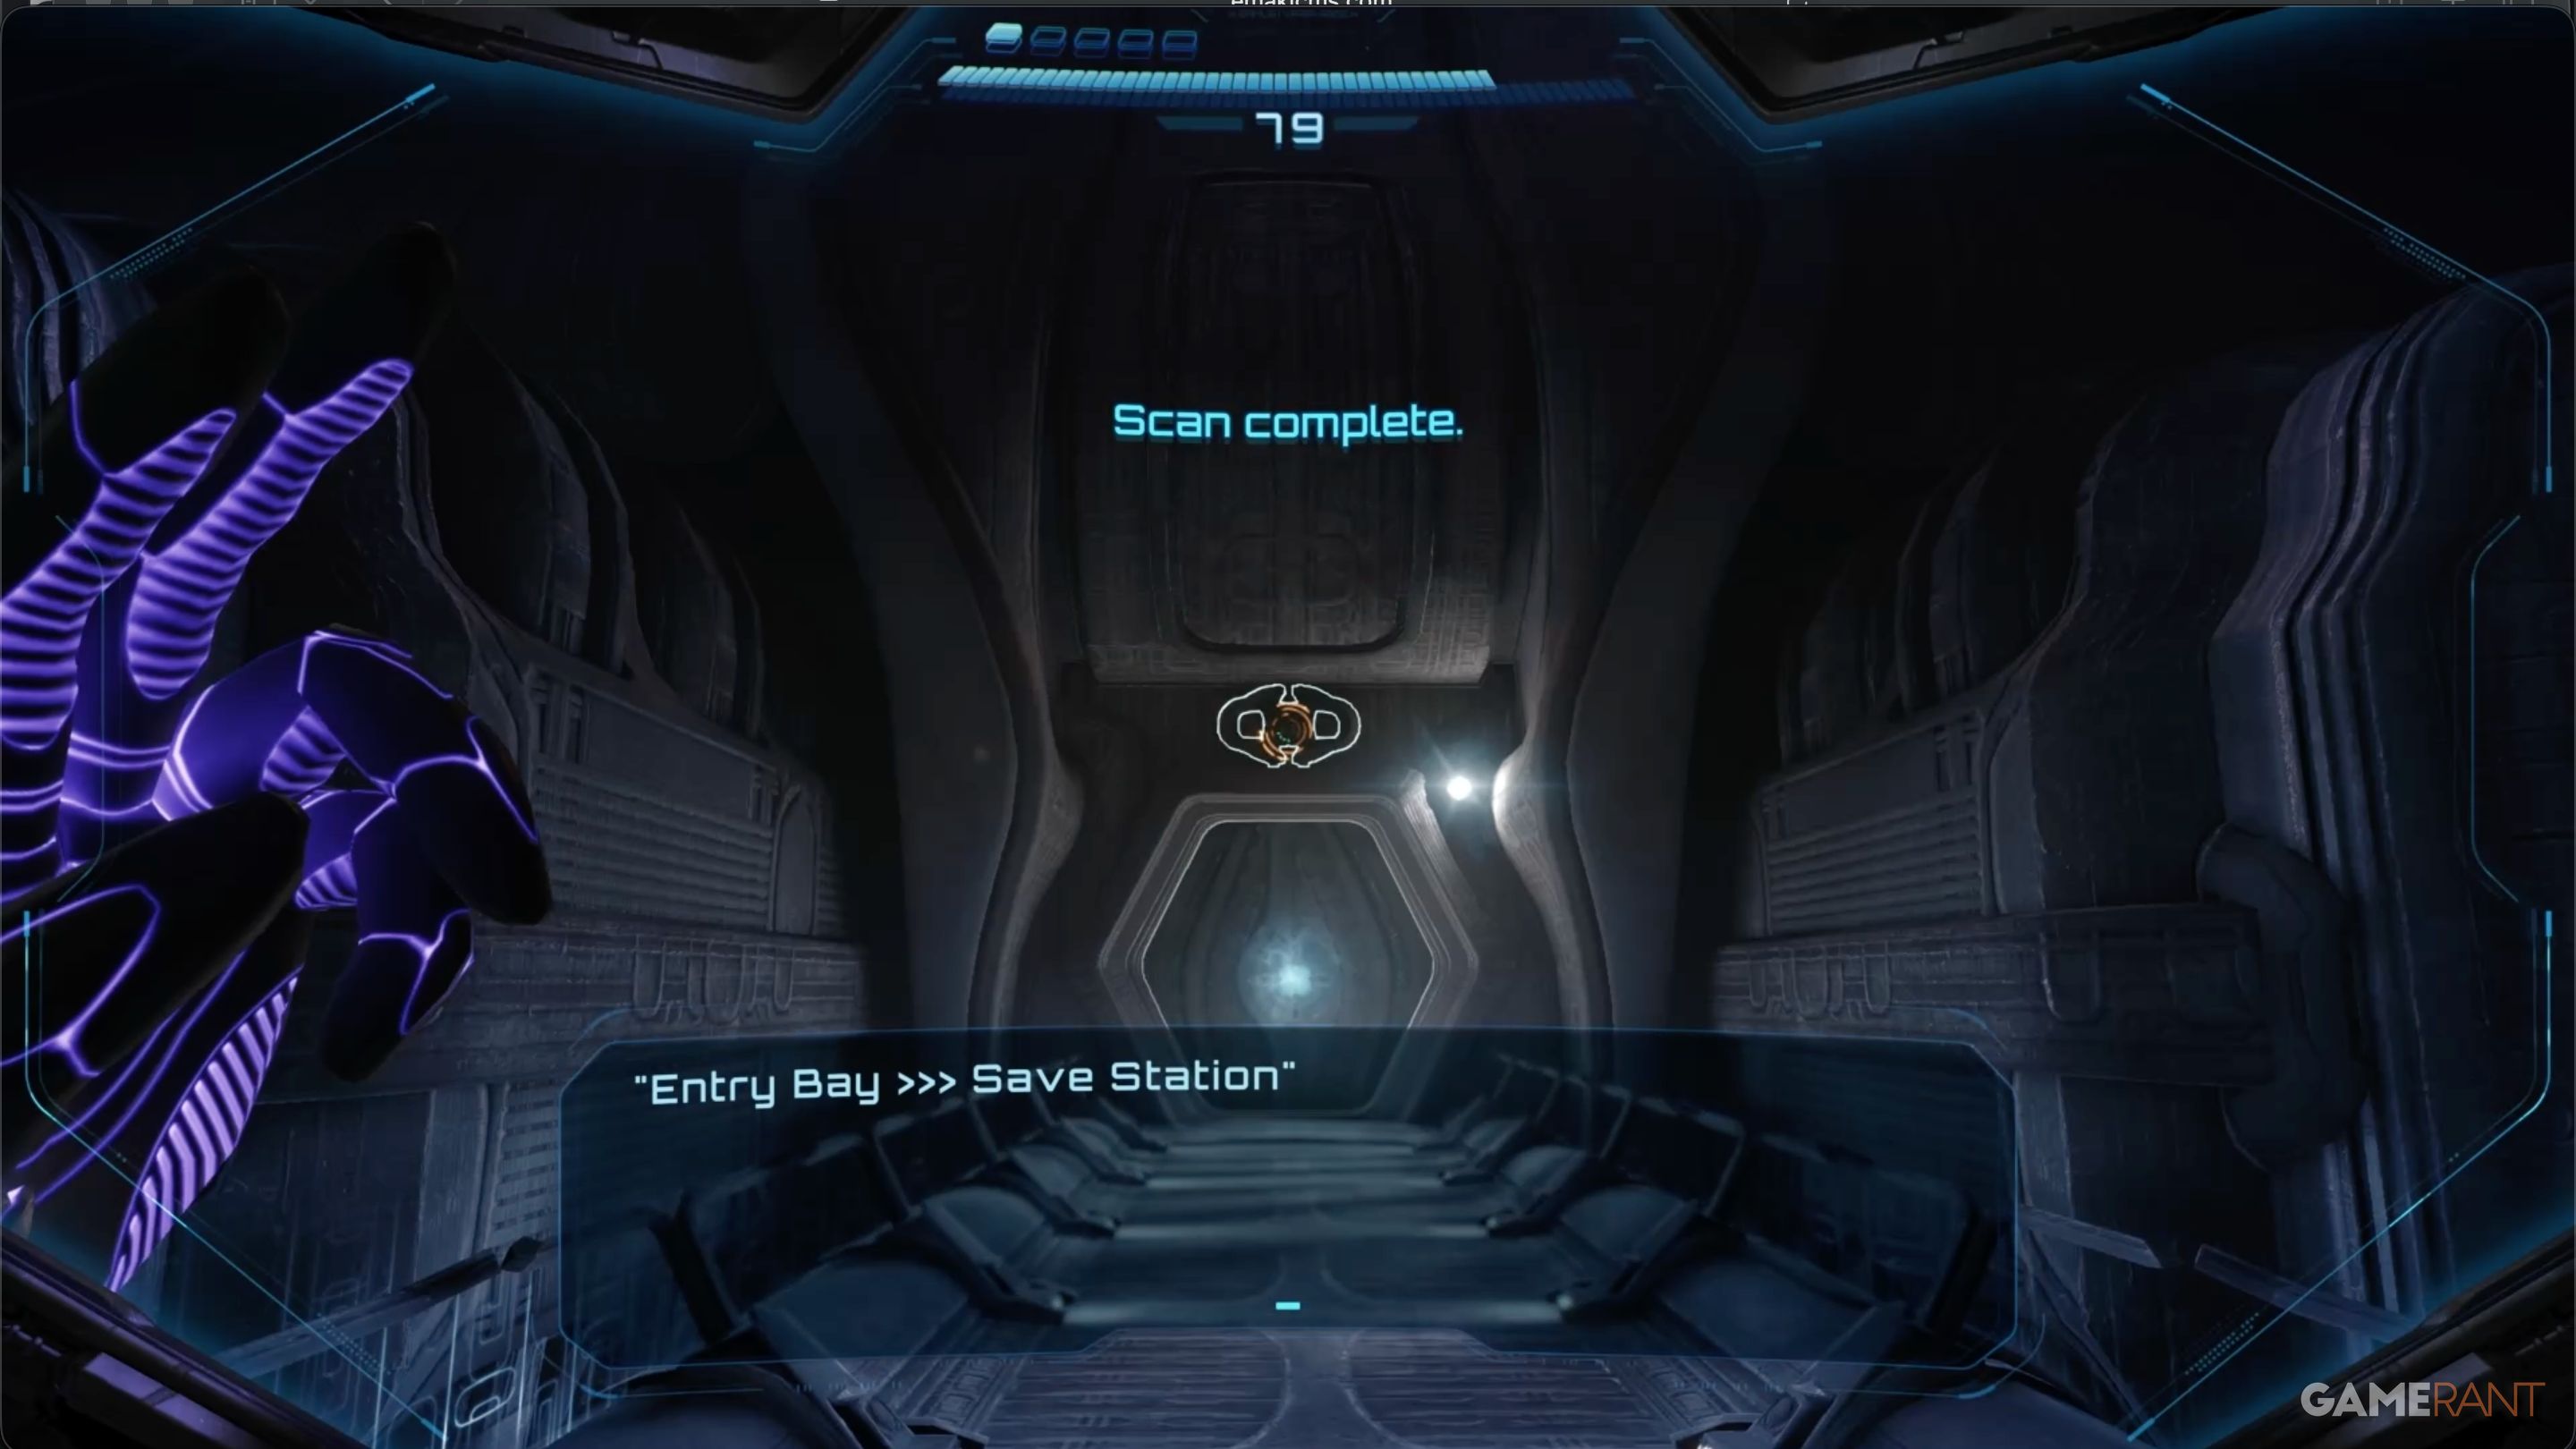
When you return to the Shoreline Access chamber, you’ll see a short cutscene with several Psy-Bot Soldiers. After defeating them, you can go through the door to the Scrapyard Access area. Shortly after entering, you’ll find a Save Station on your right. Save your game, then proceed through the access chamber to reach the Scrapyard.
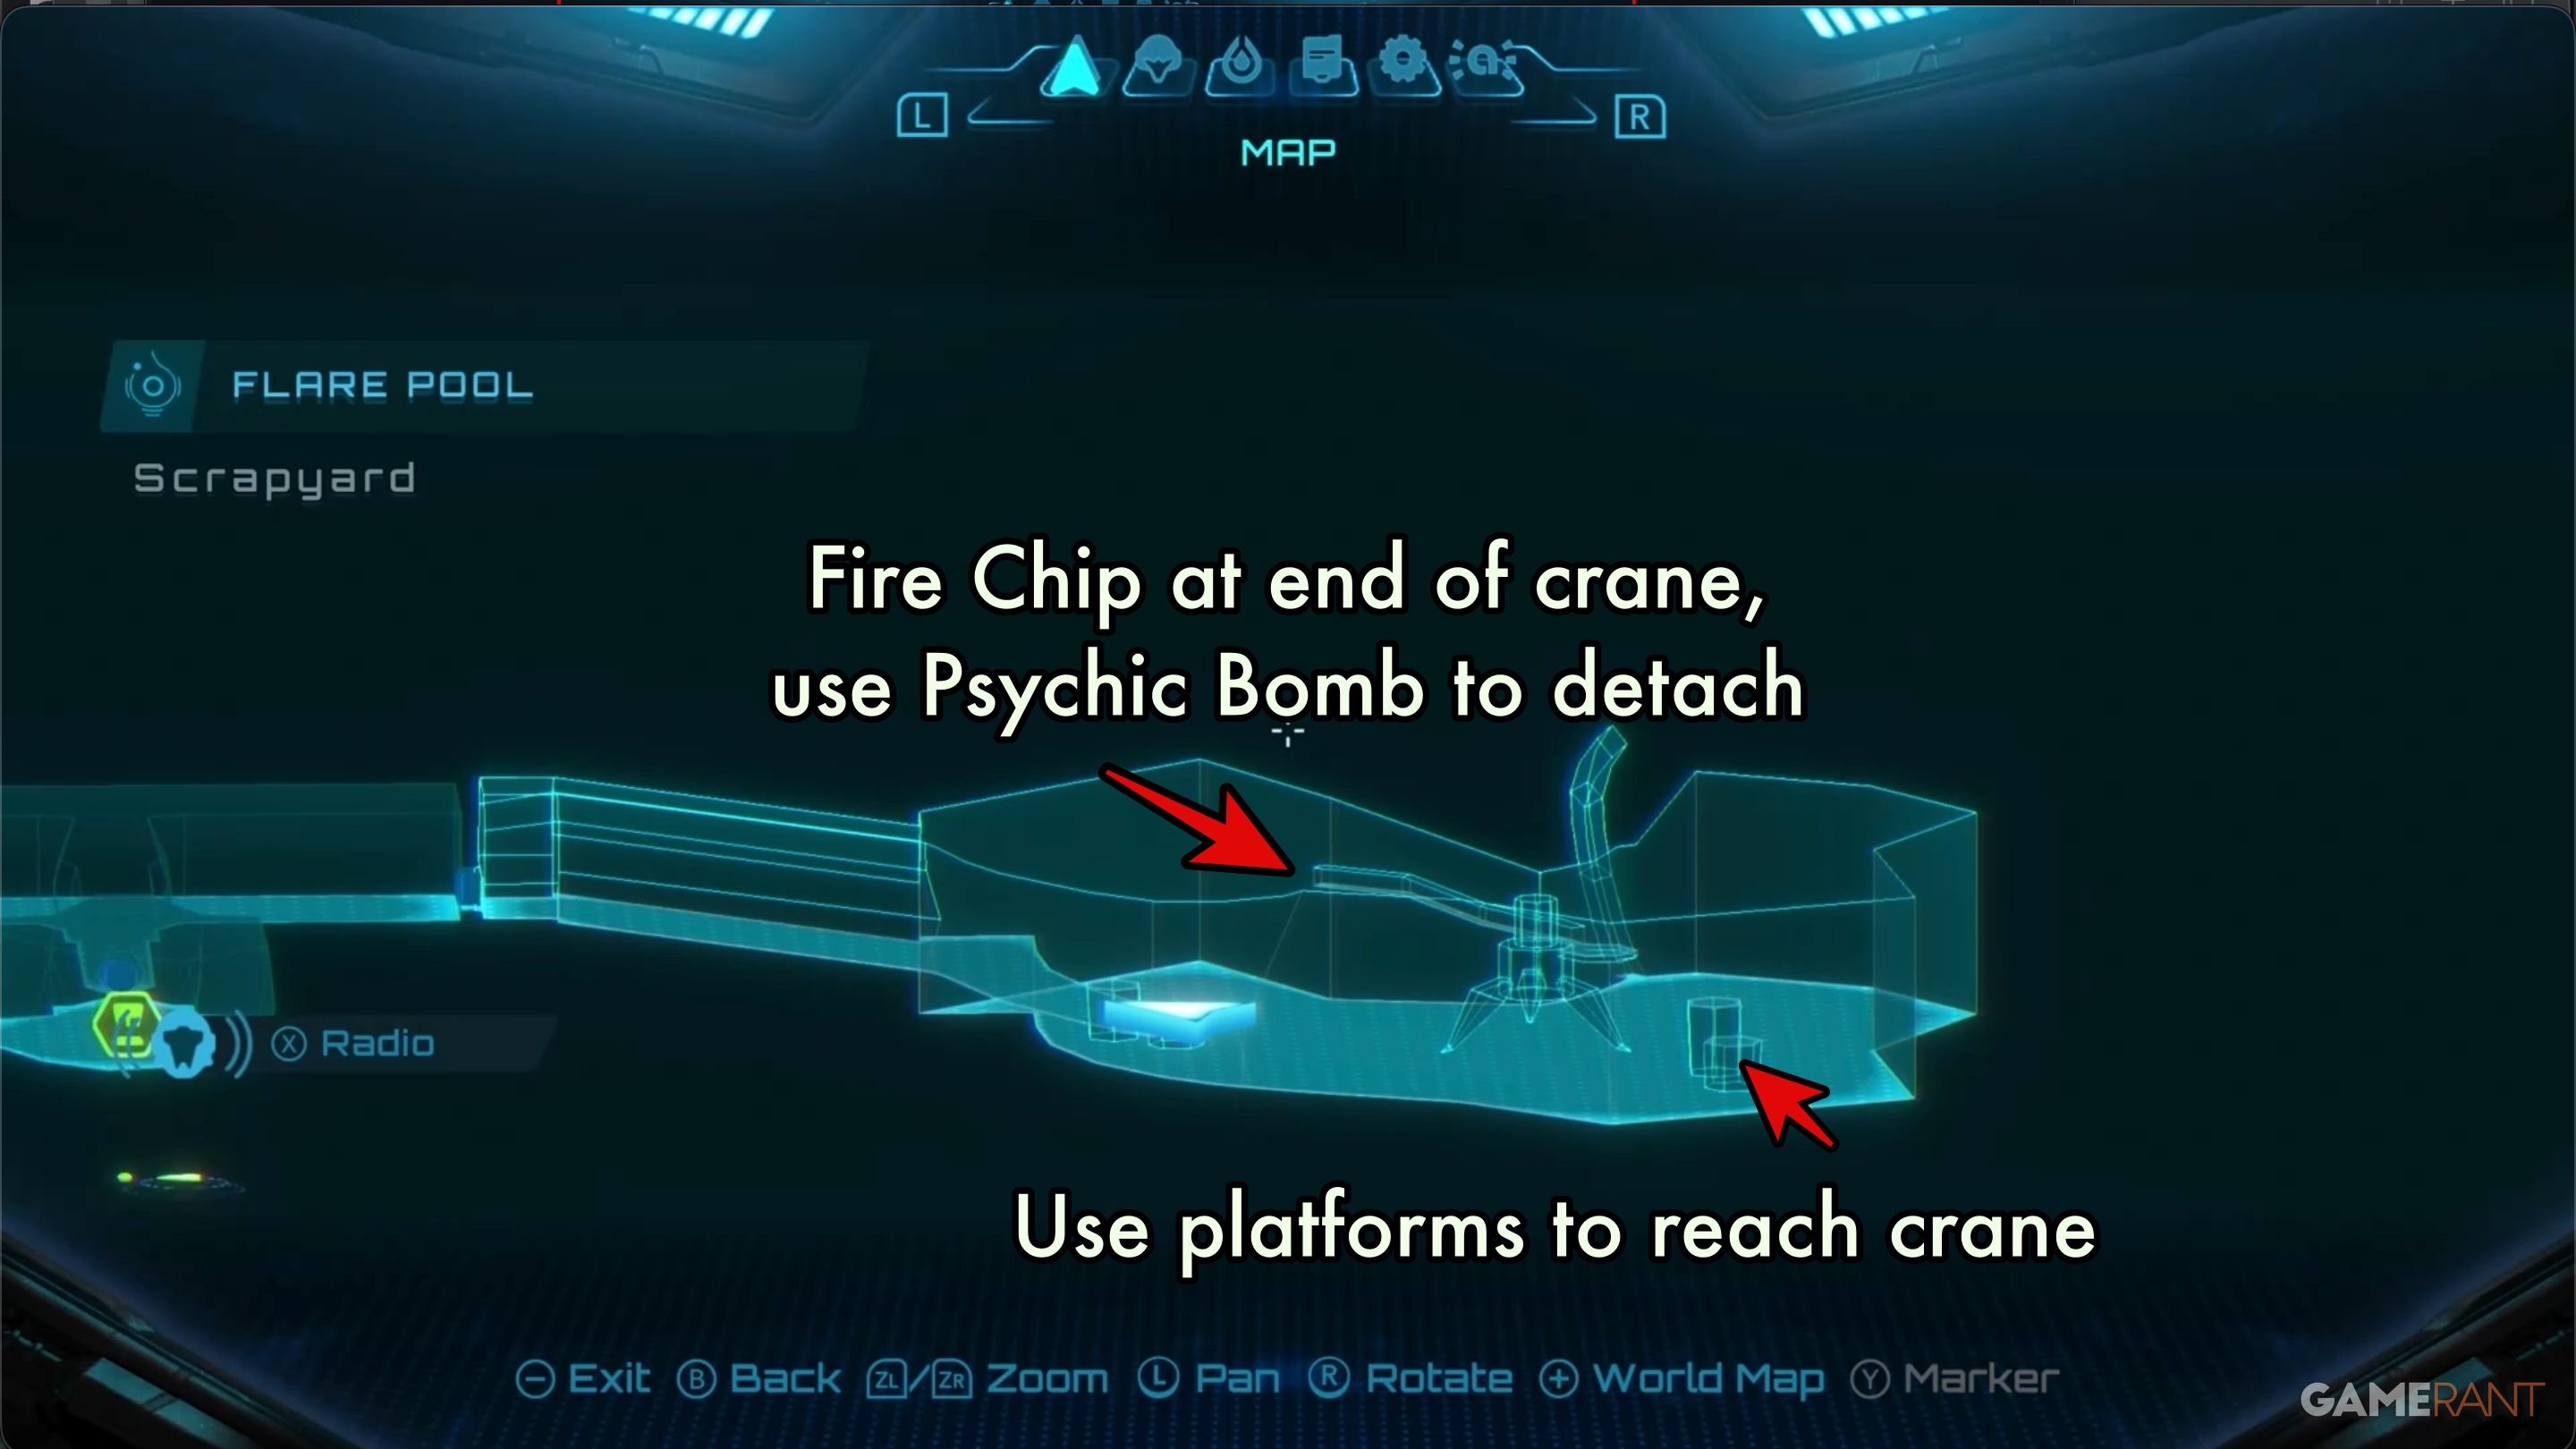
As soon as you enter the Scrapyard, you’ll notice a large crane in the center of the chamber.
You can climb onto the crane’s deck by using the platforms in the corner of the room. Once you’re on top, switch to the Morph Ball to roll along the crane’s arm. Use bombs to destroy any obstacles blocking your way.
When you get to the end, use a bomb to knock the plasma cutter down. Then, go to the glowing red object and pick up the Fire Chip.
Right now, this is everything Samus can get from the Flare Pool. Before you go, though, remember the Shot Expansion on the magnetic track above the crane. You’ll need to finish the Great Mines dungeon and get the Psychic Power Bomb first to clear the debris blocking the track’s entrance.
What to Do After Flare Pool First Visit in Metorid Prime 4?
Unlock the Fire Shot at Base Camp:
After you exit the Fire Chip area, head for the dungeon exit. Right before you leave, a huge wave of lava will fall, sealing the dungeon entrance. This is a sign that you’ll need to become more powerful before you can go back inside.
After leaving Flare Pool, you’ll need to complete the following tasks in order:
- Return to Fury Green Base Camp and speak to Myles MacKenzie. He will take the Fire Chip and turn it into the Fire Shot upgrade. Optional: There are a few expansion items around Fury Green that can now be collected by using the Fire Shot to clear webbing. You don’t have to collect them now, but the increased ammo may come in handy.
- Complete the Ice Belt dungeon. Here, you will unlock the Boost and Ice Shot upgrades. The boost is required to enter Flare Pool, so you don’t have a choice here.
- Once you’ve collected the Boost upgrade, return to Volt Forge Tower 3 to collect the Varia Suit upgrade that allows you and Vi-O-La to withstand high heat. This is required to cross the Lava Lake and progress through the dungeon. Once these are complete, you can return to Flare Pool.
Flare Pool Second Visit Main Path Walkthrough – Metroid Prime 4: Beyond
Entrance to Flare Pool Large Shot Expansion:
Before heading back into the dungeon a second time, you can easily grab the Shot Expansion. It’s located on the cliffs close to the entrance.
When you enter the Flare Pool dungeon, you’ll spot a Small-Sized Cargo Launcher. With the Psychic Boost Ball you recently obtained, activate the launcher by switching to it in your Morph Ball slot and then using the Boost ability to spin around the ring. This will power on the launcher, revealing a second Morph Ball slot. Use this slot to launch yourself onto the cliffs above, where you’ll find the Large Shot Expansion on a small ledge near the cliff face.
You can also easily move to the next platform and scan a Lamorn Sculpture, which contains a Psychic Recording with valuable lore. After finishing both of these tasks…
Enter Lava Lake:
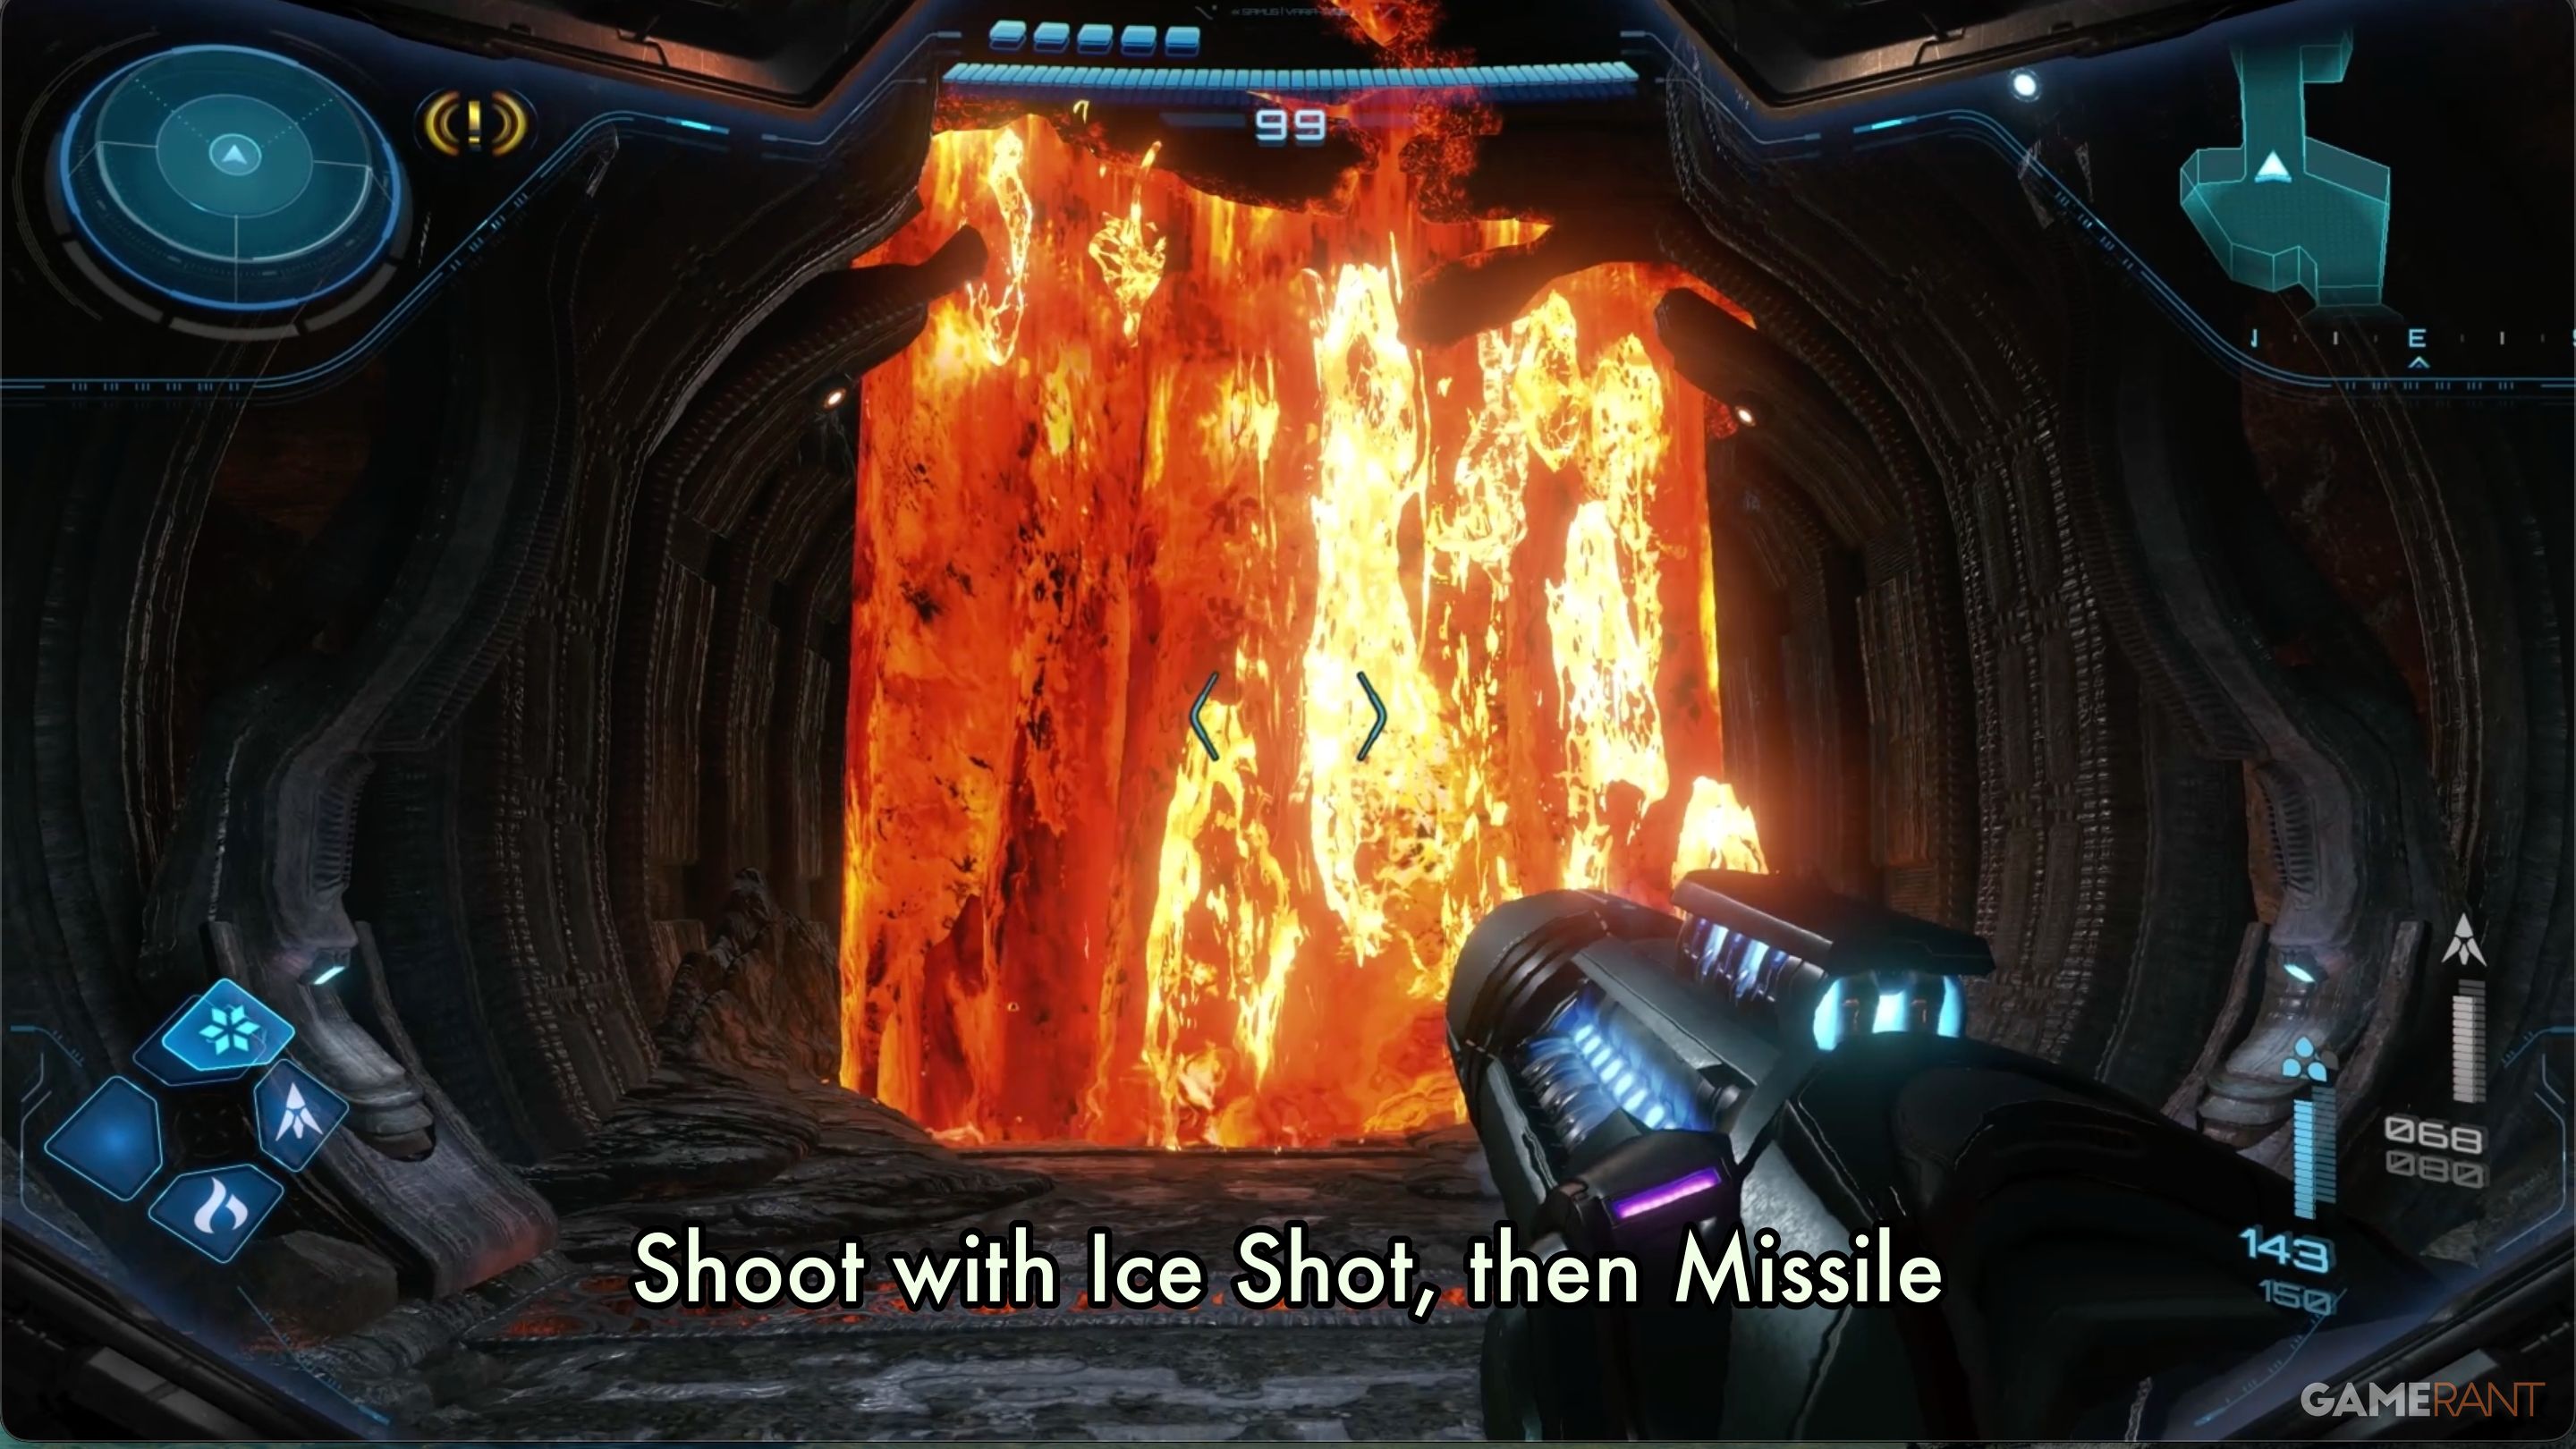
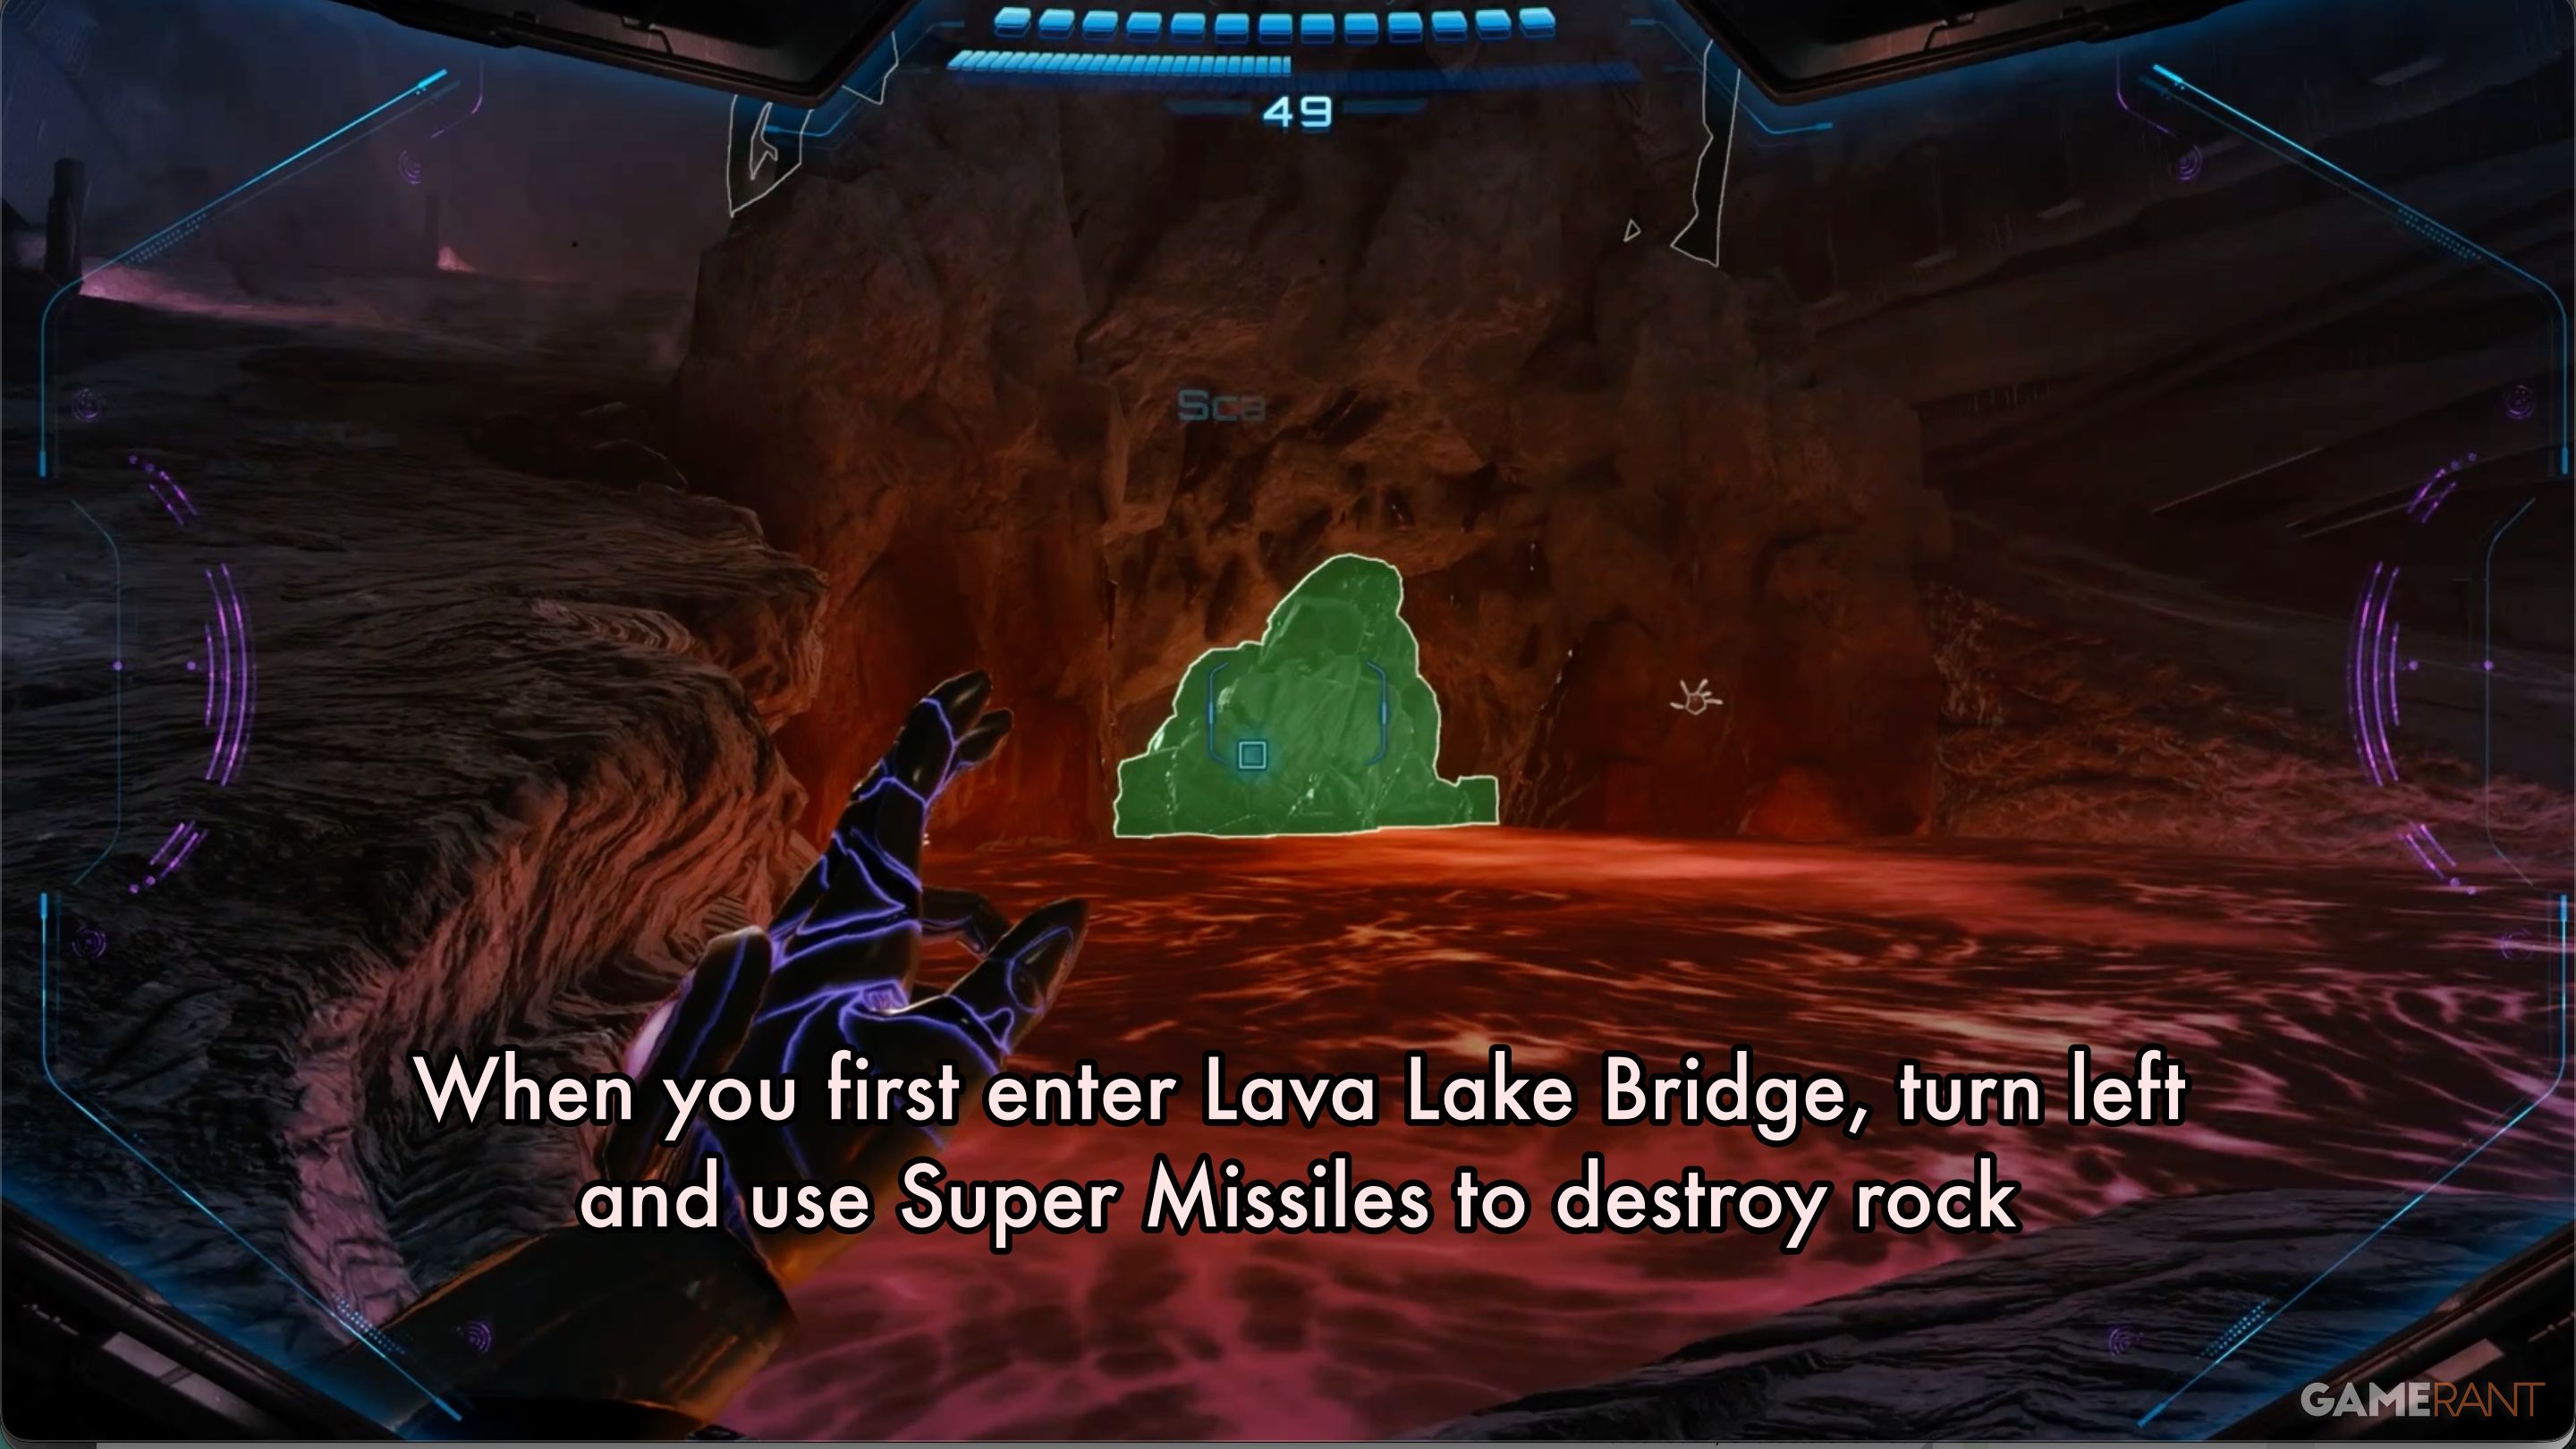
Once you’ve completed the Flare Pool dungeon once, returning will require you to clear a new lava barrier. Just use an Ice Shot on the lava, then hit the resulting rock wall with a Missile. This will briefly create a pathway forward into the Magma Overflow chamber.
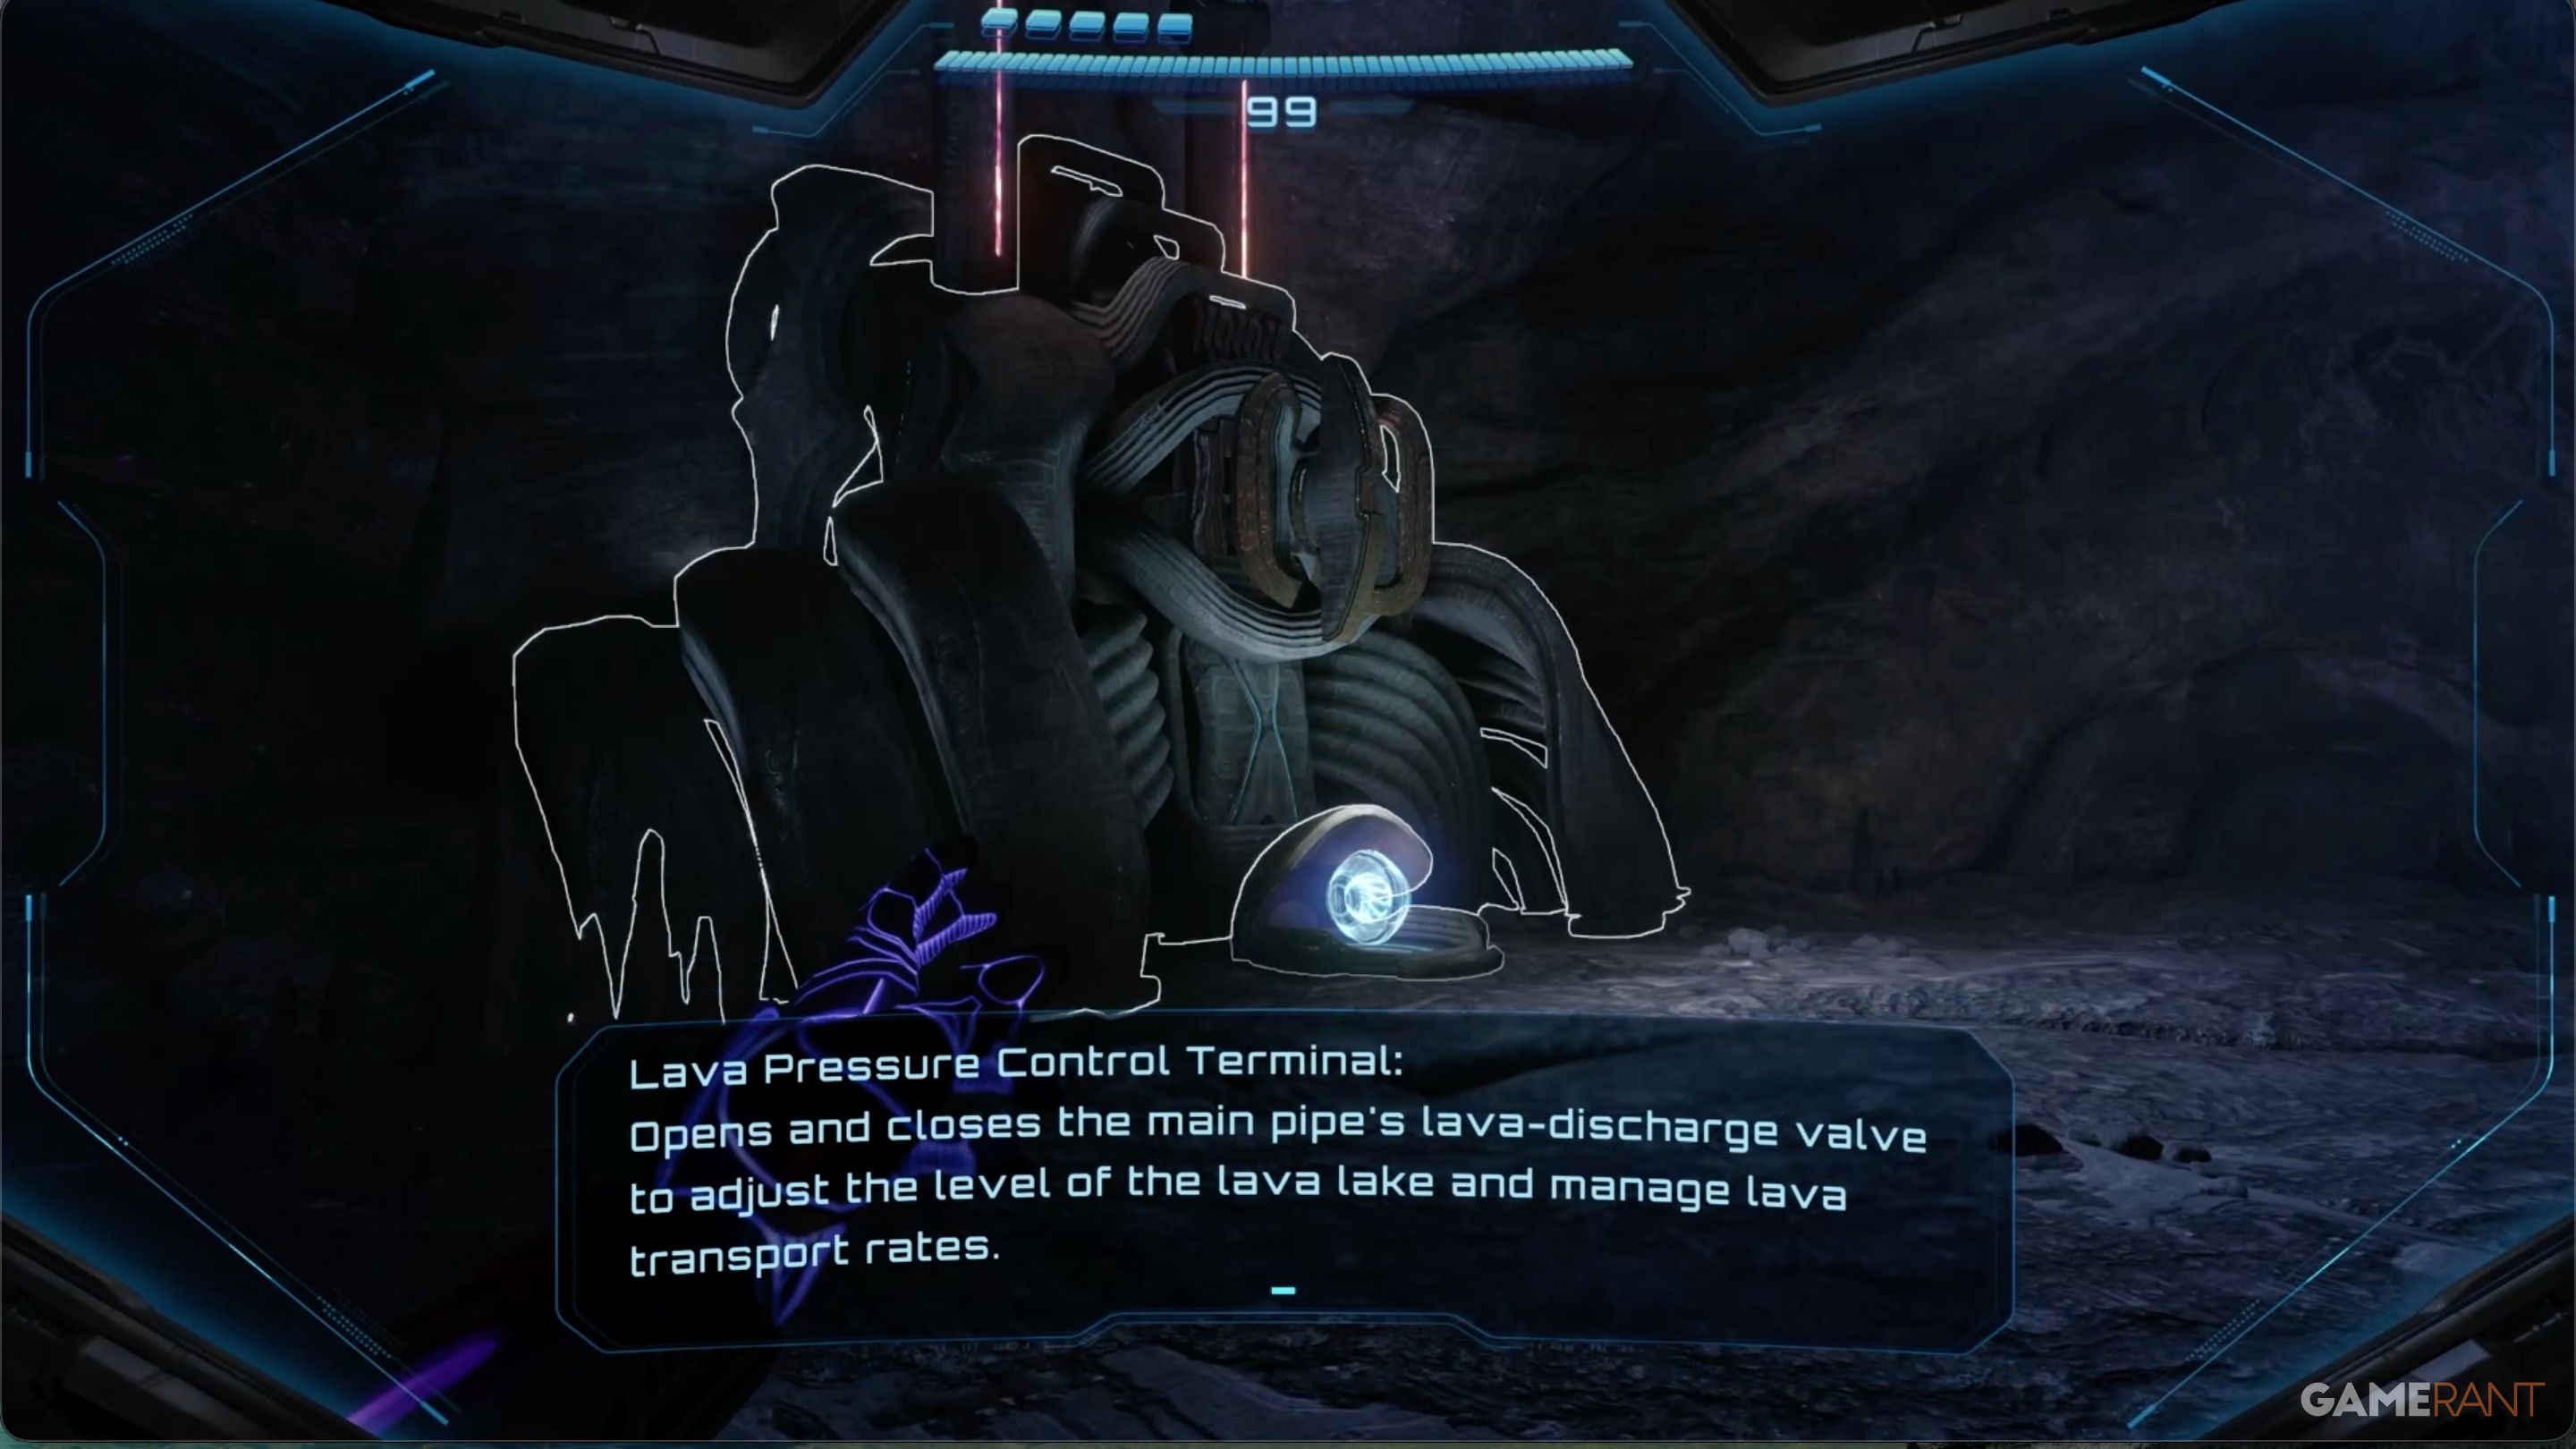
After you get through the lava barrier, look to your left for the Lava Pressure Control Terminal. Use your Boost ability on the terminal to shut off the lava flow for good.
Proceed from the Shoreline Access chamber into the Lava Lake Bridge chamber. You likely scanned the enemies here on your first visit, but keep your scanner running to check for any remaining threats.
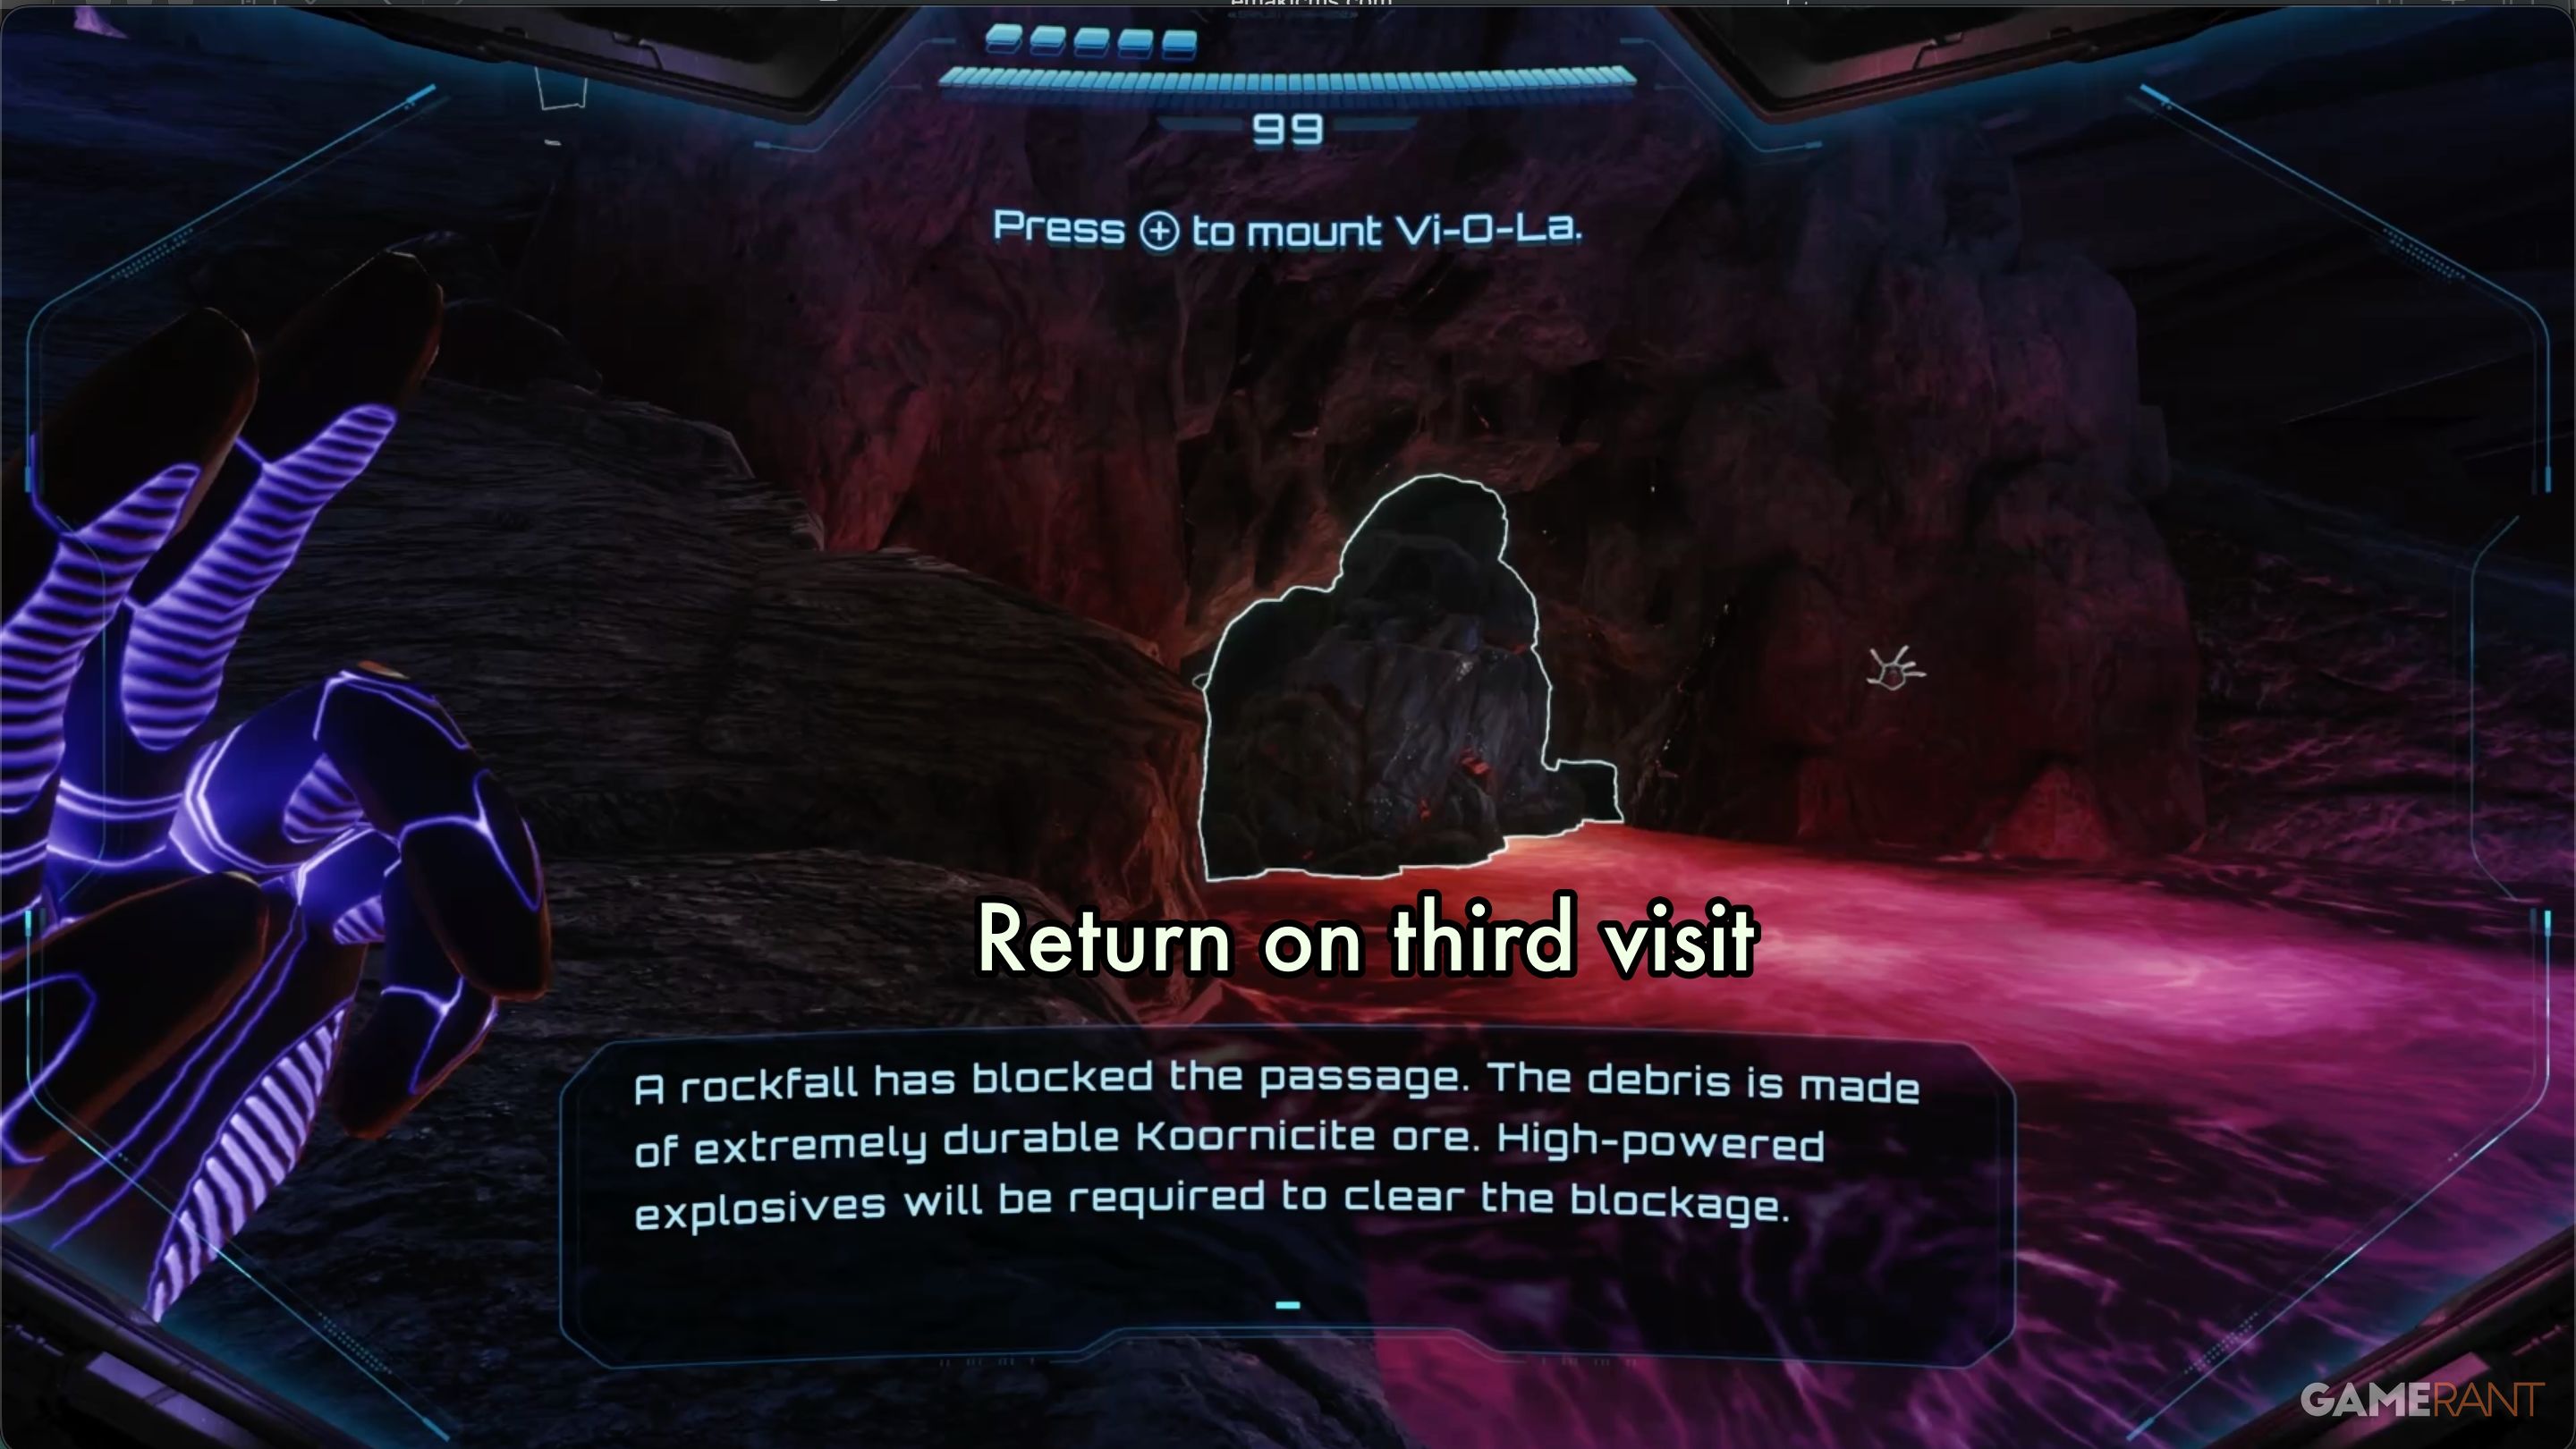
Head down to the lava’s edge, just below the bridge. You’ll see a blocked-off chamber, sealed by a large rock. You can’t get inside until you get the Super Missile upgrade in the Great Mines.
Lava Lake Bridge Psychic Rail Shot Expansion & Scout Bot Location:
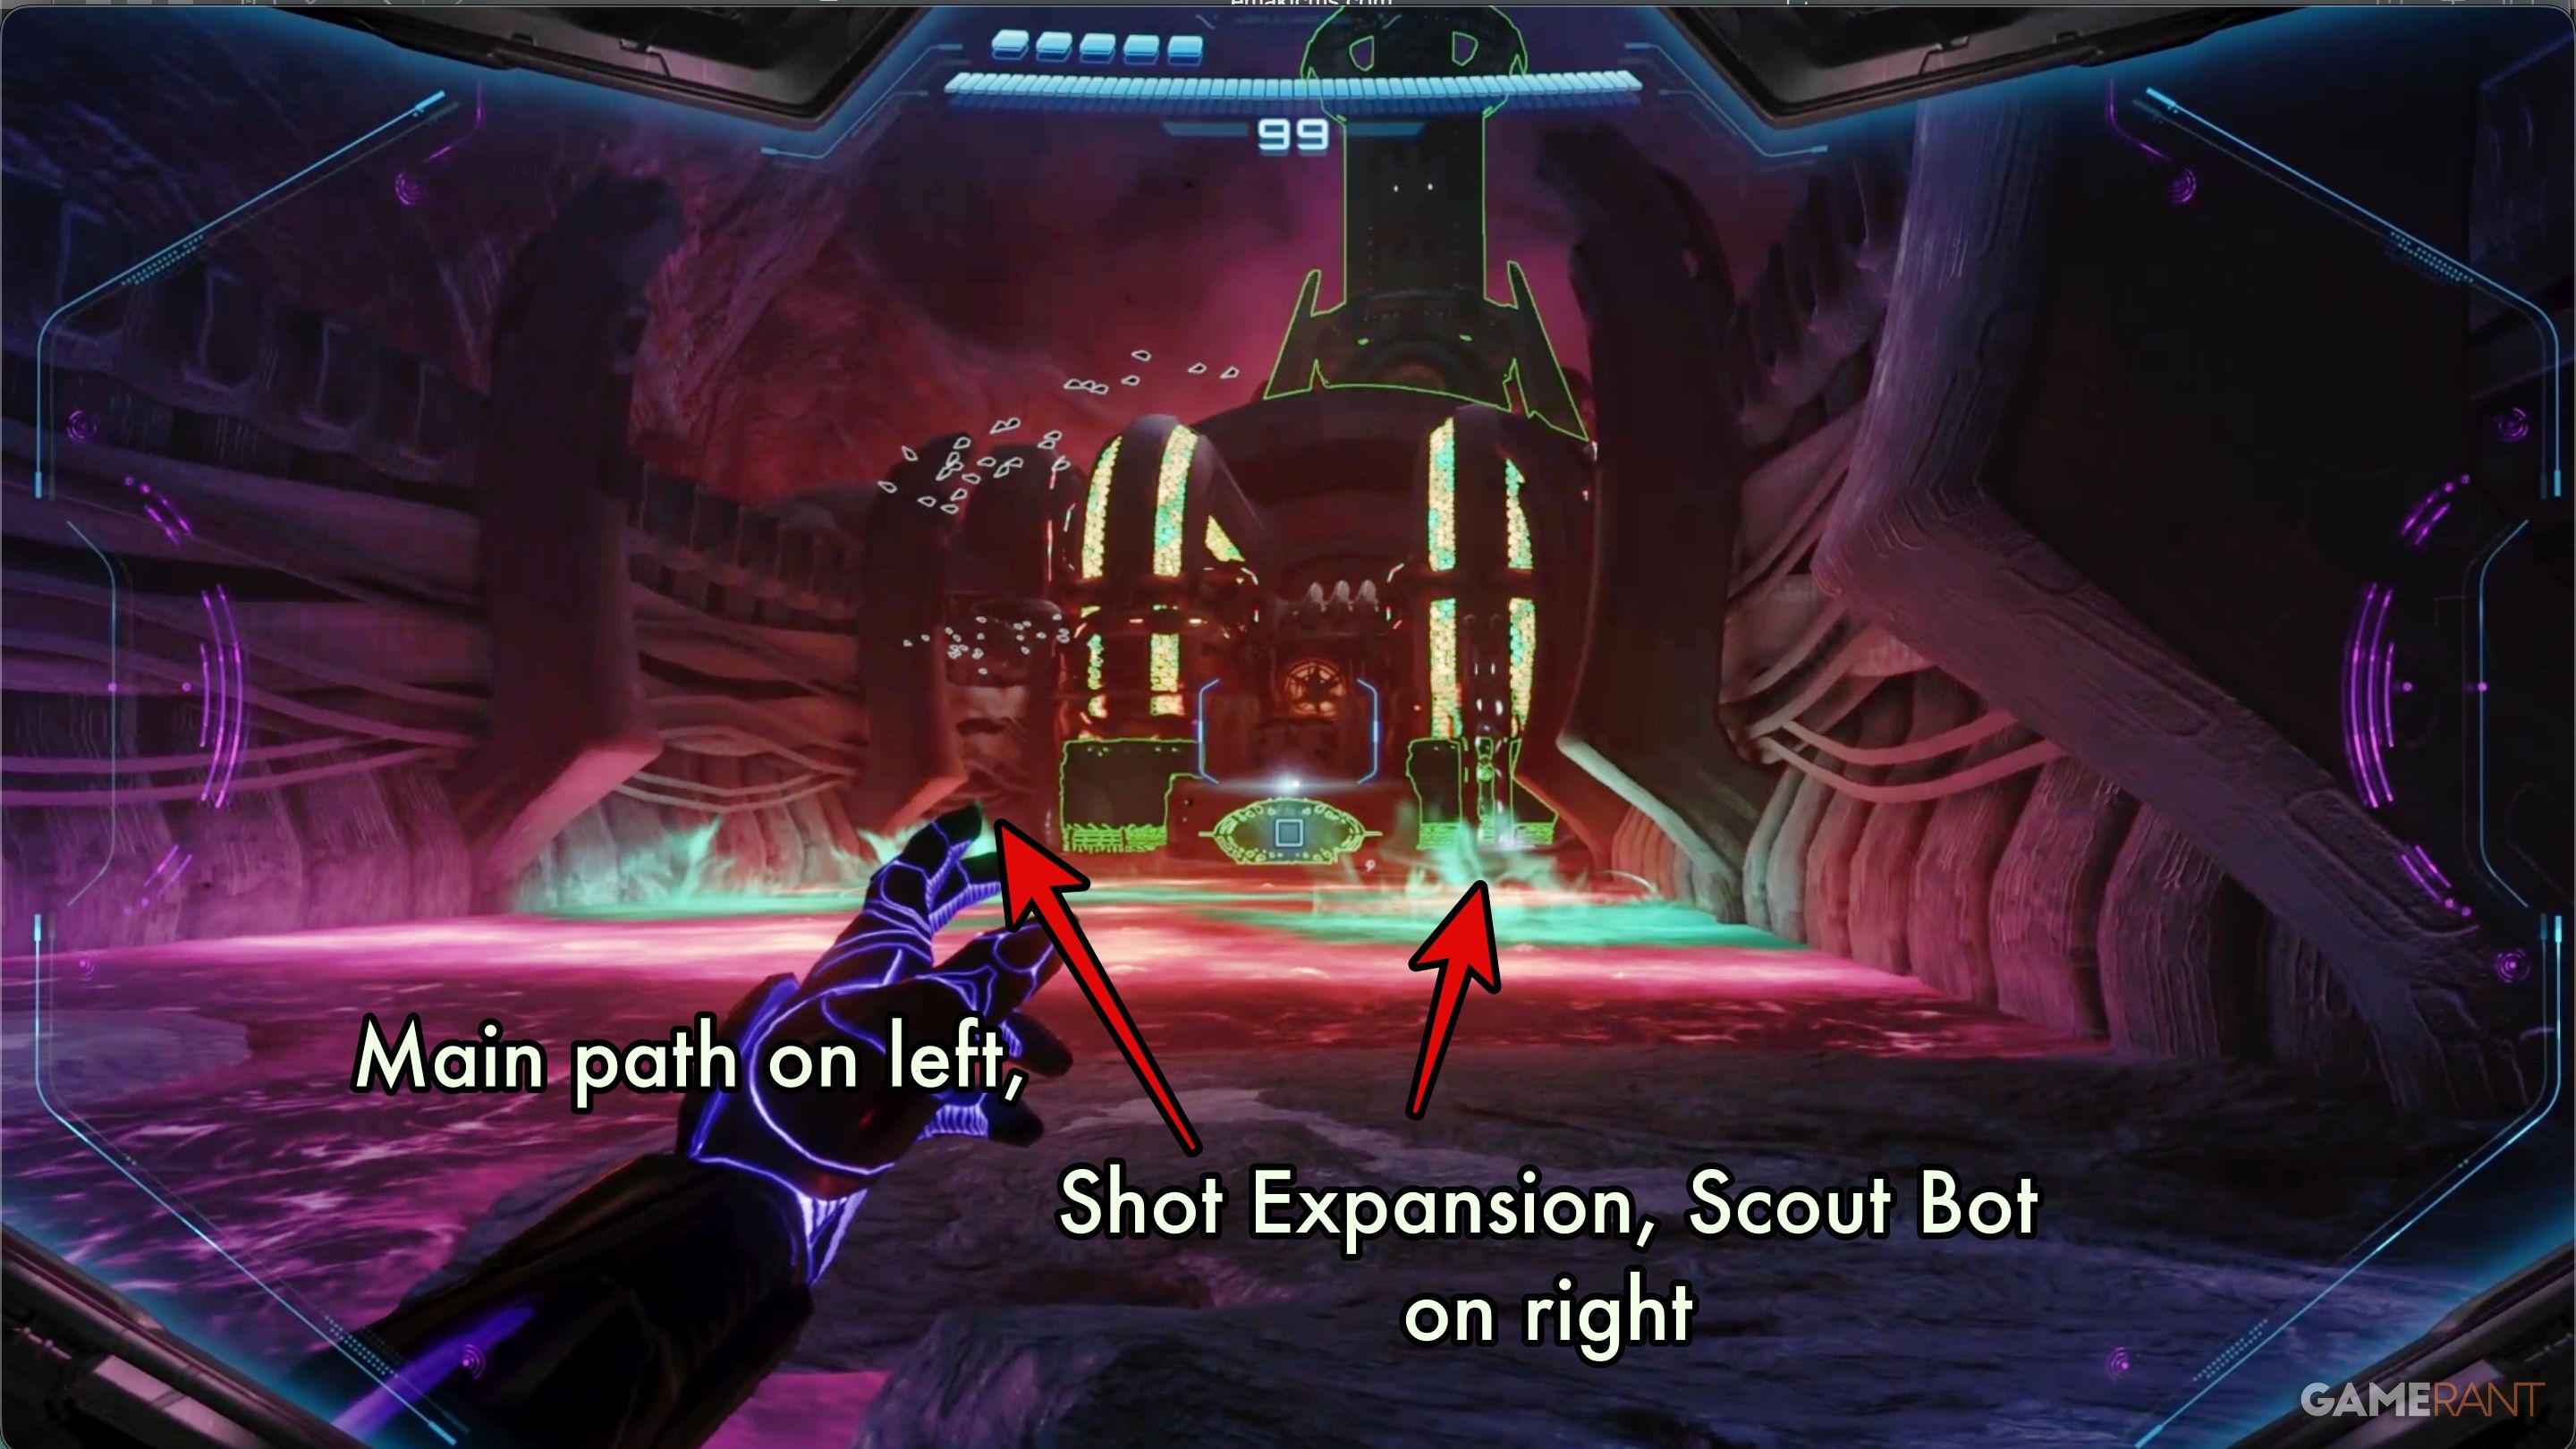
To get across the lava lake, use Vi-O-La. On the far side, you’ll notice land on both the left and right. The main path is on the left, but going to the right first will let you find a Shot Expansion. You’ll also discover the Scout Bot there, which can help you find any items you might have missed later on.
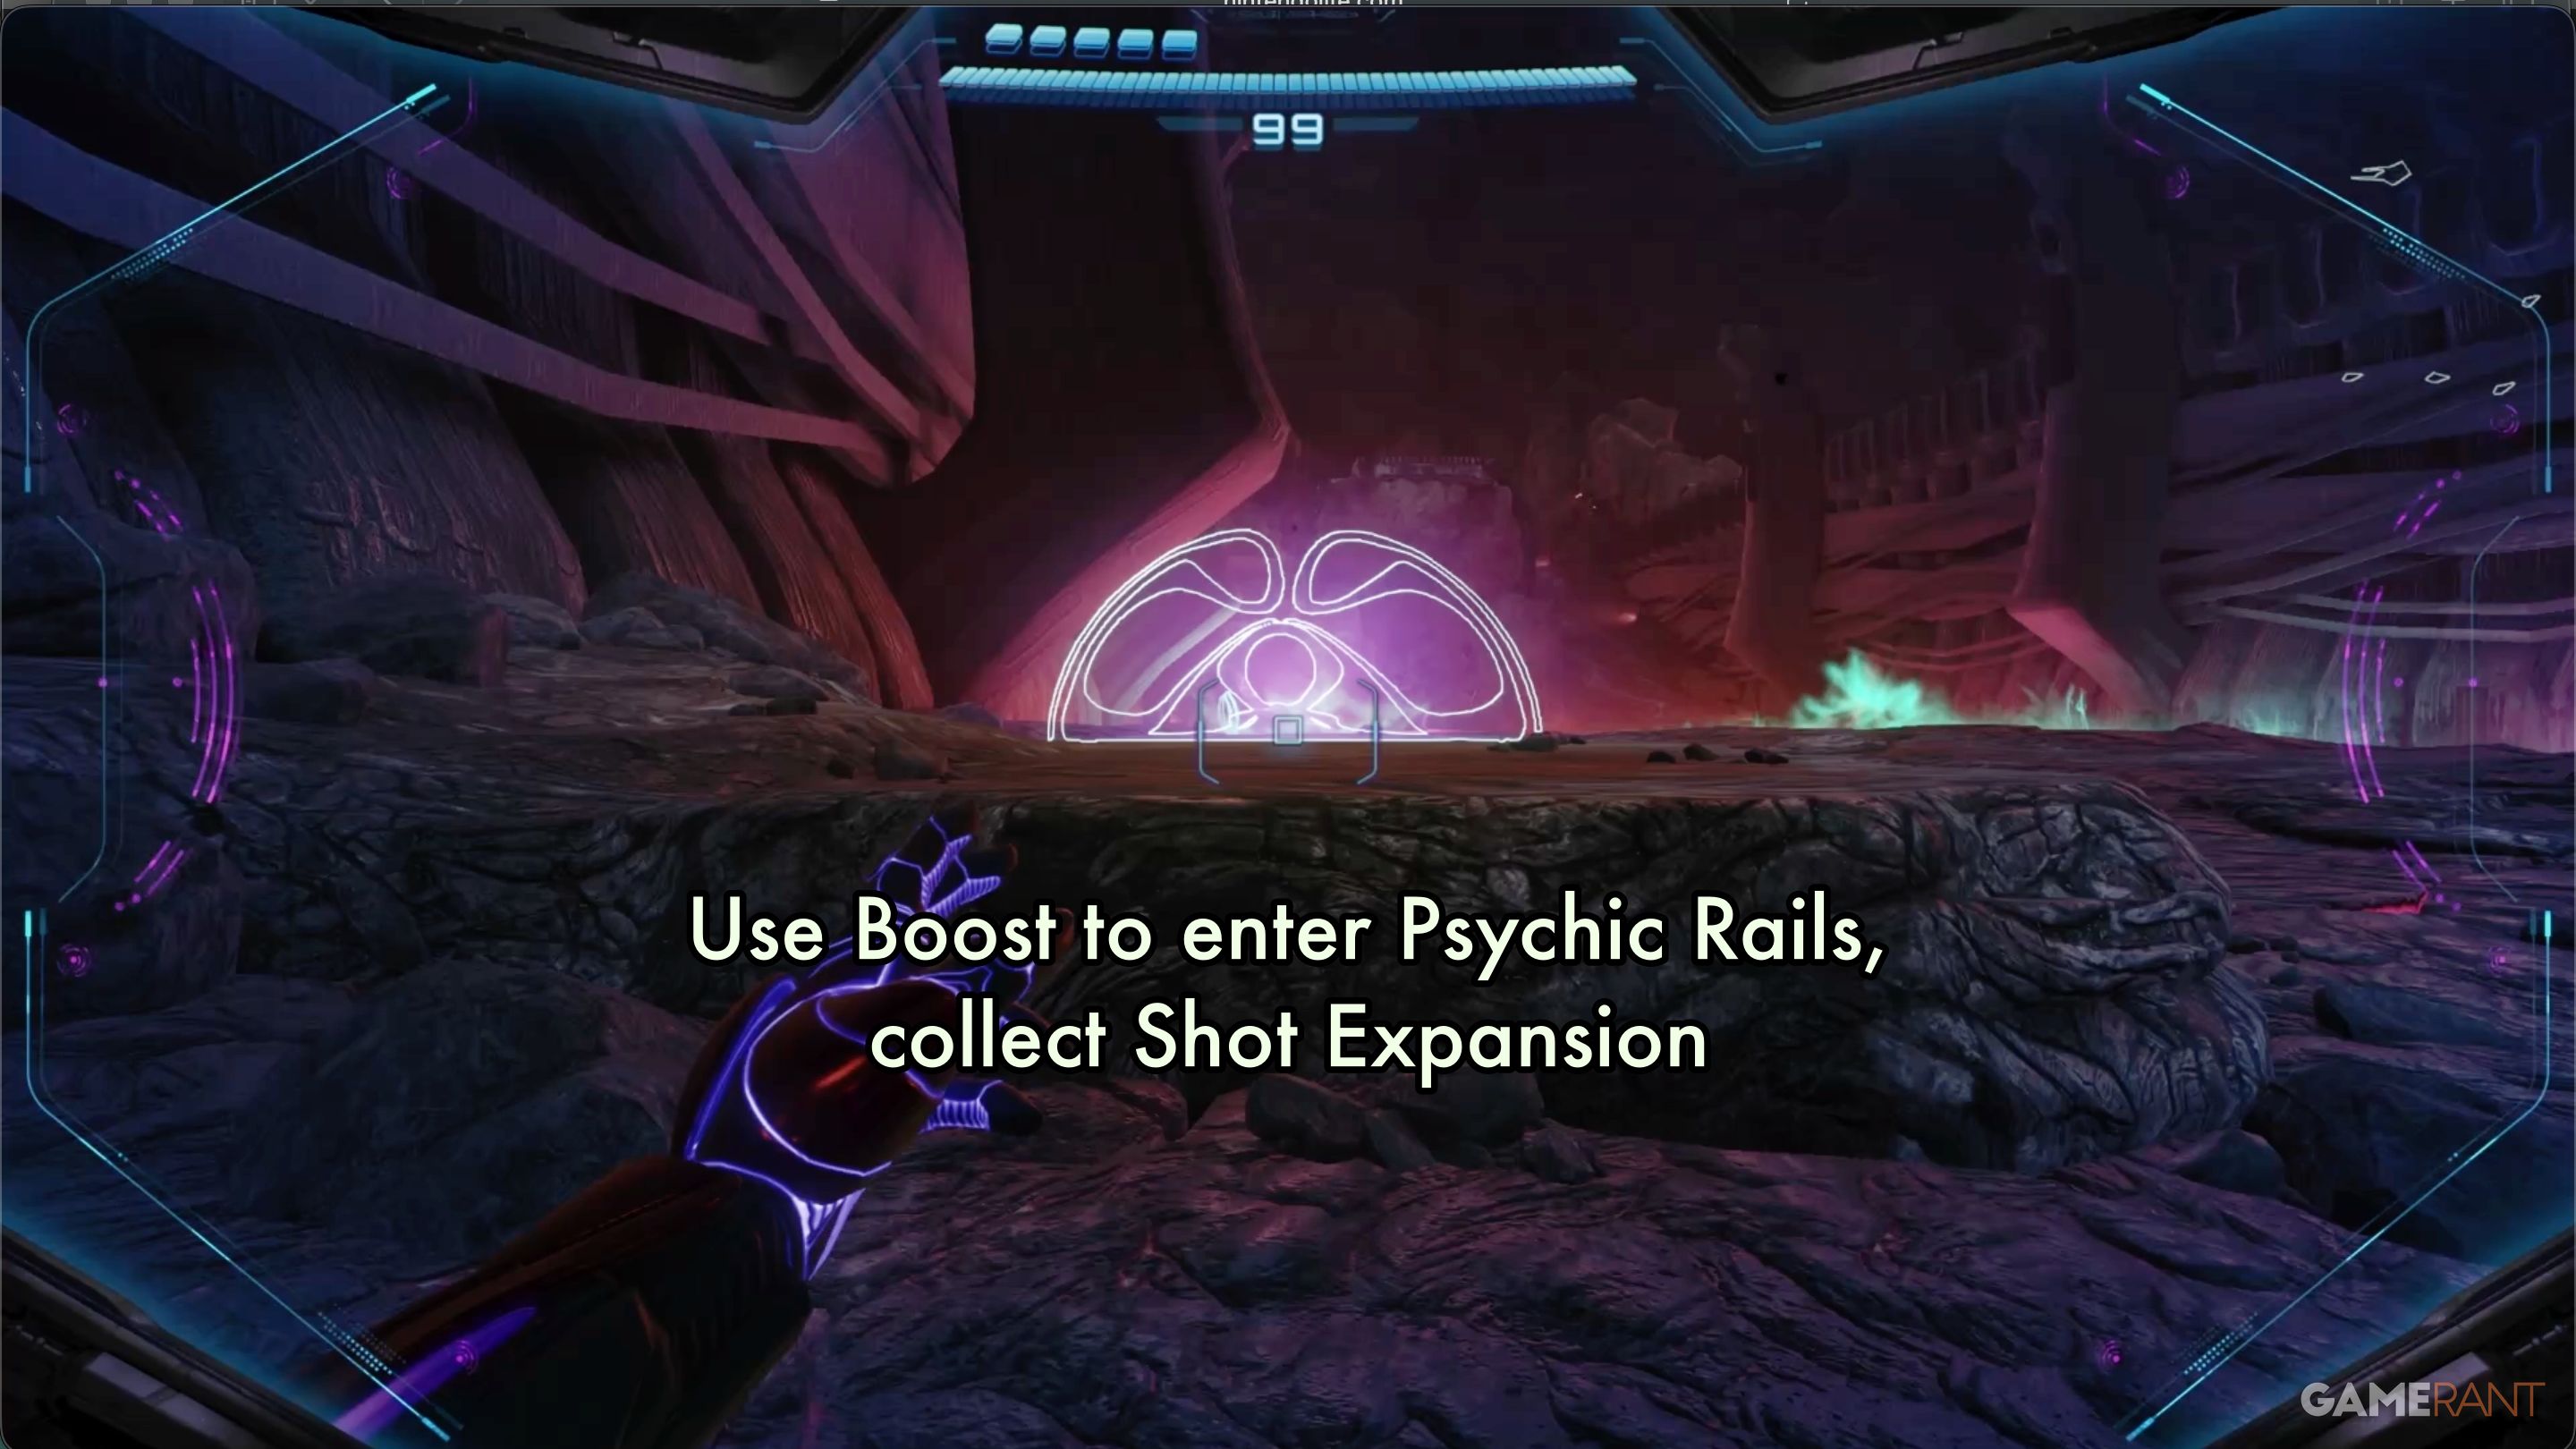
On the right, find the purple glow of a special object. Scanning it will reveal a Psychic Boost Rail. Use your Boost ability to enter the rail, which will lead you to a platform above the lava.
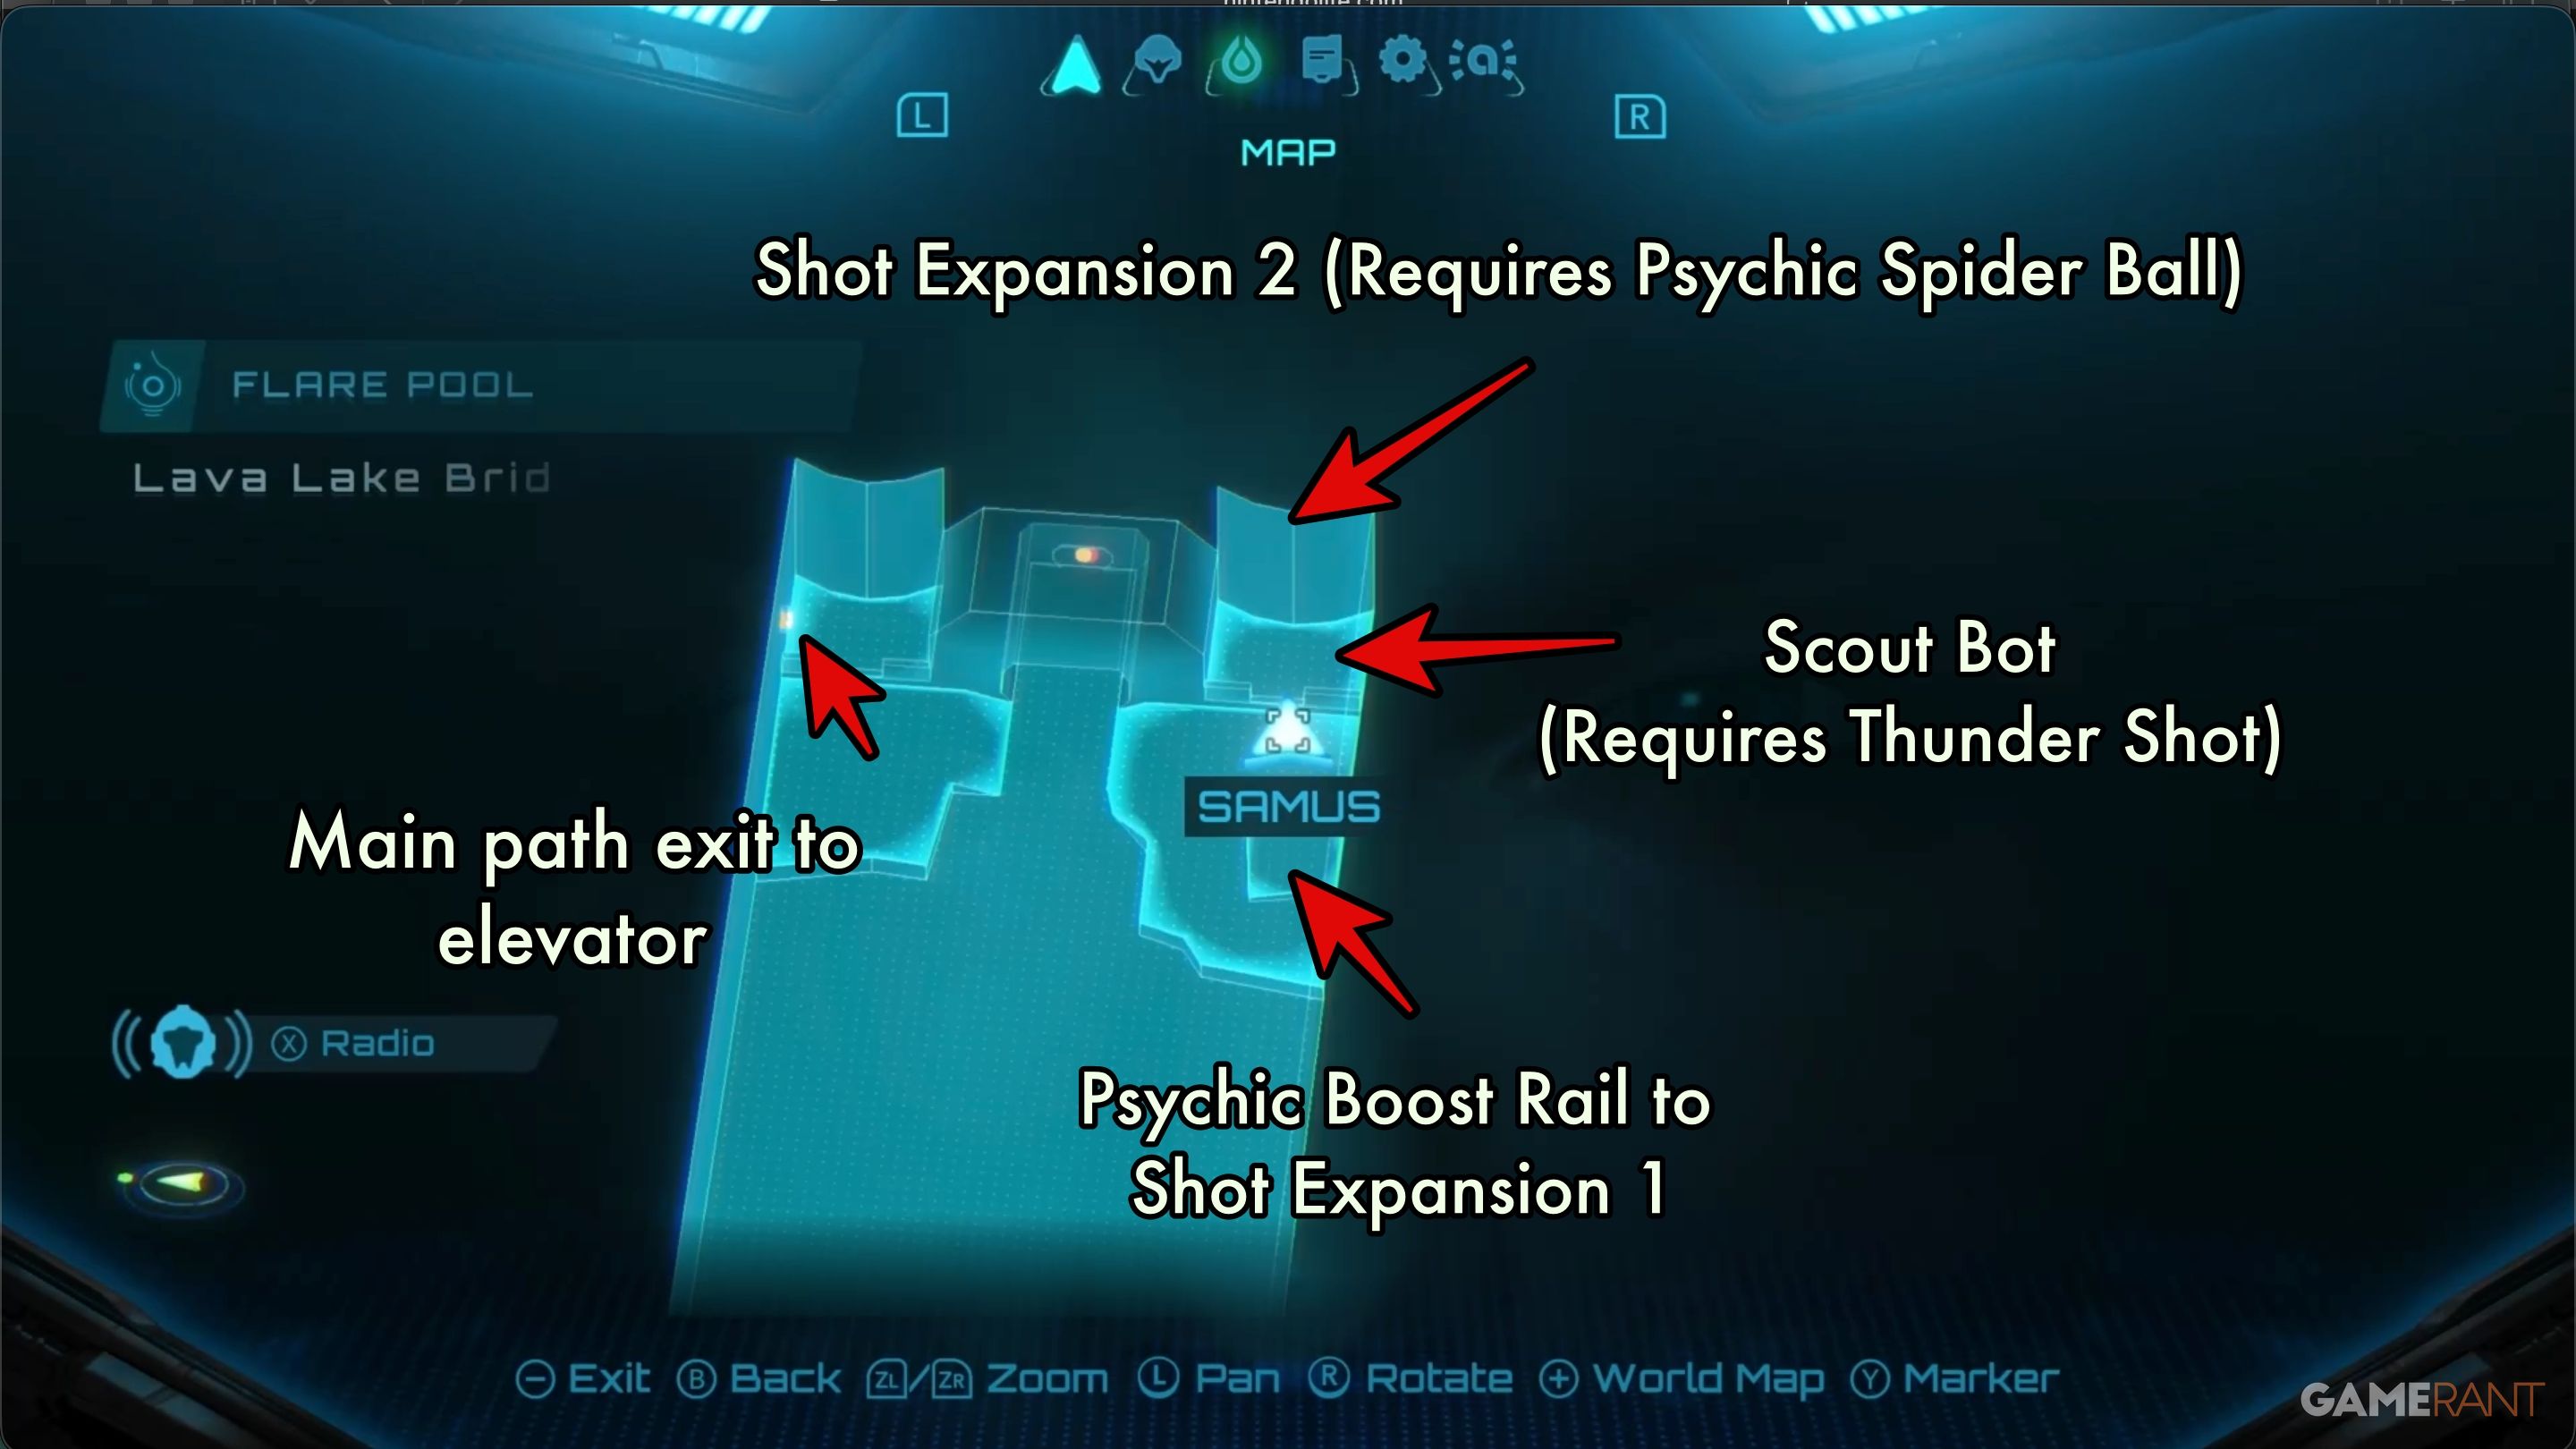
Okay, so I found the Scout Bot! It’s just past those security pylons that block Vi-O-La. There’s also a Shot Expansion up on top of that big structure, but you absolutely need the Psychic Spider Ball to get to it, so I made a mental note to come back later. After grabbing that first expansion, I headed for the exit on the left and took the elevator up to the next area.
GF Distress Beacon:
Ride the elevator upwards and start carefully crossing the bridge above the lava. As you walk, you’ll pick up a distress signal from the Galactic Federation, letting you know there’s someone waiting in the Boiler Room.
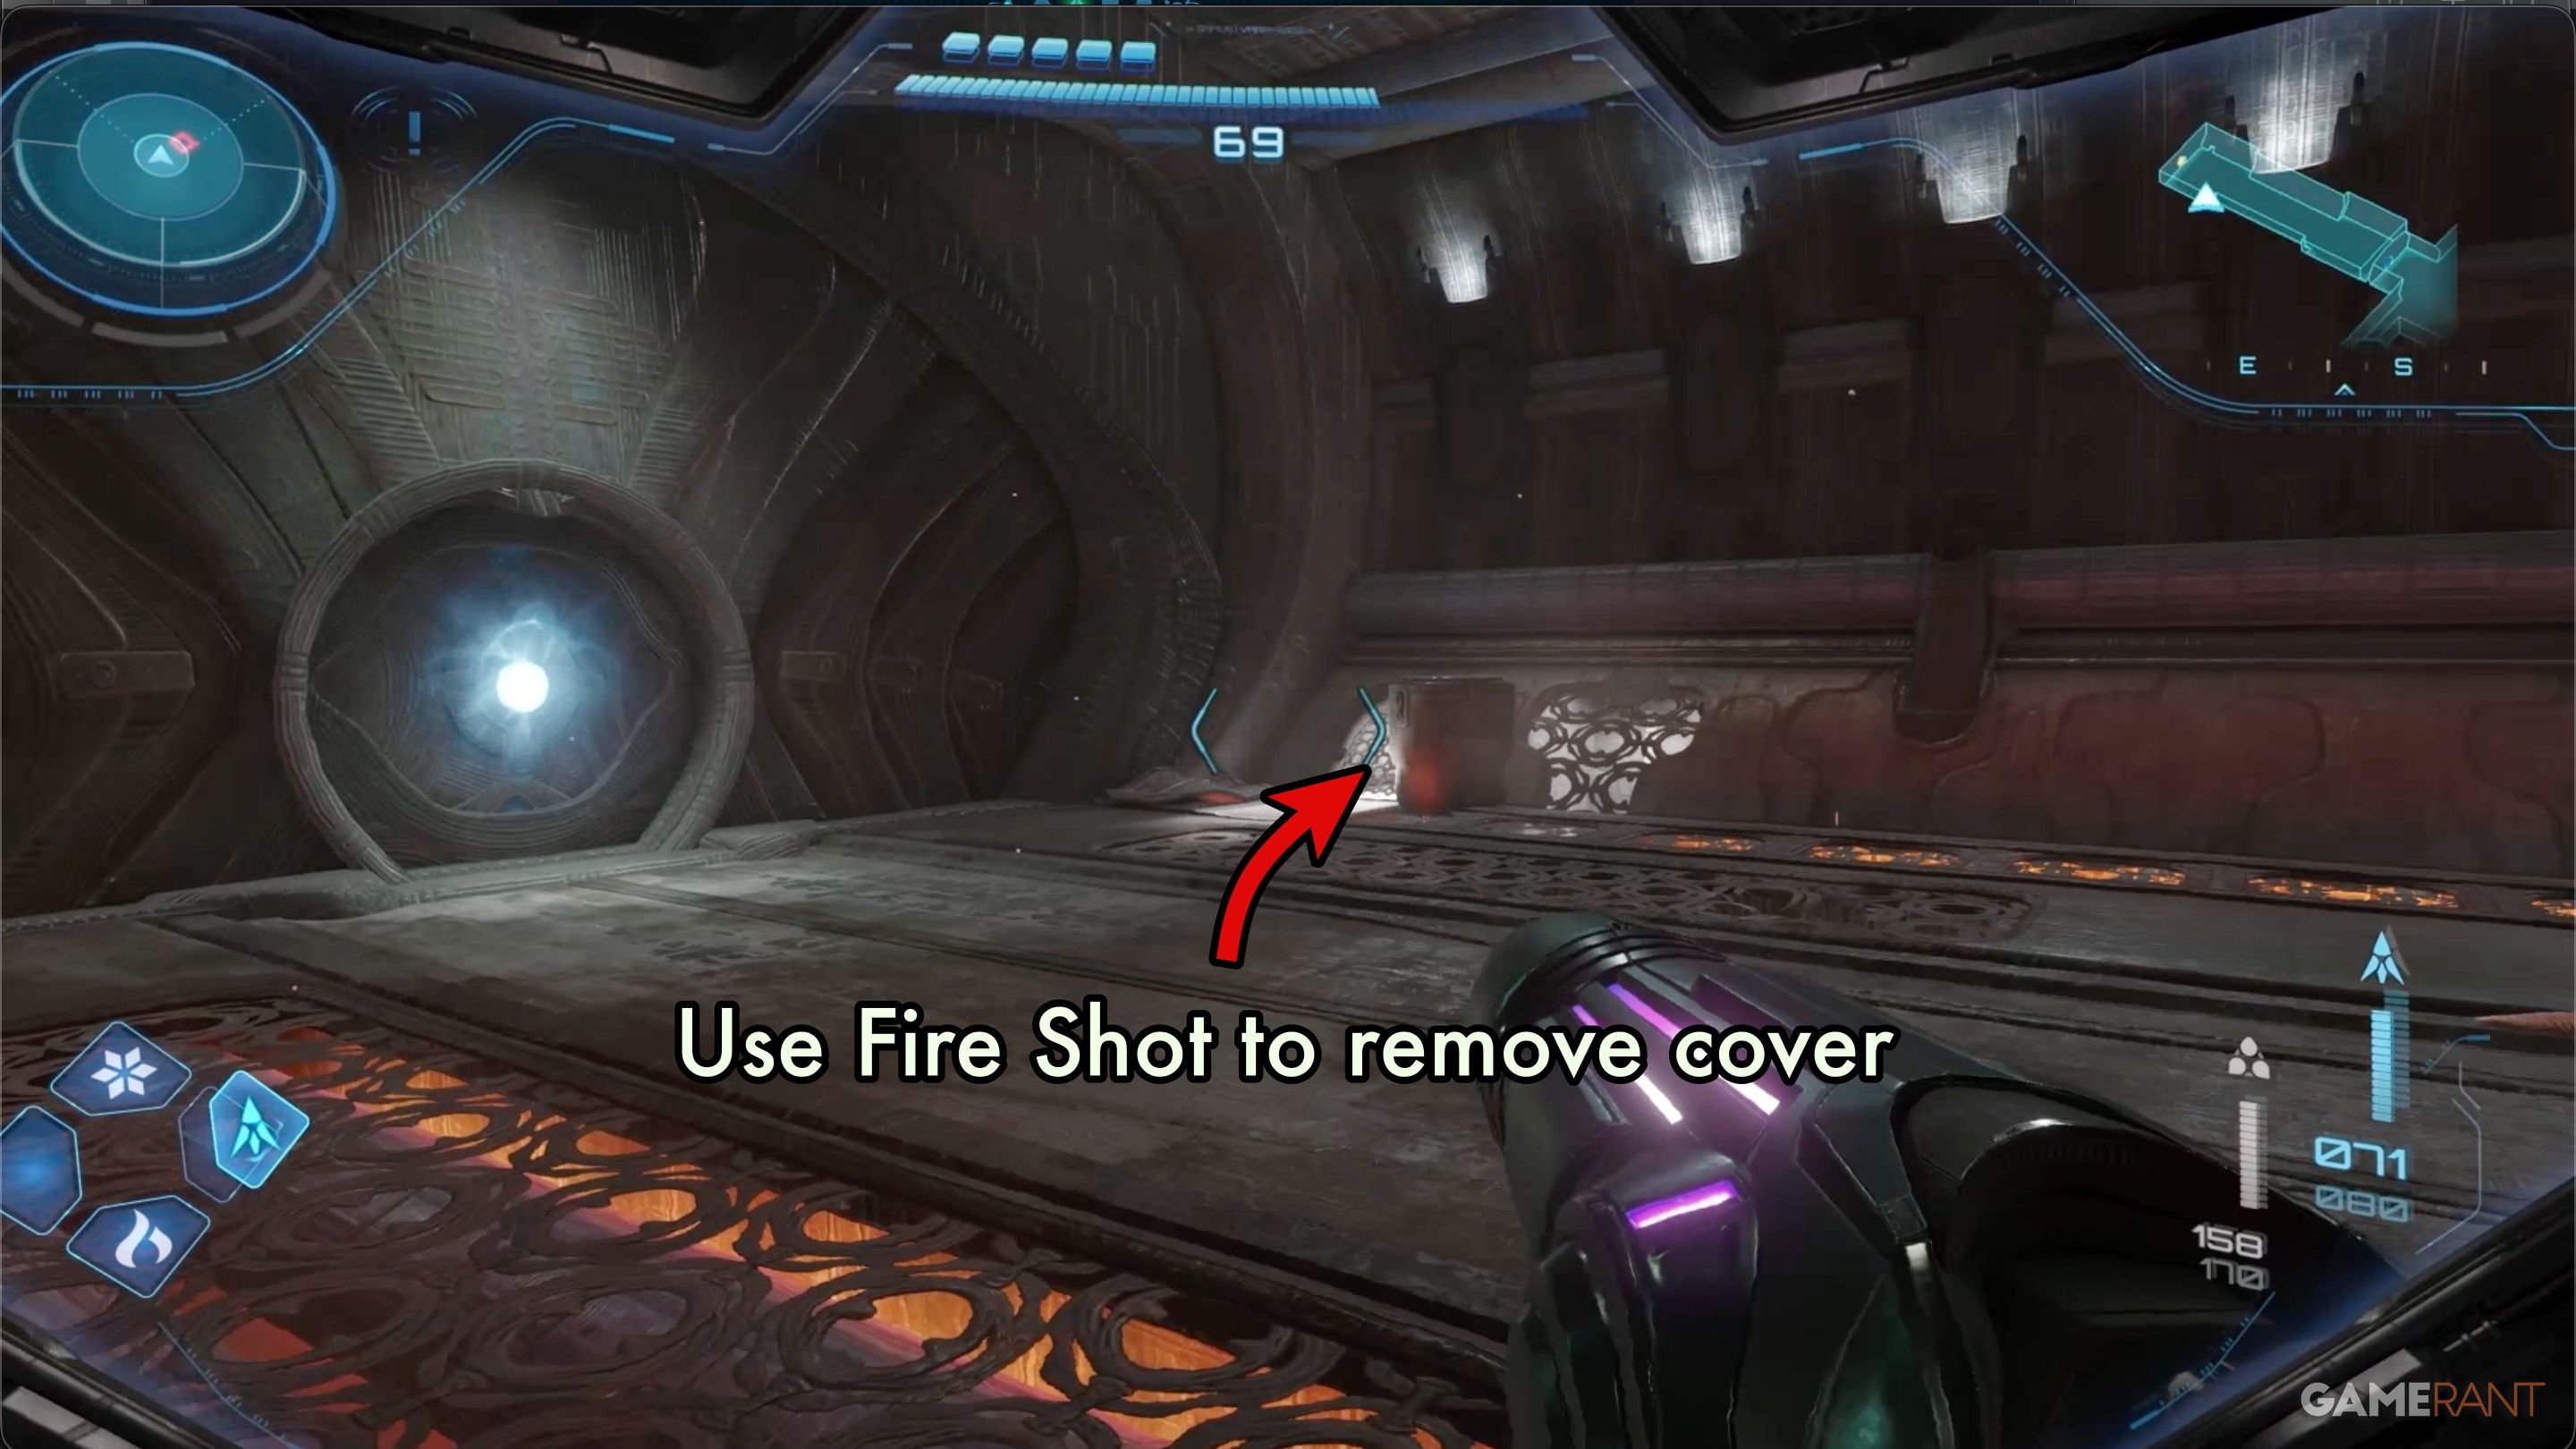
Keep following the path through the Undercarriage area. When you reach the end, you’ll find the door is blocked. Look down at the base of the wall on the right – you’ll see a grate covering a small opening for your Morph Ball. Use your Fire Shot to destroy the grate, then enter the opening.
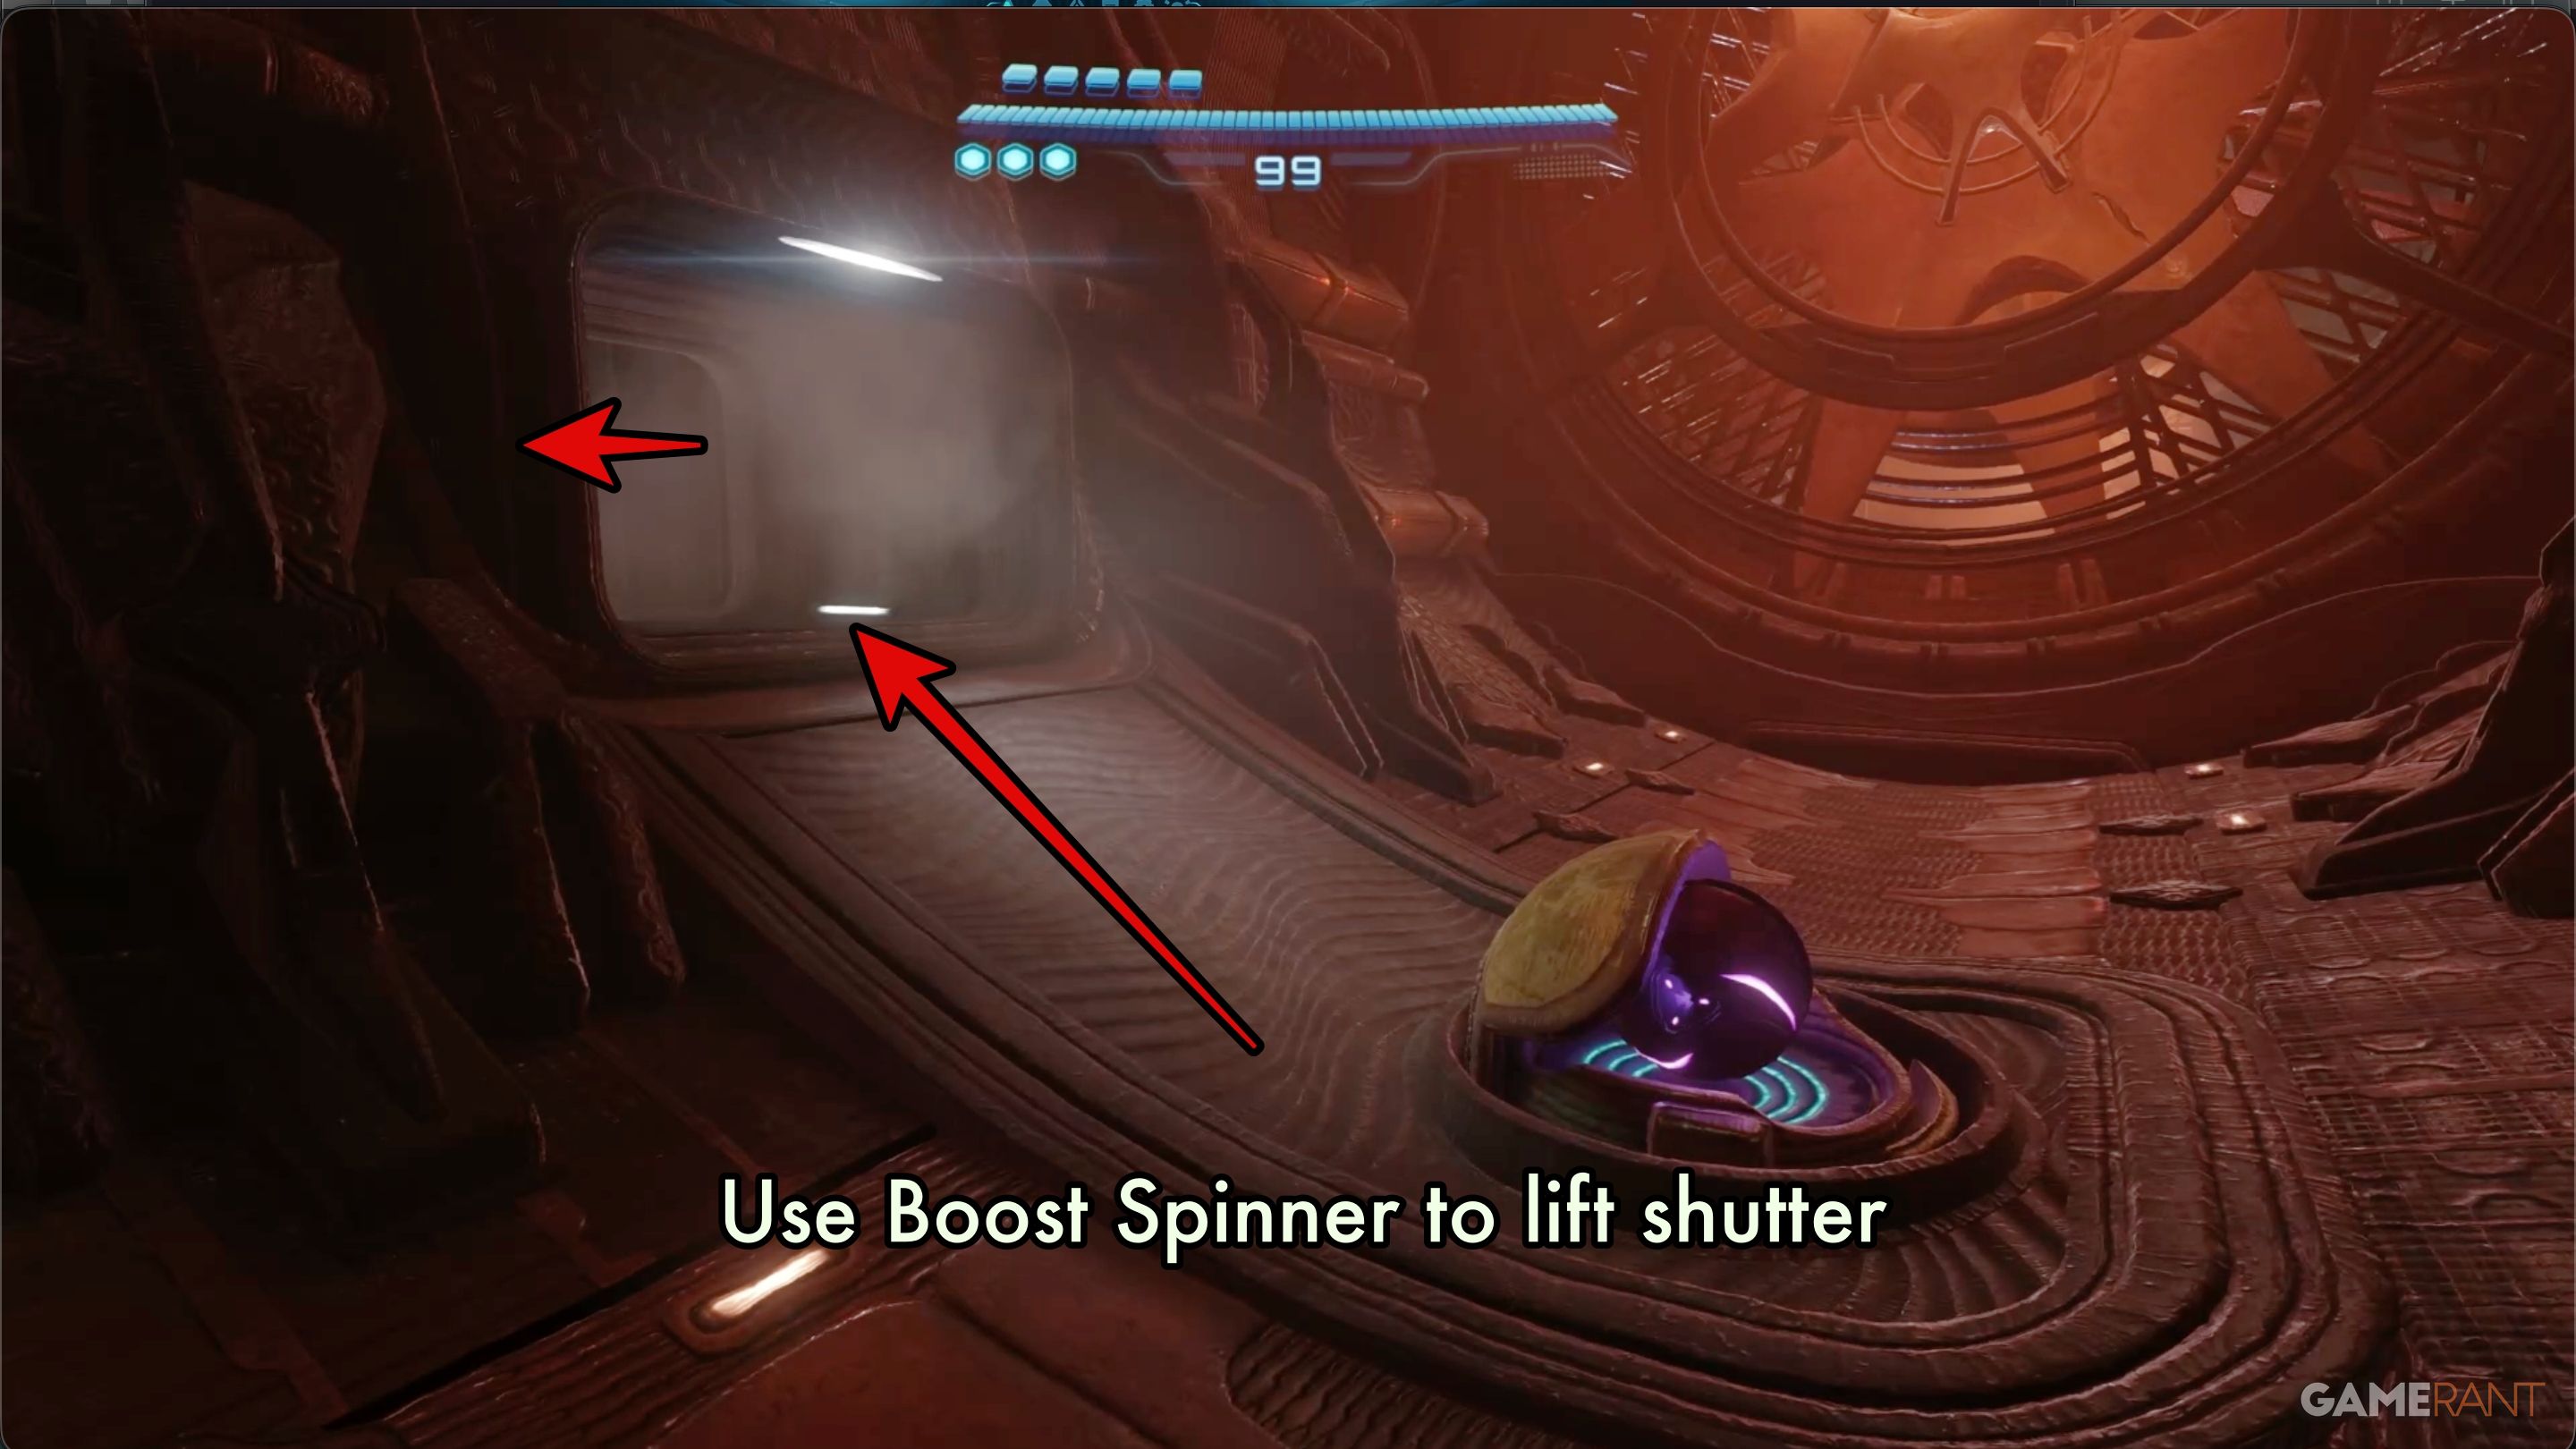
You’ll start in the Ventilation Works area. Right away, you’ll spot a Boost Spinner that you can use to raise a shutter, opening a short tunnel leading to the next room.
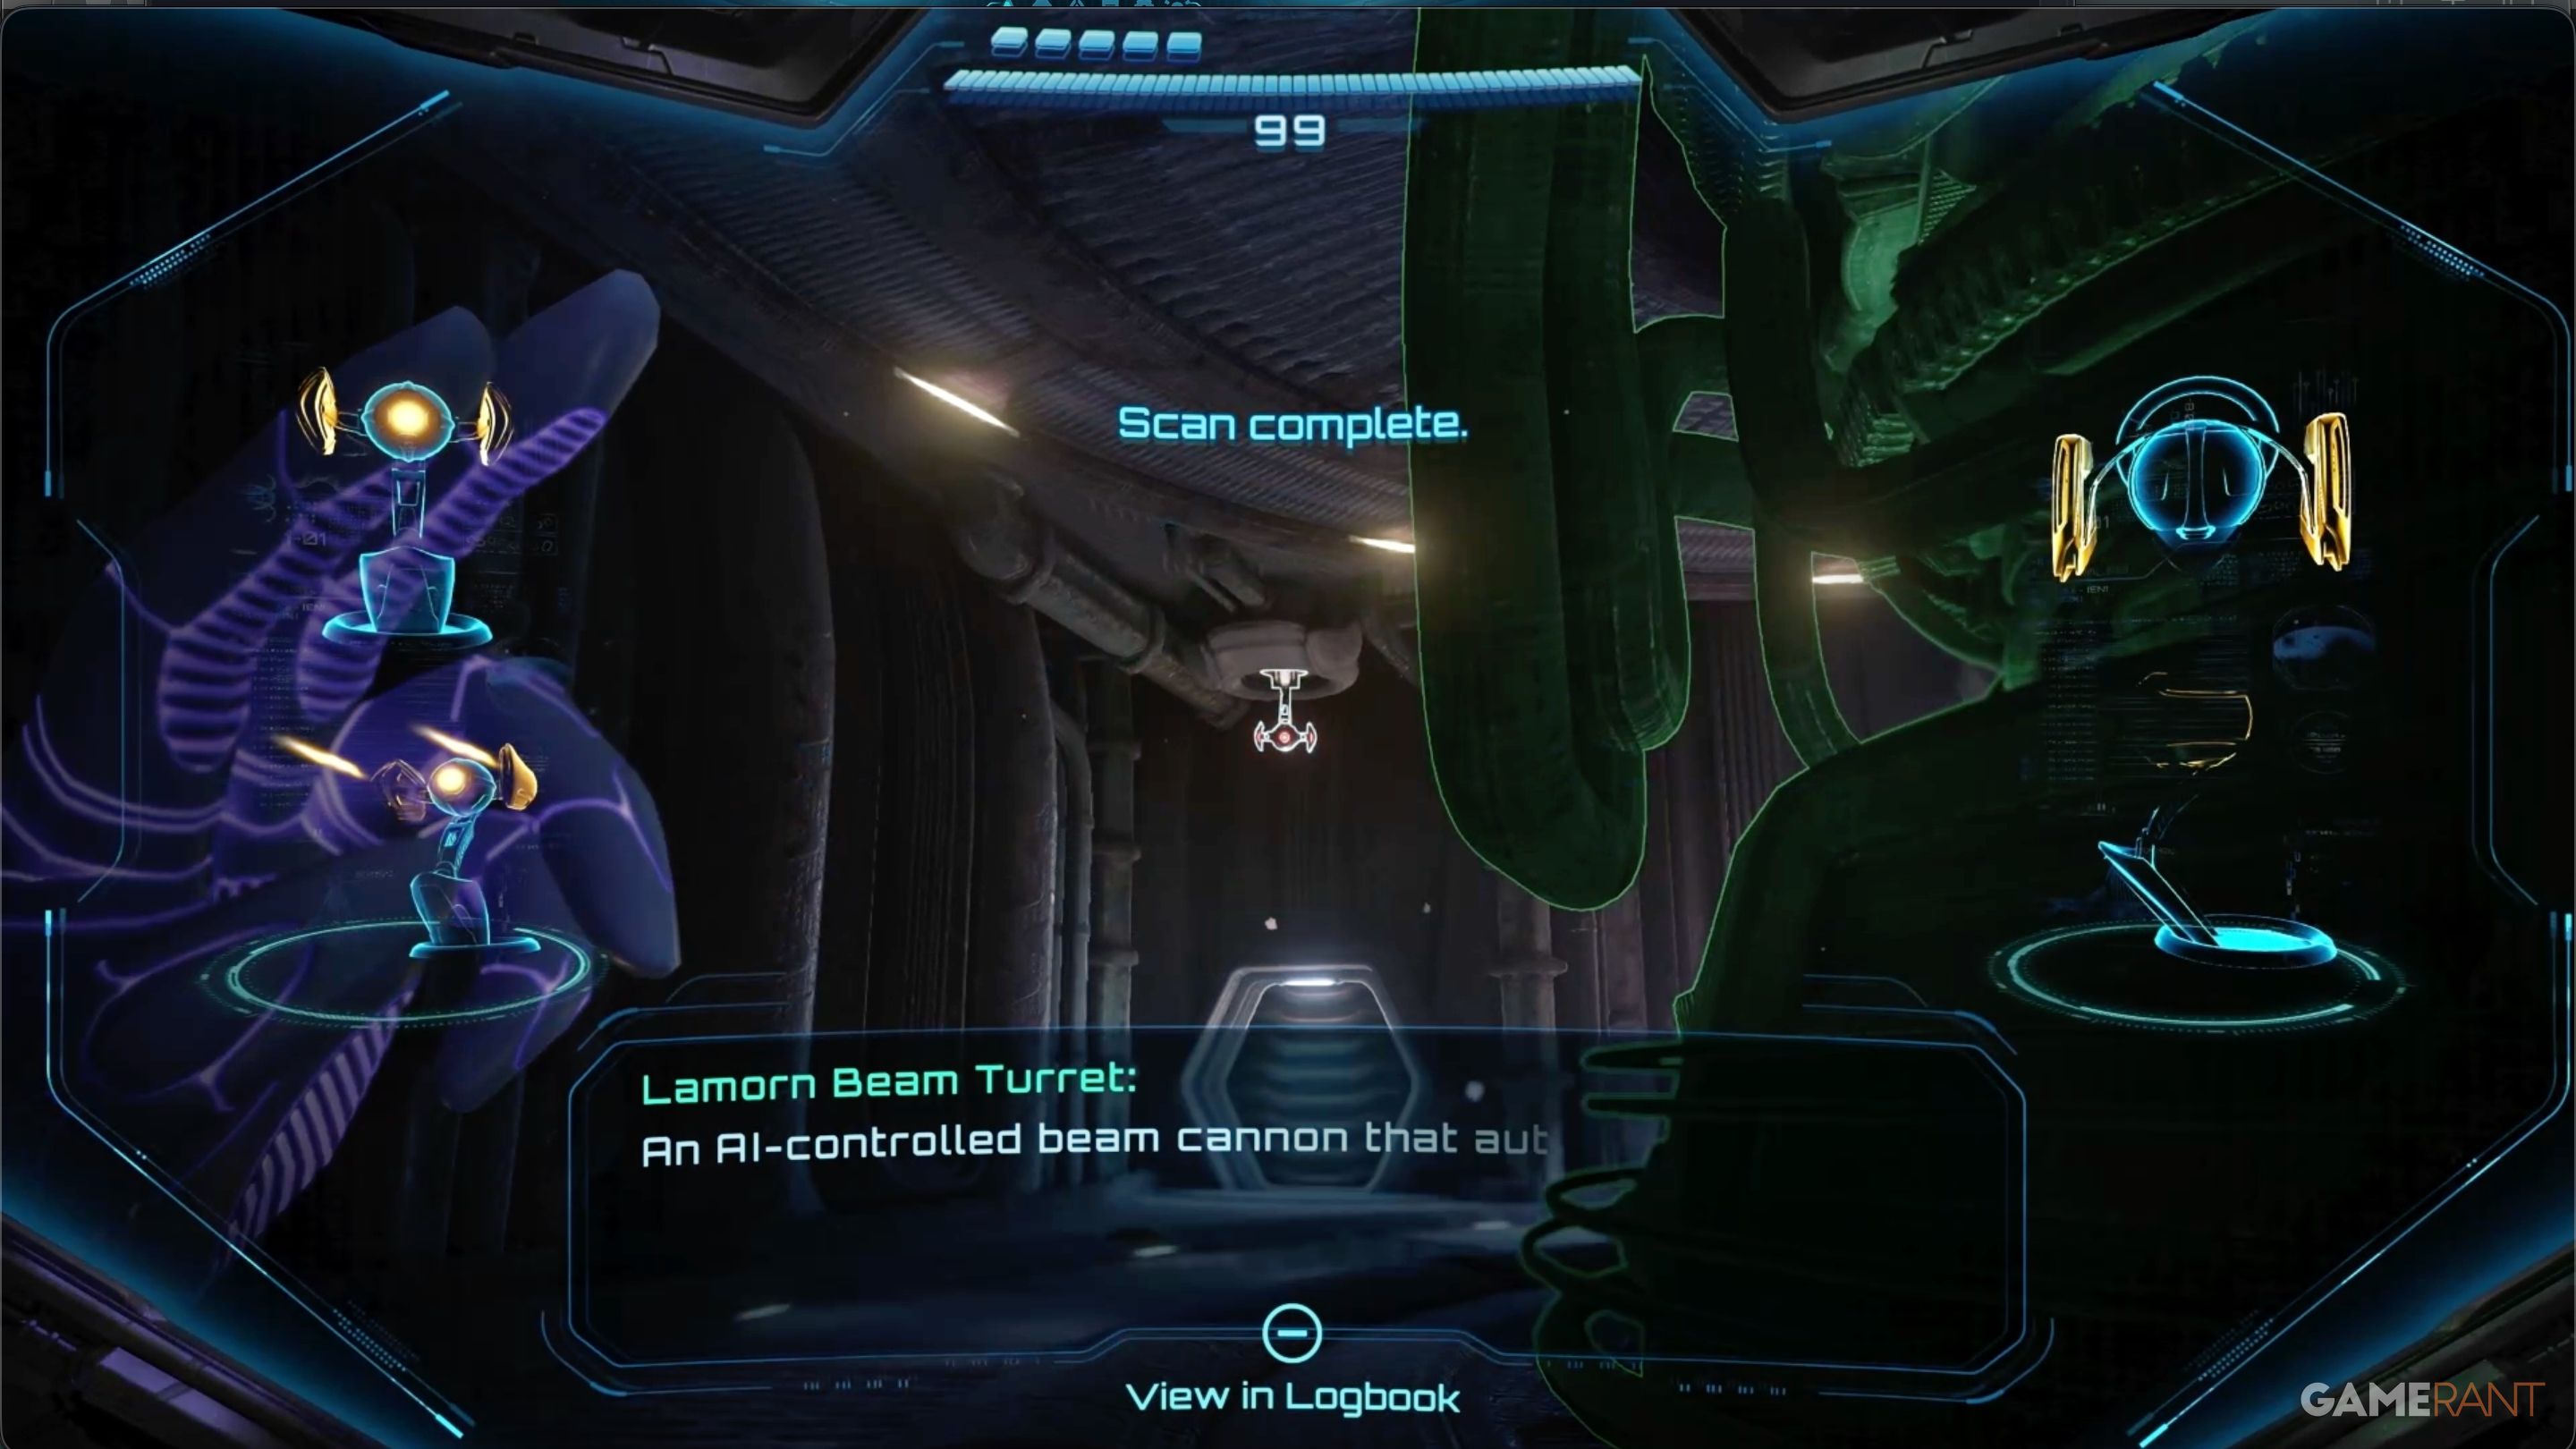
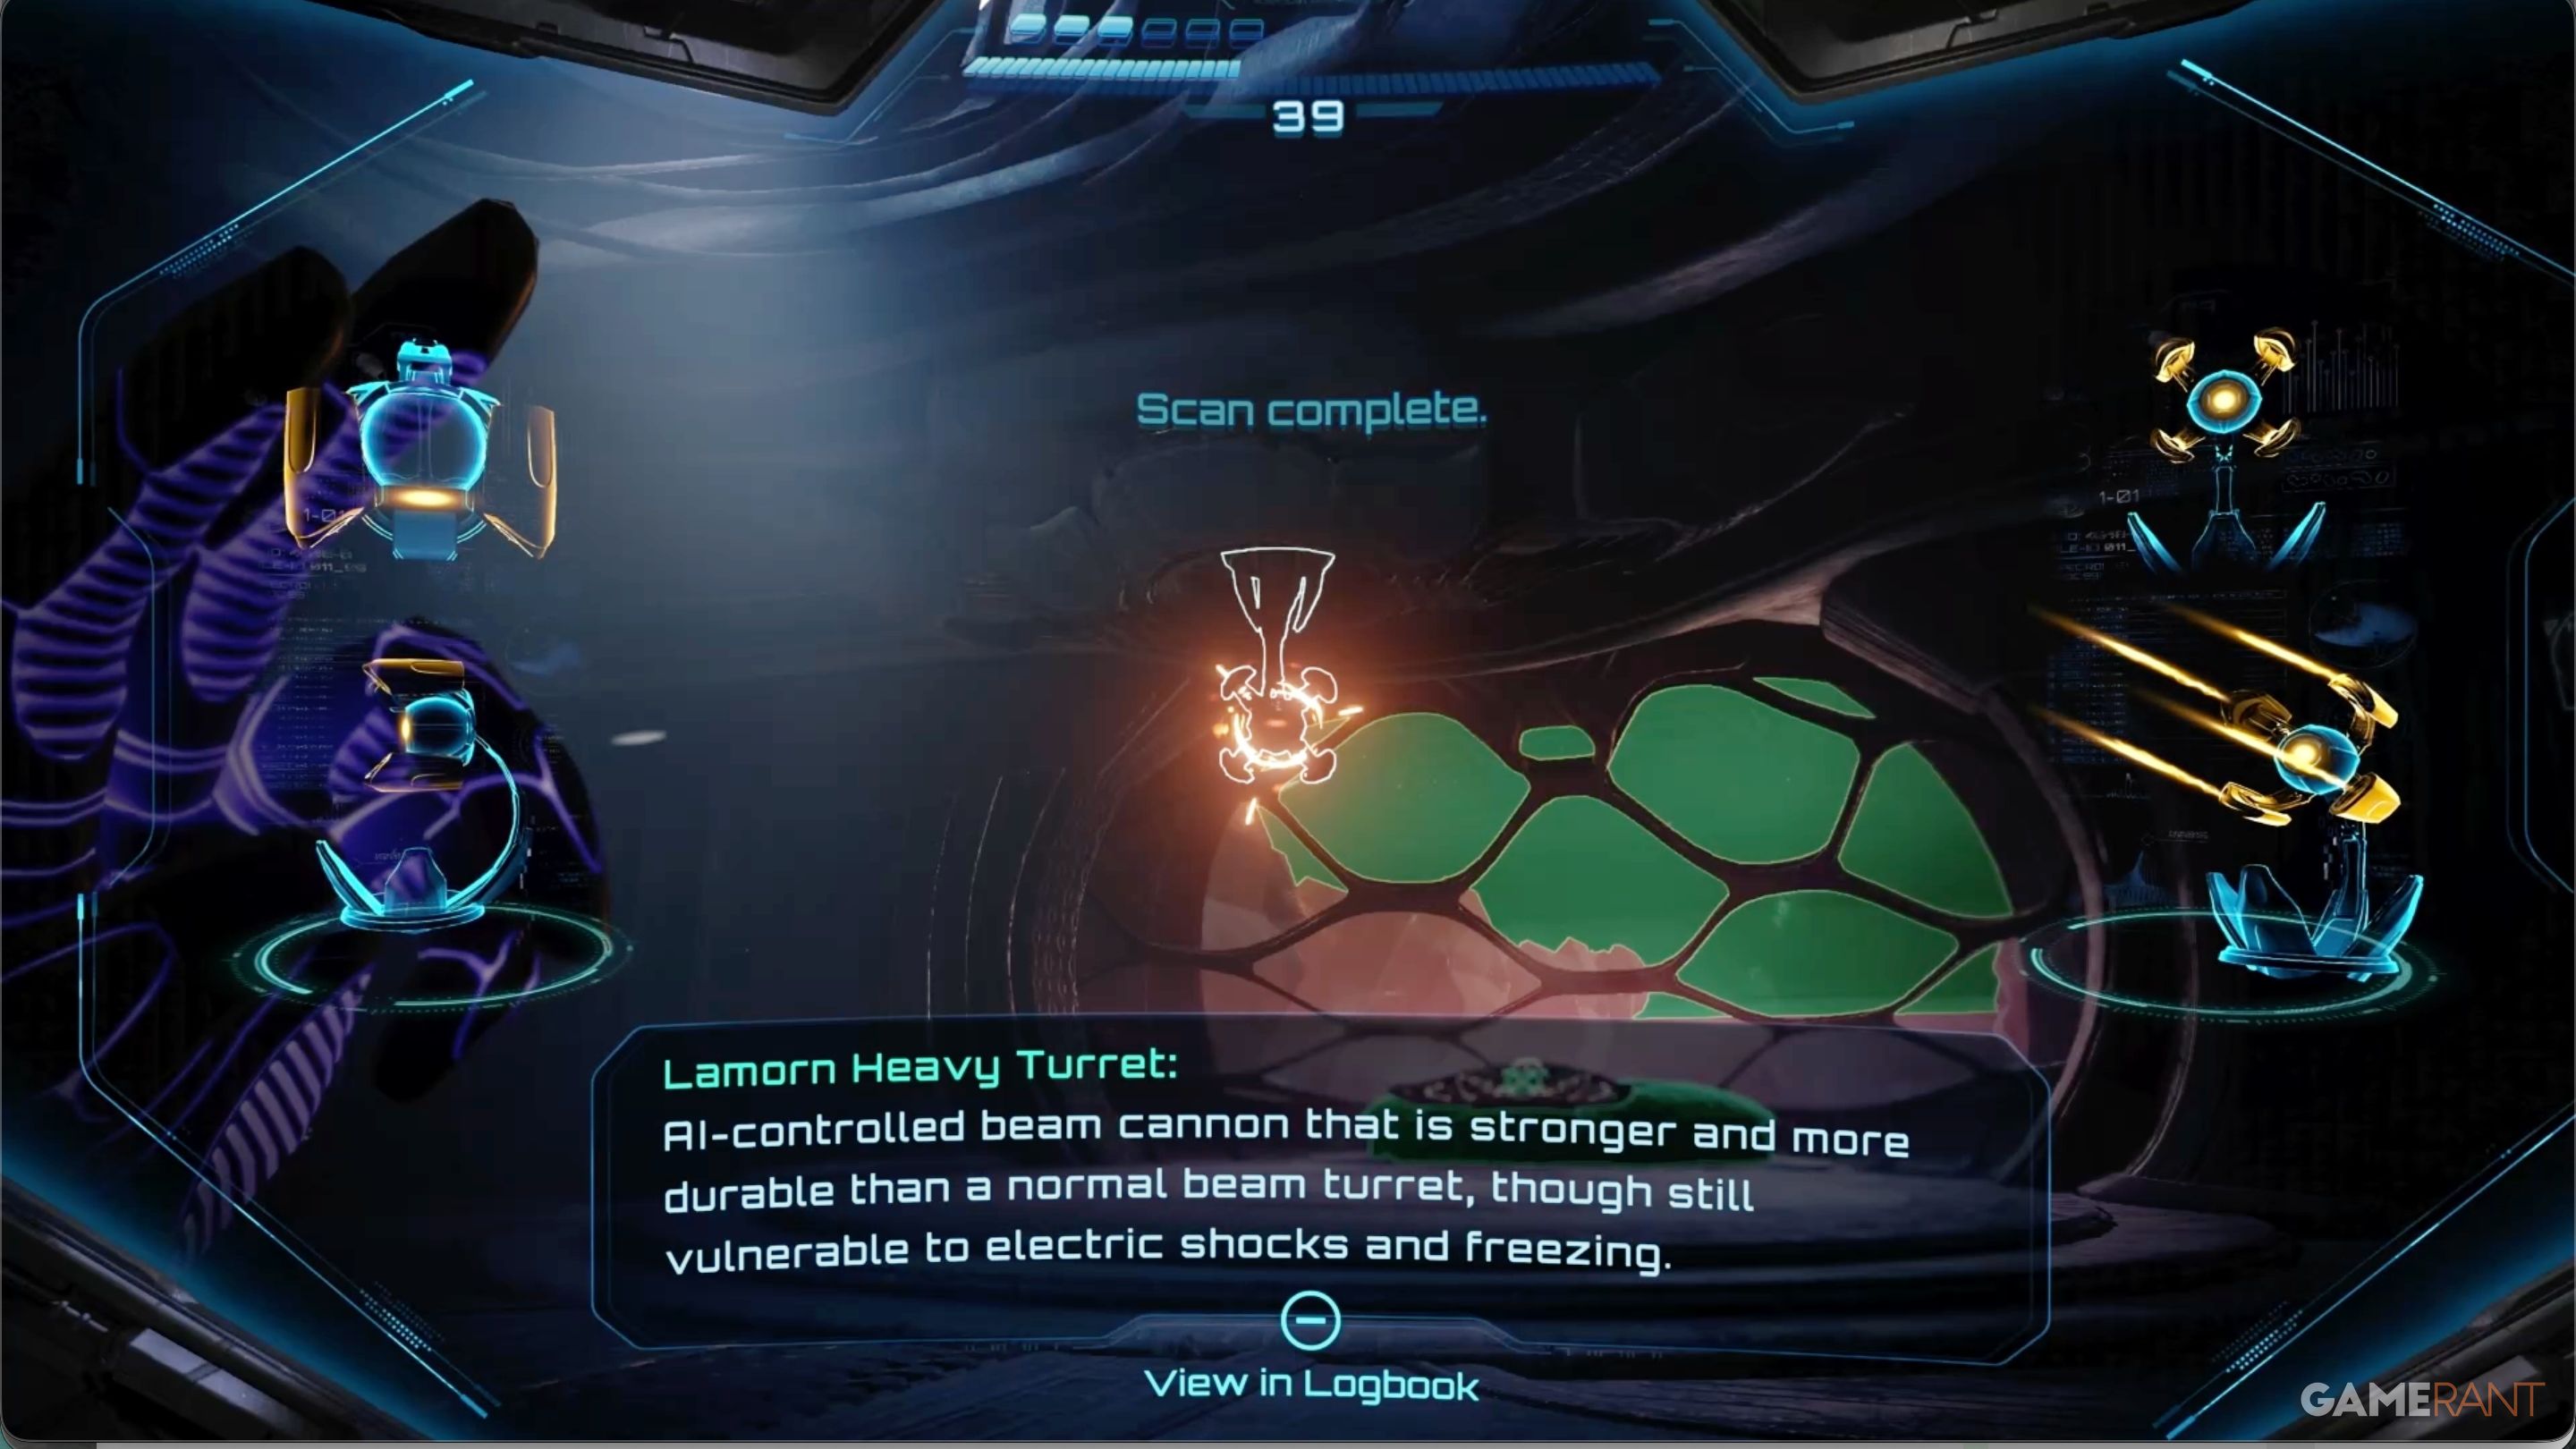
Once you exit the tunnel, turn right to find a Lamorn Beam Turret. Don’t destroy it right away – scan it first, because it’s connected to the Viewros Machines log. The easiest way to deal with it is to freeze it with an Ice Shot, which will give you a safe window to attack.
Once you’ve destroyed the turret, turn around and look for a switch by the door. Activating it will lower the security gate and open a shortcut you can use later.
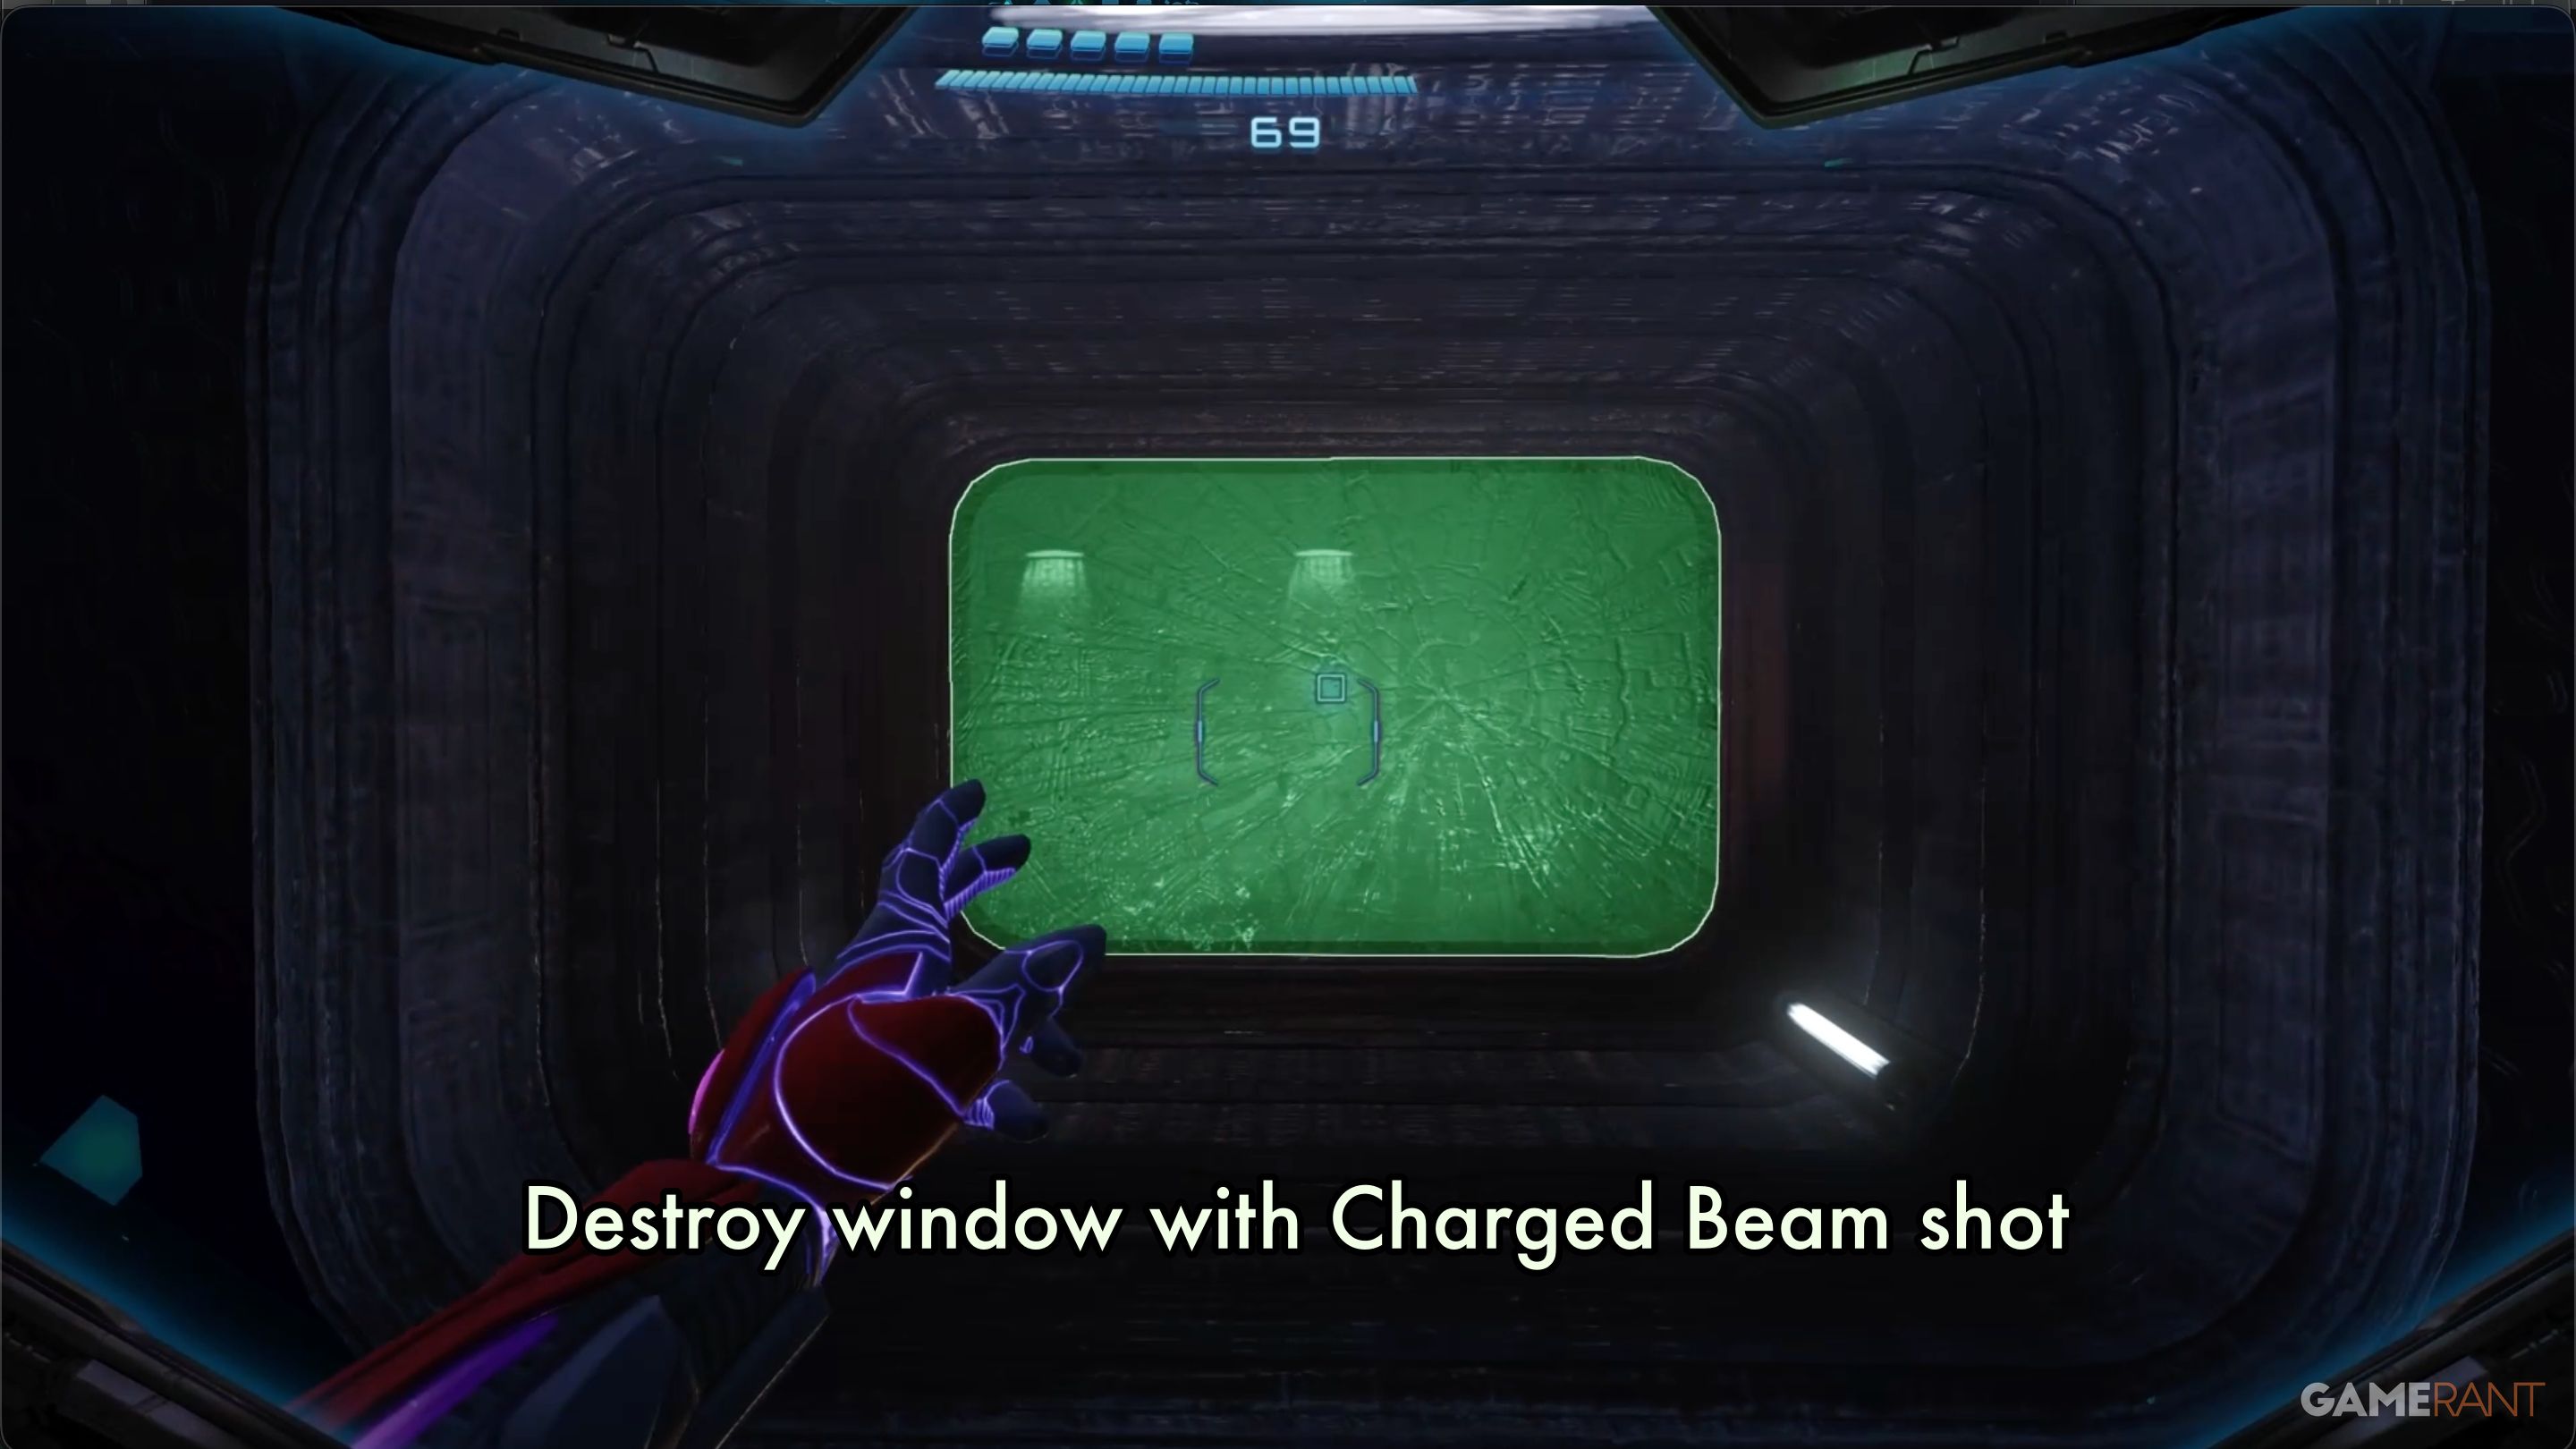
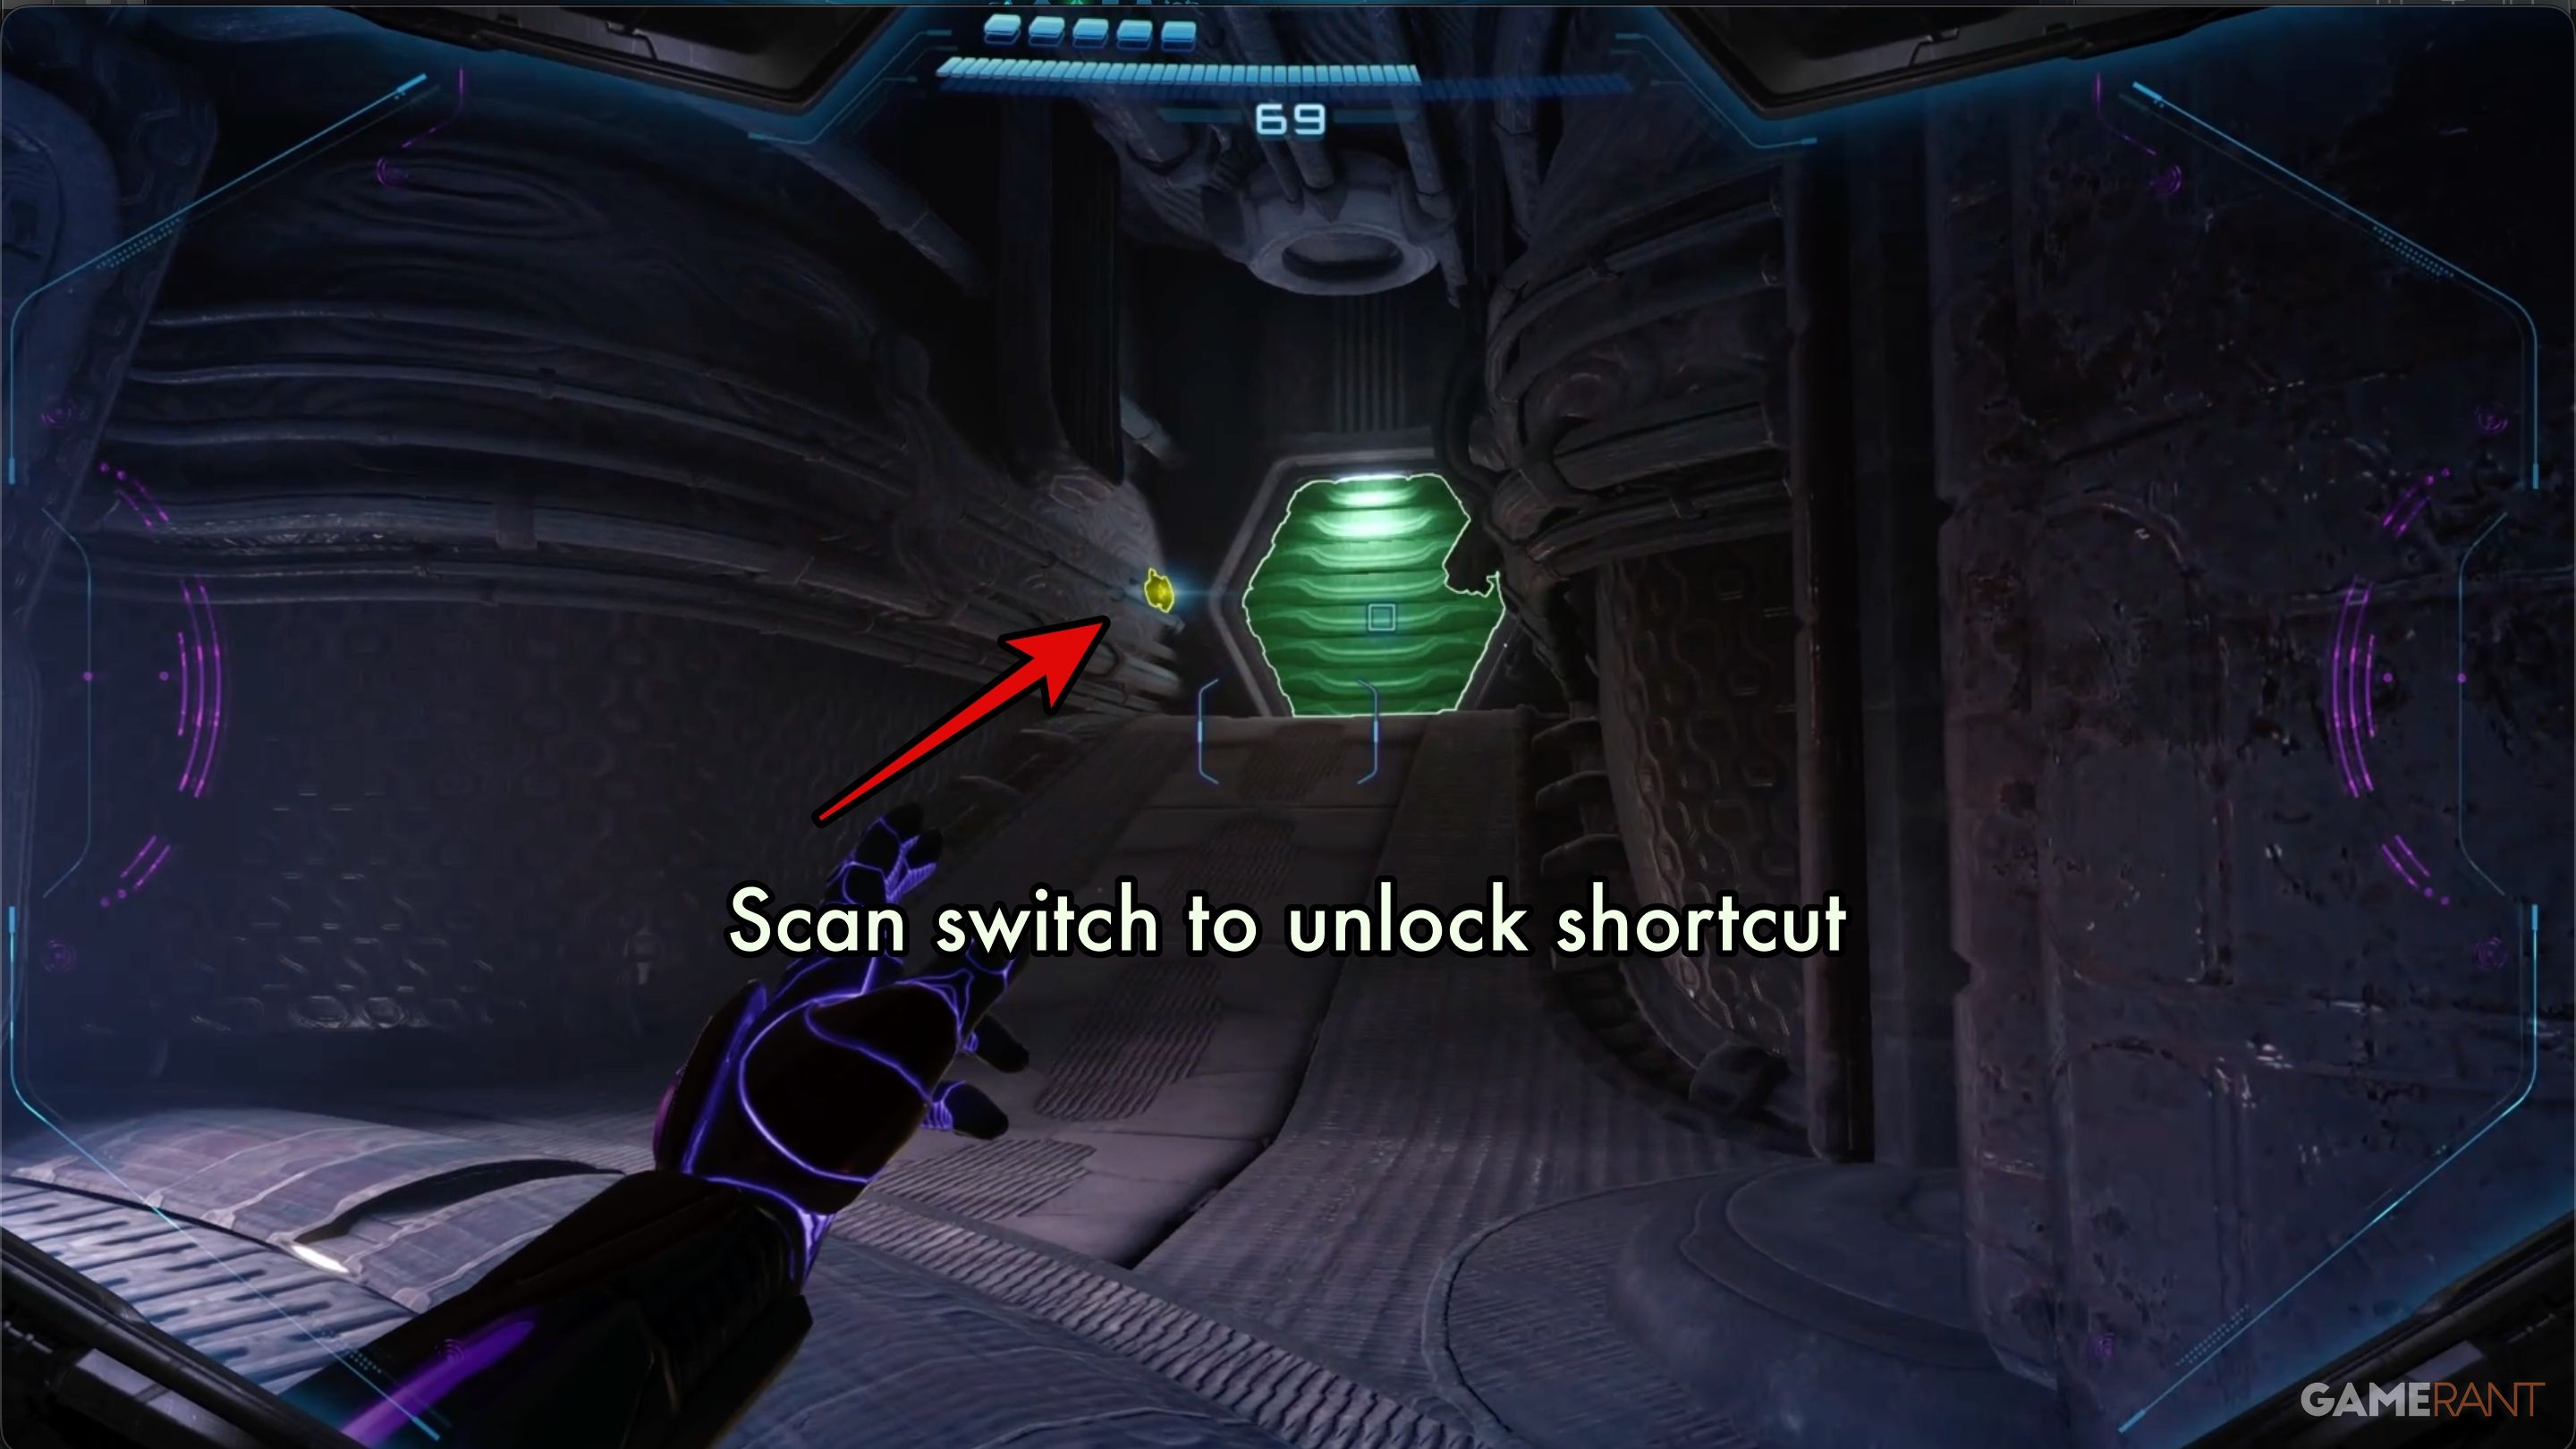
Go back to where the turret was and turn right. You’ll find a small tunnel with a window blocking the way. Break the window with a charged shot, then enter the tunnel and drop back down into the ventilation system.
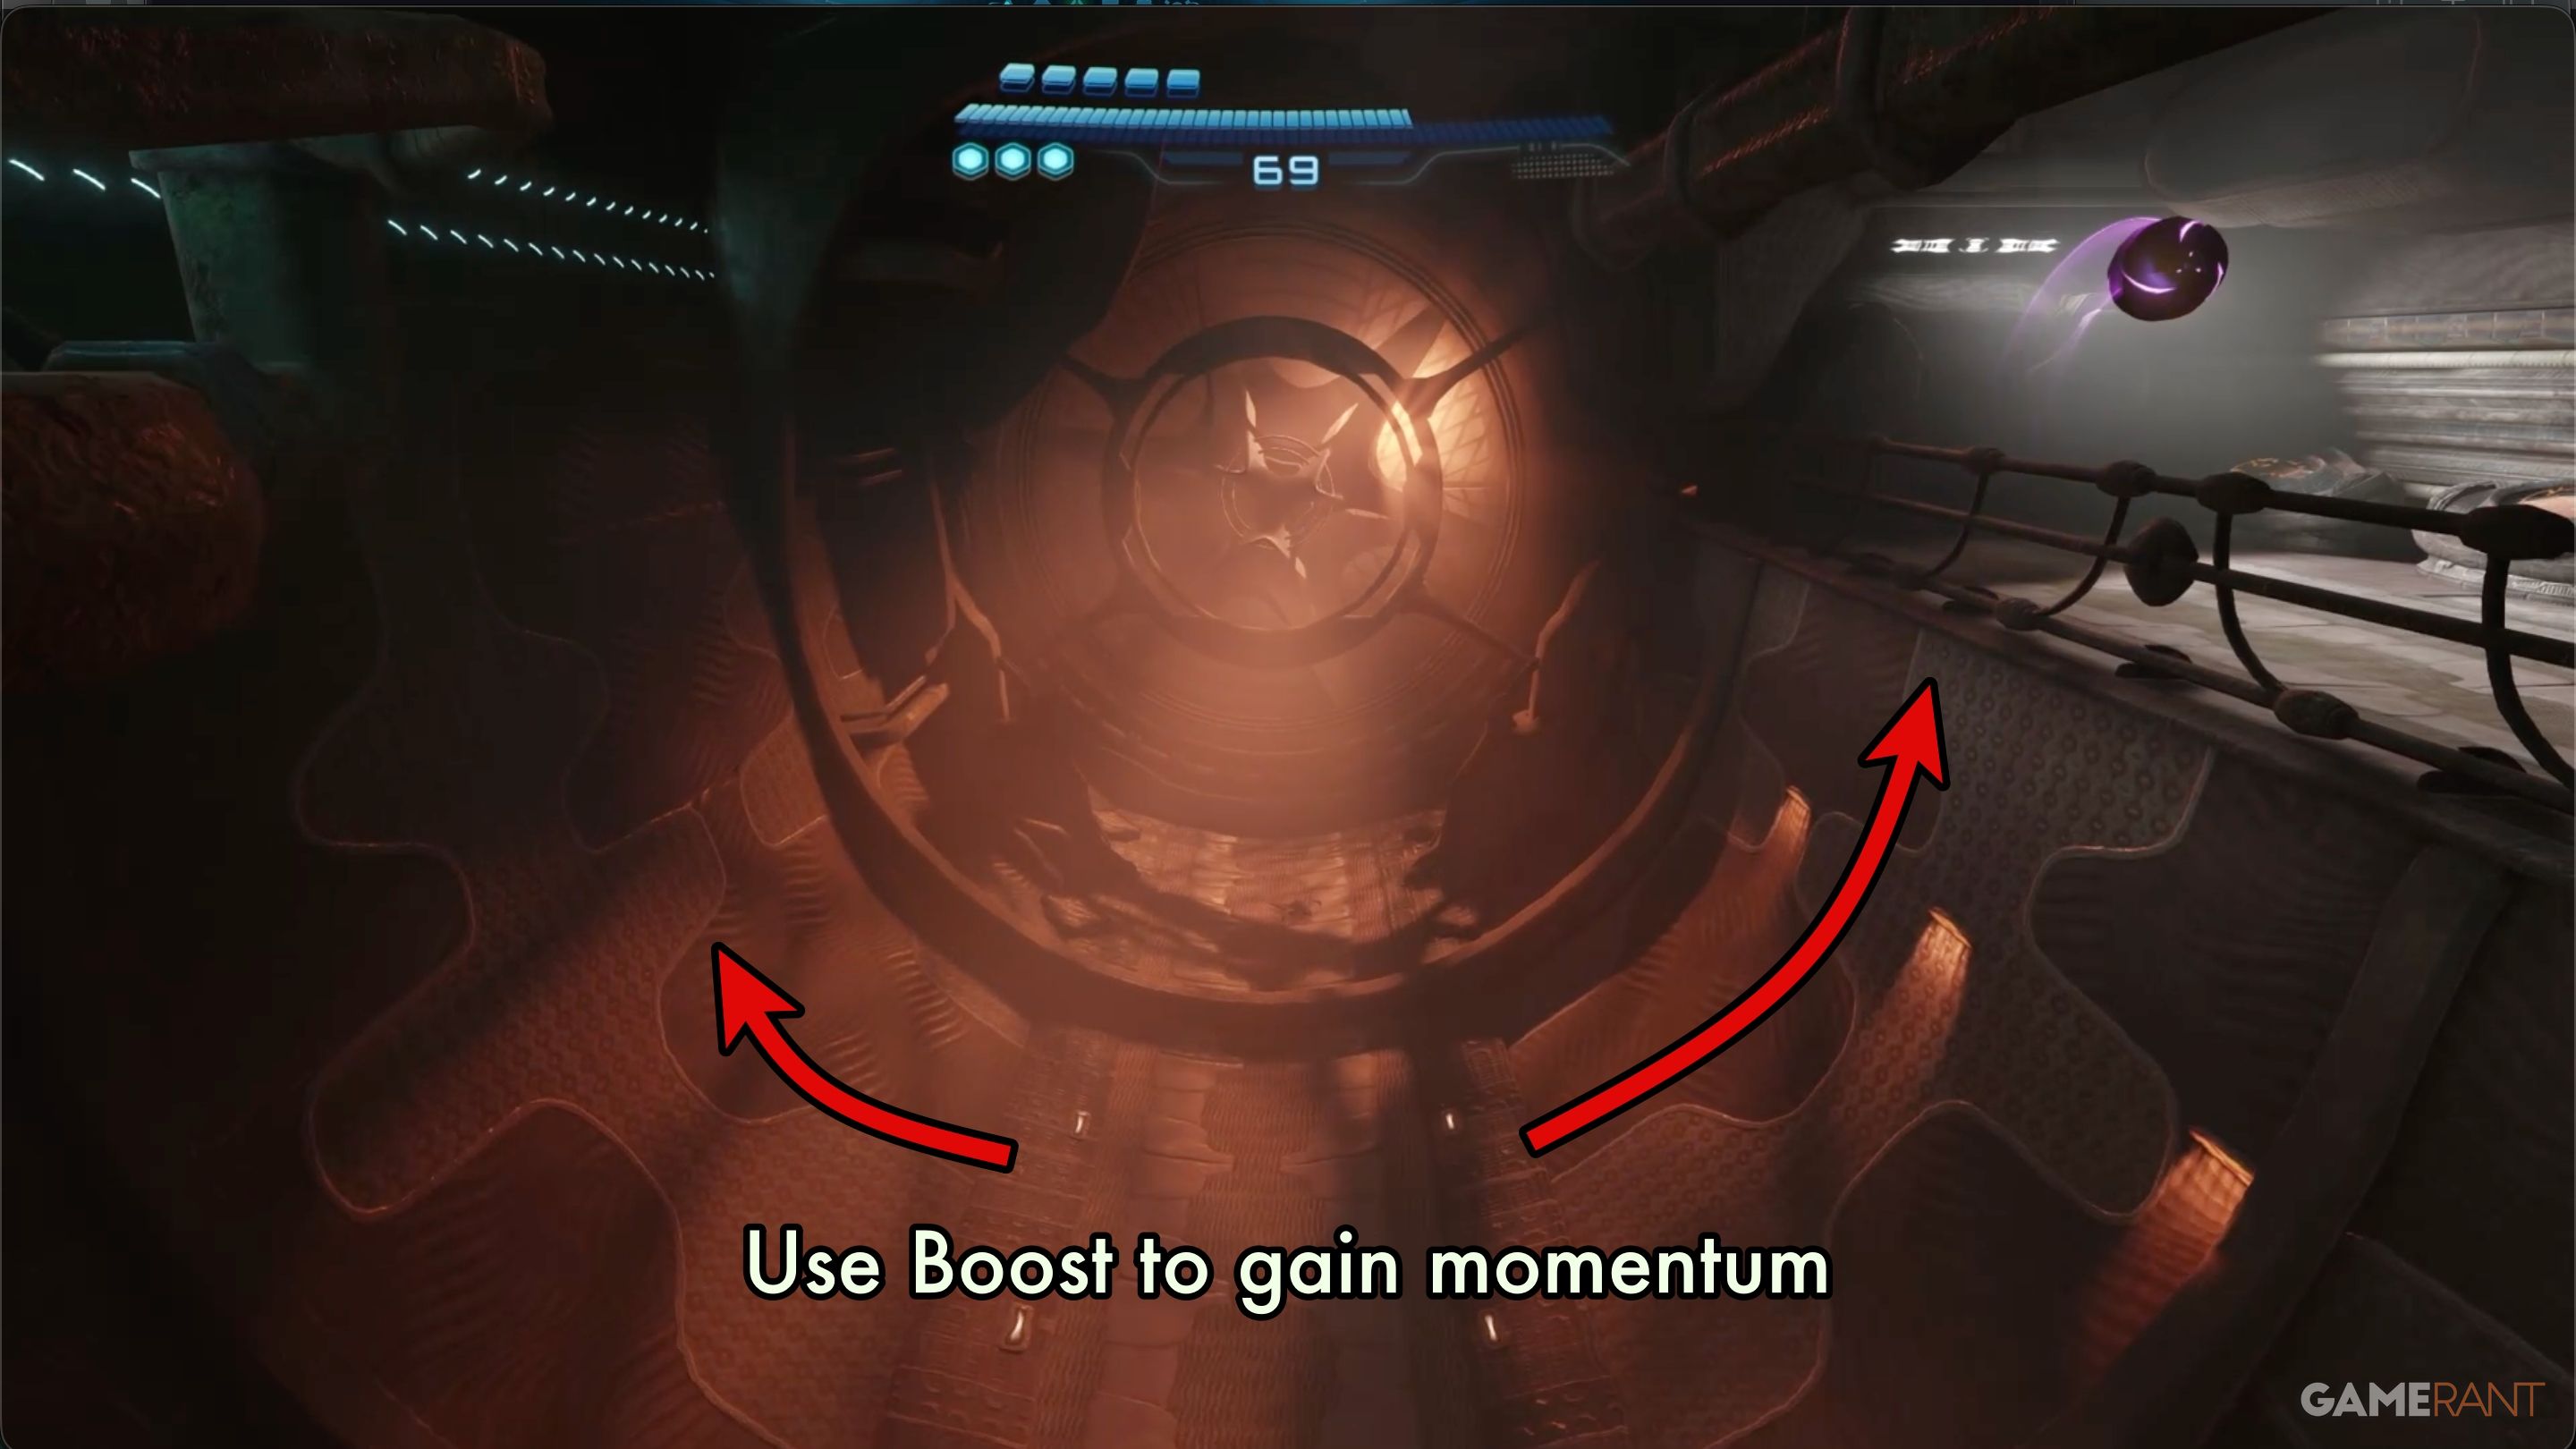
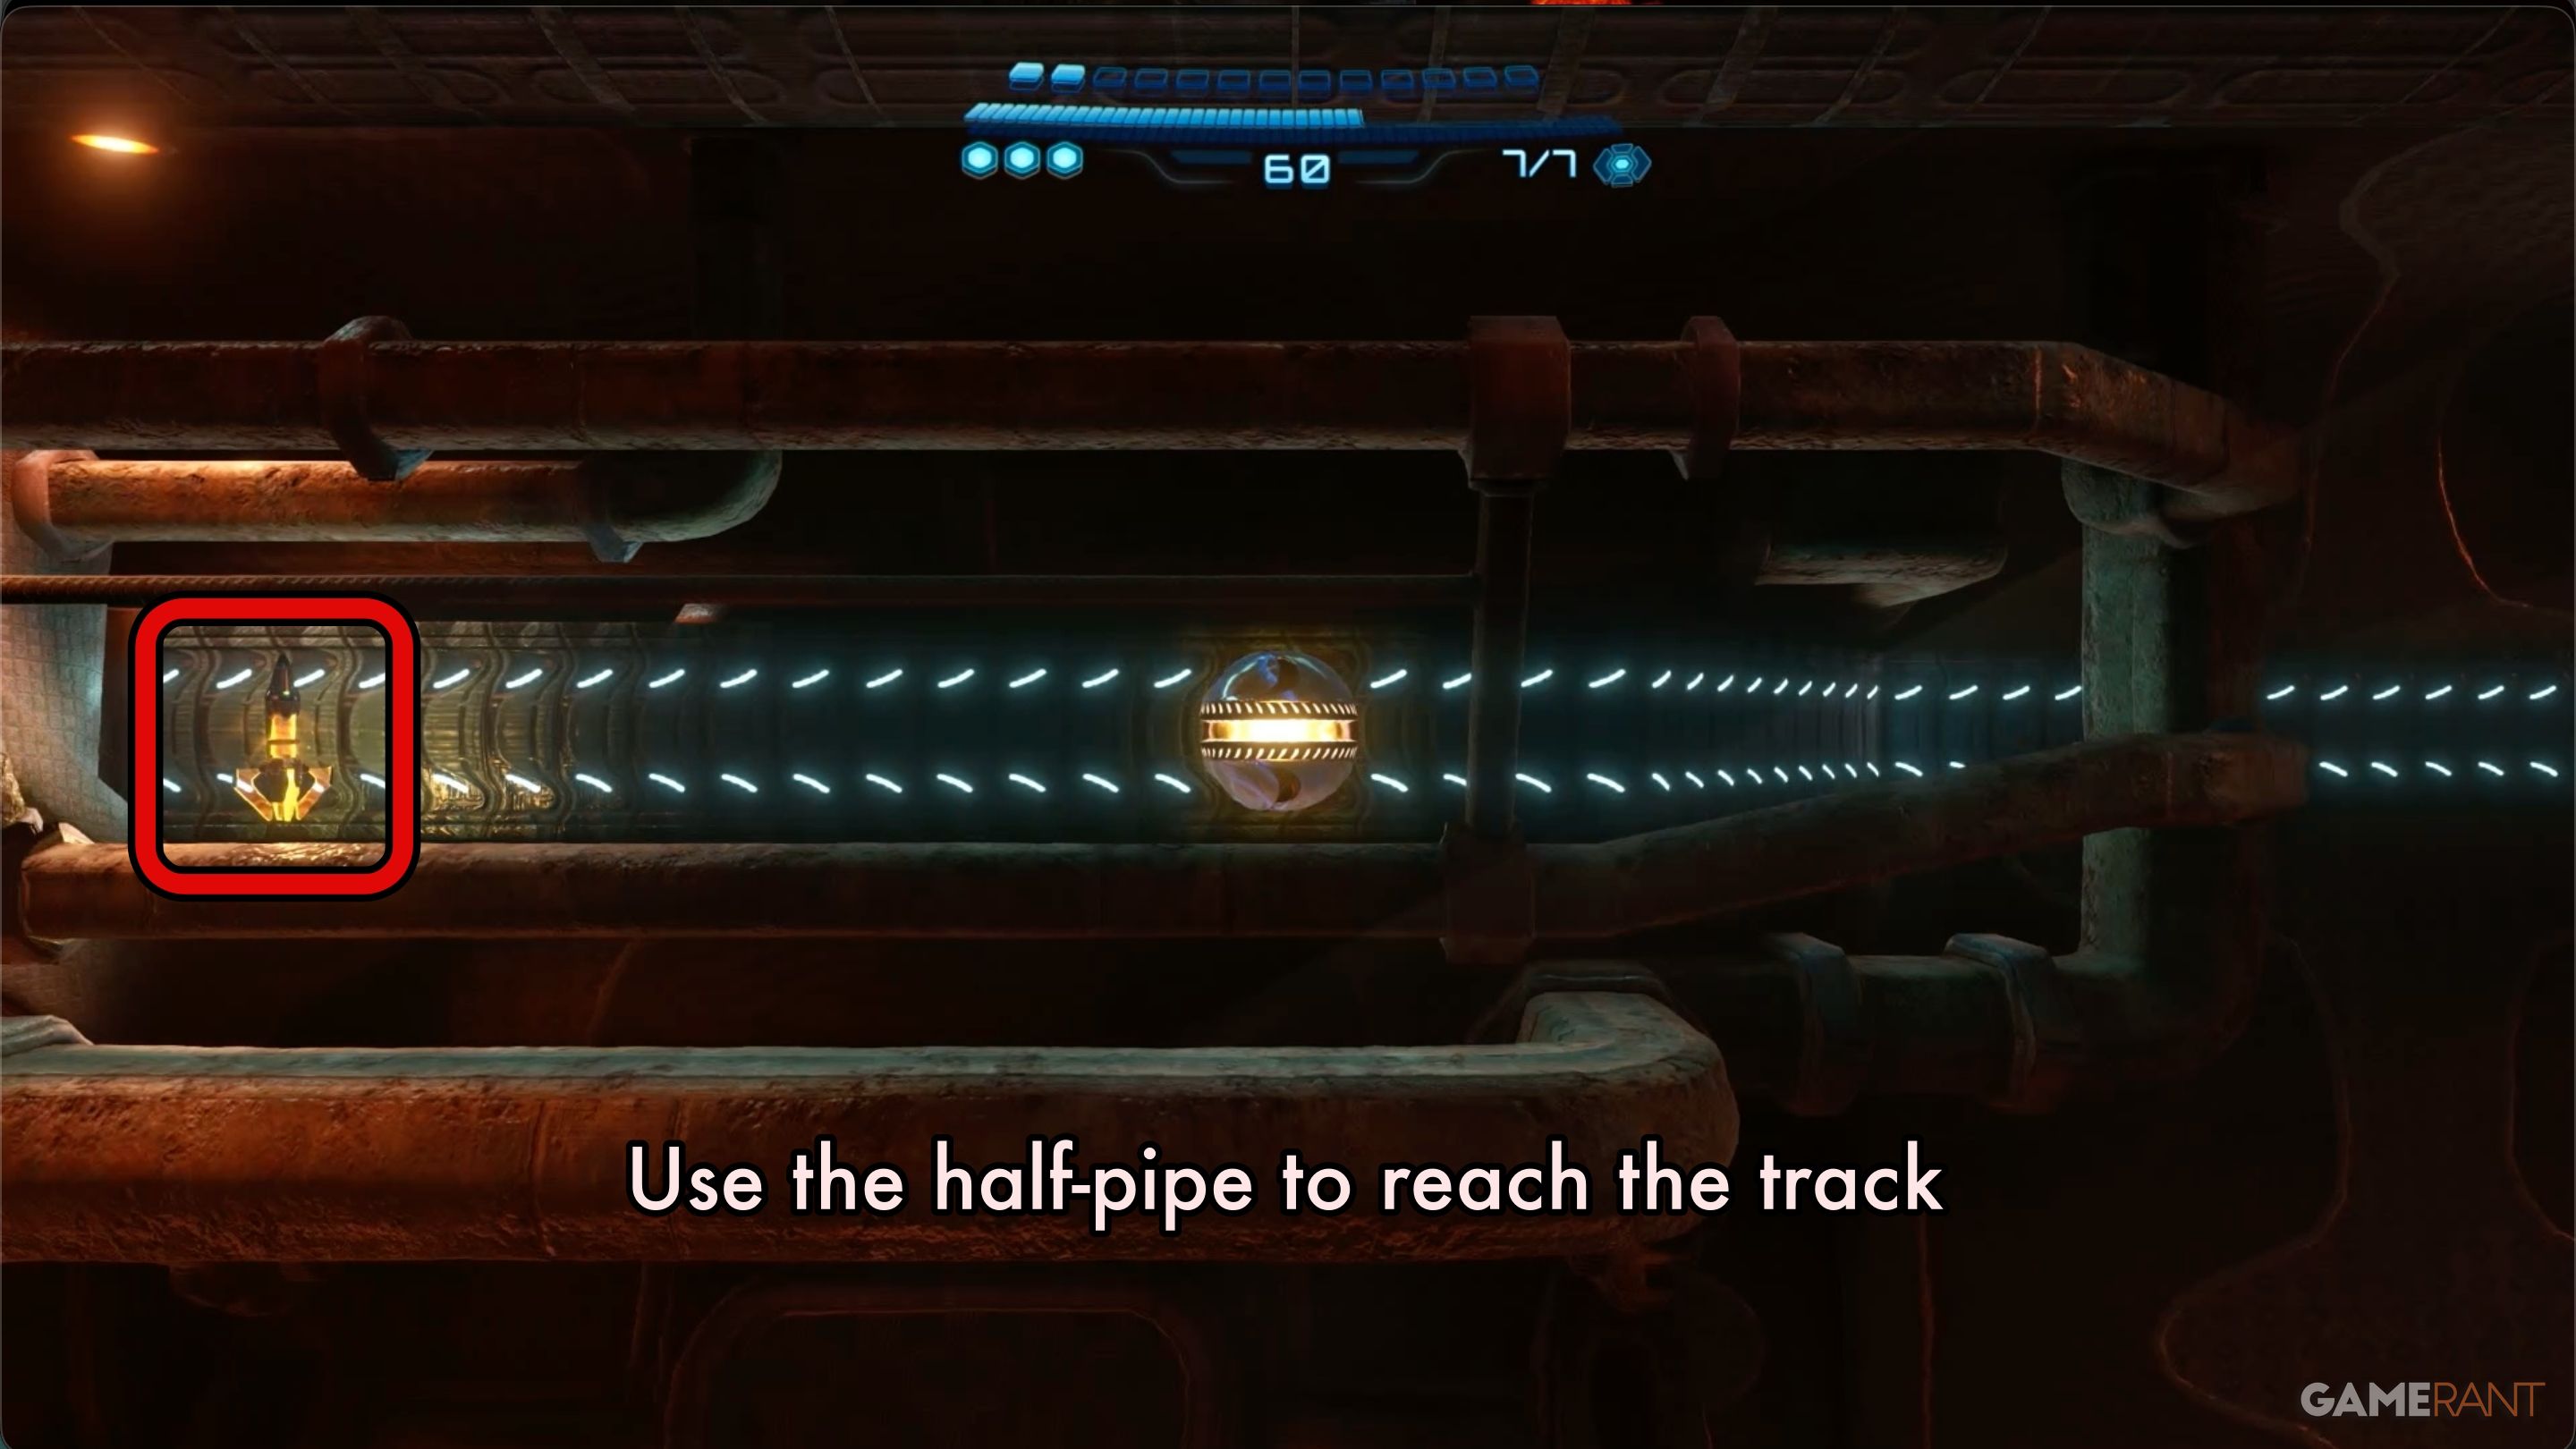
Now, transform into a Morph Ball and use Boost to get enough speed to reach the platform above.
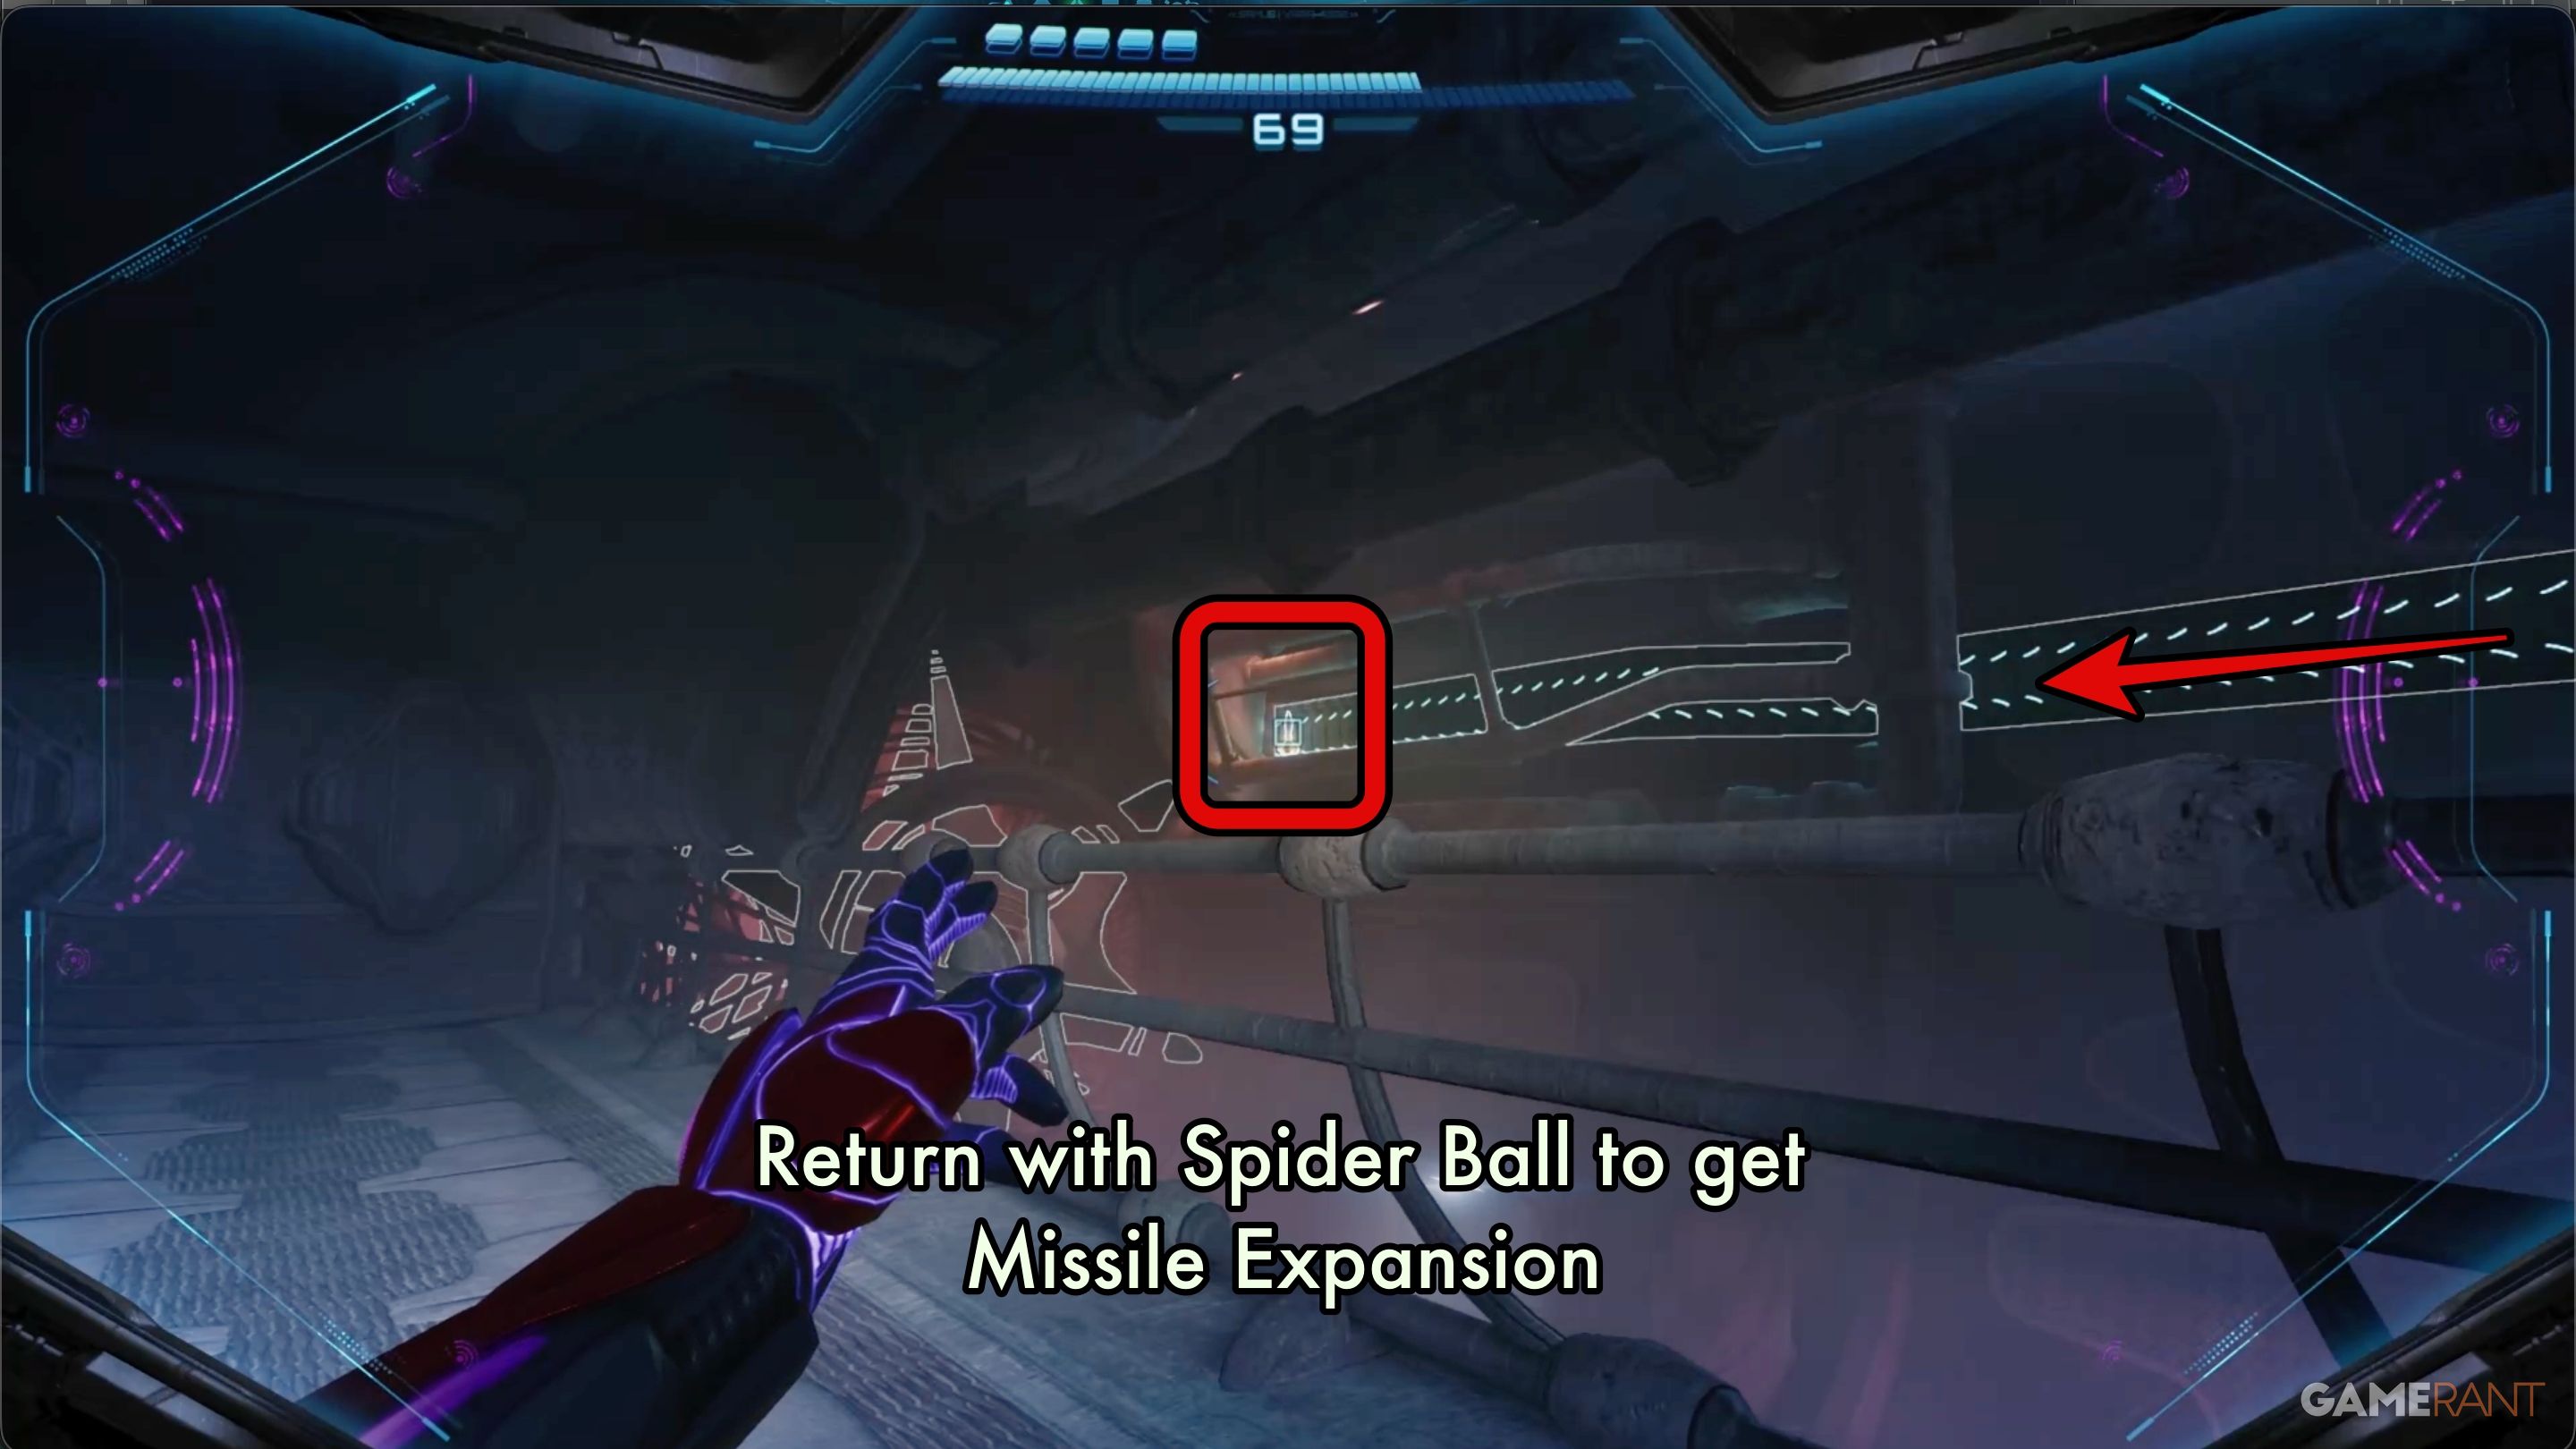
One side of the half-pipe features a magnetic track that will take you to the Missile Expansion. Don’t forget to come back after you collect the Psychic Spider Ball!
Head through the exit at the top of the half-pipe and use the next elevator.
Undercarriage Shortcut 2 & Shot Expansion:
Okay, so I just got off the elevator in the Undercarriage, and now I have a choice. There’s a regular gate on the right that just keeps me going on the main path, but there’s also another gate that leads to a shortcut and lets me expand my shots. The catch is, it’s locked with two latches, and I need to use my Psychic Lasso to get them off!
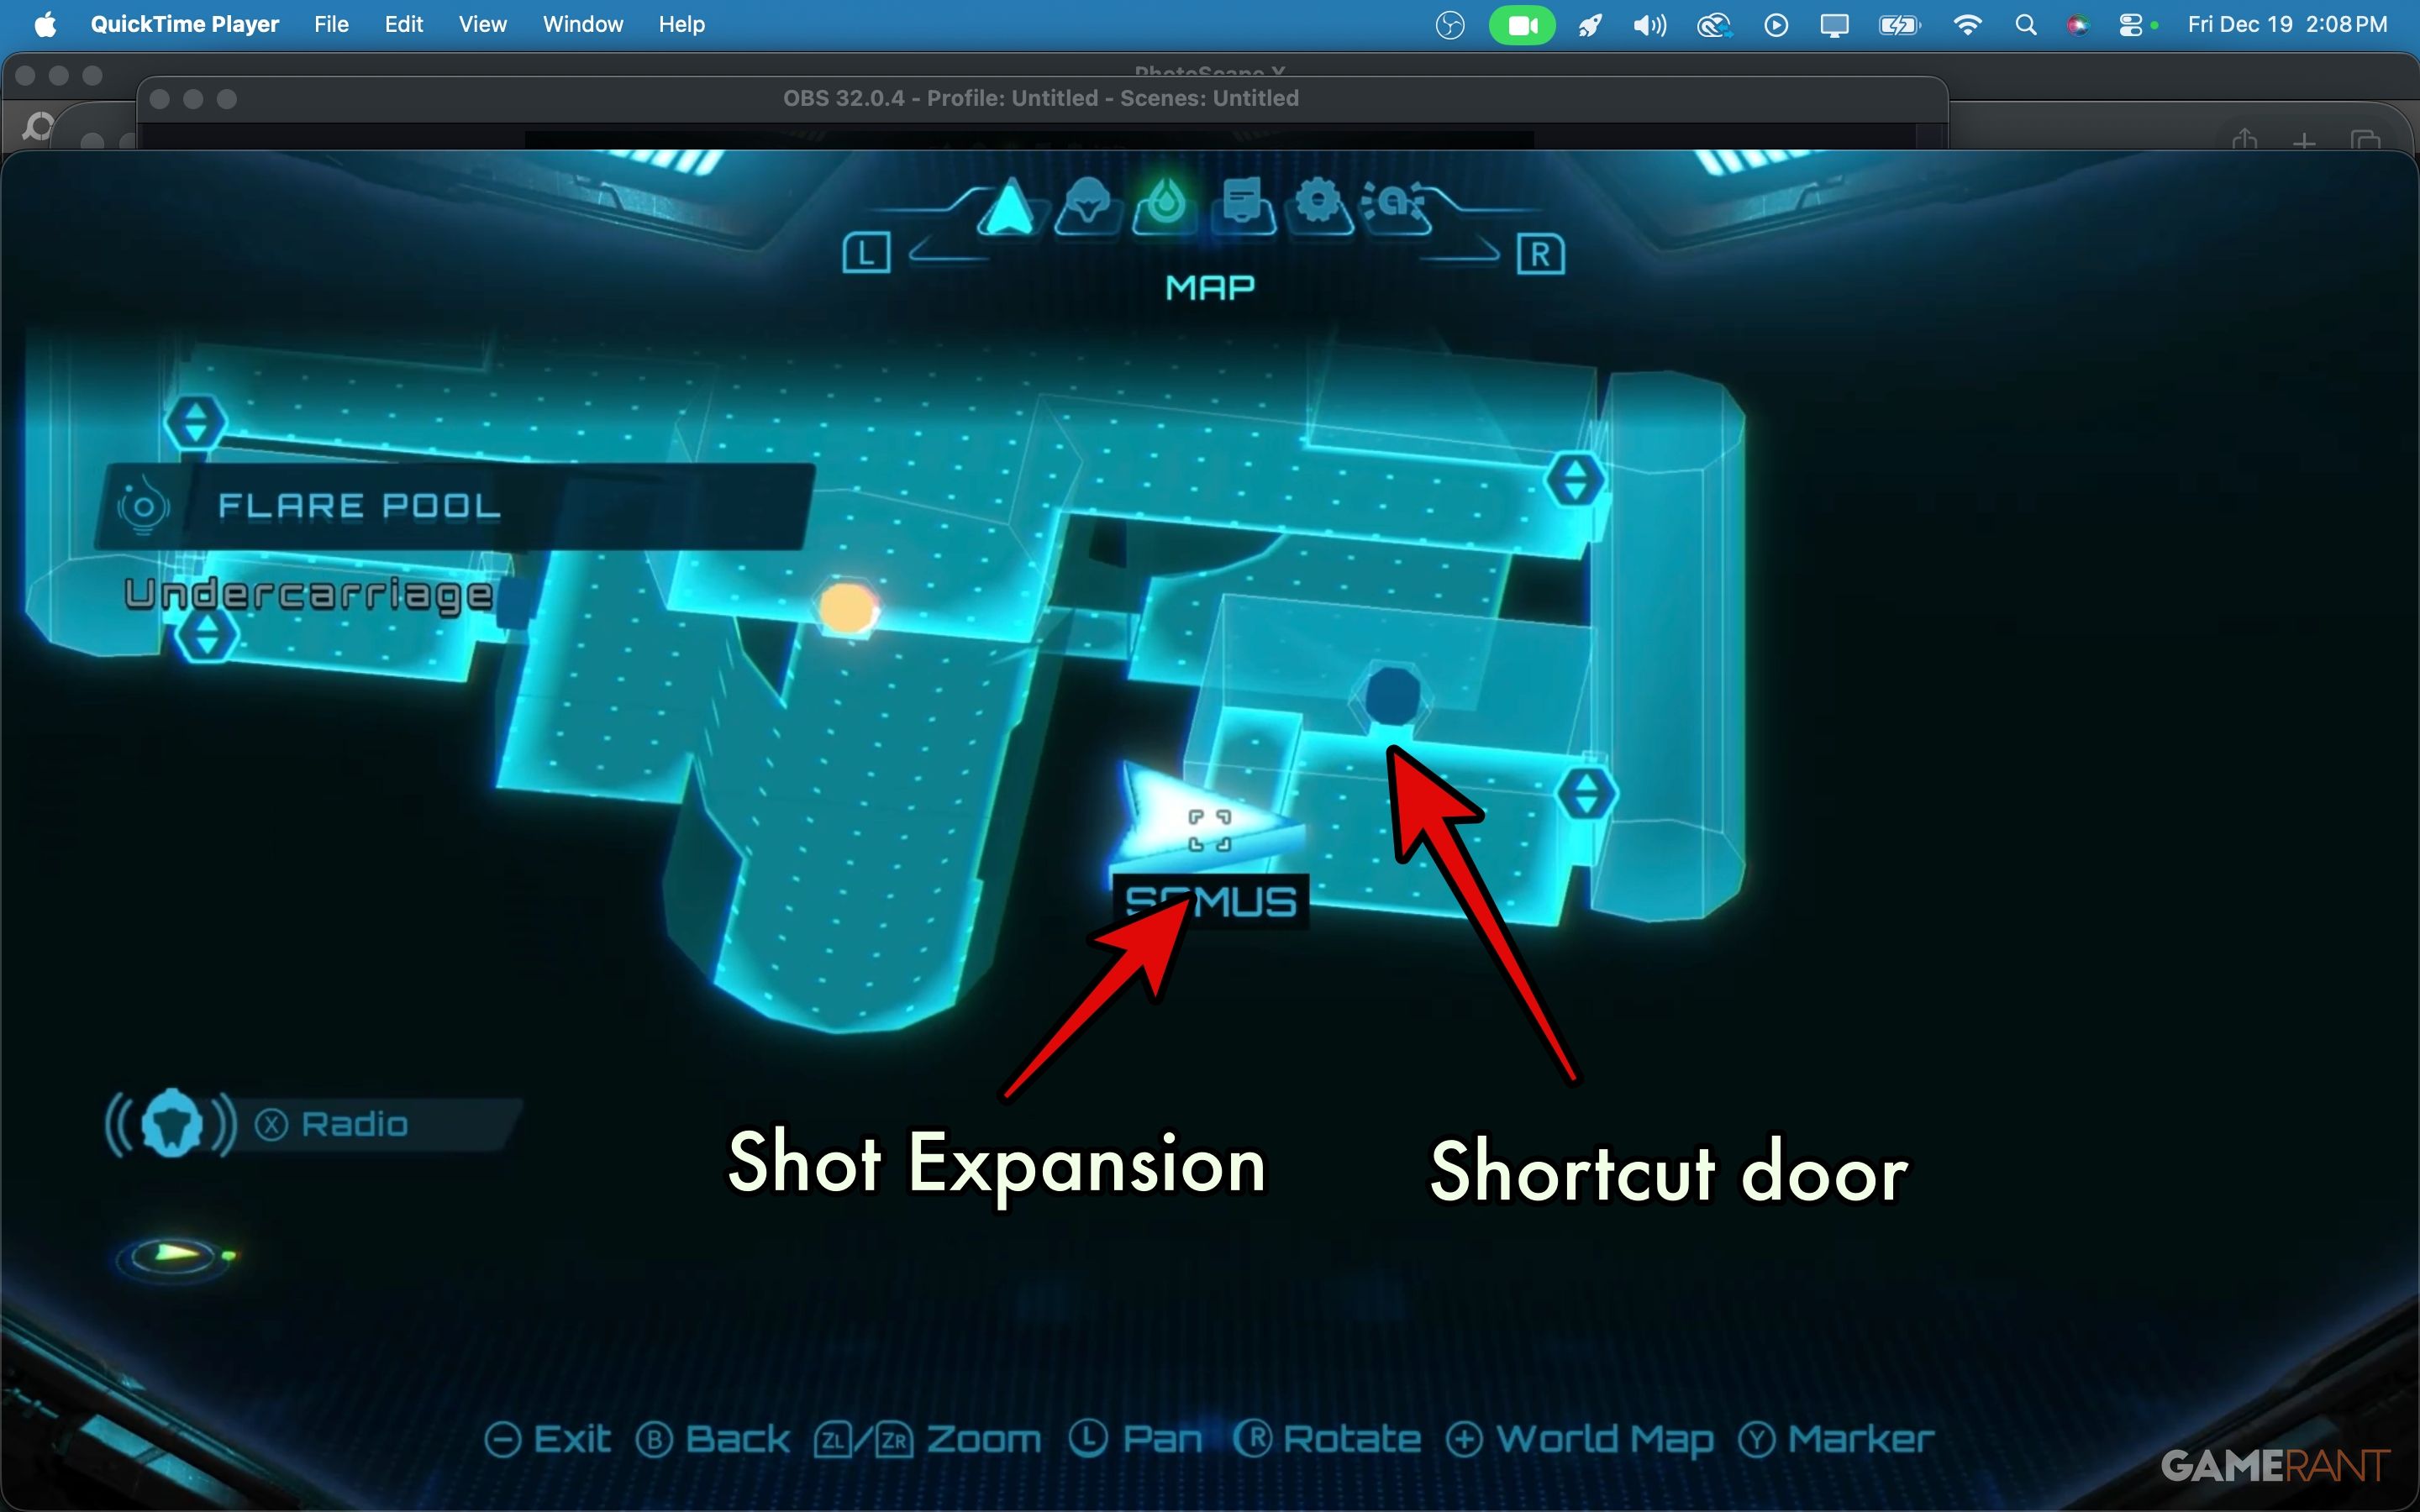
Okay, before I get back to the main story, there’s a quick thing you should do. Grab your Lasso and get rid of those latches on the gate. Then, hop in the elevator and head down to the lower level – it’s worth it, trust me!
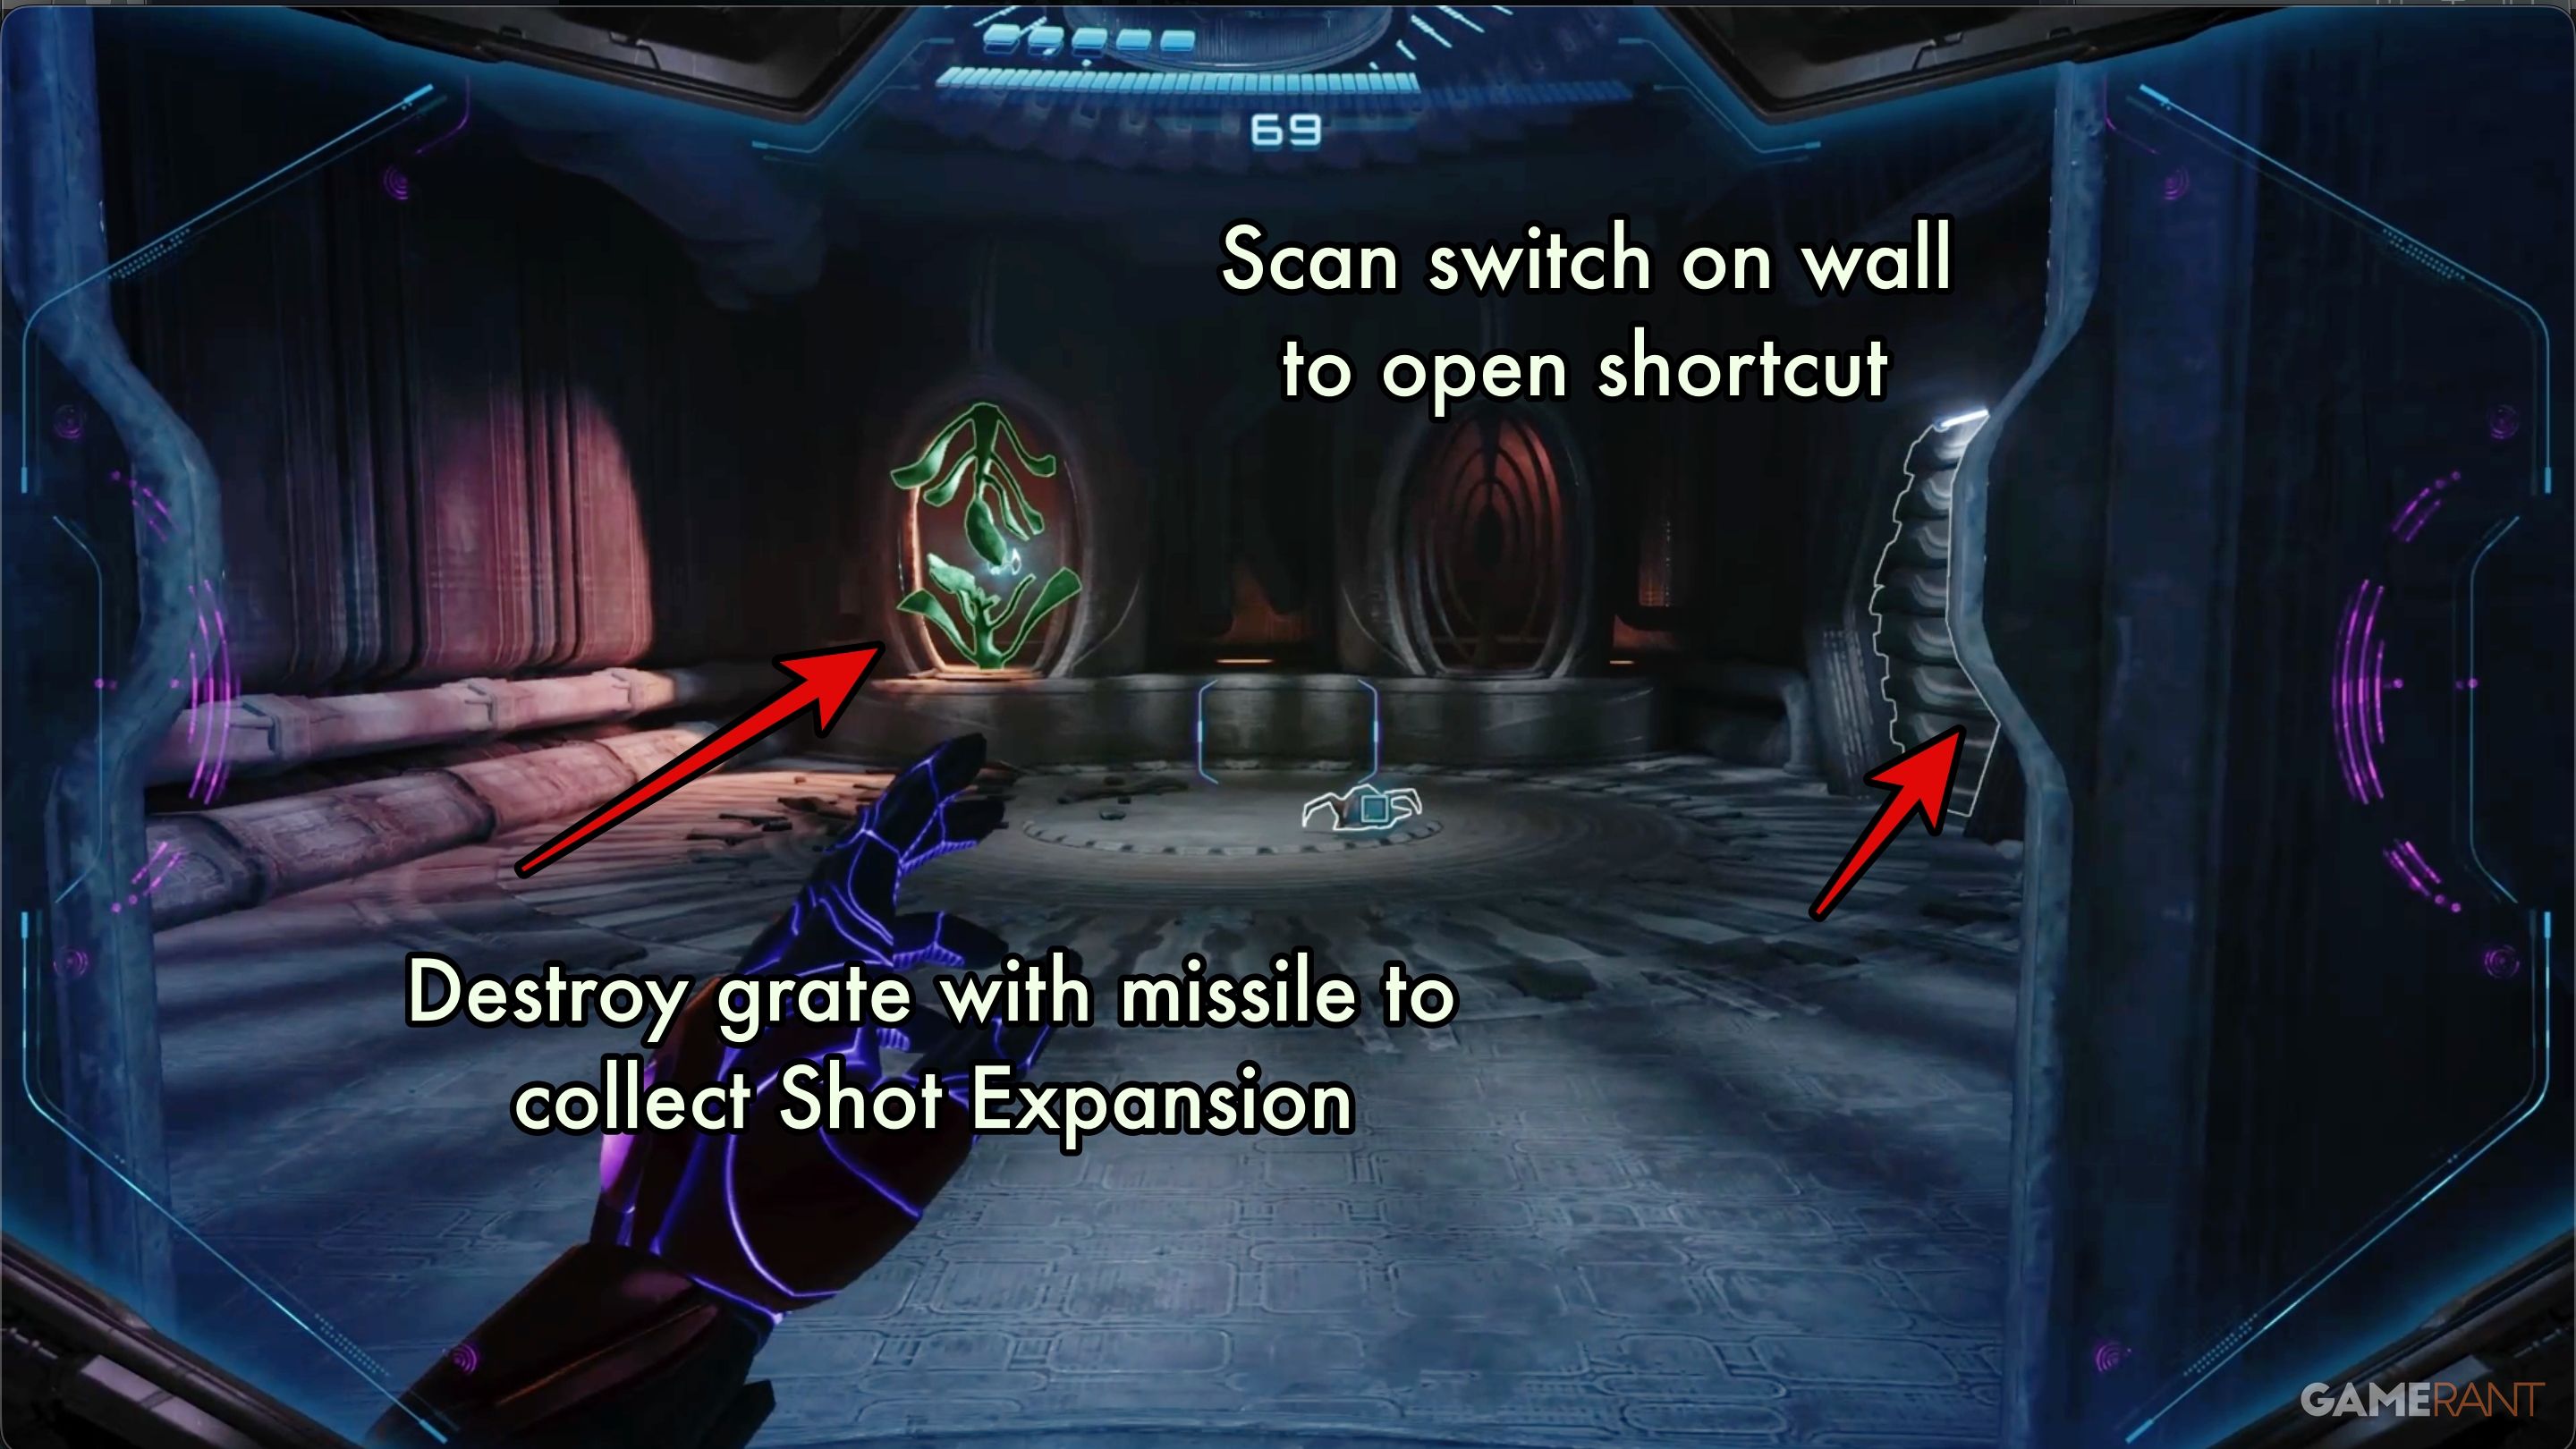
Once you step out of the elevator, you’ll find a small room with a damaged grate in front of you. Blast the grate open with a missile to get the Shot Expansion. Before going back to the elevator, find the switch beside the security door and activate it – this will unlock a shortcut to the lower Undercarriage. Then you can head back up to the level you came from.
Inspection Station Shot Expansion:
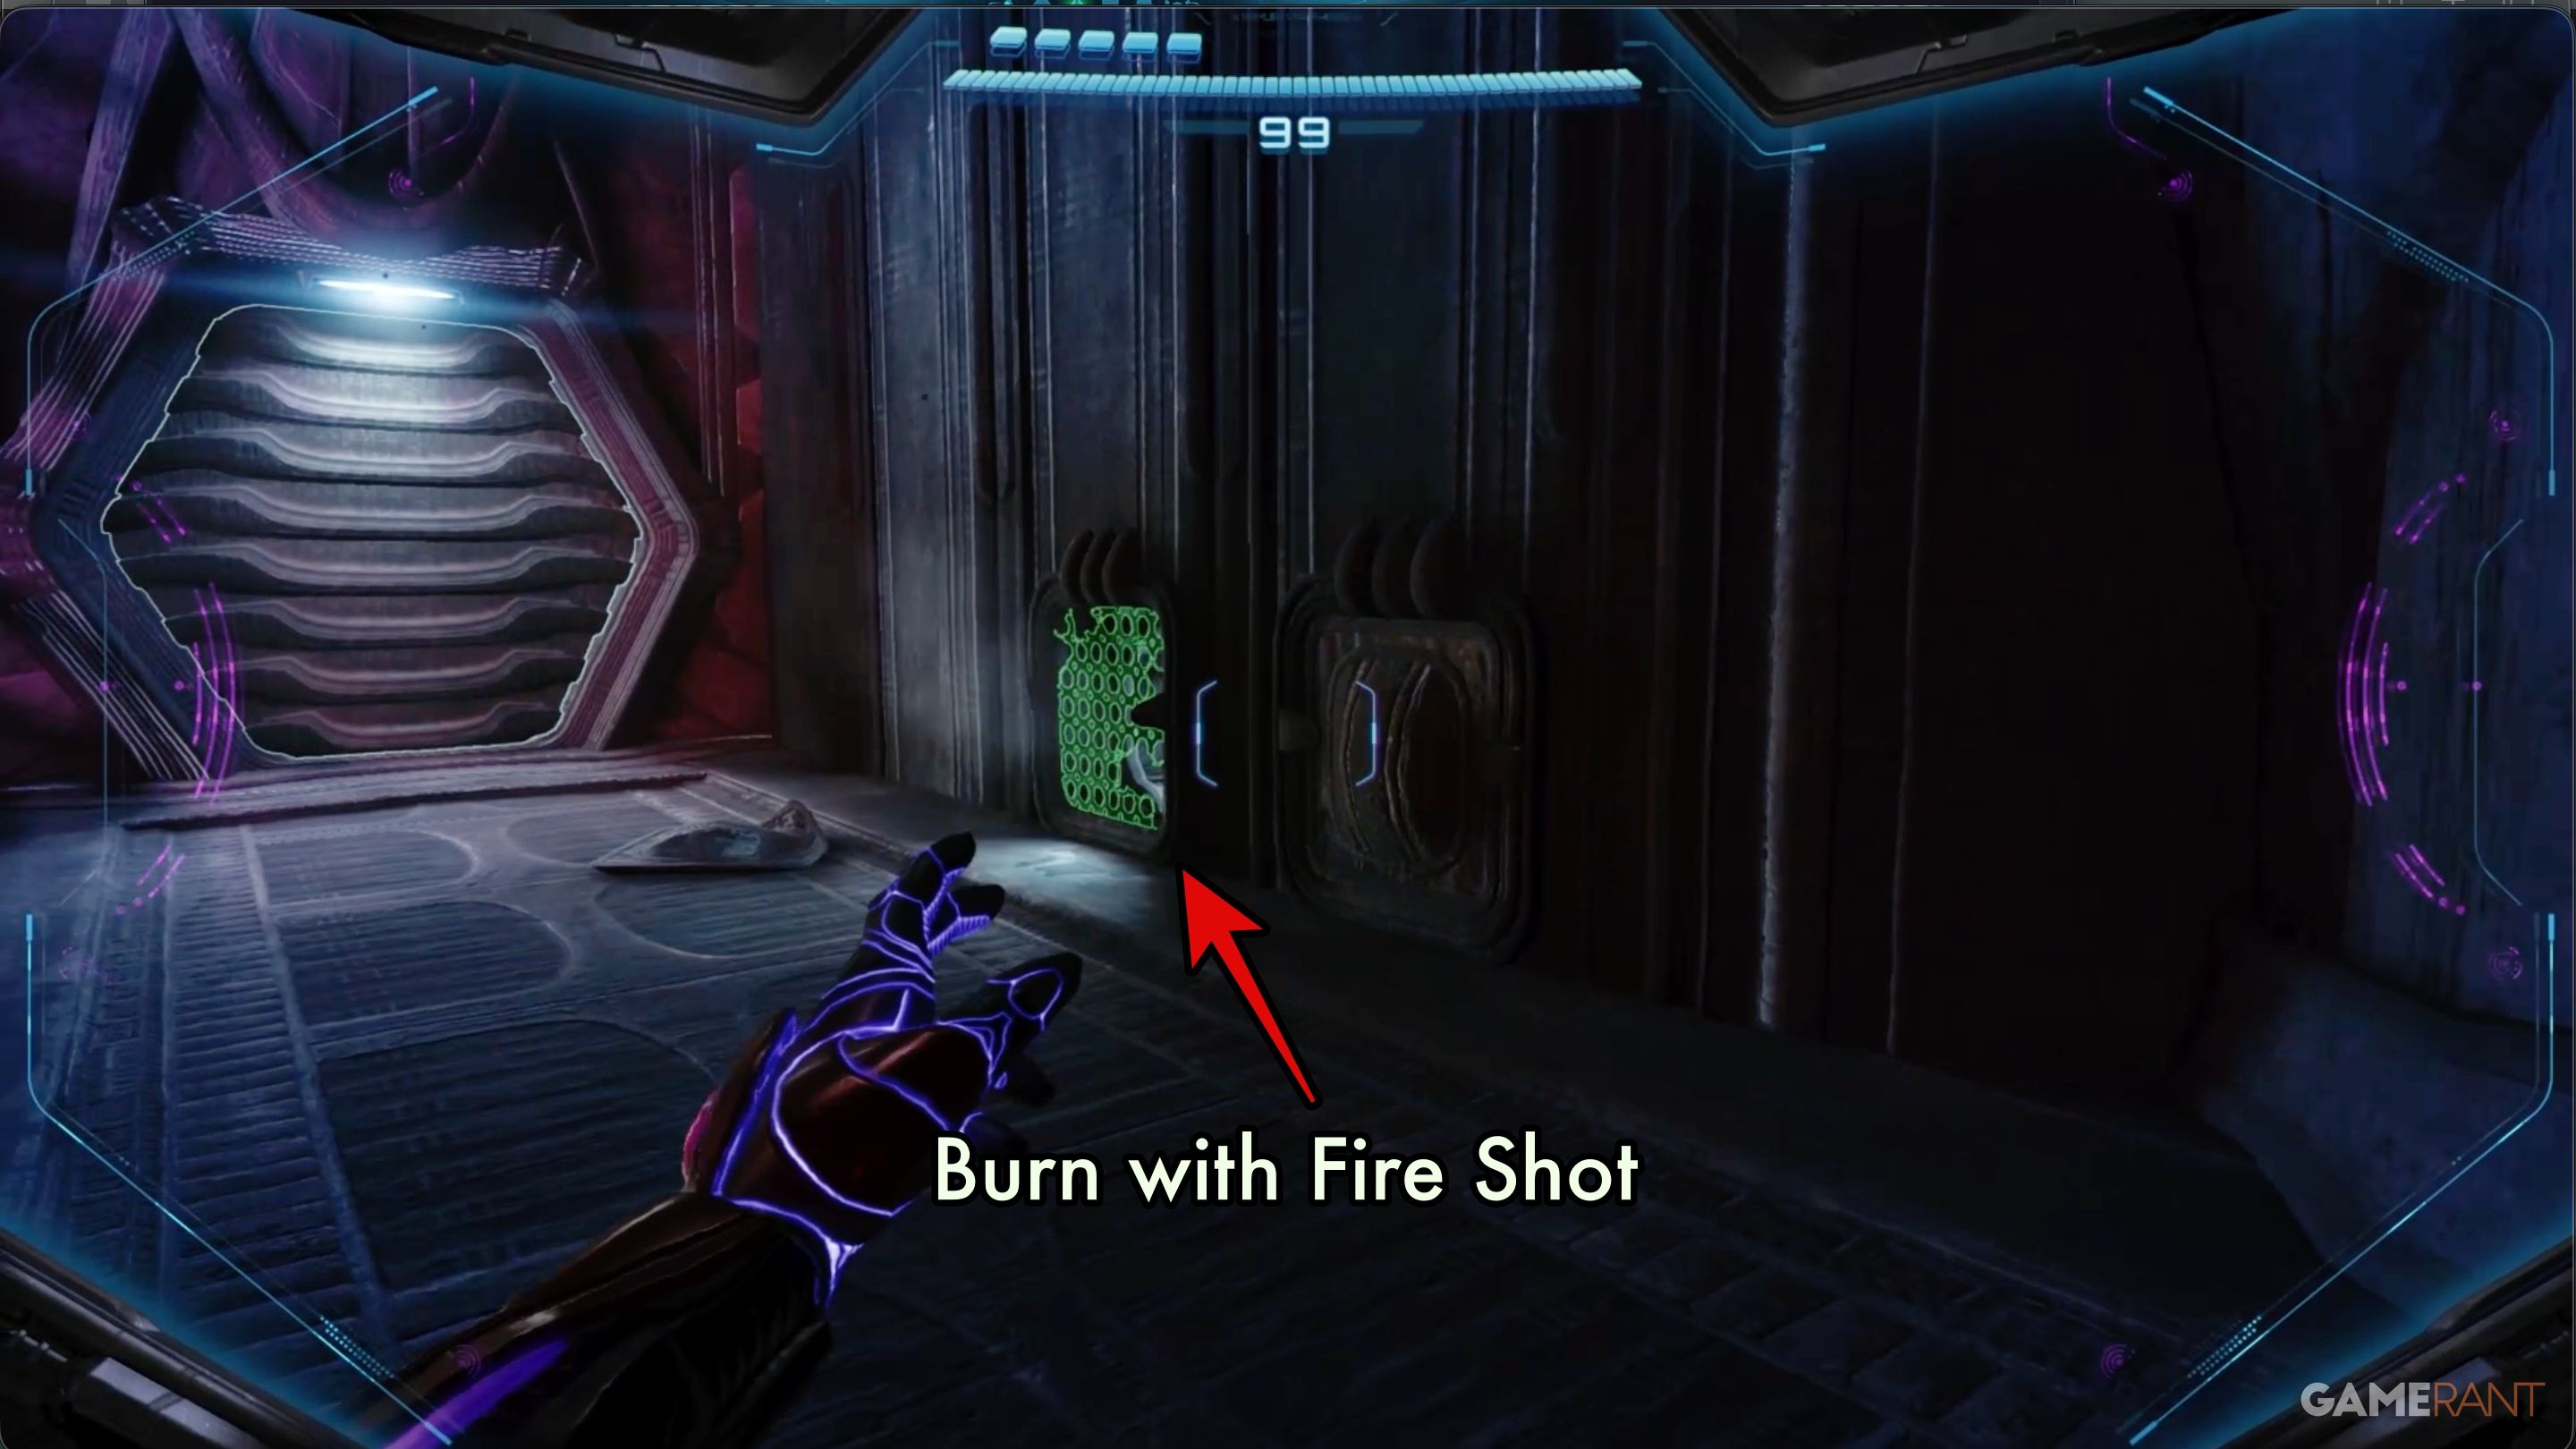
Ride the elevator back up and go through the door into the Inspection Station. Walk past the broken truck, and you’ll find another Morph Ball slot on your right, just before you reach the exit.
A small container is partially obstructing the entrance, so be careful as you approach. You’ll need to burn through the grate to be able to get inside.
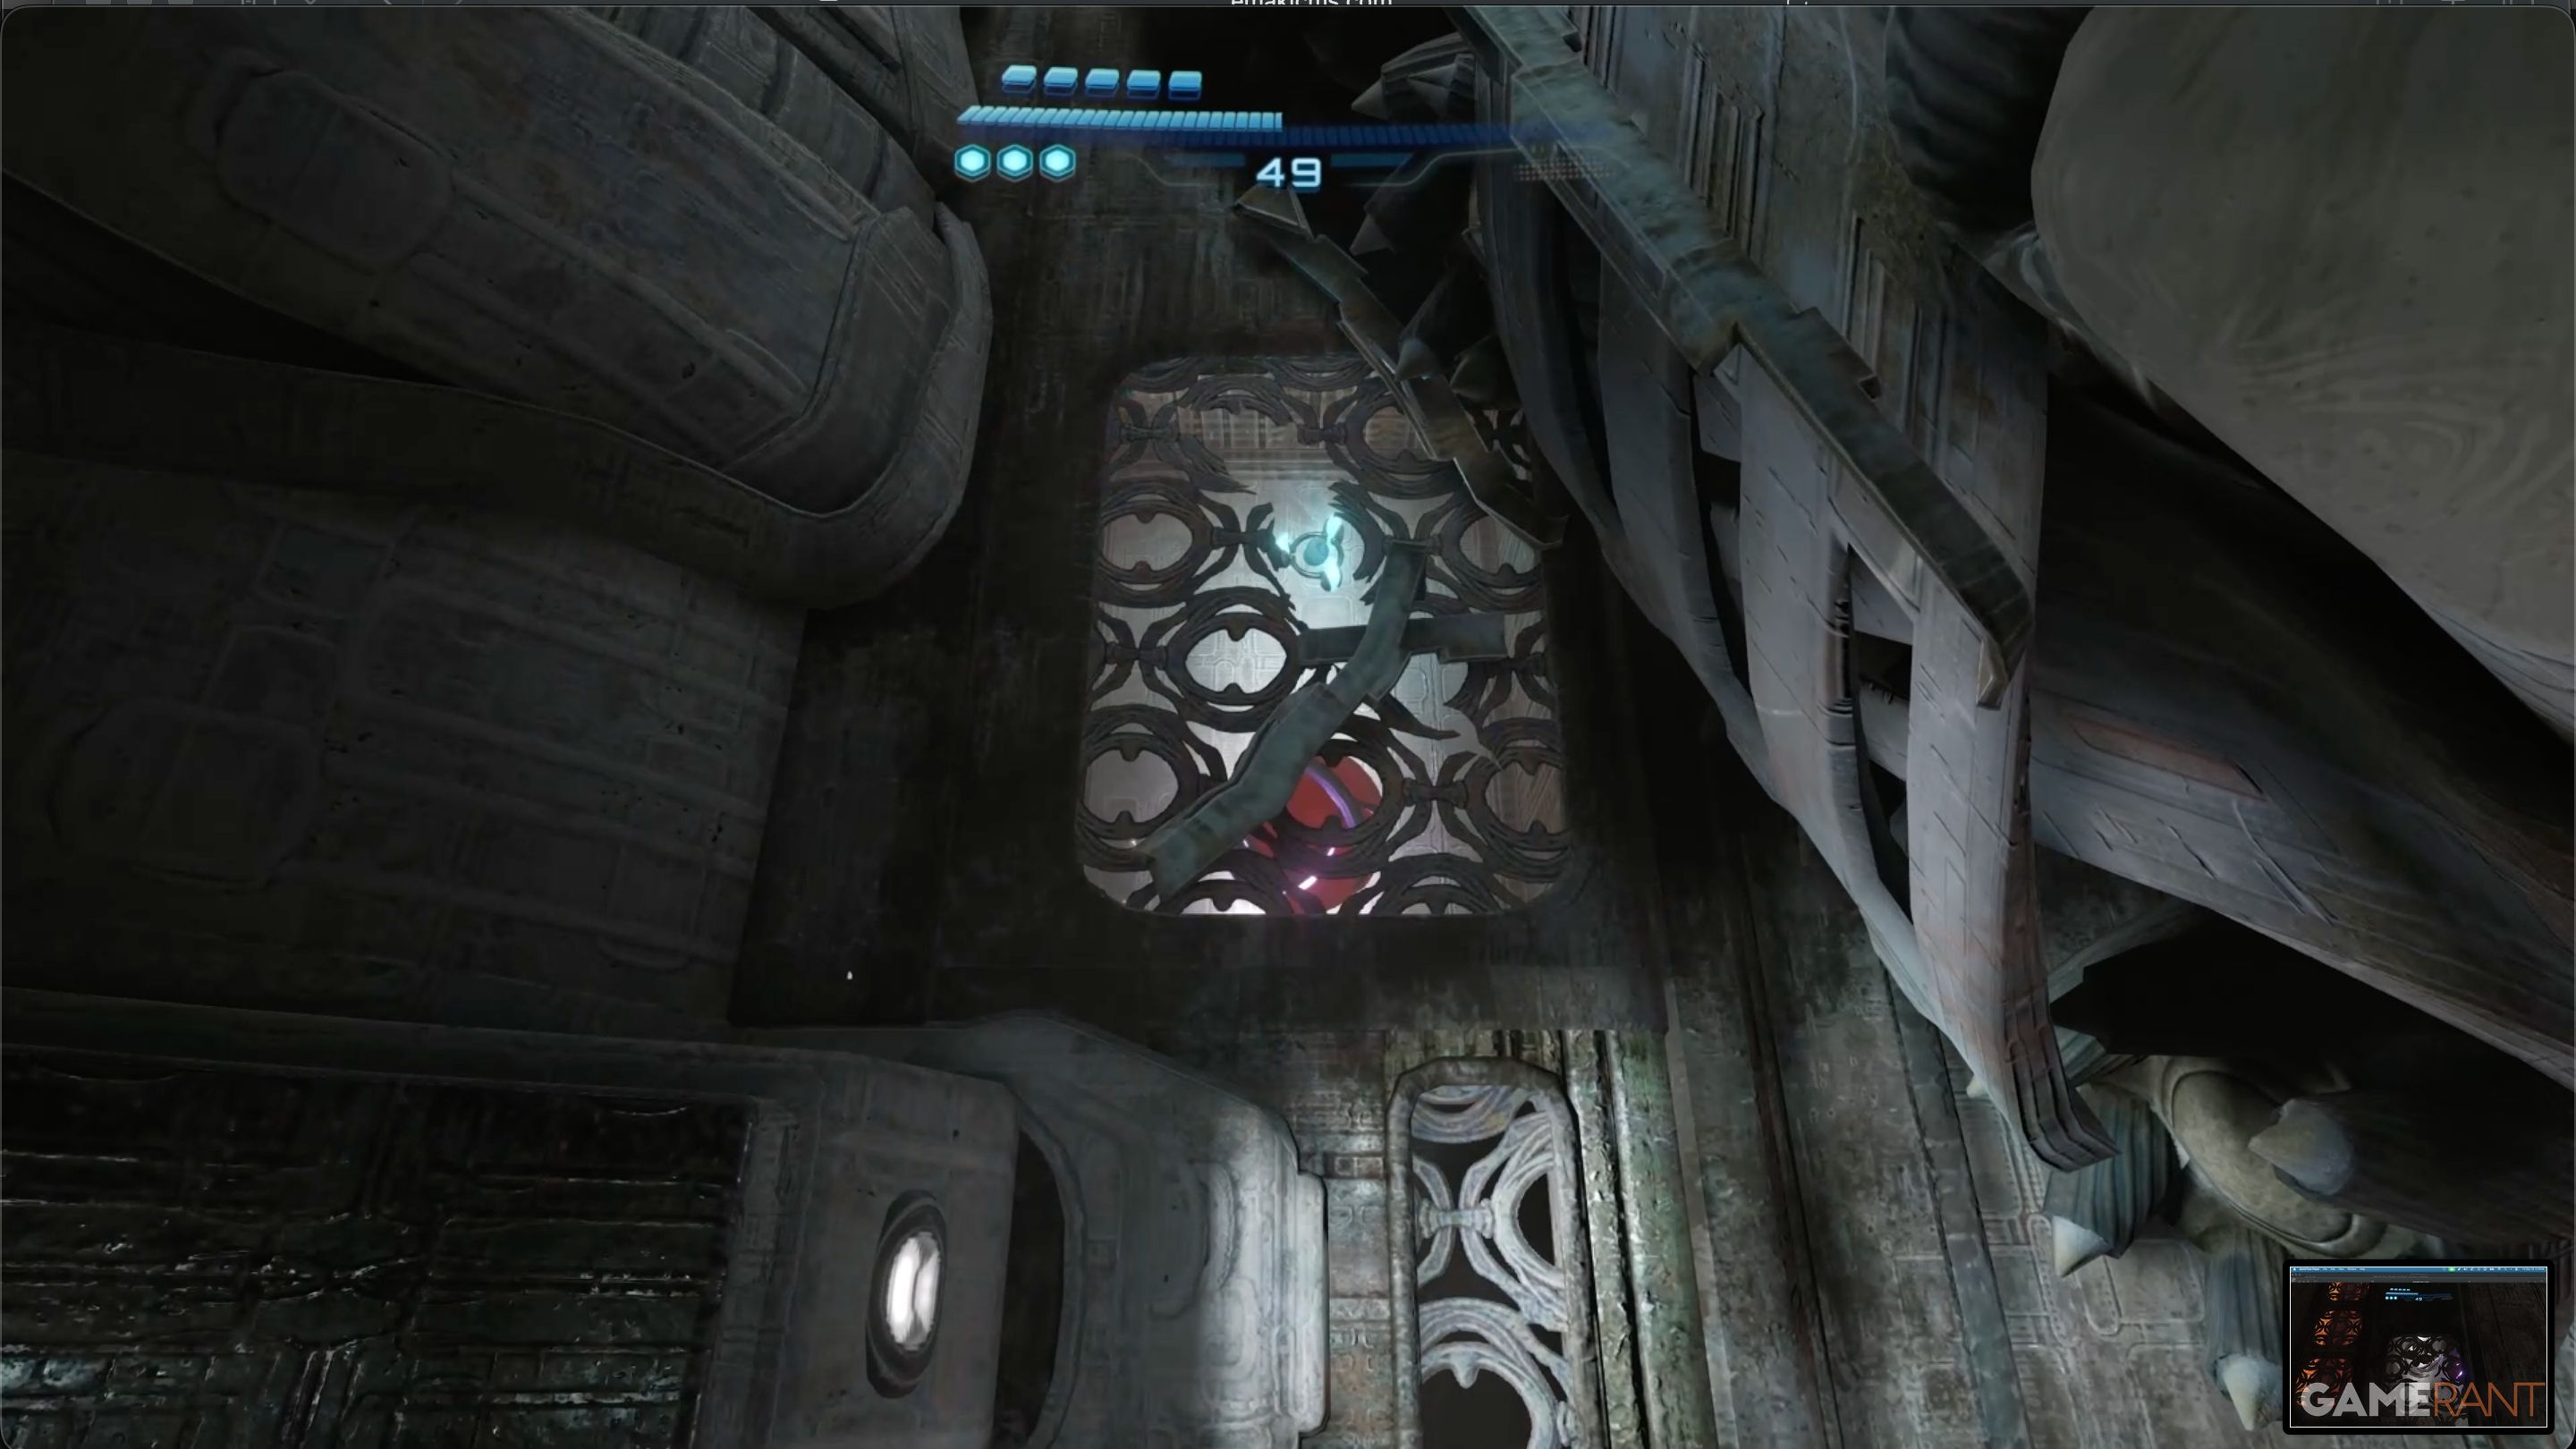
The opening will lead you down to a lower level. You’ll need to use a Psychic Bomb to clear some rubble, after which you can proceed directly to the Shot Expansion. Once you’re done there, retrace your steps back through the opening and exit, then head to the next chamber.
Entry Bay – Heavy Maintenance Tank, Data Log 1 & Save Station:
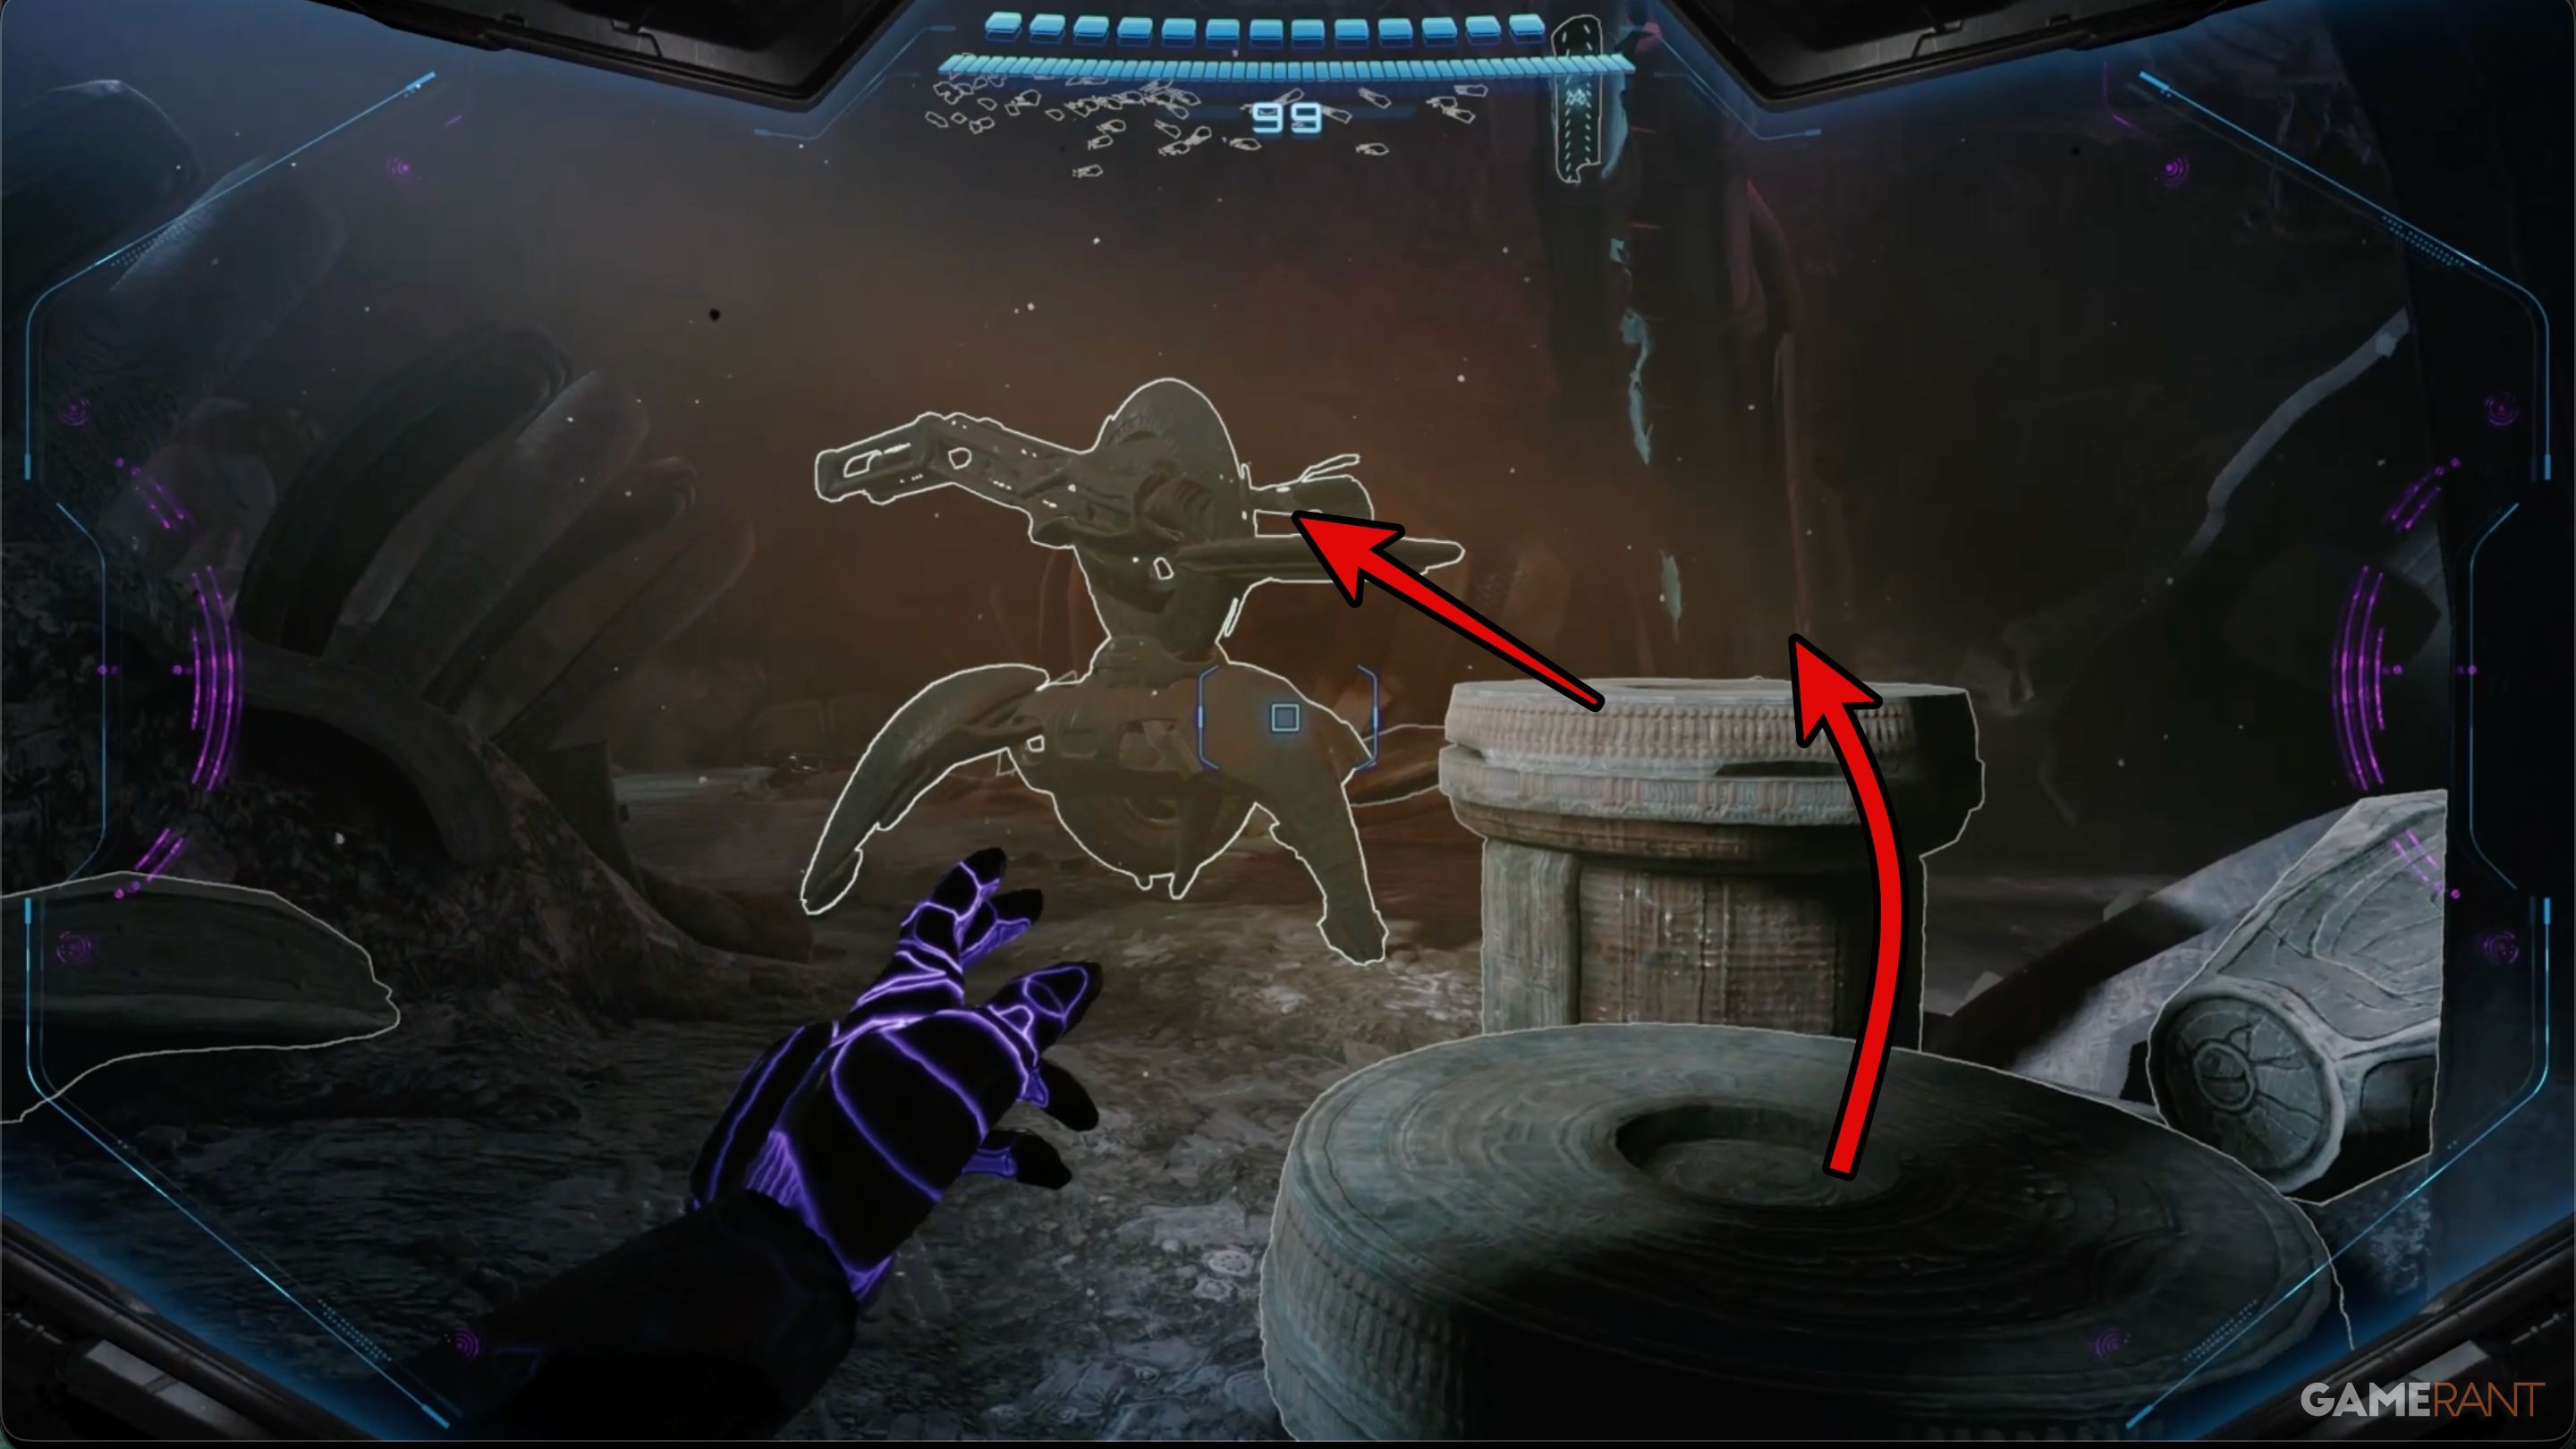
After leaving the Inspection Station, you’ll enter the Entry Bay, a spacious area with multiple paths to explore. Be prepared, though – you’ll immediately face a challenging miniboss called the Heavy Maintenance Tank.
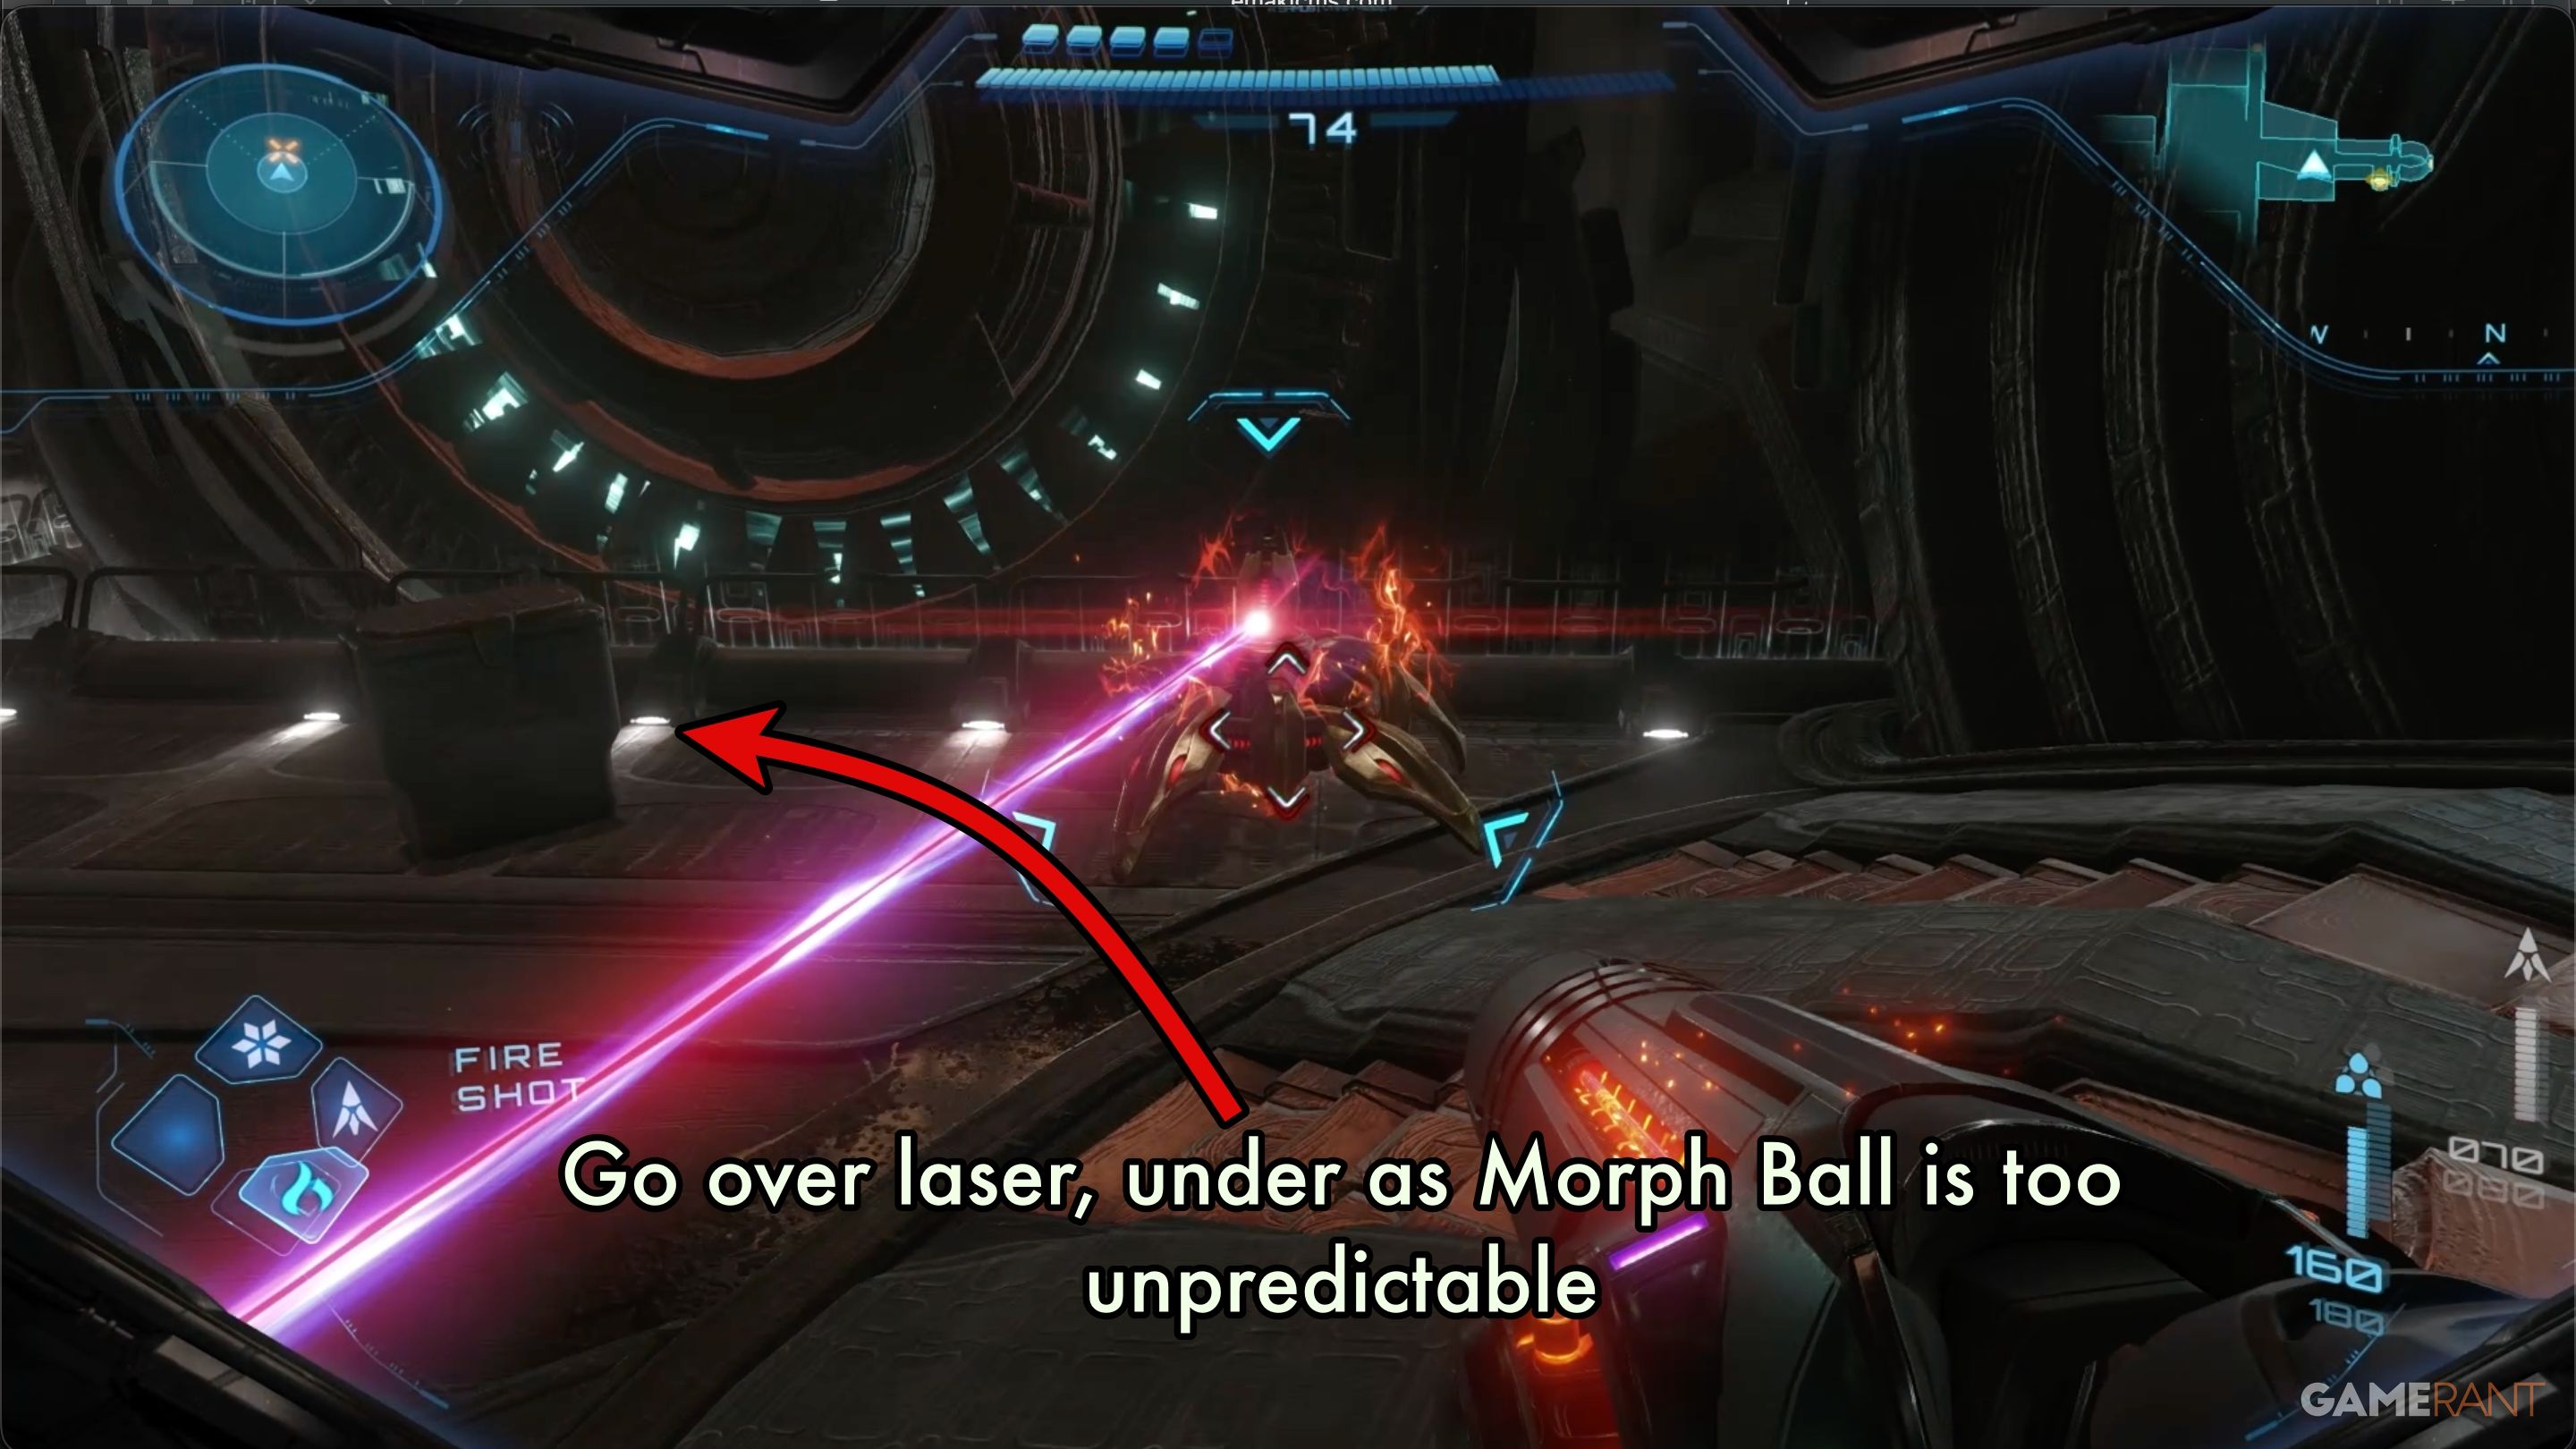
This enemy fires a powerful laser. While you can sometimes avoid the laser by rolling into a Morph Ball, it’s not always reliable. The best strategy is to jump over the laser and attack with missiles.

The first Data Log, titled “Delivery Status,” is located immediately to the right after you enter the Entry Bay. You’ll find it on a desk behind the damaged Light Delivery Truck.
After you gather the data log, find the exit with a sign pointing to the save station. If you’re facing the same direction as when you entered the Inspection Station, it will be on your right. Be cautious once you go through the door, as the path ahead isn’t very clear. You’ll encounter a Lamorn Beam Turret shortly after the first turn.
Recruit Ezra Duke:
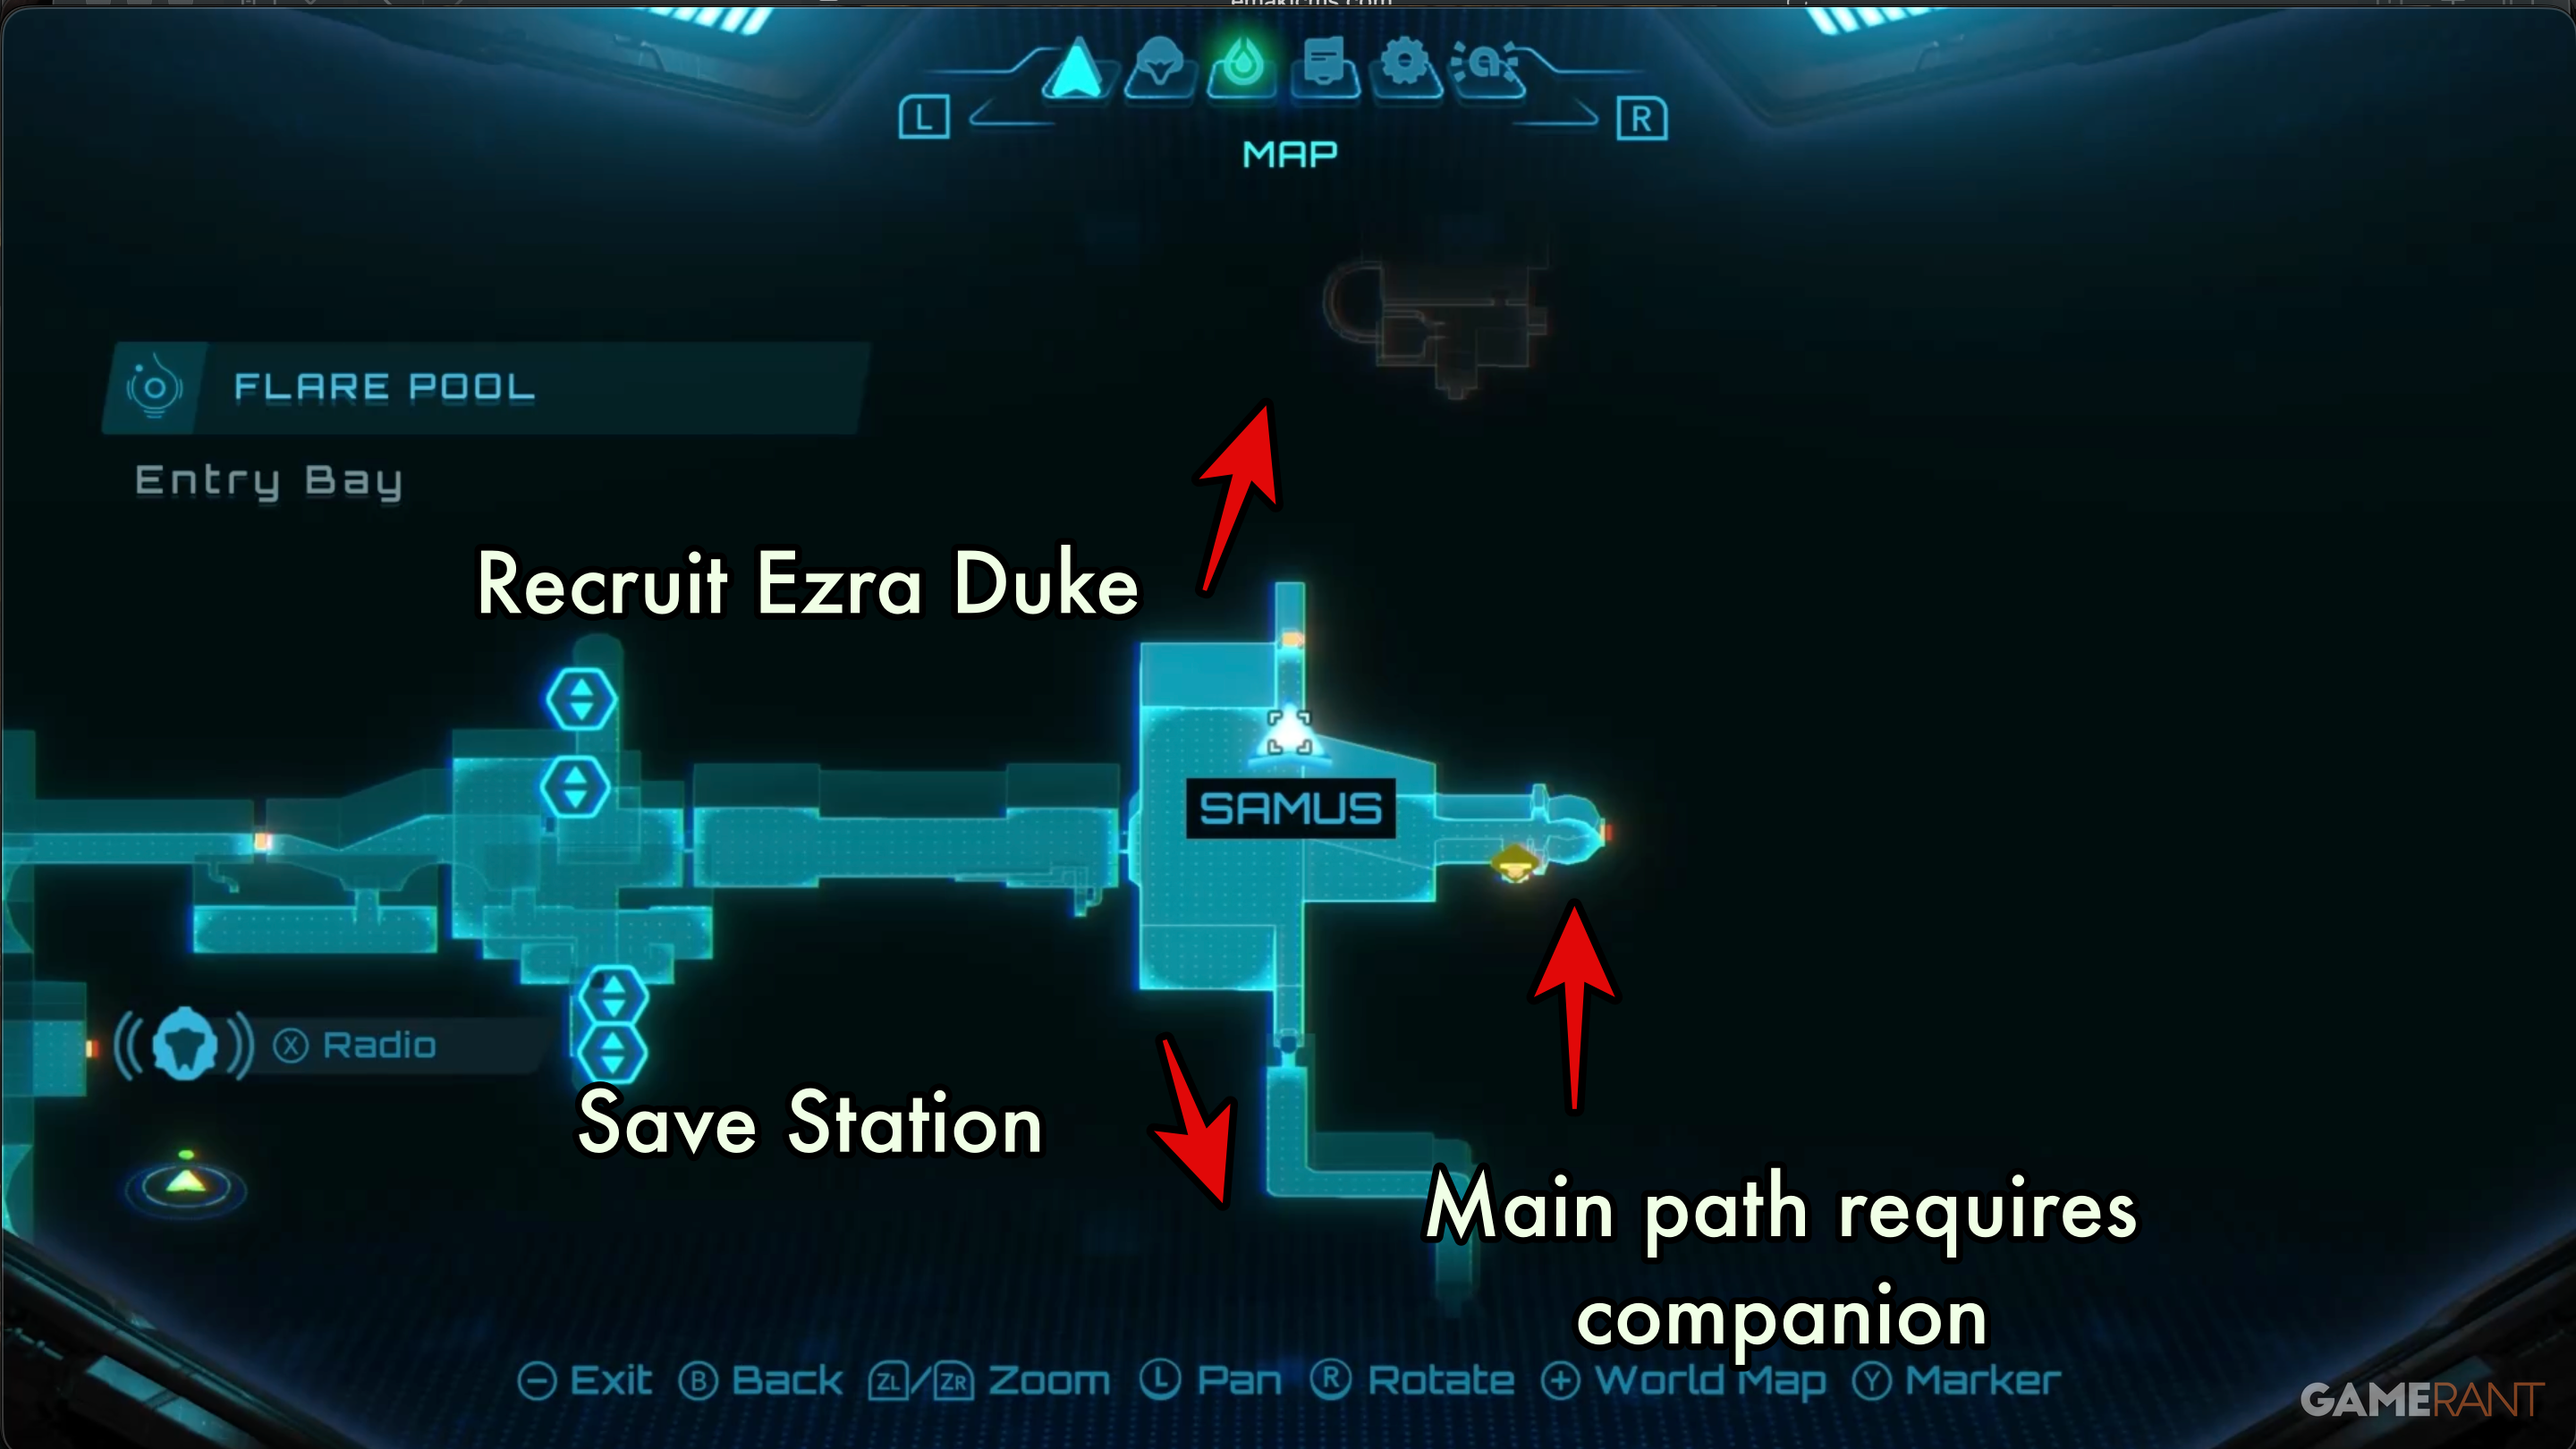
Once you return to the Entry Bay from the Save Station, go straight across to the smaller door opposite where you saved. Don’t take the main exit on the right, as that requires having specific companions – the Flare Pool GF. Head directly across the Entry Bay after leaving the Save Station.
Following this route leads to the Thermal Siphon, which eventually takes you to the Boiler Room. The first area of the Boiler Room has a door on the right blocked by a Thunder Blocker – you’ll need to come back with the Thunder Shot to open it.
To your left is a small hatch. Switch to Morph Ball mode to enter, and you’ll find yourself in the room containing the Lava Heat Boiler. You can’t interact with it just yet, so exit through the next hatch. This will lead you to the chamber where you’ll meet Ezra Duke, your first NPC companion. A cutscene will play before you can continue.
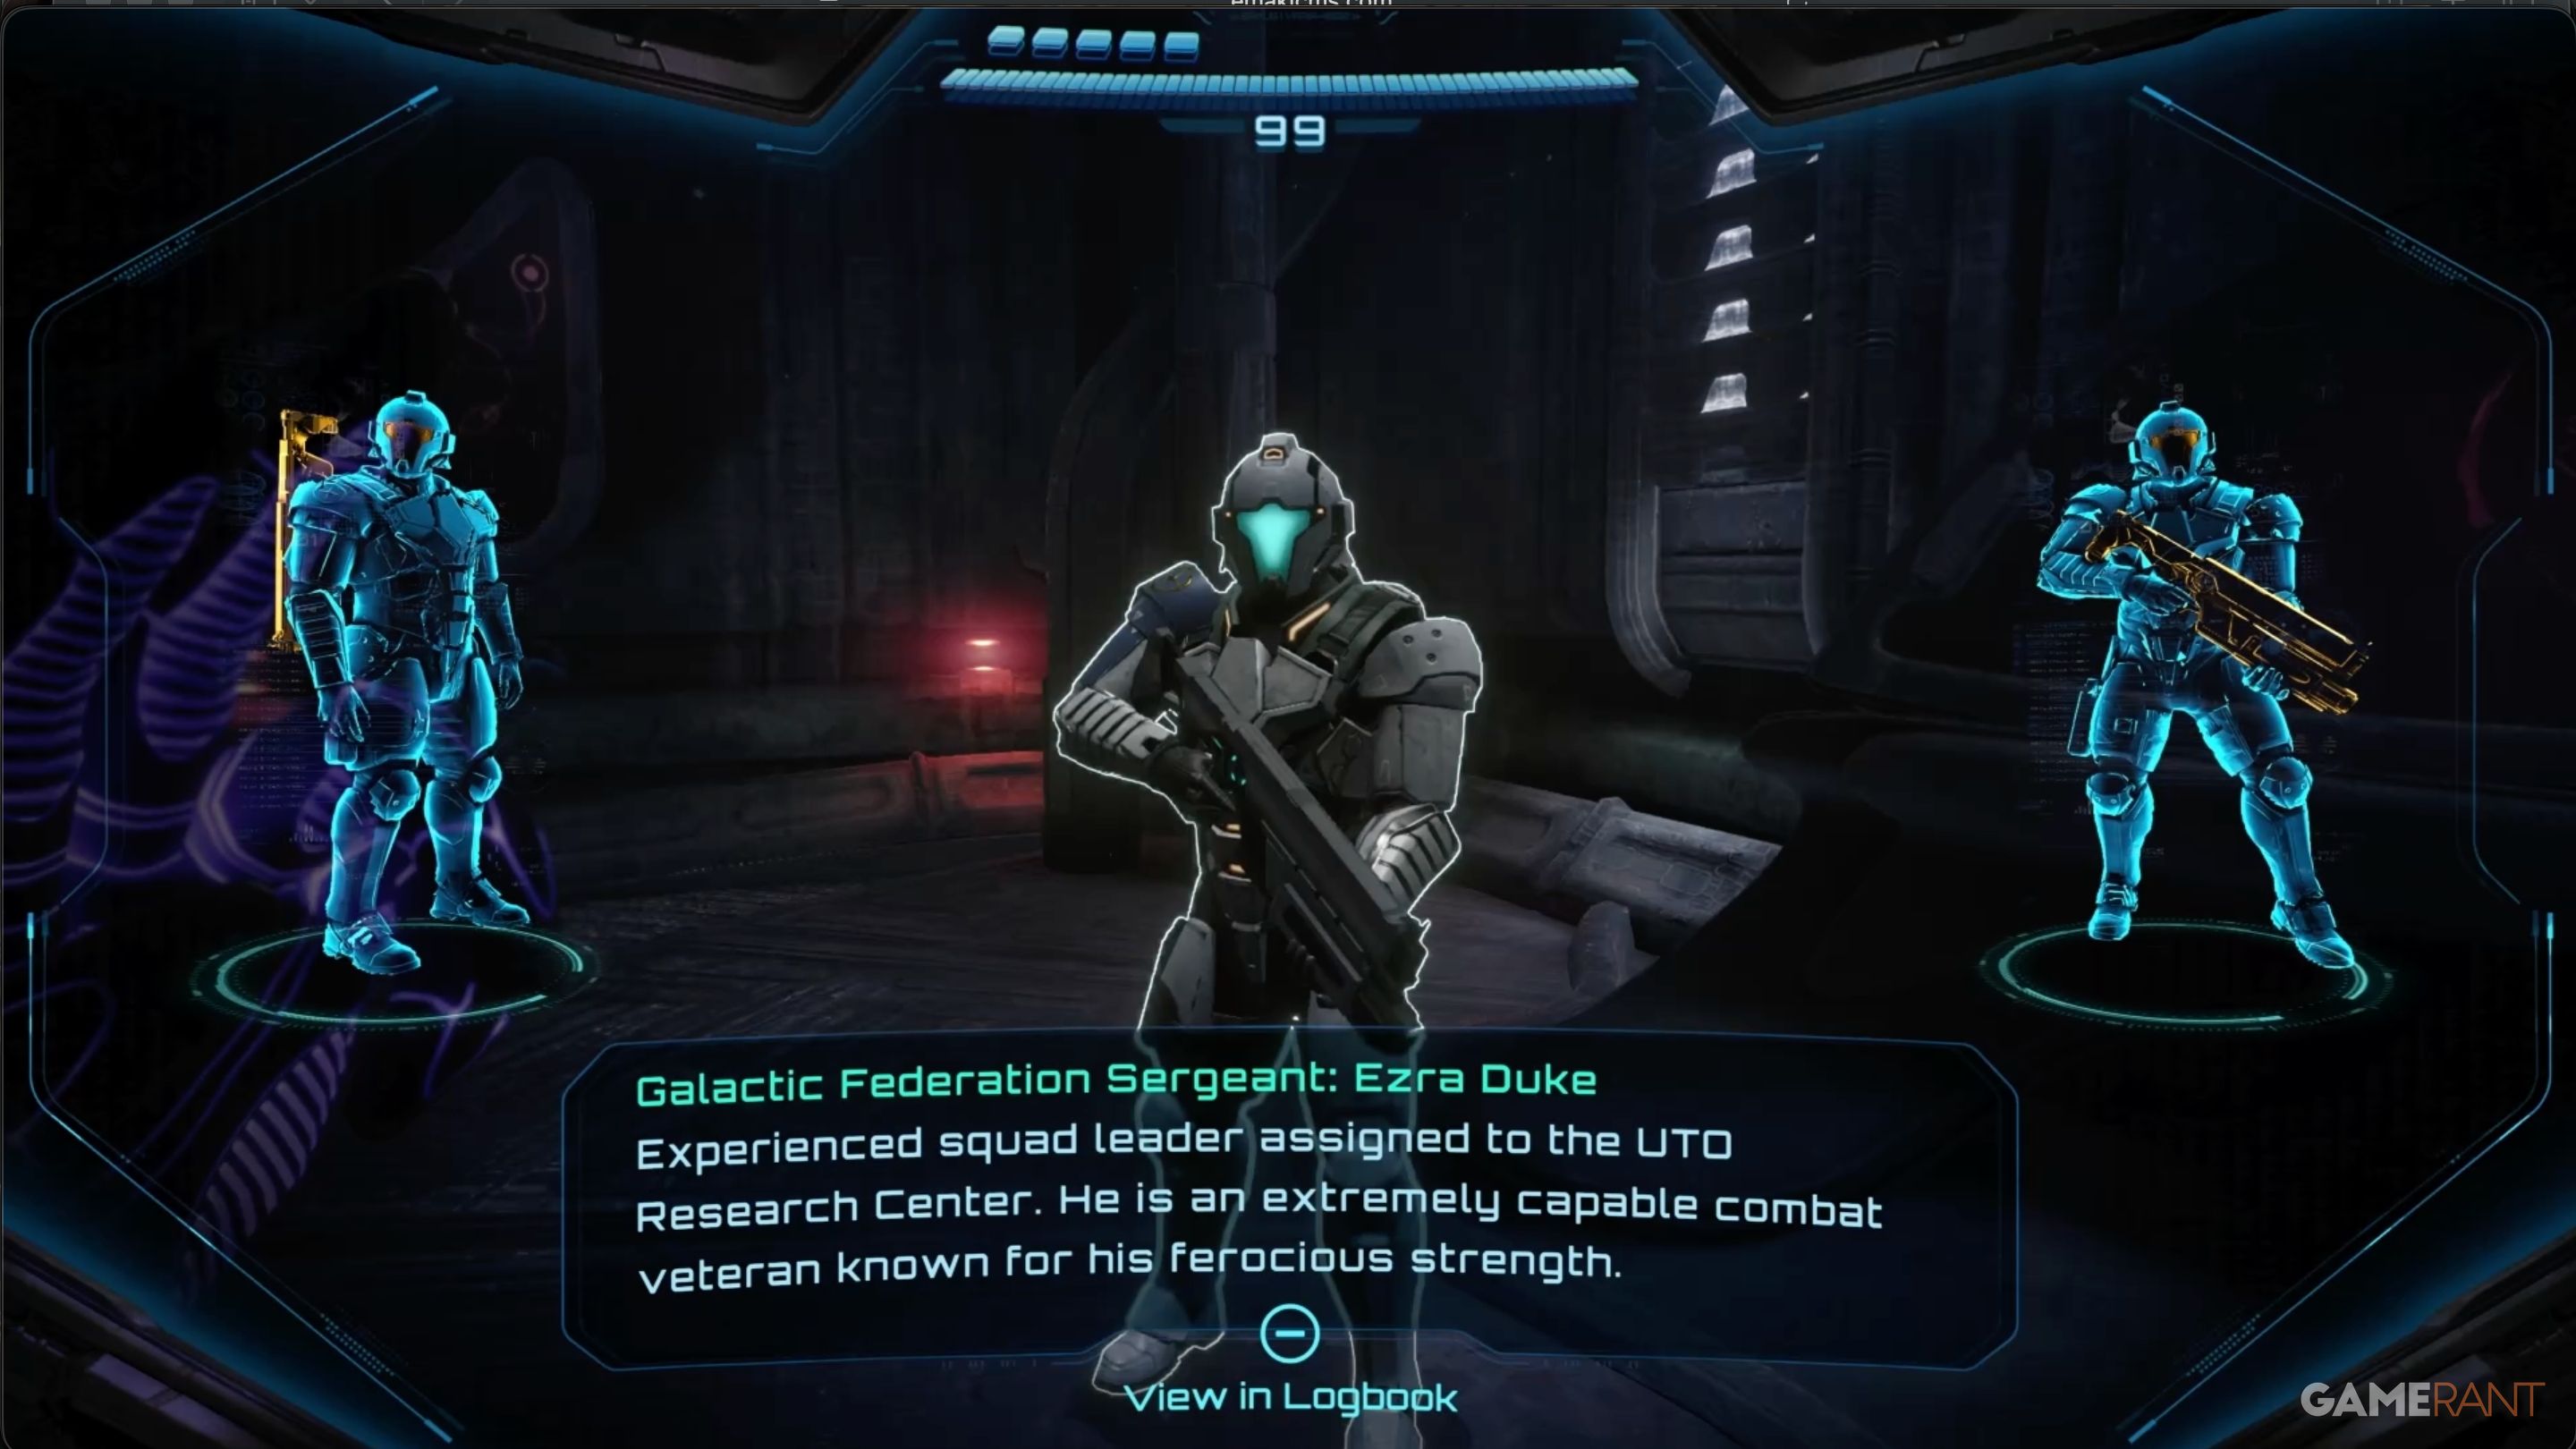
Remember to scan Ezra Duke, and all other human characters, after they’ve first spoken to you. Scanning them too soon won’t be recorded in the game’s log.
Freeze the Boiler:
Next, Samus needs to scan the hologram stand where Ezra is stationed. This will unlock a spinner hidden in the spoiler room.
Go back through the hatch to the boiler room. You’ll find another door blocked by thunder, but you’ll need Thunder Shot to open it, so you’ll have to come back later.
Head to the boiler room and use the spinner to expose the core. Freeze the core using Ice Shot, but be careful – shooting it will cause fire to erupt from the boiler. Once you’ve frozen all four sides of the core, the machine will power down.
Armstrong Distress Signal:
Once you leave the Boiler Room, go back down the Thermal Siphon corridor towards the Entry Bay. You’ll find and need to deal with two Maintenance Tank enemies on your return trip.
When you arrive at the Entry Bay, you’ll get a distress signal from Armstrong, a fellow member of the Galactic Federation. Your next task will be to find her.
Now that Duke is with you, you can open the big security doors to leave the Entry Bay and Cooling Room.
Energy Extraction – Flare Pool Data Log 2:
Once you get through the security door at the end of the Cooling Room, you’ll be in the Energy Extraction chamber. You’ll see several Psy-Bots that look like they’re turned off. The second Data Log, titled “Extraction Process,” is on a desk in a small alcove along the left wall.
Psychic Charge Beam Section:
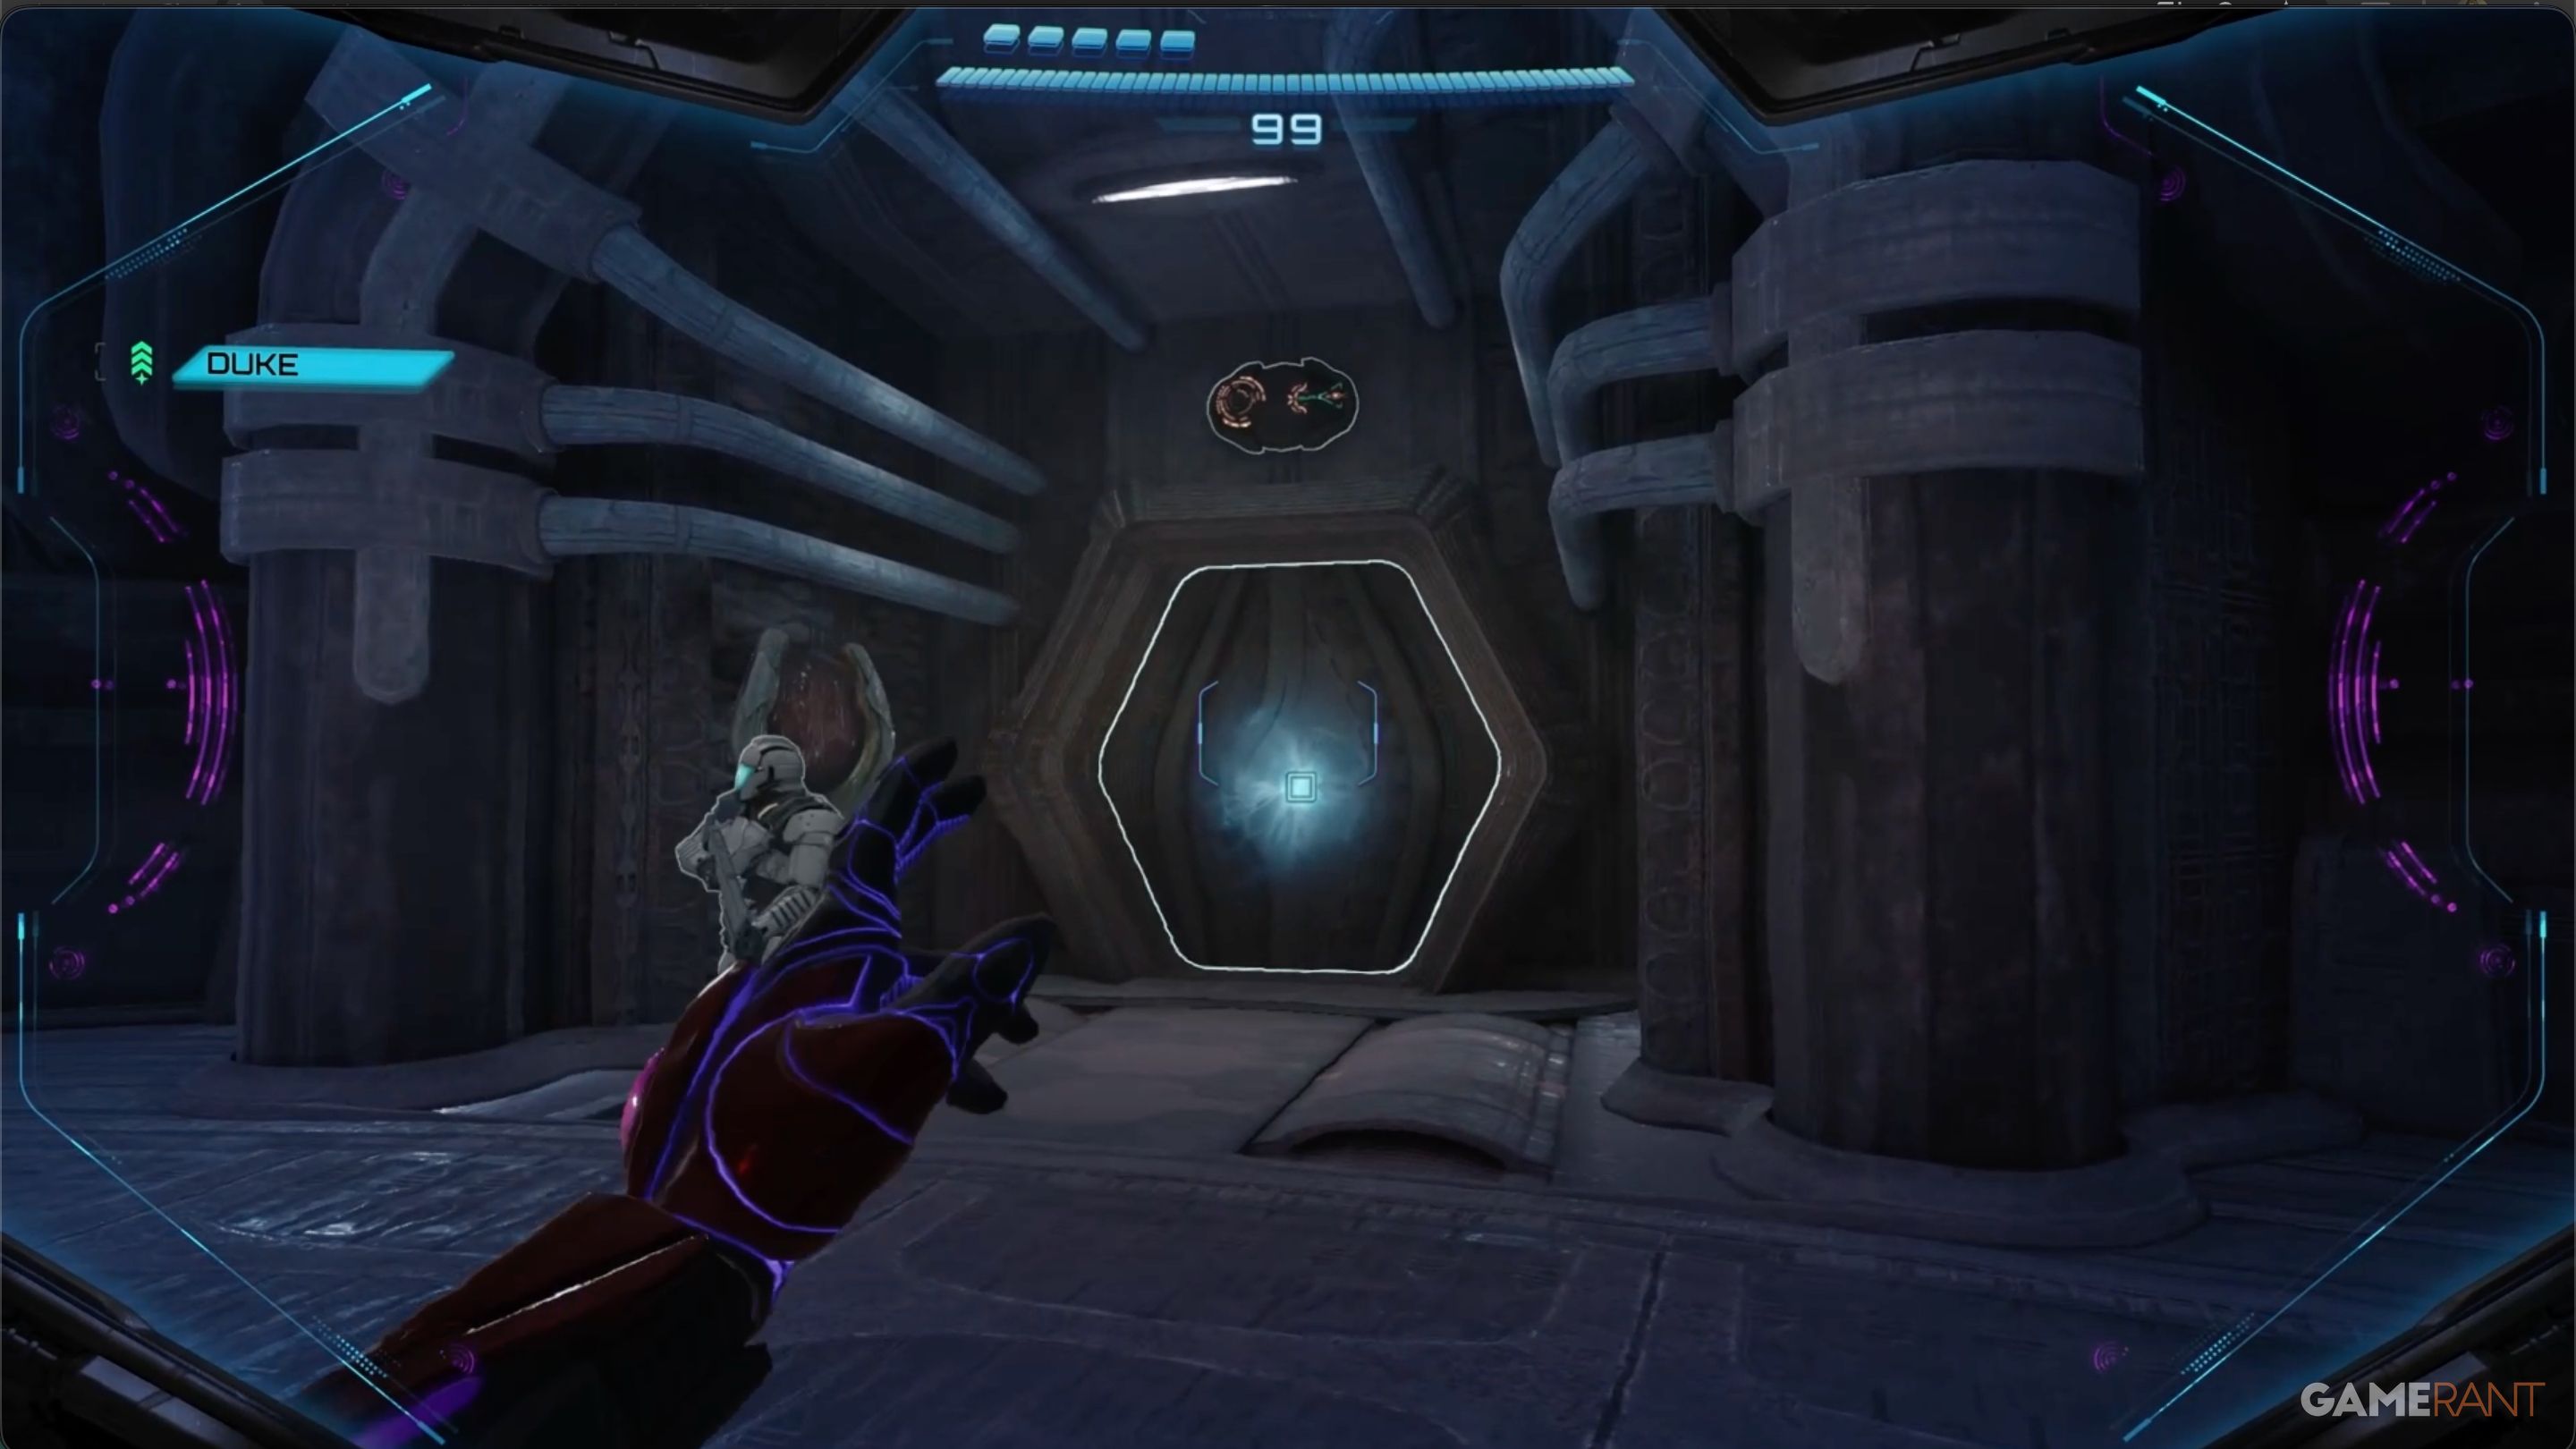
Once you’ve collected the second Data Log, Duke will be standing by a door that’s currently blocked. If you walk past him, you’ll find an elevator leading to the second floor of the Energy Extraction area.
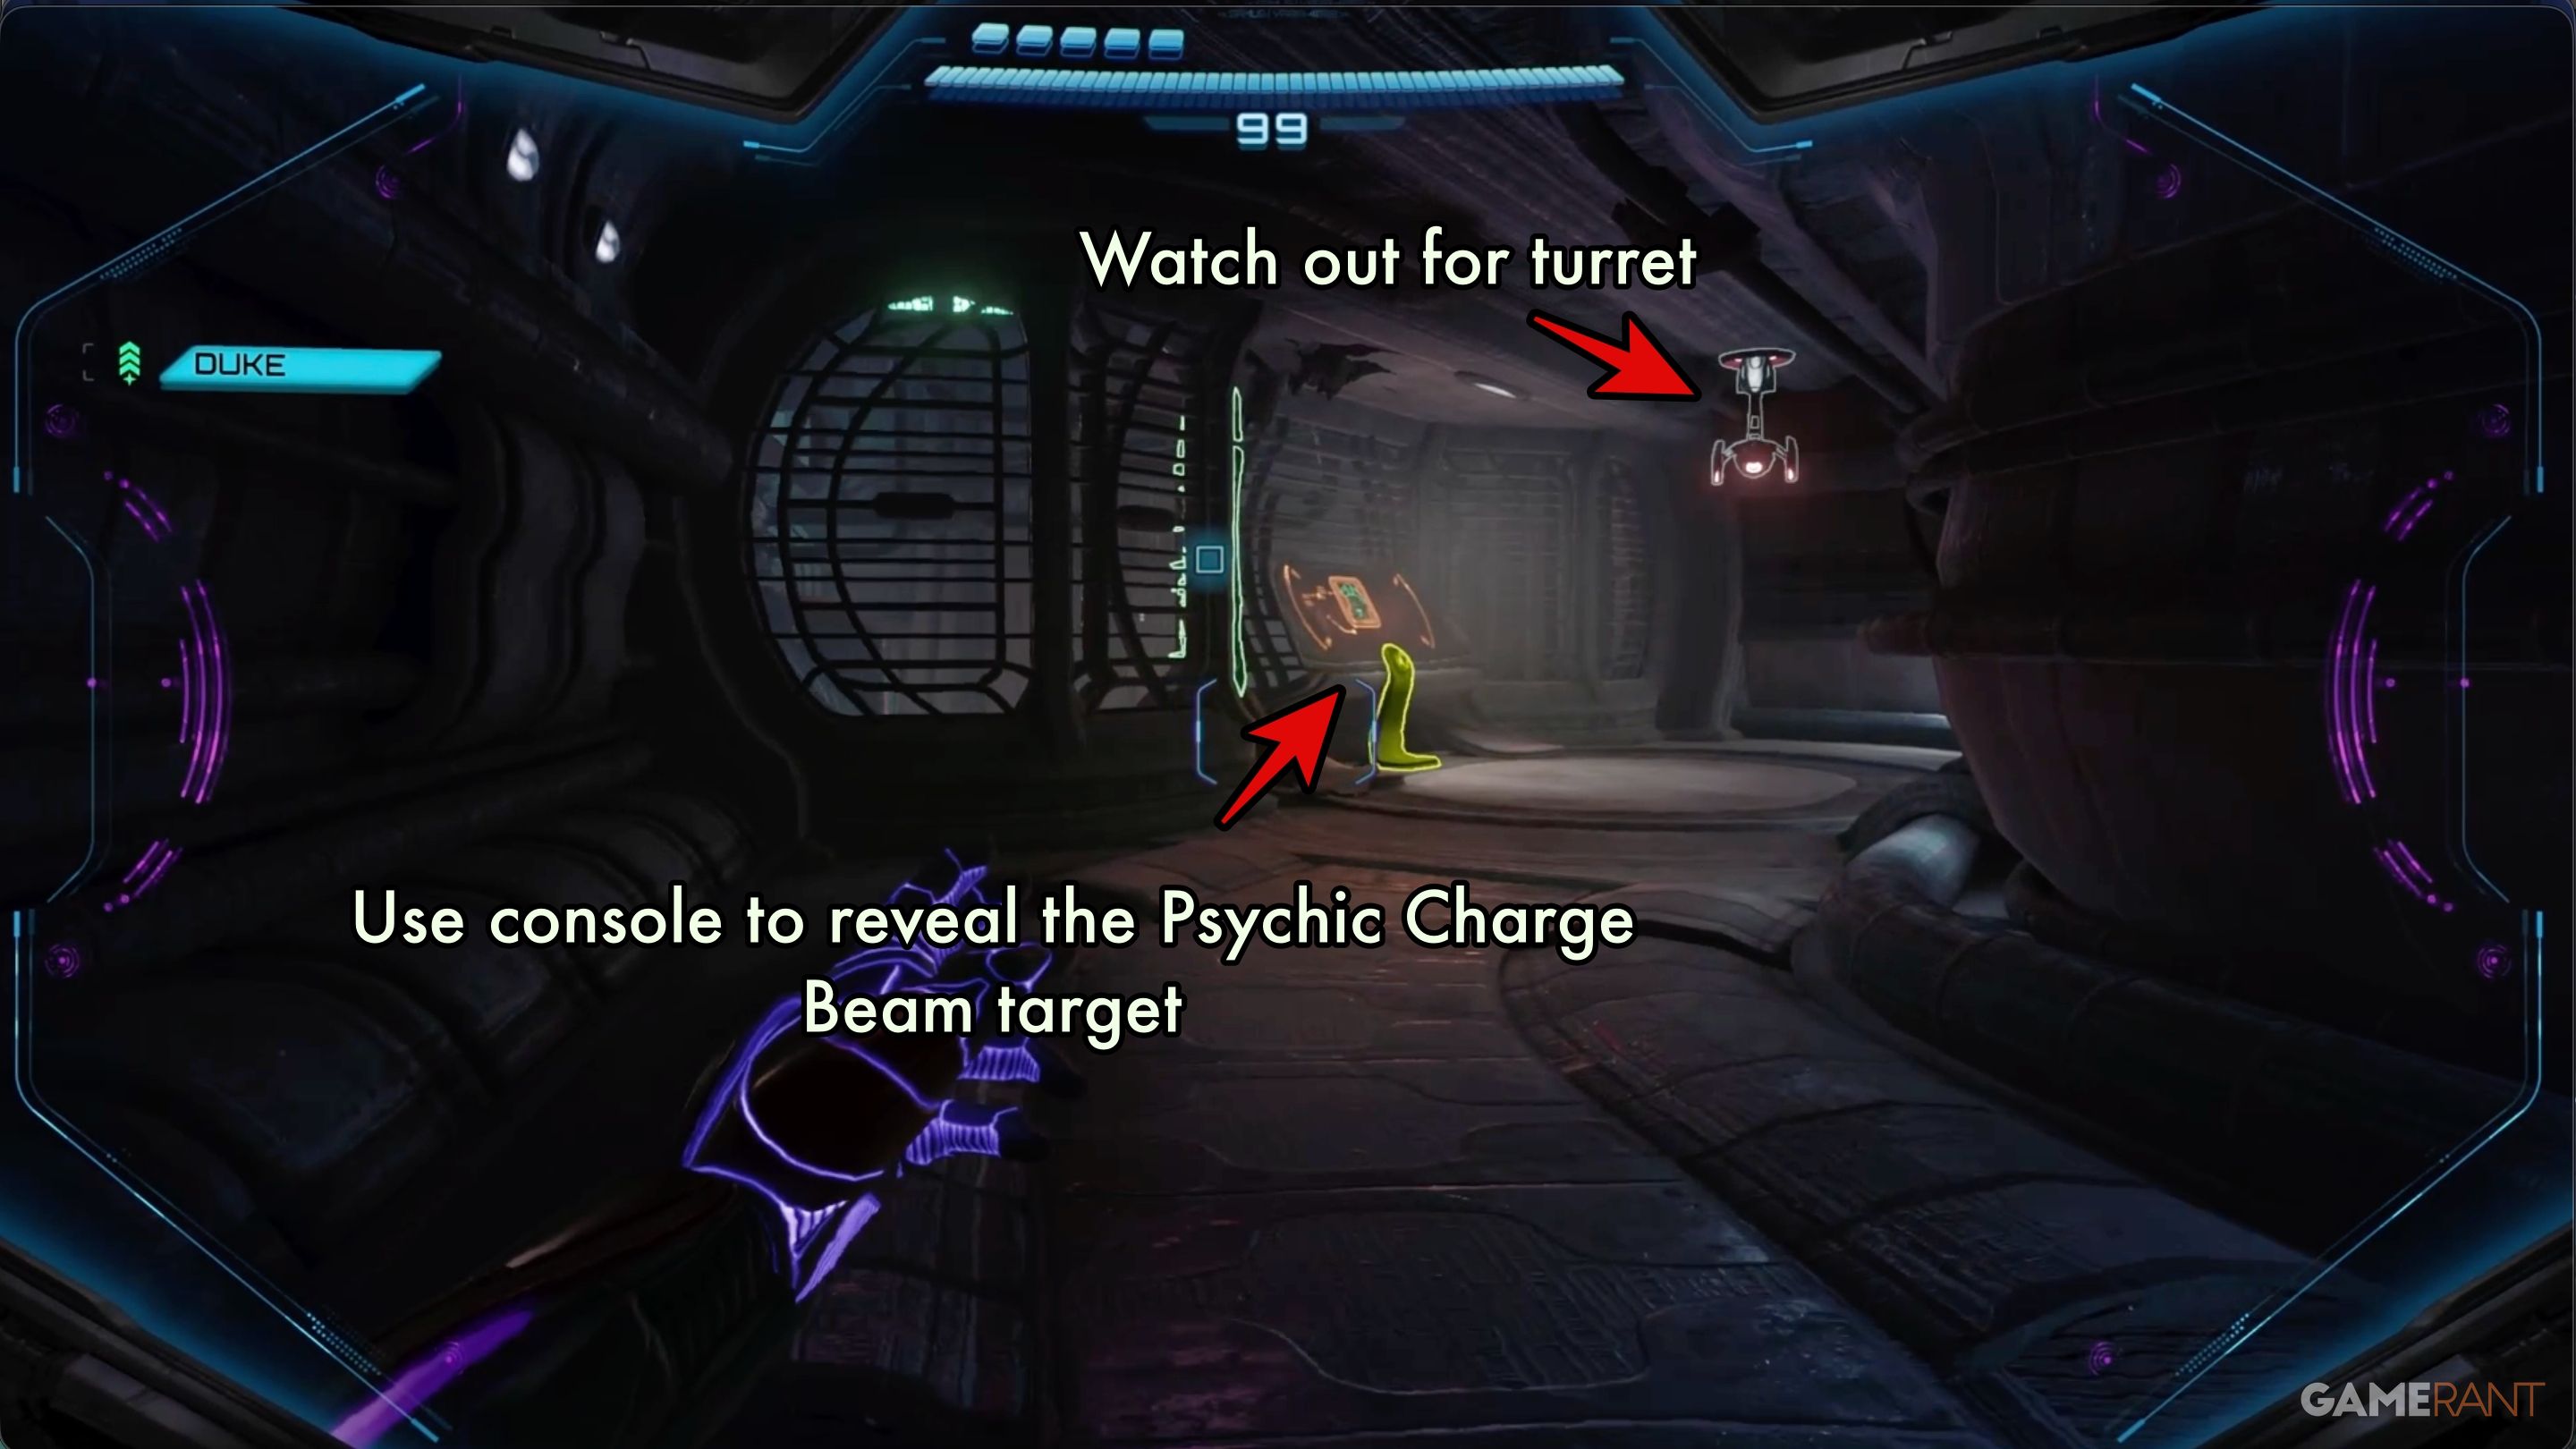
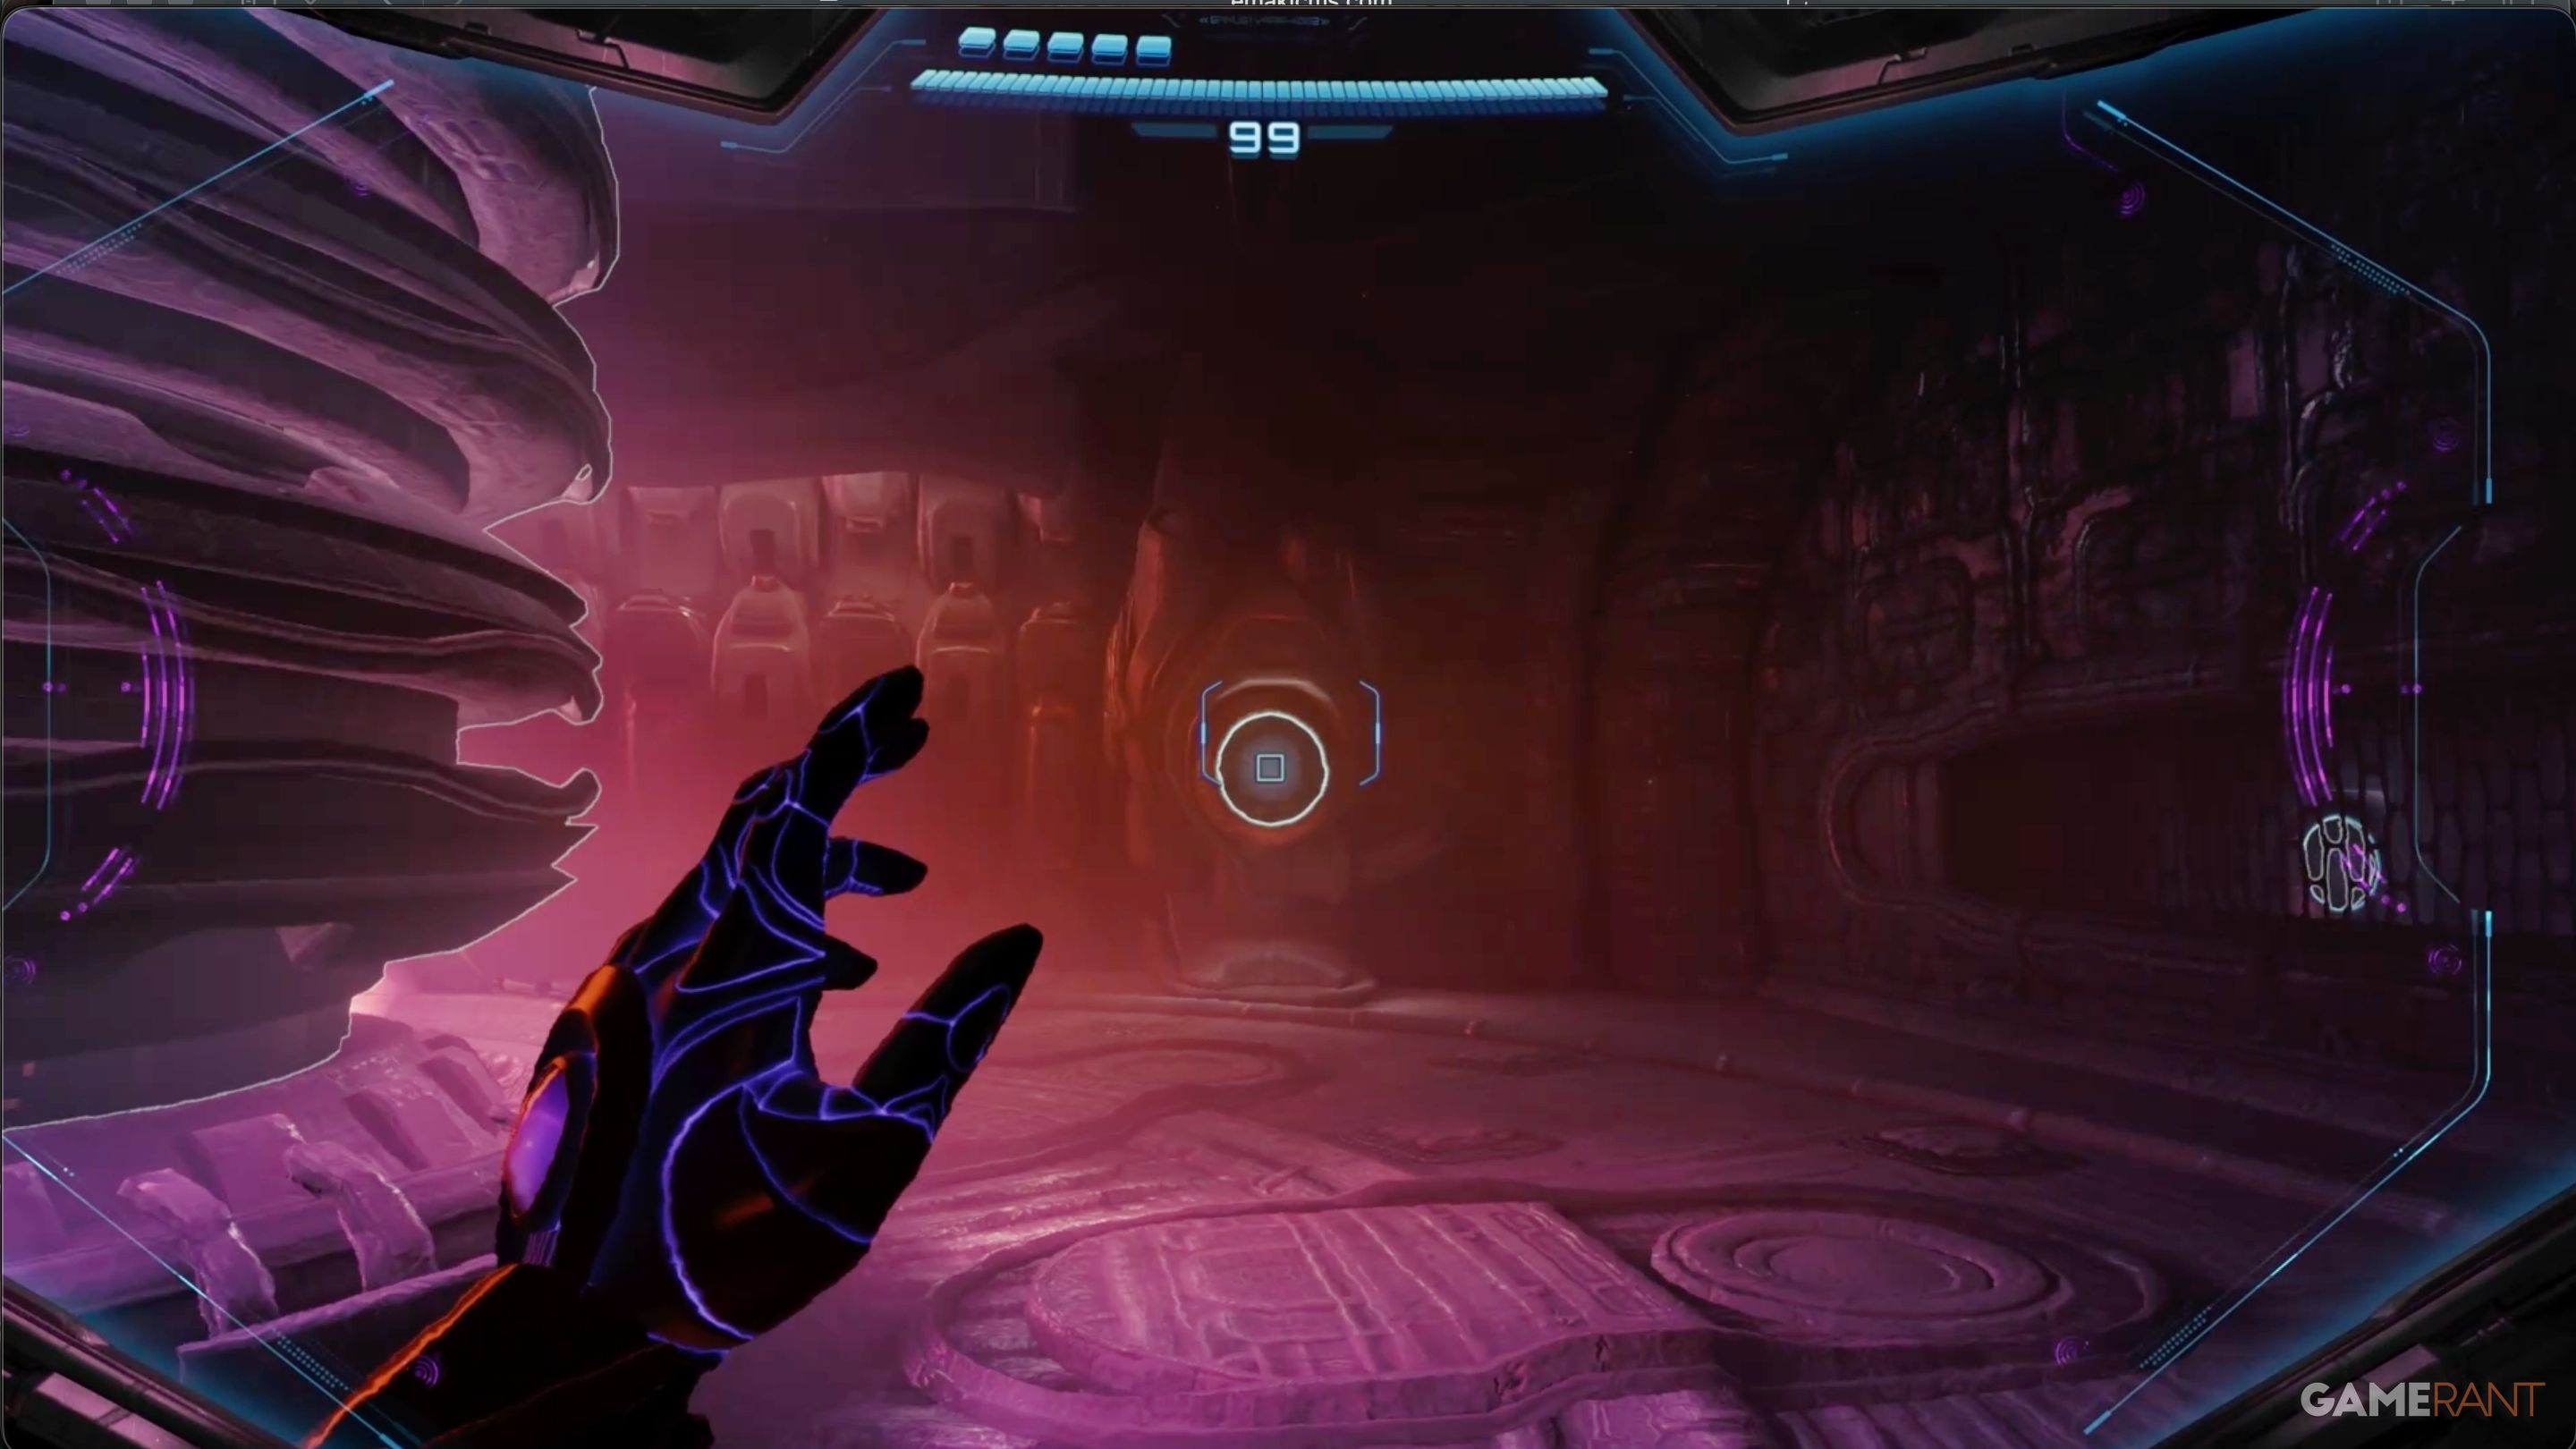
When you step out of the elevator, be careful of the Lamorn Beam Turret. Nearby, you’ll find a console by the window that you can use. Activating it will open a hidden panel across the room, exposing a target for the Psychic Charge Beam.
First, break the damaged part of the window. Then, use the beam of light to hit the target, and that will open the door where Duke is located.
Energy Extraction Missile Expansion:
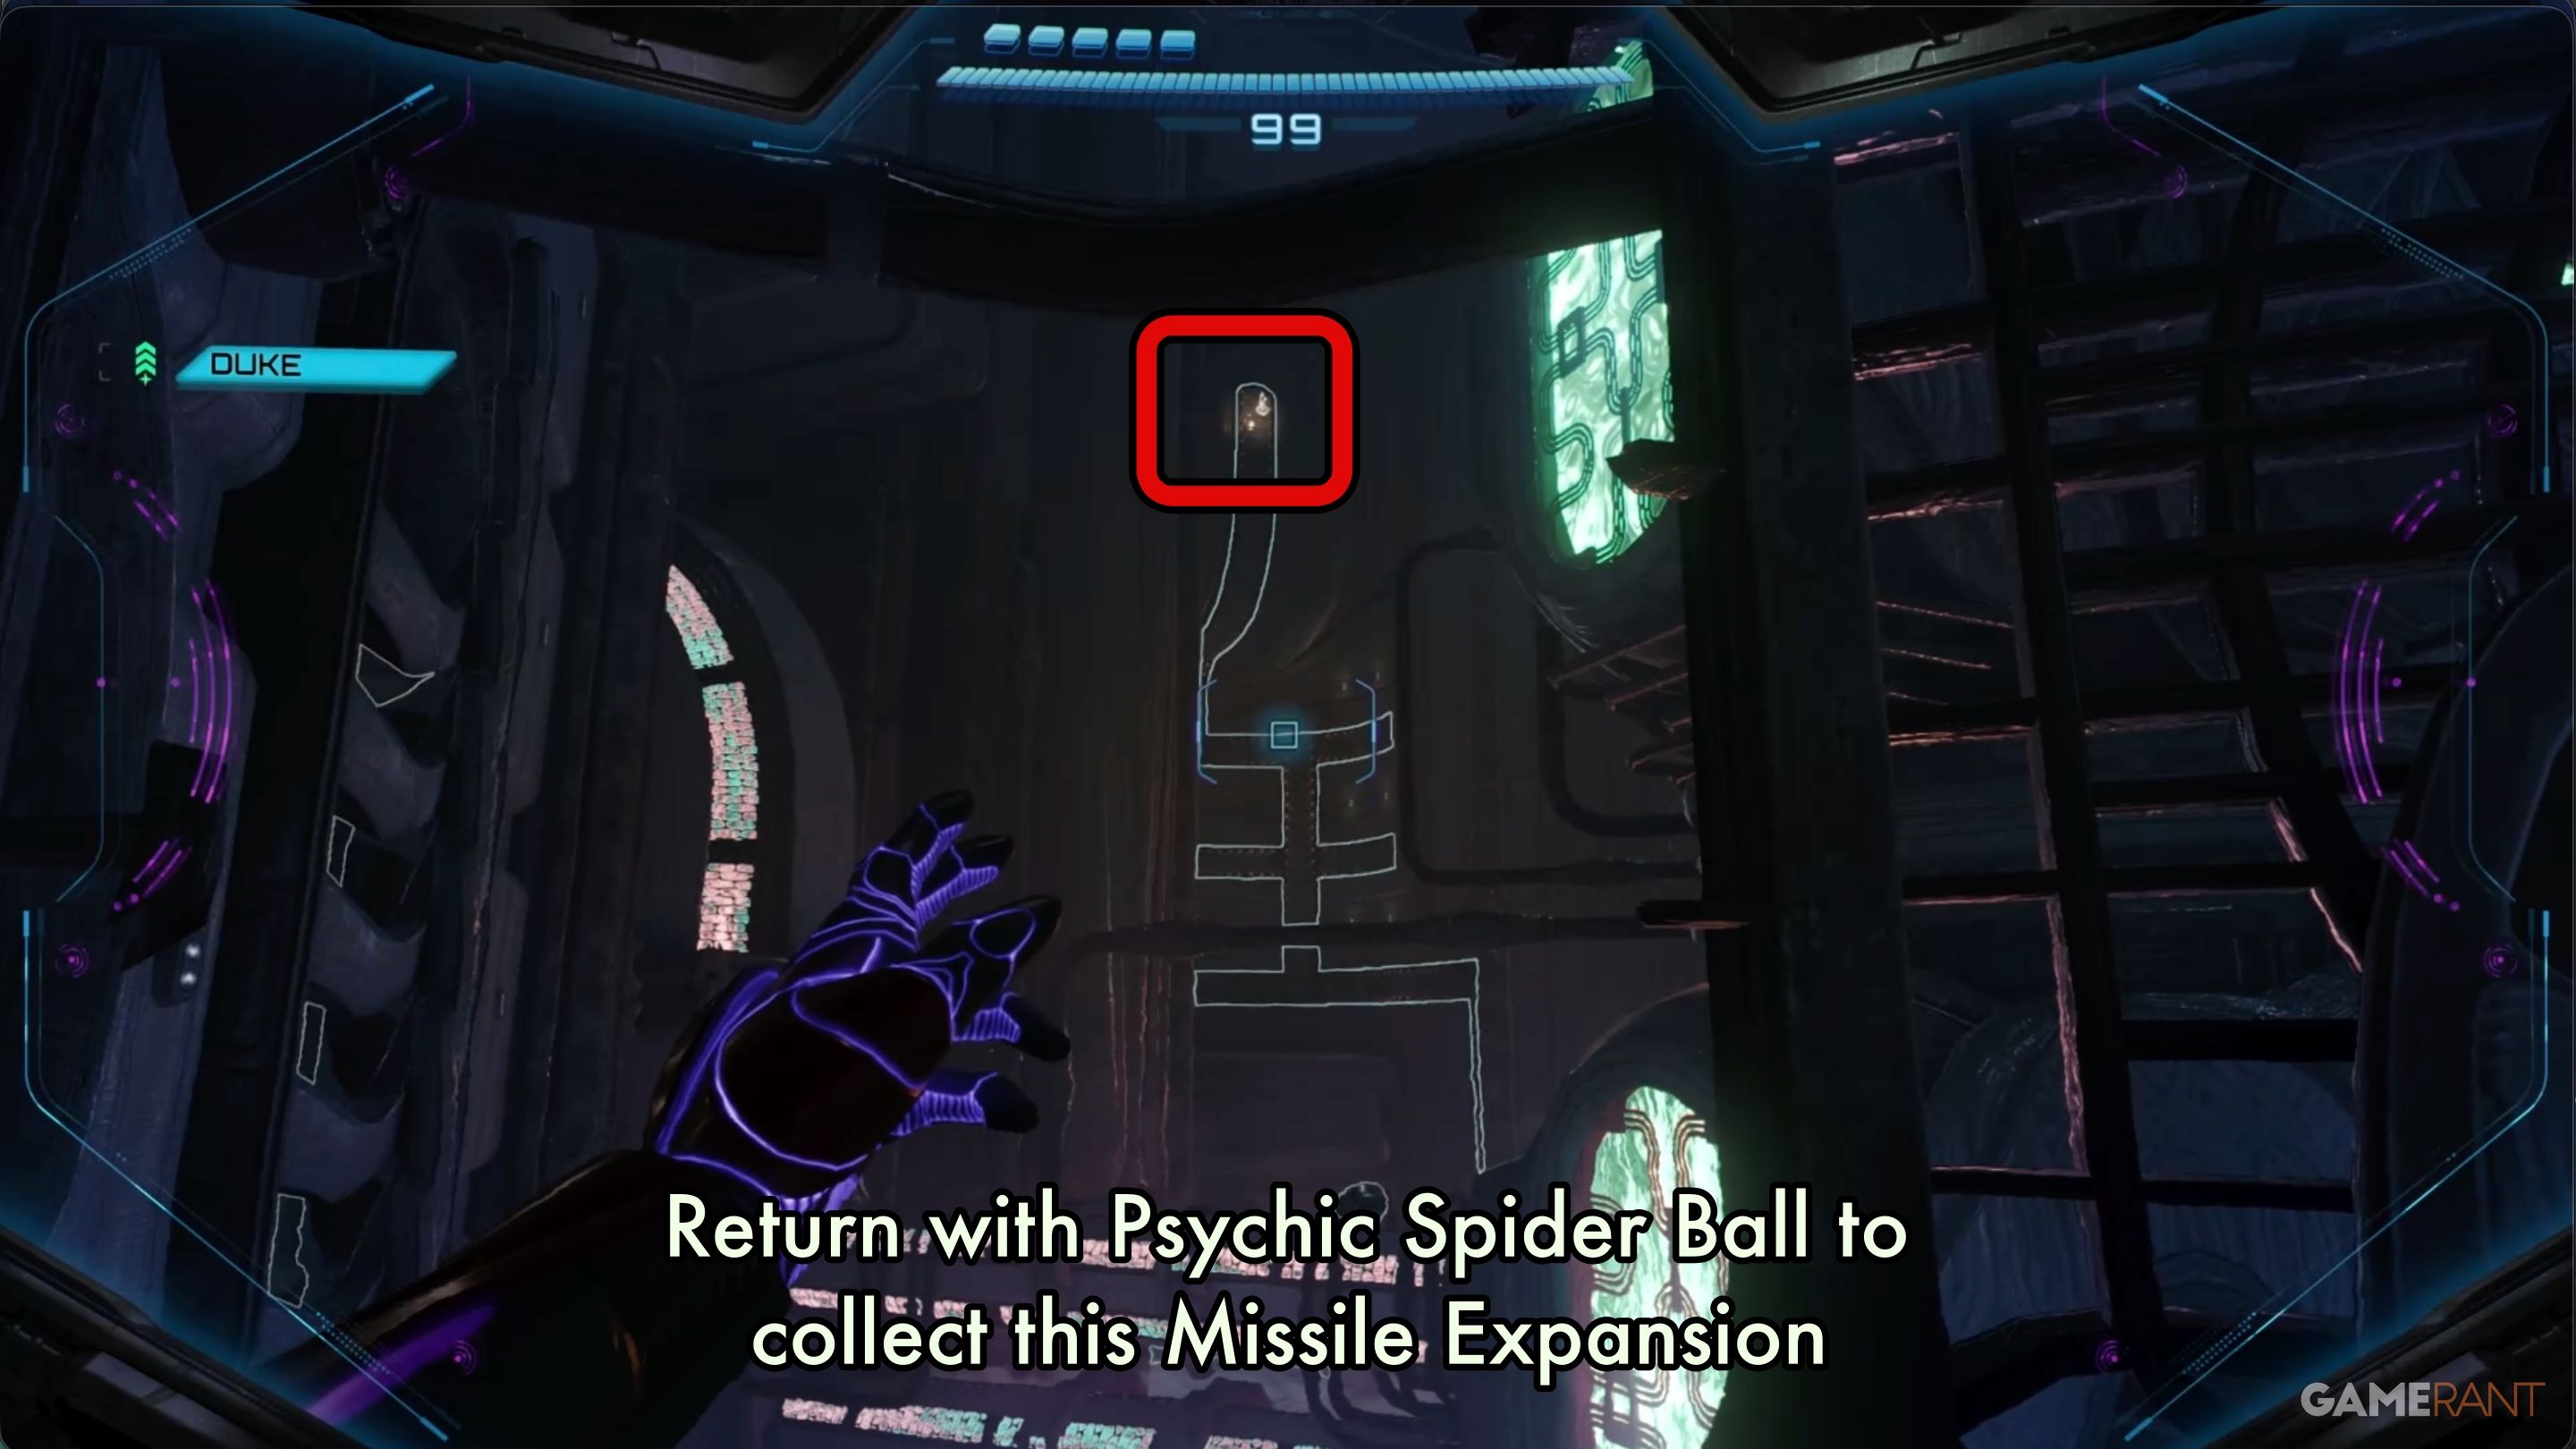
In the Energy Extraction area, look up to find a magnetic track in the corner. It leads to a Missile Expansion, but you’ll need the Psychic Spider Ball ability before you can get back there to collect it.
Unlock Area Map:
Go back down to Ezra and enter the door labeled “Energy Injection.” Looking at your map, choose the left path and follow the hallway. Be careful of the turret around the first corner.
At the end of the hallway is a room with a device that displays the area map. Use the console to unlock it. While there’s a way out of this room, it’s blocked by a Thunder Blocker. Go back down the hall and take the other path to reach Energy Injection, where you’ll see a short cutscene.
Energy Injection – Data Log 3:
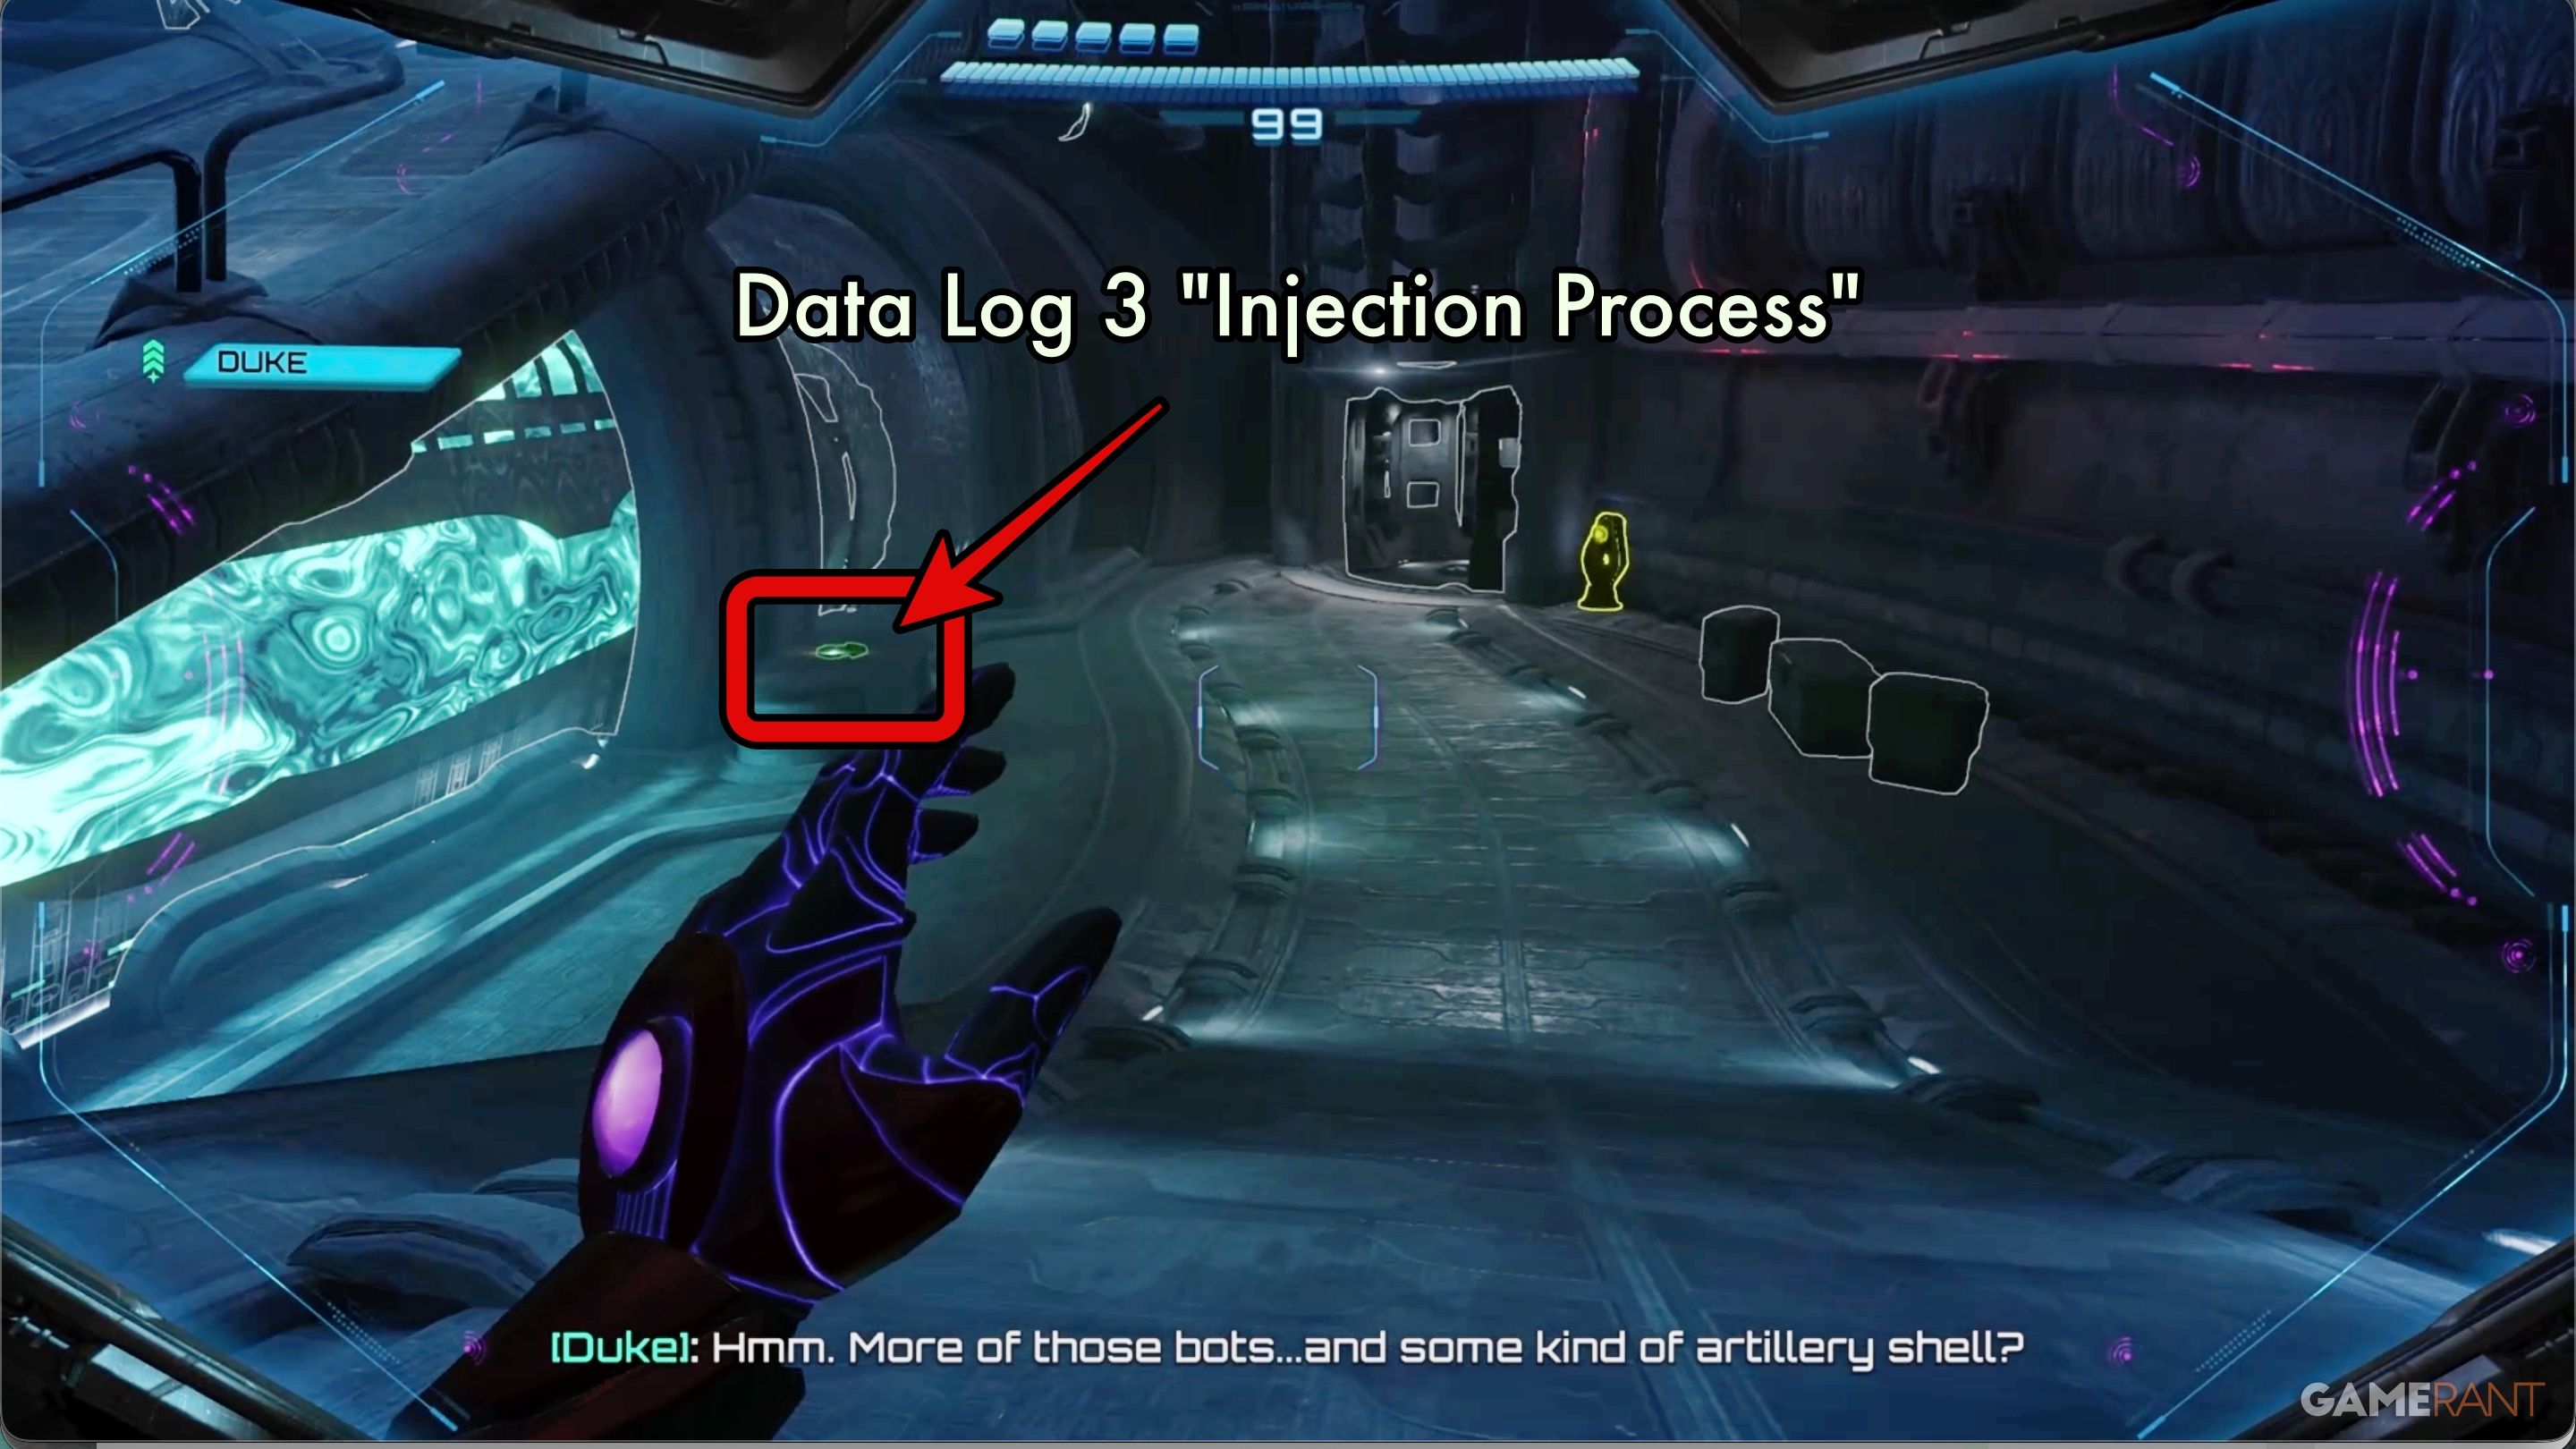
Go up the ramp in the Energy Injection chamber, follow the curved path, and then down the ramp on the other side of the big machine. You’ll find the third Data Log on a desk right across from the elevator.
Energy Injection Upper Levels:

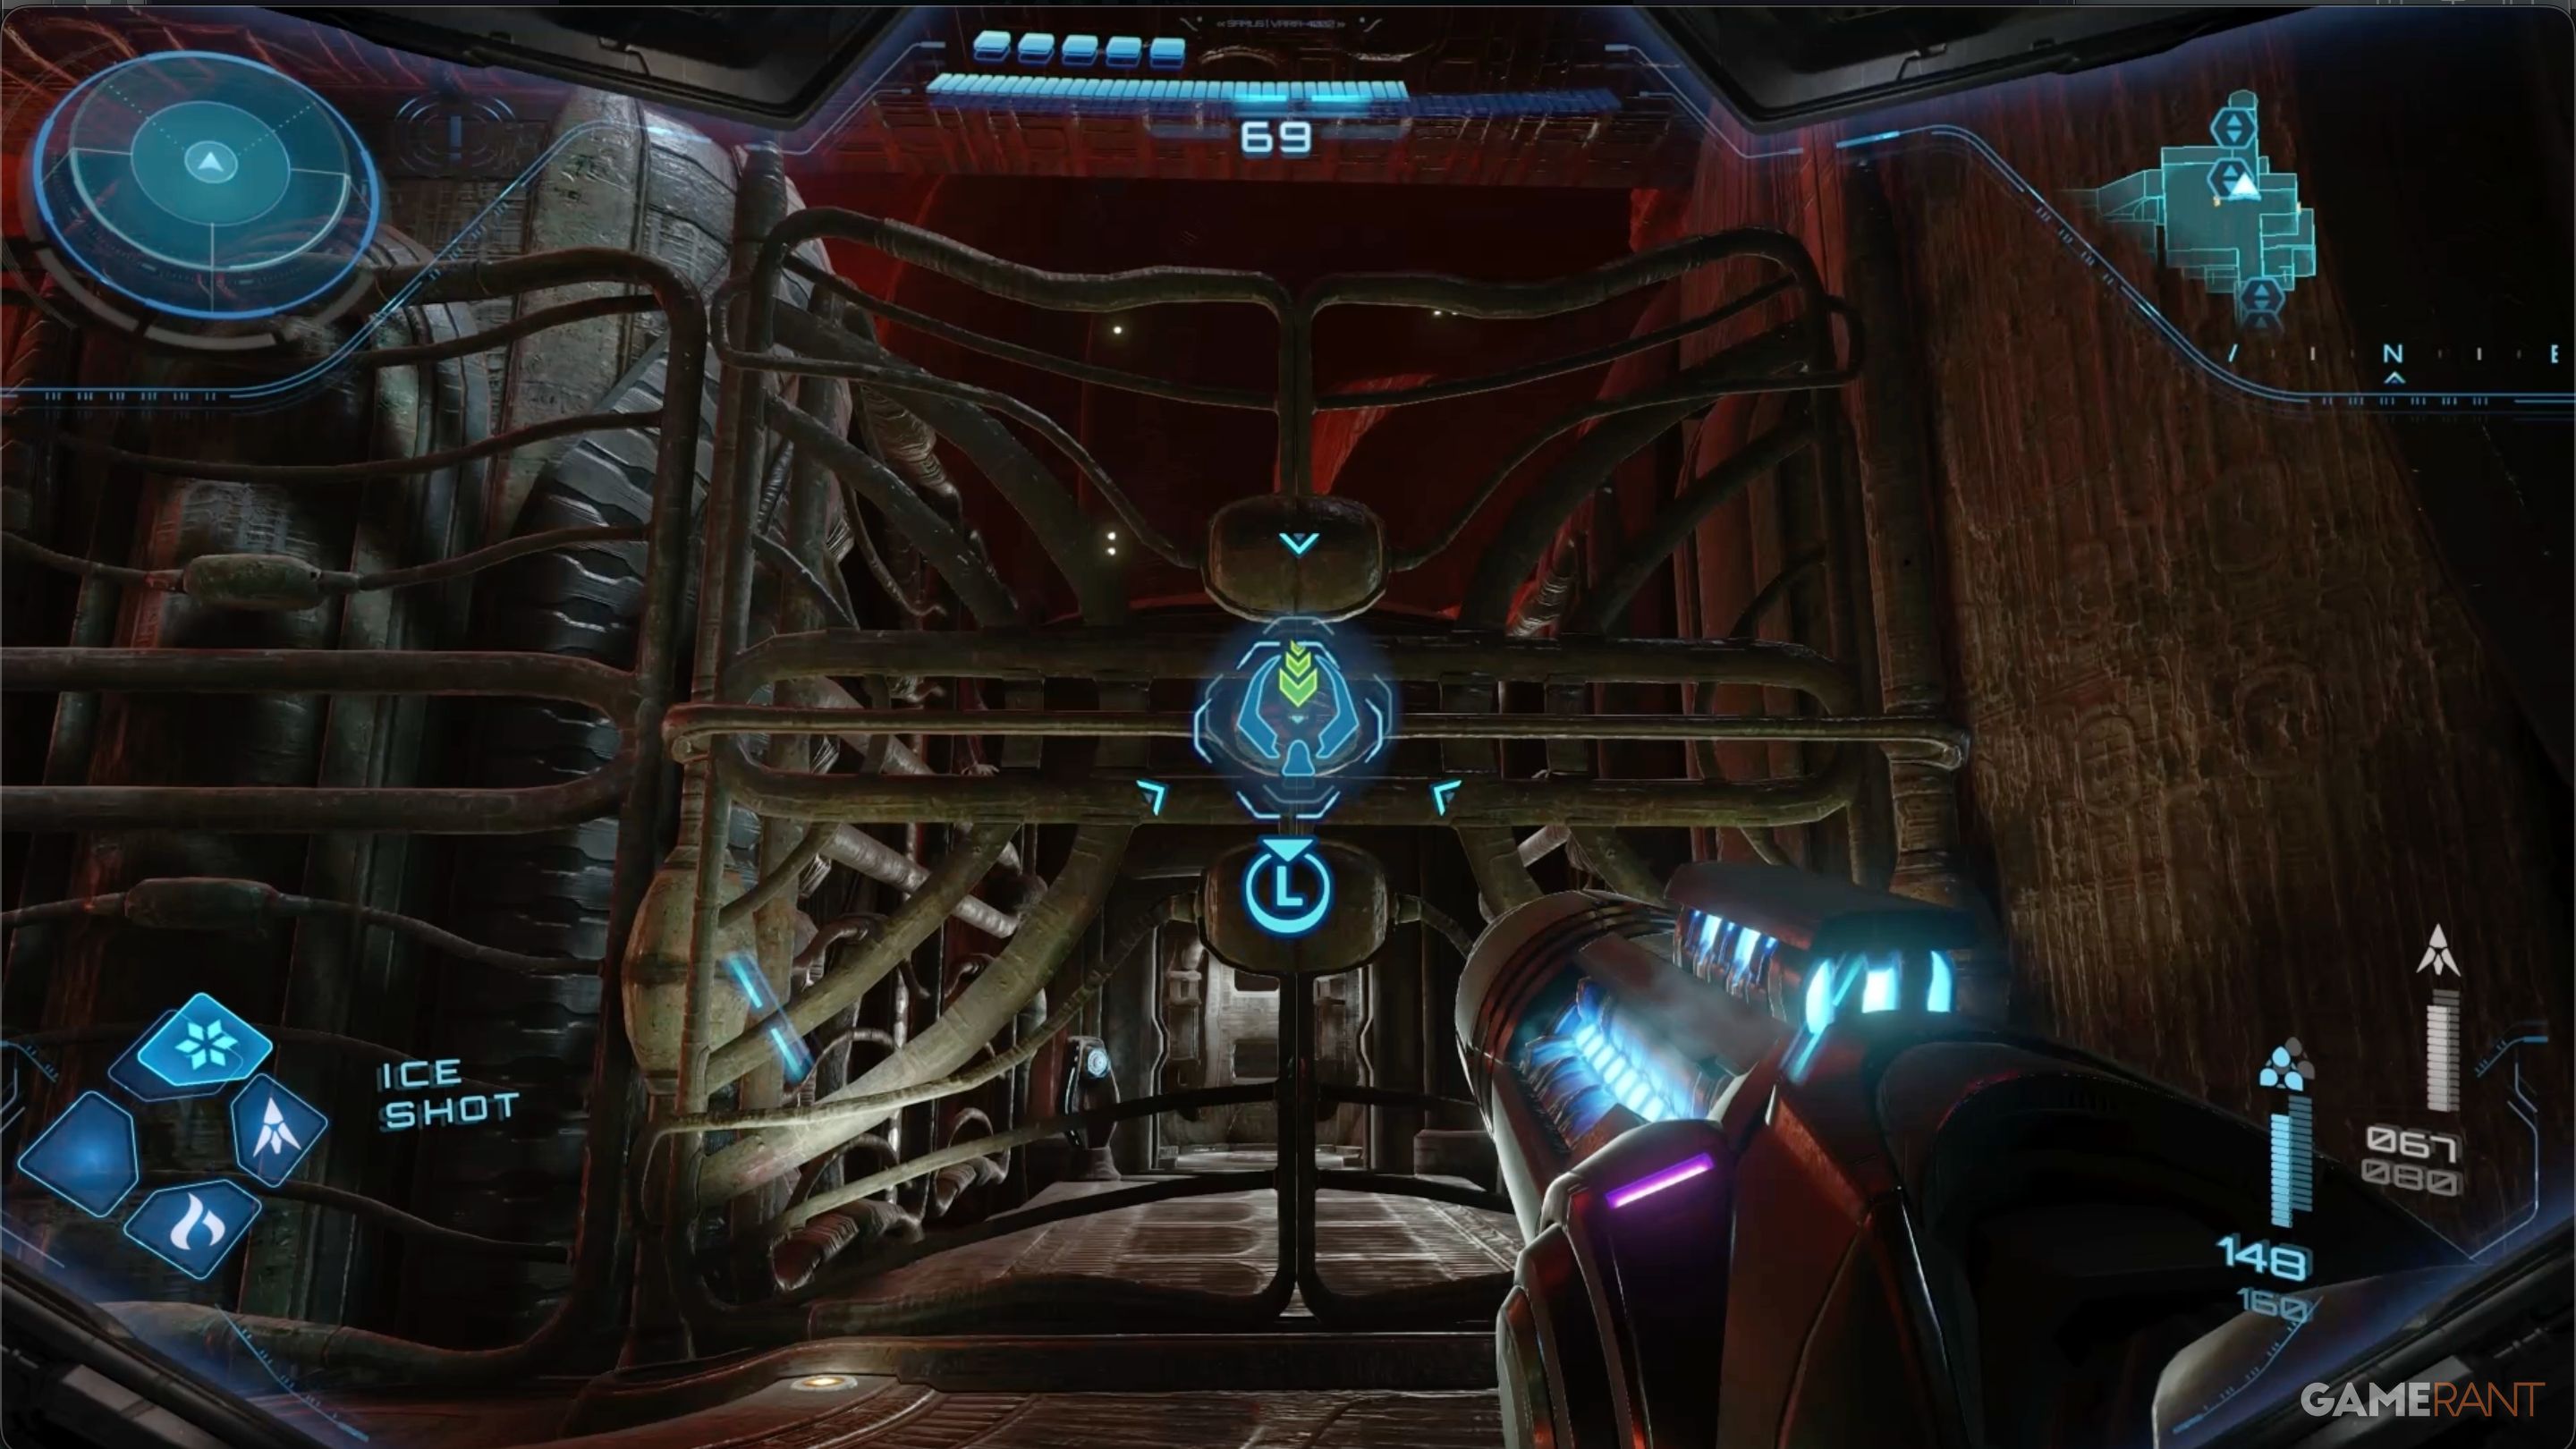
Once you have the Data Log, take the elevator. When you reach the second floor, Samus will experience a psychic disturbance, activating all the nearby Psy-Bots. Ascend the ramp, battling the floating bots as you go. The Ice Shot is particularly effective here – freezing them while they’re over the central chamber will cause them to fall and be destroyed.
At the top of the ramp, take the next elevator to continue on the main path towards Armstrong.
Overseer Storage Room — Final Data Log, Missile Expansion & Energy Tank

After dealing with another wave of Psy-Bots at the top of the Energy Injection chamber, you’ll enter the Overseer’s Chamber. But before you go in, check the small side room. Behind the fast-travel tunnel blocked by the Thunder Block, you’ll find a Psychic Container holding an Energy Tank. On a desk near the container is the last Data Log, called “Facility Shutdown.”
Okay, so I finally figured out the Missile Expansion in the Overseer Room! It’s hidden right above the center of the room. You need to use the Psychic Lasso to pull away the cover over one of the bomb slots, then just float a bomb into it. After that, you’ll see three nodes pop up – you have to hit all of them at the same time with the Psychic Charge Beam. If you do that right, the Missile Expansion will appear!
Control Room Bridge – Psy-Bot Gunner:
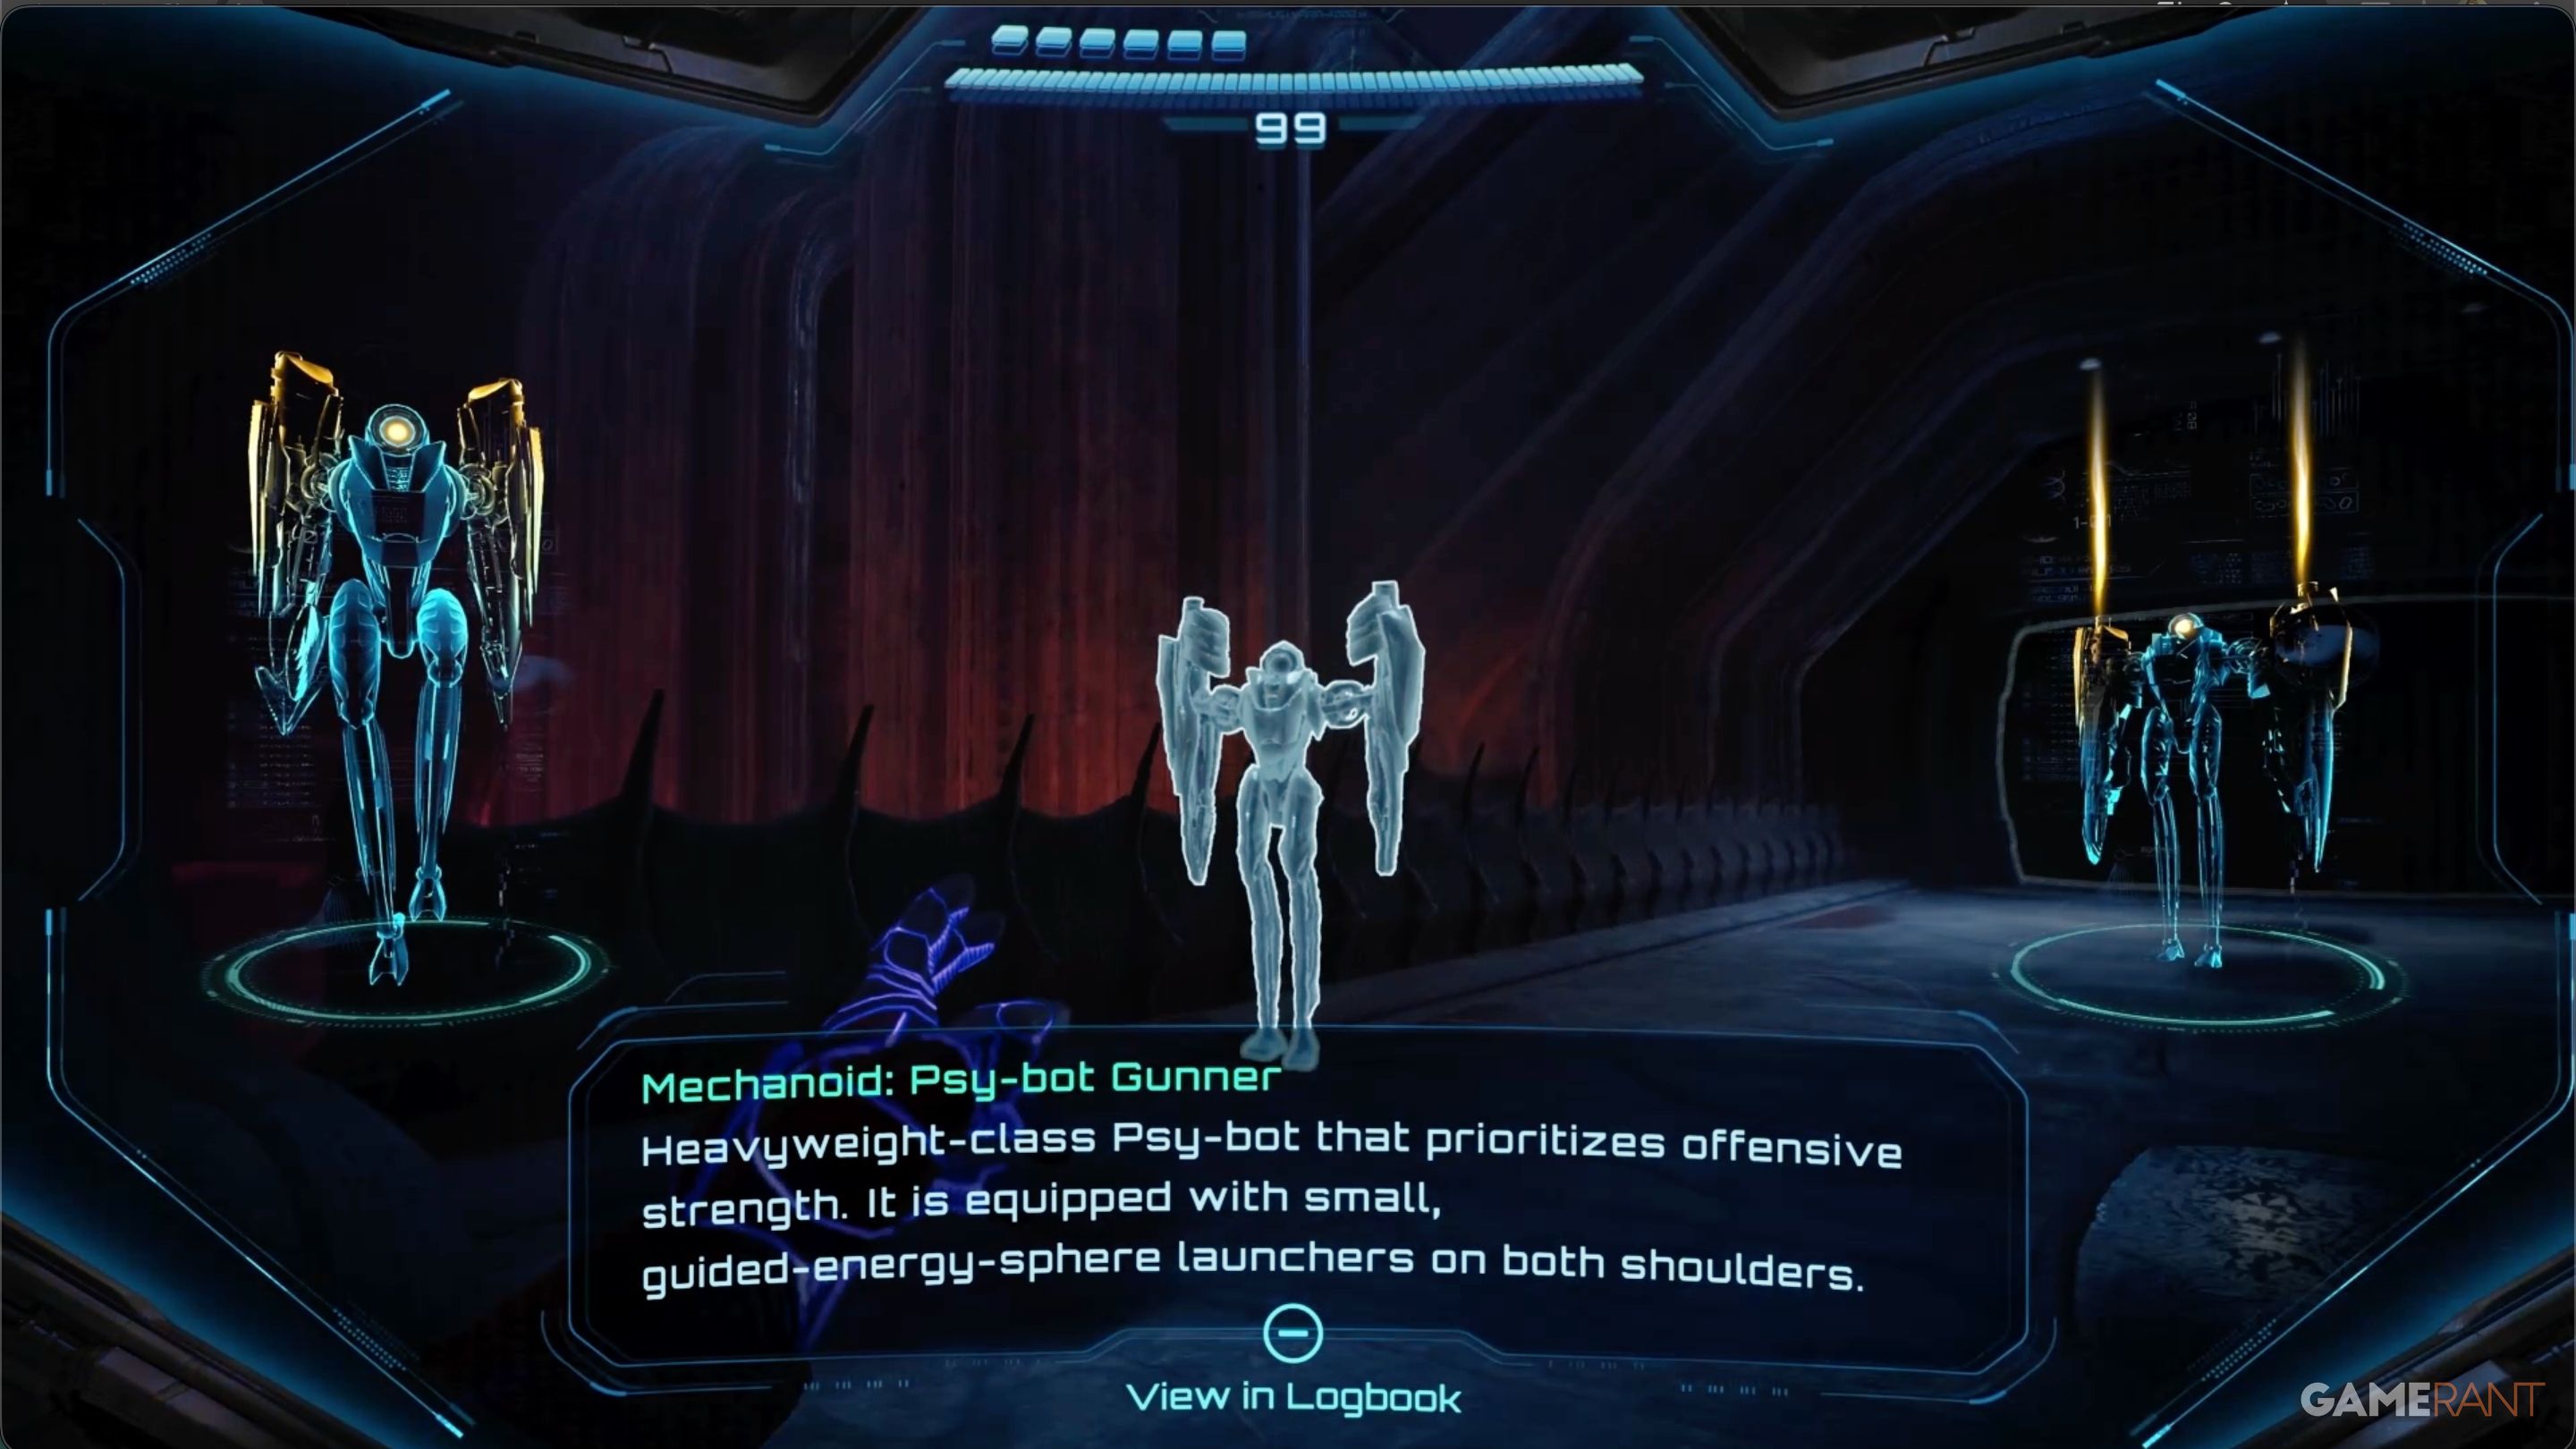
Once you leave the Overseer Room, you’ll enter the Control Room Bridge. Be prepared to fight two Psy-Bot Soldiers. After defeating them, a new, more powerful Psy-Bot Gunner will appear. Don’t forget to scan it into your log.
After you defeat the first gunner, the last group of enemies will emerge from the chamber at the bridge’s end. This group includes two Psy-Bots with shields and another Psy-Bot Gunner. Use the Psychic Lasso to remove the shields from the shielded enemies, then defeat them.
Control Room Save Station:
As you enter the Control Room, you’ll encounter a Lamorn Heavy Turret. Scan it before destroying it, then prepare to fight some Psy-Bot soldiers.
After defeating the enemies, check the console by the window – it will tell you what to do next. Before leaving on the tram, go through the new door on the north side of the control room to reach a Save Station. Don’t try to catch the tram from this station; you’ll need to go elsewhere.
Go to the Control Room and take the tram located through the door on the south side. This will trigger a short video sequence.
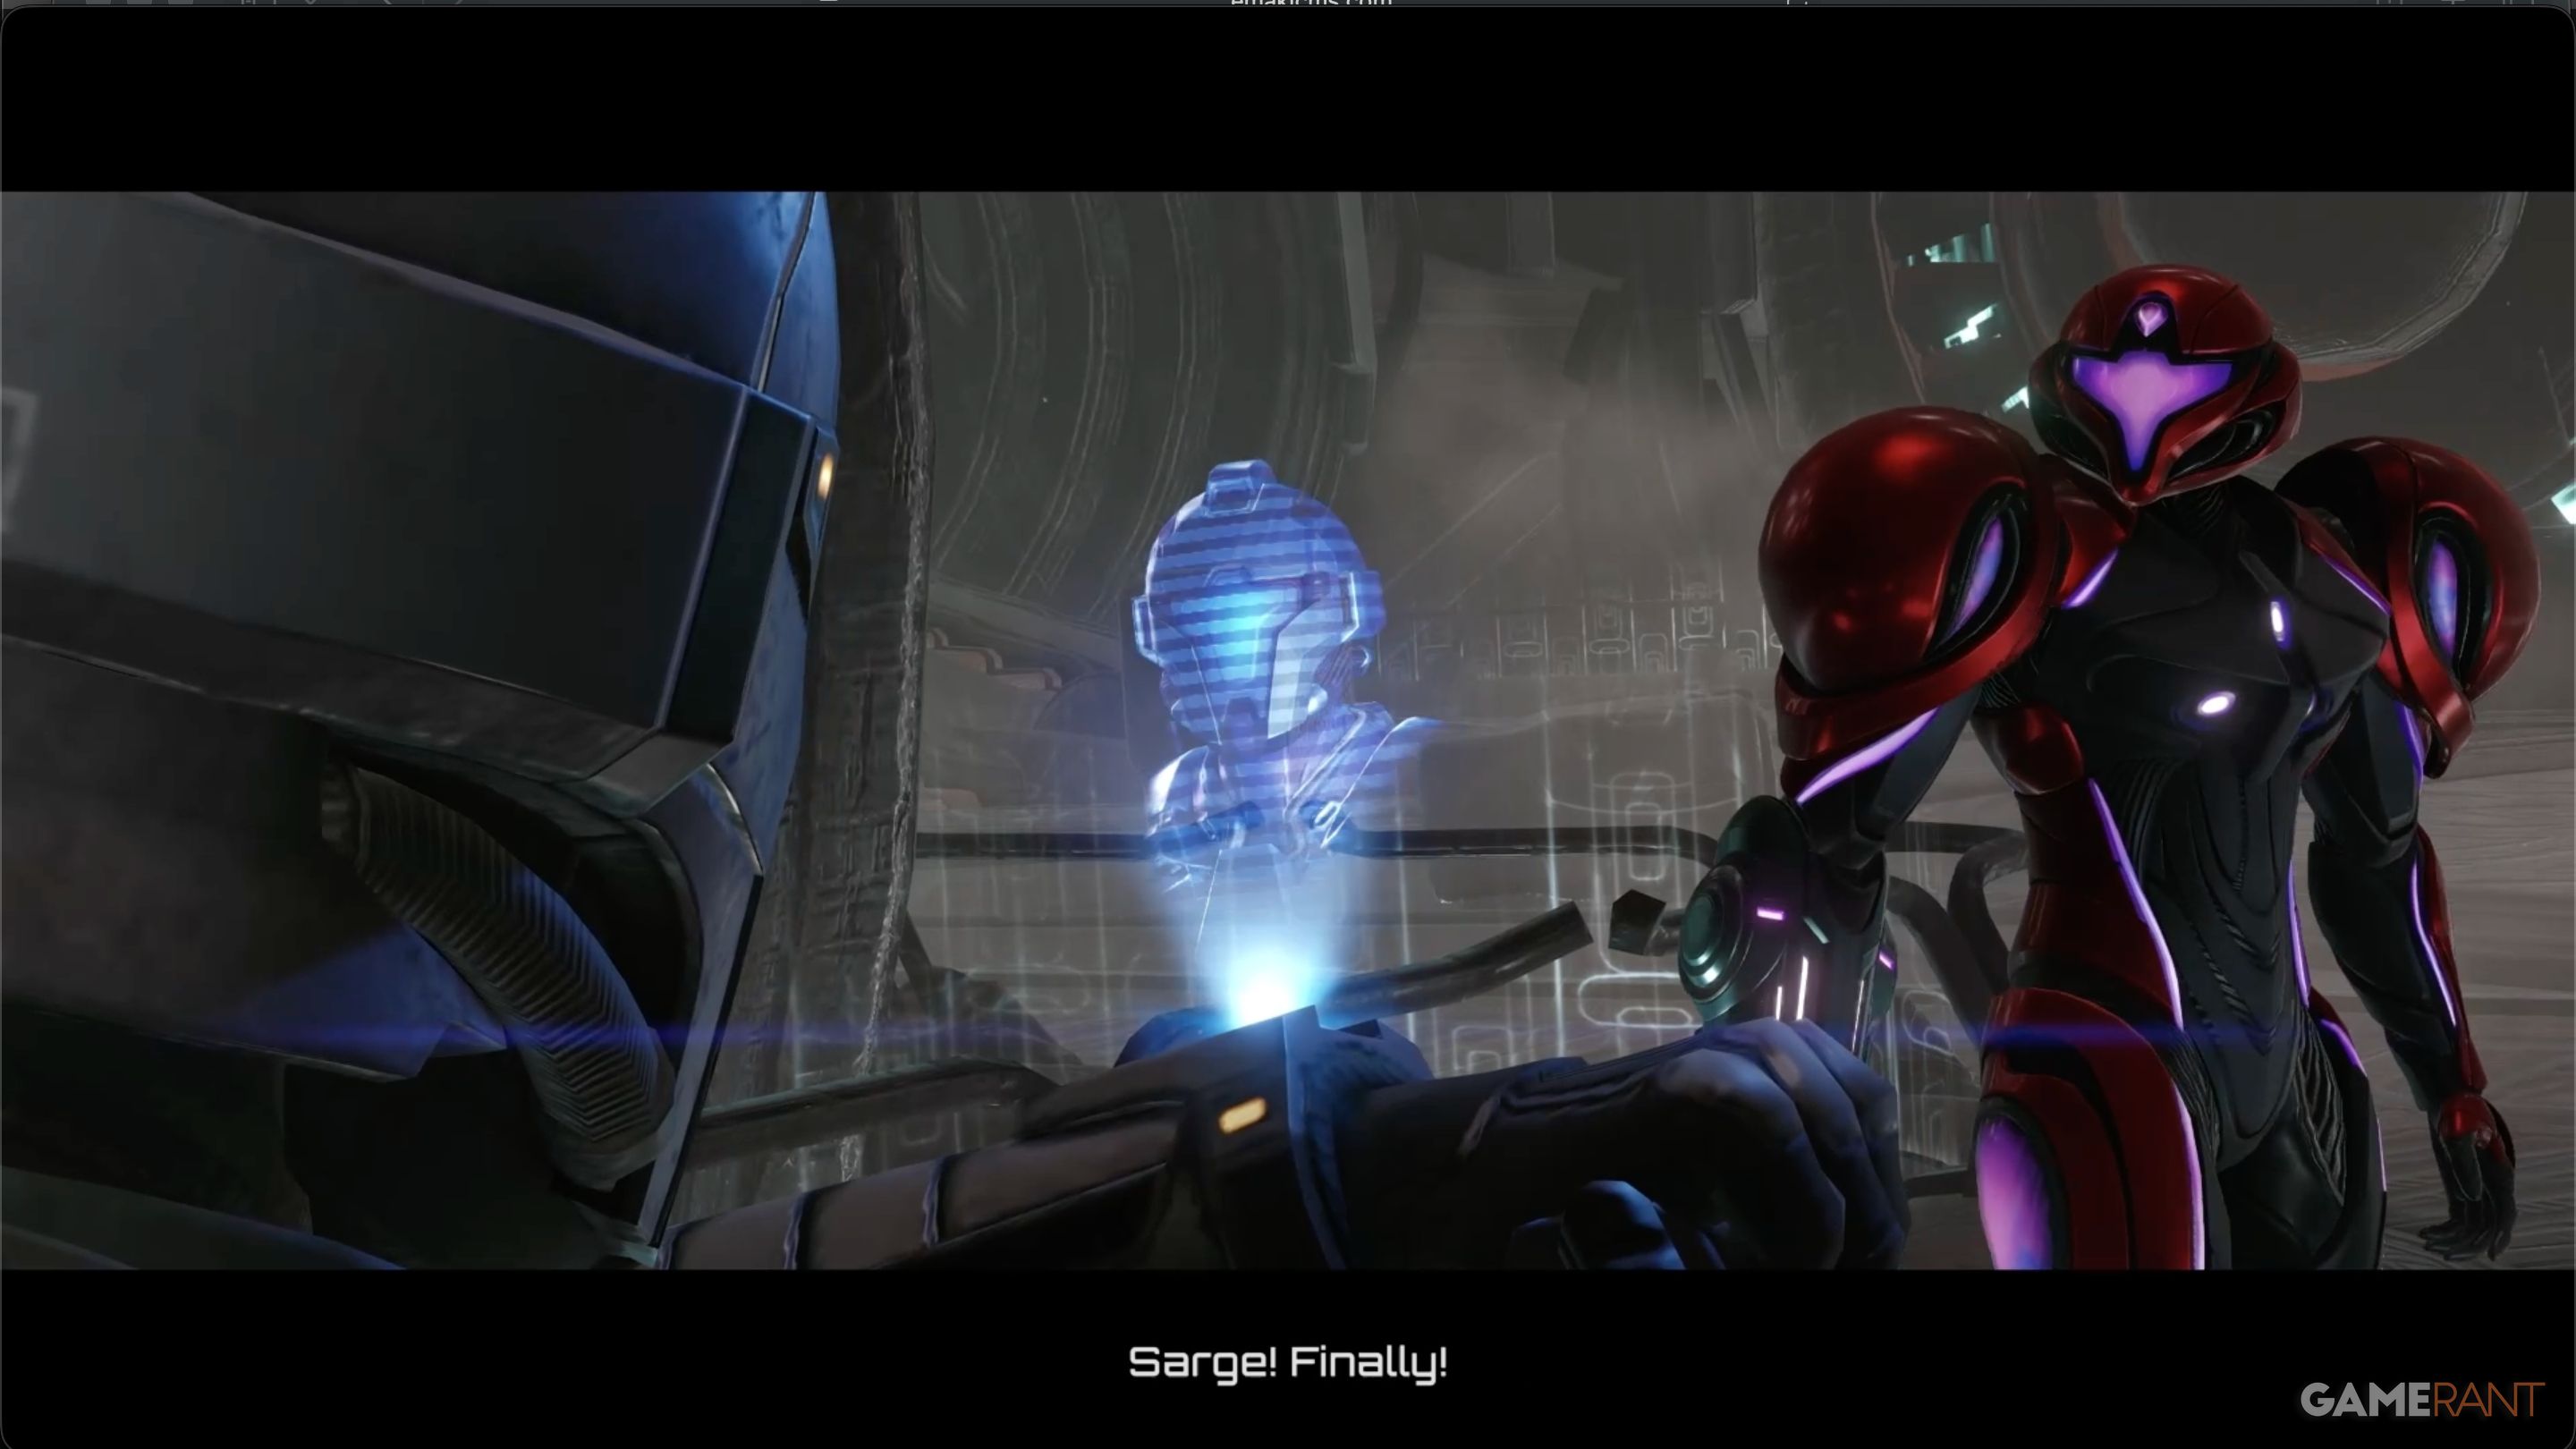
Rescue Armstrong & Release the Clamps:
When the tram arrives, you’ll be in a small area called South Clamp. You’ll encounter Nora Armstrong there. After the short scene with her finishes, be sure to scan her.
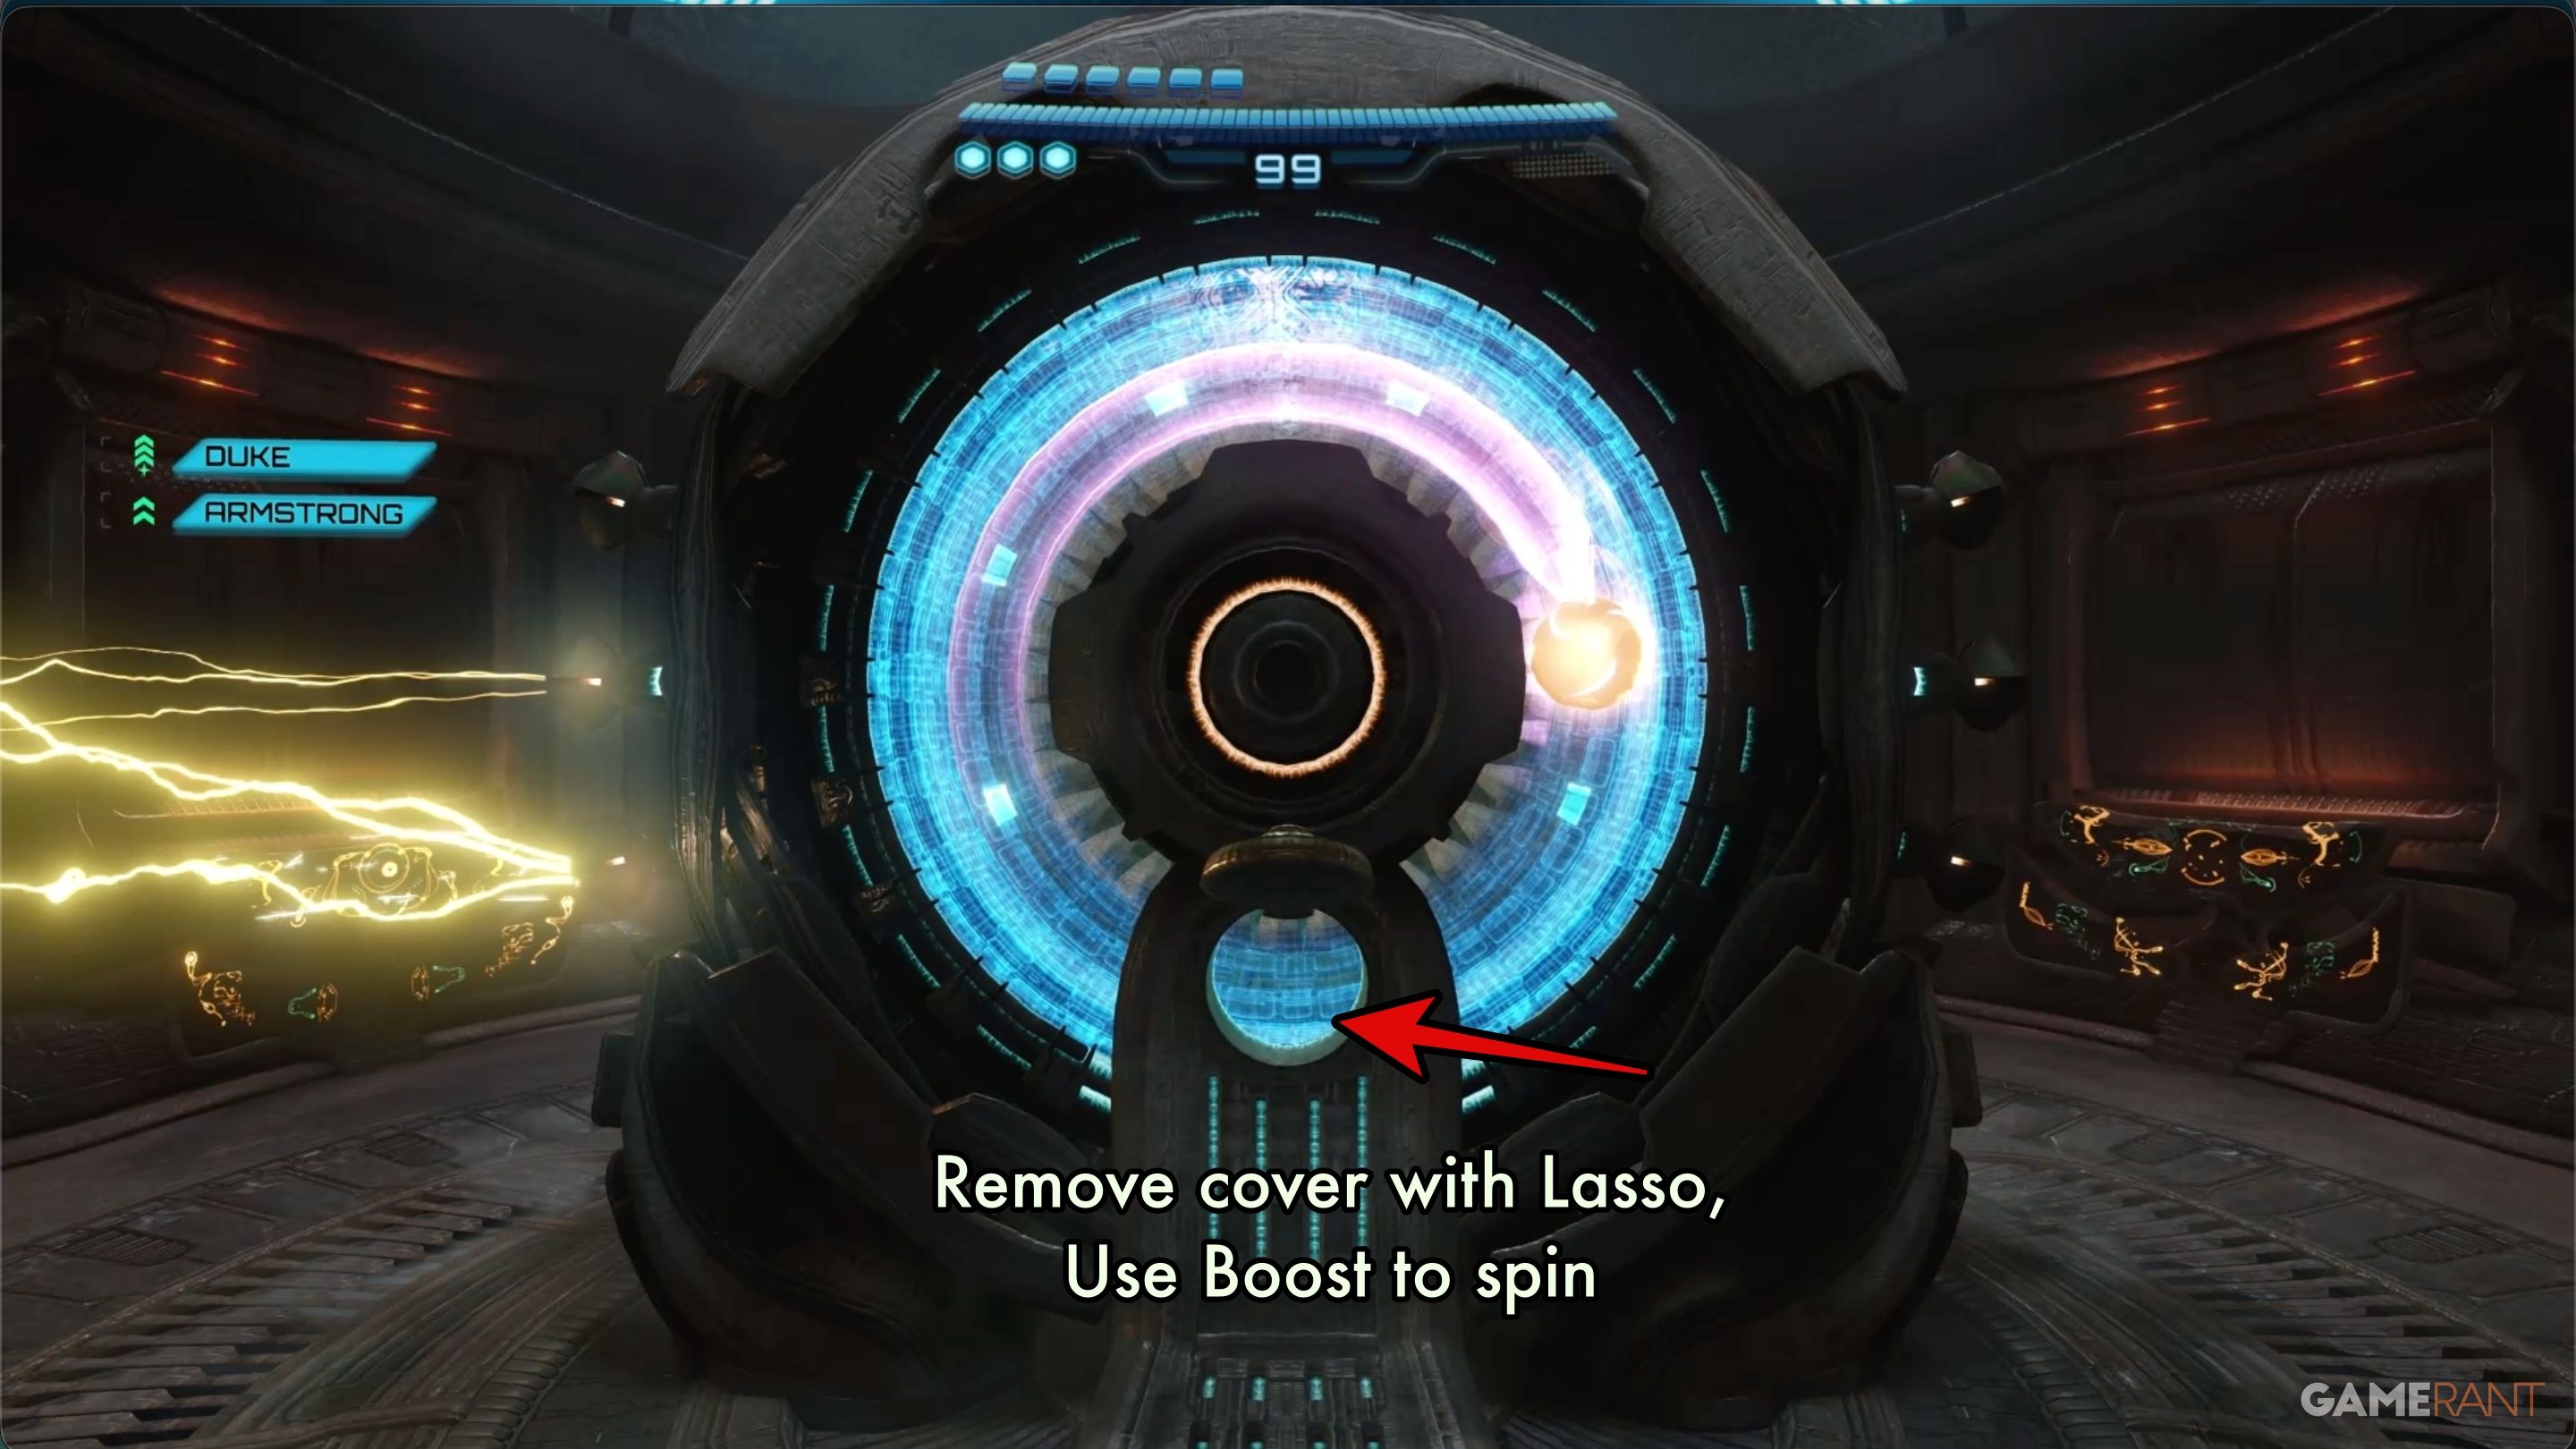
In the South Clamp chamber, you’ll find a large, circular device. Use the Psychic Lasso to remove its lid, then transform into a Morph Ball and enter. Spin around the inside of the device in the same direction as the moving light. Once it’s fully charged, head back to the tram and proceed to the next area.
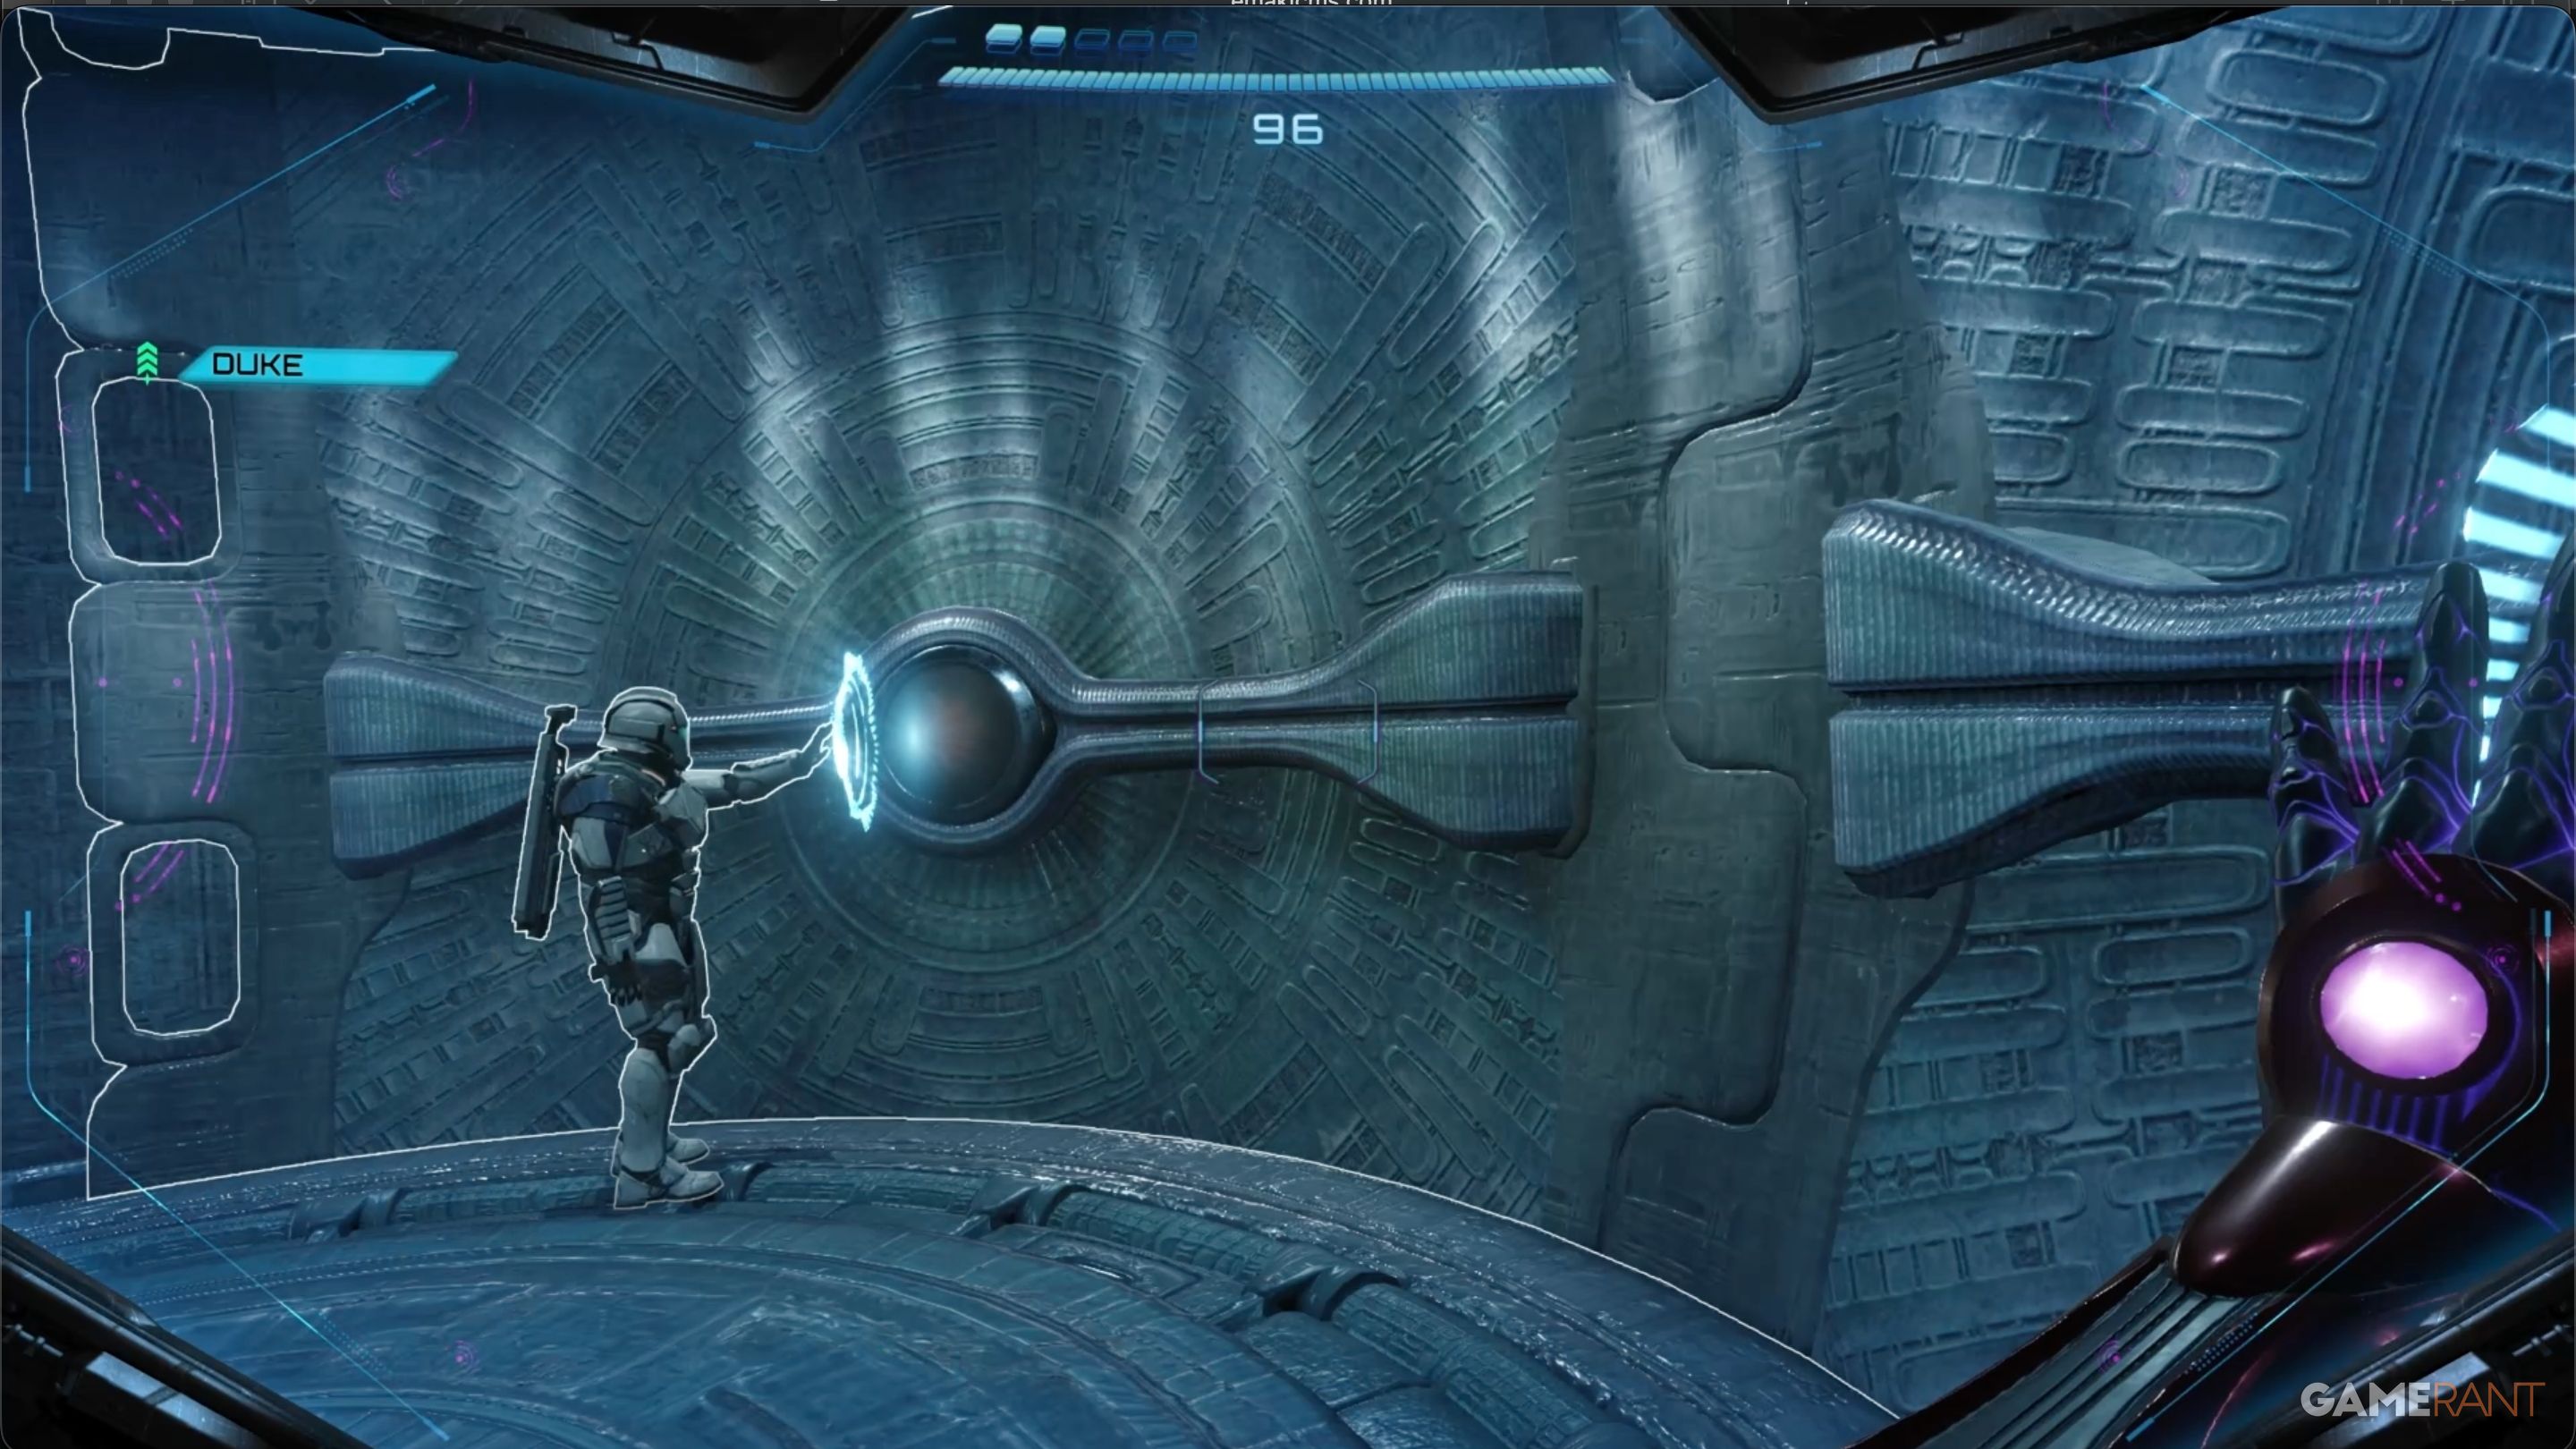
Your next destination is the North Clamp. The power is off here, so head around back and scan the gate built into the wall. Duke and Armstrong will unlock it, creating an opening just big enough for Samus to transform into a Morph Ball and pass through.

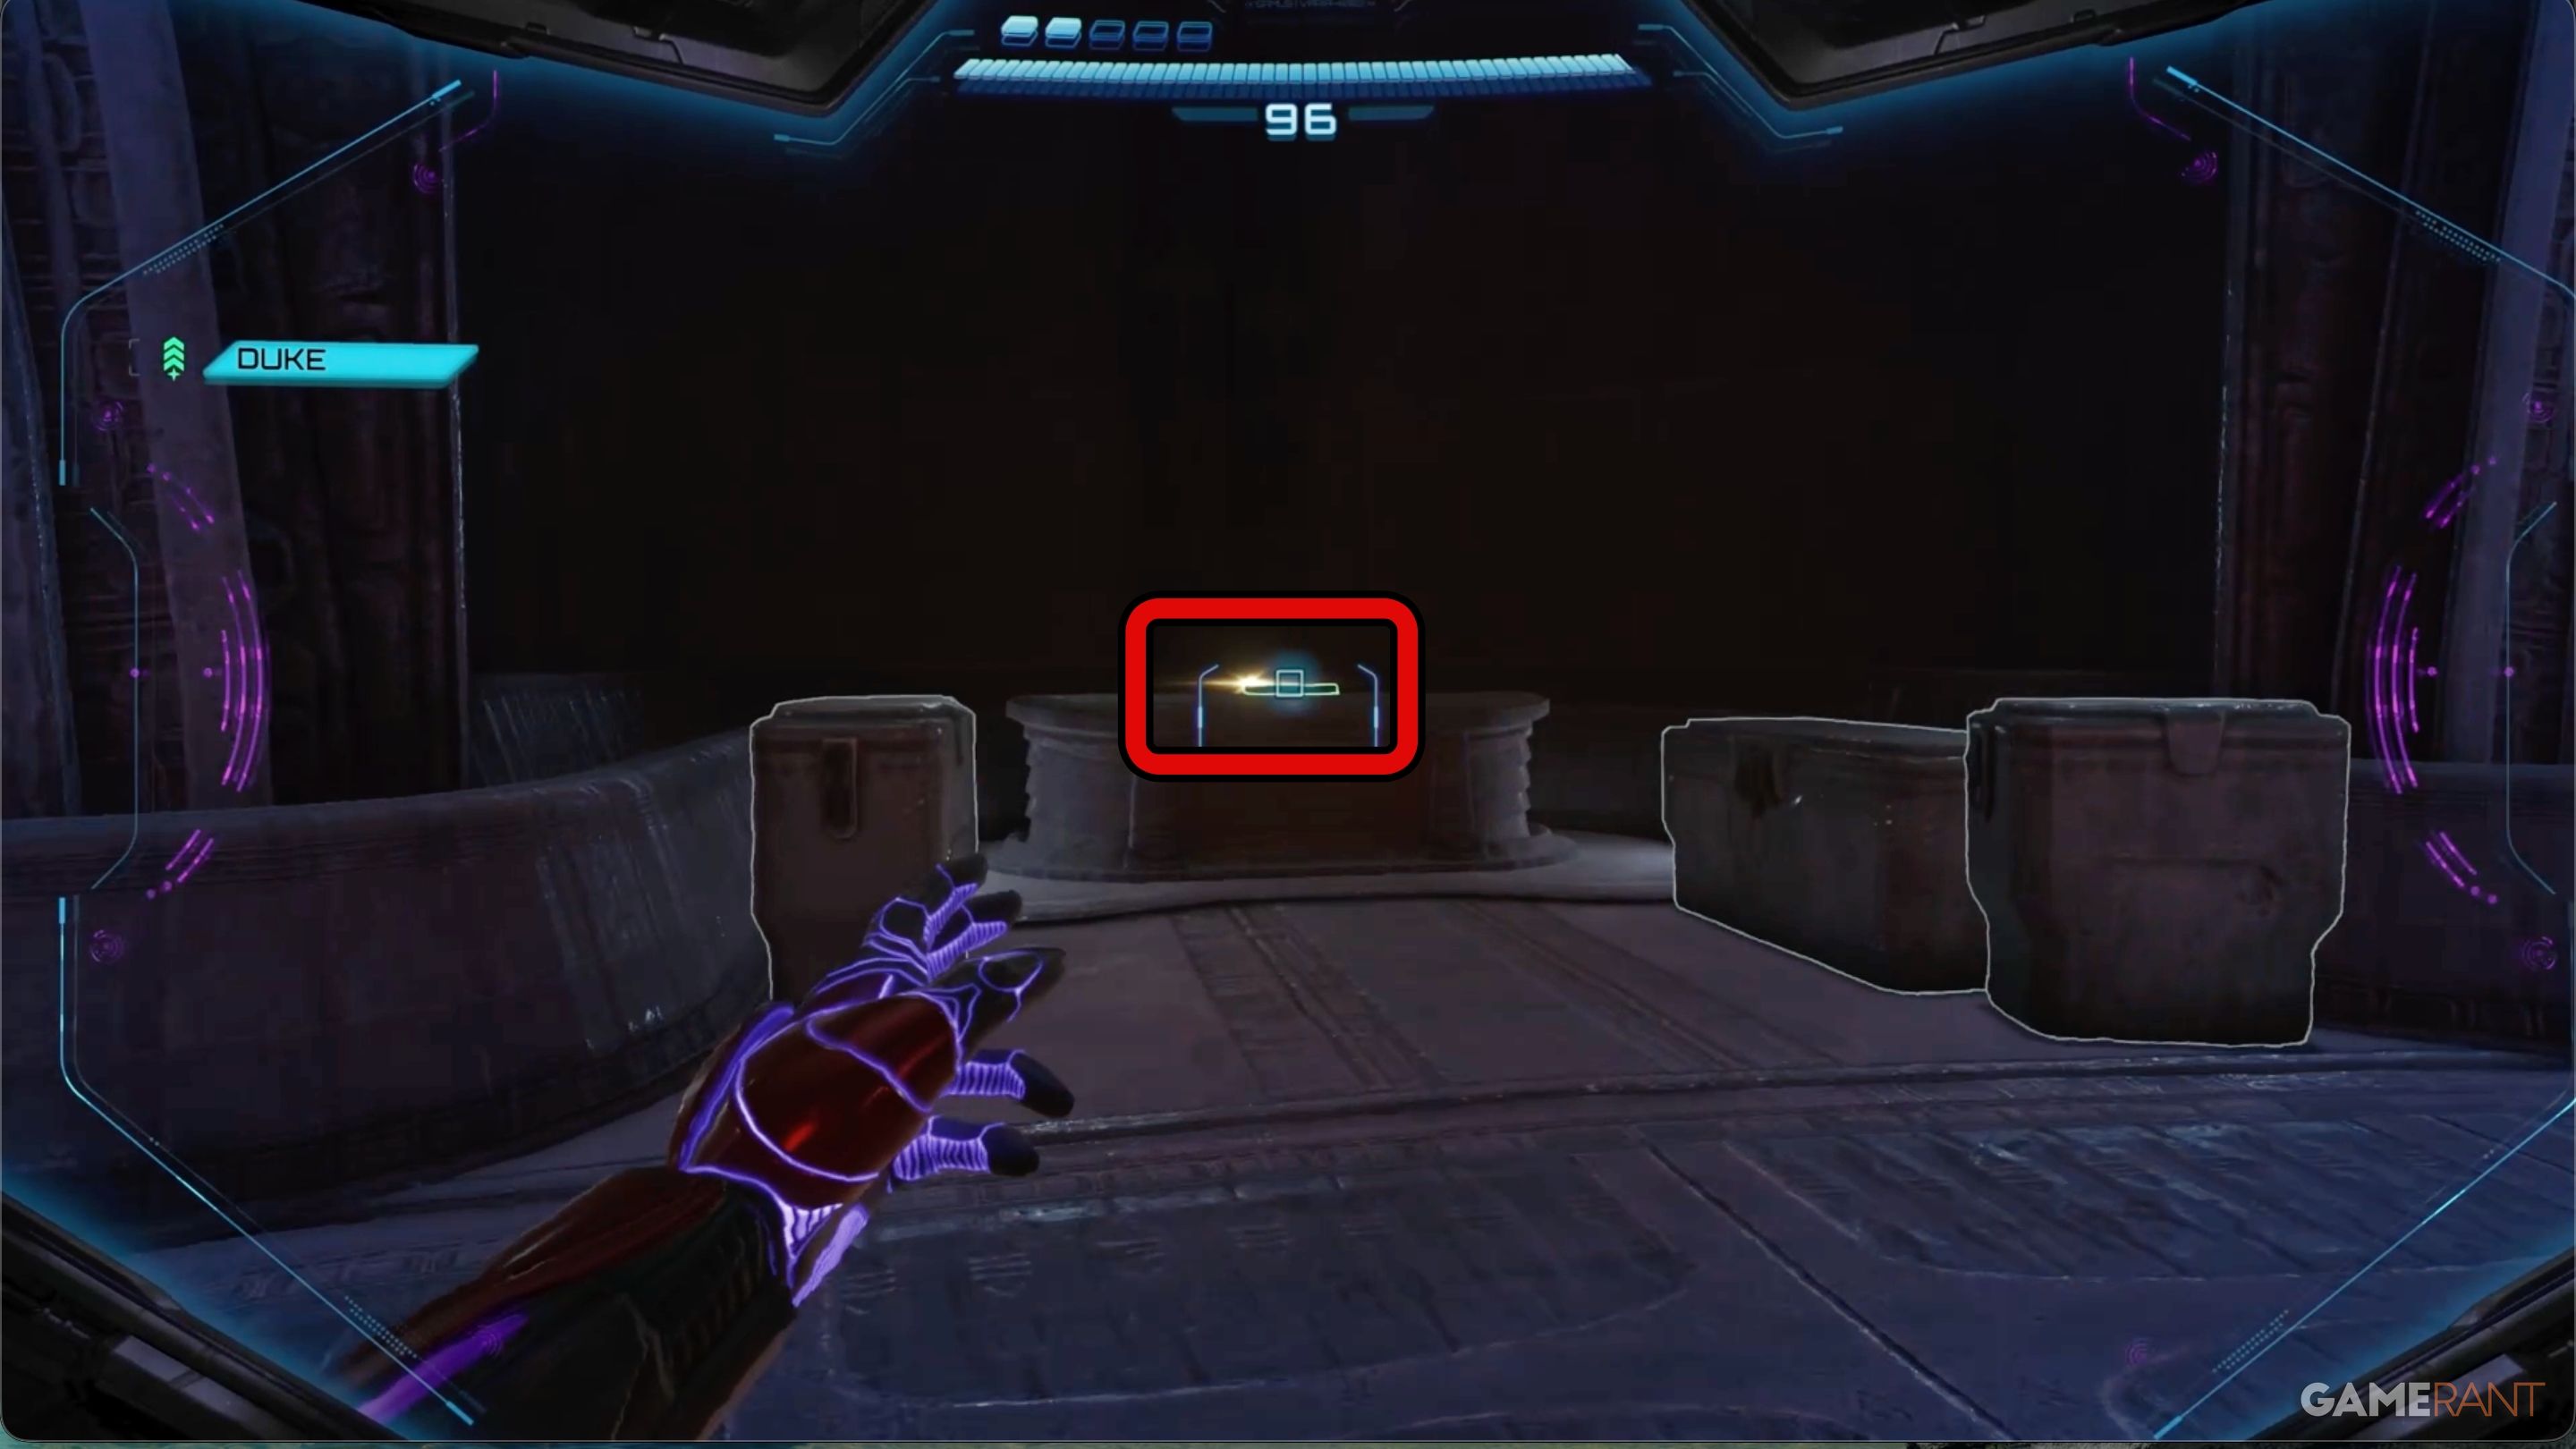
Beneath the machine, you’ll find a device with two slots for bombs. Samus needs to transform into a Morph Ball and place a bomb in each slot, racing against the clock to reach the top and plant the second one. Successfully doing this will reactivate the machine.
Once turned on, the machine will function identically to the South Clamp, releasing both clamps. You’ll then receive a message instructing you to return to the Access Gate near Lava Lake Bridge. After that, simply take the tram.
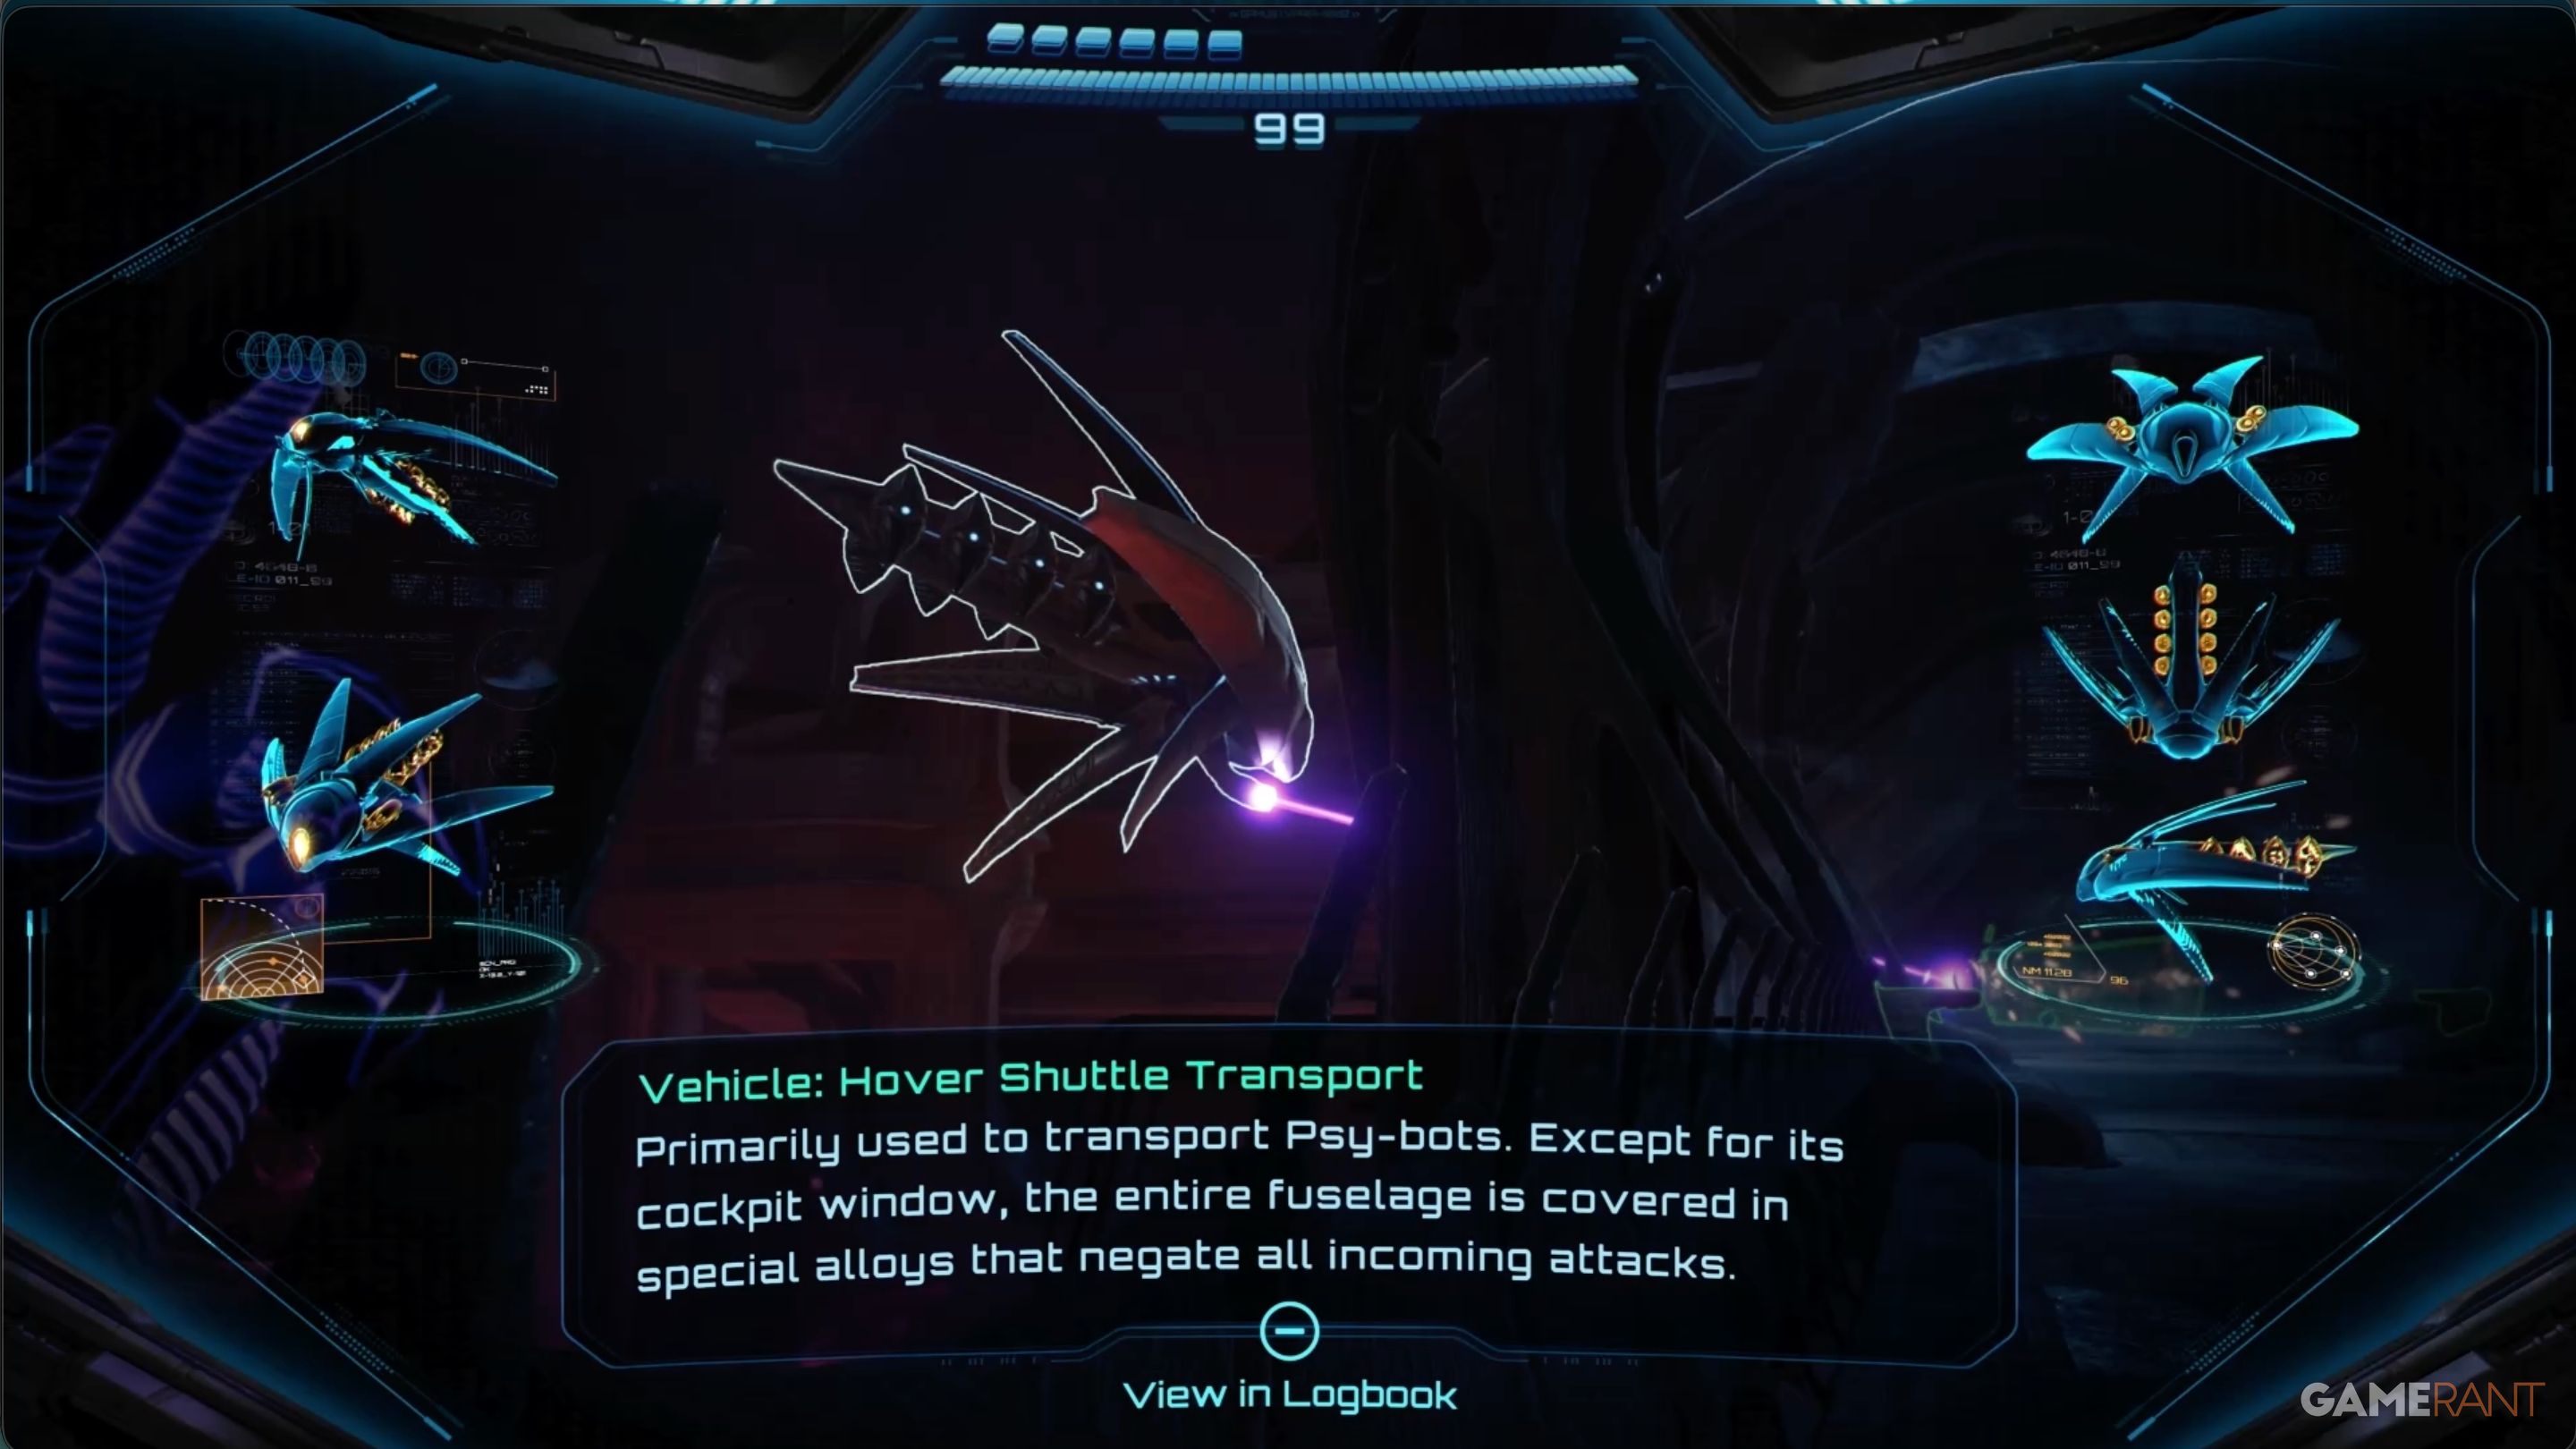
Hover Shuttle Transport:
Don’t forget to scan the Hover Shuttle Transport now! You won’t be able to later, and doing so is necessary to unlock the true ending of the game.
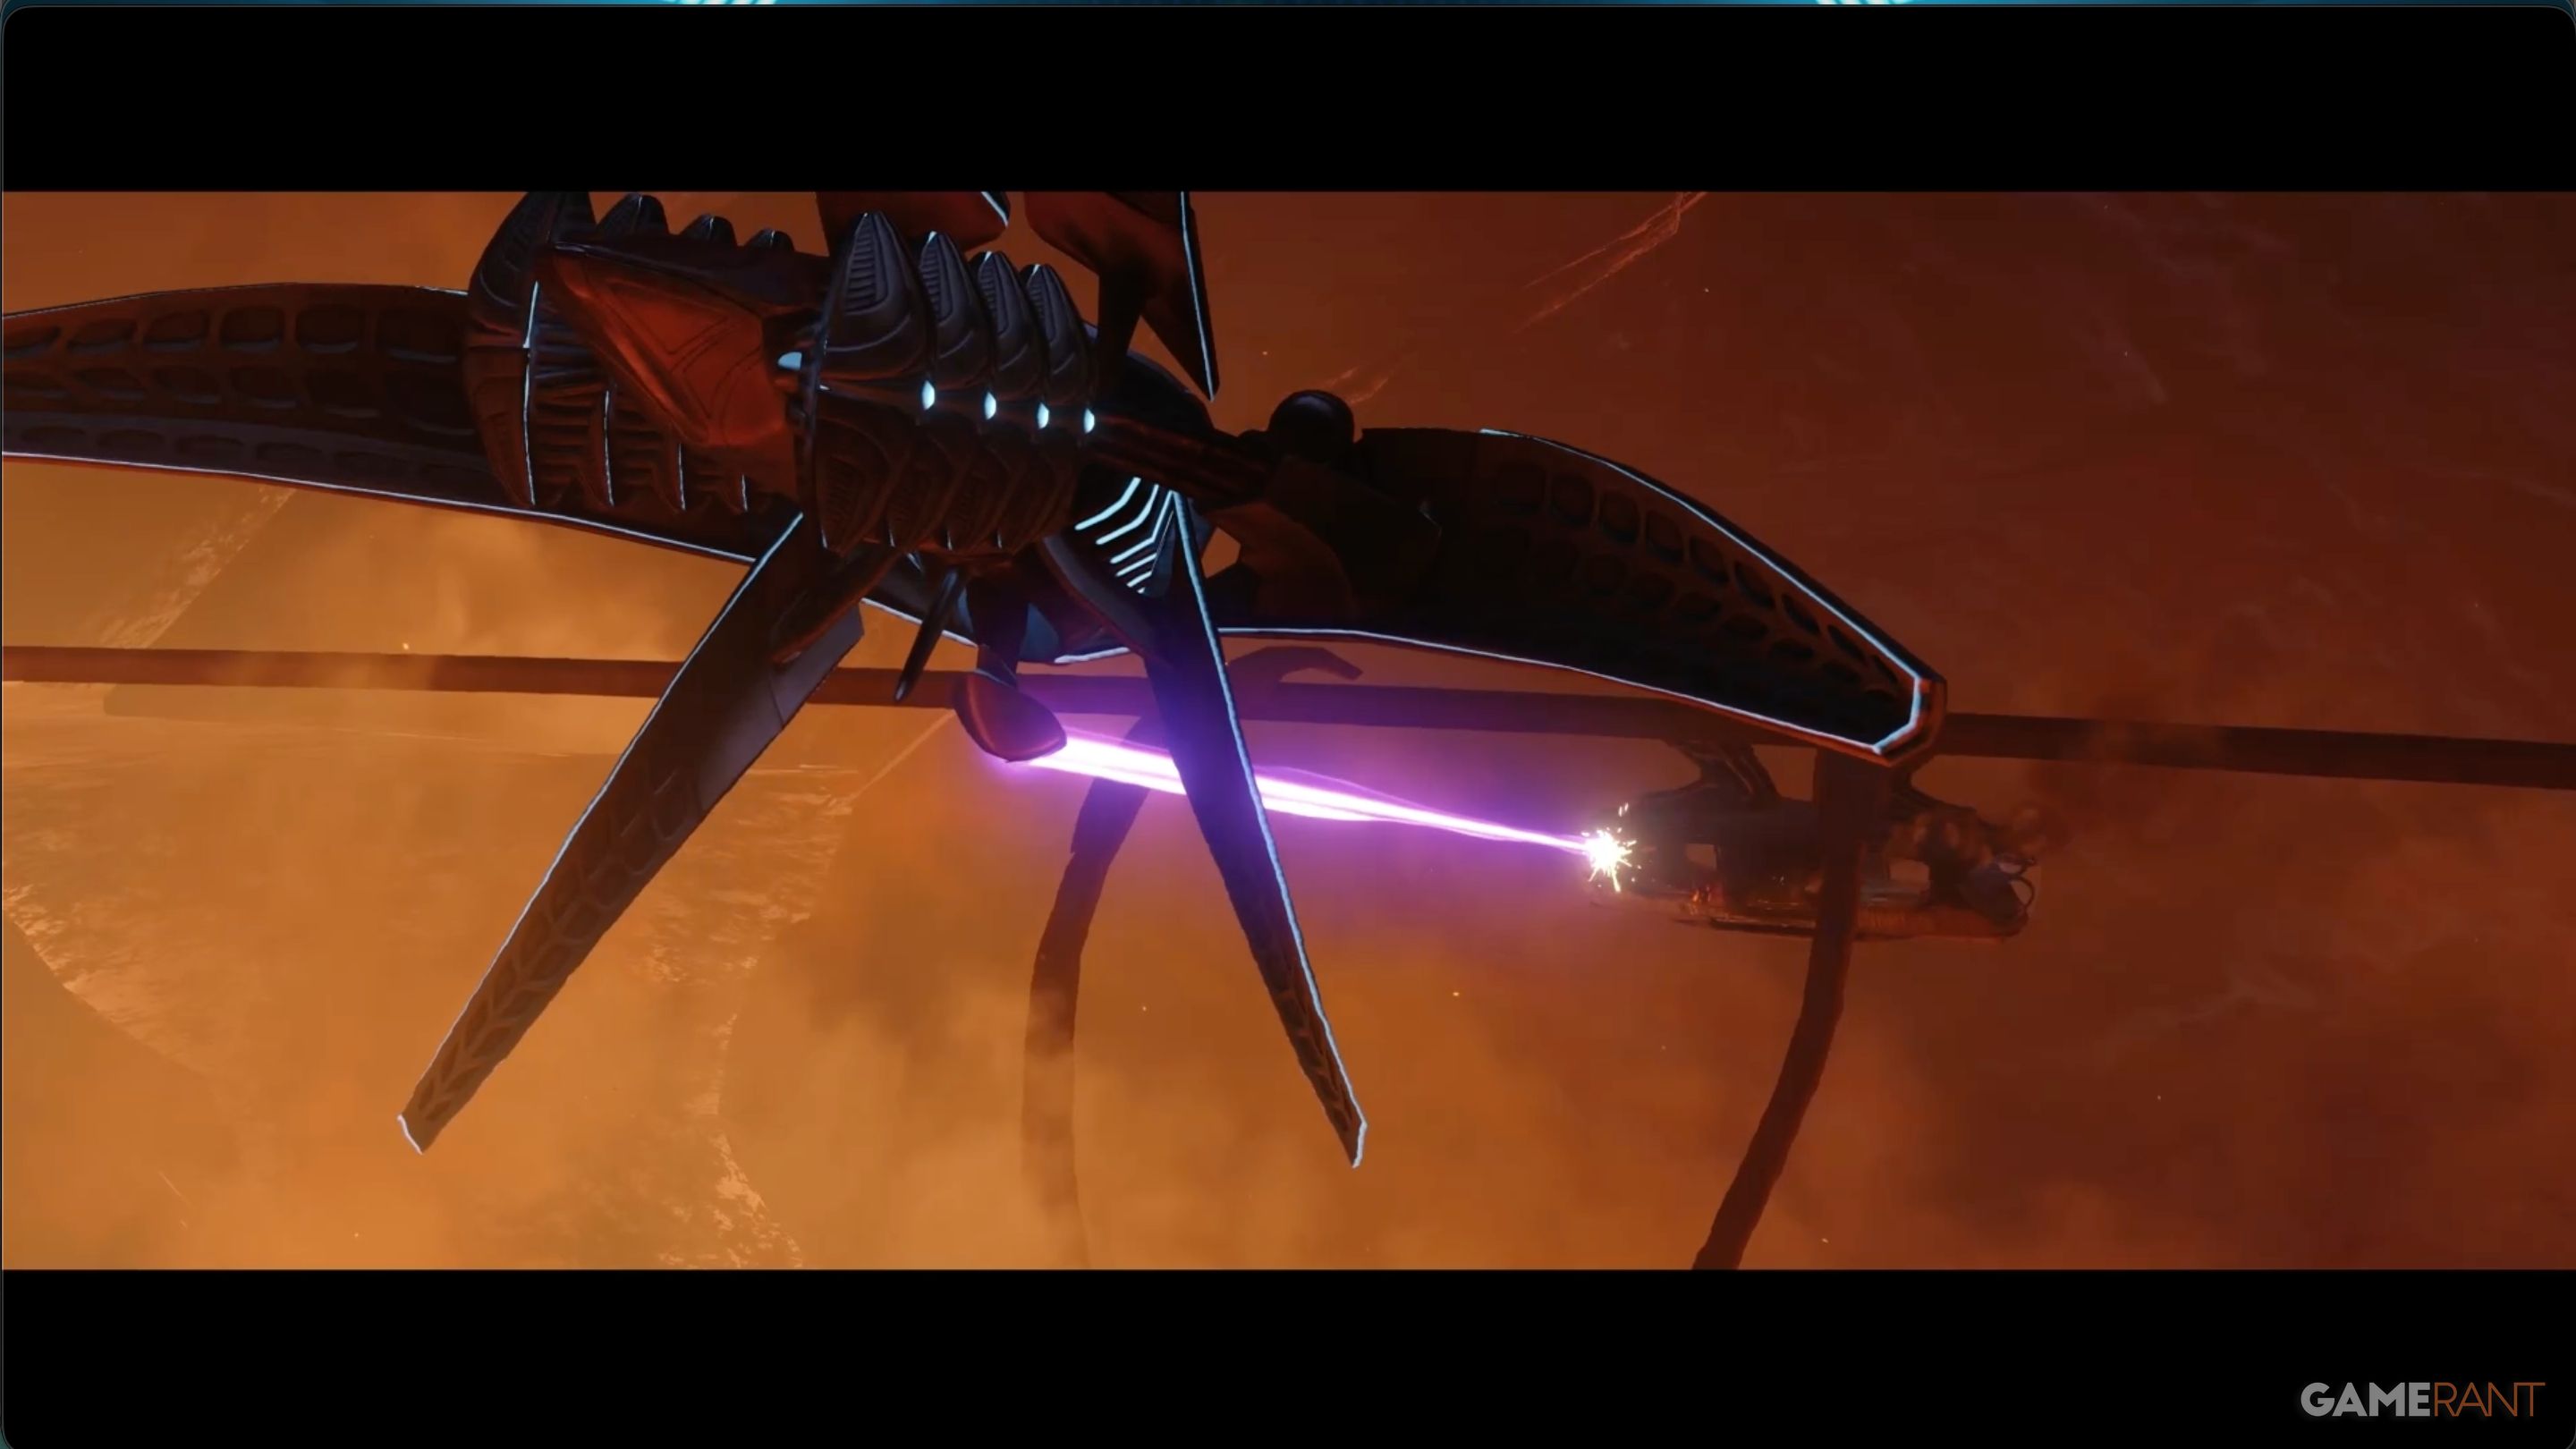
On your return trip, the tram will be attacked by a Hover Shuttle. You’ll be able to temporarily escape by crashing into the Control Room station. Be sure to use the Control Room Save Station while you’re there before continuing your journey.
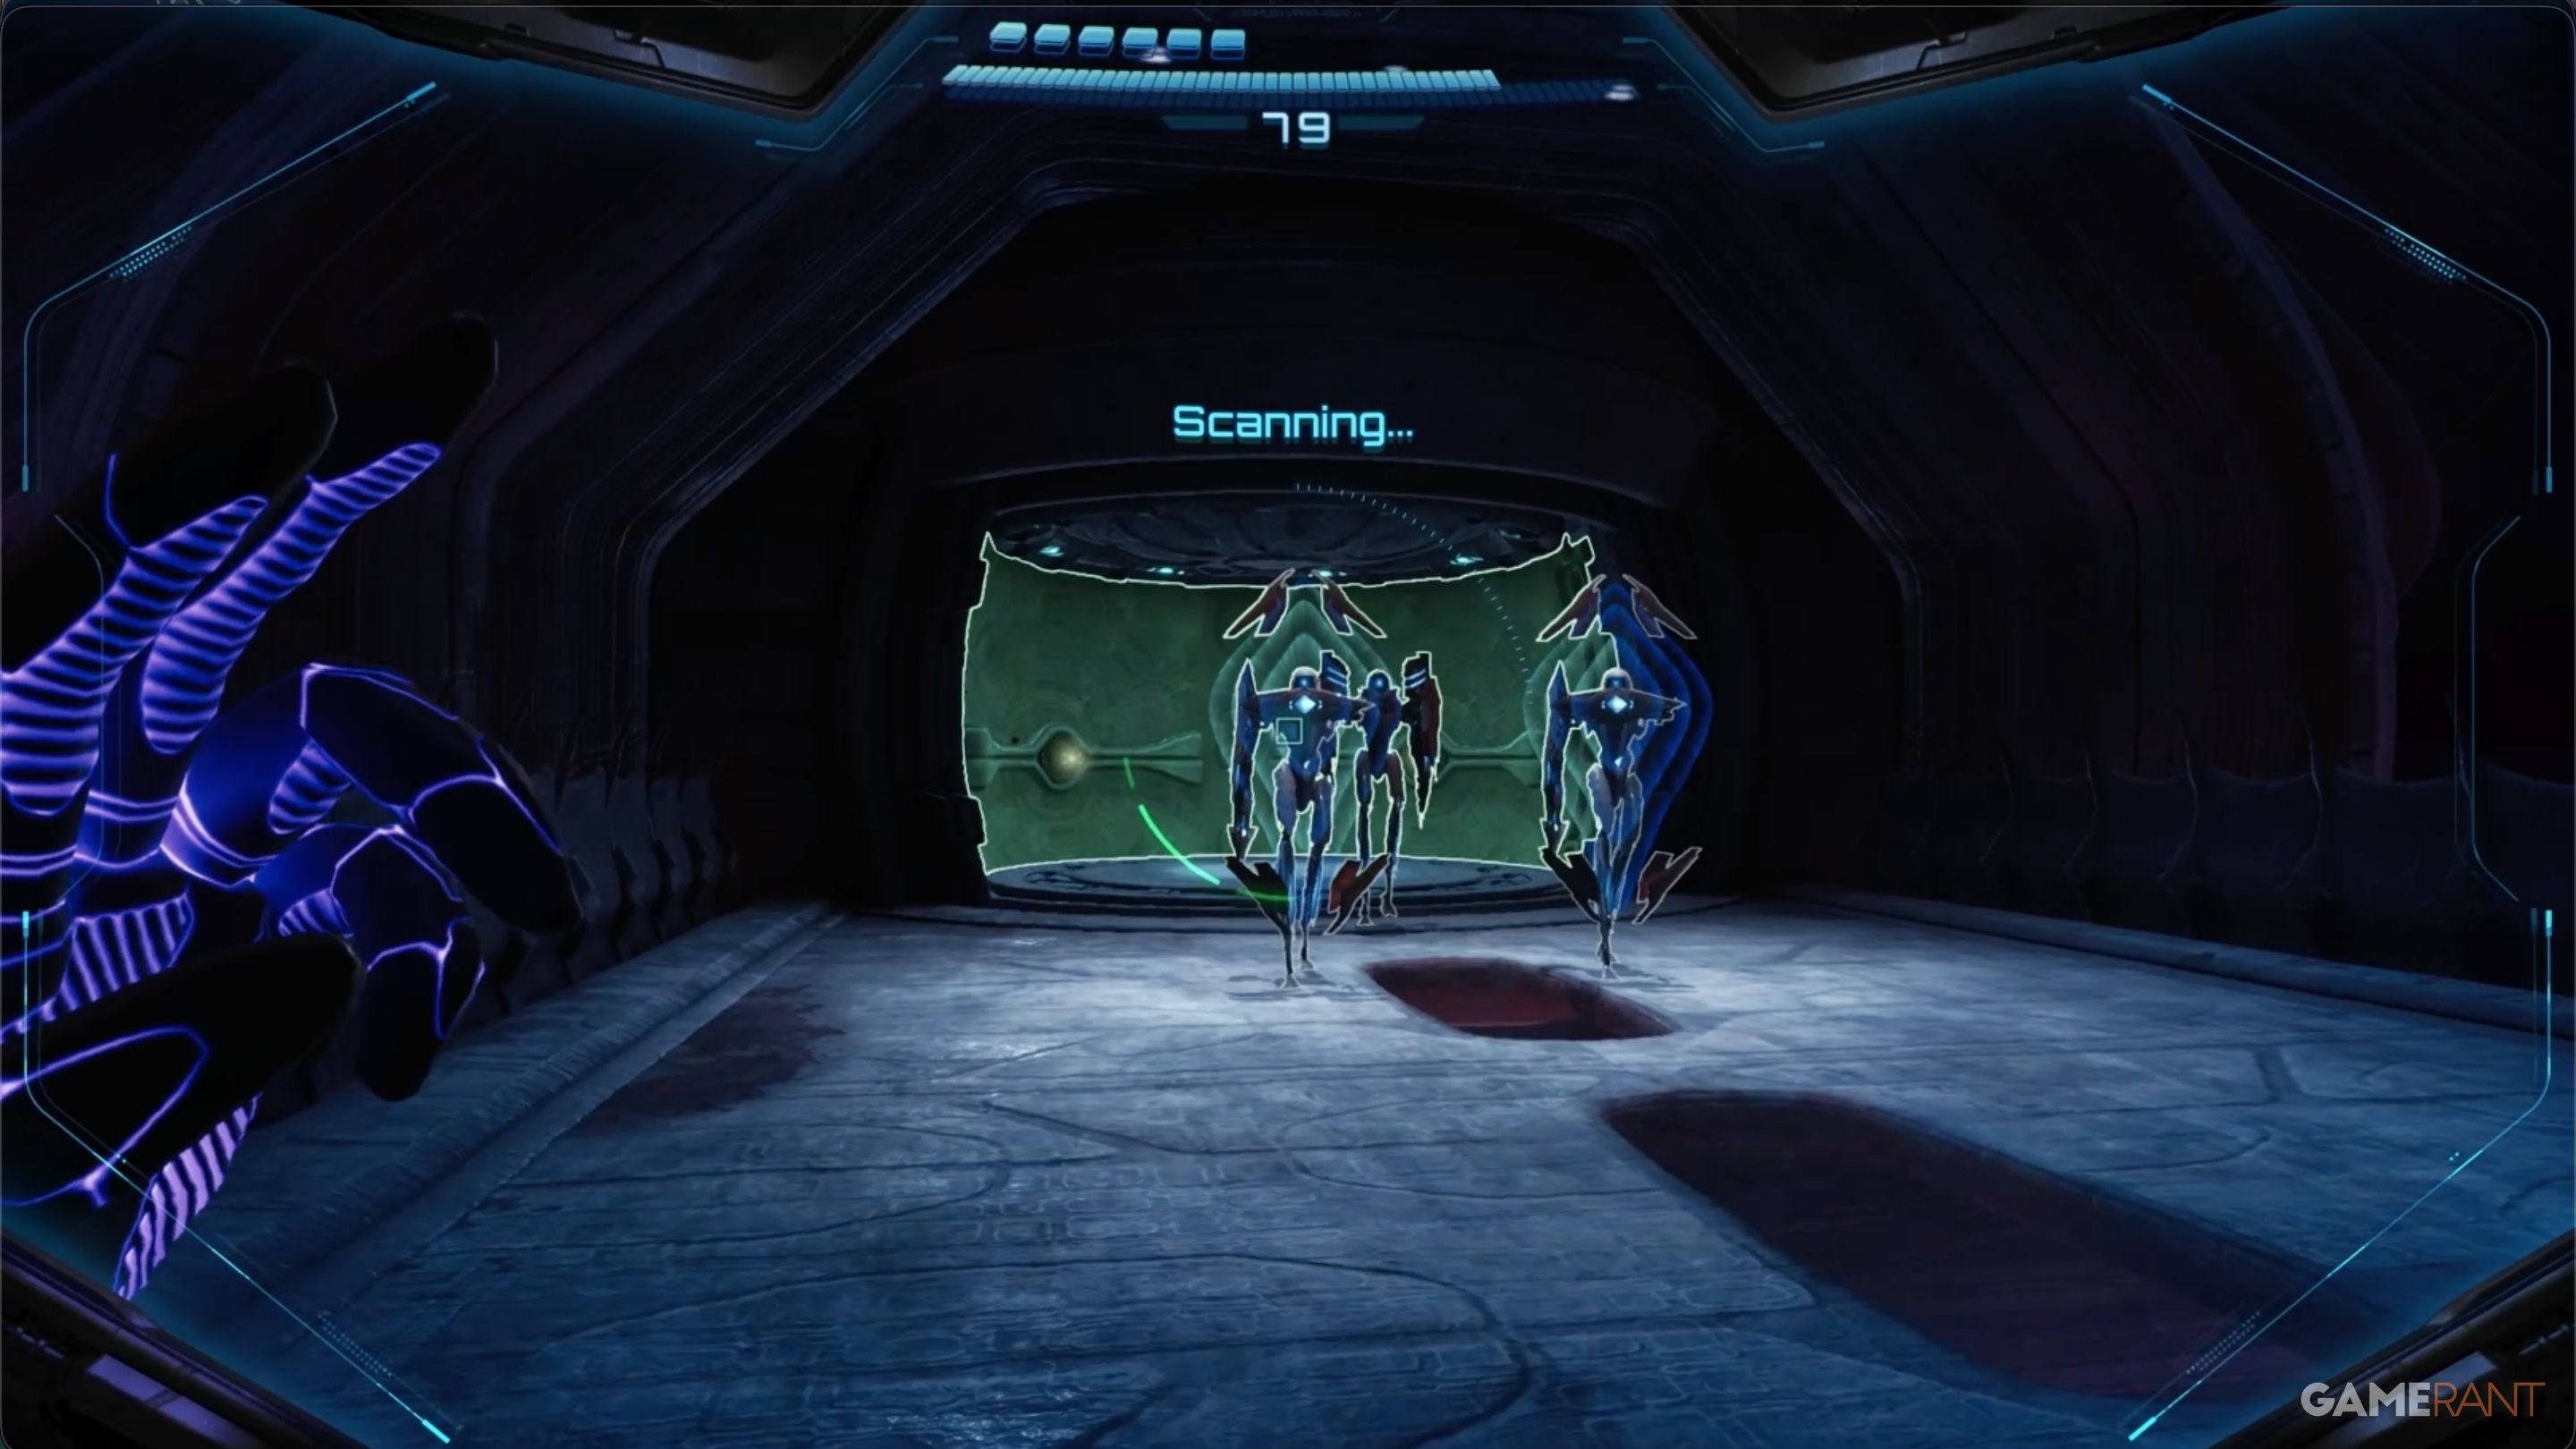
Exit through the Control Room. As you approach the Control Room Bridge, you’ll be attacked by the Hover Shuttle Transport. Be prepared for three key threats:
- Psy-Bot Drop: When it first arrives, the ship will drop several Psy-Bots
- Projectiles:The ship shoots fast-moving explosive projectiles at Samus. You can destroy them and collect items.
- Laser: The ship has an extremely deadly laser that will track Samus. Hide behind the pillars when you can. The laser will destroy them, but you can still get some protection if you hide at the right angle and distance.
This ship is weakest at its front, so focus on hitting it with rockets and regular attacks – those work best. Defeating the ship will open a new path for Samus, leading her closer to the boss.
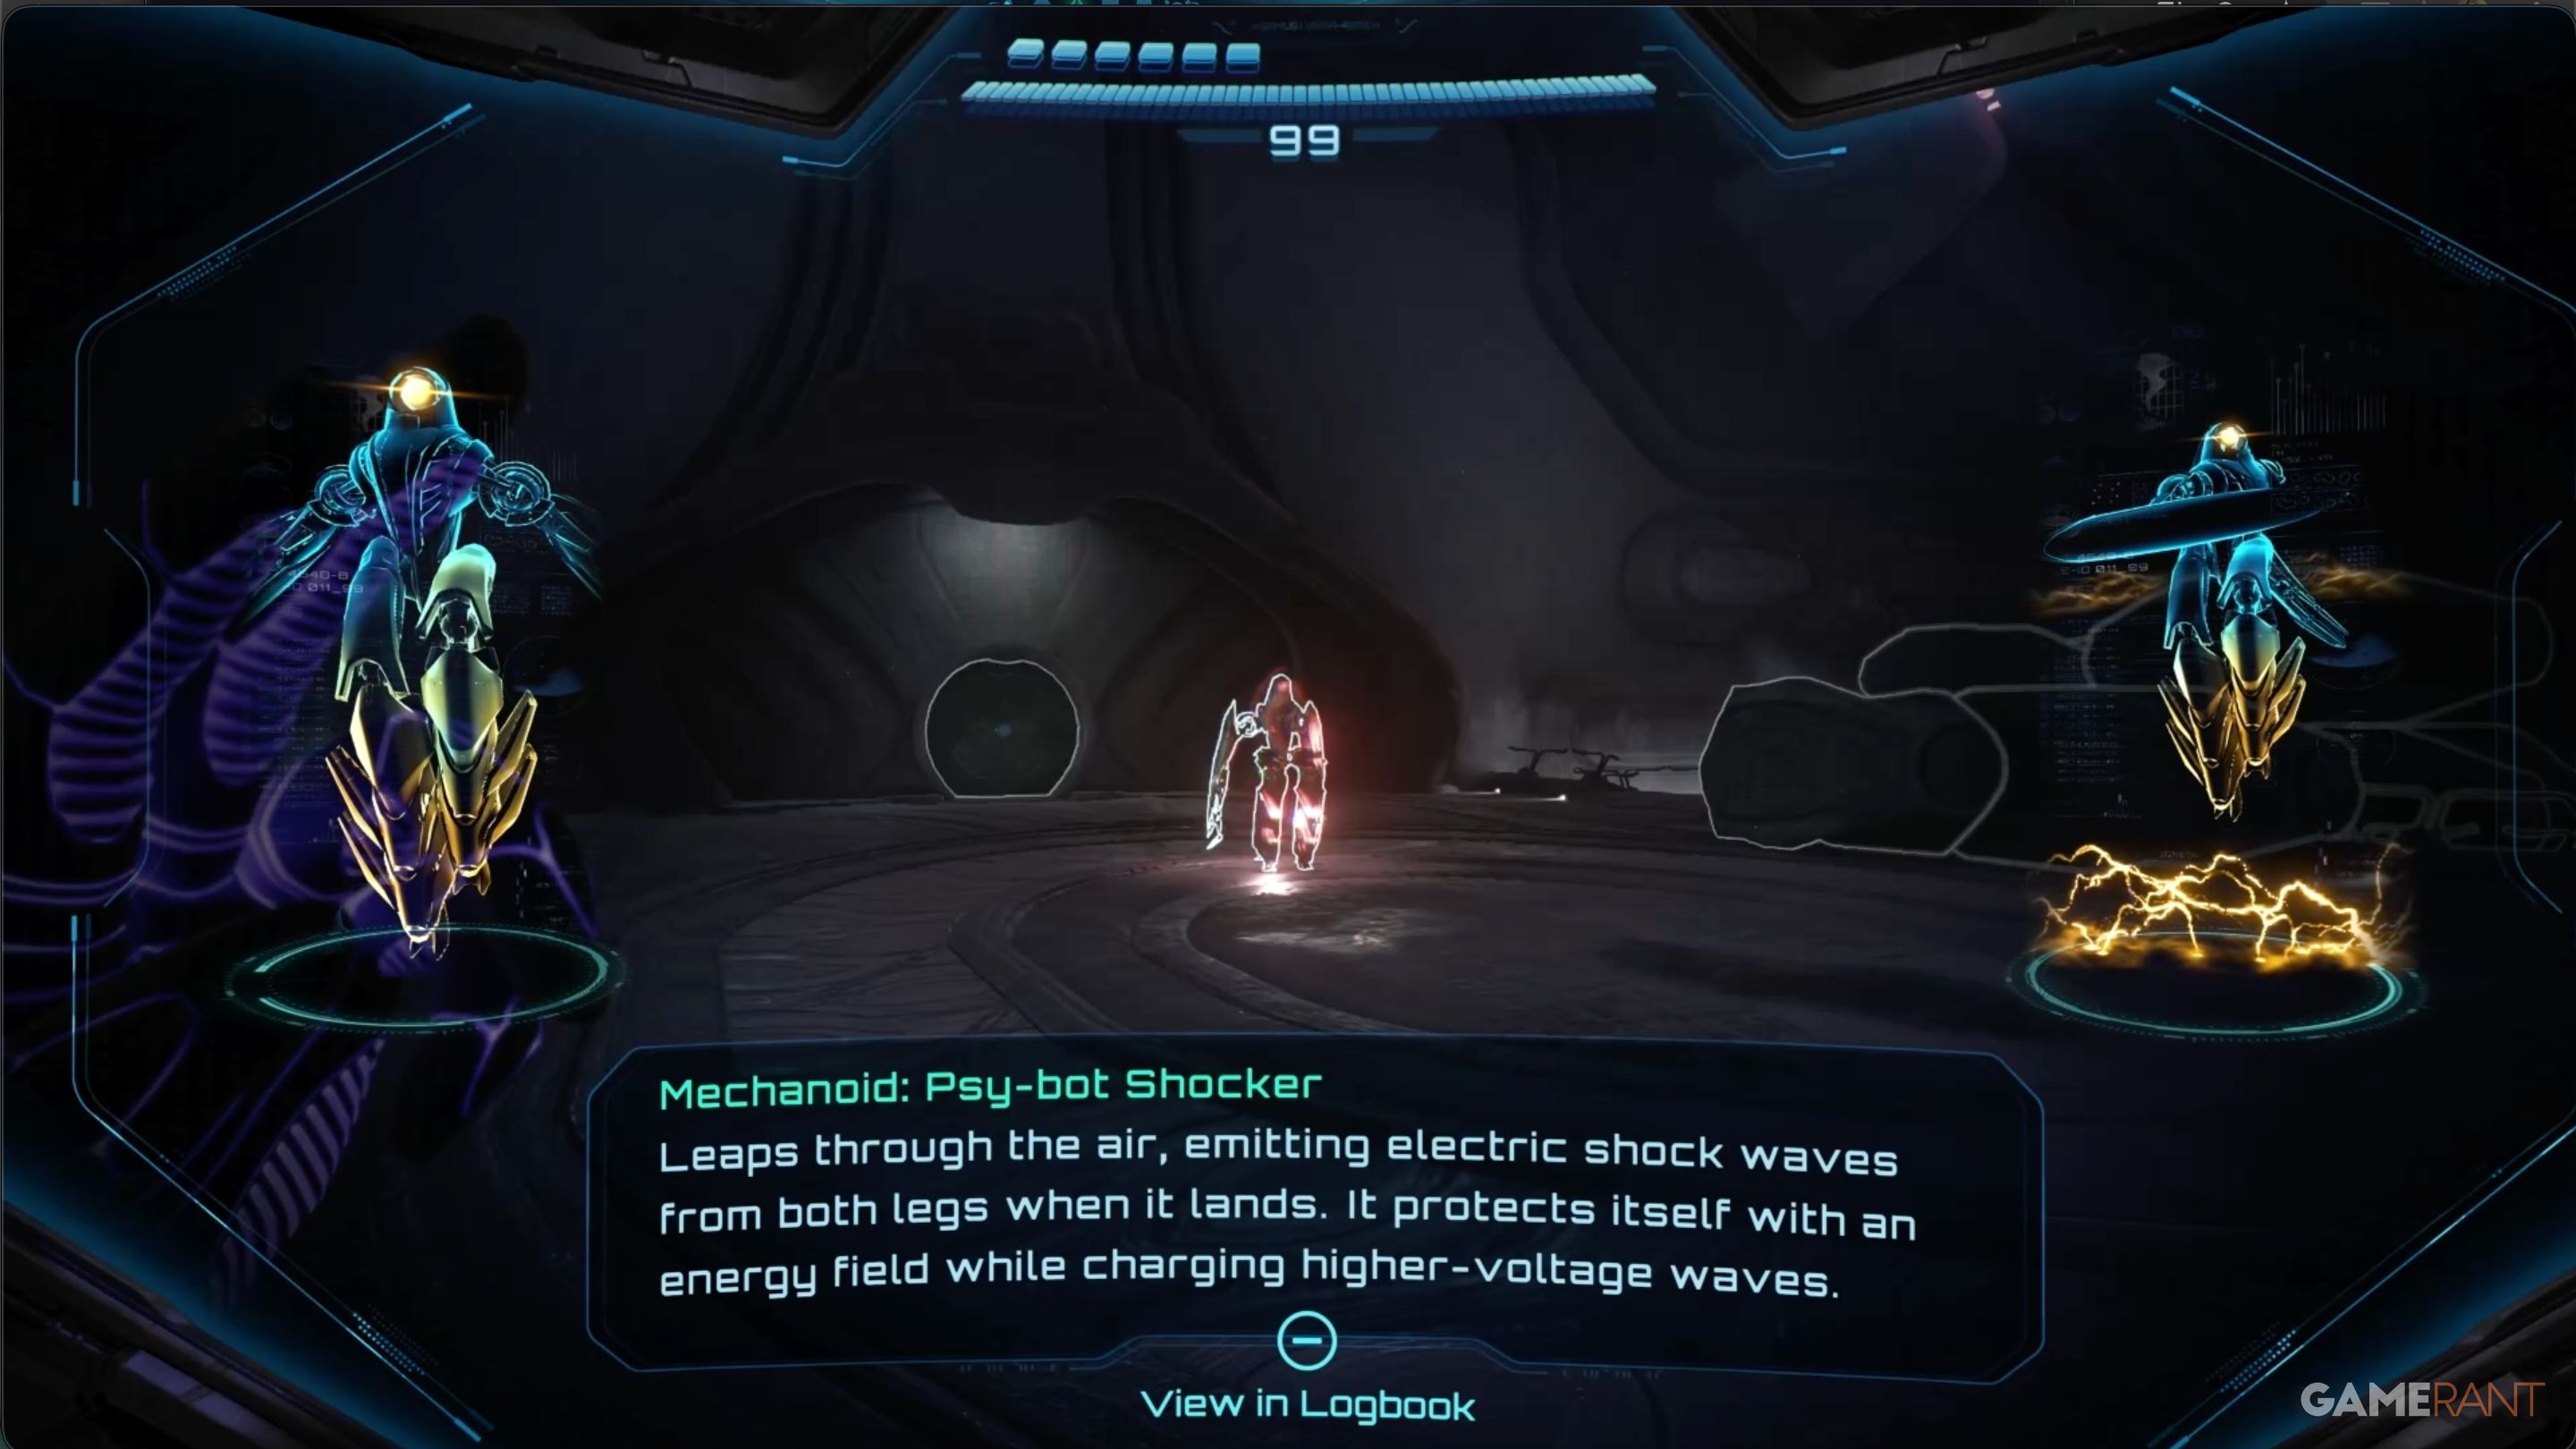
The shortcut will bring you back to Entry Bay, right before the Lava Lake Bridge. Here, you’ll encounter a new enemy called the Psy-Bot Shocker. Scan it to learn its weaknesses, then defeat it by freezing it with the Ice Shot and quickly attacking while it’s vulnerable. After that, save your progress at the Save Station in Entry Bay, and then head to the Lava Lake Bridge.
Path to Flare Pool Boss:
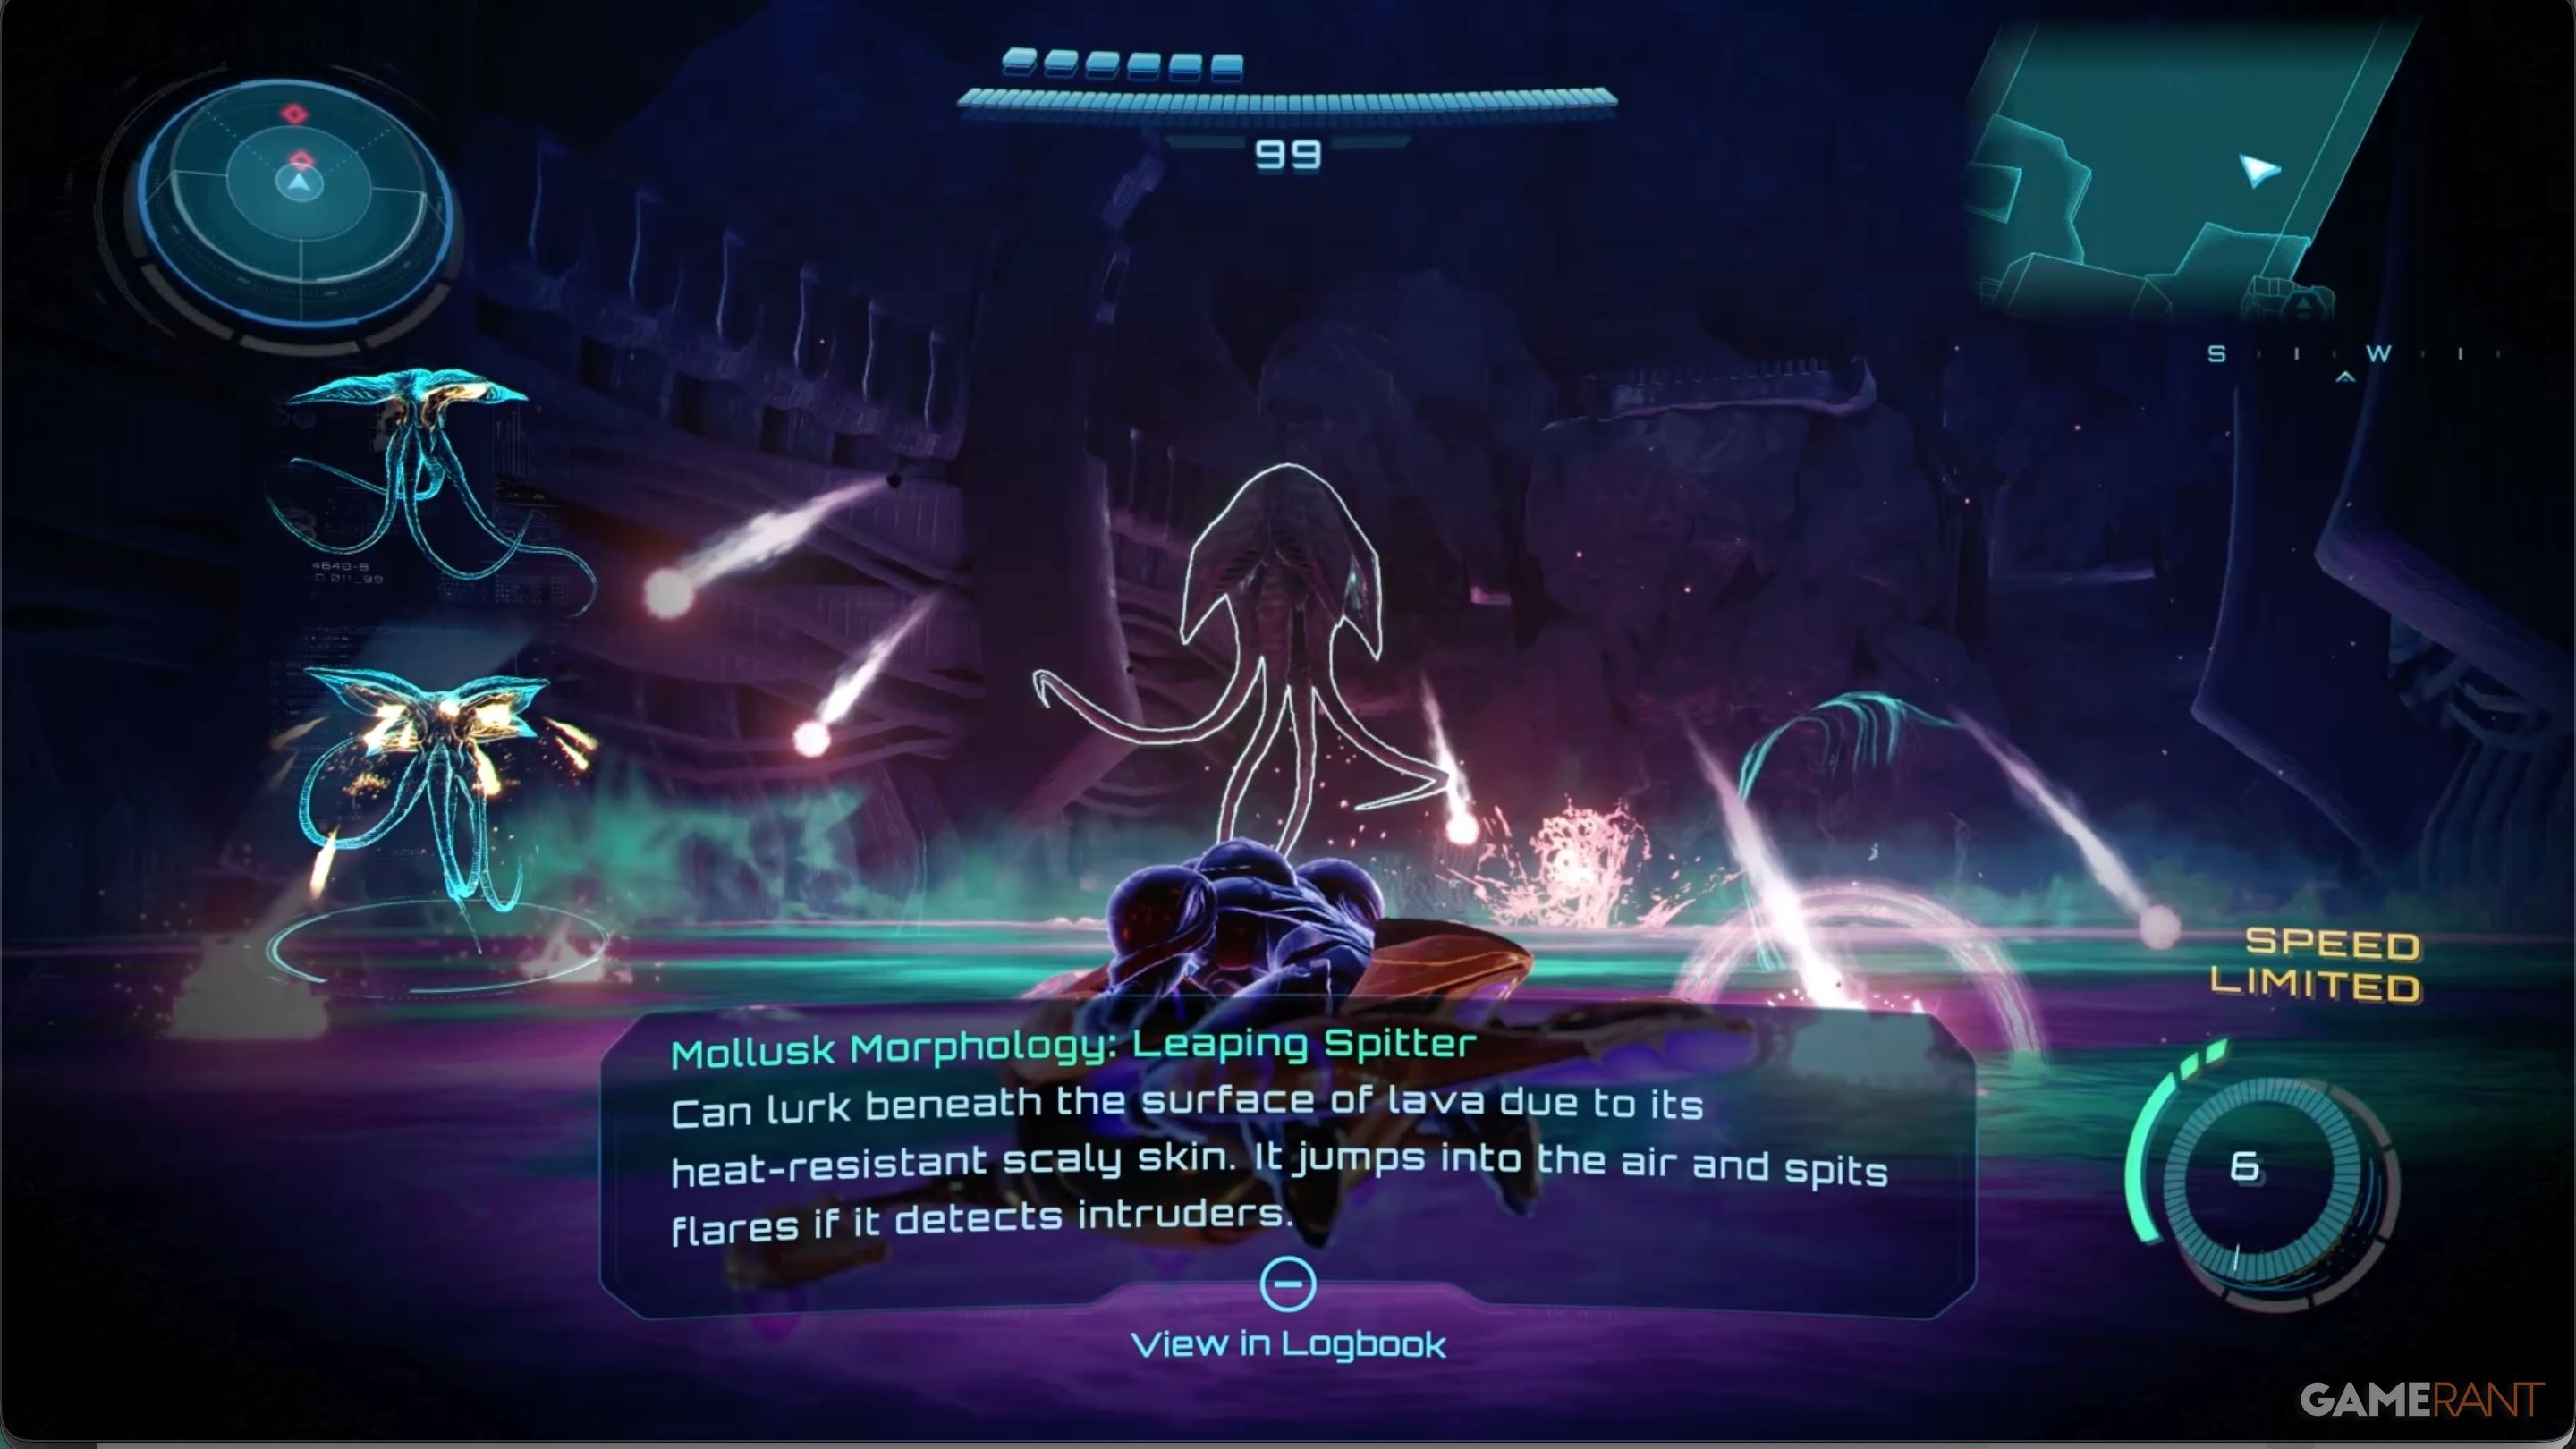
When you return to Lava Lake, be sure to scan the Leaping Spitter – it’s now jumping around on the water. You’ll probably need to ride Vi-O-La onto the lake to get a good scan.
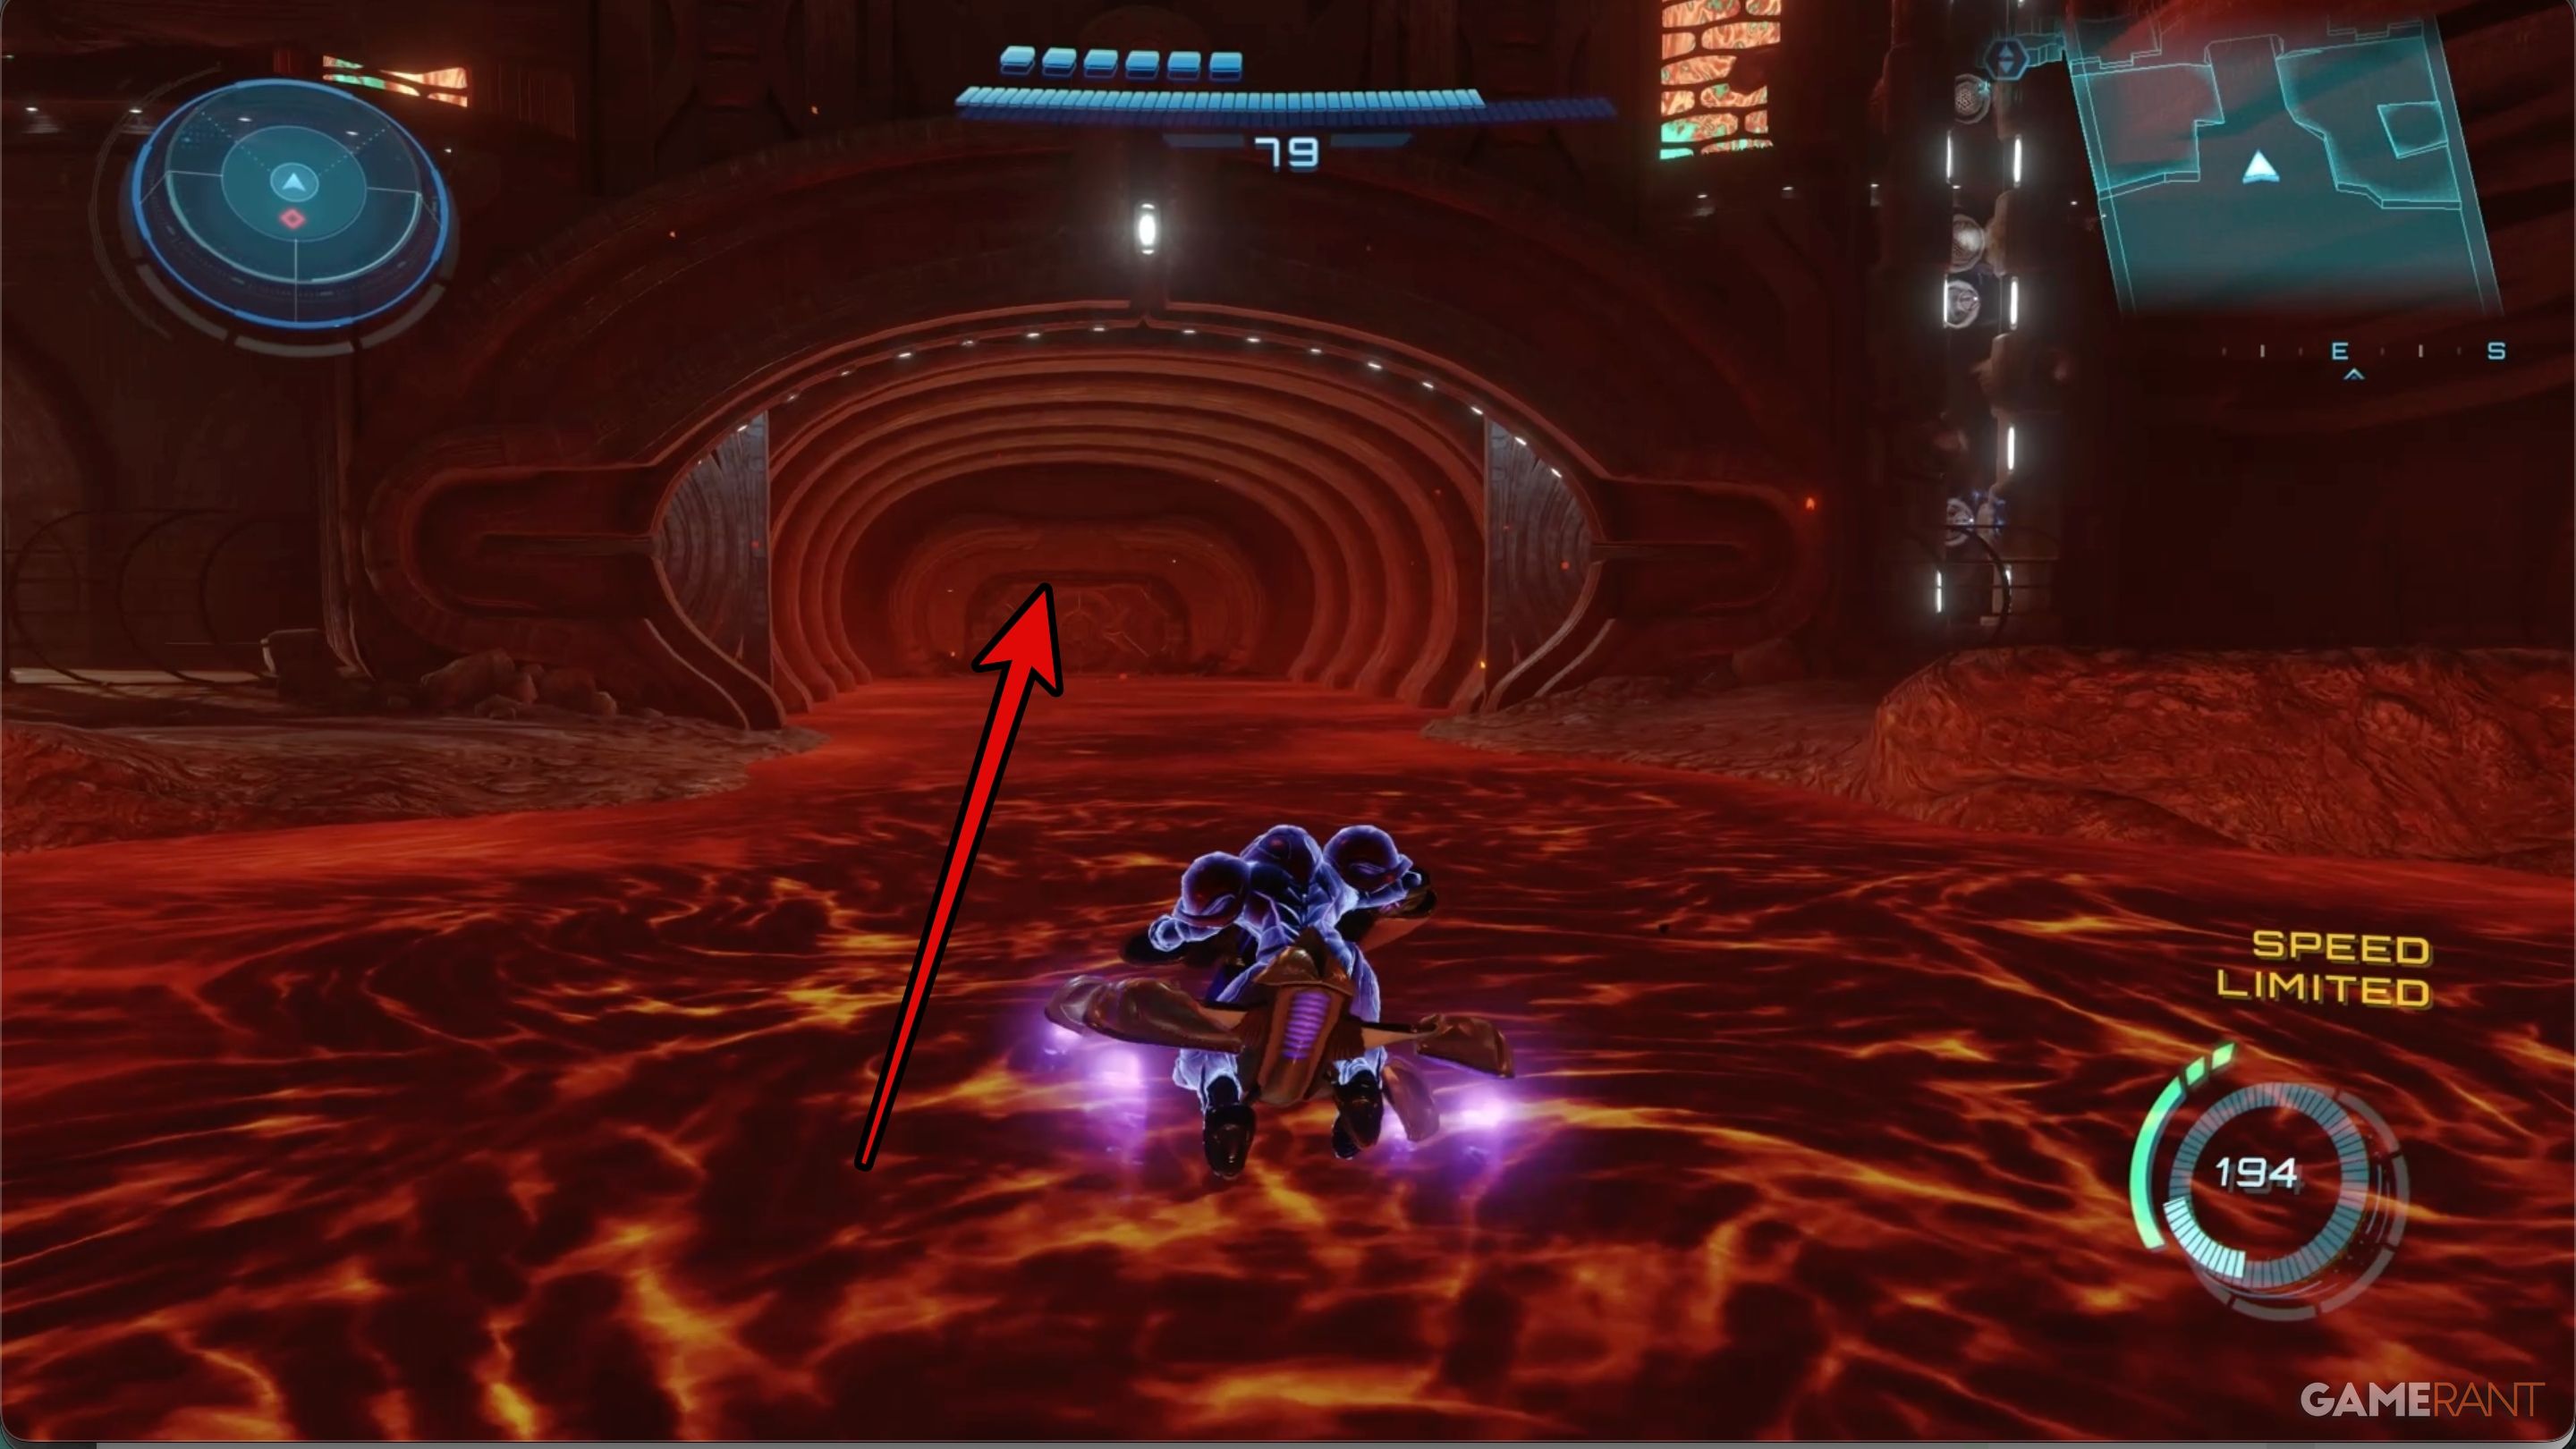
Once that is done, enter the tunnel that was previously blocked off.
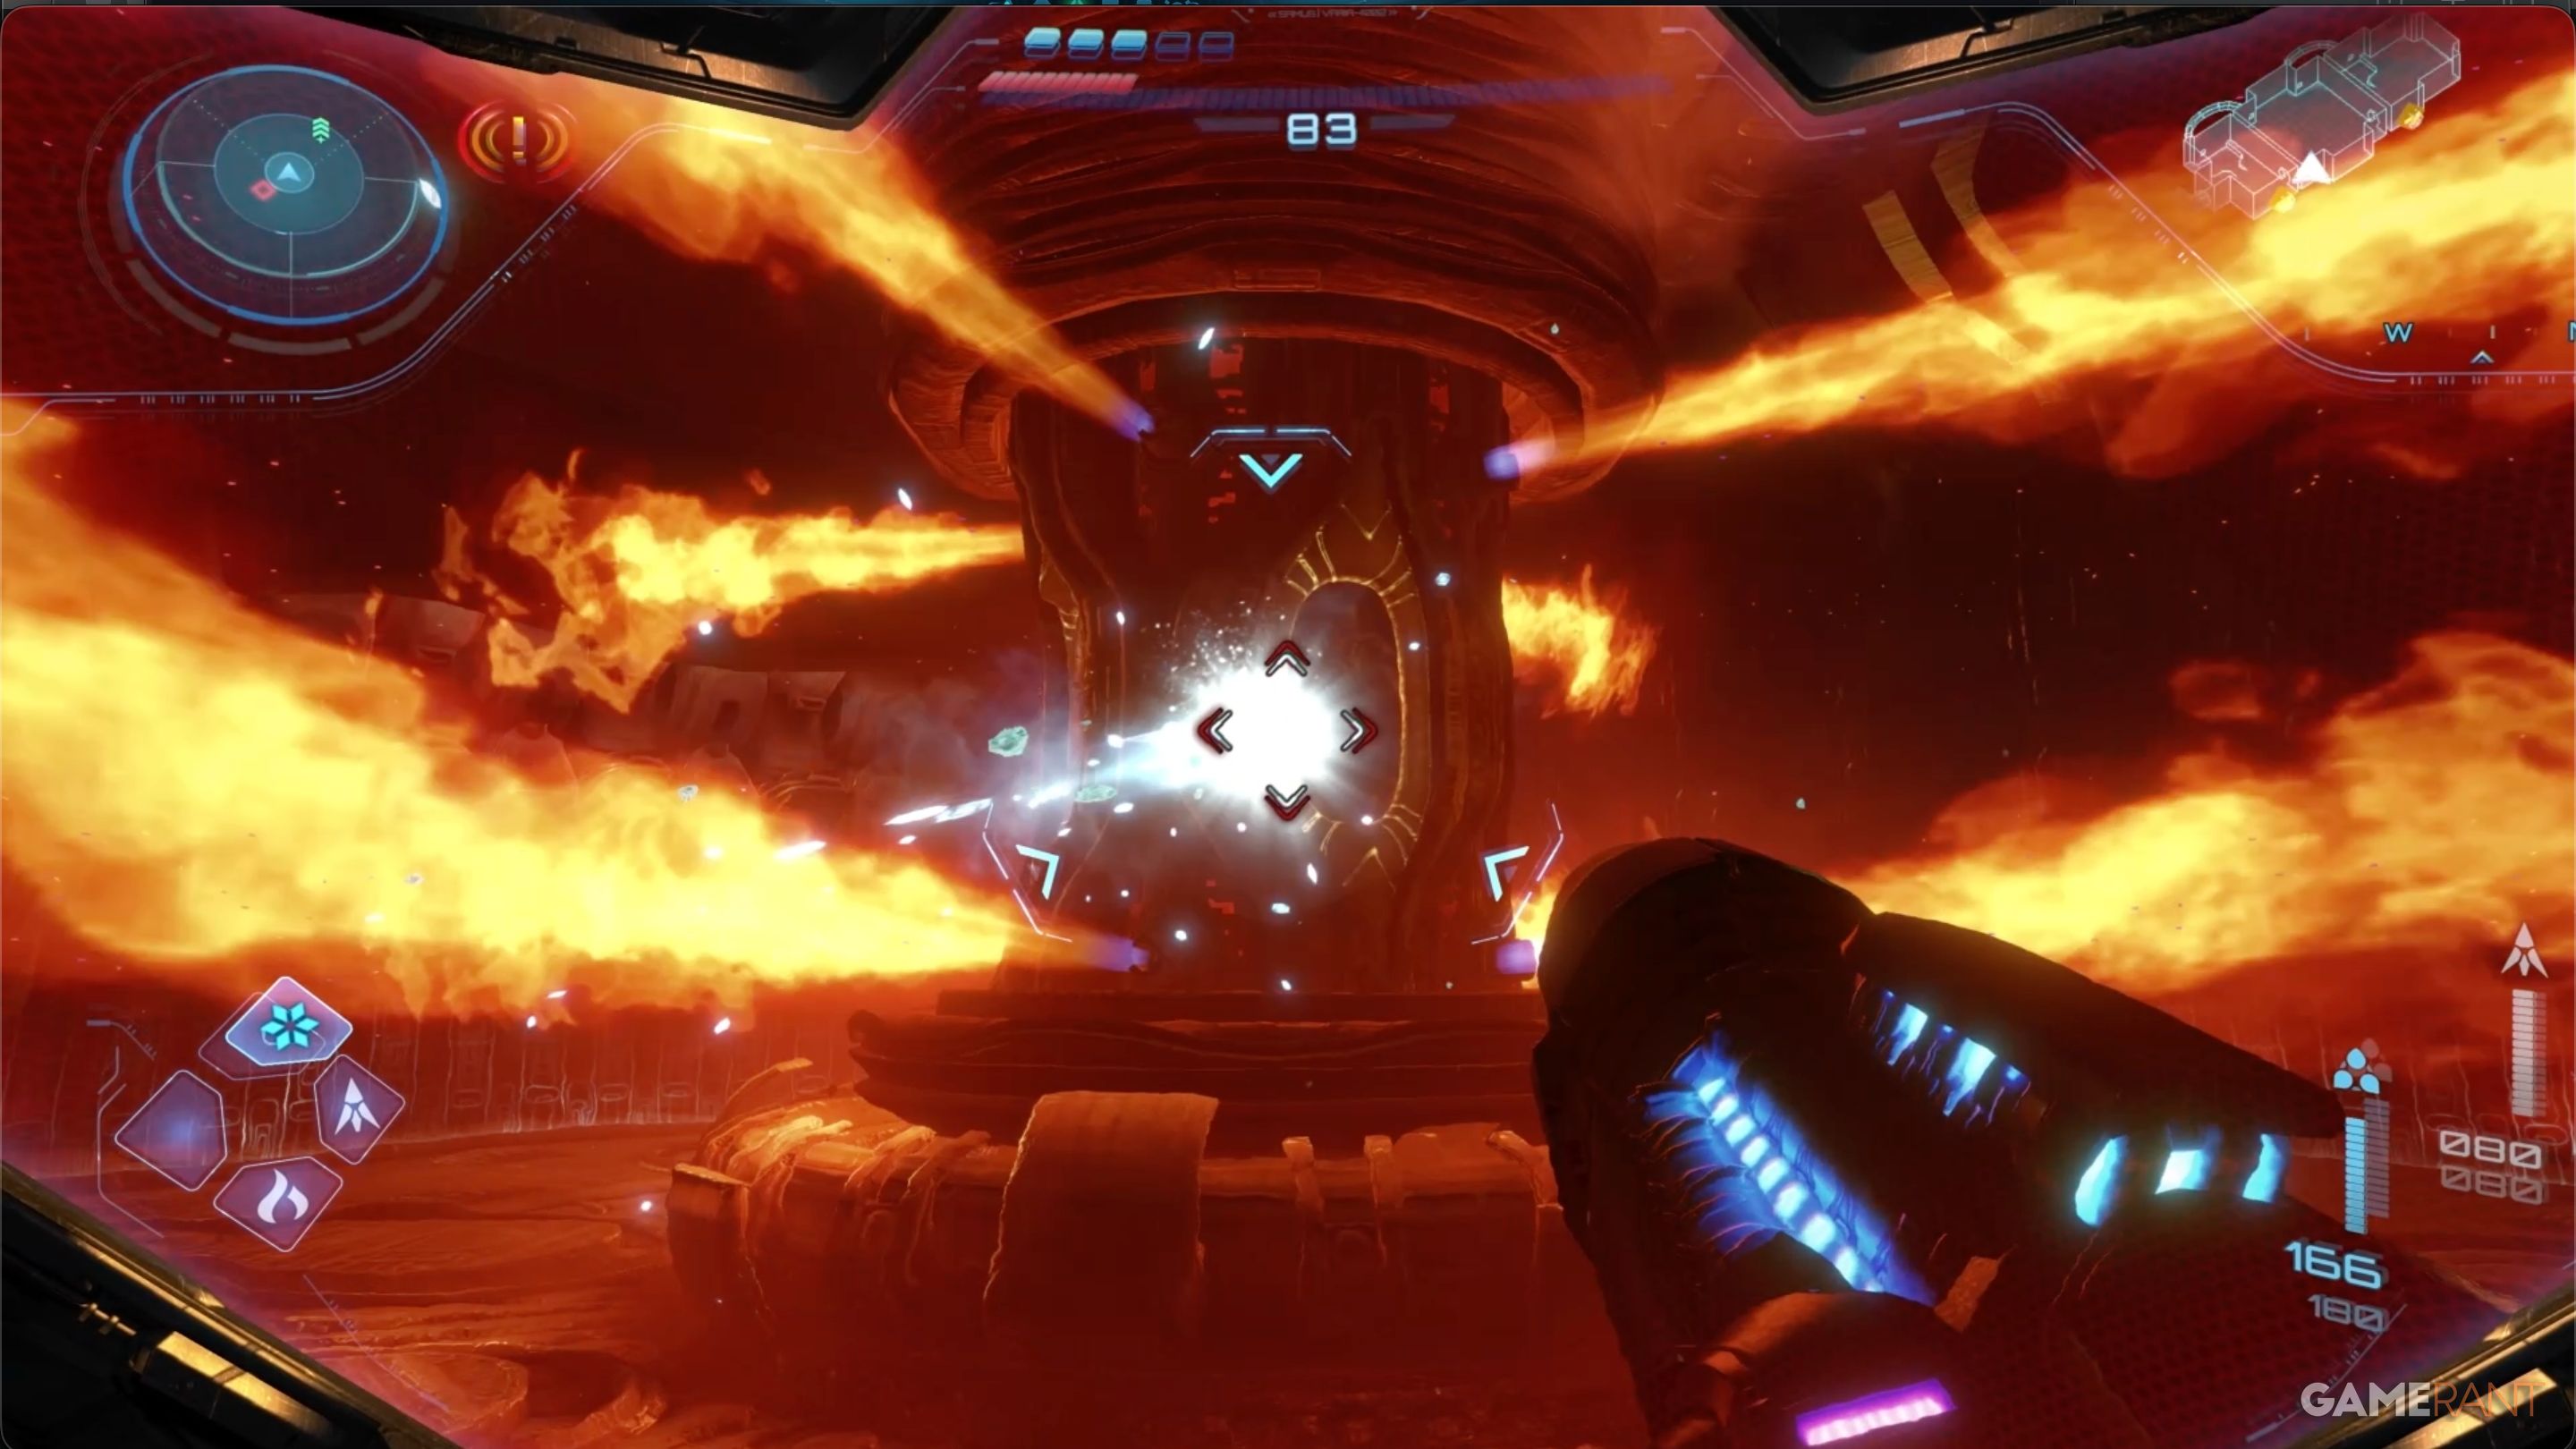
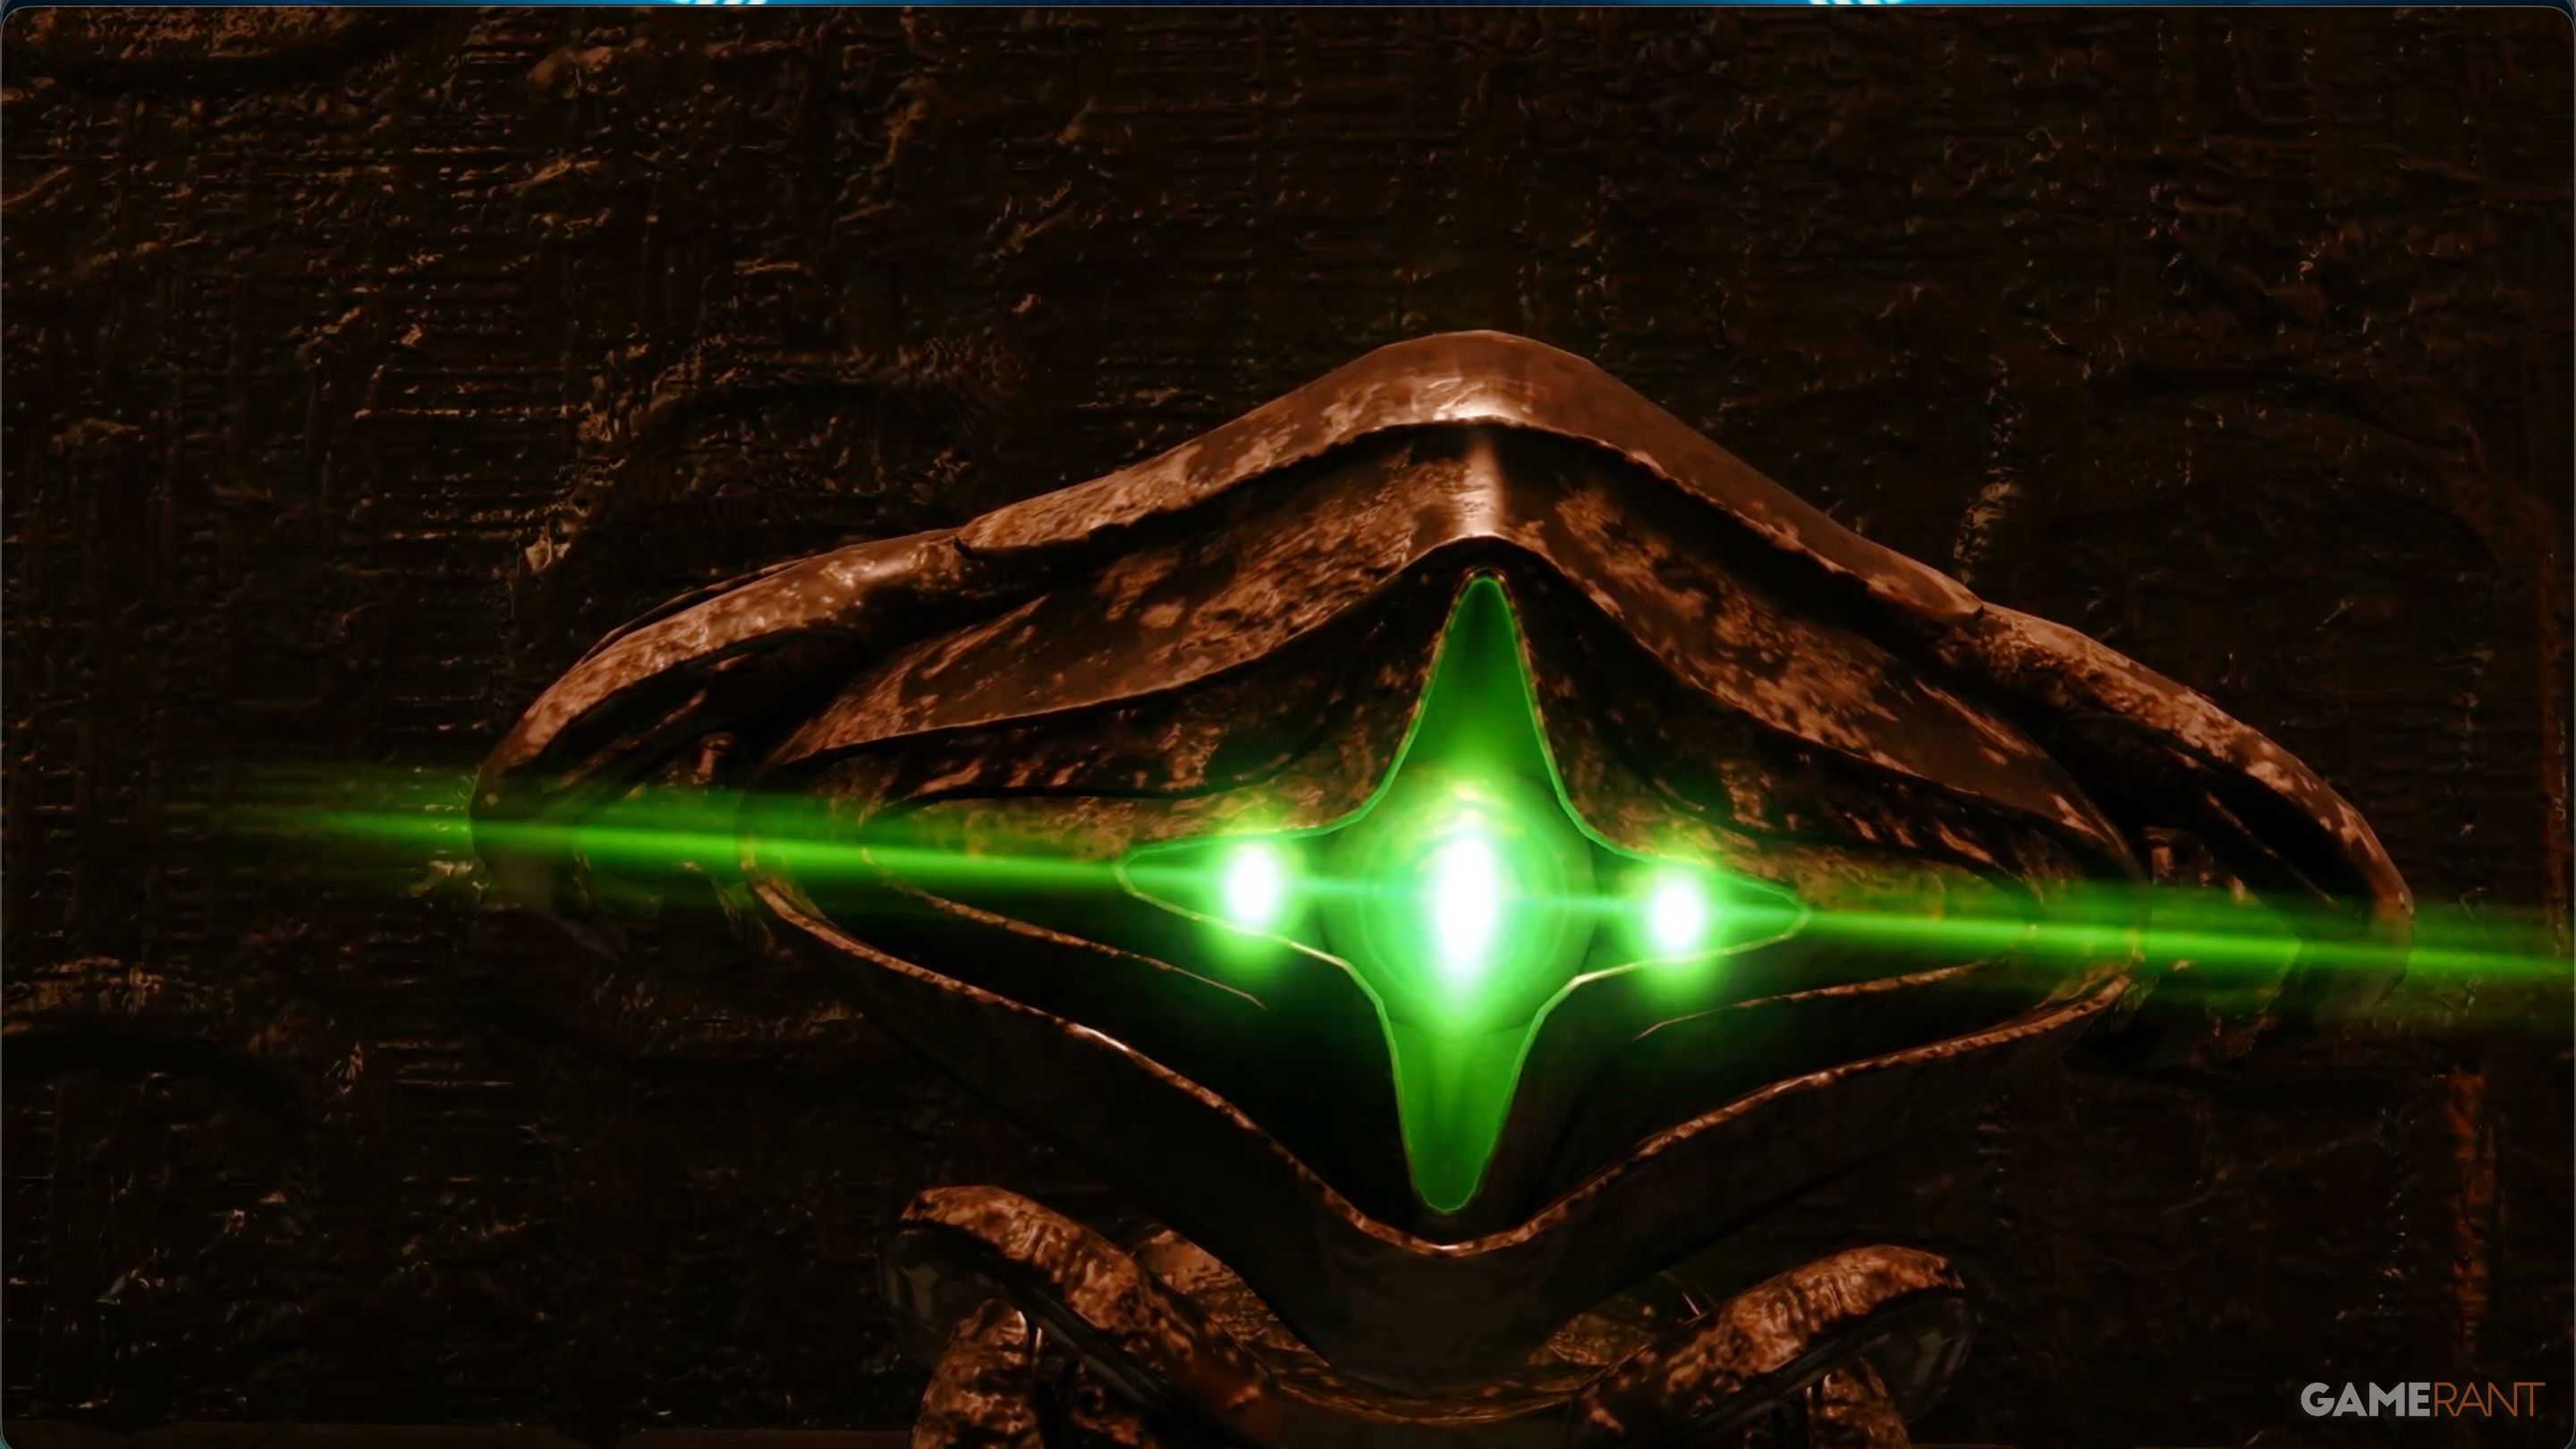
How to Beat Phenoros in Metroid Prime 4
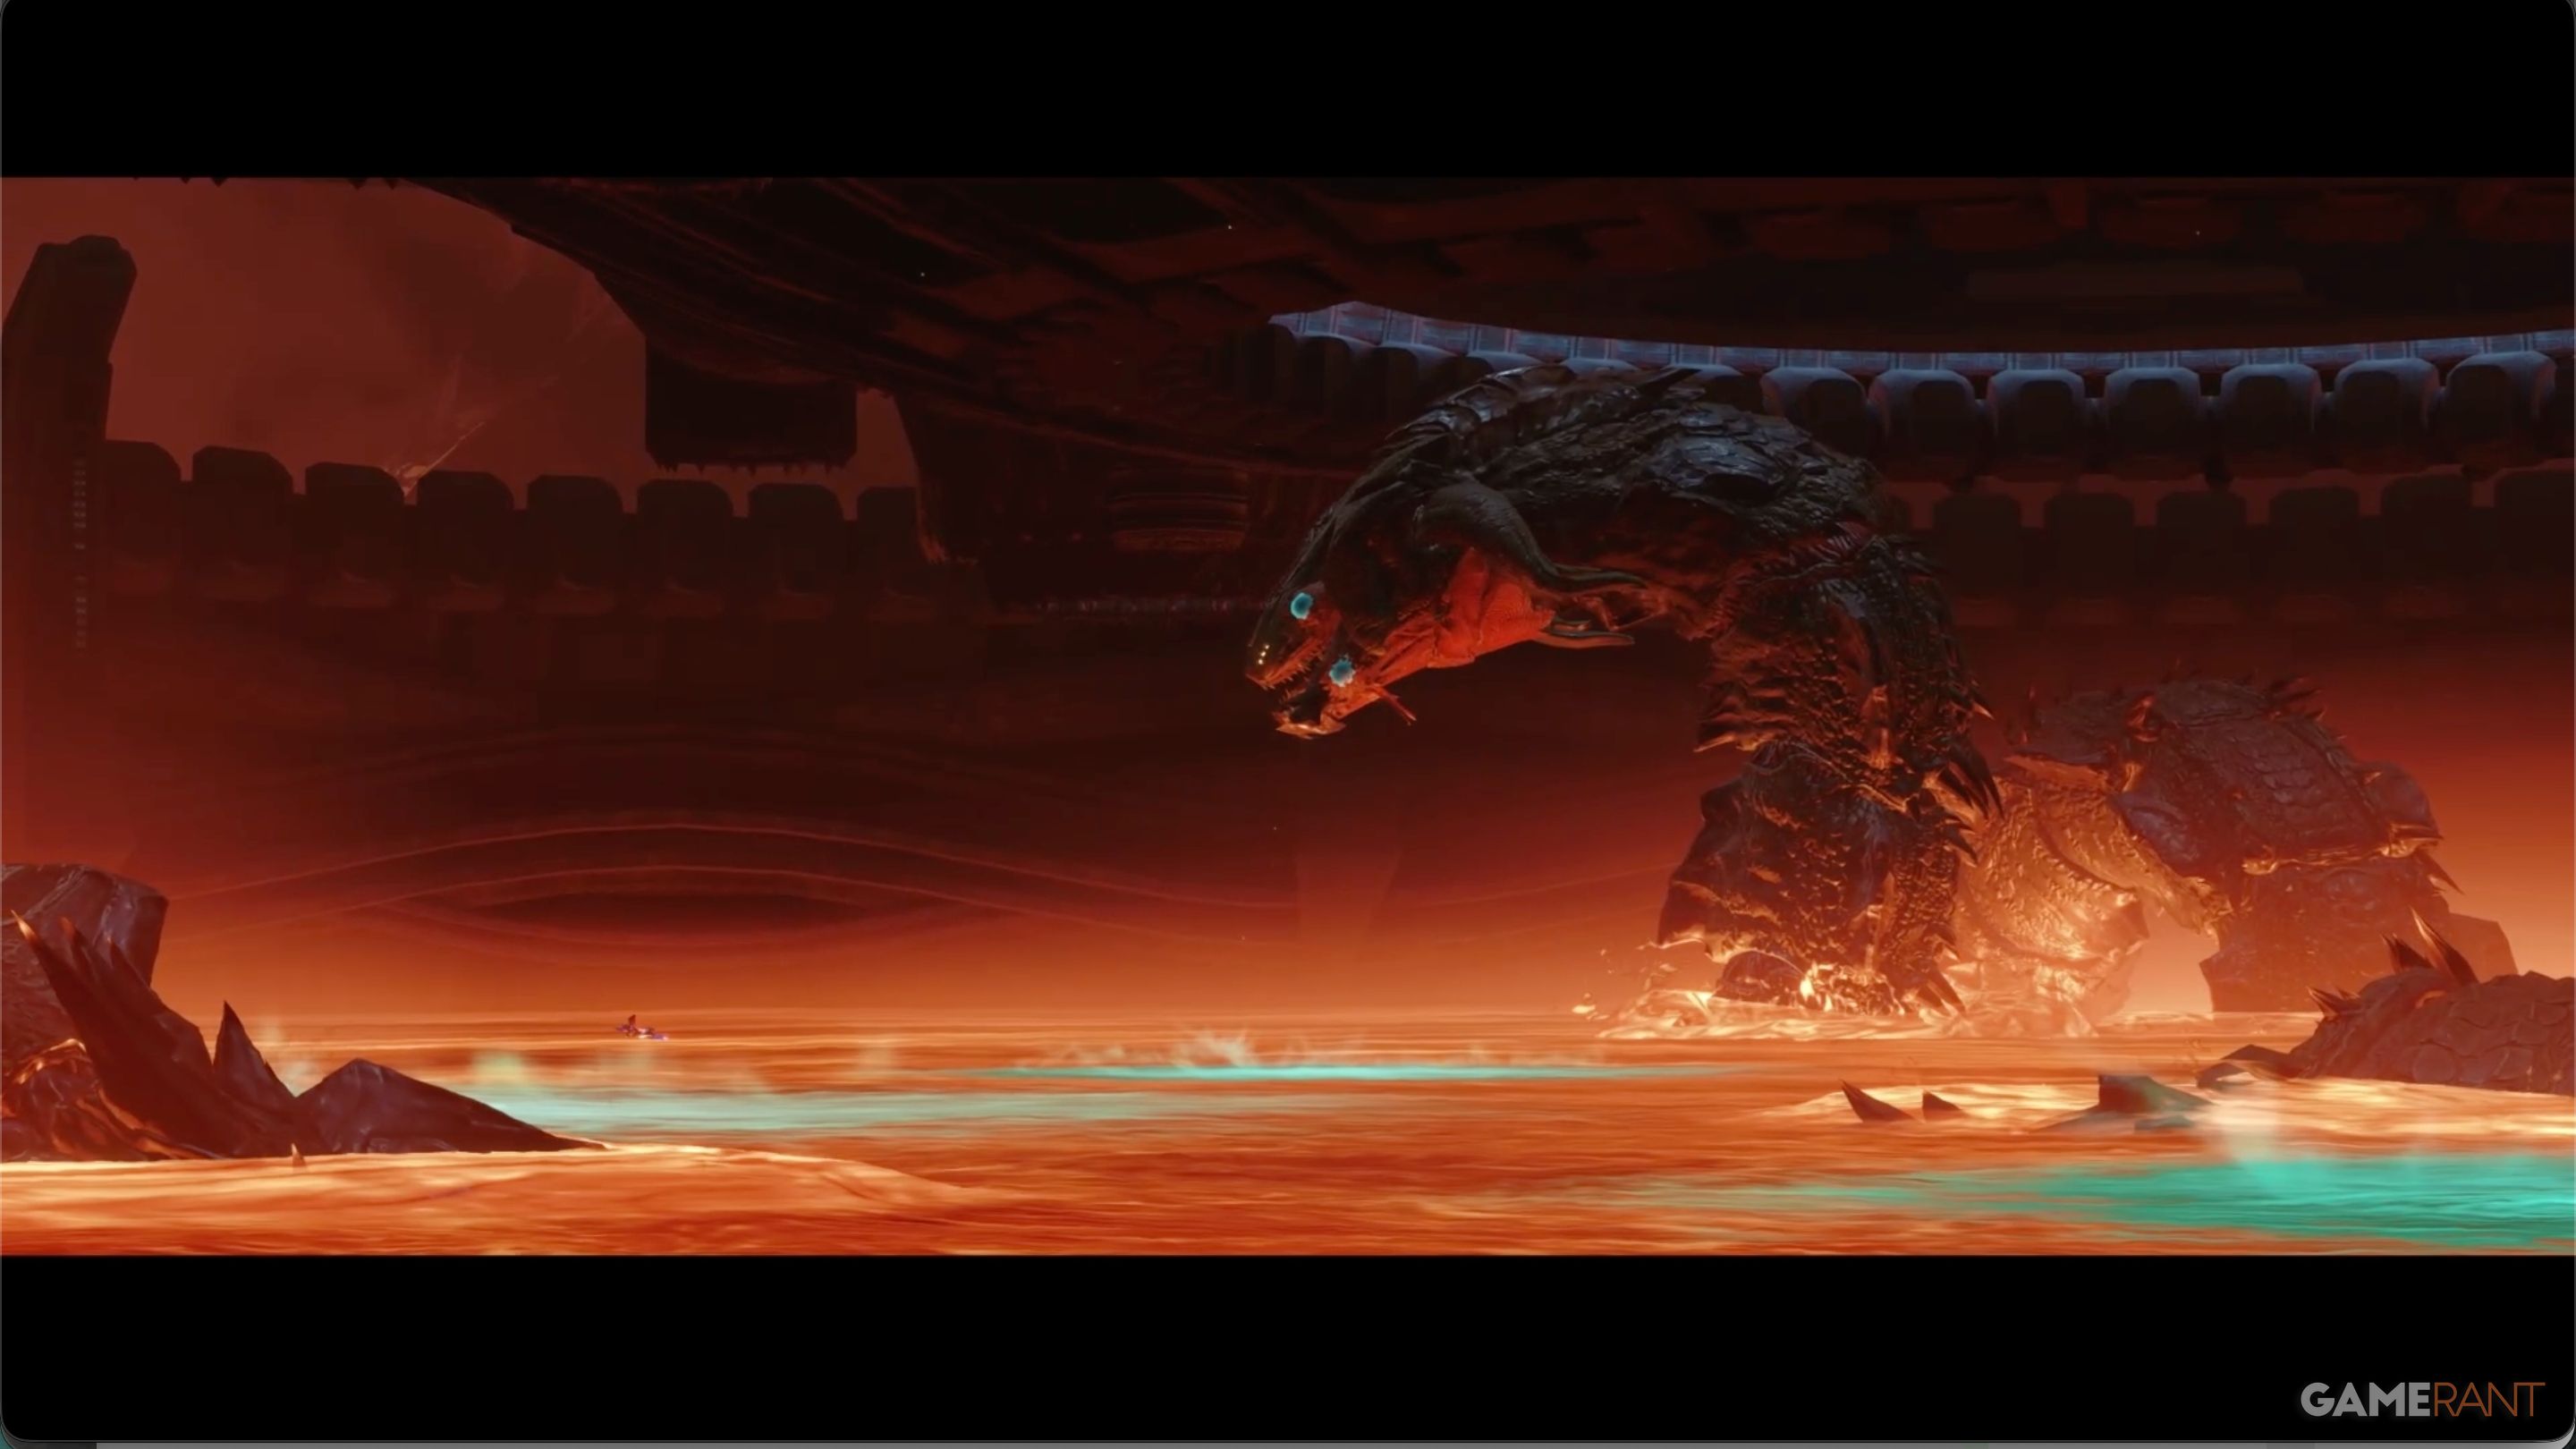
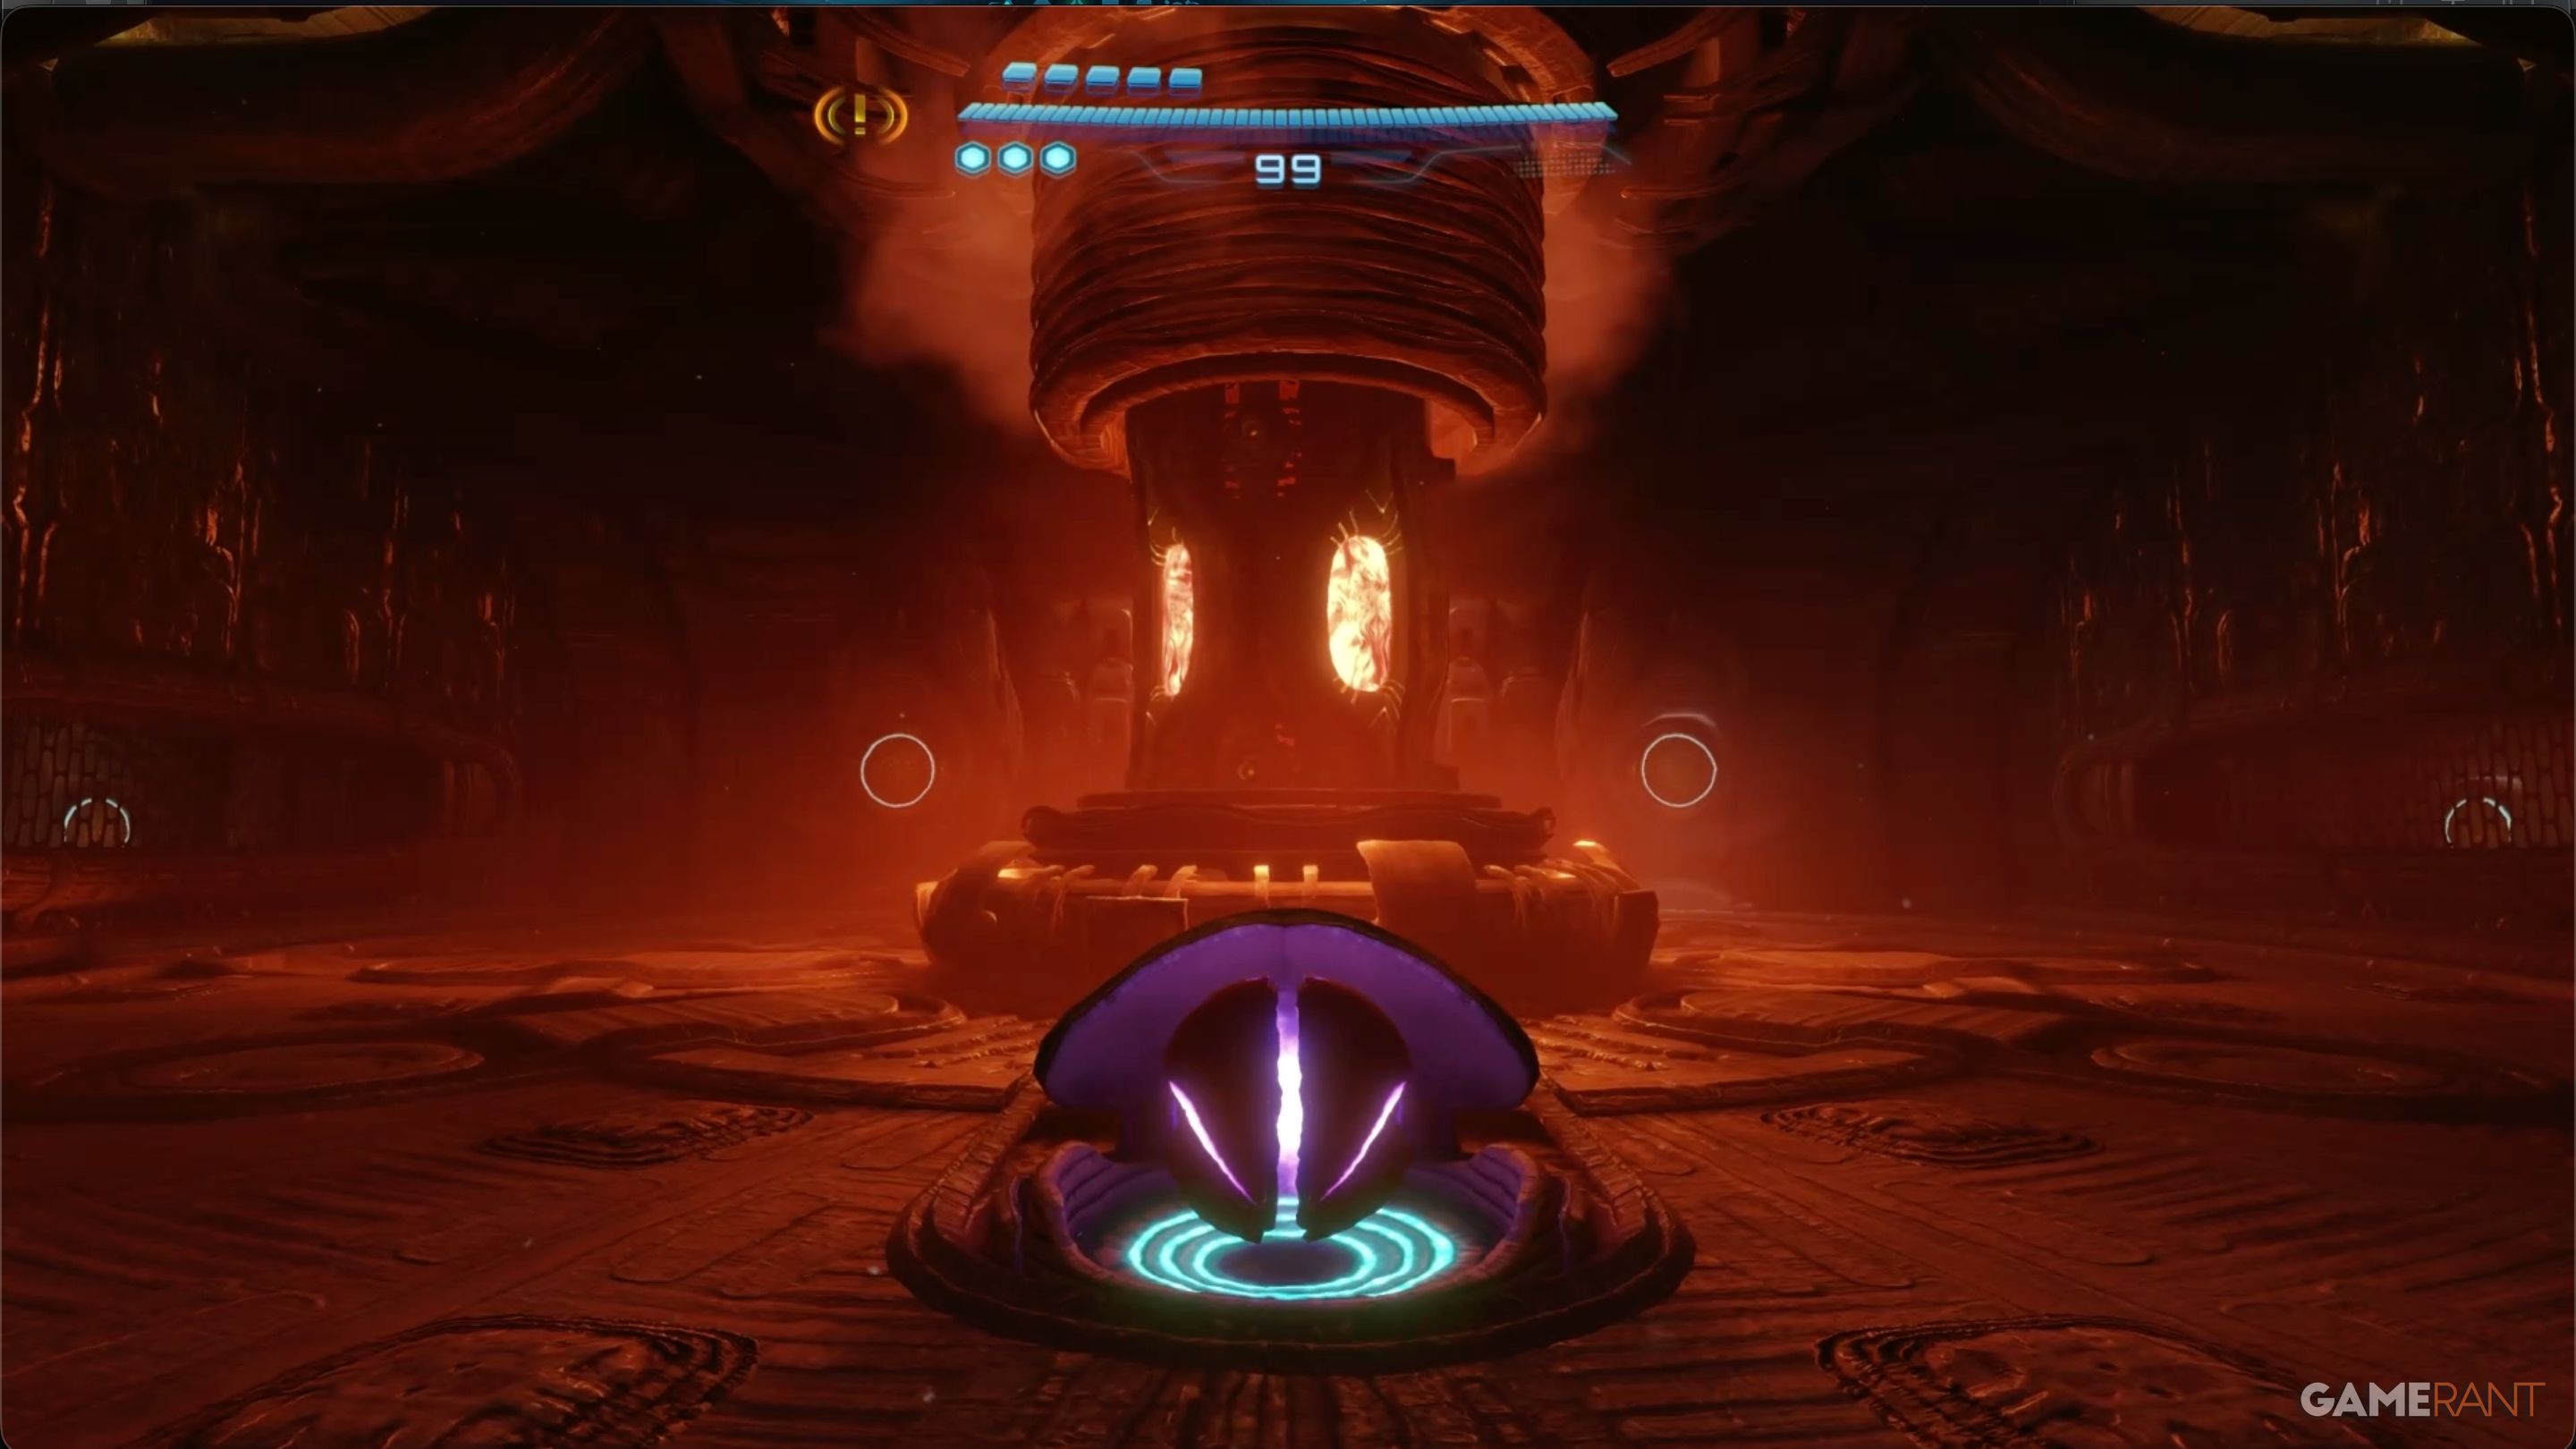
Phenoros Phase 1:

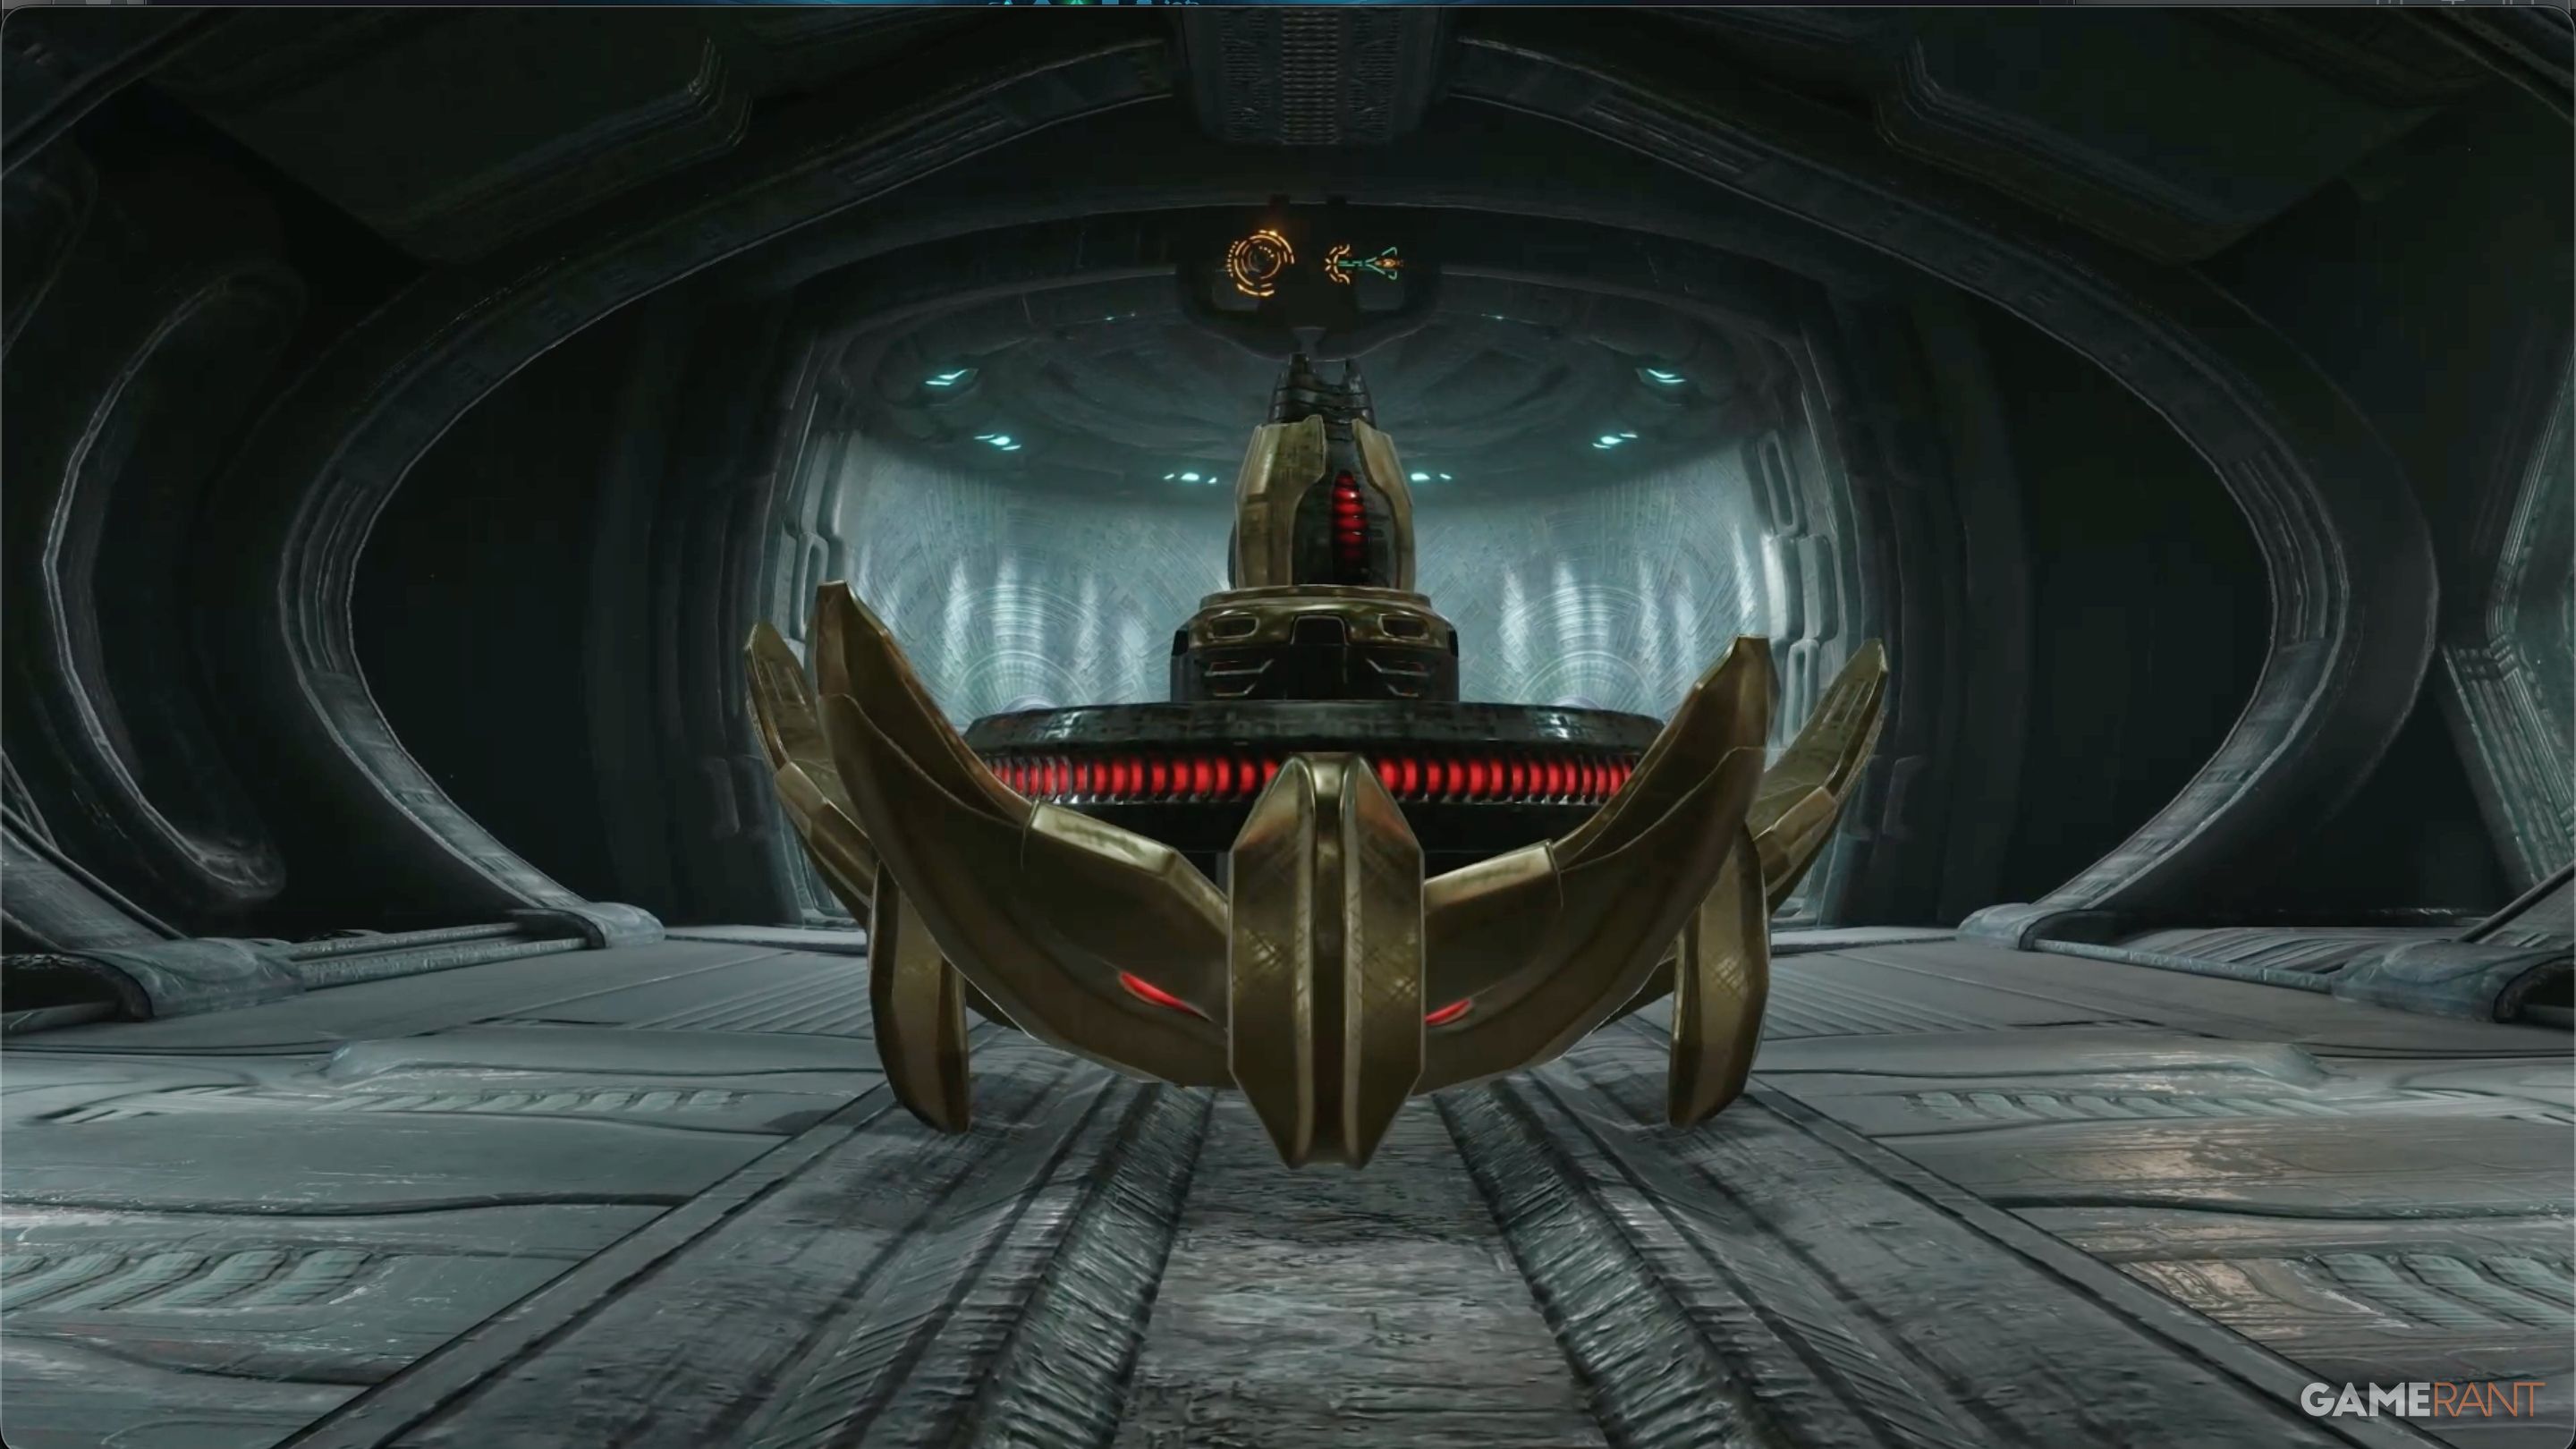
The battle against Phenoros happens in two stages. The first stage is relatively straightforward. Phenoros is a huge, snake-like monster with glowing light-blue targets lining its belly, which you can spot as it rises from the lava.
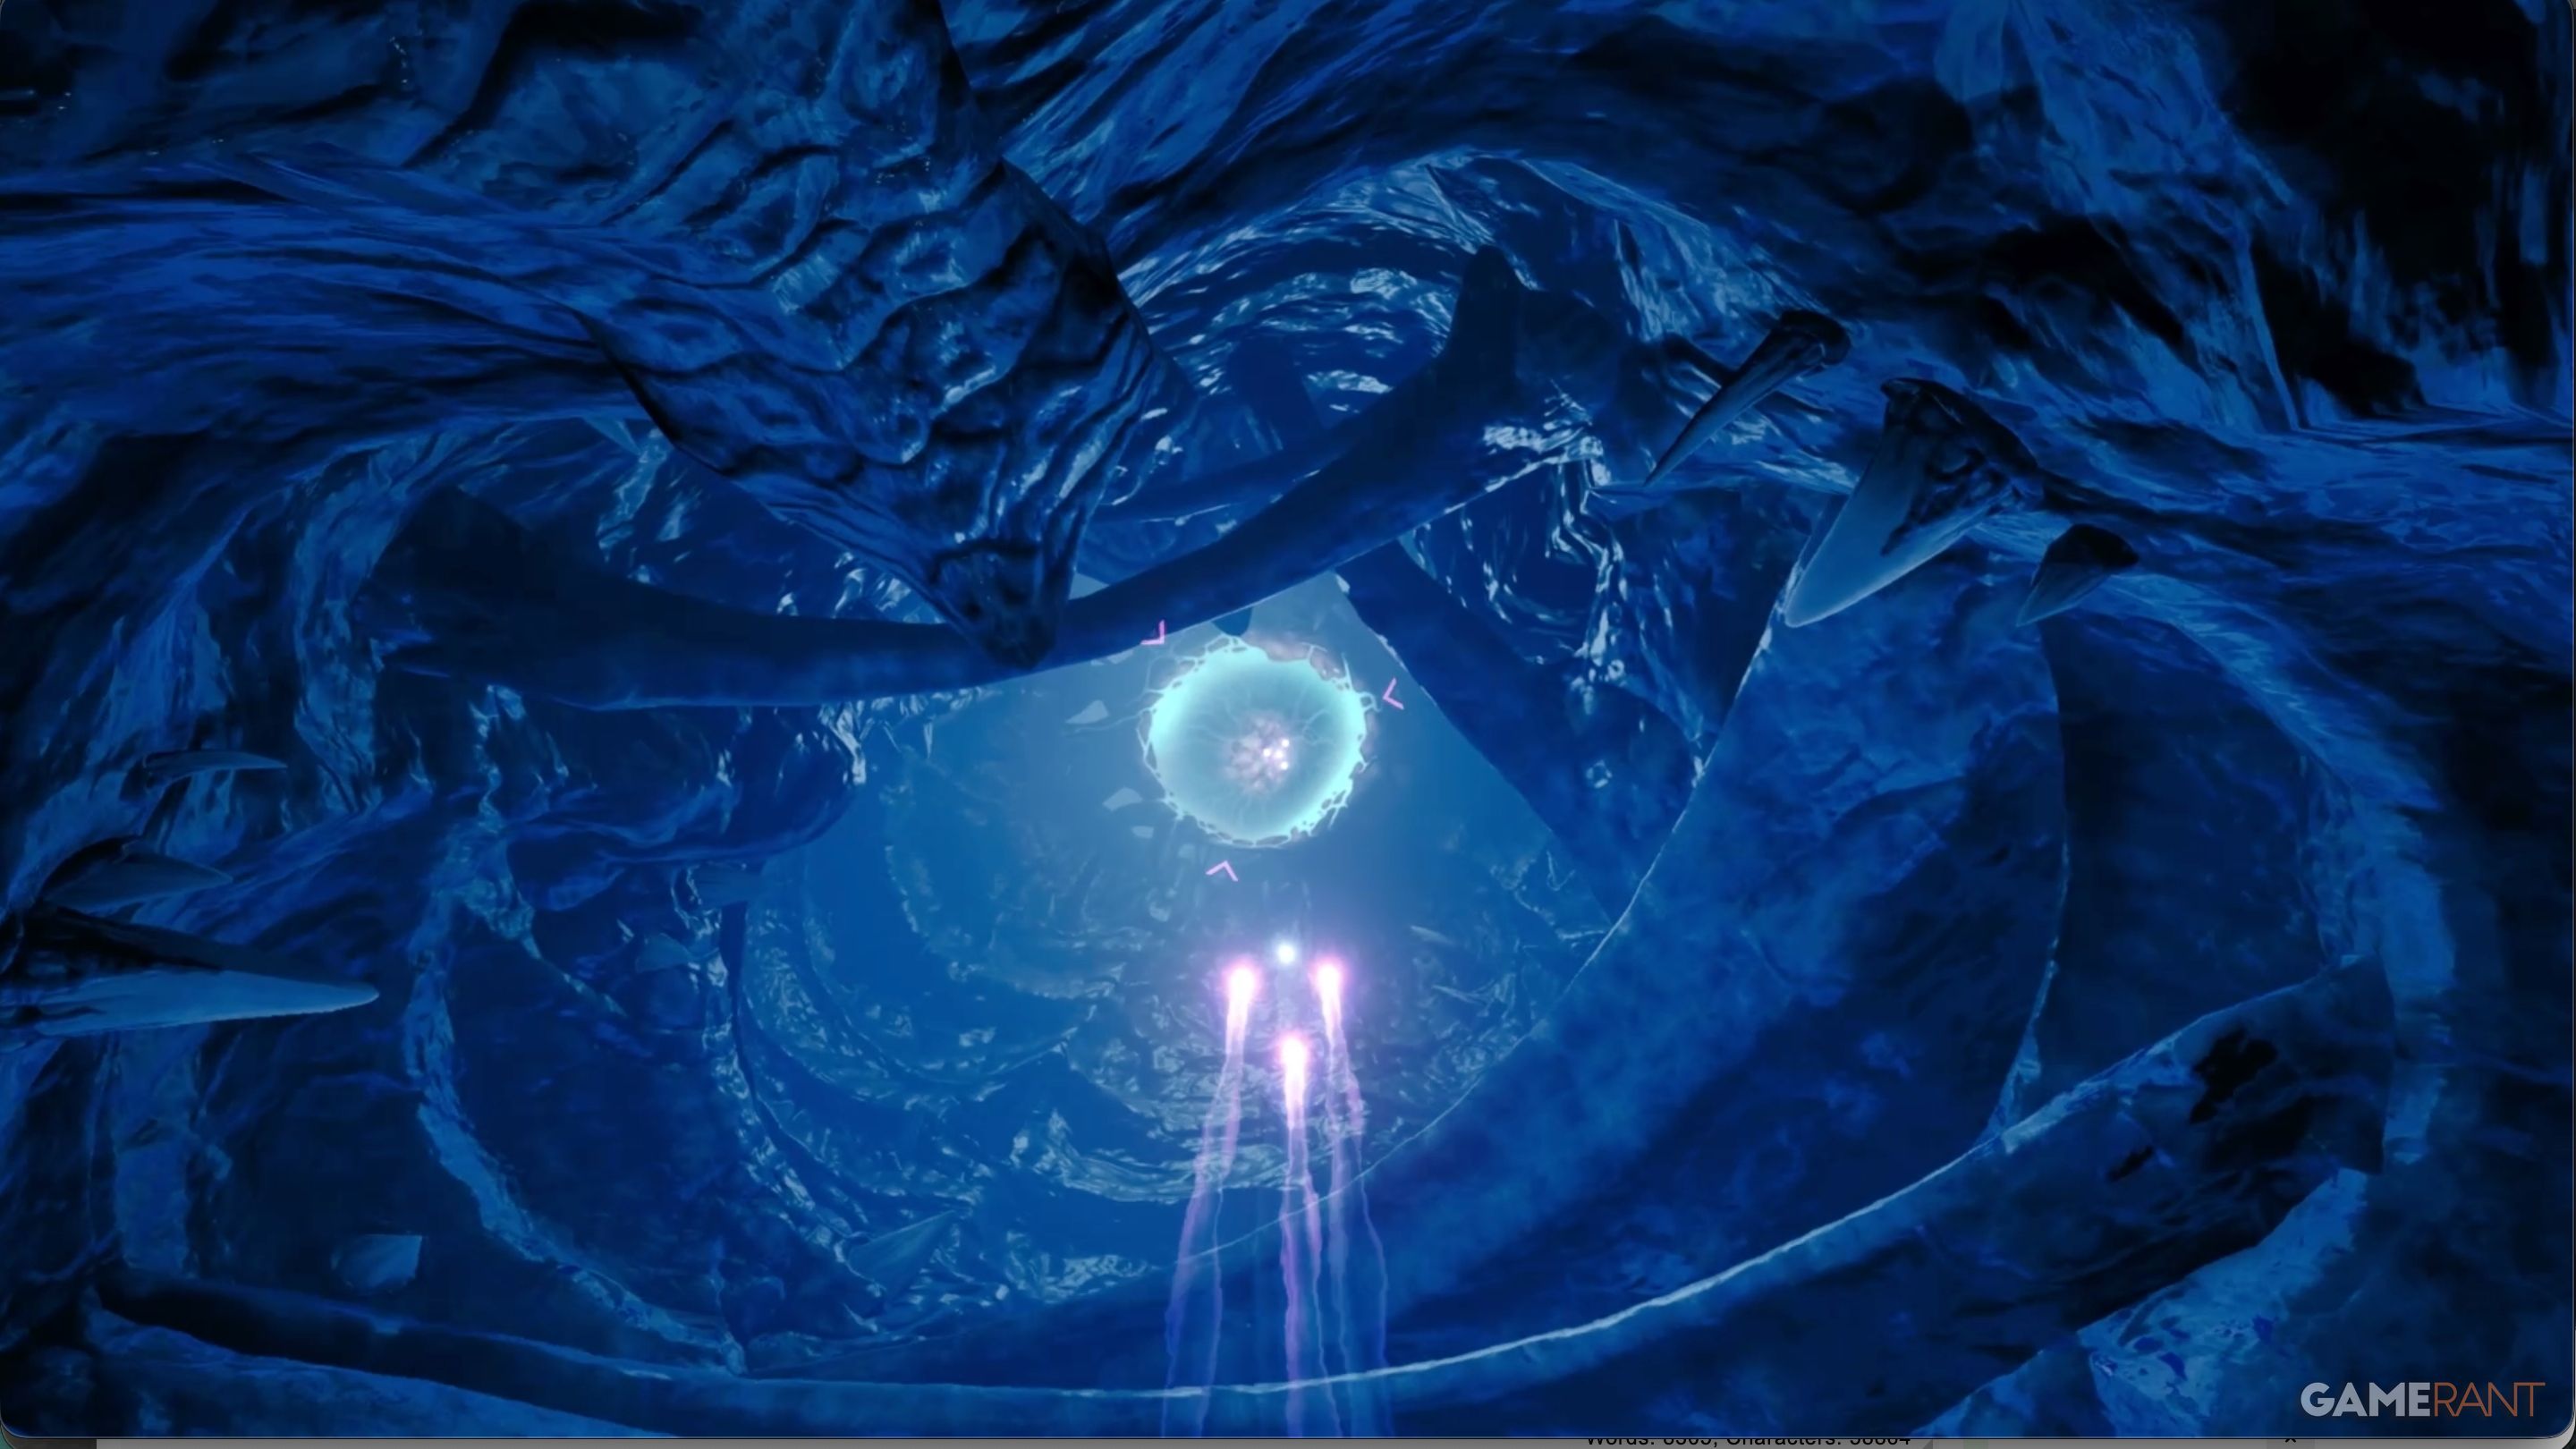
To finish this first part, you need to eliminate all the targets. The easiest way is to use Vi-O-La’s ability to hit multiple targets at once – just hold down the ‘A’ button when the targets are close enough. You’ll see red boxes appear when you’ve locked on. You can also destroy the targets individually if you prefer.
If you find yourself unable to catch up with Phenoros, make sure to use the bike’s boost ability.

You’ll also want to make sure you scan the Blow Hopper
Phenoros Phase 2:
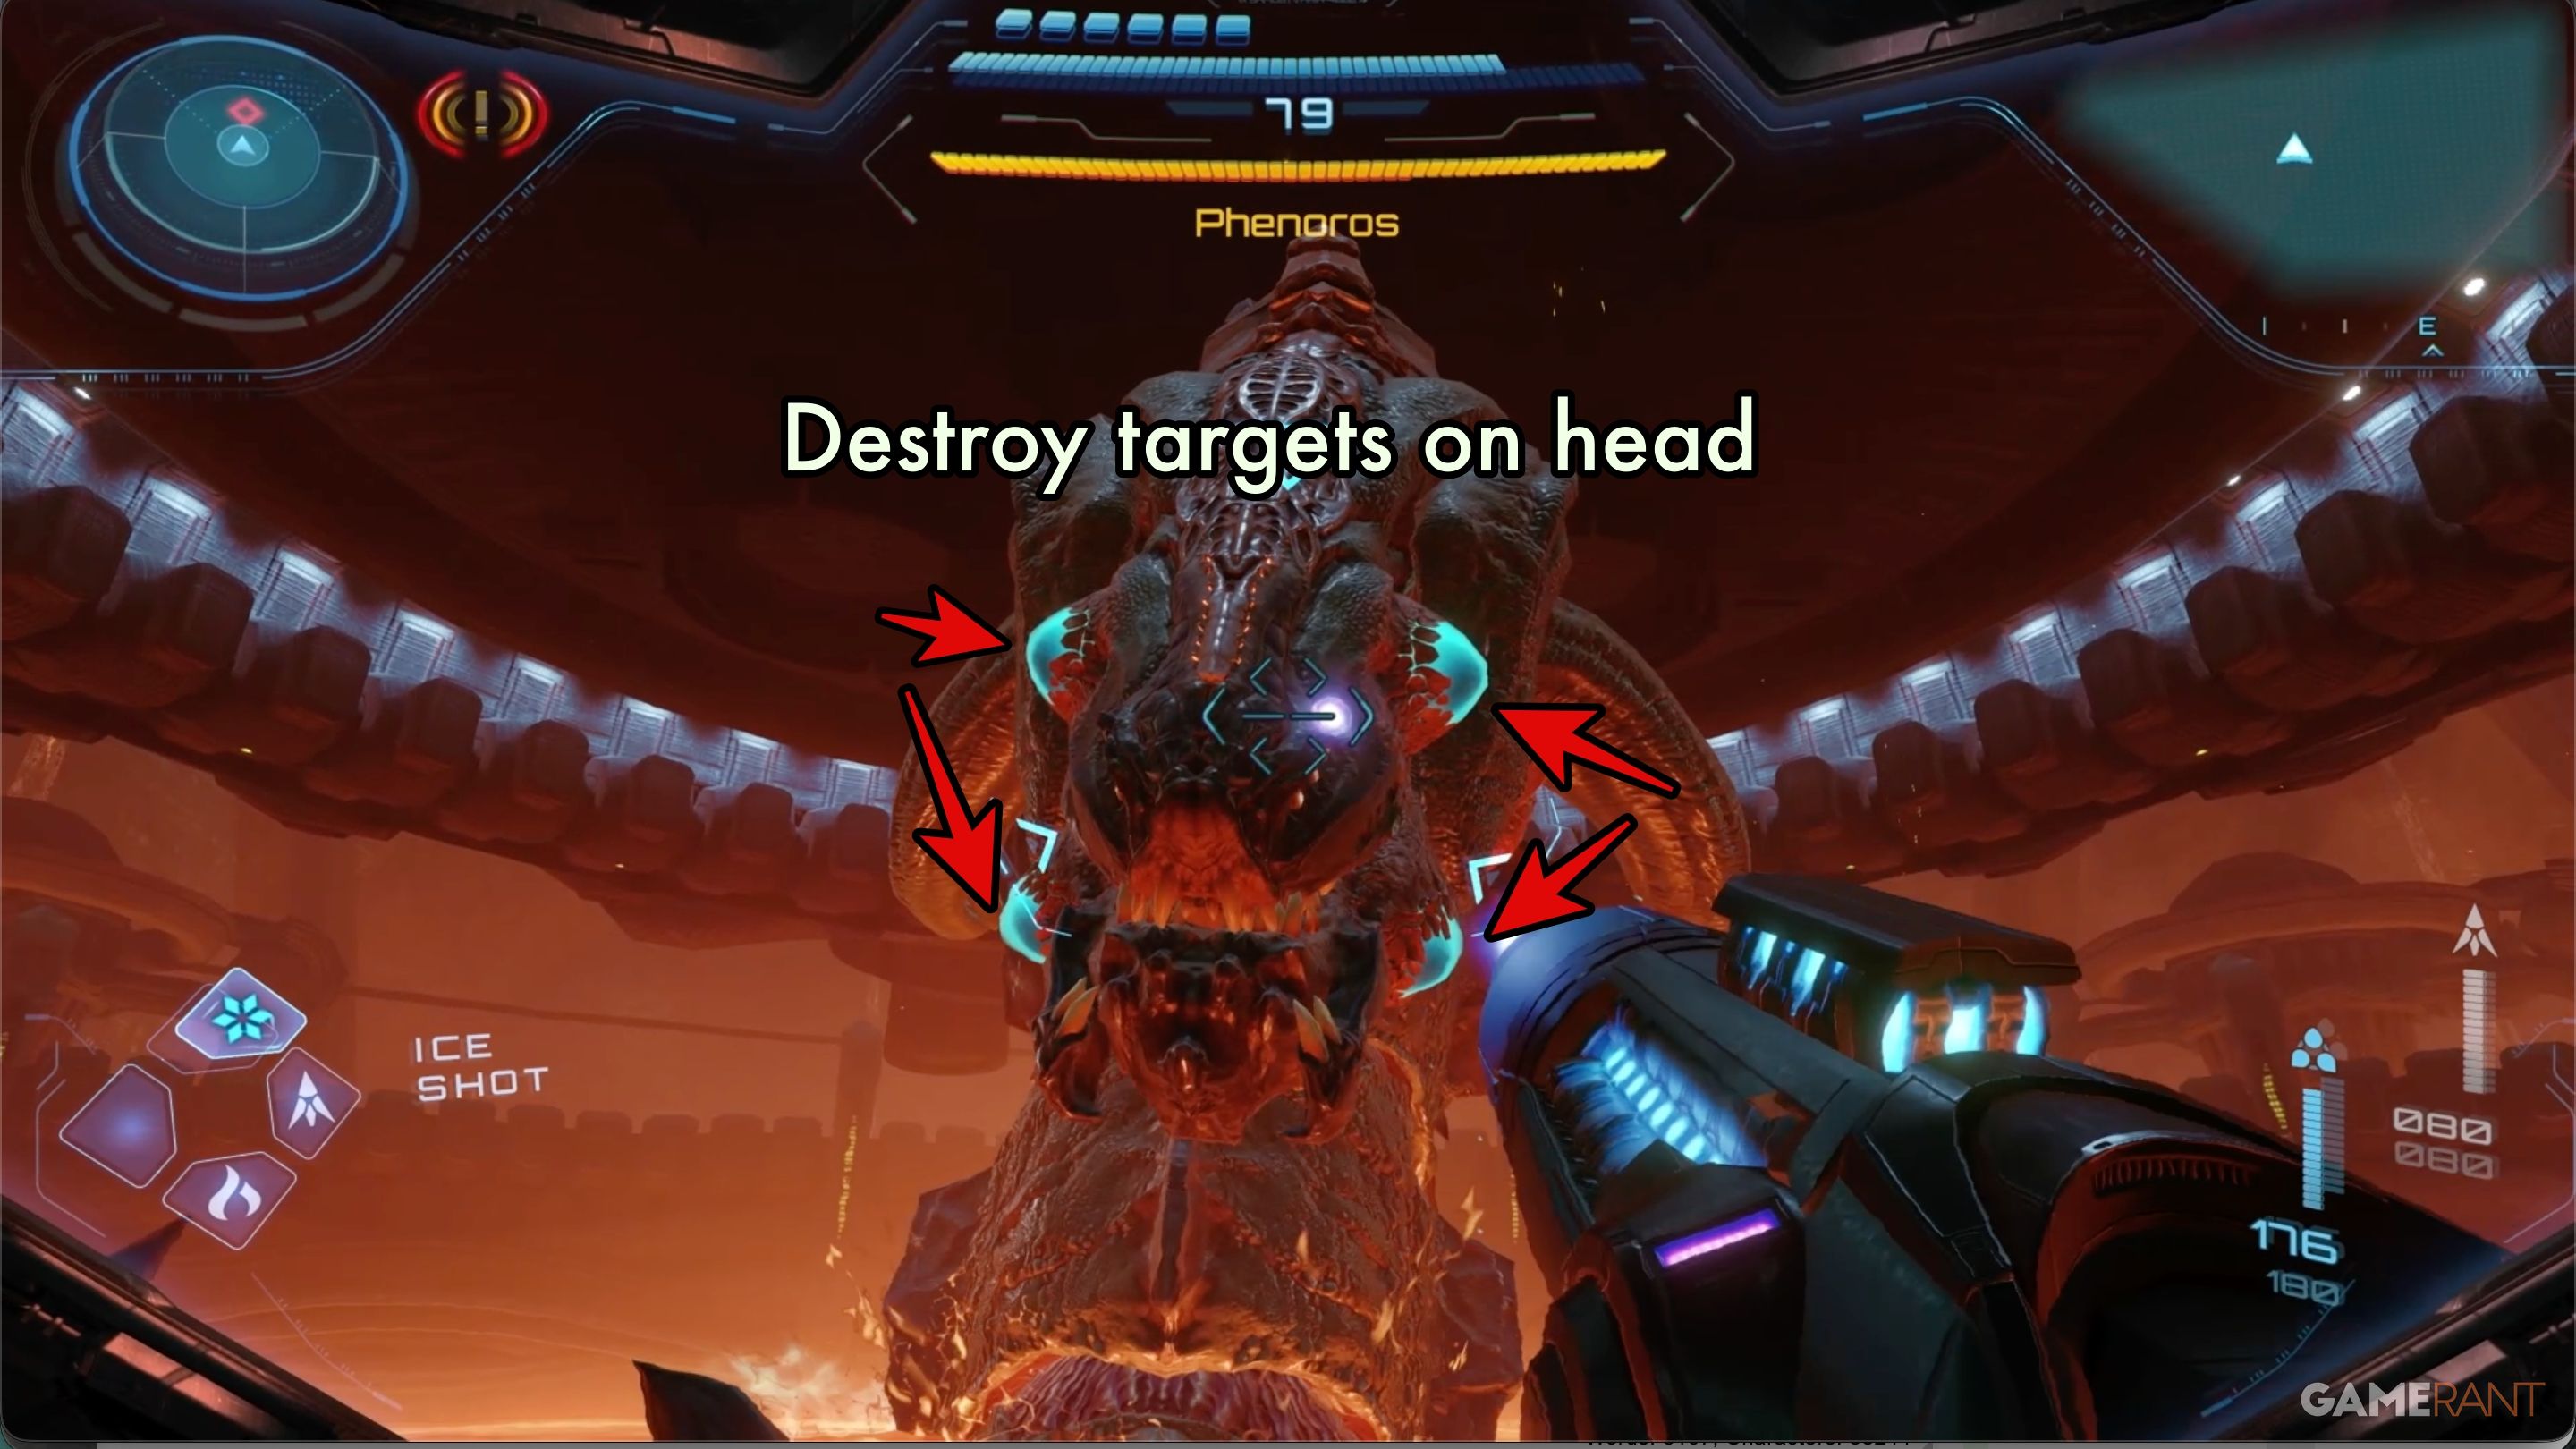
During Phase 2, Samus battles Phenoros up close. To defeat it, you need to destroy the targets on its head, which briefly weakens it. When that happens, quickly attack its mouth.
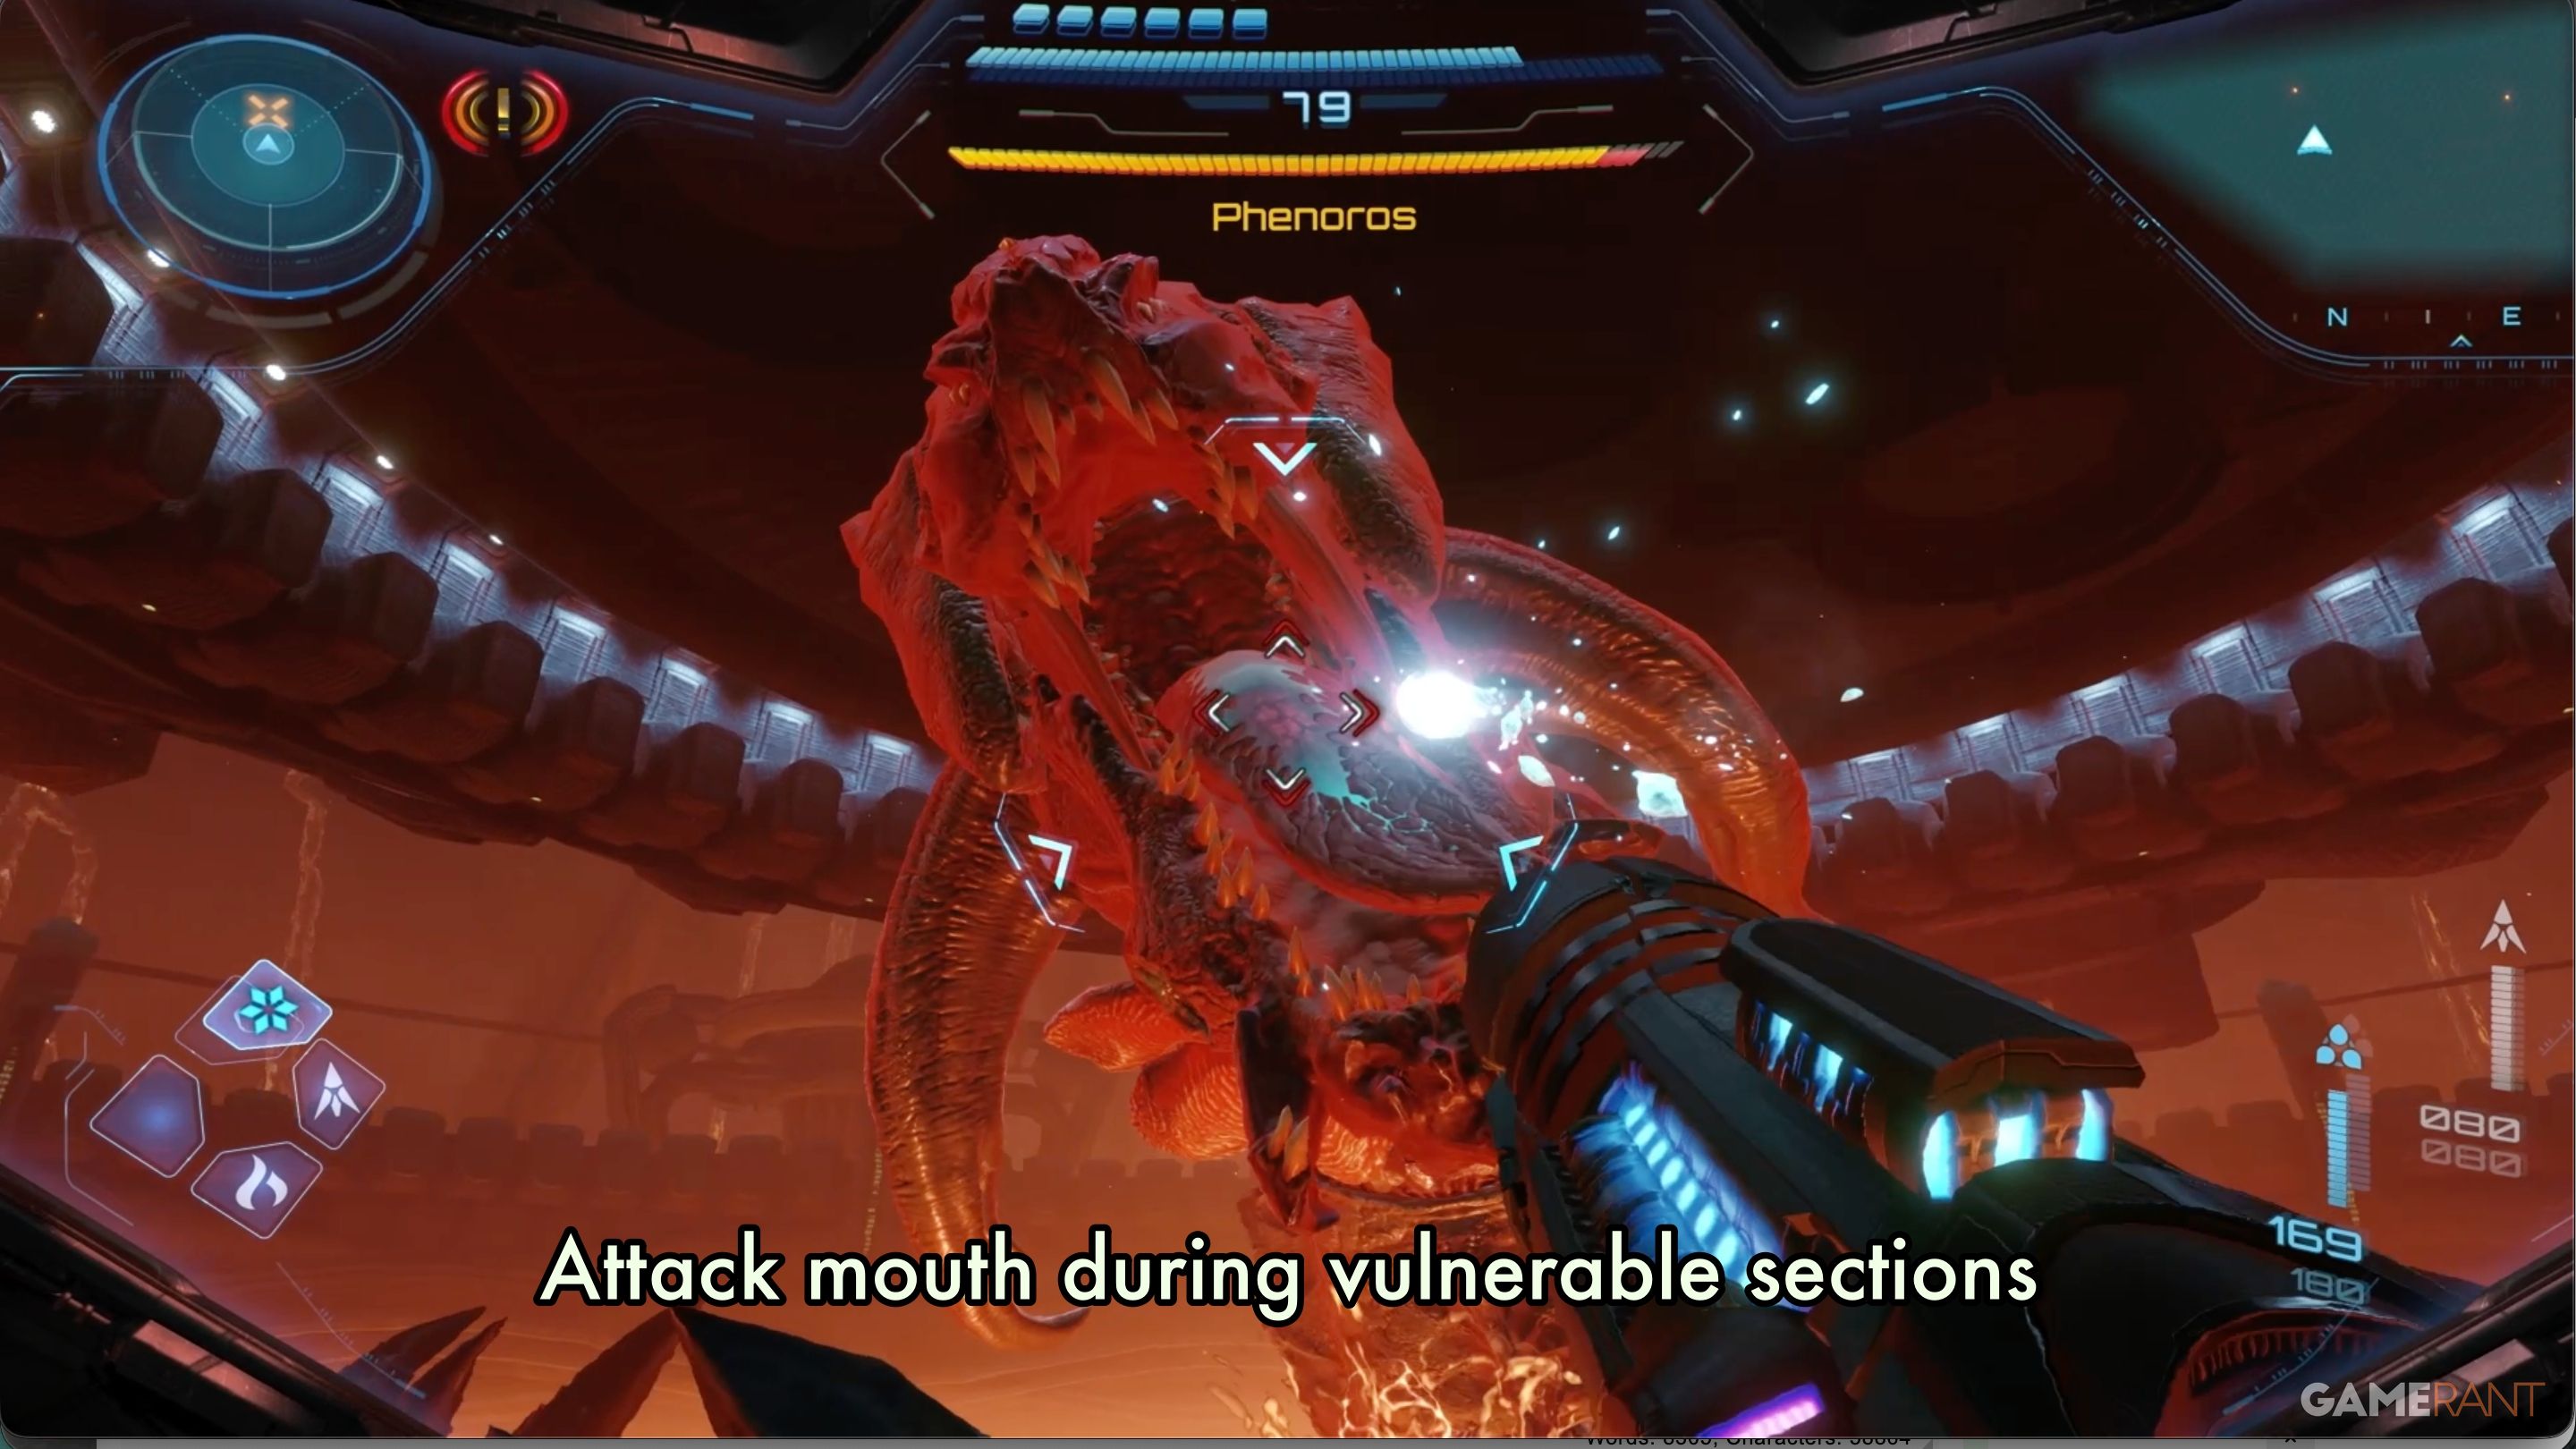
Okay, so here’s what I figured out for this fight. I stuck with the basic attack most of the time because it fires the fastest and is way easier to land while dodging around. When going for the boss’s mouth, though, Ice Shot just seemed to do the most damage. Basically, that’s the main thing you’ll be doing throughout the whole fight – basic attacks and Ice Shot on the mouth. Repeat that, and you’ll be good!
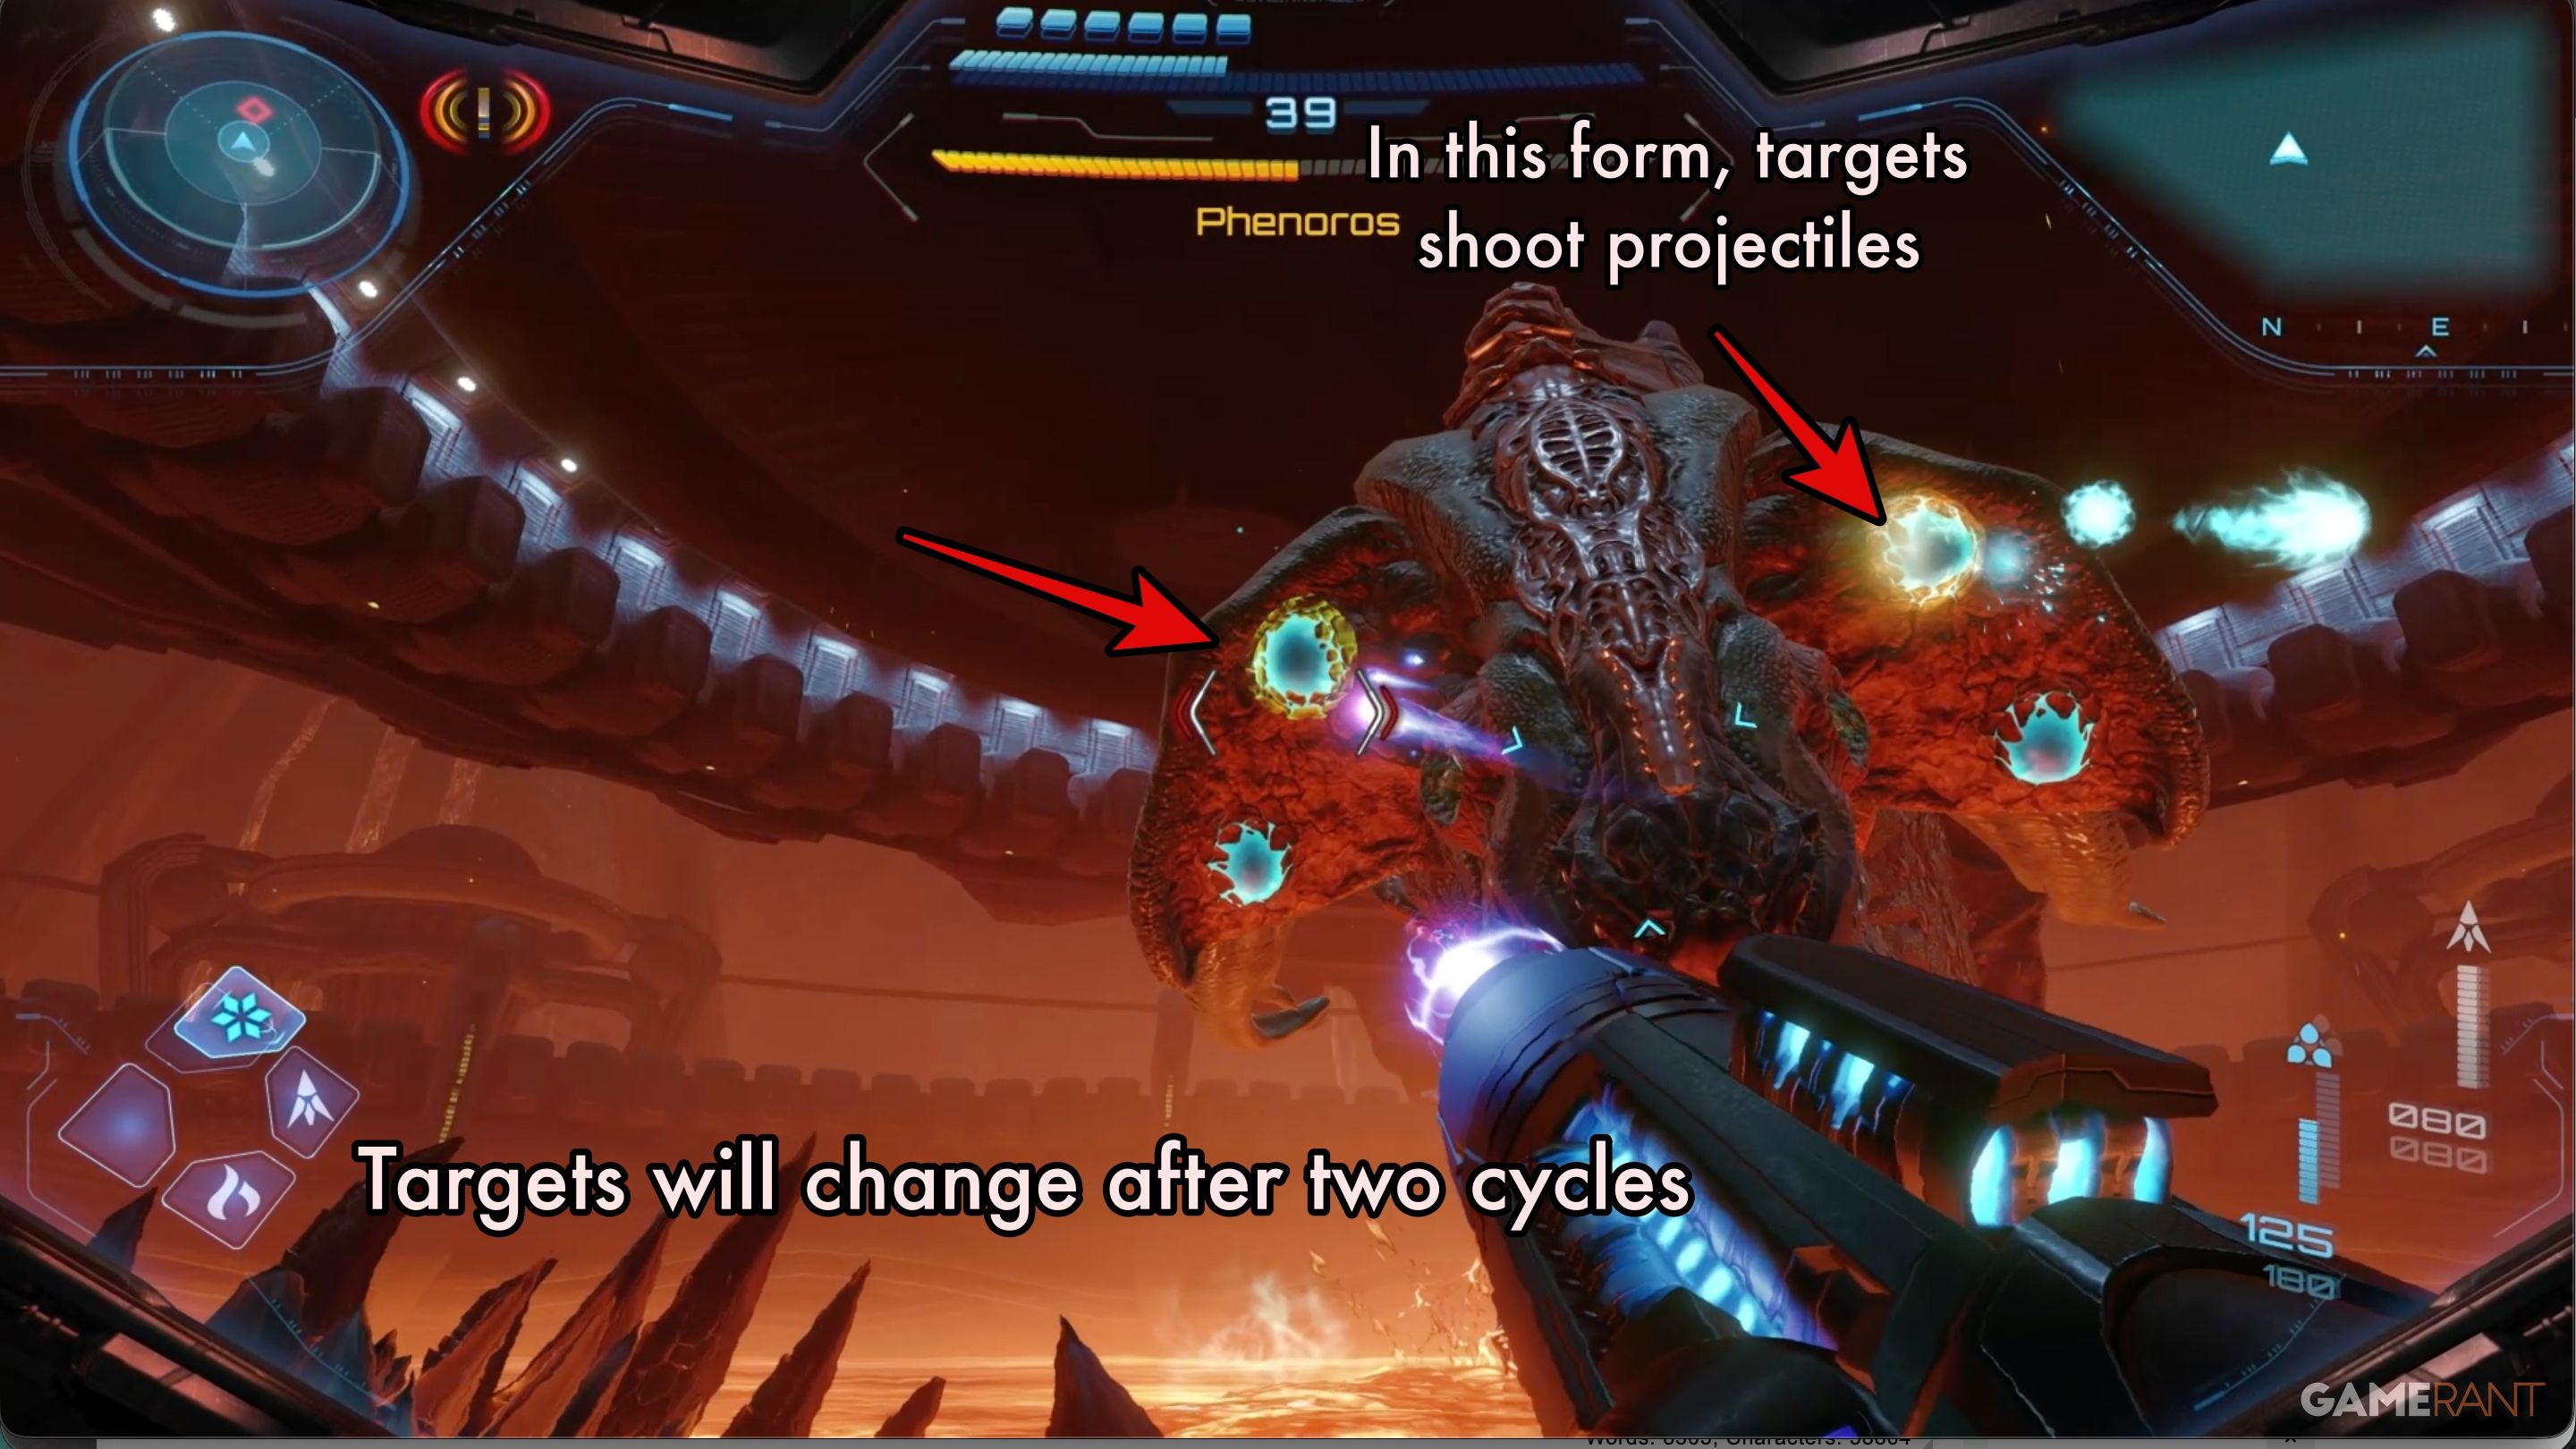
Throughout the fight with Phenoros, the glowing orbs on his head can shift positions. Initially, his large flaps are folded down, meaning you’ll mostly aim at the sides of his face. As the fight progresses, the orbs will move to appear on these flaps themselves.
Phenoros has multiple attacks. Here’s the basic outline for each, and how to avoid them:
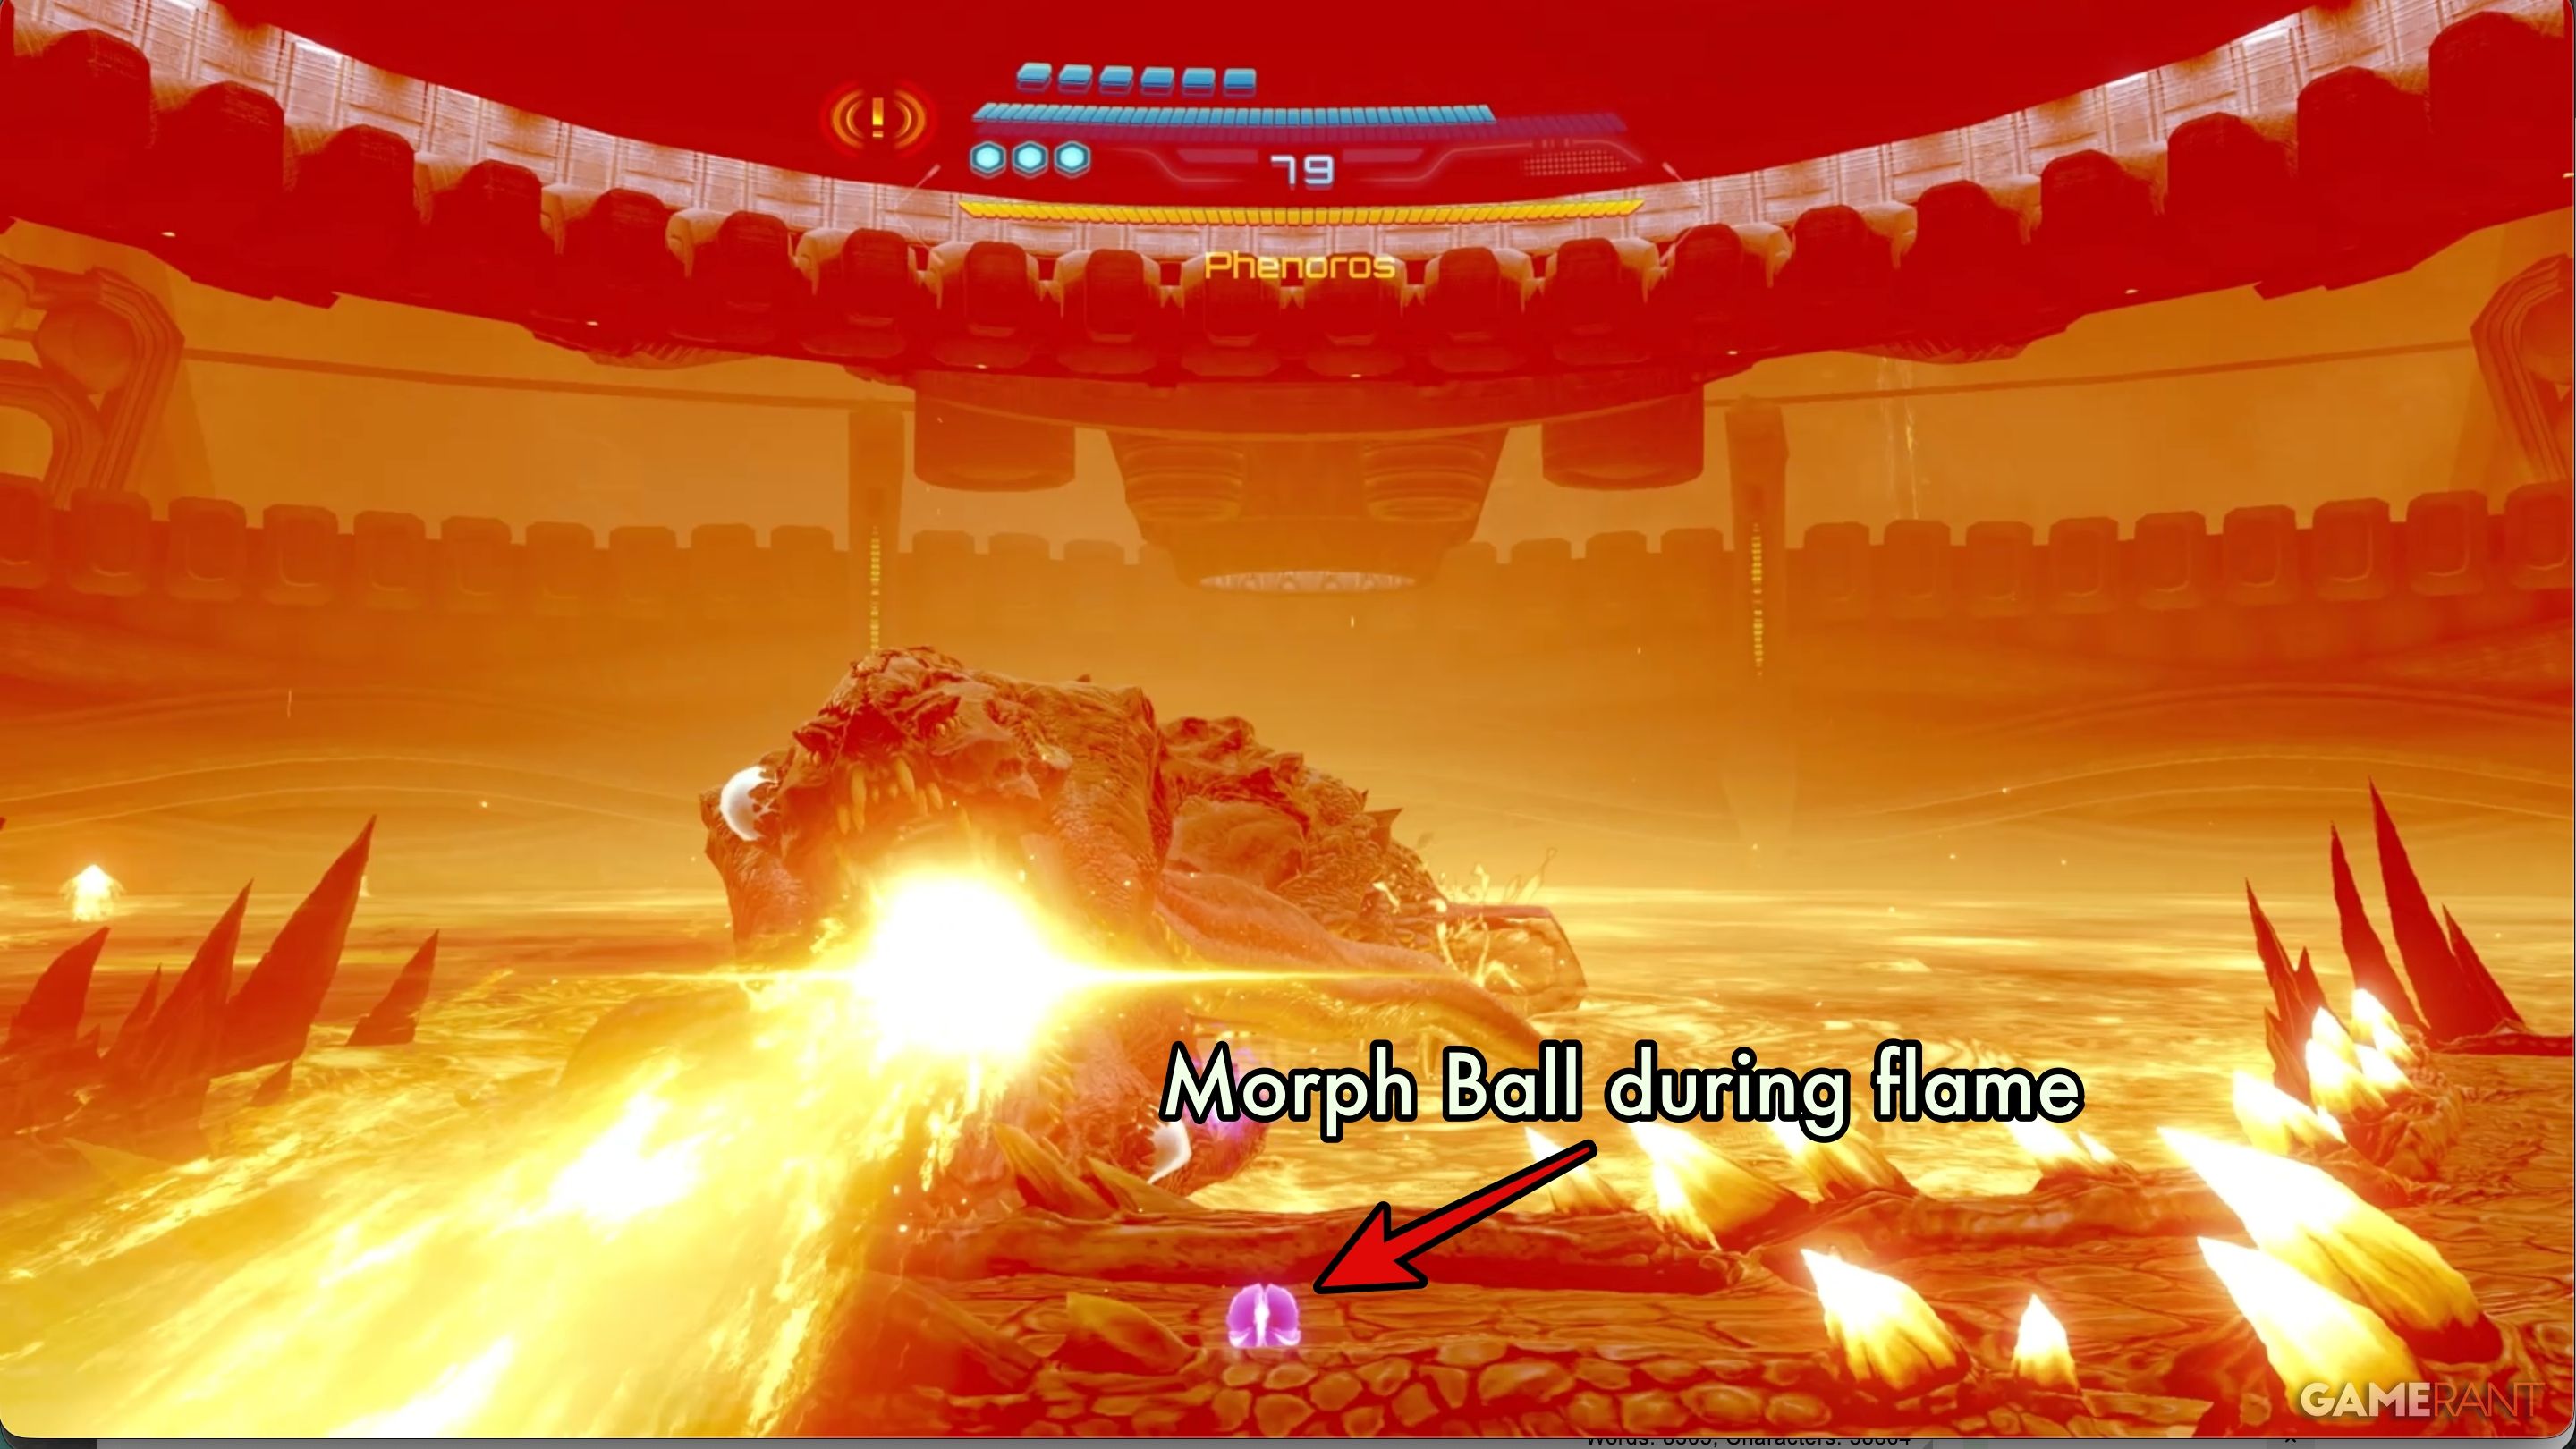
- Sweeping Flame: When Phenoros creates a sweeping horizontal beam of fire over the whole arena, you’ll simply need to use the Morph Ball ability to duck under it. Later, Phenoros will do two passes, so you may want to wait a moment before changing out of Morph Ball.
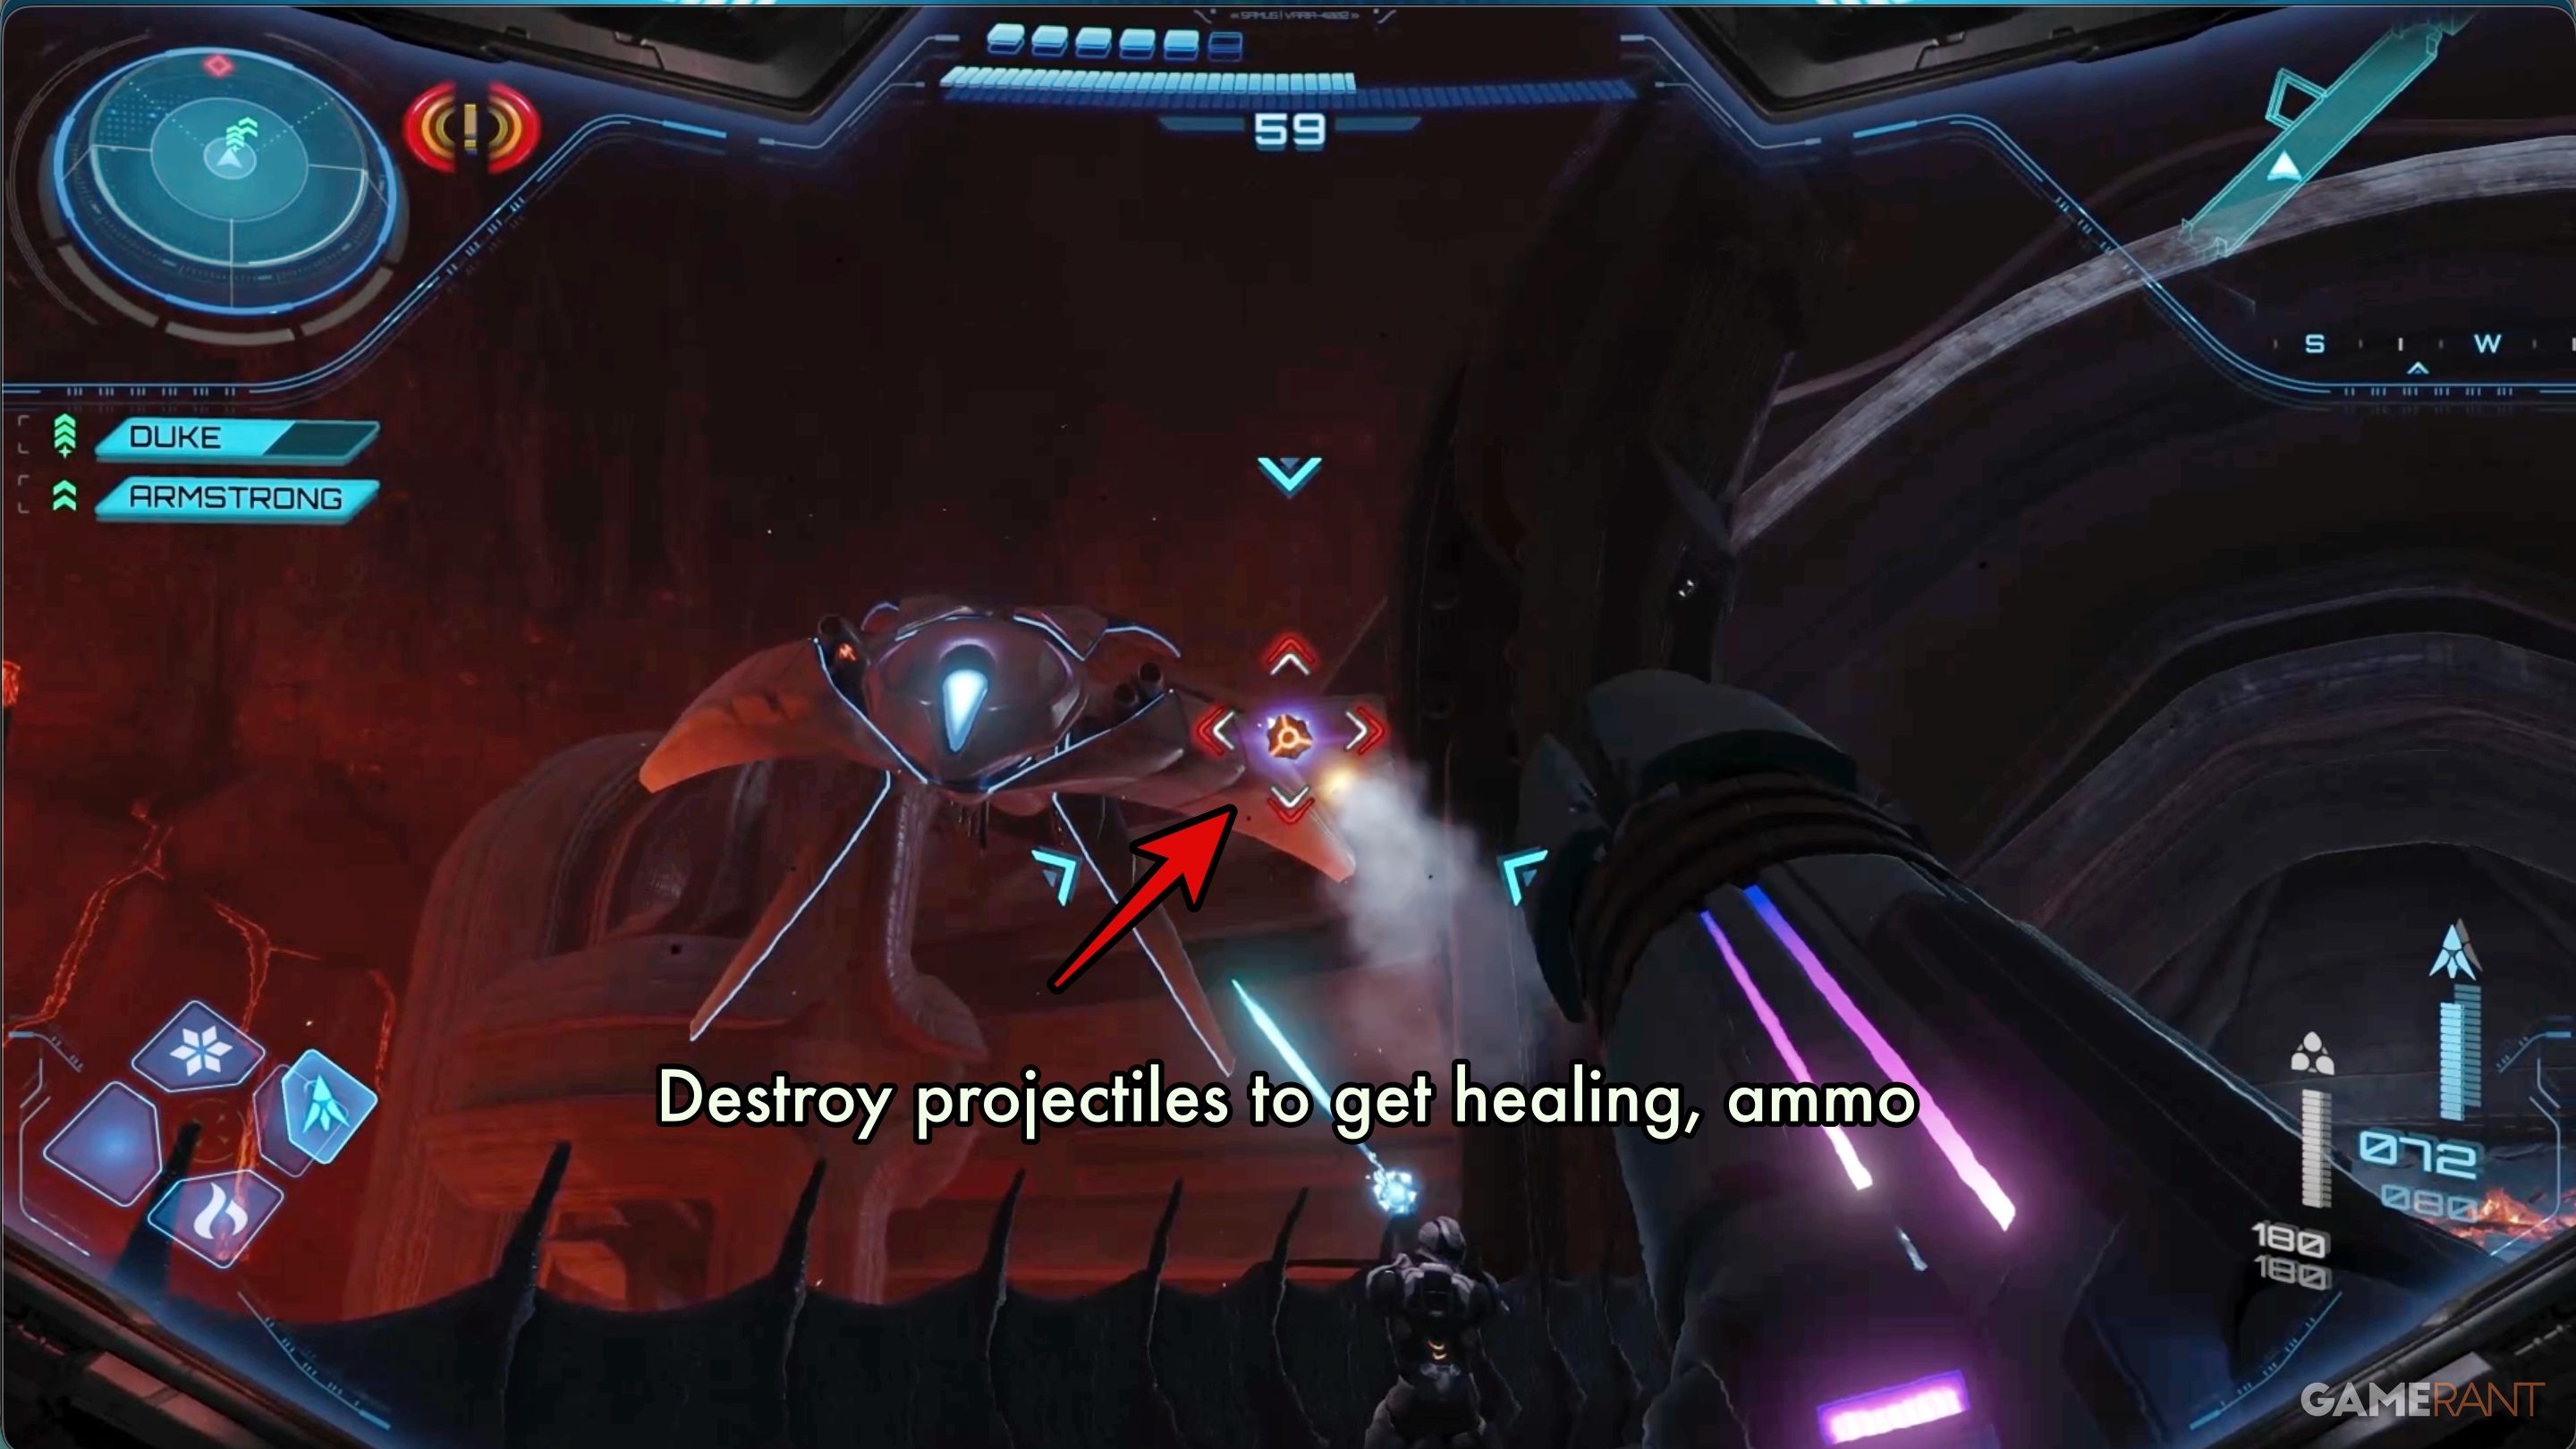
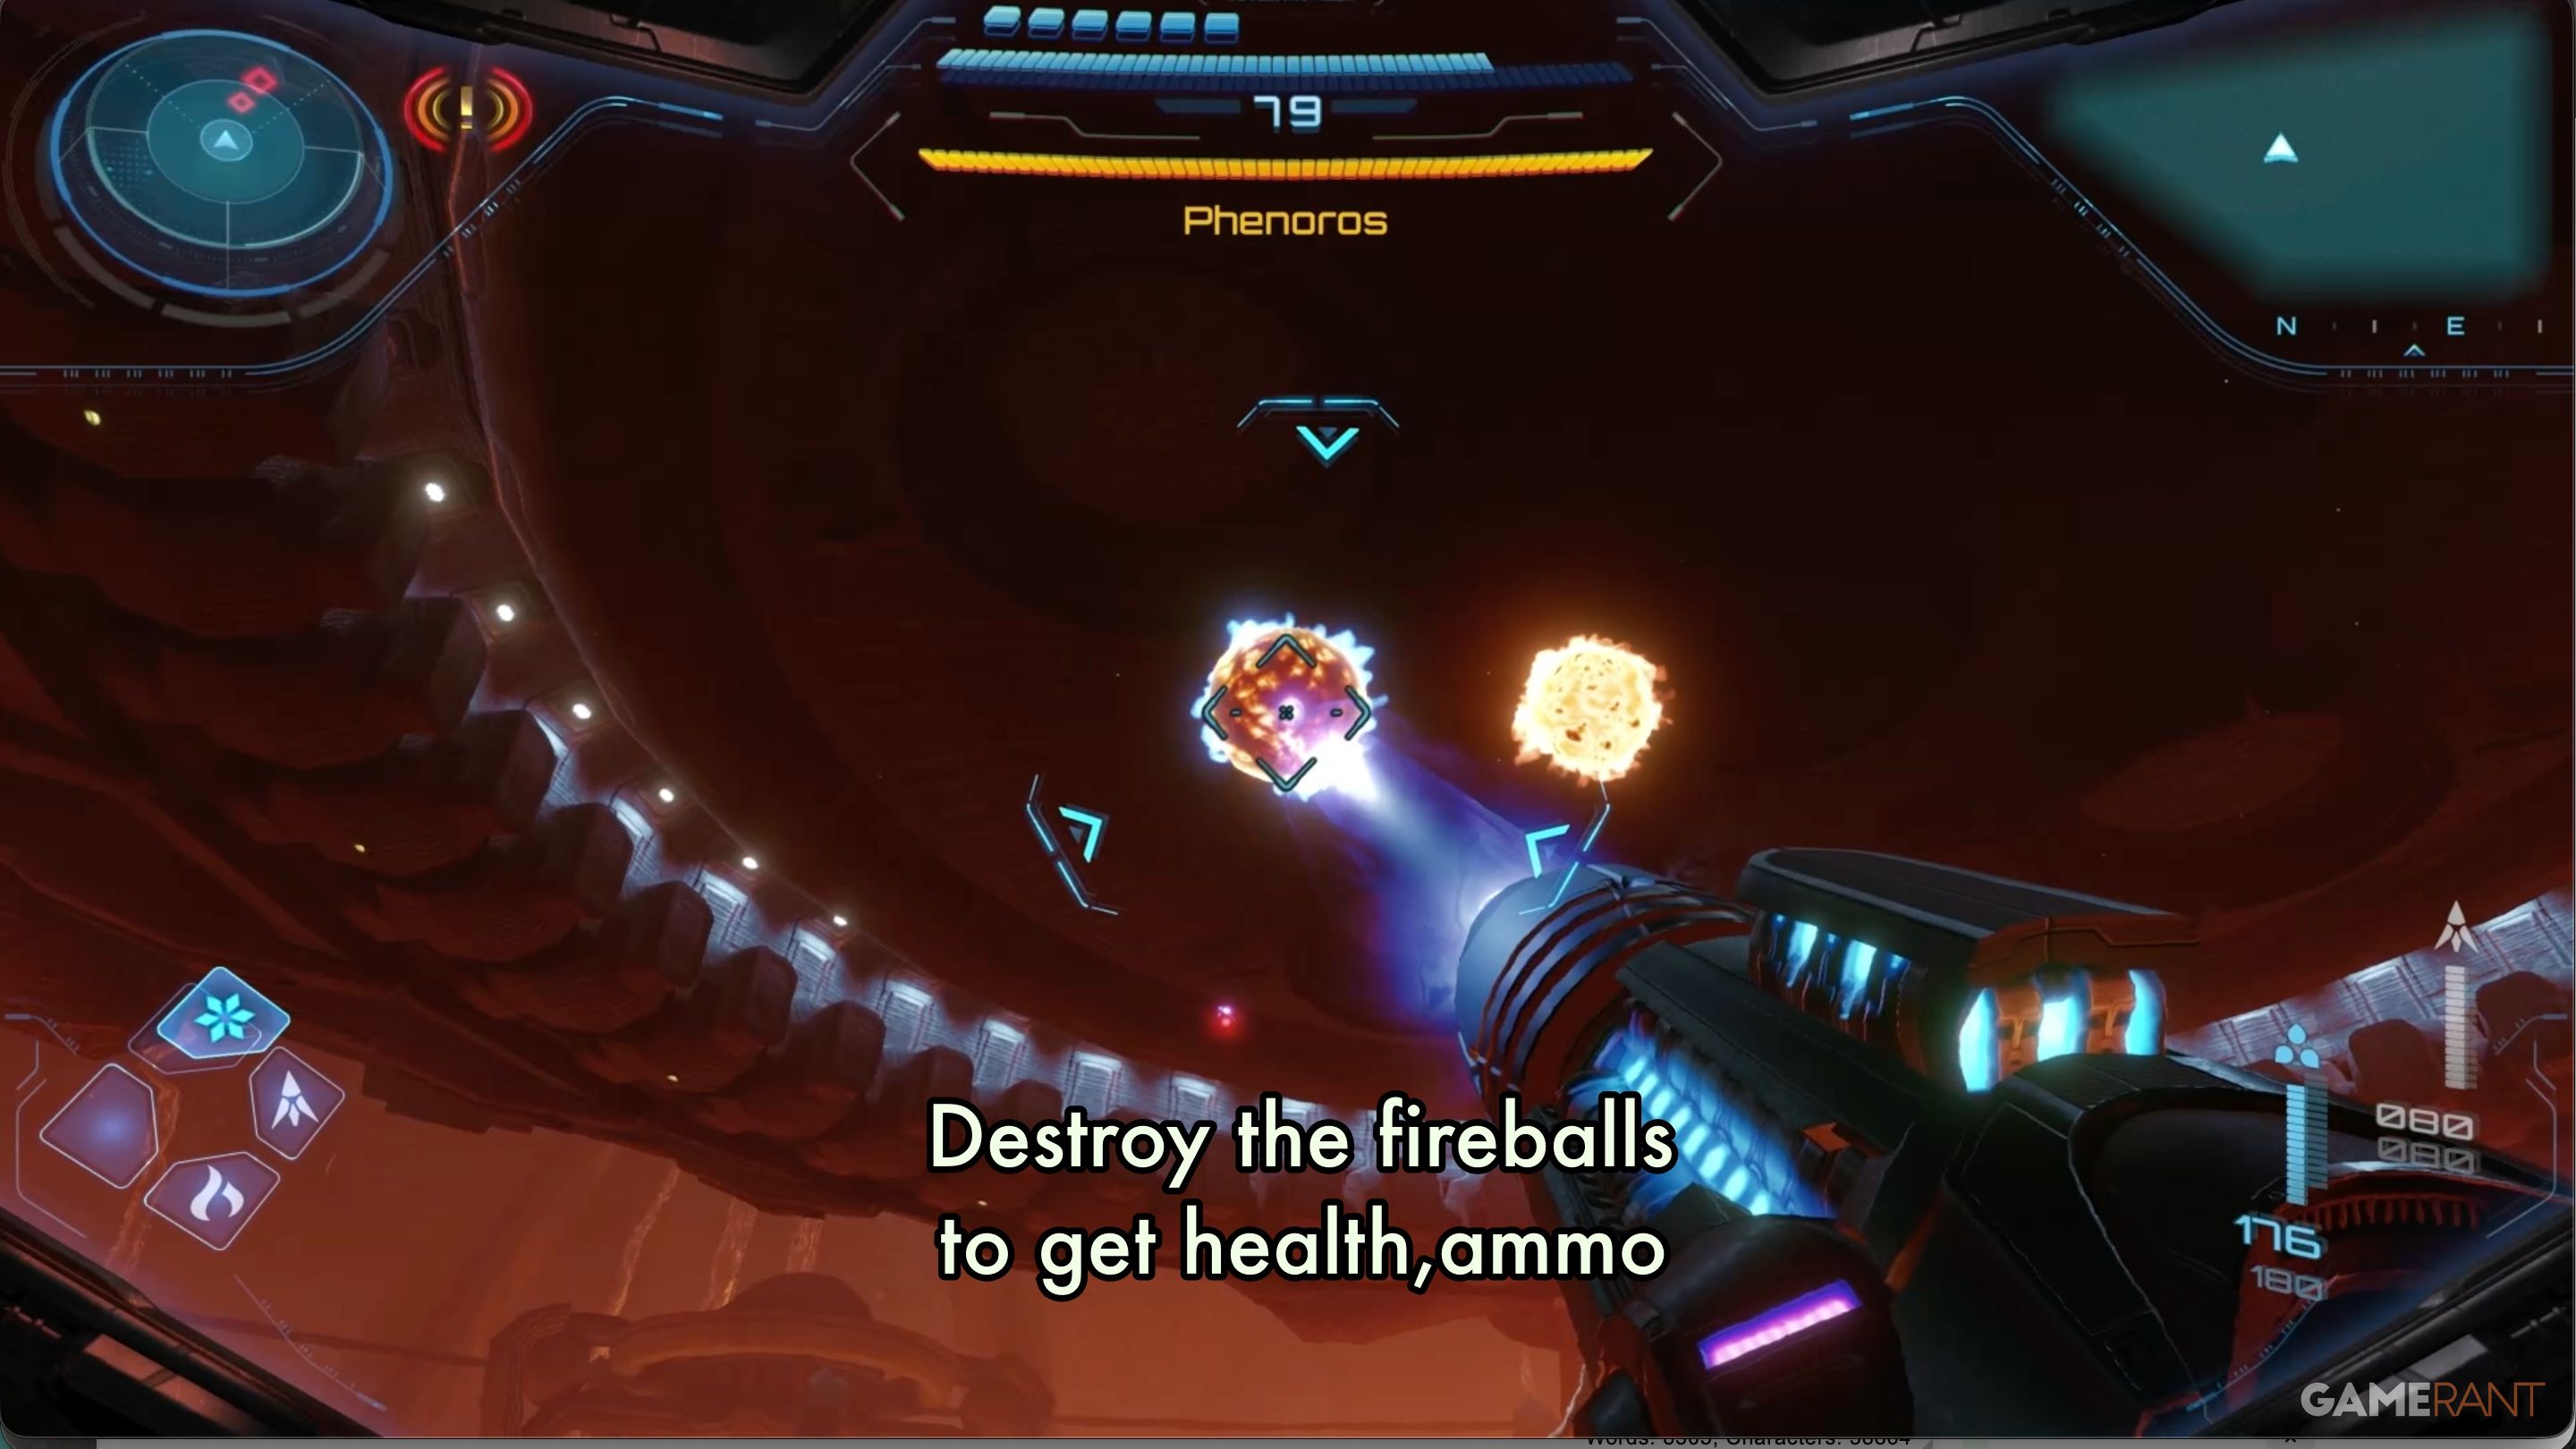
- Fireballs: Phenoros will stick his head back and launch slow-moving fireballs. These can be destroyed and will often drop health and ammo.
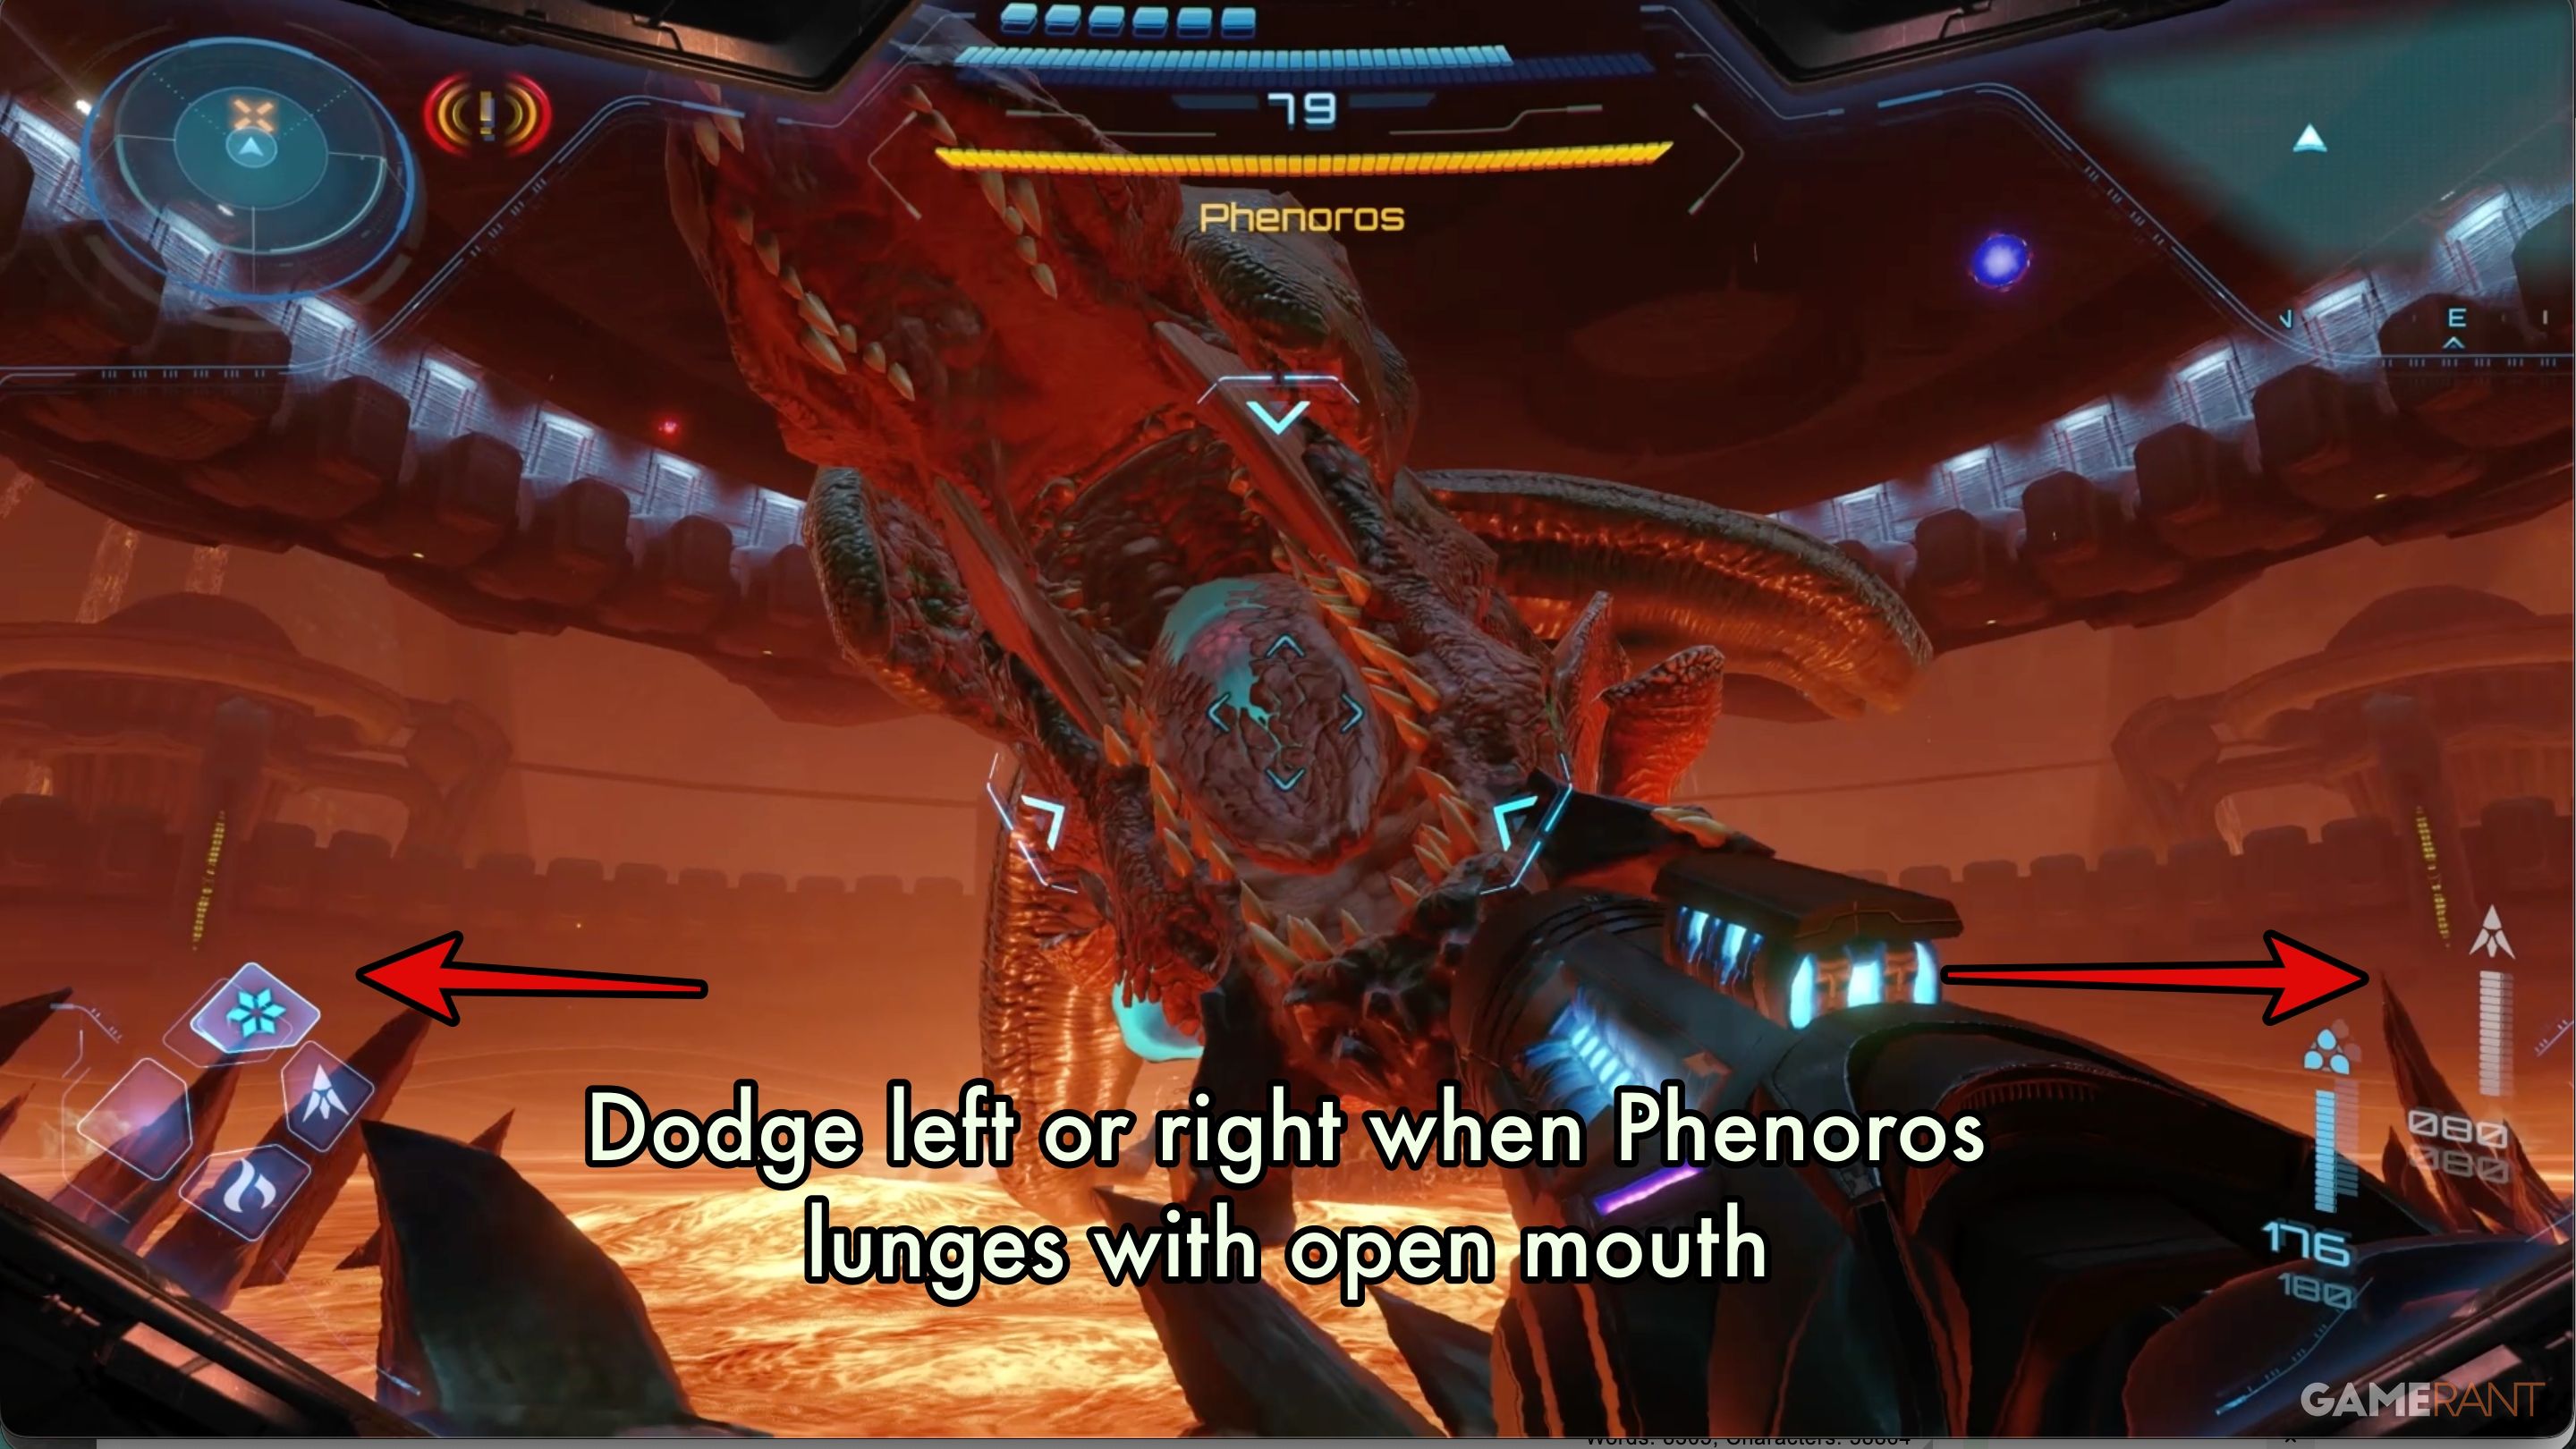
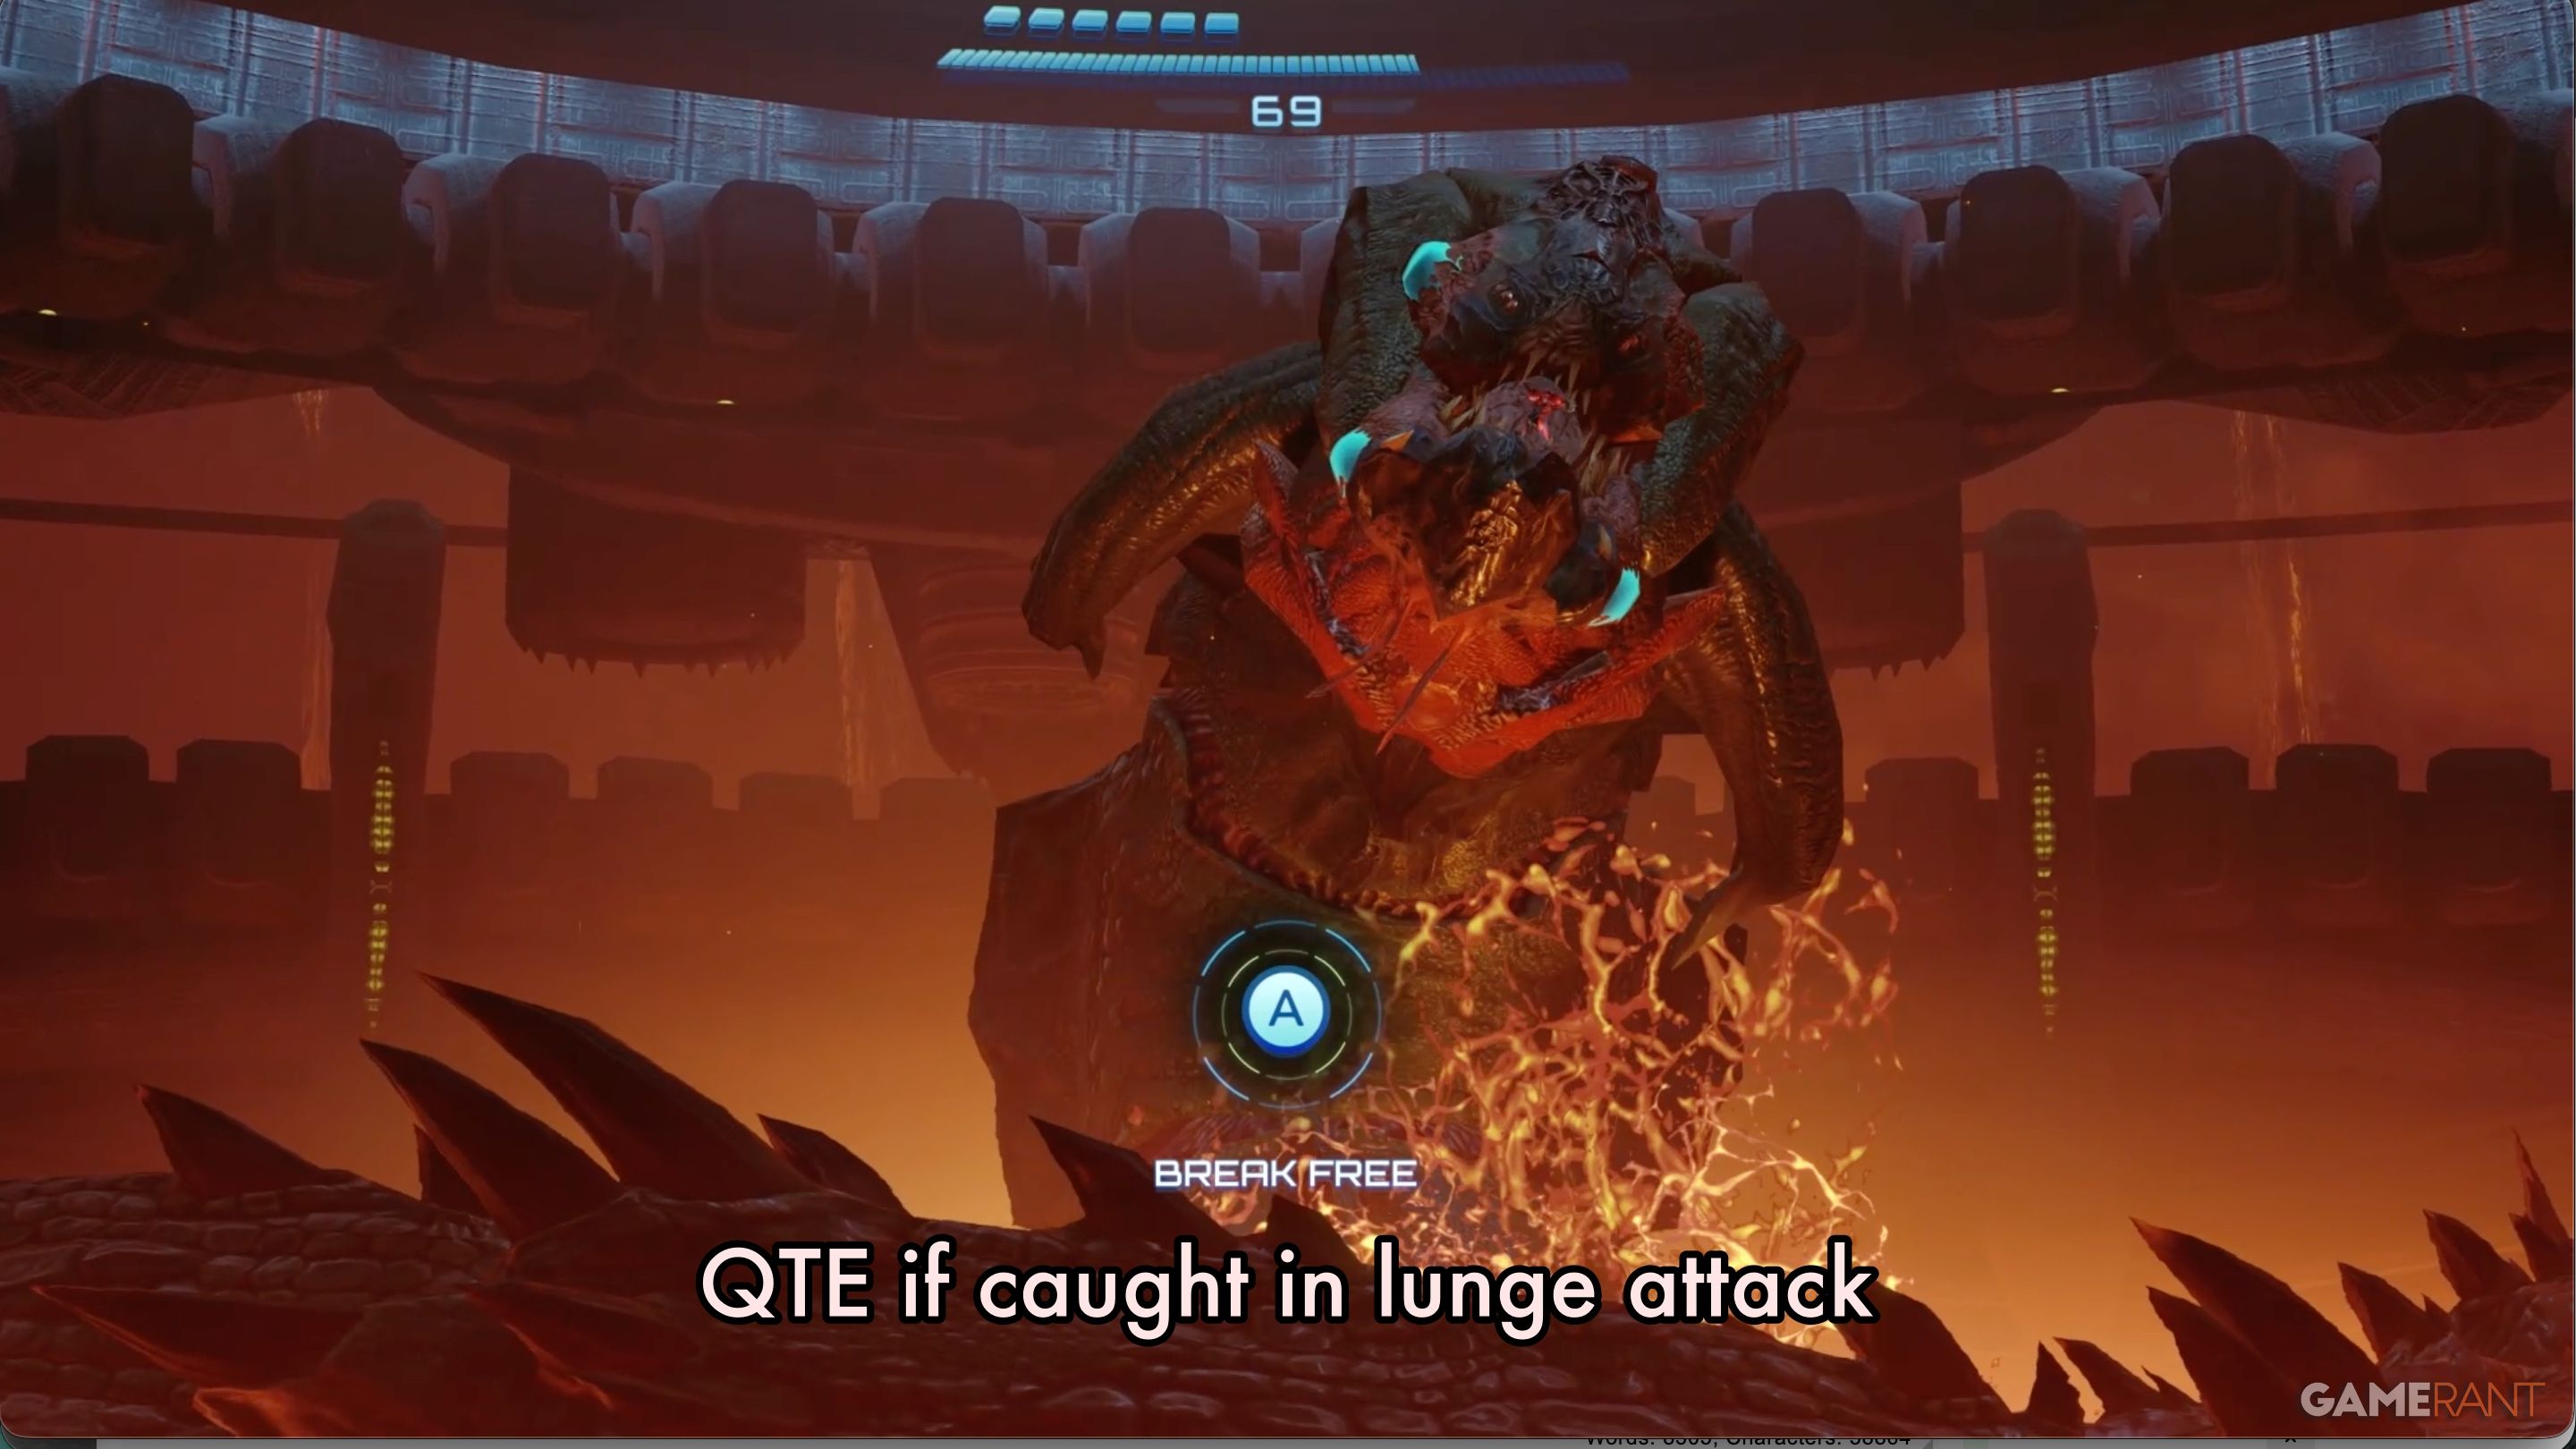
- Snapping Lunge: Phenoros will open his jaw wide, then lunge forward, hoping to trap Samus in his jaws. You can dodge left or right to move out of the way. This will expose the targets on the side of Phenoros’ head when done correctly. If you are caught, press A repeatedly to escape.
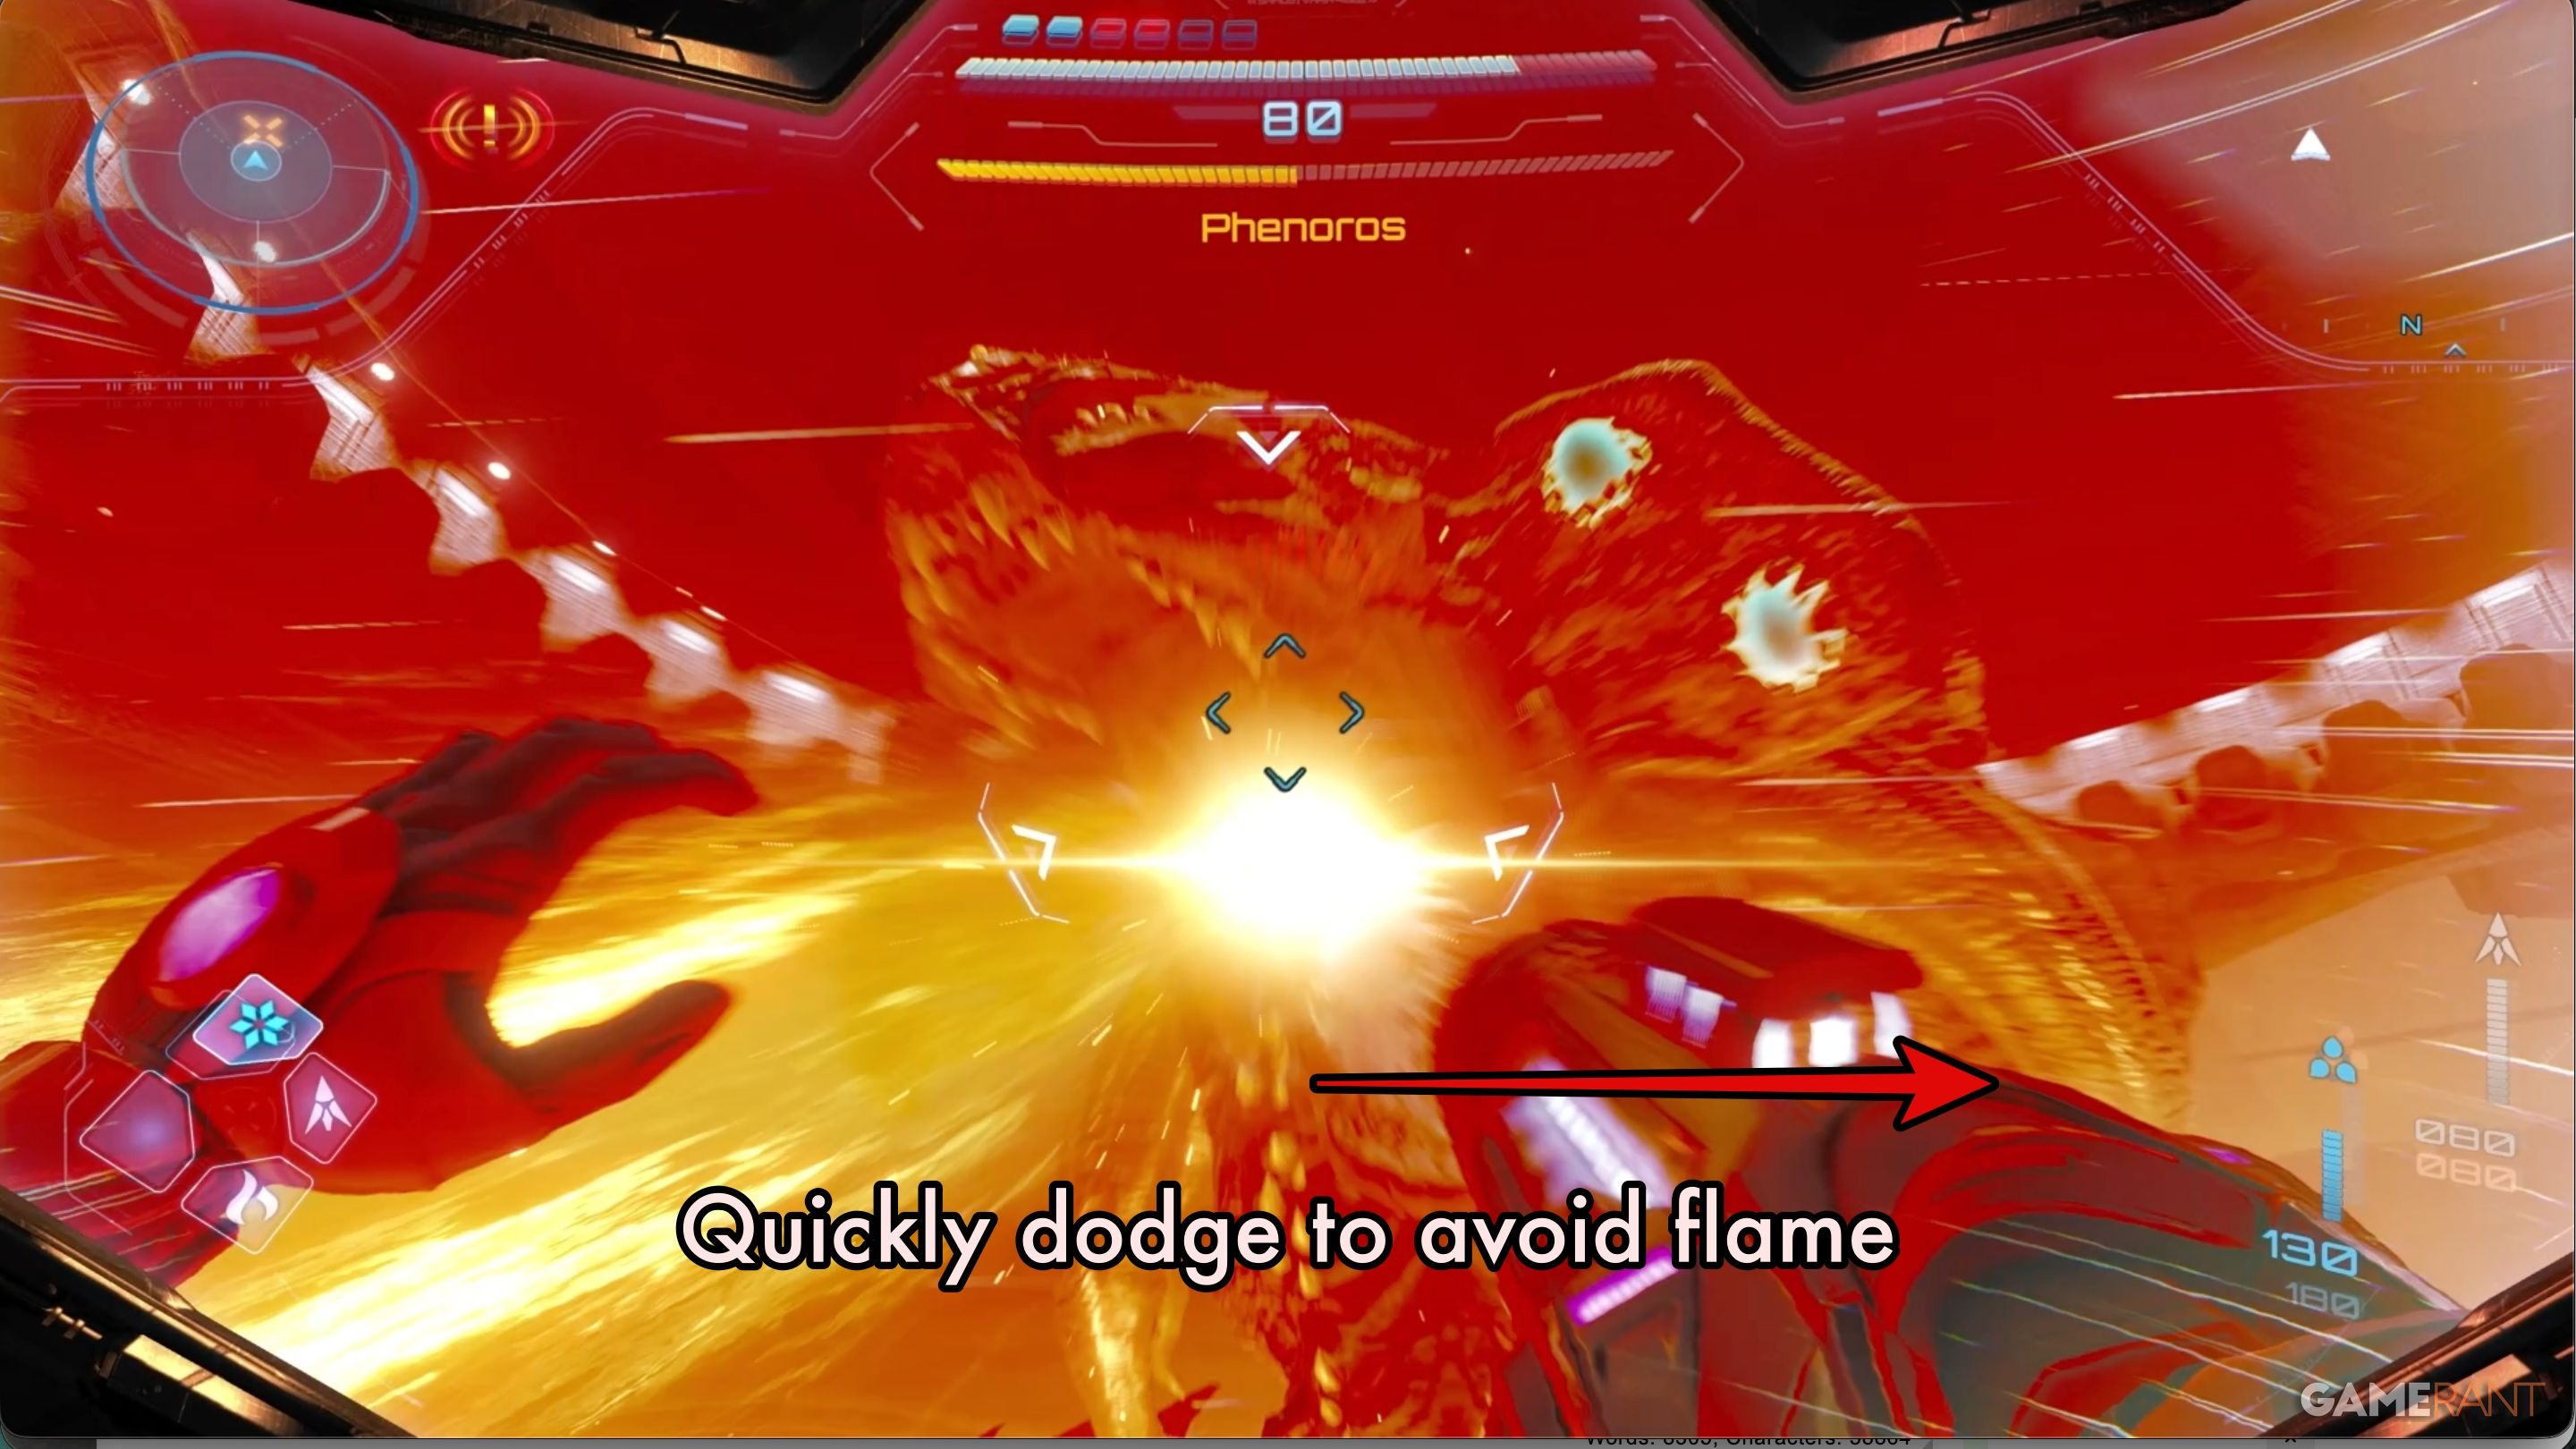
- Flame Laser: Later in the fight, Phenoros will fire a devastating beam of flame directly at Samus. Dodge as quickly as you can to the right or left.
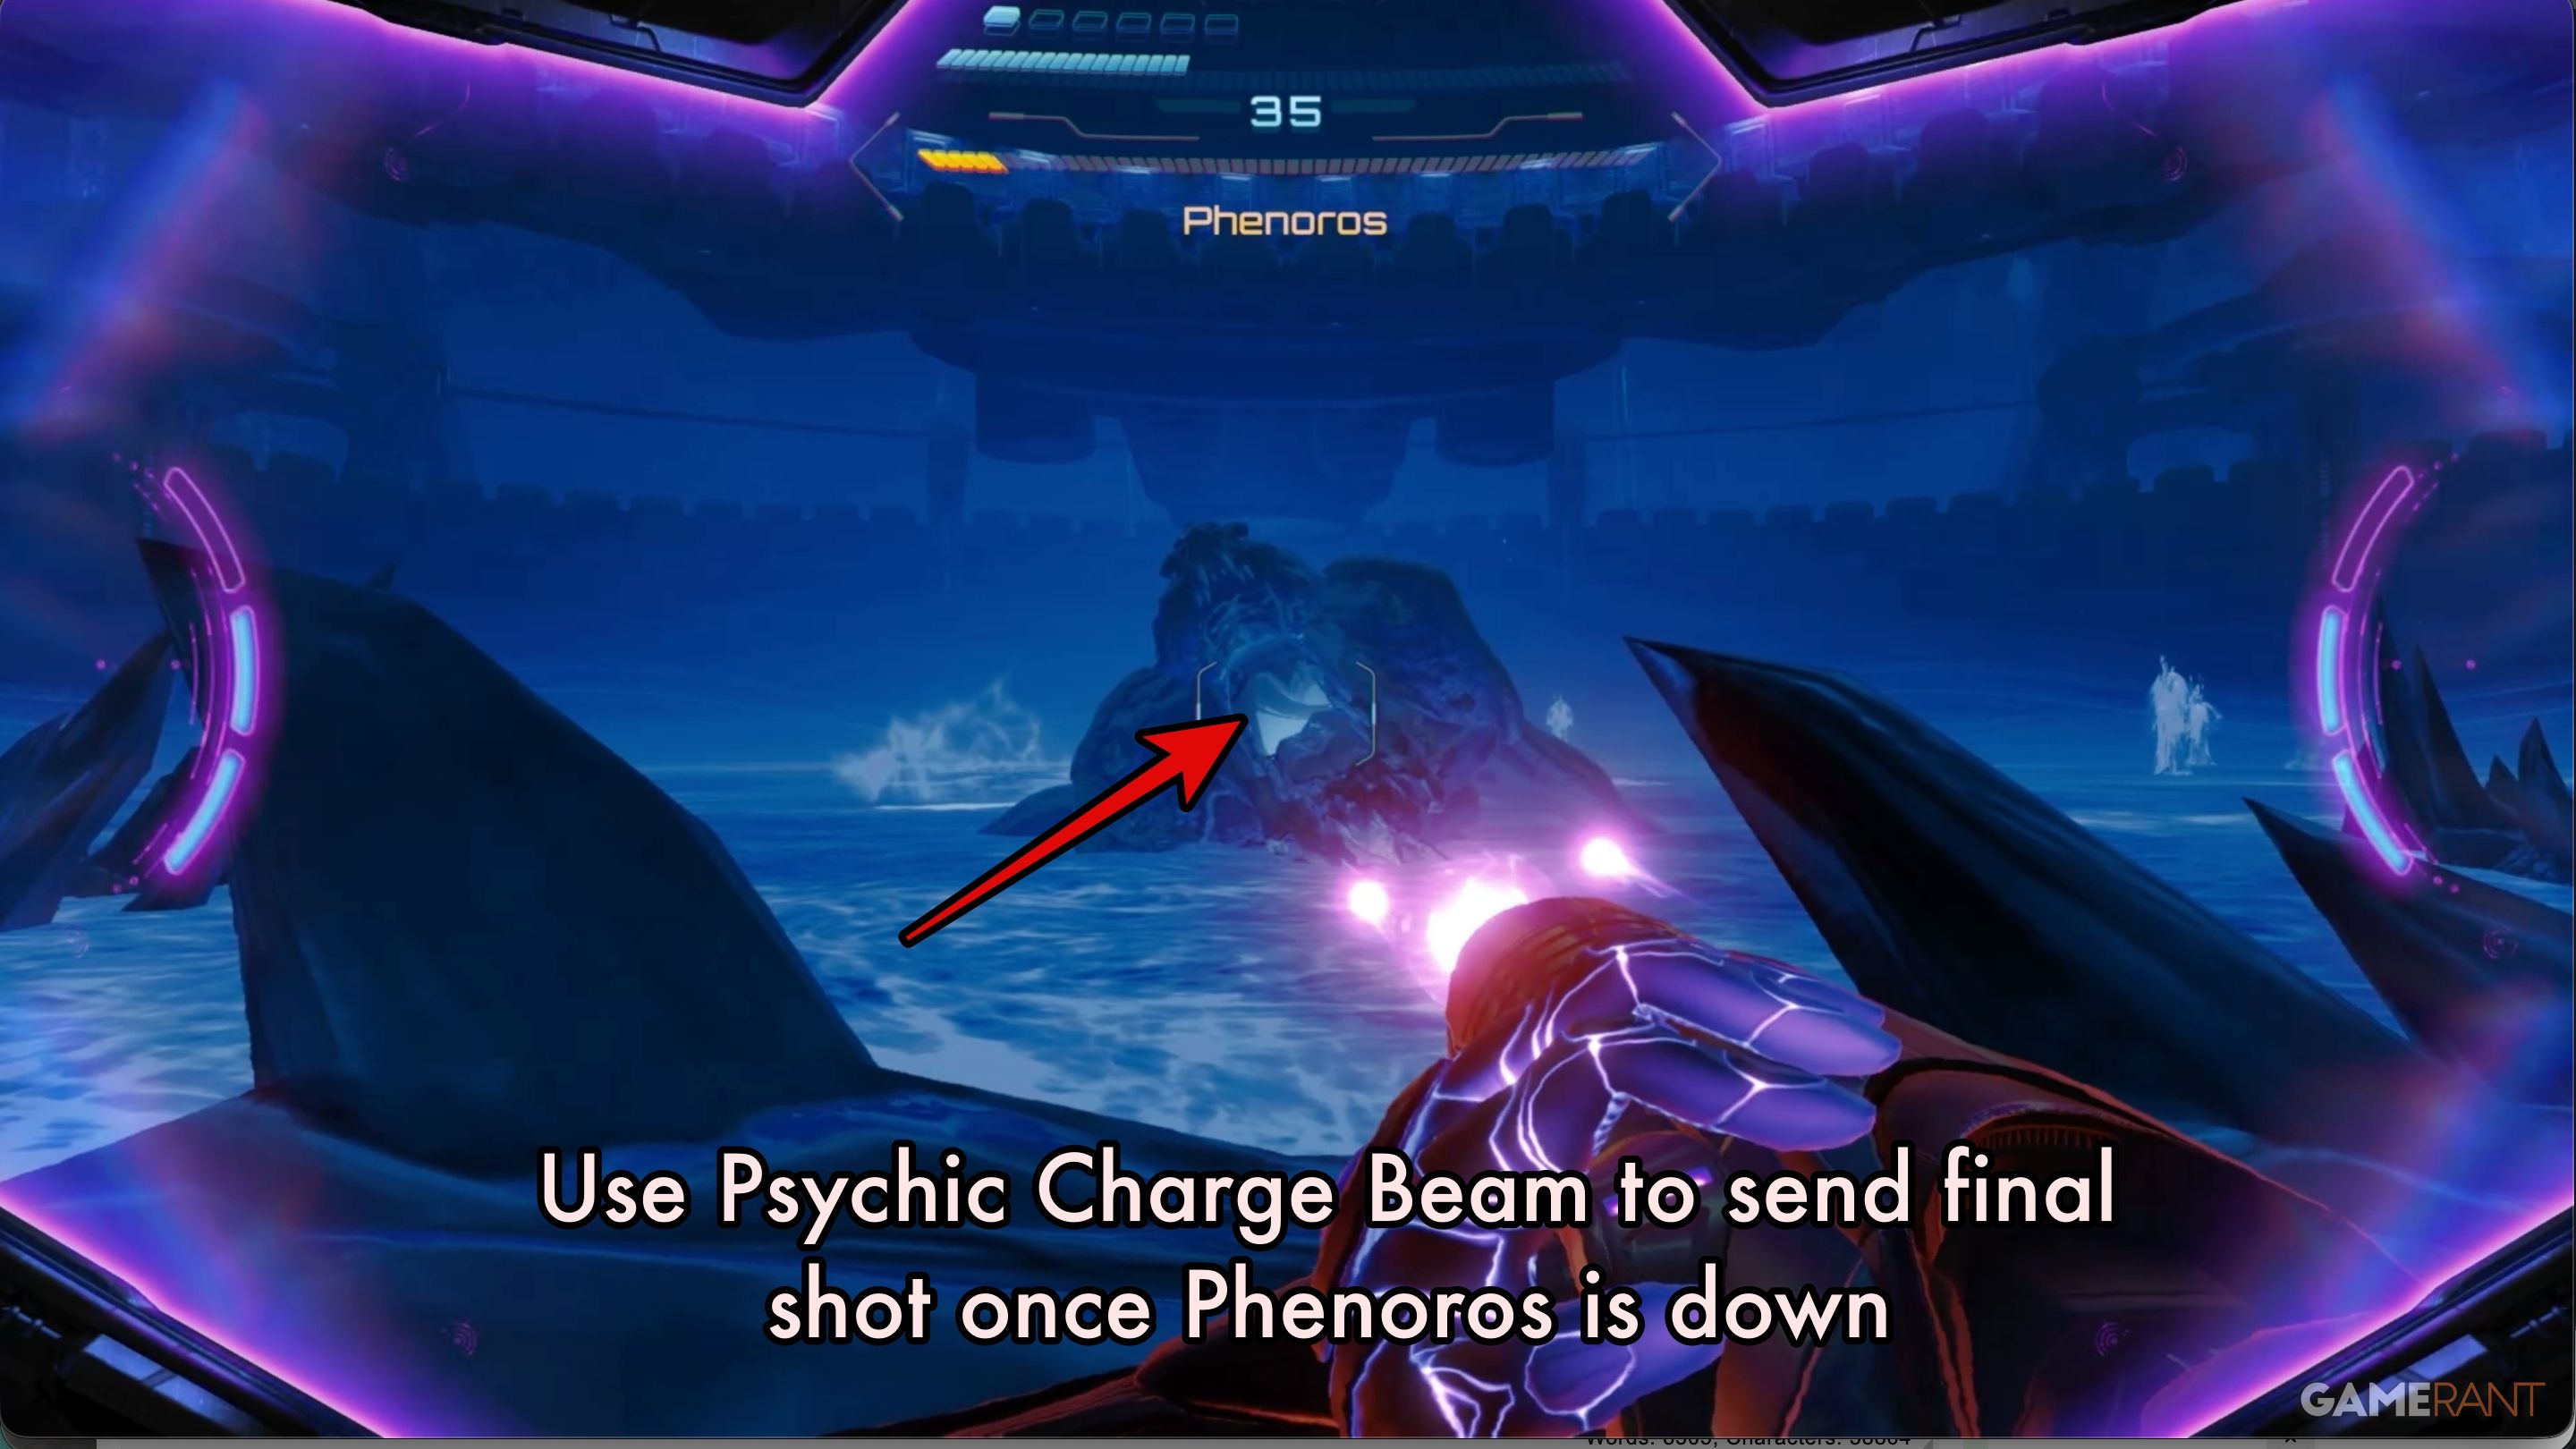
After defeating all the waves of enemies, Phenoros will be left with very little health. Scan it now. Then, use the Psychic Charge Beam to hit the opening in Phenoros’s throat. This will reveal the final target inside.
Once that is destroyed, Phenoros is defeated.
Once you’ve beaten Phenoros, grab the Grapple Ability, and then just follow the main path to leave the dungeon. Getting out is surprisingly simple.
Flare Pool Final Visit Walkthrough – Metroid Prime 4
What to Do Before Returning for the Final Visit:
Before heading back to Flare Pool, double-check that you’ve found all the ability upgrades – like Thunder Shot, Psychic Spider Ball, Psychic Power Bomb, and Super Missiles – to make sure you’re fully prepared.
You’ll need to finish the Great Mines dungeon and then go back to Volt Forge and Ice Belt. Once you do, you’ll be able to gather any items you still need.
Scrapyard – Shot Expansion:
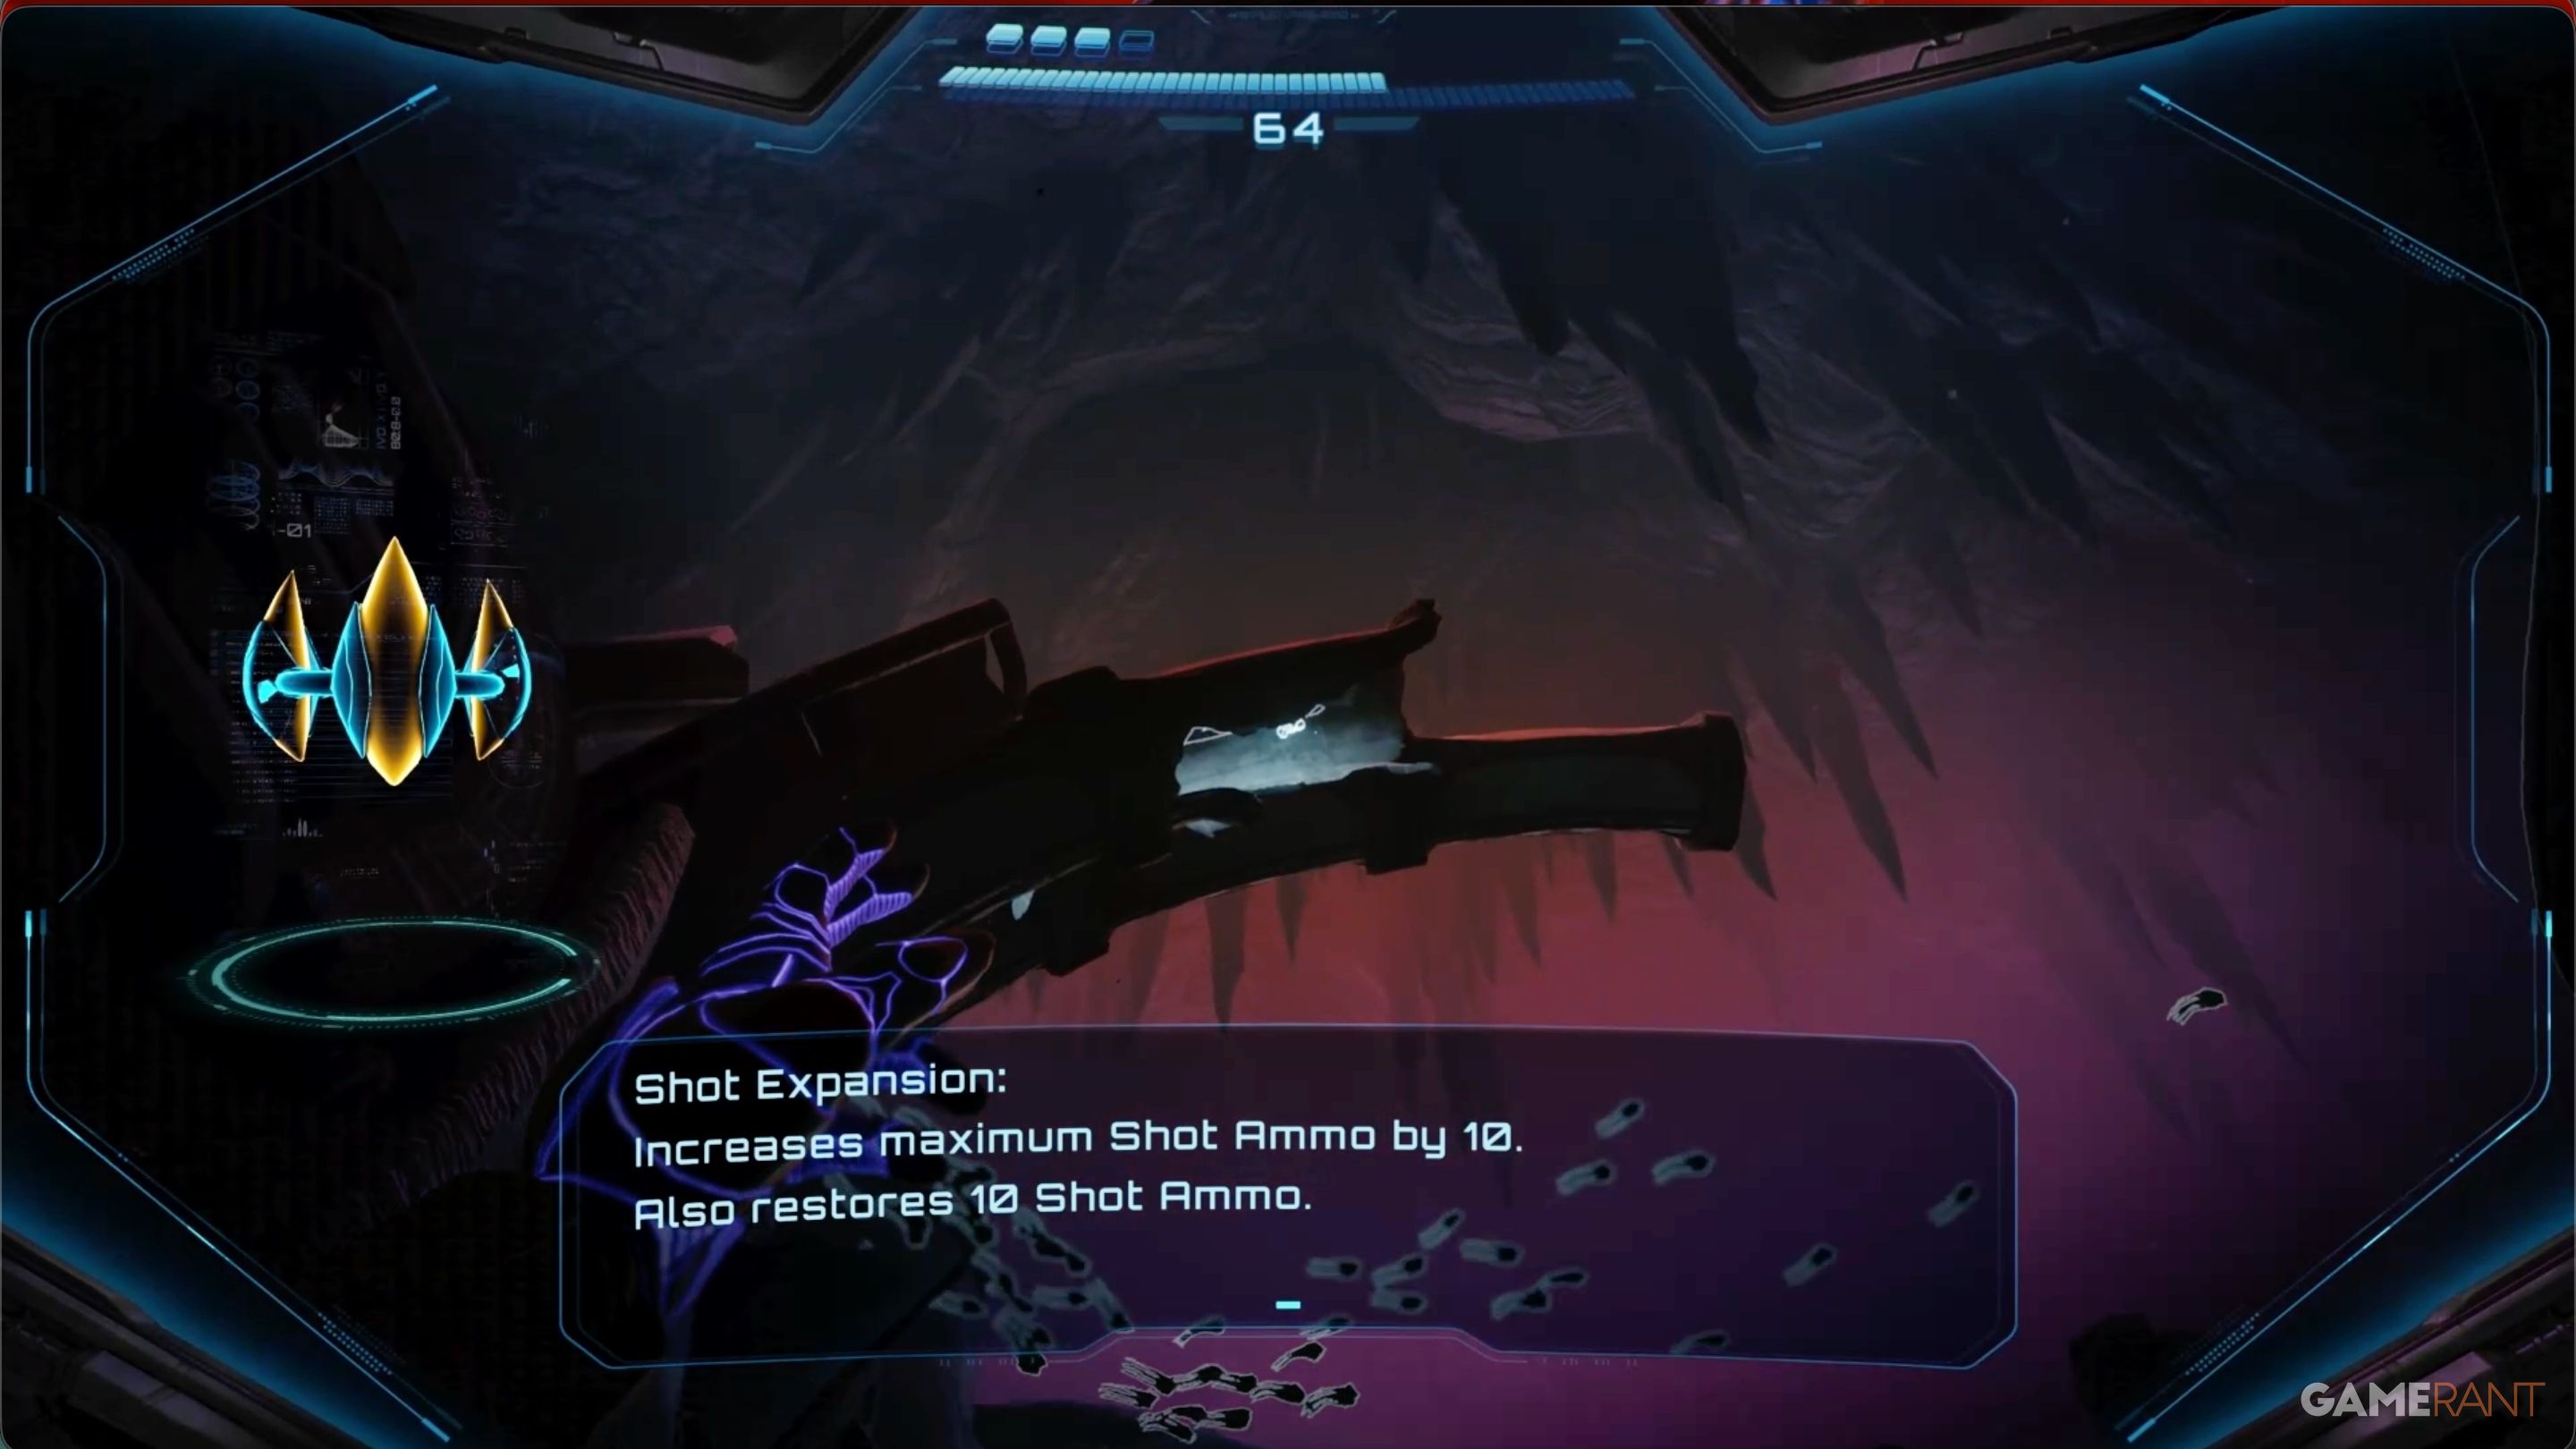
You might have noticed this upgrade while getting the Fire Chip in the Scrapyard, but you couldn’t reach it until you got the Psychic Power Bomb and Psychic Spider Ball. Before you go deep into the dungeon and fight the Scout Bot, come back here to get it.
Use the Power Bomb to remove the rocks that reveal the track that leads up to the Shot Expansion.
Return to the Scout Bot:
When you get back to Flare Pool, the first thing you should do is check in with the Scout Bot and show them everything you haven’t found yet. We’ll list any items you can only get on your last visit, as well as anything we didn’t find during our initial playthrough, below.
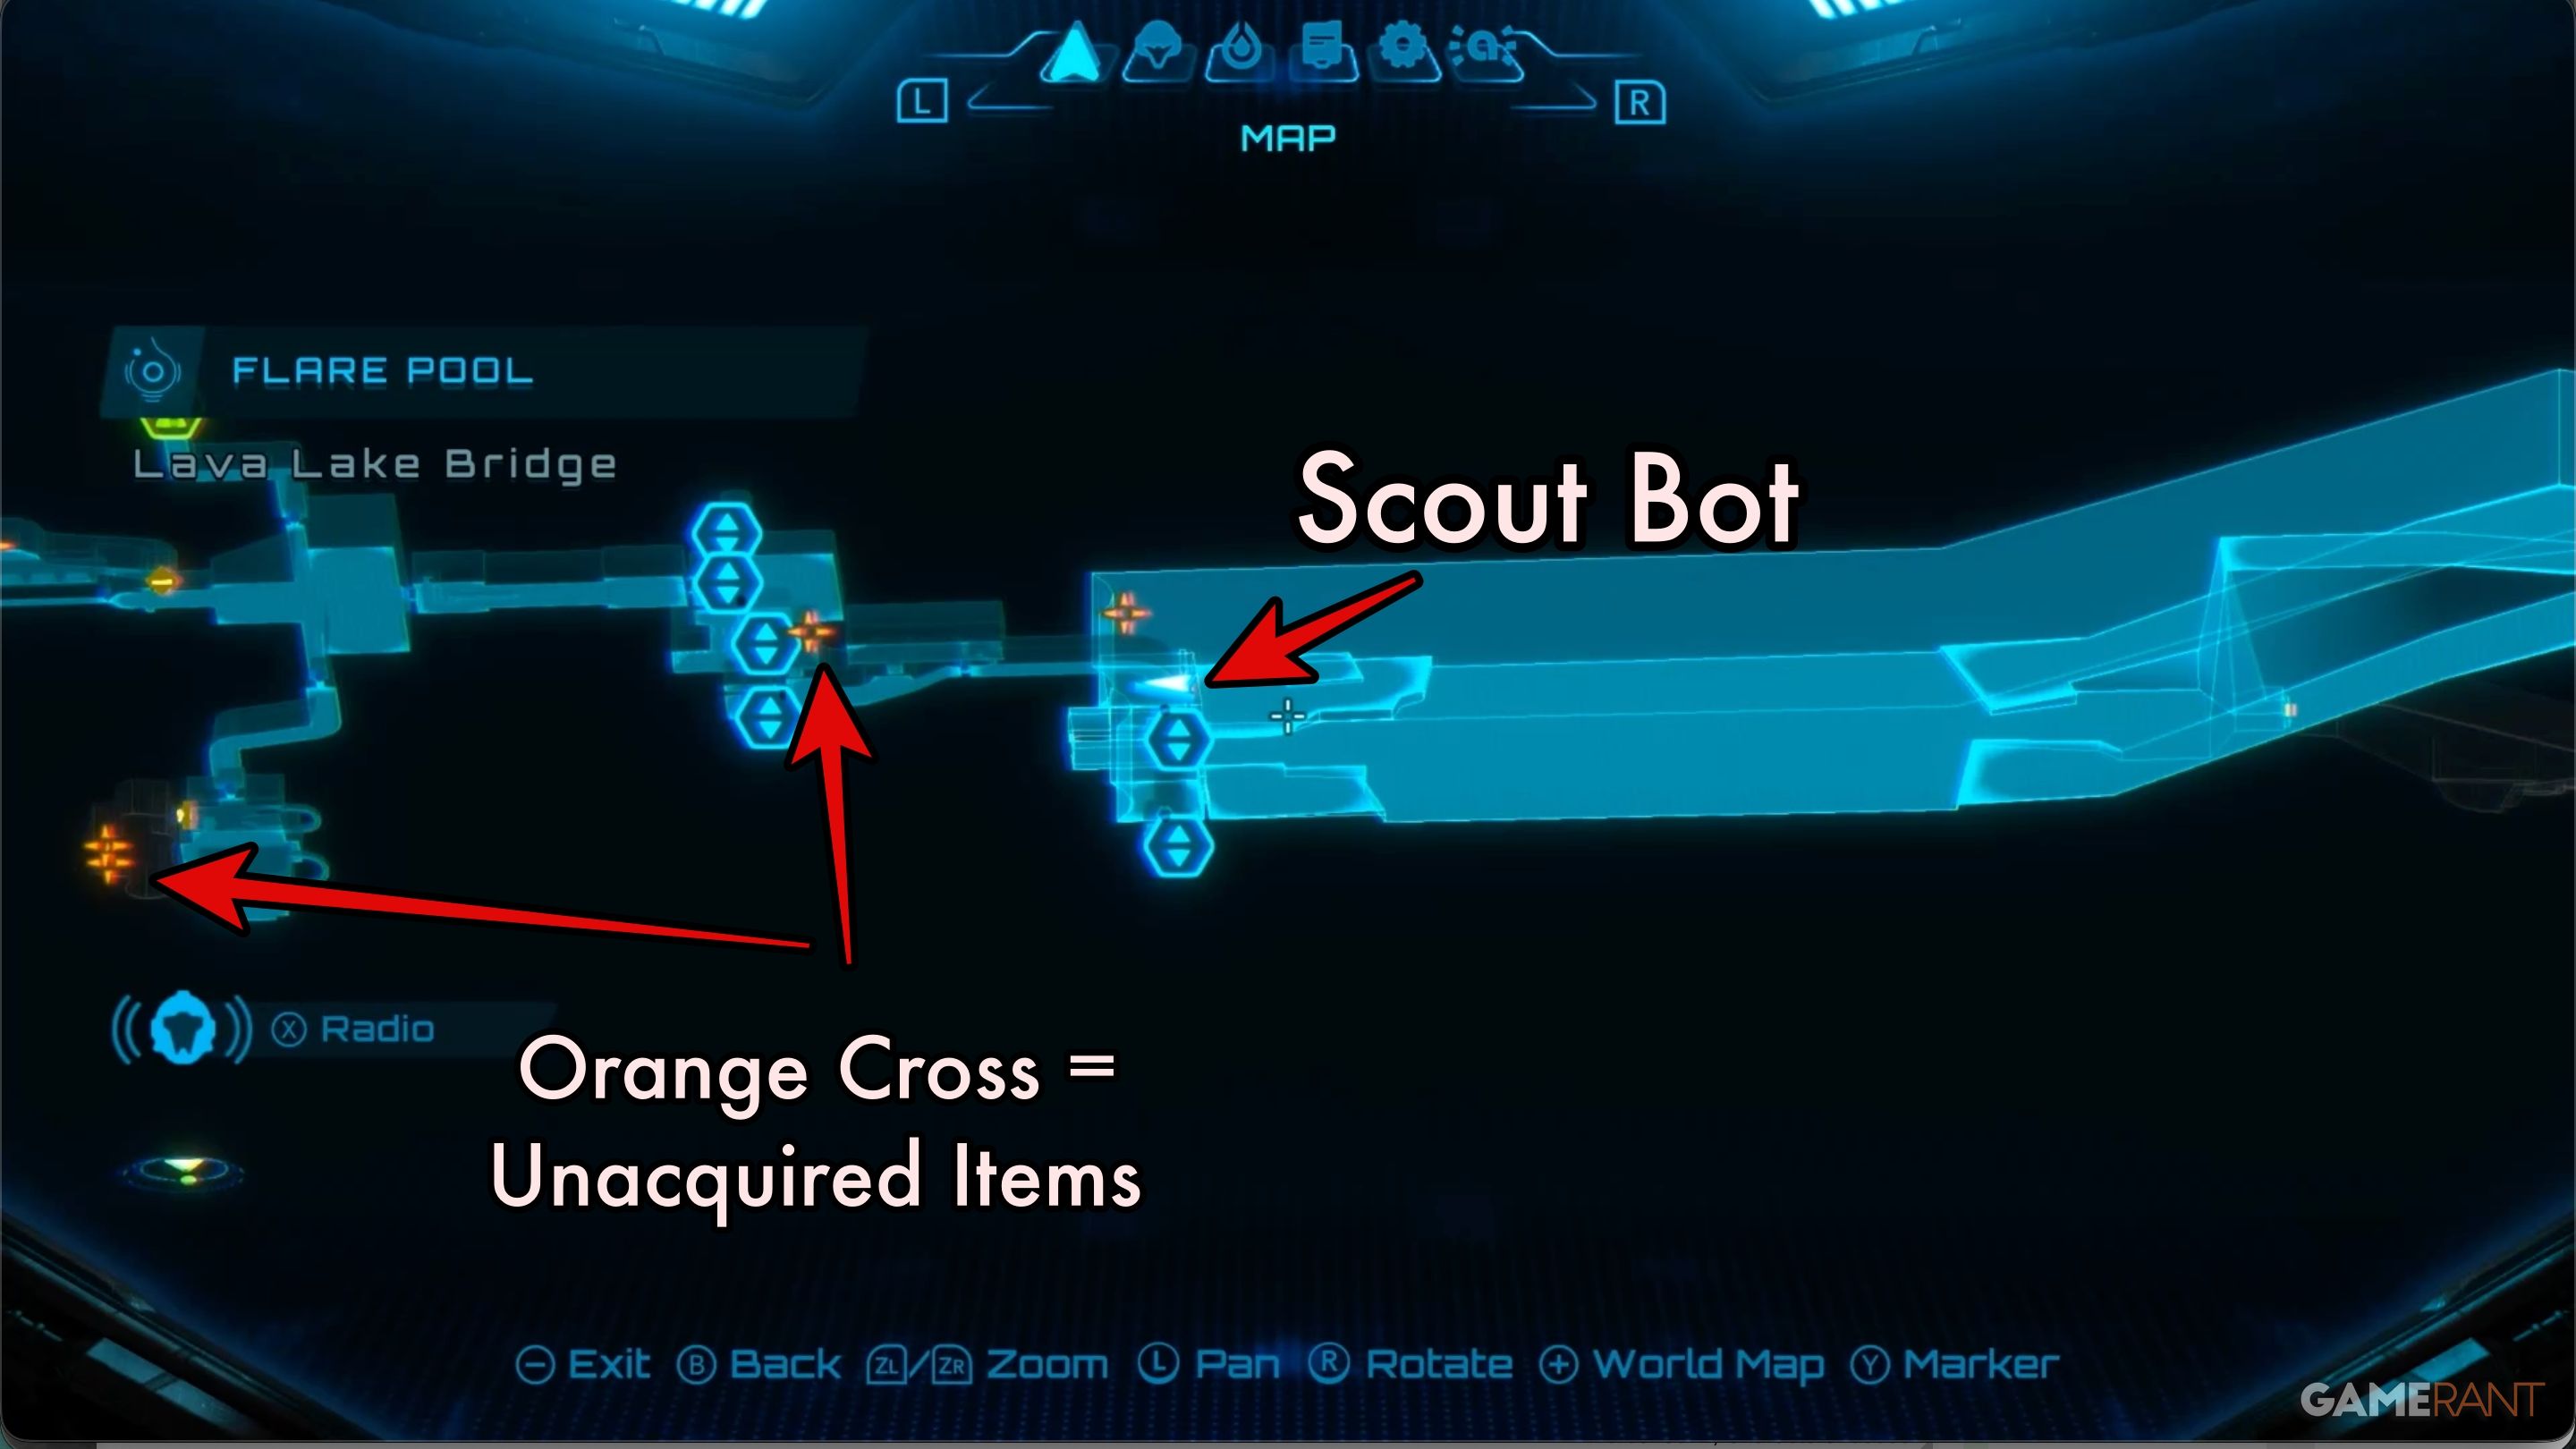
After you bring down the Scout Bot, hit it with one Thunder Shot. Once it gets back up, scan it. Then, check your map for orange markers – those show you where to find items you haven’t collected yet.
Lava Lake Bridge Shot Expansion – Psychic Spider Ball:
You can find your first upgrade right beside the Scout Bot. Use the Psychic Spider Ball to swing over and grab the Shot Expansion, which is floating near the big building next to it.
Expansion Site & Lava Works – Mech Arm, Power Bomb Expansion, & Behemoth:
Head to the far side of the lava lake and use a Super Missile to destroy the big rock that’s blocking the entrance to Lava Works.
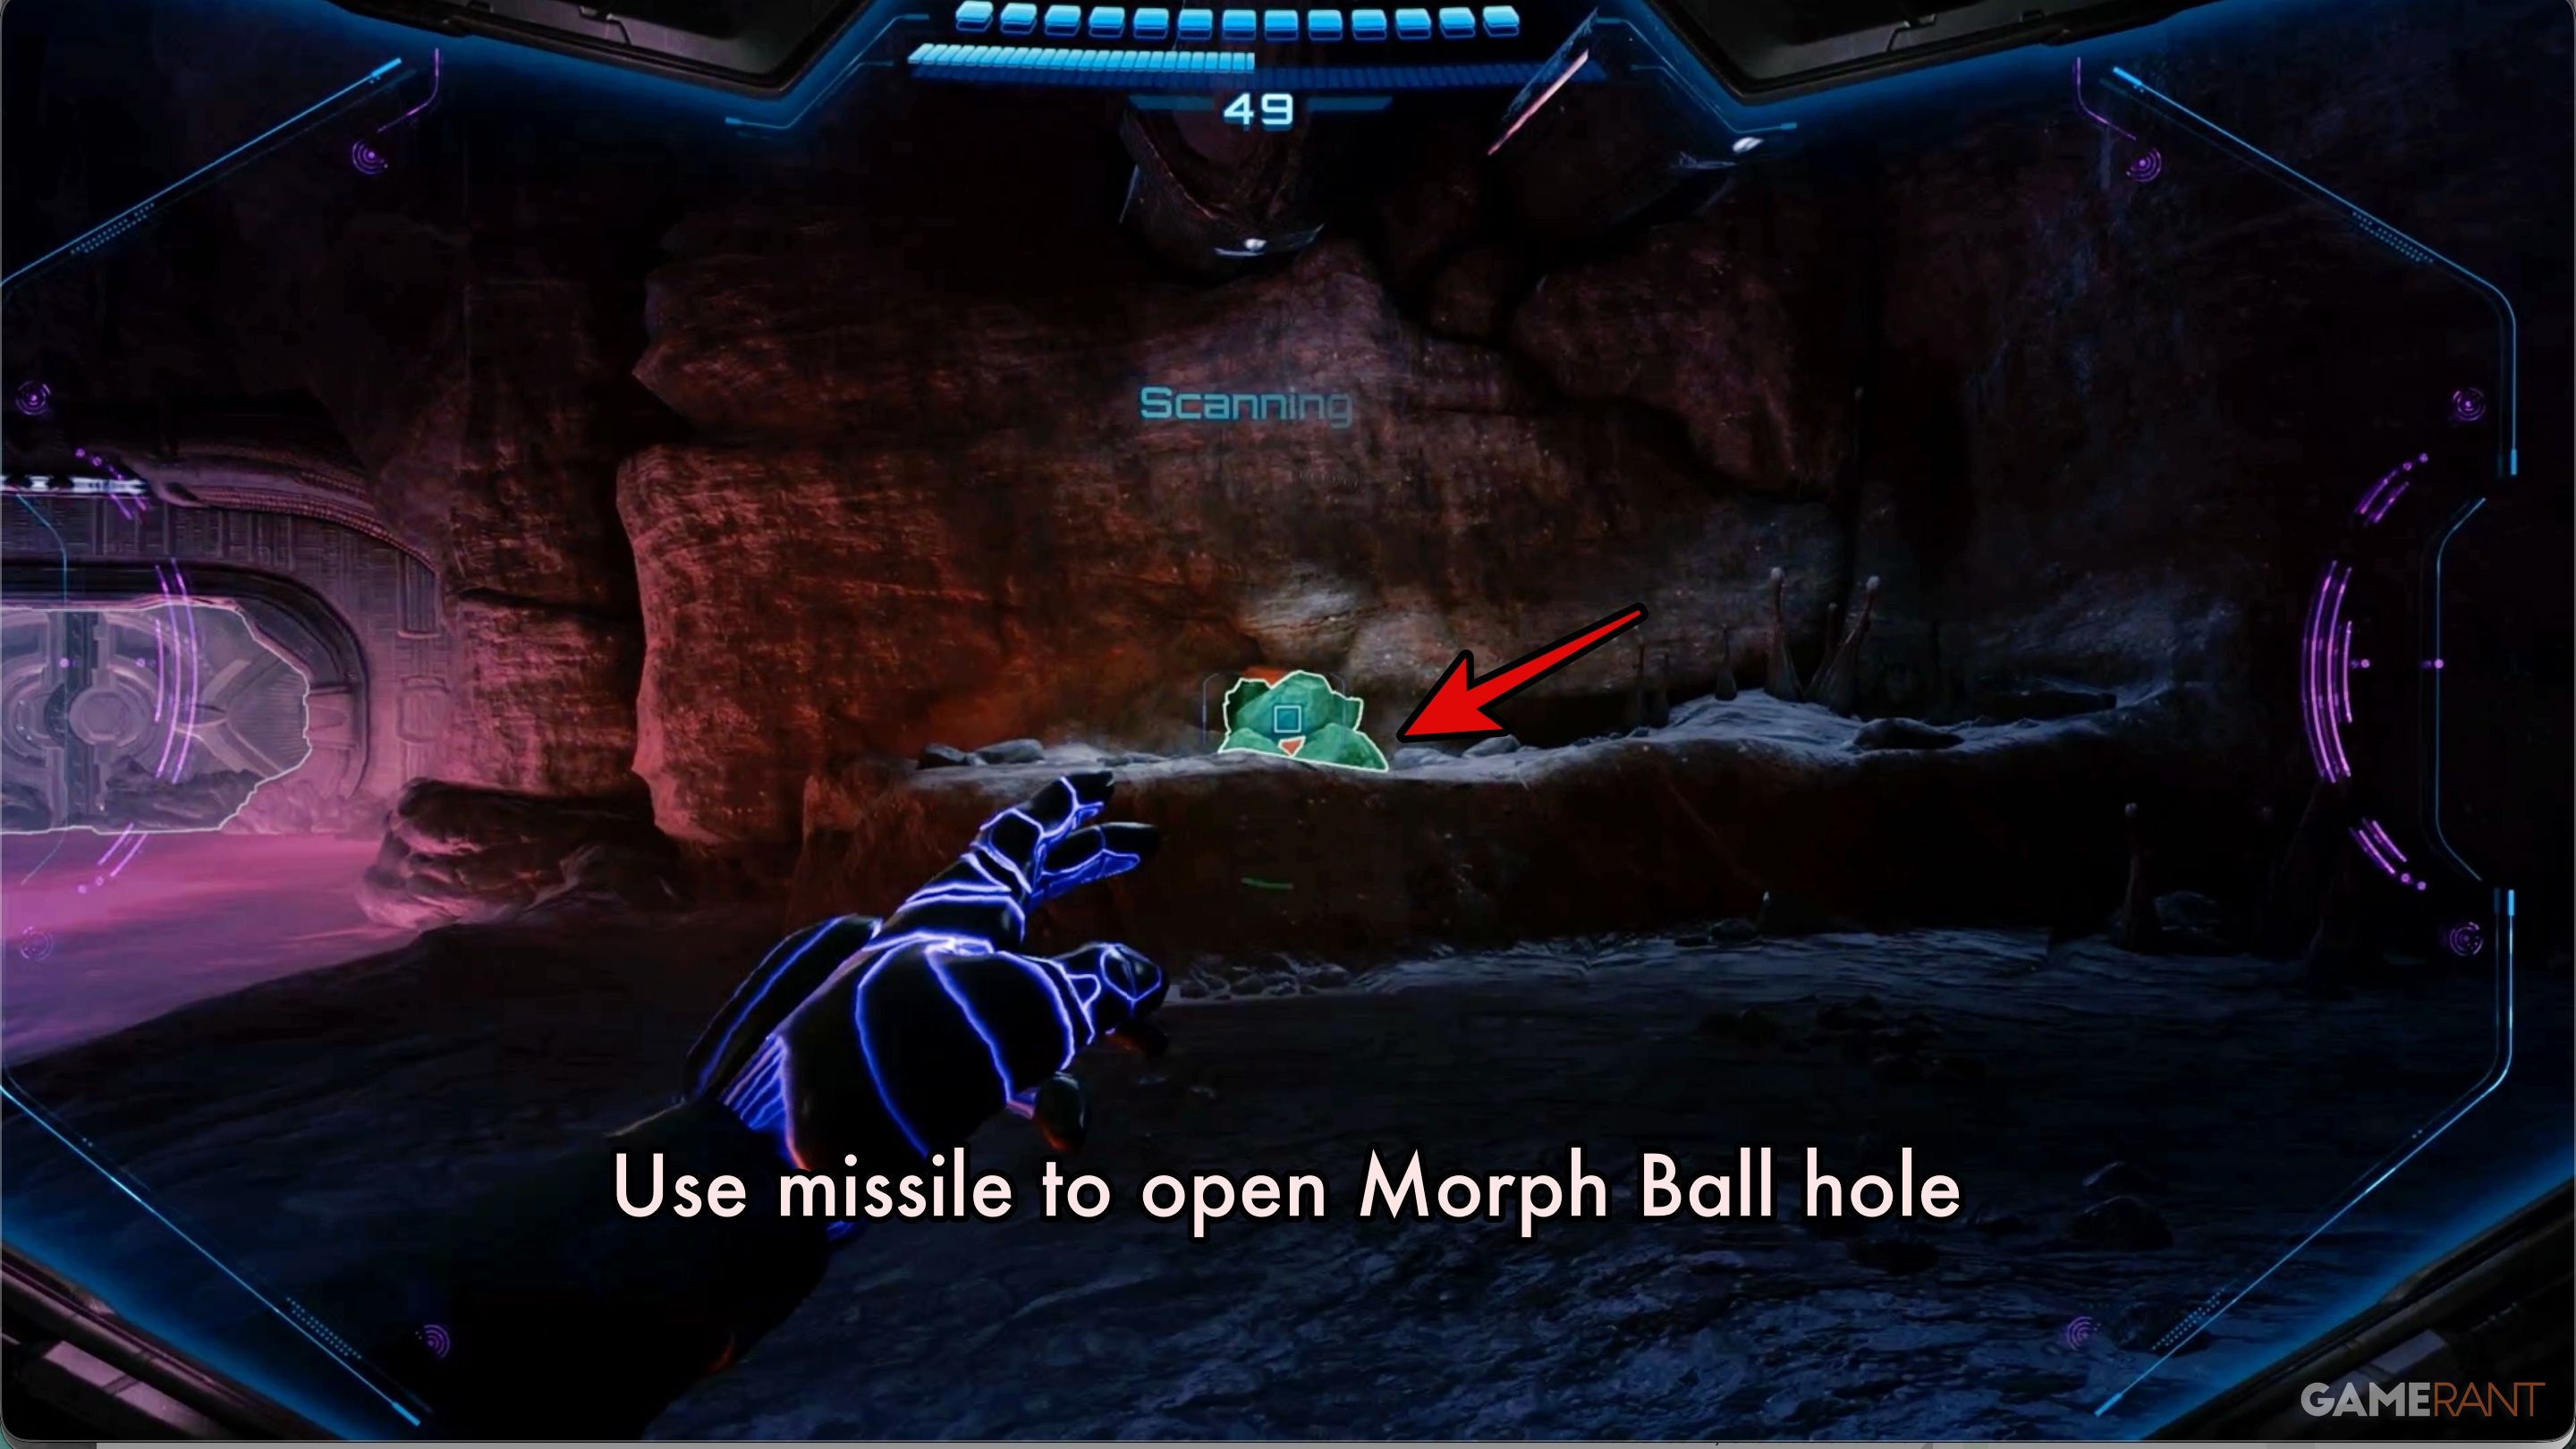
Go through the door and head to the small area on your right. Find another small rock blocking a space for your Morph Ball. Destroy it with a missile, then use the Morph Ball space. Don’t worry about the Power Bomb Expansion for now; you’ll get that after you defeat the Behemoth.
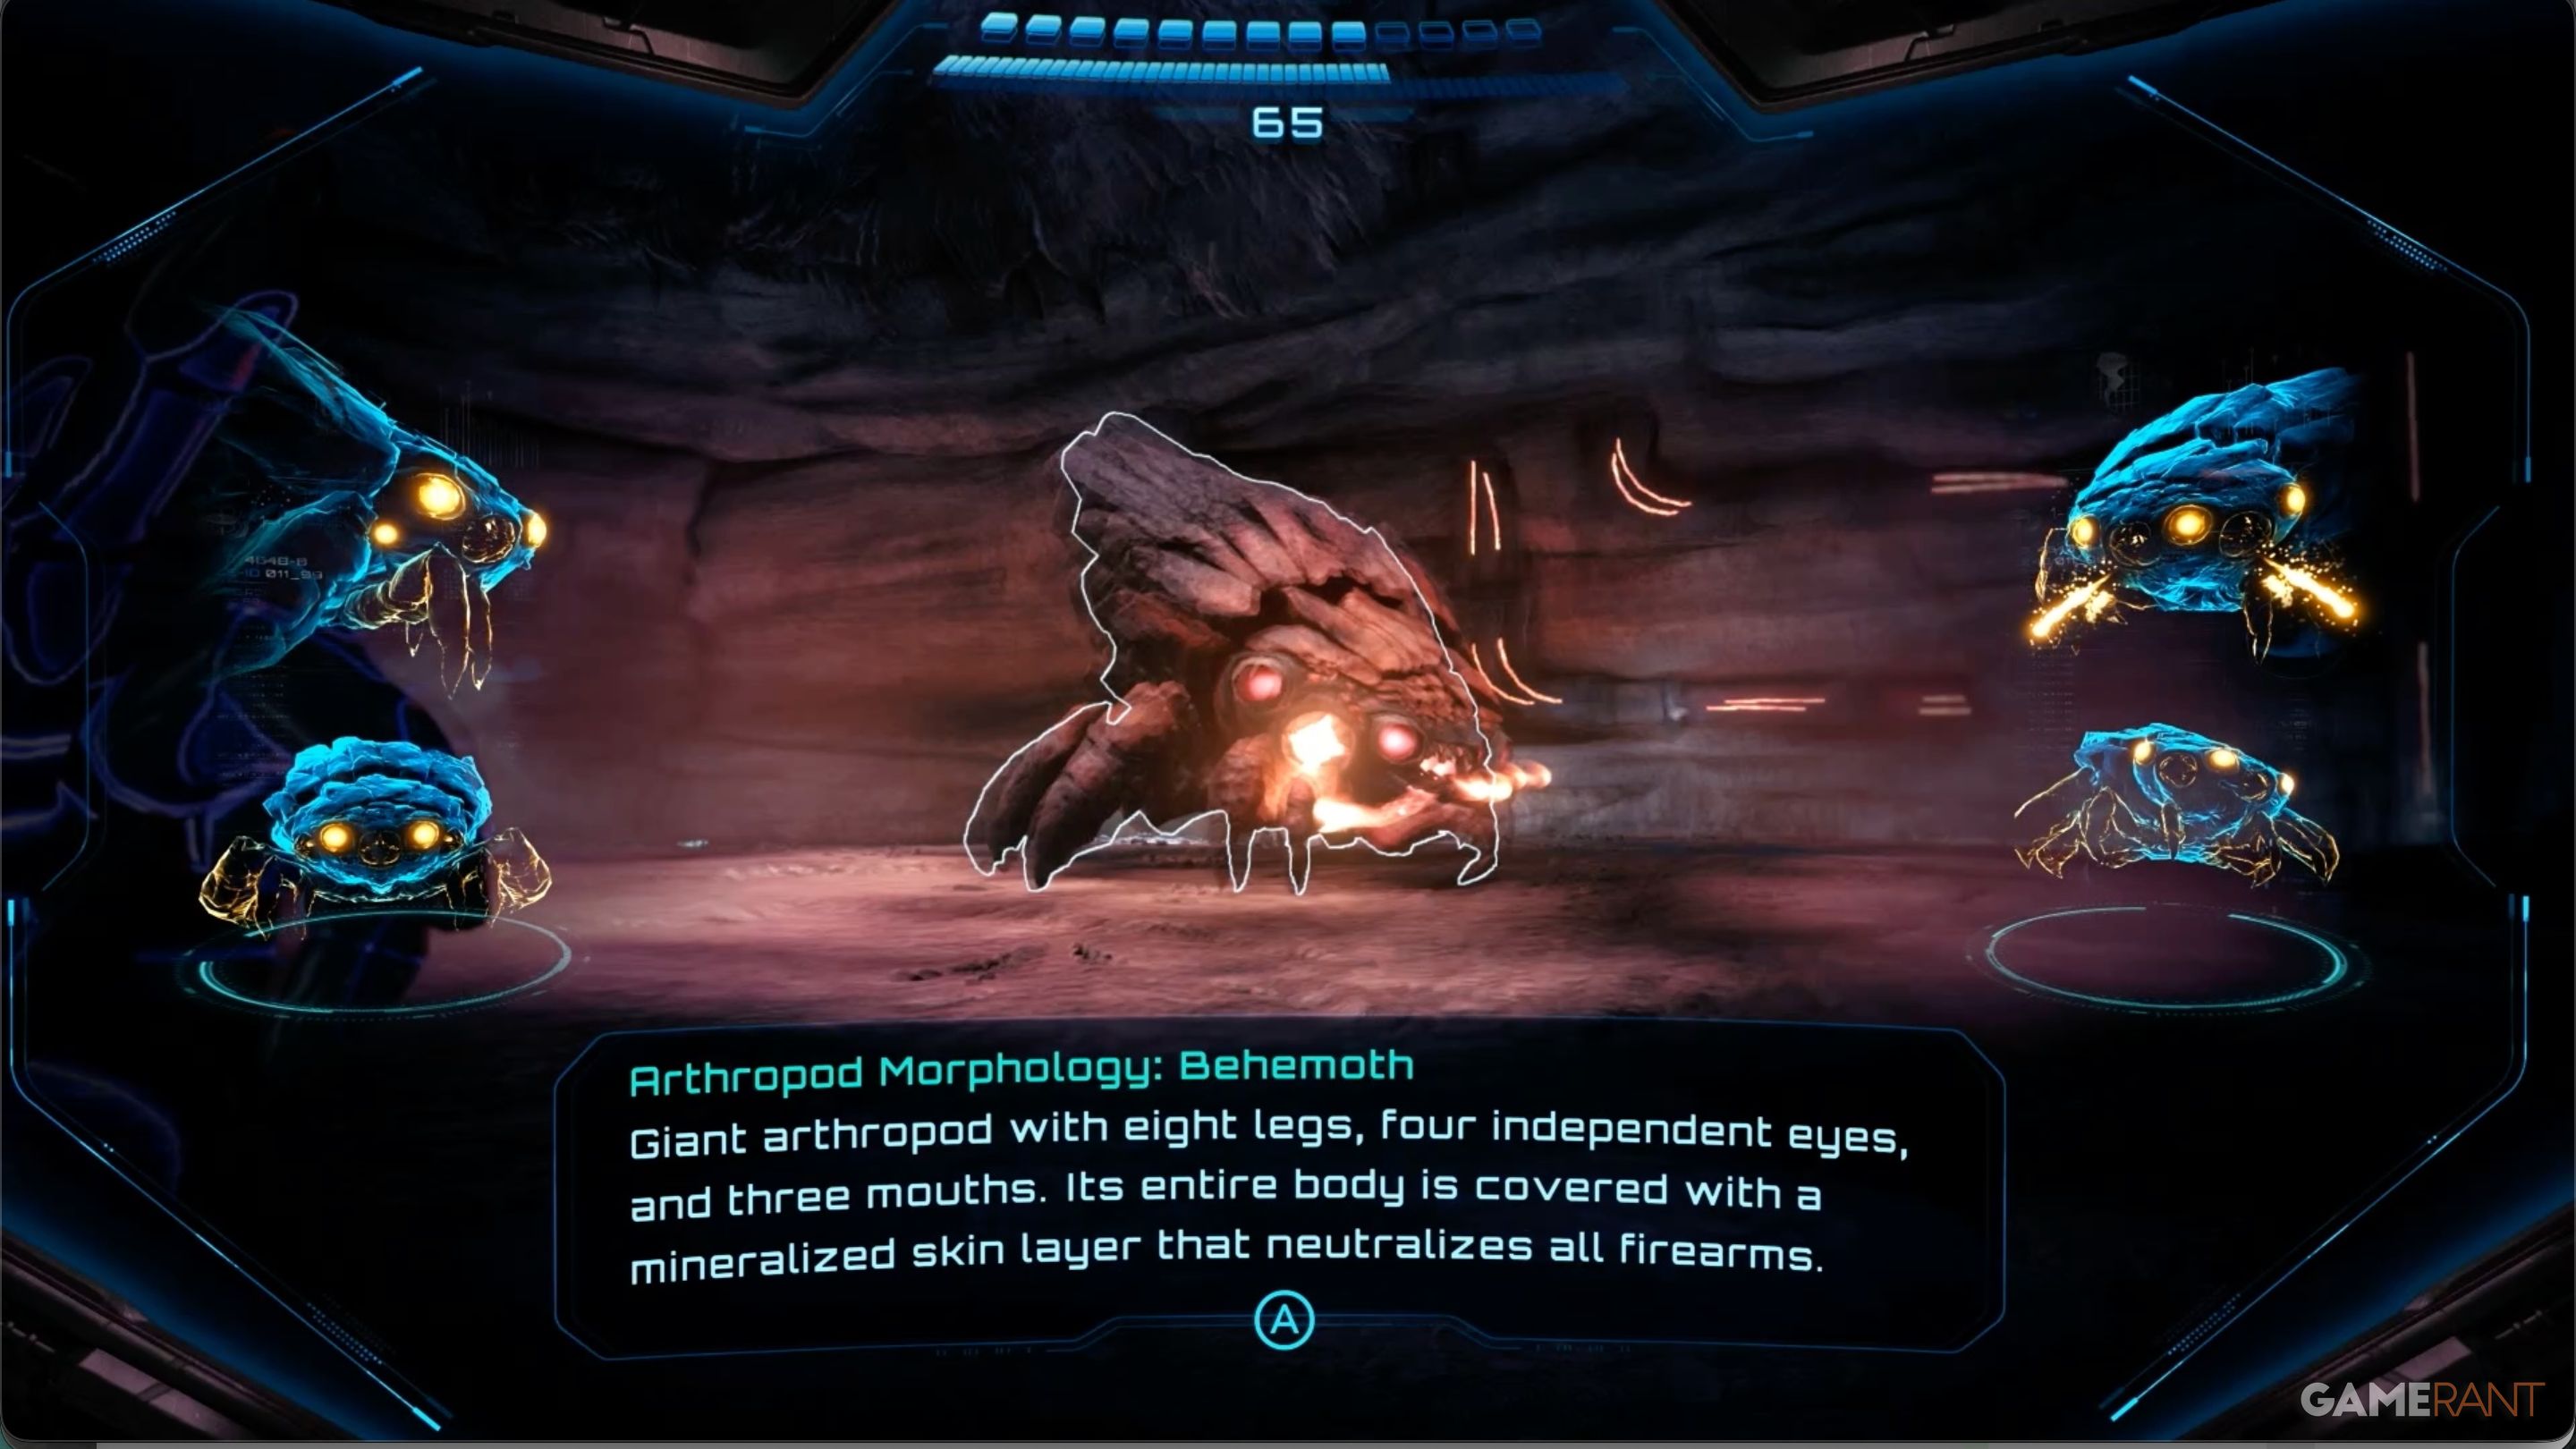
Once you leave the small room, go through the door nearby. This will take you to the Expansion Site, where a battle with the Behemoth will start immediately. Remember, you can only hurt the Behemoth by shooting its eyes, so aim carefully! After you defeat it, a Mech Arm will drop from a ledge. Pick up this part and teleport it back to Base Camp.
Be Careful! If you do not scan the Behemoth now, you will not get another chance!
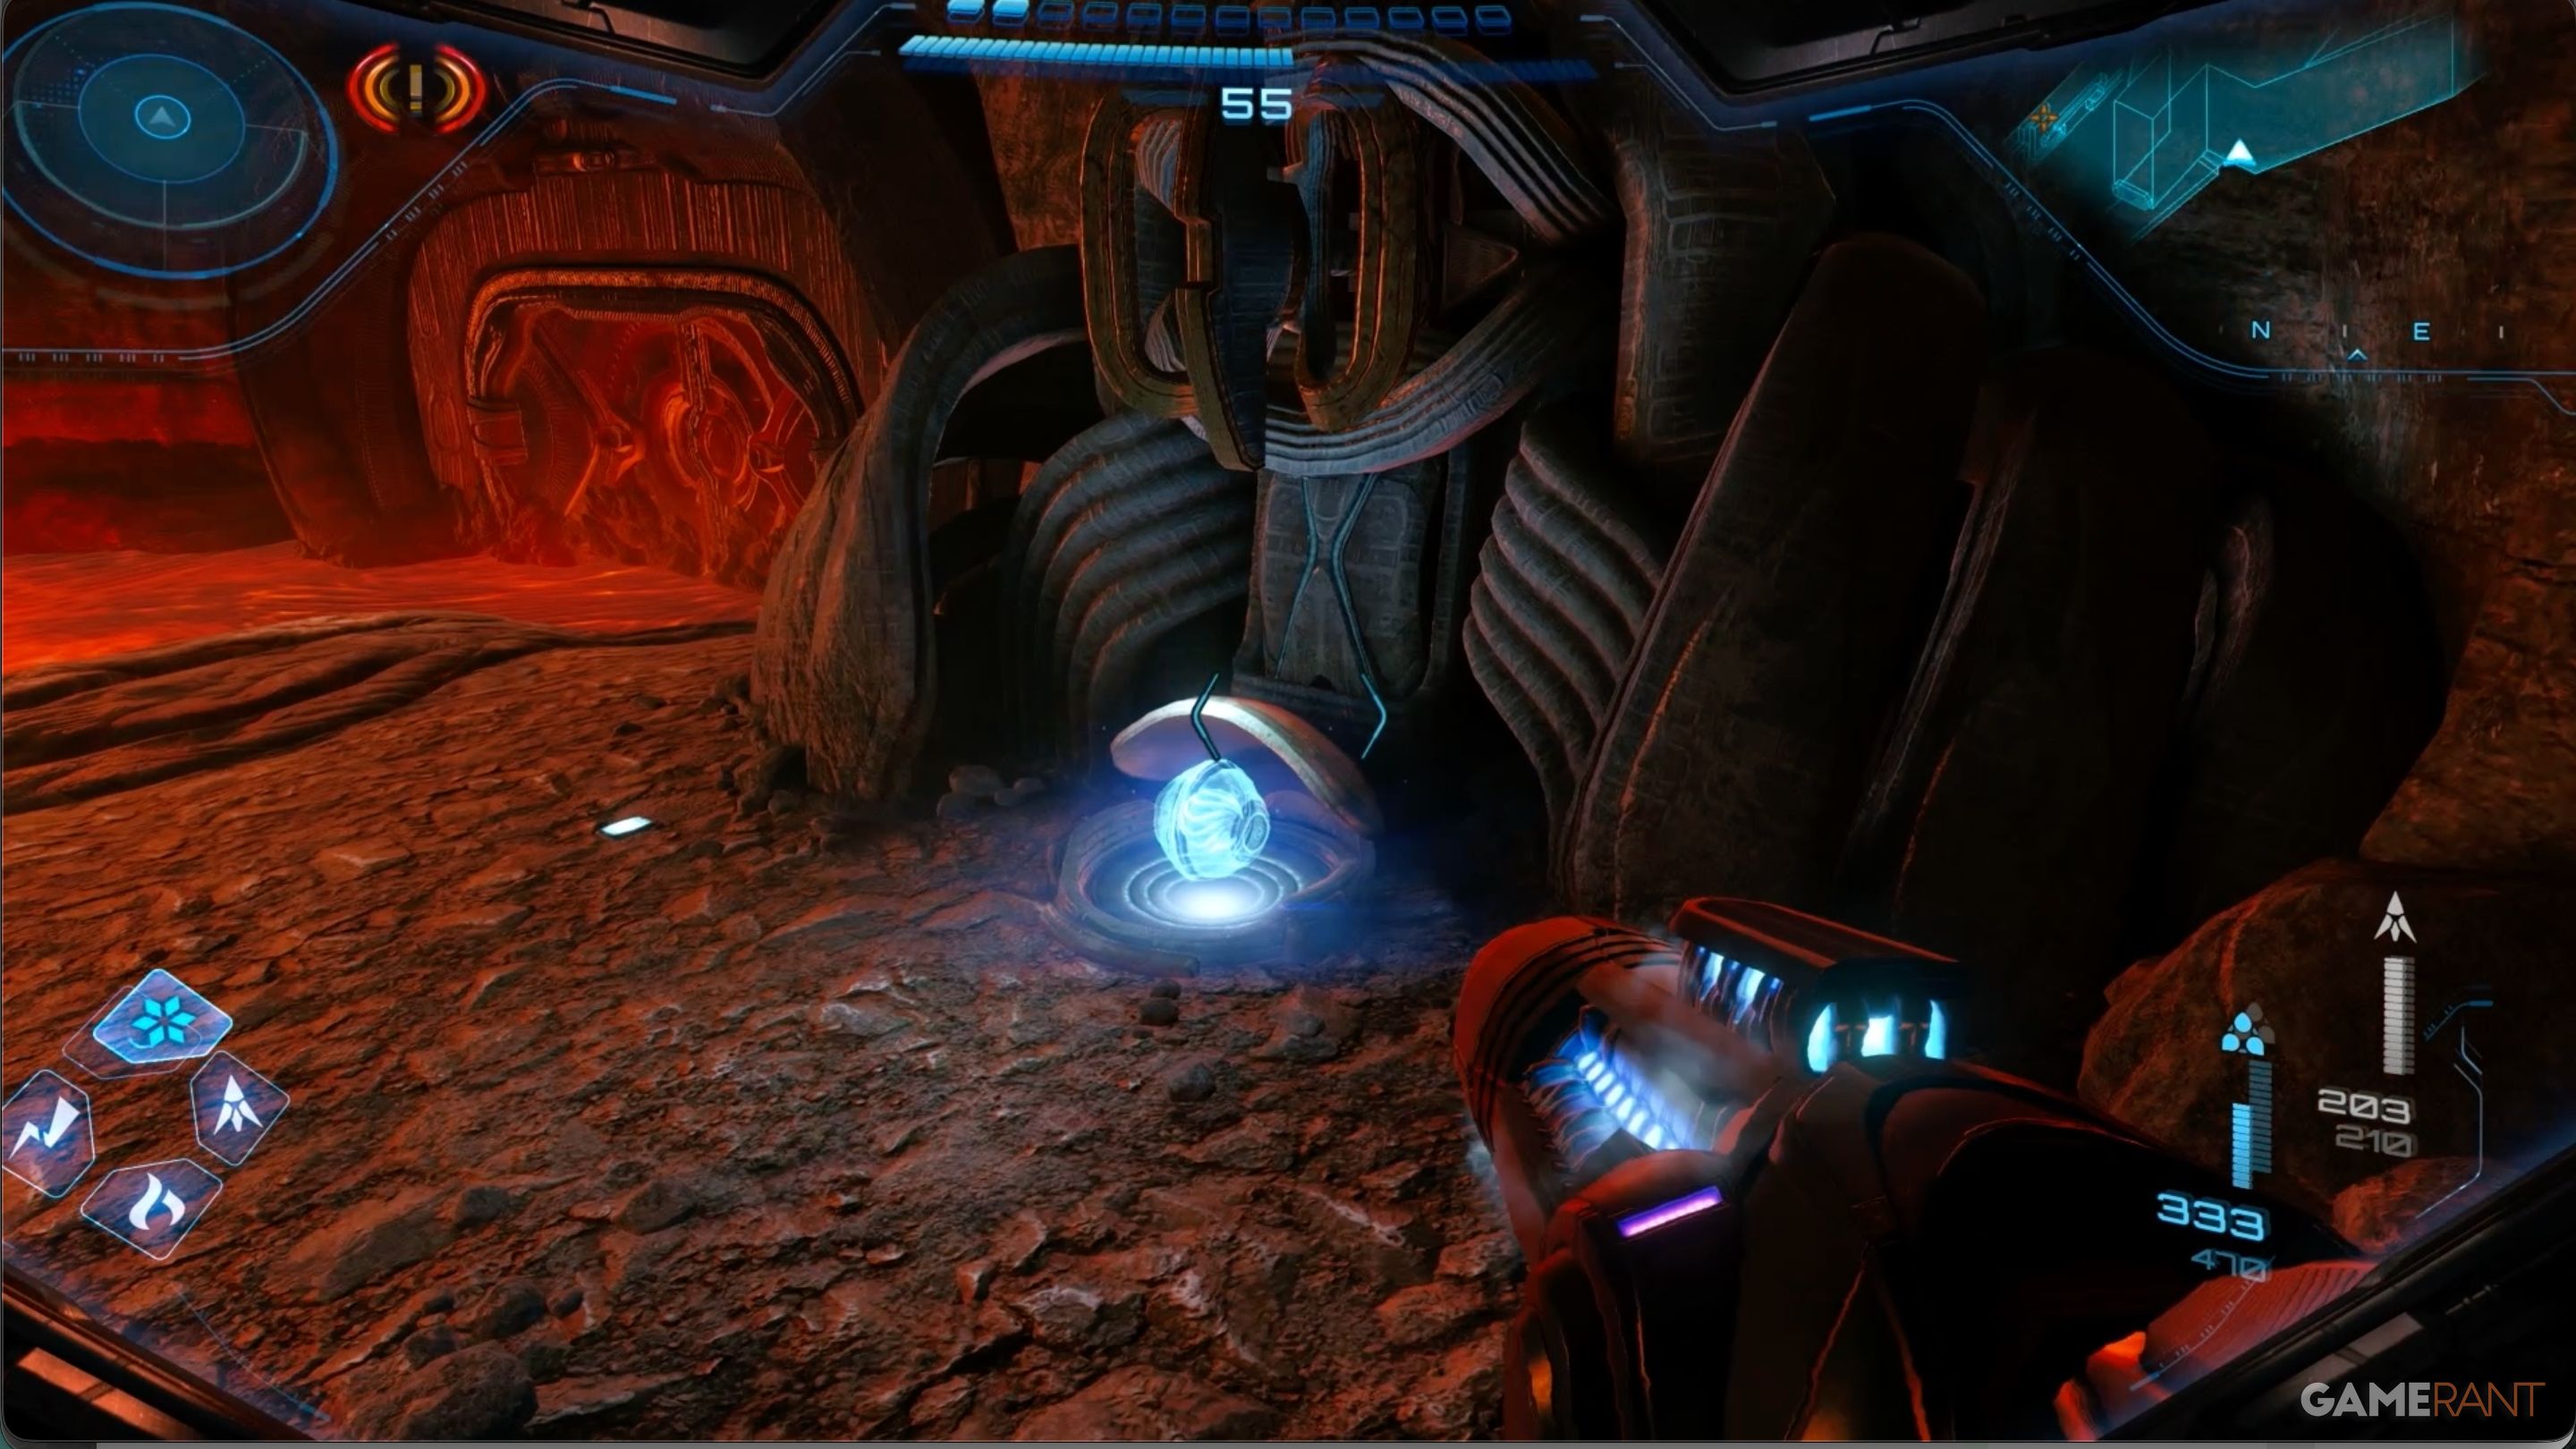
As you leave, you’ll notice several places to attach your grapple beam and swing across the lava. These will take you to a device that turns off the lava flow in the Morph Ball tunnel. Activate the device, then return to the tunnel.
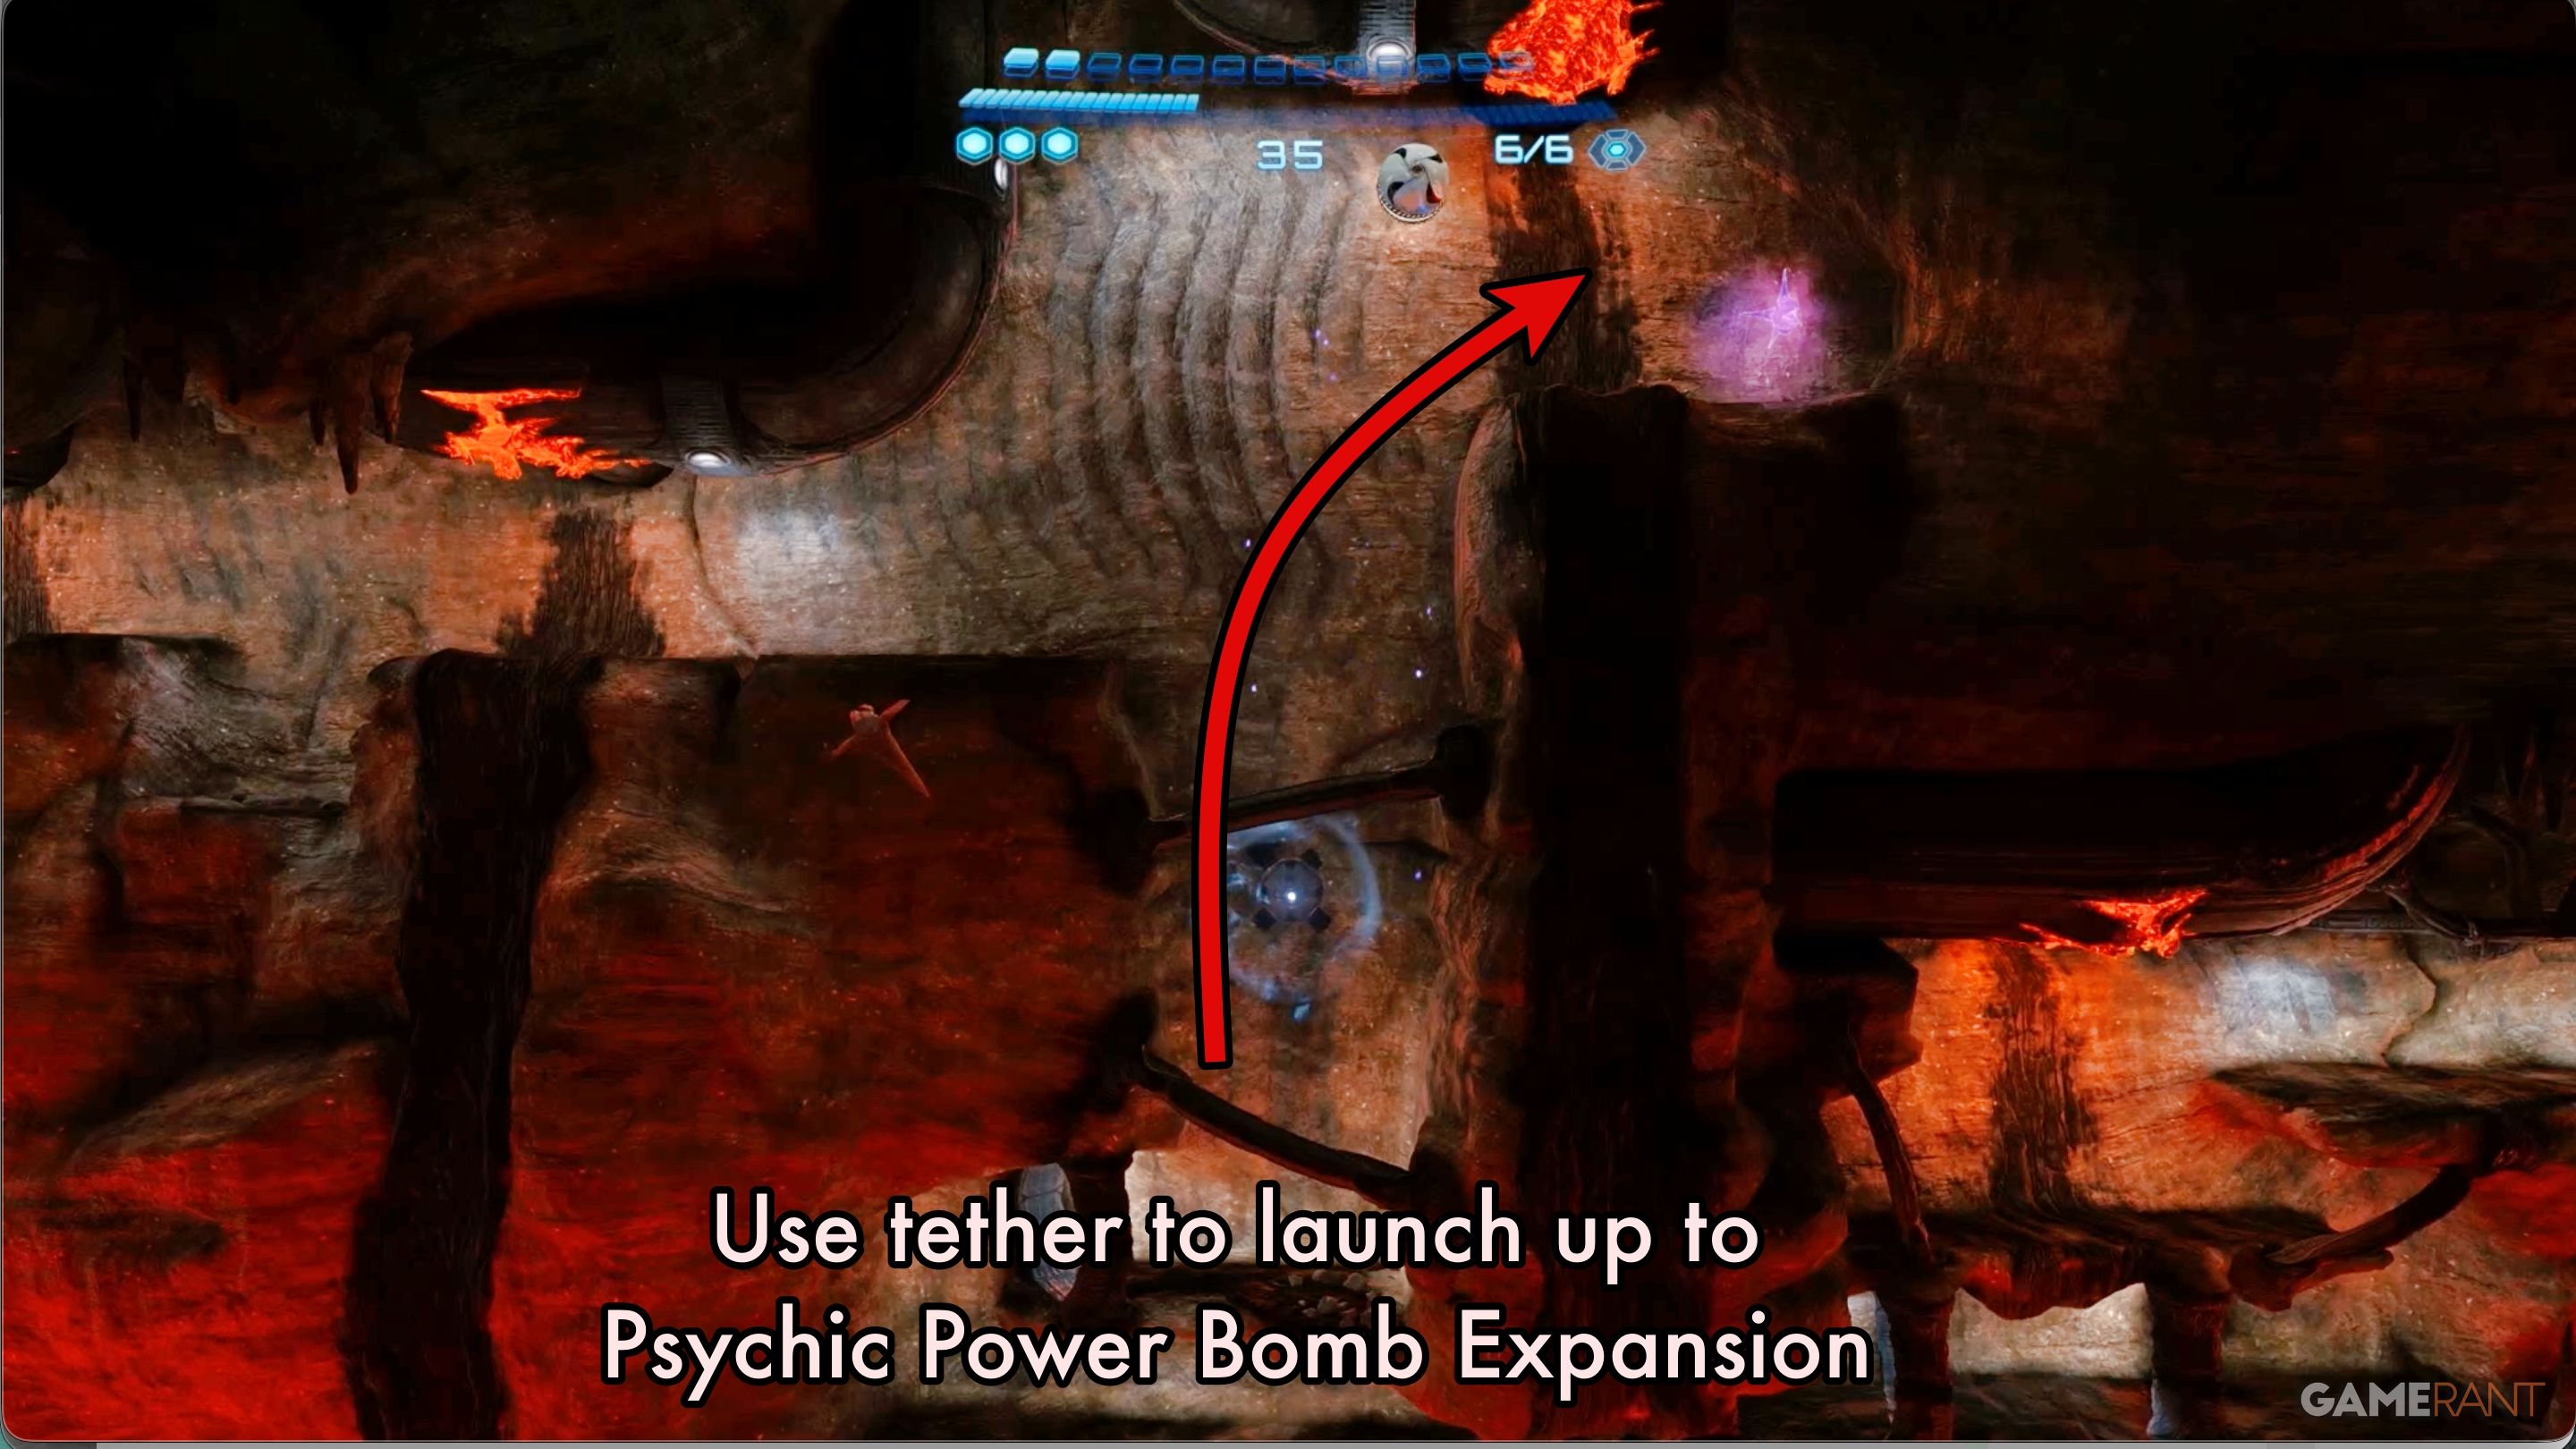
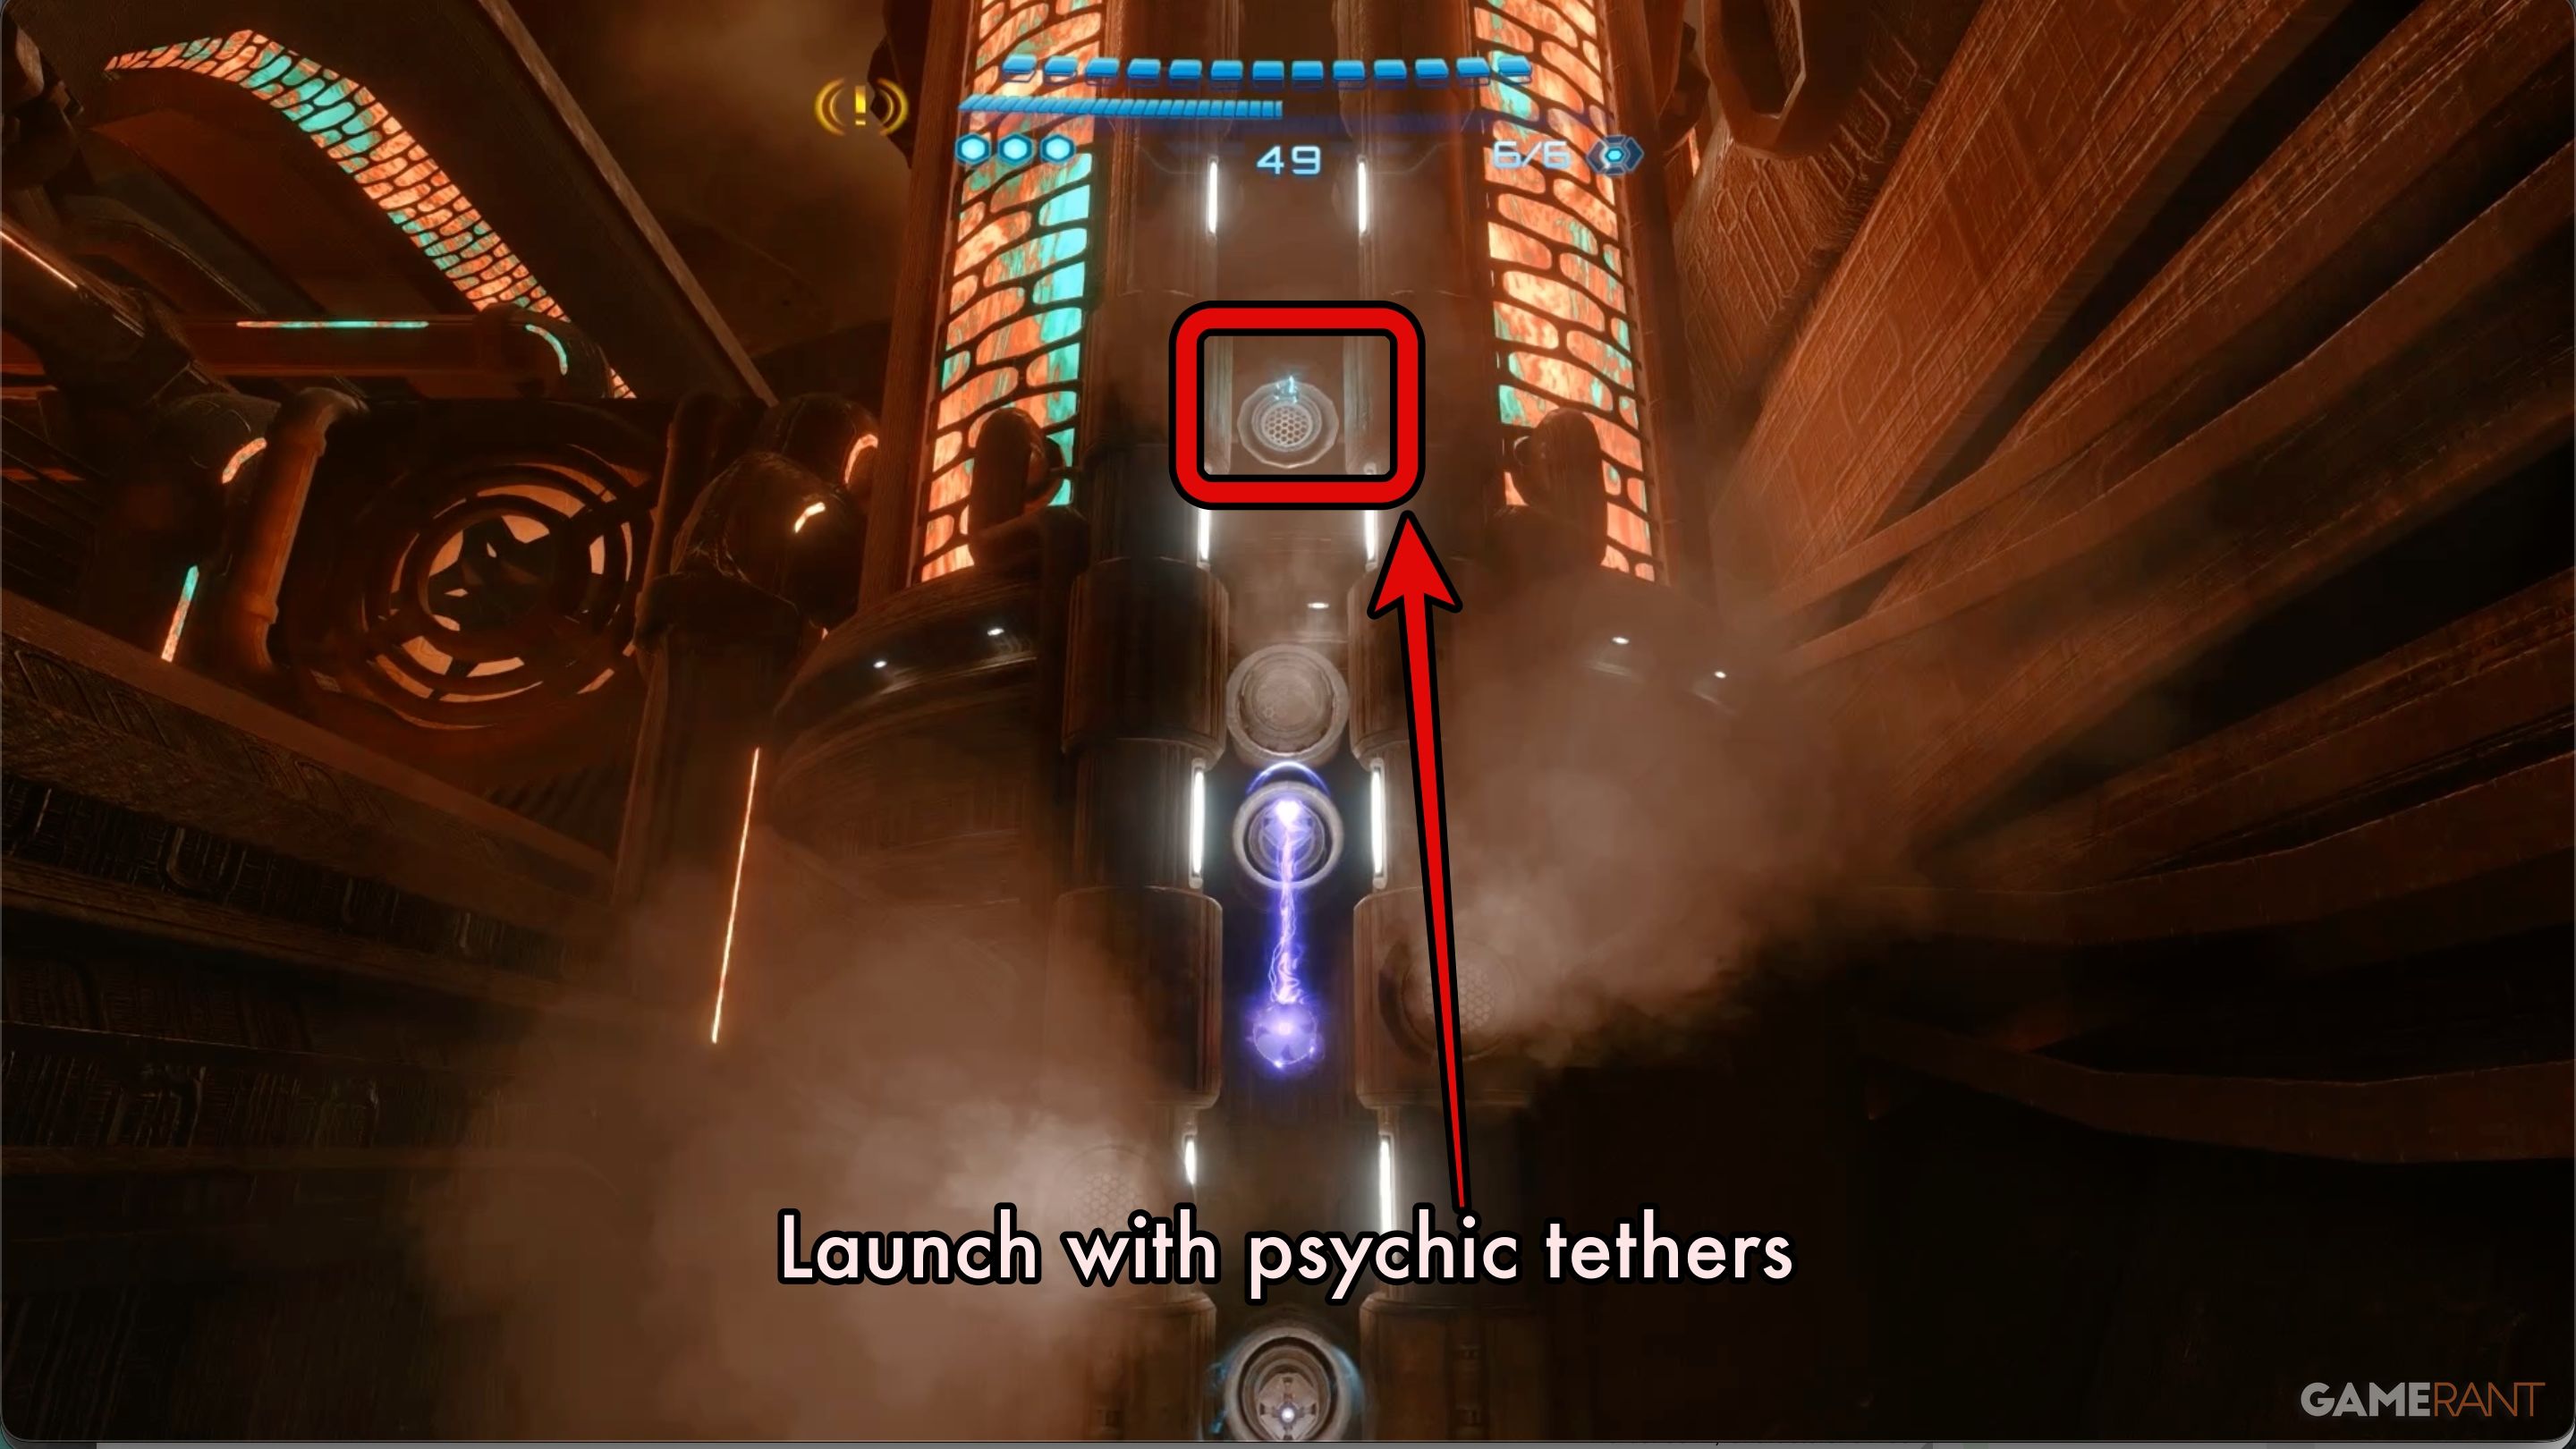
You can now use the Psychic Tethers to launch up to the Psychic Power Bomb Expansion.
Ventilation Works – Spider Ball Track Missile Expansion:
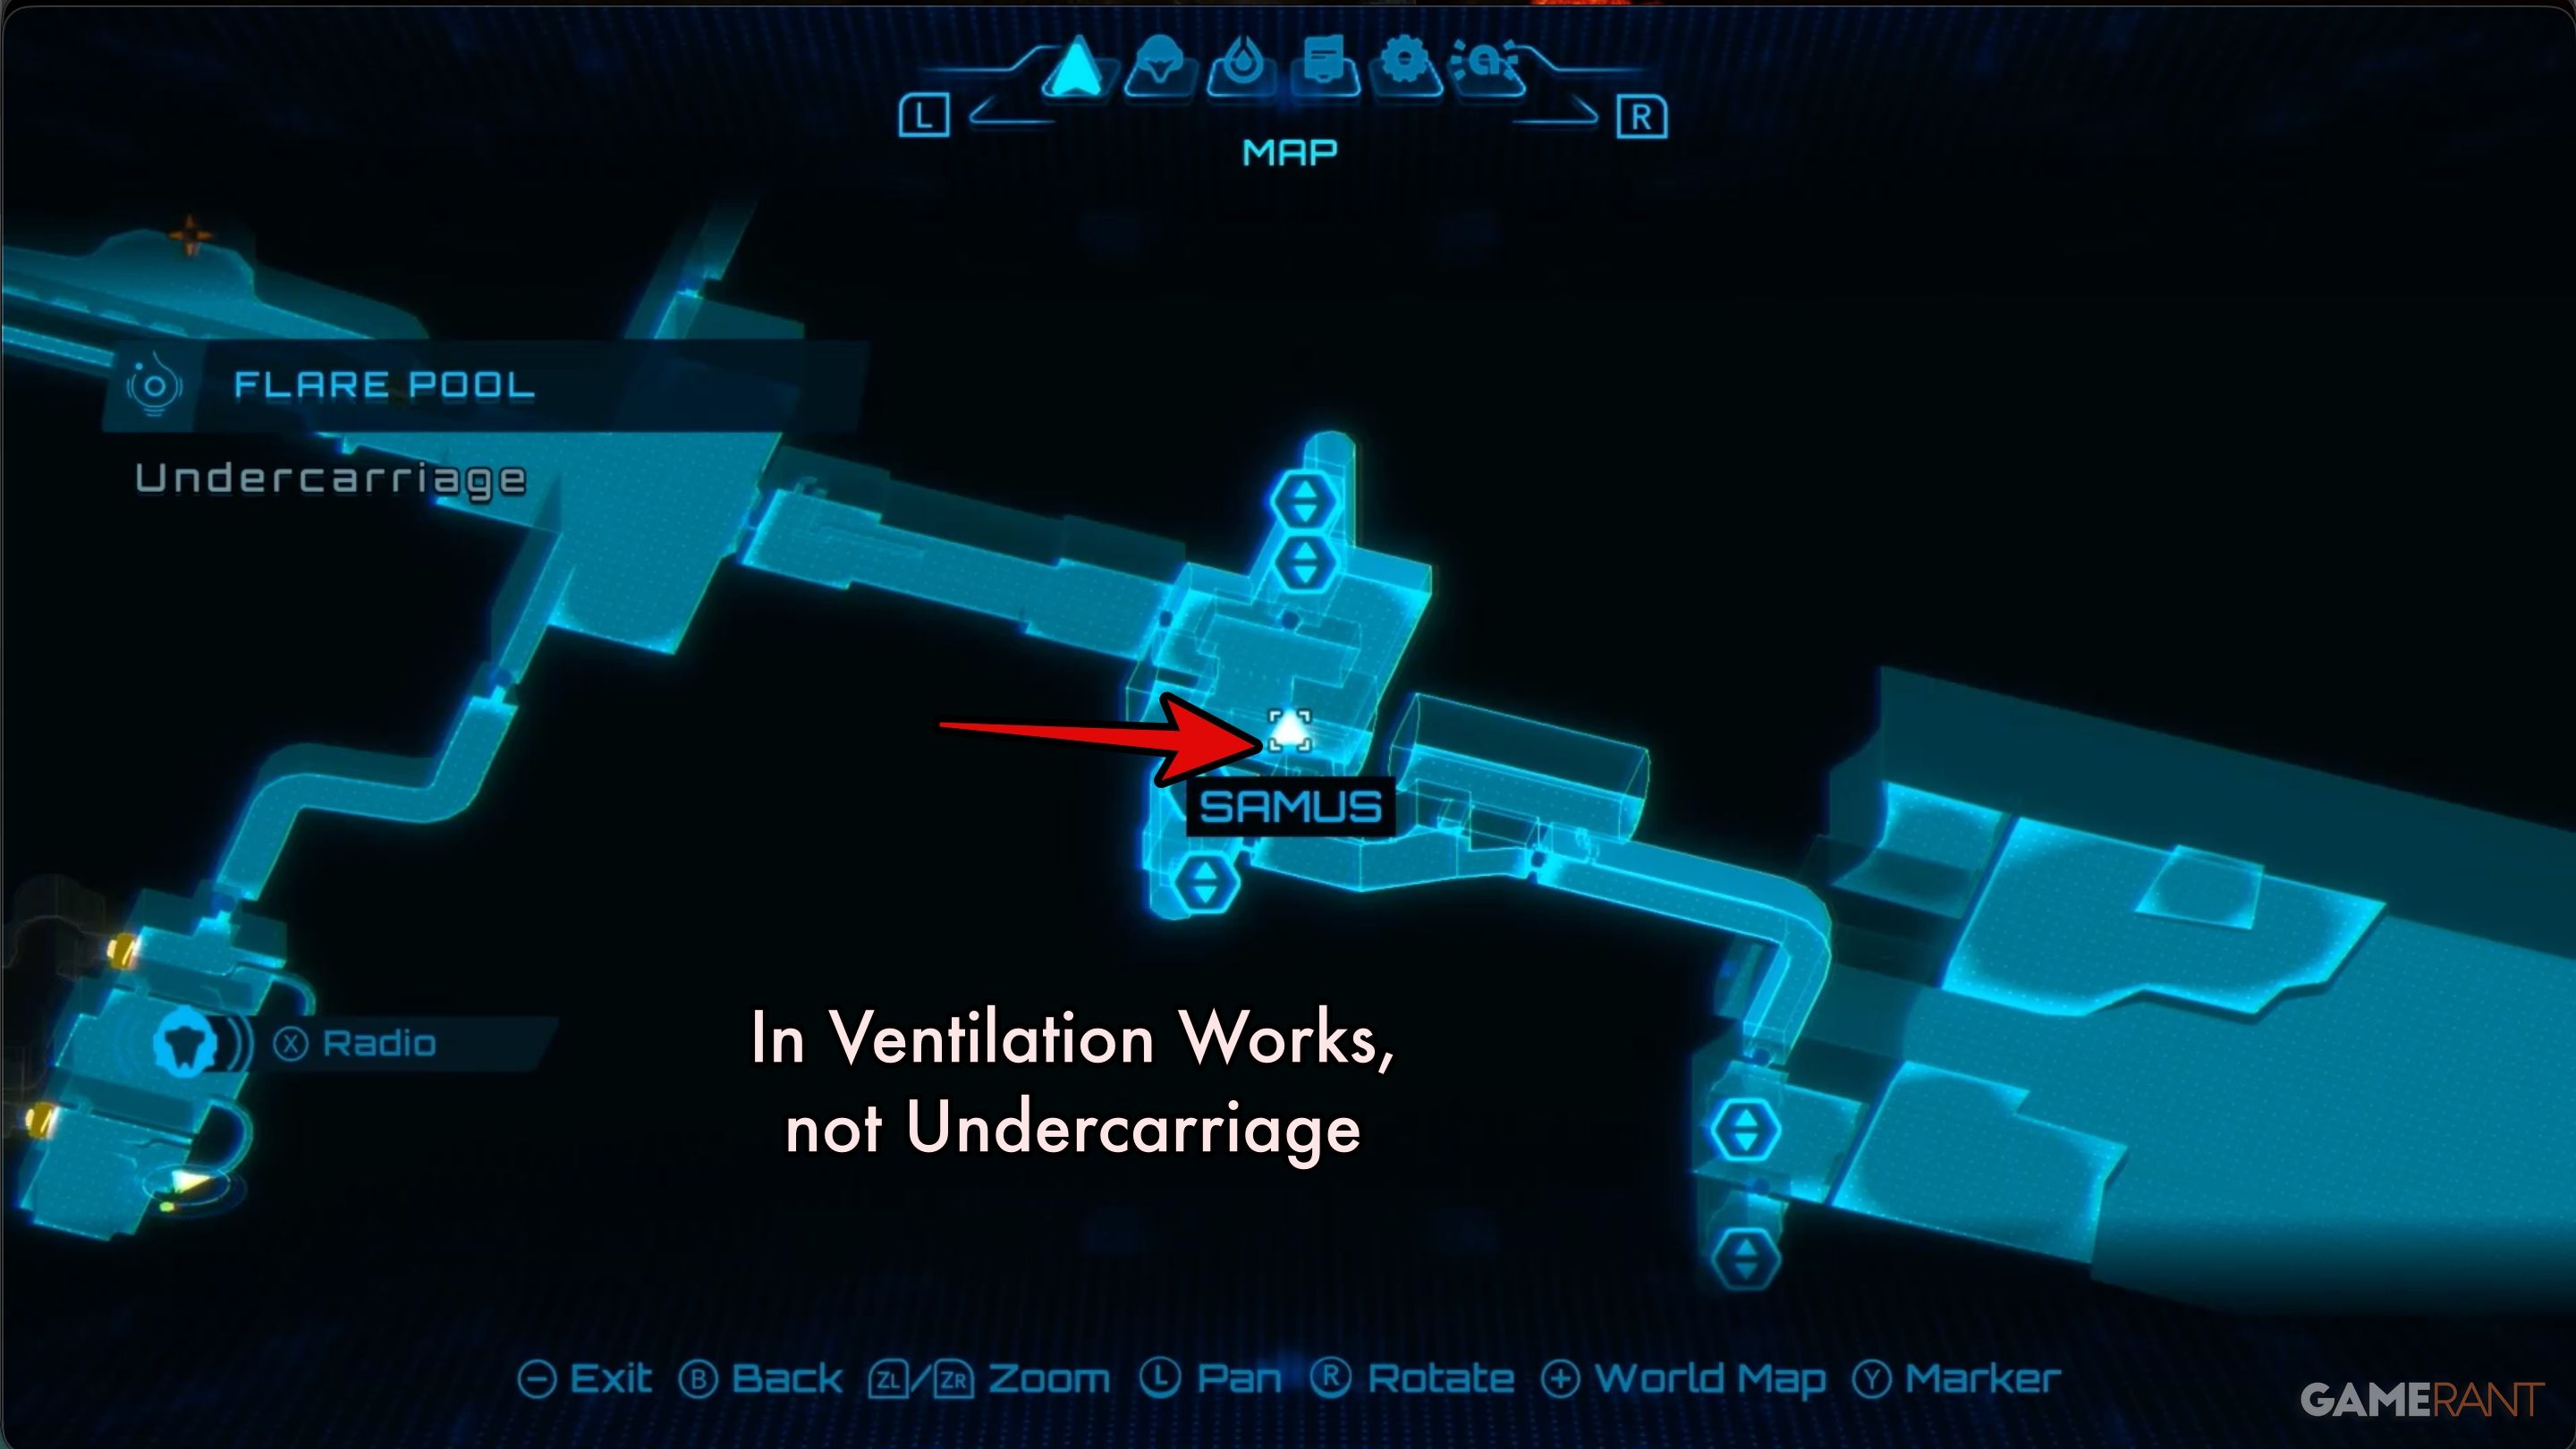
During our second inspection, we found a magnetic track inside the Ventilation Works tunnel that connects to the Missile Expansion area.
First Thunder Blocker Chambers – Shot Expansion & Missile Expansion:
The initial Thunder Blocker doors in Flare Pool are accessible from the Boiler Room. Beyond them lies a sizable machine that needs a Thunder Shot to operate.
After entering the room, use the Lasso tool to remove the cover from the machine. Then, repeatedly hit the center of the machine with Thunder Shot. This will unlock two compartments containing the items you need to expand.
Second Thunder Blocker Chamber – MIssile Expansion & Shortcut:
The next Thunder Blocker door is located right before the exit security door in the Entry Bay. It opens up access to a Missile Expansion and also provides a quicker route to the Energy Extraction chamber, bypassing the security door.
In the Cooling Room, you’ll find a turret on the floor. Destroy it with the Lasso, then check the pod behind where it was to get the Missile Expansion.
Energy Extraction – Missile Expansion:

Follow the magnetic track along the corner of the Energy Extraction chamber. Head to the top – you’ll find the Missile Expansion item there. We discussed this item when we first explored the area, and you can find a helpful image of the location if you need a reminder.
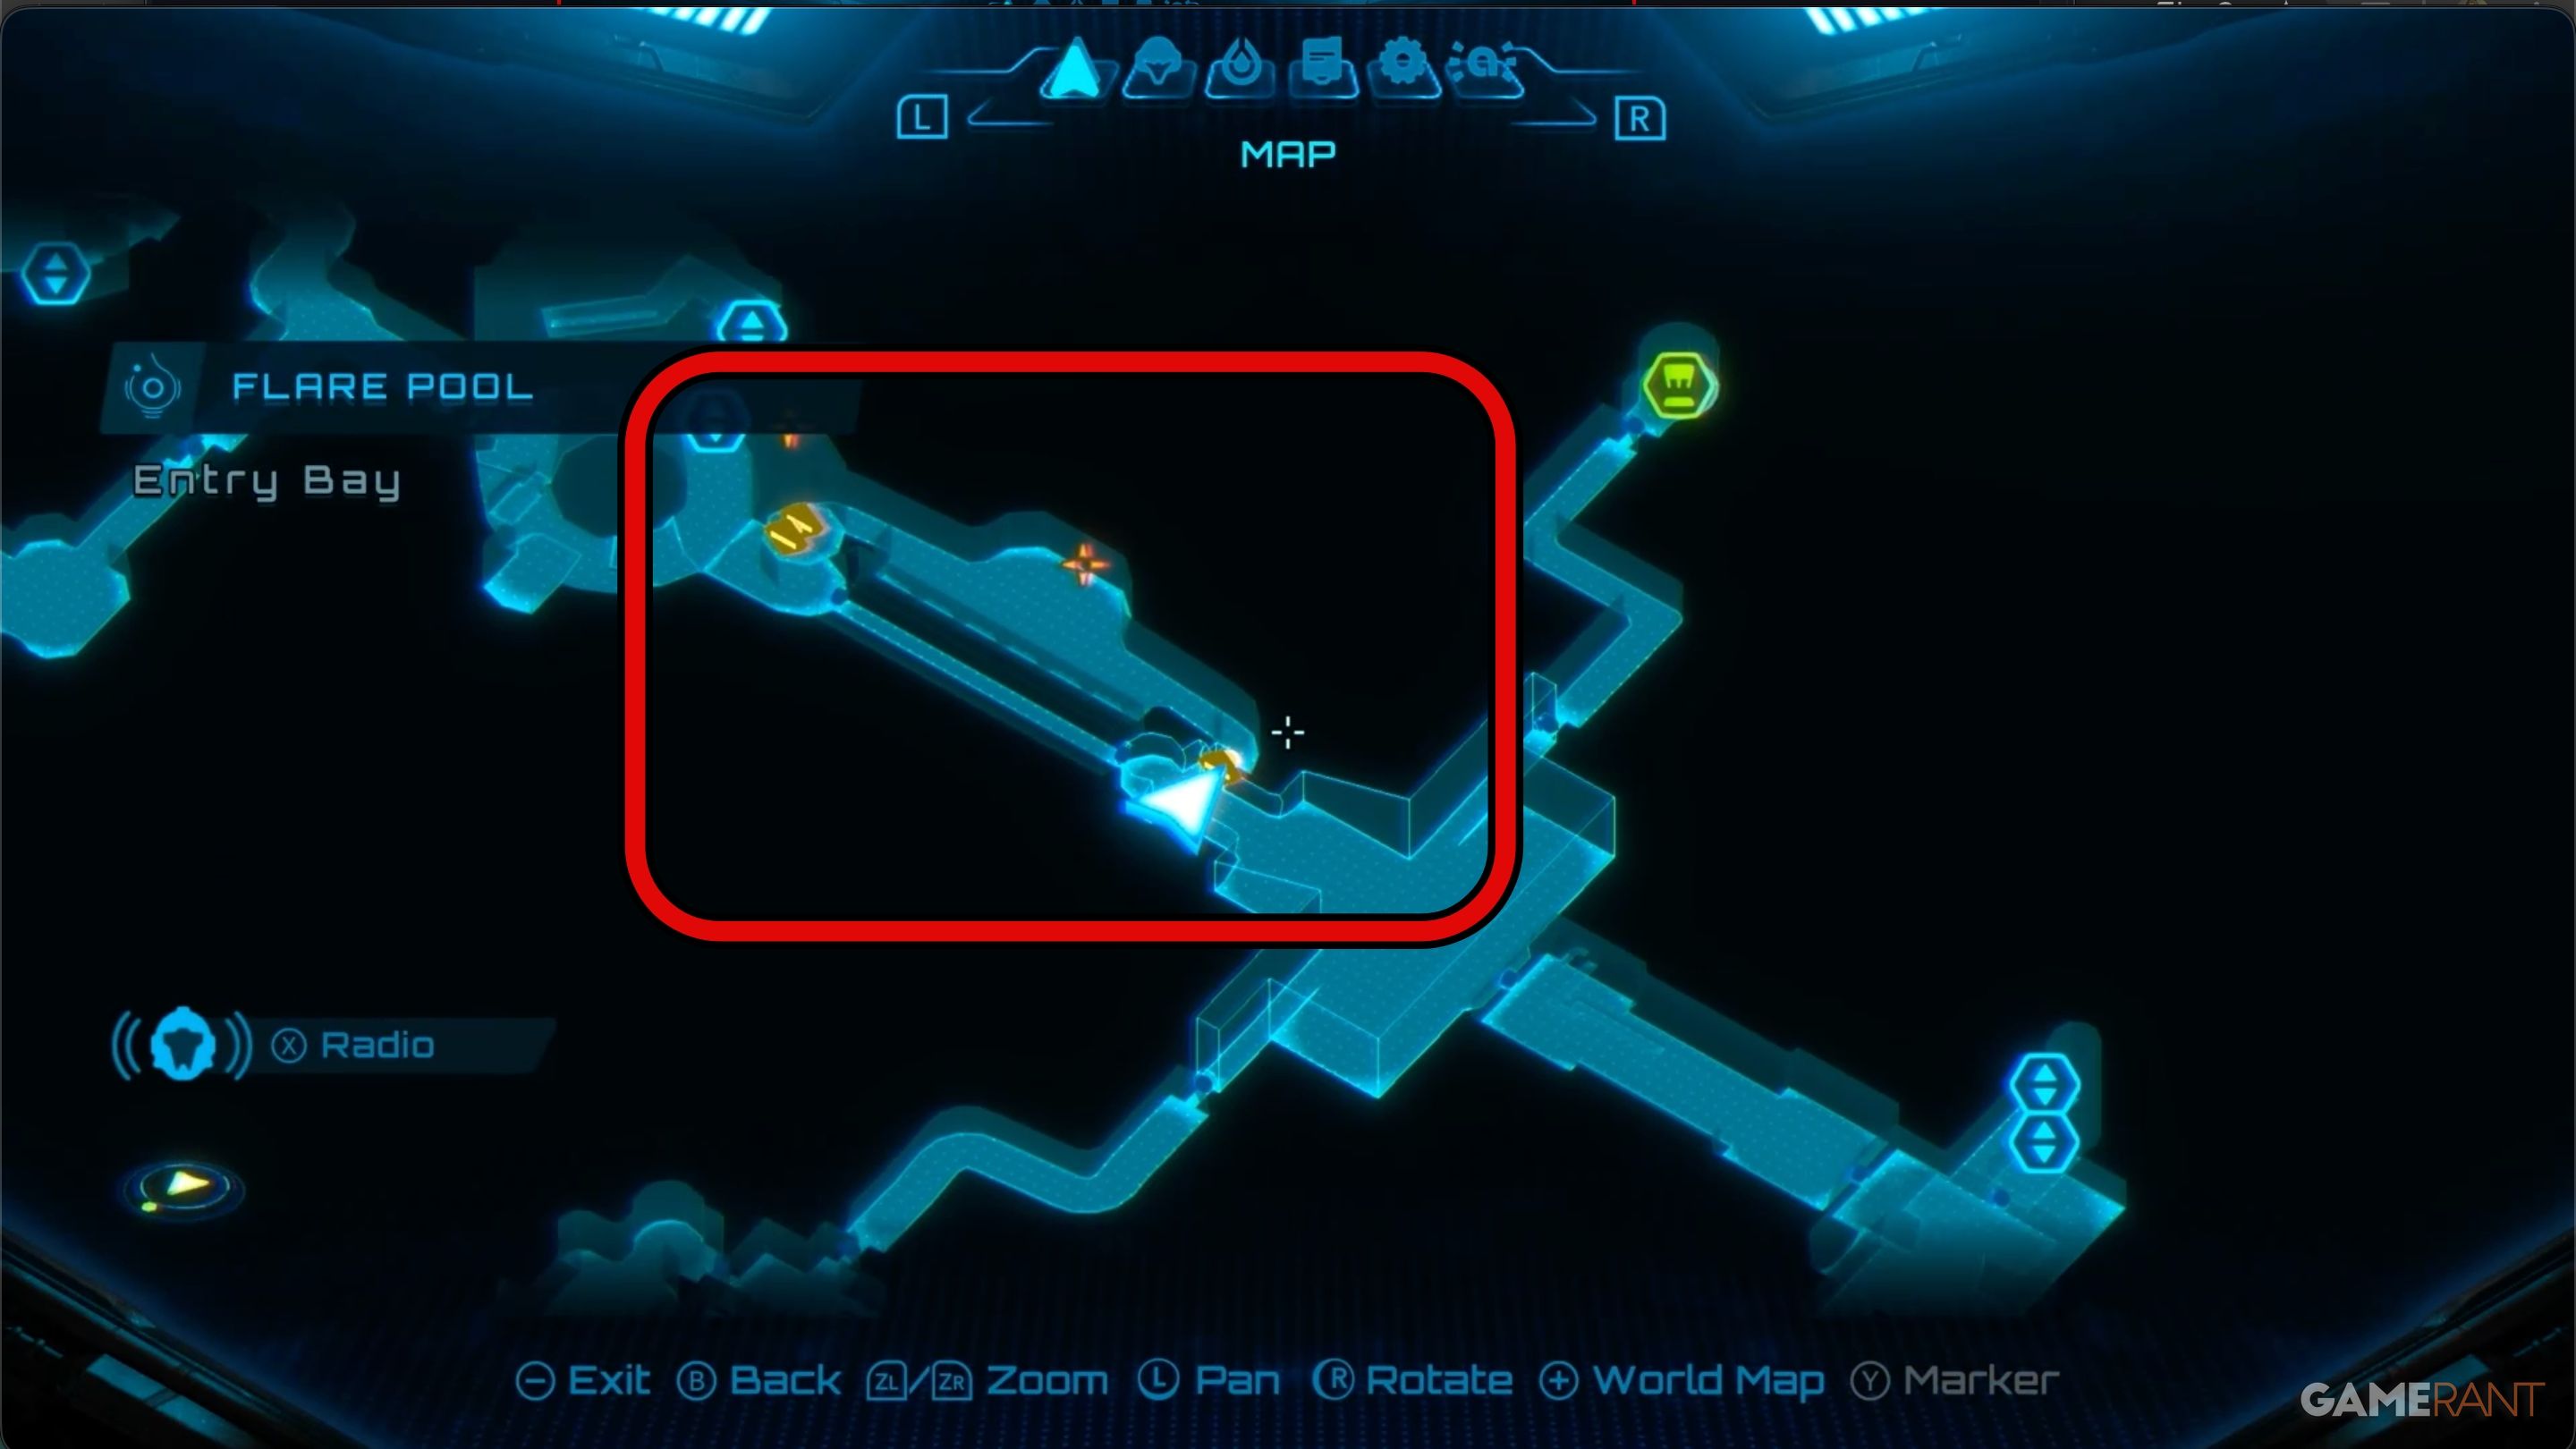
Energy Injection – Shot Expansion & Large Shot Expansion
You’ll find the first upgrade at the top of the Energy Injector room. Use your grapple to get up there, then swing to the platform across from you. It’s easy to spot – it’s right out in the open.
Unlocking the lower Large Shot Expansion is a little tricky. There’s a trench running along the bottom of the room, and a spinner is located at one end, hidden by a cover. Nearby, you’ll find a yellow rod on the wall. Shoot it with your Thunder Shot to remove the cover and reveal the Spinner.
The Large Shot Expansion is located at the bottom of the trench, but it’s secured with two latches. To open it, use boost while in the spinner to extend rods from the trench walls. You need to shoot the base of each rod with Thunder Shot to release the latches – there’s one rod on each side, so look for the one where the base is visible and shoot it. Doing this will unlock access to the Large Shot Expansion.
Thunder Blocker/Subobservation Room – Missile Expansion
To get to the Subobservation Room, head to the Map Station, which is located between the Energy Injection and Energy Extraction areas. From the Map Station, go through the Thunder Blocked door and follow the corridor to the end. This should be your final destination, as the room has a fast-travel system that will take you back to the Entry Bay.
Inside the Subobservation Room, you’ll find a large hatch on the wall. Remove the hatch, then transform into a Morph Ball to enter the wall. Navigate upwards, and use the Bomb jump technique to reach the Missile Expansion.
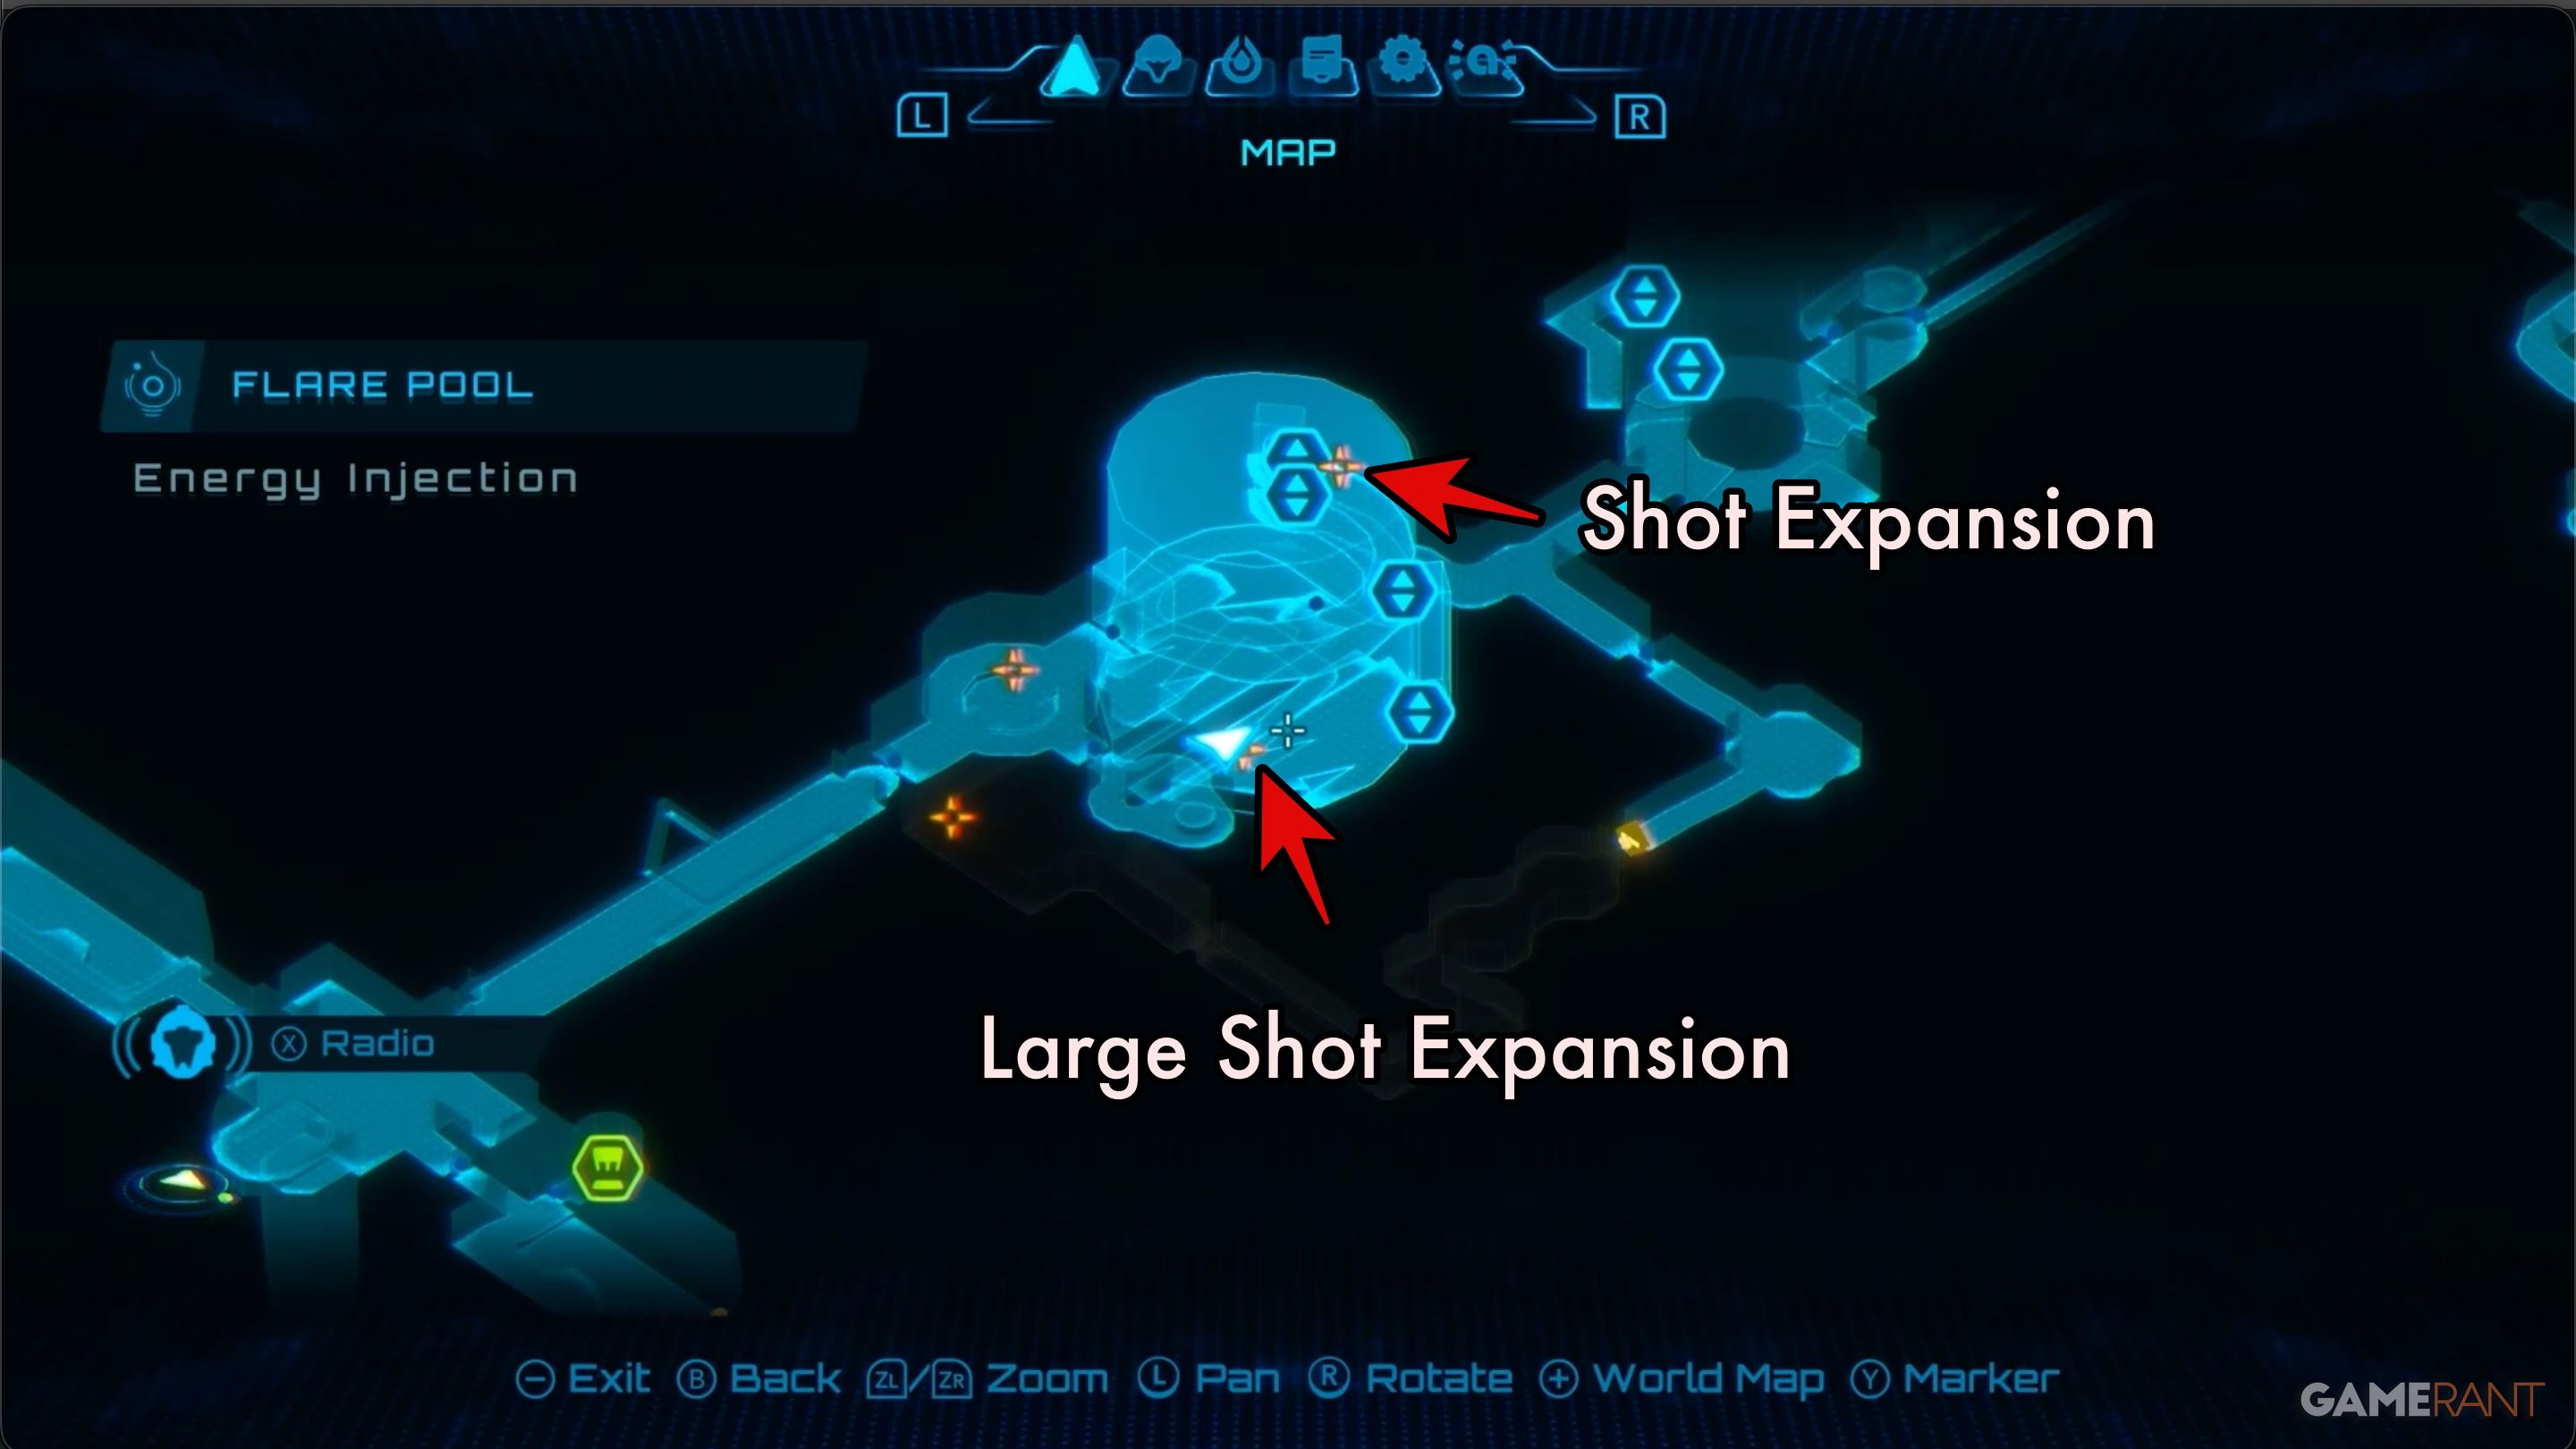
Volcano Heart – Energy Tank, Missile Expansion, Shot Expansion:
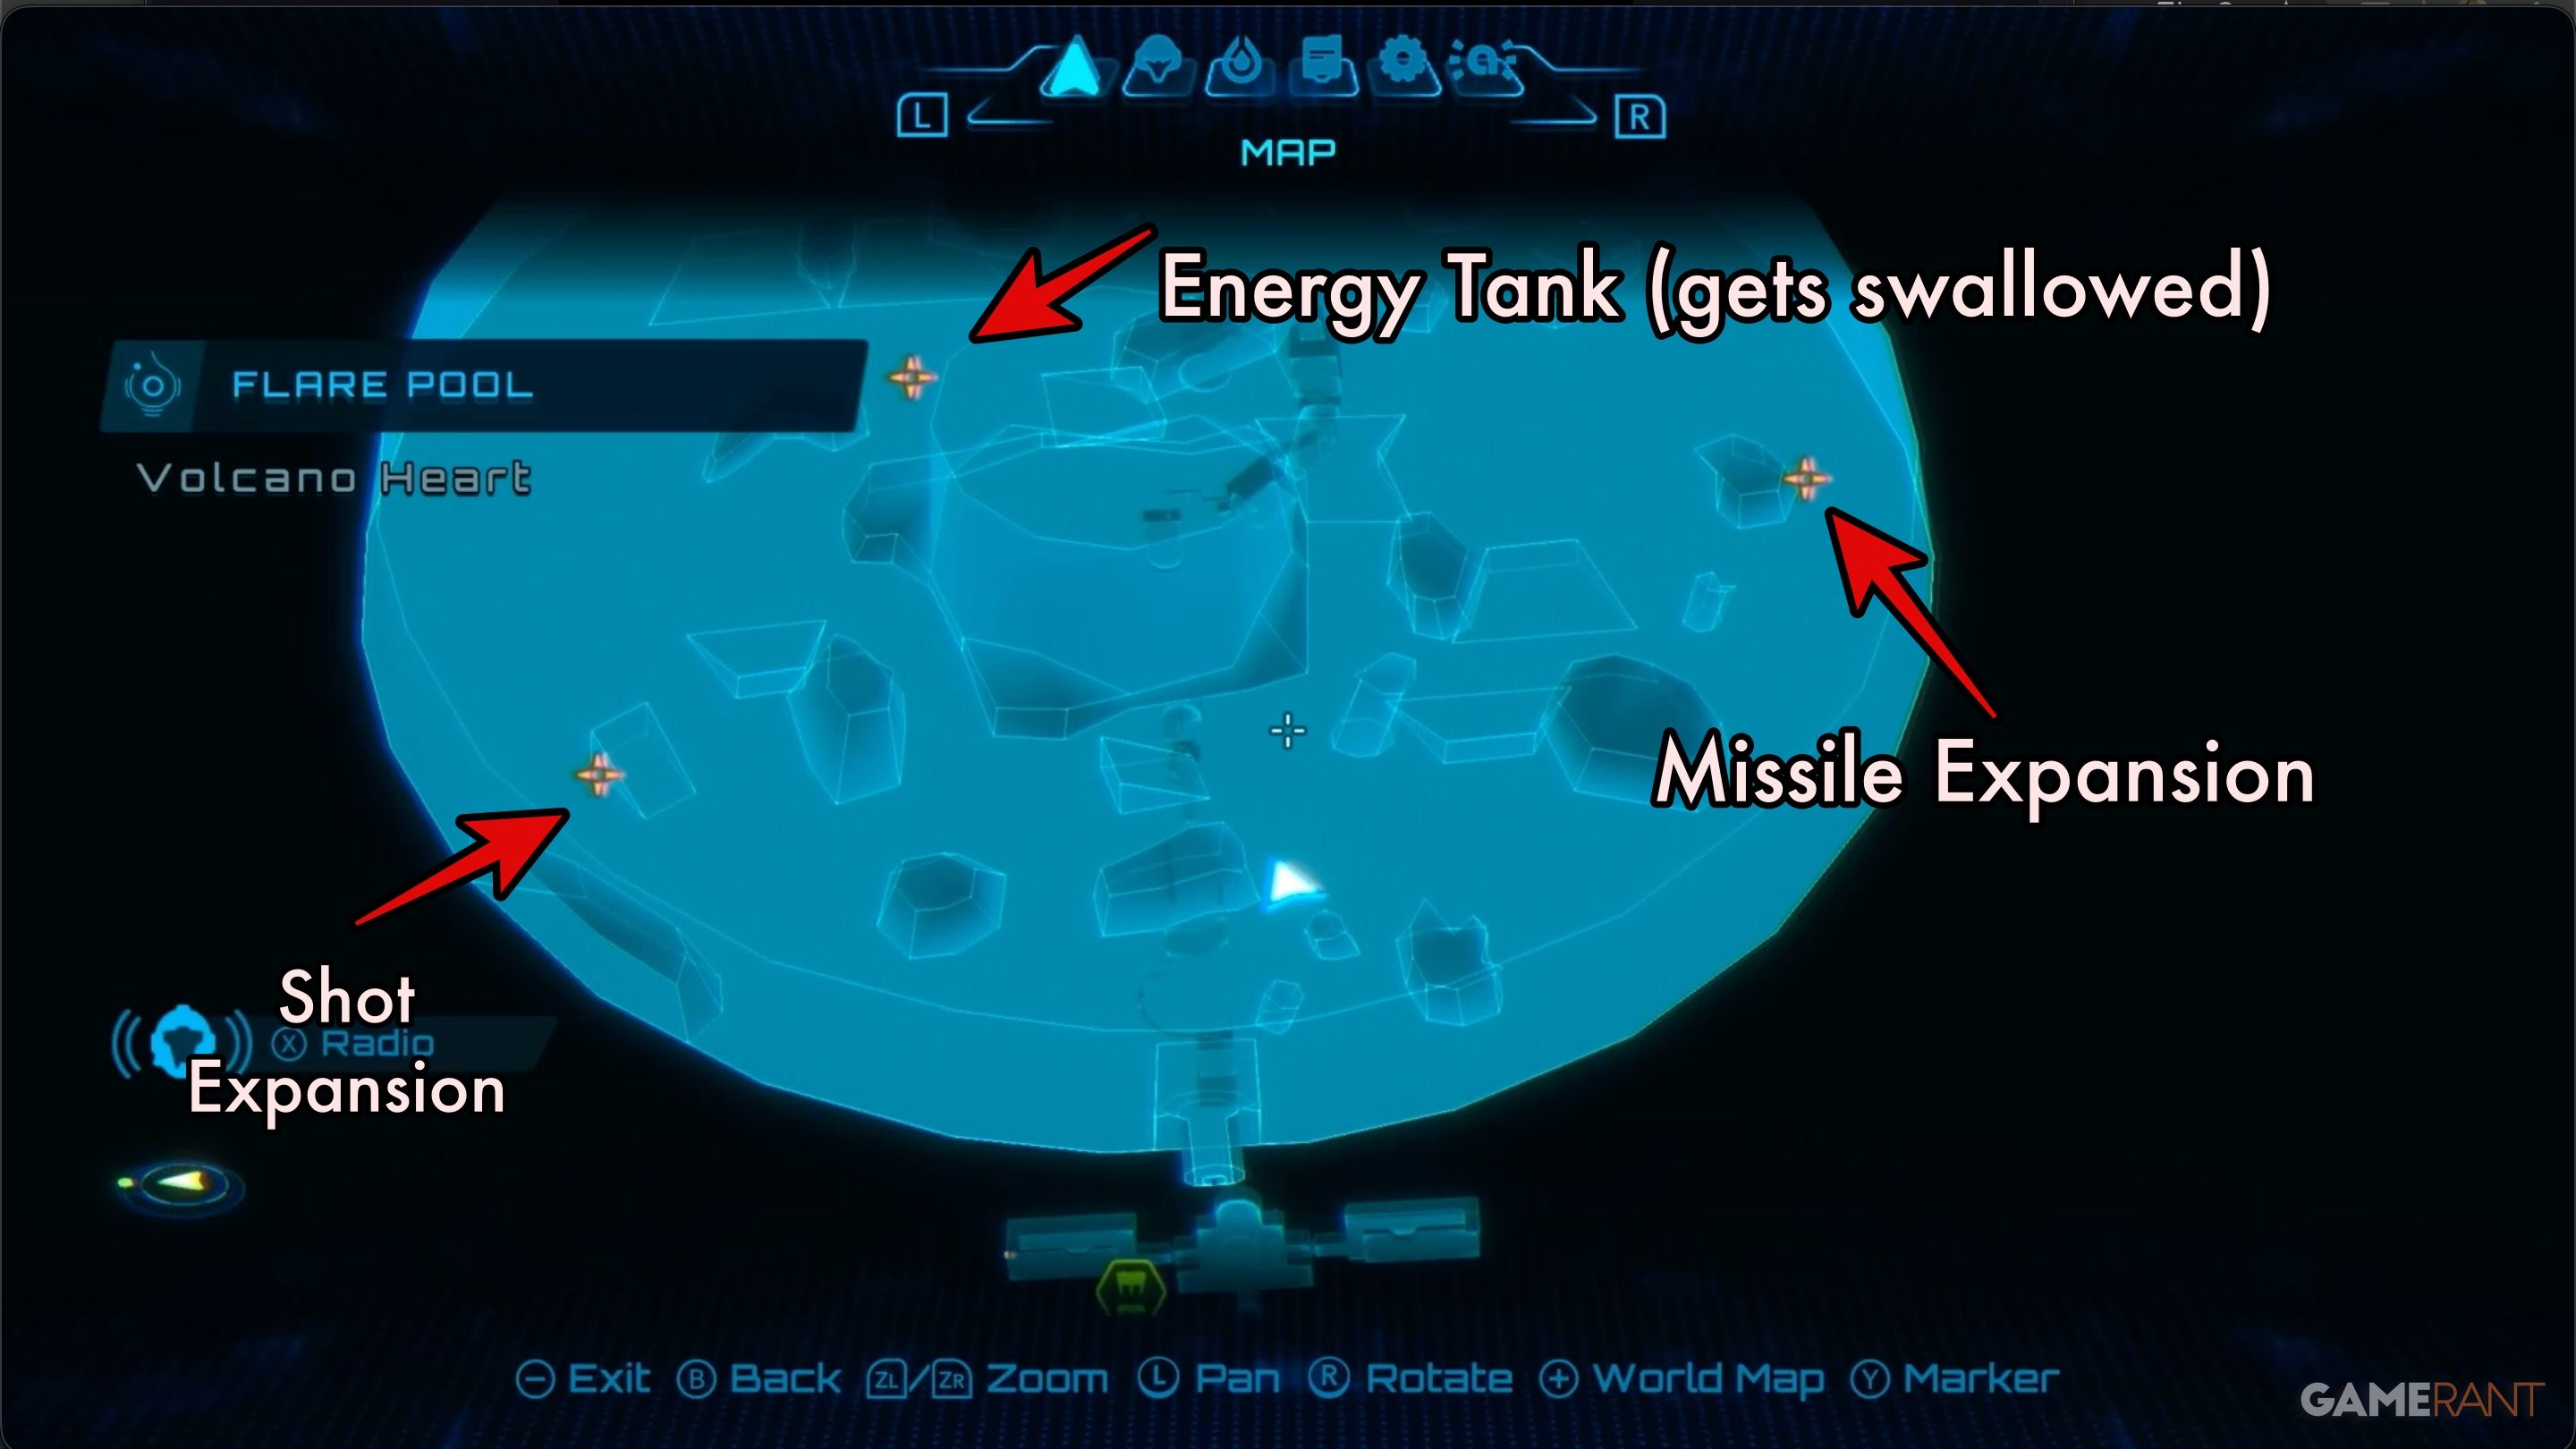
You can find the last items in the Volcano Heart – that’s the room where you battled Phenoros. Get there by going through the gate on the lower Lava Lake Bridge, just like before. Inside, you’ll discover three items, with the Missile Expansion and Shot Expansion readily visible and easy to collect.
The Energy Tank is found a bit differently. When you get close, you’ll see a small container on some broken rocks. Shoot it with Vi-O-La’s weapon, and the Energy Tank will fall into the lava. But watch out – a new enemy will quickly appear and swallow it before you can grab it!
To obtain the Energy Tank, you’ll need to repeatedly chase and shoot the Swim Snatcher. After shooting it enough times, the tank will become available once the enemy is defeated.
Okay, so I just found out something important in Flare Pool! There’s this enemy called the Swim Snatcher, and it’s the last one you can miss scanning. If you take it down before you scan it, you’ll never get to 100% completion. Seriously, scan the Swim Snatcher first, then defeat it – trust me, you don’t want to miss that!
This marks the completion of Flare Pool 100%.
Read More
- All Skyblazer Armor Locations in Crimson Desert
- All Shadow Armor Locations in Crimson Desert
- How to Get the Sunset Reed Armor Set and Hollow Visage Sword in Crimson Desert
- Marni Laser Helm Location & Upgrade in Crimson Desert
- Best Bows in Crimson Desert
- All Helfryn Armor Locations in Crimson Desert
- All Golden Greed Armor Locations in Crimson Desert
- How to Craft the Elegant Carmine Armor in Crimson Desert
- Keeping Large AI Models Connected Through Network Chaos
- One Piece Chapter 1179 Preview: The Real Imu Arrives in Elbaf
2025-12-20 23:46