In the action-RPG game Elden Ring: Nightreign, players will initially encounter a significant challenge – Tricephalos, or Gladius, the Beast of Night. This fearsome three-headed adversary is notoriously difficult in all FromSoftware games and can swiftly cut short your journey if you’re not ready. Defeating this enemy is crucial as it unlocks most of the game’s content and other Nightlords to conquer. To aid you in overcoming Tricephalos (Gladius, Beast of Night), we’ve put together a guide for Elden Ring: Nightreign.
Preparation
In the same way as numerous bosses in the Elden Ring universe, Tricephalos (Gladius) possesses a vulnerability during Nightreign. To challenge this three-headed canine, it’s essential you carry Holy weapons or Incantations. This is its unique weakness, as other elements may not be very effective. Keep an eye out for locations marked by the Holy symbol on your map while exploring.
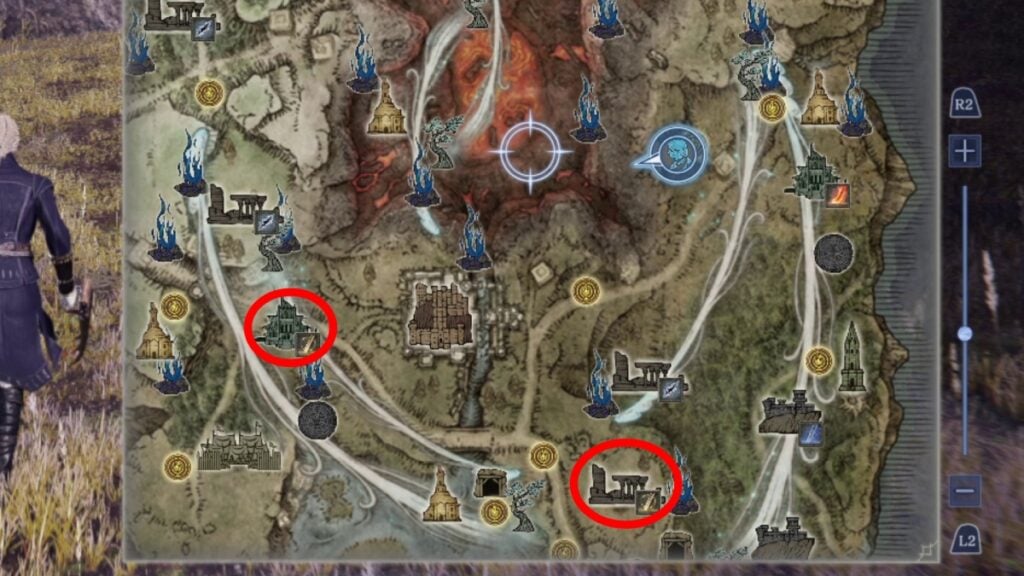
If you’re having trouble locating these specific sites, the Holy icons resemble those we’ve previously highlighted. Generally, Holy settlements or fortresses aren’t overly difficult to locate. Fortresses will be inhabited by Oracle Envoys, while camps or ruins will house Albinauric adversaries. Both types of enemies are quite feeble individually, but they can pose a challenge in numbers, particularly if you’re playing alone.
Other than that, here’s the checklist before facing Gladius in Elden Ring: Nightreign.
- Bring Holy equipment (incantations/weapons).
- Upgrade your flasks at least to six charges (you’ll get the seventh before facing Gladius).
- When choosing Nightfarers, bring Ironeye, Wylder, or Raider.
- Revenant is another great option due to her high Faith stat, but she lacks an option to restore FP.
Solo Strategy

- Recommended characters: Ironeye, Wylder
- Weapon element: Holy
To put it simply, Tricephalos (Gladius) in Elden Ring: Nightreign isn’t the toughest boss to defeat, but it can be quite irritating. It’s equipped with numerous attacks that force you to maintain distance, and when attempting a close approach, it counters with swift melee moves. Therefore, staying alert and nimble is crucial at all times.
First Phase
In your solo battle, overcoming the initial stage can be tough, and instead of blindly attacking the three-headed hound, concentrate on mastering its movements first. To start, it’s equipped with a long whip that can lash out to strike you from a distance. It often uses a series of moves, requiring you to evade at least thrice. If you’re too distant, it will fling the whip to reach you, so when this happens, keep your distance from Gladius and retreat.
Besides that, it will charge towards you and occasionally fireballs if you get too near. The best approach to navigate this stage is by staying close and always on its sides. Most attacks are wide sweeps, and they can be predicted by observing which head is holding the chain. If you’re controlling Ironeye, make sure to mark the enemy first and then retreat so you can attack. It will be a drawn-out battle, but at least it provides an opportunity to advance to the next phase.
Second Phase
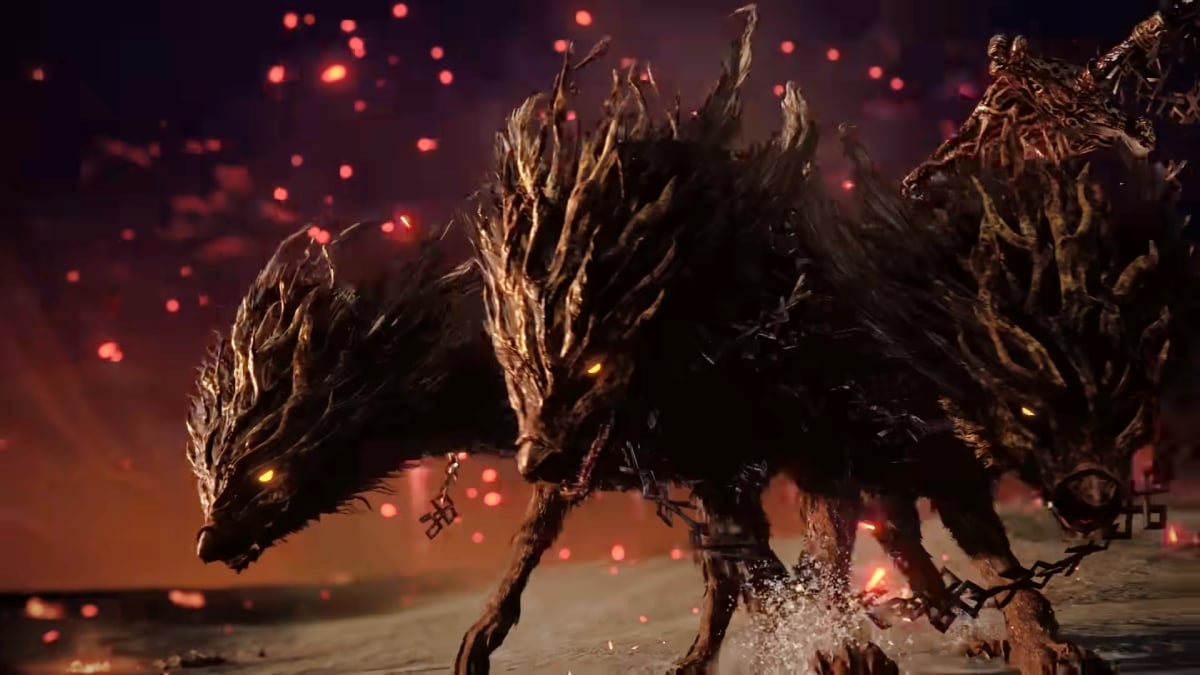
In the heat of the game, once I’ve whittled down Tricephalos to about 75% health, things are about to get intense! The arena will transform, and Gladius will split into three fierce hounds. This can be pretty terrifying for solo players, but here’s a quick trick to outsmart them:
When the hounds appear, instead of engaging in a direct fight, I’ll quickly run towards one corner of the arena. Then, I’ll wait for each hound to come after me individually. By focusing on one at a time, I can take them down more efficiently. This tactic might seem counterintuitive, but it’s a clever way to bypass the chaos and emerge victorious!
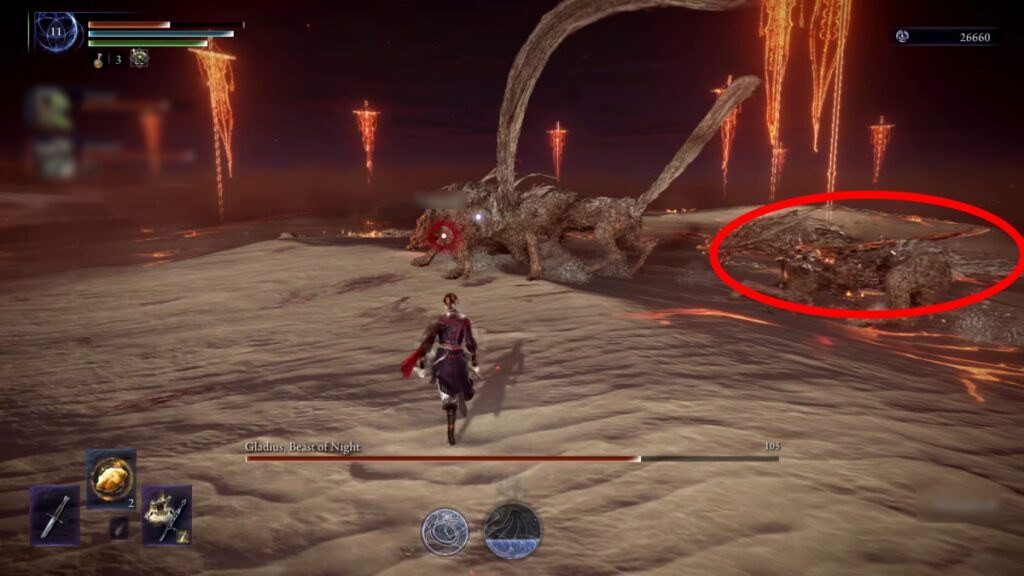
When the trio of dogs shows up, make sure to zero in on the one carrying a sword on its back. Attacking this dog will eventually cause it to become stunned, and if you manage a critical strike, it will significantly reduce the boss’s health meter. However, keep in mind that this task could be quite challenging for solo players because the sword-wielding dog usually hangs out behind the other two. If you have Ironeye with you, landing hits might become slightly easier.
Co-Op Strategy
- Recommended team: Revenant/Ironeye, Wylder, Raider
- Weapon element: Holy
In terms of setup, having a team consisting of Revenant, Wylder, and Raider is effective. Revenant serves as a healer and summoner when necessary. It’s crucial to keep Helen or Frederick active with Revenant for dealing damage and maintaining aggro. Sebastian offers power, but it doesn’t move around much, so use it only when the other two are on cooldown. If you’re controlling Revenant and have a strong Holy spell at your disposal, prioritize dealing damage rather than healing.
The Wylder serves to boost DPS further and maneuver closer to the boss using his grappling hook. Since Gladius can be elusive, it’s beneficial to get near him. However, the Raider is essential as he can stun the boss with his ultimate and deal considerable stun damage (when equipped with greathammers, which are the best weapons for the Raider).
To wrap up, we added Ironeye to our team due to his synergy with the Raider. Ironeye can tag enemies, and when the Raider strikes these tagged targets with weapons that have high stun potential, it’s possible to chain-stun the boss frequently. This is another team composition worth considering for the majority of expeditions.
First Phase
In a nutshell, the general approach doesn’t vary significantly whether you play solo or in a team. Interestingly, it becomes less challenging as the teamwork allows for easier boss aggro by deploying melee characters initially, or even summoning the Revenant first. During this stage, remain close to the boss and inflict as many blows as possible until the second phase is triggered. It’s worth noting that fighting the three-headed dog solo isn’t particularly tough, but the second part can get tricky.
Second Phase
In this game, pay attention to the dog carrying the sword. Since each dog will single out one player, the player controlling that dog can strike it repeatedly until it’s stunned. If you notice a red circle around another player, it indicates that the dog will solely focus on them, but you can capitalize on this situation. The targeted player should stay as close as possible to other teammates for mutual support in landing hits. It’ll call for great teamwork, but it’s definitely achievable.
The situation may appear intricate at first glance, but upon closer inspection, it’s more straightforward than it seems. The main hurdle is mastering and rehearsing the moves, as any death here means starting the Tricephalos expedition in Elden Ring: Nightreign from scratch, which can be quite time-consuming. Moreover, making it through the second night is no small feat. Therefore, the key to success lies in thorough planning and acquiring a powerful Holy weapon, as that’s what will inflict the most damage.
Read More
- All Shadow Armor Locations in Crimson Desert
- Sega Reveals Official Sonic Timeline: From Prehistoric to Modern Era
- Dark Marksman Armor Locations in Crimson Desert
- Genshin Impact Dev Teases New Open-World MMO With Realistic Graphics
- The Limits of Thought: Can We Compress Reasoning in AI?
- Where to Pack and Sell Trade Goods in Crimson Desert
- How to Beat Antumbra’s Sword (Sanctum of Absolution) in Crimson Desert
- Enshrouded: Giant Critter Scales Location
- Who Can You Romance In GreedFall 2: The Dying World?
- Keeping AI Agents on Track: A New Approach to Reliable Action
2025-05-30 01:35