
In Megabonk, the items you choose can drastically change how a playthrough goes. Some items are powerful with any character build, while others are only useful in certain situations. With so many options, it’s easy to feel lost. This tier list helps by ranking all items from S-tier to C-tier, so you know which ones are worth focusing on.
S Tier Items in Megabonk
As a movie buff, I’m always looking for those reliable, go-to items – the ones that just work with pretty much any character build. These are those items! They either boost your stats incredibly well, or they give you vital effects that can turn a tough situation around and guarantee a win. They’re the pieces I always reach for because they’re just so consistently helpful.
| Item | Description |
|---|---|
| Beefy Ring | When equipped, damage scales by 20% with Max HP, making you both stronger and harder to kill. A must-have for any tank build. |
| Forbidden Juice | When equipped, it increases the critical chance by +10%. This makes it a must-have for any crit-focused build. |
| Gym Sauce | When equipped, it adds a universal +10% damage bonus that makes every attack hit harder. It applies to all weapons and characters in Megabonk. |
| Overpowered Lamp | Increases proc rate and enhances elemental scaling. Great for most weapons. |
| Moldy Cheese | Inflicts poison damage over time. Best to take down bosses and mobs. |
| Turbo Socks | Gives +15% movement speed, which helps slower, tanky characters move faster across the map and dodge enemies. |
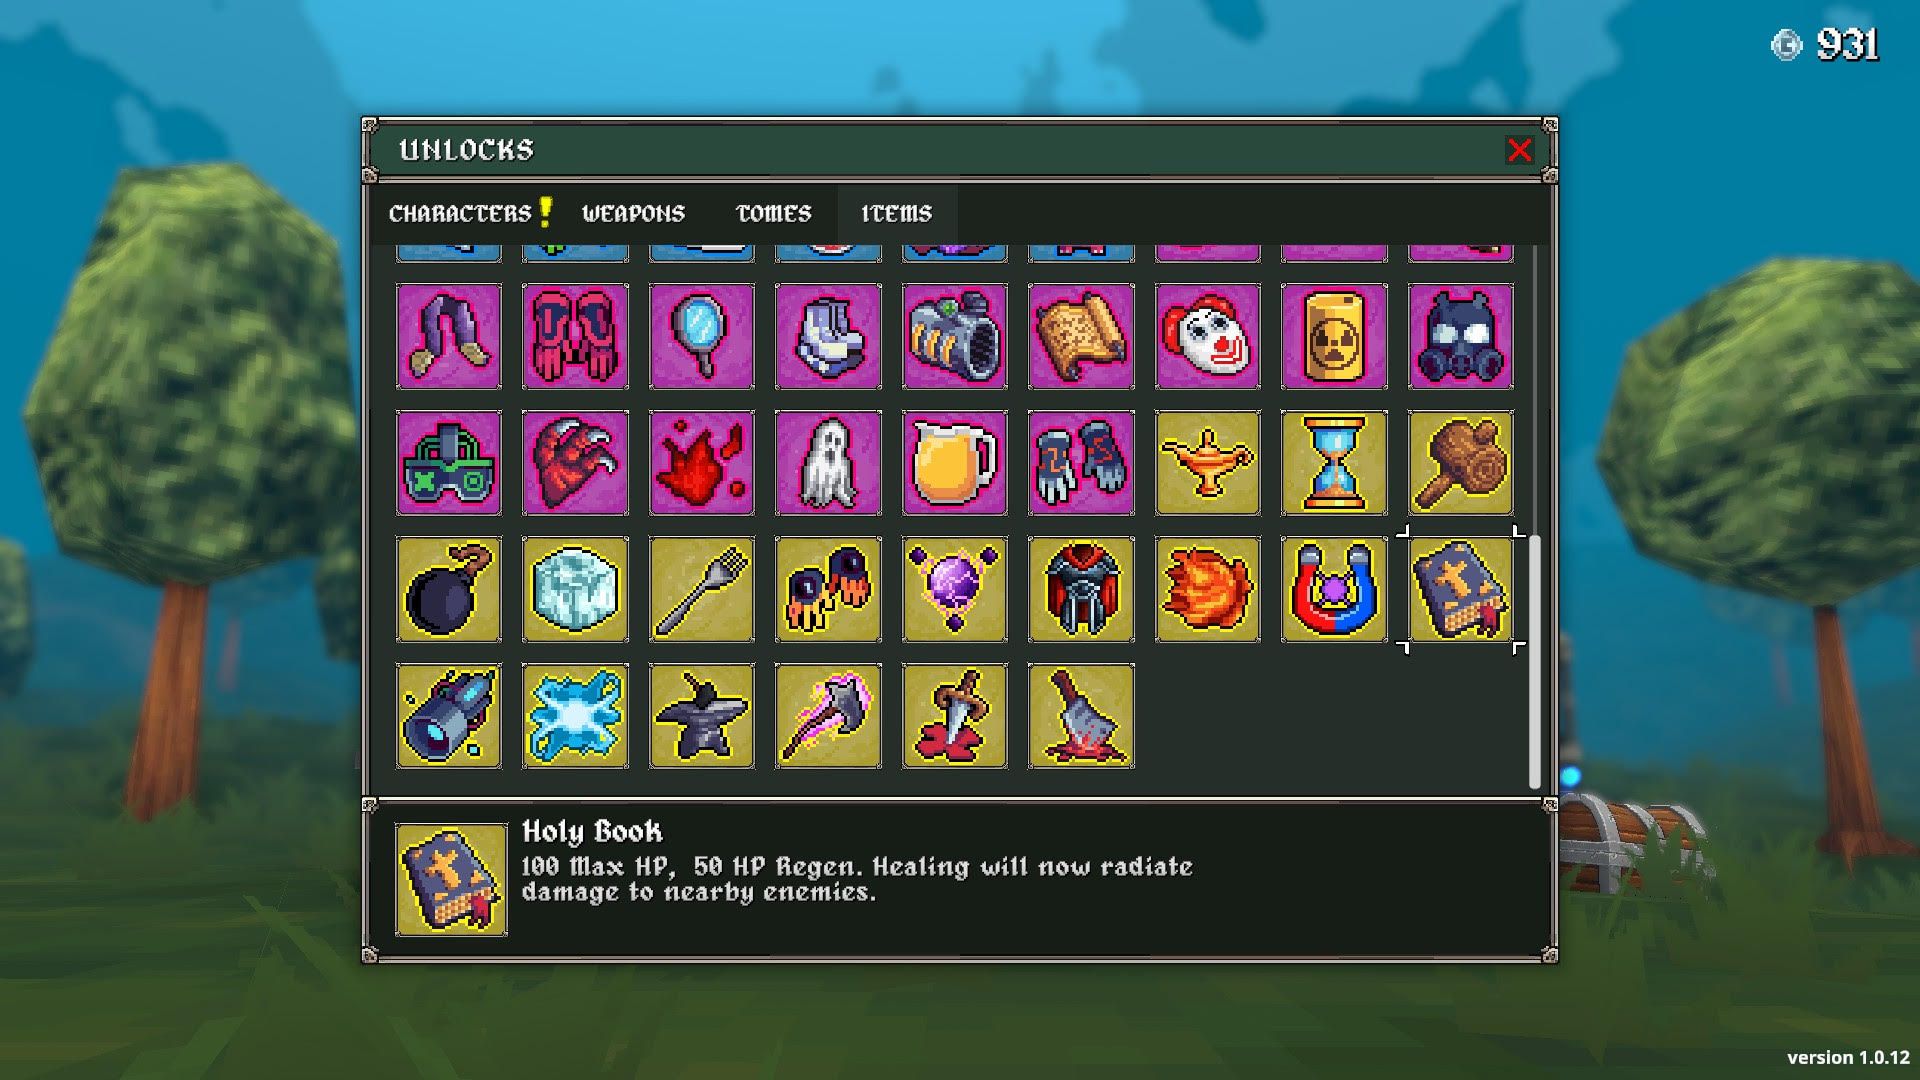
| Holy Book | Boosts HP and regeneration. Healing also deals damage to nearby enemies. |
| Anvil | All weapon upgrades give +1 stat, making it a late-game powerhouse for scaling. |
| Chonkplate | Converts overheal into extra HP and works perfectly with Lifesteal and regen builds. |
| Ice Cube | Adds a freeze effect with Ice damage that can stop enemies mid-attack. Life-saving in tough fights. |
| Turbo Skates | Turns movement speed into attack speed. Pairs perfectly with Turbo Socks for speed builds. |
| Grandma’s Secret Tonic | It gives critical hits a 50% chance of exploding and dealing 50% damage to nearby enemies. Pairs well with other items that boost critical hit chances. |
| Za Warudo | Freezes time and all enemies when your HP hits zero. It gives you a second life, making it one of the most powerful items in Megabonk. |
A Tier Items in Megabonk
These items are versatile and can be very effective if used well, working with many different strategies. They generally become more powerful as the game goes on, have dependable effects, and combine well with other items to create strong combinations.
| Item | Description |
|---|---|
| Clover | Increases your overall luck in Megabonk. This leads to better item drops. Great for long runs. |
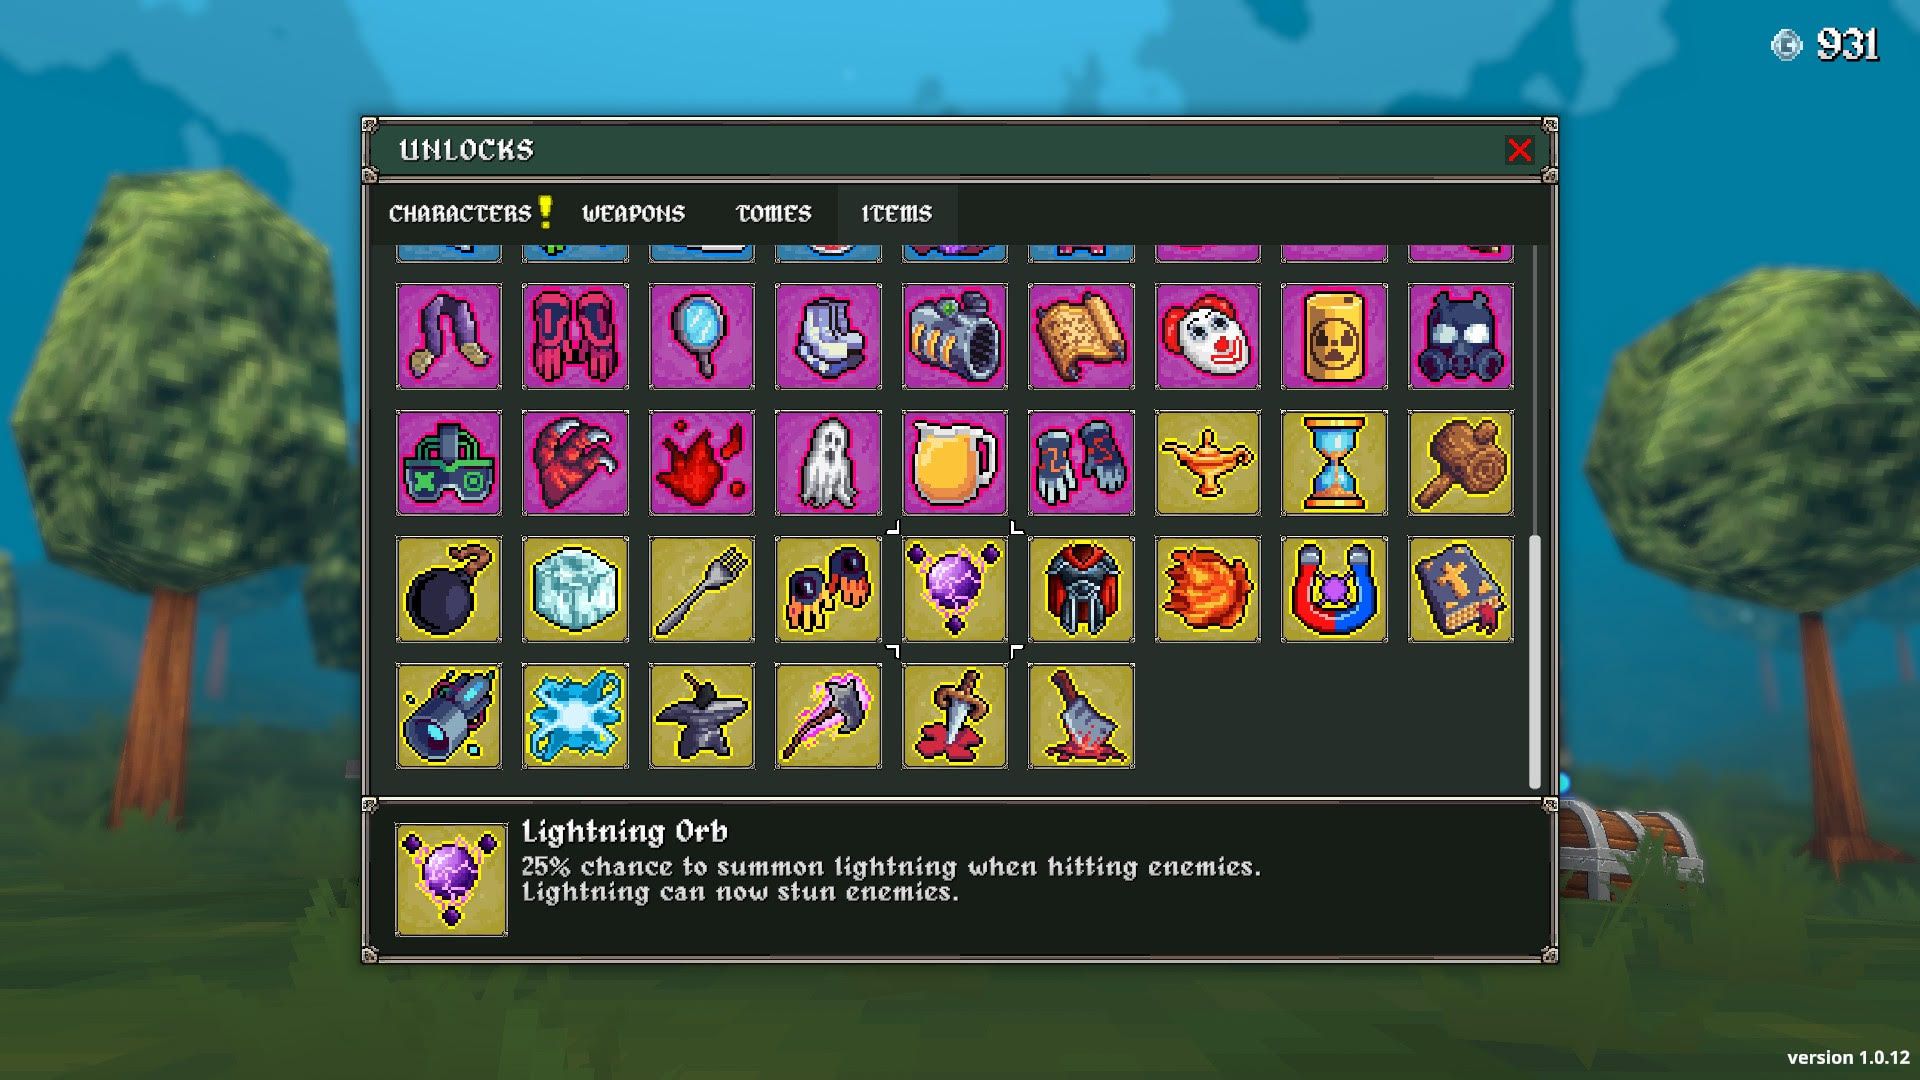
| Lightning Orb | 25% chance to summon lightning that stuns enemies. |
| Spicy Meatball | 25% chance to create explosive AoE blasts on hit. Great for crowd control. |
| Soul Harvester | Summons homing souls on kills. |
| Shattered Knowledge | Turns XP shards into damage bursts against enemies. The more you level up, the more powerful it gets. |
| Dragonfire | Inflicts burn that stacks, dealing heavy damage over time to enemies. |
| Toxic Barrel | Releases a poisonous cloud when you take damage, damaging nearby enemies. |
| Beacon | Creates healing zones that restore HP and boost stats in Megabonk. It also spawns a couple more Charge Shrine for upcoming stages. Extremely helpful before boss fights. |
| Demonic Blade | Critical hits have a 25% chance to restore your HP, making it perfect for crit-based characters. |
| Giant Fork | Turns critical hits into Megacrits for massive burst damage. Great for crit-focused characters. |
| Cactus | Shoots spikes when taking damage. |
| Demonic Soul | Boosts your damage permanently after every kill, stacking up to +100%. |
| Demon Blood | Adds a small amount of extra HP after each kill, stacking up to 200. |
| Medkit | Grants steady HP regeneration over time, increases your HP regen by +45. |
| Oats | A simple yet effective 25% HP increase, a great early-game item. |
| Speed Boi | When you’re under 50% HP, it slows time and doubles your damage. Comes in clutch for risky fights. |
| Slippery Ring | Adds a +15% evasion chance that stacks when you collect multiple rings. Great for dodging builds. |
| Backpack | The Backpack increases your projectile count for all Megabonk Weapons by 1. |
| Time Bracelet | Increases your XP gain by 8% during runs. It’s especially useful for players looking to level up quickly. |
| Kevin | Works best when paired with Mirror for near-immortality. On its own, it’s situational but useful. |
| Mirror | Reflects attacks back at enemies. Best when paired with Kevin for an almost invincible combo. |
B Tier Items in Megabonk
These items have potential and can be enjoyable to try out, but their performance isn’t always consistent and relies heavily on random chance. They’re good for casual play, but not ideal for when you’re trying to win consistently.
| Item | Description |
|---|---|
| Big Bonk | Has a 2% chance of dealing 20x damage. |
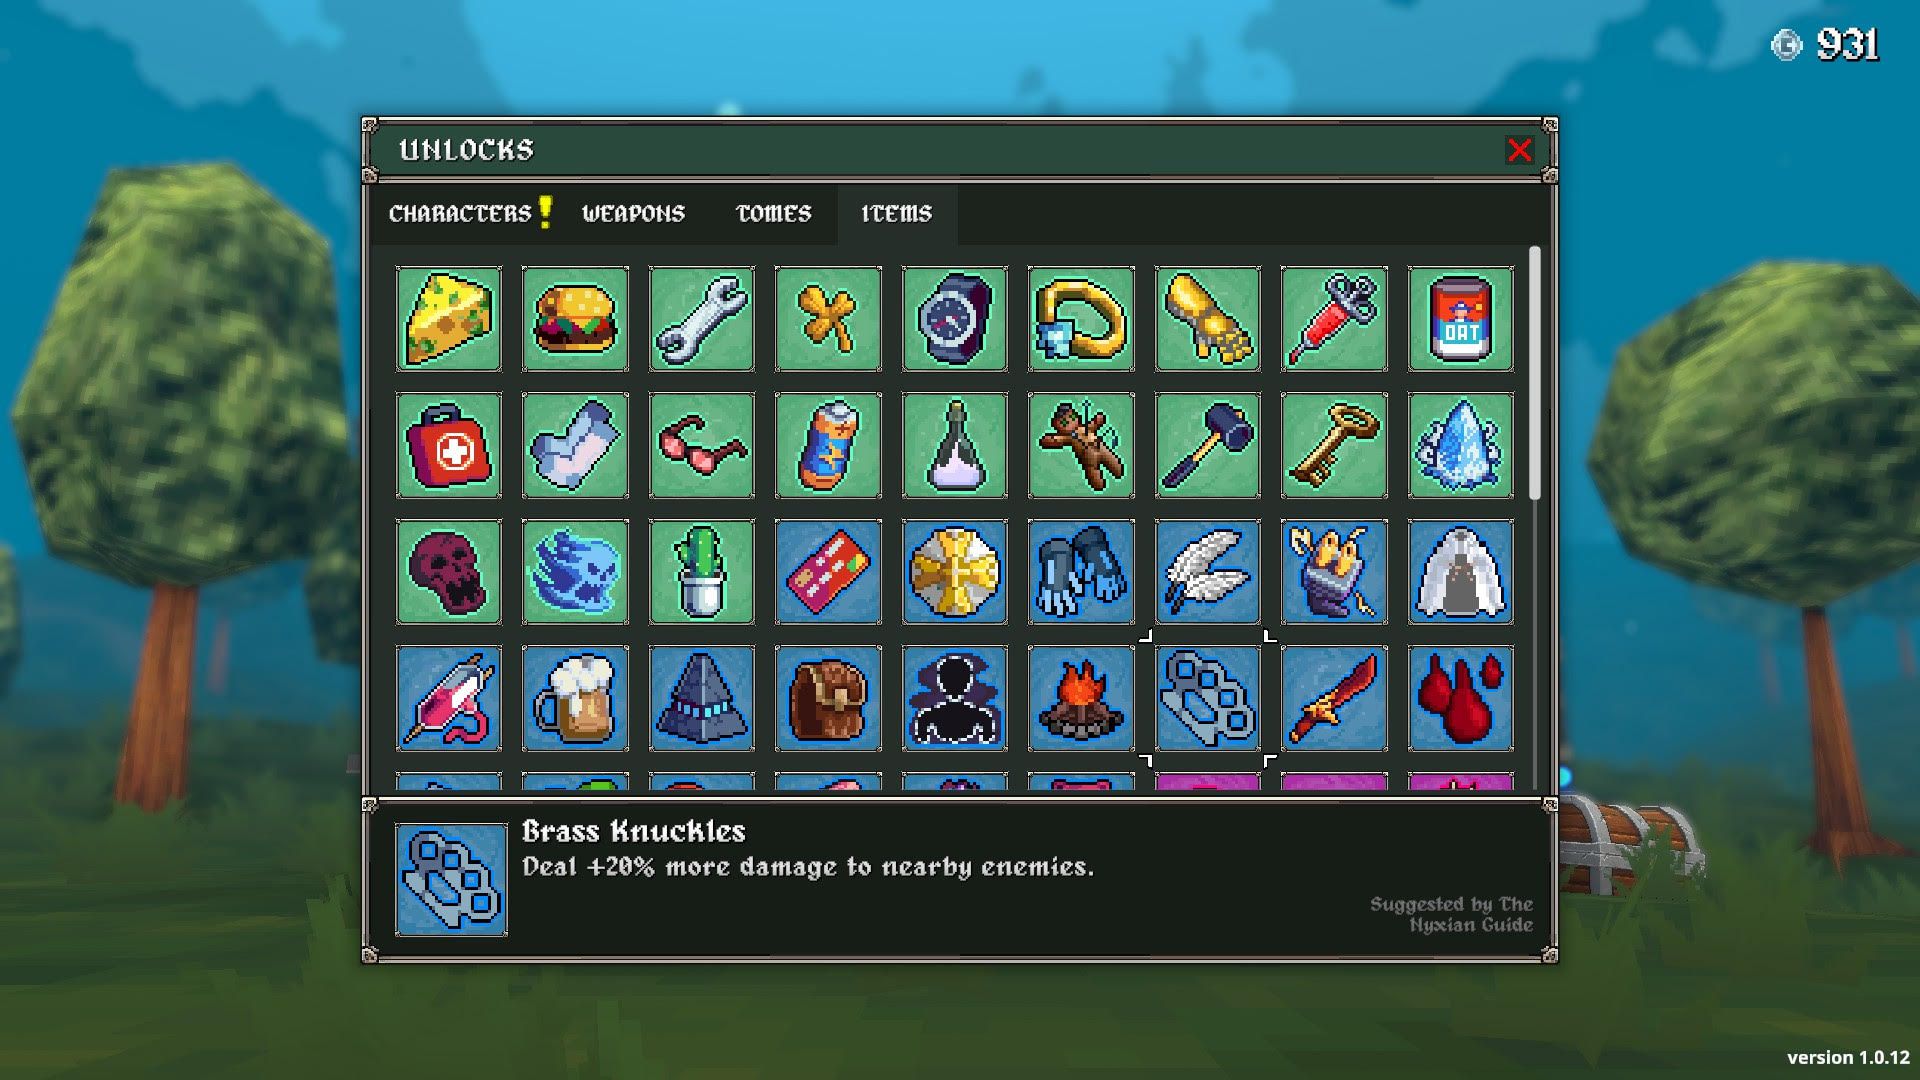
| Brass Knuckles | +20% damage to nearby enemies only. |
| Power Gloves | Random blast that looks cool but triggers too inconsistently to rely on. |
| Golden Glove | Gives you +15% gold gain from kills. Useful for farming, but doesn’t help in combat. |
| Eagle Claw | Deals 66% bonus damage to airborne enemies and can knock them up (8% chance). Very situational. |
| Gas Mask | Adds Armor and Lifesteal, which is great for poison builds. Others won’t benefit much. |
| Joe’s Dagger | 1% chance to execute an enemy and permanently boost damage. Extremely rare to trigger. |
| Slutty Cannon | 20% chance to spawn homing missiles. |
| Sucky Magnet | Pulls in XP orbs. This makes it good for lazy farming, but not important in the long run. |
| Phantom Shroud | Temporarily increases attack & movement speed after evading. |
| Scarf | Boosts damage while airborne, useful only for agile characters. |
| Spiky Shield | Adds thorns that reflect damage back to attackers. Great for tank builds. |
| Feathers | This item allows you to jump higher and farther. |
C Tier Items in Megabonk
These items aren’t powerful enough, only useful in limited situations, or don’t stay effective as you get stronger. Though they might fit into certain strategies, they’re generally not a good investment long-term.
| Item | Description |
|---|---|
| Tactical Glasses | +20% damage to enemies with over 90% HP. Not super useful against weaker mobs. |
| Slurp Gloves | Heals you for 7.5% and damages nearby enemies, but has a long cooldown. |
| Leeching Crystal | Trades HP Regen for Max HP. The loss of regen makes it risky. |
| Golden Shield | Grants gold when you take damage, but ideally, you shouldn’t be getting hit. |
| Idle Juice | Increases damage when standing still. Only viable for AFK or stationary builds. |
| Ice Crystal | 7.5% chance to freeze enemies when you hit them. A handy item, though the trigger rate is a bit low. |
| Campfire | Heals you while stationary, but standing still is deadly in later stages. |
| Electric Plug | Inflicts small bursts of electric shock on enemies when you get hit, though ideally, you should avoid taking damage. |
| Golden Sneakers | Boosts your money earnings with your character’s movement. Pairs well with agility builds, but dosn’t add much value for slower characters. |
| Coward’s Cloak | Temporary speed boost when you take damage. |
| Borgar | Tiny chance to spawn a Borgar. Fun, but completely pointless for gameplay. |
Read More
- All Shadow Armor Locations in Crimson Desert
- Dark Marksman Armor Locations in Crimson Desert
- Sega Reveals Official Sonic Timeline: From Prehistoric to Modern Era
- How to Beat Antumbra’s Sword (Sanctum of Absolution) in Crimson Desert
- Genshin Impact Dev Teases New Open-World MMO With Realistic Graphics
- Where to Pack and Sell Trade Goods in Crimson Desert
- Top 5 Militaristic Civs in Civilization 7
- Enshrouded: Giant Critter Scales Location
- The Limits of Thought: Can We Compress Reasoning in AI?
- Best Weapons, Armor, and Accessories to Get Early in Crimson Desert
2025-10-24 13:41