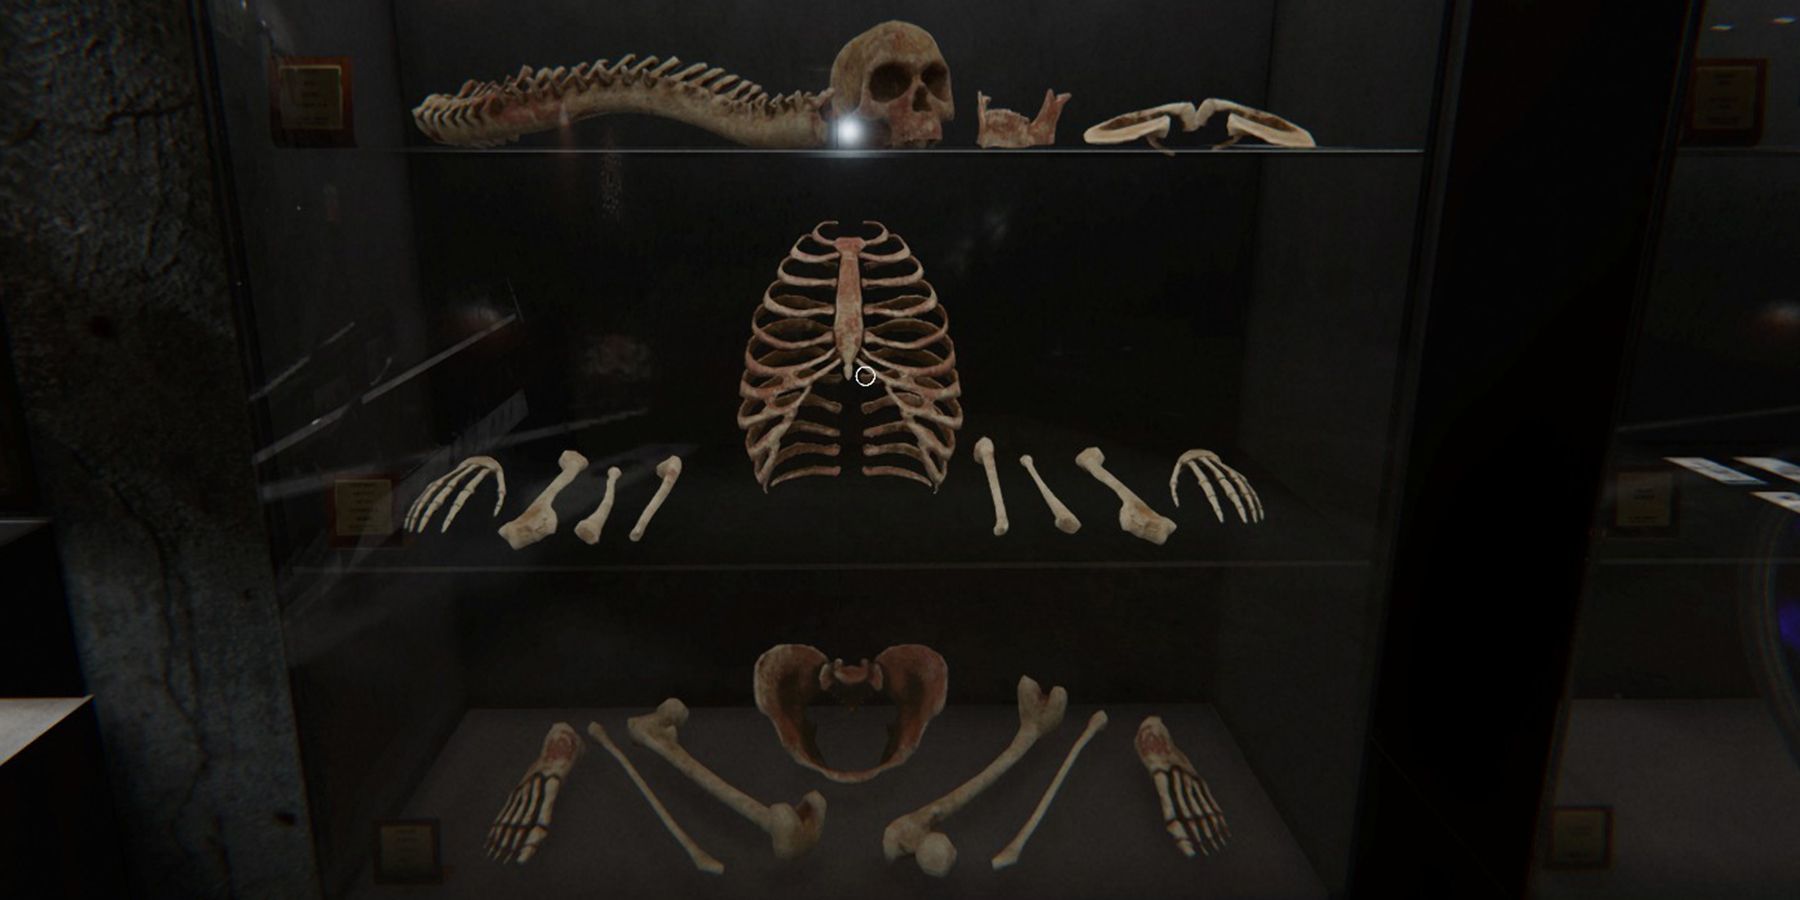
As someone who’s spent countless hours hunched over my ghost-hunting gear, I must say that the Apocalypse mode in Phasmophobia is not for the faint of heart or the casual player. Having reached level 40 and unlocked this challenging difficulty, I can vouch for its intensity. With only one piece of evidence to find, starting on 75% sanity, and a 2-second Grace Period, it’s a test of skill, patience, and nerves.
Over time, Phasmophobia has significantly evolved since its early access debut, and Kinetic Games have incorporated various degrees of difficulty for players to test their skills on. Given that the game isn’t exactly a walk in the park to begin with, it adds an extra layer of excitement as you strive to correctly identify the ghost in one of the tougher modes.
In Phasmophobia, the level of difficulty spans from Amateur to Apocalypse, and with each step up, the amount of evidence needed, the ghost’s speed, and other challenging settings increase, making the game progressively harder as you advance. You also have a variety of custom difficulty options at your disposal to tailor the game to your preferences. Moreover, the more difficult the level, the greater the XP earned, so each challenge presents its own rewards.
How Difficulty Works In Phasmophobia

In the game ‘Phasmophobia’, the level of challenges can vary based on the adjustments made within your chosen contract. While there are predefined difficulty levels available, you also have the freedom to personalize each setting according to your preference. The more demanding a specific setting, the higher the modifier increases, resulting in greater rewards for you. There’s an extensive range of options to select from under Player, Ghost, and General Contract settings. Here’s what each category represents:
Player Difficulty Setting Options
- Starting Sanity: Percentage of sanity you start on.
- Sanity Pill Restoration: How much sanity pills restore.
- Sanity Drain Speed: How quickly sanity drains in the dark/near ghost events.
- Sprinting: Whether or not your character can sprint.
- Player Speed: How quickly your character walks.
- Flashlights: Toggles flashlights being usable or not.
- Lose Items and Consumables: Whether or not you lose items when you die, and how many.
Ghost Difficulty Setting Options
- Ghost Speed: How fast the ghost walks while hunting.
- Roaming Frequency: How often the ghost roams to other rooms.
- Changing Favorite Room: How likely the ghost is to change favorite room.
- Activity Level: How often the ghost interacts with objects.
- Even Frequency: How often the ghost does ghost events.
- Friendly Ghost: Toggles whether or not the ghost hunts.
- Grace Period: How long you have before the ghost can kill you in a hunt.
- Hunt Duration: How long the hunt will last.
- Kills Extend Hunts: Whether or not kills in the hunt make it go longer.
- Evidence Given: How much evidence the ghost gives.
Contract Difficulty Setting Options
- Setup Time: How long you have to setup before the ghost can start hunts.
- Weather: Can be set to specific weather or random.
- Doors Starting Open: Whether or not doors start open.
- Number of Hiding Places: How many spots you can use to hide from the ghost.
- Sanity Monitor: Toggles if you can see your sanity in the van.
- Activity Monitor: Toggles if you can see ghost activity from the van.
- Fuse Box: Whether it starts on or off.
- Cursed Possessions Quantity: How many and/or which Cursed Possession you have in the contract.
All Preset Difficulty Settings In Phasmophobia
In the game Phasmophobia, there are six pre-set levels of difficulty to select, with each level becoming progressively harder as you move up. To access higher levels, you need to attain specific levels within the game, and initially, you’ll start at the Amateur level.
Amateur (Gives You Space To Learn The Game)
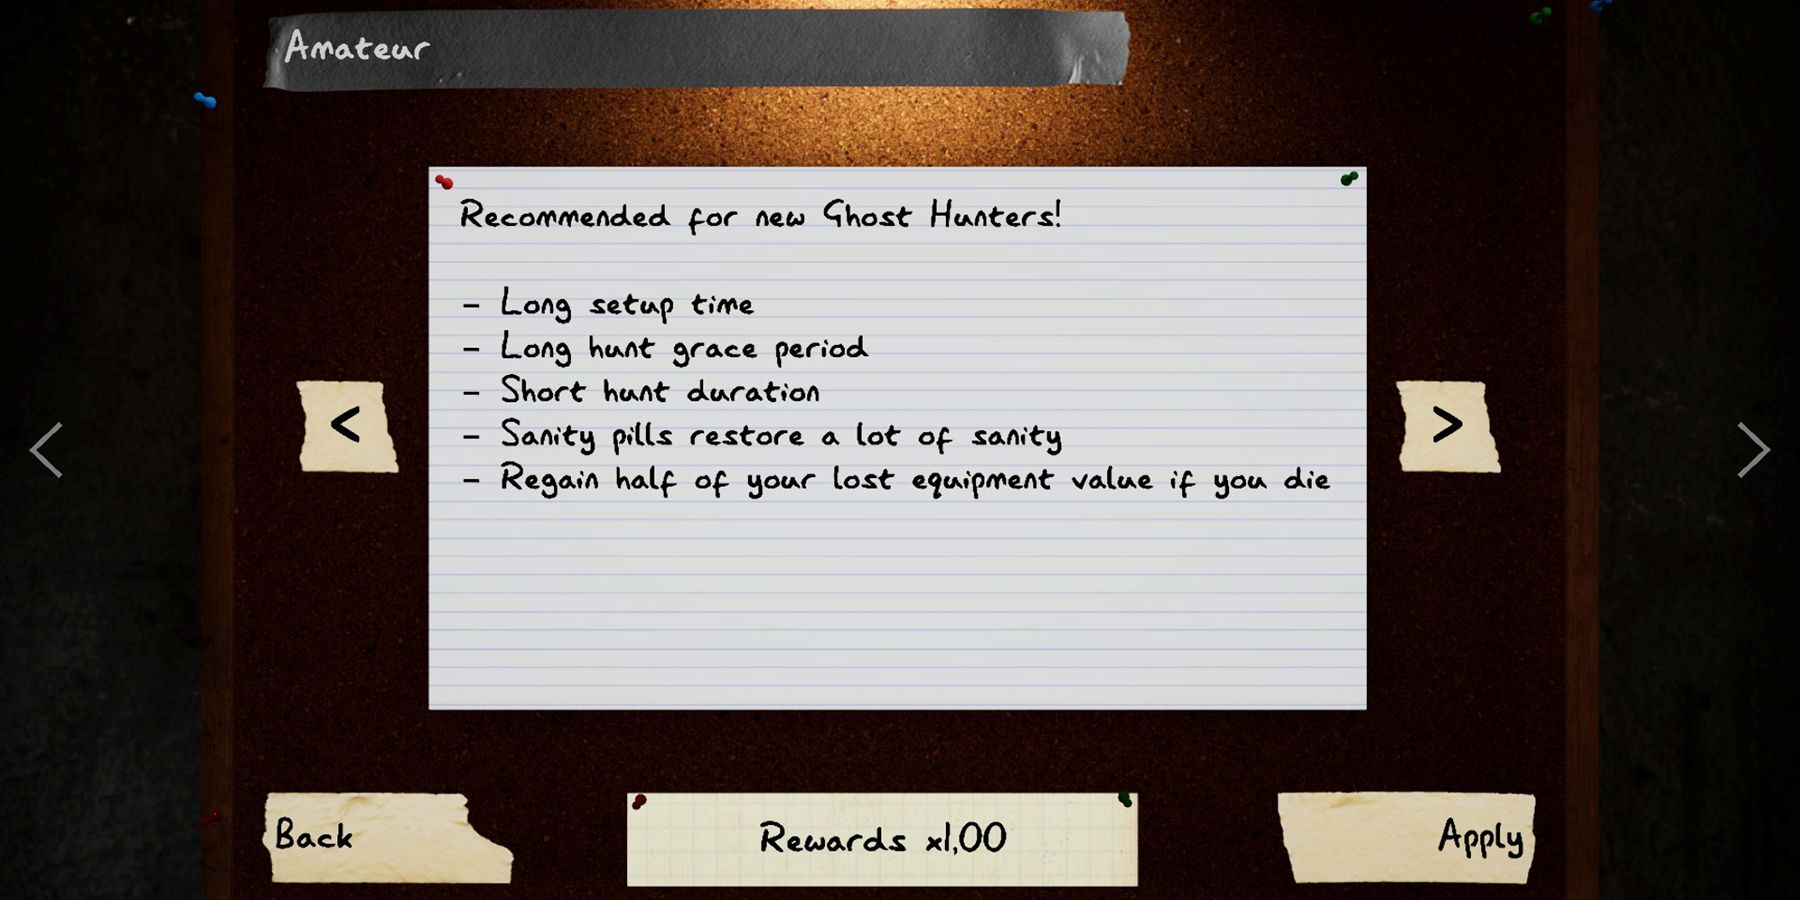
- XP Gain: x1
- Breaker: On
- Evidence: 3
- Sanity Drain: 100%
- Number of Hiding Places: Very High
In Phasmophobia, the Amateur difficulty level is the most beginner-friendly. It provides you with all the necessary tools for understanding the game mechanics. Beyond the stated facts, you’ll also enjoy a 5-minute setup period where the ghost can’t target you, a 5-second Grace Period when it does start hunting, and the ghost will always stick to its preferred room, making it simpler to gather evidence.
Additionally, you possess numerous hideouts, ensuring you can evade the ghost during its pursuit. However, despite this advantage, there comes a point when you might want to move beyond the Amateur level as you acquire superior gear and gain more expertise. This is primarily because it offers the least rewarding payout in the game, with all earnings from contracts multiplied by just x1.
Intermediate (Shorter Setup Time, Slightly Reduced Hiding Places)
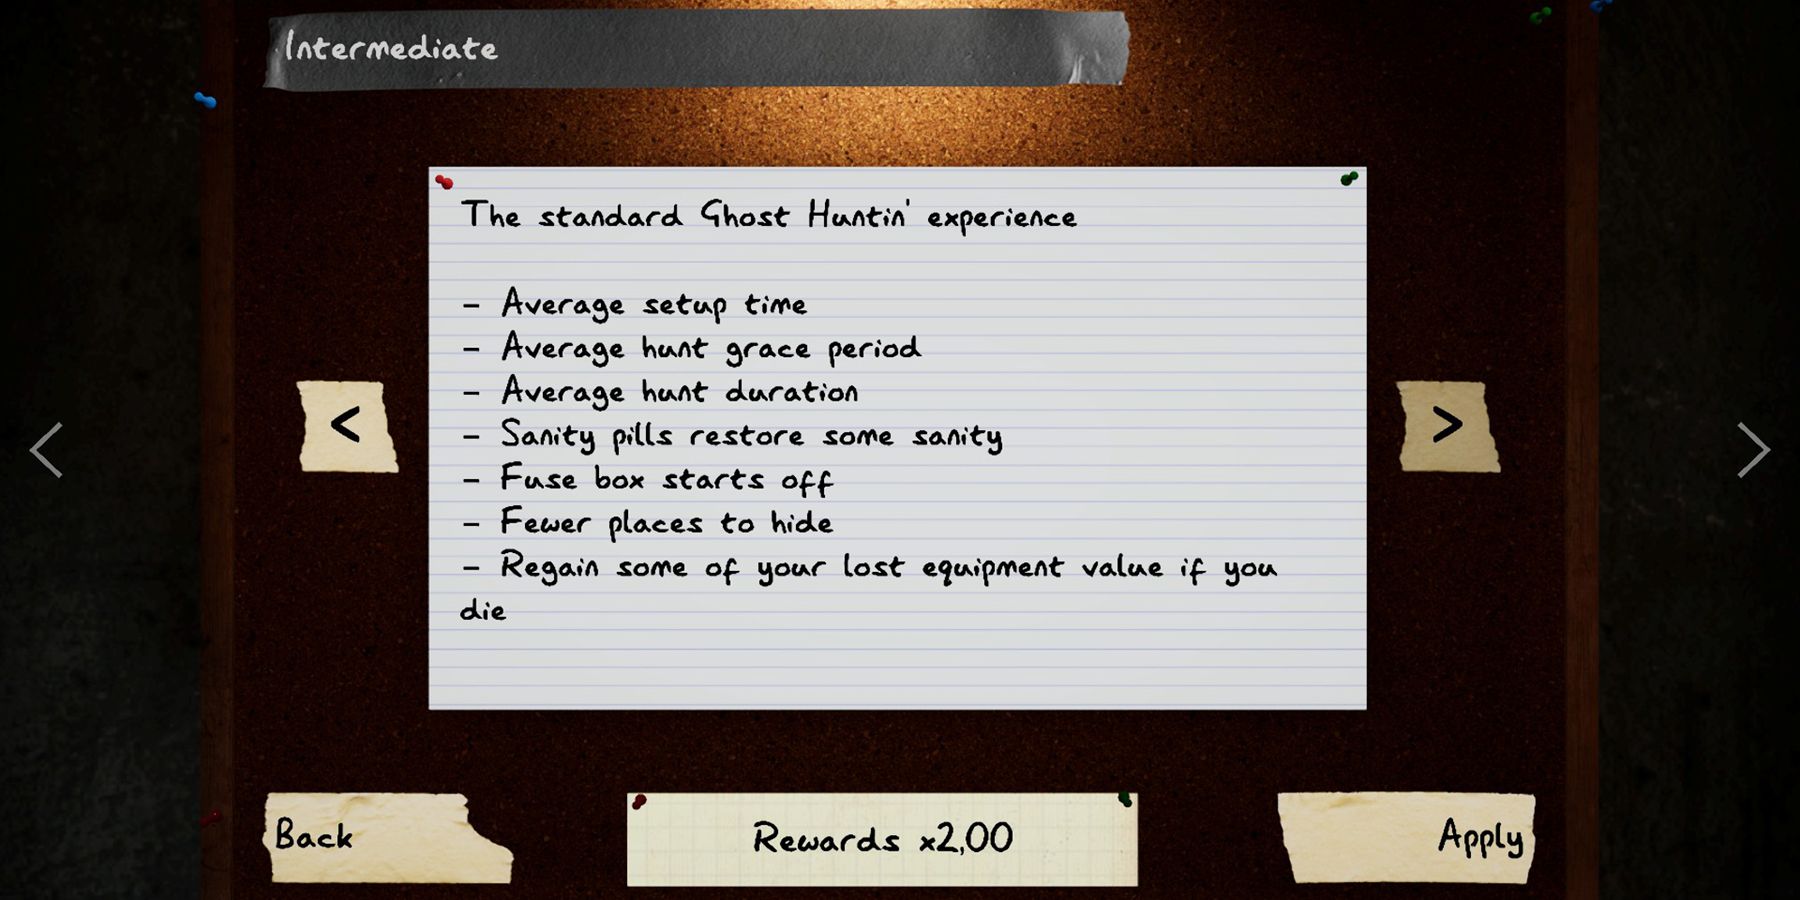
- XP Gain: x2
- Breaker: Off
- Evidence: 3
- Sanity Drain: 150%
- Number of Hiding Places: High
Upon reaching Level 10, you’ll advance to the Intermediate level, which is an exciting progression from the Amateur stage. You’ll still be given a generous 2 minutes for setup, ensuring you don’t dive straight into deep waters, and you’ll also enjoy a 4-second Grace Period when the ghost initiates a hunt. The ghost will continue to favor a specific room, keeping evidence collection manageable, and you’ll receive a handy x2 multiplier on all rewards earned upon completing the contract.
In simpler terms, the gap between Intermediate and Amateur levels is such that your resources get depleted quicker, and you won’t find as many safe spots or strategic positions on the game map. Once you feel comfortable with the game’s various functions, it can be beneficial to challenge yourself at this level.
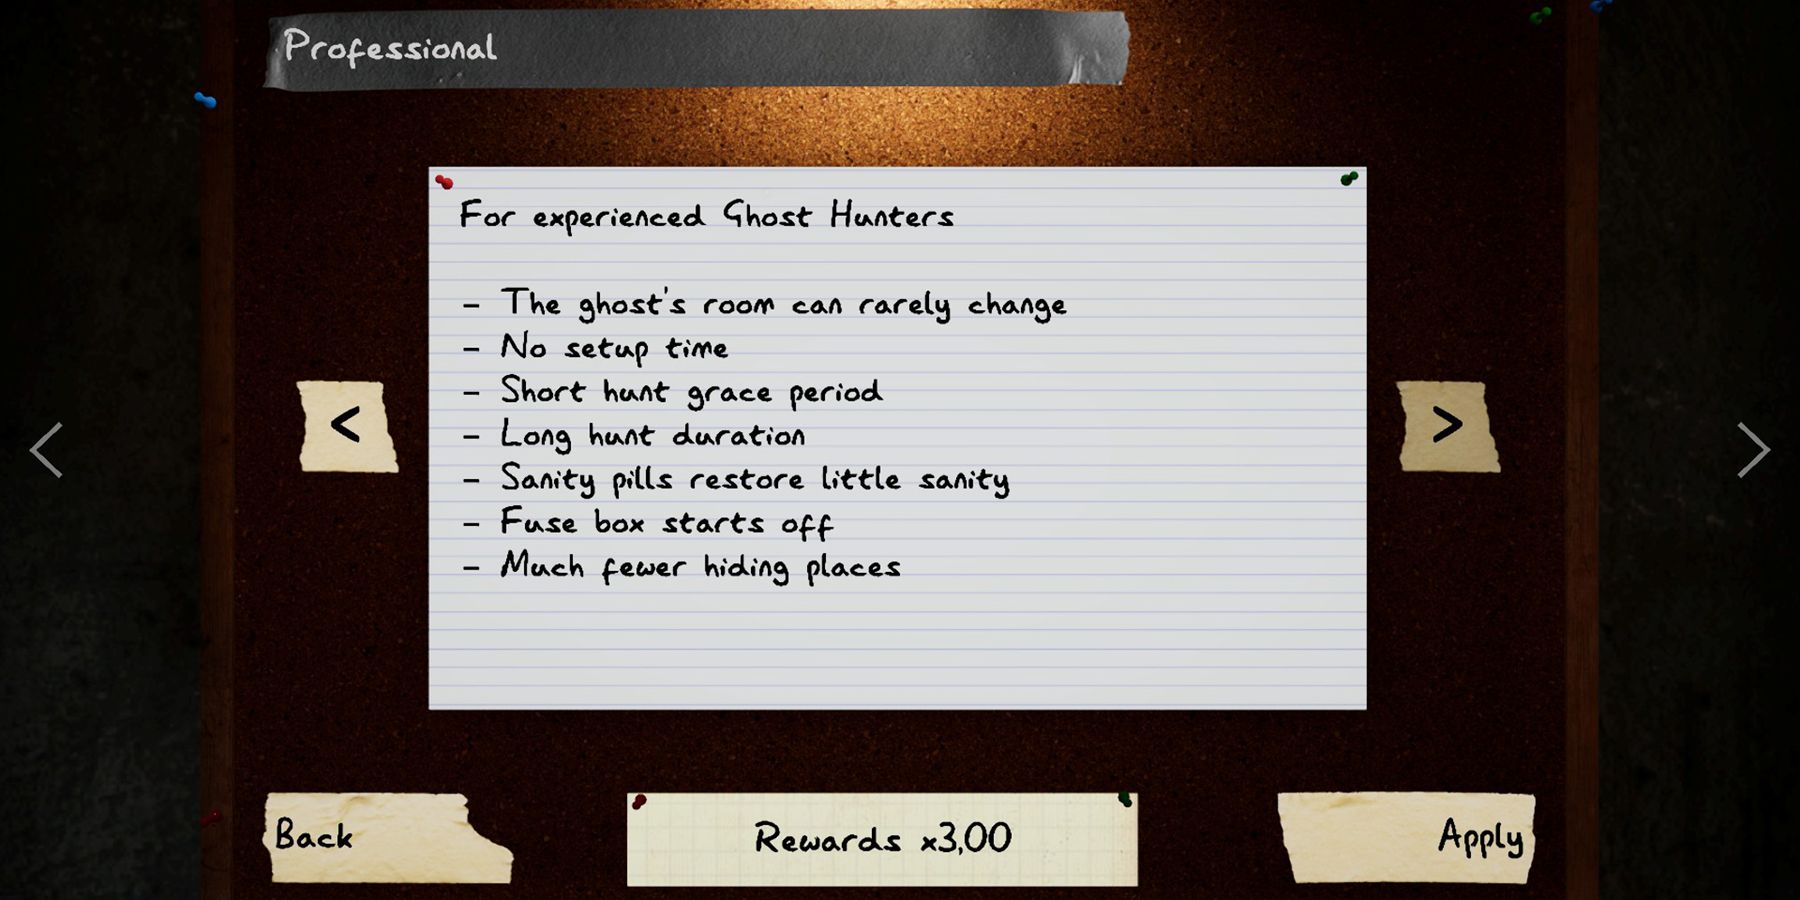
Professional (No Setup Time, Ghost Can Change Its Favorite Room)
- XP Gain: x3
- Breaker: Off
- Evidence: 3
- Sanity Drain: 200%
- Number of Hiding Places: Medium
In the game Phasmophobia, things get tricky when you reach the professional level because there are fewer places to hide and your sanity depletes at a faster rate. Additionally, unlike in lower difficulties, there is no setup time in this difficulty, which means that if you’re dealing with a Demon, it can start hunting you as soon as you enter the building. However, you do still have a 3-second Grace Period, providing a brief window of opportunity to quickly move to a safe hiding spot before the ghost is able to kill you once it initiates a hunt.
At level 20, you gain access to the Professional mode. This is the stage where the ghost starts swapping its preferred room, though it’s not common. Keep in mind this capability while playing, as it might catch you off guard if you lose sight of the ghost. It’s recommended that you try this mode once you’re more accustomed to the game.
Nightmare (Broken Monitors, Limited Hiding Places)
- XP Gain: x4
- Breaker: Off
- Evidence: 2
- Sanity Drain: 200%
- Number of Hiding Places: Low
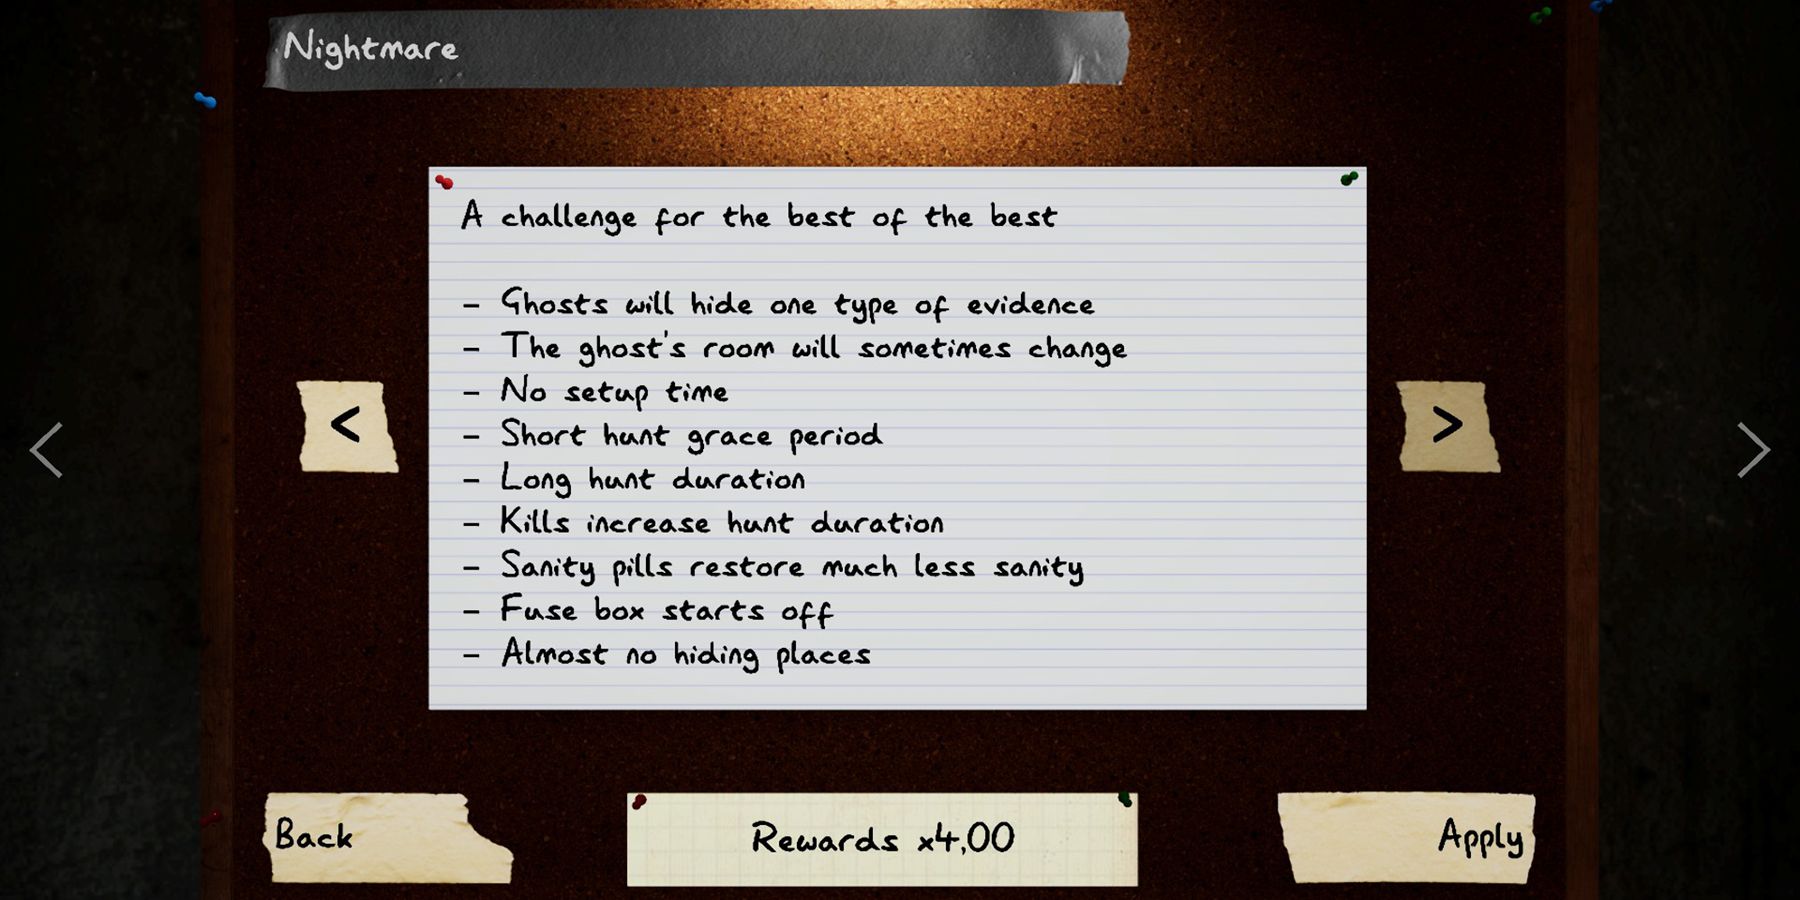
In the game Phasmophobia, Nightmare is one of the toughest challenges (next to Apocalypse), and it becomes available at level 30. The ghost will conceal a single piece of evidence, leaving you with limited hiding spots. Moreover, you get a brief 2-second Grace Period when the ghost begins hunting. It can be quite tough the first few times you encounter it, but the increased 4x reward multiplier after completing the mission makes it worthwhile. Also, this is the initial difficulty level where the van’s monitors are out of order, so you won’t be able to observe ghost activity or your team’s mental state.
In this game, Sanity Medication doesn’t fully restore your composure, so it’s crucial to maintain your mental state while playing on this level of difficulty. To help with this, make sure you familiarize yourself with the unique abilities that ghosts possess, enabling you to recognize and select the appropriate evidence pieces afterwards.
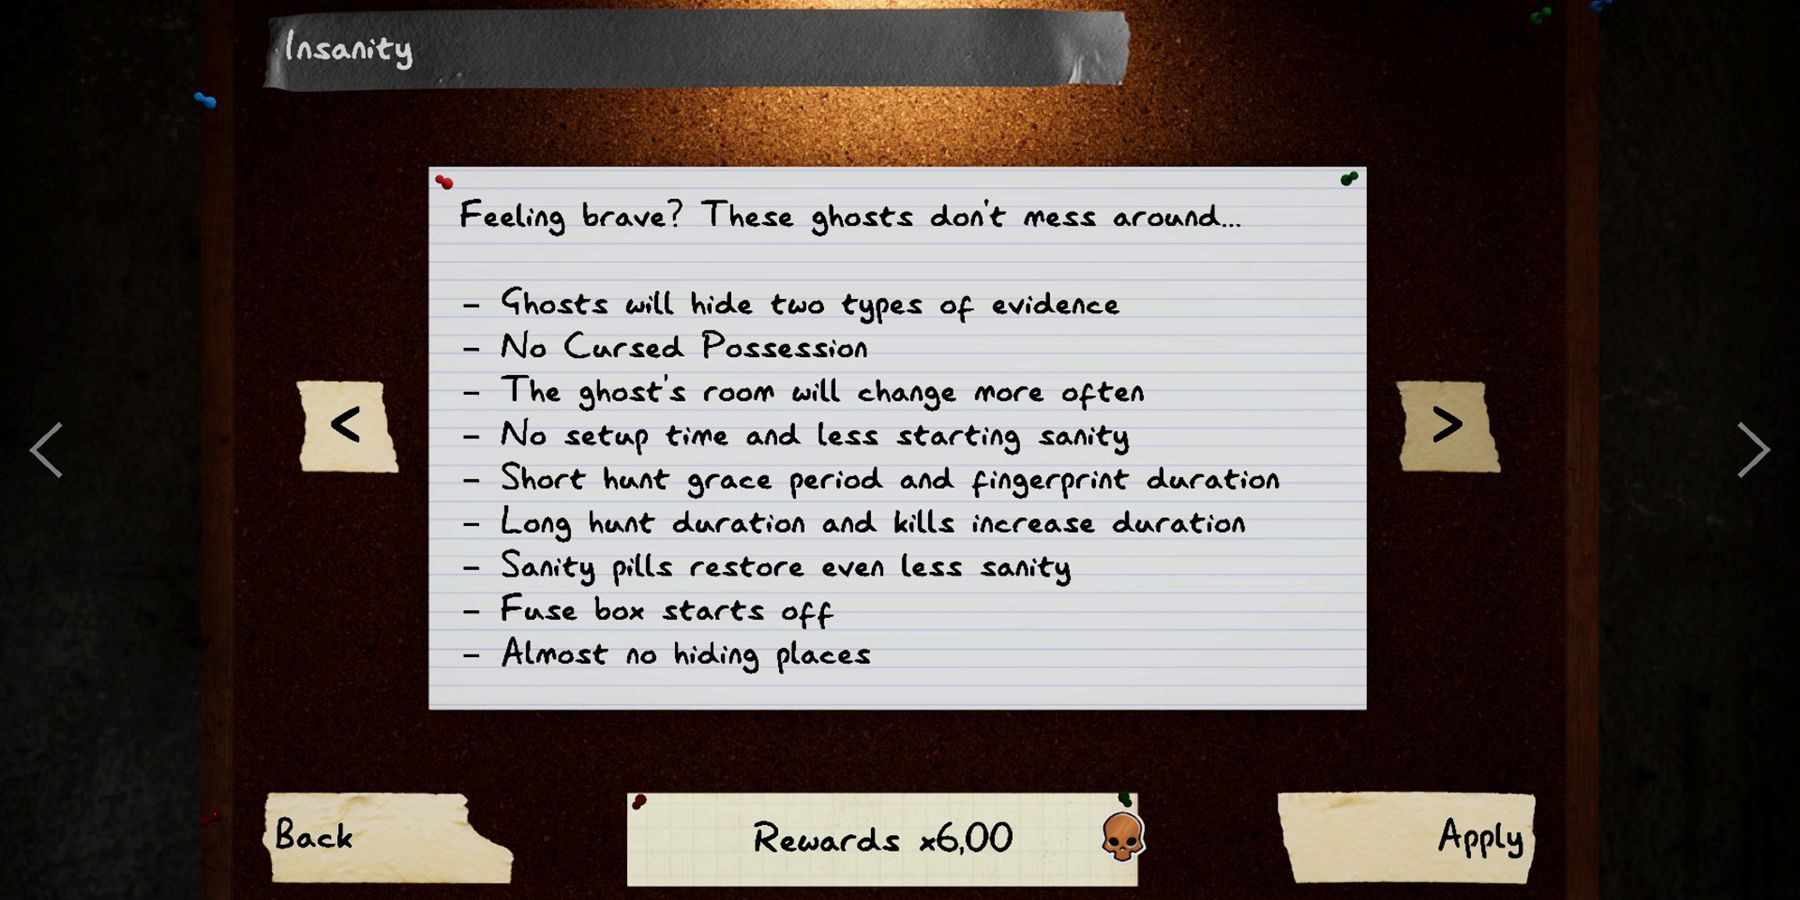
Insanity (Expert Knowledge Required)
- XP Gain: x6
- Breaker: Off
- Evidence: 1
- Sanity Drain: 200%
- Number of Hiding Places: Low
In addition to Apocalypse, Insanity is the toughest difficulty level in Phasmophobia, which you can unlock at level 40. This mode only allows for one piece of evidence collection, and it starts with your sanity at just 75%. Losing sanity happens quickly in this mode, and it offers an opportunity for experienced, high-sanity hunters to begin each contract from scratch. Fortunately, you still get a 2-second Grace Period to attempt an escape.
Give this mode a shot when you’re confident in your game mastery and fully grasp the intricacies of ghost behavior, as it offers a 6x multiplier on all rewards, accelerating your level progression. This speedier leveling allows for faster acquisition of superior gear, enabling you to handle more challenging tiers with ease.
Apocalypse (Challenge Modes)
The Apocalypse mode is a special setting to get the Apocalypse trophies in Phasmophobia. Technically speaking, these are not difficulties, but rather challenge modes you must play alone and on Sunny Meadows in order to get the achievement. You don’t even have to play on a specific setting; you just need to make sure that your rewards multiplier meets the conditions to get one of the three trophies. For example, you can get the Apocalypse 1 achievement while playing on Insanity. Here are the required modifiers needed for each level of Apocalypse:
- Apocalypse 1 (Bronze): x6
- Apocalypse 2 (Silver): x10
- Apocalypse 3 (Gold): x15
As a gamer, I can customize my experience by selecting from pre-defined difficulty levels under ‘Presets’, ranging from Apocalypse 1, 2, or 3. The game automatically adjusts the settings according to the chosen level, providing me with the perfect challenge to dive right in and test my skills!
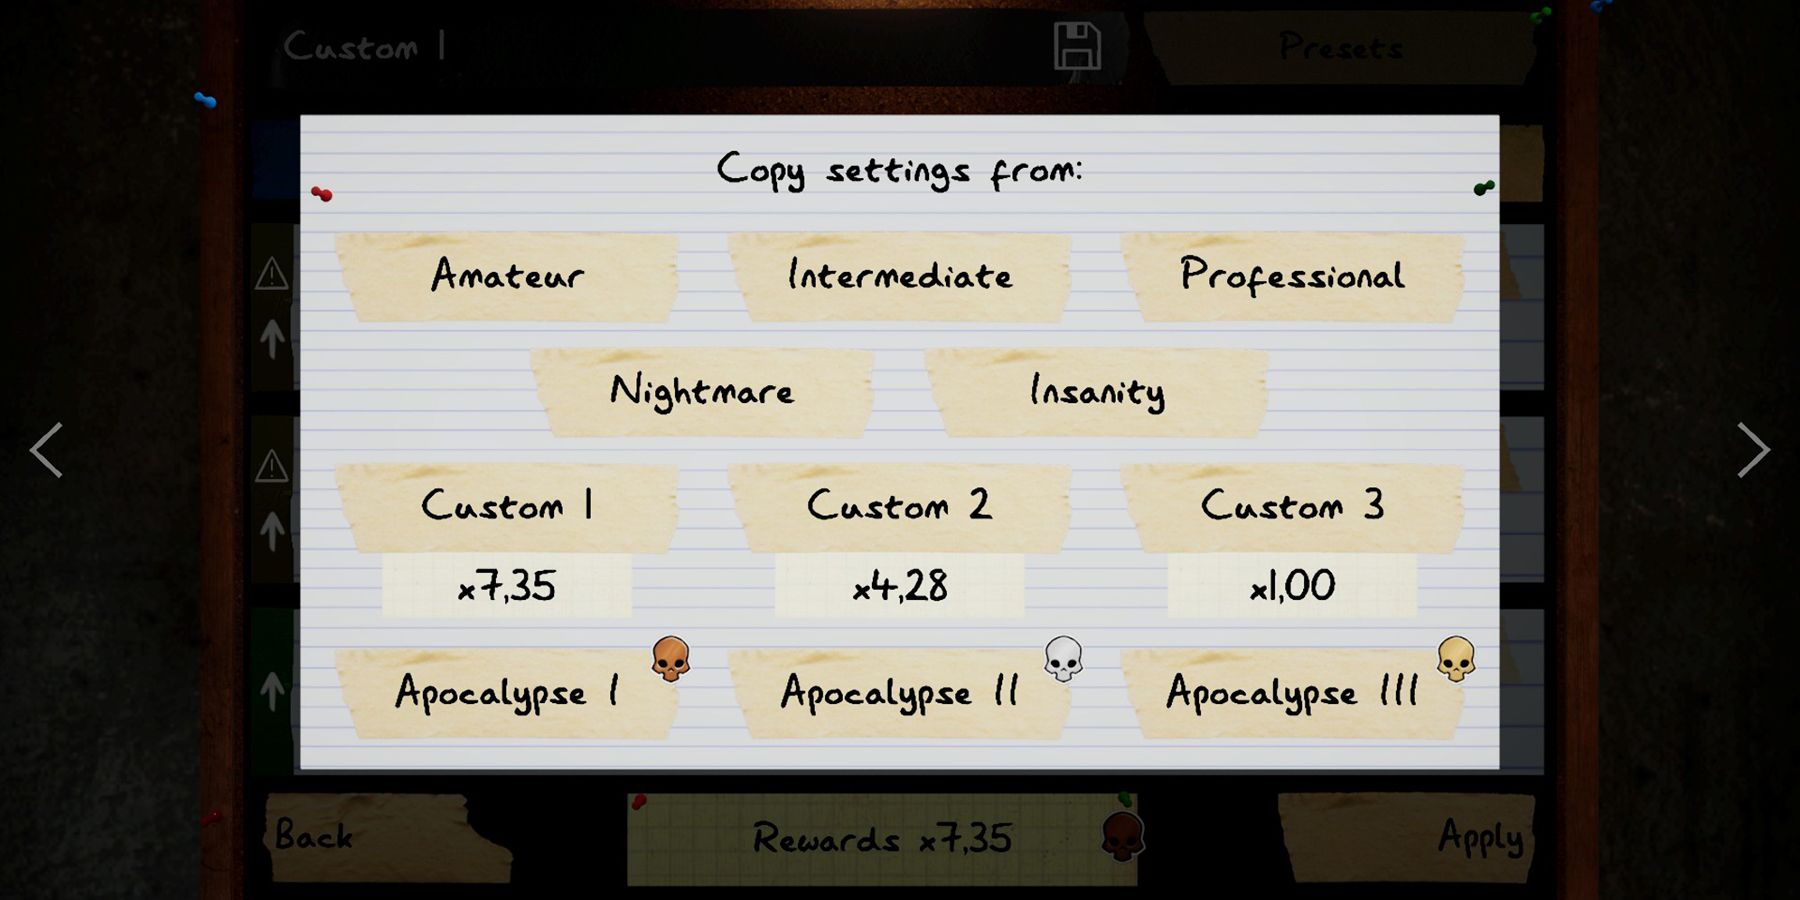
How To Create A Custom Difficulty Setting

In the game Phasmophobia, you can set a custom difficulty by starting either a multiplayer or solo game and then clicking the “Edit” button located beneath the “Choose a contract” text. Once you’ve clicked that, use the arrows on the screen to navigate past the predefined difficulties until you find ‘Custom Difficulty.’
When you reach the ‘Custom Difficulty’ option, look for the edit button at the page’s bottom. This is where you get to customize the settings according to your preference (selecting from the options given earlier). You also have the freedom to opt for a Friendly Ghost with all the Cursed Possessions, or design your own unique challenge. Essentially, you’re in control!
After choosing your preferred settings, simply click on the ‘Apply’ button located at the bottom-right corner of the screen. The new settings will be instantly applied to your upcoming contracts.
If you enjoy the personalized level of challenge you’ve set up, navigate back to the editing screen and click the ‘Save’ button near the ‘Presets’ option to be able to play it again without needing to enter the settings again.
Read More
- USD ZAR PREDICTION
- SOL PREDICTION. SOL cryptocurrency
- BTC PREDICTION. BTC cryptocurrency
- CKB PREDICTION. CKB cryptocurrency
- USD CLP PREDICTION
- LUNC PREDICTION. LUNC cryptocurrency
- BICO PREDICTION. BICO cryptocurrency
- USD COP PREDICTION
- SEILOR PREDICTION. SEILOR cryptocurrency
- EUR ILS PREDICTION
2024-09-20 09:04