
As a seasoned veteran of Risk of Rain 2, I can confidently say that crafting the perfect build for the elusive Artificer is akin to finding the Holy Grail or solving Fermat’s Last Theorem – it’s a challenge worth undertaking. The Artificer, being the closest thing to a true mage in this chaotic world, demands a strategy that maximizes her elemental prowess and floating abilities.
“Risk of Rain 2” stands among the top thrilling rogue-like games to emerge over the past decade. This game boasts a vast array of weapons, playstyles, enemies, and its progression systems are coveted by others in the randomly generated genre. To make it even more appealing, it outshines its predecessor in every aspect.”
Even experienced players haven’t tried every combo in the game, and some are a little more out of the way than others. It’s hard to find rare items sometimes, and other times it’s difficult to get a good number of stacks on items that benefit from stacking. However, if you do get to run with one of these Risk of Rain 2 builds, you’ll feel unstoppable.
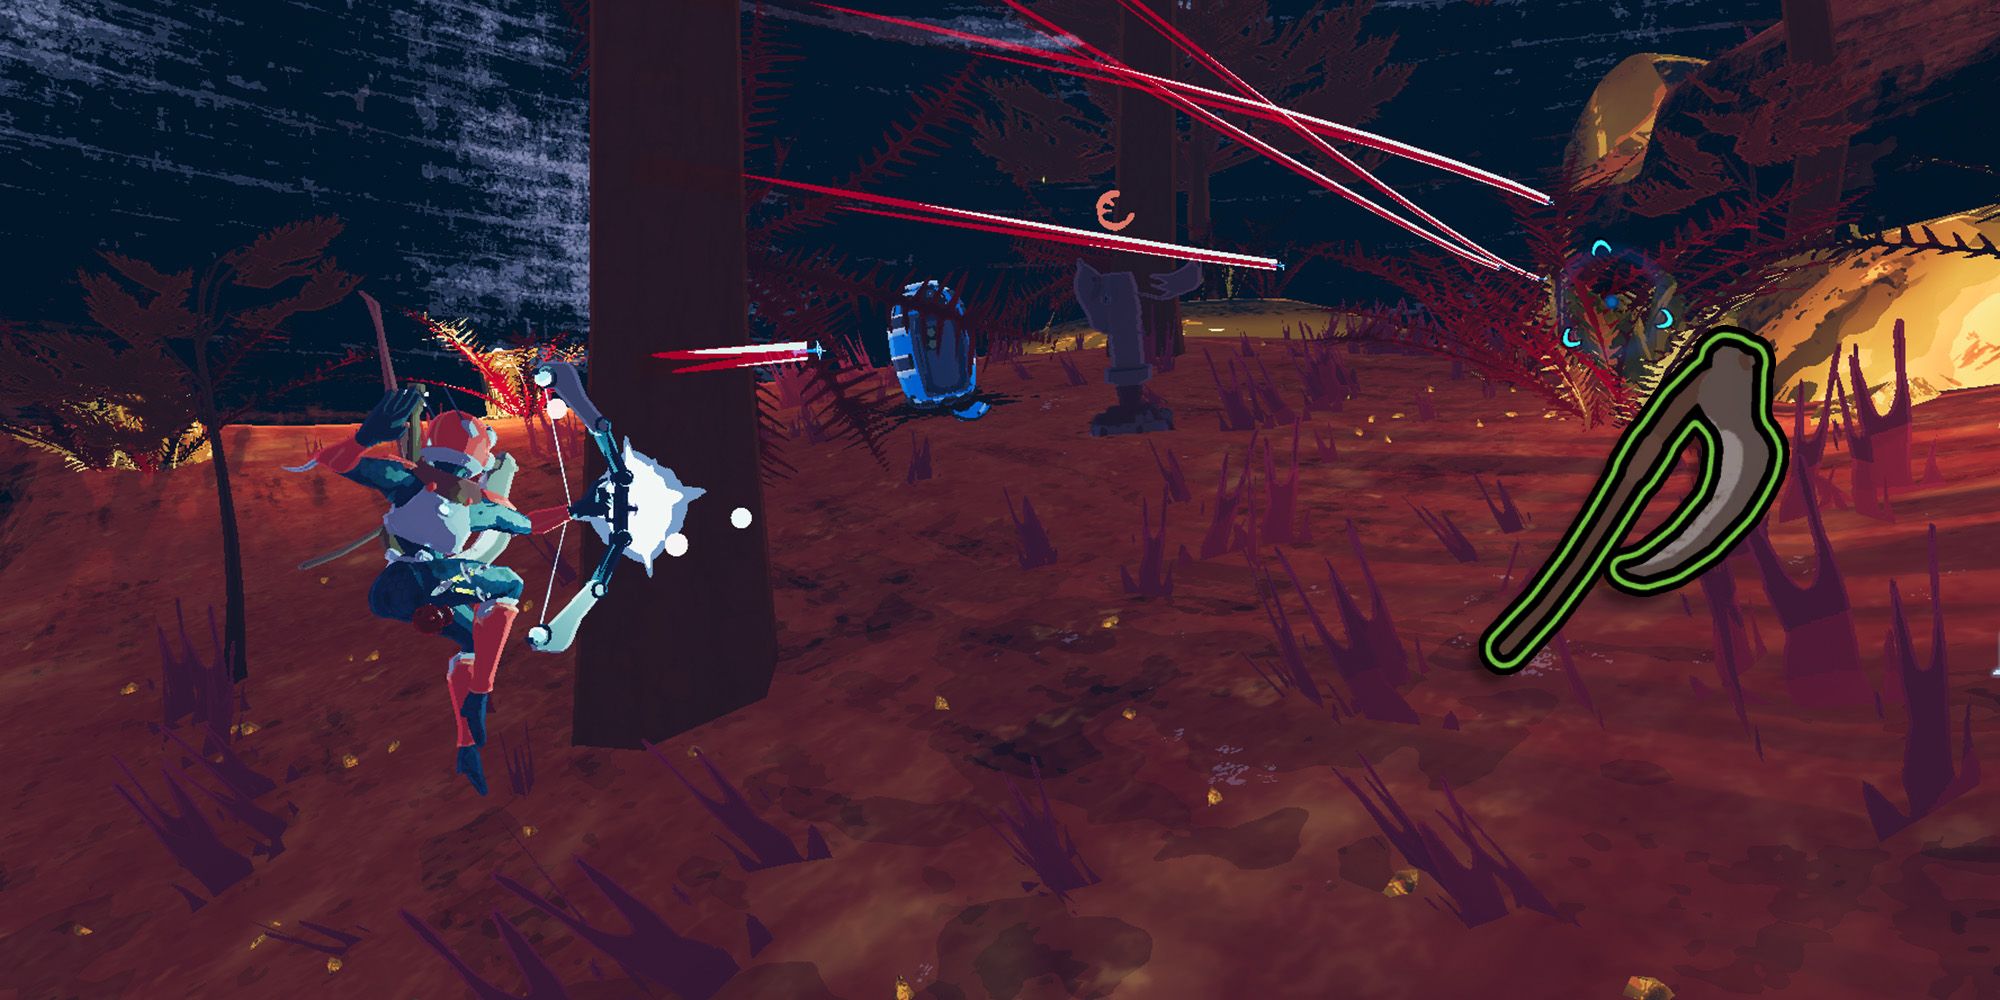
6 Huntress Build
Crit Chance + Harvester’s Scythe for Some Much-Needed Sustain
| Name | Rarity | Effect | Stacking ‘Type’ | Additional Info |
|---|---|---|---|---|
| Lens-Maker’s Glasses | Common | Gain +10 percent Crit Chance. | Linear | Each stack adds an additional +10 percent Crit Chance. |
| Harvester’s Scythe | Uncommon | Gain +5 percent Crit Chance. Additionally, Critical Strikes now heal you for 8 Health. | Linear | Every Scythe adds +4 to the amount of Health healed per Crit. |
| Ukulele | Uncommon | Gain a 25 percent chance to fire chain lightning for 80 percent of your Total Damage on up to 3 targets within 20 meters whenever this effect is triggered. | Linear | Amount of Targets + 2 per stack & +2 meter additional radius per stack |
Characteristically, Huntress shares similarities with Commando as they both appear relatively frail at the game’s outset; however, their ability to deal damage is remarkably potent. Initially, when embarking on a run with Huntress, you might find yourself feeling underpowered in terms of damage and health. Fortunately, this can be swiftly rectified.
One effective solution for this issue is by using any amount of Critical Chance in conjunction with the Harvester’s Scythe. The healing from the Harvester’s Scythe isn’t extraordinary, but on characters who frequently launch a multitude of critical attacks, it transforms into an indispensable healing asset.
Playstyle
When controlling the Huntress character, focus on scouting for items that directly boost the survivor’s Damage Per Second (DPS). Although the Huntress is agile and one of the best characters to dodge, she struggles when confronting single targets such as bosses. Be mindful of Crit Chance and Ukulele’s, as these can significantly reduce the difficulty of eliminating groups of enemies while playing as the Huntress.
5 Melee Character Build
Let the Enemies Take Themselves Out Just By Damaging You
| Name | Rarity | Effect | Stacking ‘Type’ | Additional Info |
|---|---|---|---|---|
| Medkit | Common | 2 seconds after taking damage, heal for 20 health plus an additional 5 percent of your Maximum Health. | Linear | Each stack adds +5 percent to the Maximum Health part of the heal. |
| Razorwire | Uncommon | Getting hit causes you to explode in a burst of razors, dealing 160 percent damage to 5 targets in a 25-meter radius around you. | Linear | Each stack adds +2 targets & +10 meters to the radius. |
| Helfire Tincture | Lunar/Equipment | When activated, Ignites all characters within 15 meters for 12 seconds, dealing 5 percent of your Max Health per second as burning damage. The burn is 0.5 times stronger on yourself, 0.25 times stronger on allies, and 24 times stronger on enemies. | N/A | Has a cooldown of 45 seconds, is meant for dealing damage to nearby enemies, & triggers Razorwire. |
As a fan of melee Survivors, I’ve found a unique strategy that works well, especially at the beginning of a run. An item called Razorwire might not seem impressive initially due to its modest damage output and small range when used alone. But once you’ve gathered three or more of these items, both the damage and range significantly increase. To amplify this effect, combine it with Helfire Tincture, a Lunar Item that continuously damages both me and nearby enemies while active. This setup keeps Razorwire constantly activated, making it an effective tool in my arsenal.
Since a key component of this construction project involves using Lunar Items for optimal performance, it’s essential to familiarize yourself with the locations of Newt Altars across all levels. This will ensure you have ample opportunities to visit the Lunar Shop. Furthermore, acquiring on-hit items like Sticky Bombs or AtGs can be quite beneficial with this setup, as both Razorwire and Helfire Tincture’s strikes have the potential to set these off too.
Playstyle
In the game ‘Risk of Rain 2’, the Razorwire-stacking build isn’t widely popular at the start, but it’s incredibly powerful. To excel with this build, focus on accumulating as many Razorwires as possible because, once you have enough, you can essentially stand in the center of the stage, allow enemies to approach, and quickly activate Helfire Tincture when they appear, instantly depleting their health bars. Remember that this build heavily leans on taking damage to yourself, so it’s crucial to gather healing items before fully relying on Razorwire damage.
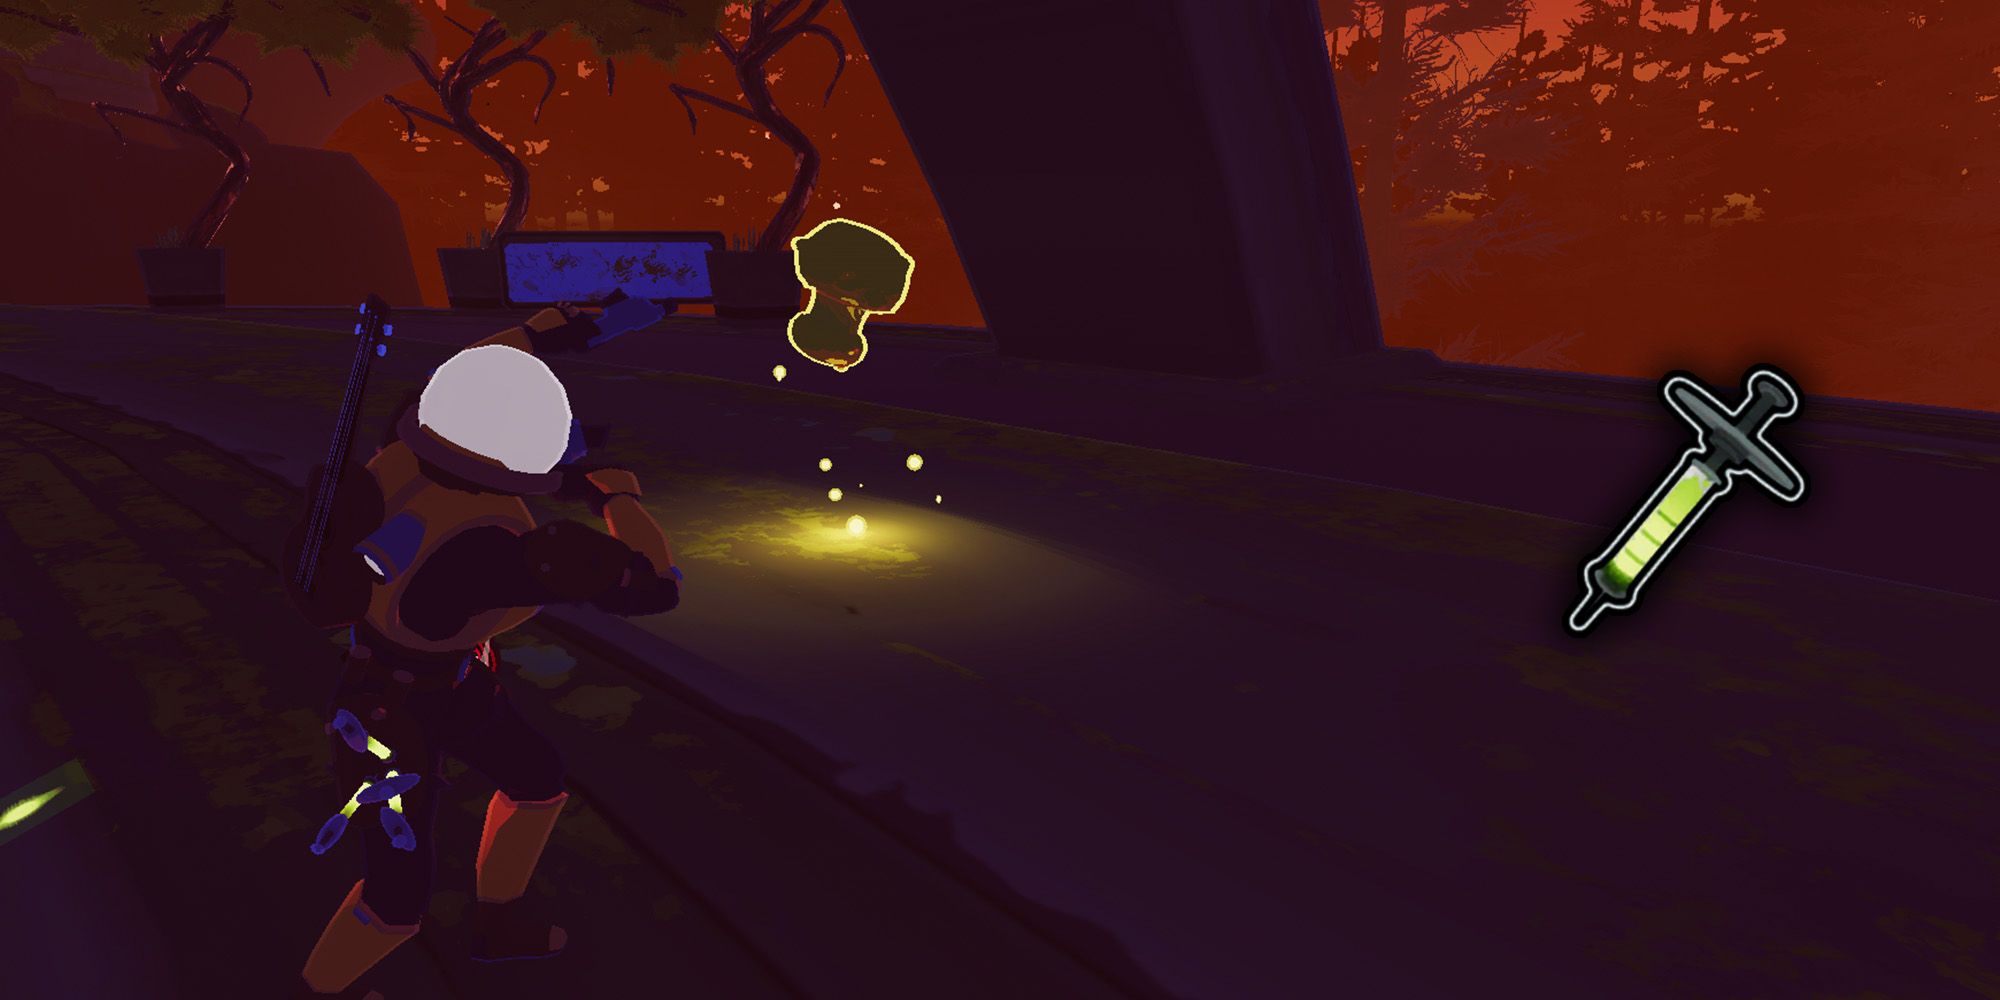
4 High Attack Speed Character Build
The Tried & True Bleed Build
| Name | Rarity | Effect | Stacking ‘Type’ | Additional Info |
|---|---|---|---|---|
| Soldier’s Syringe | Common | Increases attack speed by 15 percent | Linear | Each stack adds an additional 15 percent. |
| Mocha | Common | Increases Attack Speed by 7.5 percent and Movement Speed by 7 percent. | Linear | Each stack adds +7.5 percent Attack Speed & +7 percent Movement Speed. |
| Tri-Tip Dagger | Common | Gain a +10 percent chance to bleed an enemy for 240 percent base damage. | Linear | Each stack gives +10 percent more chance to proc bleed. |
| Shatterspleen | Boss | Gain +5 percent Crit Chance. Critical Strikes now bleed enemies for 240 percent base damage. Bleeding enemies now also explode on death for 400 percent damage, plus an additional 15 percent of their maximum health. | Linear | Each stack adds +400 percent damage to the bleed explosion and +15 percent to the maximum health portion of the bleed explosion damage. |
As a seasoned Survivor in this game, I’ve found that there’s a versatile build that works well with most characters but truly shines on those with high base Attack Speed. This strategy is all about gathering speed buffing items early and later focusing on Tri-Tip Daggers to inflict massive bleed on any foe you strike. The key here is timing, precision, and a bit of luck – traits I’ve honed over countless battles in my gaming life. Give it a try, fellow Survivor, and watch your enemies crumble beneath the power of your quick strikes!
If fortune favors you, obtaining a Shatterspleen from an Imp Overlord significantly strengthens your gameplay throughout the rest of your adventure. Notably, this build centers around ‘on-hit’ mechanics, so if Tri-Tip Daggers aren’t falling your way, focus on gathering other on-hit items instead. You’ll usually remain quite formidable regardless.
Playstyle
In the thrilling world of Risk of Rain 2, I’ve found that on-hit builds are quite popular, but they do require a touch of luck when it comes to item drops early in a run. If for two stages I haven’t stumbled upon any items significantly boosting my attack speed, it’s often wiser to adapt swiftly and opt for another build type instead.
In an on-hit build strategy, the aim is to strike enemies repeatedly to activate the most potent on-hit damage ability available. With this particular build, that ability is causing bleed, and since bleed can accumulate indefinitely, it remains effective regardless of how many times you engage in combat with an enemy.
3 Any Character Build
Just Get Bands, They’re Always Worth Grabbing
| Name | Rarity | Effect | Stacking ‘Type’ | Additional Info |
|---|---|---|---|---|
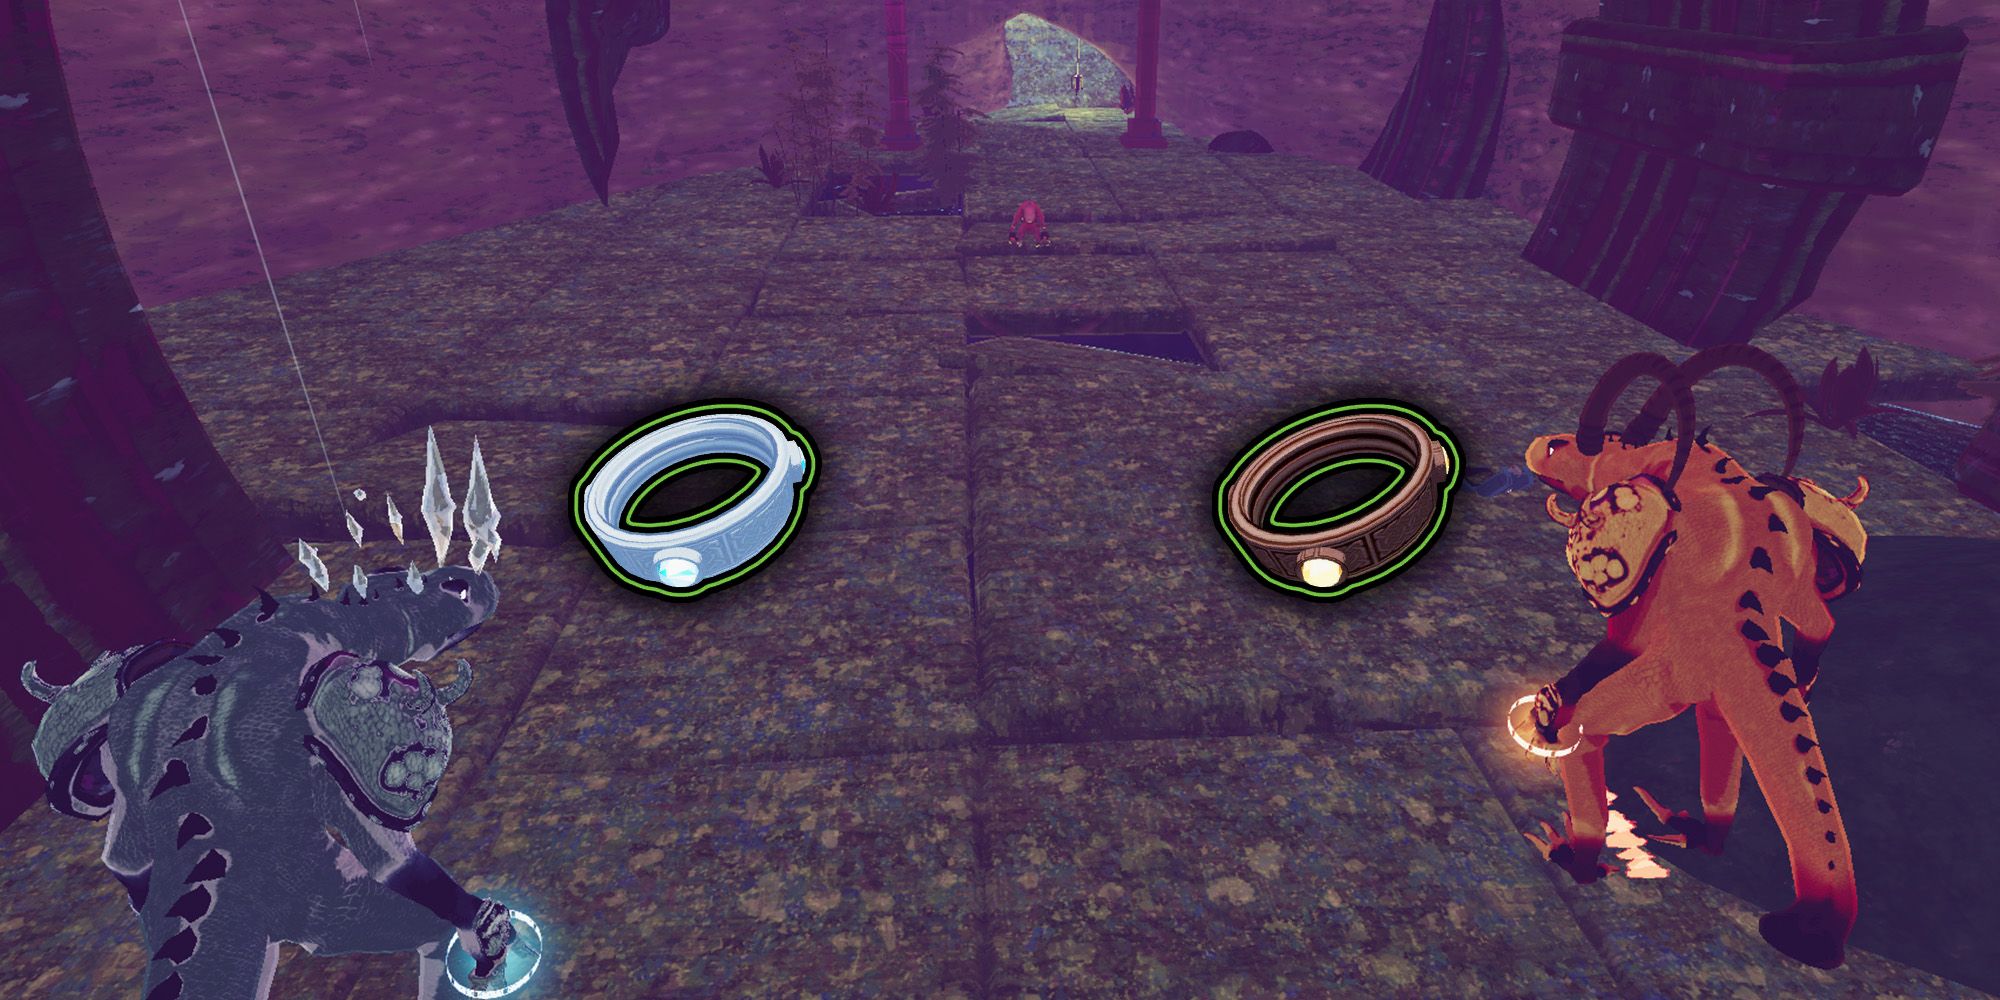
| Kjaro’s Band | Uncommon | Hits that deal more than 400 percent damage will now also blast enemies with a runic flame tornado that deals 300 percent Total Damage over time in an area around it. This effect will recharge 10 seconds after it is triggered. | Linear | Each stack adds +300 percent Total Damage to the runic flame tornado. |
| Runald’s Band | Uncommon | Hits that deal more than 400 percent damage will now also blast enemies with a runic ice blast that deals 250 percent Total Damage over time in an area around it and also slows any enemies hit by it by 80 percent for 3 seconds. This effect will recharge 10 seconds after it is triggered. | Linear | Each stack adds +3 seconds to the slowing effect and +250 percent Total Damage to the runic ice blast. |
In simpler terms, the upcoming discussion emphasizes that Runald’s Band and Kjaro’s Band are standout items in Risk of Rain 2. They form the backbone of many damage-focused builds and significantly boost a survivor’s damage output if they can inflict 400% damage (which most characters can).
In simpler terms, having either Kjaro’s Band or Runald’s in your construction will enhance it significantly. The advantage of having both available at the Abandoned Aqueduct stage, as long as you press the correct switches, is a significant perk. If we had to choose one, we’d favor Kjaro’s Band over Runald’s for its superior DPS (Damage Per Second), Area of Effect Damage, and compatibility with more items like the Ignition Tank.
How To Unlock Kjaro’s and Runald’s Band in Risk of Rain 2
In the desolate hillside of the Forsaken Aqueduct region, search for an apparent large cave-like opening in the cliff face, which has a gate attached. Players need to discover two pressure sensitive spots depicted on the map. Simultaneously standing on both these spots by multiple players will unlock a hidden area.
After it’s unlocked, make your way inside and retrieve what appear to be Kjaro and Runald, taking their Bands while you’re at it. For the initial time you do this, their Bands are added to the selection of Uncommon Items for all subsequent playthroughs. However, you can always find a duplicate of each Band on this stage itself.
2 Movement Speed Build
Just Run Around & Let Little Disciple Do All the Work

| Name | Rarity | Effect | Stacking ‘Type’ | Additional Info |
|---|---|---|---|---|
| Paul’s Goat Hoof | Common | Increases Movement Speed by +14 percent. | Linear | Each stack adds an additional 14 percent Movement Speed increase. |
| Mocha | Common | Increases Attack Speed by 7.5 percent and Movement Speed by 7 percent. | Linear | Each stack adds +7.5 percent Attack Speed & +7 percent Movement Speed. |
| Red Whip | Uncommon | Gain a +30 percent Movement Speed buff whenever you’re not in combat. | Linear | Each stack adds +30 percent to the out-of-combat Movement Speed buff. |
| Little Disciple | Boss | Fire a tracking wisp for 300 percent damage. Fires every 1.6 seconds while sprinting. Fire Rate increases with Movement Speed. | Linear | Each stack adds +300 percent to the tracking wisp damage. |
In “Risk of Rain 2,” movement speed is crucial since it allows you to dodge most of the damage incoming. If you stand still, you might find yourself in a perilous situation. This game essentially embodies the phrase ‘motion equals survival.’
As a gamer, I can tell you from personal experience that having a high movement speed significantly boosts my ability to dodge attacks, breeze through stages, and ultimately succeed in the game. Consequently, I rarely pass up on items like Paul’s Goat Hoof, Mocha, or at least one Red Whip because they contribute significantly to my speed. However, if you’re aiming for a unique build centered around these speed-enhancing items, then a Little Disciple build would be your best choice. But keep in mind that this strategy hinges on obtaining the Grovetender as your boss during the Scorched Acres stage.
Playstyle
With Little Disciple and any Movement Speed artifact in hand, the setup becomes essentially operational. Your main task then would be to move about freely while ensuring that your sprint is activated regularly.
As Little Disciple’s tracking wisp eliminates mobs near you, it leaves you to concentrate your Survivor’s core damage on more challenging or durable opponents. The Movement Speed build is highly effective for swiftly navigating stages, making the task of exploring each stage much easier.
1 Artificer Build
Let Artificer Feel Like a True Mage Character
| Name | Rarity | Effect | Stacking ‘Type’ | Additional Info |
|---|---|---|---|---|
| Backup Magazine | Common | Adds +1 charge to your Secondary Skill. | Linear | Each stack adds another +1 charge to your Secondary Skill. |
| Alien Head | Legendary | Reduces all of your Skill Cooldowns by 25 percent | Exponential | Each stack reduces the Skill Cooldown time by 25 percent. Exponential Stacking means if 1 Alien head reduces a 10-second cooldown to 7.5 seconds, the next Alien Head will reduce it again but by 1.875 seconds (25 percent of 7.5) not by 2.5 (25 percent of 10). |
| Light Flux Pauldron | Lunar | Decreases your Skill Cooldowns by 50 percent, but also decreases your Attack Speed by 50 percent. | Exponential | Each stack increases Skill Cooldowns and decreases Attack Speed by +50 percent. |
To wrap up, let’s discuss a setup for one of RoR2’s more intricate characters – the Artificer. The Artificer, much like a ‘Mage’, is found in Risk of Rain 2 and excels in manipulating various elements, hovering above ground, and dealing damage predominantly with elemental projections.
1. The Cooldown Reduction provided by Alien Head is advantageous to everyone, but Artificer enjoys this benefit the most. Furthermore, with just one Backup Magazine, an Artificer can continuously deal full damage from mid-air, consistently unleash burst damage, and always have alternative strategies when situations become challenging.
Playstyle
1 Alien Head’s exponential 25% Cooldown Reduction boost suggests that acquiring multiple of them may not significantly enhance your gameplay. Similarly, if you find Light Flux Pauldron during a stage or it’s available in the Glass Newt’s shop, it’s not essential for this build, but it can be beneficial as it allows Artificer players to swiftly eliminate high-health opponents or even Mithrix. However, the Attack Speed debuff can be challenging, but it can be mitigated with other items in various ways.
Read More
- USD ZAR PREDICTION
- SOL PREDICTION. SOL cryptocurrency
- BTC PREDICTION. BTC cryptocurrency
- CKB PREDICTION. CKB cryptocurrency
- USD CLP PREDICTION
- LUNC PREDICTION. LUNC cryptocurrency
- BICO PREDICTION. BICO cryptocurrency
- USD COP PREDICTION
- SEILOR PREDICTION. SEILOR cryptocurrency
- EUR ILS PREDICTION
2024-08-20 04:05