As a seasoned gamer with over two decades under my belt, I can confidently say that The Plucky Squire has certainly caught my attention! This charming little adventure game has tested my wits and patience, but finding those elusive Glitchbirds has been an exciting challenge.
The Diligent Knight
The Plucky Squire – Chapter 1 Glitchbird
At the start of the game, after reuniting with your friend Violet for the first time, you’ll eventually encounter a word puzzle that will unlock a barrier later on. After exiting the shop, head north into the next region. Continue along the path, and you’ll notice the Glitchbird perched by the exit, near a signpost indicating the direction to Tome Tower.
The Plucky Squire – Chapter 2 Glitchbird
When you join forces with Violet and Thrash, you’ll come across an area on the map where electricity begins to gather, so it’s crucial to dodge lightning bolts. Keep moving forward along the path, and eventually, you’ll encounter a small ledge that you can jump off. However, before doing so, take a detour by walking behind the nearby stone wall to discover a secretive Glitchbird.
The Plucky Squire – Chapter 3 Glitchbird
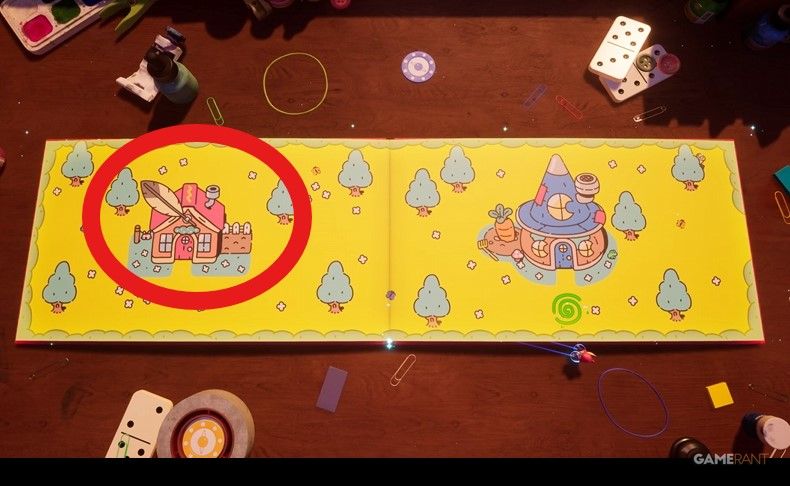
In the third chapter of “The Plucky Squire“, things move quickly. Upon returning to the story, Moonbeard will request Jot to fetch him something to quench his thirst. Using the portal, he leaps from the book and travels back two pages to locate Moonbeard’s residence and his own home.
Before picking up the drink from Moonbeard’s location, Enter your home on the left side of the book first, as that’s where you’ll discover a secret Glitchbird lounging around.
If you search near a tree to the back and right of Moonbeard’s home, you can find an Art Scroll.
The Plucky Squire – Chapter 4 Glitchbird
In Chapter 4, it’s time for you to delve into the three-dimensional environment, often referred to as the desk, in search of the Elven Bow hidden there by Alowynia, our woodland ranger elf. Once you manage to secure the Elven Bow, a mini-game will ensue where you’ll need to take down some pesky bugs with your newly acquired bow. Following this exciting challenge, you’ll find yourself in a town where you can leave the book via a magical portal.
In a three-dimensional environment, flip the book over two pages, and you’ll encounter a blank, dark page on your left side. At the center of this page, there’s an entrance that leads to discovering the elusive Glitchbird, which is hidden within.
The Plucky Squire – Chapter 5 Glitchbird
In Artia, while fulfilling Umber’s task of locating all the Rubboinks, players may meet Tiny, a massive pig. Moonbeard proposes that there might be an item in the 3D realm which could aid you. Jump through the portal beneath the dog and grab the Tilt Gloves. With these gloves, you can accomplish Umber’s mission and converse with the queen within.
In the central room of the castle, veer to the left where you’ll find a large, blue pencil sharpener. To your left, there’s a secret passageway that leads to a tucked-away room. Inside this secluded space, you’ll discover the Glitchbird.
The Plucky Squire – Chapter 6 Glitchbird
In Chapter 6, you’ll encounter a patch of Weeds obstructing your way forward. Moonbeard offers assistance by making a bomb to blast through the obstruction. After getting the bomb, go back a few pages to locate additional Weeds for elimination instead of advancing on the main path. Jump to the Cheese Mouse room and move backwards to the previous page to apply the Weed Eliminator on the blockade. This action will create a small clear space, uncovering a hidden Glitchbird within.
Don’t fret over the missing Weed Killer Bomb, as you’ll discover another one within Moonbeard’s residence a few pages down the line.
The Plucky Squire – Chapter 7 Glitchbird
Once you arrive at the Hot Air Balloon, notice a Glitchbird off to your left that you can’t reach yet. Keep progressing through the story until you enter a 3D world to obtain the Bomb Stamp. With the Bomb Stamp in your collection, go back a few pages from where you first saw the Glitchbird and use it to blow up the block beside the Glitchbird. Then, enter the portal on the same page and ascend to find the seventh Glitchbird.
In Chapter 7, the Bomb Symbol is essential for solving a somewhat intricate riddle connected to a massive metal power source, referred to as the battery.
The Plucky Squire – Chapter 8 Glitchbird
After getting back to Artia City, it’s time for me, as a gamer, to obliterate those tanks and dive in to confront the mage boss. If Violet manages to take down this boss, flip the page to find the Hooded Figure on the run. The elusive Glitchbird is lurking near a tree to the left, far away from here.
The Plucky Squire – Chapter 9 Glitchbirds
Following your escape from prison, you’ll be reconnected with Pip. In the very same chamber where he sketches the bridge, make your way towards the room painted yellow that’s located on the left side. It is within this concealed area that you will discover the elusive Glitchbird.
The Second Glitchbird in Chapter 9
Towards the close of Chapter 9, gamers will wind up within the Palace of Humgrump. Disregard the fellow tidying in the center of the chamber and make a beeline for the right side, where they’ll discover the final Glitchbird hidden behind a metallic cylinder.
Read More
- SOL PREDICTION. SOL cryptocurrency
- USD PHP PREDICTION
- BTC PREDICTION. BTC cryptocurrency
- USD COP PREDICTION
- TON PREDICTION. TON cryptocurrency
- Strongest Magic Types In Fairy Tail
- ENA PREDICTION. ENA cryptocurrency
- LUNC PREDICTION. LUNC cryptocurrency
- AAVE PREDICTION. AAVE cryptocurrency
- TAO PREDICTION. TAO cryptocurrency
2024-09-20 18:53