As a seasoned adventurer who has traversed countless digital worlds, I can confidently guide you through the labyrinthine depths of Barbuta. The path you tread is fraught with danger, yet rewarding beyond measure, my friend.
As a dedicated gamer diving into the UFO 50 universe for the very first time, I’ve found myself stuck quite often in the challenging adventure game known as Barbuta. The labyrinthine puzzles and complex narrative have left me baffled about how to progress. But fear not, fellow gamers! This walkthrough is designed to clear up any confusion, guiding us through every nook and cranny, uncovering hidden items, secrets, and ultimately leading us to victory over Barbuta in UFO 50. So let’s embark on this adventure together, armed with the knowledge needed to conquer!
Before getting to the walkthrough, it is important to make a few quick points of clarification:
- The route detailed in this walkthrough is just one of many ways to approach Barbuta, and it is definitely not the shortest path to the end. That said, players who follow this guide will get a thorough understanding of everything that this game has to offer.
- Players can earn Barbuta‘s Cherry by having all six Eggs (life) at the end. Fortunately, indie game fans will have the opportunity to exchange Cash for Eggs just before fighting the final boss, making it fairly easy to beat the game with full life.
- If the red skull appears, players should simply exit and reenter the room until it leaves. Notably, the grid in the bottom-left corner of the screen shows the relative position of the skull, with the red square representing the room that the character is in, and the white dot representing the room that the skull is in.
UFO 50: Barbuta Walkthrough
Get Umbrella
Initially, players need to move towards the right side, ensuring they leap over the initial tile on that path, as this triggers a section of the ceiling collapse when stepped upon. In the subsequent room, enthusiasts of pixel art should ascend the first ladder, then descend the second one, shift left to touch the edge of the platform, and finally jump towards the left side. At this point, players ought to climb down two ladders, and veer left at the base of the second ladder to access an area containing pools of harmful liquid.
As I traverse through here, I’ll find myself dealing with a noxious, dripping green liquid. At first, it’s crucial to coordinate my steps carefully to ensure I don’t touch this stuff. But once I grab the Umbrella, I can move freely without worrying about avoiding it anymore.
As a keen enthusiast, I’d like to share an intriguing detail: There’s a seemingly ordinary wall at the summit of the ladder on the left side of this initial toxic chamber. Gamers are advised to proceed through it. Beyond that wall, you’ll come across a corridor ending in a chest. A swift strike with your sword on this chest will yield the Umbrella.
Get Necklace
After grabbing the Umbrella, players need to head back to the previous chamber. In that room, they’ll find a chest close to the ceiling which contains 50 Cash; use the nearby ladder to leave the room through the floor below. Next, navigate through the room with two bats (overlooking the chest located on the left wall). This will lead you to another room with two fish and a chest. Inside this chest is 100 Cash, so be sure to pick it up before leaving the room to your left.
In an adjoining space, gamers should navigate towards the ladder leading upwards through the roof and scale it. Enthusiasts of vintage games are then tasked with ascending to the highest point of a room with two fish, leap into the green substance on the right side, and traverse through the sham wall on the right. Now, they can reach the chest previously overlooked in the bat-filled room, which contains a Necklace.
In this still, unmoving green body of water is where players should leap. Unlike the dynamic pools scattered throughout the game, its immobility signifies a safe swimming spot.
Get Pin
Players are now instructed to navigate two screens down and two screens to the left. This will lead them to a lower room, adjacent to the one with the safe liquid. From there, fans should depart through the left exit and ascend ladders until they find a door. Upon entering this door, players can gather 100 Cash from the chest on the left-hand side of the next room. Lastly, they should use the door located on the right side of that room for further progression.
Now, players have returned to the previous chamber they were in prior to heading towards the toxic zone. To get back to the game’s starting point, they need to depart through the left exit. Players should traverse this room, taking care to leap over a tile that triggers the ceiling collapse. Afterward, they should ascend the ladders in the chamber featuring a planetary backdrop, and then jump onto the shifting red platform to rise higher.
This red platform is stationary prior to obtaining the Necklace.
Players should move to the left when the platform reaches its highest point, cross over to the next screen, and locate the ladder in the top-left corner. Climb up the ladder, then leap to the rightmost part of the upper platform. Jump again to reach the platform on the far right. Now standing on a small platform, players should jump from its left edge to grab the chest located earlier, which contains a Pin.
Get Bat
Once obtaining the Pin, players need to climb onto the shifting platform within the room, and leap from its left side. Following that, they should navigate to the left side and position themselves on the solitary purple block. As time passes, a ladder along with the Bat item will materialize.
Get Blood Sword
Players need to advance to a room located two screens to their right, where they’ll find two bouncing mushrooms as enemies. Once these foes are defeated, position yourself on the left side of the blocks resting on the light blue platform and hold down the ‘right’ key or direction. Over time, this will cause the blocks to shift to the right.
Now, players are instructed to move left and make their way down the ladder. At the foot of the ladder, they should pass through a gap on the right side and land on a light blue platform located above. This platform will lead them to a room containing a chest, which houses the Blood Sword. Players can access this chest by jumping onto the spikes, then climbing ladders after respawning.
In the two-mushroom room, you create a small space for jumping onto the light blue platform by moving the blocks there.
Get 100 Cash
Players are now instructed to re-enter the room where they previously found the light blue platform. There, they’ll spot a ladder on the left side. They should use this ladder to lower themselves through the floor. In the subsequent room, players must vanquish the pair of lizard adversaries and the bat. This action will make the green skull in the room vanish, uncovering a gem that awards 100 Cash.
In this particular room, there’s a door that opens up to a vendor offering an item called Trash for 50 Cash units. Although it’s generally advised against for players to buy Trash due to its apparent lack of usefulness within the game, enthusiasts who aim to amass every single item in the game might find this one intriguing and decide to acquire it immediately.
Get 50 Cash
Now, players need to utilize the staircase at the room’s base for going down through the floor. Afterward, in the subsequent room, players should move towards the bottom-right corner, burst the bubbles by hitting them, and then exit via the right side. Later on, fans should get back into the bubble-filled room, touch the top-right bubble to pop it, and employ the remaining bubbles to access a chest containing 50 Cash.
The Pin that was obtained previously makes popping bubbles possible.
Get 100 Cash
Following their acquisition of the Cash, players ought to depart towards the right and ascend ladders until they encounter a familiar door. Enthusiasts of exploration games should proceed through that door, utilize the doorway on the right side of the next chamber, and journey left, eventually finding themselves back in the room with the shifting red platform.
Players should now make their way back to the screen where they found the Pin, climb the ladder in the top-left corner, and go left. Players should then ride another moving red platform to reach a screen with a green skull, which will yield a gem worth 100 Cash after the two enemies are defeated.
Get Candy
Now, players are instructed to take the lift towards the bottom, utilize the stairs to access lower levels, and proceed through any doors they come across. You’ll find a merchant on the other side of that door, and players should purchase sweets from him for a cost of 100 Cash units.
Candy increases climbing speed.
Get 100 Cash
Players are instructed to locate and utilize the door at the same level as the vendor, proceed through another door on their right side, and enter one more door in a room containing an NPC and a floor filled with spikes. Meanwhile, fans should navigate towards the left exit, climb down a ladder which leads to four bubbles, burst those bubbles, and then fall. Upon falling, they should move to the left to reach a chest that contains 100 Cash.
Make a Choice
Now, players need to choose their strategy for getting to the game’s ultimate enemy. They have three possible routes: the “alternative route,” the “secure route,” and the “mallet route.” Each of these options is explained in detail in the subsequent sections that follow.
Previously, I mentioned that Barbuta’s Cherry is given to gamers who complete the game with all six lives, or Eggs. To grab this coveted award, fellow players are recommended to either choose the “switch route” or the “lock route,” as these paths allow you to save up some Cash to recharge your Eggs before taking on the final boss. On the other hand, opting for the “hammer path” will require a hefty sum of Cash (500).
Barbuta: Switch Path
For those aiming to follow the switch route, keep moving forward until you find a spacious room with a towering green knight figure inside. In this room, you’ll discover an unseen stairway that can be ascended by standing on the fifth block from the entrance and raising your character upward. At the top of this hidden ladder lies a treasure chest containing 50 units of currency. Don’t forget to grab it before making your descent, moving right when you’re ready to come back down.
After buying the Candy, players will find themselves on a path where they can catch a peek at the summit of an unseen staircase. This brief view serves as a clue for fans to deduce the presence and location of the hidden ladder.
Players will now find themselves on the platforms on the right side of the room with the green knight, and they should exit to the right. Fans should then hit the switch that they encounter, jump off the ledge, and pass through a gap in the floor that they have just created.
Currently, players find themselves in a room where a seemingly innocuous chest poses as a hidden adversary. Defeat this deceptive enemy, and enthusiasts should proceed rightwards, move through the subsequent door that appears, and ascend a sequence of ladders to ultimately reach another door.
Beyond that door lies a space where players are instructed to move to the right upon exiting, walk all the way to the edge of the platform, and then jump off it. Afterward, enthusiasts should proceed in the same direction to arrive at a room containing a violet egg. This egg can be interacted with to restore 100 Cash for every egg collected.
As I’ve just revived myself in this game, it’s time for me, the gamer, to scale the ladder and leap towards what seems like a dangerous floor of spikes. This daring move will uncover an elusive platform hidden among the spikes, a secret pathway that leads right to the final boss, ready for me to conquer!
To conquer the boss, gamers should merely dodge its thrown objects and strike it with their Blood Sword once it’s on the ground. The Bat they acquired throughout their adventure will handle the ghosts that pop up during combat.
Barbuta: Lock Path
As a player on the hunt for the secret path, I suggest you look for the ladder next to the chest where you picked up 100 Cash. You’ll find yourself in a room with two towering green knights, my friend! To keep moving forward, steer clear of these enemies and head towards the bottom-right corner of the room instead.
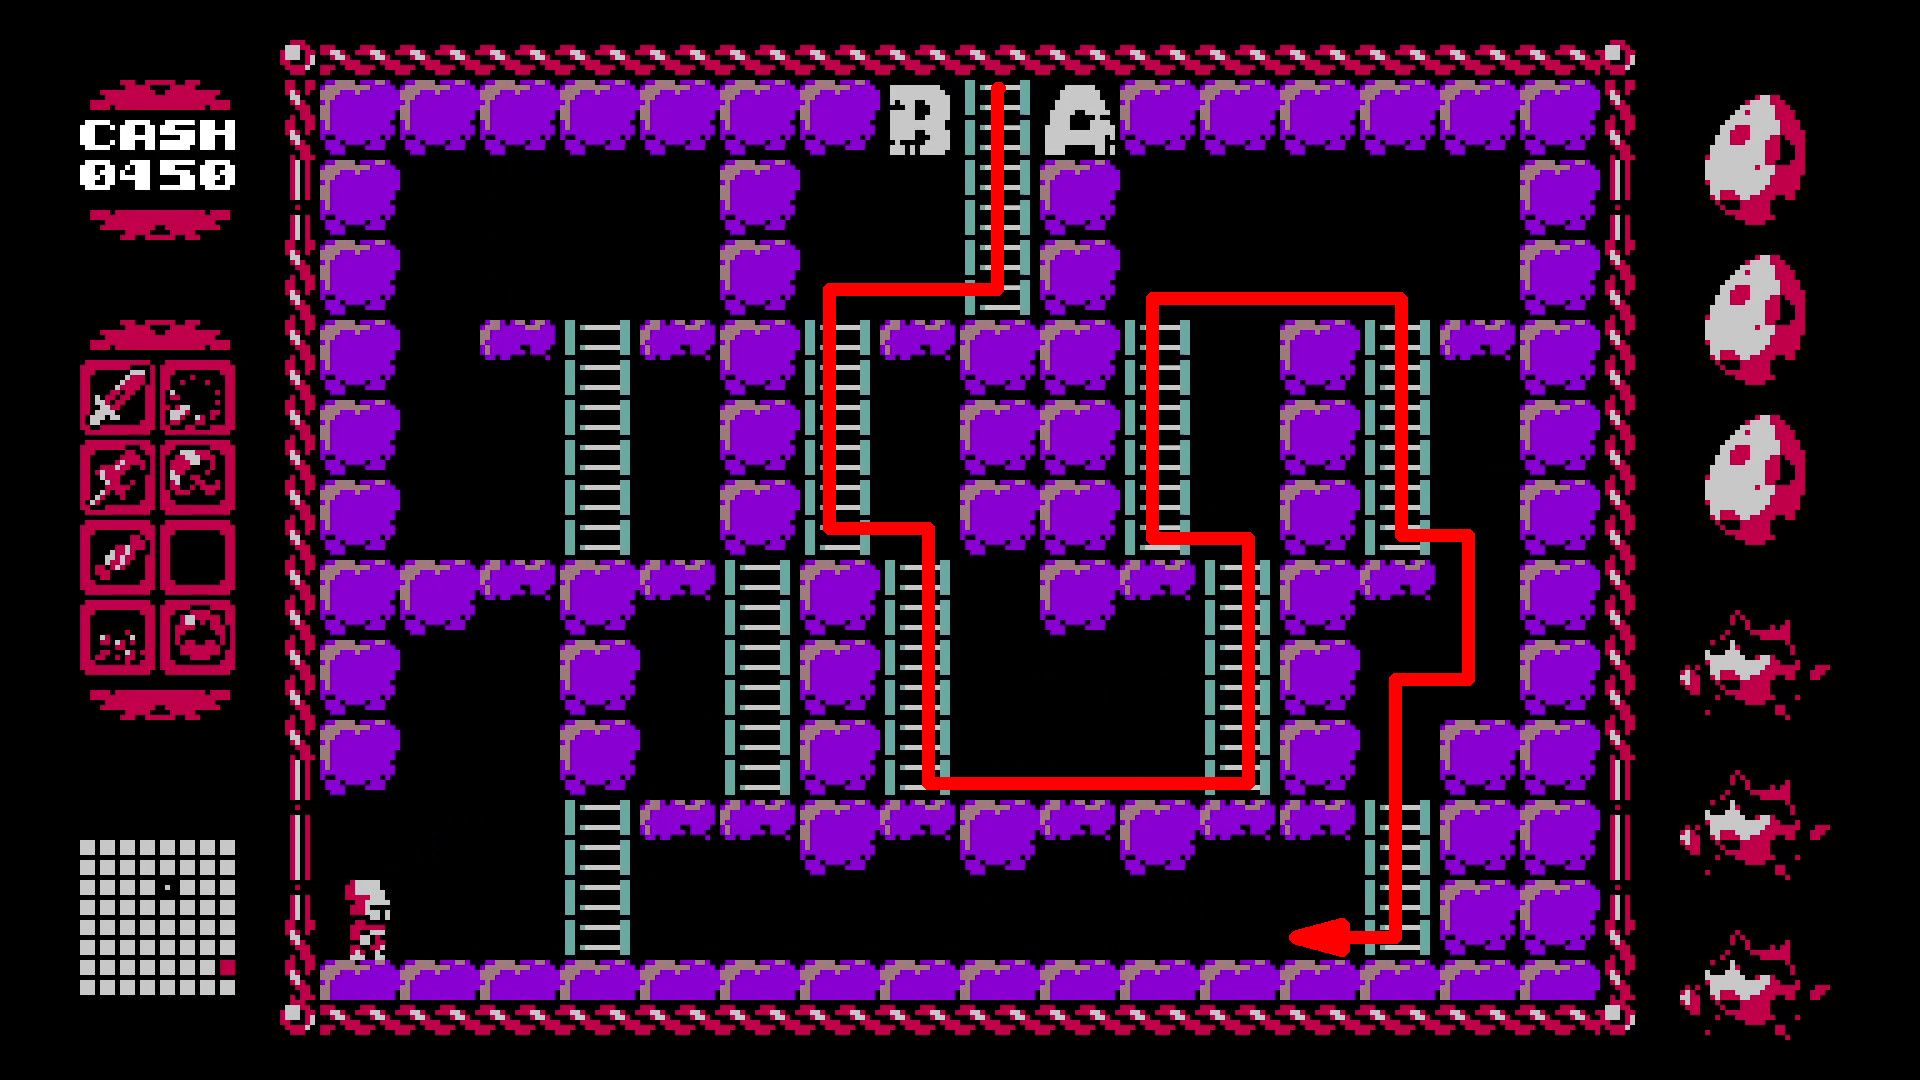
Players should head towards the right to get into the “BA” chamber, which forms part of a challenge that eventually rewards them with a key for unlocking a lock. Solving this puzzle requires figuring out the exact route from the top of the “BA” room to the bottom, and the solution is illustrated in the previous image.
Now, the players should proceed towards the “AB” room, situated down a ladder found in the planet room where a moving red platform resides. There are multiple paths to this room, but those uncertain of its location can easily trace it by following the path illustrated in the previous pictures.
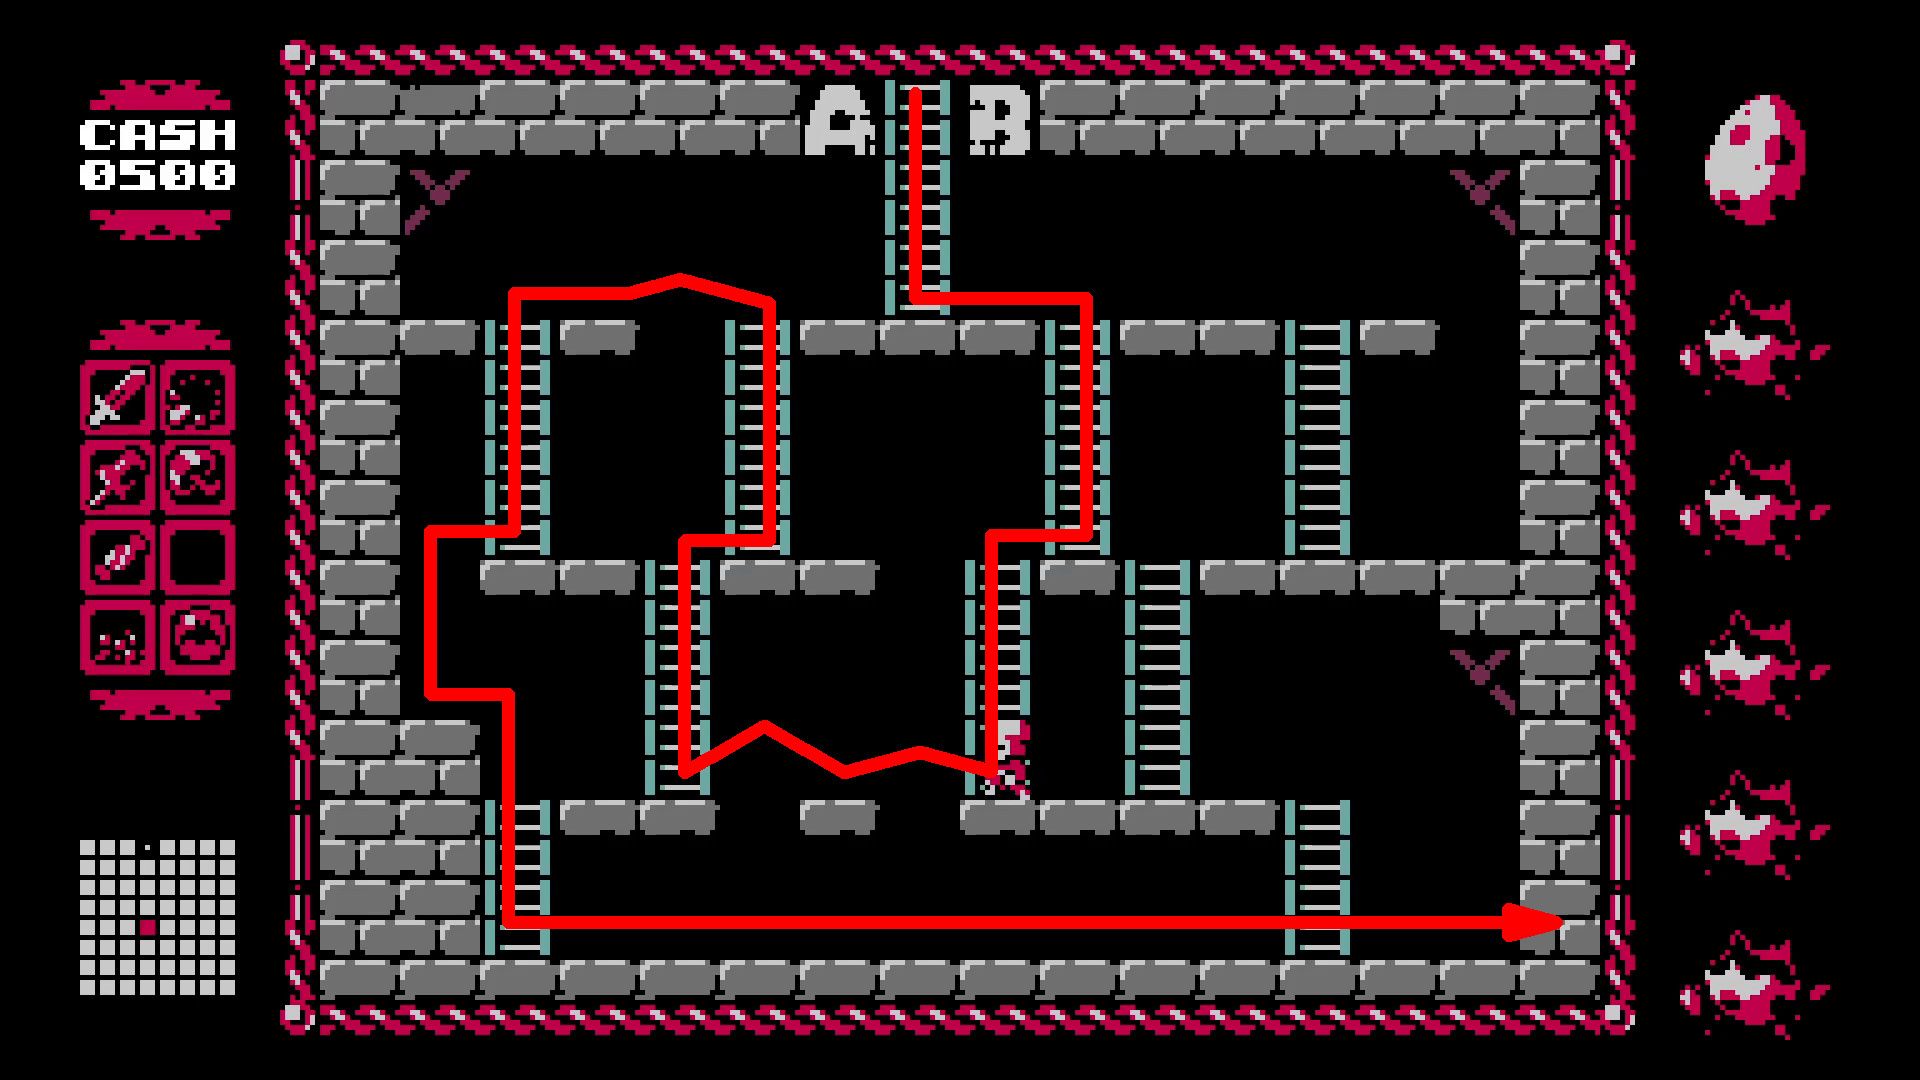
In the “AB” space, players need to recreate the route they initially chose when exploring the “BA” area. Keep in mind that these rooms are symmetrical, so the path you take should also be mirrored. The picture provided demonstrates this mirror-image path, and once a player completes it, an entrance will materialize in the lower-right corner of the room.
Moving forward from the initial entrance, gamers will discover a treasure chest containing a Key. Upon retrieving this artifact, enthusiasts should navigate their way back up to the “AB” chamber, hop onto the red platform located in the celestial space, and proceed to the right at the summit. Subsequently, they need to skillfully traverse a sequence of shifting platforms to cross a room filled with spikes, unlock the door, and ascend the ladder in the adjoining area.
As a passionate gamer, I find myself in a room adorned with a captivating purple egg, a magical item that restores my Egg count by 100 Cash each time I interact with it. Once replenished, I should ascend the nearby ladder and perform a daring jump towards the spike-laden floor below. This seemingly perilous leap unveils an invisible platform hidden above the spikes, which can be utilized to reach the ladder that provides direct access to the final boss. What an exhilarating adventure!
As a dedicated gamer, I’d suggest focusing on evading the boss’s projectiles while waiting for it to slump to the ground so you can strike it with your Blood Sword. The bat you acquired throughout your gameplay journey will handle those pesky ghosts that pop up during combat. Enjoy the victory!
Barbuta: Hammer Path
For players who haven’t acquired the Trash item, they now receive 500 Cash – the same sum needed for the hammer path.
- Drop to the left of the chest, and climb the ladder on the left side of the room.
- Go right at the top of the ladder, making sure not to jump into the spikes.
- Climb the ladders to exit the next room through the top.
- Climb the ladders, and give the character at the top of the screen 500 Cash to use his hammer on a wall.
- Exit the room through the top, and go left to pass through the cleared wall.
- Climb the ladder in the next room.
Currently, the participants find themselves in a chamber that contains a violet orb resembling an egg. Their objective is to ascend the nearby runged structure and leap towards the floor adorned with sharp spikes. Performing this action will unveil a hidden stage positioned above the spikes, which savvy players can traverse to reach a ladder that provides direct access to the ultimate adversary.
In order to vanquish the boss, players need only dodge its projections and strike it with their Blood Sword once it’s on the ground. During combat, a Bat they acquired earlier will handle any apparitions that may show up.
As a dedicated player finding myself with 450 Cash after buying the Trash item, I’m thrilled to share some good news about the hammer path! Although it may seem like I’ve reached a dead end, there’s actually more cash to be discovered in Barbuta. In fact, there’s a handy 50 Cash stashed nearby for me and other players in my situation. Here’s what I should do next:
- Use the information in the “Lock Path” section to reach the “BA” room. There is a ladder just before the “BA” room that leads to a chest with 50 Cash.
- Use the information in the “Lock Path” section to reach the planet room.
- Use the moving red platforms to return to the vendor that sold Candy.
- Follow the path beyond that vendor to return to the starting location for this section.
- Use the information at the beginning of this section to follow the hammer path and reach the boss.
Barbuta: Additional Items and Secrets
In the previous guide, there were several points and hidden details left unexplained, and here they are:
Wand
Trading one’s Sword for a Wand with an NPC character allows players to acquire the wand, although it may not be as powerful against the final boss compared to the Blood Sword.
- Reach the room with the green knights to the left of the “BA” room.
- Follow the path to the left and descend into a room with another green knight.
- Exit the room to the right to reach the Wand vendor.
Secret Path #1
There is a secret path in the top-right corner of the planet room. To reach it, players should take these actions:
- Ride the moving red platform in the planet room.
- Drop to the right of the ladder to fall onto a light blue platform in the planet room.
- Repeatedly strike the wall to clear a path, jumping to continue forward as needed.
- At the end of the path, go two blocks to the left and press up to enter a hidden door.
Secret Path #2
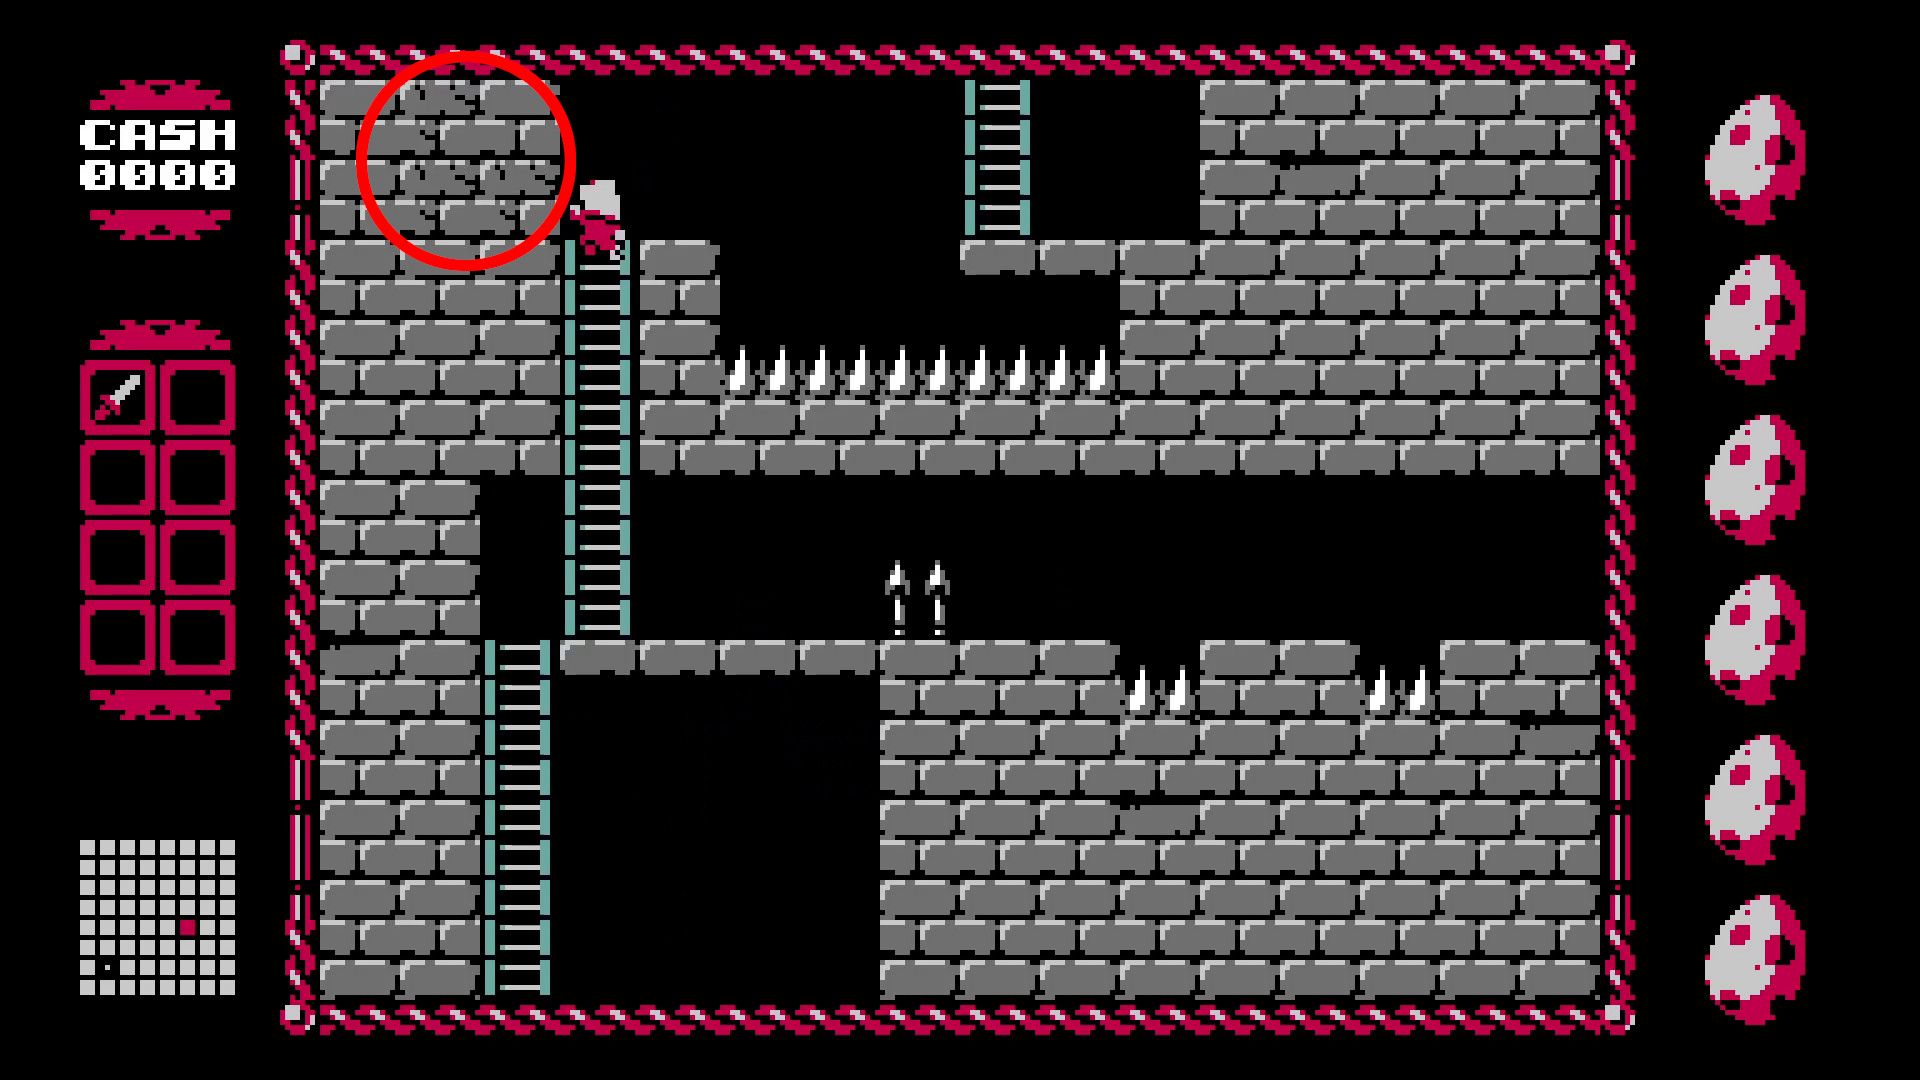
There is a secret path one screen right and one screen down from the game’s starting room. It is in the top-left corner of the room, and it is revealed by repeatedly striking the cracked blocks with the sword.
Read More
- LUNC PREDICTION. LUNC cryptocurrency
- BTC PREDICTION. BTC cryptocurrency
- BICO PREDICTION. BICO cryptocurrency
- SOL PREDICTION. SOL cryptocurrency
- USD CLP PREDICTION
- VANRY PREDICTION. VANRY cryptocurrency
- USD COP PREDICTION
- USD PHP PREDICTION
- USD ZAR PREDICTION
- ASTO PREDICTION. ASTO cryptocurrency
2024-09-24 20:25