Following your journey through the werewolf-infested town in the sixth chapter of Ninja Gaiden 2 Black, you’ll eventually ascend the castle and confront the Lycanthropes’ King in Chapter 7: The Castle of the Werewolves. Resuming control of Ryu Hayabusa, you’ll continue slicing through hordes of enemies. In this guide, we’ll offer a detailed walkthrough, complete with locations for every collectible found in Ninja Gaiden 2 Black’s seventh chapter.
Once you’ve navigated the sixth level of Ninja Gaiden 2 Black (which is a werewolf-infested town), you reach Chapter 7: The Werewolves’ Castle, where you battle the King of the Werewolves. Continuing as Ryu Hayabusa, you cut your way through numerous foes. This guide provides a step-by-step walkthrough, including tips on finding every hidden item in Ninja Gaiden 2 Black’s seventh chapter.
Chapter 7 Walkthrough Part 1 – Ninja Gaiden 2 Black
How to Reach the Roof:
In this guide, we’ll divide the content into distinct ‘segments‘ or sections. Each segment corresponds to the gameplay between two save points. For instance, Segment 1 encompasses the beginning of Chapter 7 up until the first save point is reached.
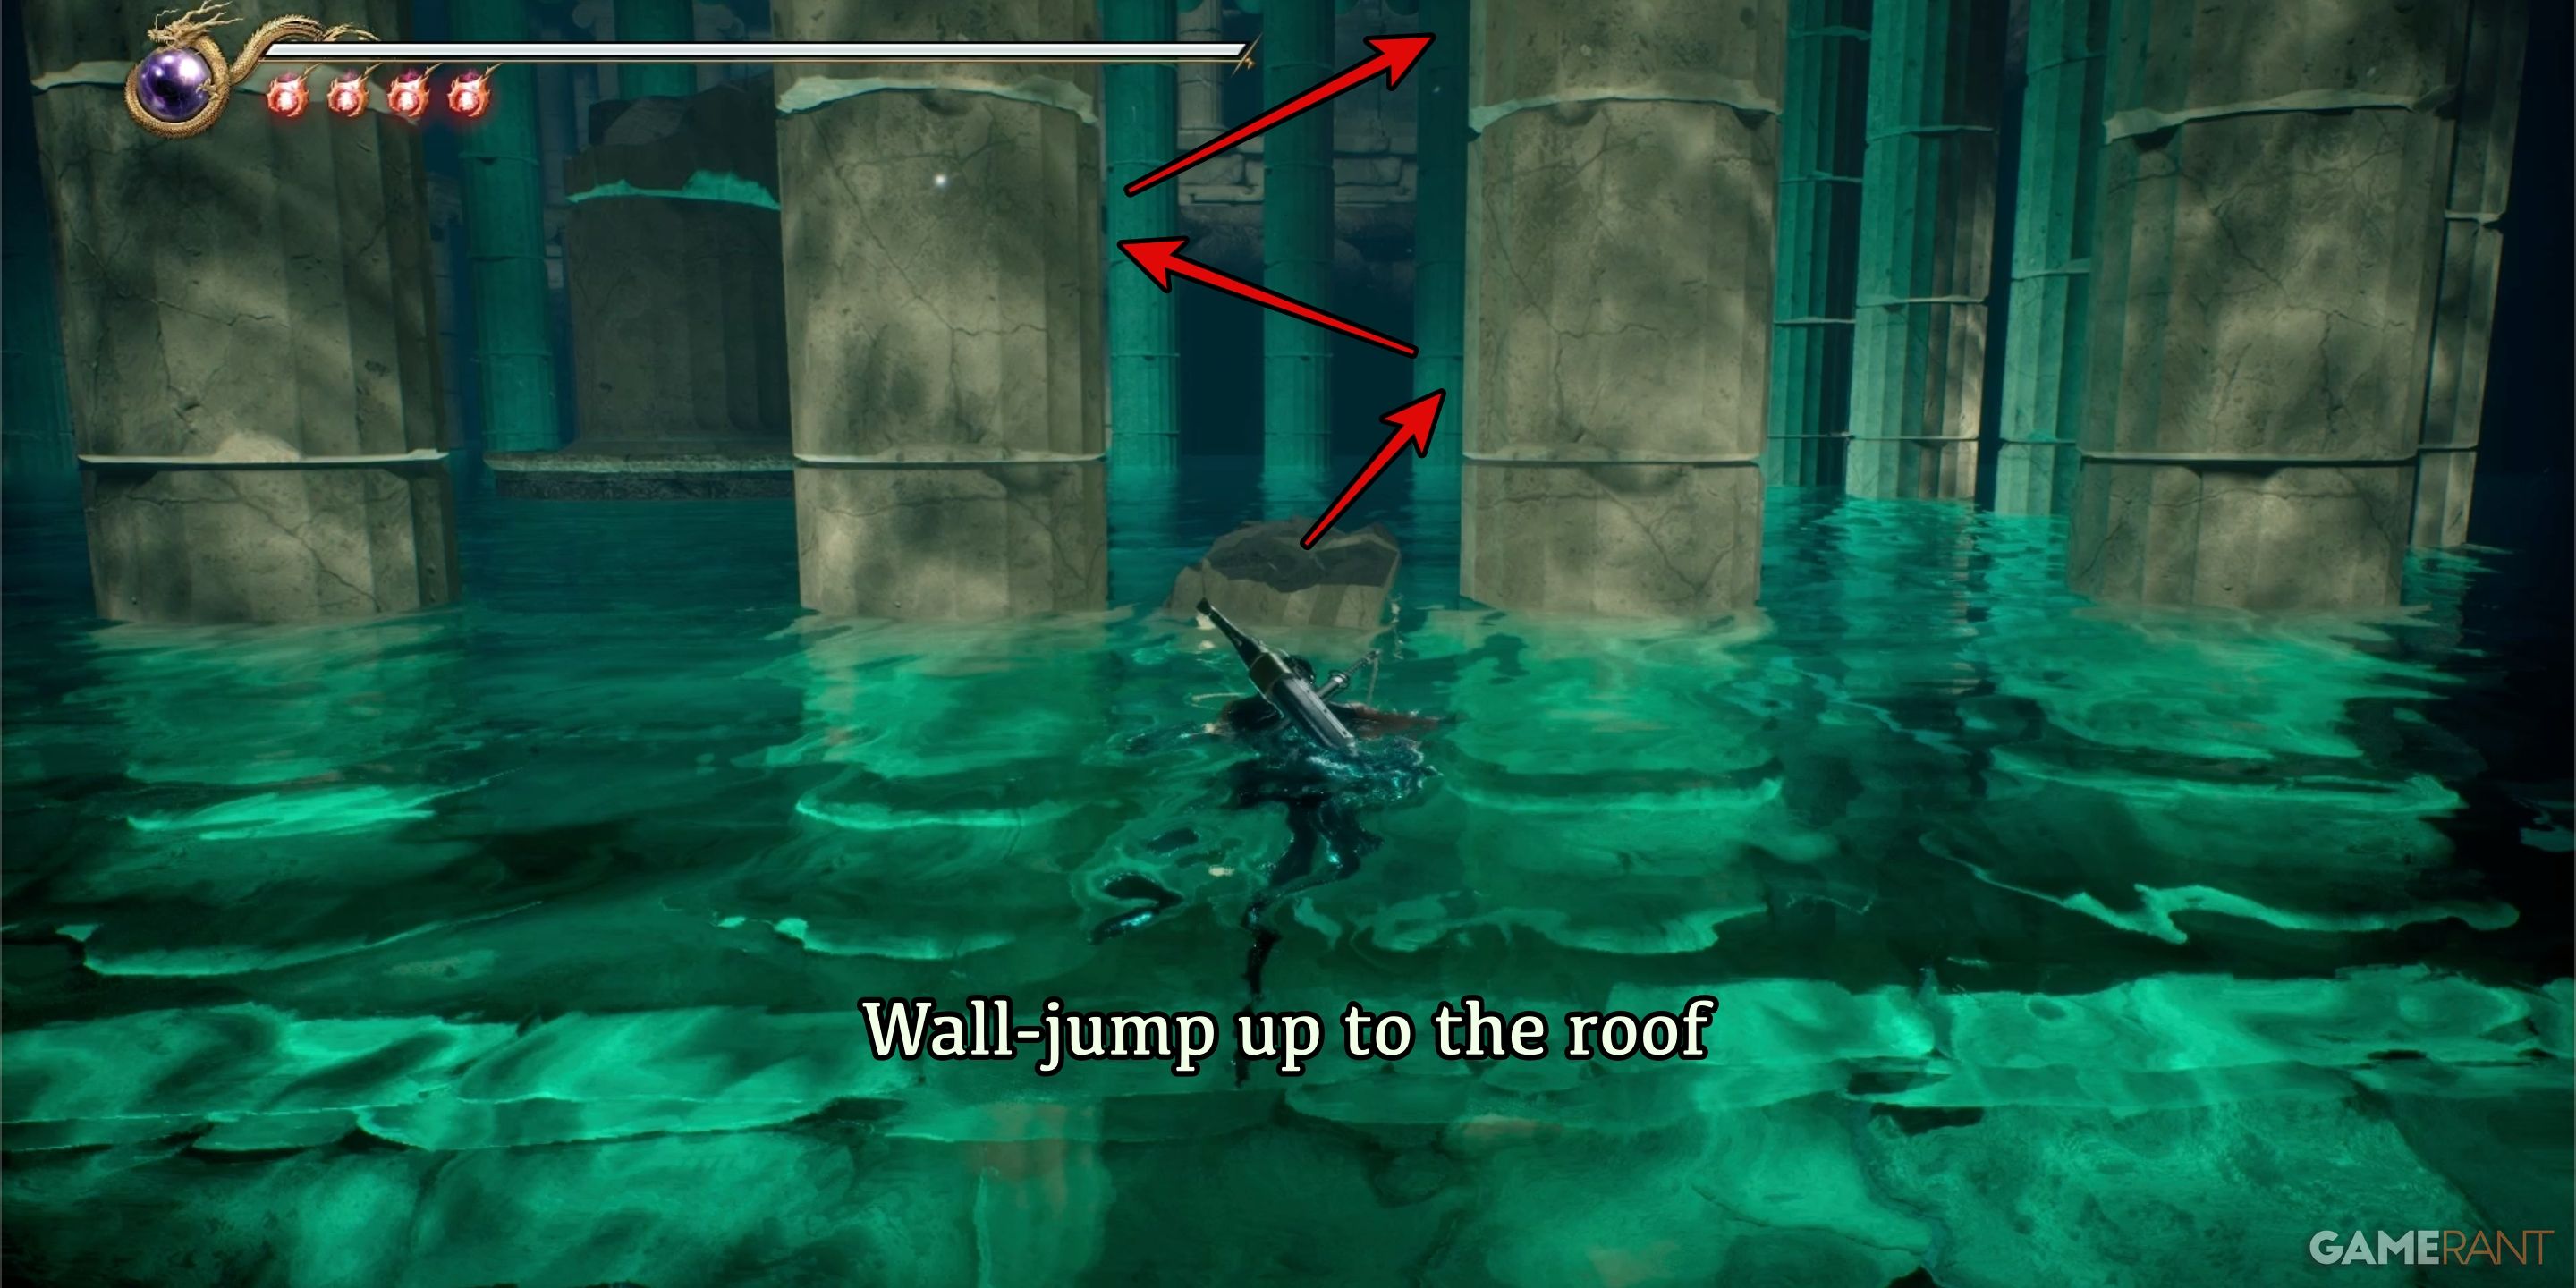
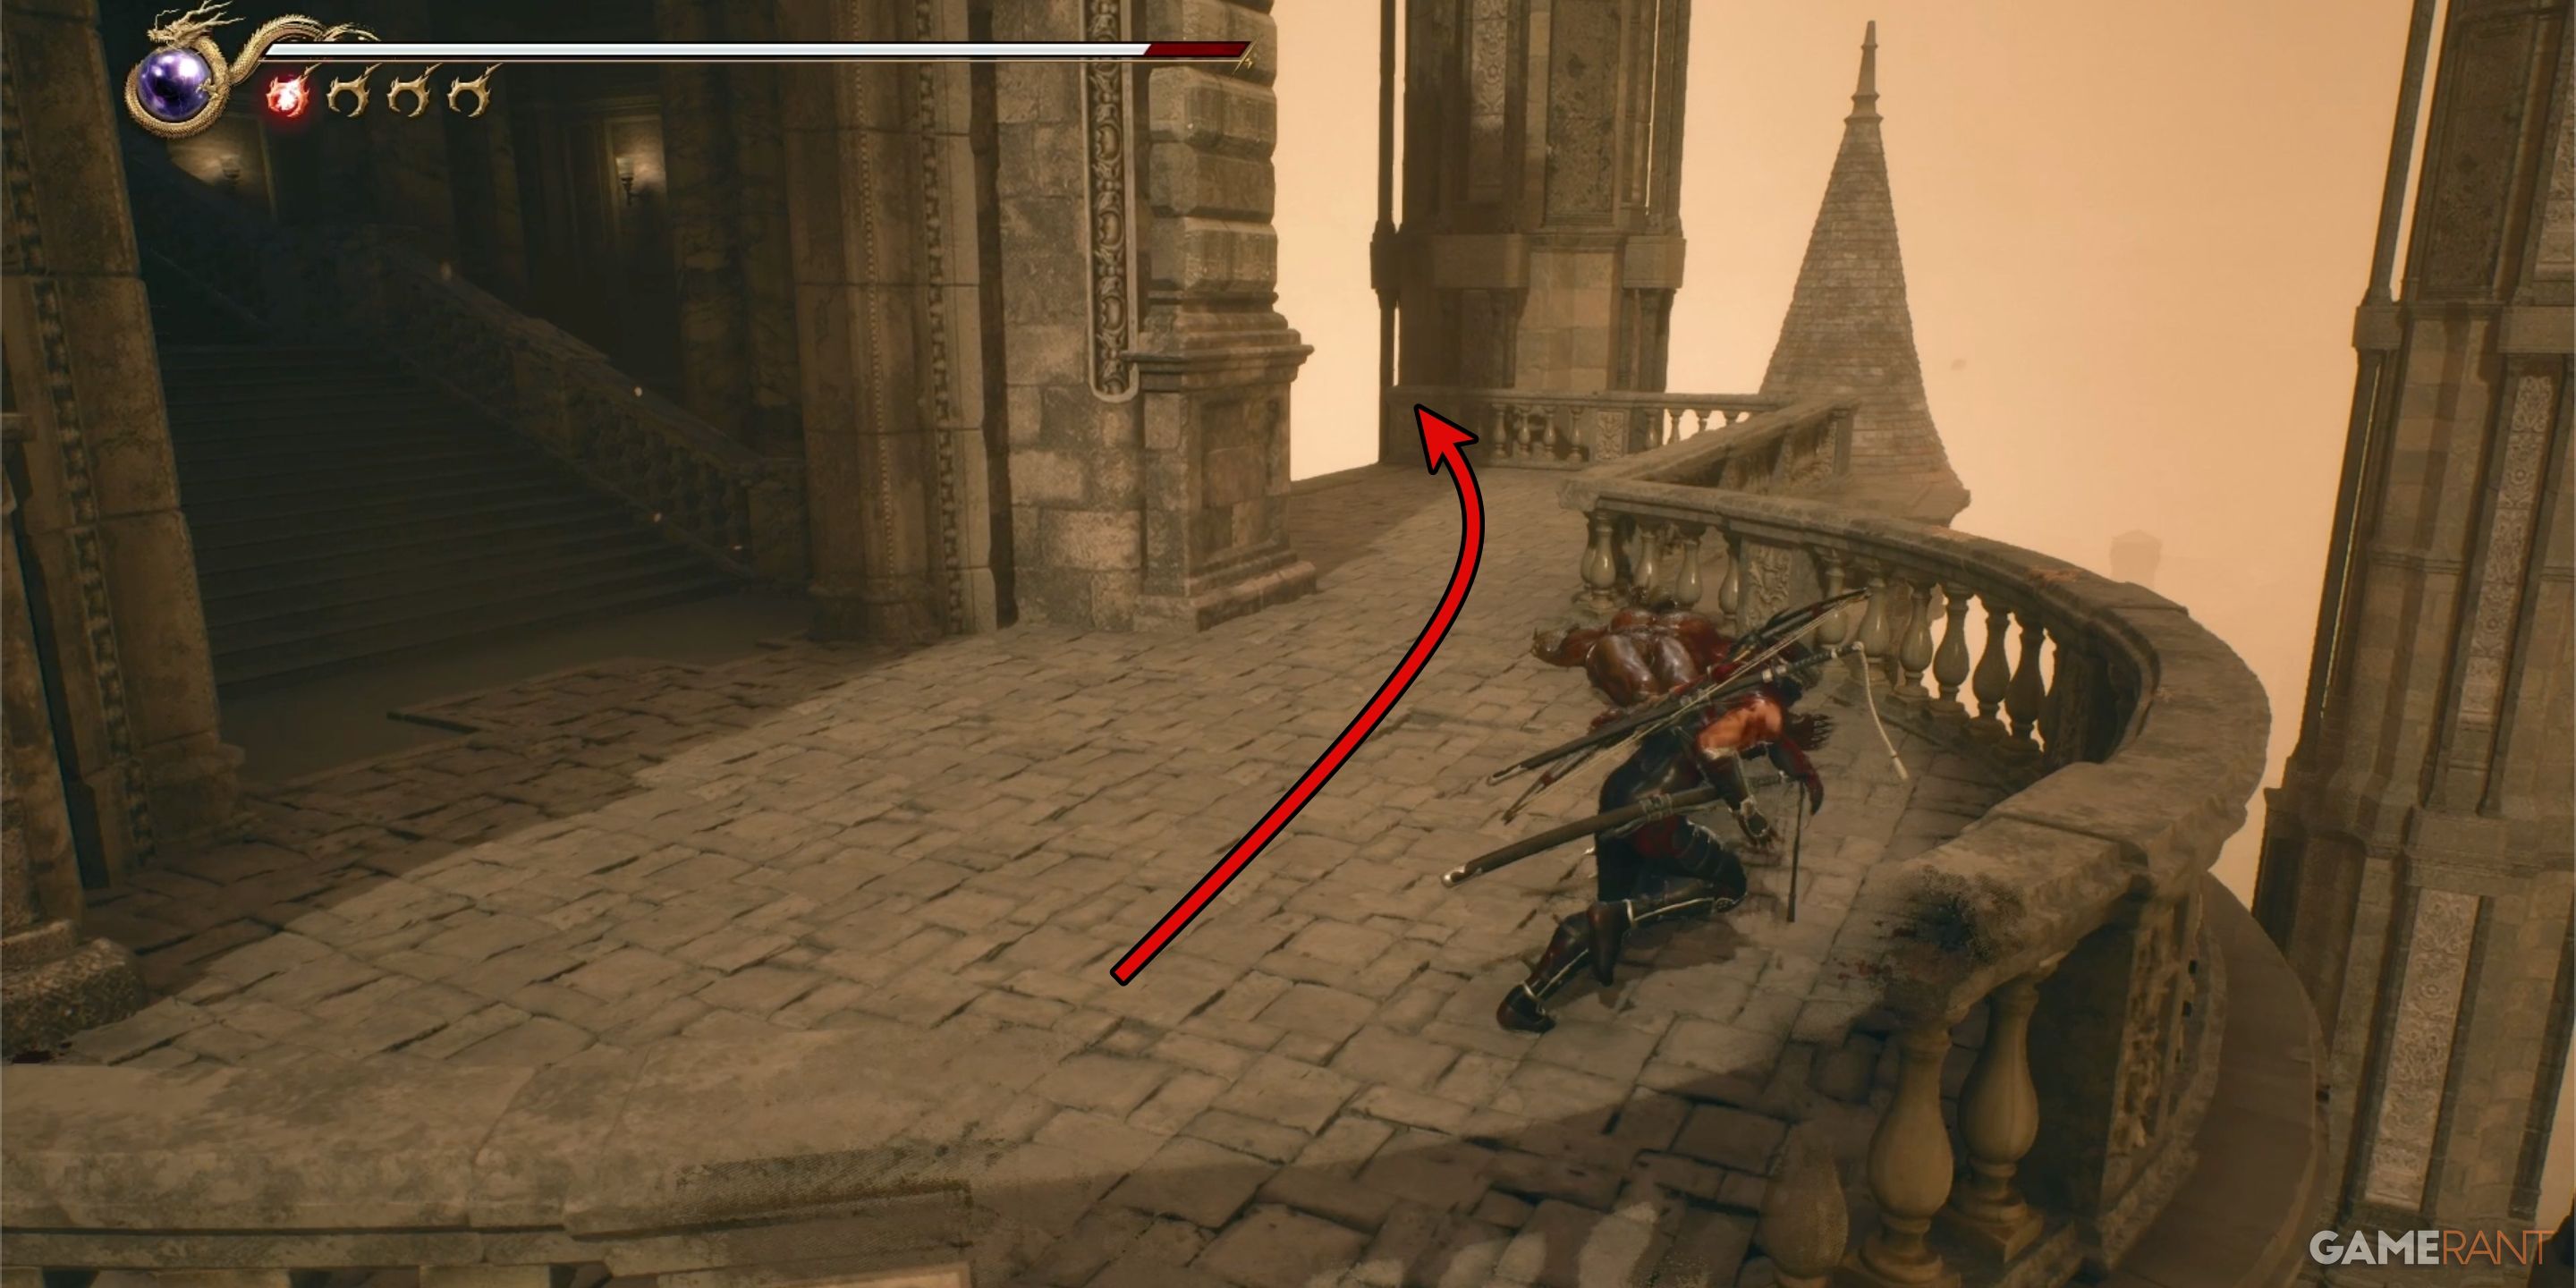
Chapter 7 commences immediately following the conclusion of Chapter 6’s events starring Ryu submerged beneath the water as The Water Dragon meets its end. Following the termination of the cutscene, you’ll likely have observed that it emphasized on the rooftop of the ruins where the battle with The Water Dragon occurred. To ascend to this rooftop, explore the structure until you come across two pillars with a damaged one situated in between them. Utilize the damaged pillar as a stepping stone to wall jump your way up to the rooftop.
Crystal Skull 1:
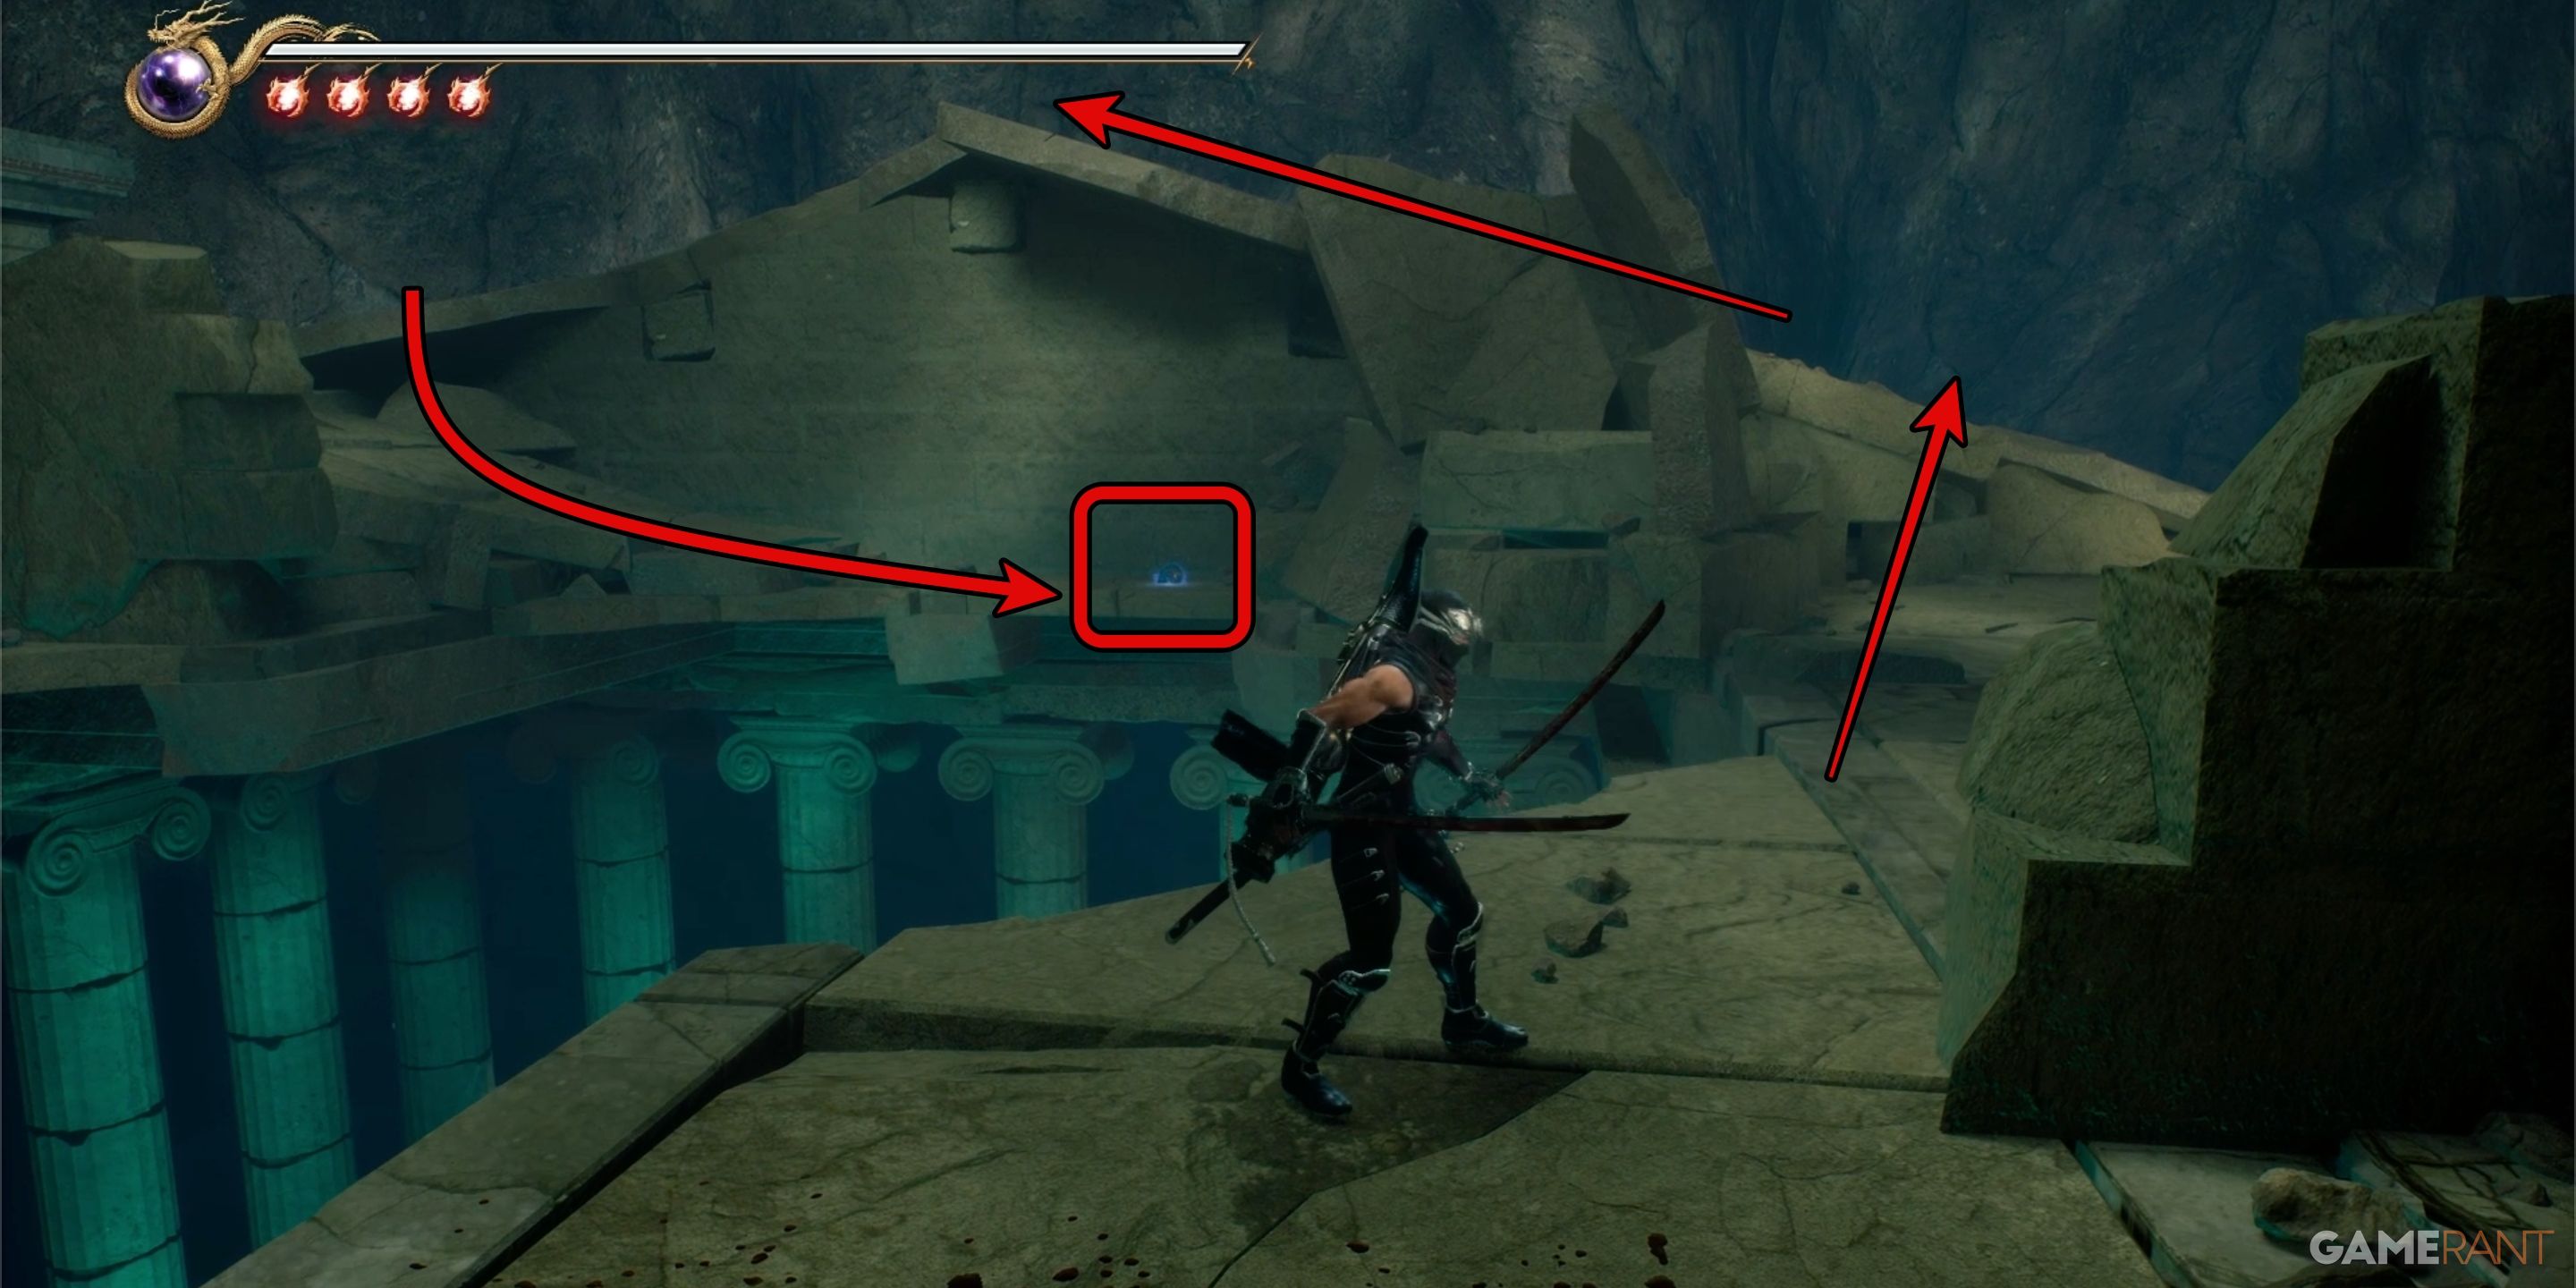
After making it to the rooftop, notice that a Muramasa store is located at the far end. Proceed ahead and defeat any white fish foes that come your way. Once they’re vanquished, turn back around and discover the game’s 13th Crystal Skull, the first of three in Chapter 7, resting on a ledge beneath the rooftop’s peak. If you move to the front of the roof, towards where the shop is situated, you’ll find a secret chest tucked away in a niche-like area.
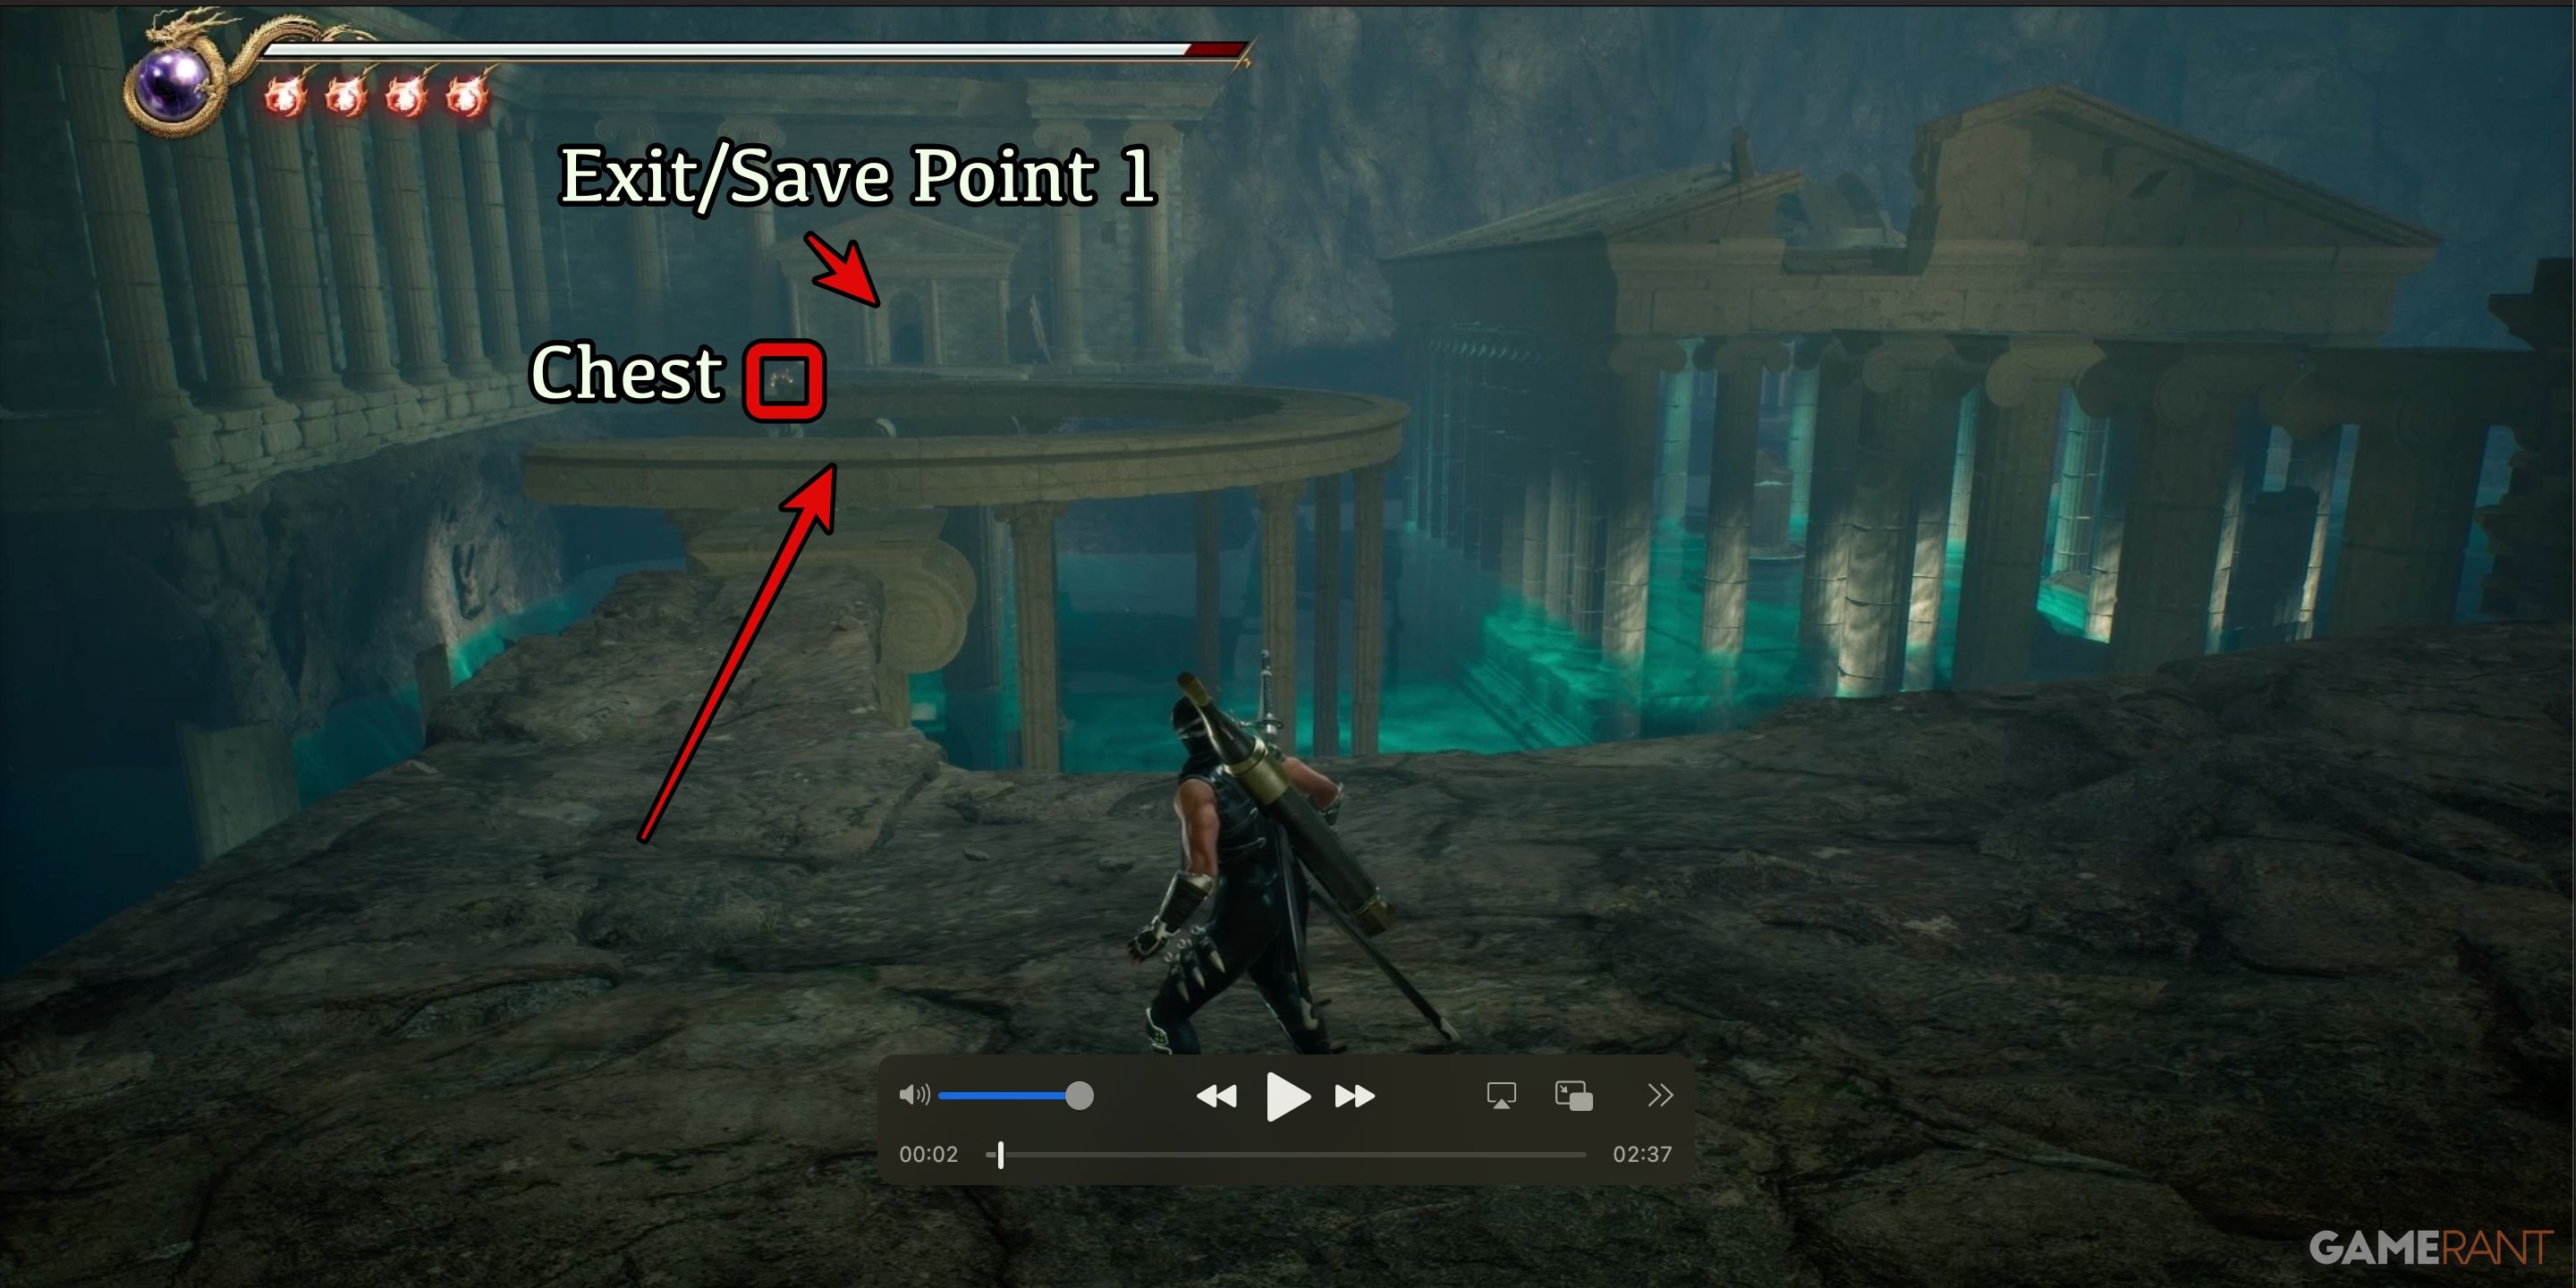
Exit the Underground Cavern – Save Point 1:
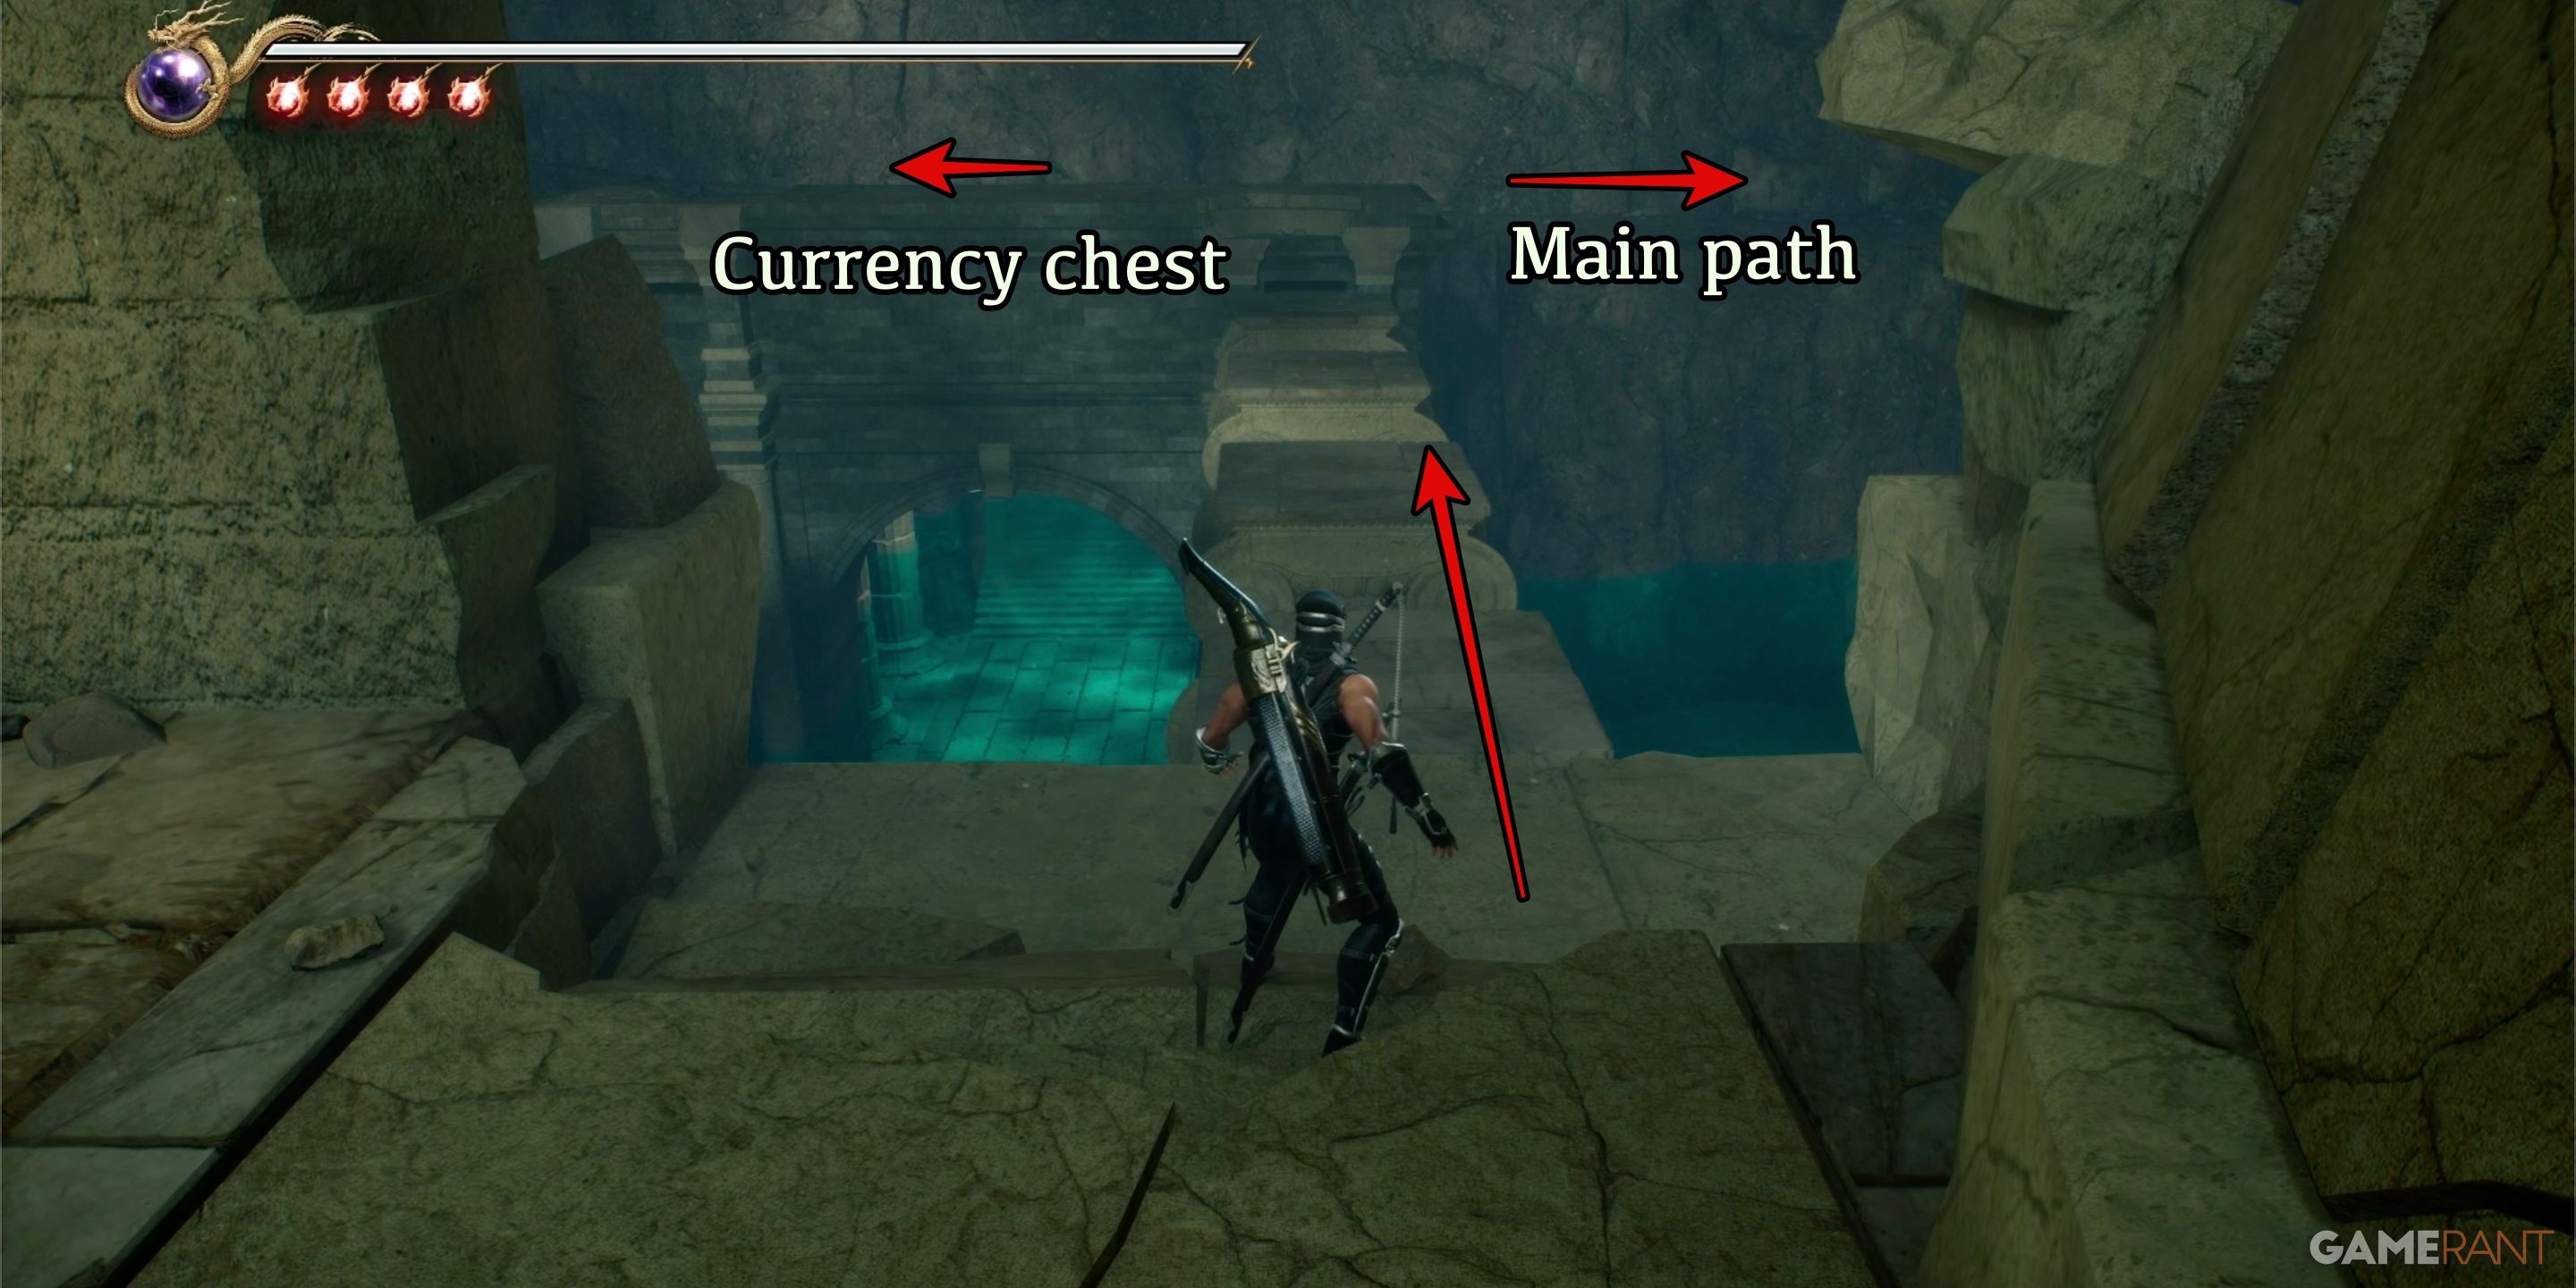
Move forward beyond Muramasa Shop, then hop over to the pillars on your right side, but be cautious as some fish foes might attempt to latch onto you. Proceed until you reach a dirt path at the end of these pillars. If you go left, you’ll stumble upon a chest located in a dead-end, which contains yellow currency orbs. Opting for the right direction will lead you down the main path where you’ll encounter spiny snake adversaries.
Watch out here, because various areas on the ground may give way, leading to a fall into the water if you’re not careful.
Following the prickly adversaries, you’ll come across a chest filled with red spheres to your left before proceeding towards the peak of the circular column setup. Navigate through the circular ruins, taking care to avoid more fish-like enemies. You’ll spot another chest off to the left of the pillars you leap from the circular structure.
In this rephrased version:
After overcoming the spiky foes, you’ll find a chest containing red orbs on your left side before proceeding upwards to the top of the round column arrangement. Journey through the circular ruins, keeping an eye out for more aquatic enemies. You’ll discover another chest situated off to the left of the pillars you leap from the circular structure.
Follow the pillars, and you’ll find the first save point in a small chamber at the end.
Chapter 7 Walkthrough Part 2 – Ninja Gaiden 2 Black
Jewel of the Demon Seal:
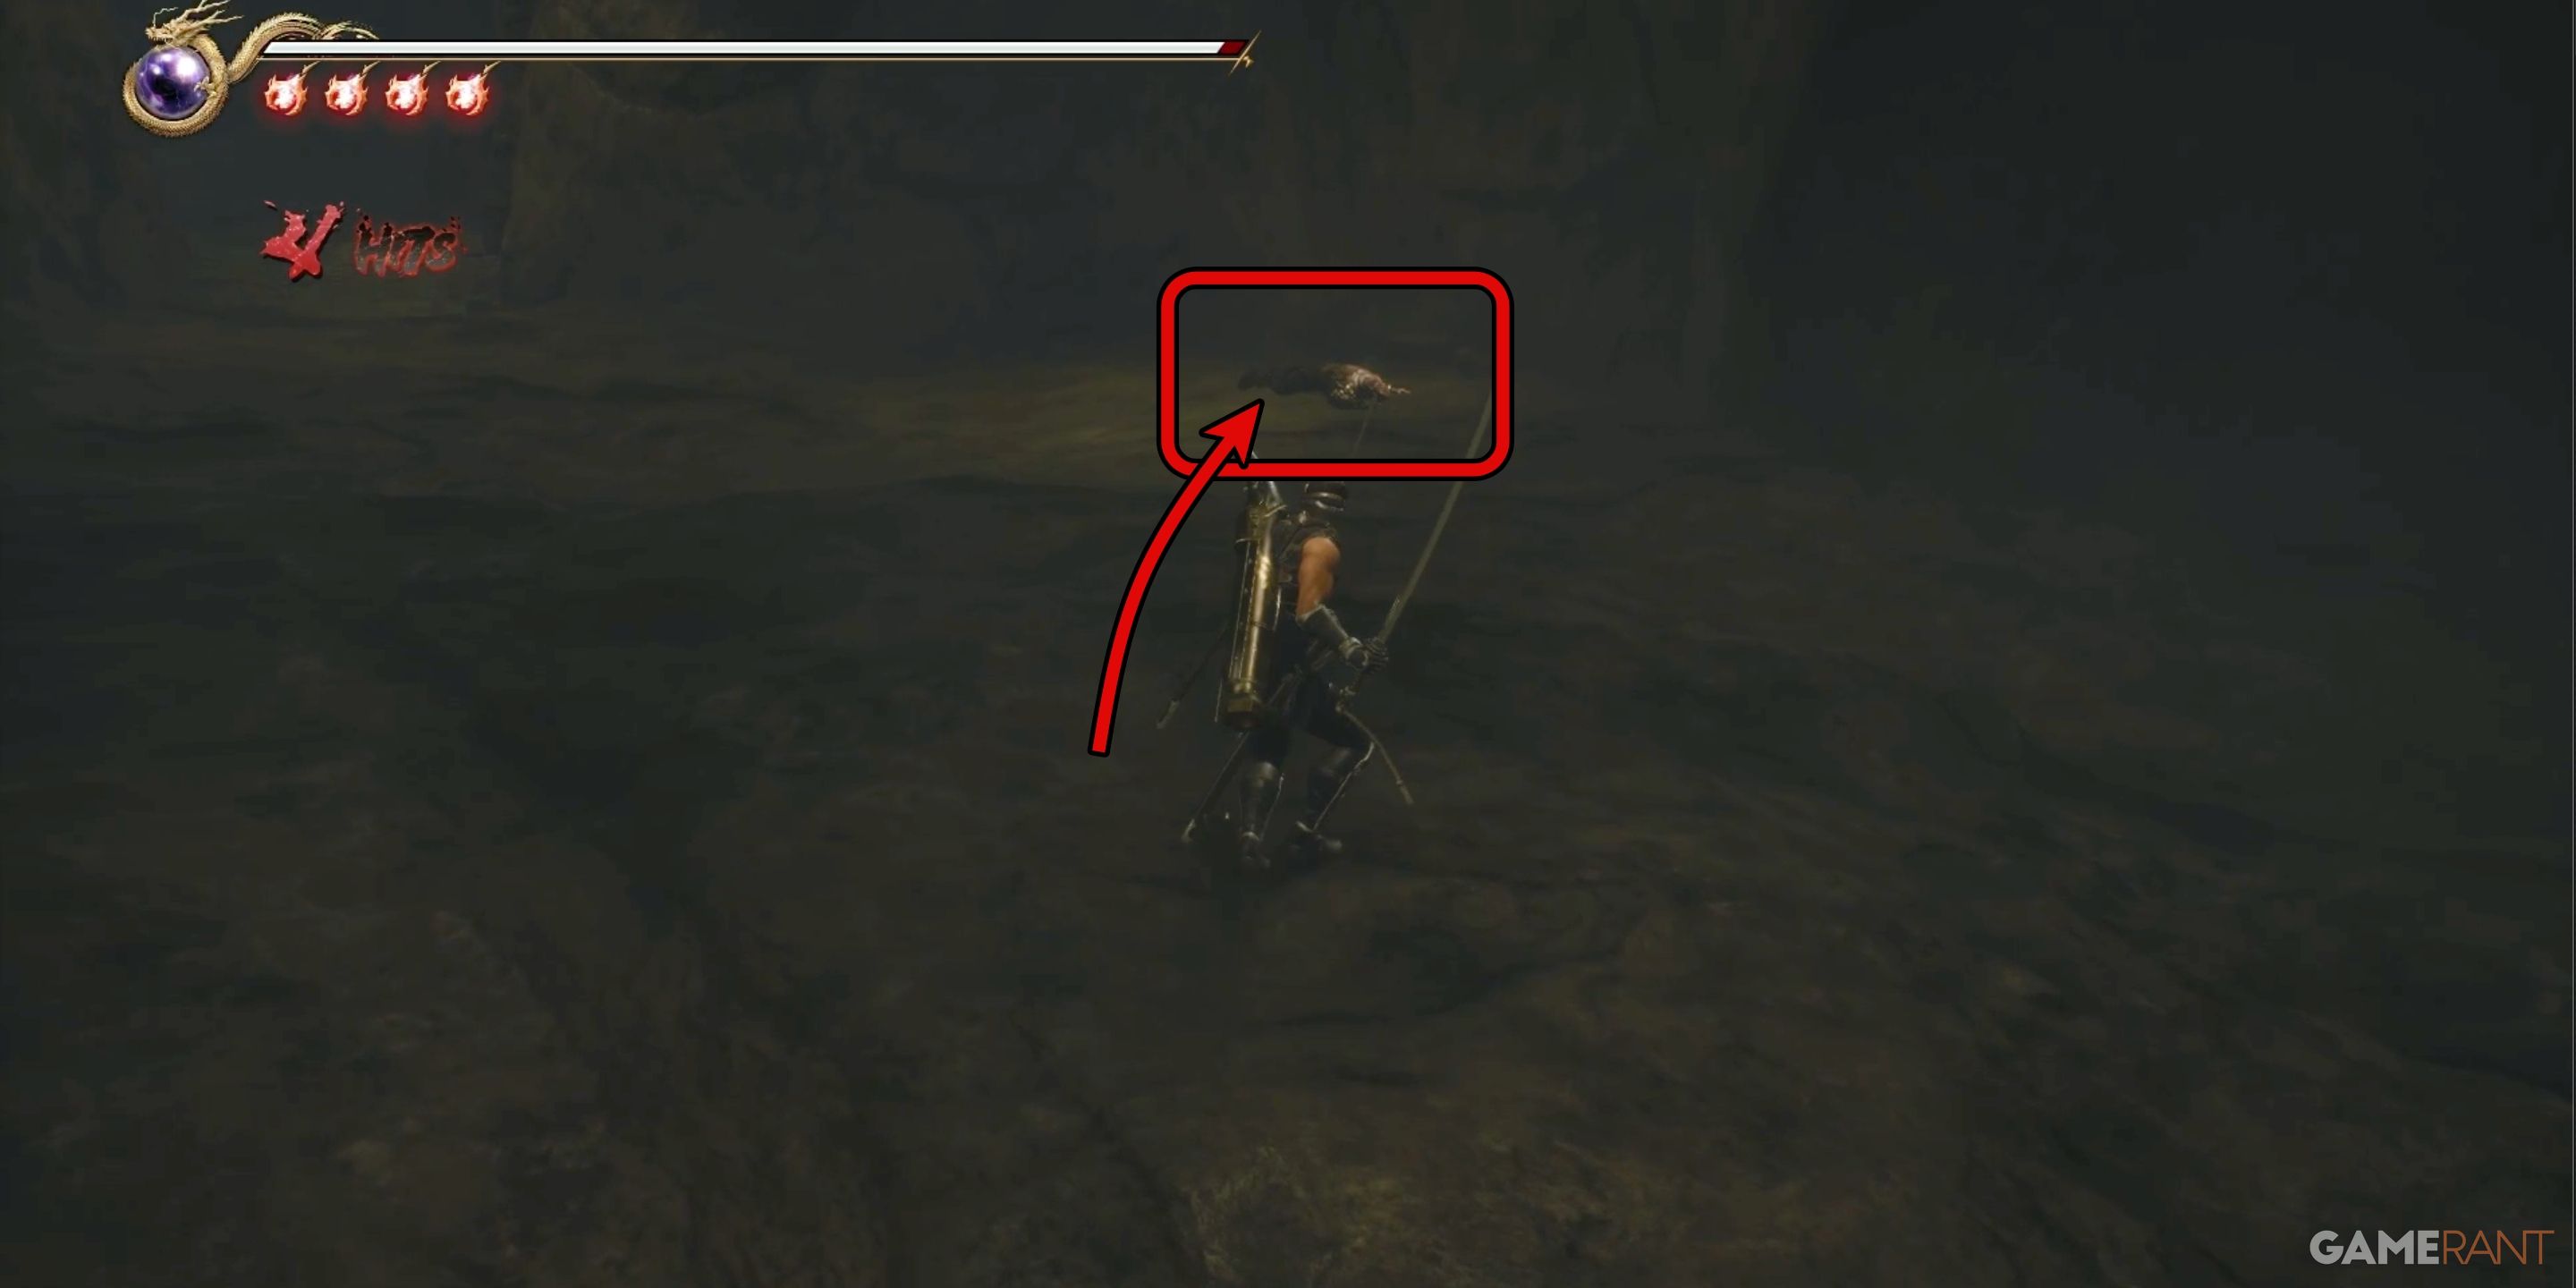
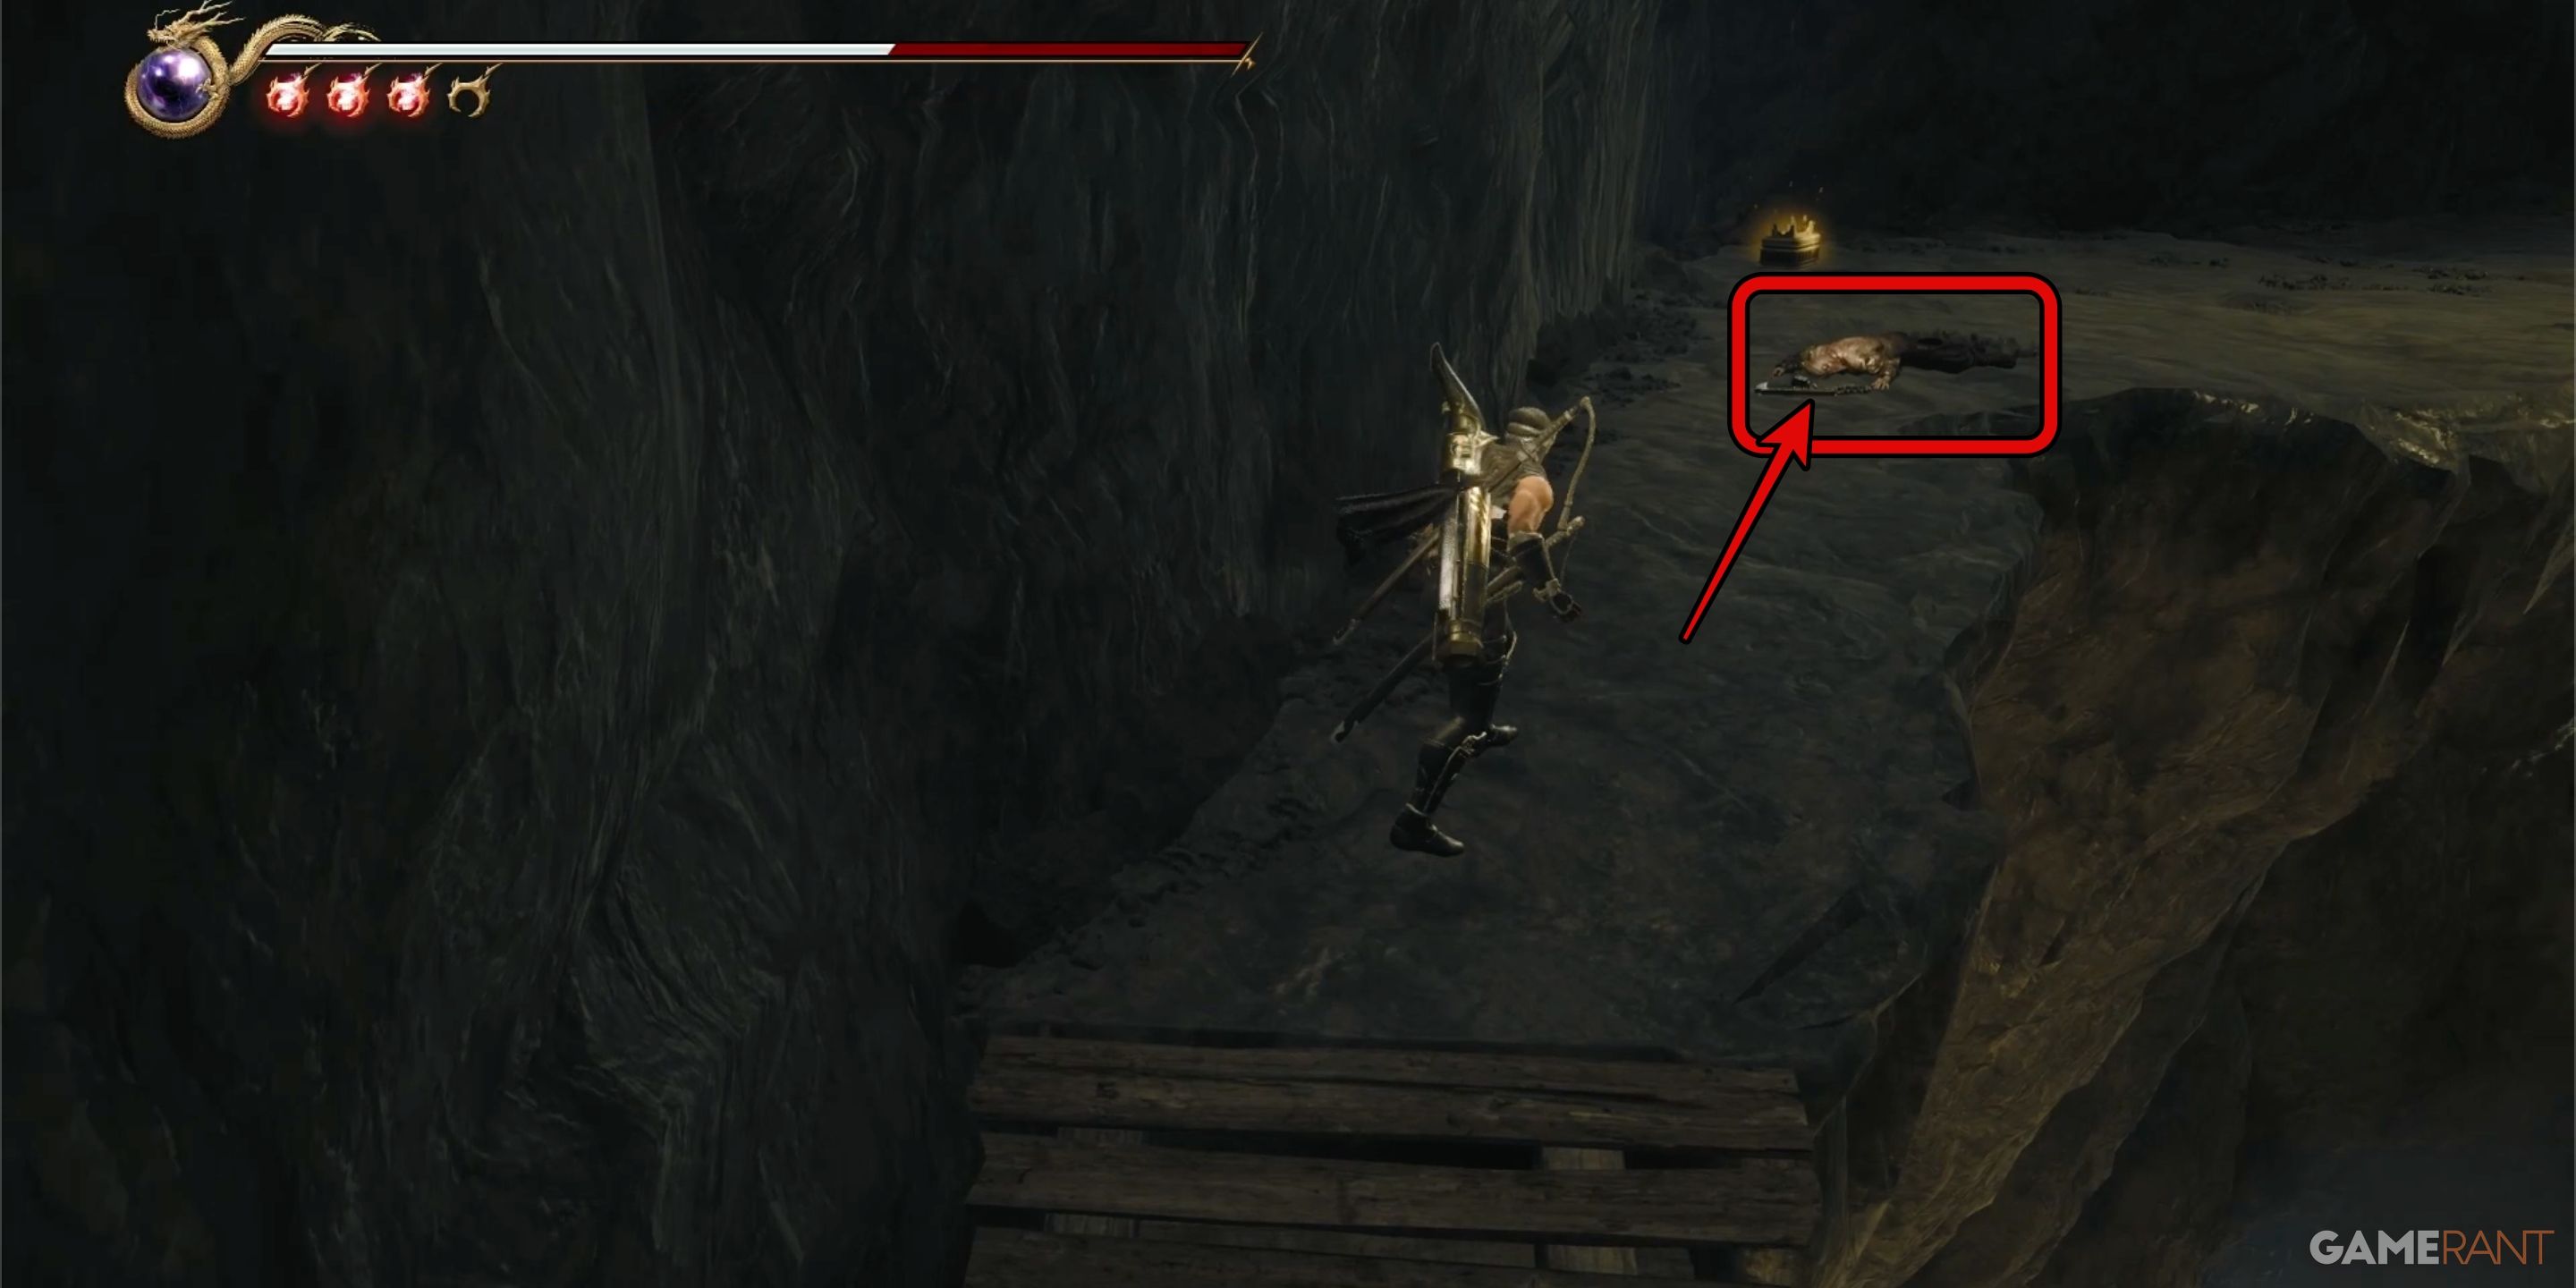
In Chapter 7, you’ll discover the “Demon Seal’s Treasure” immediately after passing the initial save point. Following your departure from the subterranean cave, navigate through a narrow earth tunnel that gradually expands. Along this tunnel, you’ll encounter several tiny, scorpion-like creatures that will attempt to attack you. Defeat them and search for a deceased body where you can find the treasure hidden inside.
Gogmagog Boss Fight:

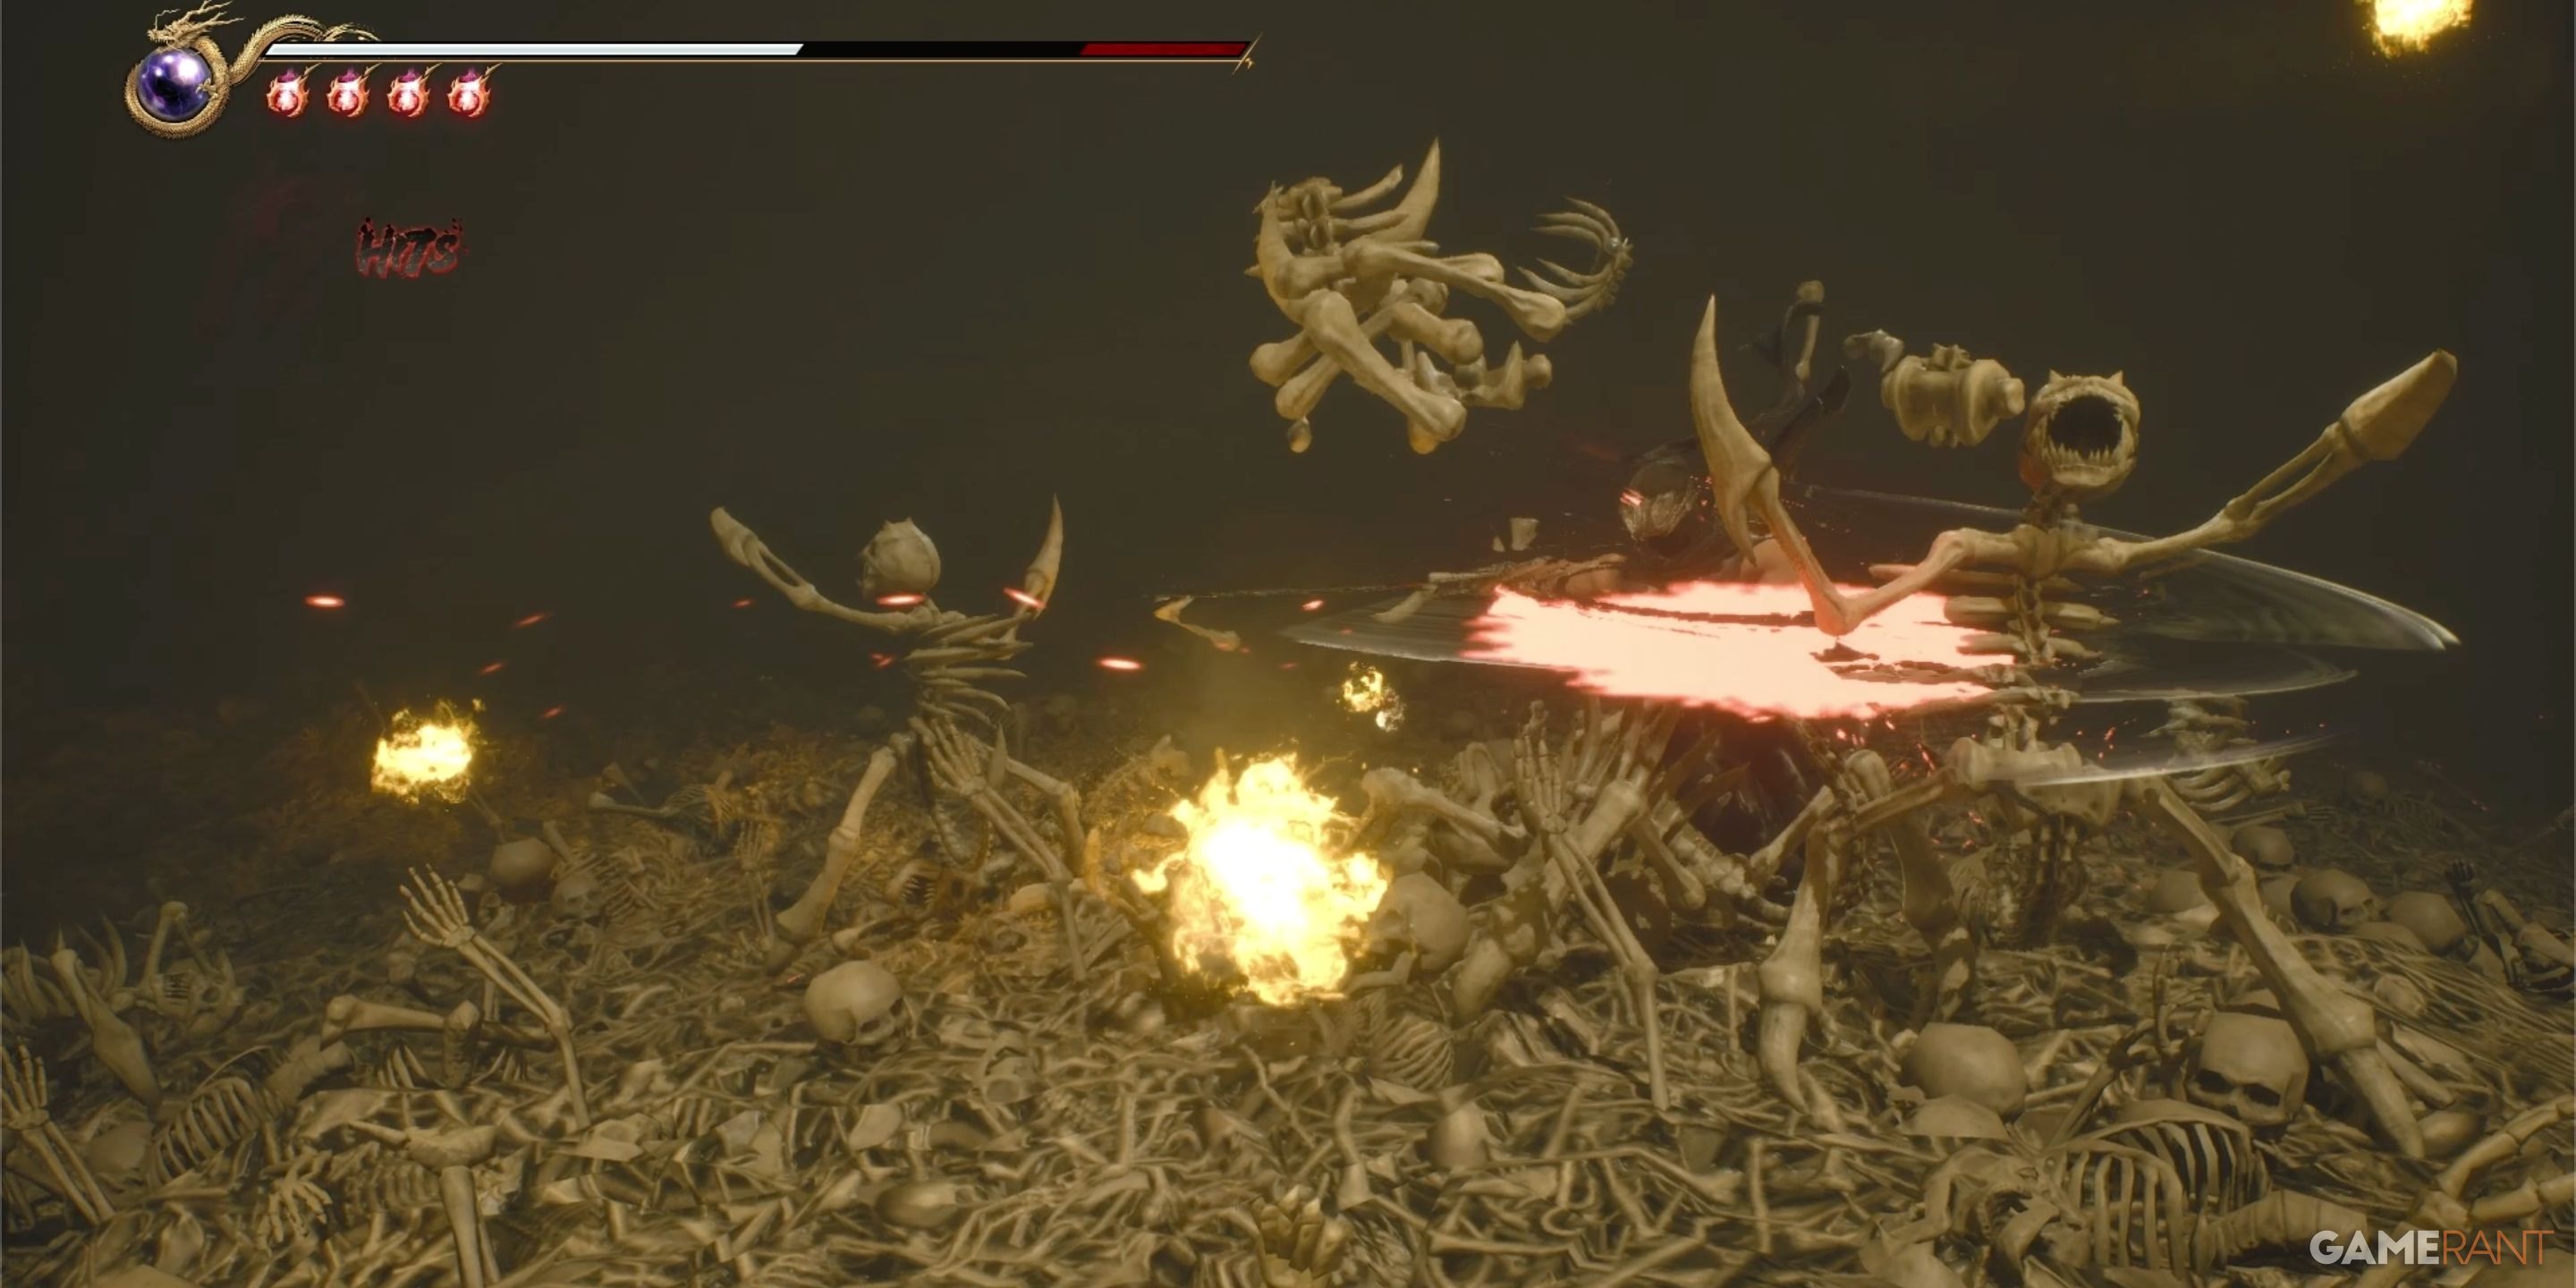
Leaving the earth-filled passage, you’ll stumble upon a towering mound of bone fragments. Ascend this heap and brace yourself for an onslaught of numerous scorpion foes. Overpower them all, and a cinematic sequence will unfold automatically. Post the scene, the formidable figure of Gogmagog will rise from the pile of bones.
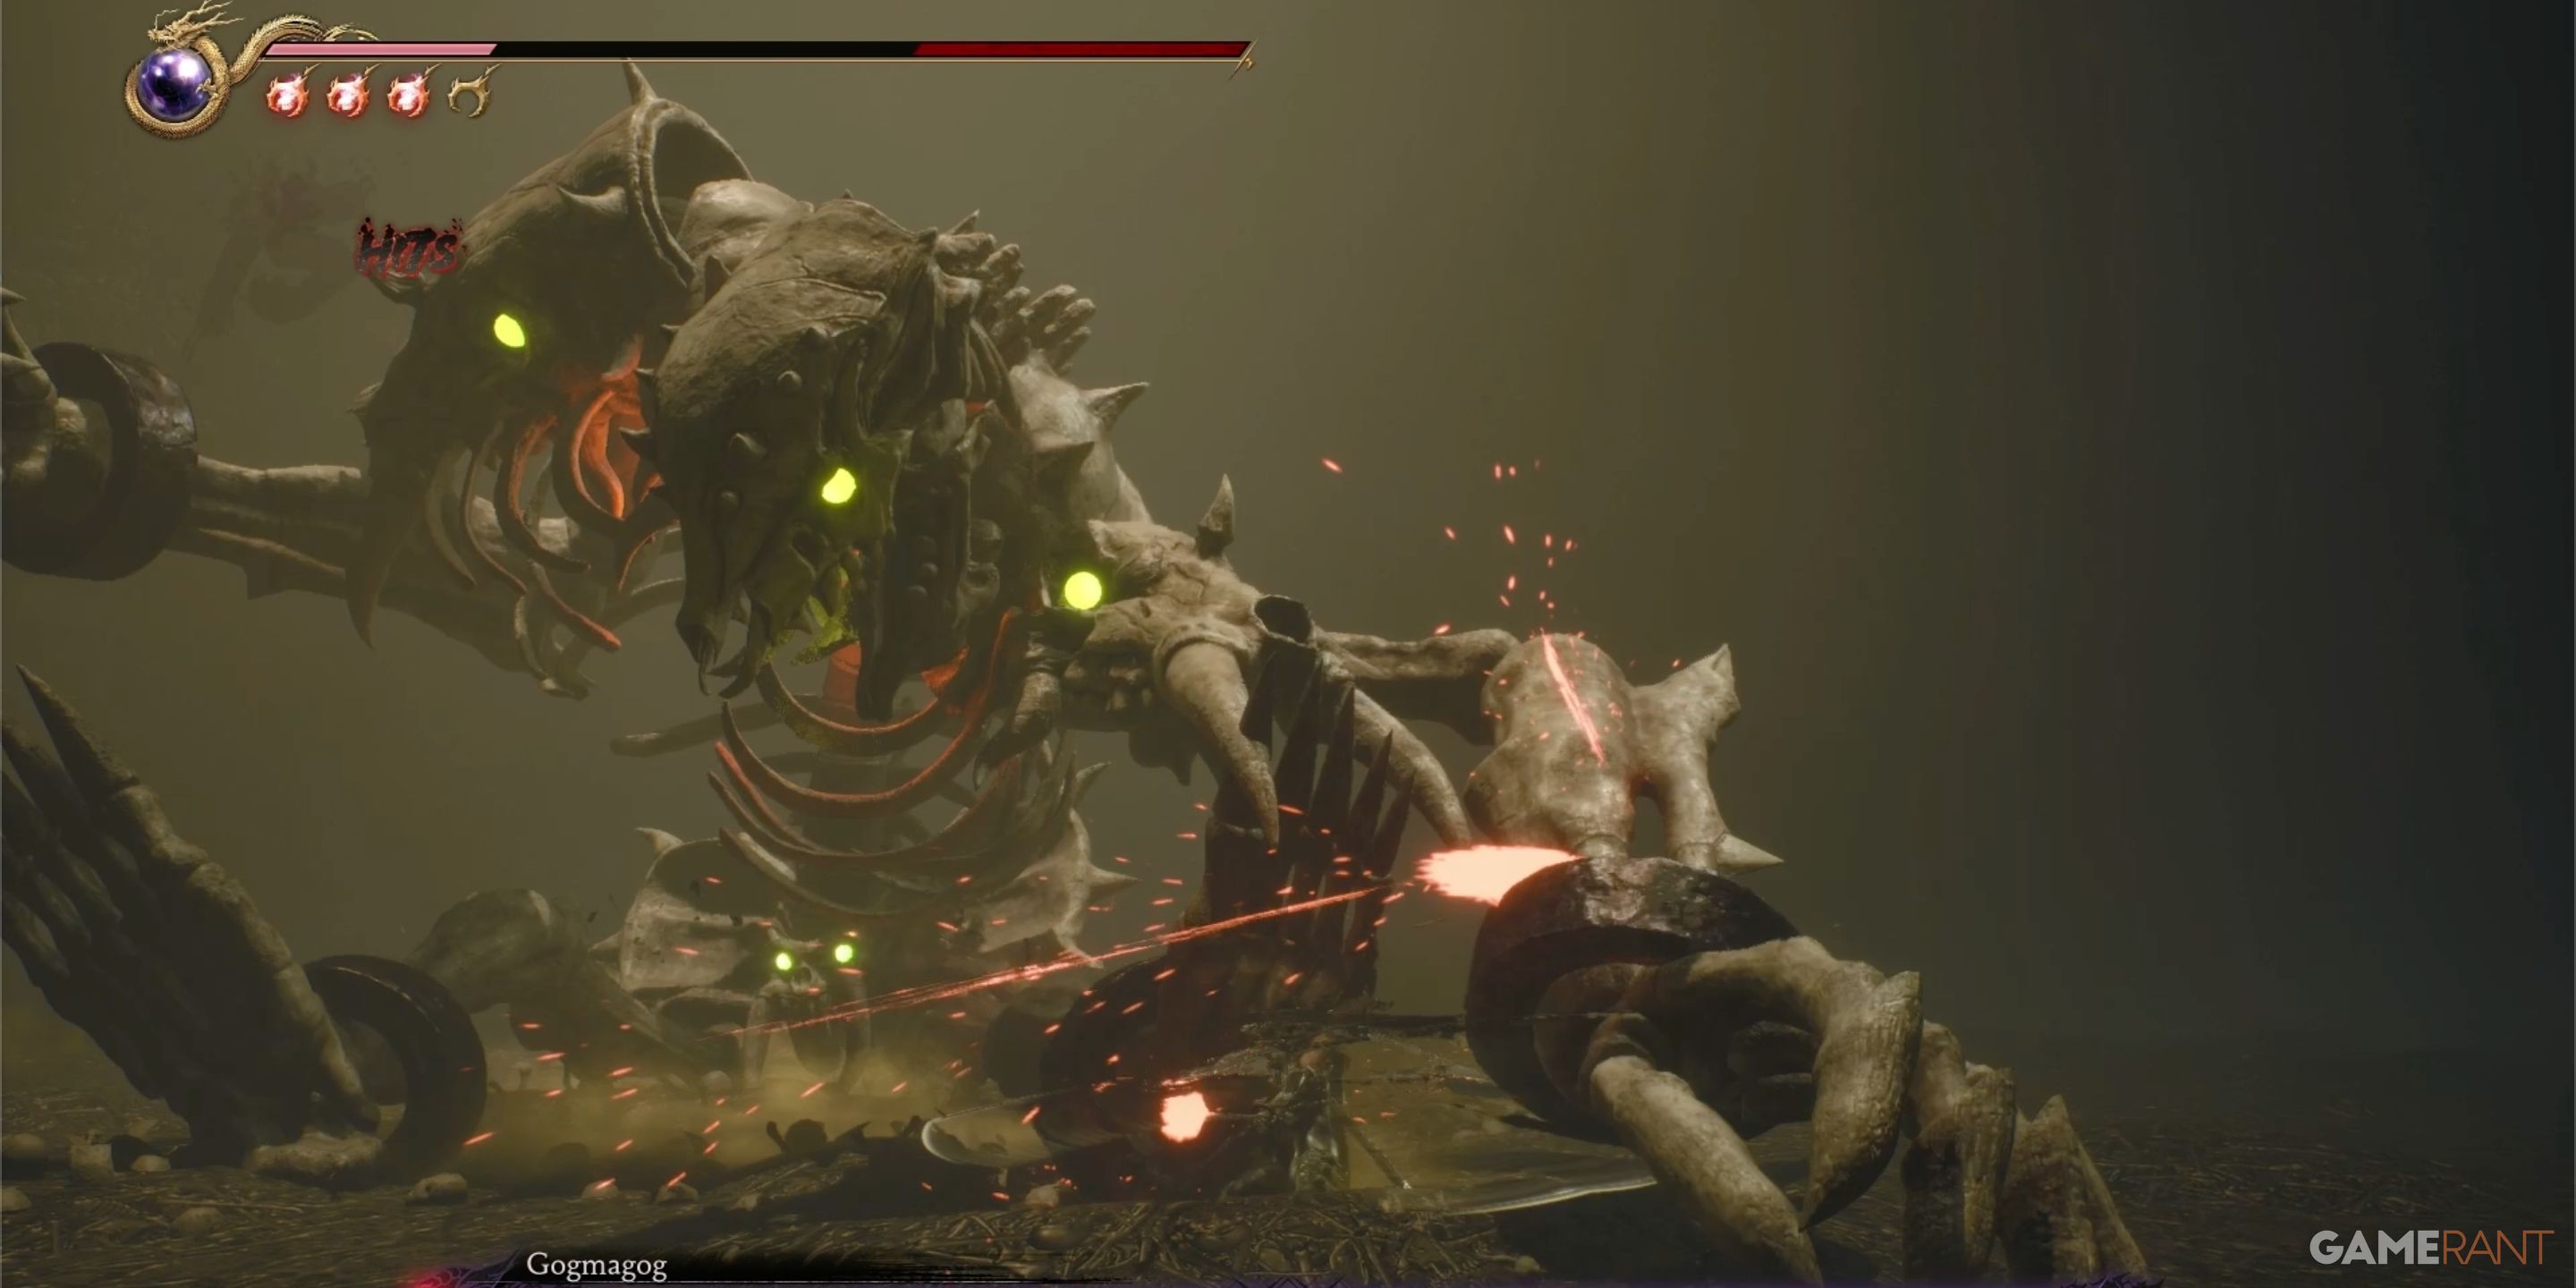
In simpler terms, Gogmagog is relatively easy to defeat if you focus on its legs. Once it’s toppled over, take advantage by inflicting heavy damage. But remember to be patient, as Gogmagog can deal massive harm if you recklessly attack without any defense. So, keep blocking and dodging until you get a good opportunity to target its feet or legs.
New Weapon – Kusari-gama:
After overcoming Gogmagog and letting the pile of bones settle, look for a previously hidden wall-jumping route that will guide you towards the escape path. Proceed up this path, and once you’ve crossed the missing part using a wall-run, you’ll find the body bearing the Kusari-gama nearby. Don’t forget to grab the yellow currency orbs from the nearby chest right after the dead body.
Save Point 2:
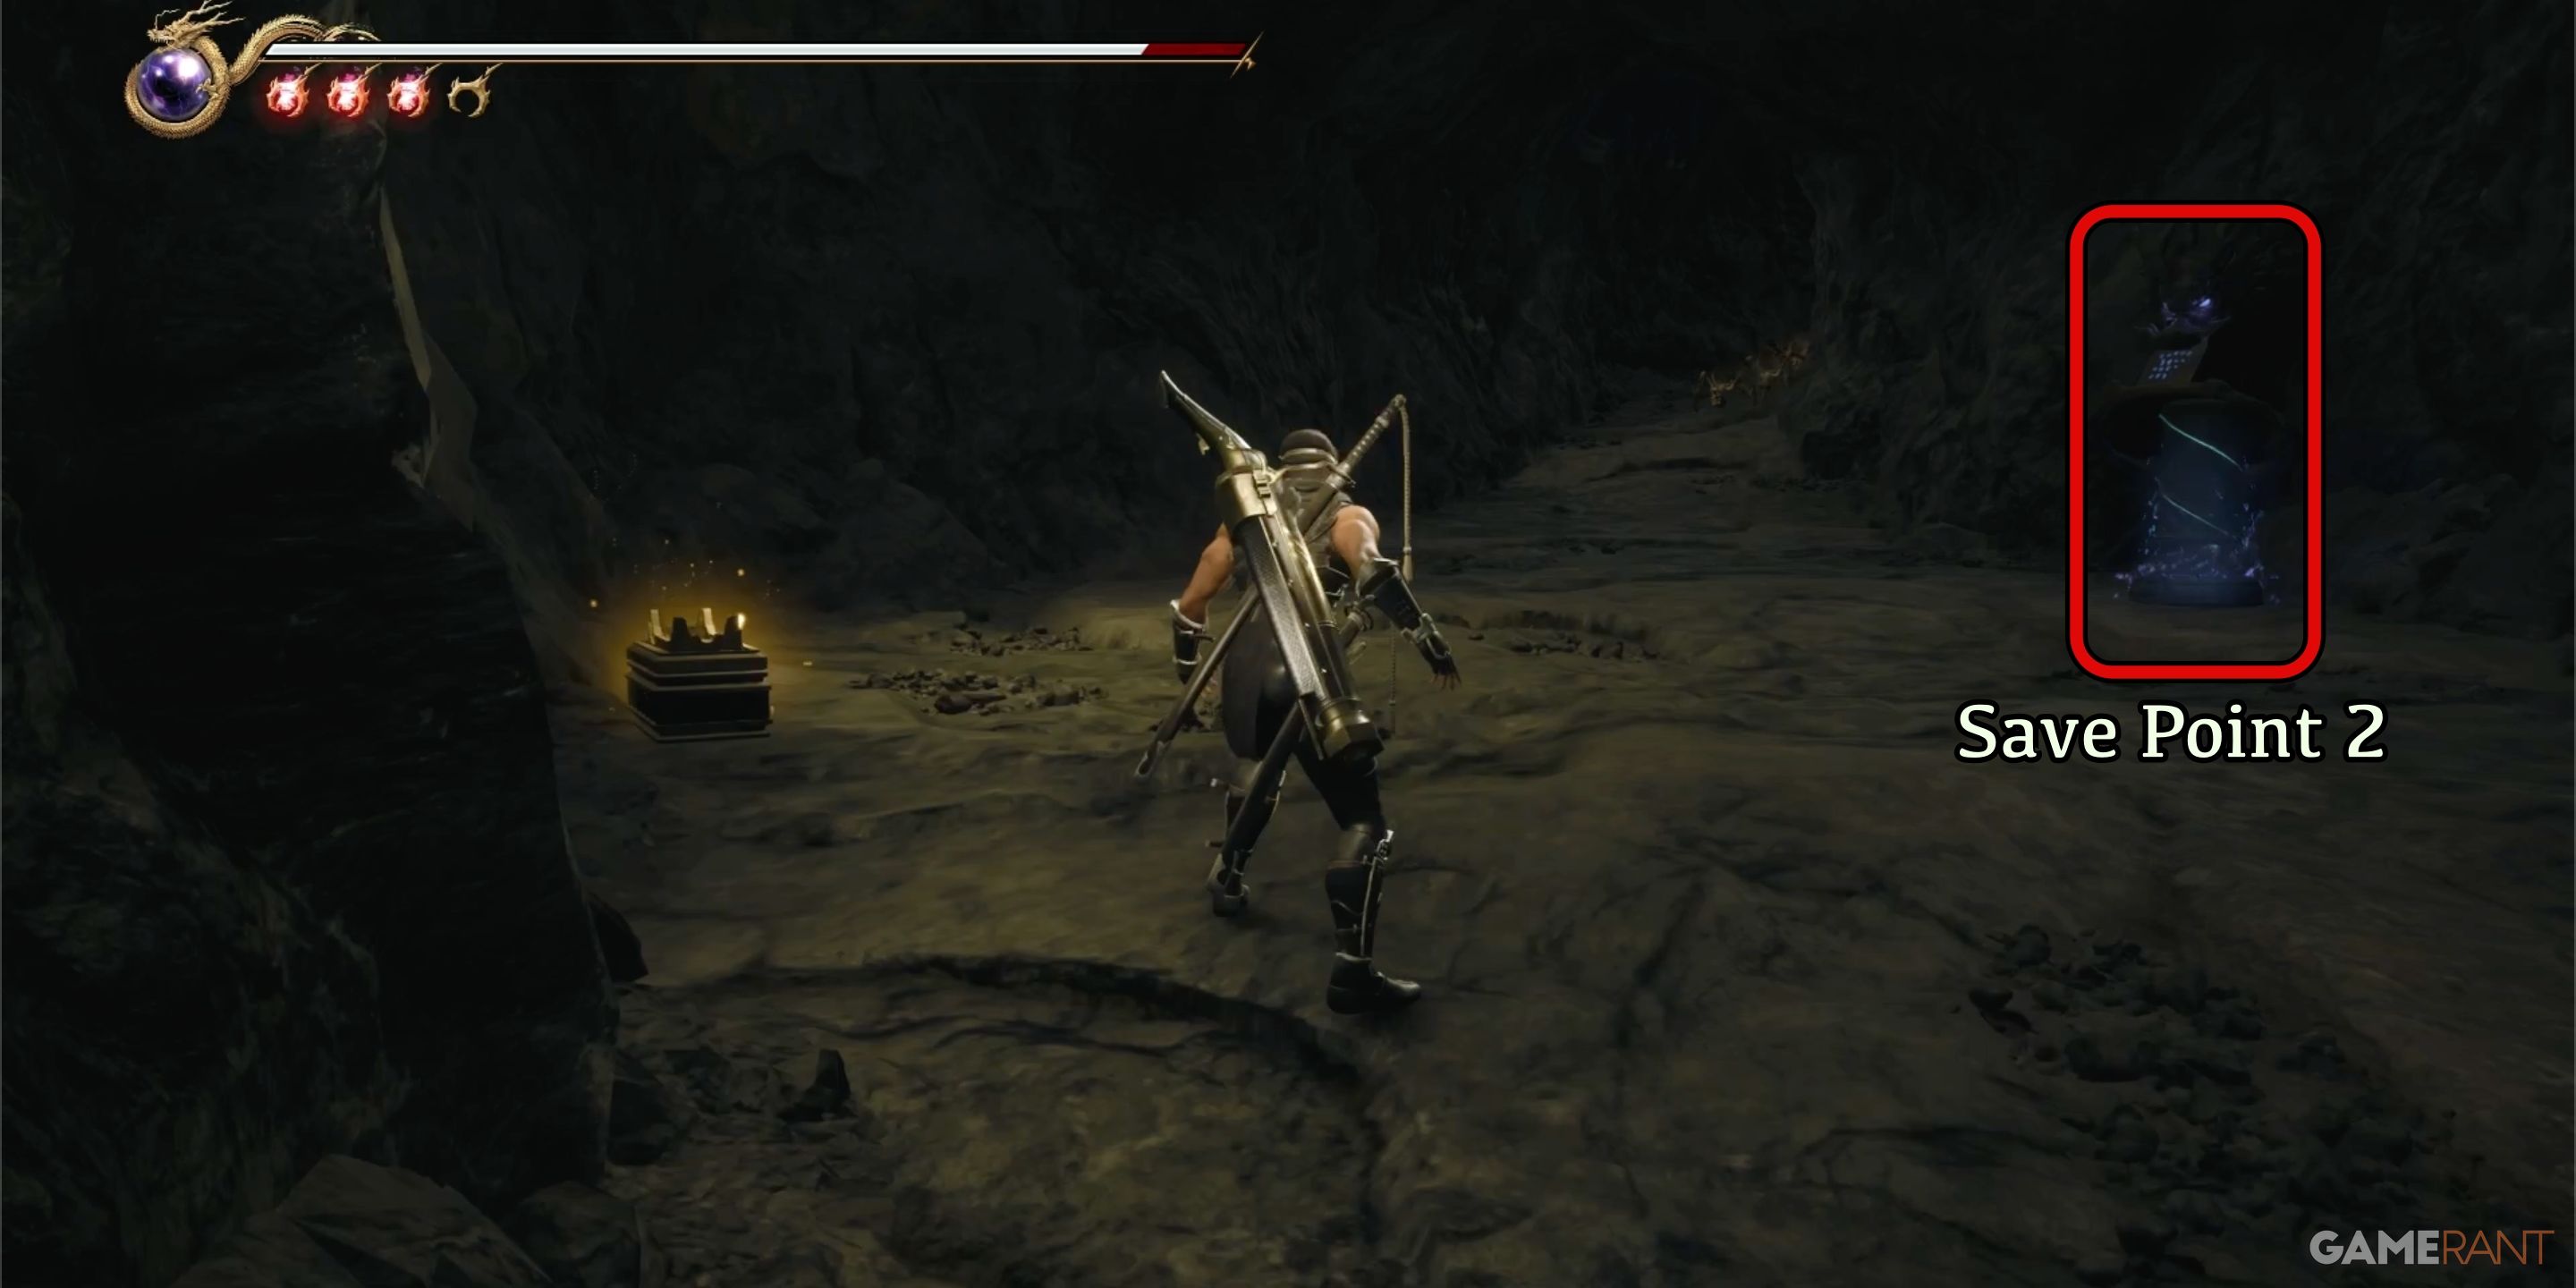
Keep walking along the path until you find a cozy little room, which serves as the second safe spot. Inside this room, there’s also a chest that holds an Herb of Spiritual Life.
Save Point 3, Muramasa Shop & Crystal Skull 2:
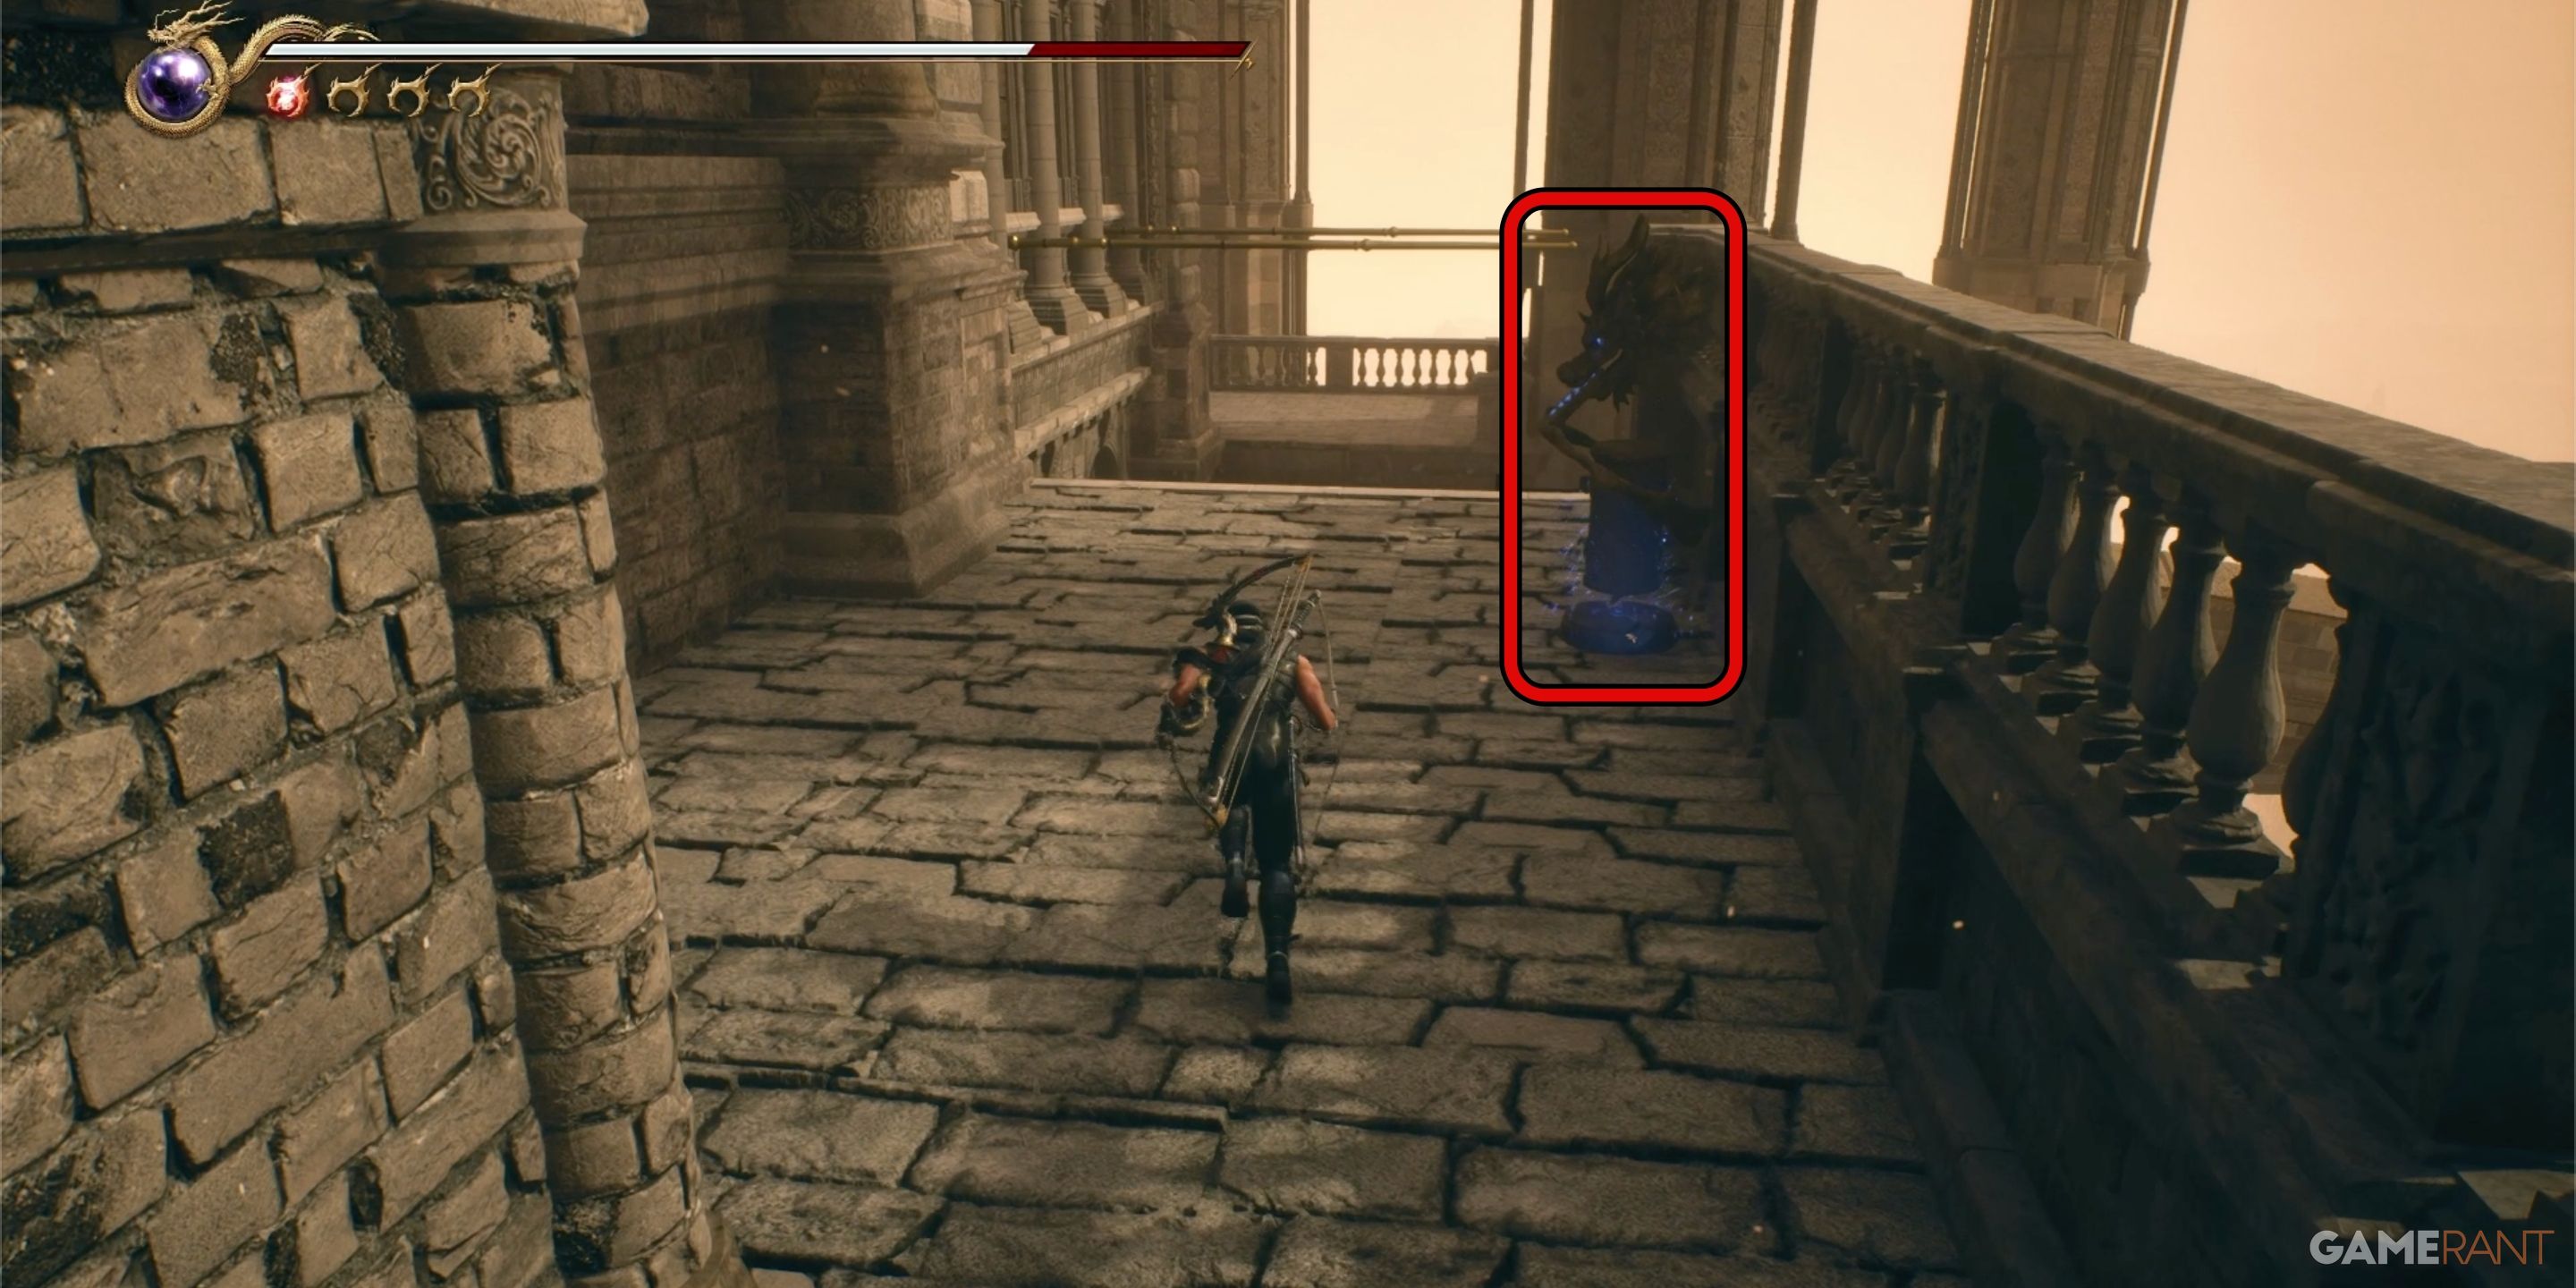
Once you reach the second safe spot within the cave, it’s just a short walk along the path leading out of the cave and onto the castle walls. As soon as you step outside the cave, a scene will unfold. Upon recognizing your presence as a formidable opponent, Volf summons a massive tempest. Following the scene, locate the guillotine positioned near the entrance of the cave.
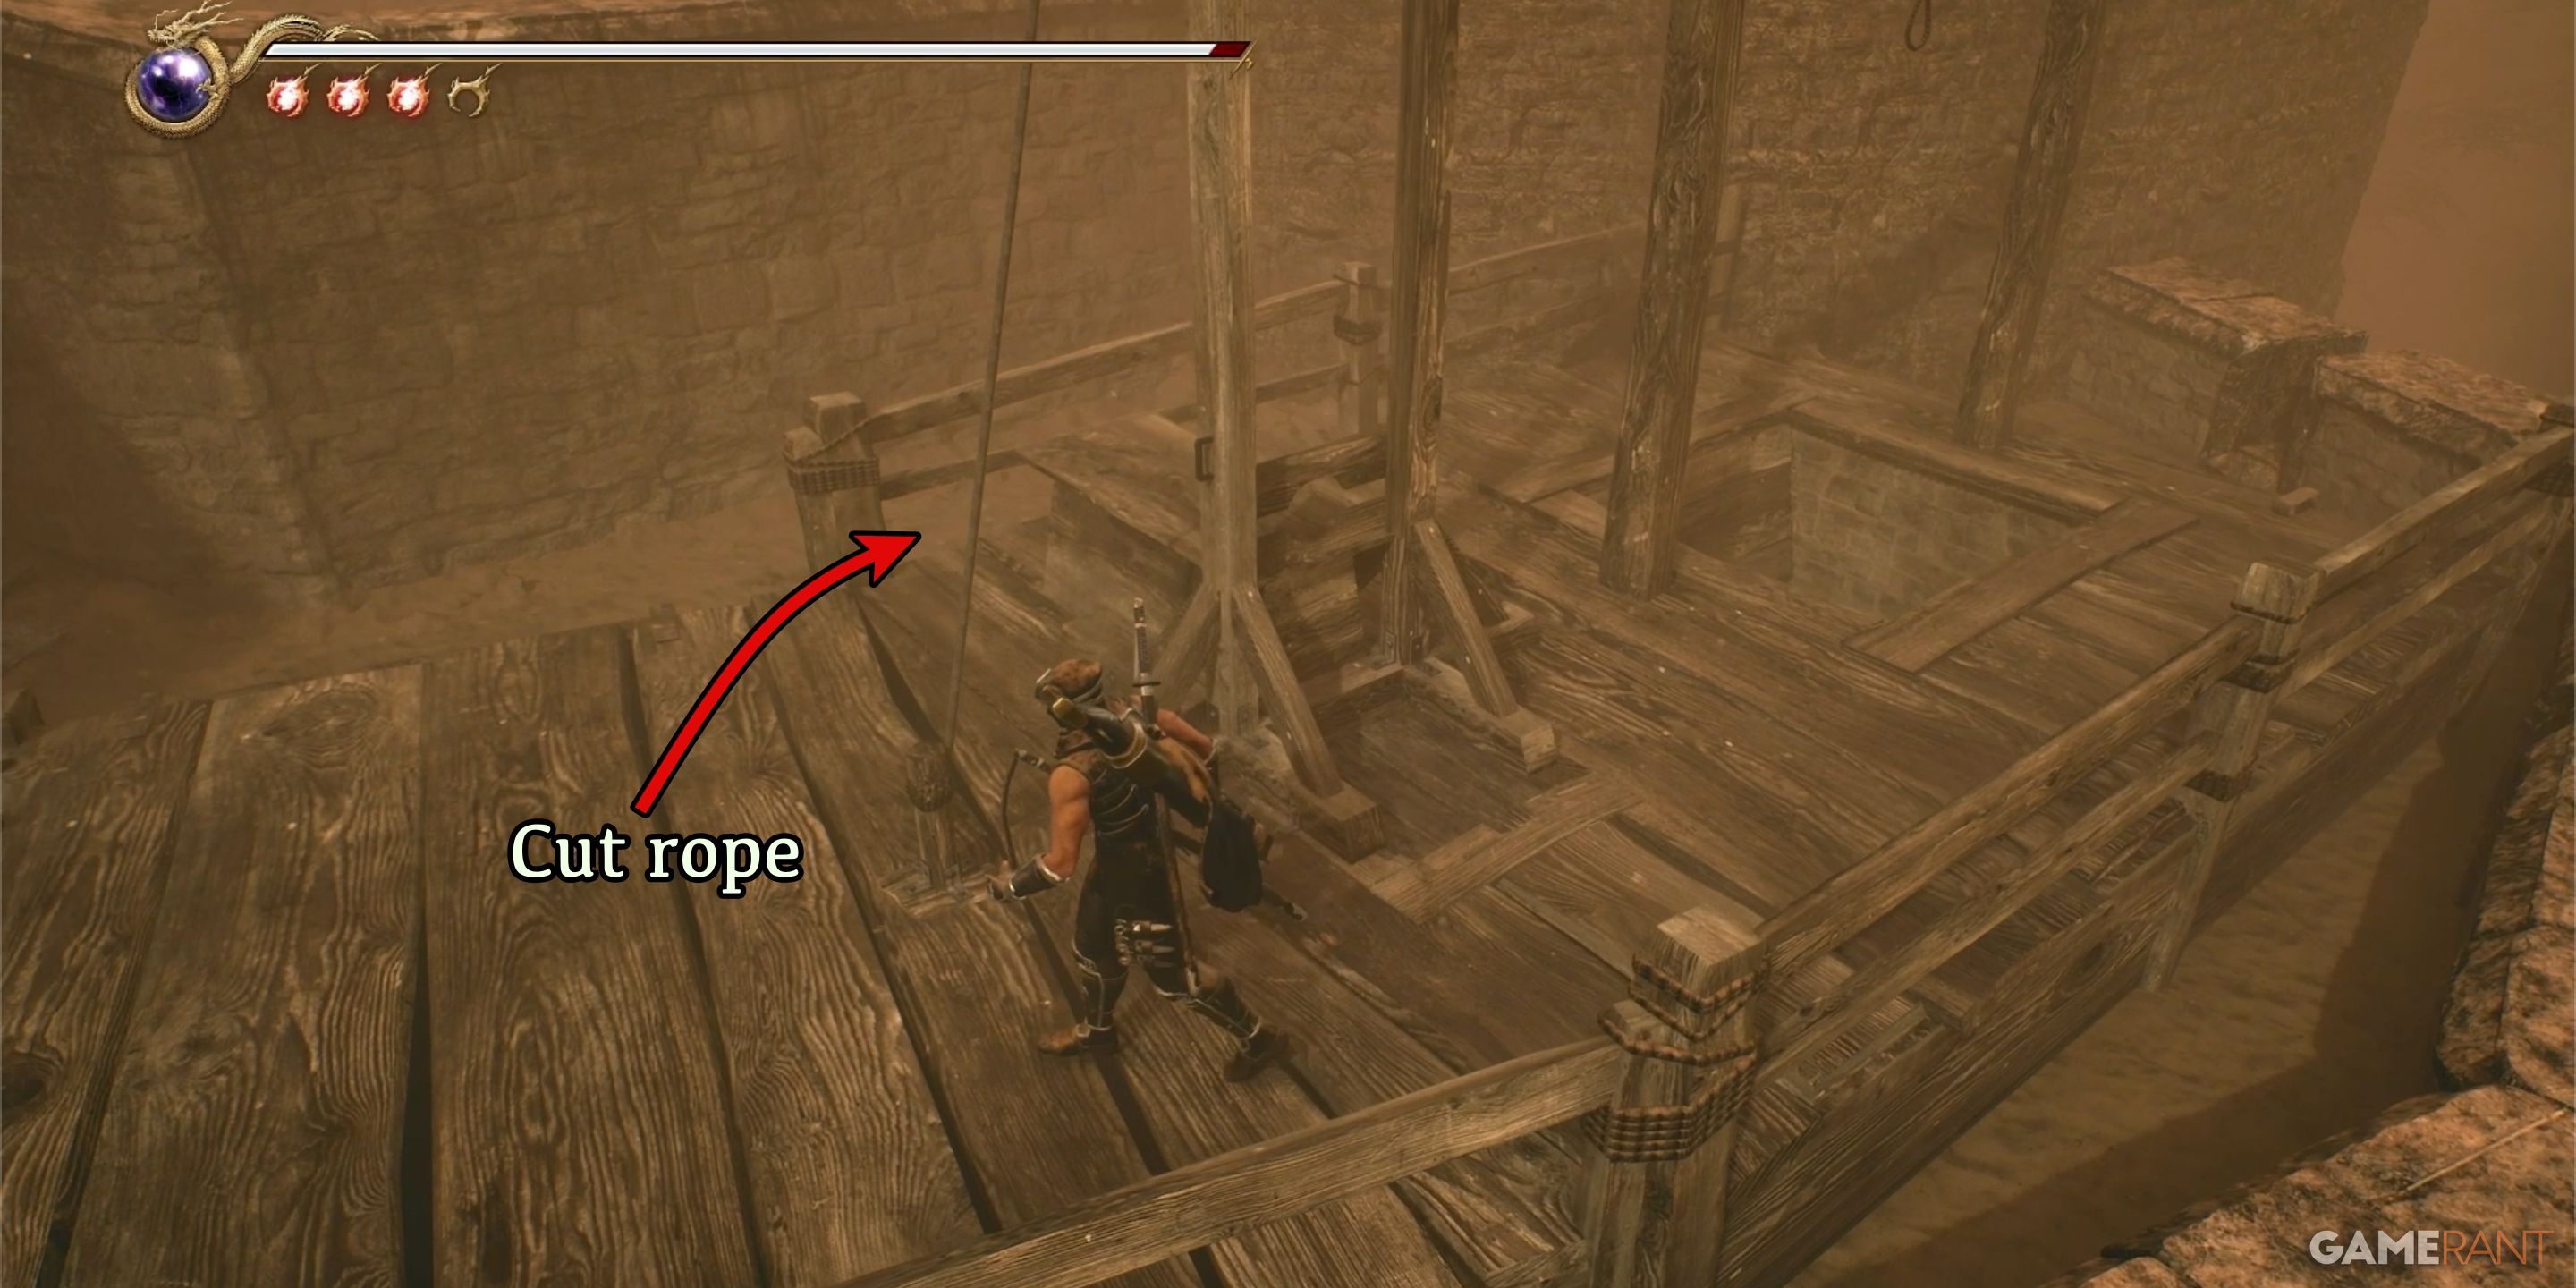
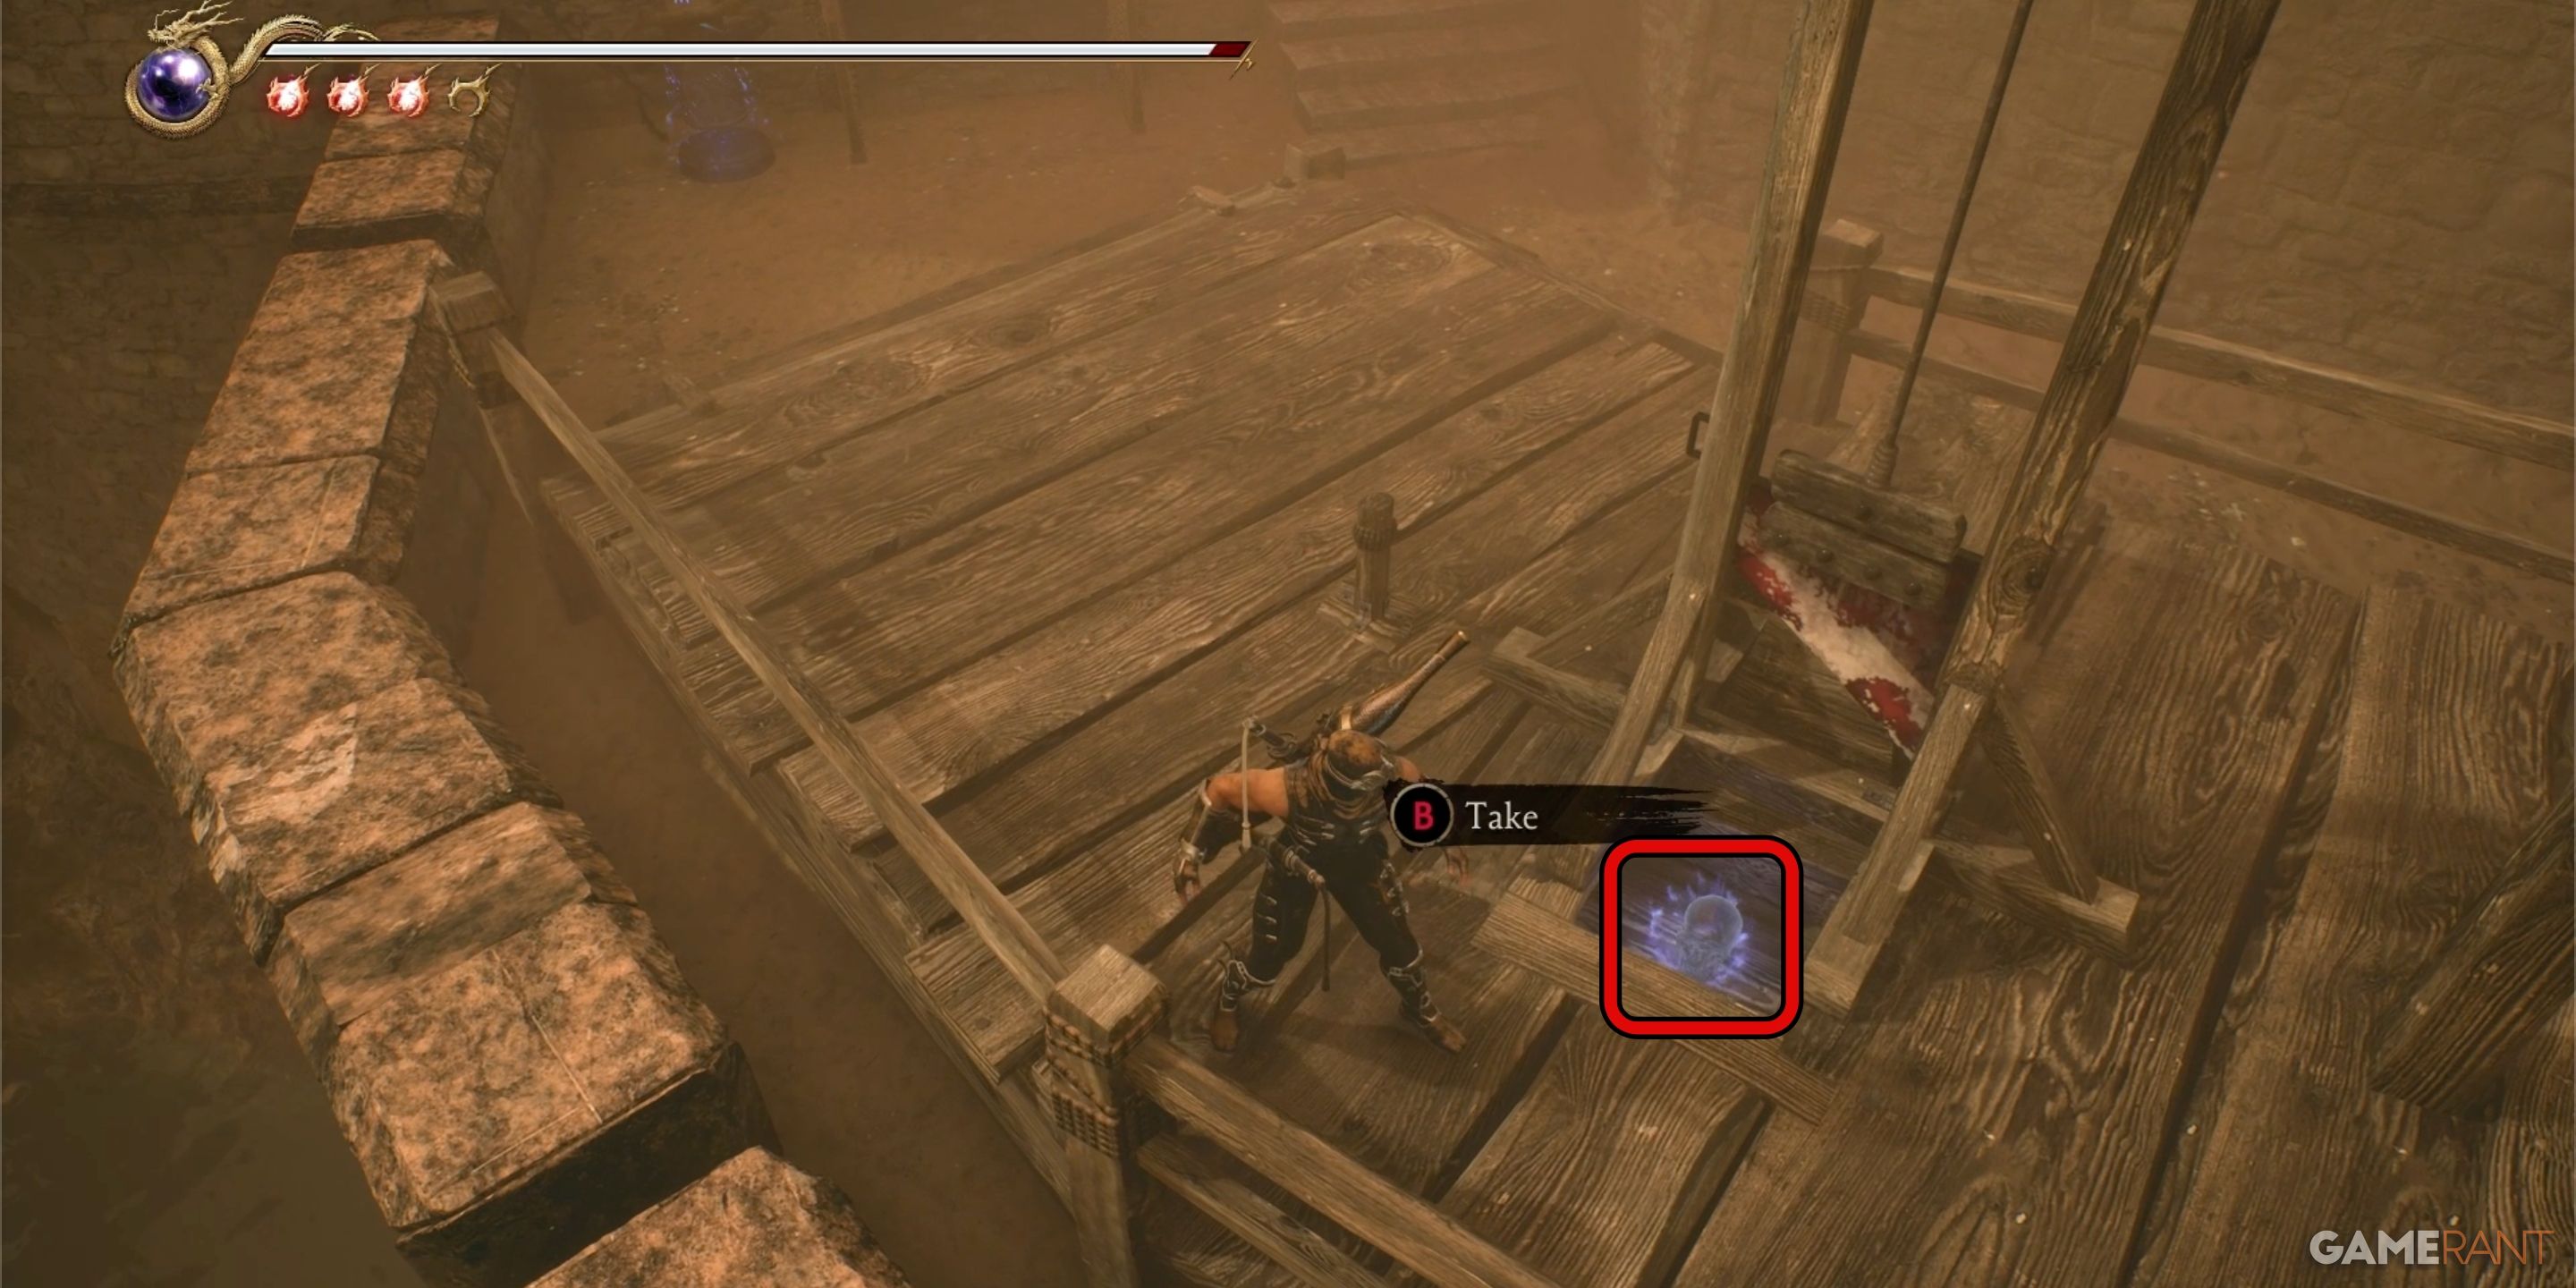
The guillotine features a rope tethering its blade. If you sever this rope, the blade will plummet, unveiling a concealed spot beneath the apparatus where the Crystal Skull 14 had been stowed away.
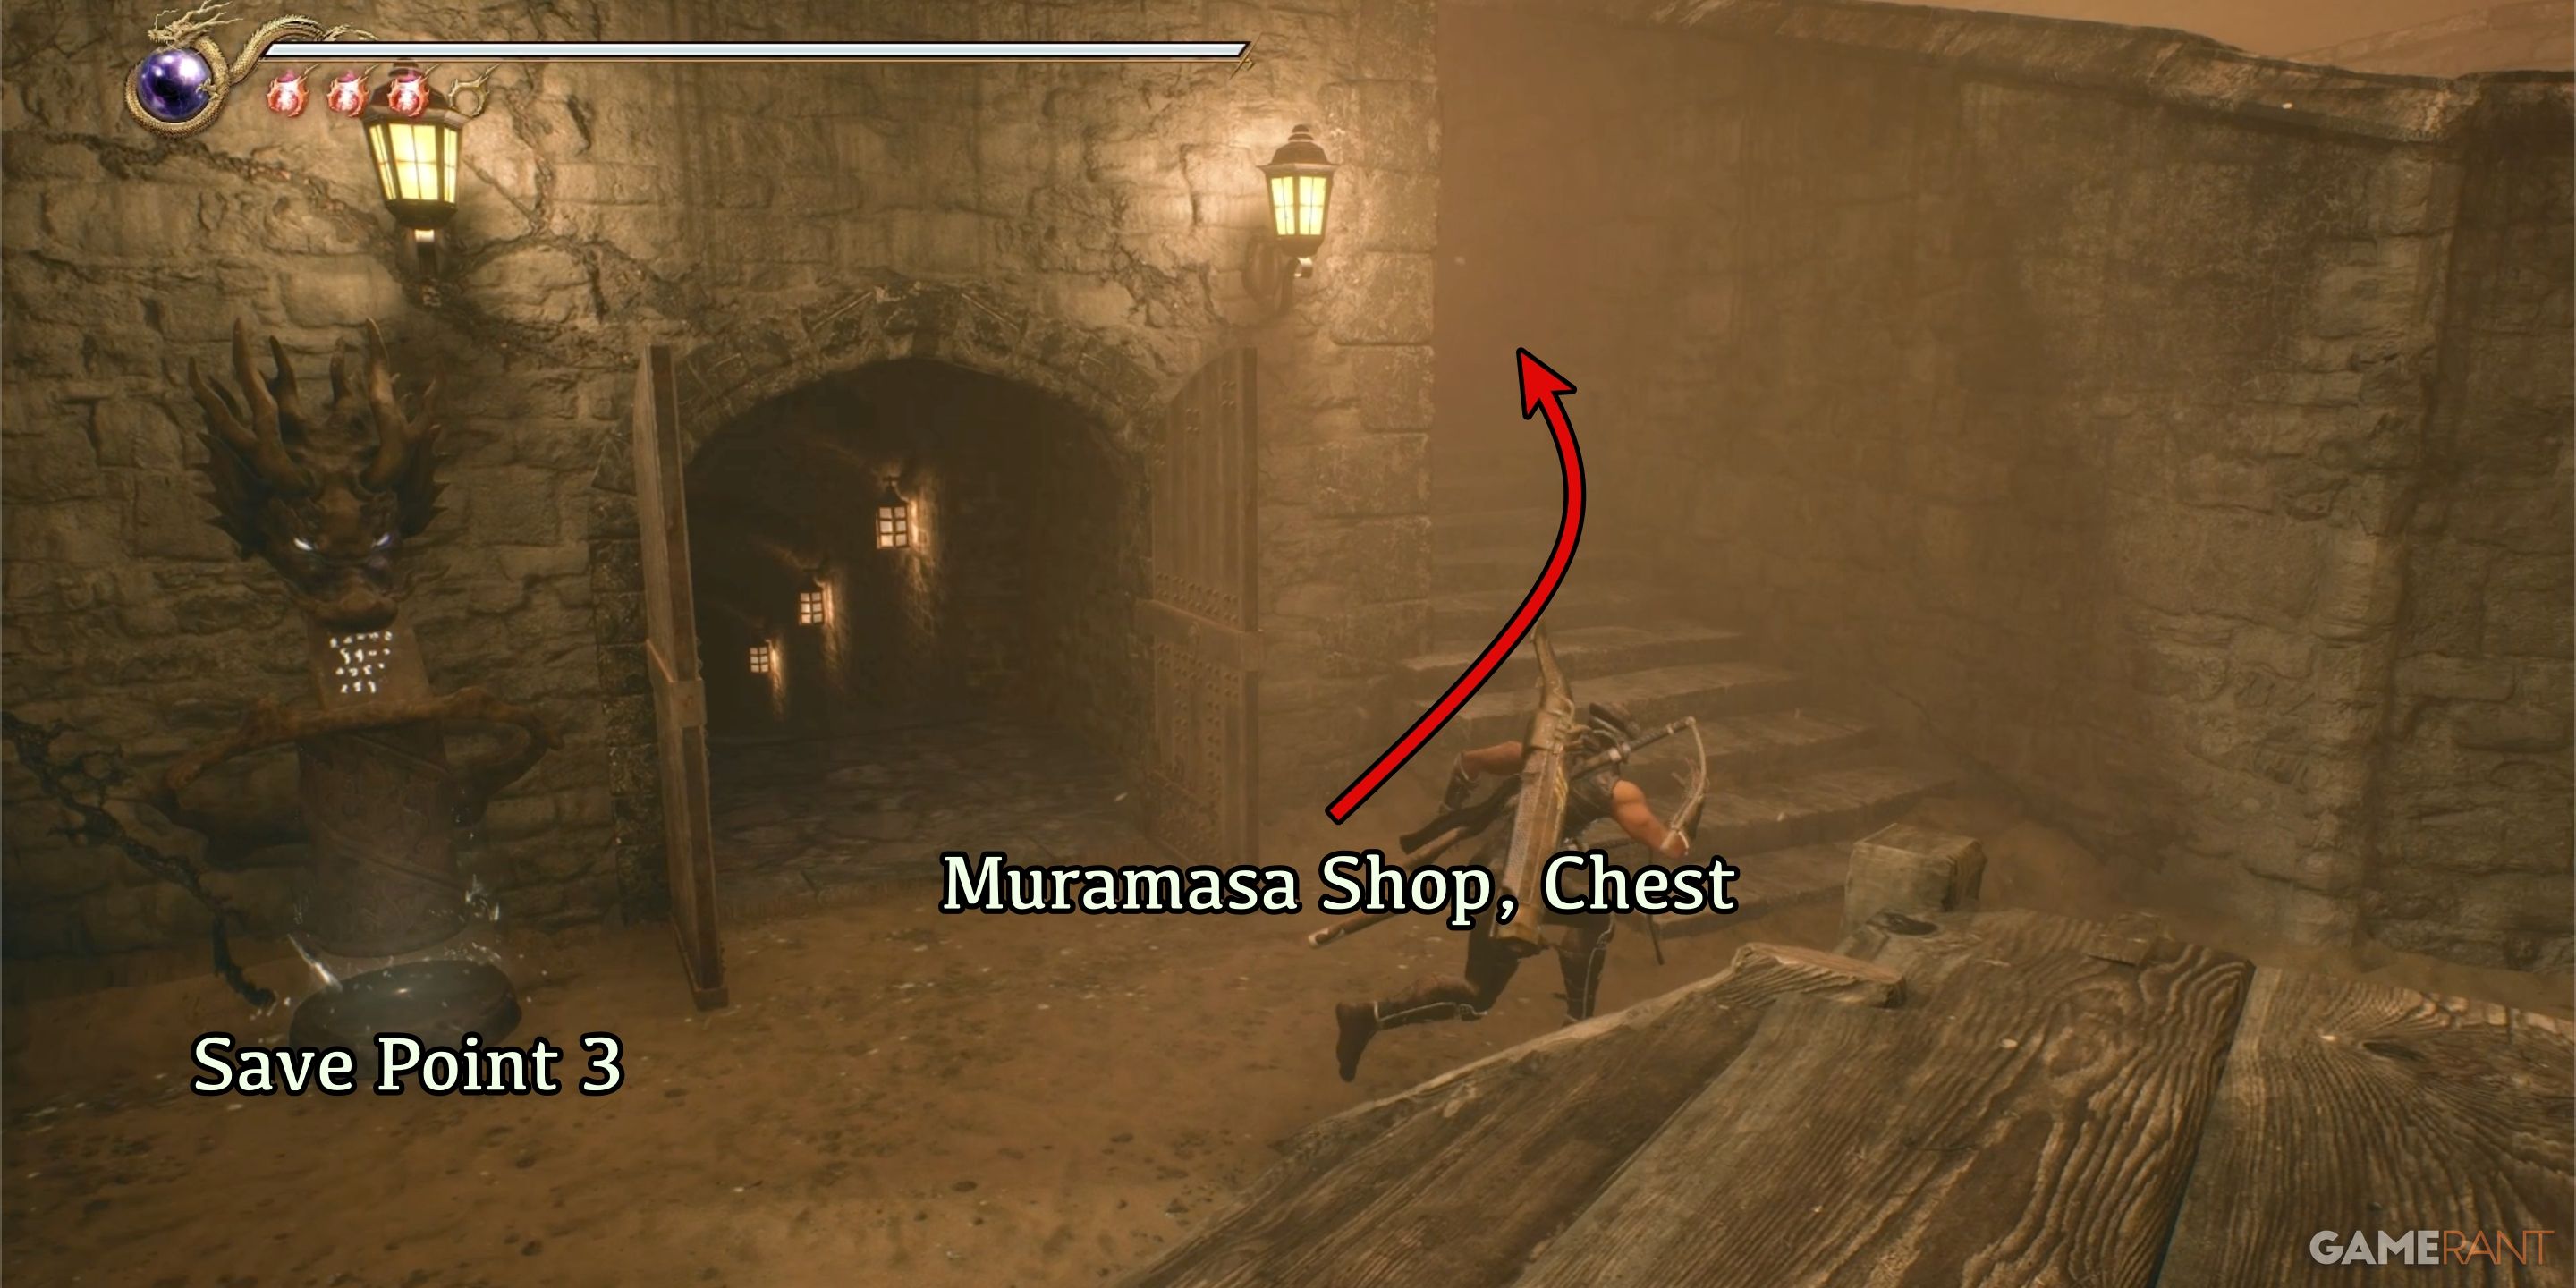
Following your acquisition of the skull, you’ll notice Save Point 3 situated not far, nestled by the doorway that opens onto a lengthy corridor below. You may choose to venture rightwards from the door and ascend the staircase to engage in a battle with a Muramasa Shop. Additionally, there’s a compact tower nearby, which you can scale. At the pinnacle of this tower lies a chest holding a valuable currency orb.
Chapter 7 Wakthrough Part 3 – Ninja Gaiden 2 Black
Save Point 4:
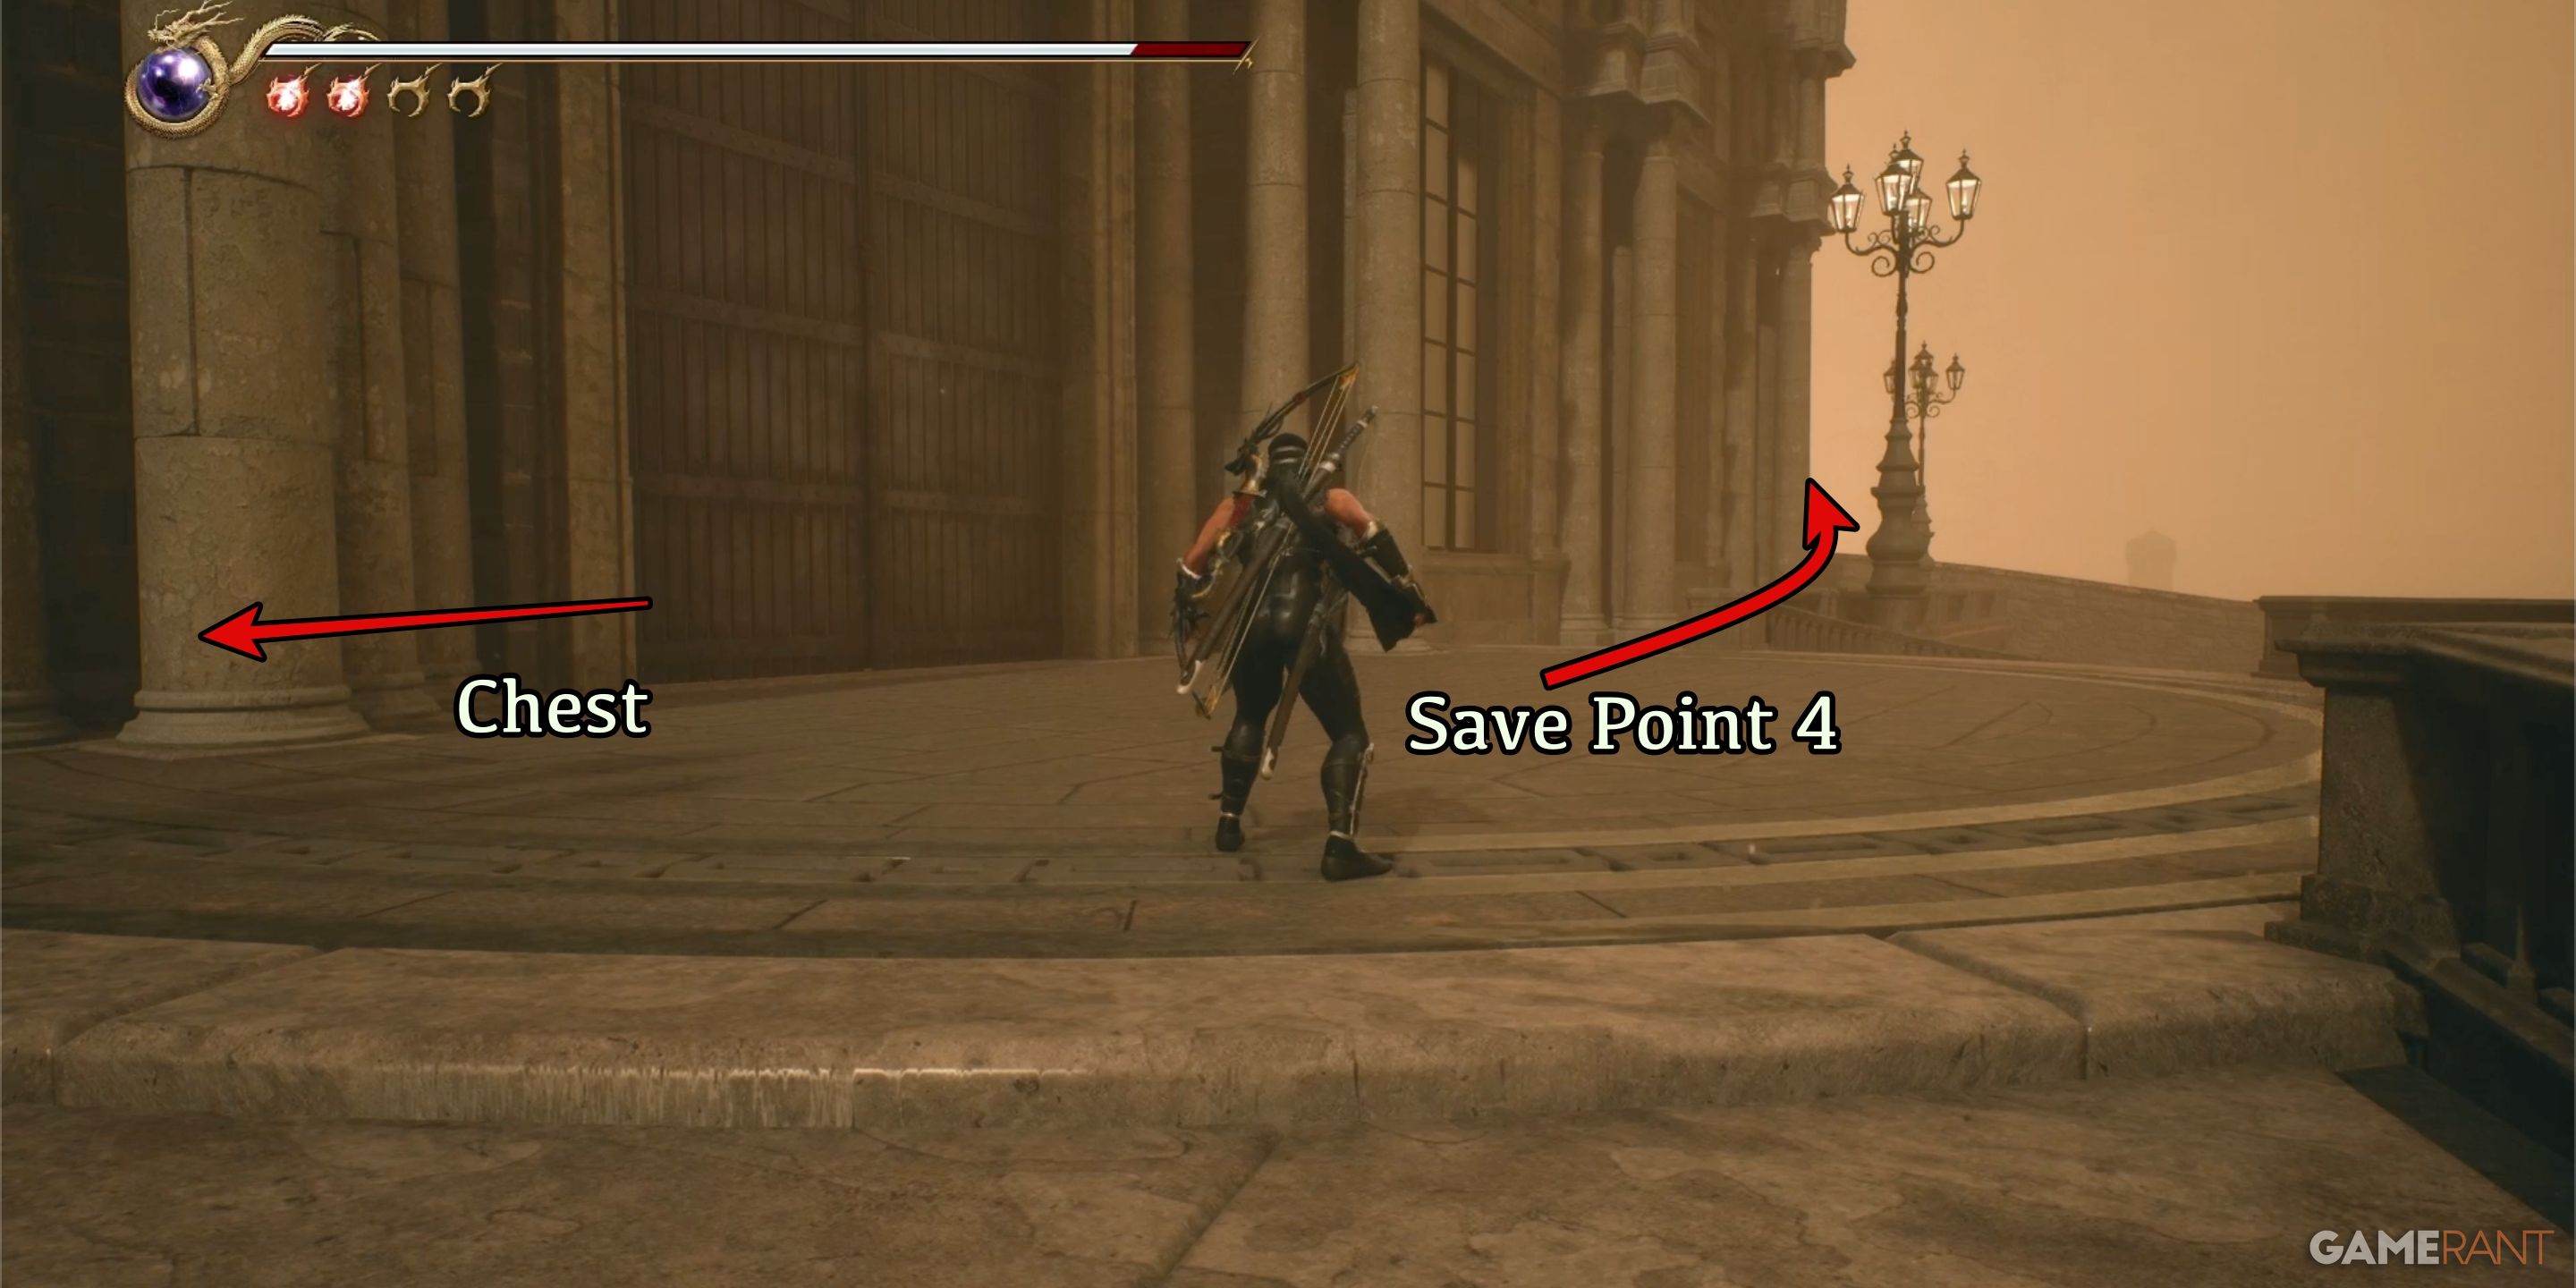
After departing from the third safe spot, your journey continues upward on a series of staircases until you stand before the imposing entrance of a substantial edifice. Upon drawing near to this colossal door, you find it barred, leaving no means of entry through the front. Should you glance to the left and right from the door, you’ll notice paths leading in both directions.

To your left lies a swift route ending at a dead-end, accompanied by a treasure chest filled with glowing red spheres. The path to your right curves gently towards the building’s side, leading you to Save Point 4.
Enter the Cathedral:
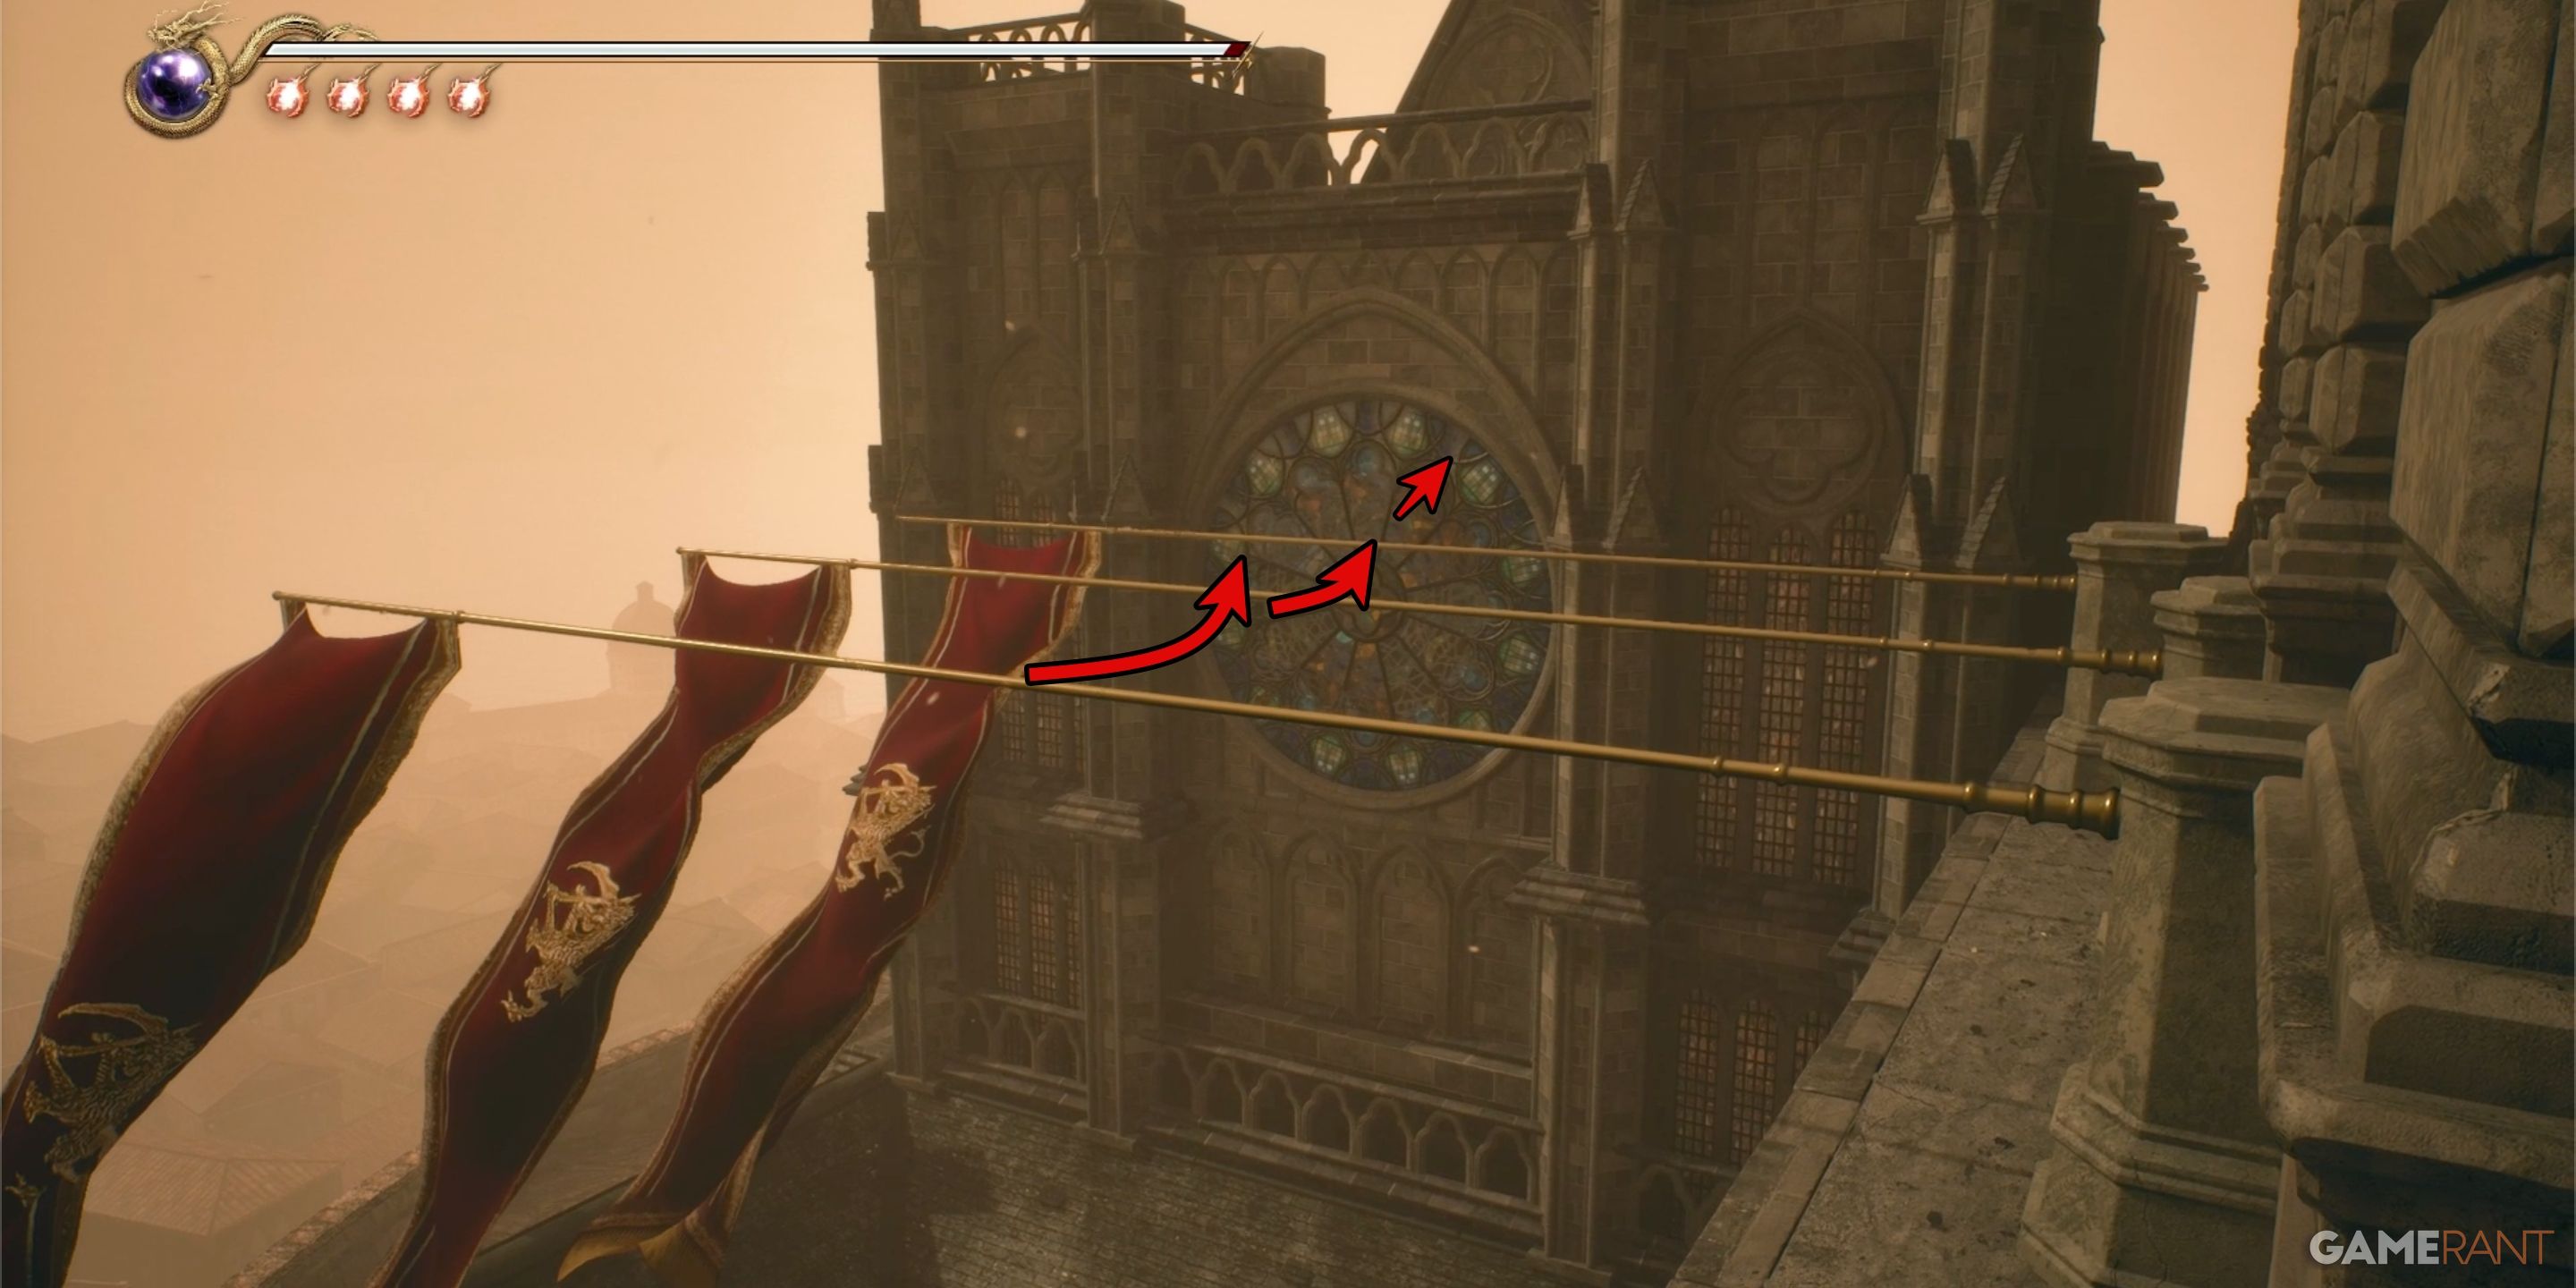
Starting from my last save at point 4, I scale the ladder and keep pressing forward, ascending to the rooftops. No collectibles are found until I reach the cathedral, so there’s no need for detours. As I journey upwards, I encounter numerous foes, so it’s crucial to stay alert and concentrate on defeating them.
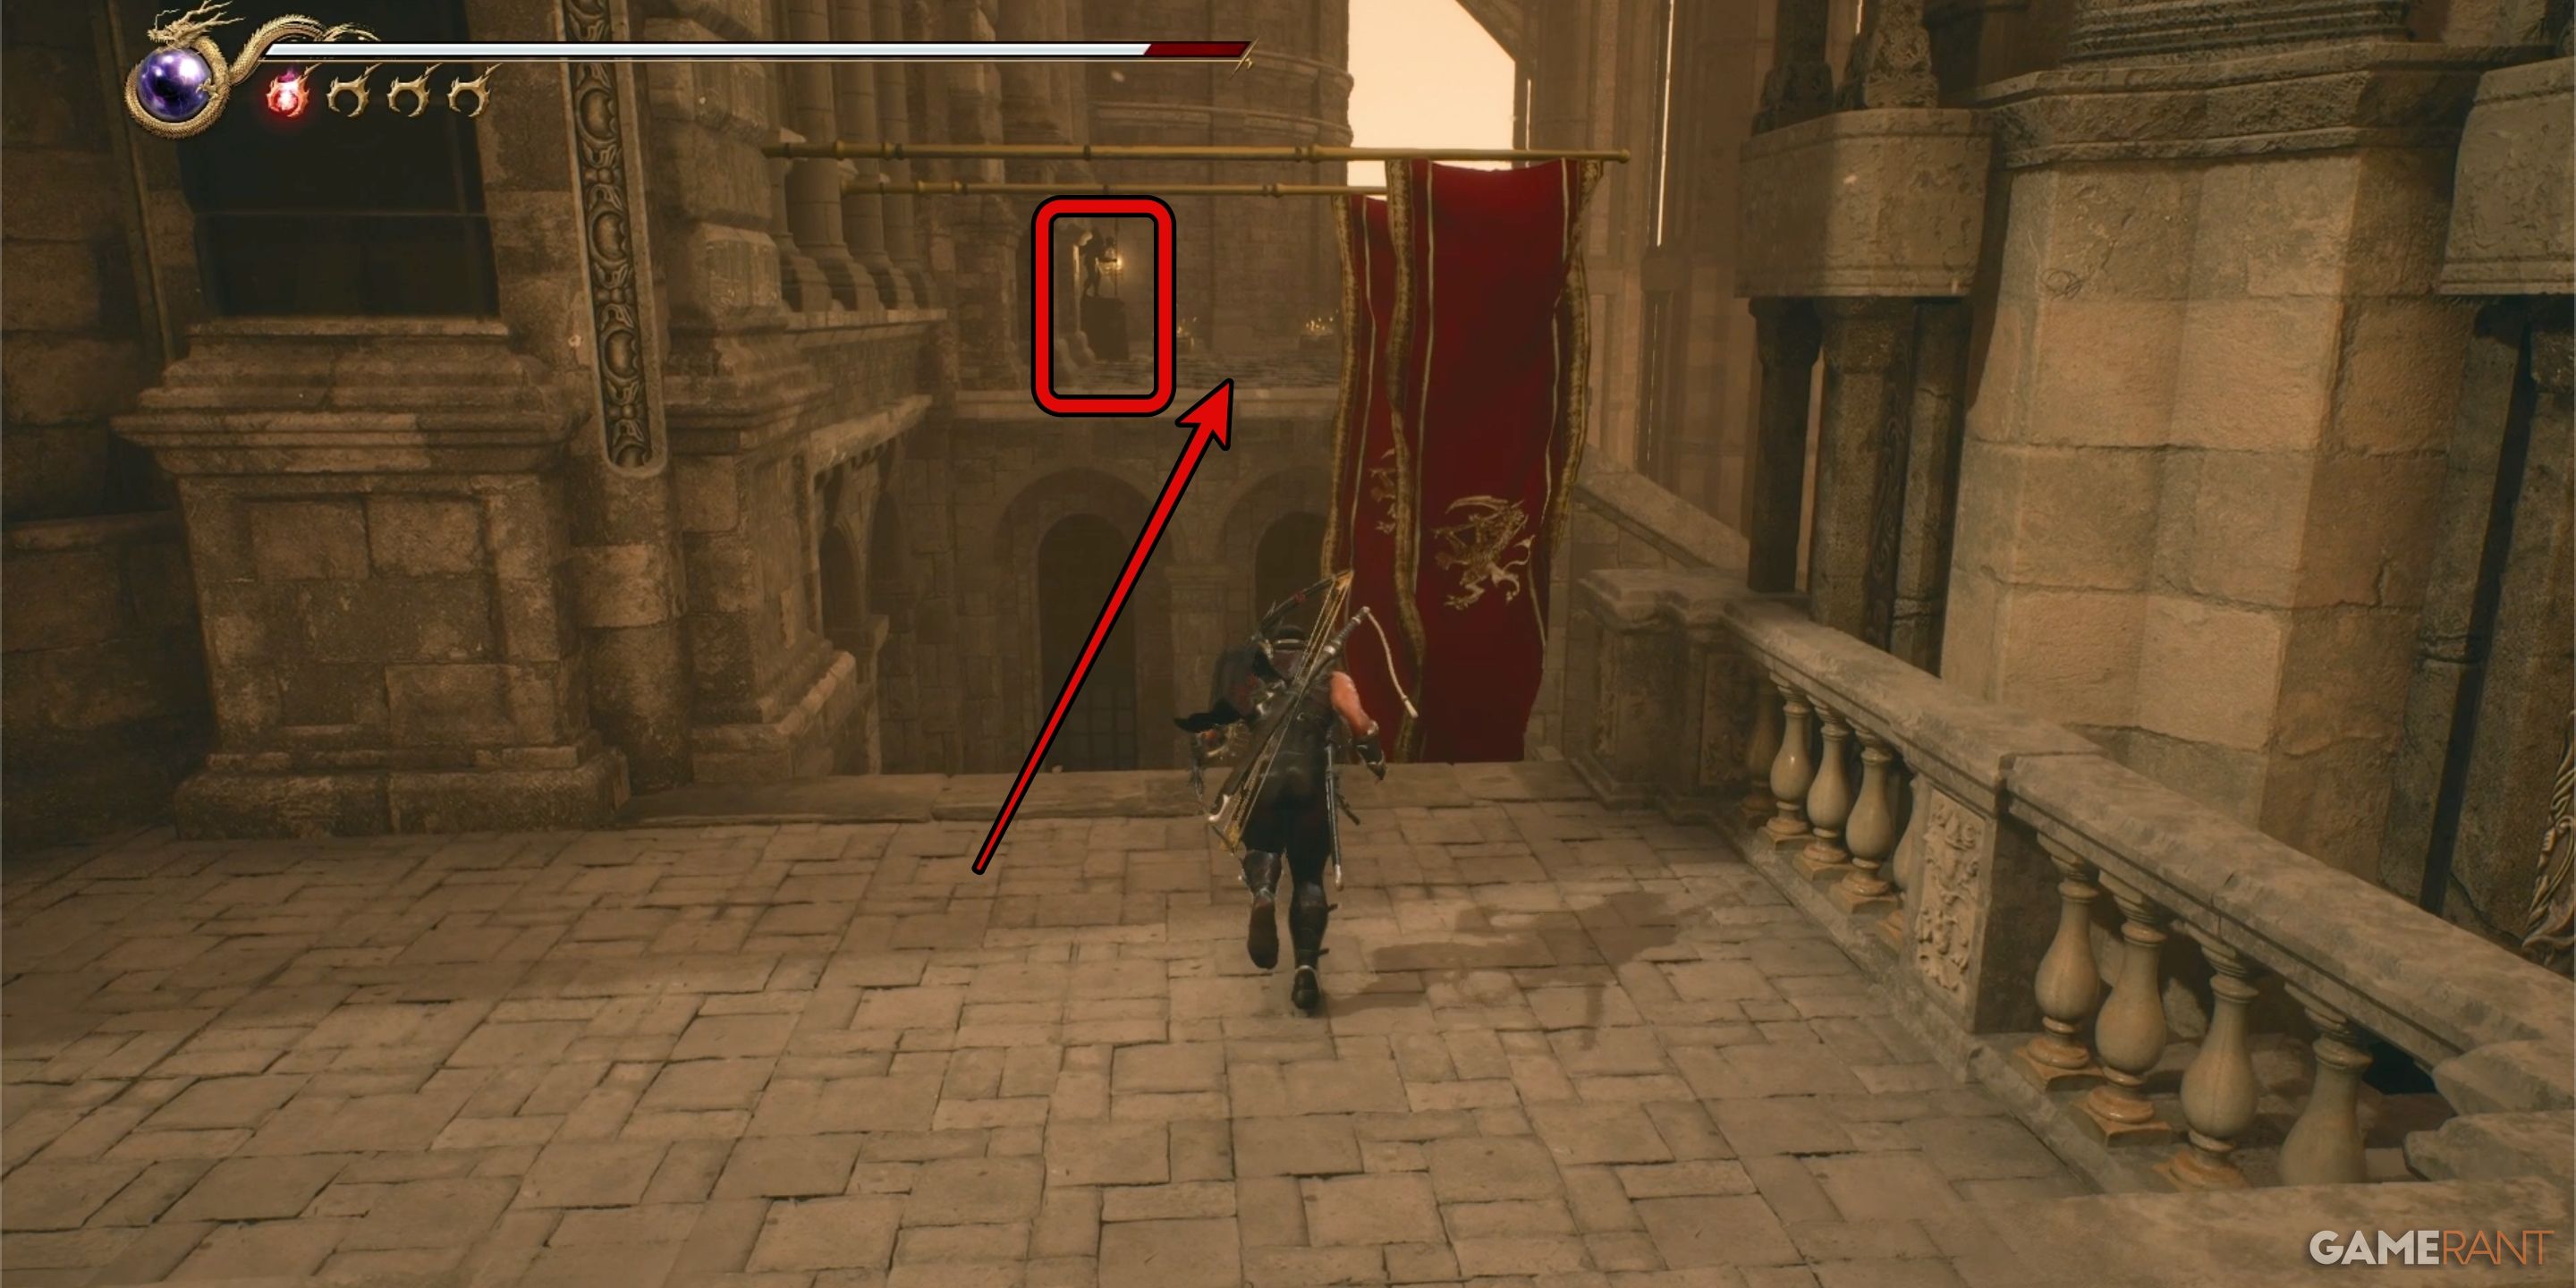
Ultimately, you’ll come across a place marked by three tall flagstaffs in front of a grand stained-glass window. Climb up and swing on these poles, transitioning from one to another until you reach the window. Pass through the window to find yourself inside the cathedral.
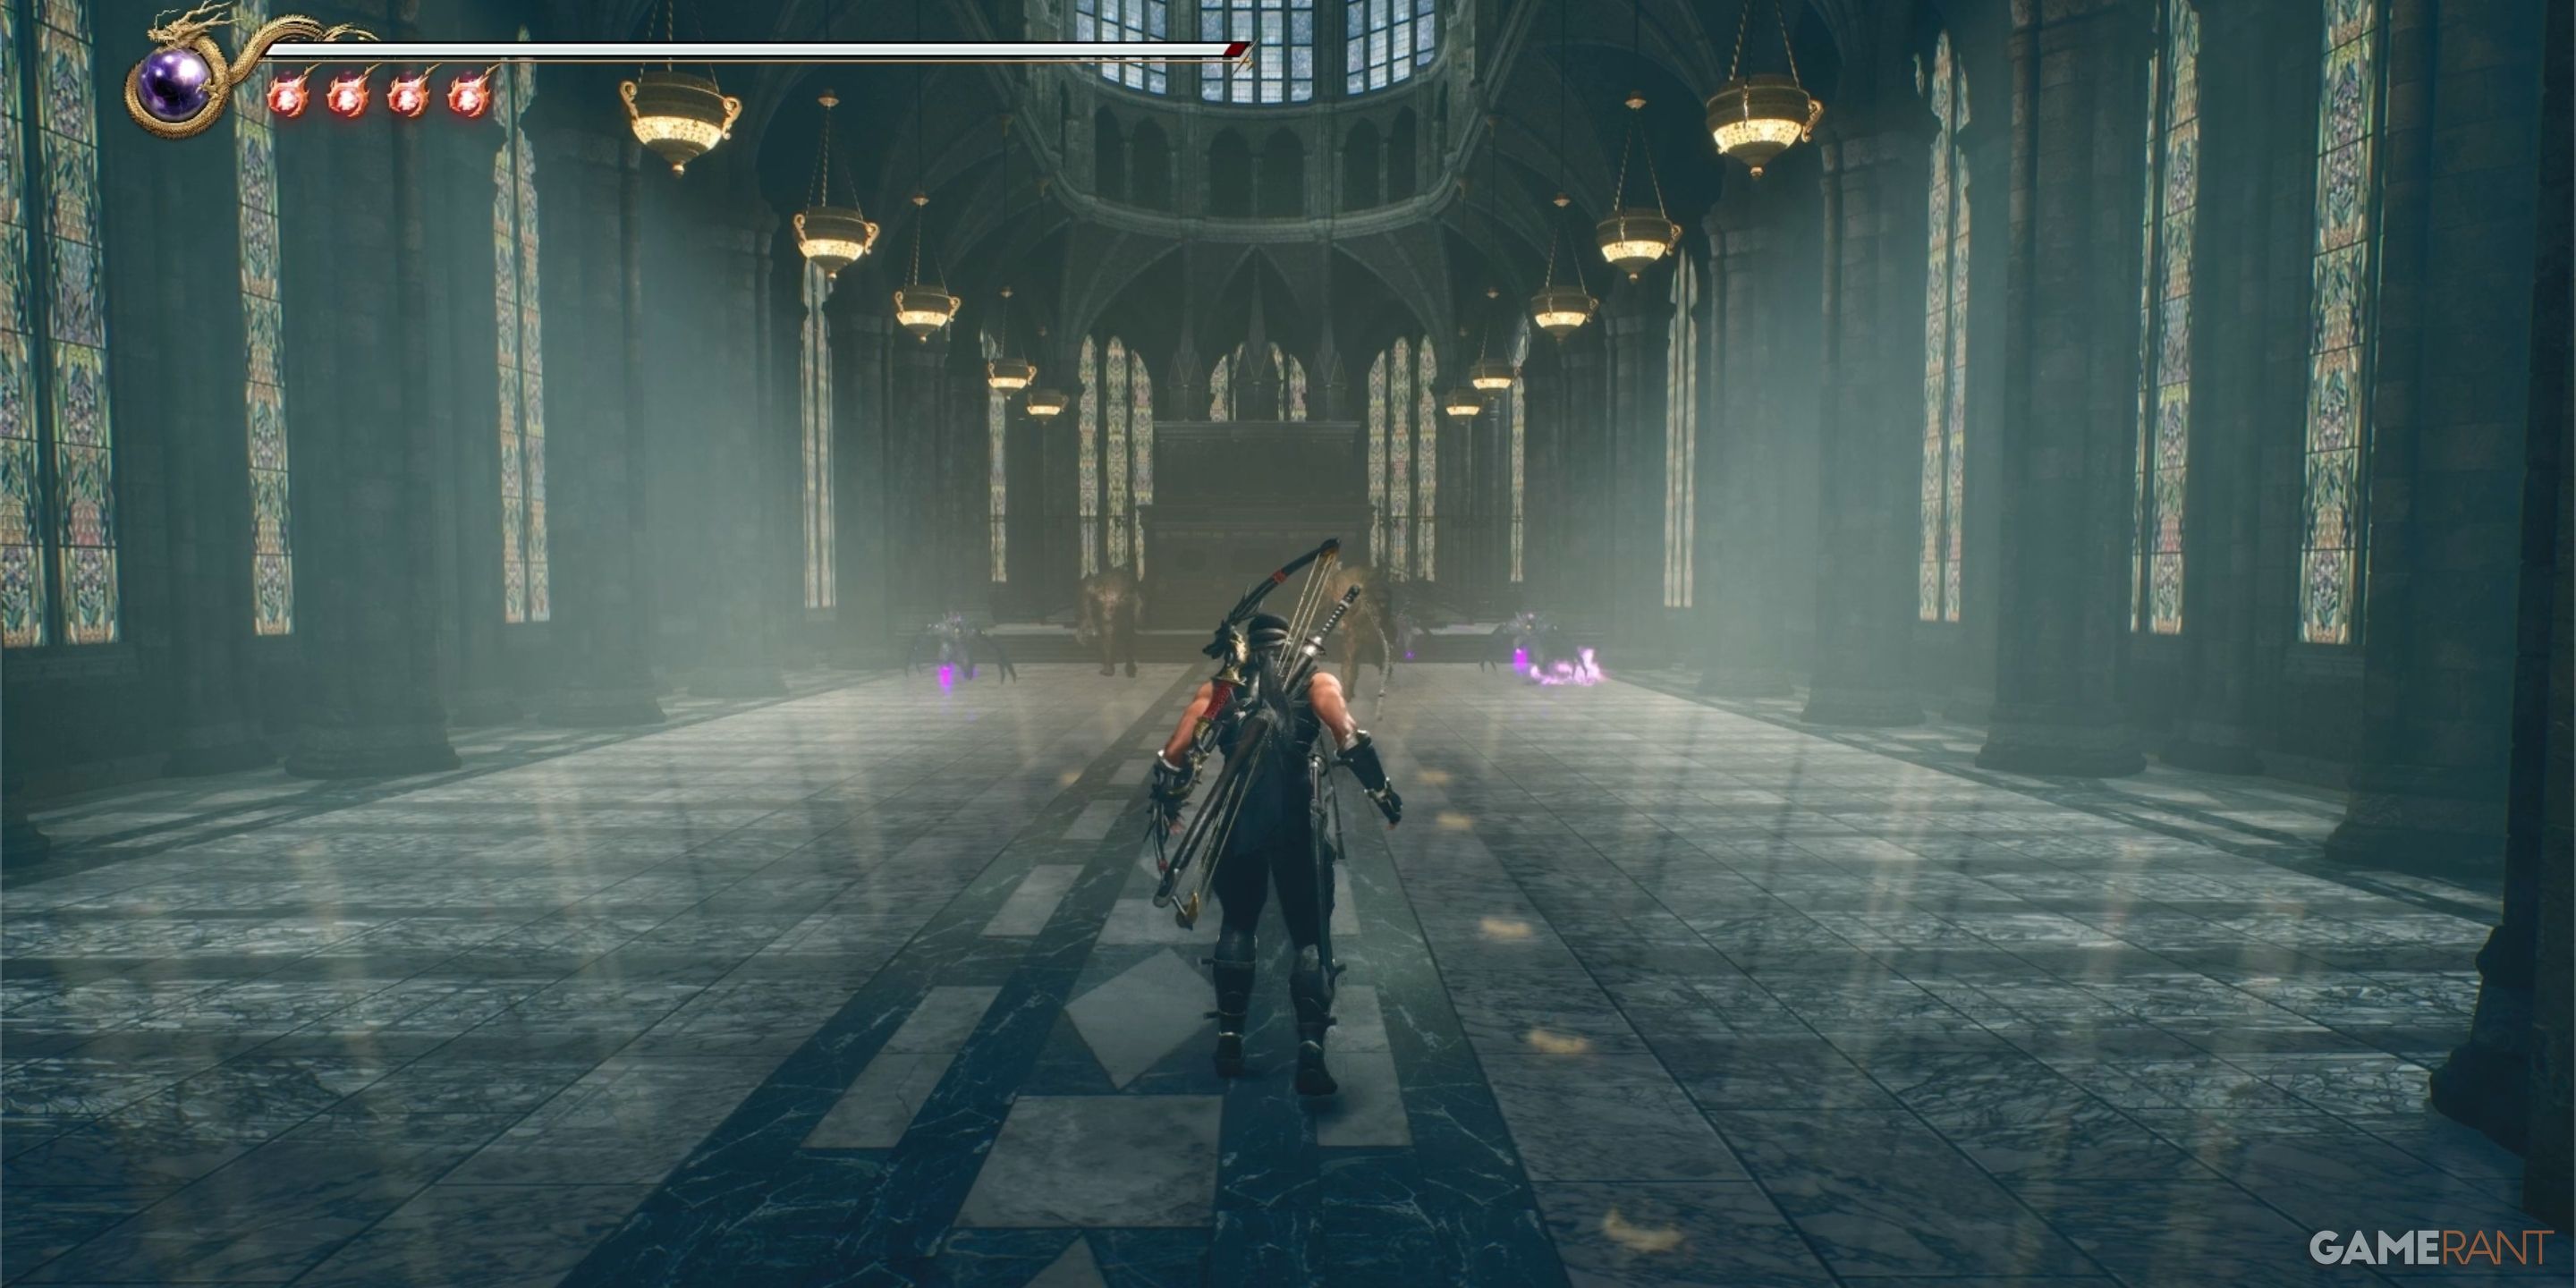
As I step foot inside the hallowed cathedral, brace yourself – the moment I touch down, I’m going to be under attack. Buckle up for a fierce battle! Once we’ve cleared the battlefield, make your way out of the cathedral. In the courtyard, you’ll stumble upon a lifeless body. Lift up the deceased’s belongings and voila – there lies Inukoma’s Notebook.
Life of the Gods:
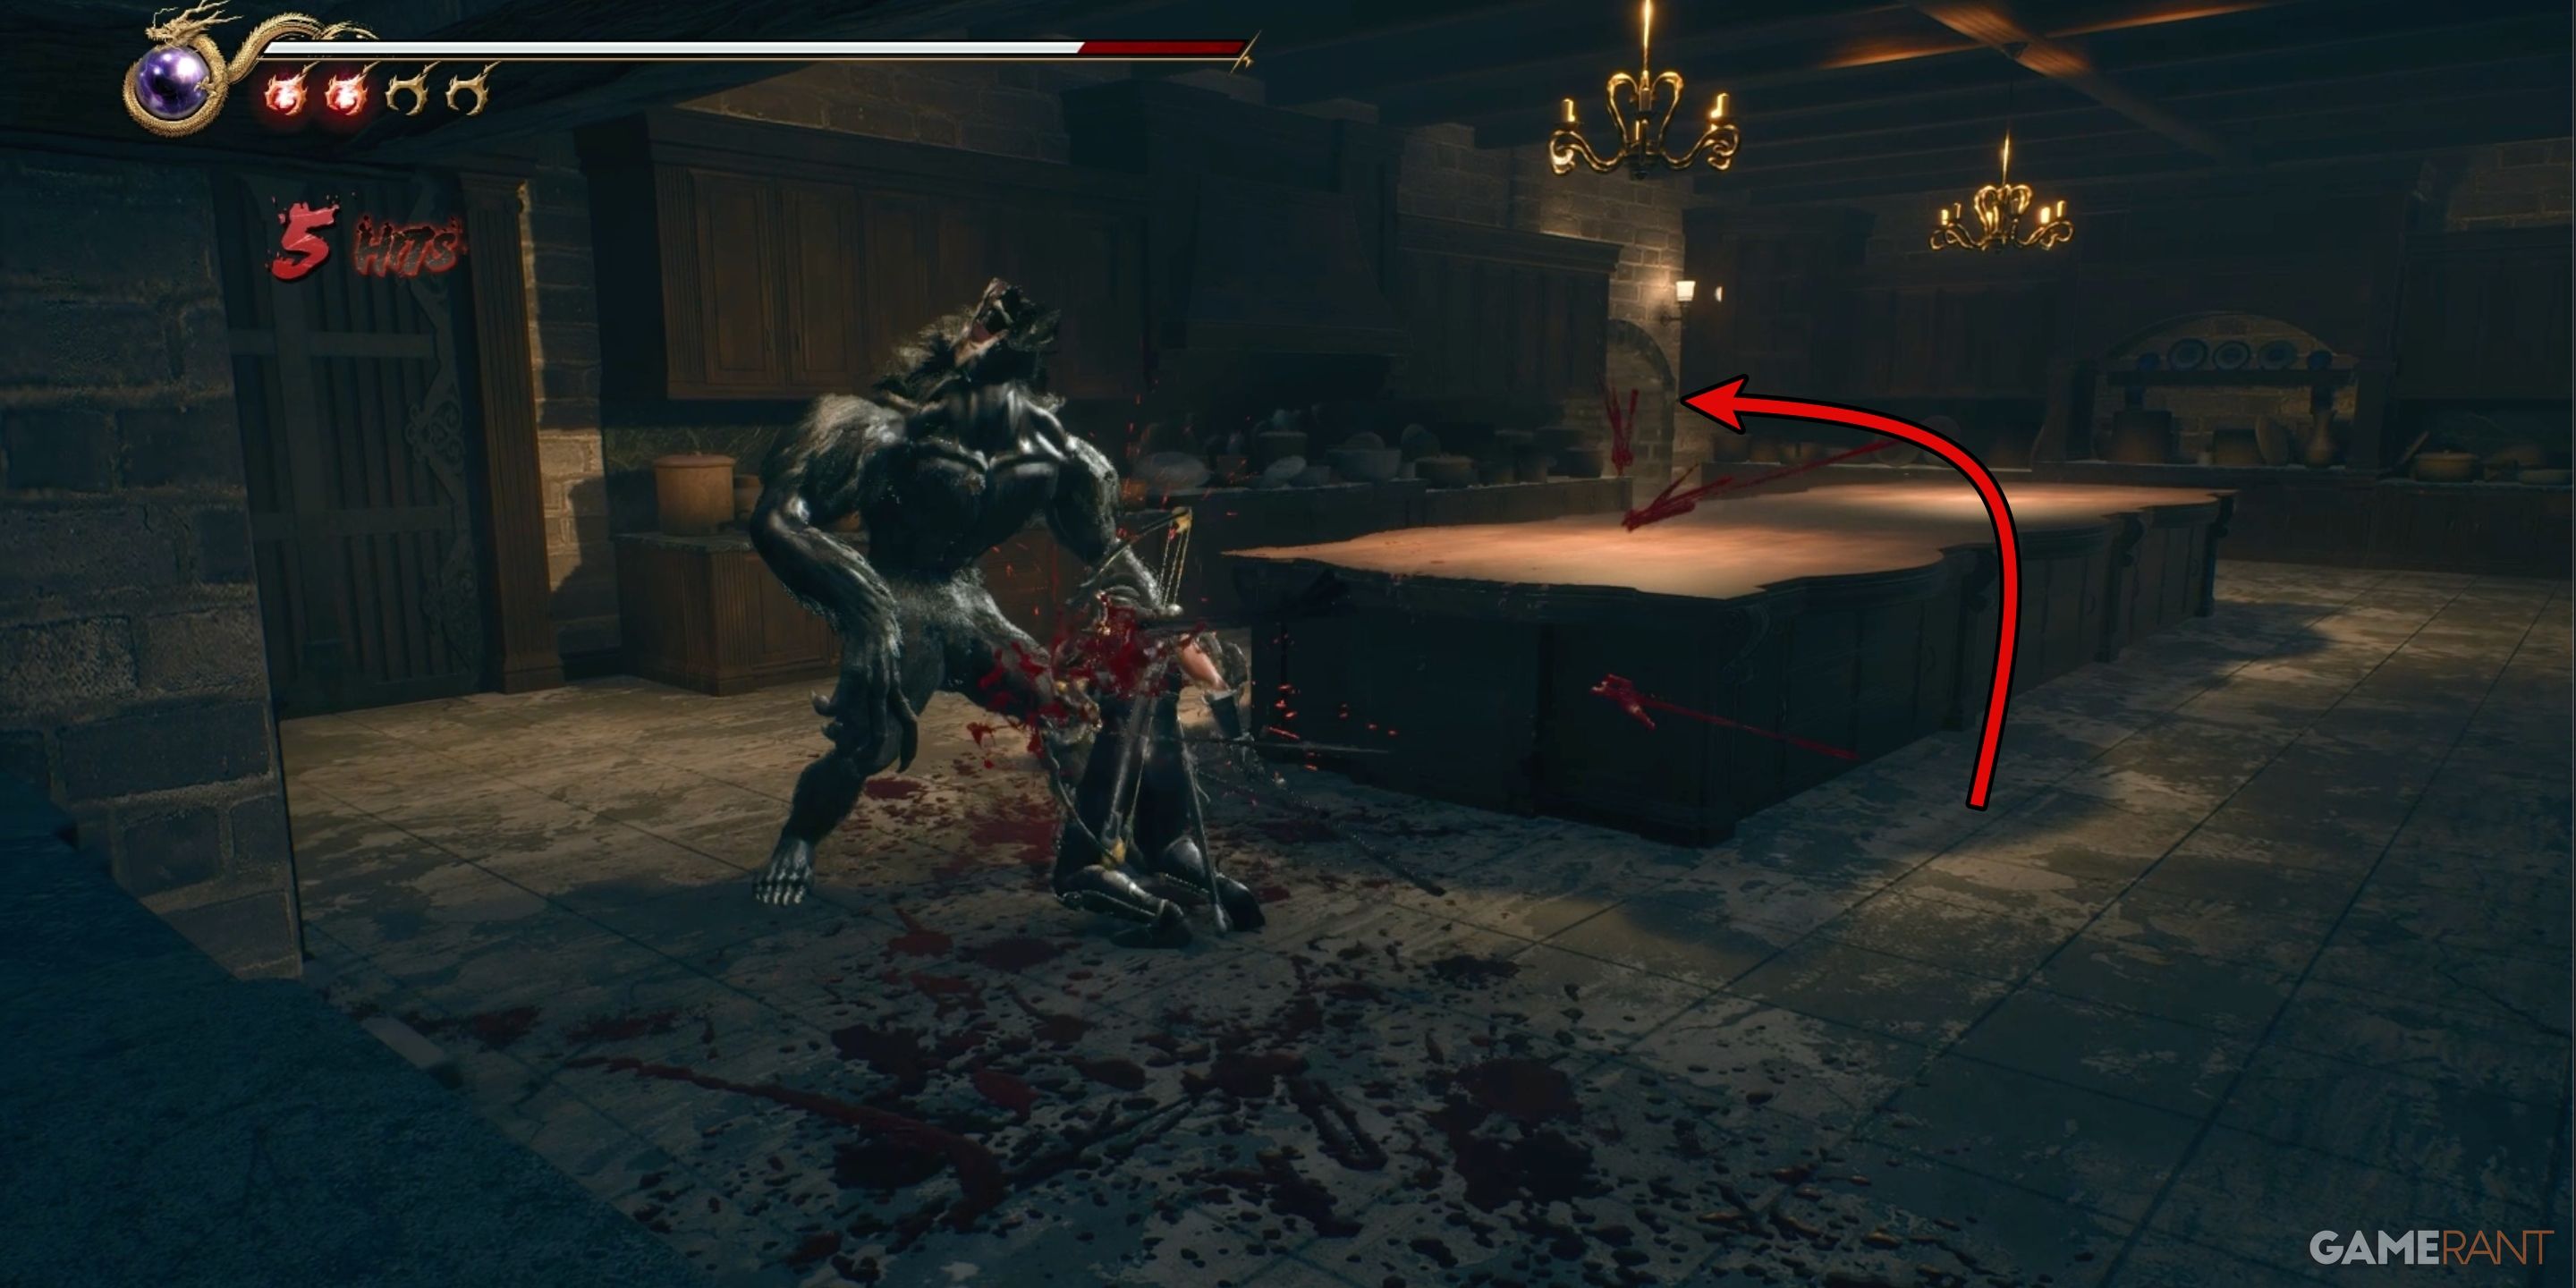
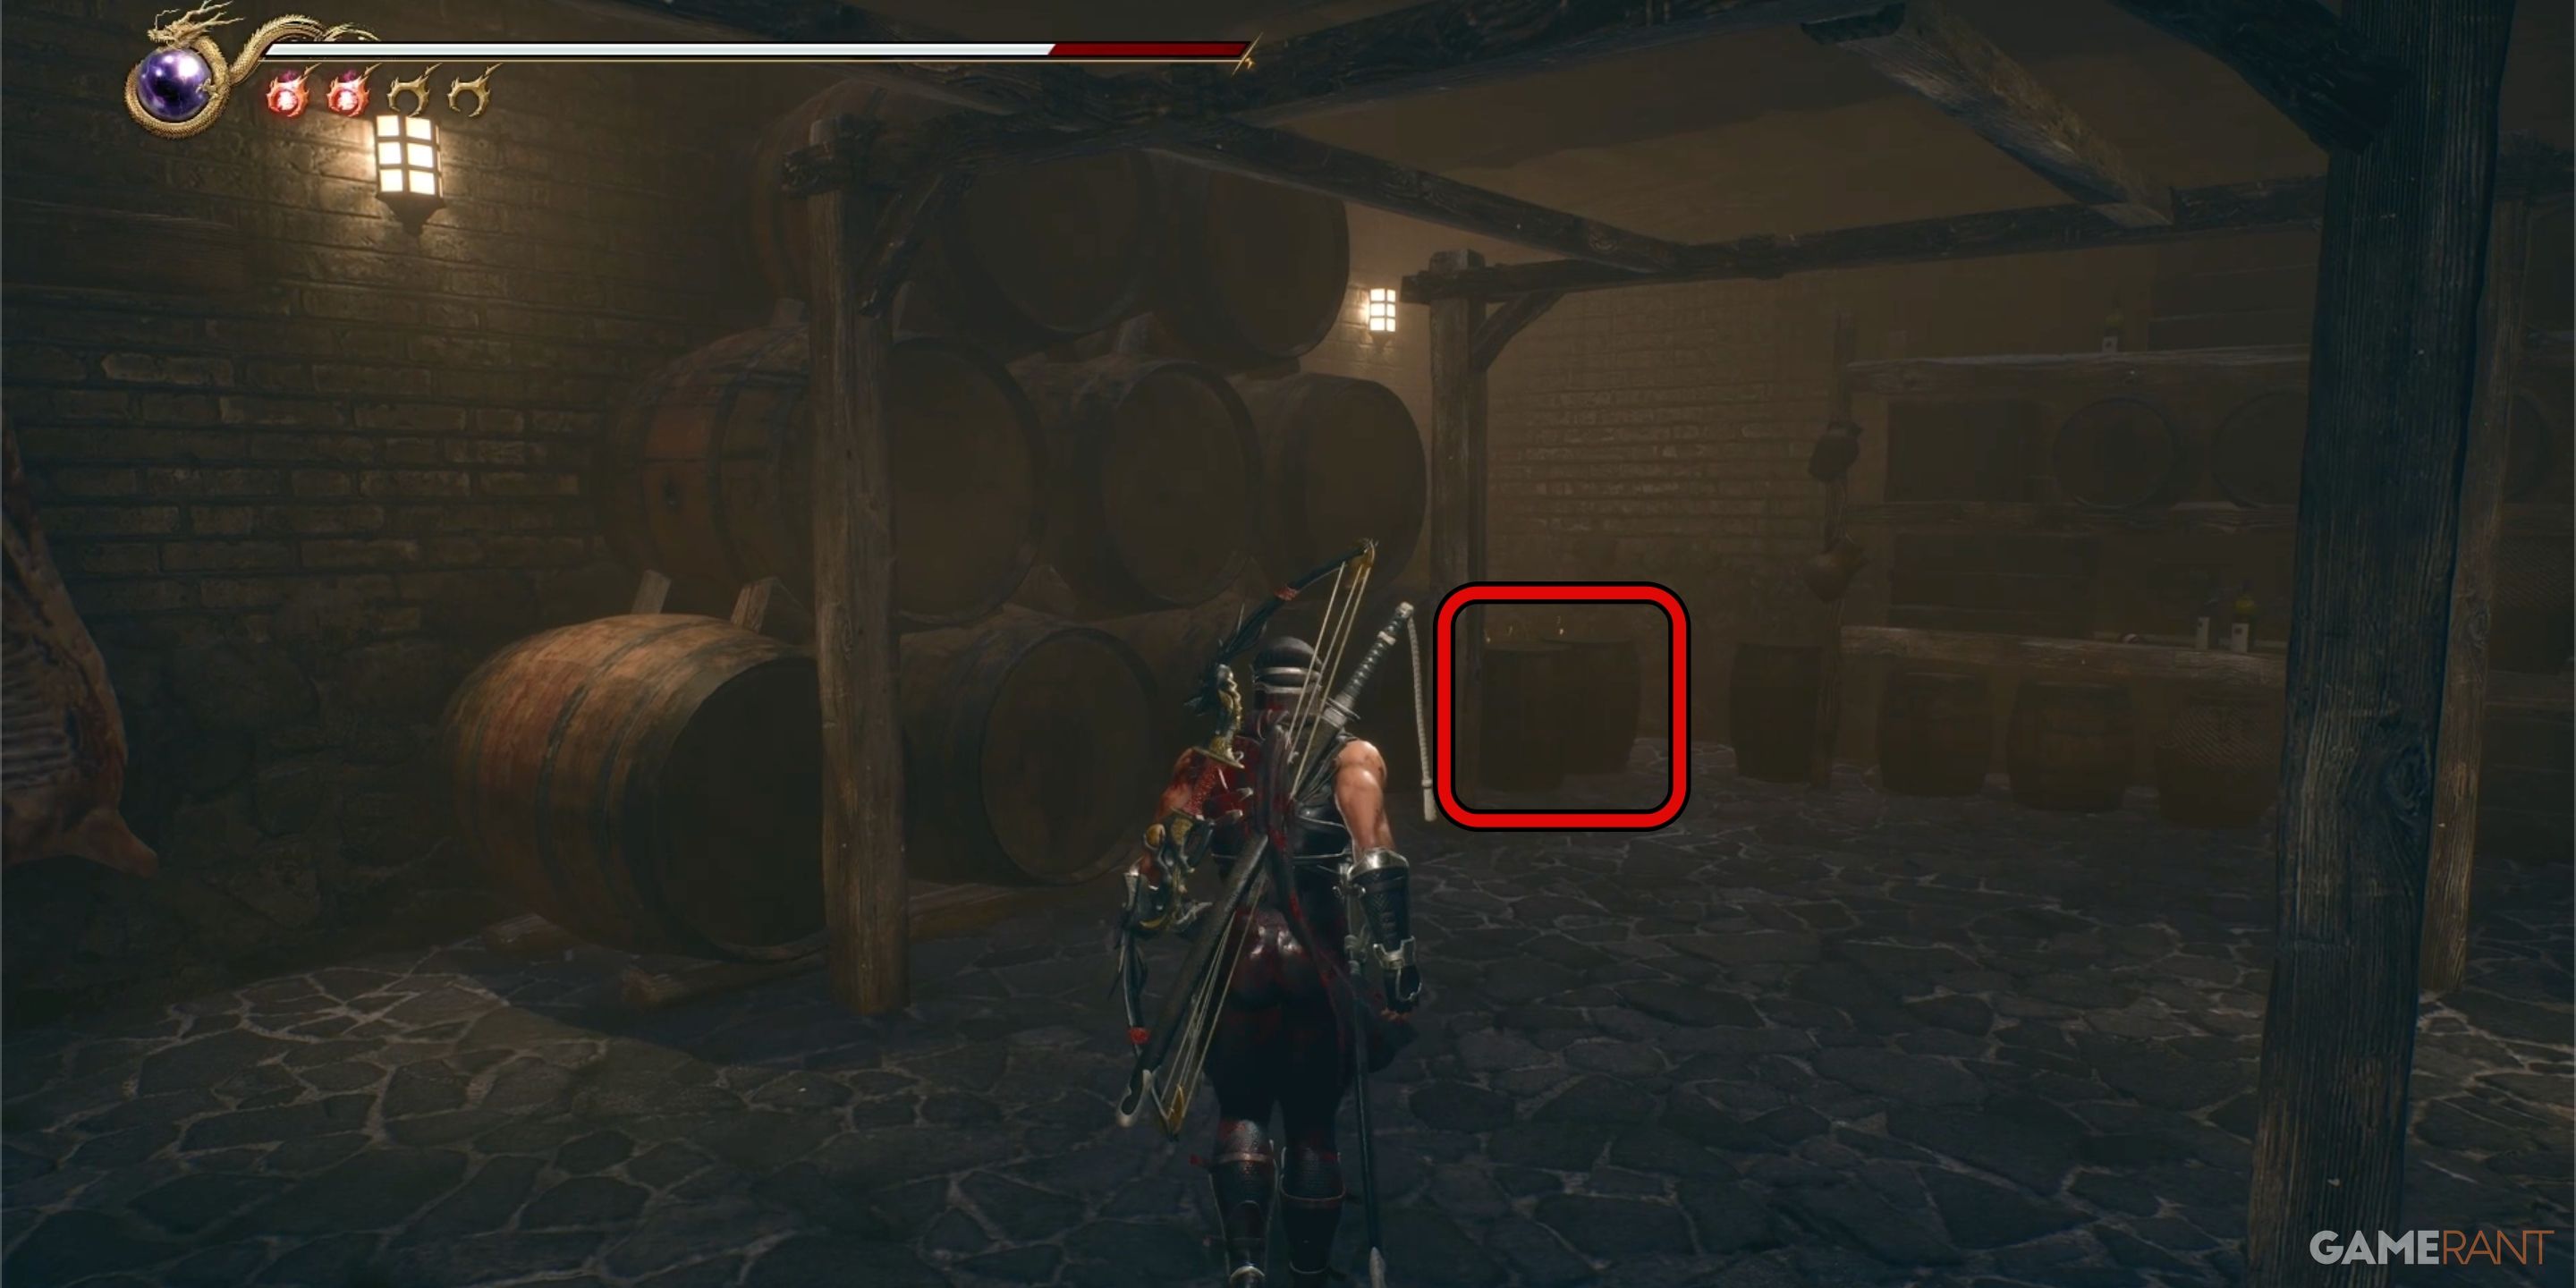
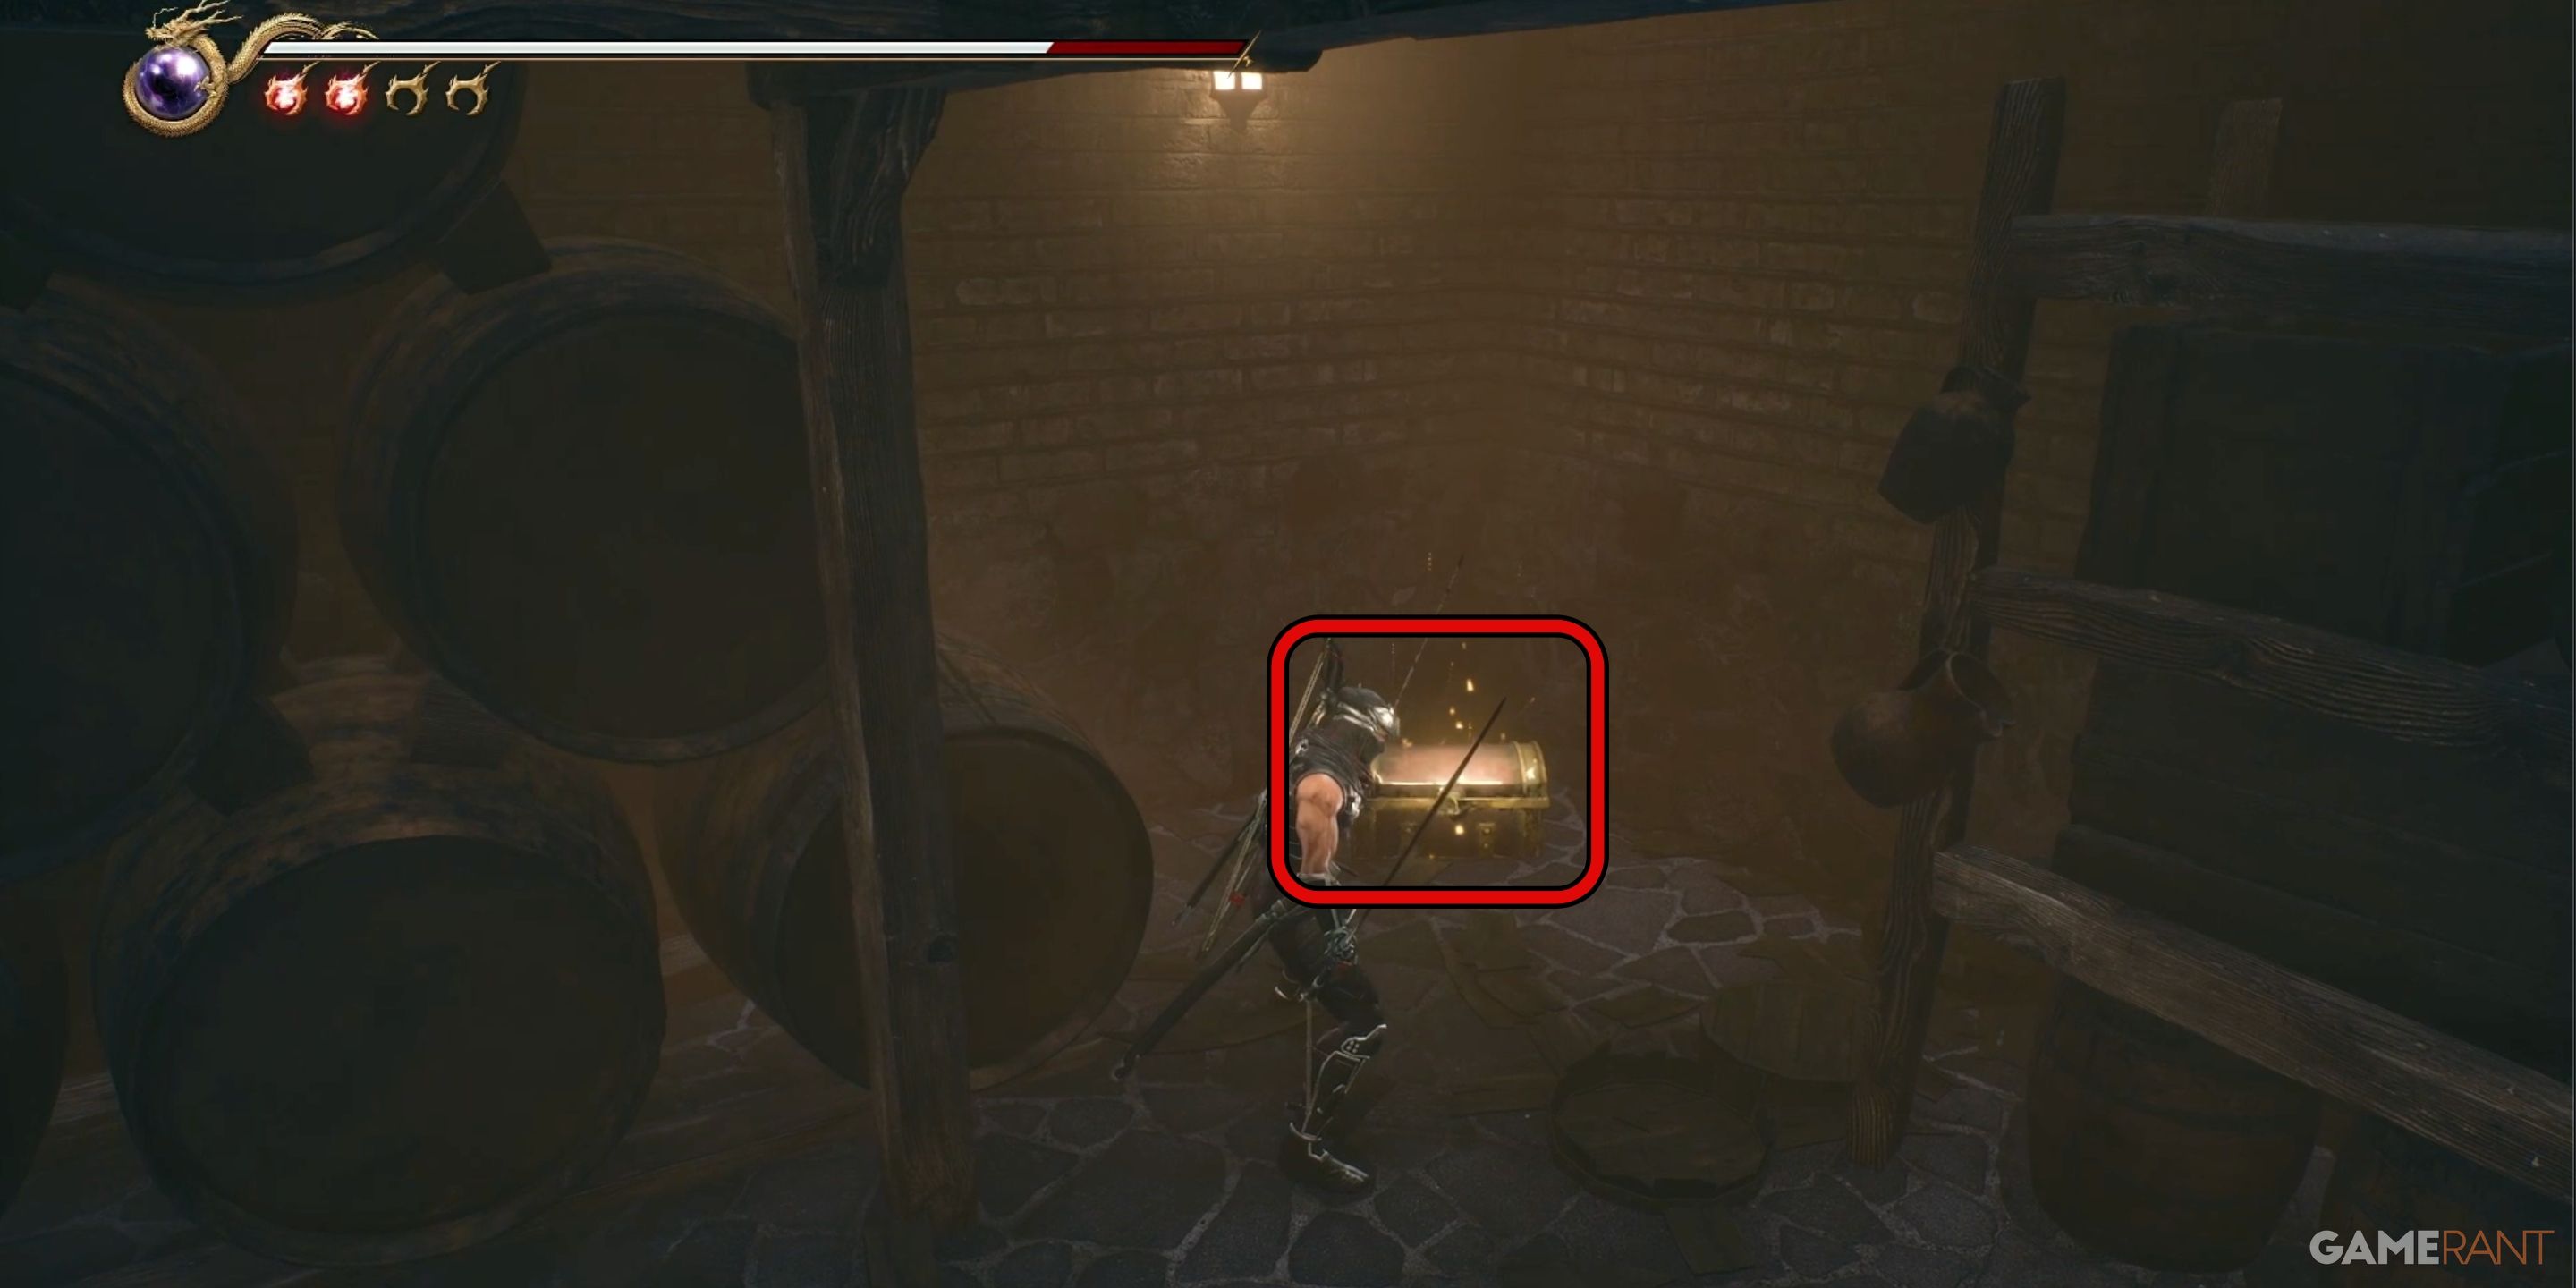
Starting from the courtyard, locate the single entrance and step inside, leading you to the kitchen. Confront any werewolves that attack, proceeding further into a room filled with barrels. In the back corner, notice a chest hidden behind two of these barrels. Knock over or remove the barrels to gain access to the chest. Inside, discover the tenth Life of the Gods upgrade known as NG2Bi’s tenth Life of the Gods.
Save Point 5:
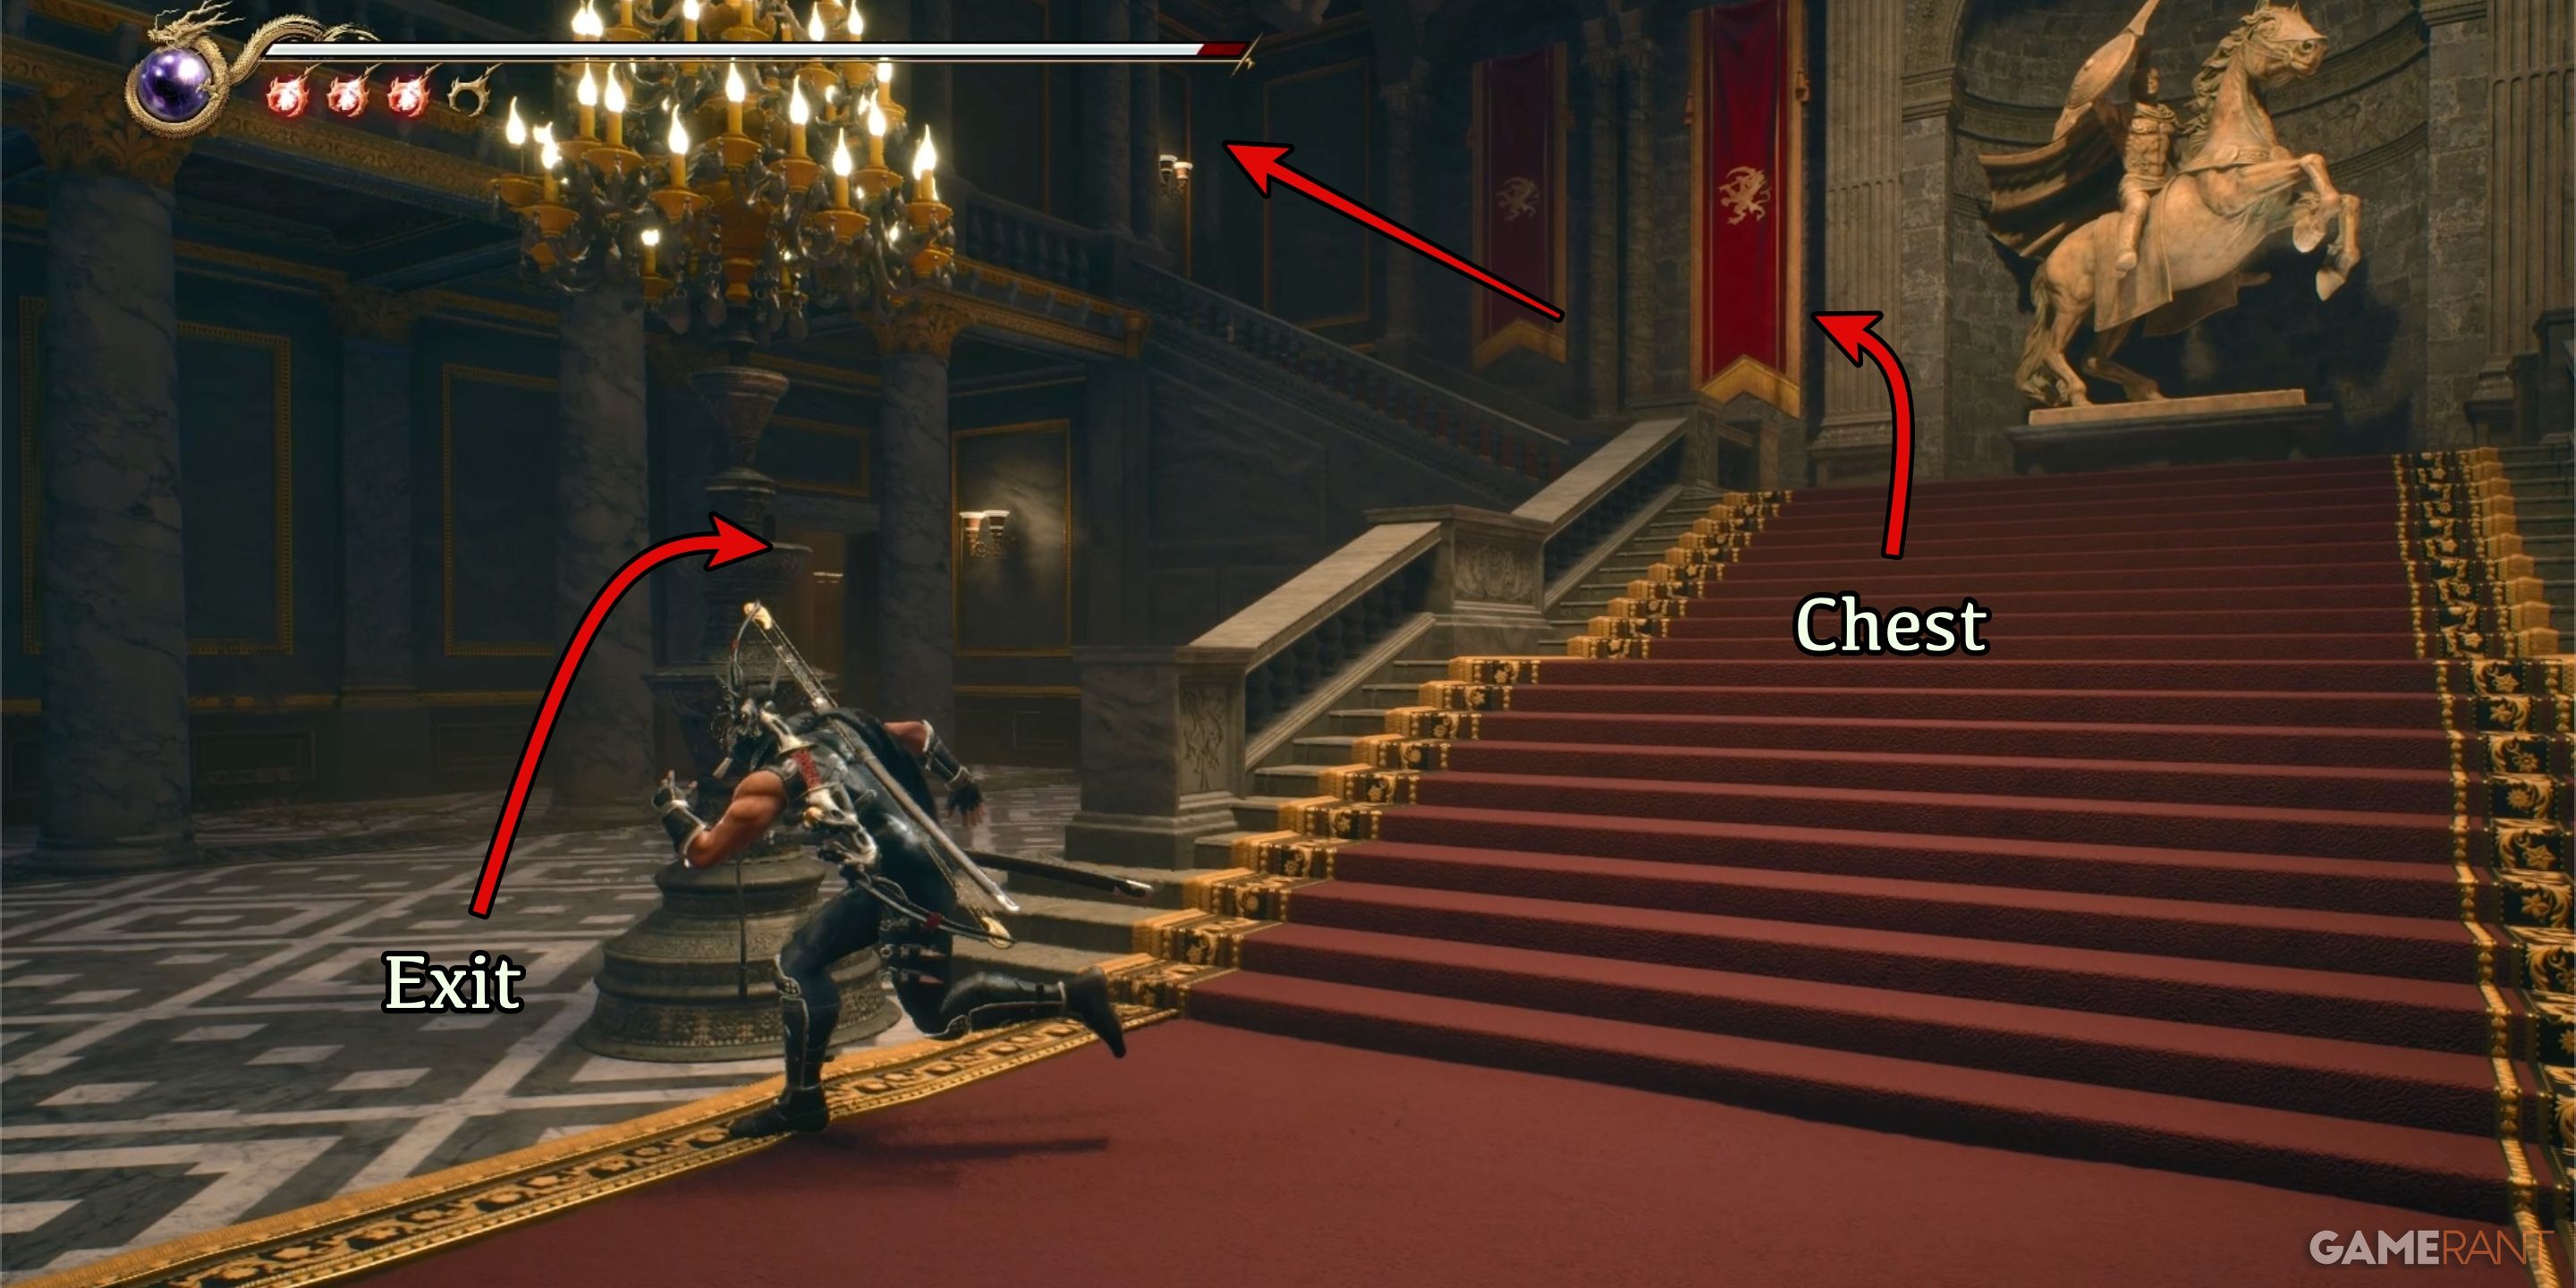
After departing from the room where the Life of the Gods is located, Save Point 5 will be on your right side. Upon leaving this save point, you’ll encounter a vast chamber with colossal stairs that apparently lead nowhere for now. At the upper level, there’s just a chest holding a substantial currency orb. However, upon entering the room initially, a werewolf emerged from a door to assault you. Re-enter through the same door to keep moving along the main pathway.
New Weapon – Tonfa:
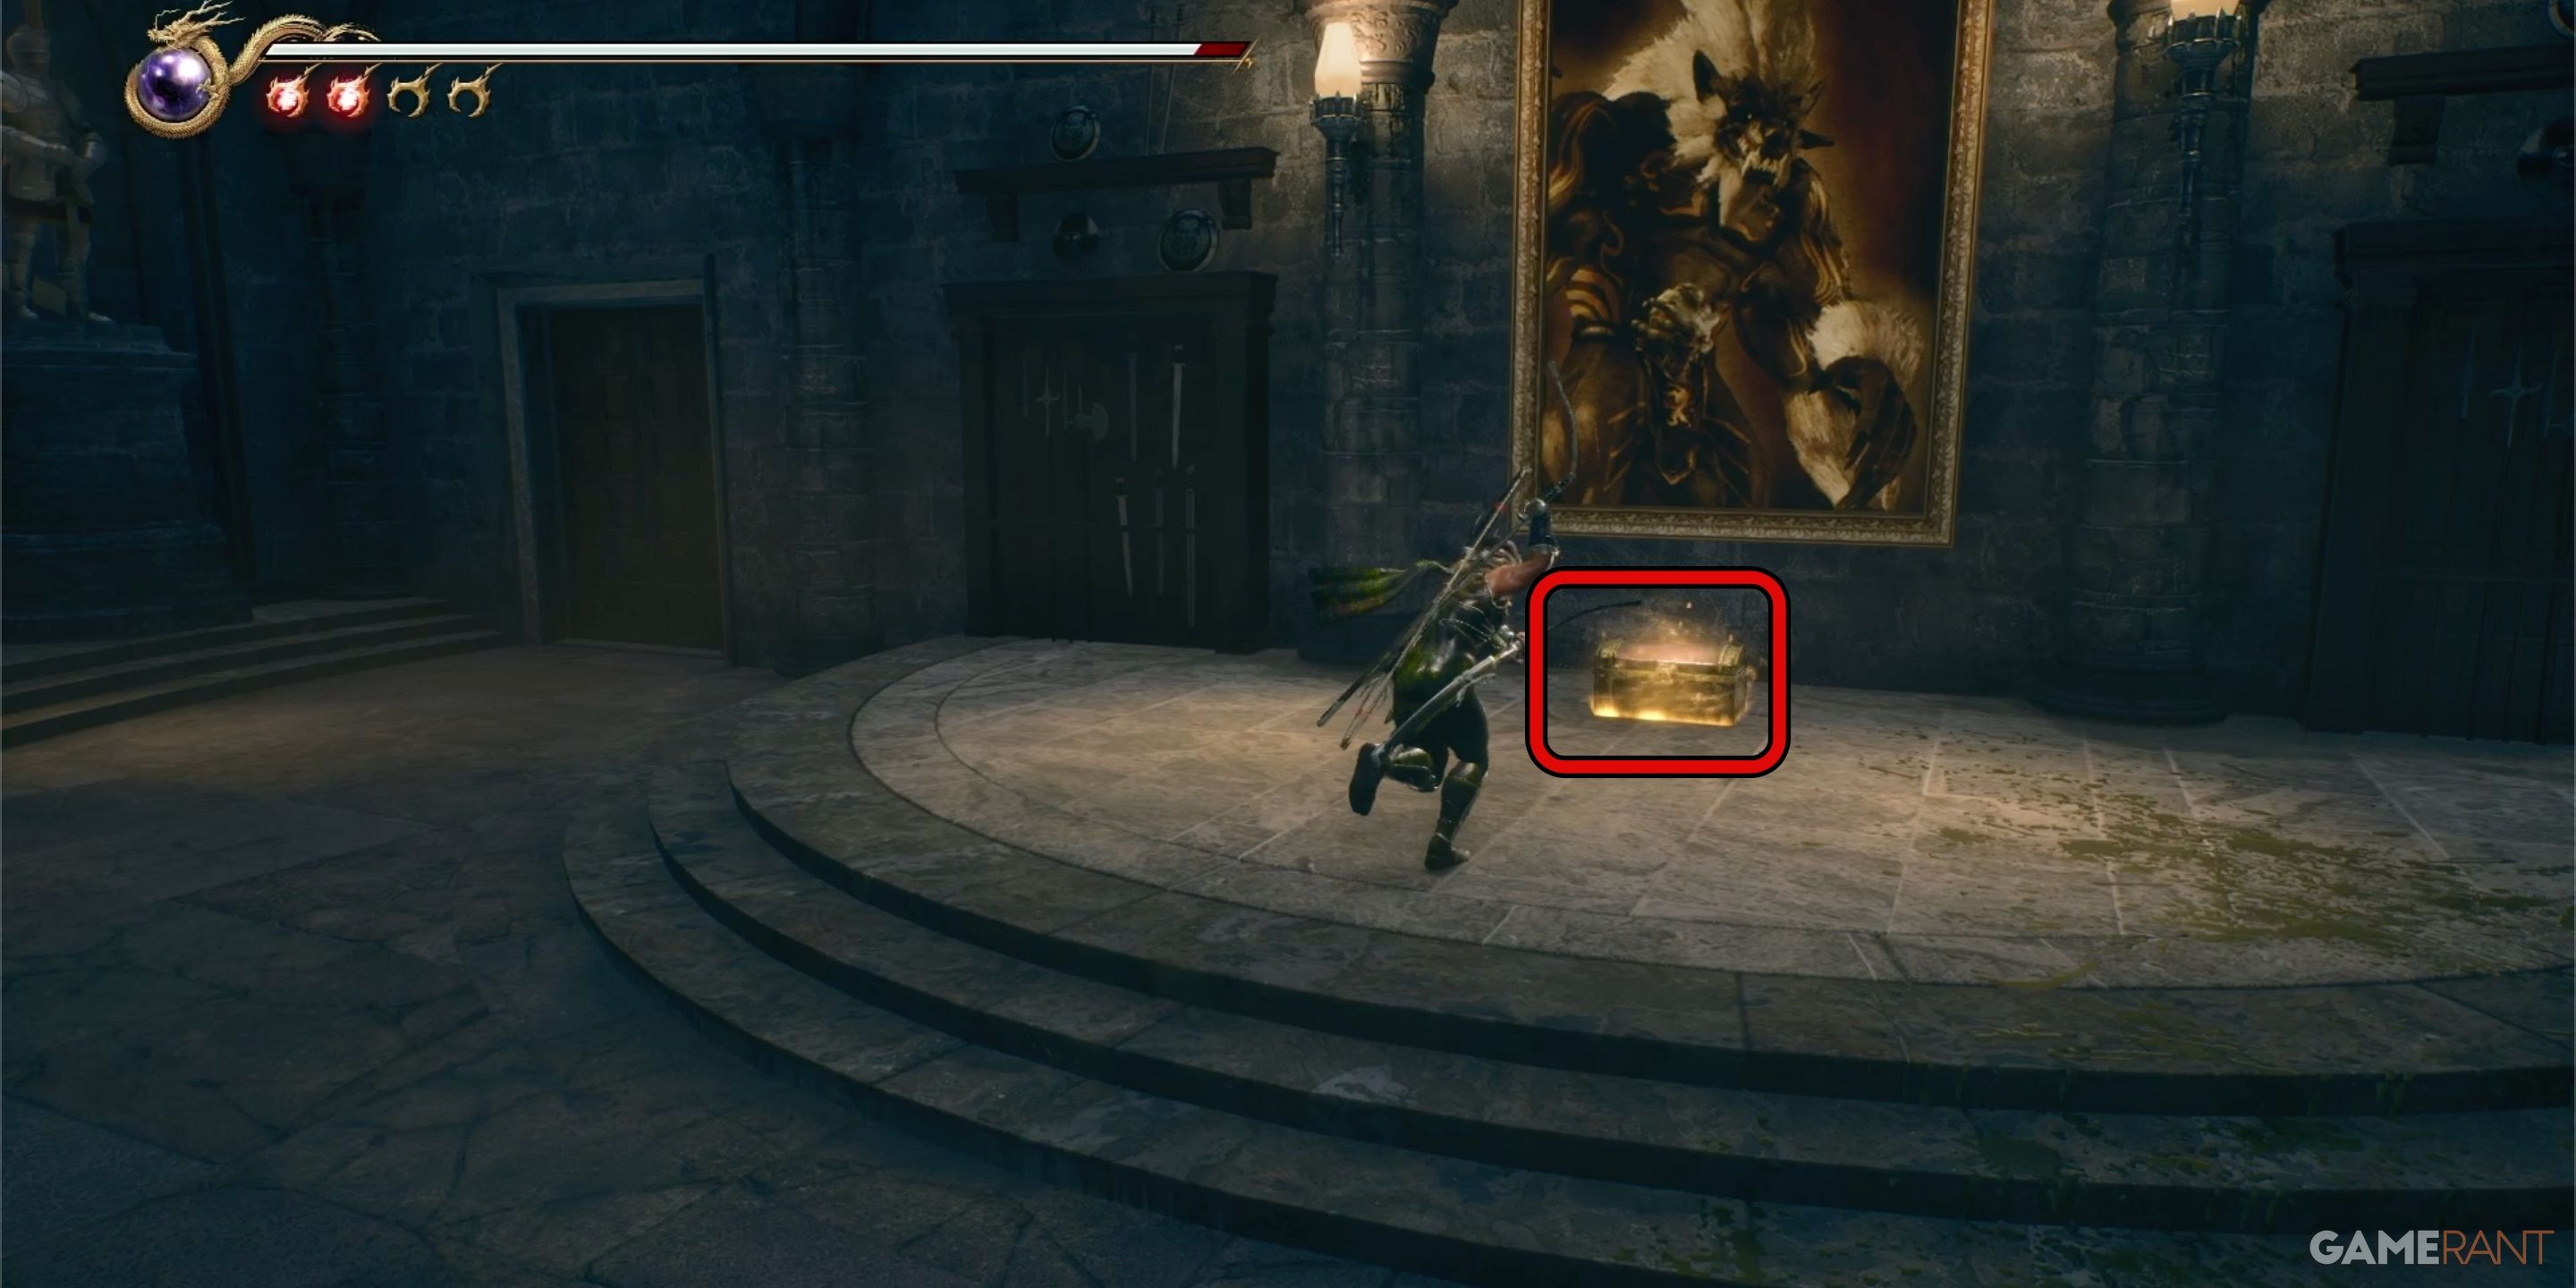
Following the room featuring a staircase, you’ll pass through a dining area next, then encounter an ambush chamber. After this, you’ll find yourself in a spacious stone-floored chamber adorned with a colossal painting of Volf. Overcome all the foes within this chamber, and a chest will materialize beneath Volf’s portrait, holding the Tonfa.
Save Point 6:
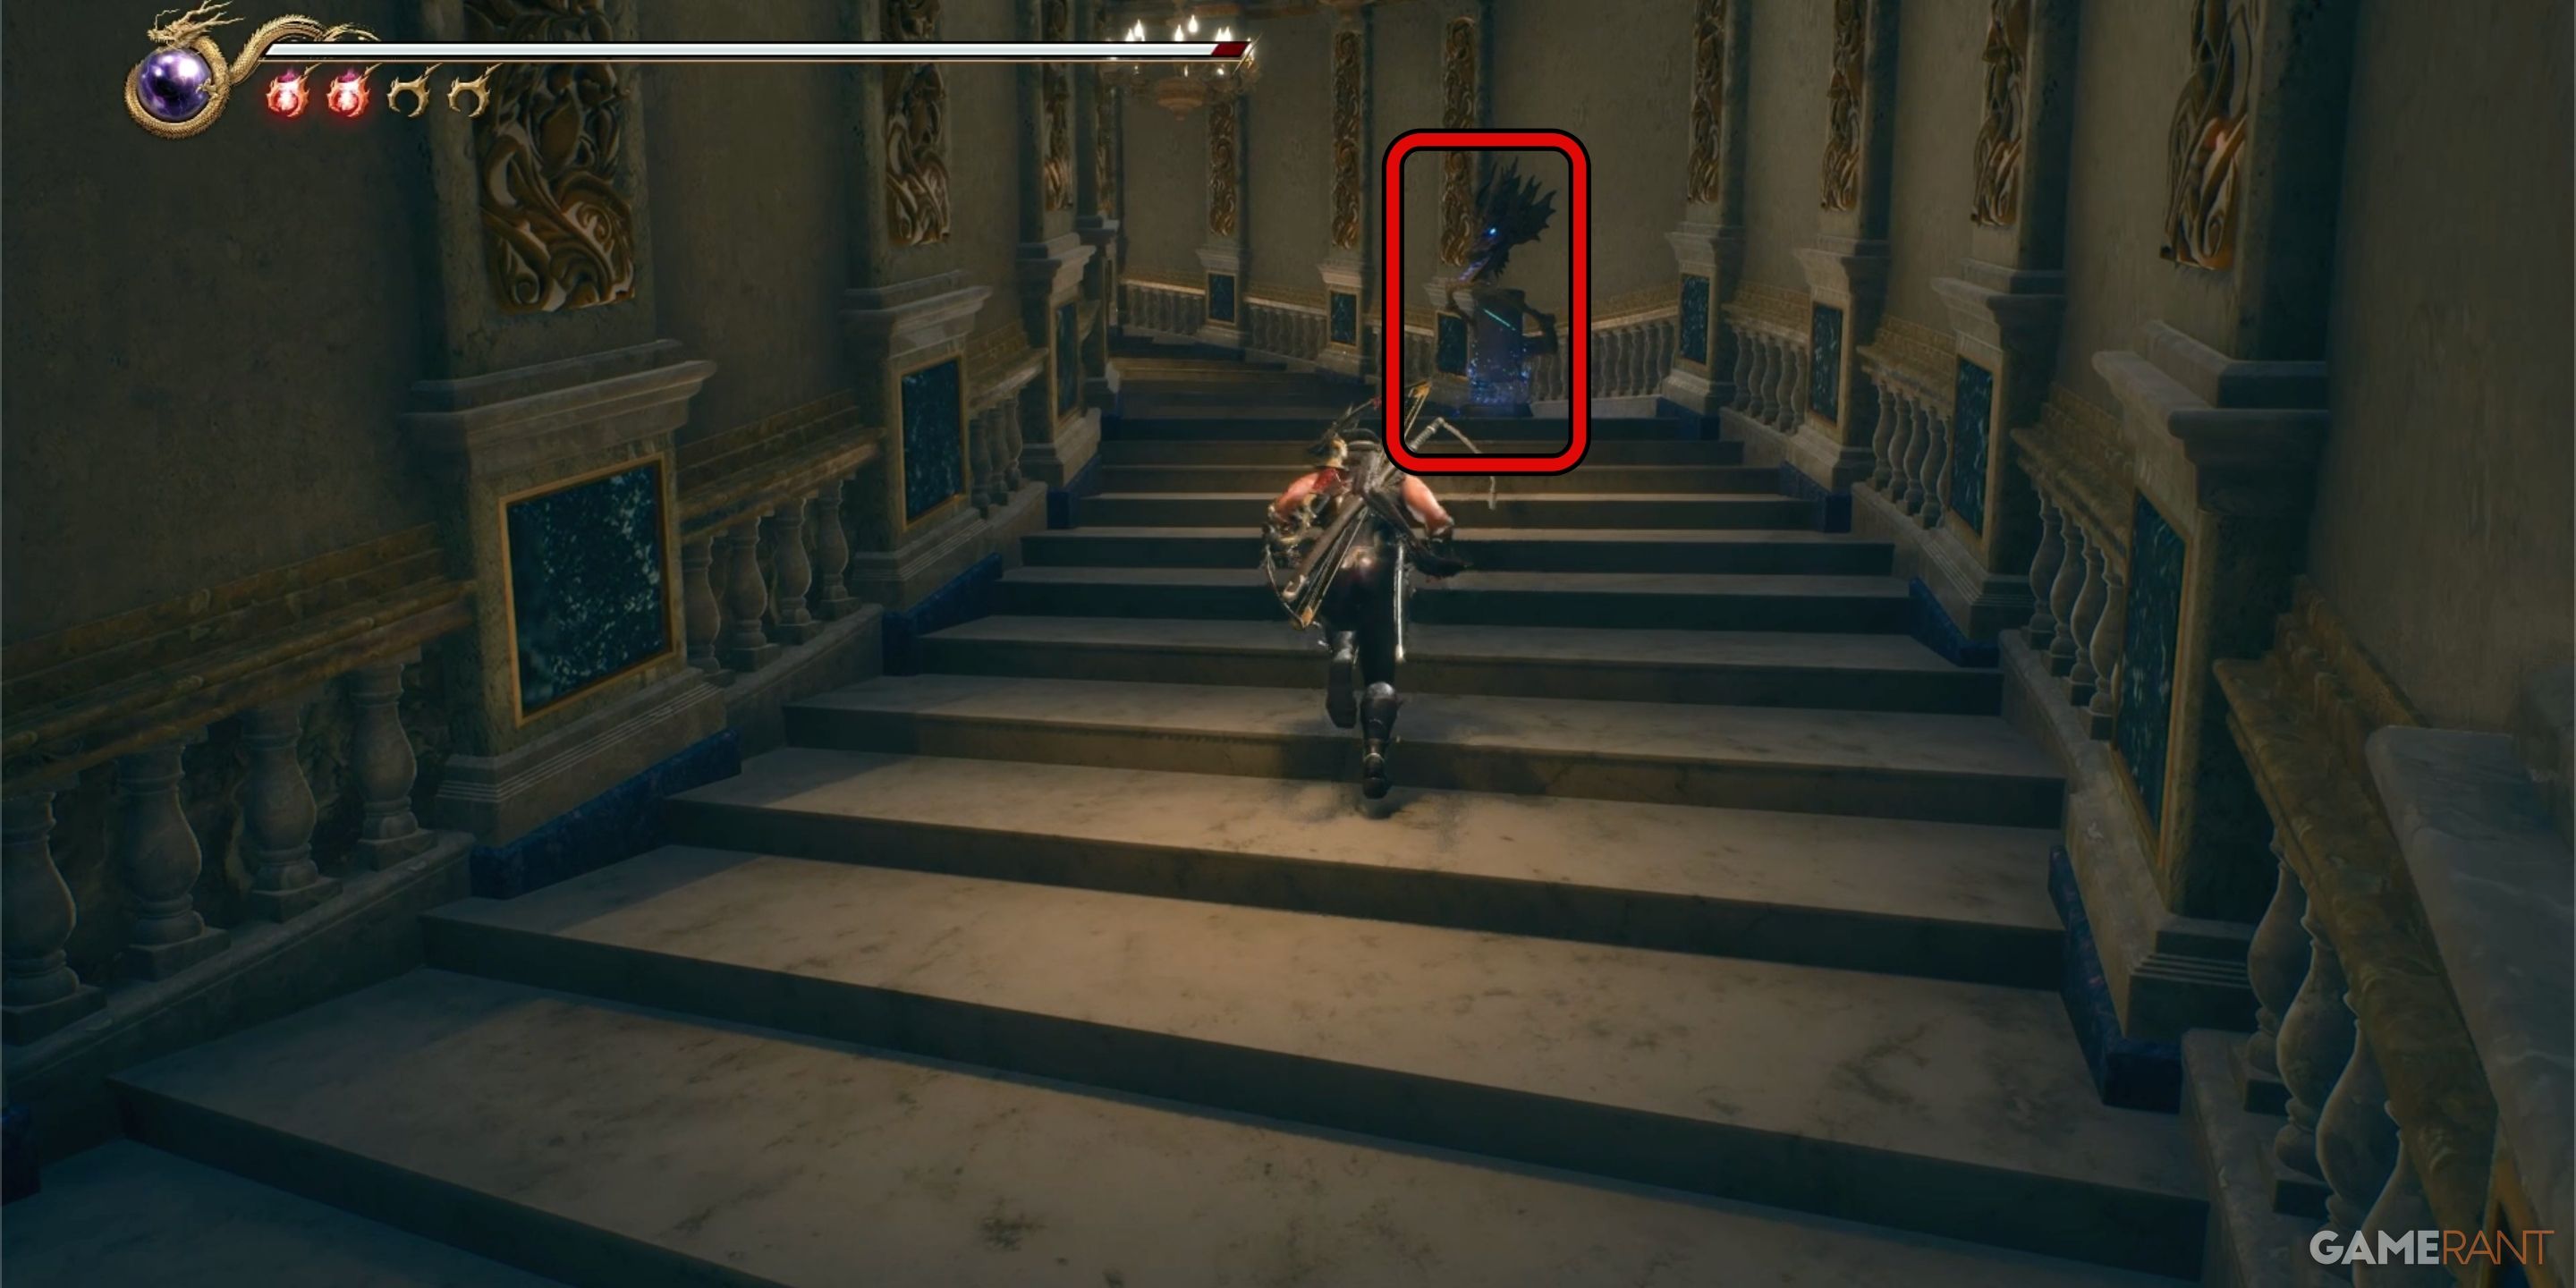
As I grab the Tonfa and make my way out the door, I find myself back in the chamber with the massive staircase ahead. Scaling those steps takes me, but soon enough, a horde of werewolves bursts through a door to my right. After fending them off, I push forward, finding myself at Save Point 6 as I ascend the luxurious marble stairs.
Chapter 7 Walkthrough Part 4 – Ninja Gaiden 2 Black
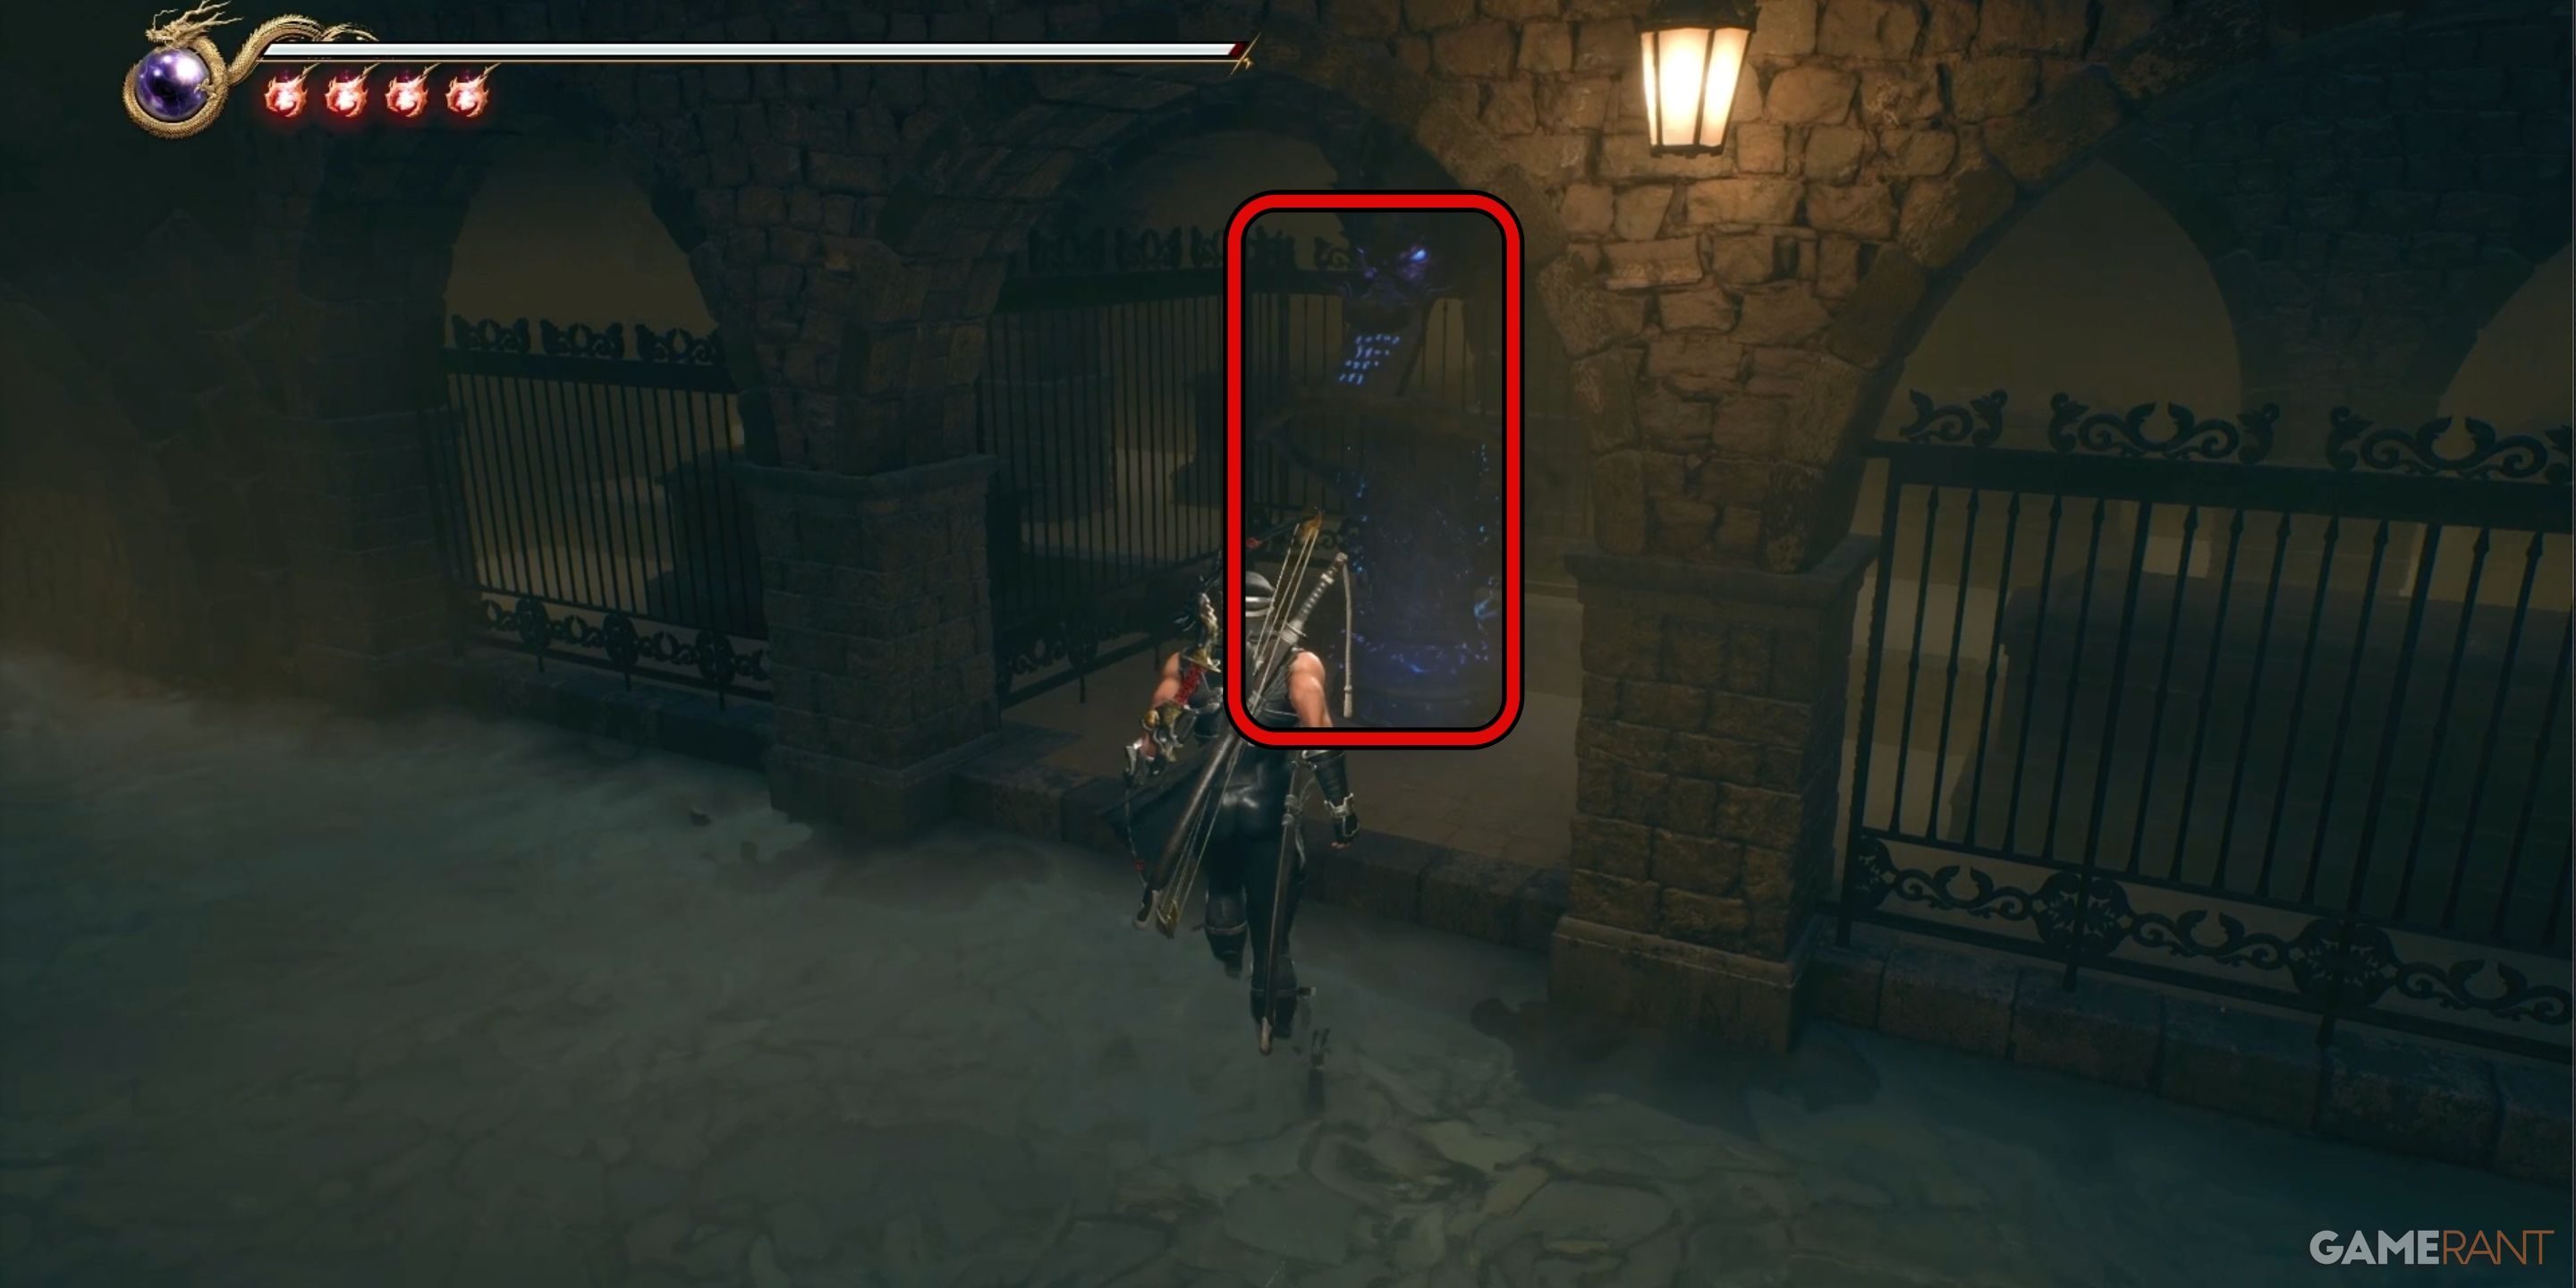
Crystal Skull 3:
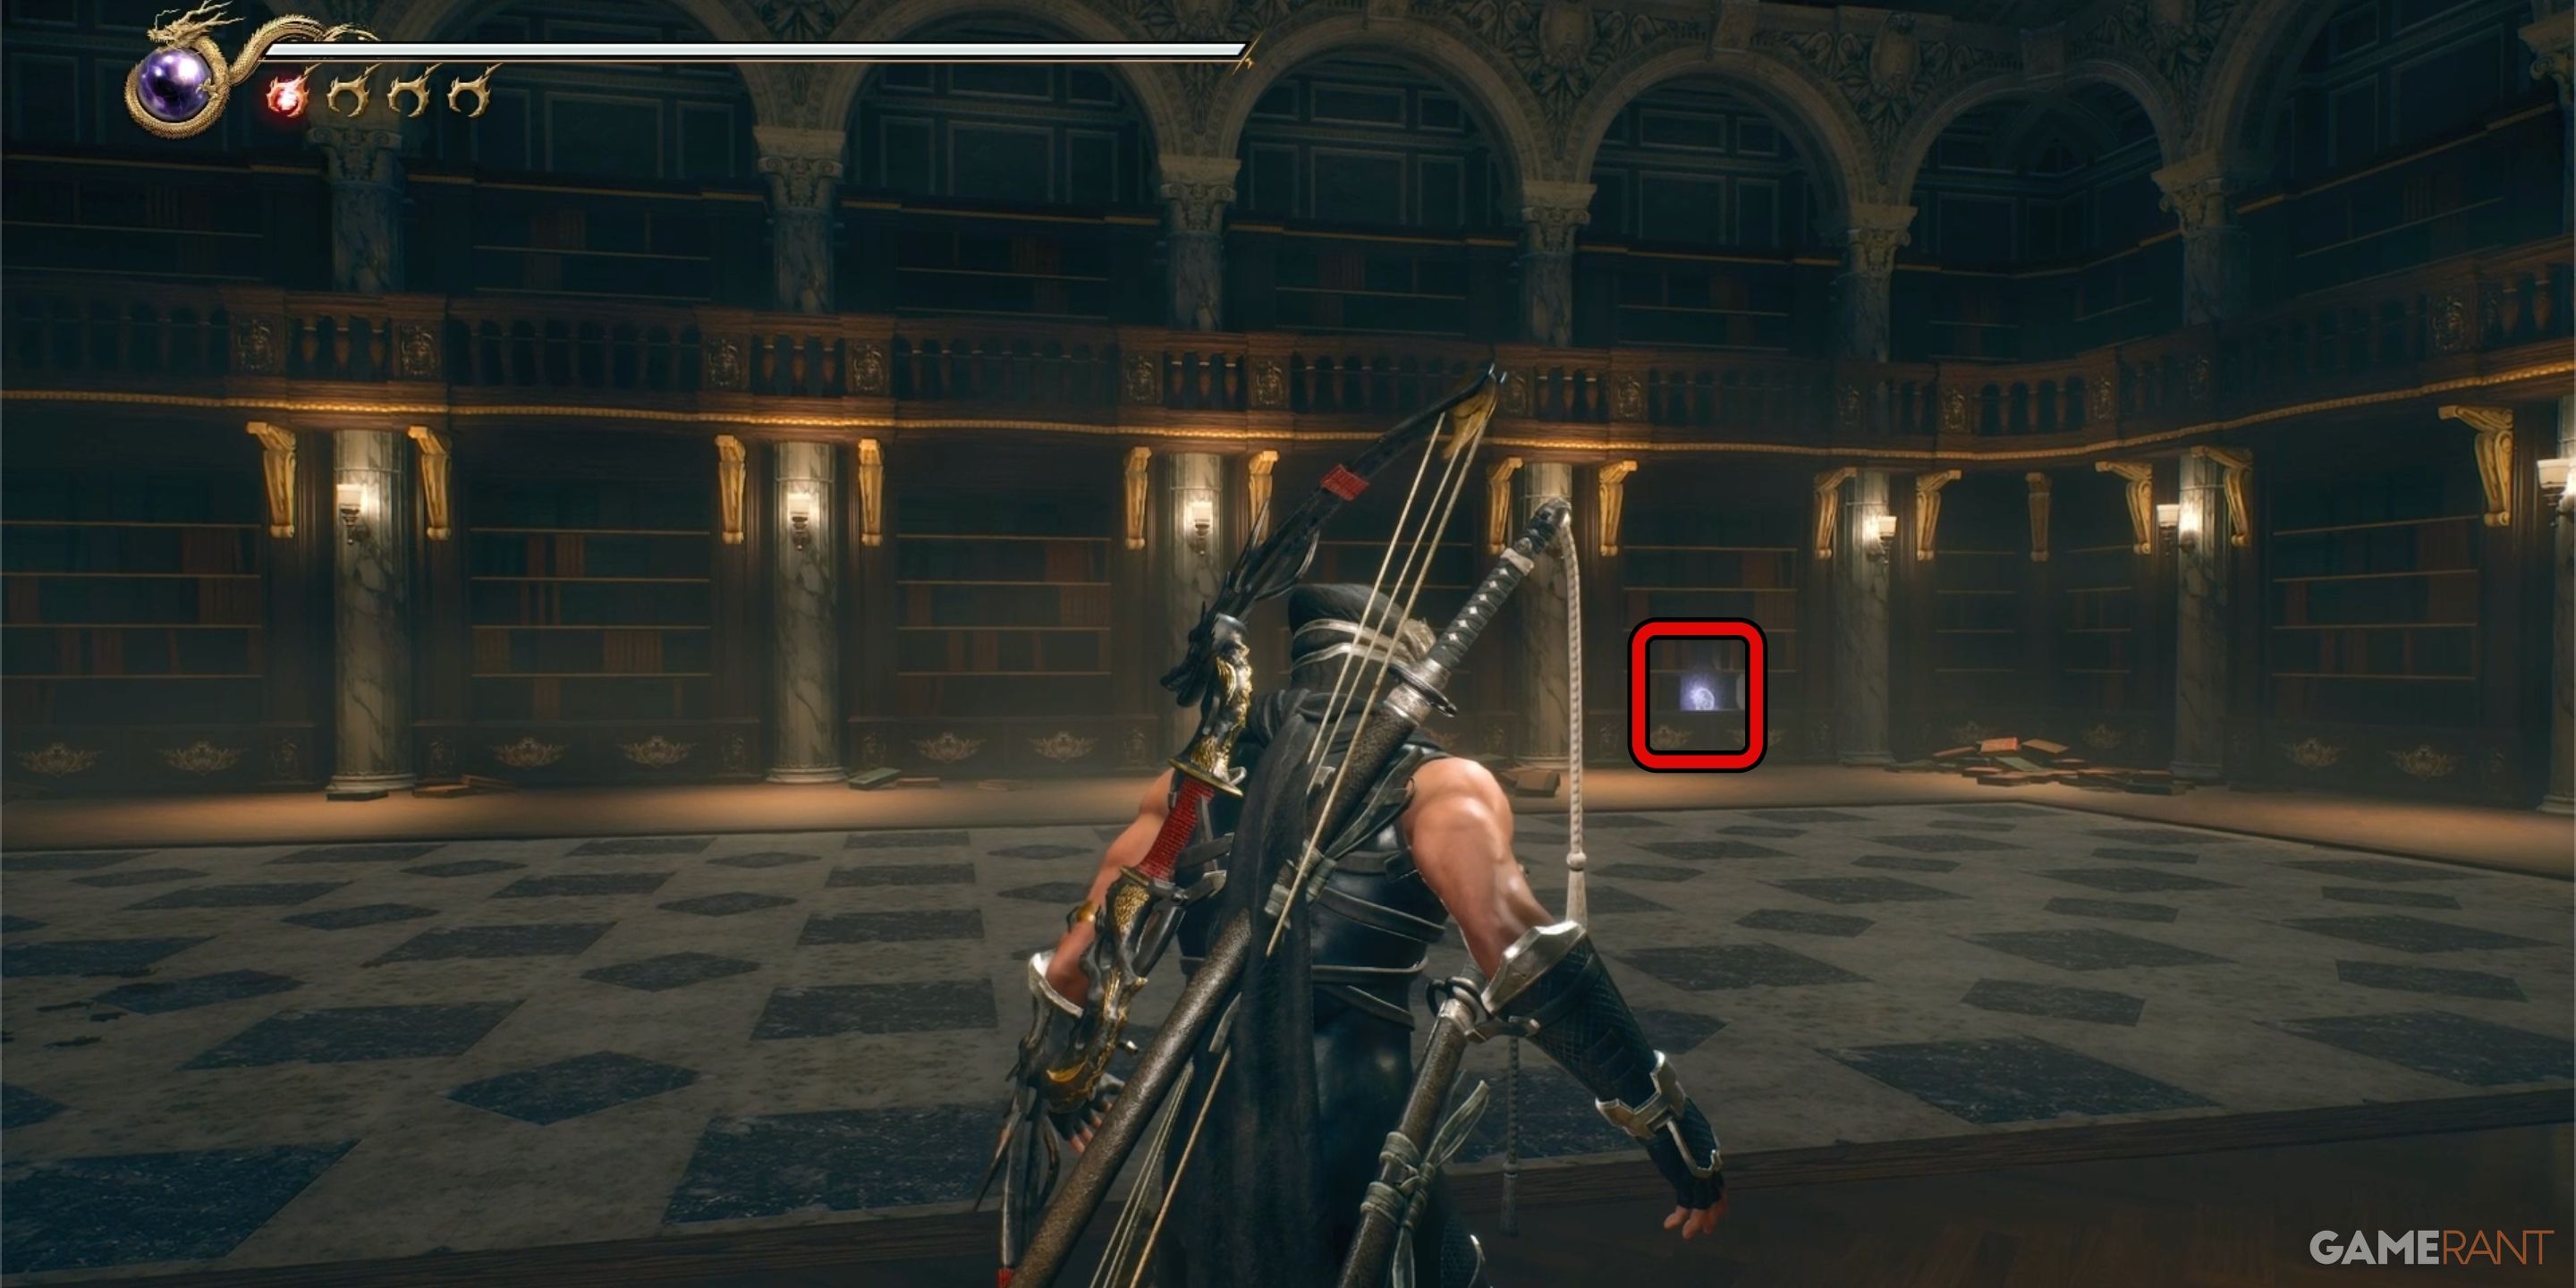
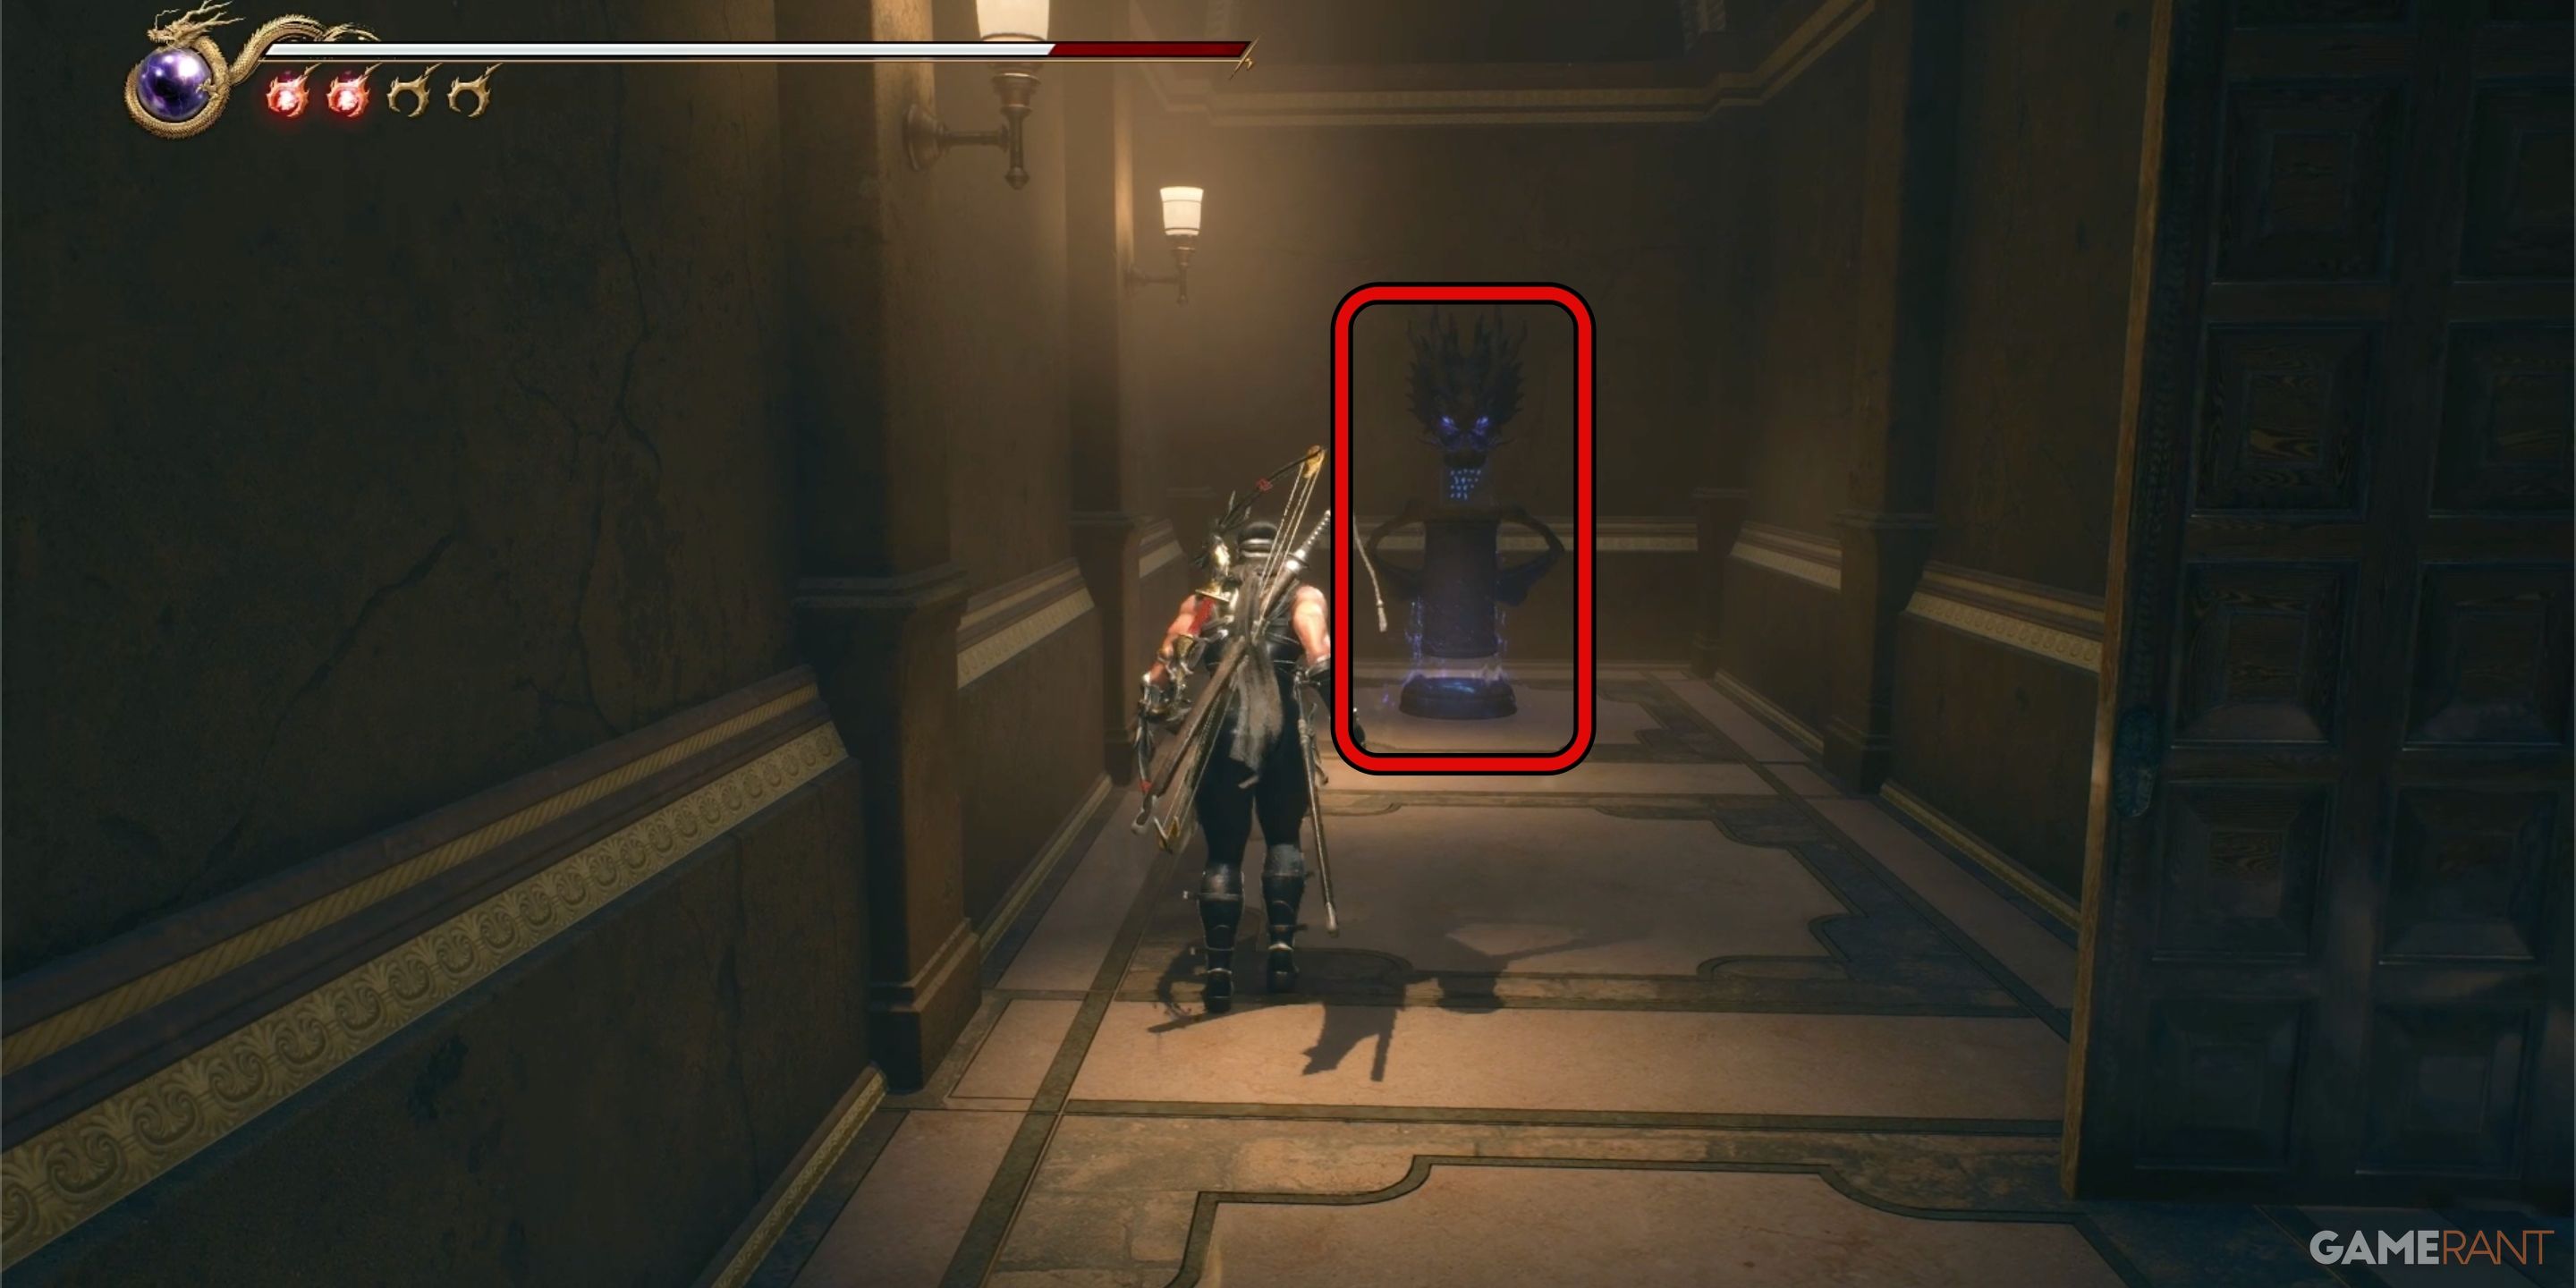
In the library room at the peak of the marble stairway, where Save Point 6 resides, you’ll find Chapter 7’s final Crystal Skull. Defeat the enemies in the library, then position yourself with your back towards the fireplace. From this spot, there’s a bookcase on the left side, slightly to the right of the room’s corner. The crystal skull will appear after you attack that shelf, which is the location shown in the provided image. This action rewards you with the game’s fifteenth Crystal Skull.
Save Point 7:
Once you’ve retrieved the skull, return to the hearth, enter it, and employ a wall jump technique to ascend the chimney to the following level. In the upcoming chamber, vanquish all adversaries, then search for another fireplace. Utilize this fireplace in the same manner as before; this time it will transport you to the rooftop, where Save Point 7 can be found.
Masamura Shop 2:
Starting at Checkpoint 7, utilize the platforms to leap over the chasm ahead. After clearing the turn, prepare for an ambush by multiple werewolves. In case you require a visit to Masamura’s Shop, avoid entering through the large door and climbing the stairs. Instead, circumnavigate the building’s other side, and you’ll discover a Masamura Shop and two chests spanning the gap. Caution: One chest has a trap set, as fish enemies will emerge and attack you. The second chest holds red orbs.
Save Point 8:
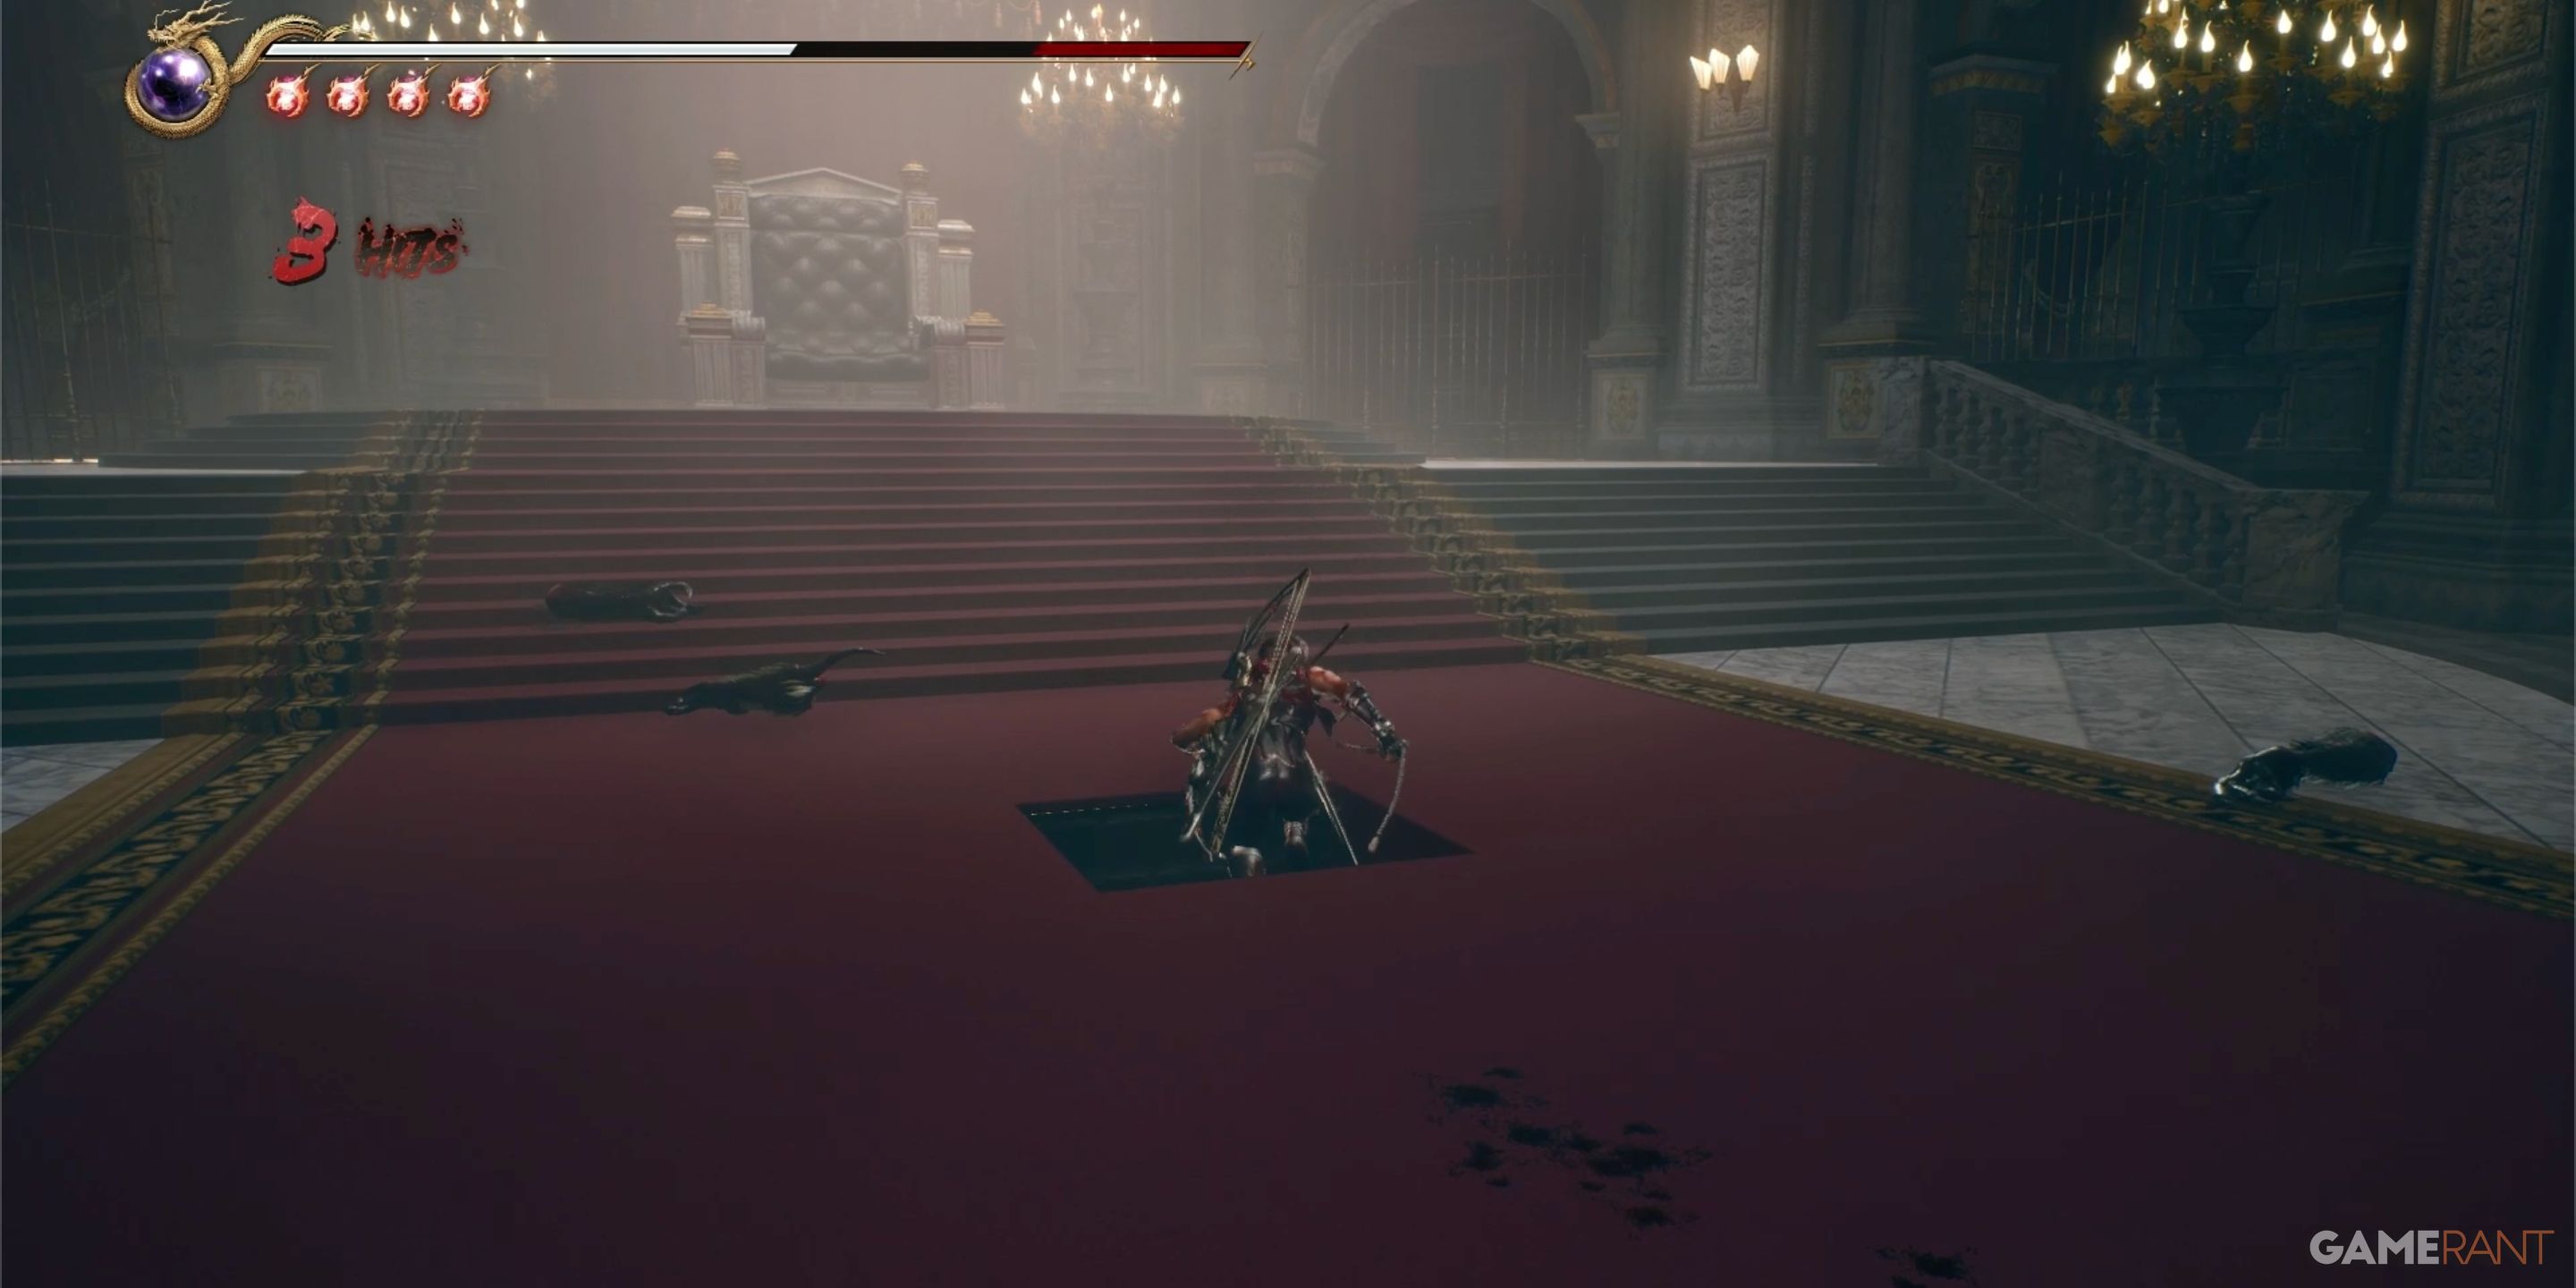
Following save point number 7, ascend the grand stairway, and you’ll encounter Volf. He informs you that the throne room isn’t an appropriate battleground and hints that he can be found in the Colosseum instead.
Following your victory against the foes in the royal chamber, you should step towards the trapdoor situated before the throne. This trapdoor serves as your passageway, leading you to a waterway. Here, you will discover a treasure chest holding radiant blue healing orbs, along with Save Point 8.
Reach the Colleseum:
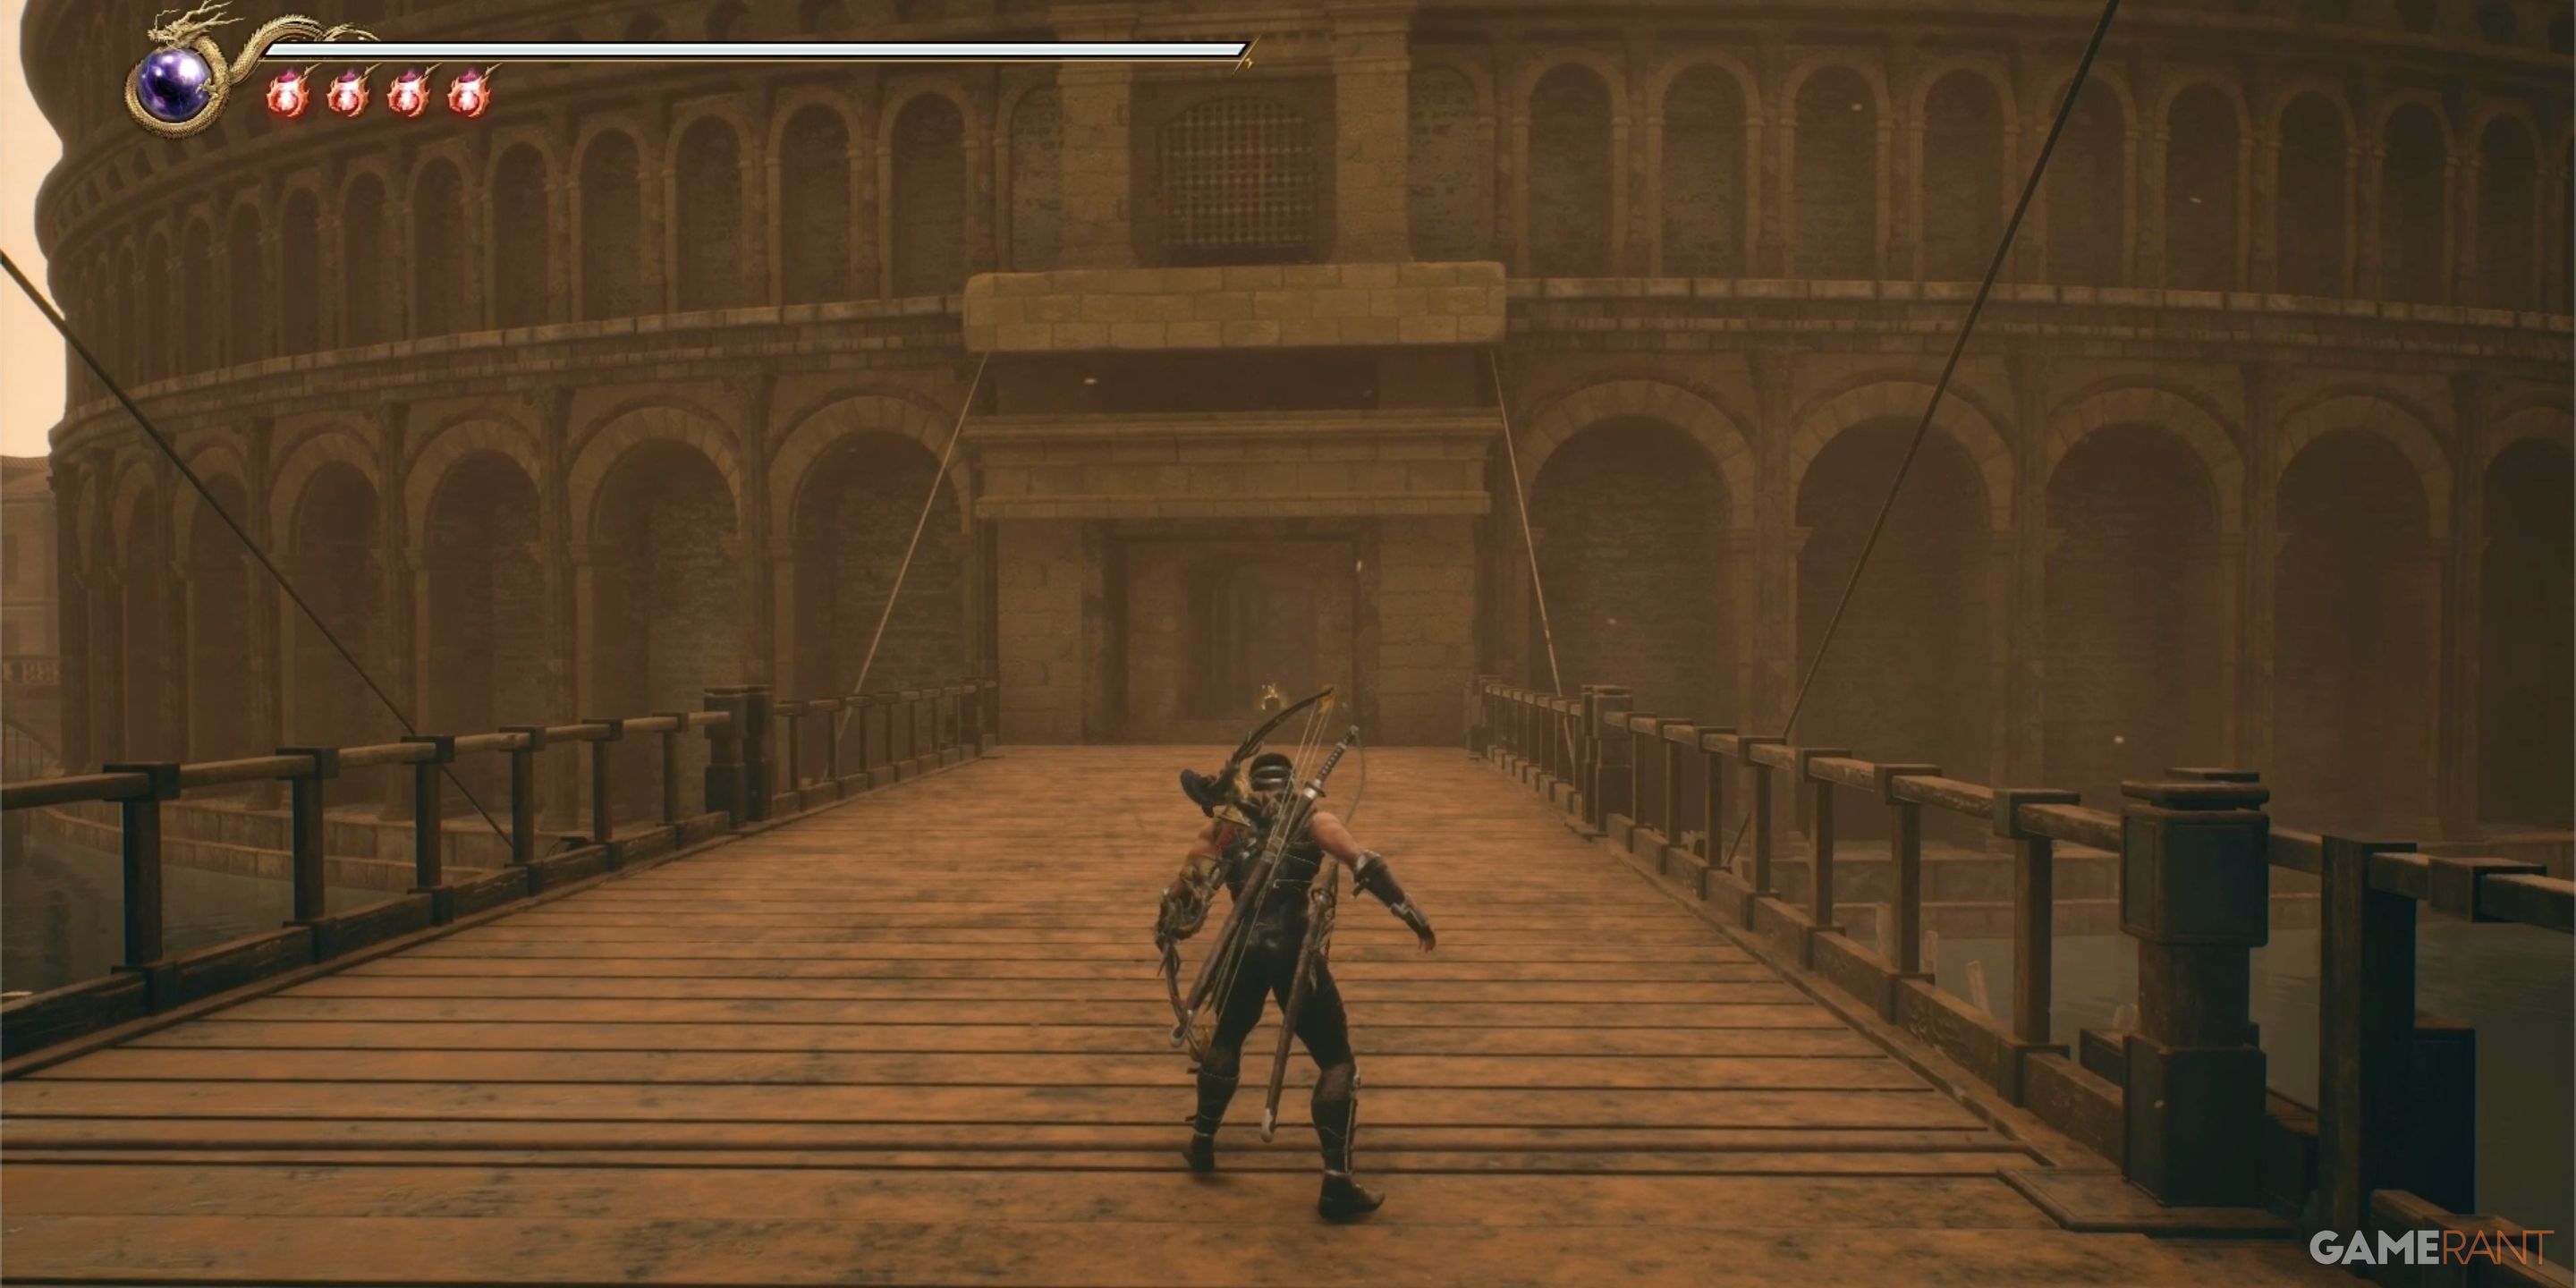
Leaving the canal behind, you’ll find yourself at the castle entrance, where the big locked door now stands above you. Go back down the steps you ascended earlier. You’ll spot a gate that is currently up, and remember the lifted bridge from your ascent, now lowered. Traverse the bridge and unlock the chest to gather a large golden orb of currency.
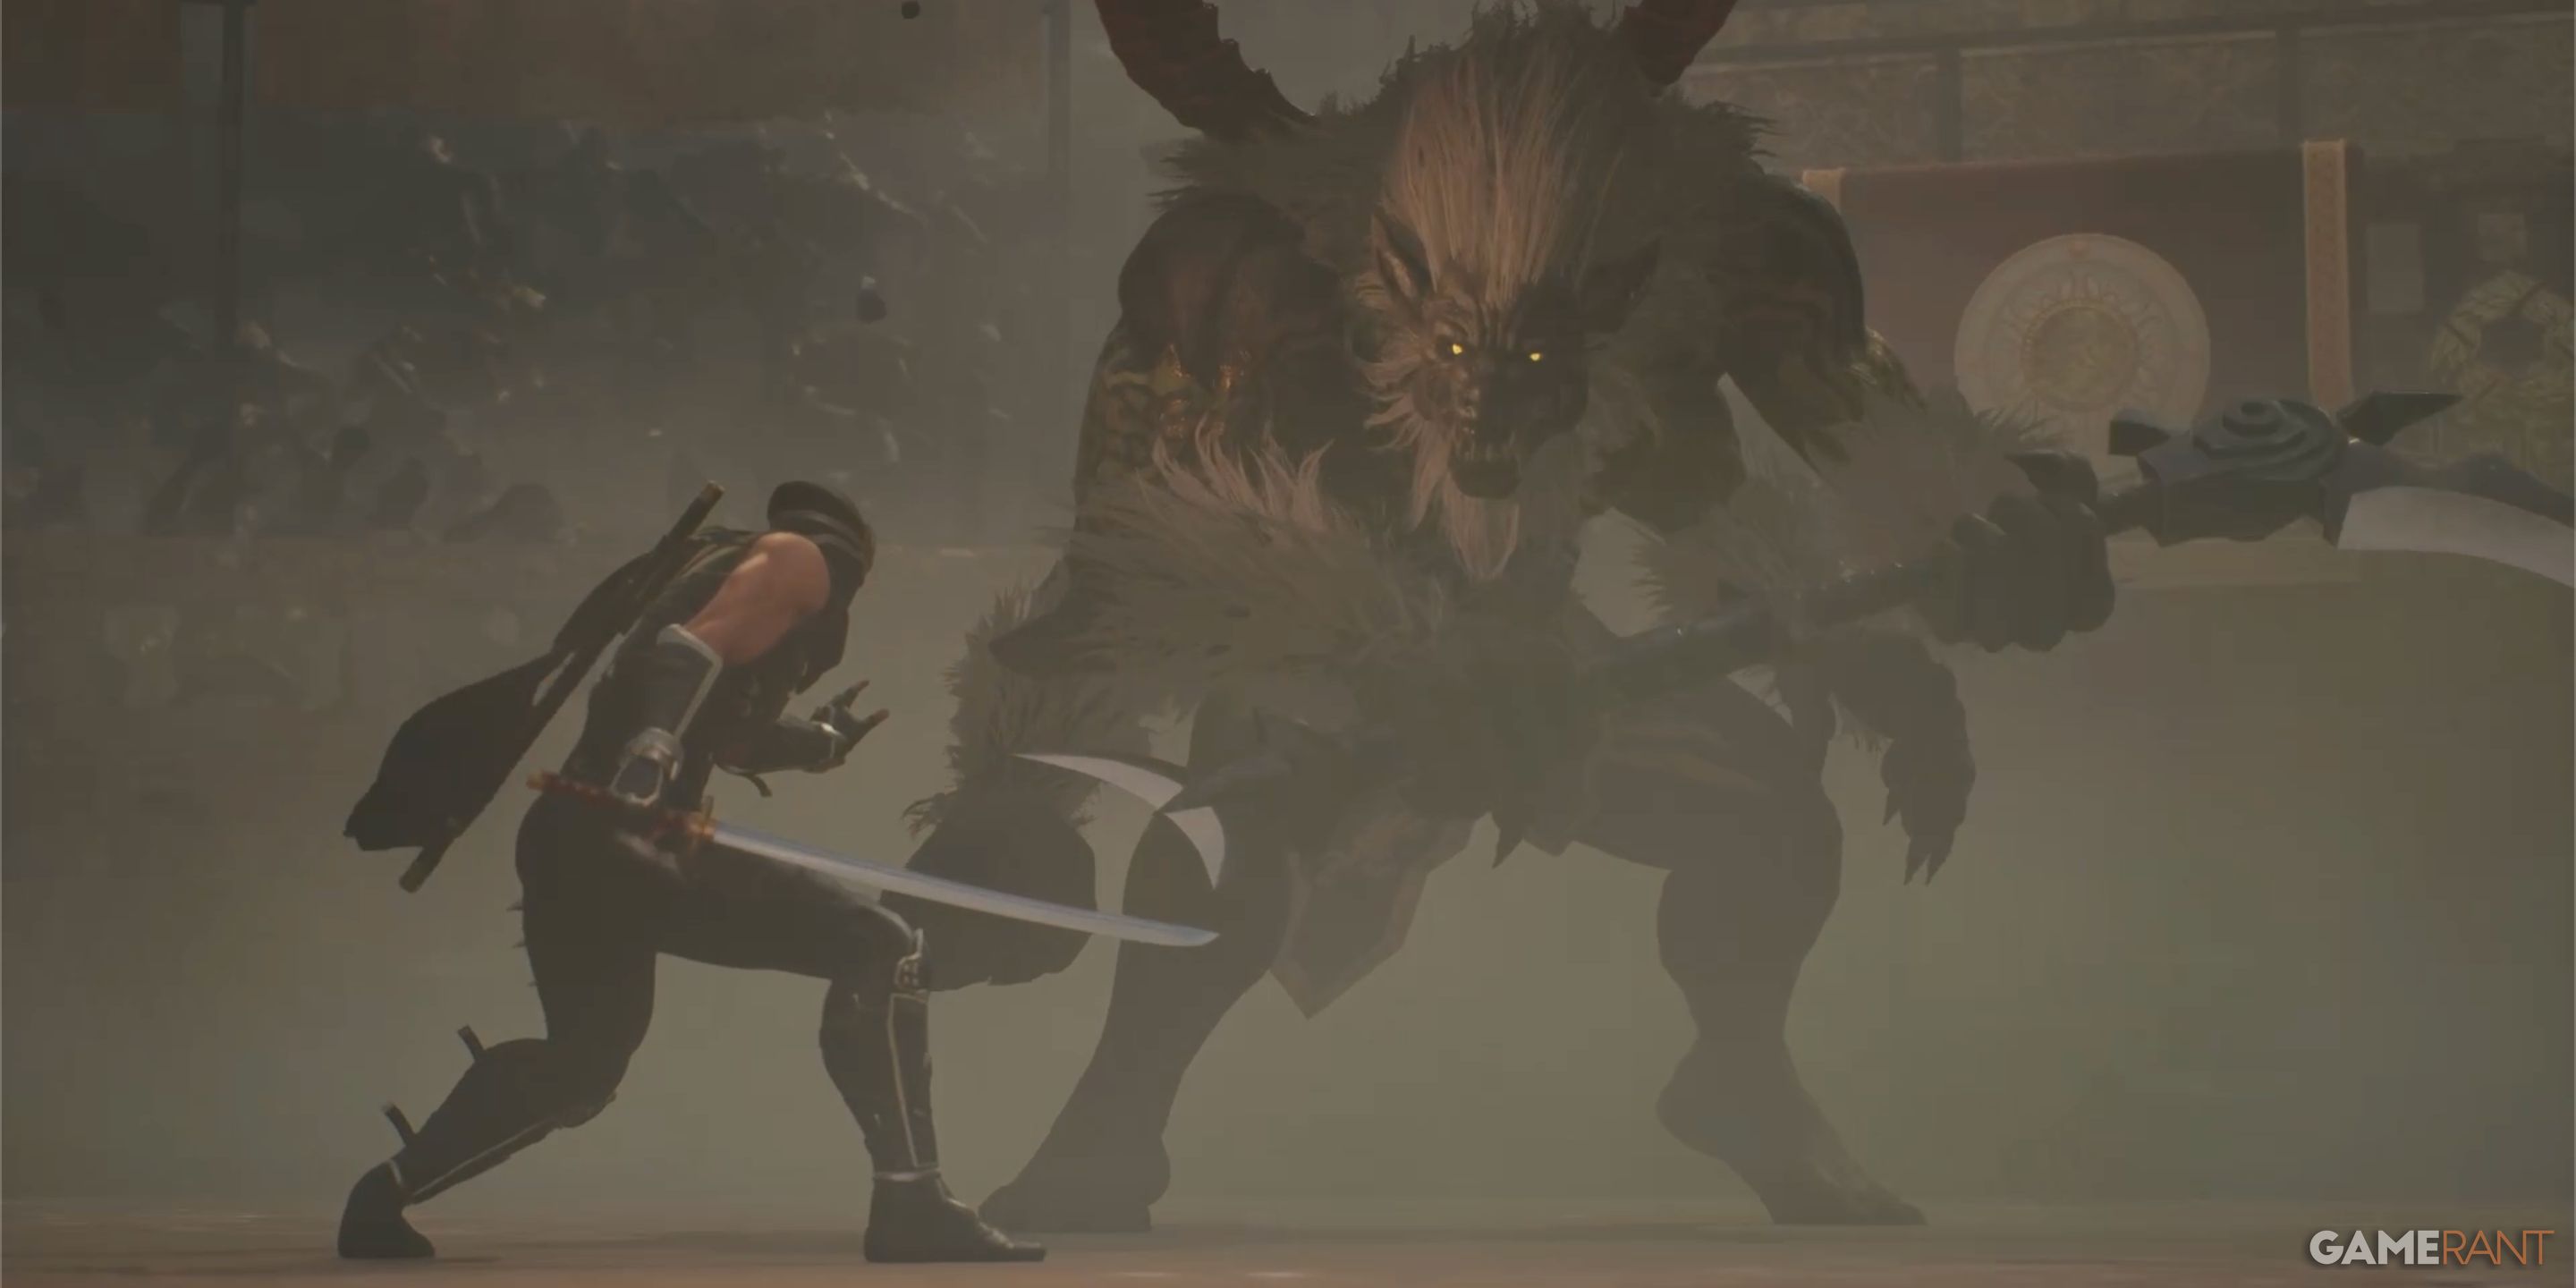
Volf Boss Fight:
Stepping into the Colosseum brings you face-to-face with Volf, a formidable foe. To conquer this massive adversary, as with most challenging battles in the game, practice patience. If you’re playing at normal difficulty or above, remember to move cautiously and make use of the defensive strategies provided. Dodge Volf’s attacks to lessen his impact swiftly.
After overcoming Volf, you gain access to the Eclipse Scythe – a weapon he personally wields. However, before the story concludes, you’ll face a massive wave of werewolves. In the end, you’ll be saved by Helicopter Lady, marking the finale of the chapter.
Read More
- All Skyblazer Armor Locations in Crimson Desert
- How to Get the Sunset Reed Armor Set and Hollow Visage Sword in Crimson Desert
- All Shadow Armor Locations in Crimson Desert
- Marni Laser Helm Location & Upgrade in Crimson Desert
- All Helfryn Armor Locations in Crimson Desert
- All Golden Greed Armor Locations in Crimson Desert
- All Icewing Armor Locations in Crimson Desert
- Best Bows in Crimson Desert
- How to Beat Stonewalker Antiquum at the Gate of Truth in Crimson Desert
- Legendary White Lion Necklace Location in Crimson Desert
2025-04-22 13:26