In the game “Fantasy Life I: The Girl Who Steals Time”, Ginormosia is the largest region, teeming with diverse landscapes and areas. Each area within this region includes a Googlancia Tower; investigating these towers adds that area’s map to the player’s tablet. Maps are indispensable for navigating the region and discovering valuable resources.
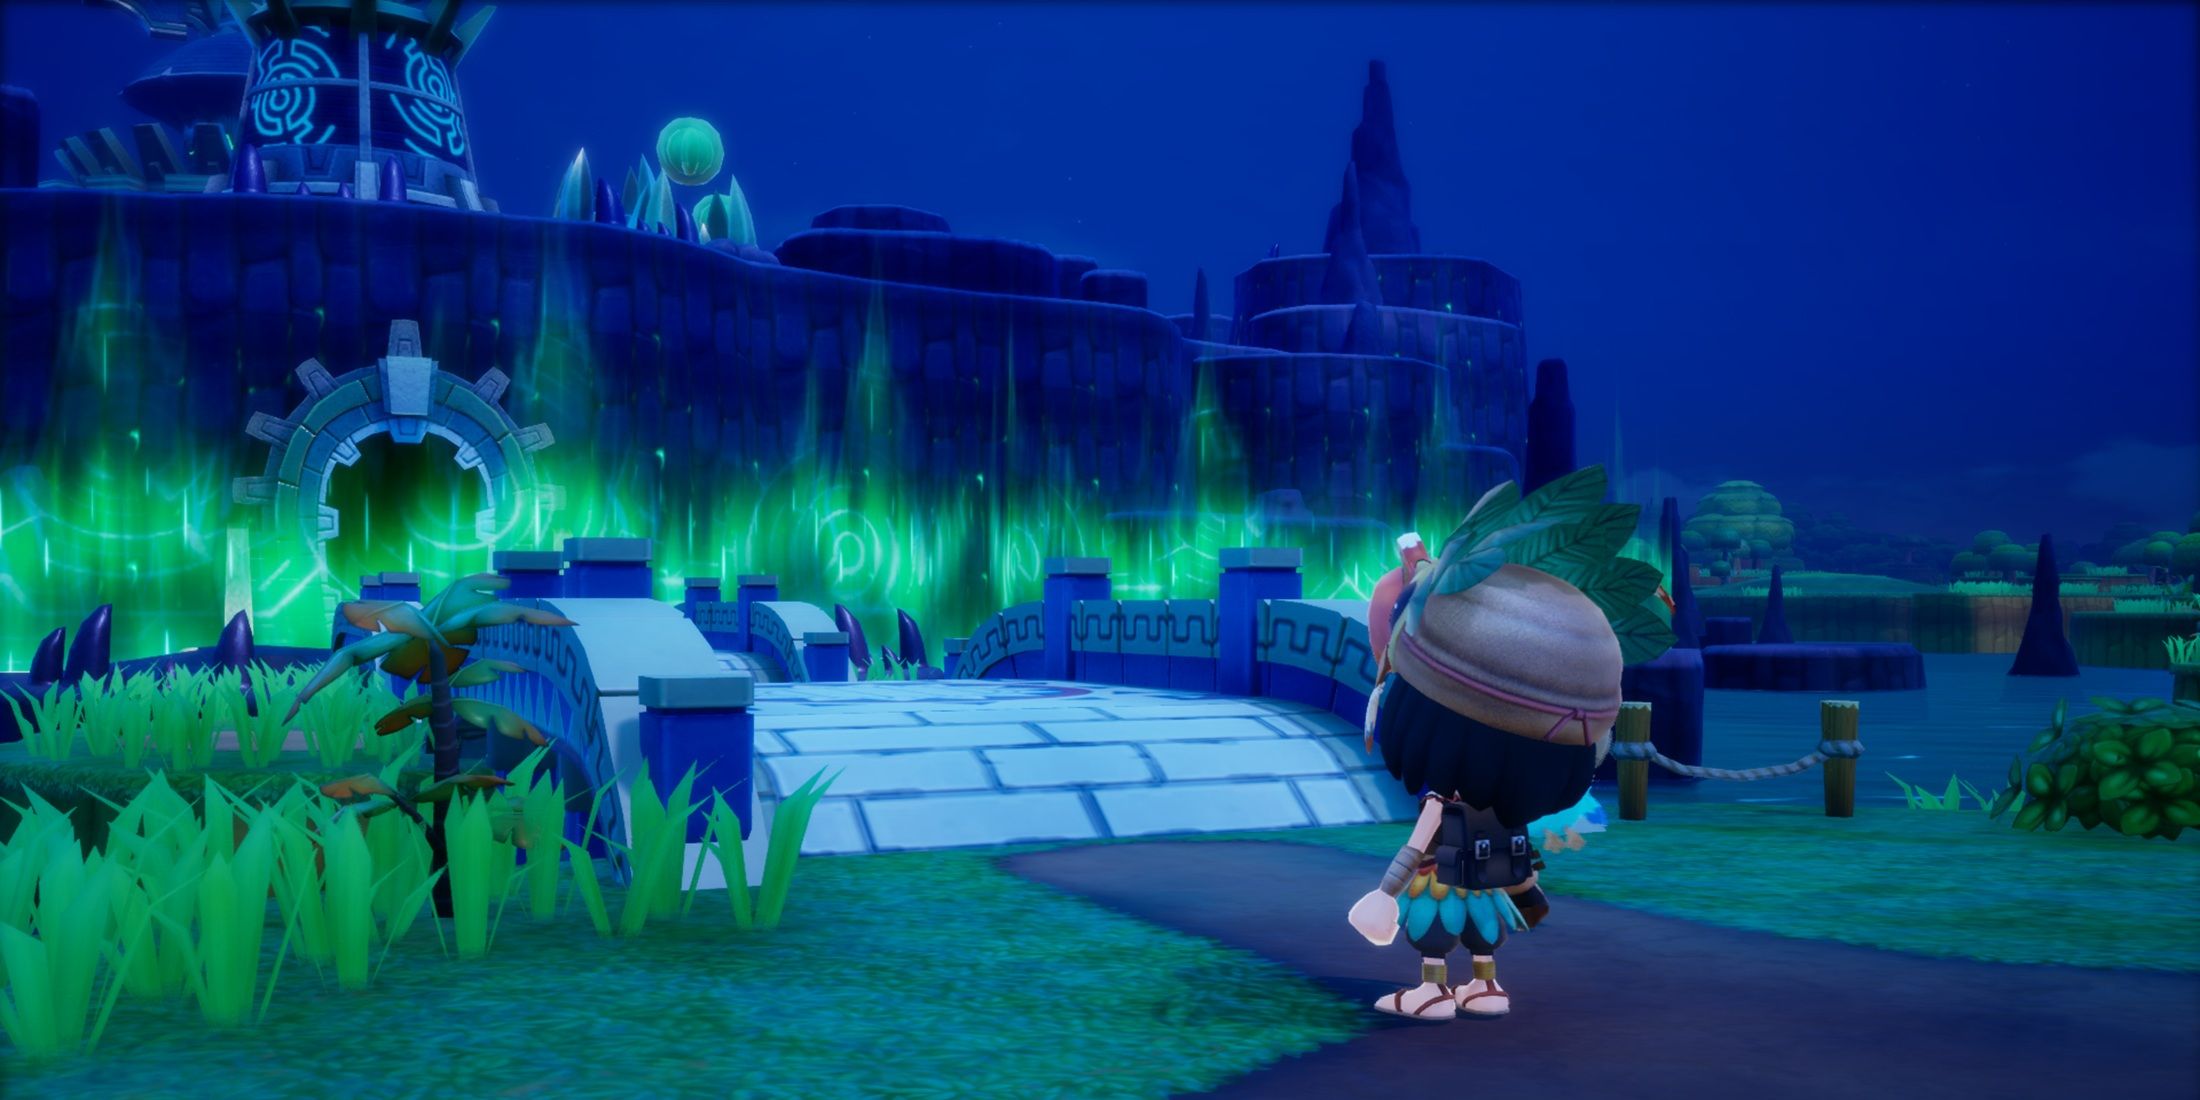
Within each district of Ginormosia, you’ll find one to two Sanctuaries. If your goal is to find Strangelings, overcoming the challenges at these sanctuaries is the key. Each sanctuary contains a captive Strangeling that can only be freed once the player successfully completes the challenge, either by vanquishing enemies or solving riddles. These sanctuaries are not initially marked on your map; instead, you must explore and find them yourself, or learn from others’ discoveries!
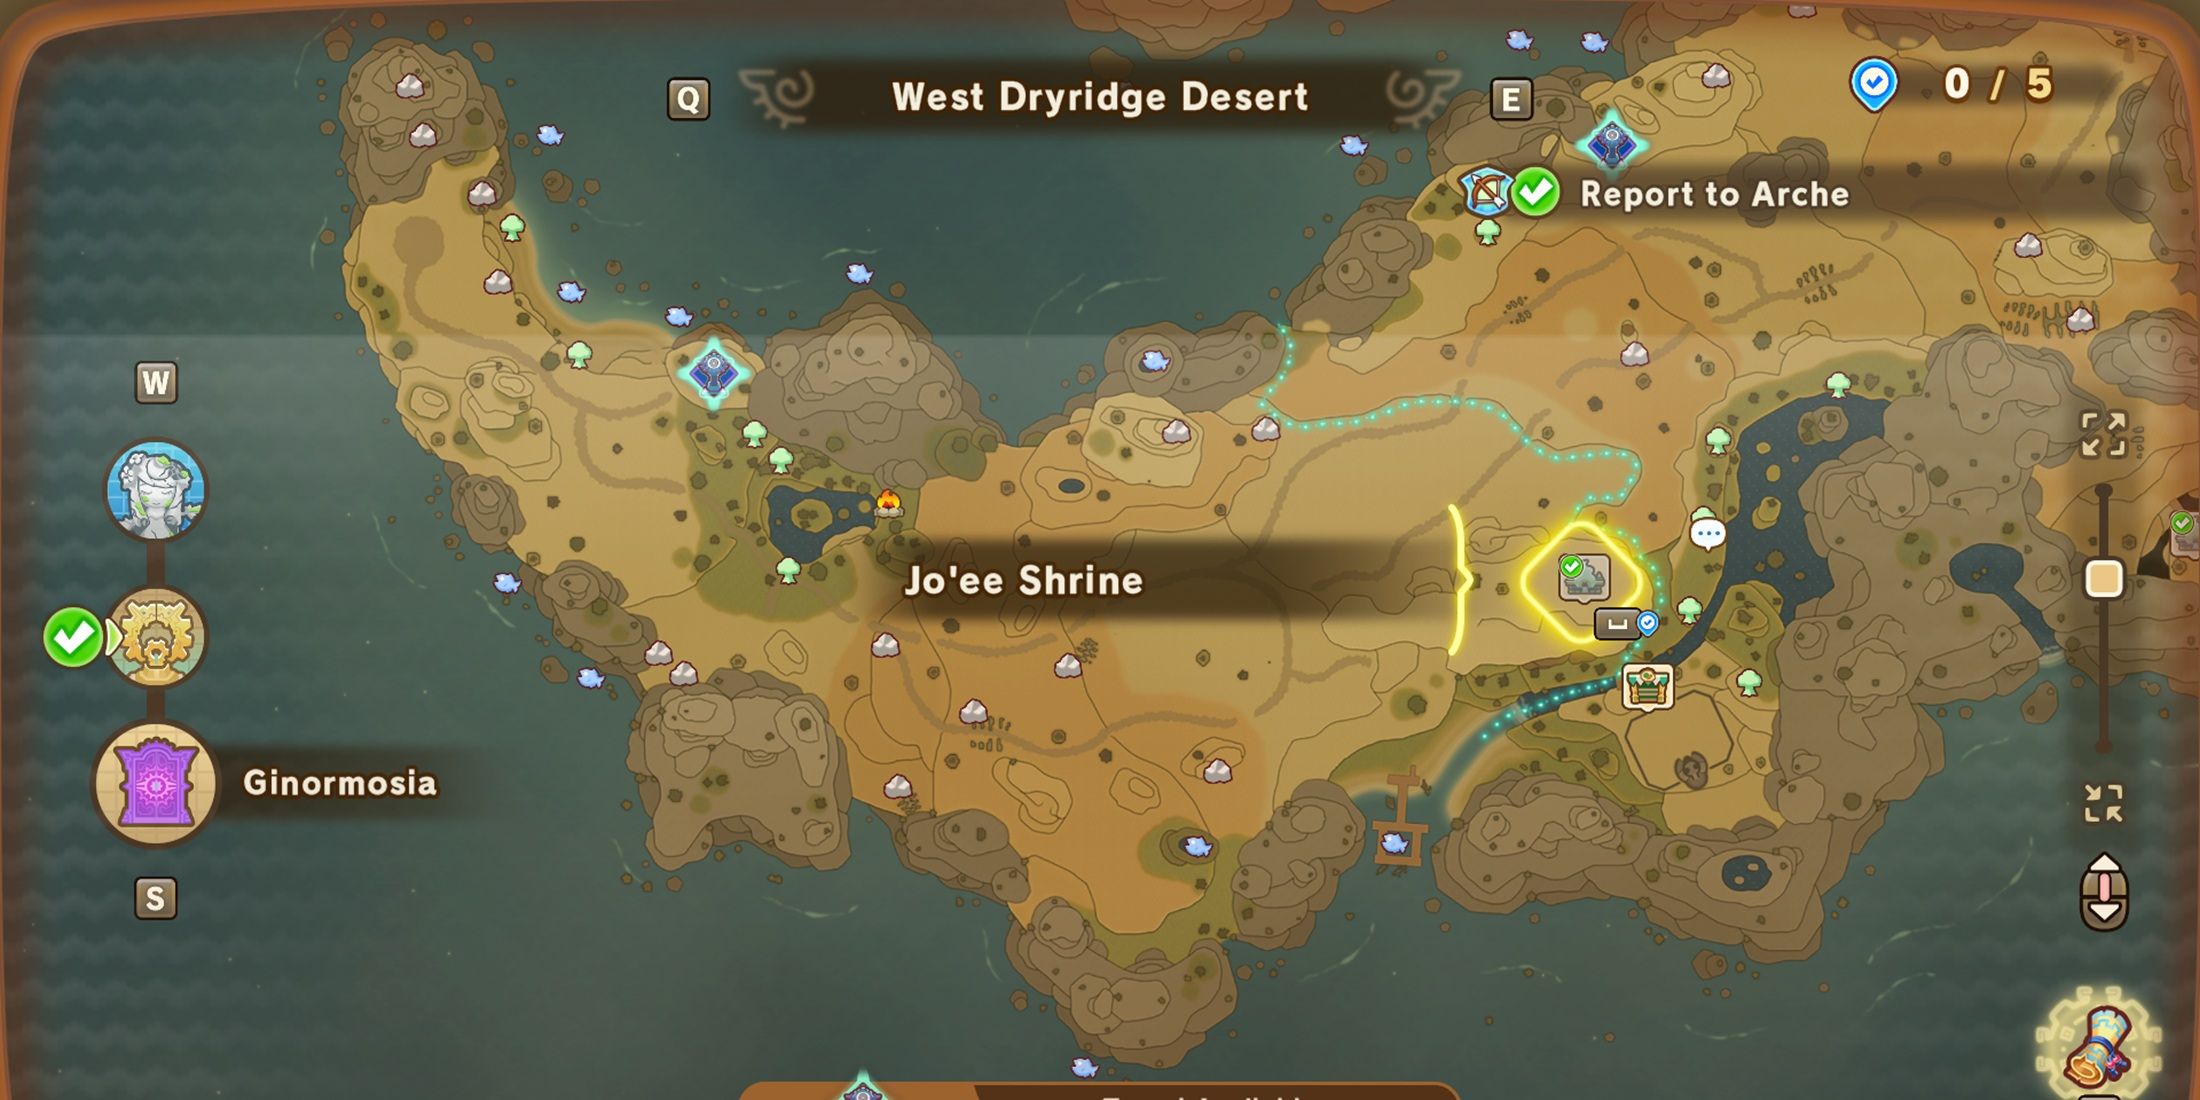
West Dryridge Desert Shrine Location
- 1 Shrine
In Ginormosia, players initially gain access to the West Dryridge Desert as their starting location. As they advance through the game’s story quests, various points of interest within this desert become accessible. One such point of interest is the Jo’ee Shrine, situated in the southeastern part of the region, right by the border with East Dryridge Desert. Notably, this region only has one shrine, which is the Jo’ee Shrine.
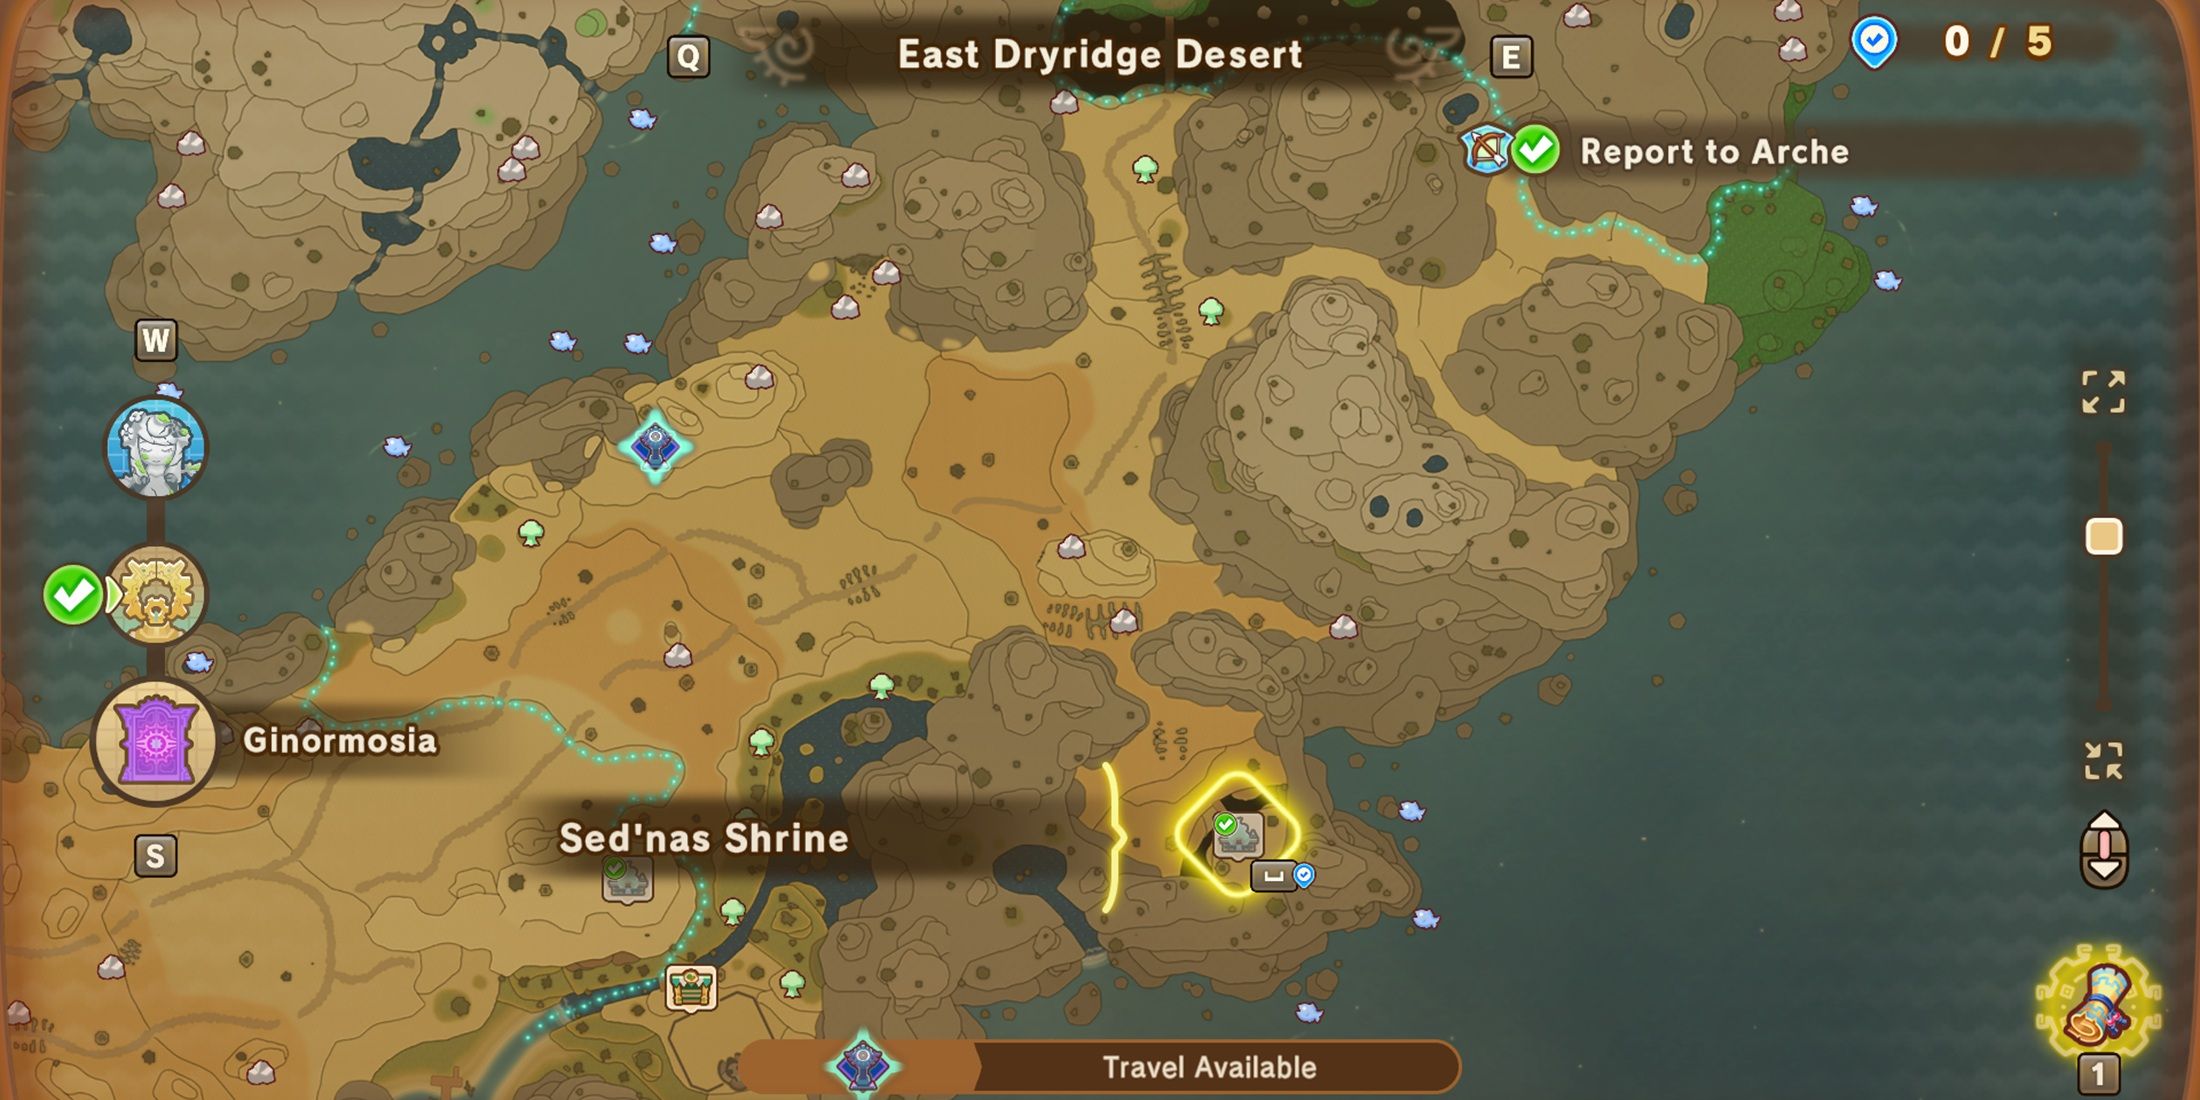
East Dryridge Desert Shrine Location
- 1 Shrine
Just like its western counterpart, the Eastern Dryridge Desert has only one sanctuary, much like Sed’nas Shrine. To find this temple, adventurers must journey towards the southernmost bay in the region. As they approach the sea, they should keep an eye out for the shrine situated high up on a towering cliff. It may be necessary to dismount and scale the cliff on foot to reach the sanctuary.
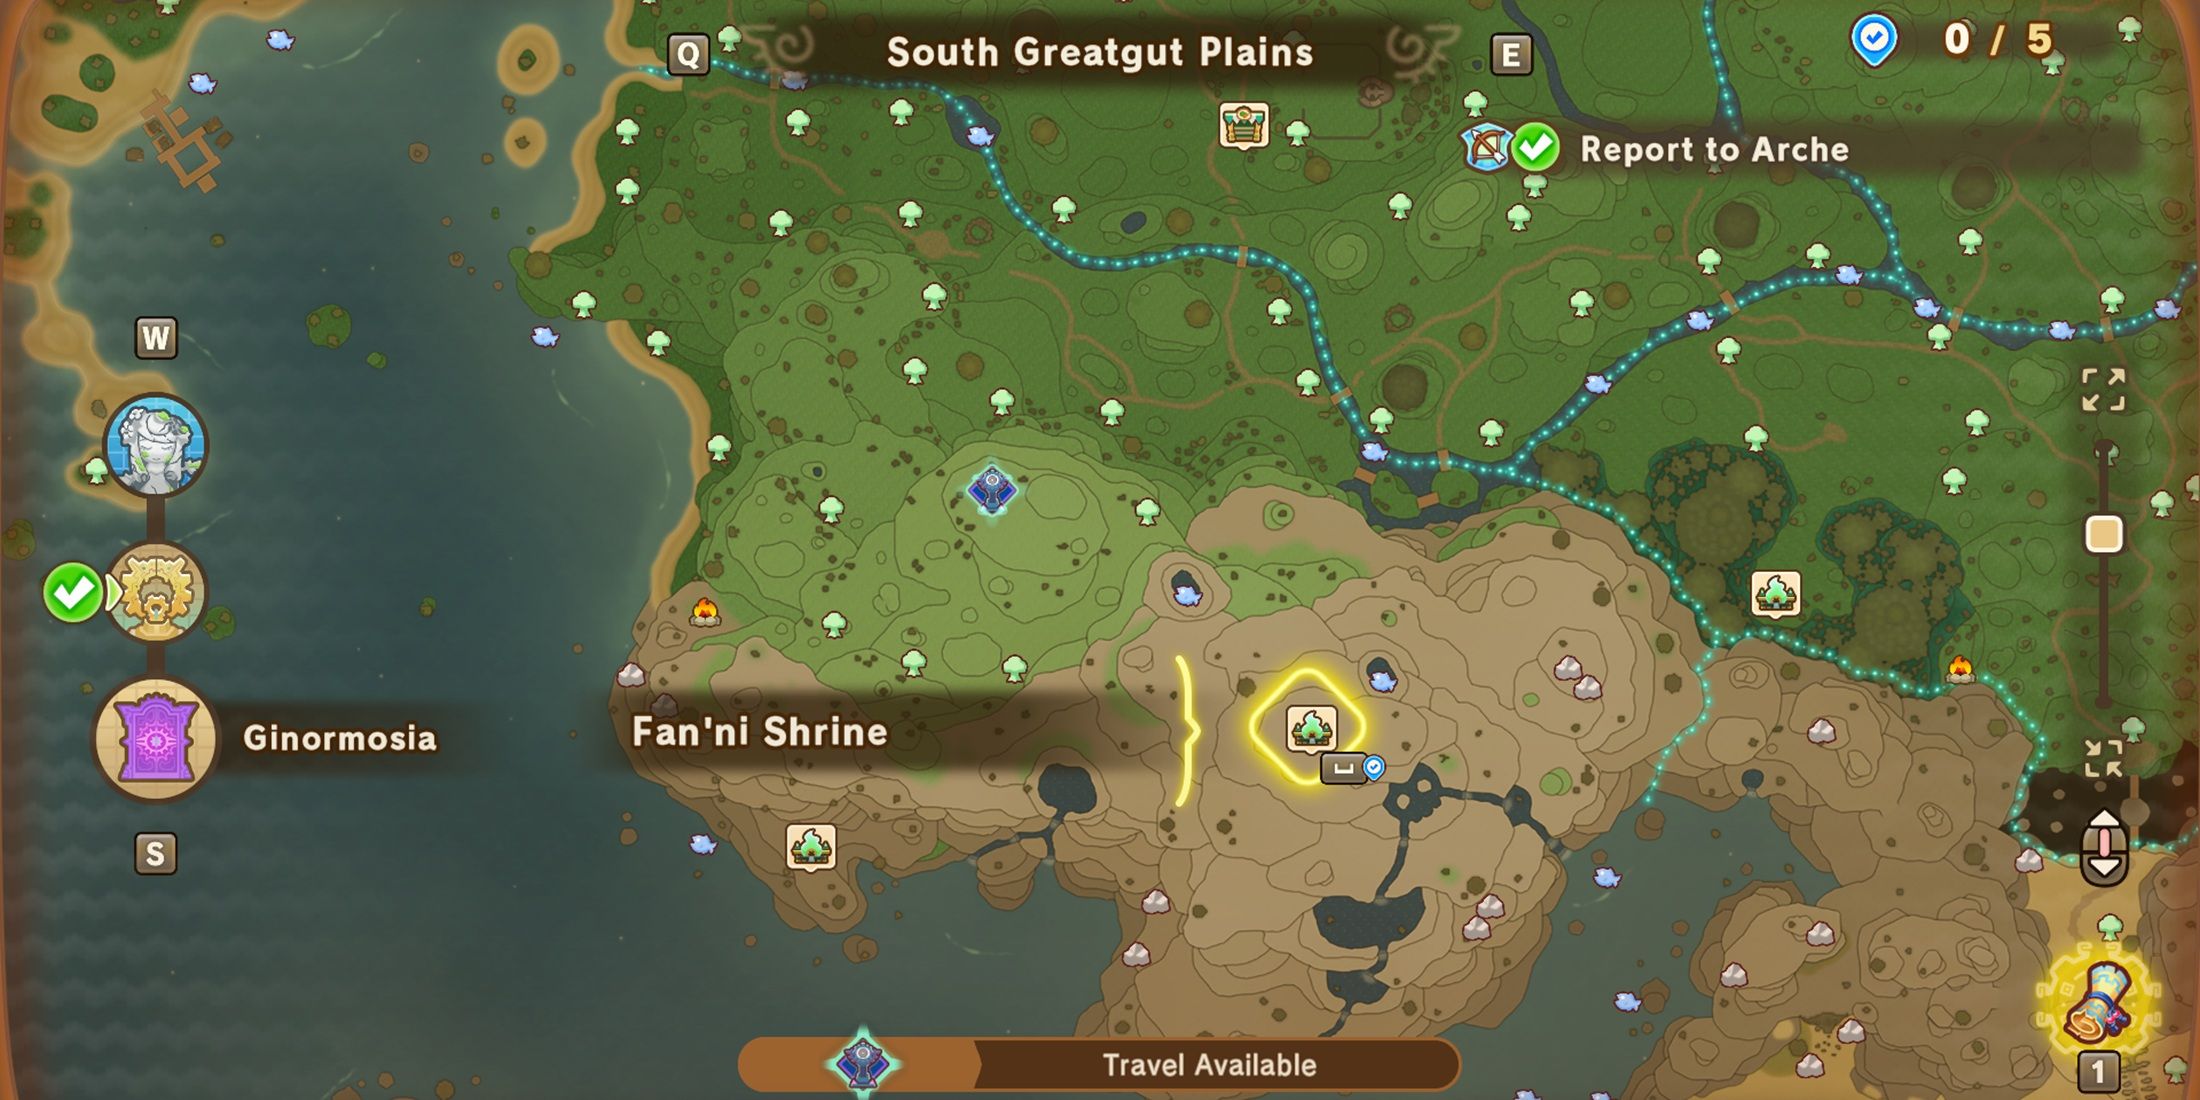
South Greatgut Plains Shrine Locations
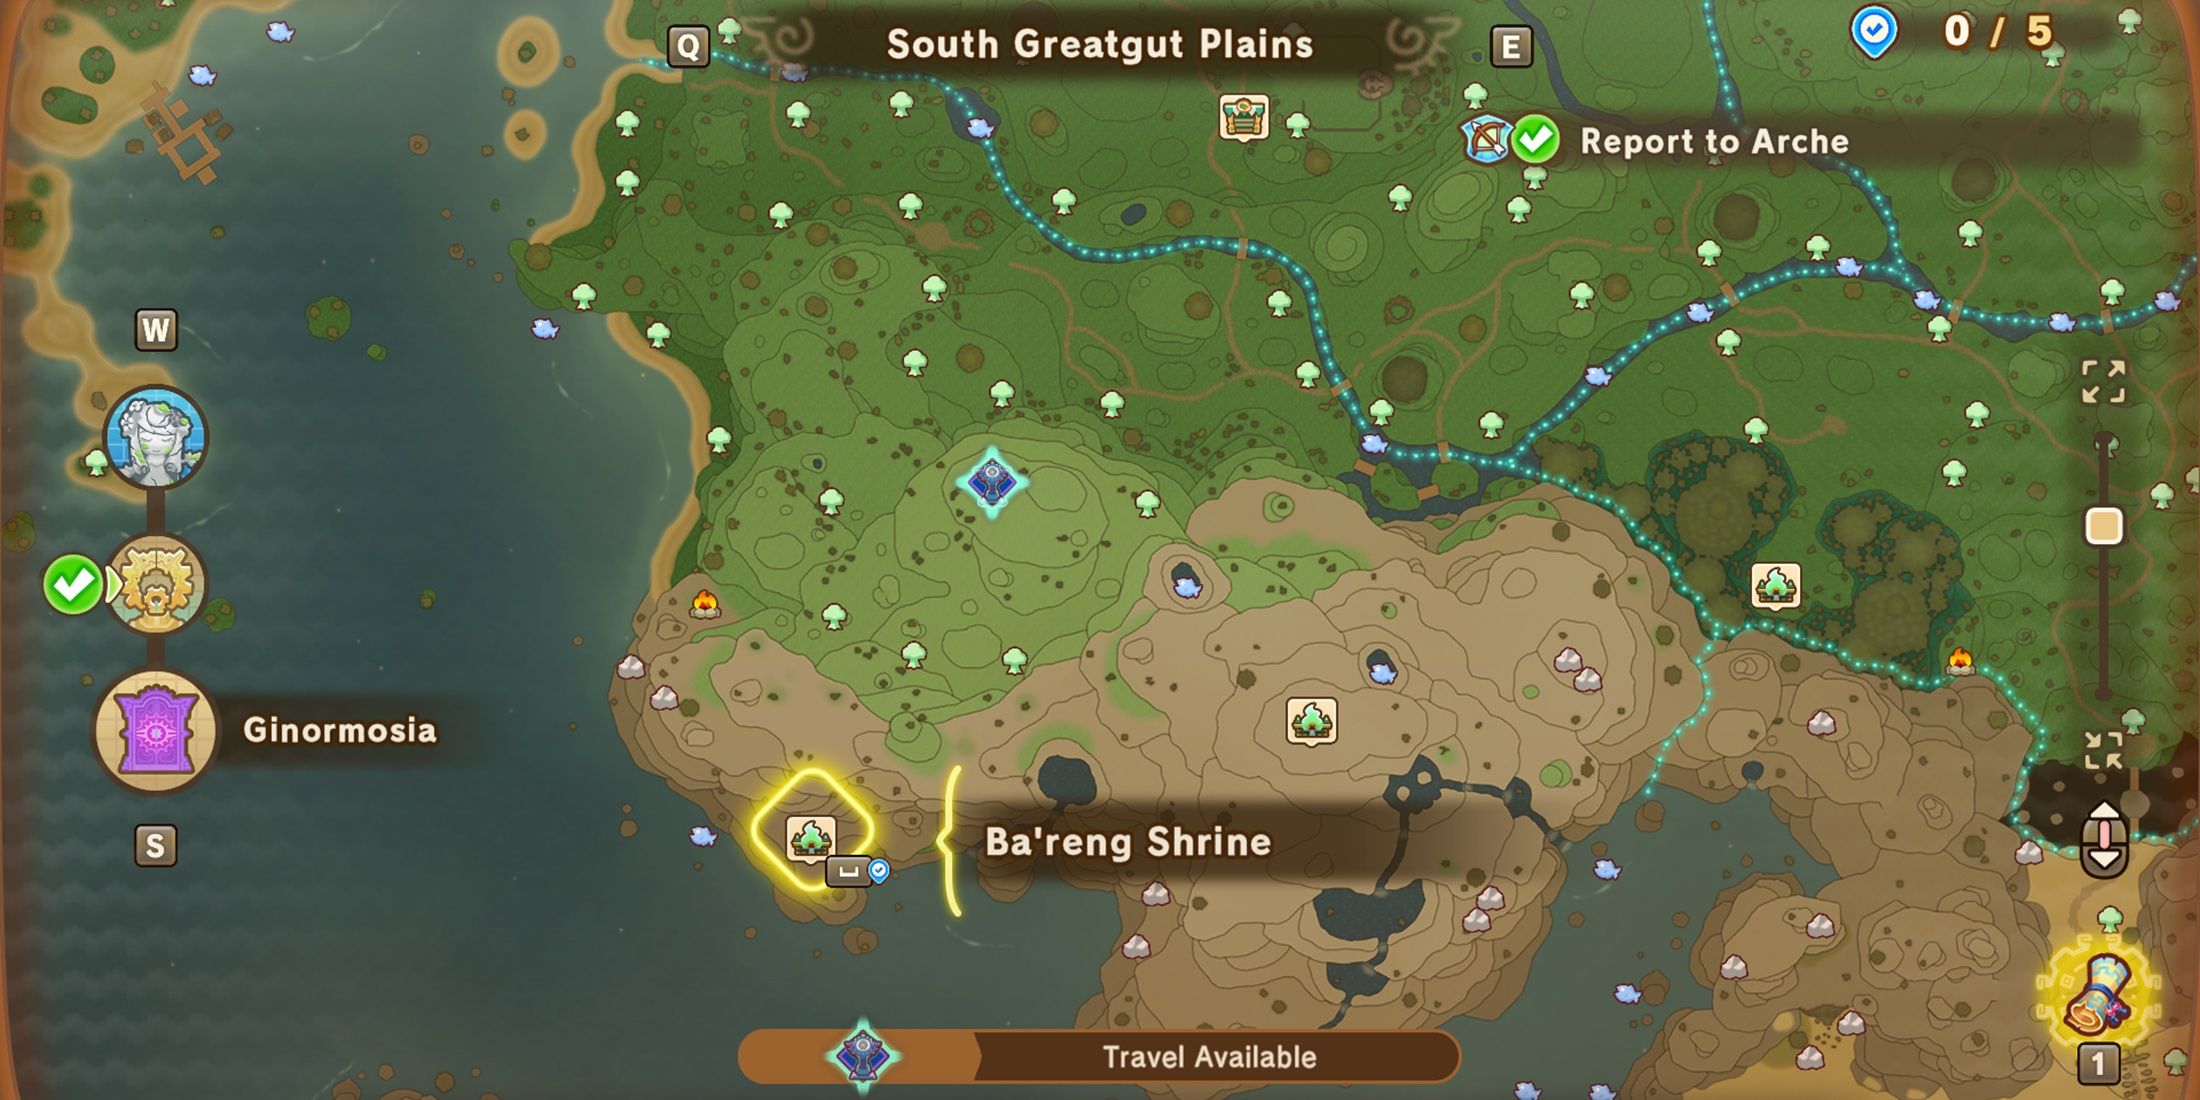
- 2 Shrines
The South Greatgut Plains provides a route to two sacred sites. One of these, known as the Fan’ni Shrine, is nestled in the eastern expanse of the region. It maintains roughly equal distances from both the ocean and the boundary with East Dryridge Desert. Notably, this shrine is perched atop the highest cliff within the area, which means it might not be visible until you’ve reached the precise location.
The following shrine, known as Be’ranh Shrine, is situated slightly to the west of Fan’ni Shrine. It’s quite near the bay and can be a bit tricky to locate from afar since it’s concealed behind towering cliffs.
Viridia Plateau Shrine Locations
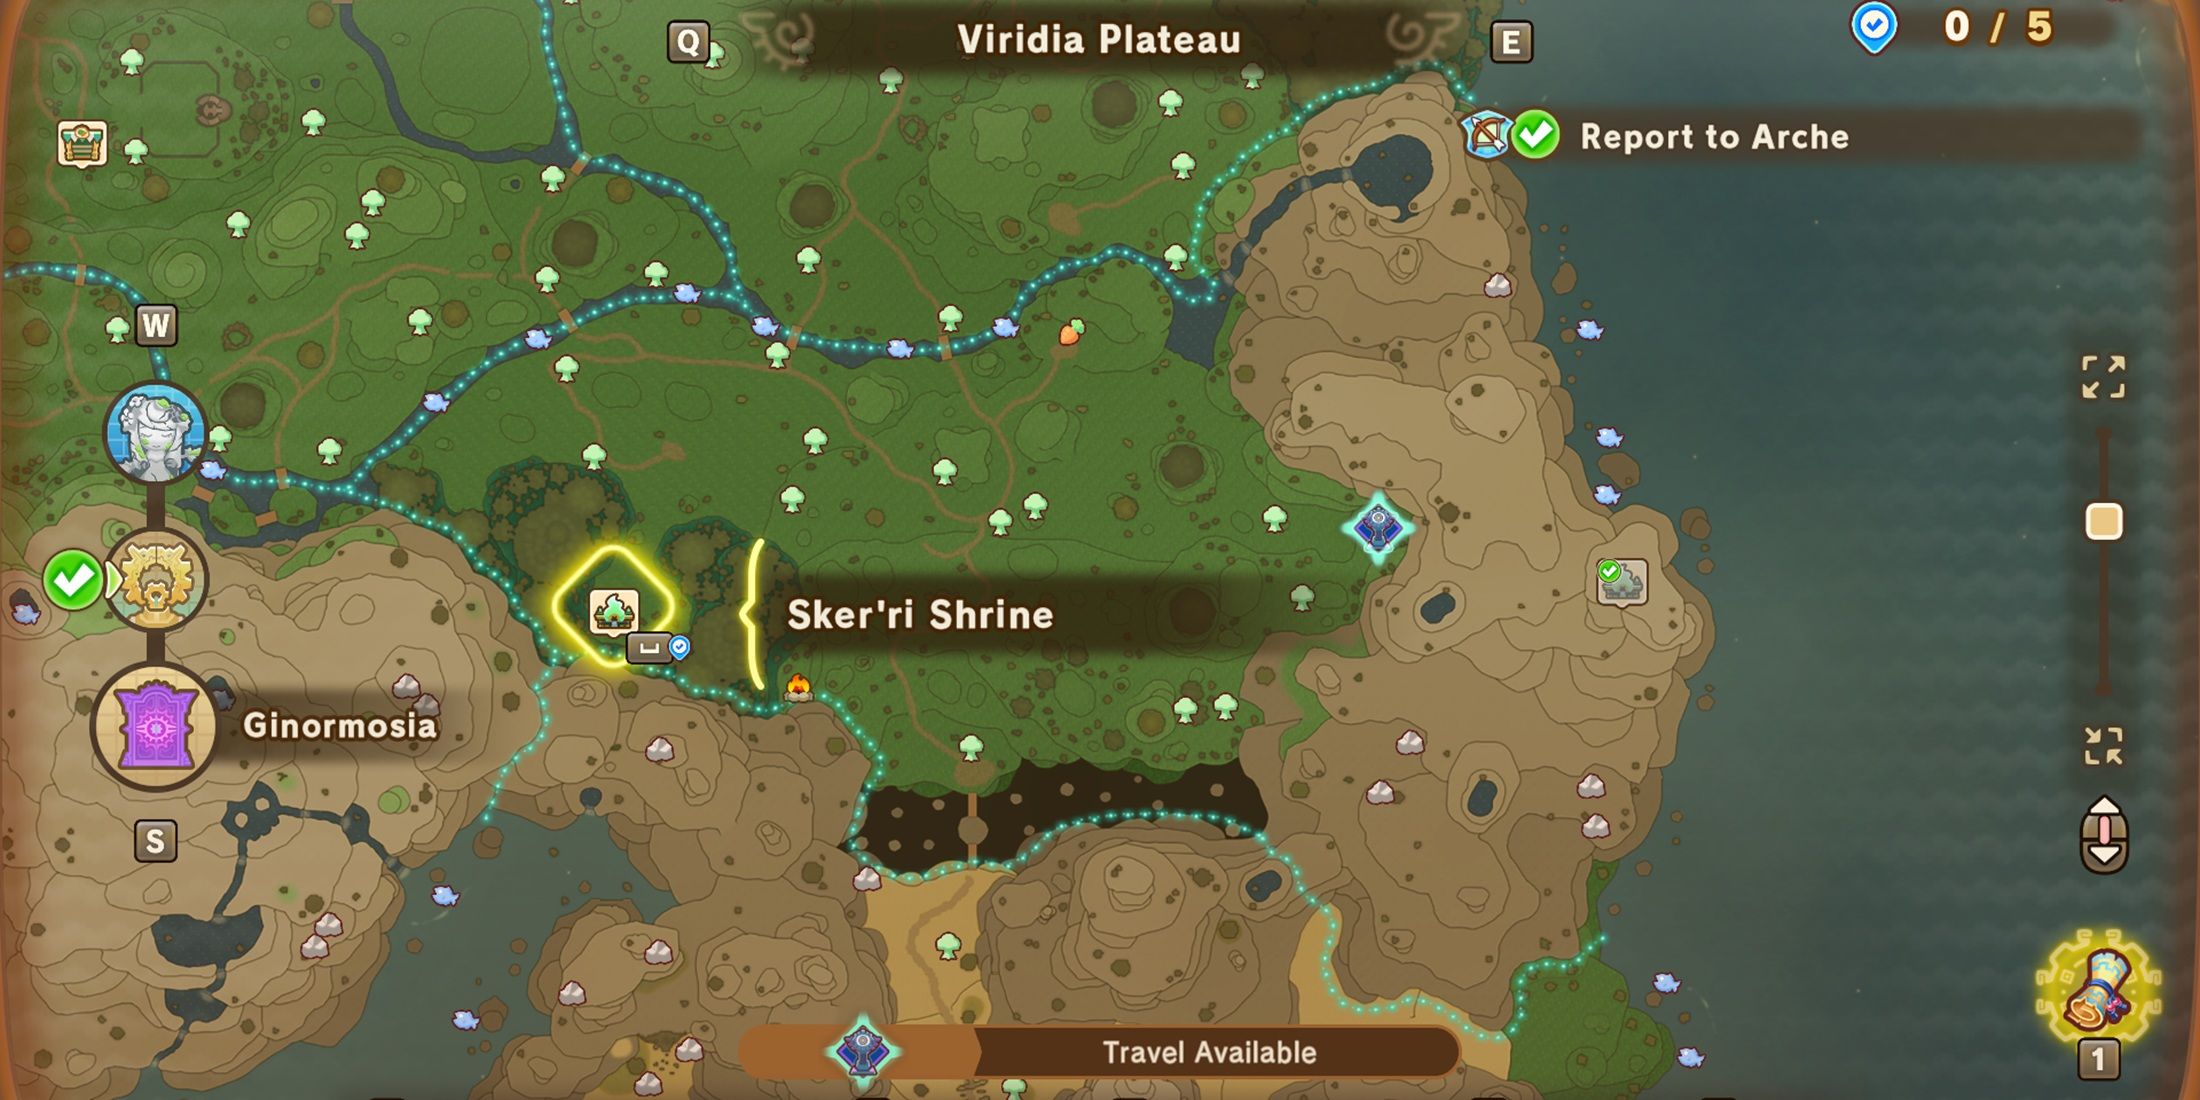
- 2 Shrines
The shrines named Sker’ri and Angar can be discovered on the expansive Viridia Plateau. They are positioned nearly along a horizontal line, with one situated on the western edge of the region and the other at the end of the eastern bay.
The Sker’ri Shrine is situated quite near the borders of both East Dryridge Desert and South Greatgut Plains. You can simply step over the boundary to get there. However, the shrine is enclosed by an impenetrable forest. Therefore, you need to traverse Viridia Plateau initially, skirt around the forest, and eventually discover the secluded path within.
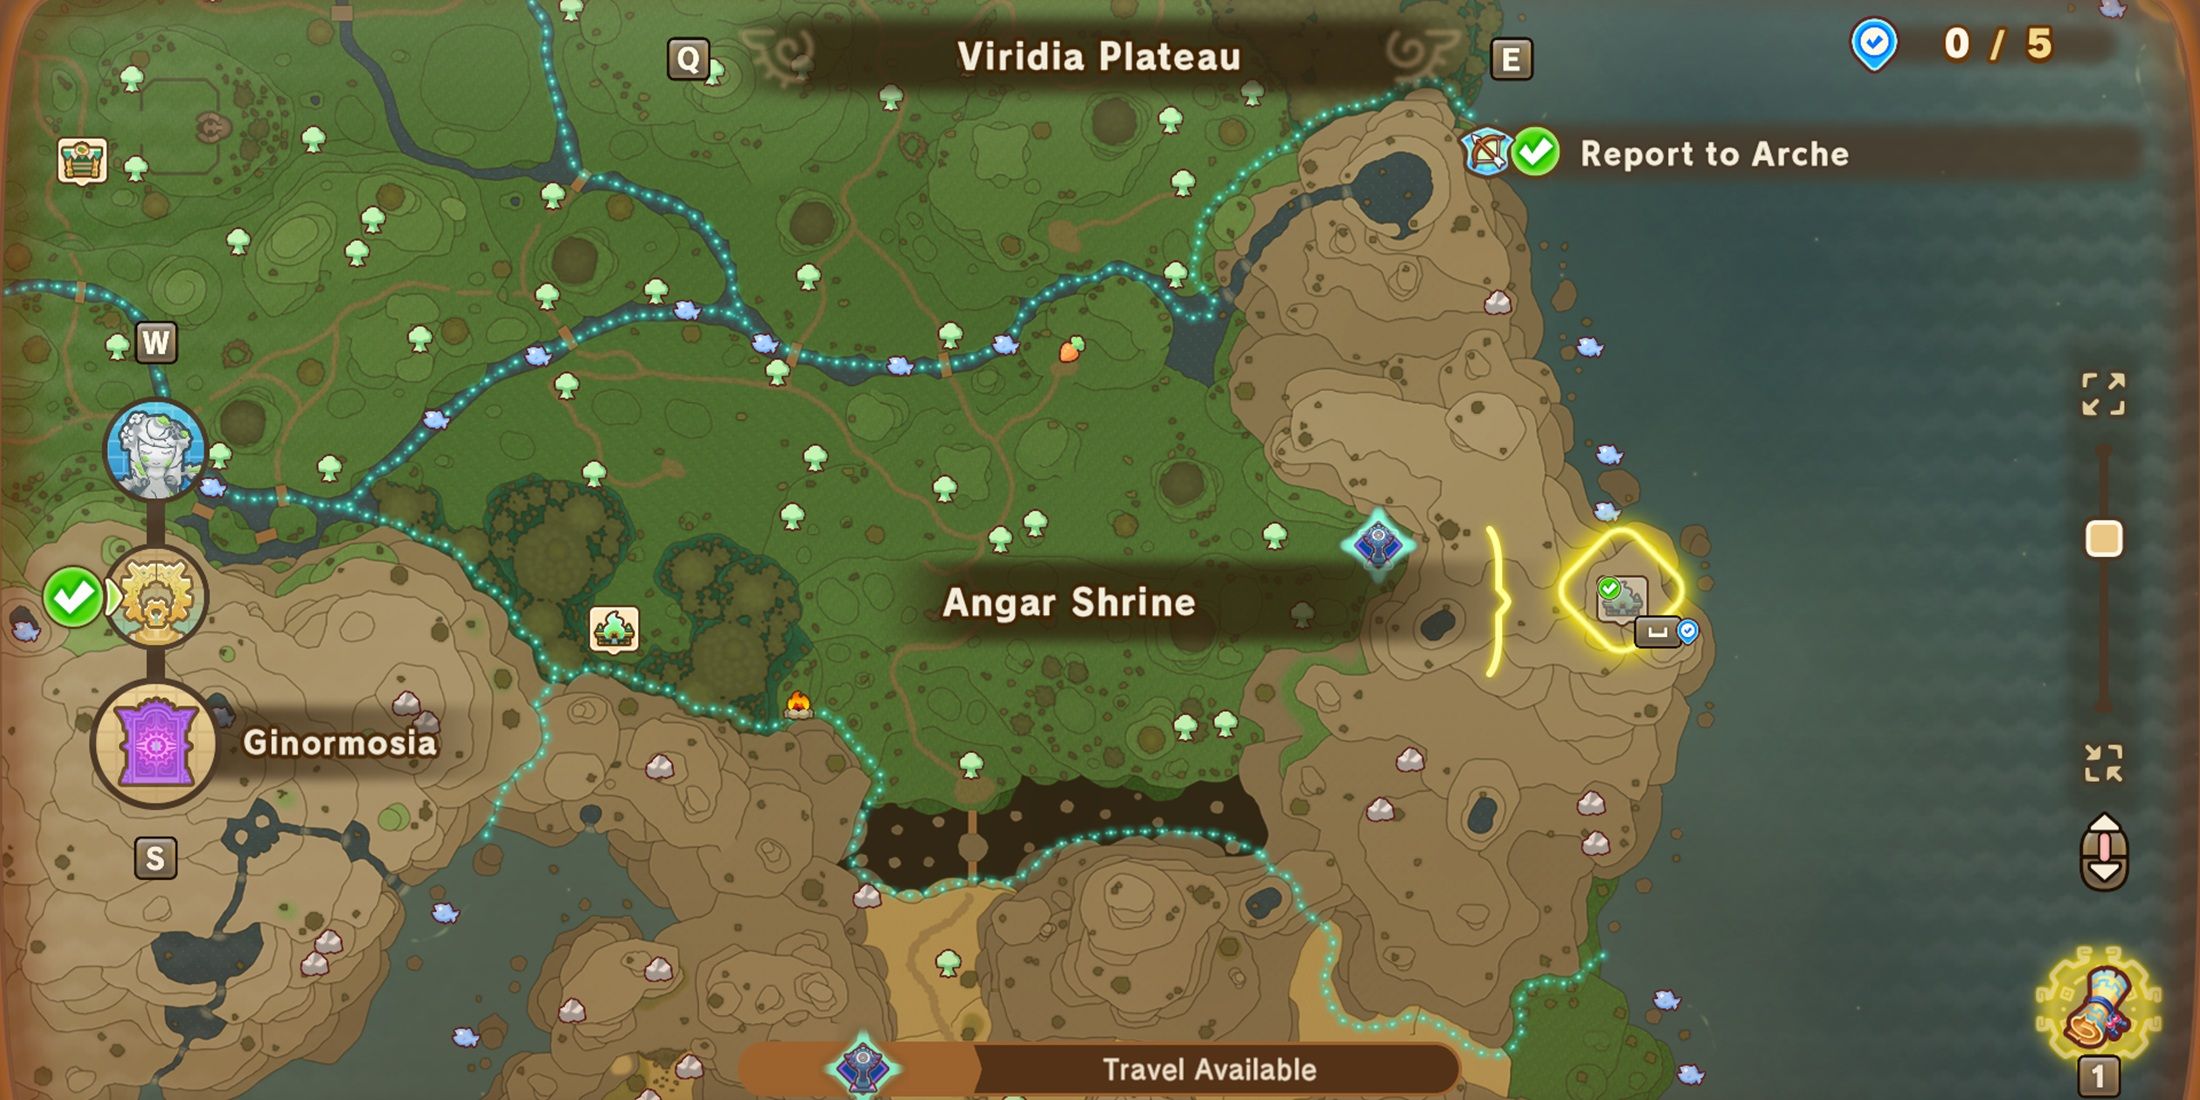
The Angar Shrine, however, perches atop rugged desert cliffs, yet it’s quite near Virida’s Googlancia Tower, just a leisurely stroll away.
West Greatgut Plains Shrine Location
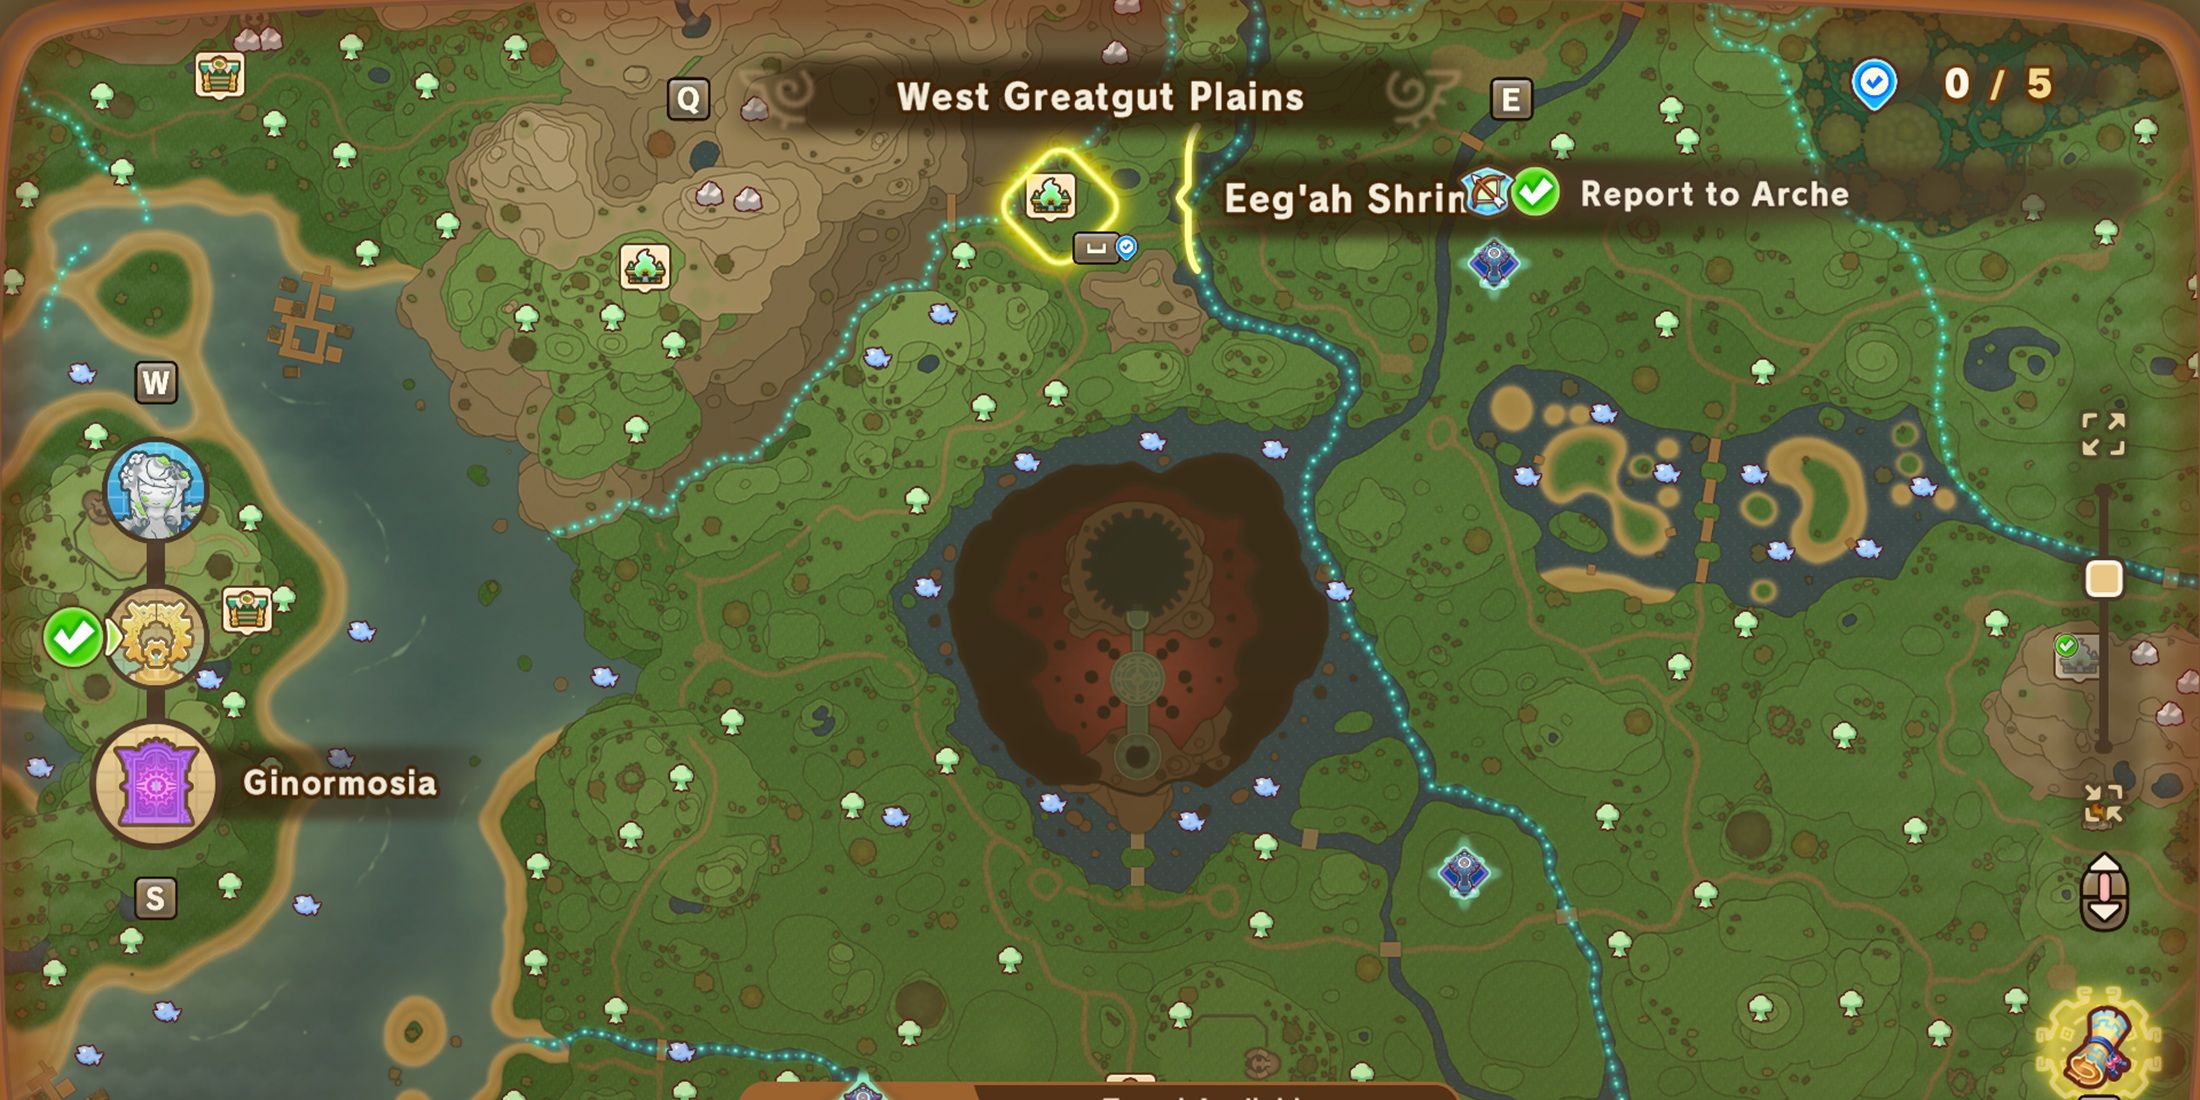
- 1 Shrine
Heading northward beyond the expansive South Greatgut Plains, you’ll find yourself venturing into the western part of these plains. In the heart of this sector lies a colossal castle, enchanted and inaccessible until gamers have conquered every last shrine.
Travel past the castle moving towards the north, and you’ll come across the Eeg’ah Shrine situated near the edge of Crickneck Canyon.
East Greatgut Plains Shrine Location
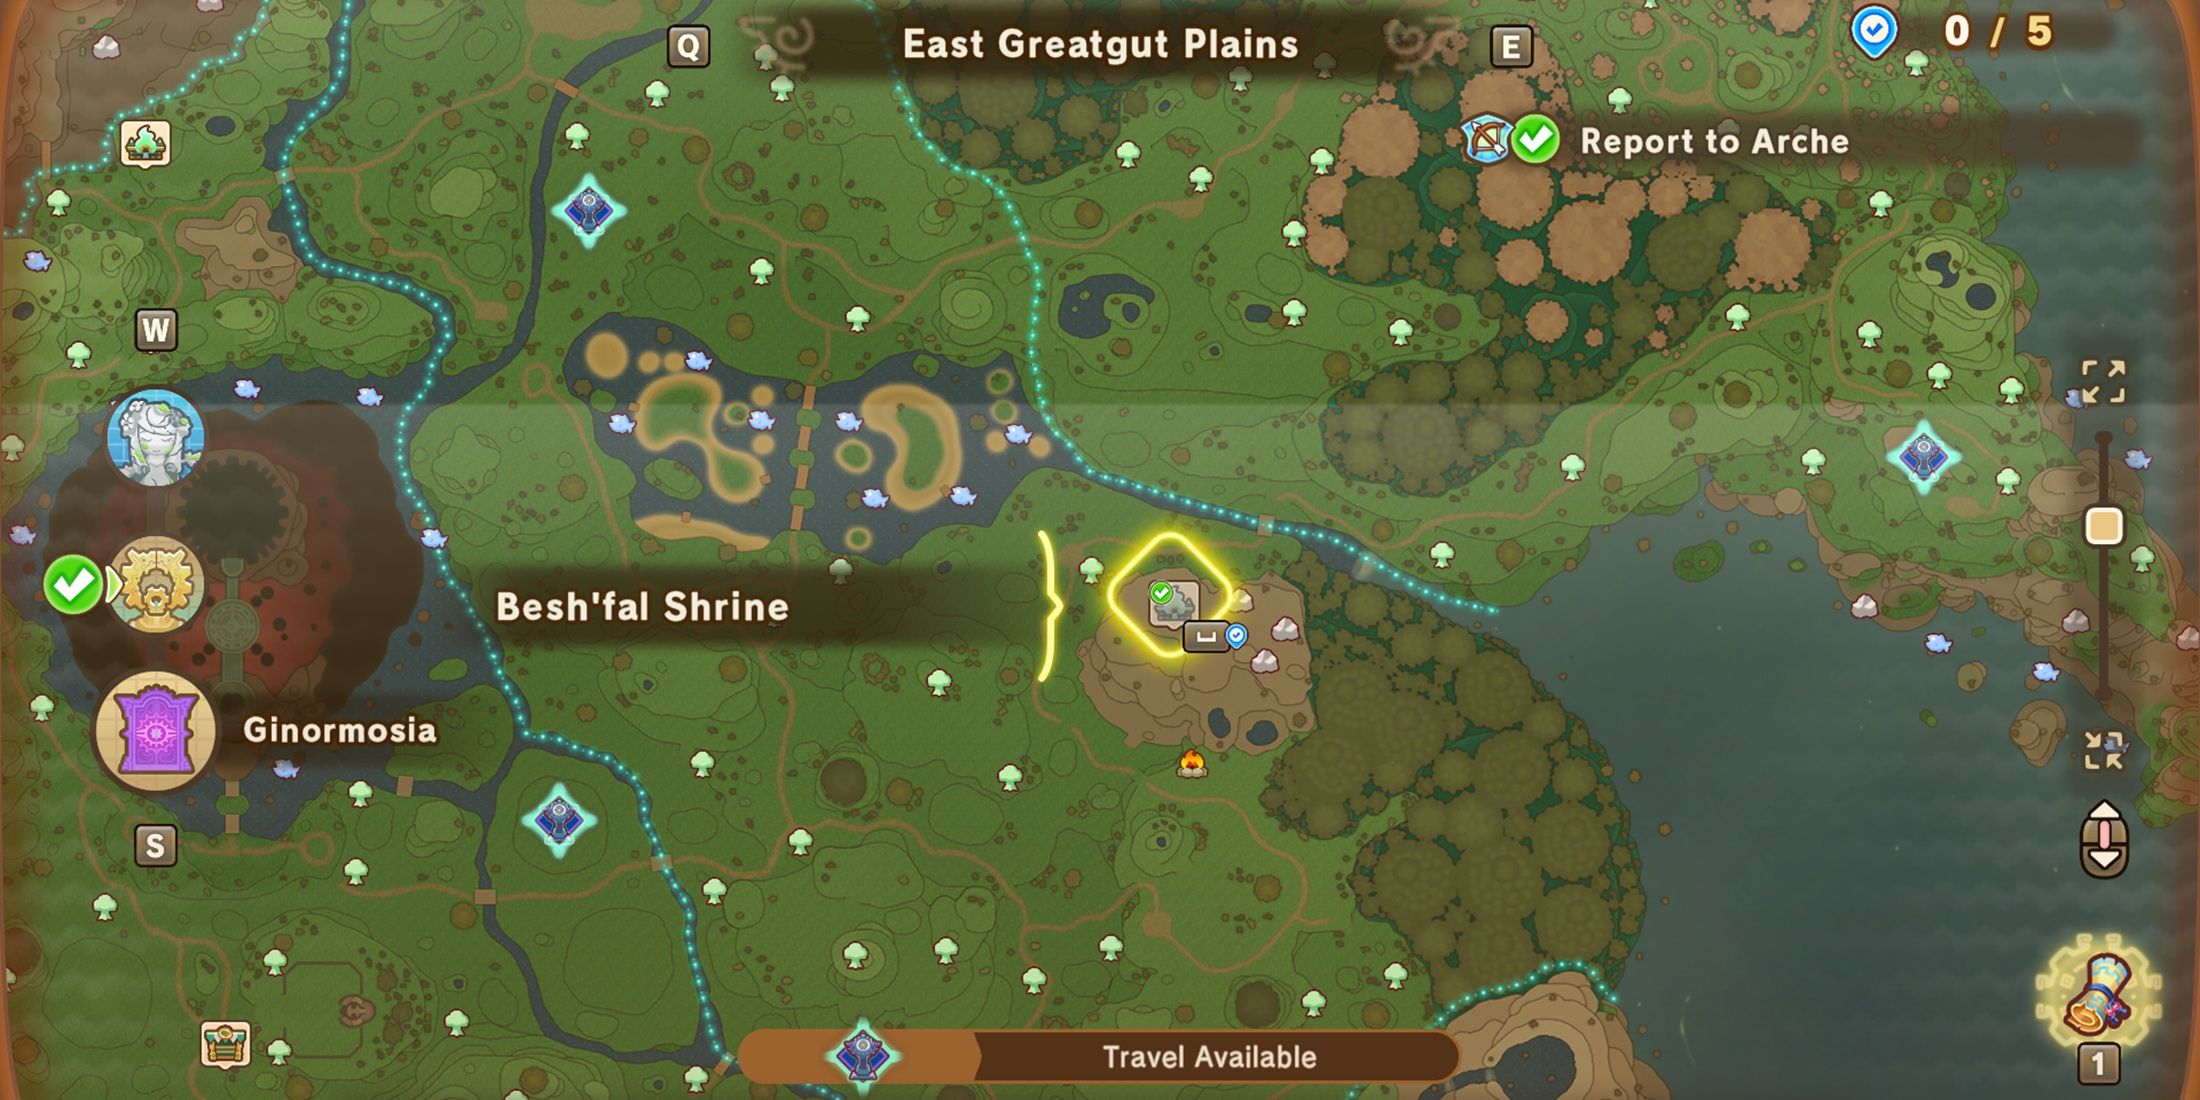
- 1 Shrine
To get to Besh’fal Shrine in East Greatgut Plains, you should head southeast from Eeg’ah Shrine. As you travel, keep an eye out for a water body with small islands; this indicates that you are near the shrine. The shrine is actually perched atop some desert cliffs to the southeast of these islands.
Pettlewing Wood Shrine Location
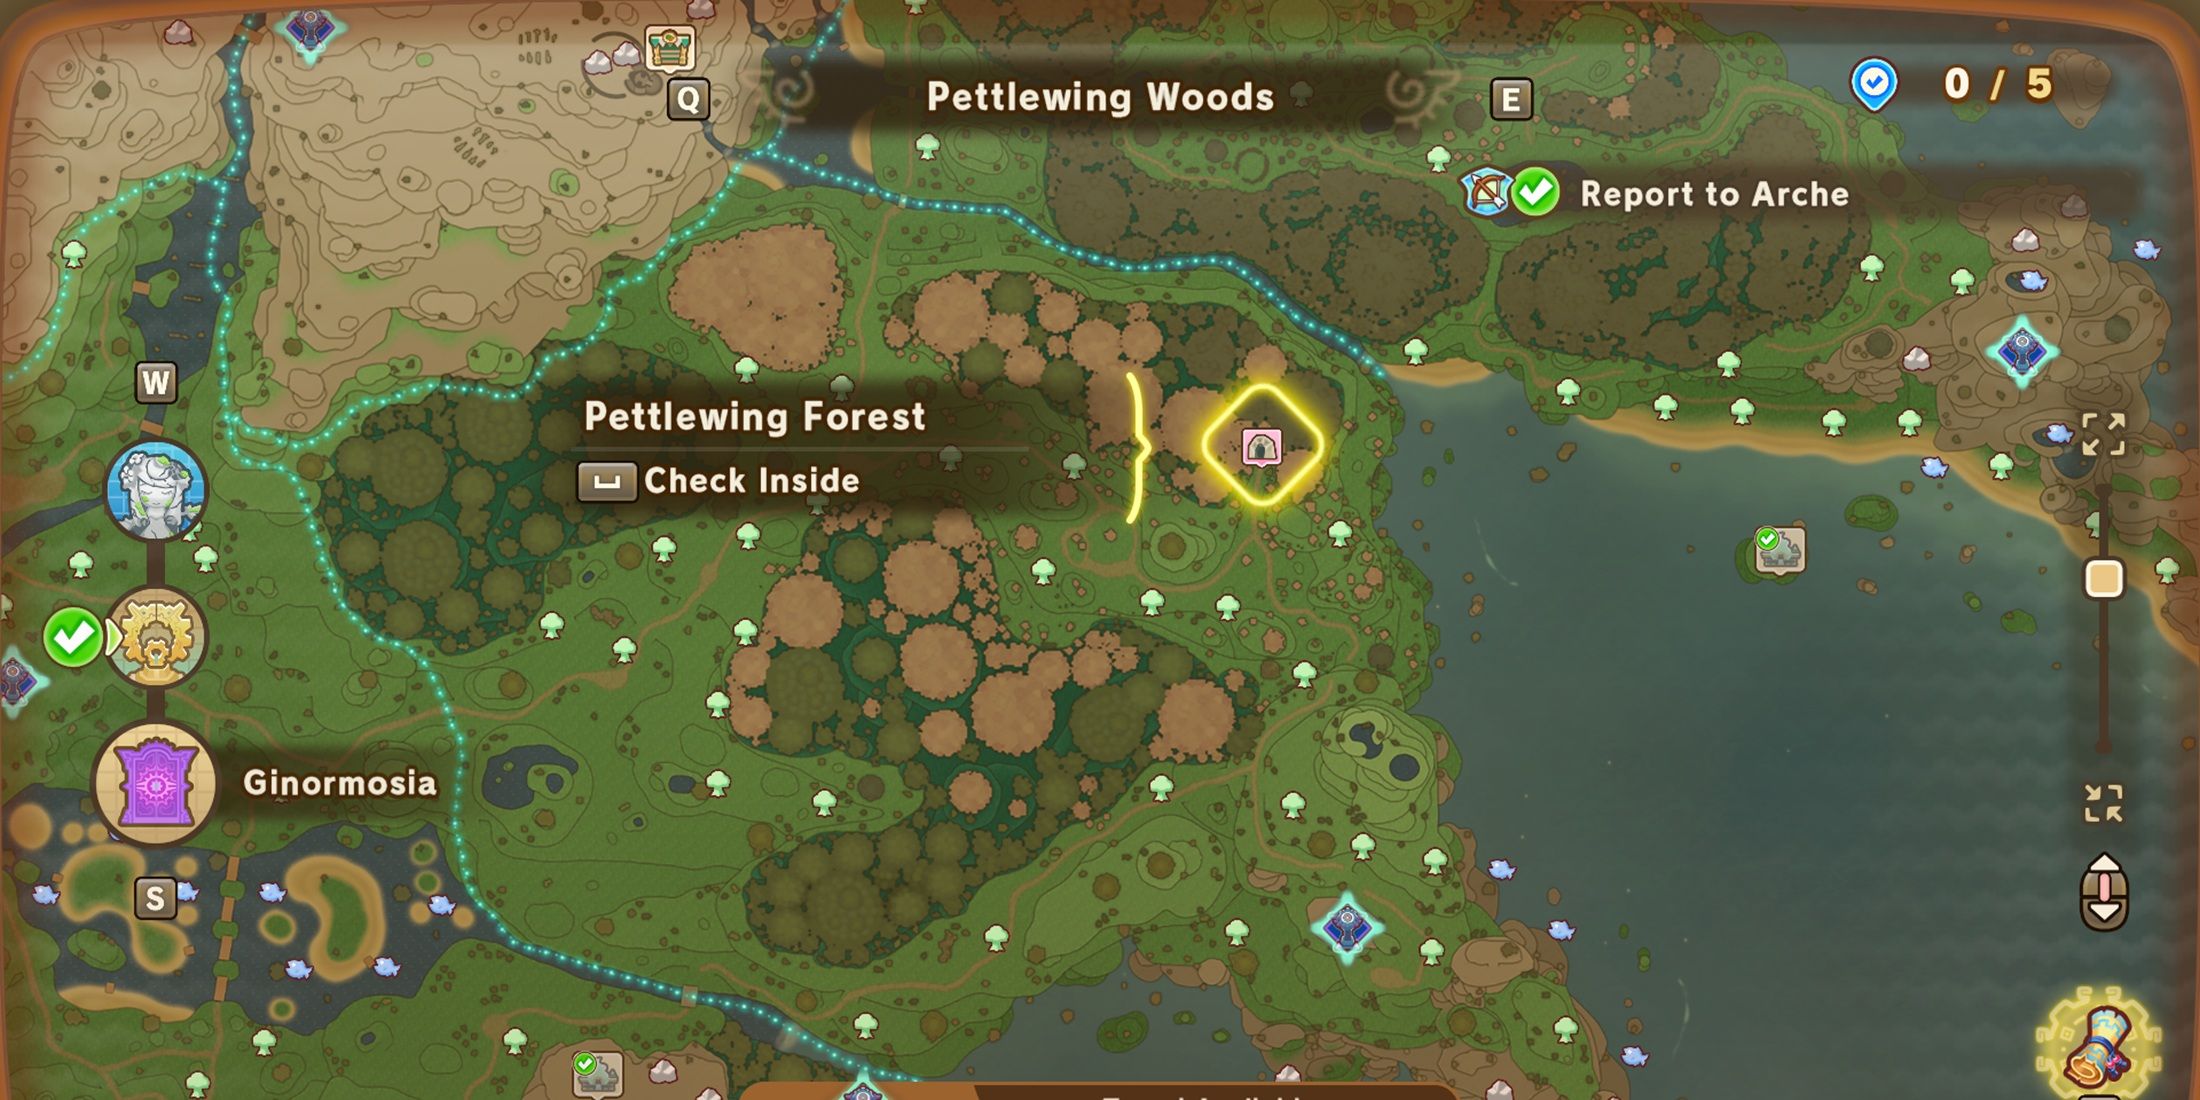
- 1 Shrine
This shrine, nestled within intricacies, is hidden deep within a labyrinth found within Pettling Wood. To gain access, navigate your way to the designated spot on the map that leads into Pettling Forest. Keep venturing deeper into the forest until you encounter the marked trail shown in the second image.
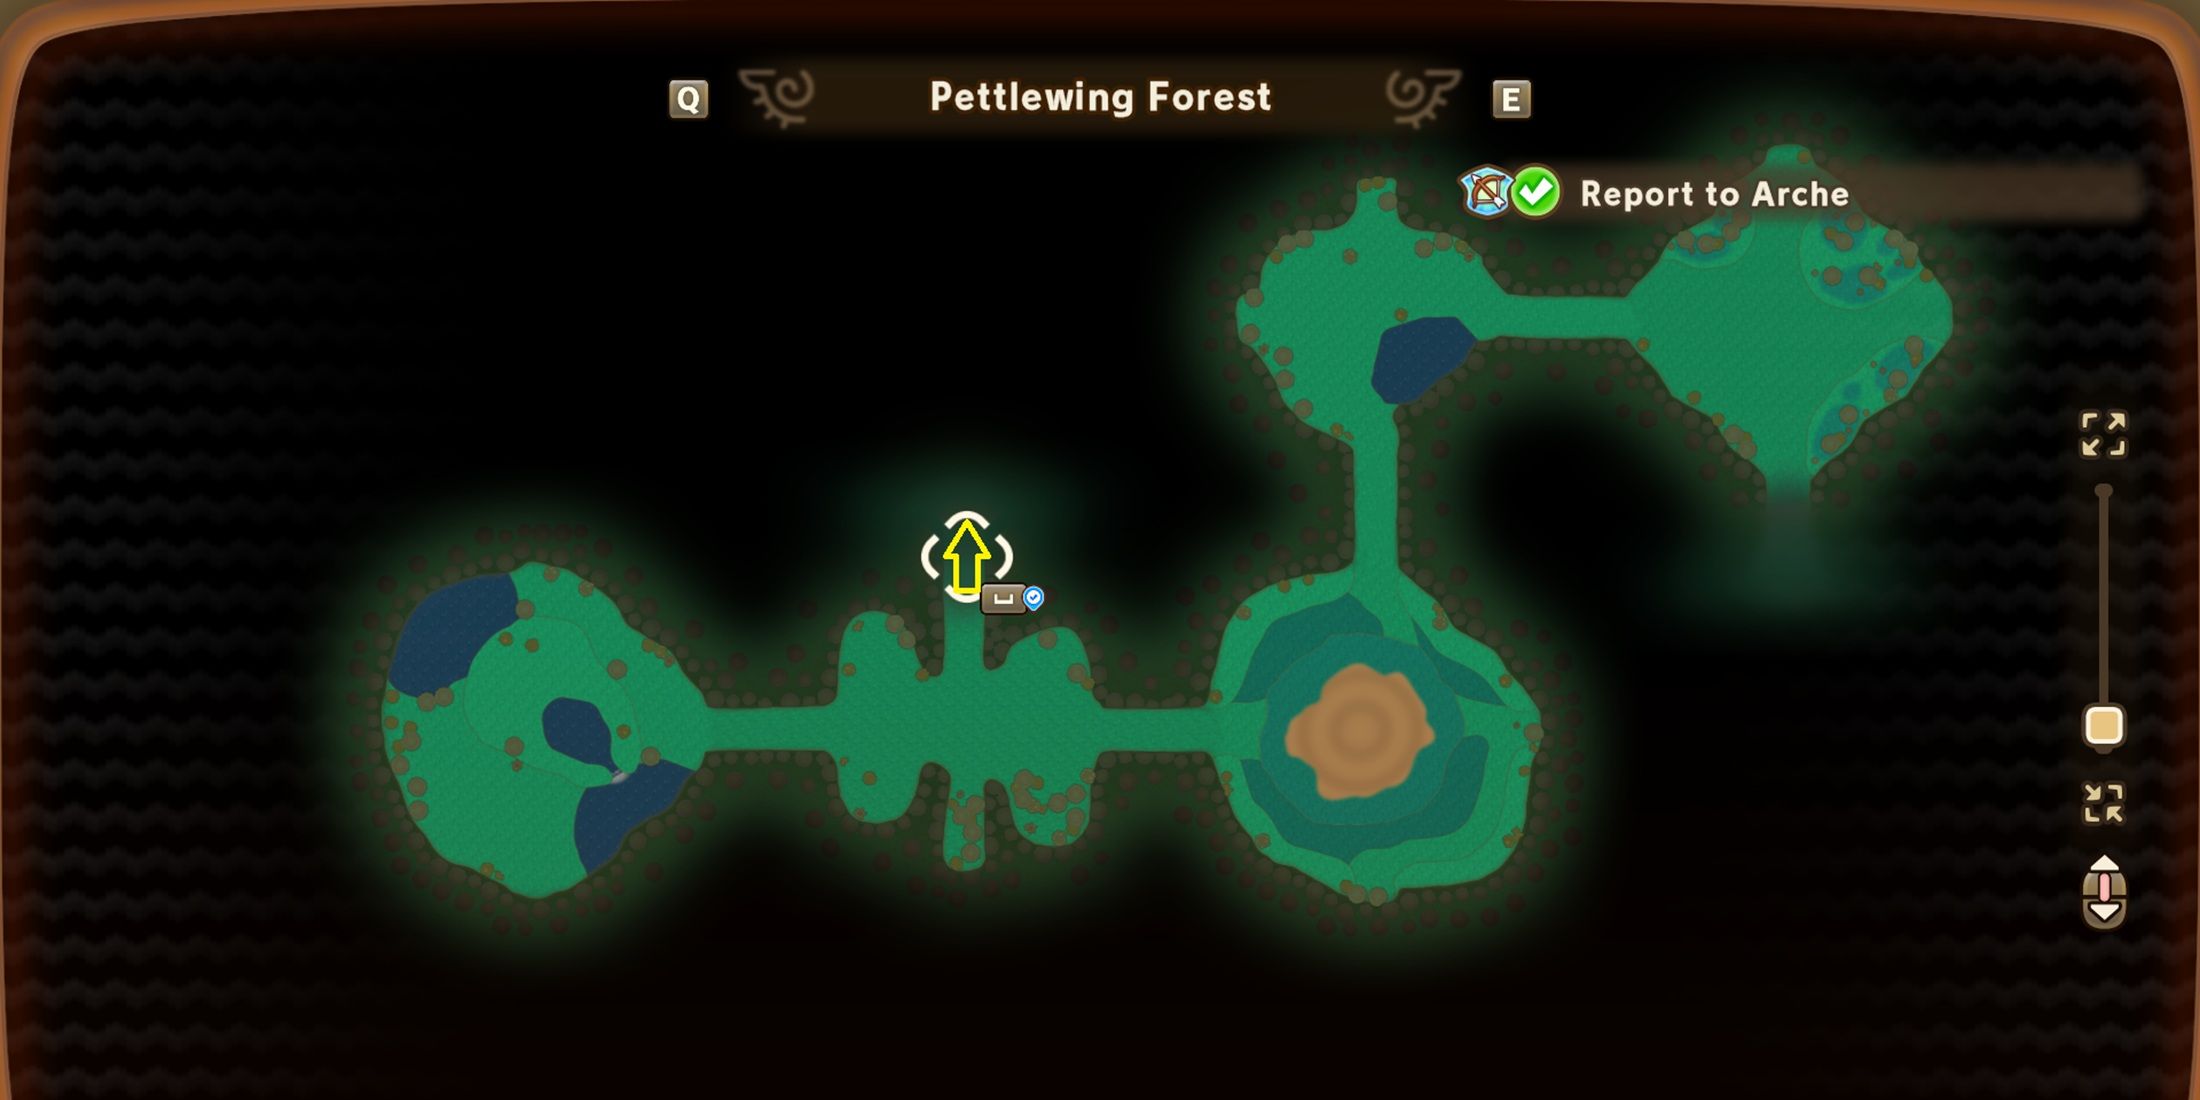
This route takes you to a well-known labyrinth-style puzzle if you’ve advanced far enough in the campaign. The labyrinth places you in a chamber with numerous paths, but only one leads correctly. If your screen turns completely white following your choice of path, it signifies an incorrect selection, and you will be sent back to the initial room of the maze. Conversely, if the screen switches to black, it indicates a correct choice, and you’ve moved on to the next room in the labyrinth.
To find the shrine, start by choosing the left path in the first chamber, then proceed to the right path in the second one, and lastly, select the left path once more in the third. If you follow these steps accurately, the fourth room will lead you to where the shrine is hidden.
Shroomhaven Shrine Location
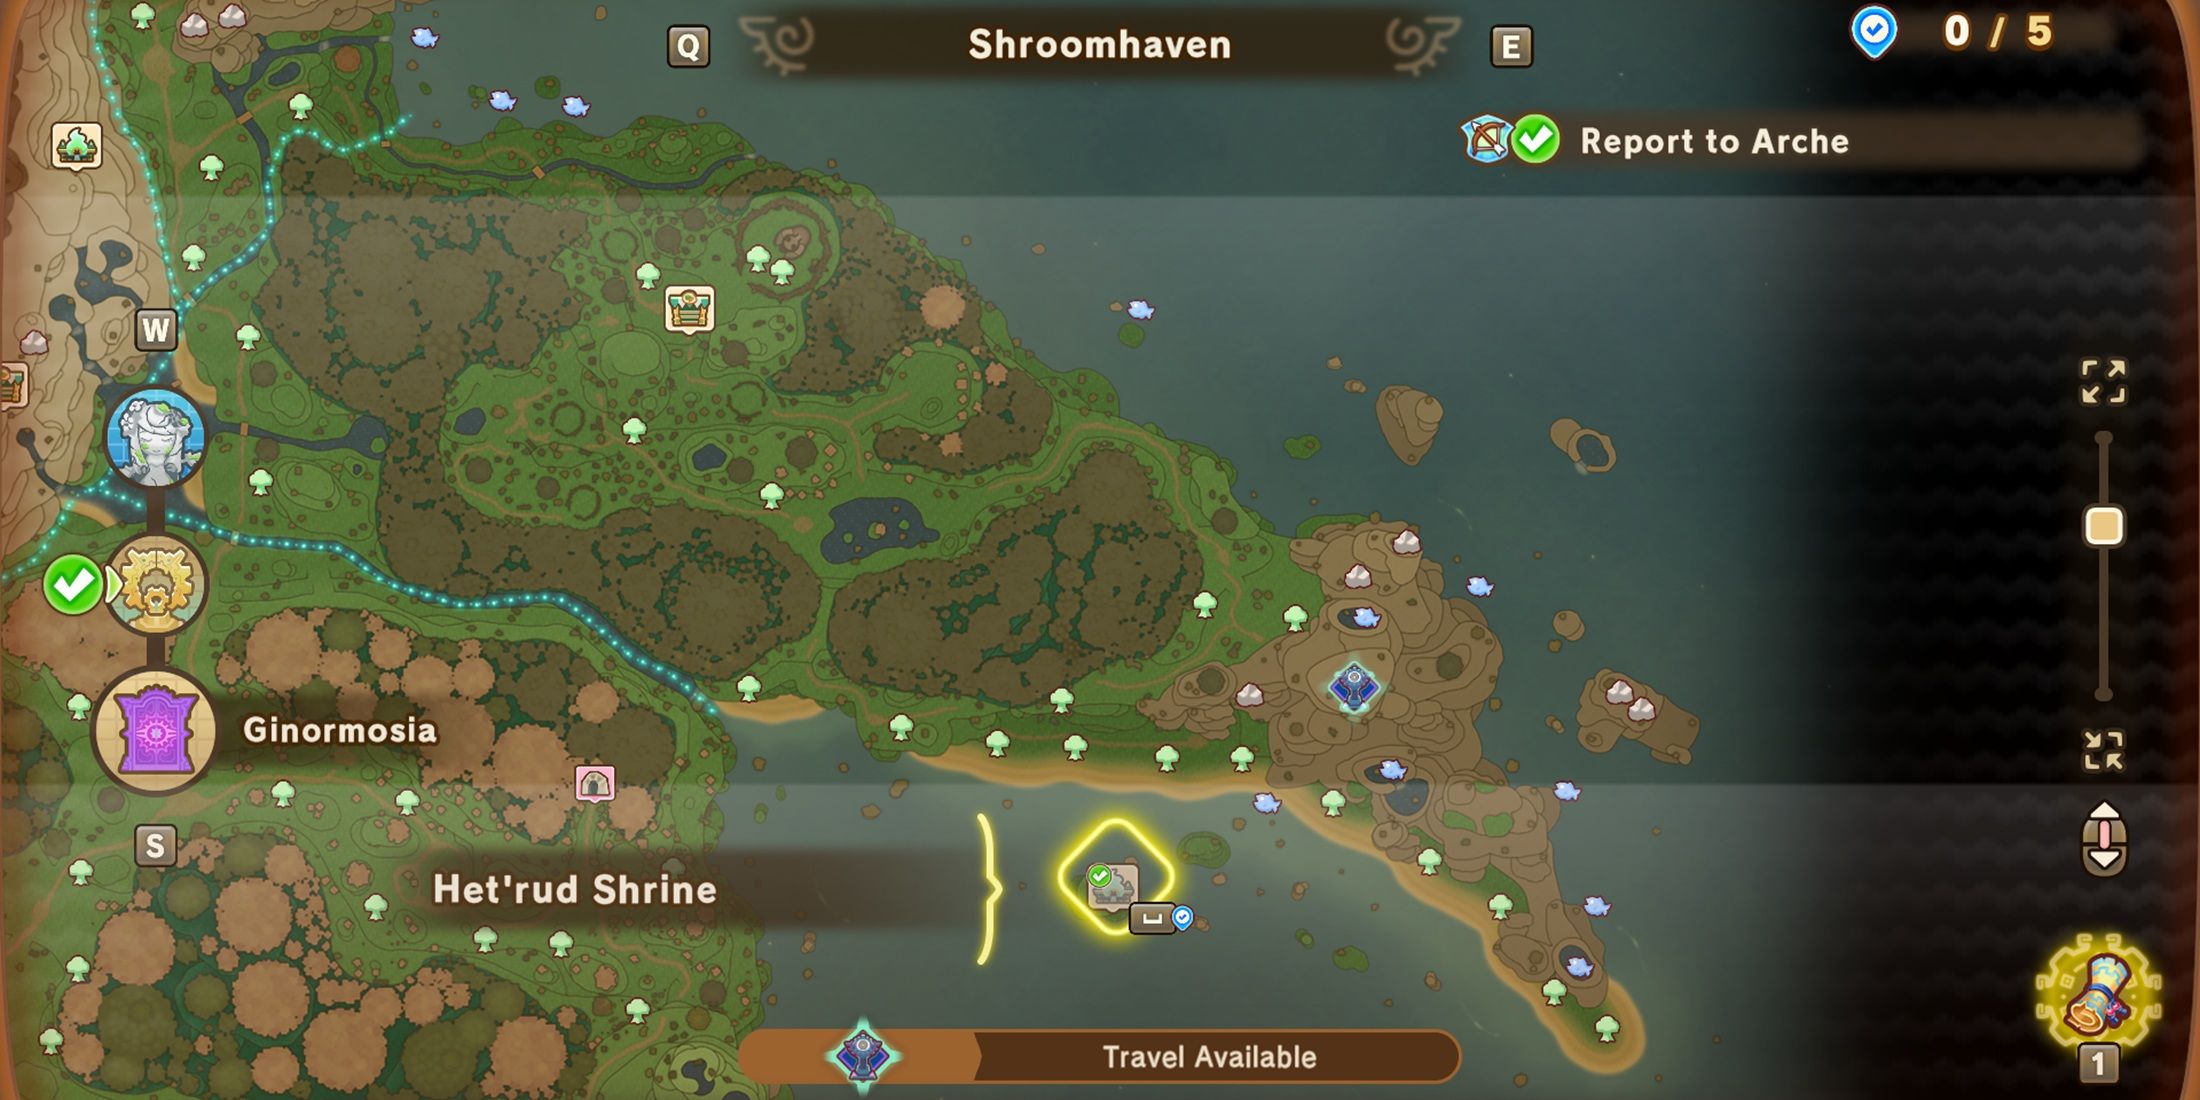
- 1 Shrine
The shrine isn’t located on Shroomhaven itself, but it’s perched atop a tiny island south of it. You can swim east from the entrance of Pettling Wood forest, and you should be able to see the shrine from a distance. But if you’ve found Shroomhaven’s Googlancia Tower, that offers a more convenient shortcut instead.
Wingtip Valley Shrine Locations
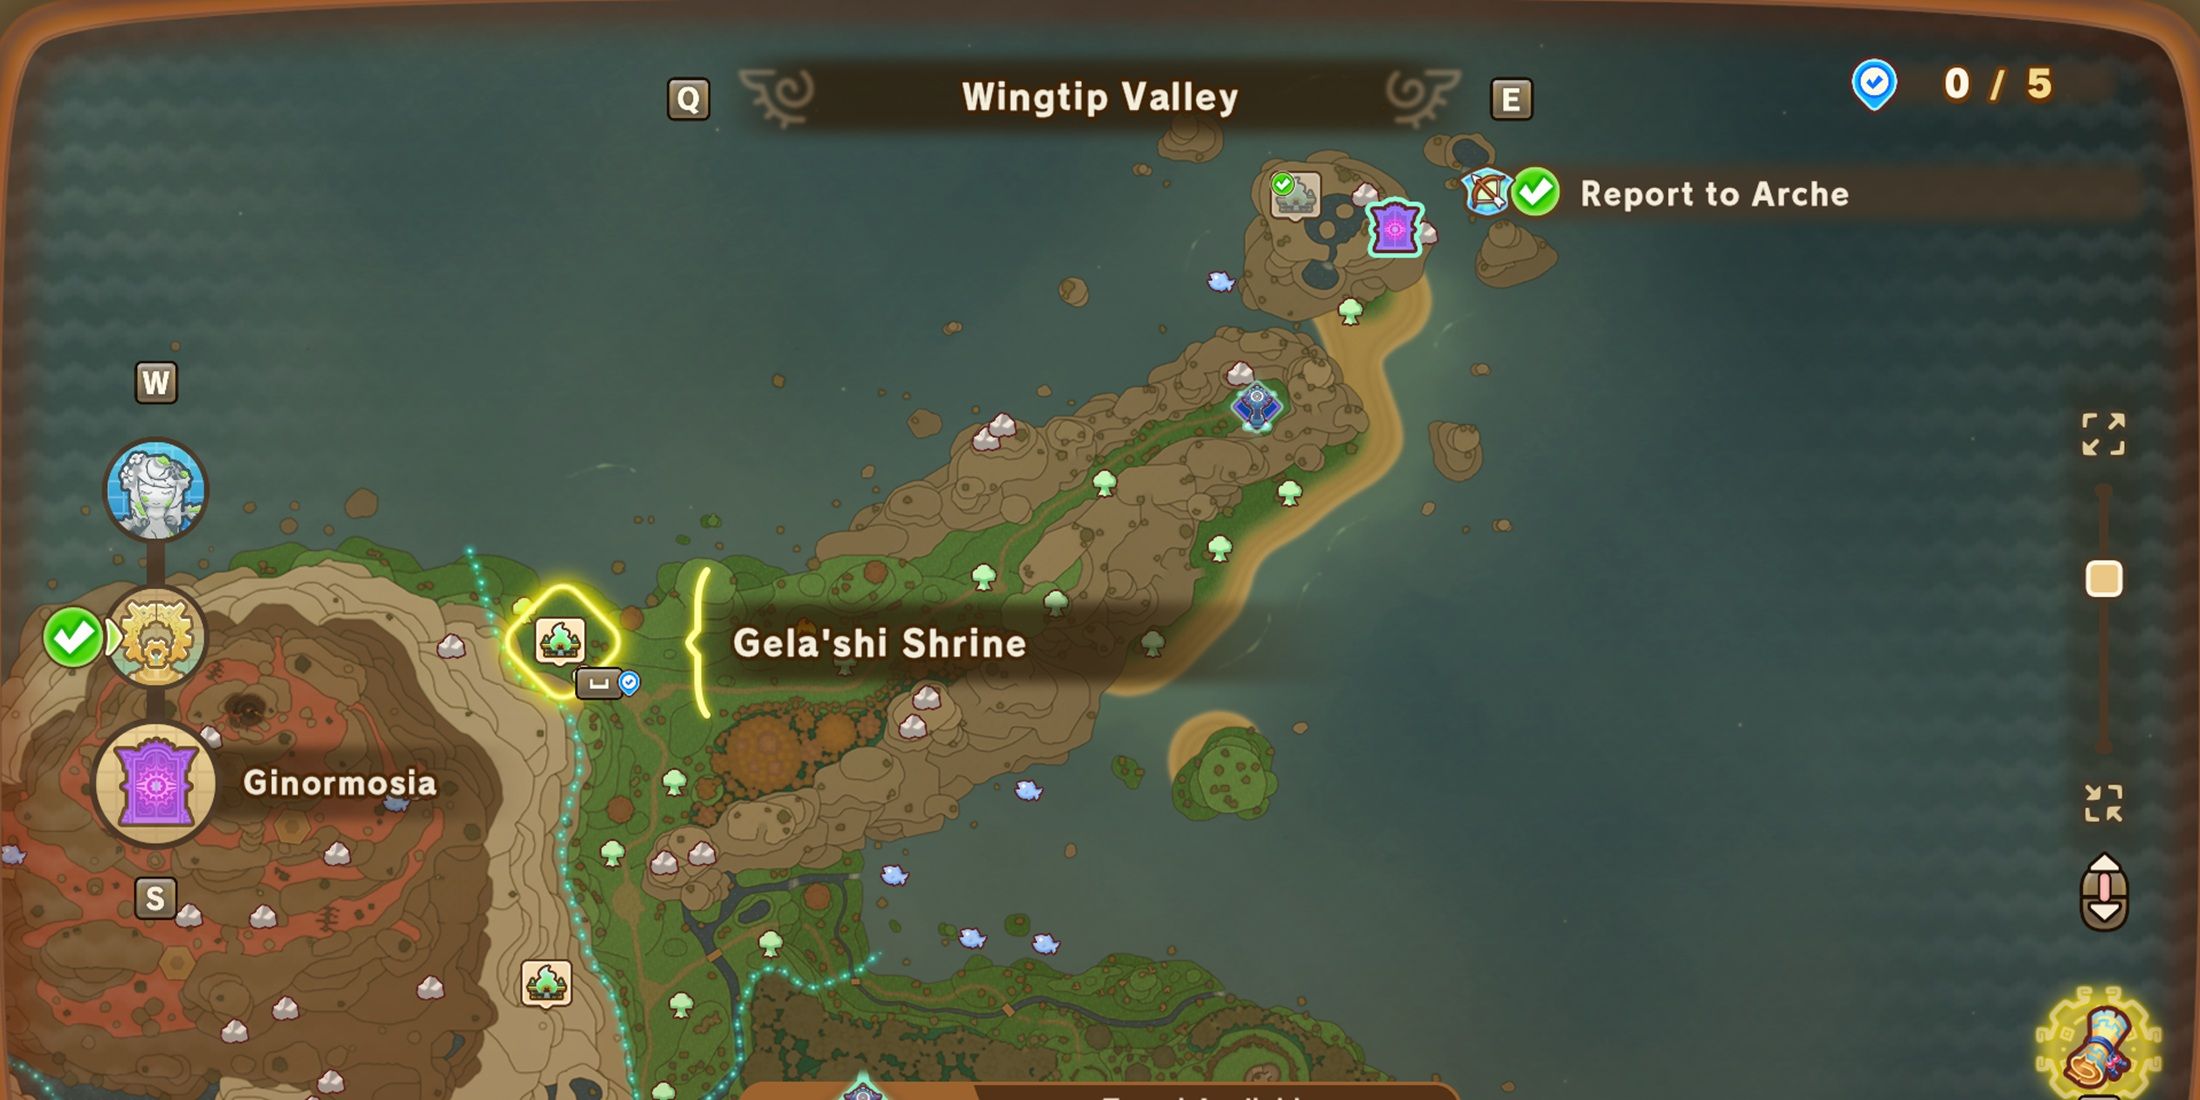
- 2 Shrines
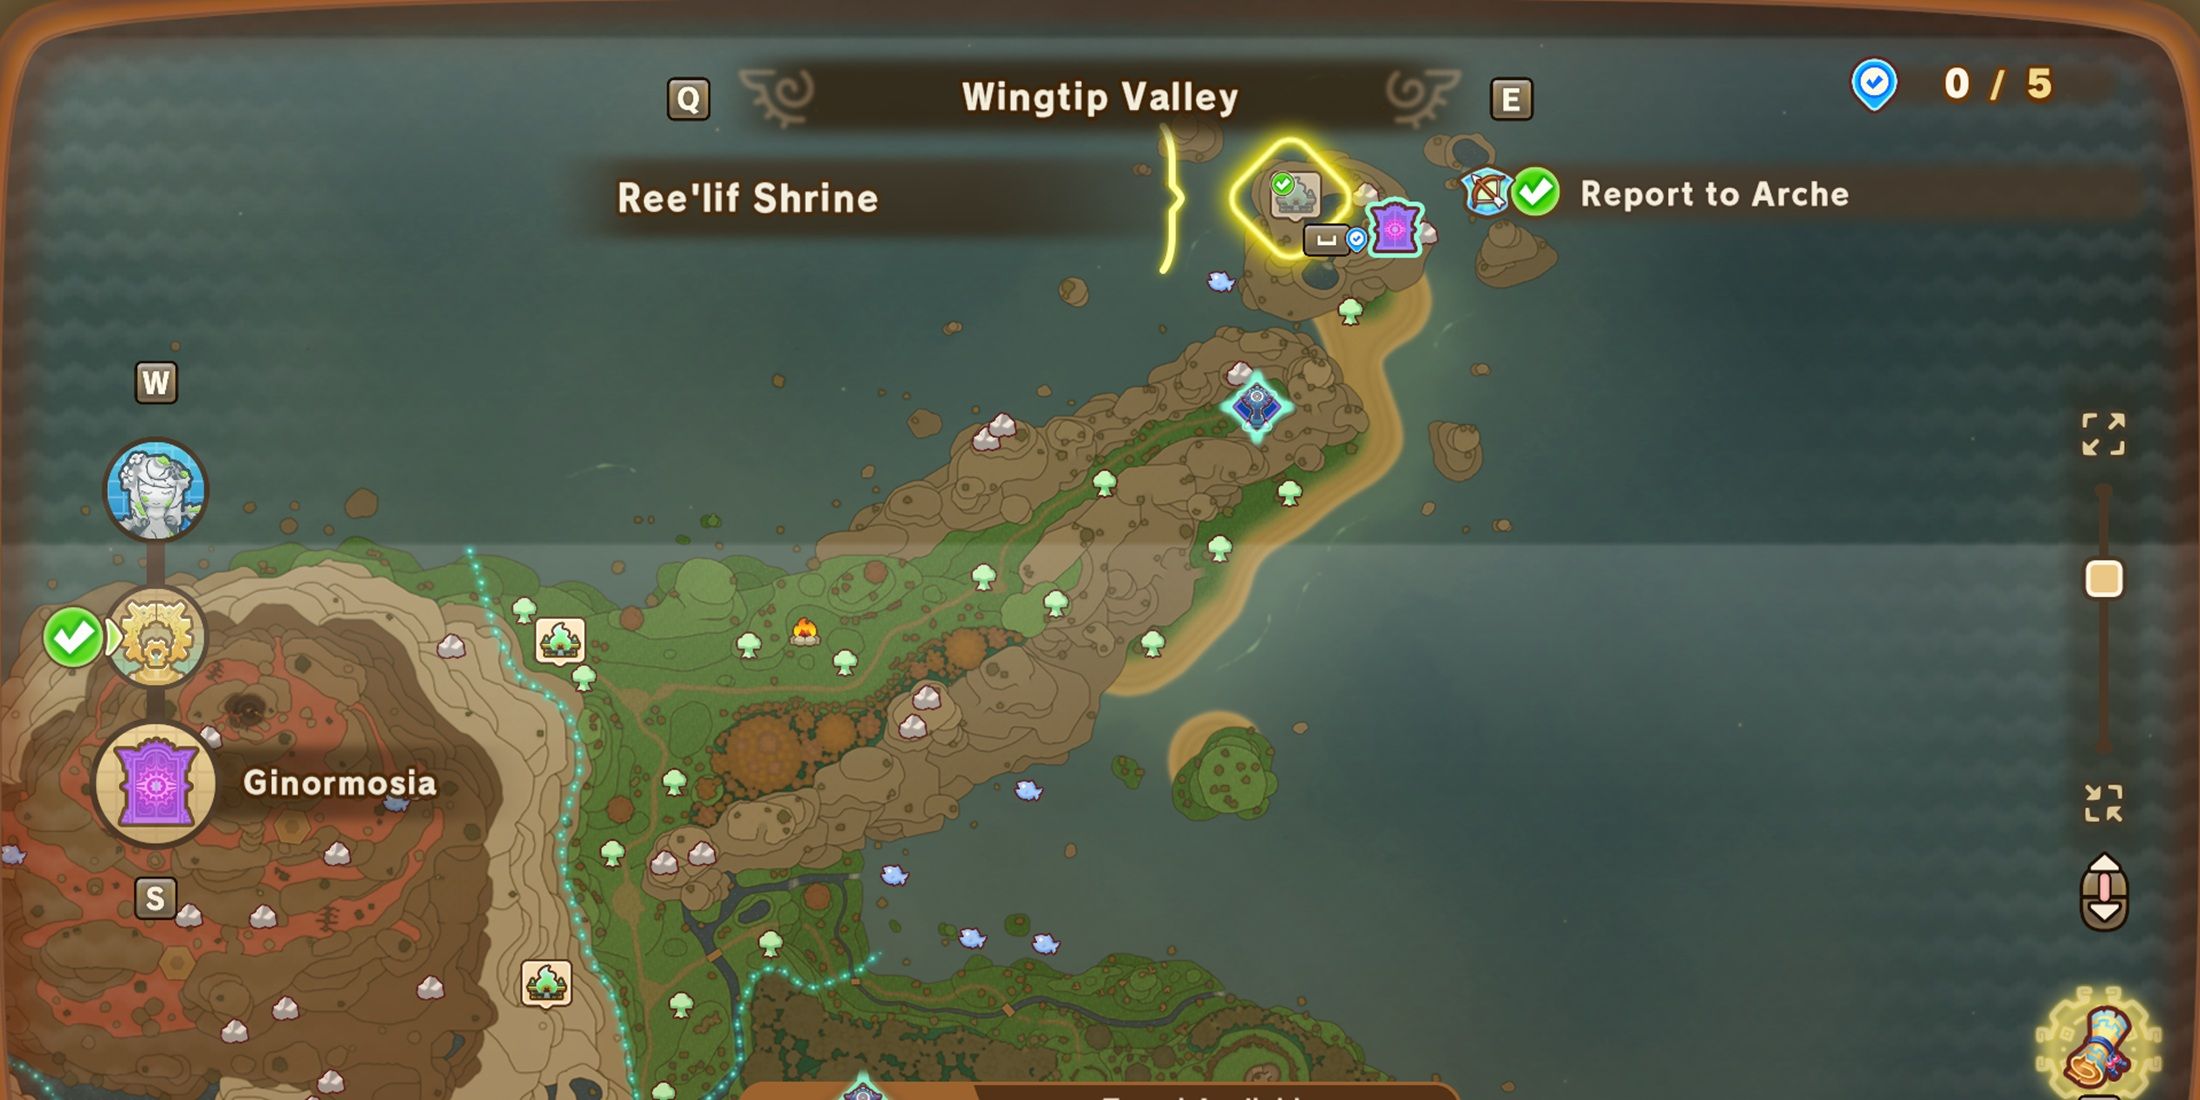
In the northeastern region of the map, you’ll find two sacred sites: Gela’shi and Ree’lif. Gela’shi is situated close to the border with Moltana Wastes, near a northern bay. If you’re traveling from the East Greatgut Plains, simply stick to the main route leading north on the map, and you’ll eventually arrive at the Gela ‘shi Shrine.
The life you seek can be effortlessly found. Simply proceed towards the north-eastern part of the region, and you’ll come across the shrine right there.
Moltana Wastes Shrine Location

- 1 Shrine
In the realm of Moltana Wastes lies a mountain adorned by flowing rivers of lava, yet to reach its sacred site, War’yu Shrine, you won’t have to scale the mountain’s heights. Instead, this sanctuary nestles at the foot of the mountain’s southeastern base, right along the border with Wingtip Valley.
Scorchrock Mountains Shrine Location
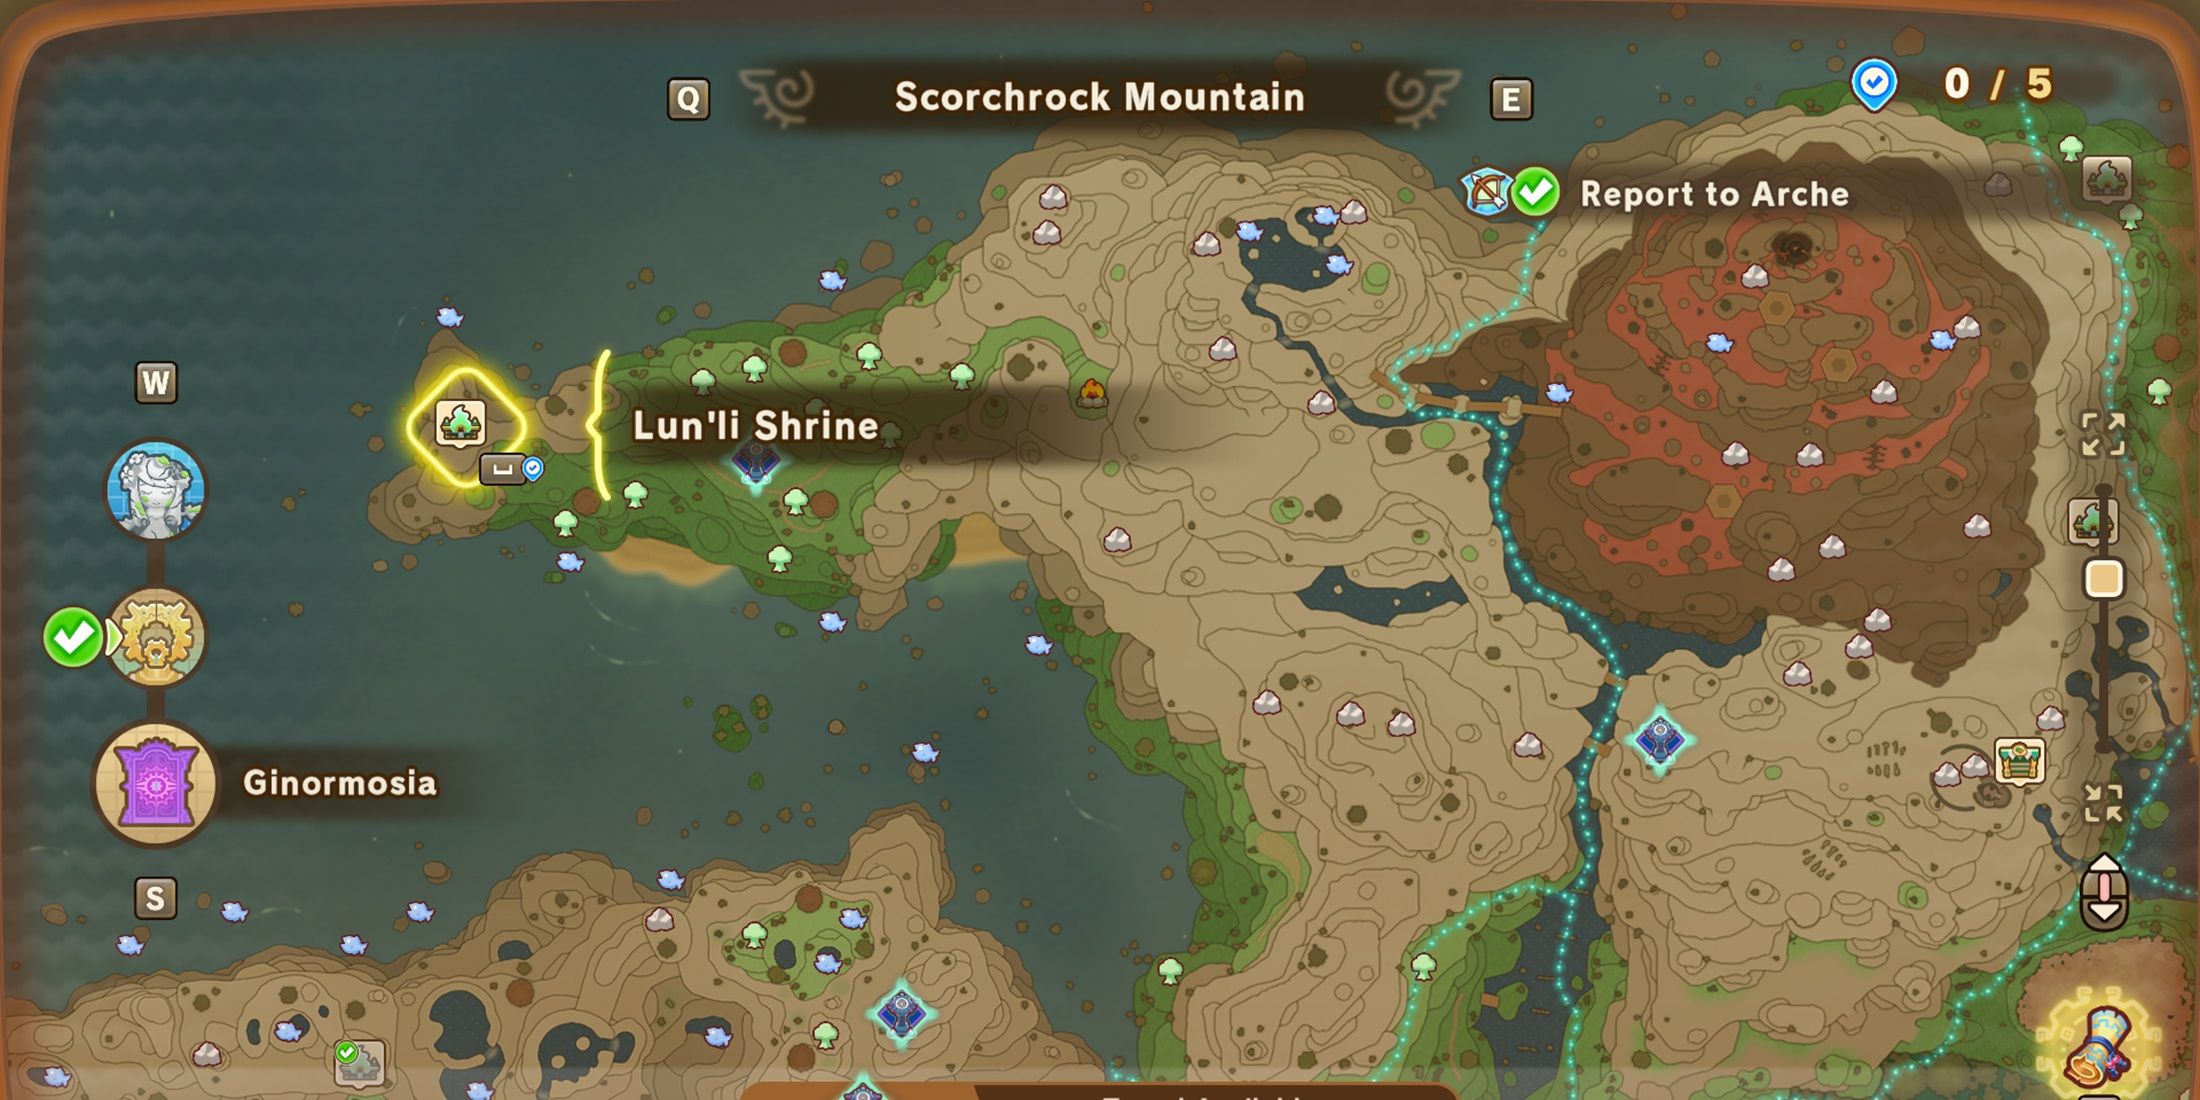
- 1 Shrine
Scorchrock Mountain is situated towards the west in the expanse known as Moltana Wastes. The sole shrine within this region is nestled at its most distant western point, right on the edge where it meets the sea.
Crickneck Canyon Shrine Locations
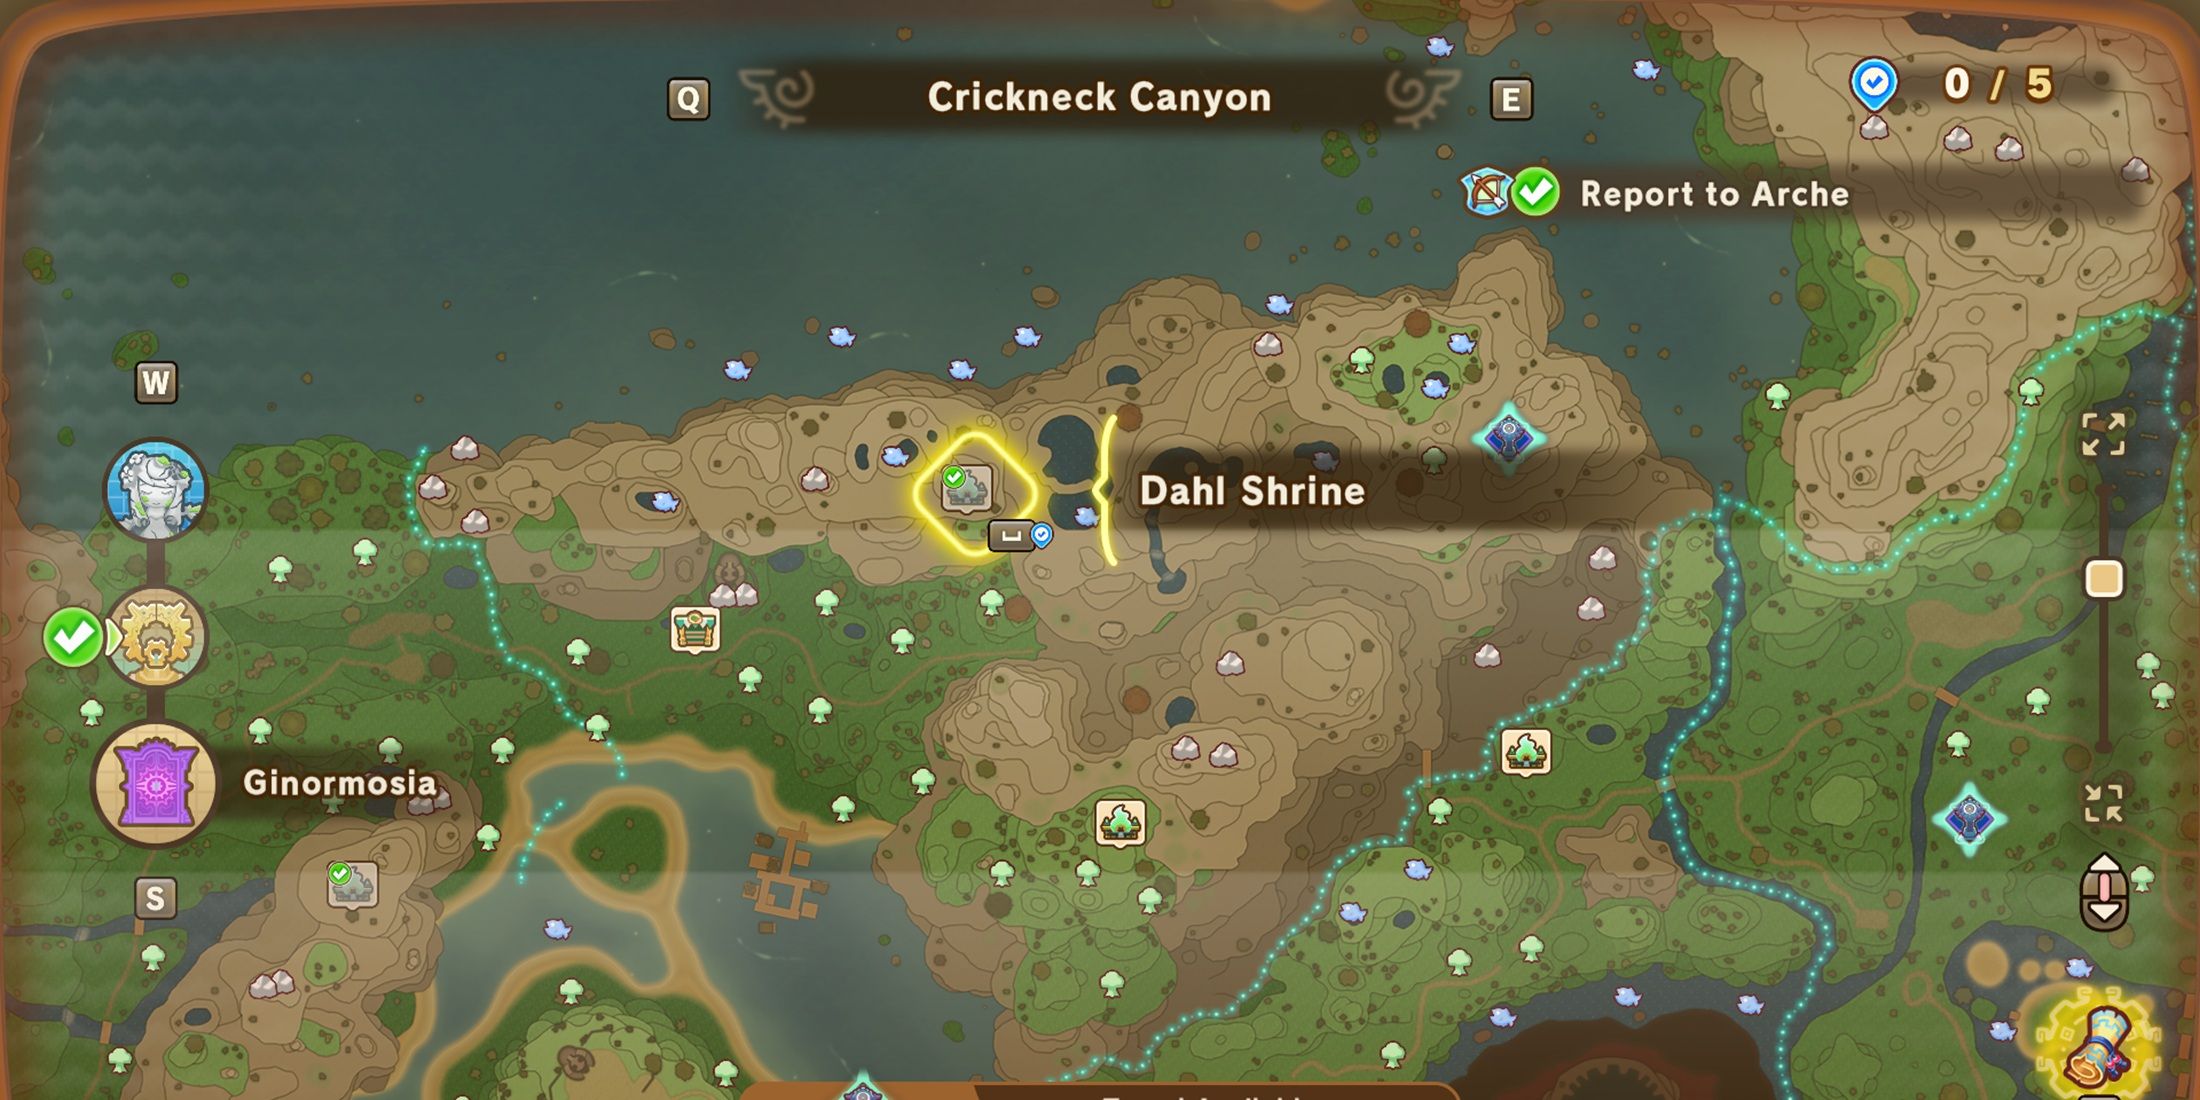
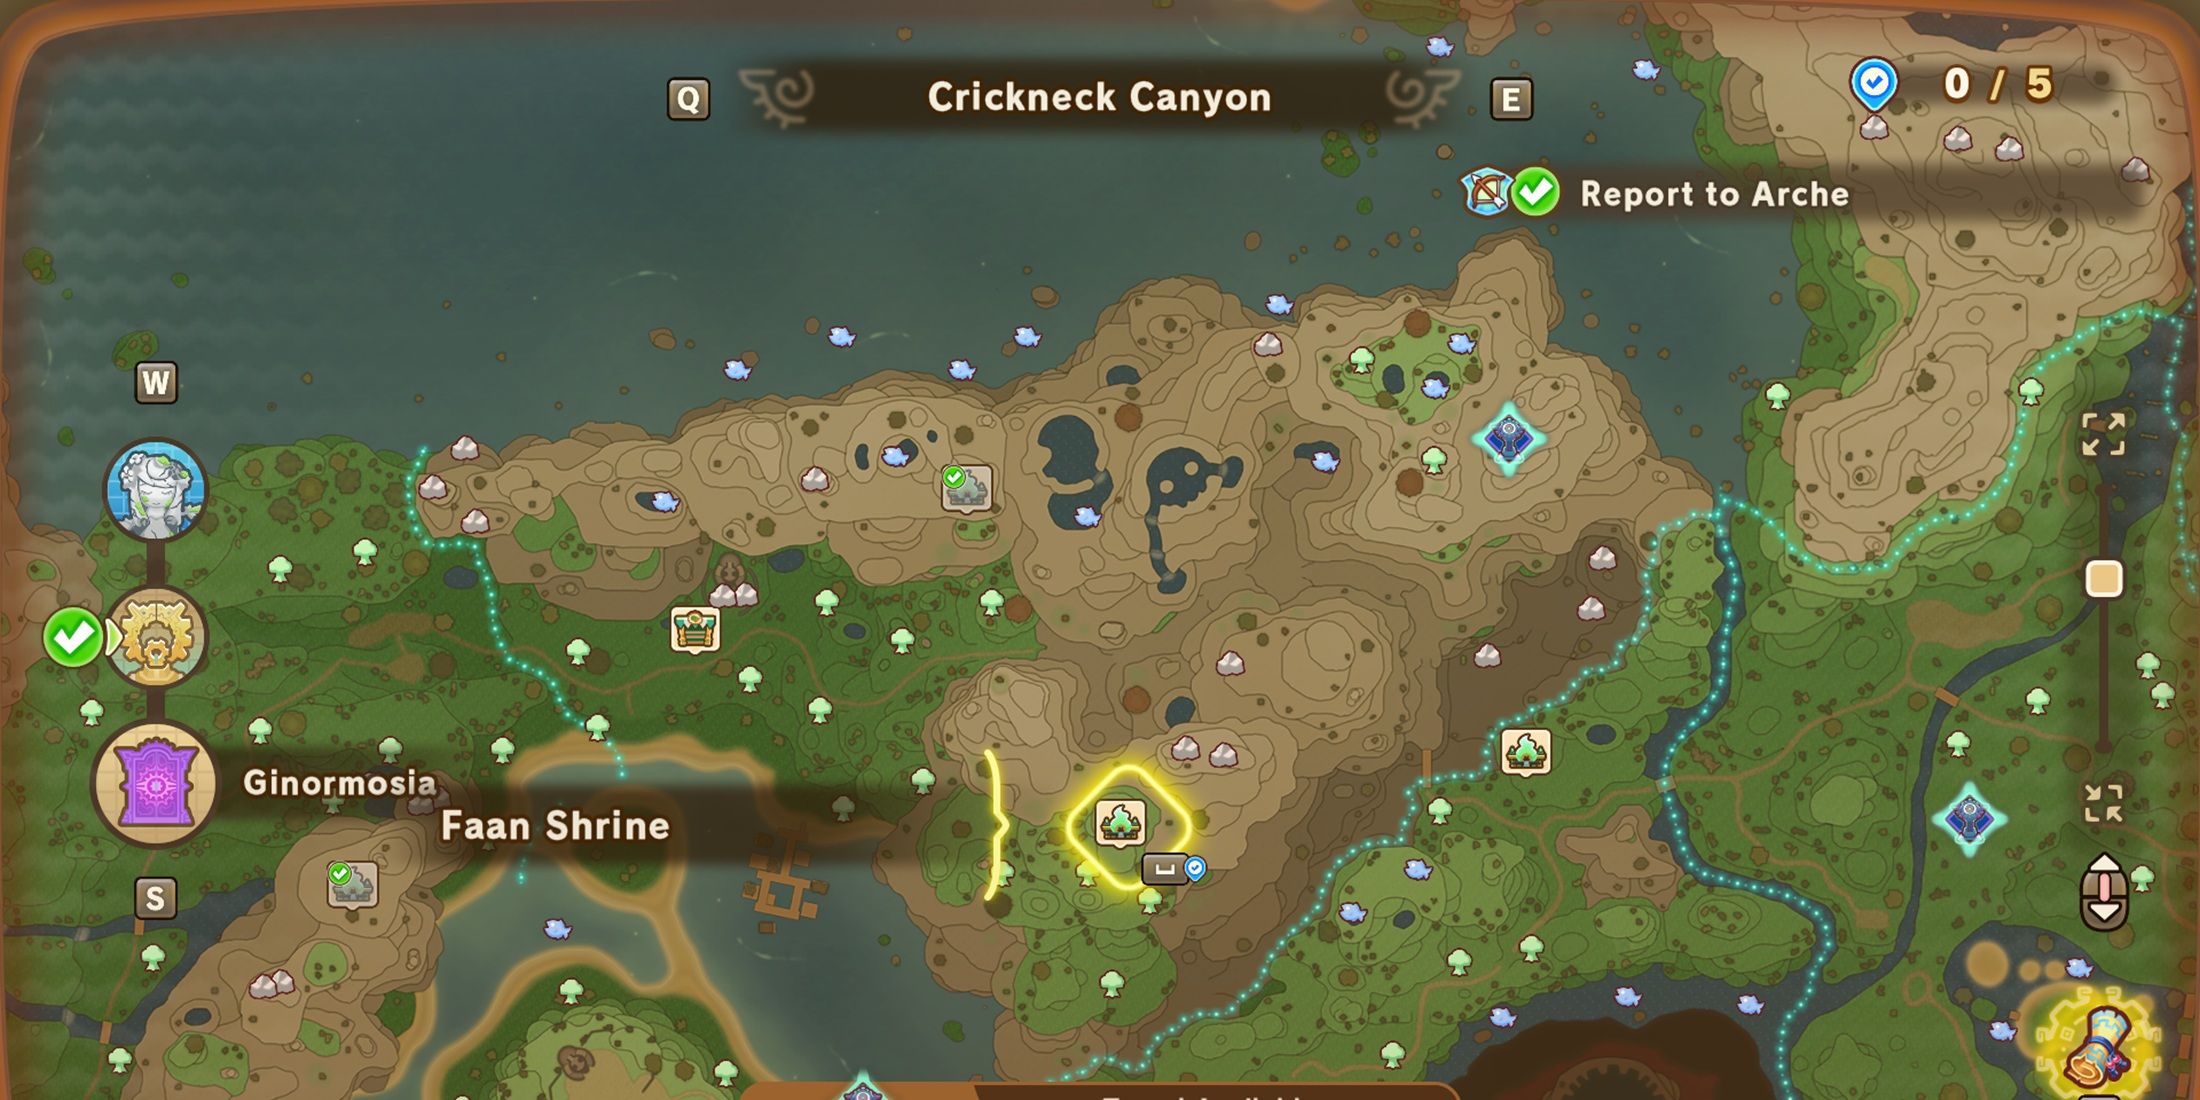
- 2 Shrines
Traveling south from Scorchrock Mountain and crossing over the body of water, you’ll eventually come across Crickneck Canyon which has two shrines. One of these shrines, the Dahl Shrine, is positioned more towards the northern part of the canyon, closer to the bay on its north side. Inside this area, there’s a large body of water, and the Dahl Shrine lies west of it.
The Faan Shrine, conversely, is situated in the southern sector of the region. To locate it, you should head southward slightly and then move a bit towards the east from the Dahl Shrine. You will find the Faan nestled within a field of grass, bordered by barren cliffs that have been abandoned for quite some time.
Fangshore Isles Shrine Location
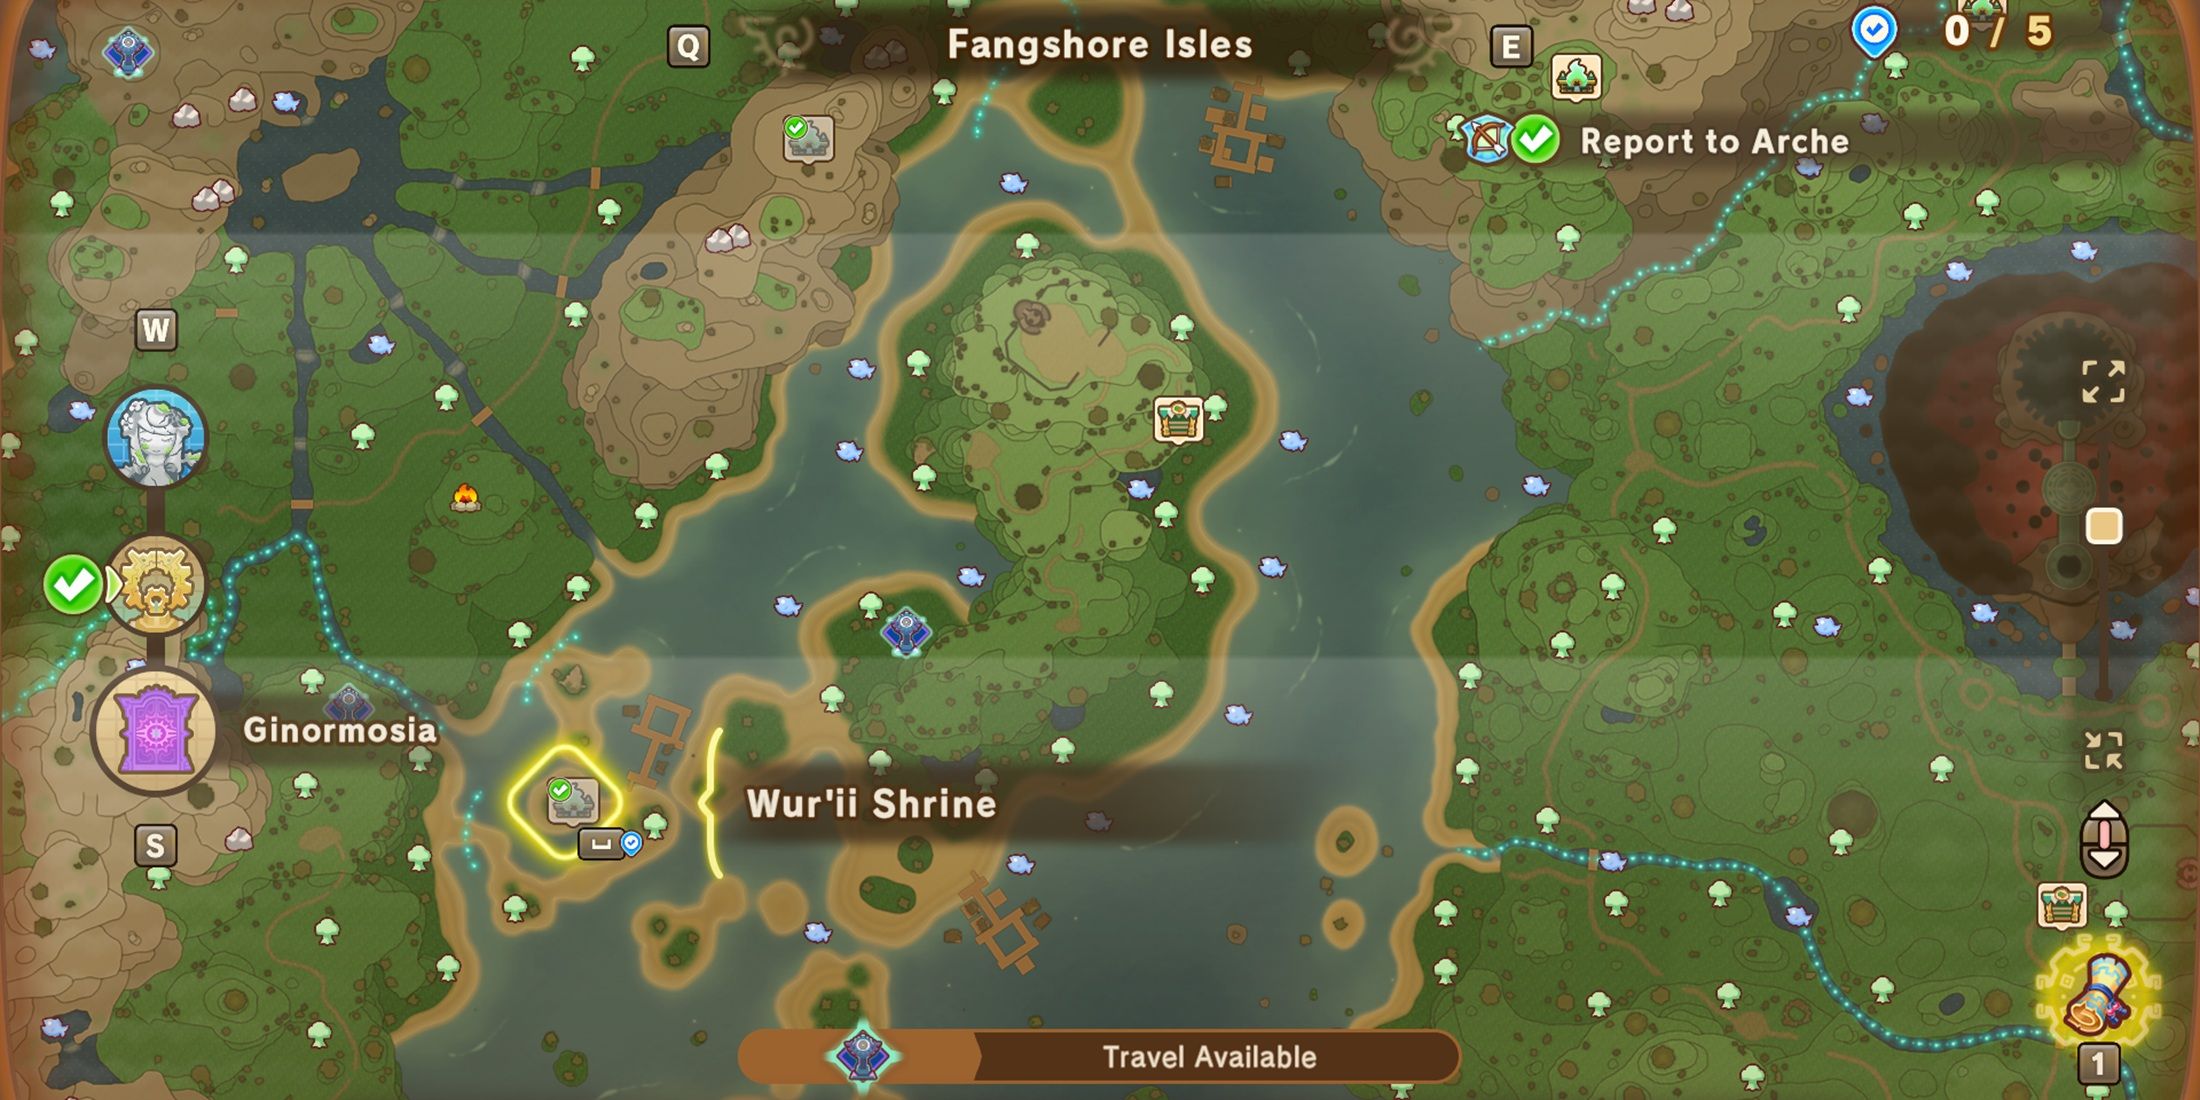
- 1 Shrine
Heading west from the Western Greatgut Plains, you’ll eventually come across water. Beyond this body of water lies a chain of islands close together. The War’ii Shrine is situated southwestward, nestled on a route connecting Fenshore Isles and Drakesnout Range.
Drakesnout Range Shrine Location
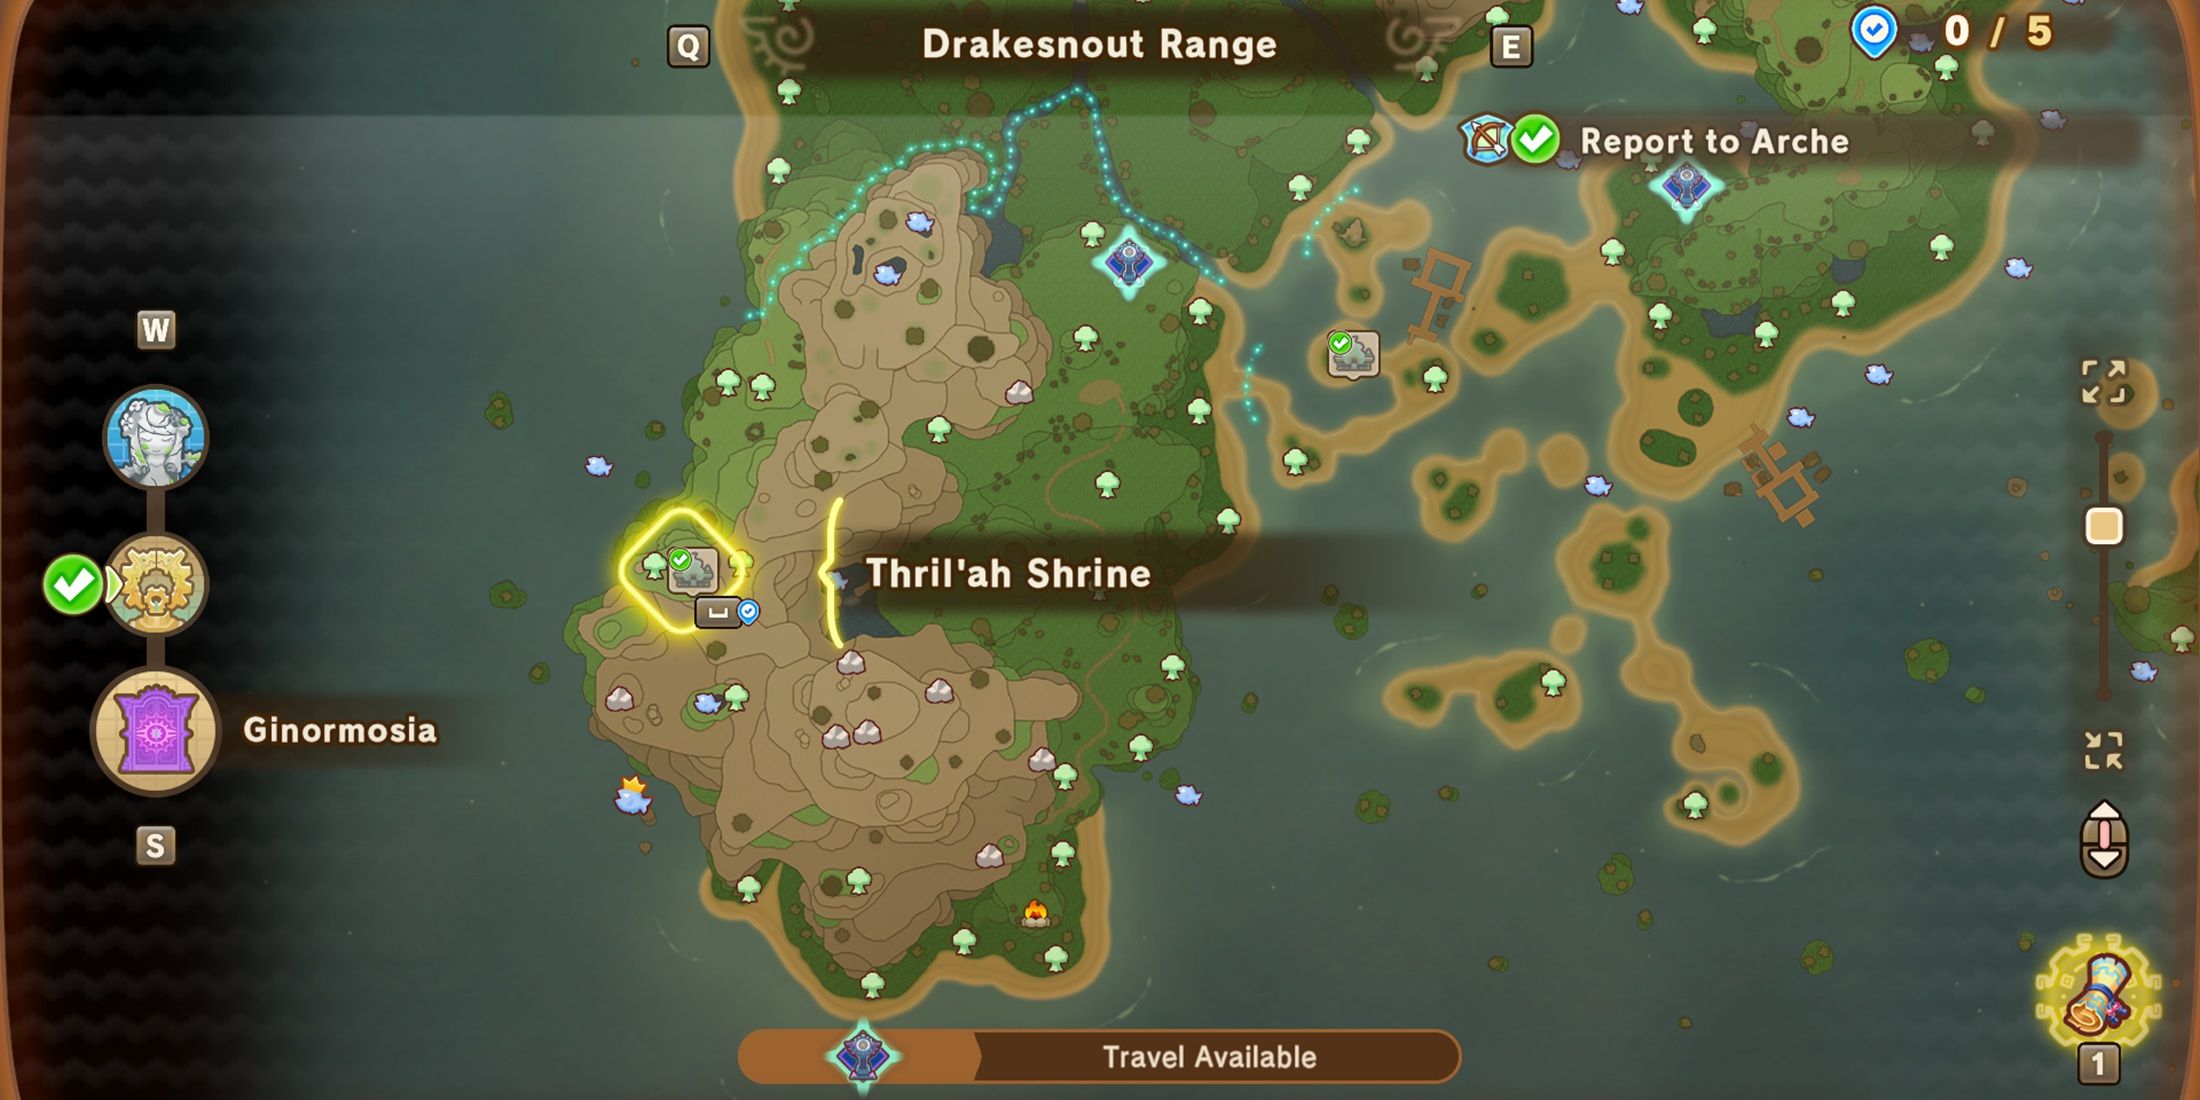
- 1 Shrine
Heading southwest from War’ii Shrine, I make my way towards Thril’ah Shrine. Nestled near the western bay of Drakesnout Range, this hidden gem can be found after scaling the desert cliffs. Beyond those towering formations lies a serene, small grass field where the shrine is tucked away.
Drakeseye Valley Shrine Locations
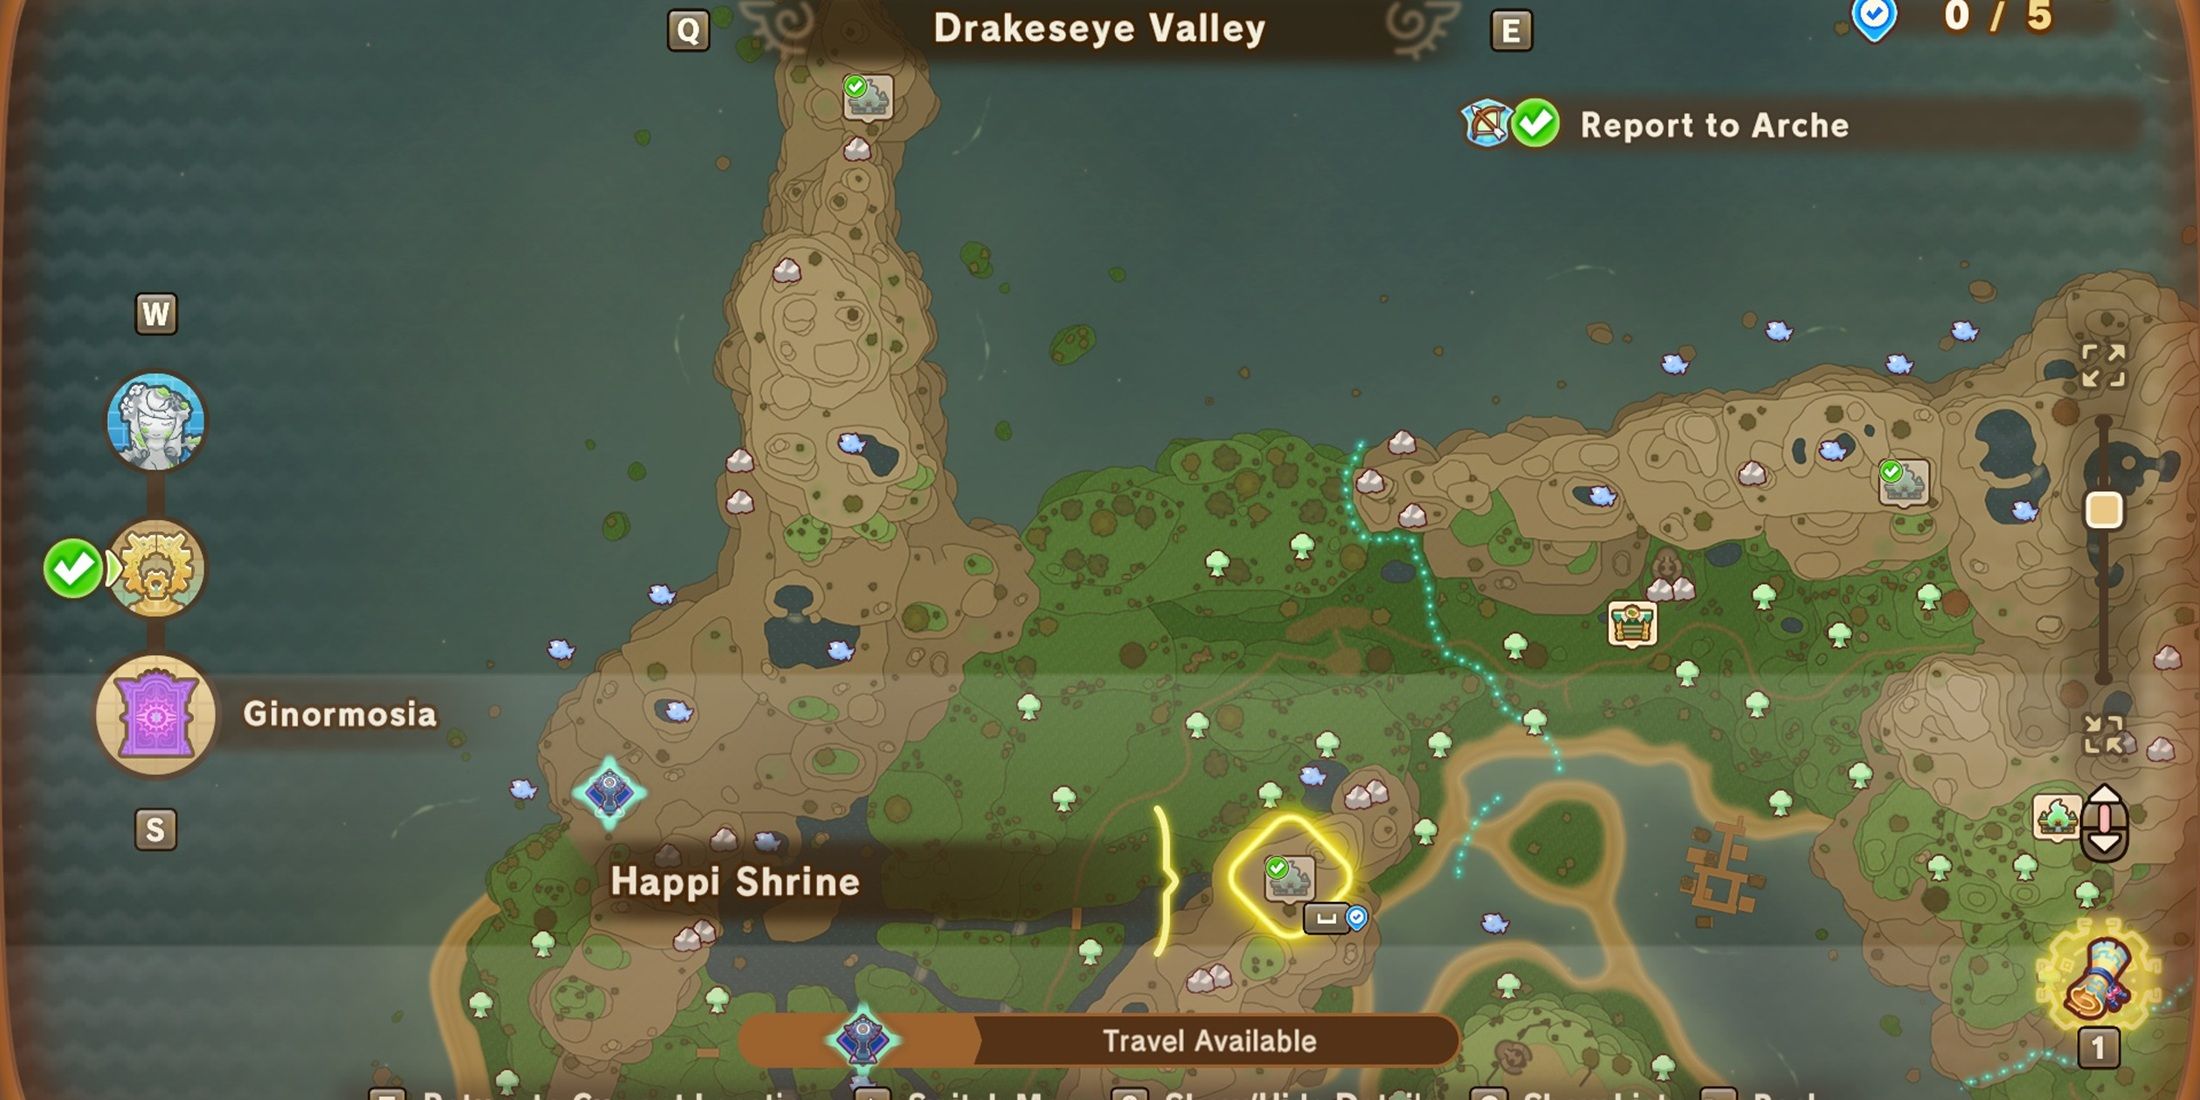
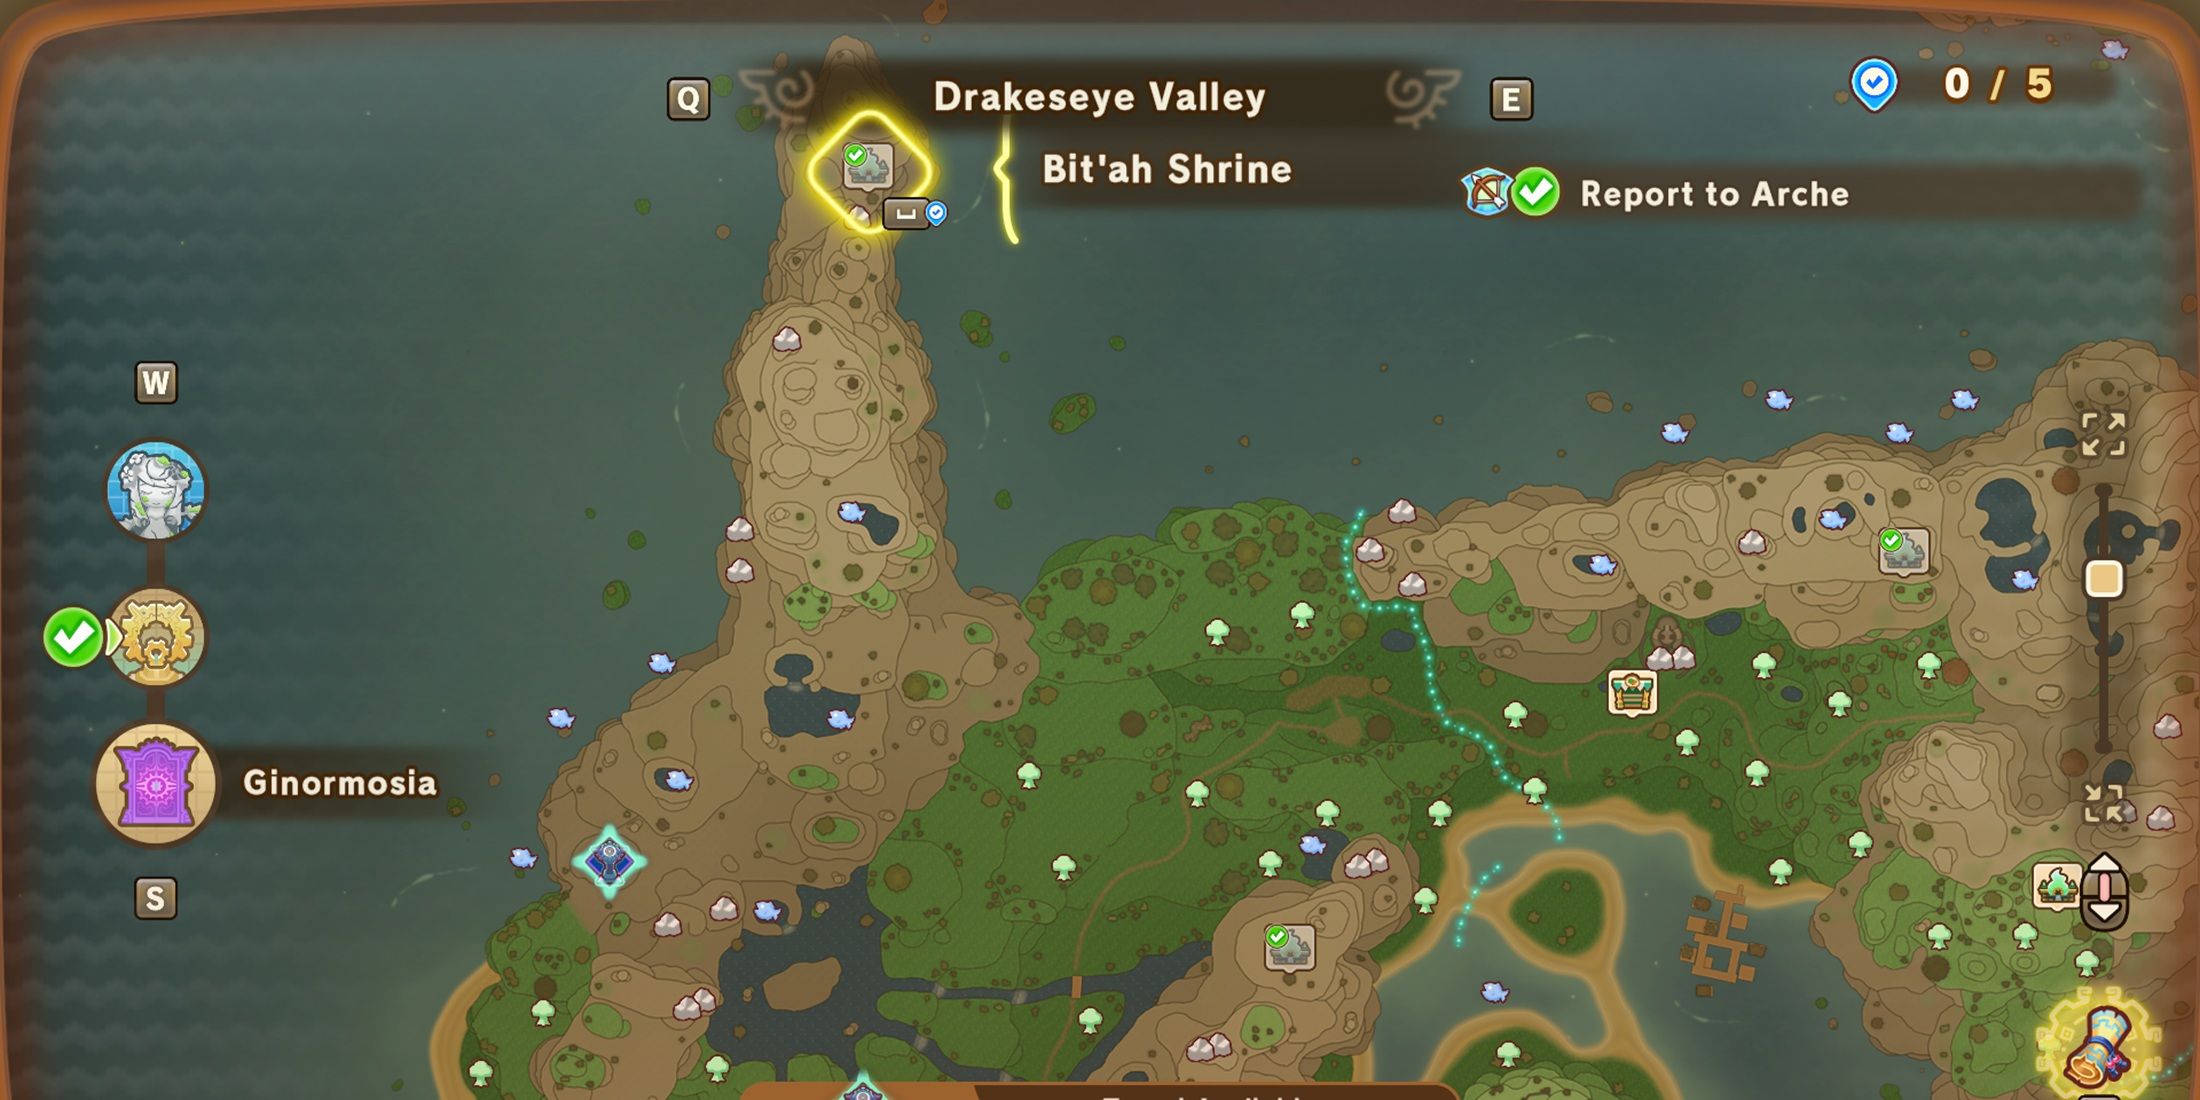
- 2 Shrines
The last region, Drakeseye Valley, houses the last pair of shrines. The first one, known as Bit’ah Shrine, can be found at the very north of this area, making it quite accessible. The second one, Happi Shrine, lies along the eastern boundary with Fangshore Isles. It’s perched on a row of desert cliffs, offering a breathtaking view over the isles.
Read More
- All Shadow Armor Locations in Crimson Desert
- Dark Marksman Armor Locations in Crimson Desert
- Sega Reveals Official Sonic Timeline: From Prehistoric to Modern Era
- Genshin Impact Dev Teases New Open-World MMO With Realistic Graphics
- How to Beat Antumbra’s Sword (Sanctum of Absolution) in Crimson Desert
- The Limits of Thought: Can We Compress Reasoning in AI?
- Where to Pack and Sell Trade Goods in Crimson Desert
- Who Can You Romance In GreedFall 2: The Dying World?
- Enshrouded: Giant Critter Scales Location
- Best Weapons, Armor, and Accessories to Get Early in Crimson Desert
2025-05-21 23:11