Following a grueling trek across Pharloom, once The Last Judge is defeated and the Act 2 cutscene unfolds, Hornet will make her way into the Citadel. Unlike Act 1, Act 2 in the game Silksong has a more unstructured flow. This non-linear progression has left some players pondering the best course of action upon starting Act 2.
Don’t let the Citadel’s intimidating nature discourage you – as you get accustomed to its labyrinthine passages and learn how to handle its many adversaries, navigating Act 2 becomes significantly simpler. This guide will help you determine the most effective starting points in Act 2 of Silksong, and it will also show you where to locate crucial landmarks that are vital for your adventure in the game’s second half.
Spend 40 Rosaries to Get the Grand Gate Map
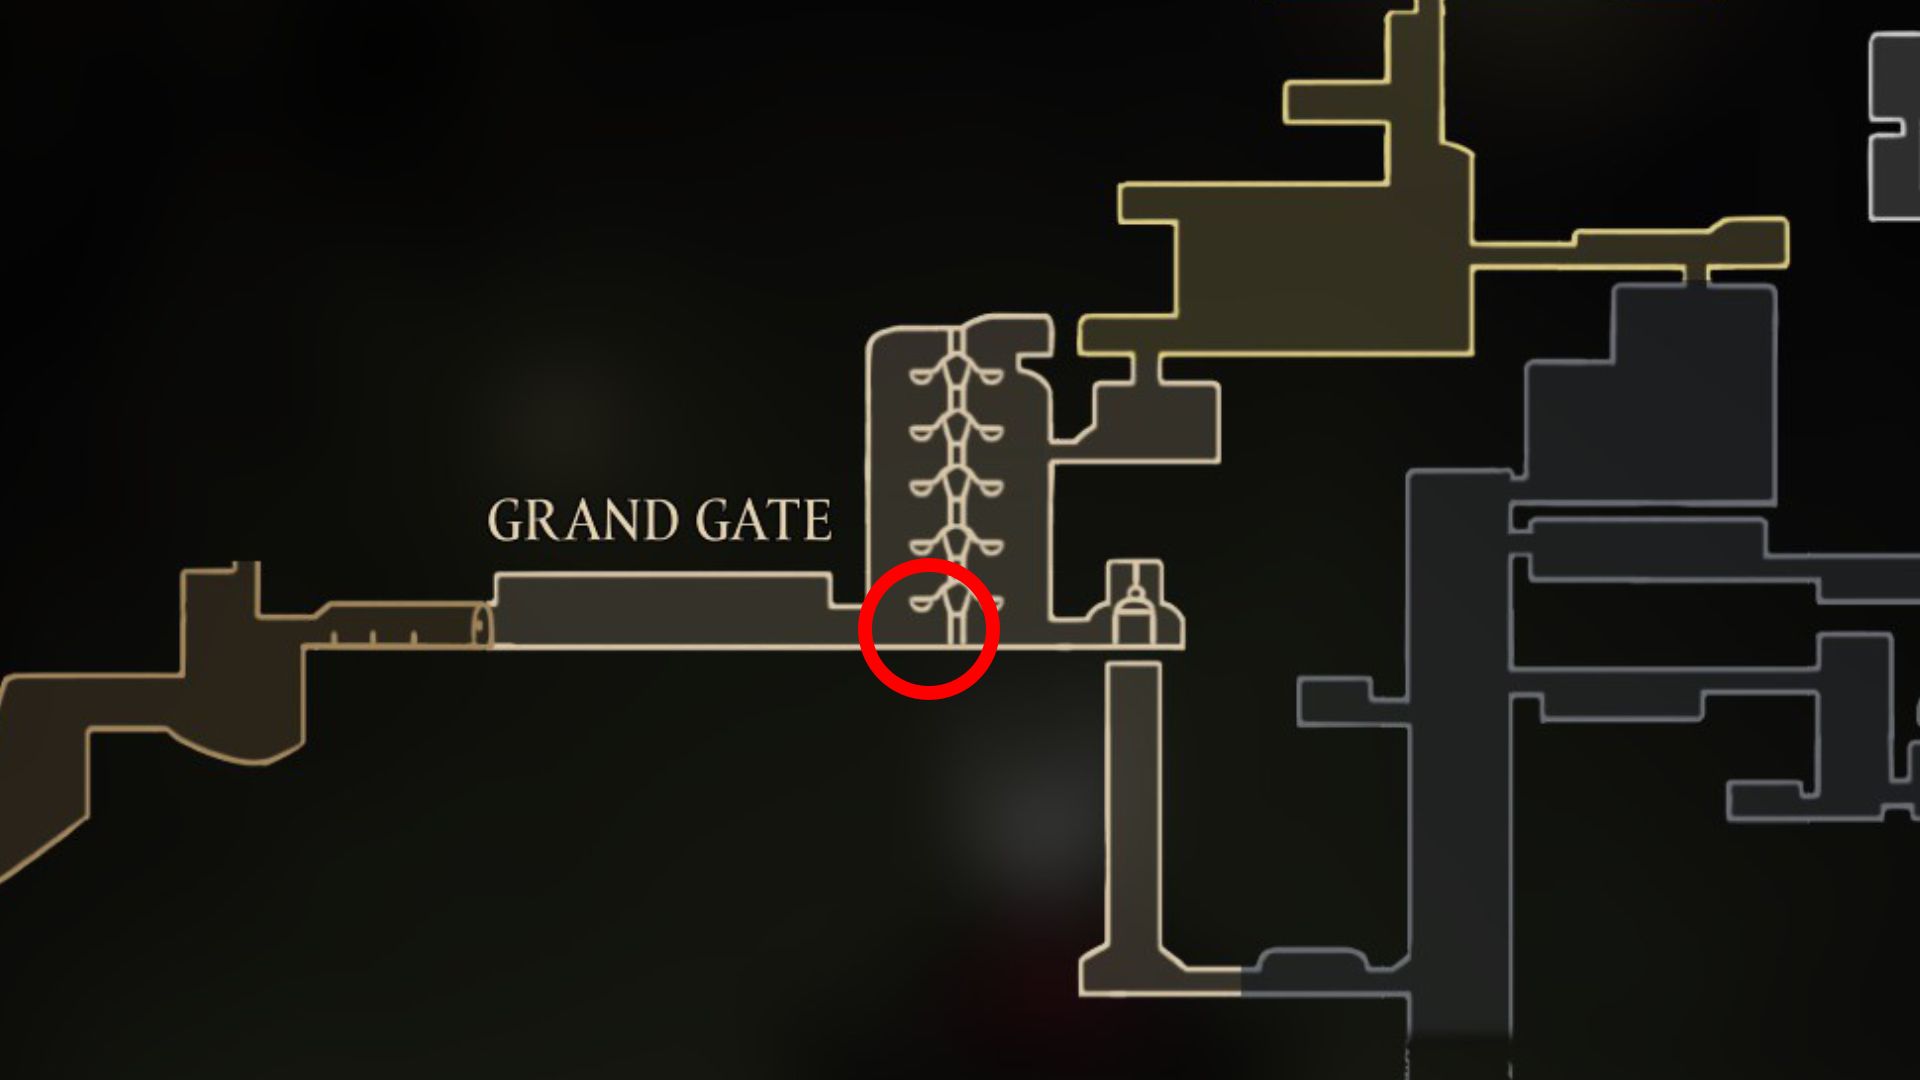
Once you’ve successfully defeated The Last Judge and moved on to Act 2, the initial step for you should be acquiring your first map for this act. Different from Act 1, where you could often buy maps from characters like Shakra, in Act 2, most of your maps will not be sold by NPCs. Instead, these maps are usually obtained from machines that showcase a small replica of the Citadel.
Step into the initial chamber of the Citadel, and you’ll find one of these devices. Engage with it, then hand over 40 Rosaries to obtain a map of the Grand Gate. Though small in size, covering only the space between the Scorched Stairs and the expansive Choral Chambers above, this area provides a good starting point!
Reach Choral Chambers via the Underworks
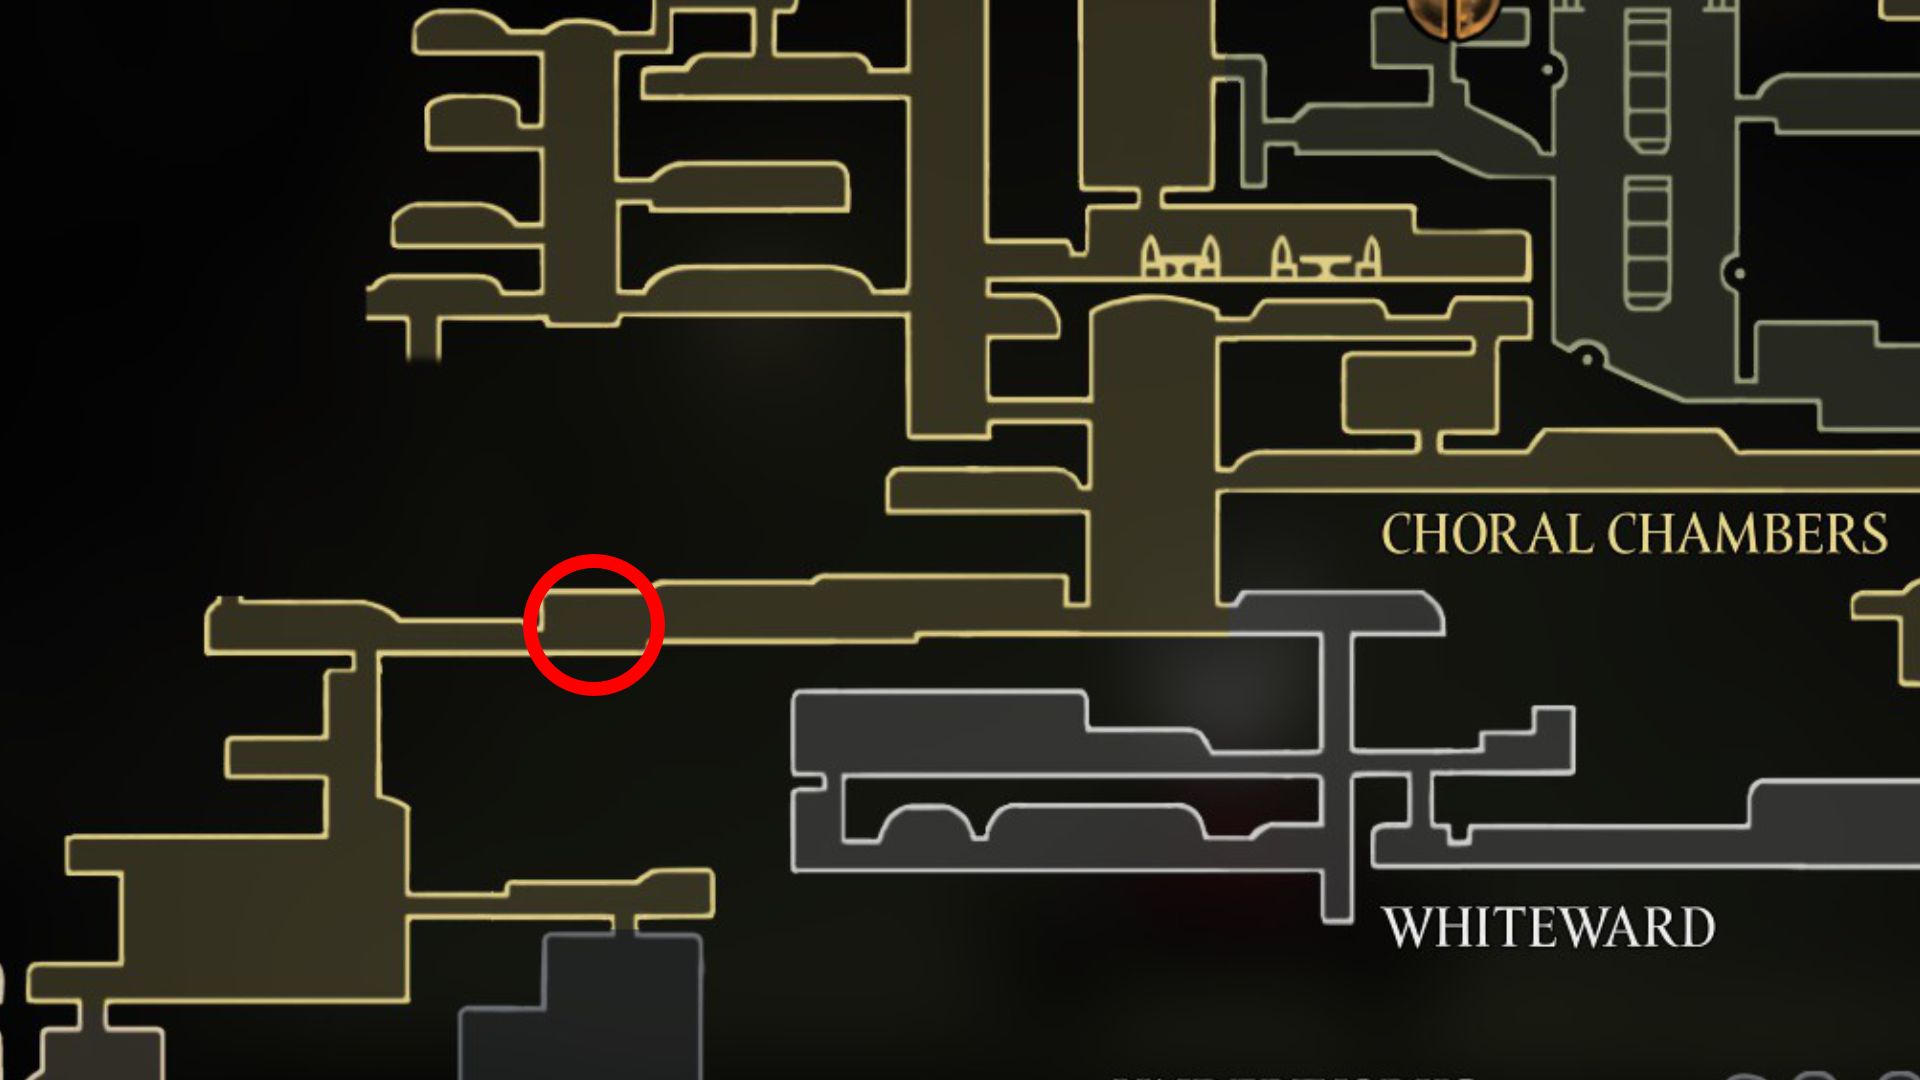
Starting from the Grand Gate’s map device, proceed right, then make your way down into The Underworks. Ascend through this ominous sub-region, where insects are coerced into labor for the Citadel, until you encounter a room marked by symbols and lines. Entering this space will reveal an Underworks map affixed to a bulletin board, which is free for Hornet to take.
As a keen explorer, I ventured upwards, eager to uncover the mystery of the Choral Chambers. After traversing through these enchanting chambers, I stumbled upon another map machine nestled at the entrance of a slanted, elongated room. With 70 Rosaries in hand, I decided to invest in this intriguing map. Then, turning my gaze to the left, I stumbled upon my first Ventrica station – what an exciting discovery!
In the Citadel, Ventrica Stations serve as the main method for quick transportation. However, to activate each station, it requires 80 Rosaries.
Find the Shortcut to The Slab
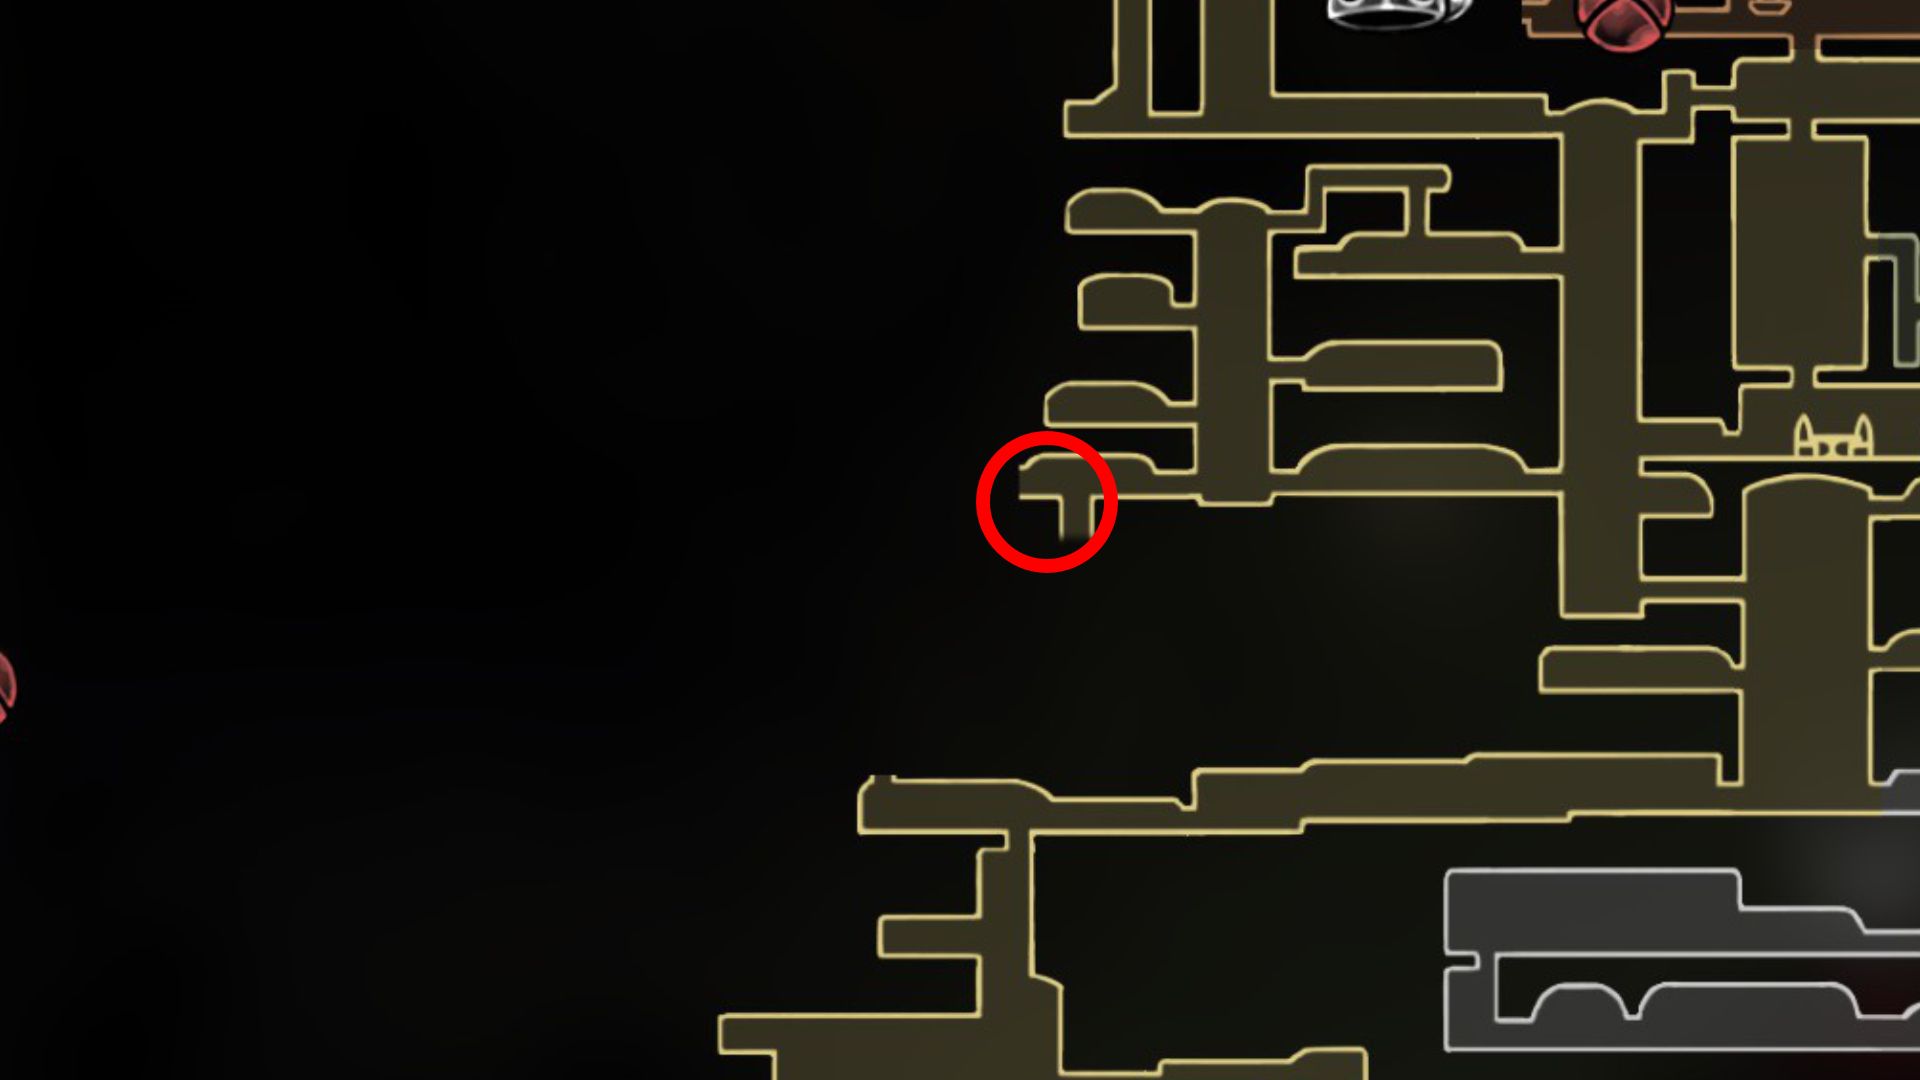
To reach The Slab the usual way, players need Hornet to get caught in a cage by a big enemy in Deep Docks. However, you can find an alternative path on the left side of Choral Chambers that leads directly to The Slab and nearby stations.
As a fellow explorer, I can’t stress enough how significant it is for our journey ahead. You’ll find yourself back at Slab Bellway Station later on, as it’s the key to reaching Mount Fay. This majestic peak is home to an incredibly handy movement item that we’ll surely find useful. However, to gain access to this zone and its formidable platforming challenge, we need to obtain the Clawline ability hidden somewhere within the Citadel. Let’s keep our eyes peeled!
Defeat the Cogwork Dancers
In The Citadel, The Cogwork Dancers are the initial significant boss you’ll come across. Perched high in the Choral Chambers, these mechanical dancers may not offer the toughest battle in the game, but they certainly present one of the most poignant (and aesthetically pleasing) encounters. Hornet engages with two Cogwork Dancers simultaneously, and their movements sync with the music, providing a clue about their upcoming attacks.
In essence, there are three distinct stages in the battle, with the tempo of the song increasing progressively. Once you vanquish a dancer for the third time, it’ll be annihilated. The sole survivor will persist with the routine, marking a poignant fourth phase as the music transitions to a slower, melancholic tune.
Following your victory over the Cogwork Dancers, and surviving the emotional turbulence they may trigger in your real-life journey, you’ll gain entry to the Cogworks Core beneath, as well as the remaining areas of the Choral Chambers to your right.
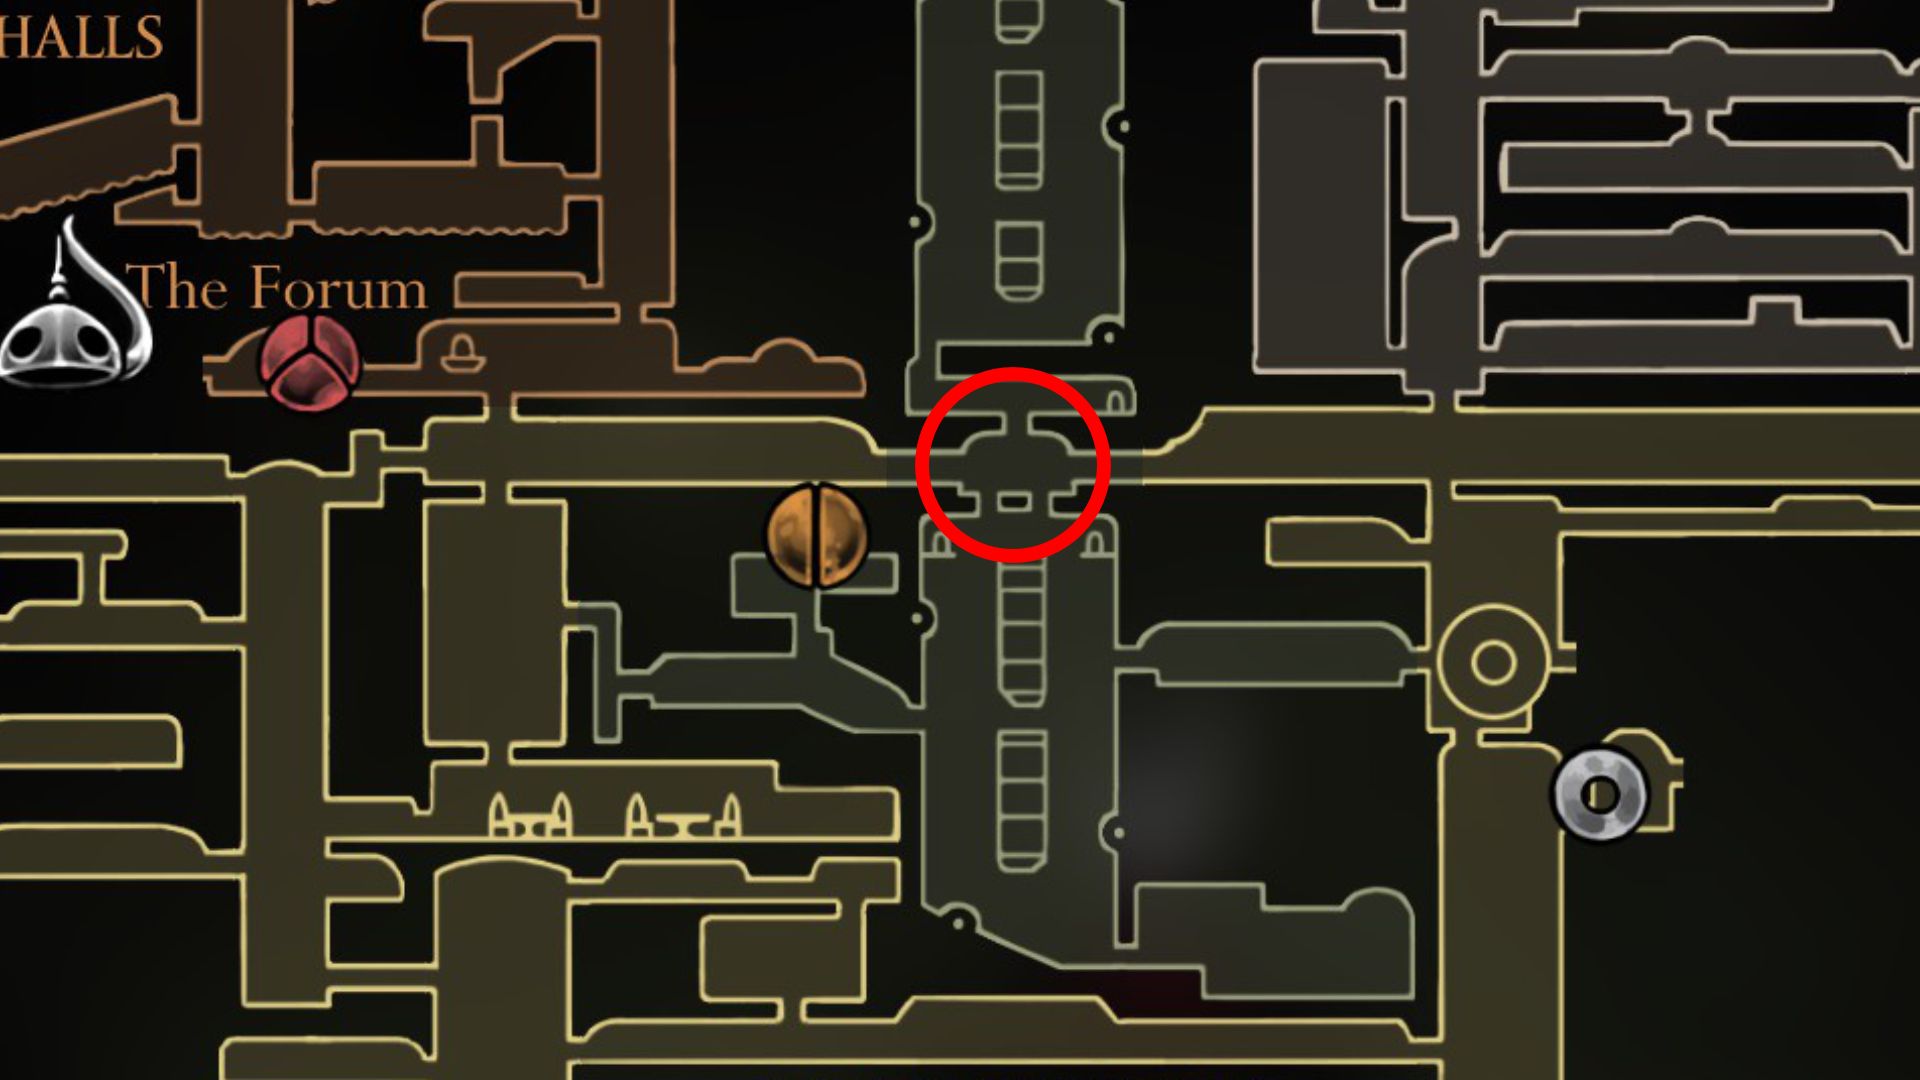
Ring the Grand Bell to Unlock Songclave
Following your victory over the Cogwork Dancers, move right, minding the two formidable, large adversaries en route that require a jump to bypass. Continue on this path until you reach an unusual structure perched high atop-right in the Citadel. Go inside and strike the bell housed within to summon a bench. Upon leaving the room, encounter a character known as the Caretaker who queries if you have rung the bell, and cautions that it will invite pilgrims to the site.
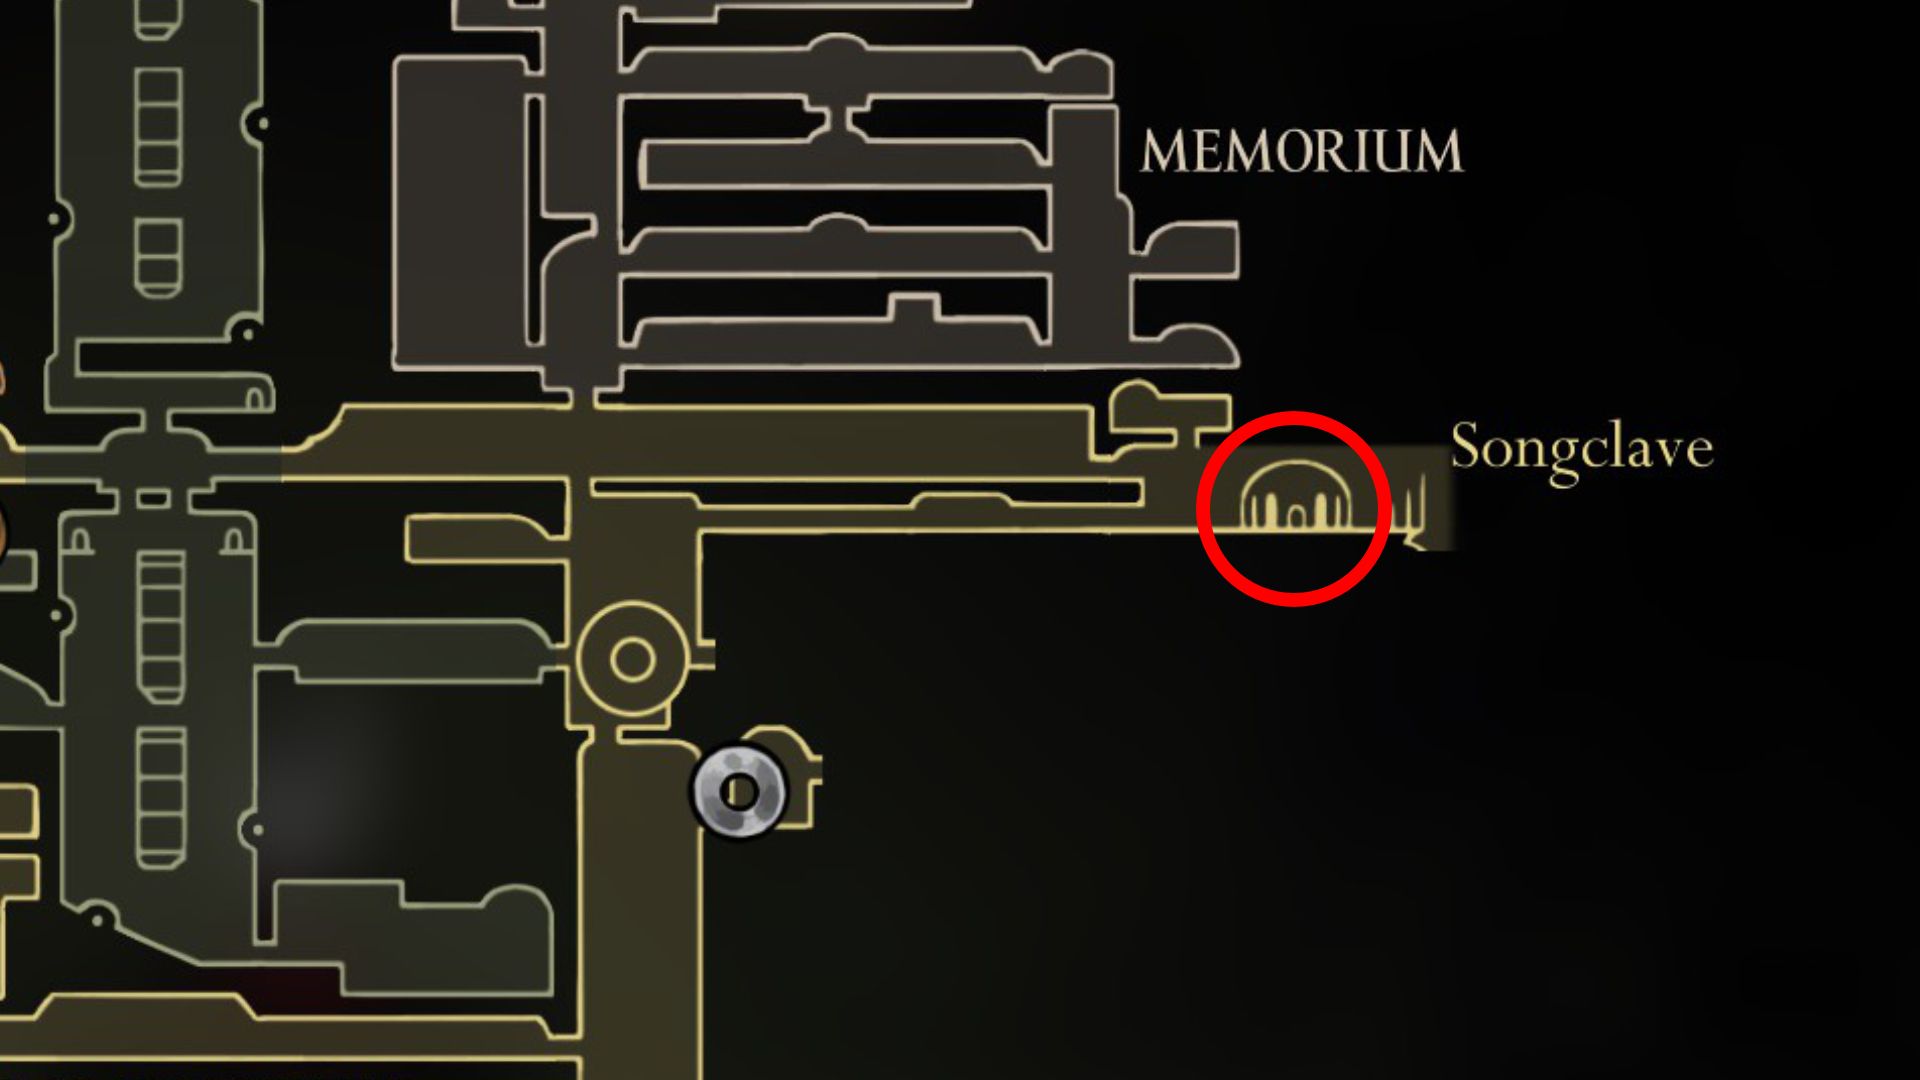
Absolutely, return to this location at a later time, and it will have been changed into a new gathering place called Songclave. The Guardian seems to be somewhat irritated by the influx of newcomers, but on the bright side, you’ll now be able to assist pilgrims with their Wishwall requests in Songclave.
As I navigate through the game, I spot a White Key hidden to the right of that building. With this key in my inventory, I’ll be able to gain access to the Whiteward, located beneath the Choral Chambers.
Locate the Grand Bellway in Choral Chambers
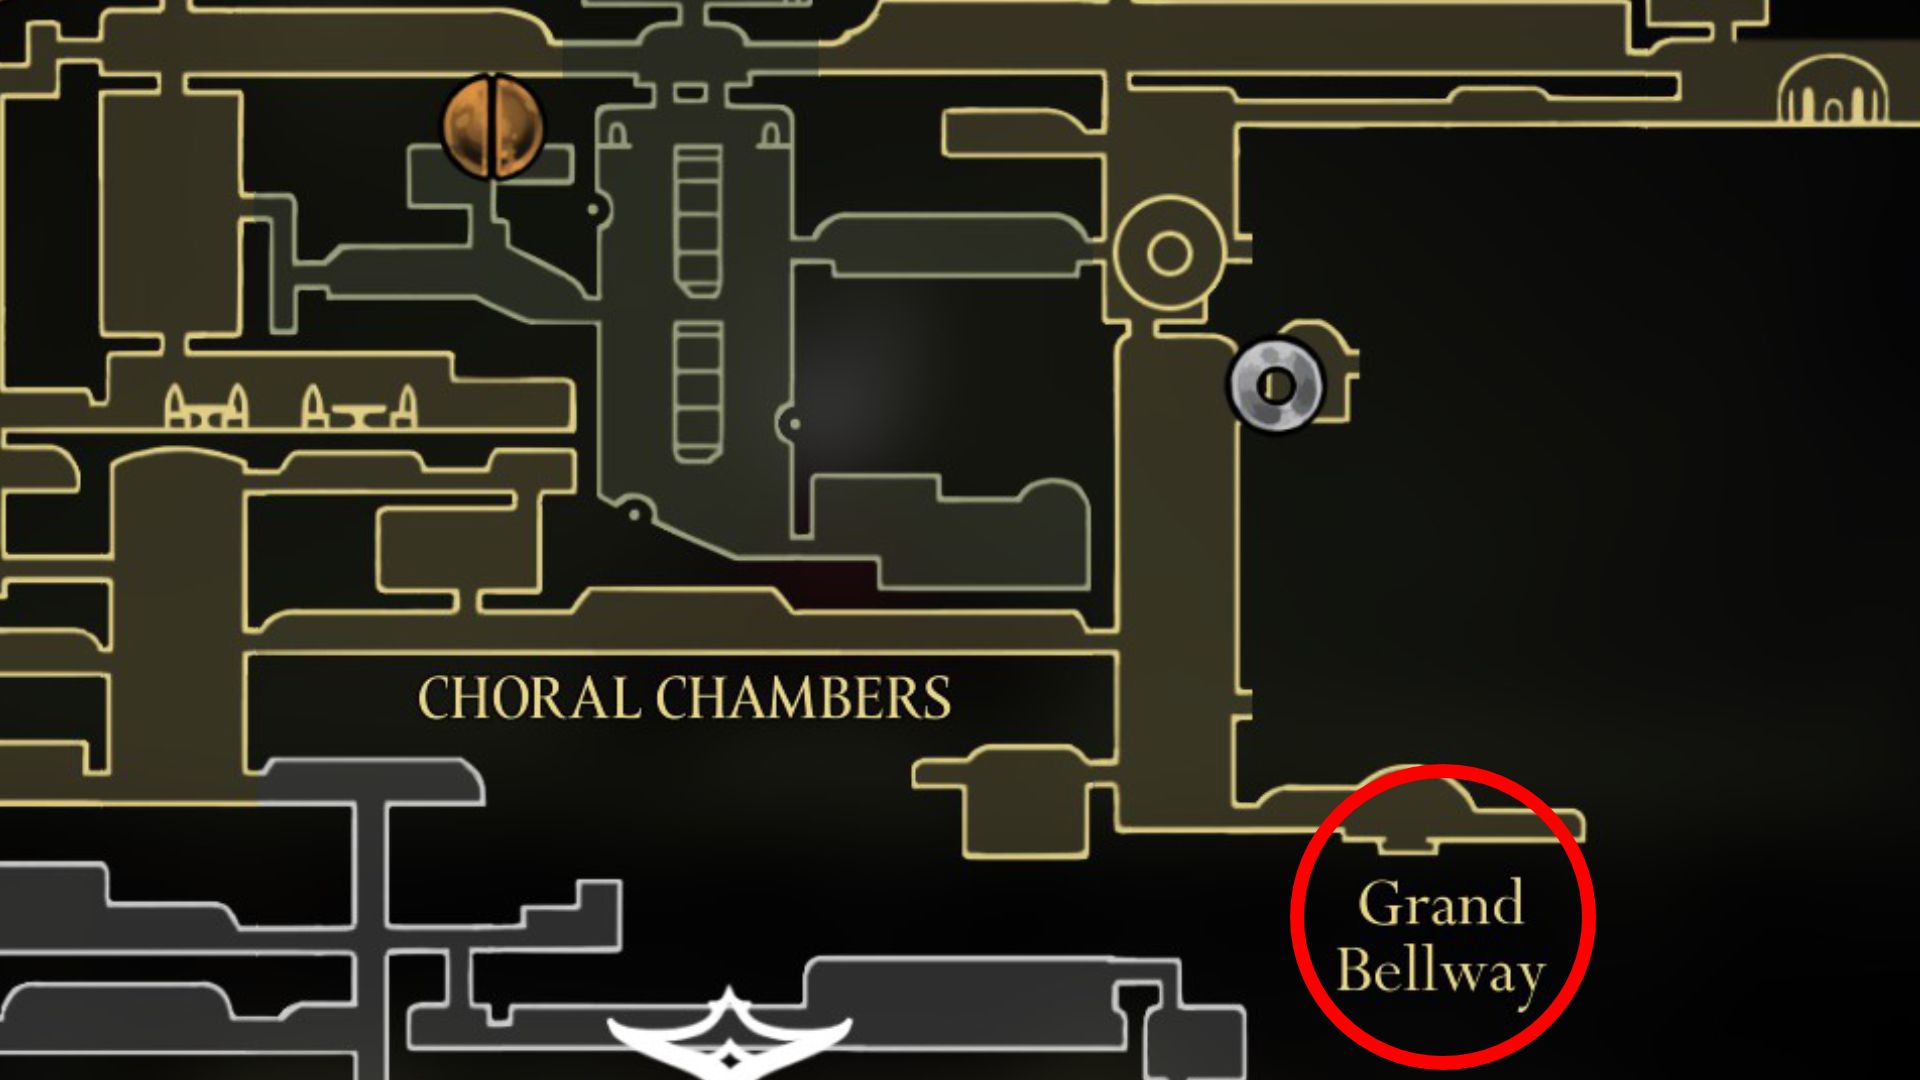
To find the Grand Bellway station, located centrally in the Citadel, journey towards the lower right corner of the Choral Chambers zone. This strategic location is helpful if you need to retrace steps from Act 1 for reasons such as gathering remaining Mask Shards, Spool Fragments, acquiring optional abilities, fulfilling unmet wishes, or completing any side content you may have overlooked on your journey to the Citadel.
The Grand Bellway is situated right below
Look For Pale Oil in Whispering Vaults

As a devoted explorer, I must share my excitement about the enigmatic sanctuary known as The Whispering Vaults. Navigating here isn’t straightforward unless you’re well-acquainted with the directions.
Instead, retrace your steps to the Cogwork Dancers arena and descend. This will take you to the Cogwork Core, a sub-area with similarities to the Path of Pain from Hollow Knight. After descending three levels, make your way down, turn right, and then move upwards to reach the other side of the central pillar in the lower portion of this room.
To navigate through this area successfully, you’ll need to frequently employ Hornet’s various mobility techniques and the skill of performing a downward slash while rebounding off cogs.
Unlock a shortcut to the left side about halfway up the right side, for easy access later on.
Navigate towards the upper-right corner of the room, jumping on moving cogs along their tracks, and then proceed right. Upon reaching the end of this corridor, turn left, and you’ll discover a room that leads you to the left side of an enormous wheel-shaped gate. Pull the lever, move across to the right, and enter the Whispering Vaults from there.
Deep within the Echoing Catacombs lies a Faded Lamp Oil. Utilizing this item will enable Hornet to enhance her Quill for another round, boosting its damaging potential even more.
Hunt Down Pieces to The Threefold Melody
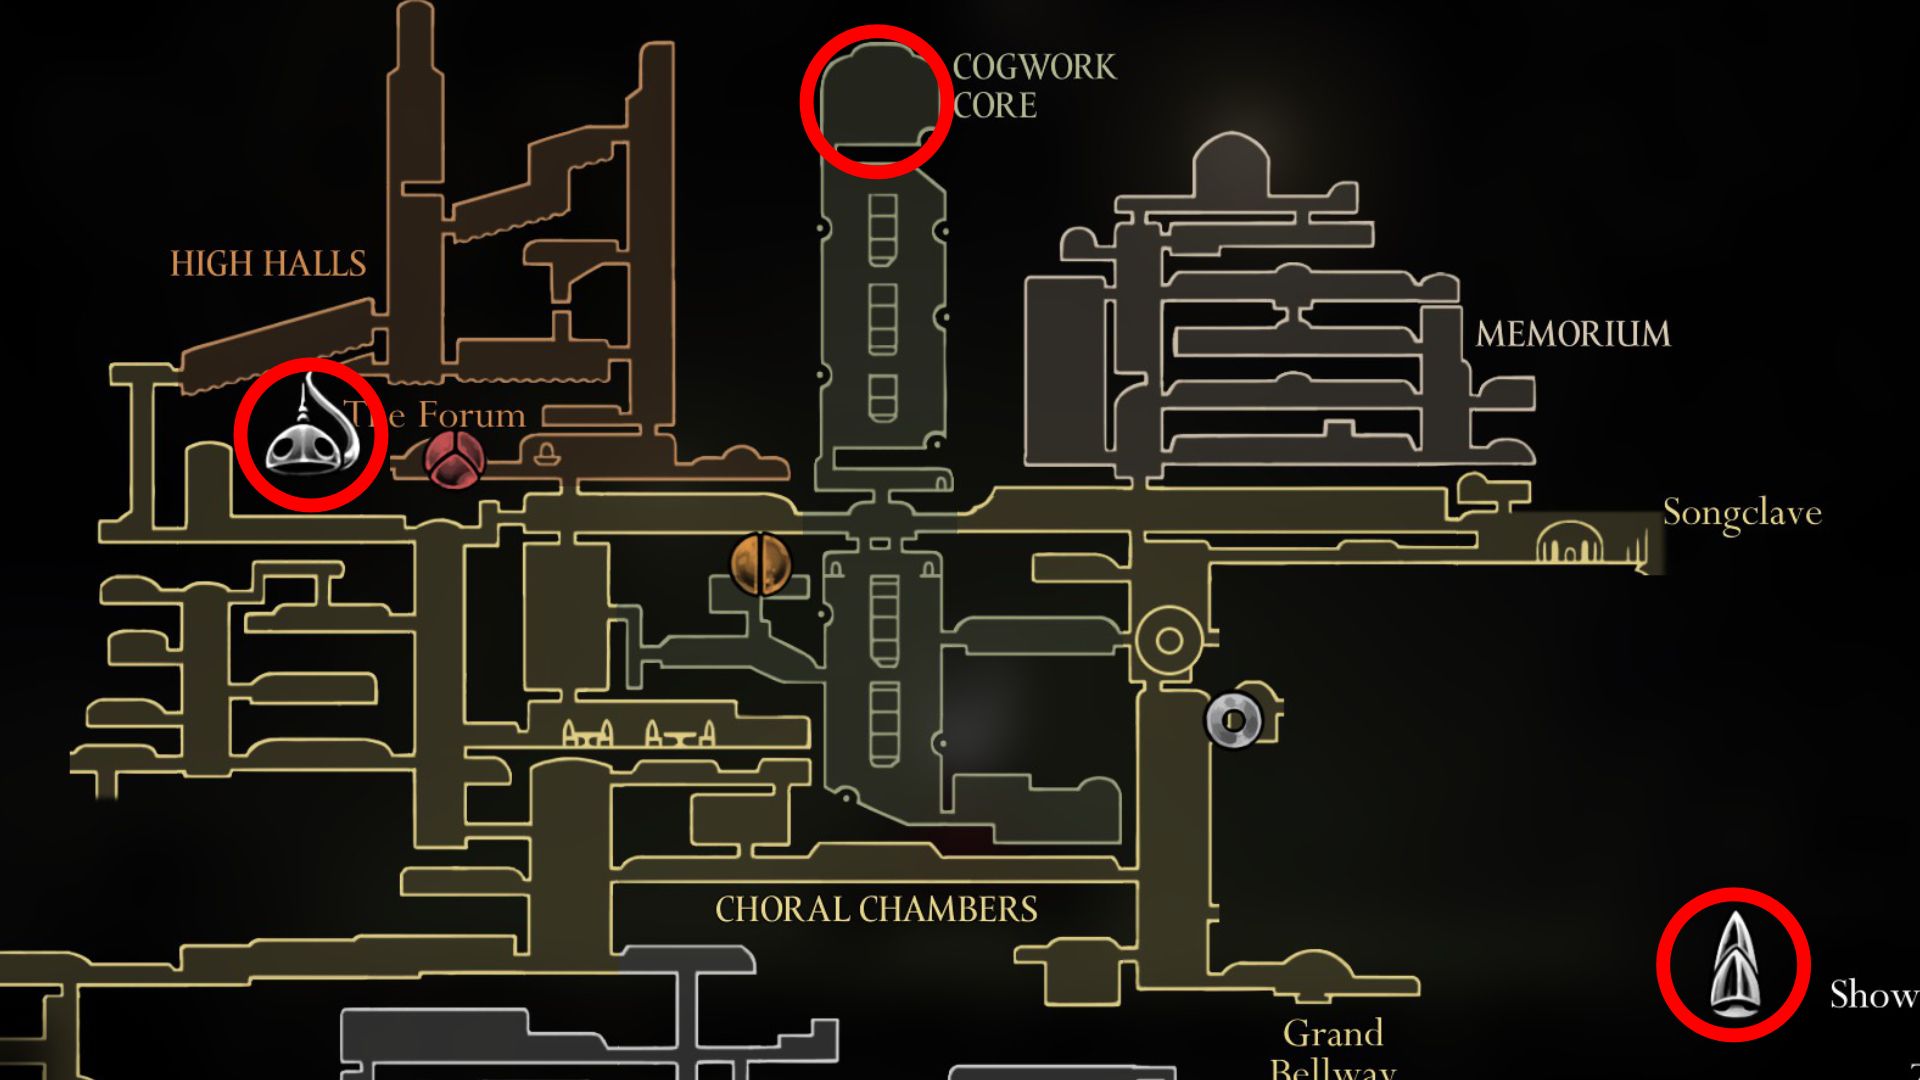
Following your victory over the Cogwork Dancers, the room’s backdrop will spin around, unveiling three foreboding statues. Engage with these statues to discover Hornet’s last mission to scale Pharloom’s summit: locate and collect all three parts of the Threefold Melody, then perform it in their presence.
As a dedicated fan, I’ve stumbled upon an intriguing puzzle: the three segments of the song are secreted away in the hard-to-reach corners of the Citadel. Two of them are concealed behind demanding gauntlet rooms, one tucked away at the top-left and another at the bottom-right extremities. The last one is subtly camouflaged on the elevated Clockwork Core area.
Preparing for this endeavor may require a considerable amount of time, and it’s likely that you’ll need to delve into various locations to reach your objective. These include the Cauldron, the depths of the Whispering Vaults, Bilewater, the High Halls, Whiteward, Memorium, and many more.
To simplify the task at hand, start by visiting Underworks and the Cauldron initially to acquire the Clawline ability. Subsequently, return to Slab Bellway station. Take a left turn and use your newly acquired Clawline ability to enter Mount Fay. Overcome the challenging platforming obstacles within Mount Fay to reach its peak and you’ll be granted the Faydown Cloak as a reward, bestowing Hornet with the power of double-jumping.
Read More
- All Skyblazer Armor Locations in Crimson Desert
- All Shadow Armor Locations in Crimson Desert
- How to Get the Sunset Reed Armor Set and Hollow Visage Sword in Crimson Desert
- Marni Laser Helm Location & Upgrade in Crimson Desert
- Best Bows in Crimson Desert
- All Helfryn Armor Locations in Crimson Desert
- All Golden Greed Armor Locations in Crimson Desert
- How to Craft the Elegant Carmine Armor in Crimson Desert
- Keeping Large AI Models Connected Through Network Chaos
- One Piece Chapter 1179 Preview: The Real Imu Arrives in Elbaf
2025-09-10 02:18