
As a seasoned gamer with over two decades under my belt, I must say that I’ve seen it all – from the glory days of EverQuest to the modern marvels of World of Warcraft and beyond. And let me tell you, these set bonuses are nothing short of game-changers!
In the world of Dungeonborne, the game becomes increasingly intricate as you progress, presenting a challenge even for seasoned players. To withstand the onslaught of formidable monsters lurking in the tainted dungeons and hostile opponents, it’s crucial to acquire the most advantageous Set Bonuses from your chosen gear.
As a gamer, figuring out which game sets cater to my unique playstyle can be quite challenging, especially when there’s limited info about their abilities and activation requirements. However, this compiled list provides a ranked order of the top set bonuses, along with details on their effects, activation conditions, and precise strategies for maximizing their benefits.
9 Tiny Torment
Good Extra Damage, But Useless Long-Term

- Pros: Extra damage.
- Cons: Only useful in the early game.
- Good for: Harassing, AoE combos.
In essence, it’s widely agreed that Tiny Torment isn’t particularly beneficial among all Set Bonuses. While it may be useful at lower levels, as players advance and upgrade both their characters and gear, they find themselves needing more potent effects to thrive. High-level PvE enemies demand top-tier equipment to defeat effectively.
In Tiny Torment’s Tier 1, activation occurs once you collect 6 charges. When dealing undefended damage to any character (either player or NPC), they will endure 3 points of true damage every half second for a duration of 5 seconds, which is damage over time. This damage over time effect has a 15-second cool-down on the same target, but it can be applied simultaneously to multiple targets. However, it cannot be reapplied until a 15-second interval has passed since the last application.
8 Drunk Alchemist
Unreliable, Situational Use Only

- Pros: Can save players in a pinch.
- Cons: Can benefit the enemy if players attack from range.
- Good for: Situational, lucky players.
As a devoted fan, let me express my disappointment with this bonus. To be activated, it demands a hefty sum of 15 set charges, which feels quite steep. Worse still, it’s priced similarly to more beneficial Set Bonuses. The kicker? Its effect is unreliable and only useful in specific situations.
The only tier of Drunk Alchemist Bonus Set causes the following effects. When dealing unblocked direct damage to enemy players outside of combat, the user will gain a random potion effect. If the damage is ranged, there is a chance that the player will instead apply a random flask effect to the target. This effect can trigger once every 30 seconds.
7 Midas Touch
The Best Way To Make Extra Gold
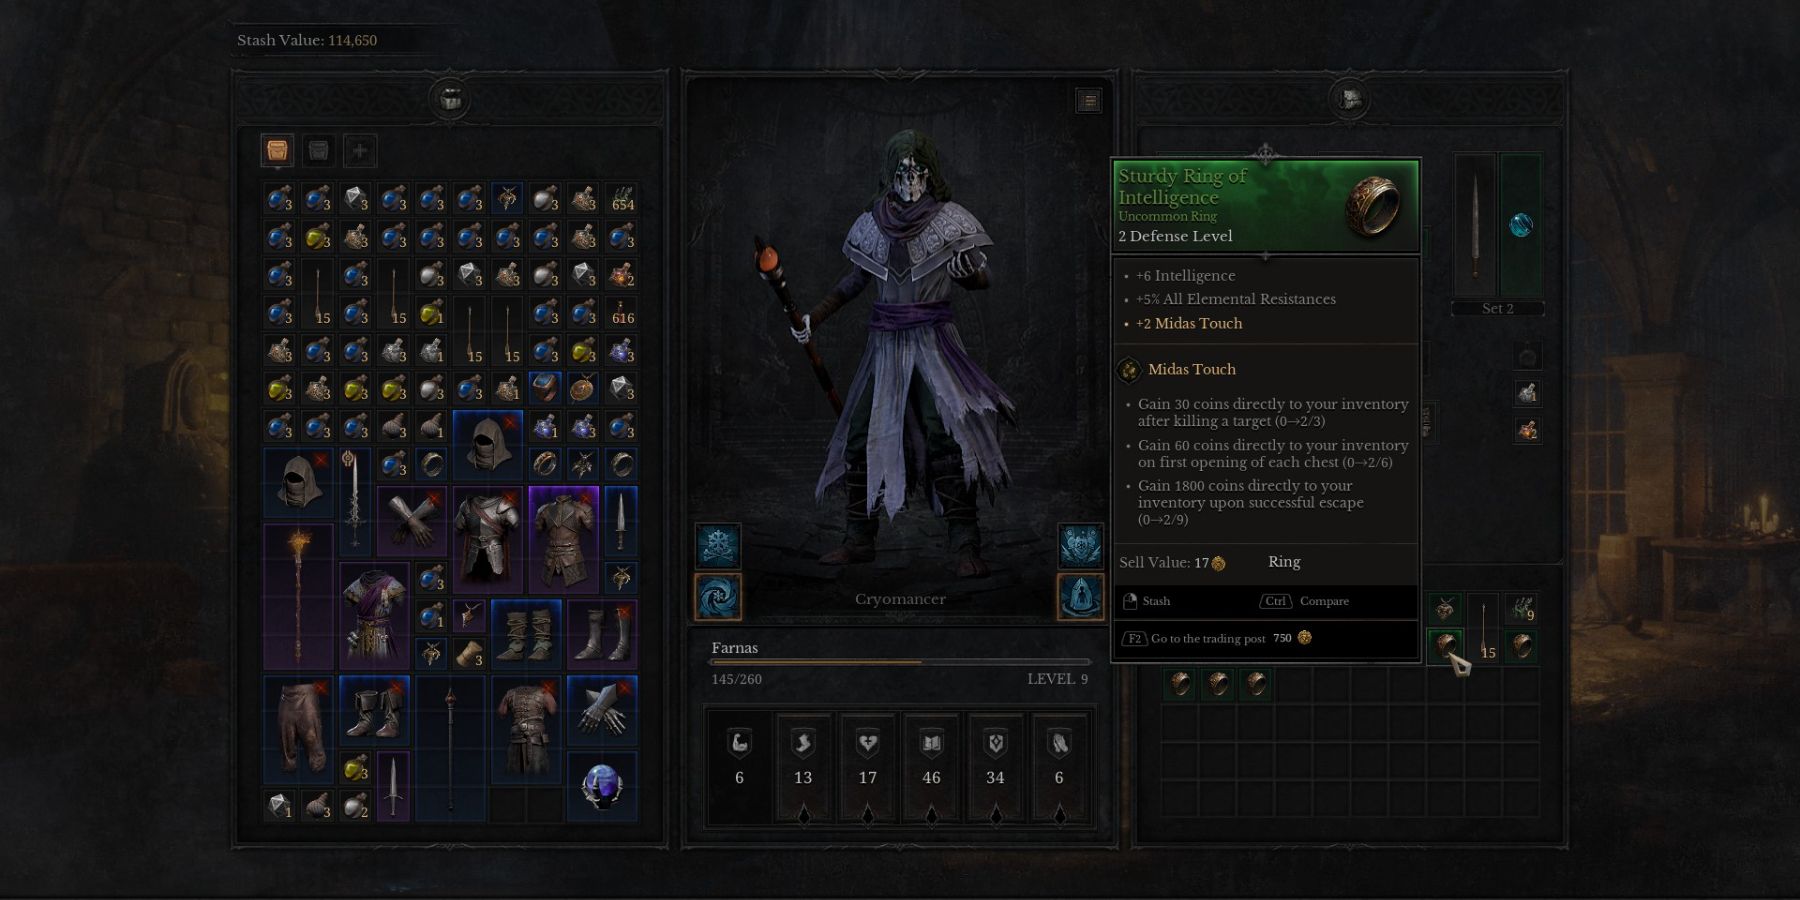
- Pros: Earn gold fast.
- Cons: No other effects.
- Good for: Farming currency.
In the late stages of the game, The Midas Touch set is an exceptional method to accumulate additional gold, a valuable resource that many players strive for. By defeating monsters, unlocking treasure chests, and carefully withdrawing your earnings, you can amass a substantial amount of gold. With each withdrawal, this passive income has the potential to grow exponentially, much like a snowball rolling downhill.
As a dedicated player, I excitedly look forward to the rewards my set offers. After successfully eliminating a target, Tier 1 instantly adds 30 coins to my inventory (this perk activates when I have accumulated 3 charges of the set). Moving on, upon opening my first chest in the map, Tier 2 generously grants me 60 coins, with this effect triggering when I reach 6 charges (set charges, that is). Lastly, a momentous occasion occurs when I reach 15 charges. Each time I safely extract, I’m handsomely rewarded with 1800 gold coins!
6 Tangling Chain
Great For Crowd Control And Mitigation
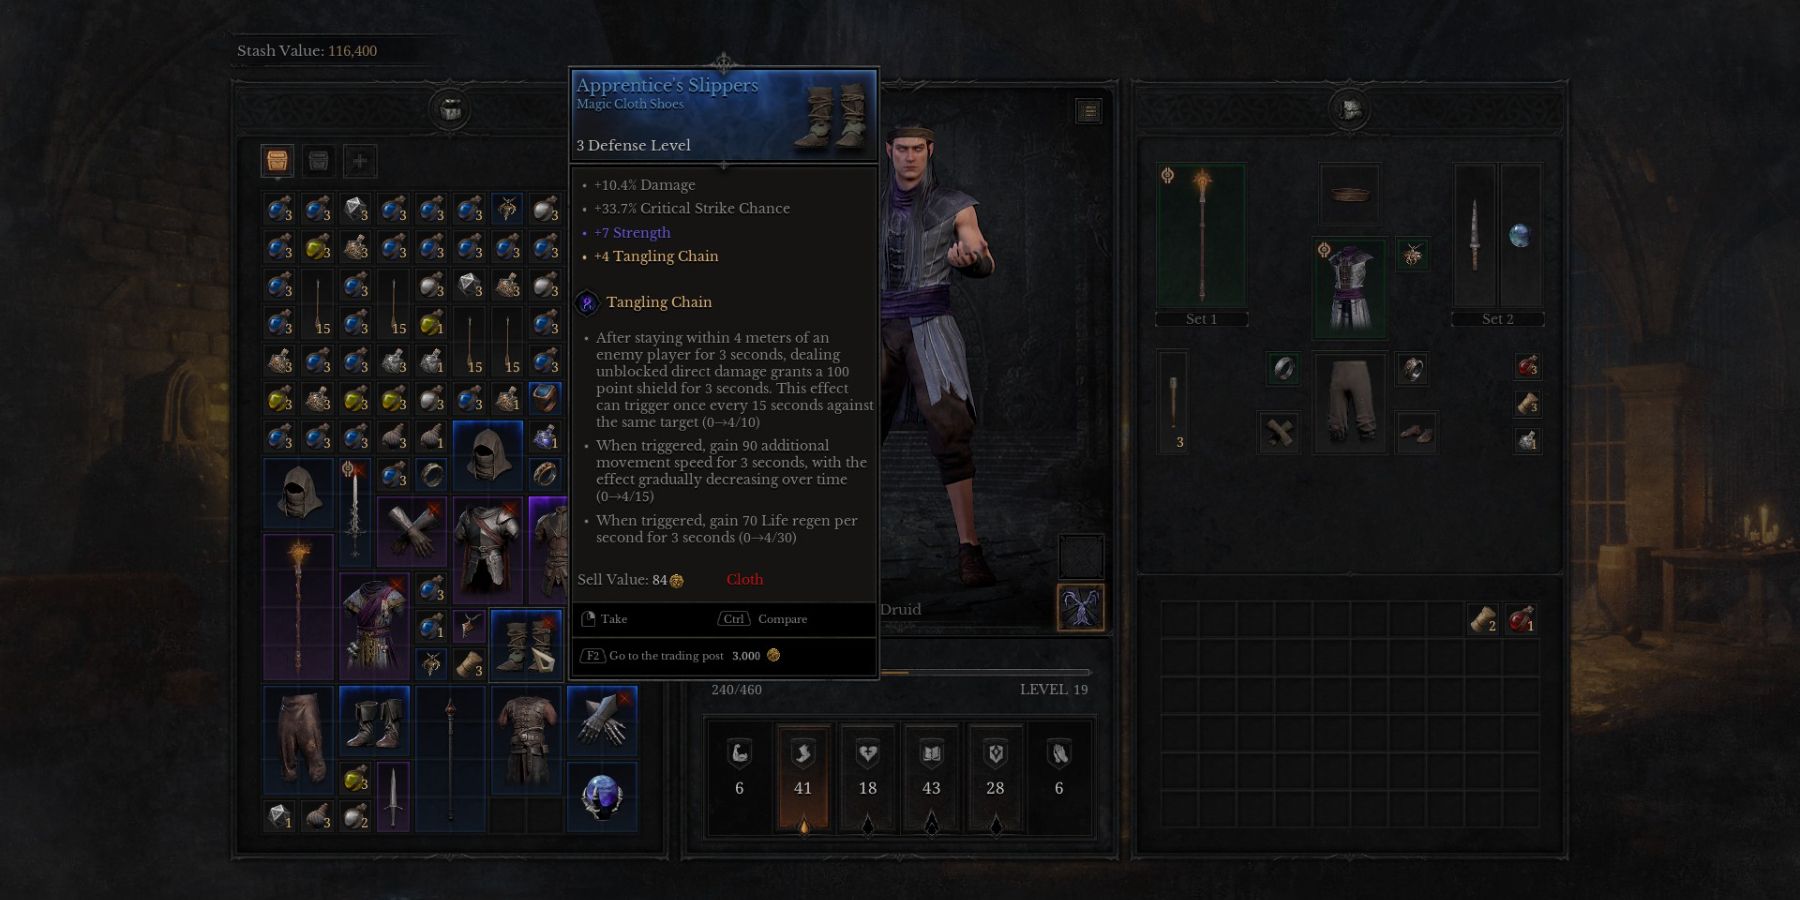
- Pros: Best CC and mitigation.
- Cons: High budget, class limitations.
- Good for: Tanks and melee classes.
As a gamer, I’d say: “The Tangling Chain is my go-to tool for managing crowds and mitigating damage. At tier 1, if I stay close to an opponent for 3 seconds, I can dish out unblockable damage, earning me a 100-point shield for 3 seconds in return. This effect can only trigger once every 15 seconds against the same foe, and it requires accumulating 12 set charges before it activates.”
Advancing to Tier 2 offers extra advantages. Once activated, players receive a speed boost of 90% more movement speed for a span of 3 seconds, which then gradually diminishes (requiring 25 charges to activate). After amassing 30 charges, the Tier 3 effect triggers, bestowing the user with 33 points of health regeneration per second for another 3 seconds. Properly utilizing accessories and defensive attributes can significantly alter the game’s outcome.
5 Force Of Trinity
Good Against Vanguards, Great AoE Damage

- Pros: Great for Vanguards.
- Cons: Situational for other classes.
- Good for: Harassing, prolonged fights, PvP.
For ranged class players seeking a better option than constantly clashing with melee classes, the Trinity Force Set stands out as an excellent investment. In Tier 1, when three consecutive unblocked attacks or abilities inflict direct damage on targets within a span of 3 seconds, users will retaliate by dealing 100 physical damage to surrounding enemies in an area-of-effect (AoE) radius (this effect triggers once the set accumulates 15 charges, which can be reached over time).
As a gamer, here’s my take on paraphrasing that ability description:
4 Faery Of The Lake
Good For Damage And Harassing
- Pros: Good at kiting and harassing.
- Cons: Lots of noise and light, can reveal your position.
- Good for: Cornering targets, extra damage.
As a dedicated mage enthusiast, I can’t help but sing praises for the Faery of the Lake Set Bonus! At its initial tier, when I land an unblocked attack directly on an opponent, a fae companion appears and chases them down. Once it hits the target, this magical being bursts into a radiant flash, dishing out 50 holy damage to surrounding enemies while bestowing a 50-point shield to my allies for a full 5 seconds.
1. The fairy-powered explosion can’t be repeated until the fairy reappears, and it needs 20 charges from the set to operate, but it’s terrific in confined areas. The second level of this set upgrade boosts the fairy’s speed and repeats the explosive effect when it comes back (requiring 30 charges for activation). This high-cost but lucrative set feature is a great match for Cryomancers, Pyromancers, Druids, and Priests.
3 Storm Rage
The Best Area Damage And Utility Combination

- Pros: Great Extra Damage, chain effect.
- Cons: High budget.
- Good for: Harassing, debuff, utility.
chain lightning, increased speed, and a slowing effect on enemies. At Tier 1, moving accumulates charges, and when you reach 100 charges by not being blocked, the Storm Rage ability activates. This activation deals extra lightning damage to the target and slows them down significantly for about three-quarters of a second (becomes active after accumulating 12 set charges). This makes it an effective method for starting long-range fights.
When a player accumulates 25 instances of Storm Rage, they’ll automatically receive a 40% speed boost for one second. There’s no waiting period for this activation; it solely depends on the number of Storm Rage charges. Continuously moving allows players to repeatedly trigger this bonus. In Tier 3, Storm Rage will bounce between as many as three targets, inflicting 100 points of lightning damage and slowing each one down. This advanced feature needs 30 set charges to become active, but it’s a worthwhile enhancement.
2 Dragon’s Scale
The Best At Damage Mitigation
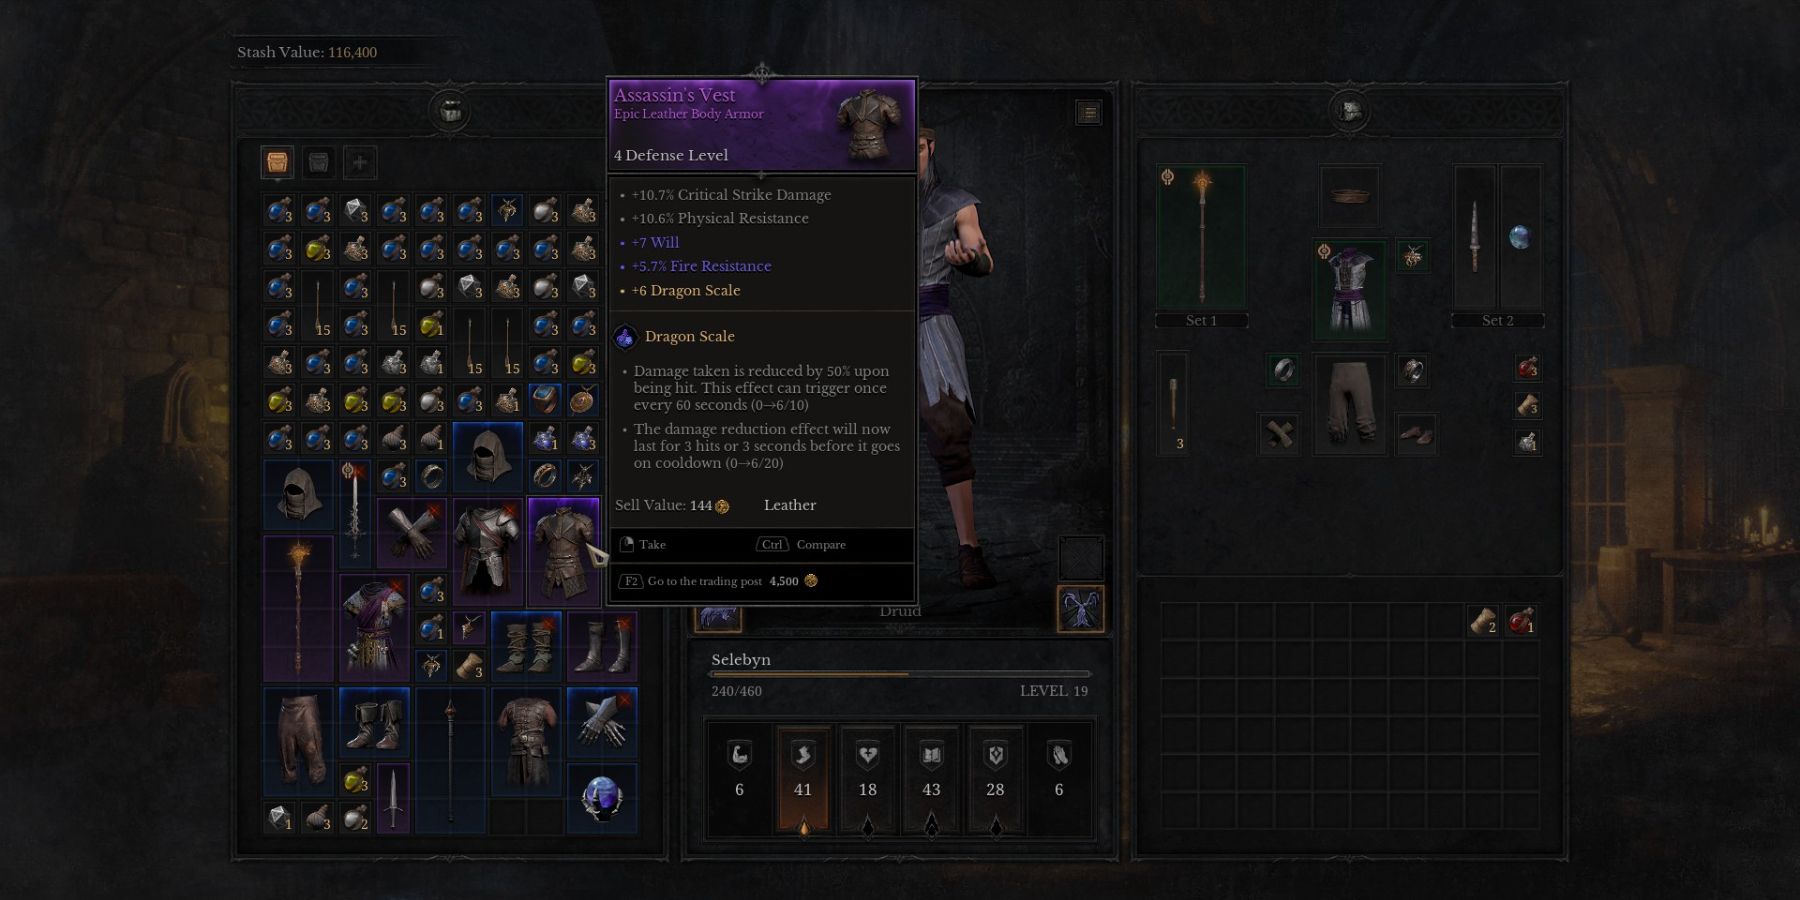
- Pros: Good mitigation.
- Cons: Works best with certain classes.
- Good for: Vanguard classes, especially Swordmaster and Death Knight.
If you prefer playing a defensive role like a tank or melee character, the Dragon’s Scale armor set offers an excellent method to further boost your defense. Conversely, if you are more comfortable with characters that have less durability, this set can be a vital aid in PvP situations. The initial tier of Dragon’s Scale reduces incoming damage by half when struck. This protective effect can be activated once every minute, but it requires 15 charges from the set to become active.
Once 25 charges are accumulated, a second protective effect kicks in. This durability-boosting effect continues for either 3 consecutive attacks or 3 seconds, after which it needs to recharge. Stacking this defensive benefit with other similar traits, such as the Swordmaster’s Whirling Blades passive, can make players appear almost invincible.
1 Pity Of Death
Will Save The Player’s Life In A Pinch

- Pros: Low budget, auto-revive.
- Cons: None.
- Good for: PvP, all classes.
Regarding the concept of immortality in the game, a desirable state is referred to as “The Pity of Death.” In the initial level or Tier 1, when a player receives lethal damage, they will not perish but instead be revitalized with 70 health points. This effect can only occur once and resets after resurrection. It takes accumulating 9 charges from the set to activate this feature.
When the set bonus charges up to 15, its effect will repeat several times (with a 120-second wait between each activation), making players virtually invincible during continuous combat, though this holds true for at least 3 to 5 instances, subject to certain conditions. This is arguably the most powerful set among all, offering affordability as it can be paired with other sets based on how players adjust their gear.
Read More
- SOL PREDICTION. SOL cryptocurrency
- LUNC PREDICTION. LUNC cryptocurrency
- BTC PREDICTION. BTC cryptocurrency
- USD COP PREDICTION
- TON PREDICTION. TON cryptocurrency
- USD PHP PREDICTION
- USD ZAR PREDICTION
- Top gainers and losers
- ENA PREDICTION. ENA cryptocurrency
- EUR AUD PREDICTION
2024-08-09 05:34