If you delve deeply into the realm of Assassin’s Creed Shadows, you might discover numerous mysteries and points of interest that require one of the game’s two main characters to solve or access. In certain instances, it may not be immediately clear which character is needed, and given that you primarily control Naoe during the early stages of AC Shadows, it can sometimes feel a bit perplexing. For numerous gamers, this predicament will arise with Makino Kurumazuka Kofun, an intricate underground puzzle point of interest hidden within the game’s opening hours, but only solvable by a character other than Naoe.
How to Solve the Makino Kurumazuka Kofun in AC Shadows
Unlocking Yasuke:
To solve the Makino Kurumazuka Kofun puzzle in Assassin’s Creed Shadows, it’s crucial to understand that you can’t accomplish it until the character Yasuke becomes playable. Once you gain the freedom to switch characters within AC Shadows, you’ll have the necessary tools to tackle this intricate puzzle.
Where to Find the Makino Kurumazuka Kofun:
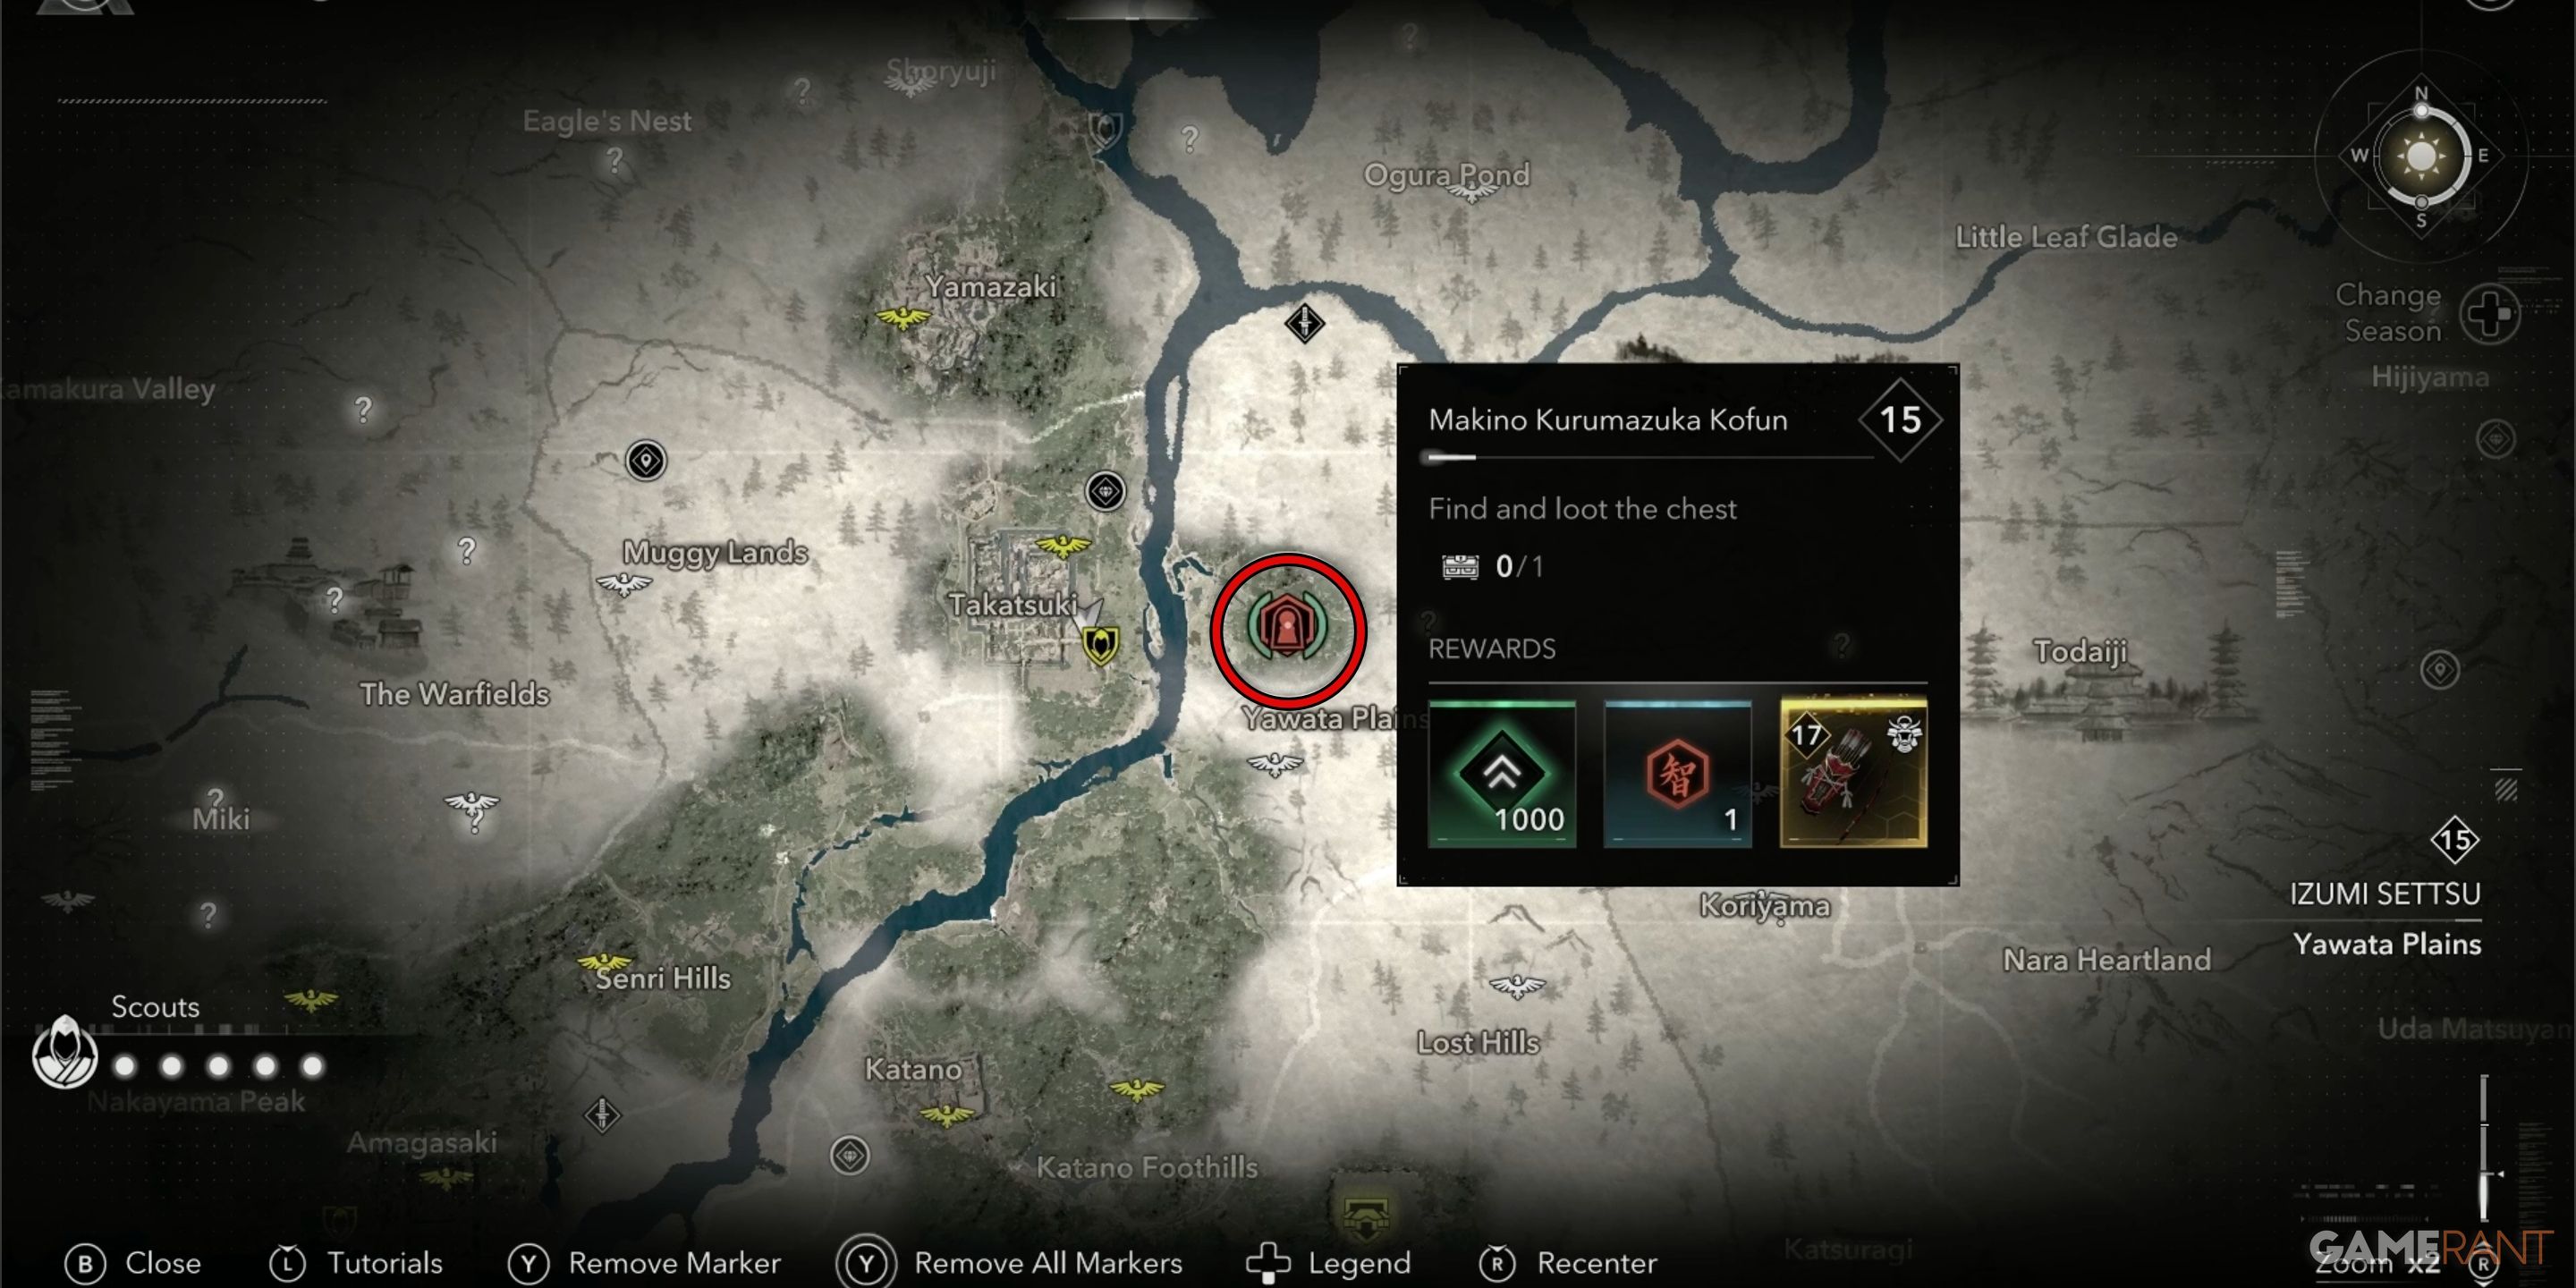
Since the Kofun houses one of the top-tier Legendary Bows in the game, players who want to get their hands on this powerful item might be curious about its location. Fortunately, after unlocking Yasuke, you won’t have to travel far to find it.
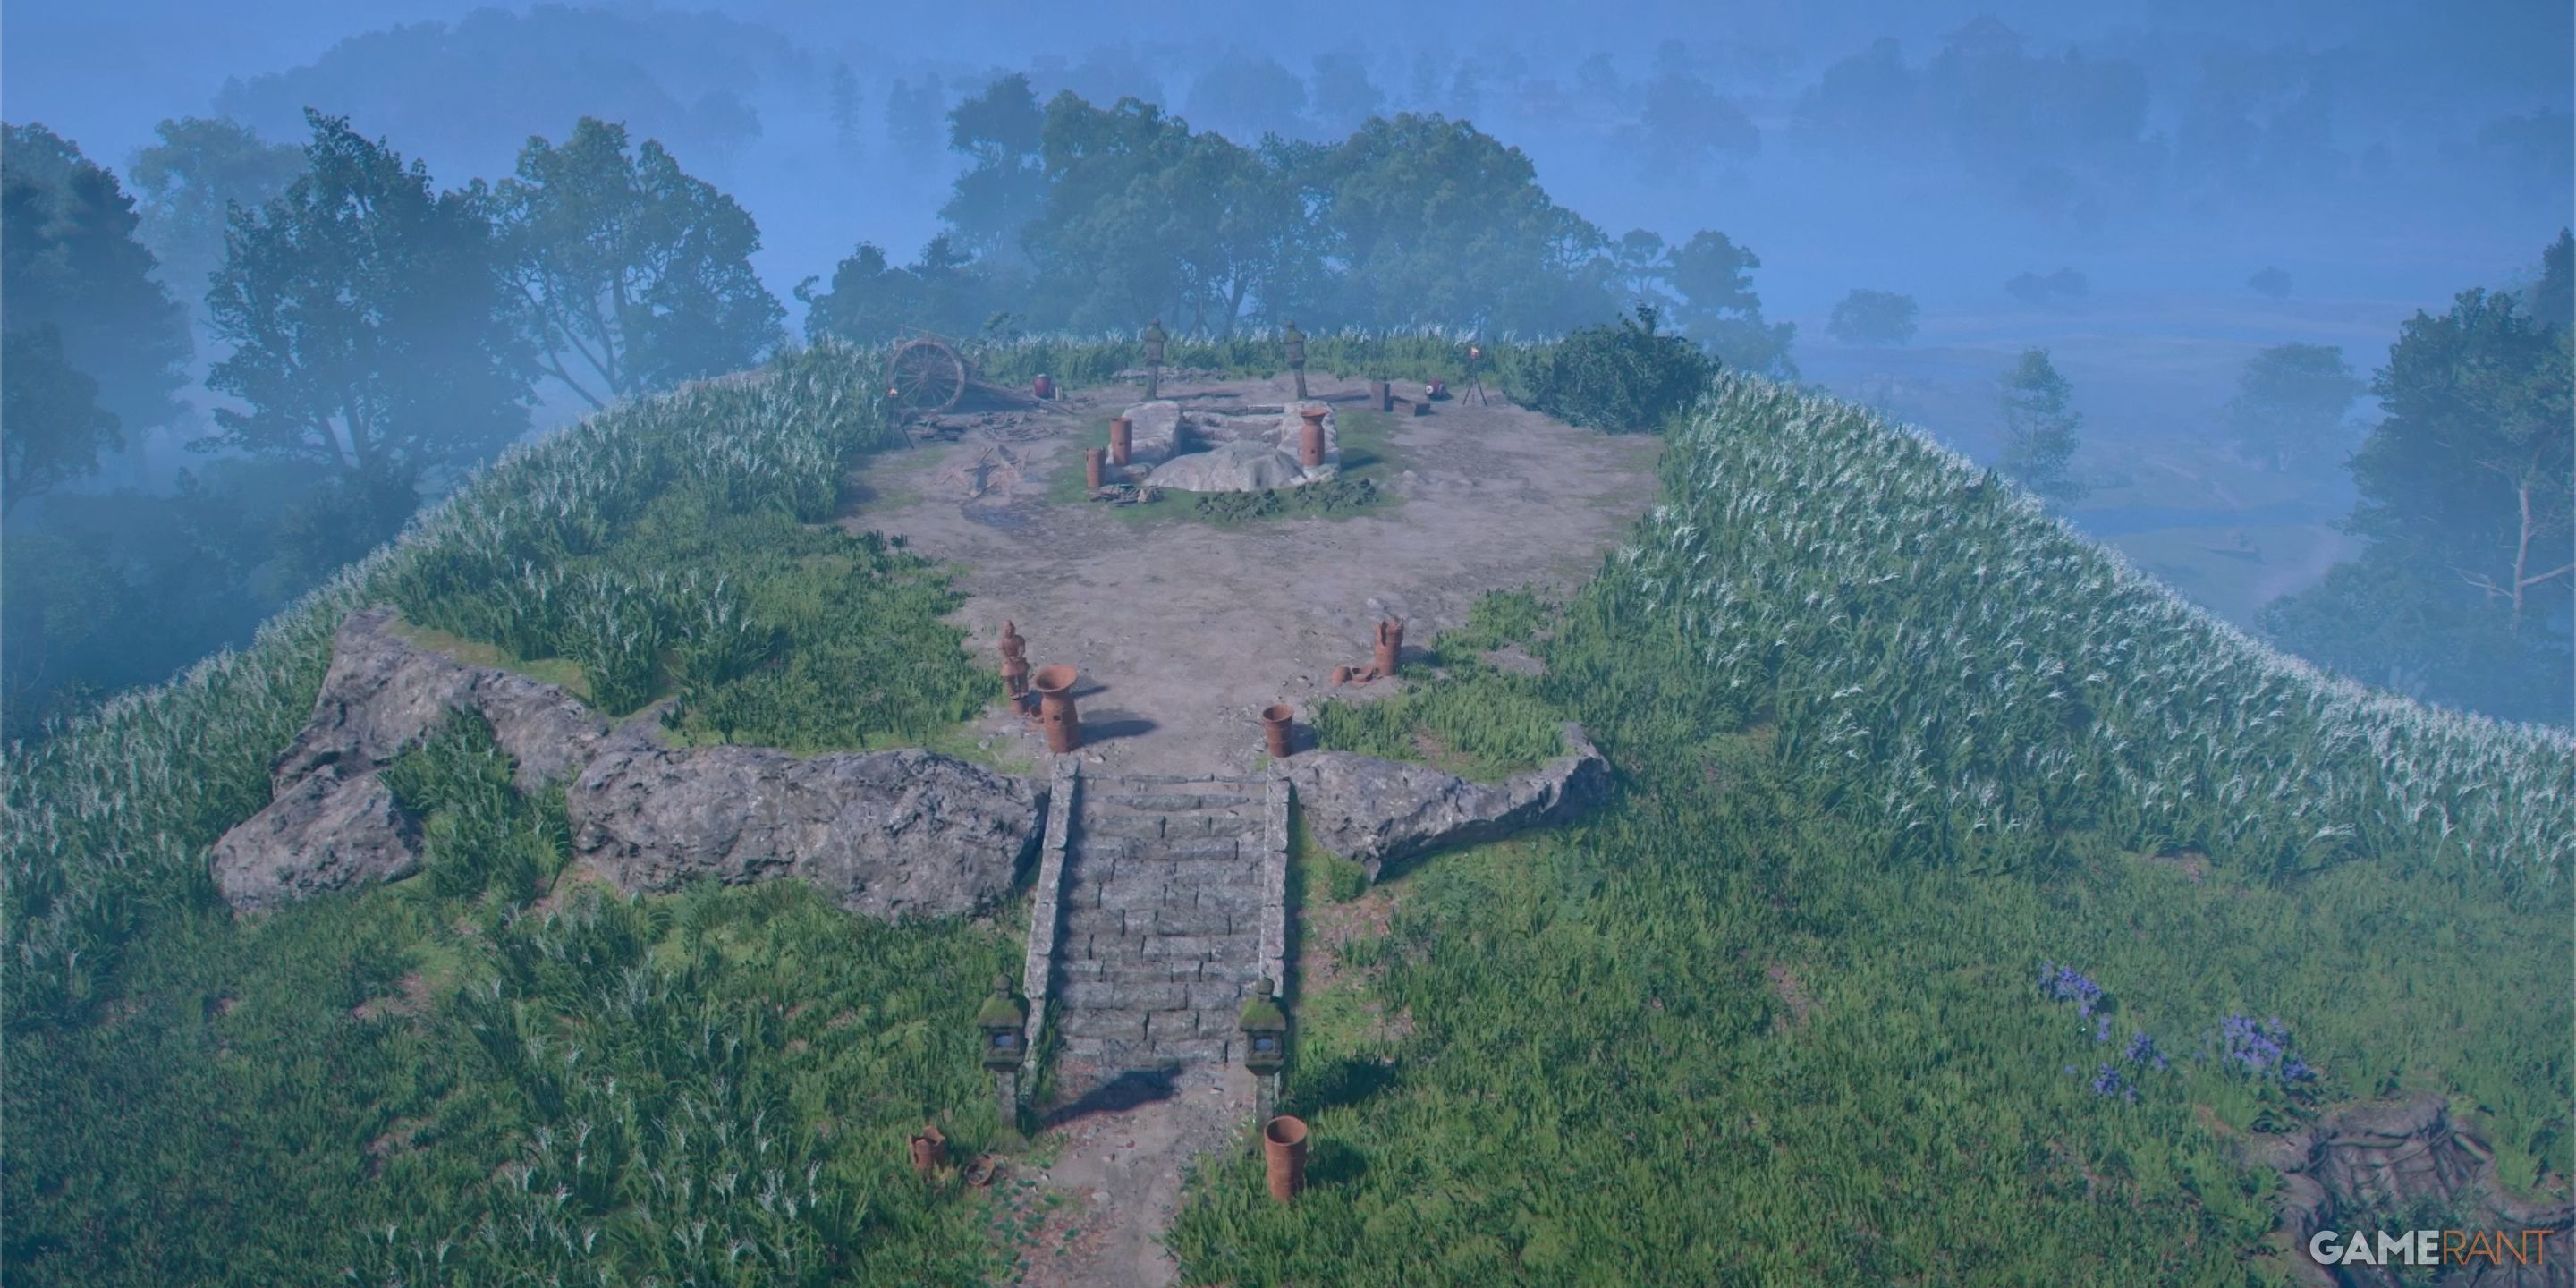
The Makino Kurumazuka Kofun can be found in the Yawata Plains region, which belongs to the Izumi Settsu province. This is where the story of ‘Shadows’ begins. The tomb appears as a large earthen mound and lies eastward from Takatsuki city, situated across the river that marks the boundary between provinces.
Makino Kurumazuka Kofun Solution:
In my gaming journey through Makino Kurumazuka Kofun, or any tomb in the game, it’s essential to keep an eye on every flickering candle I encounter along the way. Lighting them serves as a useful marker, helping me recall the paths I’ve previously trodden. This becomes particularly important when I find myself at dead ends or uncovering new pathways, as I often have to retrace my steps in this intriguing adventure.
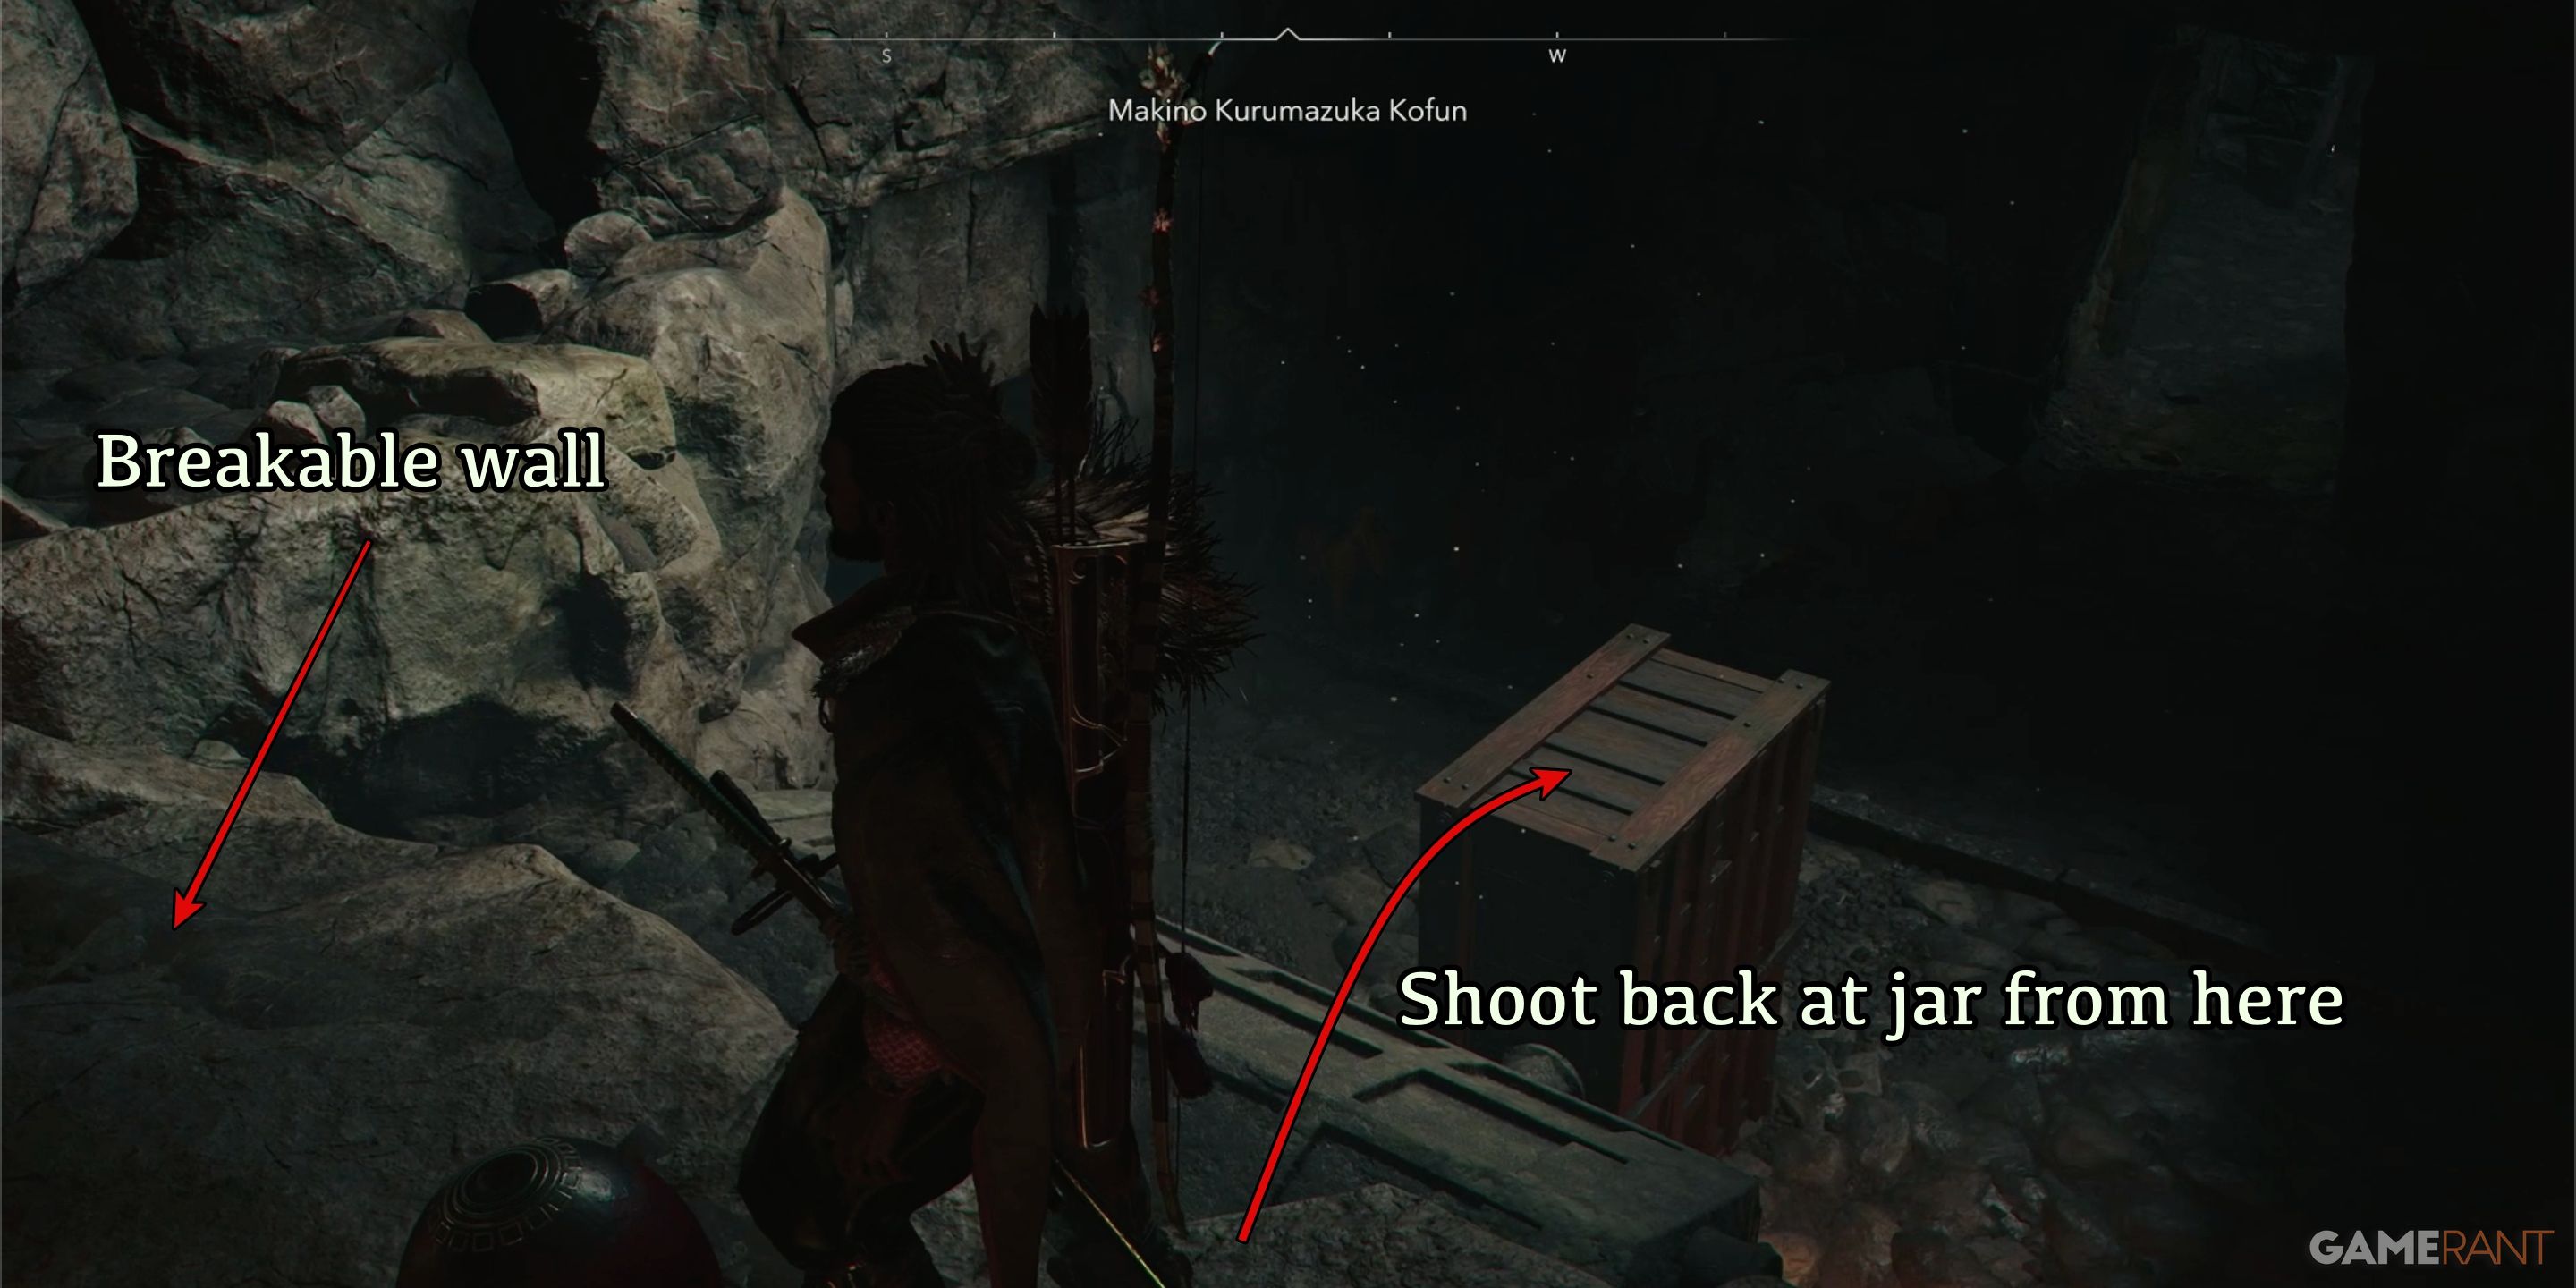
As soon as you reach the Kofun, you’ll spot a barricade made of rocks blocking the entrance. To bypass this obstacle, you’ll find two explosive jars strategically placed at the summit of the stairs. Interestingly, only Yasuke has the ability to lift these jars, which is part of the reason he alone can conquer this Kofun.
Position the jar in front of the stone cliff, move back, and pick one of Yasuke’s long-range attacks to hit it. If you don’t have a long-range weapon for Yasuke yet, grab one from the Equipment Supplier in Sakai. Choose an affordable option since you will eventually find a Legendary Bow during this challenge. Breaking the jar will remove the stone wall.
Upon entering the Kofun, there’s a chest, and two passages obstructed by hefty, shiftable cabinets. As before, it’s Yasuke who can manipulate these items. Should you employ Observation, you’ll discern that the primary prize lies hidden beyond the immovable cabinet. Consequently, your progress is limited to a single route ahead.
Puzzle 1 Solution:
Starting your journey along the principal path, you’ll encounter the initial puzzle area shortly. Inside this space, you’ll find a movable obstacle obstructing the exit and an damaged staircase on the left side. This chamber houses two destructible walls: one situated atop the stairs, and another at ground level. It’s worth noting that there are no jars in this room.

Push the gate clear of the exit, then proceed along the path. Later on, you’ll encounter another room with a wall that can be broken and two jars that explode. Use one jar to shatter the wall (which is opposite the lower wall from the previous chamber), then take the second jar through the new opening, leading back to the chamber you just exited.
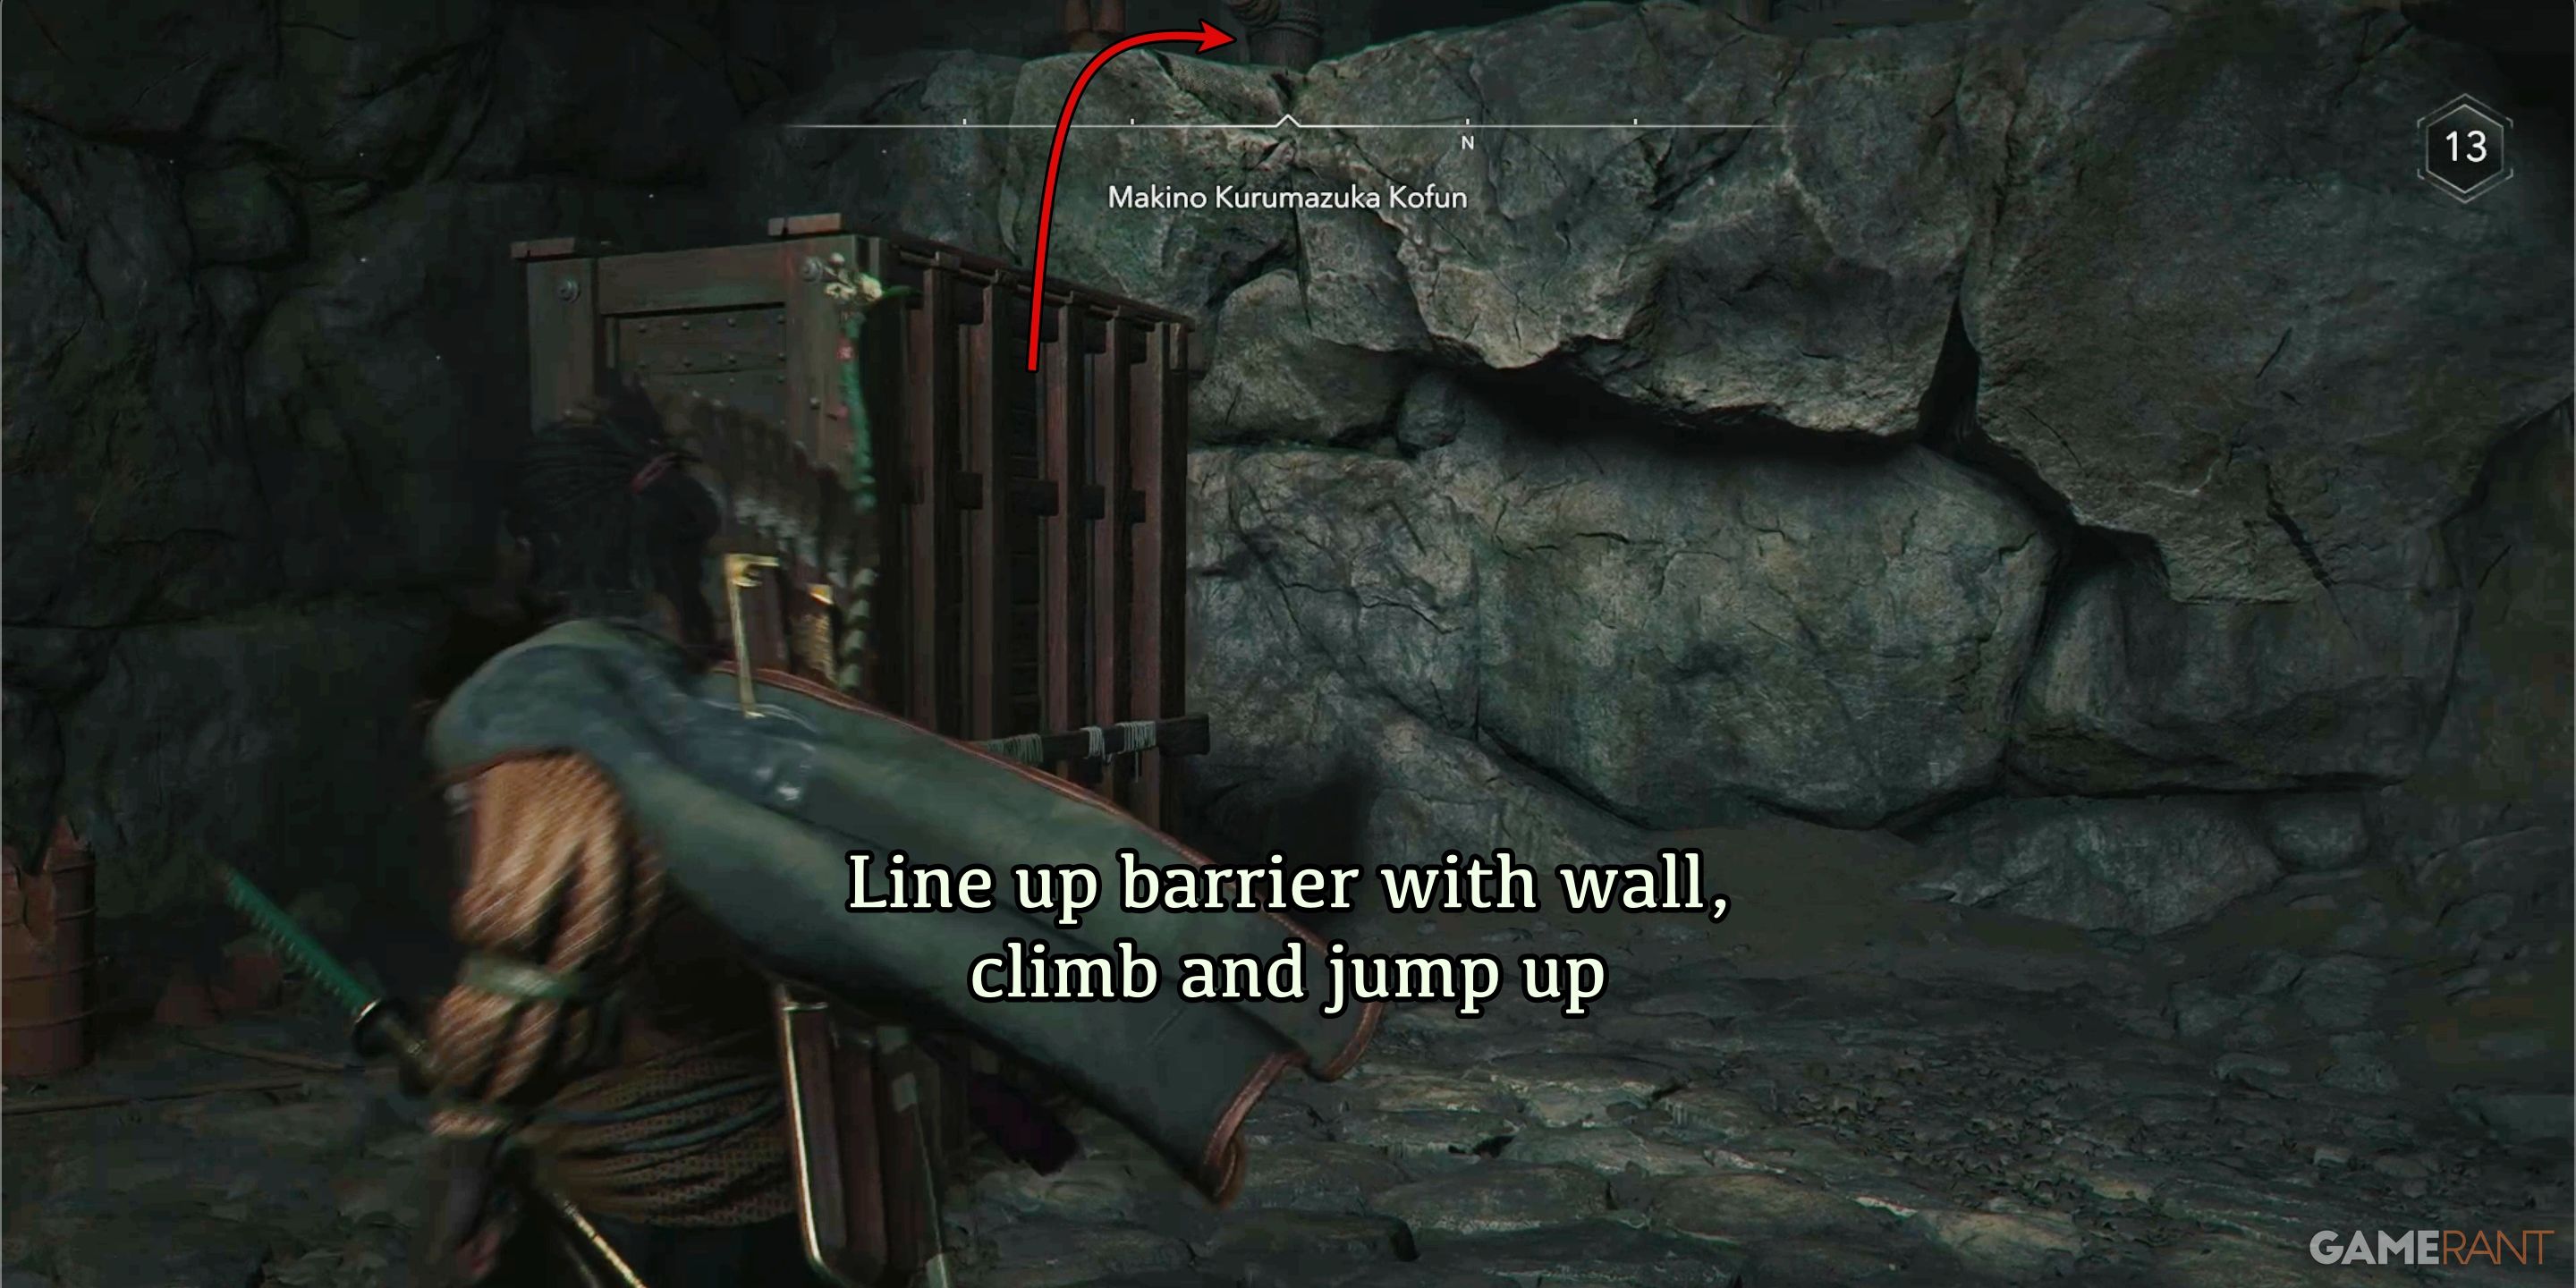
Place the jar in front of the wall at the top of the stairs, then align an obstacle so you can step onto it from the upper level, providing space for shooting the jar without causing an explosion. Proceed through the opening, and you’ll notice that you can choose to turn left or right. Turning left will lead to a cul-de-sac with a storage box, while turning right keeps you on the main path.
Puzzle 2 Solution:
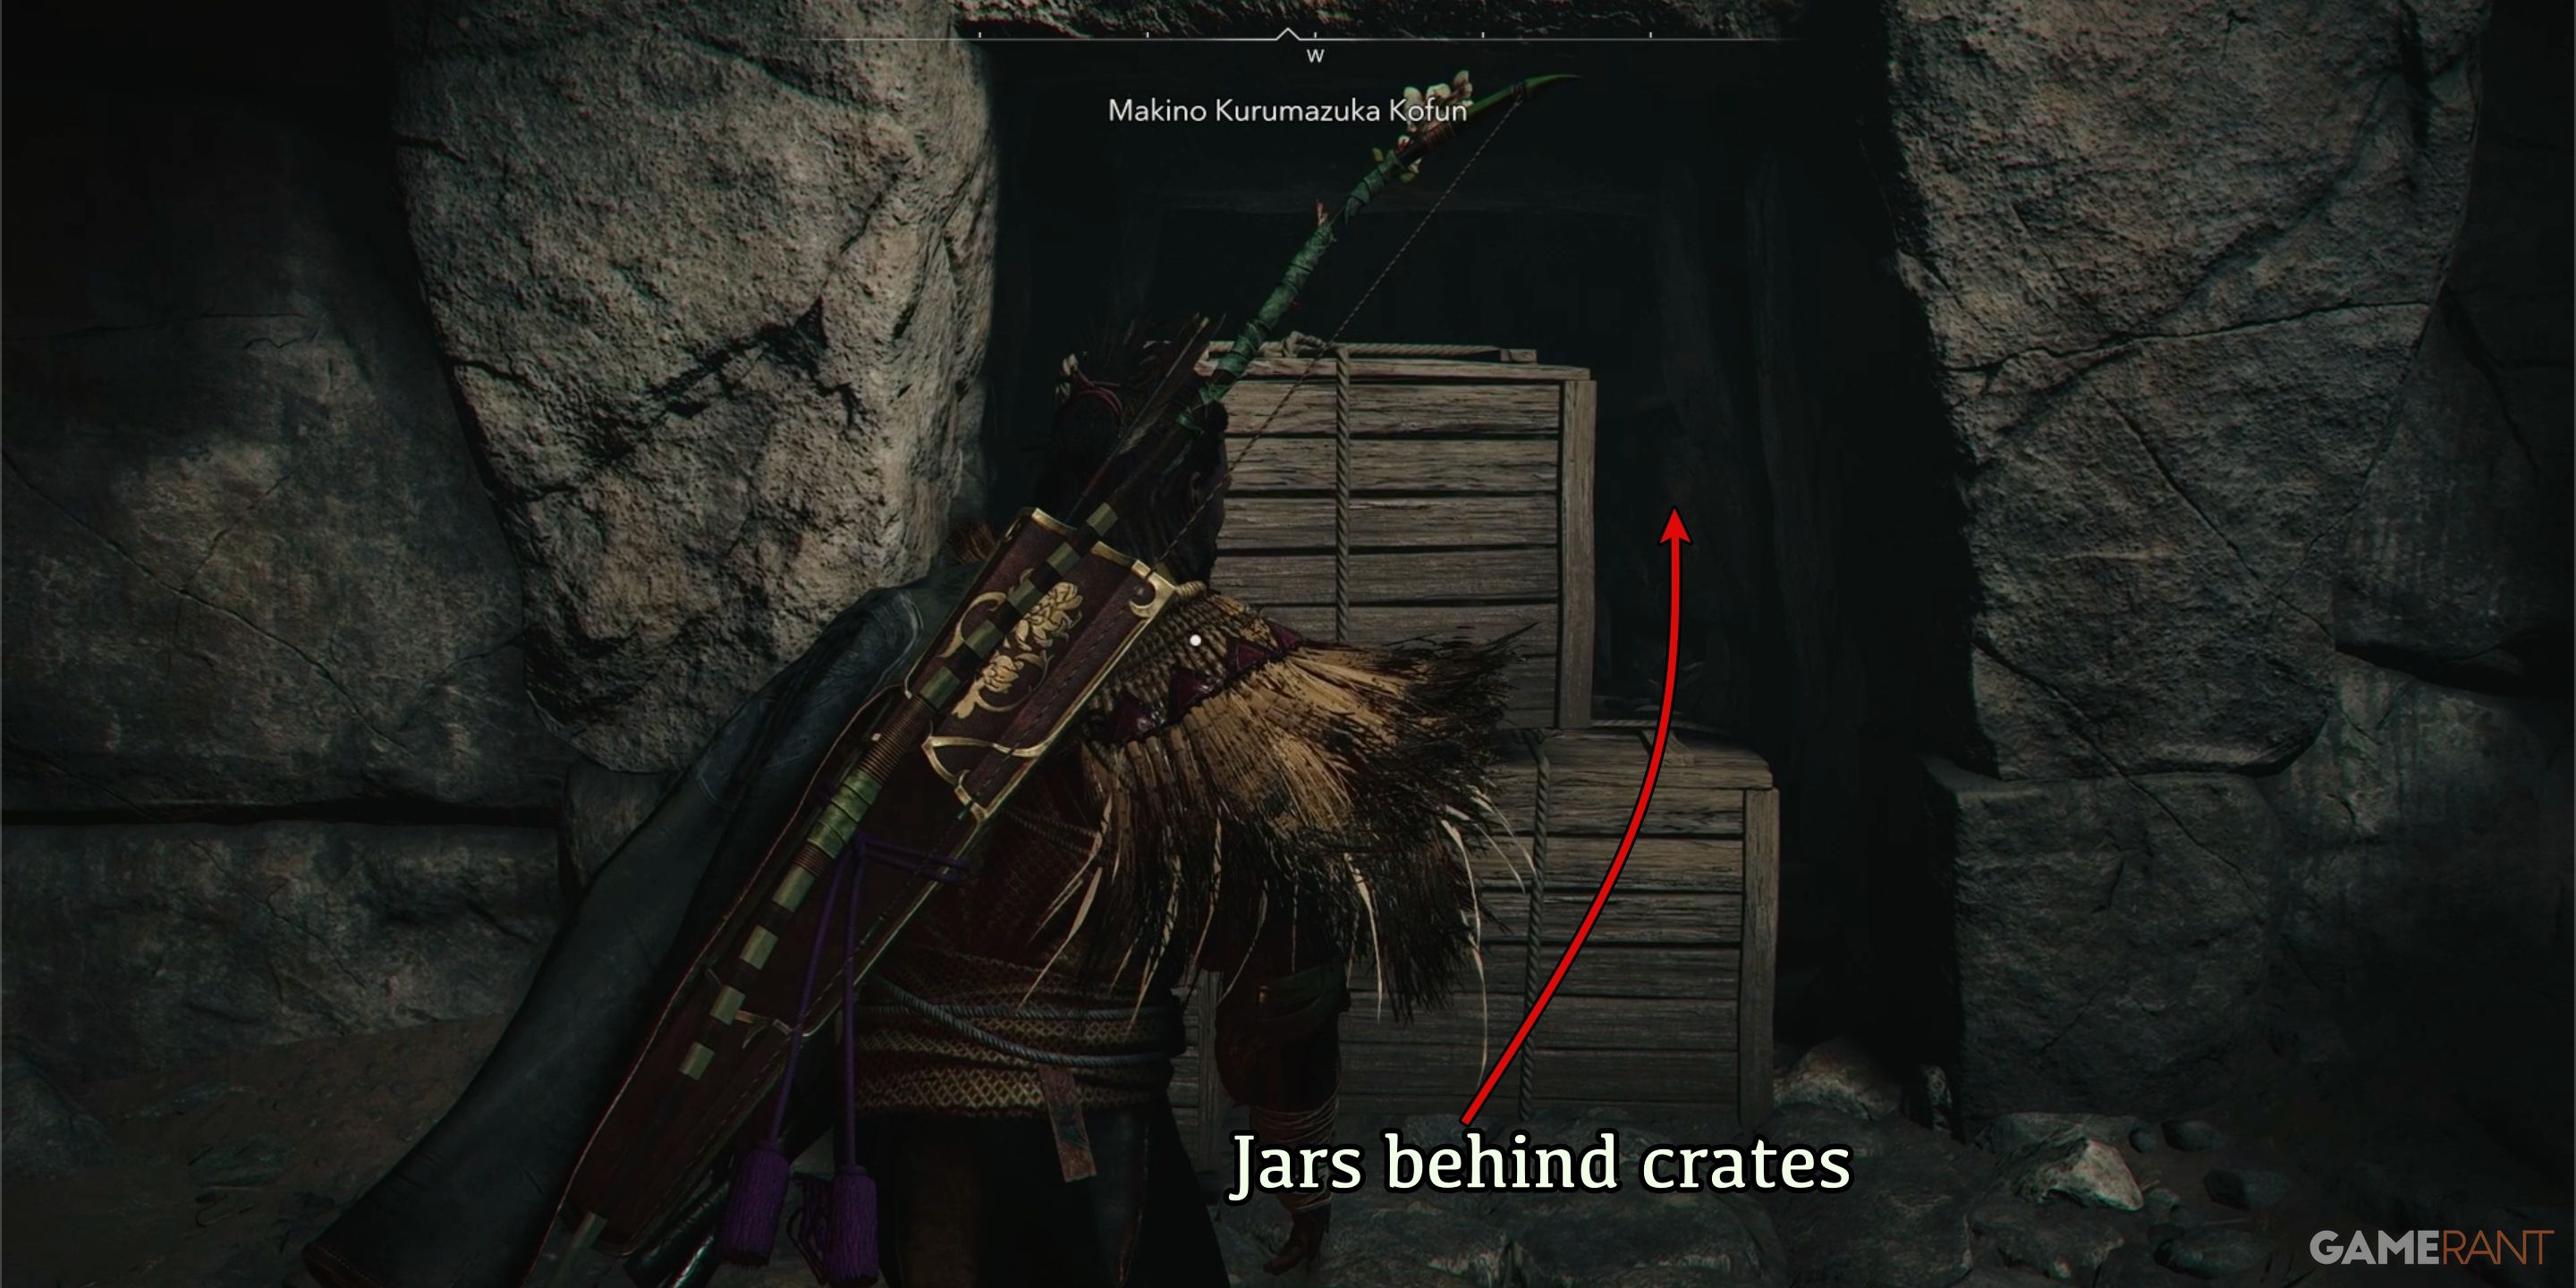
Once you take a right, you’ll reach a room with a pond at its heart and a damaged bridge suspended above. Just swim over it and proceed through the opening. Keep moving forward on the primary path, then climb the stairs, and you’ll encounter the broken bridge again. From this vantage point, you can spot a rocky cliff spanning the chasm. Explore the room thoroughly, and you’ll discover a pile of wooden crates obstructing a narrow nook. Knock over the crates to uncover two explosive jars hidden inside.
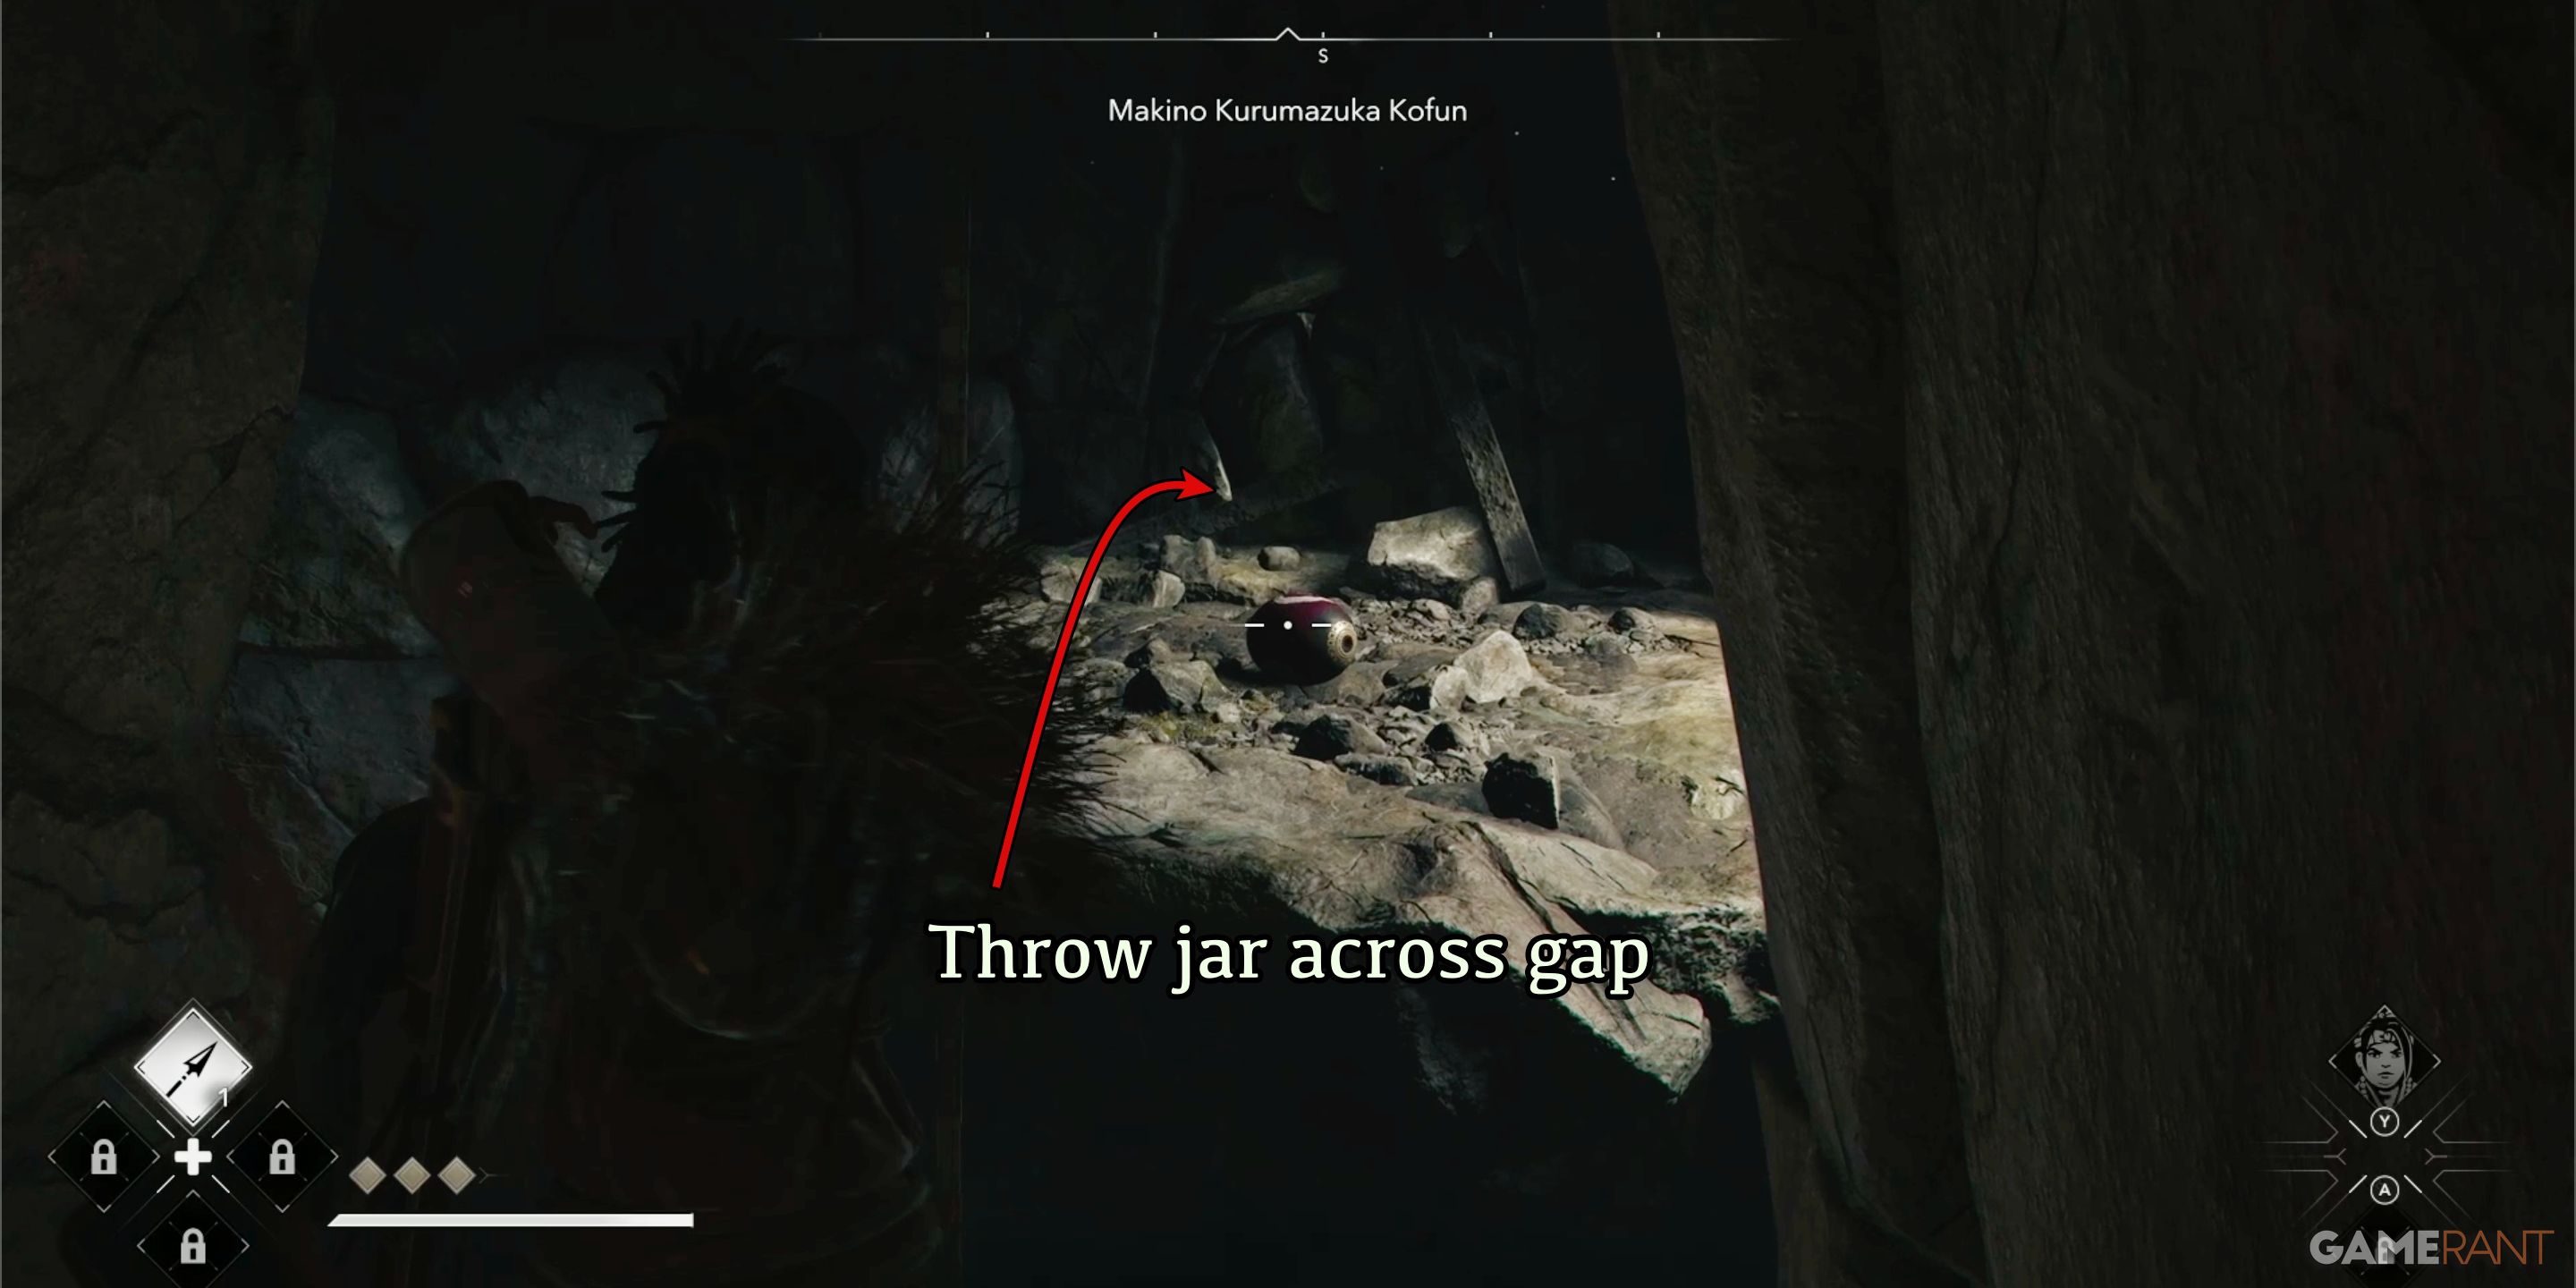
As a gamer, I hurl one of the jars across the chasm, following it up with a shot to demolish the wall on the other side. Leaping across the chasm, I proceed through the opening and notice a narrow crevice to my left that I can wriggle under, or I could opt to go right only to encounter another dead end. There’s an arrow replenishment station at this impasse, should you need ammunition. If not, I squirm beneath the gap to carry on with my adventure.
Puzzle 3 Solution:
As I approach the submerged room, I notice a tightrope stretched between its walls. Unfortunately, Naoe isn’t around to make the crossing. Attempting to traverse it with Yasuke seems futile as the rope would surely break under his weight. Instead, regardless of whether I try to walk or jump, Yasuke finds himself tumbling into the sunken chamber below.
Proceed along the single path that leads from the submerged room. To ascend to the upper-level exit, first remove a movable barrier and push it completely back into the sunken chamber. Utilize this barrier for climbing purposes. Before leaving, don’t forget to collect the chest that was concealed behind the barrier. Follow the main path until you arrive at the last puzzle room.
Final Puzzle Solution:
At the final room, there’s a tiny ramp on the left side of the southern exit, but it’s obstructed by a movable wall and has a roof overhang above it. Towards the western end of the room, you’ll notice another movable barrier simply standing still. Lastly, there’s a stairway pointing north that ascends to another blocked exit, with barriers jammed from the opposite side.
Initially, shift the obstruction from near the south exit. Proceed through the opening straight ahead. Take a right turn and walk along this path until you arrive at the room that is located atop the previously mentioned northern stairs. You’ll notice that you’re now on the other side of the jammed barriers. First, move the nearest barrier to your right, then clear the path by moving the second one as well.
In this specific area, you’ll notice an explosive jar as well. For now, just make a mental note of its presence. Later on, proceed back to the primary room and position the western-end barrier at the top of the ramp. You’ll find a fitting slot for it if you look carefully. Once there, move the barrier that was obstructing the southern exit into the designated slot within the western chamber instead.


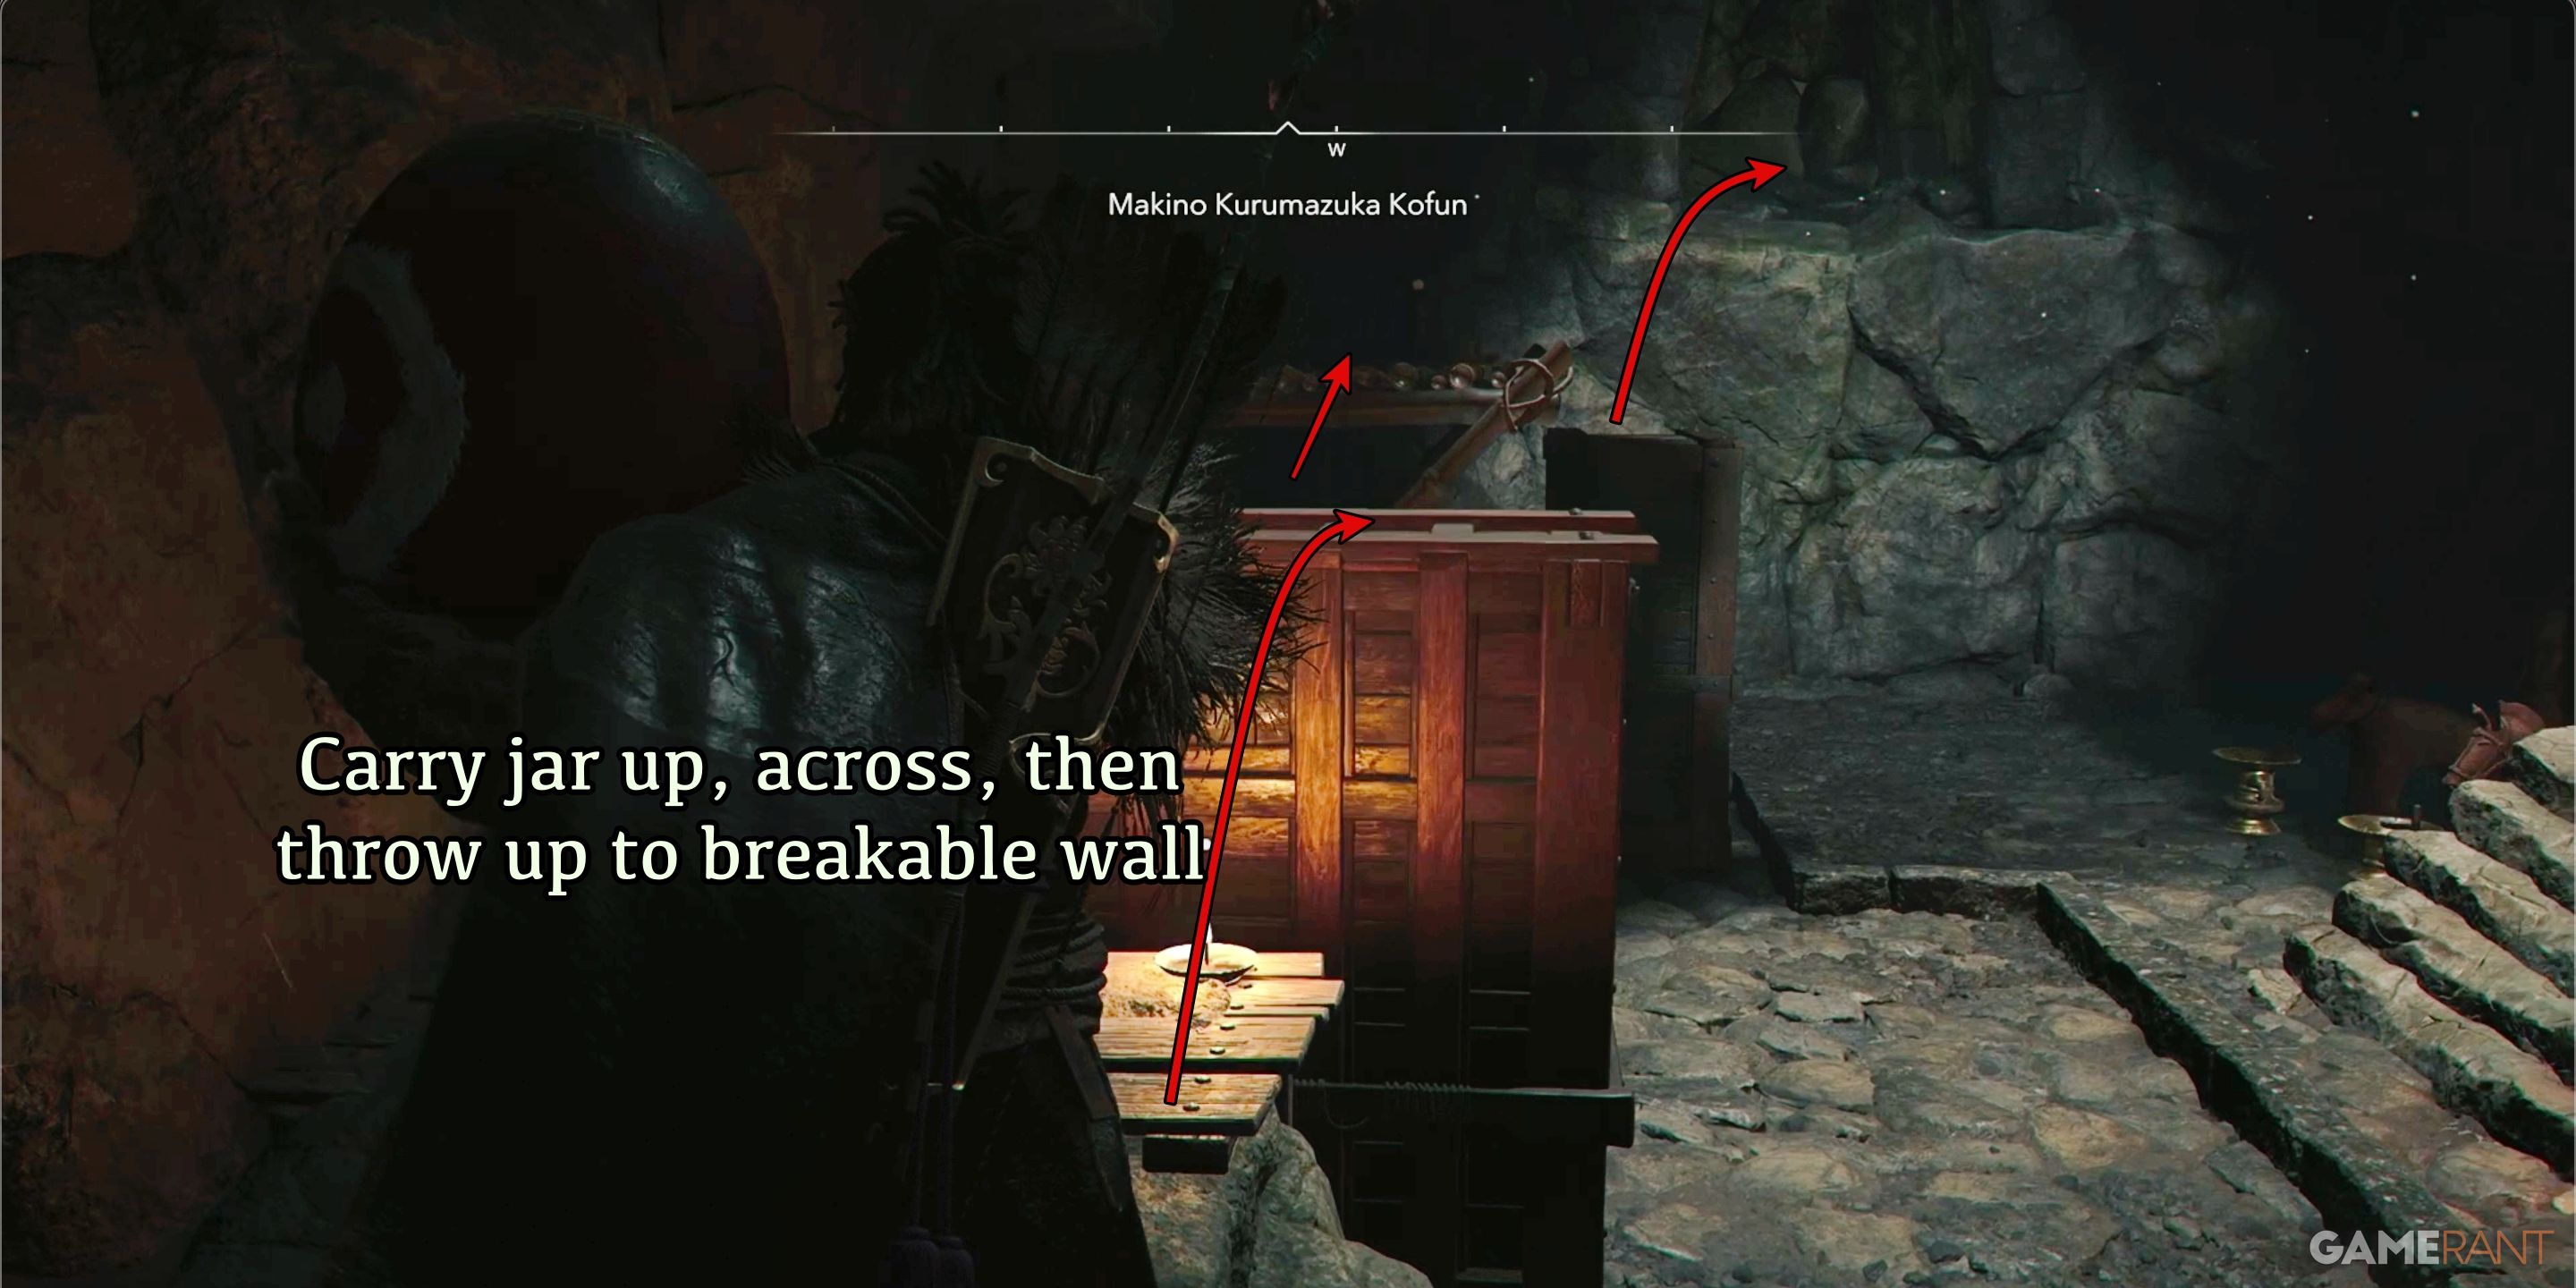
First, get the jar and head towards the ramp. Climb up the ramp, then leap onto the first obstacle. After that, jump from the obstacle to the ledge above. From this ledge, make a final jump to the western-end barrier in the chamber. If you arrange things properly, you can perform all these actions while holding the jar. Once you’re on top of the last barrier, notice a breakable wall atop the western wall. Toss the jar onto the wall and then shoot it with your bow.
Clear the obstacle and make your way towards the ultimate exit that takes you straight to the Mythical Chest. After retrieving the contents of the chest, shift the blockade that obstructs the exit, and you’ll find yourself back at the main chamber. Just follow the stairs to leave.
Makino Kurumazuka Kofun Rewards:
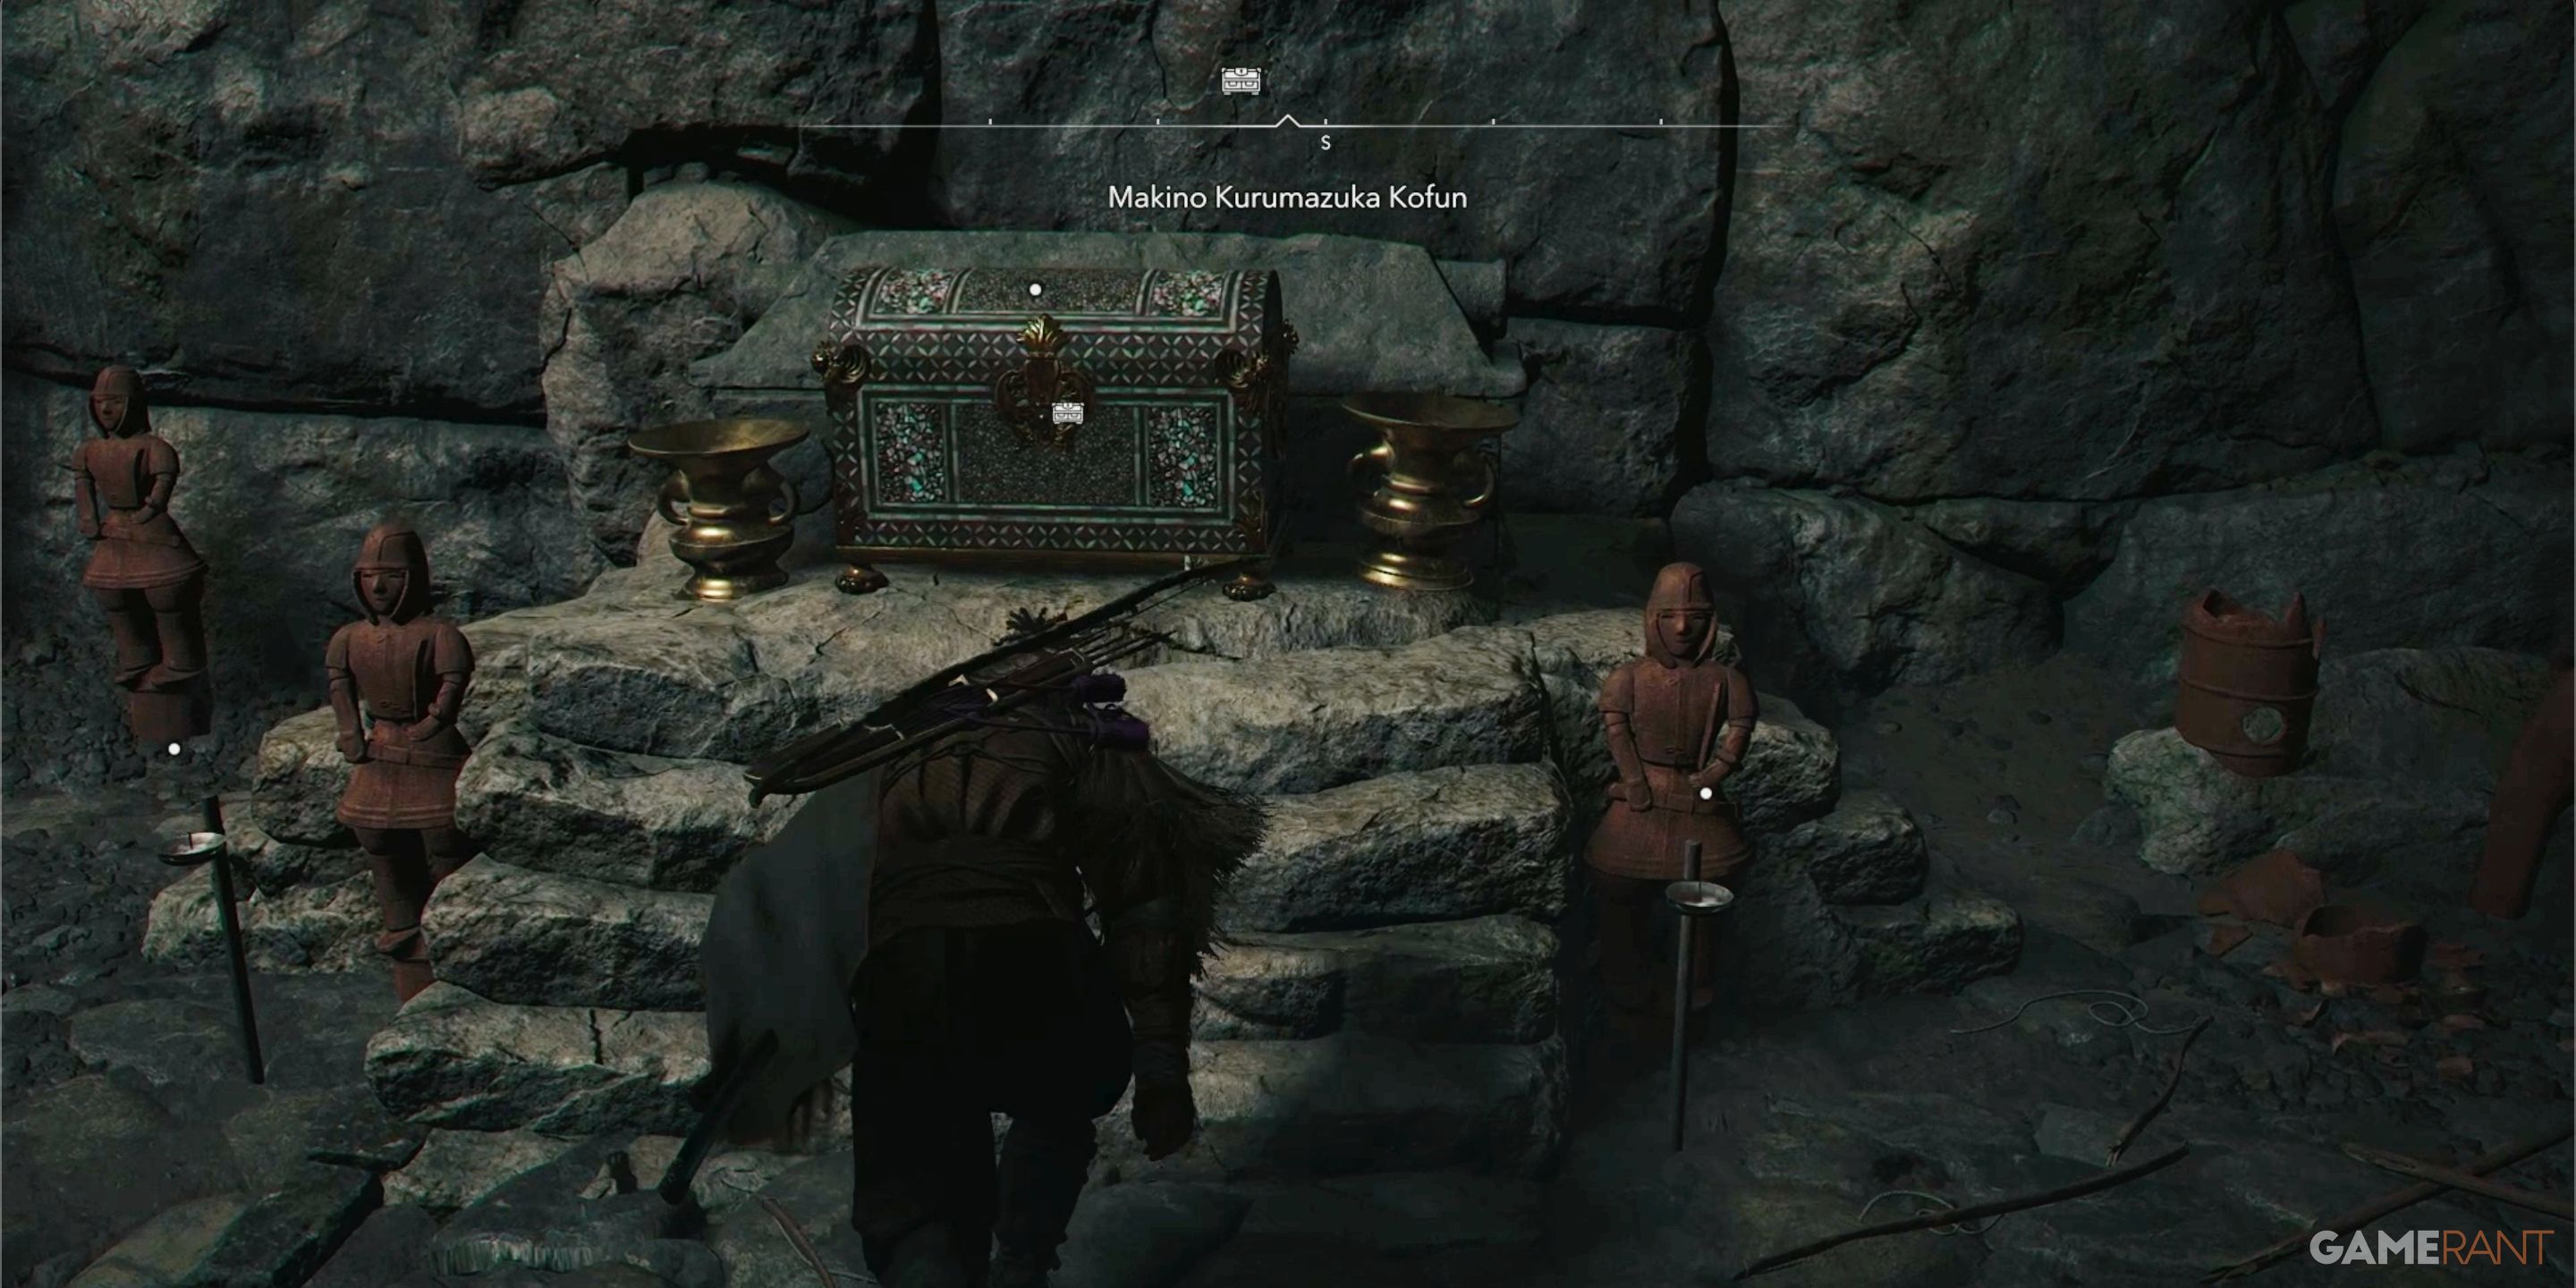
- Blush of the Earth Legendary Bow
- Extend Clear Mind Engraving
- Knowledge Point x1
- 2000 XP
Read More
- All Shadow Armor Locations in Crimson Desert
- Dark Marksman Armor Locations in Crimson Desert
- Sega Reveals Official Sonic Timeline: From Prehistoric to Modern Era
- Genshin Impact Dev Teases New Open-World MMO With Realistic Graphics
- How to Beat Antumbra’s Sword (Sanctum of Absolution) in Crimson Desert
- The Limits of Thought: Can We Compress Reasoning in AI?
- Where to Pack and Sell Trade Goods in Crimson Desert
- Who Can You Romance In GreedFall 2: The Dying World?
- Enshrouded: Giant Critter Scales Location
- All Frostcursed Armor Locations in Crimson Desert
2025-03-26 02:26