Running out of space for items is a common frustration in survival games, and Subnautica 2 is no exception. Early in the game, you’ll likely be searching for ways to increase your inventory size, and thankfully, the first Biobeds – which offer a small boost – aren’t too hard to find. However, collecting all of them takes more effort. This guide will show you the location of every Biobed in Subnautica 2 to help you expand your inventory.
Just a quick note about coordinates in Subnautica 2: The game features a huge underwater world without a traditional map. Because of this, slight differences in where you start measuring distance and depth can lead to small variations in the numbers you get. Also, since Subnautica 2 is still in development (Early Access), locations might shift a little with updates. If you’re having trouble finding a Biobed, please let me know!
Want to explore everything Proteus has to offer? Our interactive map for Subnautica 2 has you covered!
Biobed Location Overview – Subnautica 2
- There are currently seven known Biobed locations in Subnautica 2. They are usually found in abandoned habitats and wreckage. For precise details of each Biobed location, check the step-by-step guides below.
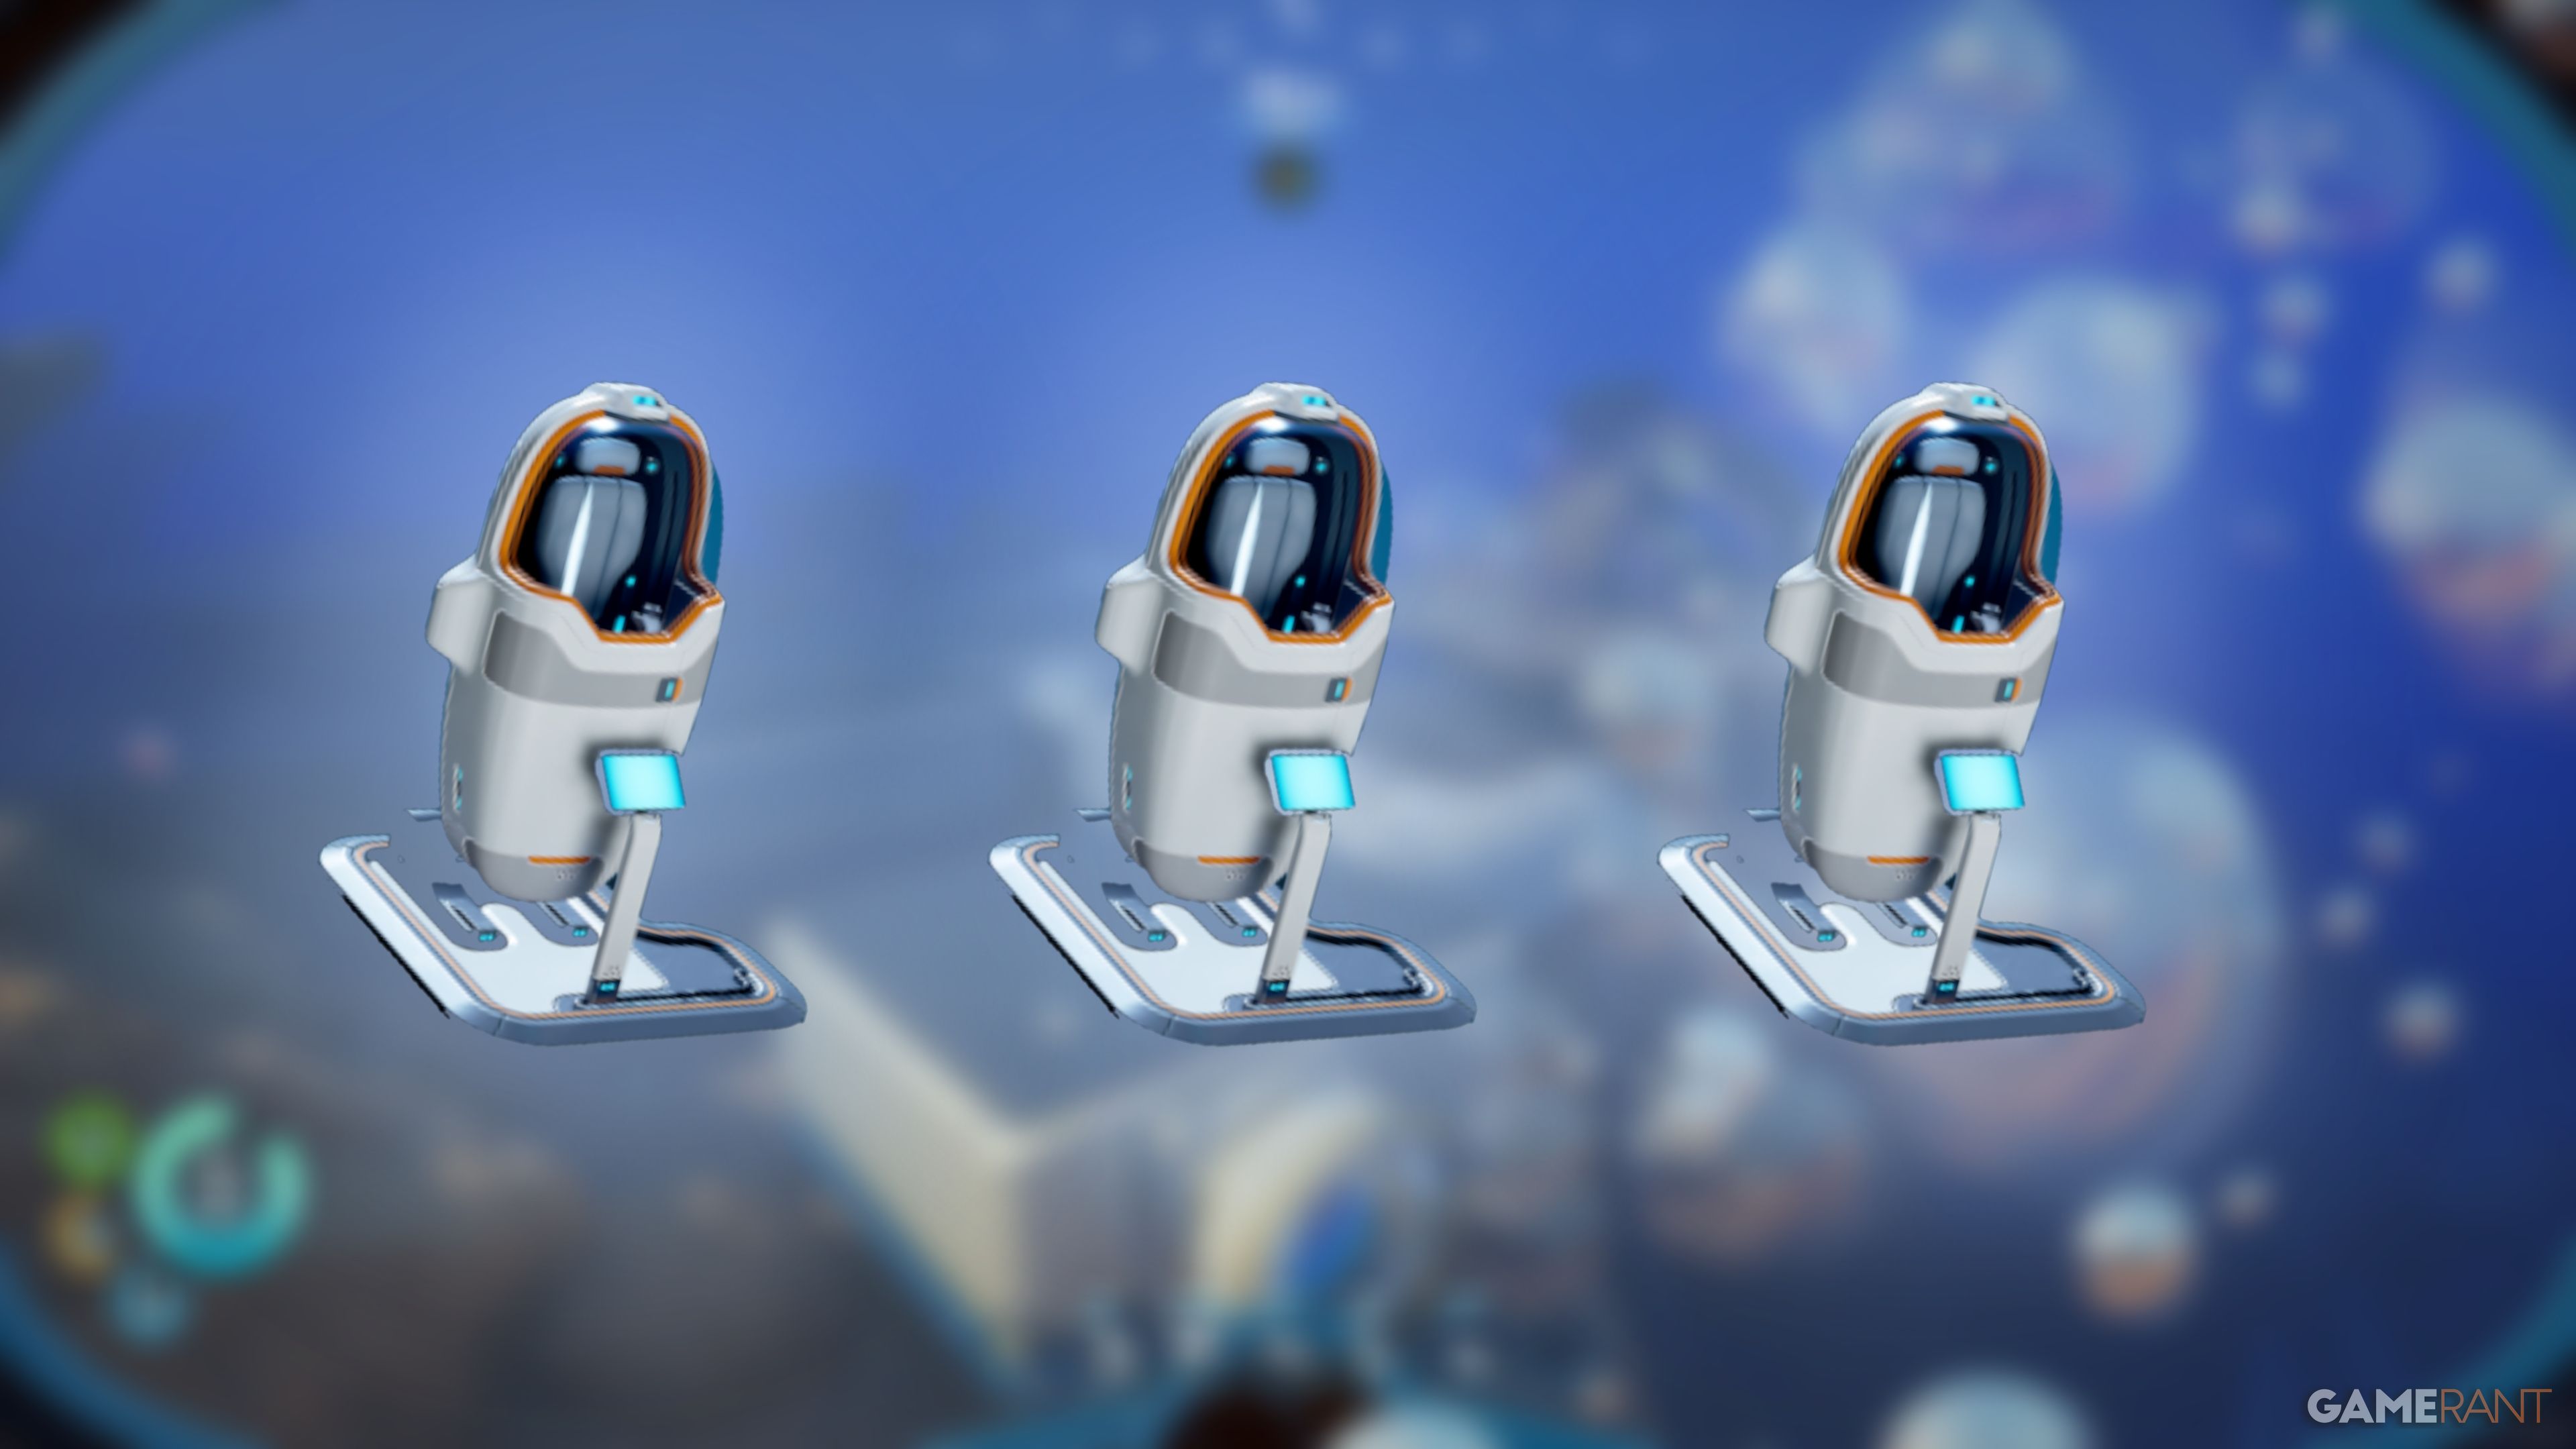
- There are two types of Biobed inventory upgrades. The first and most prominent are basic Endurance inventory expansions, each adding three new slots to your inventory. The second type, called Dexterity upgrades, adds another slot to your Quickbar.
- There are five basic inventory Biobeds, and two Quickbar upgrade Biobeds.
What do I need to find every Biobed in Subnautica 2?
Most of the Biobeds in Subnautica 2 are easy to collect, but the last two are different. You’ll likely need tools like the Wavemaker and Tadpole to get them, so it’s a good idea to be prepared. Here’s a helpful checklist:
| Biobed Location | Upgrade Type | Distance From Lifepod | Depth | Key Requirement |
|---|---|---|---|---|
| Quaker’s Meetinghouse | Endurance; +3 Inventory Slots | 220m SE | 42m | N/A |
| Anita’s Garden | Endurance; +3 Inventory Slots | 90m NE | 30m | N/A |
| Salvage Colonist Bunker | Dexterity; +1 Quickbar Slot | 220 NE | 85m | N/A |
| Unauthorized NOA Modification Bunker | Endurance; +3 Inventory Slots | 265 SW | 85m | N/A |
| Sophie’s Retreat | Endurance; +3 Inventory Slots | 440 N | 65m | N/A |
| Nahema’s Lab | Dexterity; +1 Quickbar Slot | 365m SE | 90m | Heat Tolerance Adaptation |
| Cicada Wreck | Endurance; +3 inventory Slots | 475 E | 75m | Heat Tolerance Adaptation |
Where to Find Every Biobed Location in Subnautica 2
Biobed Inventory Expansion 1 – Quaker’s Meetinghouse (Chap’s Blackbox):
This Biobed isn’t the nearest one to the Lifepod, but I found it first because it’s part of an early mission from NOA. Once you unlock the signal for Chap’s Blackbox, you’ll know exactly where it is. If you’ve already been to Chap’s Blackbox, you can re-enable the signal in the main menu under the “Signals” tab.
Location: Chap’s Habitat, 220 meters south-east of the Lifepod
Depth: 42m
Upgrade: Endurance – three additional inventory slots.
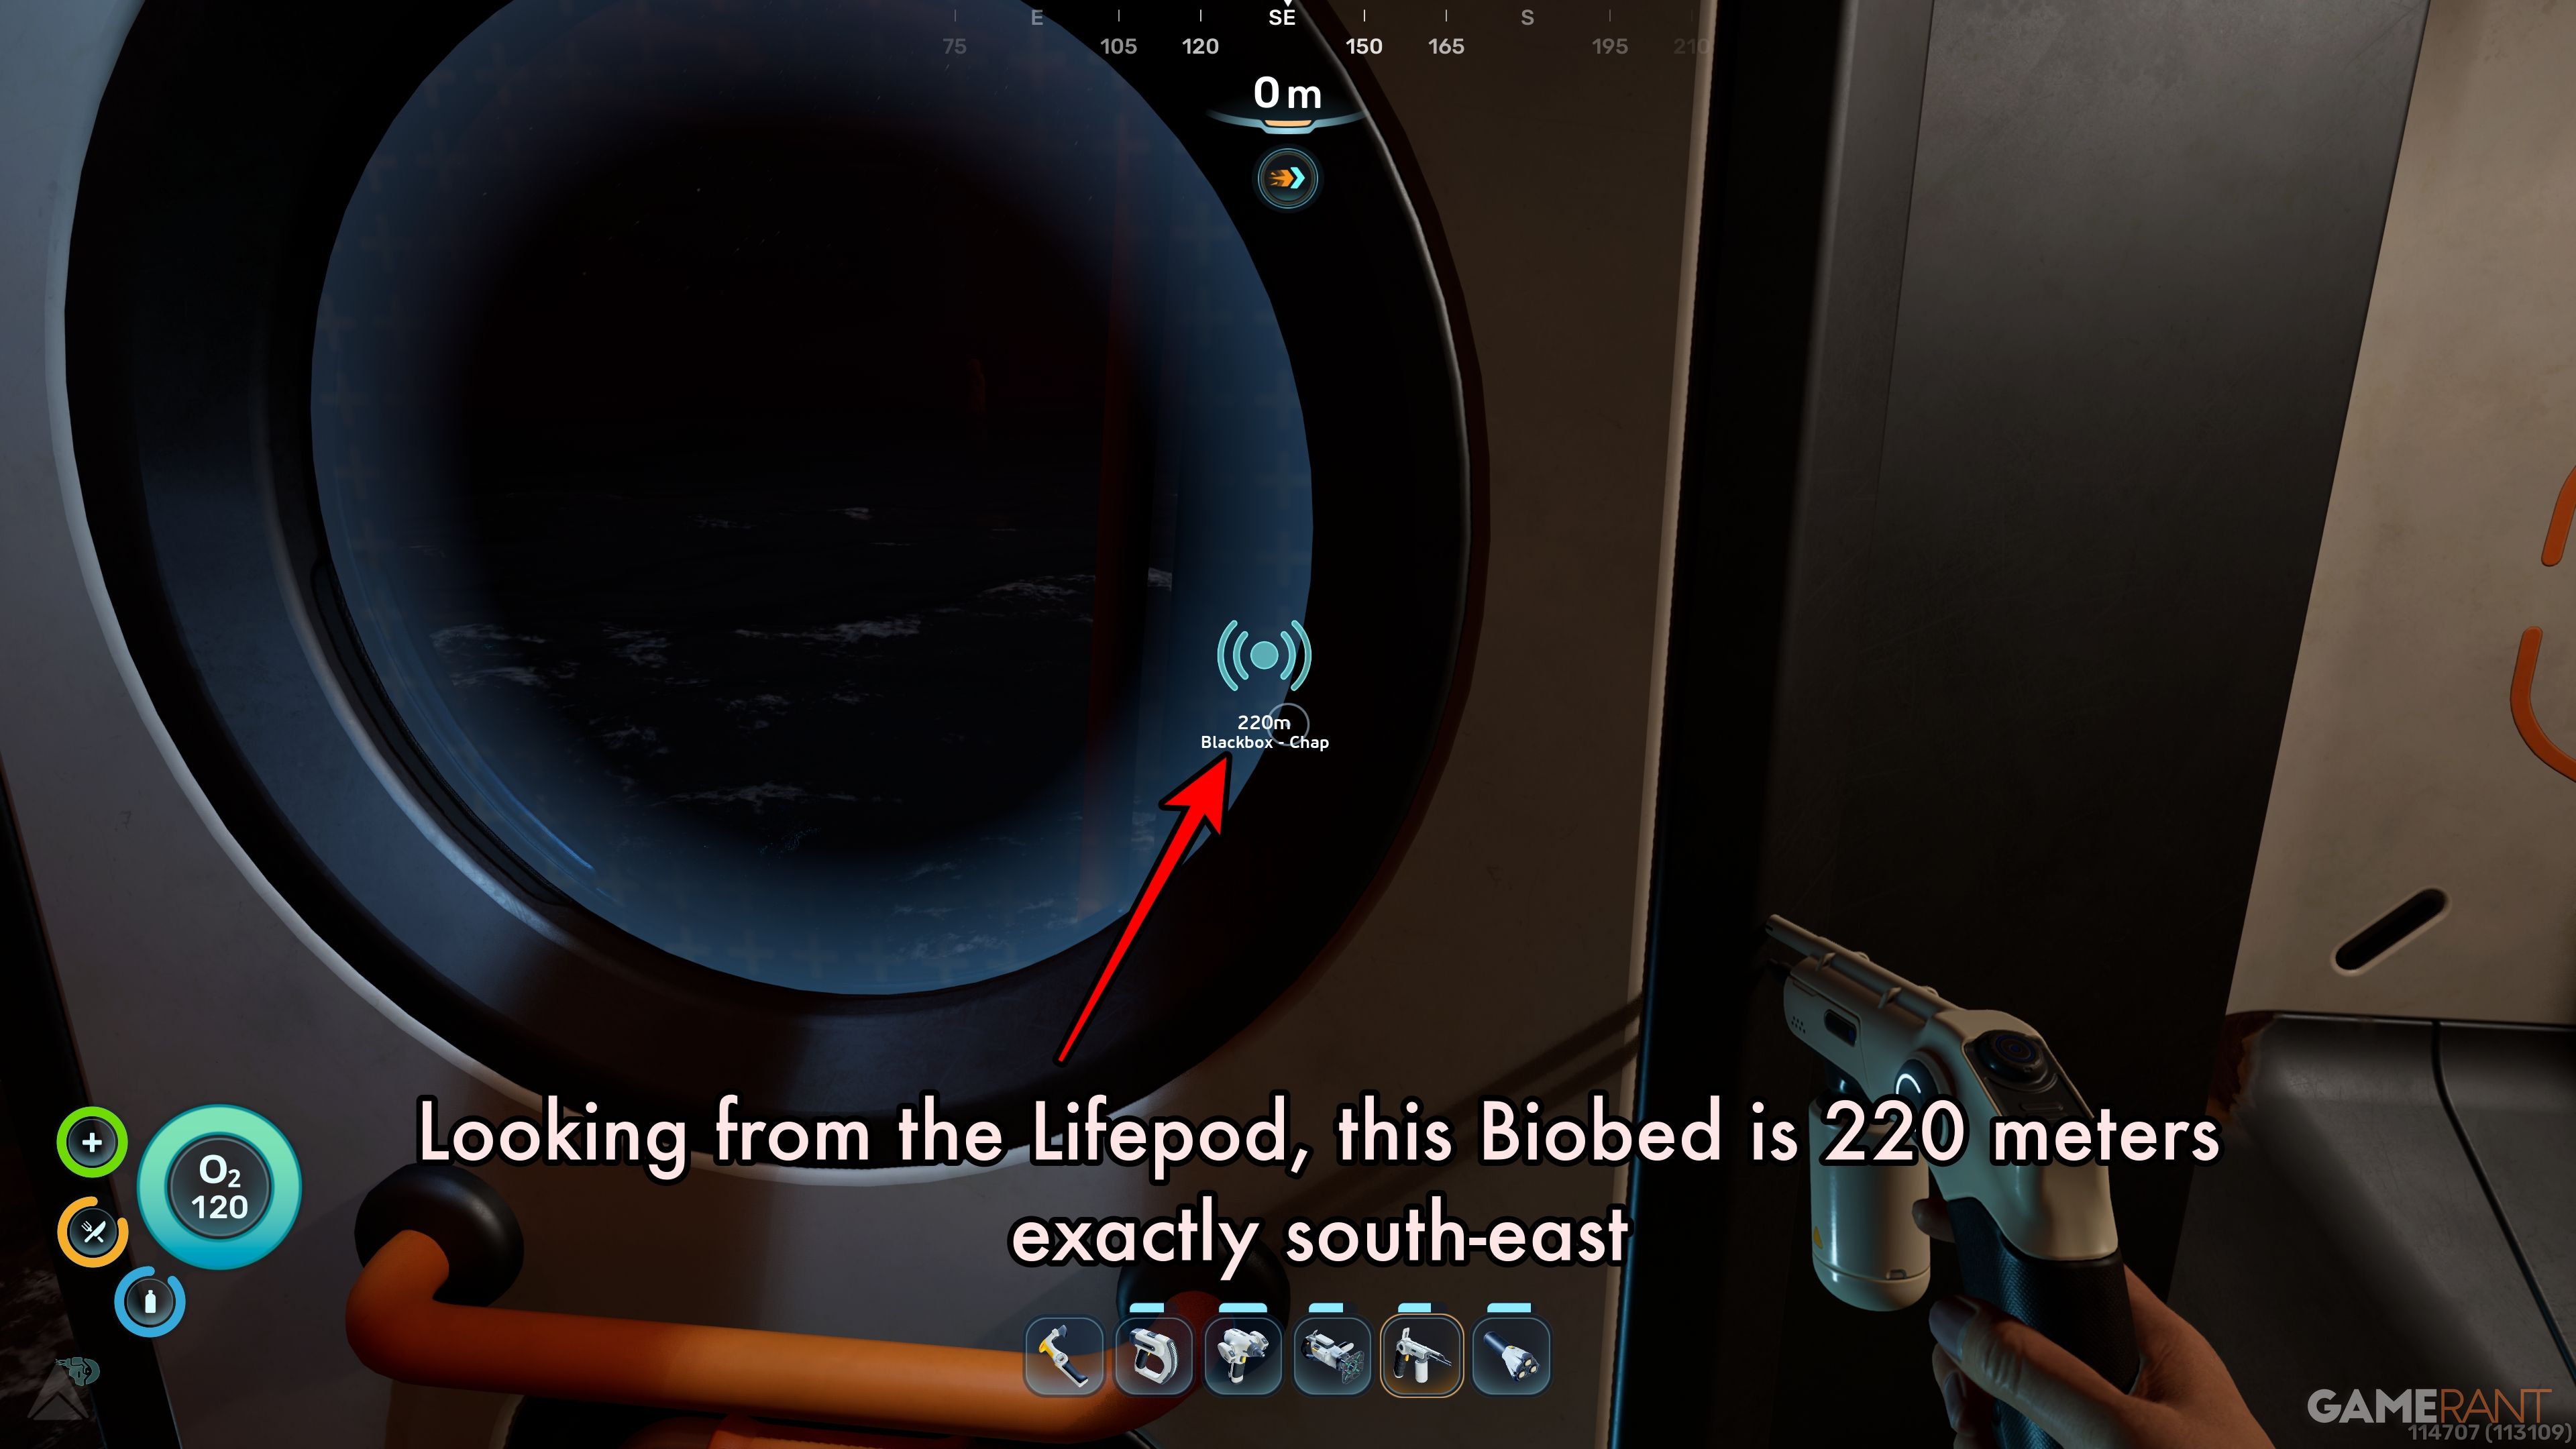
You can find the first Endurance Biobed by waiting for NOA to start the Chap’s Blackbox mission. This mission will take you to the Biobed’s location very early in the game.
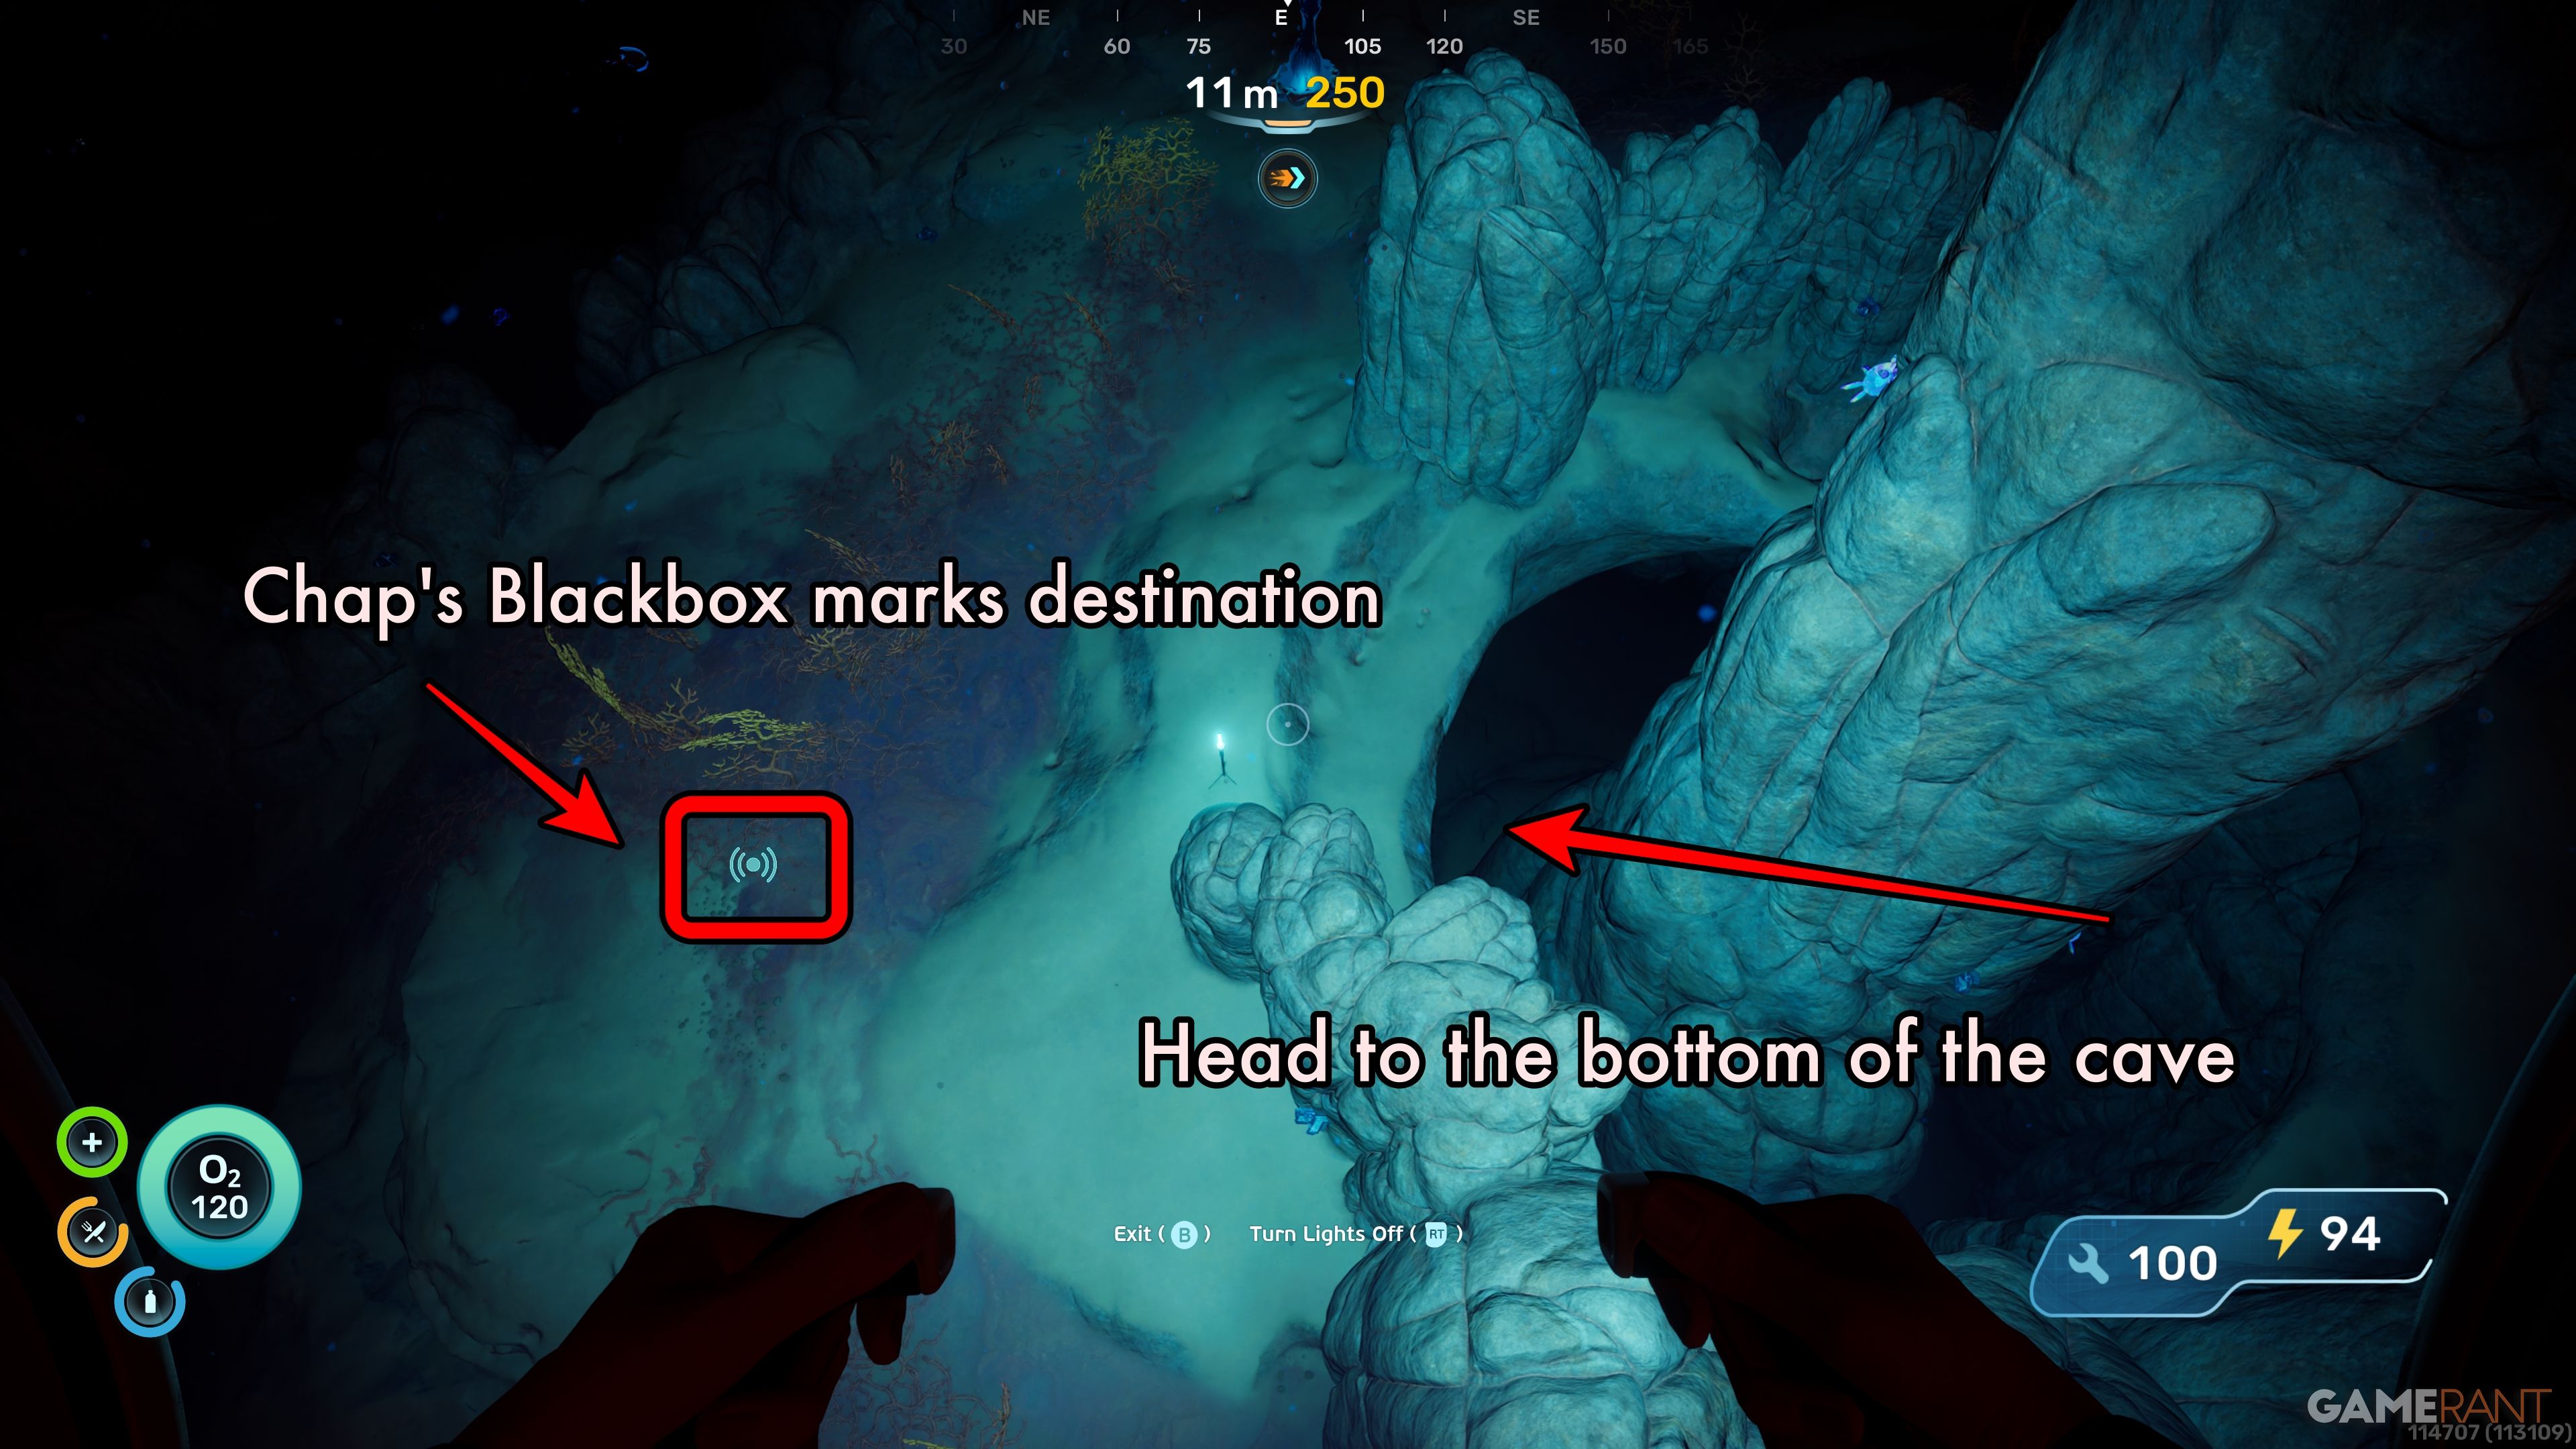
If you lost the signal, you can re-enable it by going to the Signals tab in the main menu. This will guide you 220 meters southeast of the Lifepod to a large, underwater plateau featuring a complex network of caves.
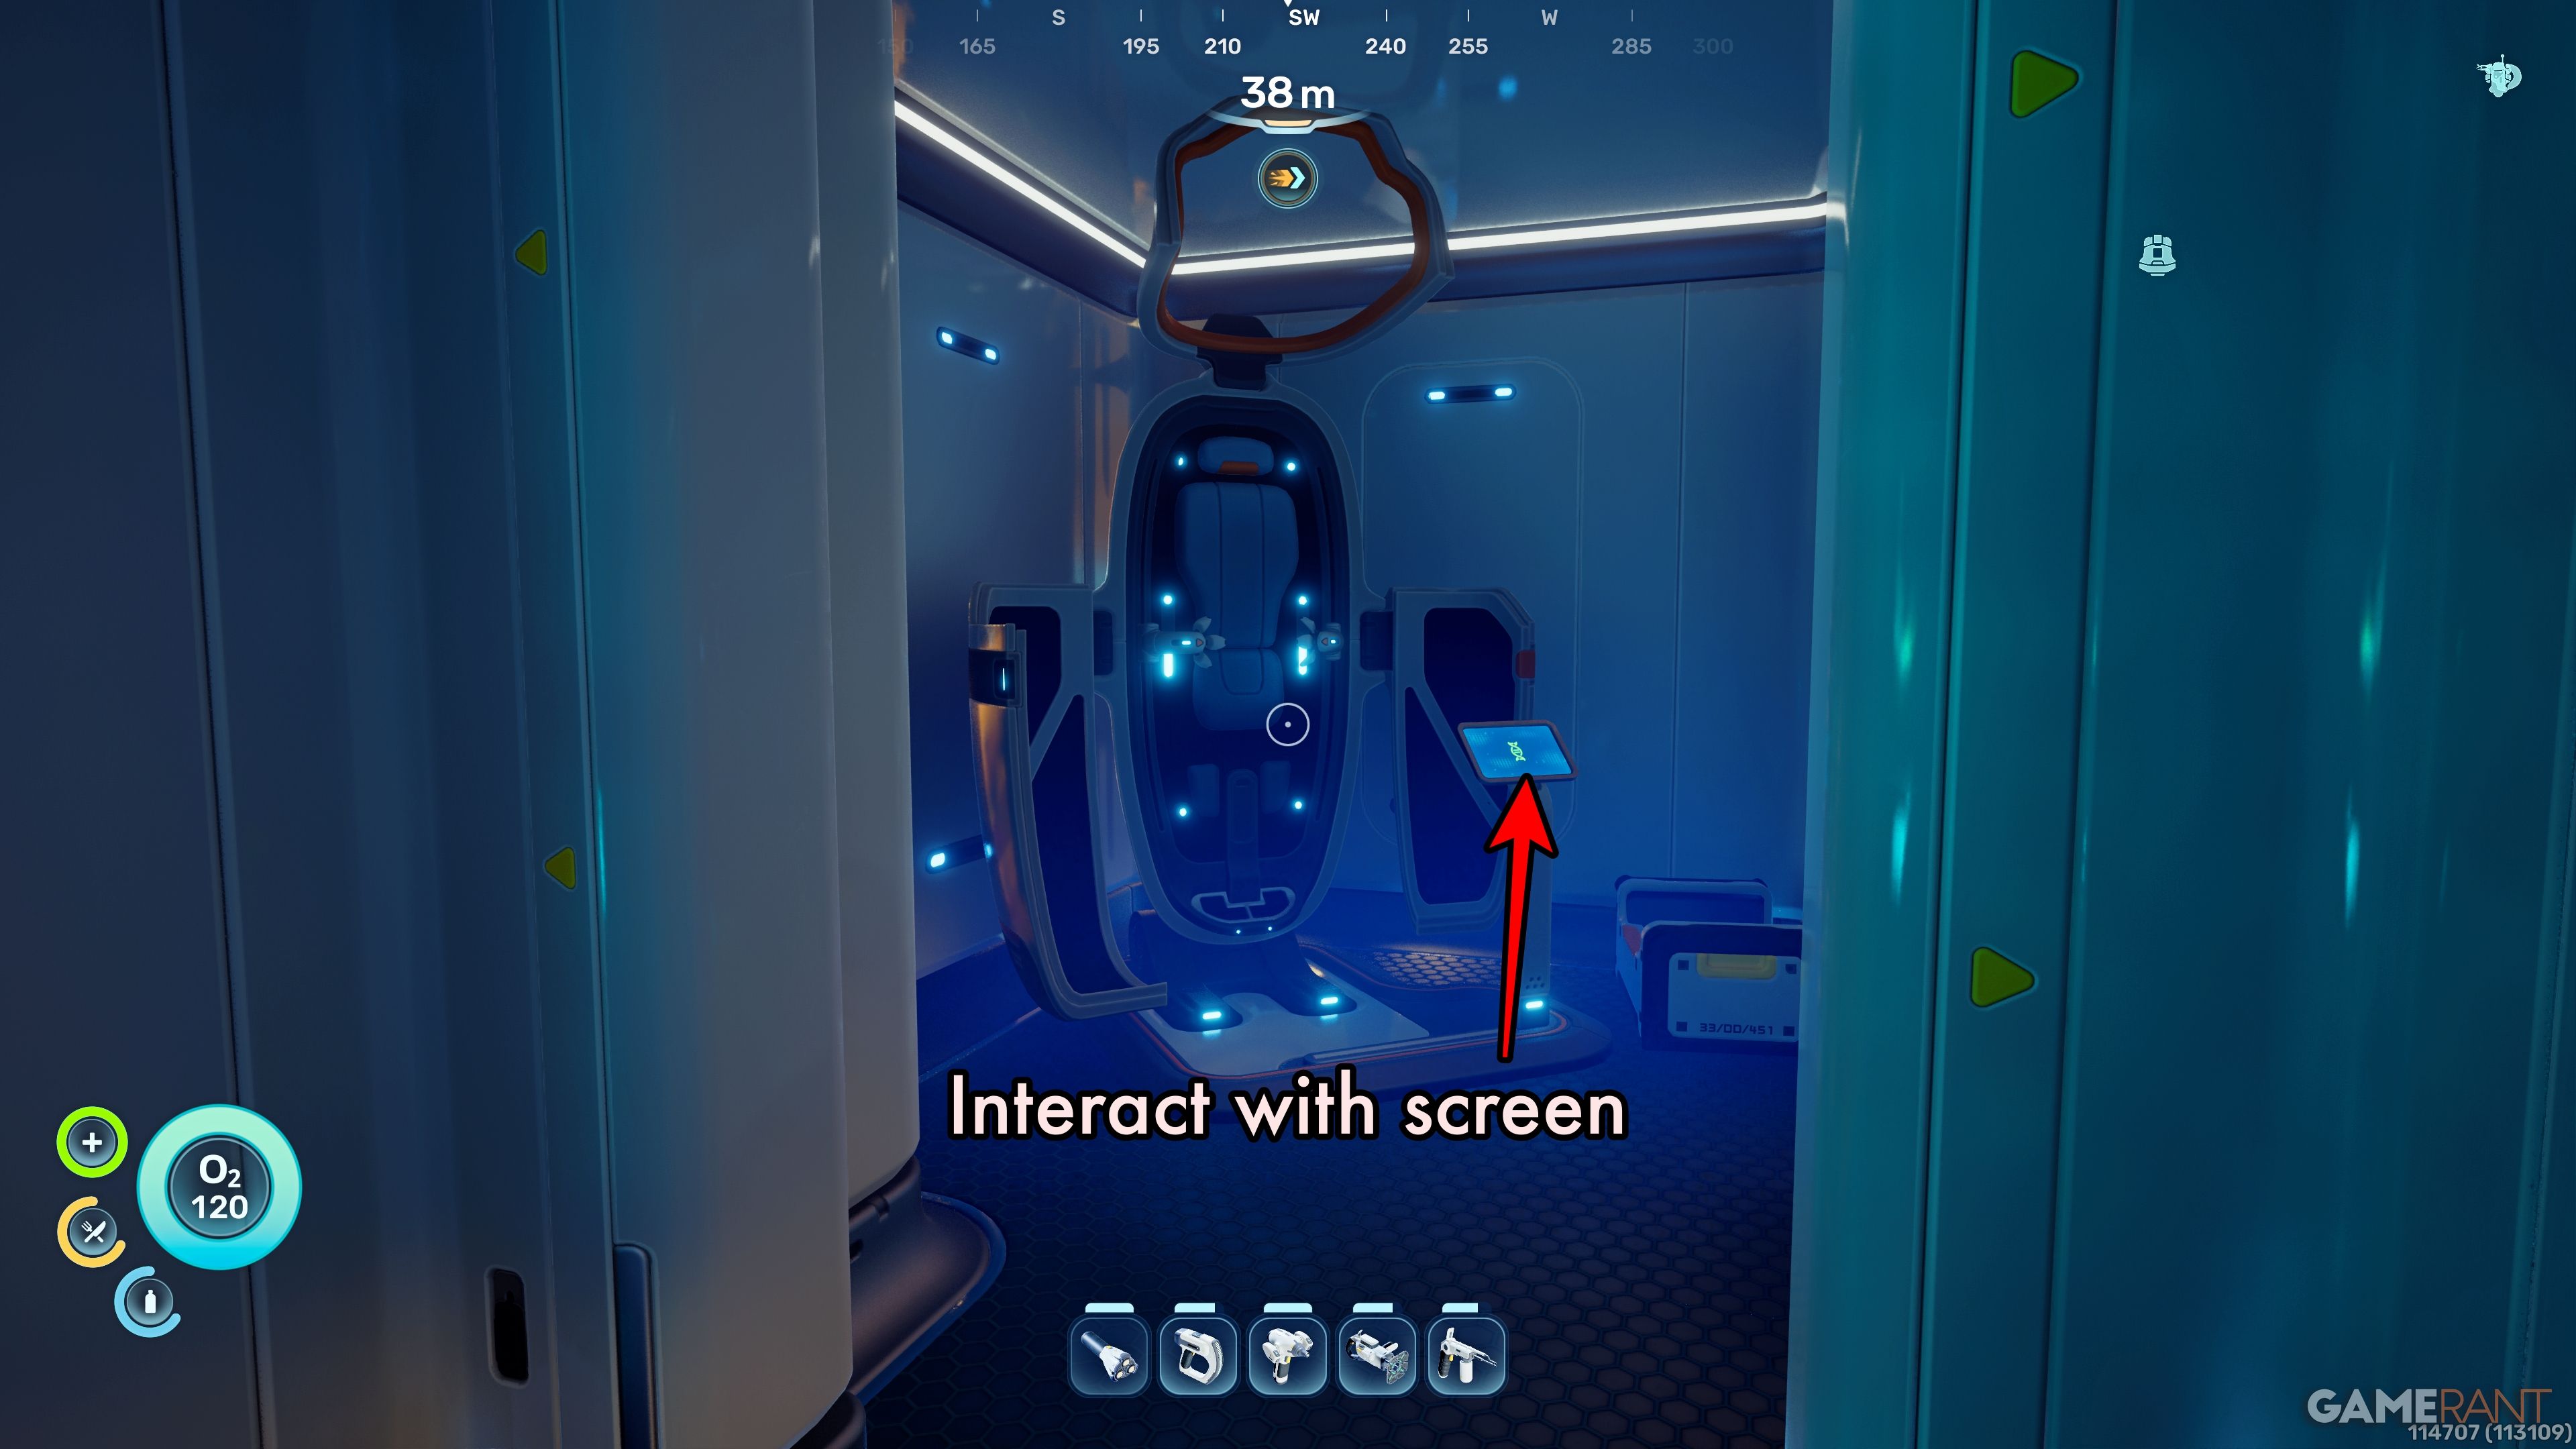
From above, you can spot the cave entrance on the plateau. Dive down to the cave floor and go through the habitat hatch. You’ll find the Biobed inside.

Interact with the screen to receive three additional basic inventory slots.
Biobed Inventory Expansion 2 – Anita’s Garden:
- Location: Entrance is about 90 meters north-east of the Lifepod. Use a bearing of around 70 degrees.
- Depth: Around 30 meters down.
- Upgrade: Endurance – three additional inventory slots.

Starting from the Lifepod, head roughly 90 meters in a direction between east and northeast. You’ll come across a large piece of wreckage. The entrance to a cave is on top of a small plateau located just to the right of the wreckage.
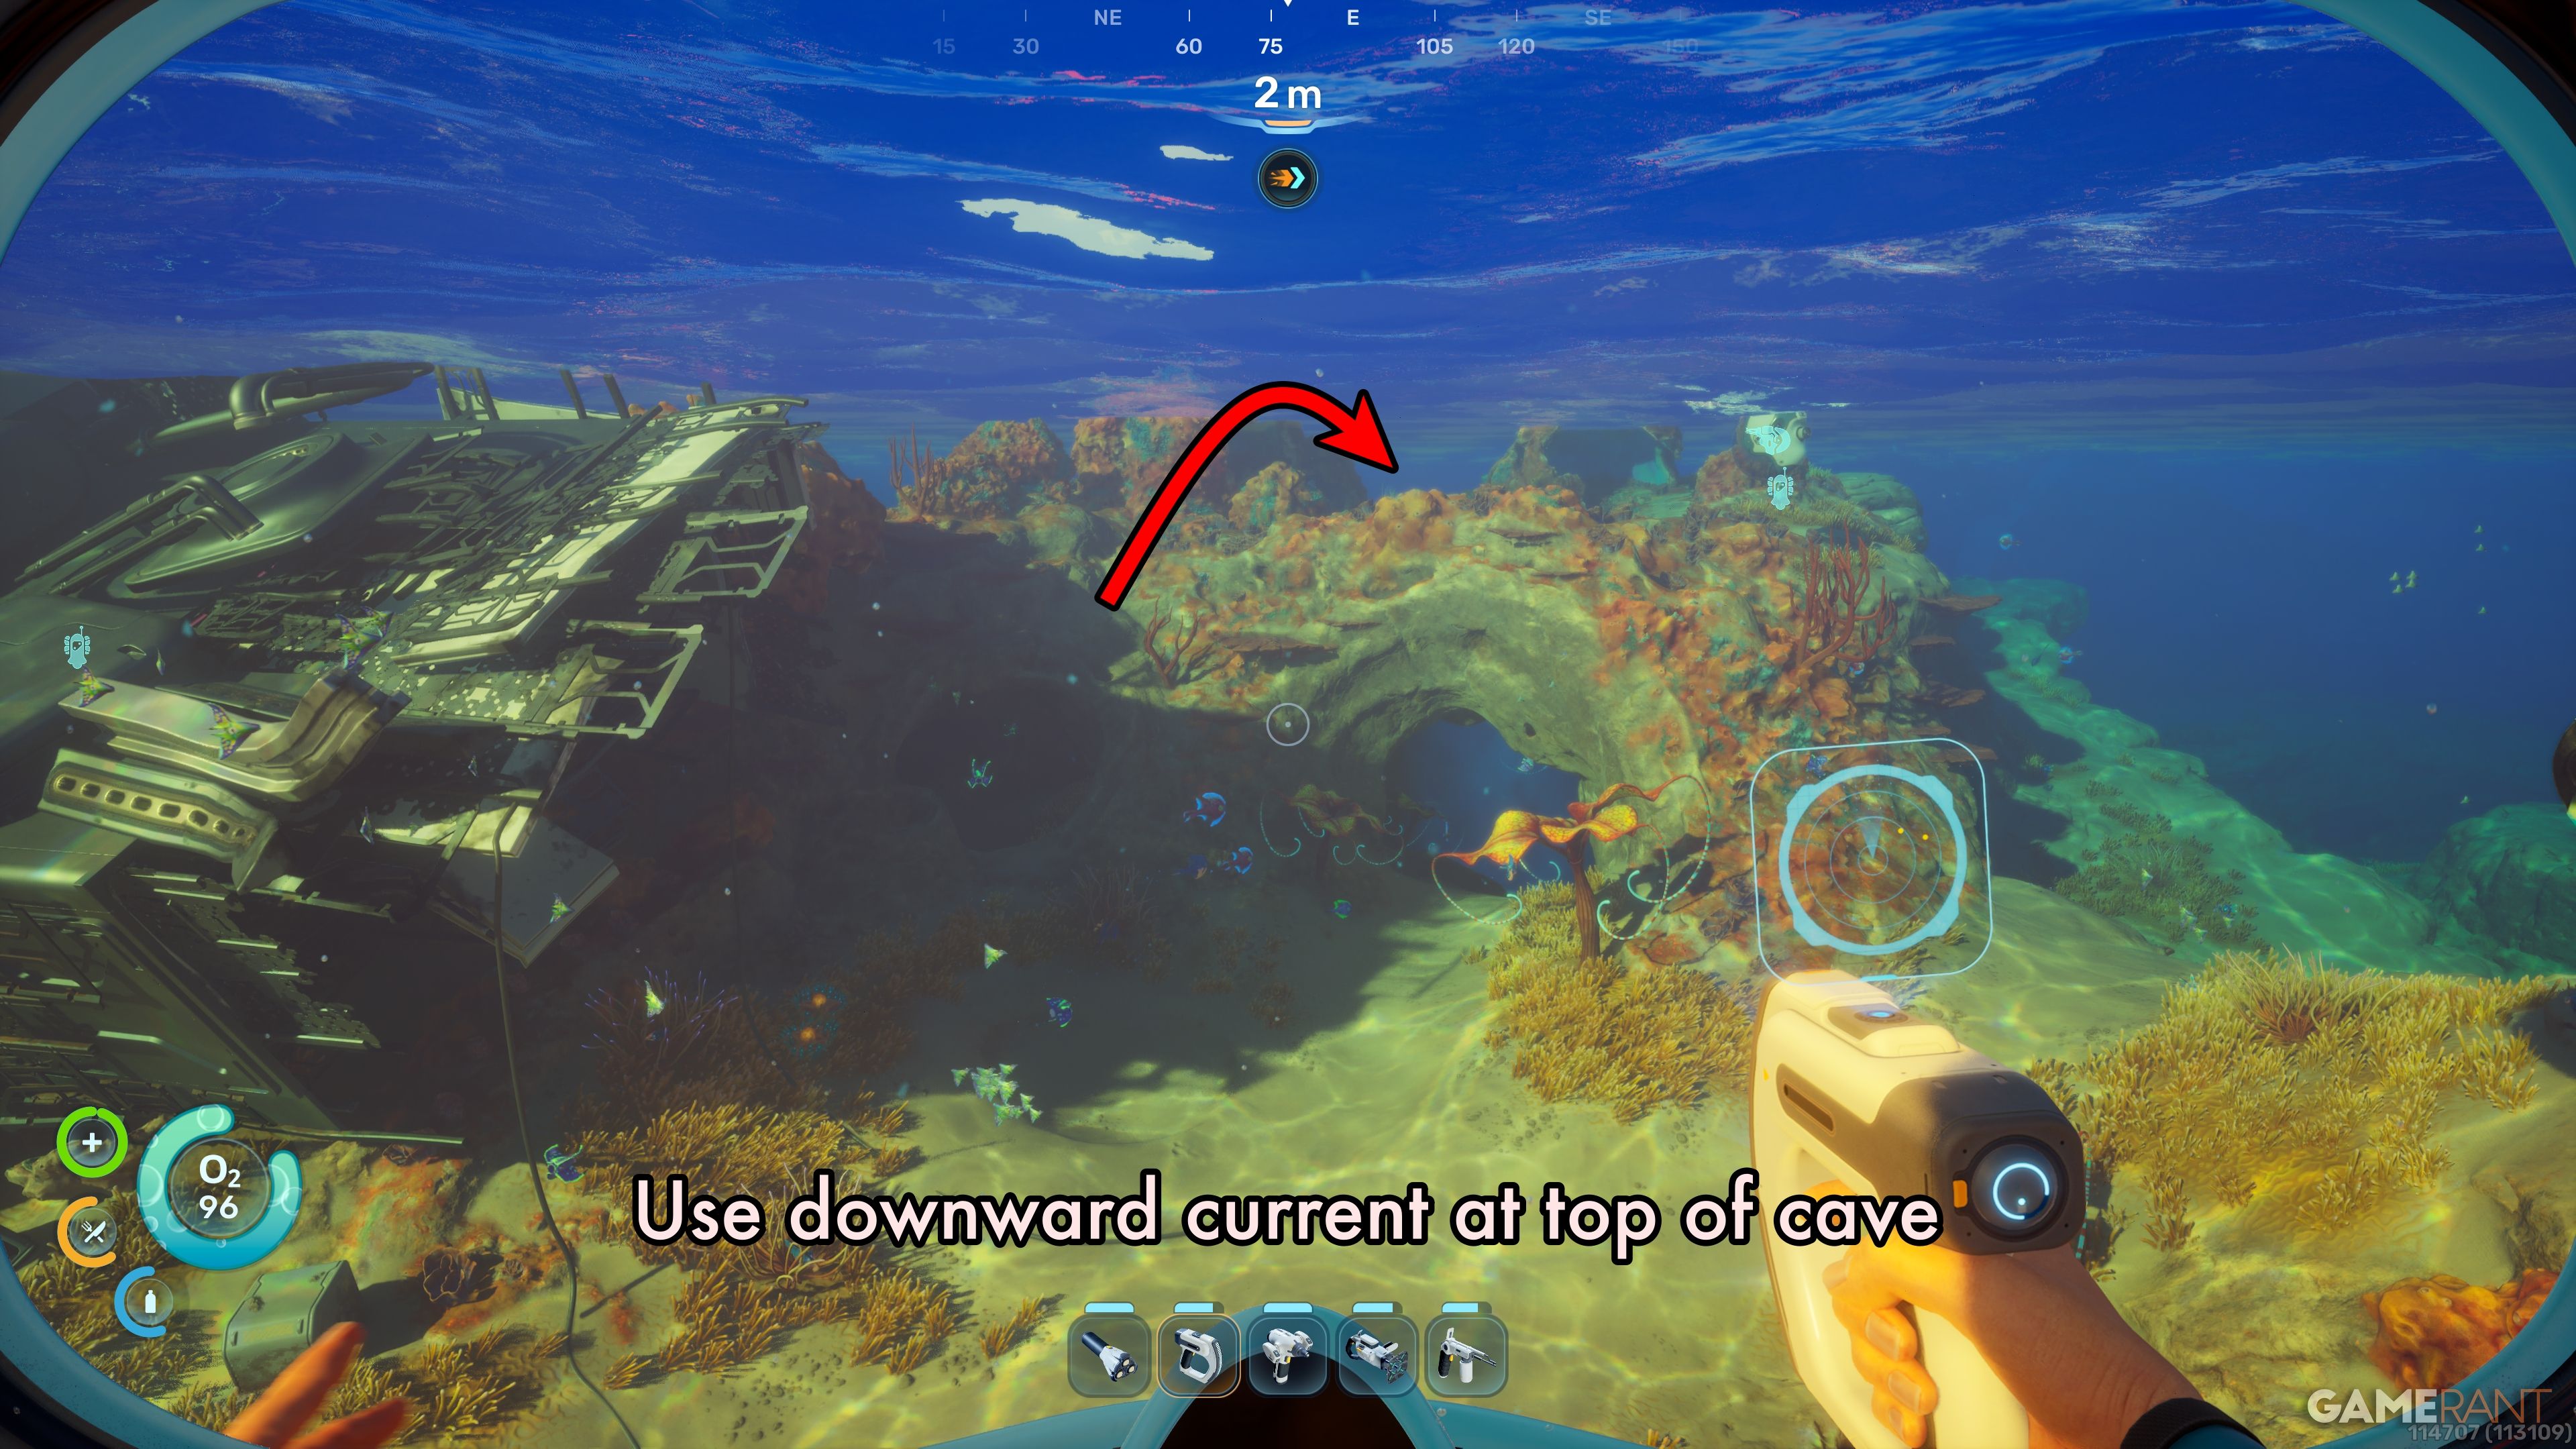
A strong current pulls you down at the cave’s opening. Let it carry you to the cave floor.
Once you’re at the lowest part of the cave, turn east and walk beyond the platform. You’ll find an Oxygen Tunic there. Then, turn right from the plant and search for a tunnel entrance marked by a red Feather Kelp nearby.
Go into the tunnel and follow the passage. You’ll find an entrance to the habitat on your right.
Go through the hatch and into the back room to locate the Biobed. Use the screen next to it to unlock more space in your inventory – you’ll get three extra slots!
Biobed Inventory Expansion 3 – Salvage Colonist Bunker:
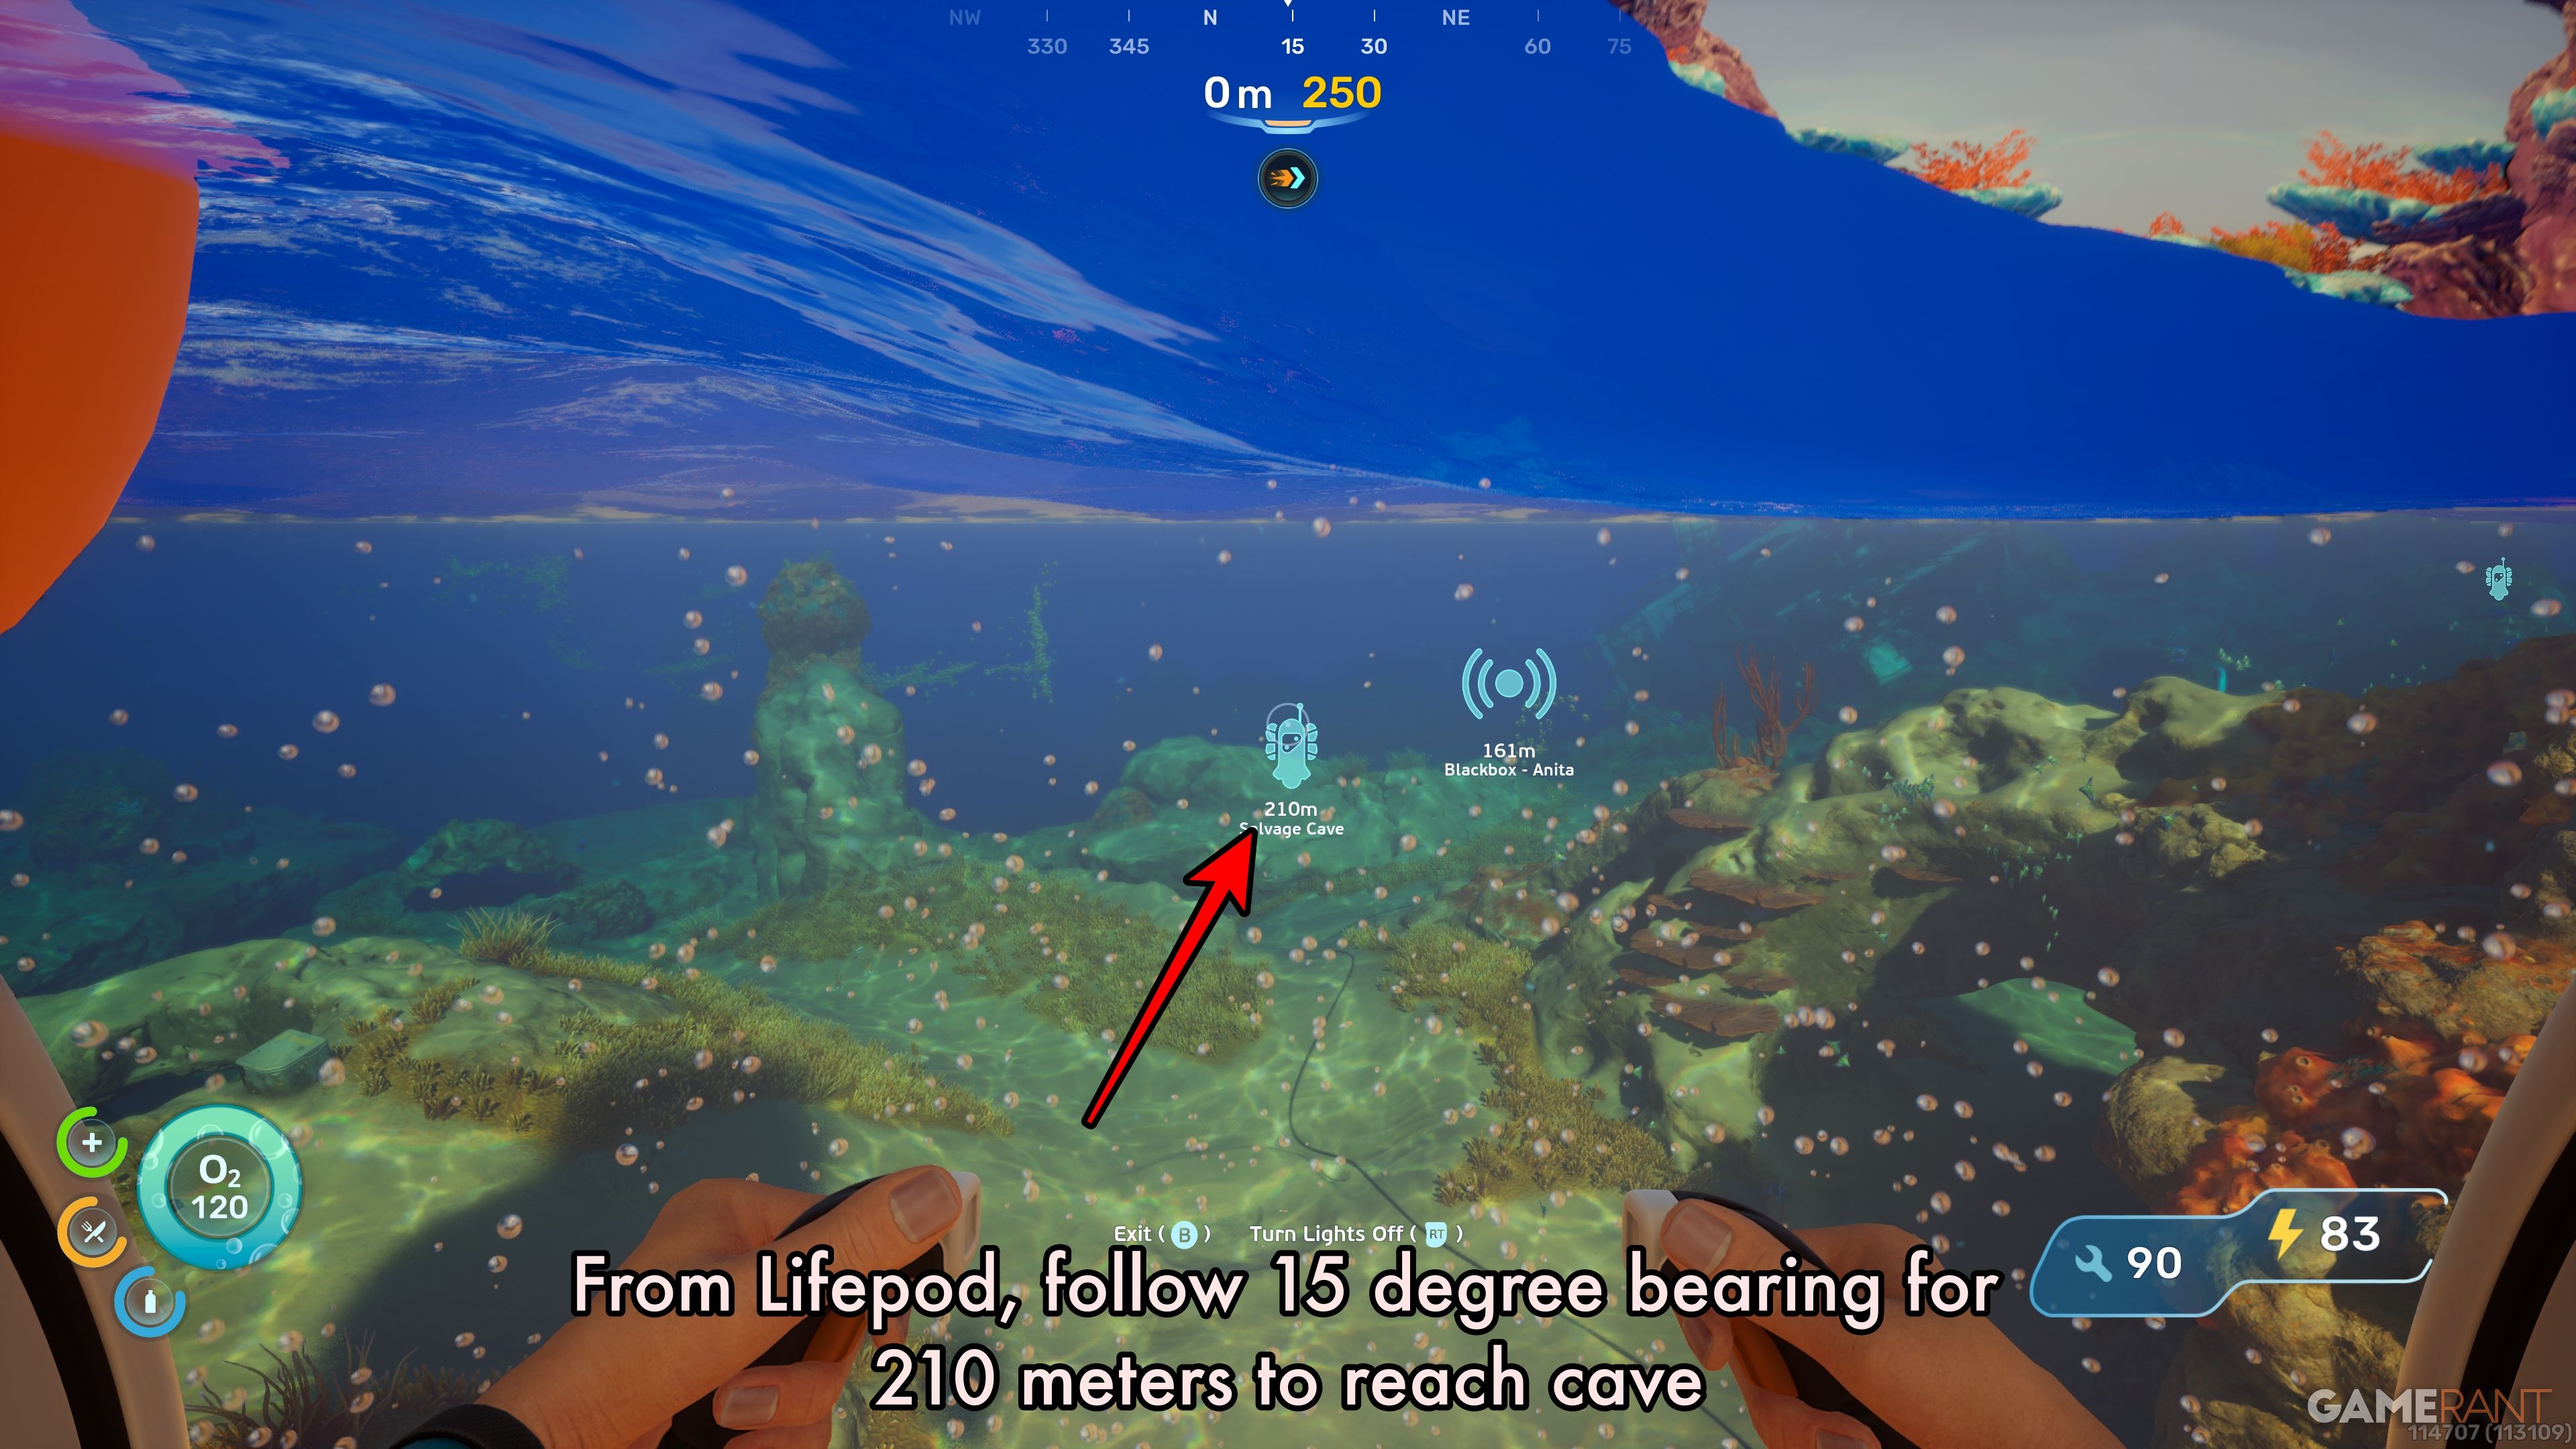
- Location: Cave entrance is 210 meters north-north-east of the Lifepod. Bearing of 15 degrees. Use Anita’s Blackbox signal as a guide.
- Depth: Cave entrance is at 35m. The bunker entrance is 85m down.
- Upgrade: Dexterity — adds a single slot to your Quickbar.
You can locate the Biobed by following the signal from Anita’s Blackbox, if it’s unlocked. Otherwise, use the Digestion Angel Comb to guide you.
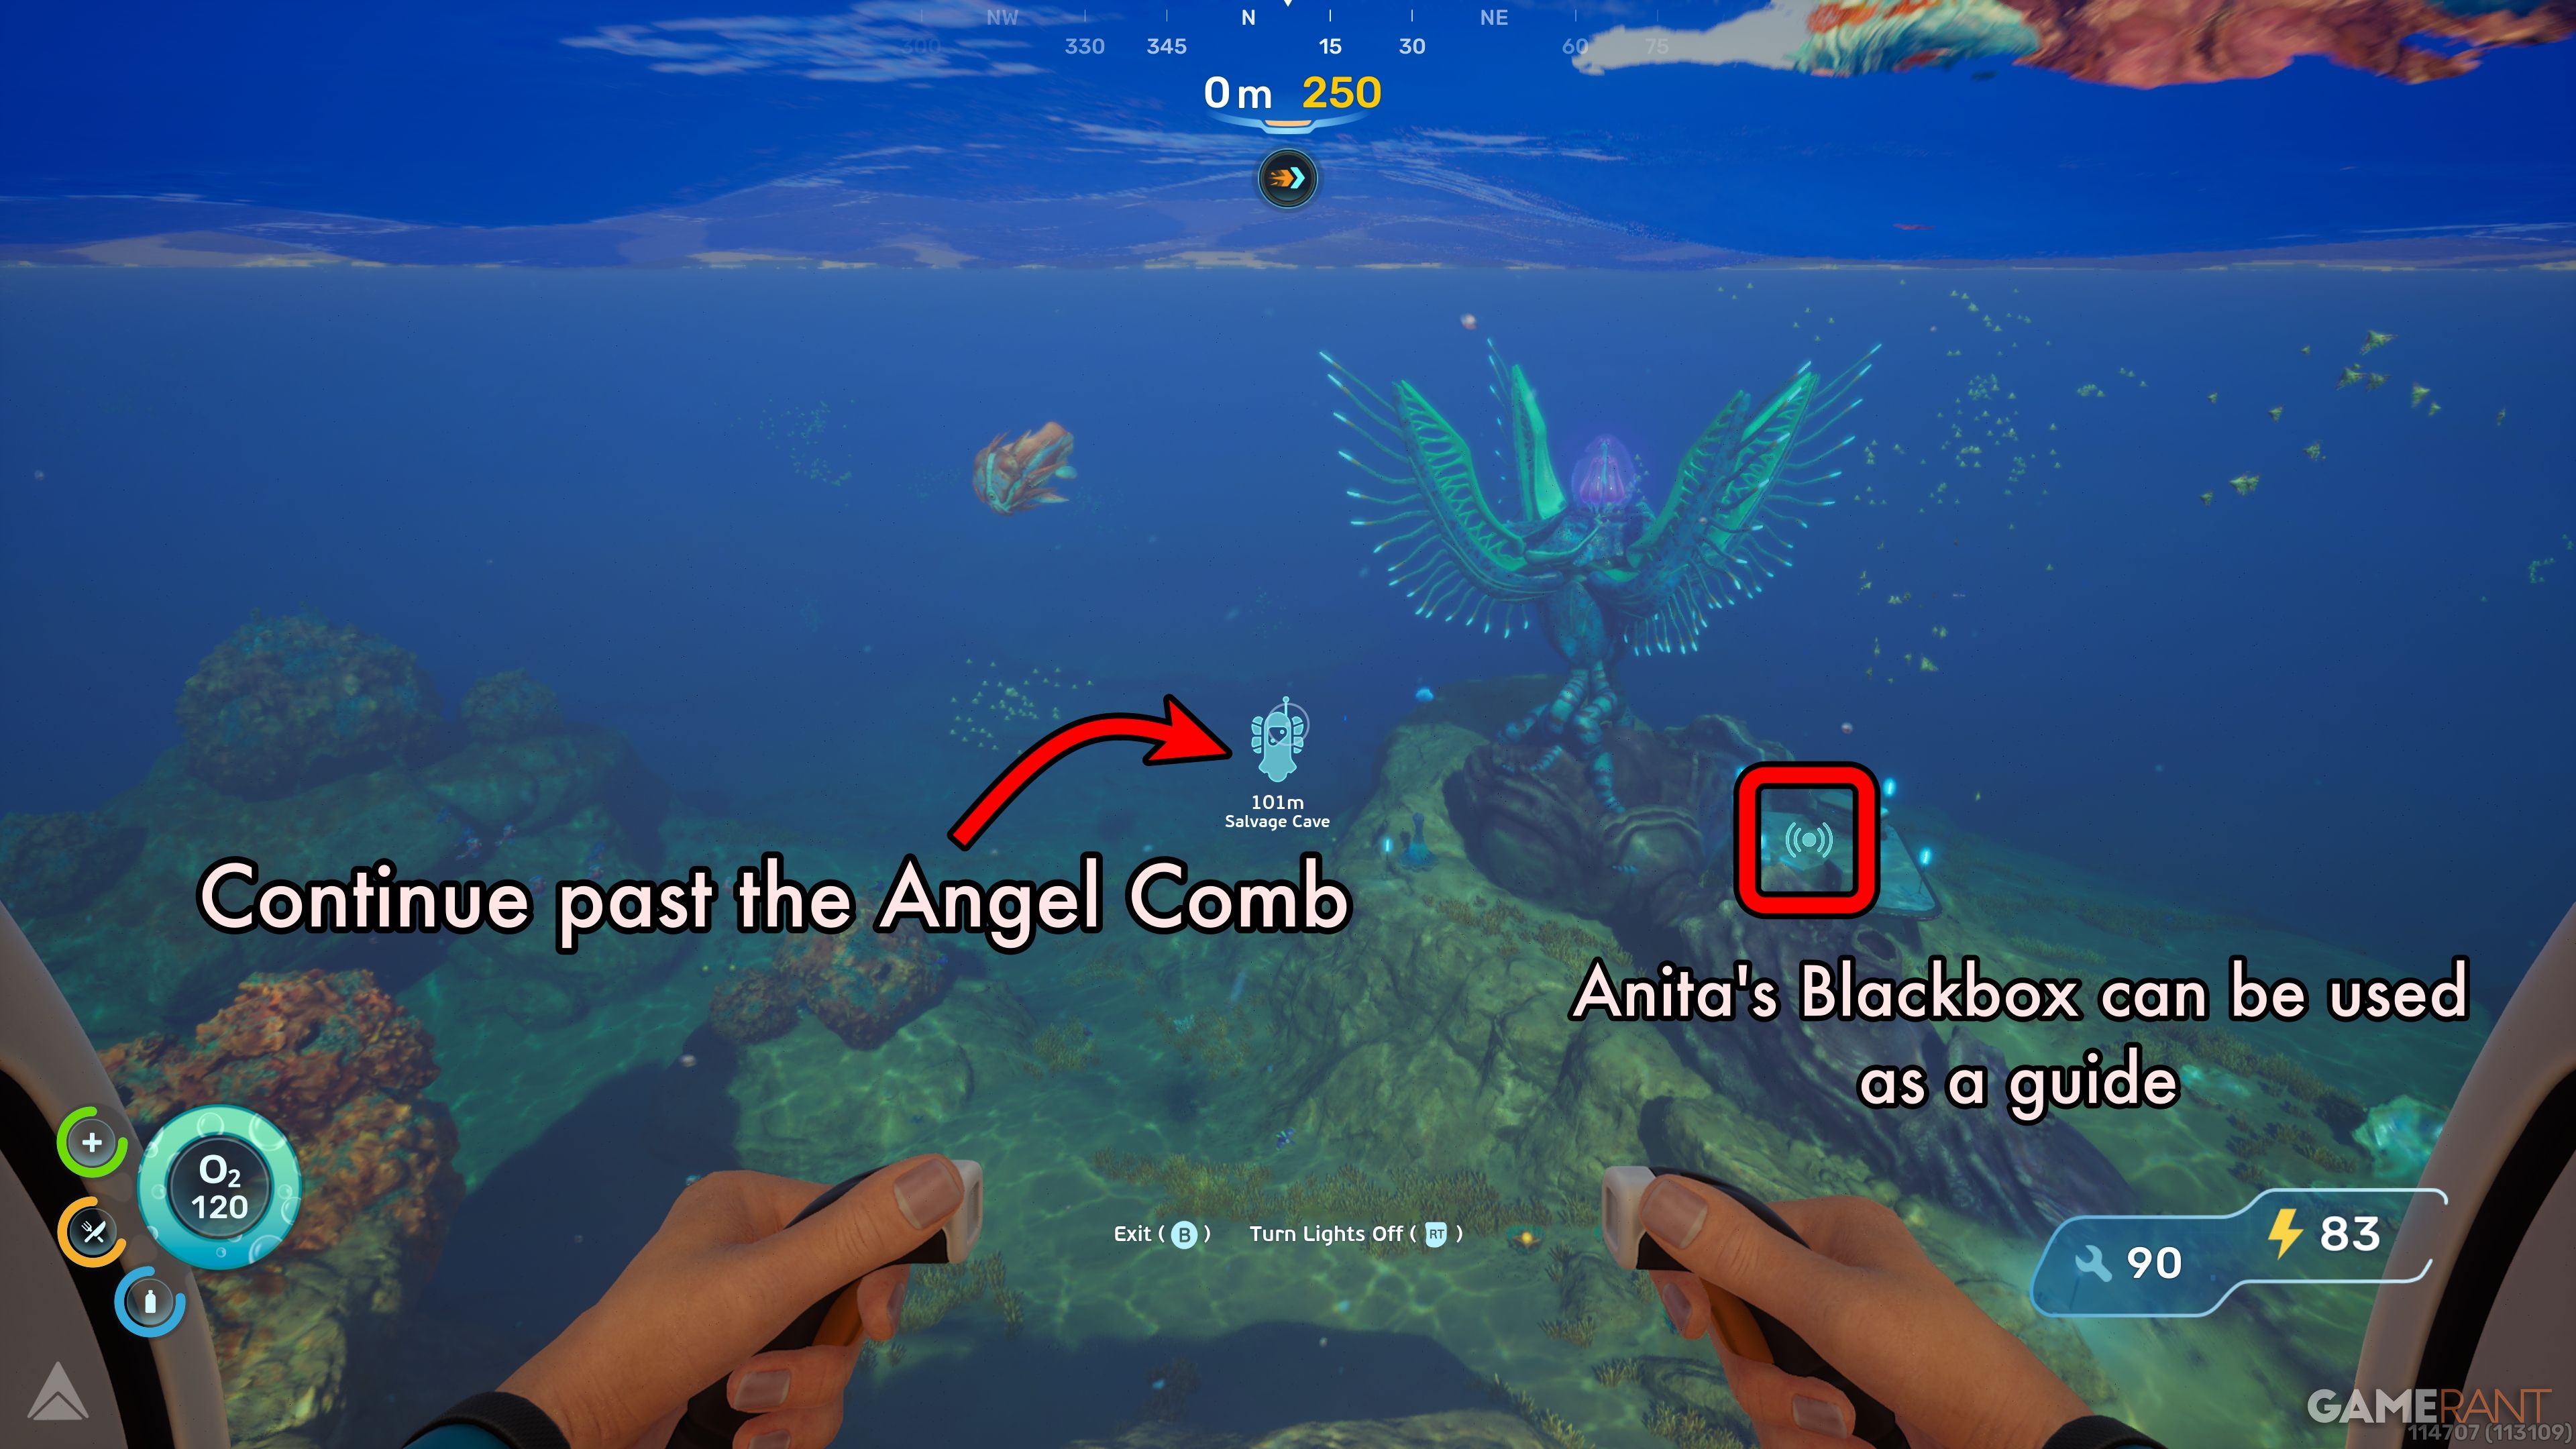
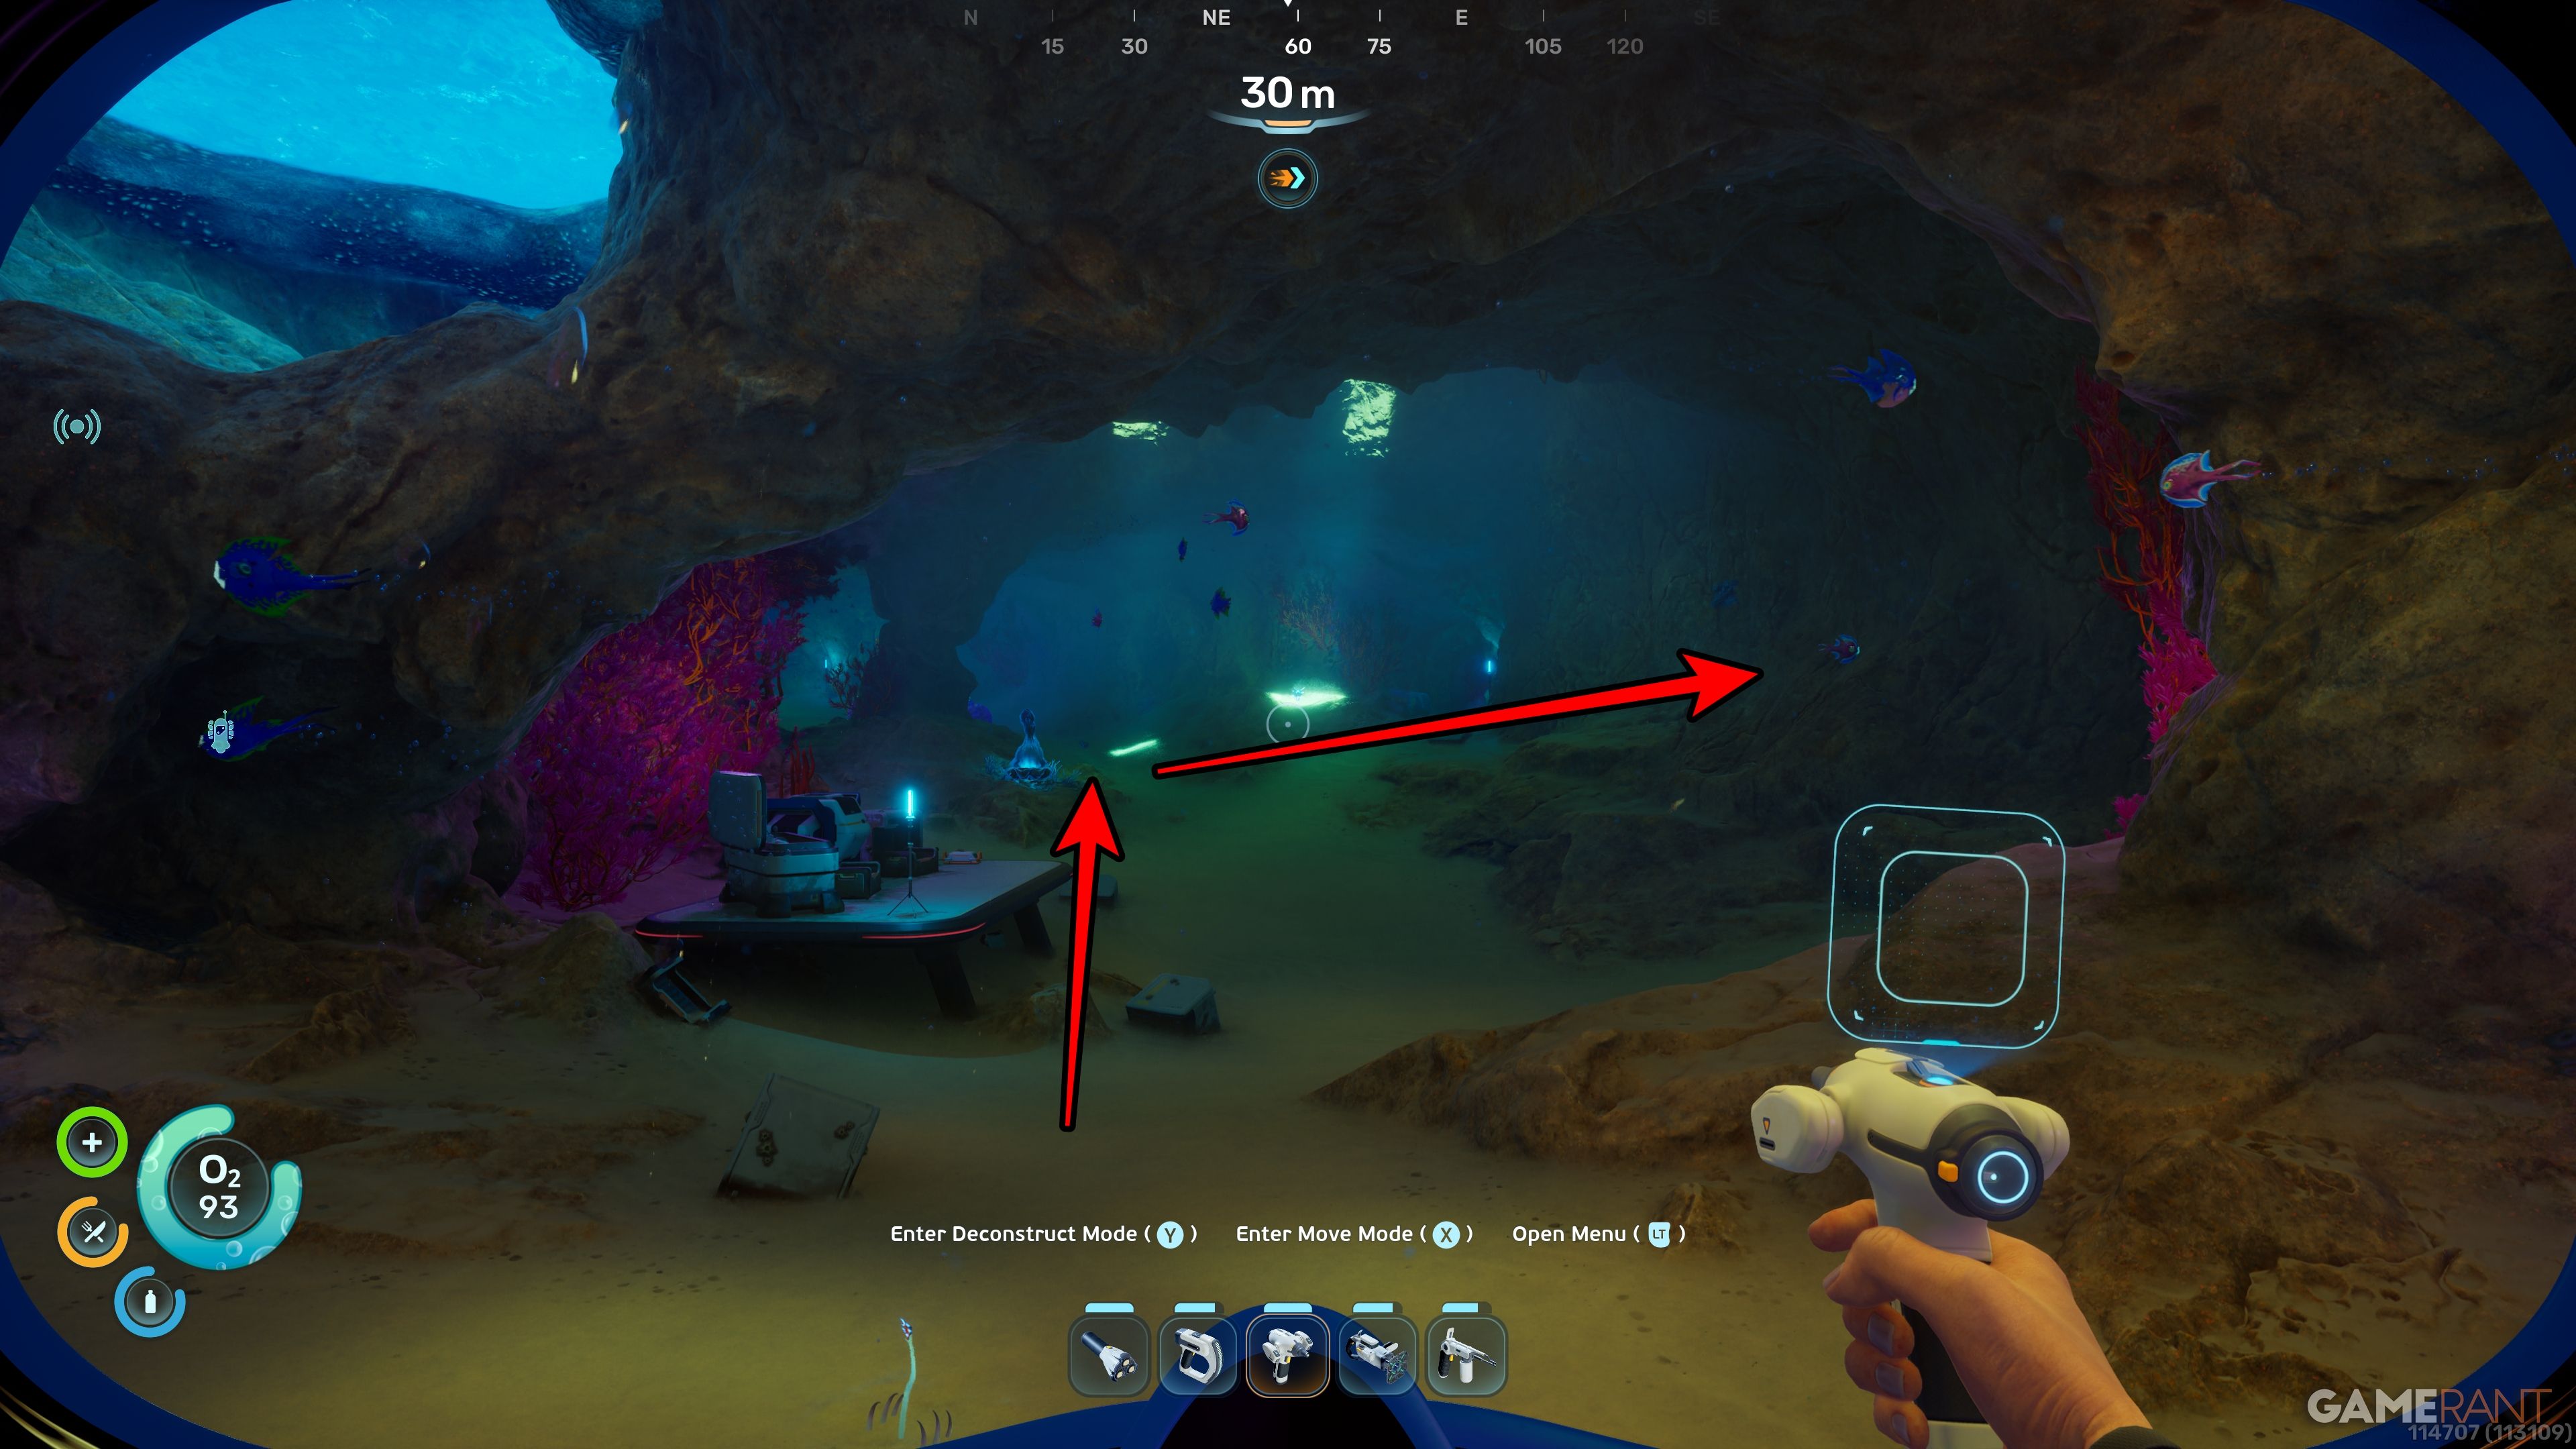
From the Lifepod, head northeast at a 15-degree angle towards a platform on the sea floor, located just past the Digestion Angel Comb. You’ll find a cave to the left of the platform, and its entrance is marked by green flowers.
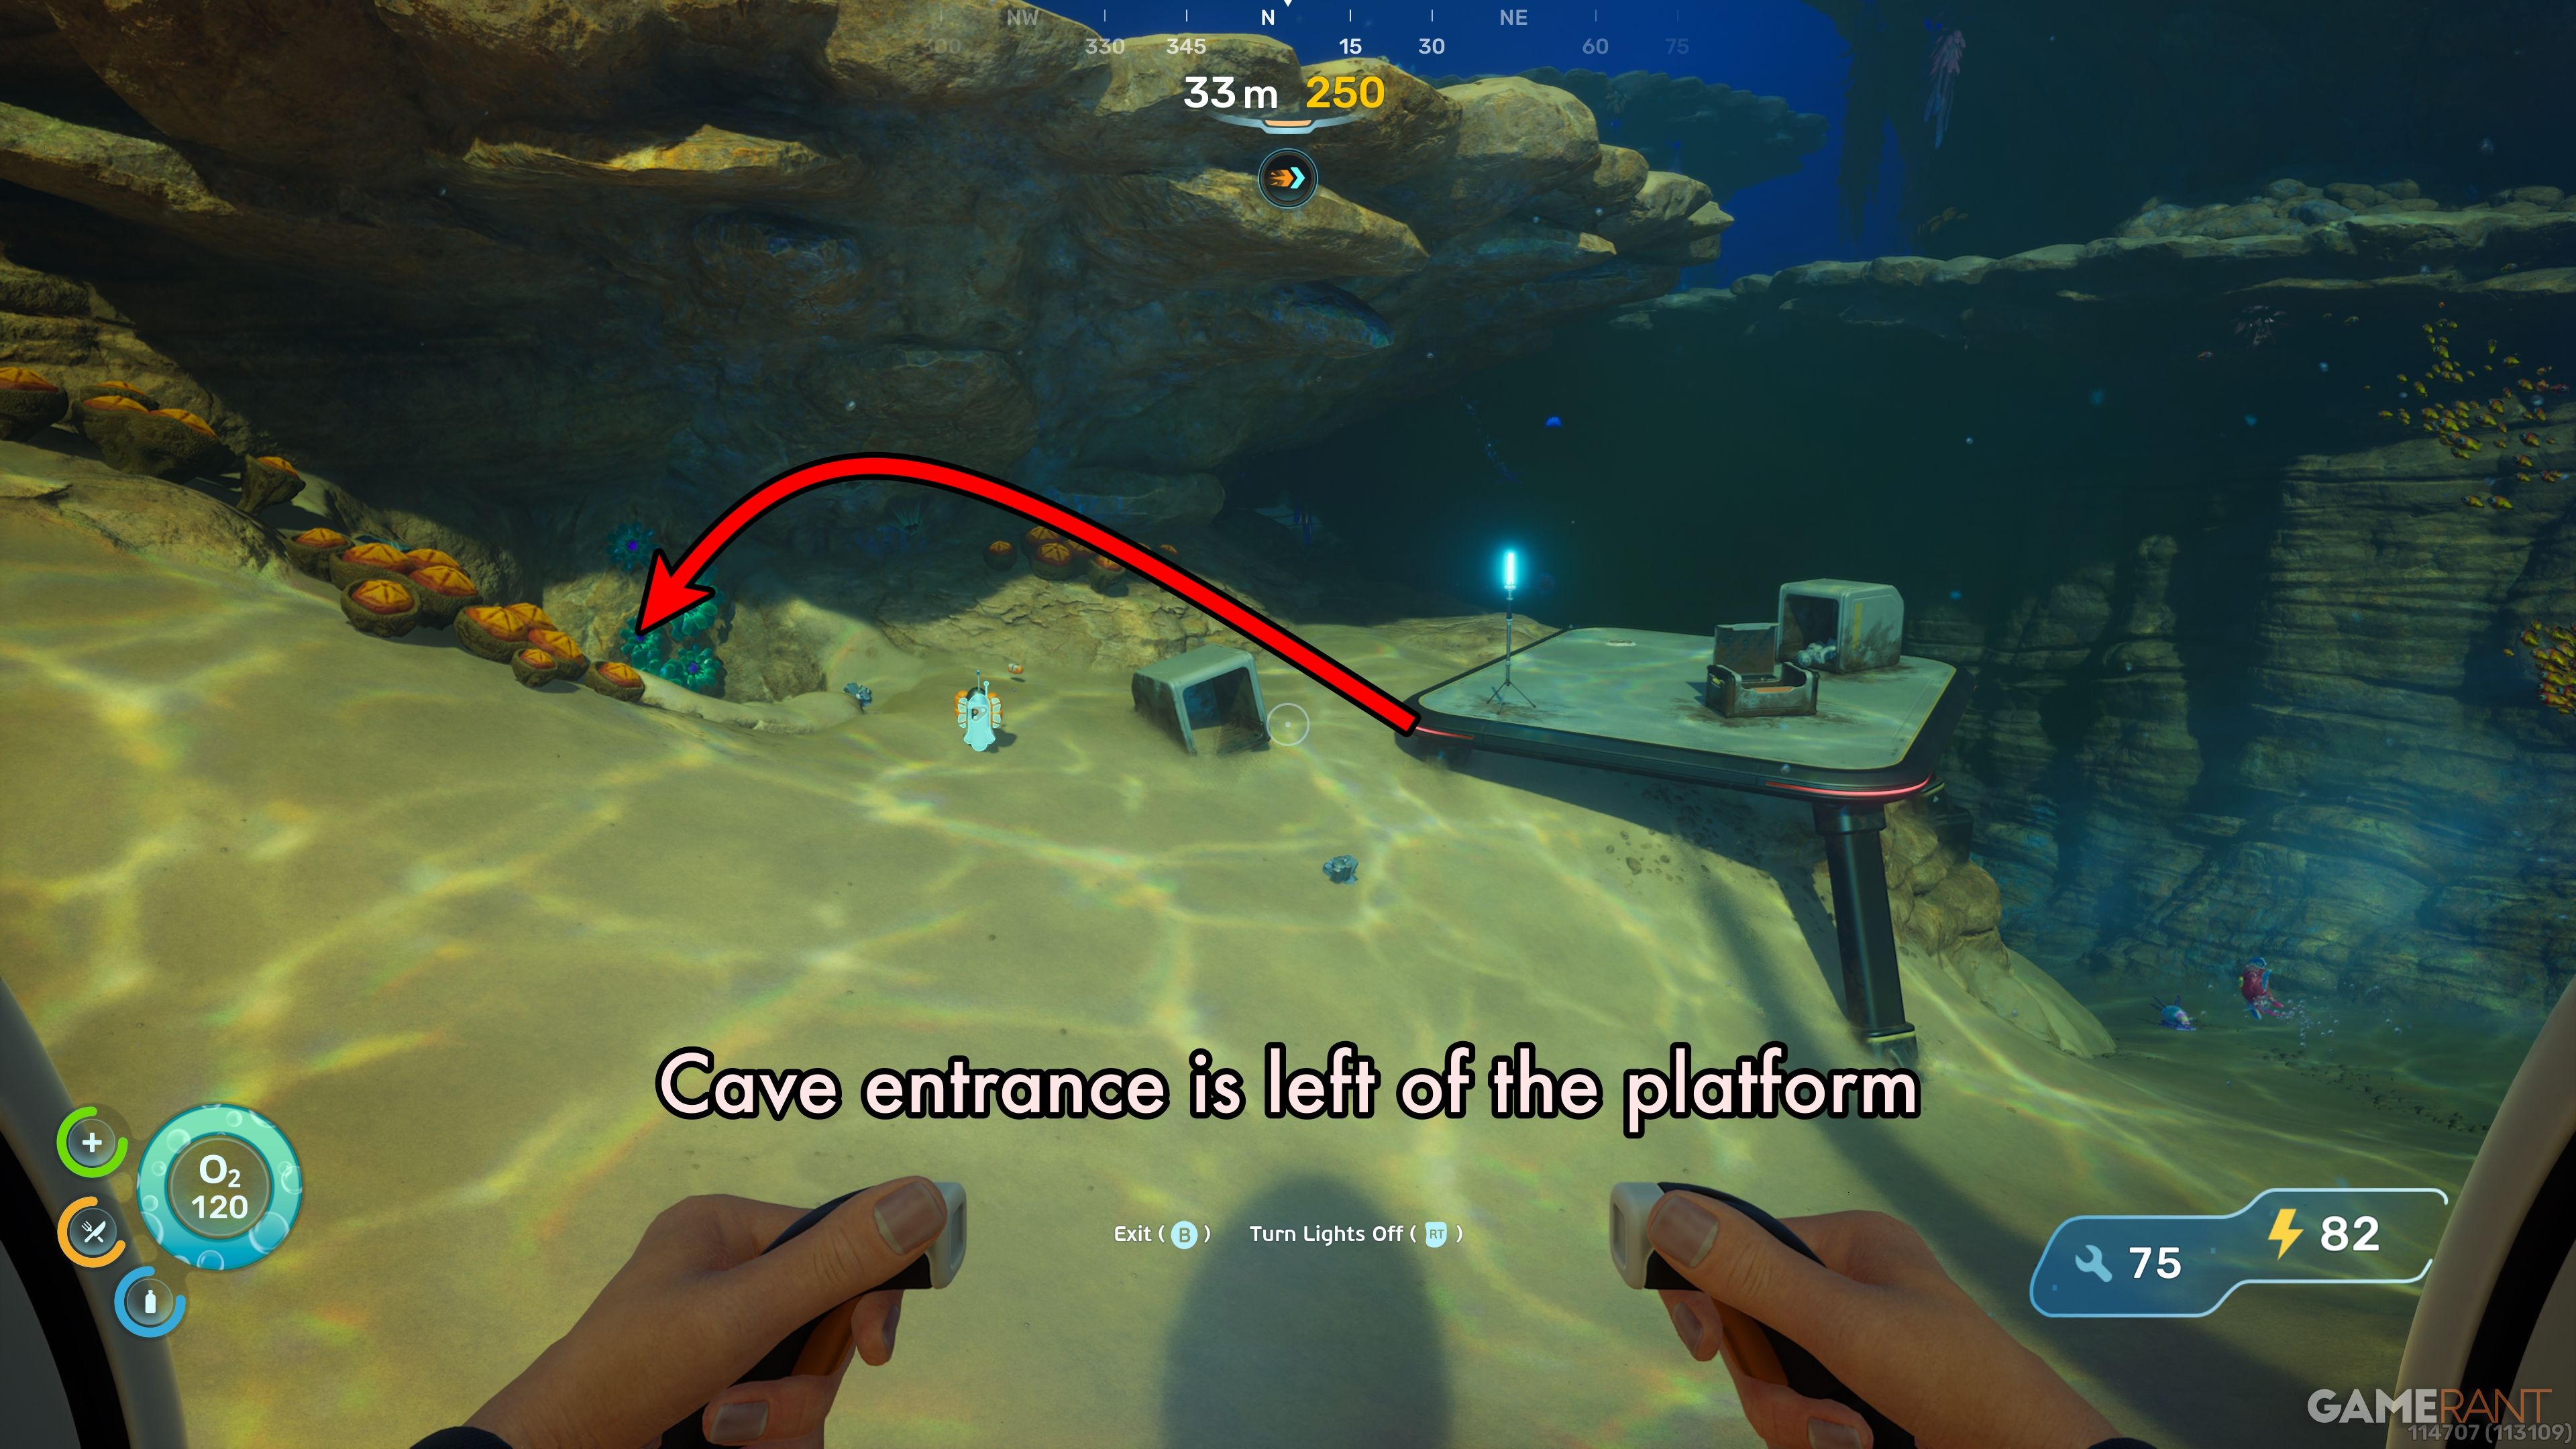
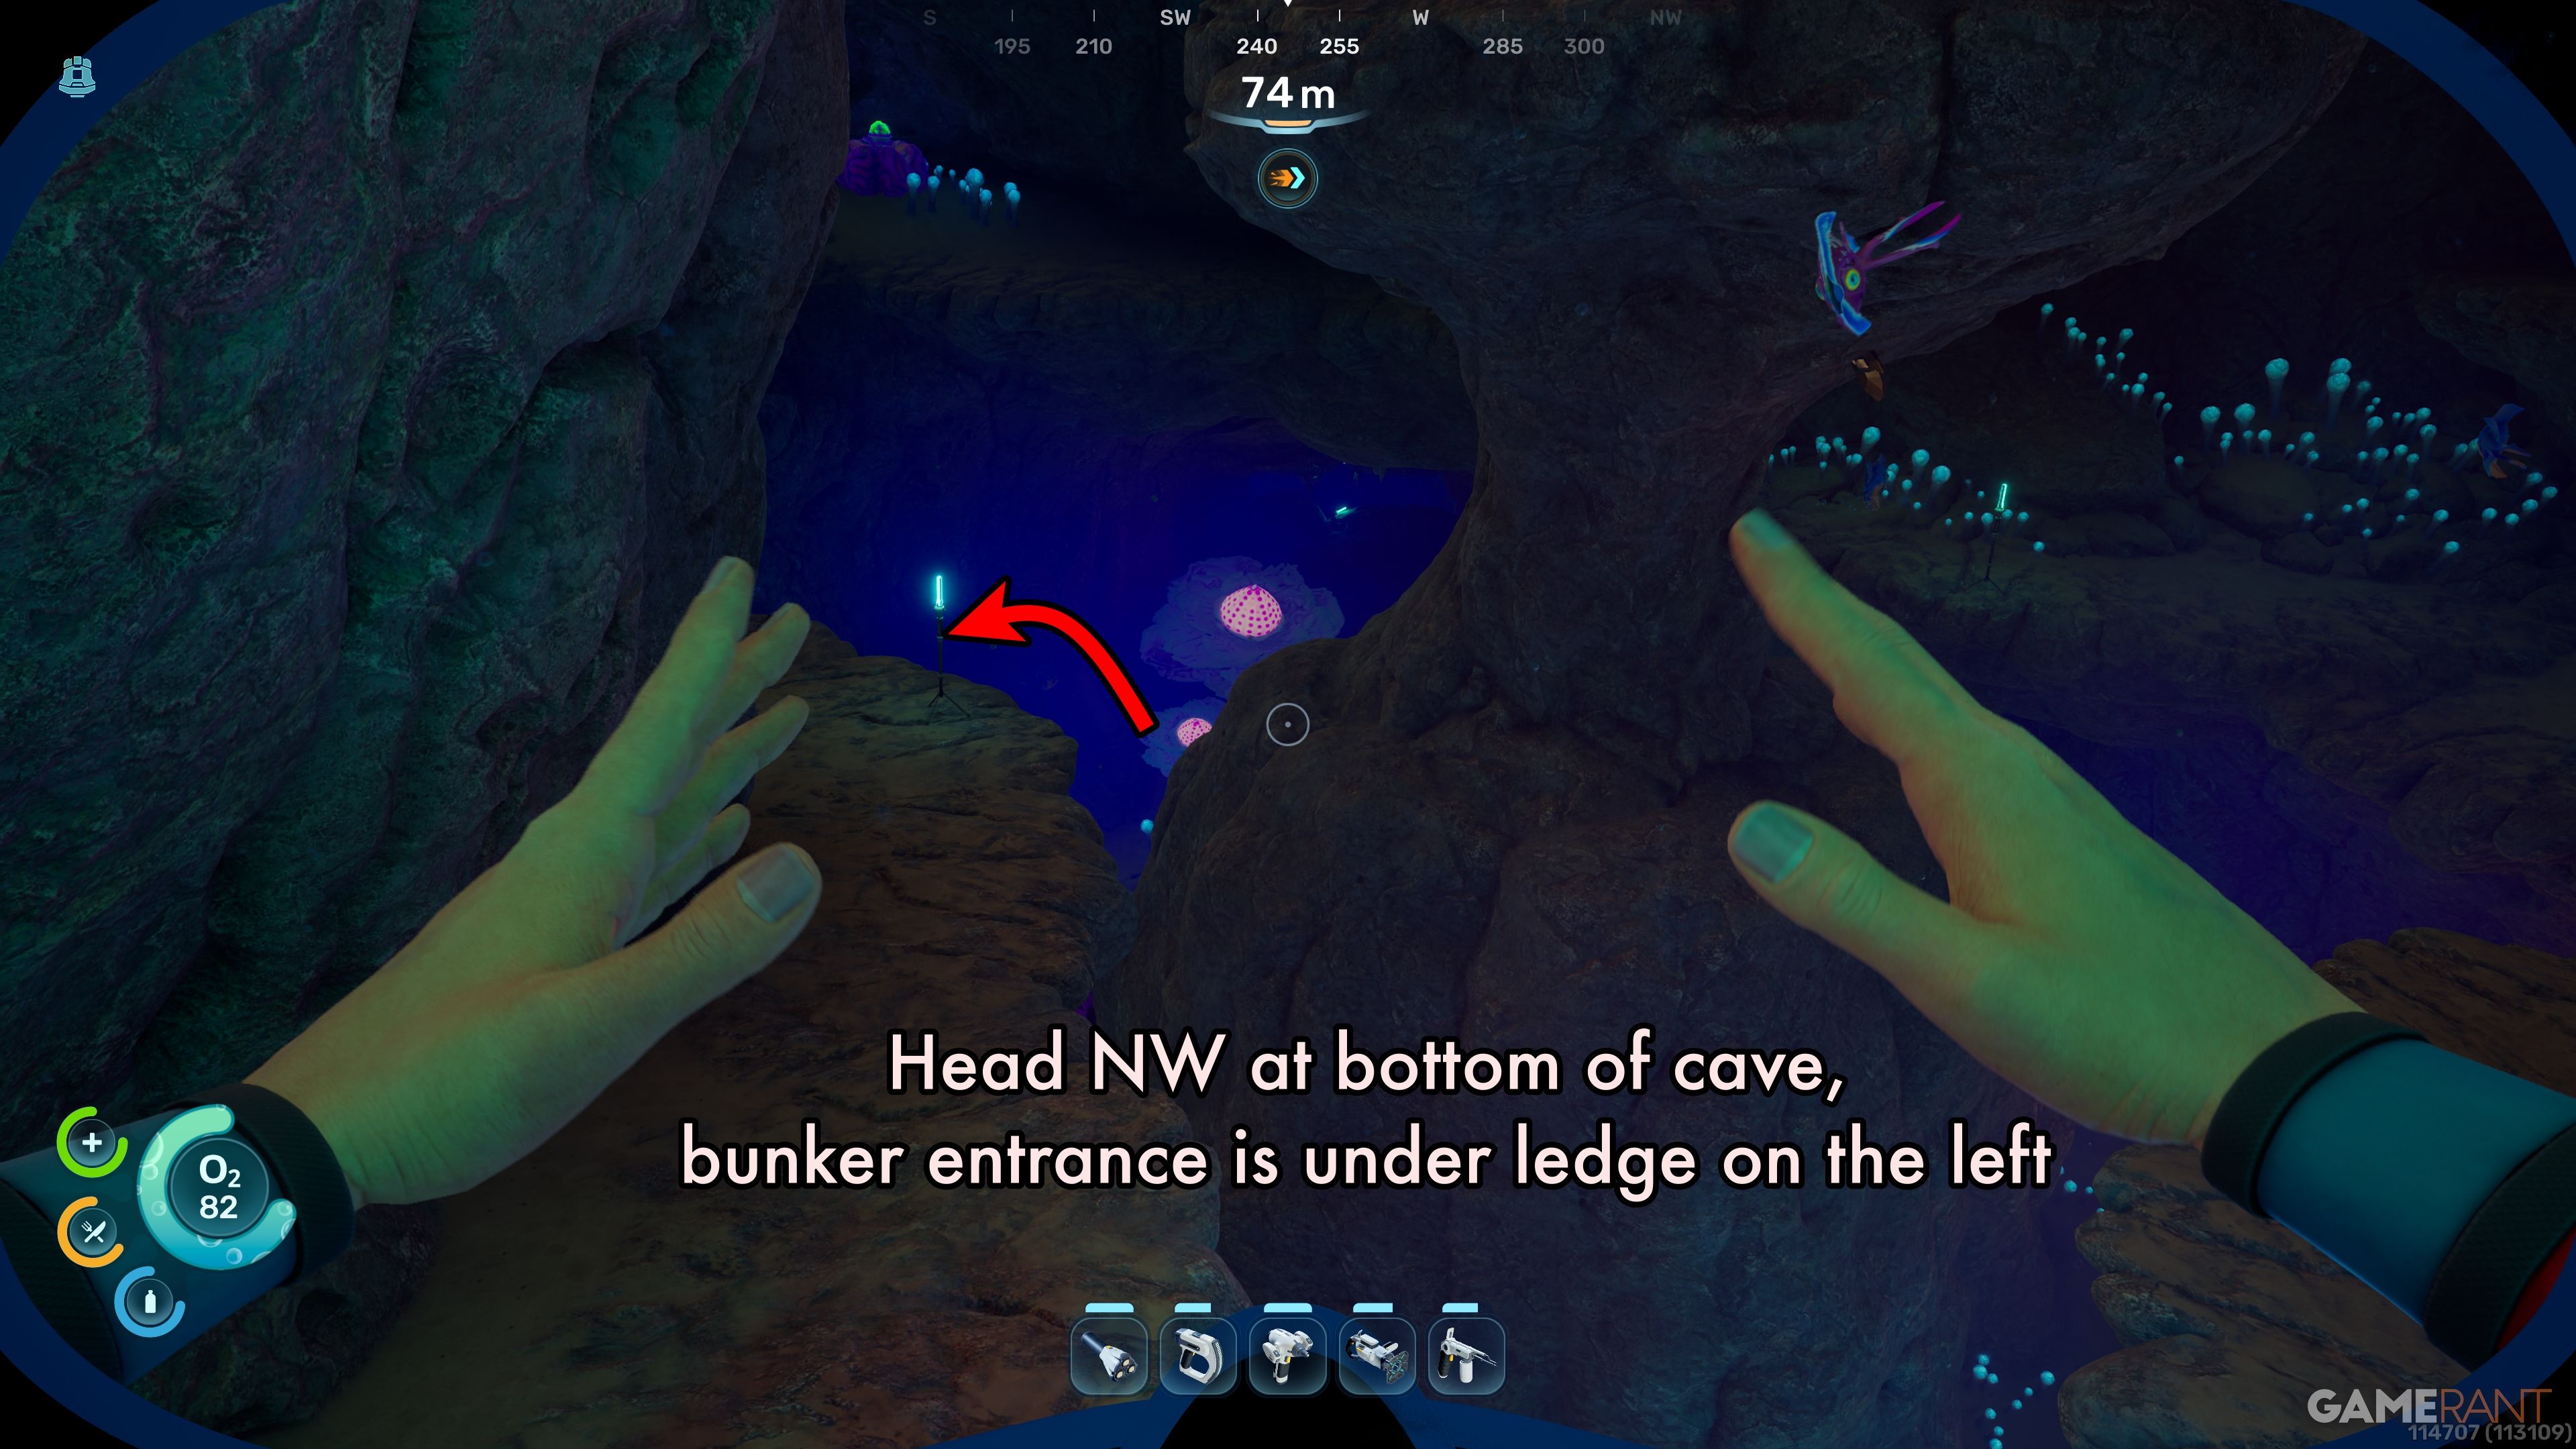
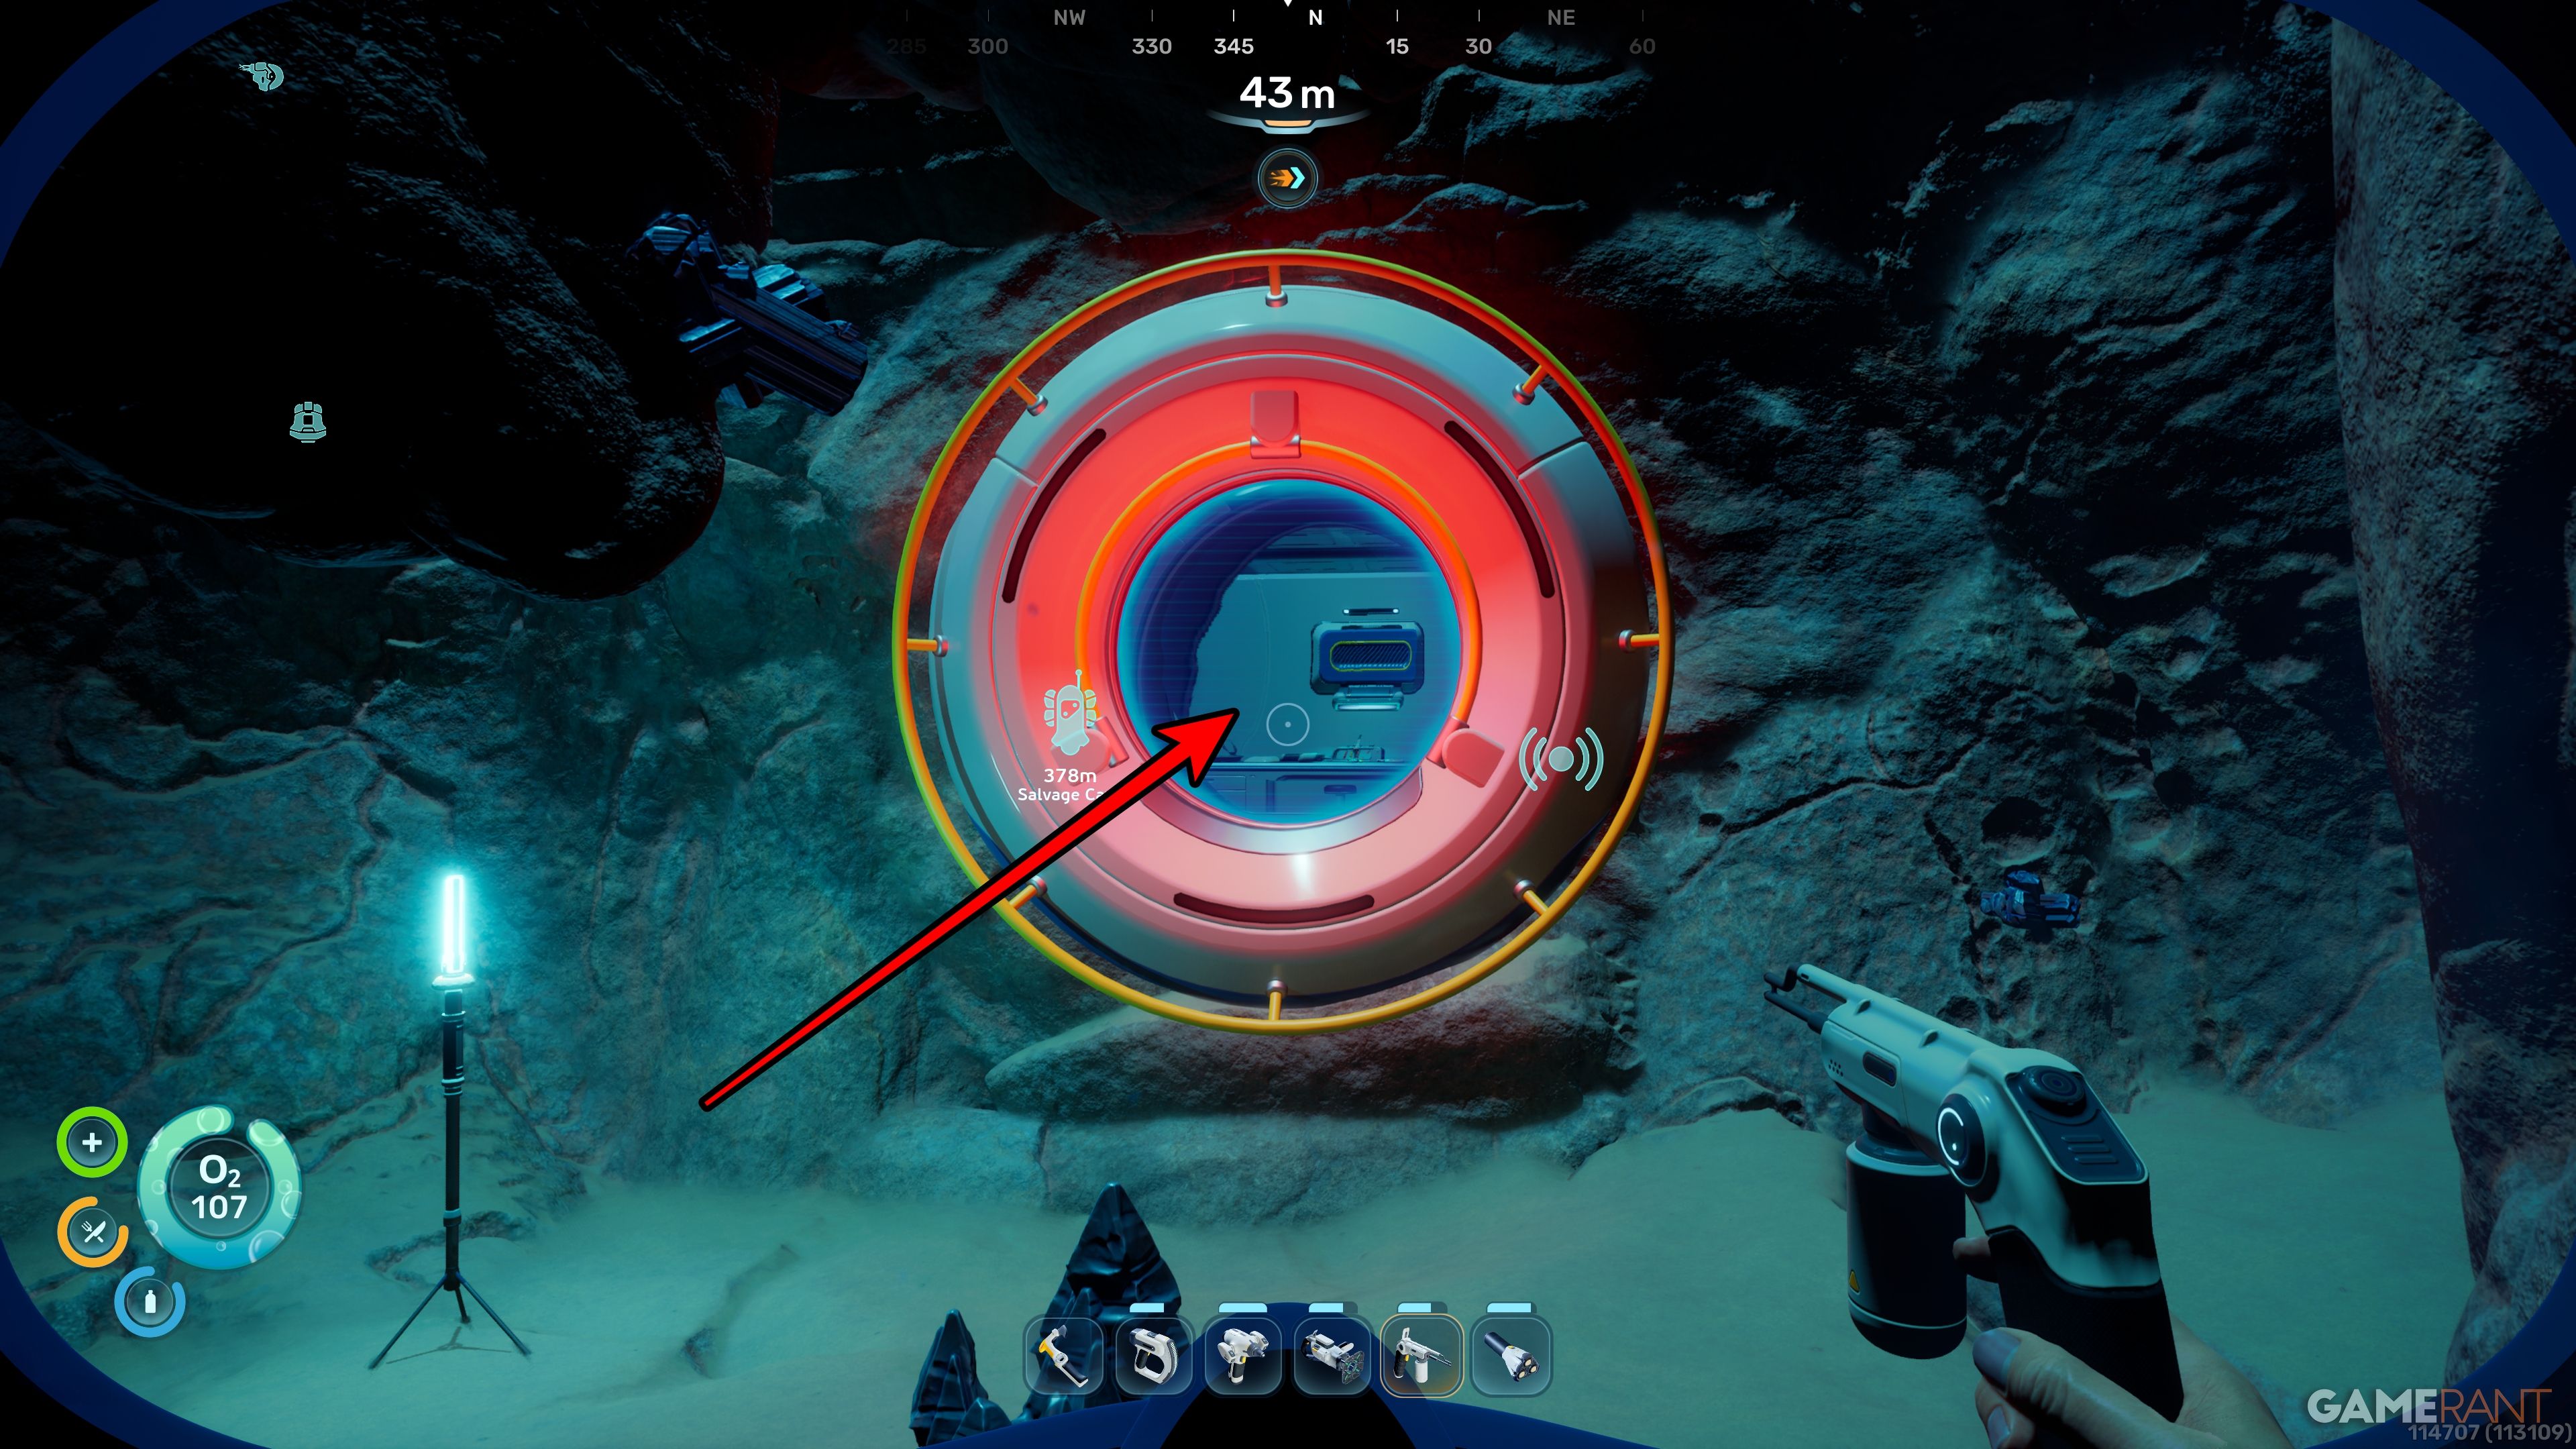
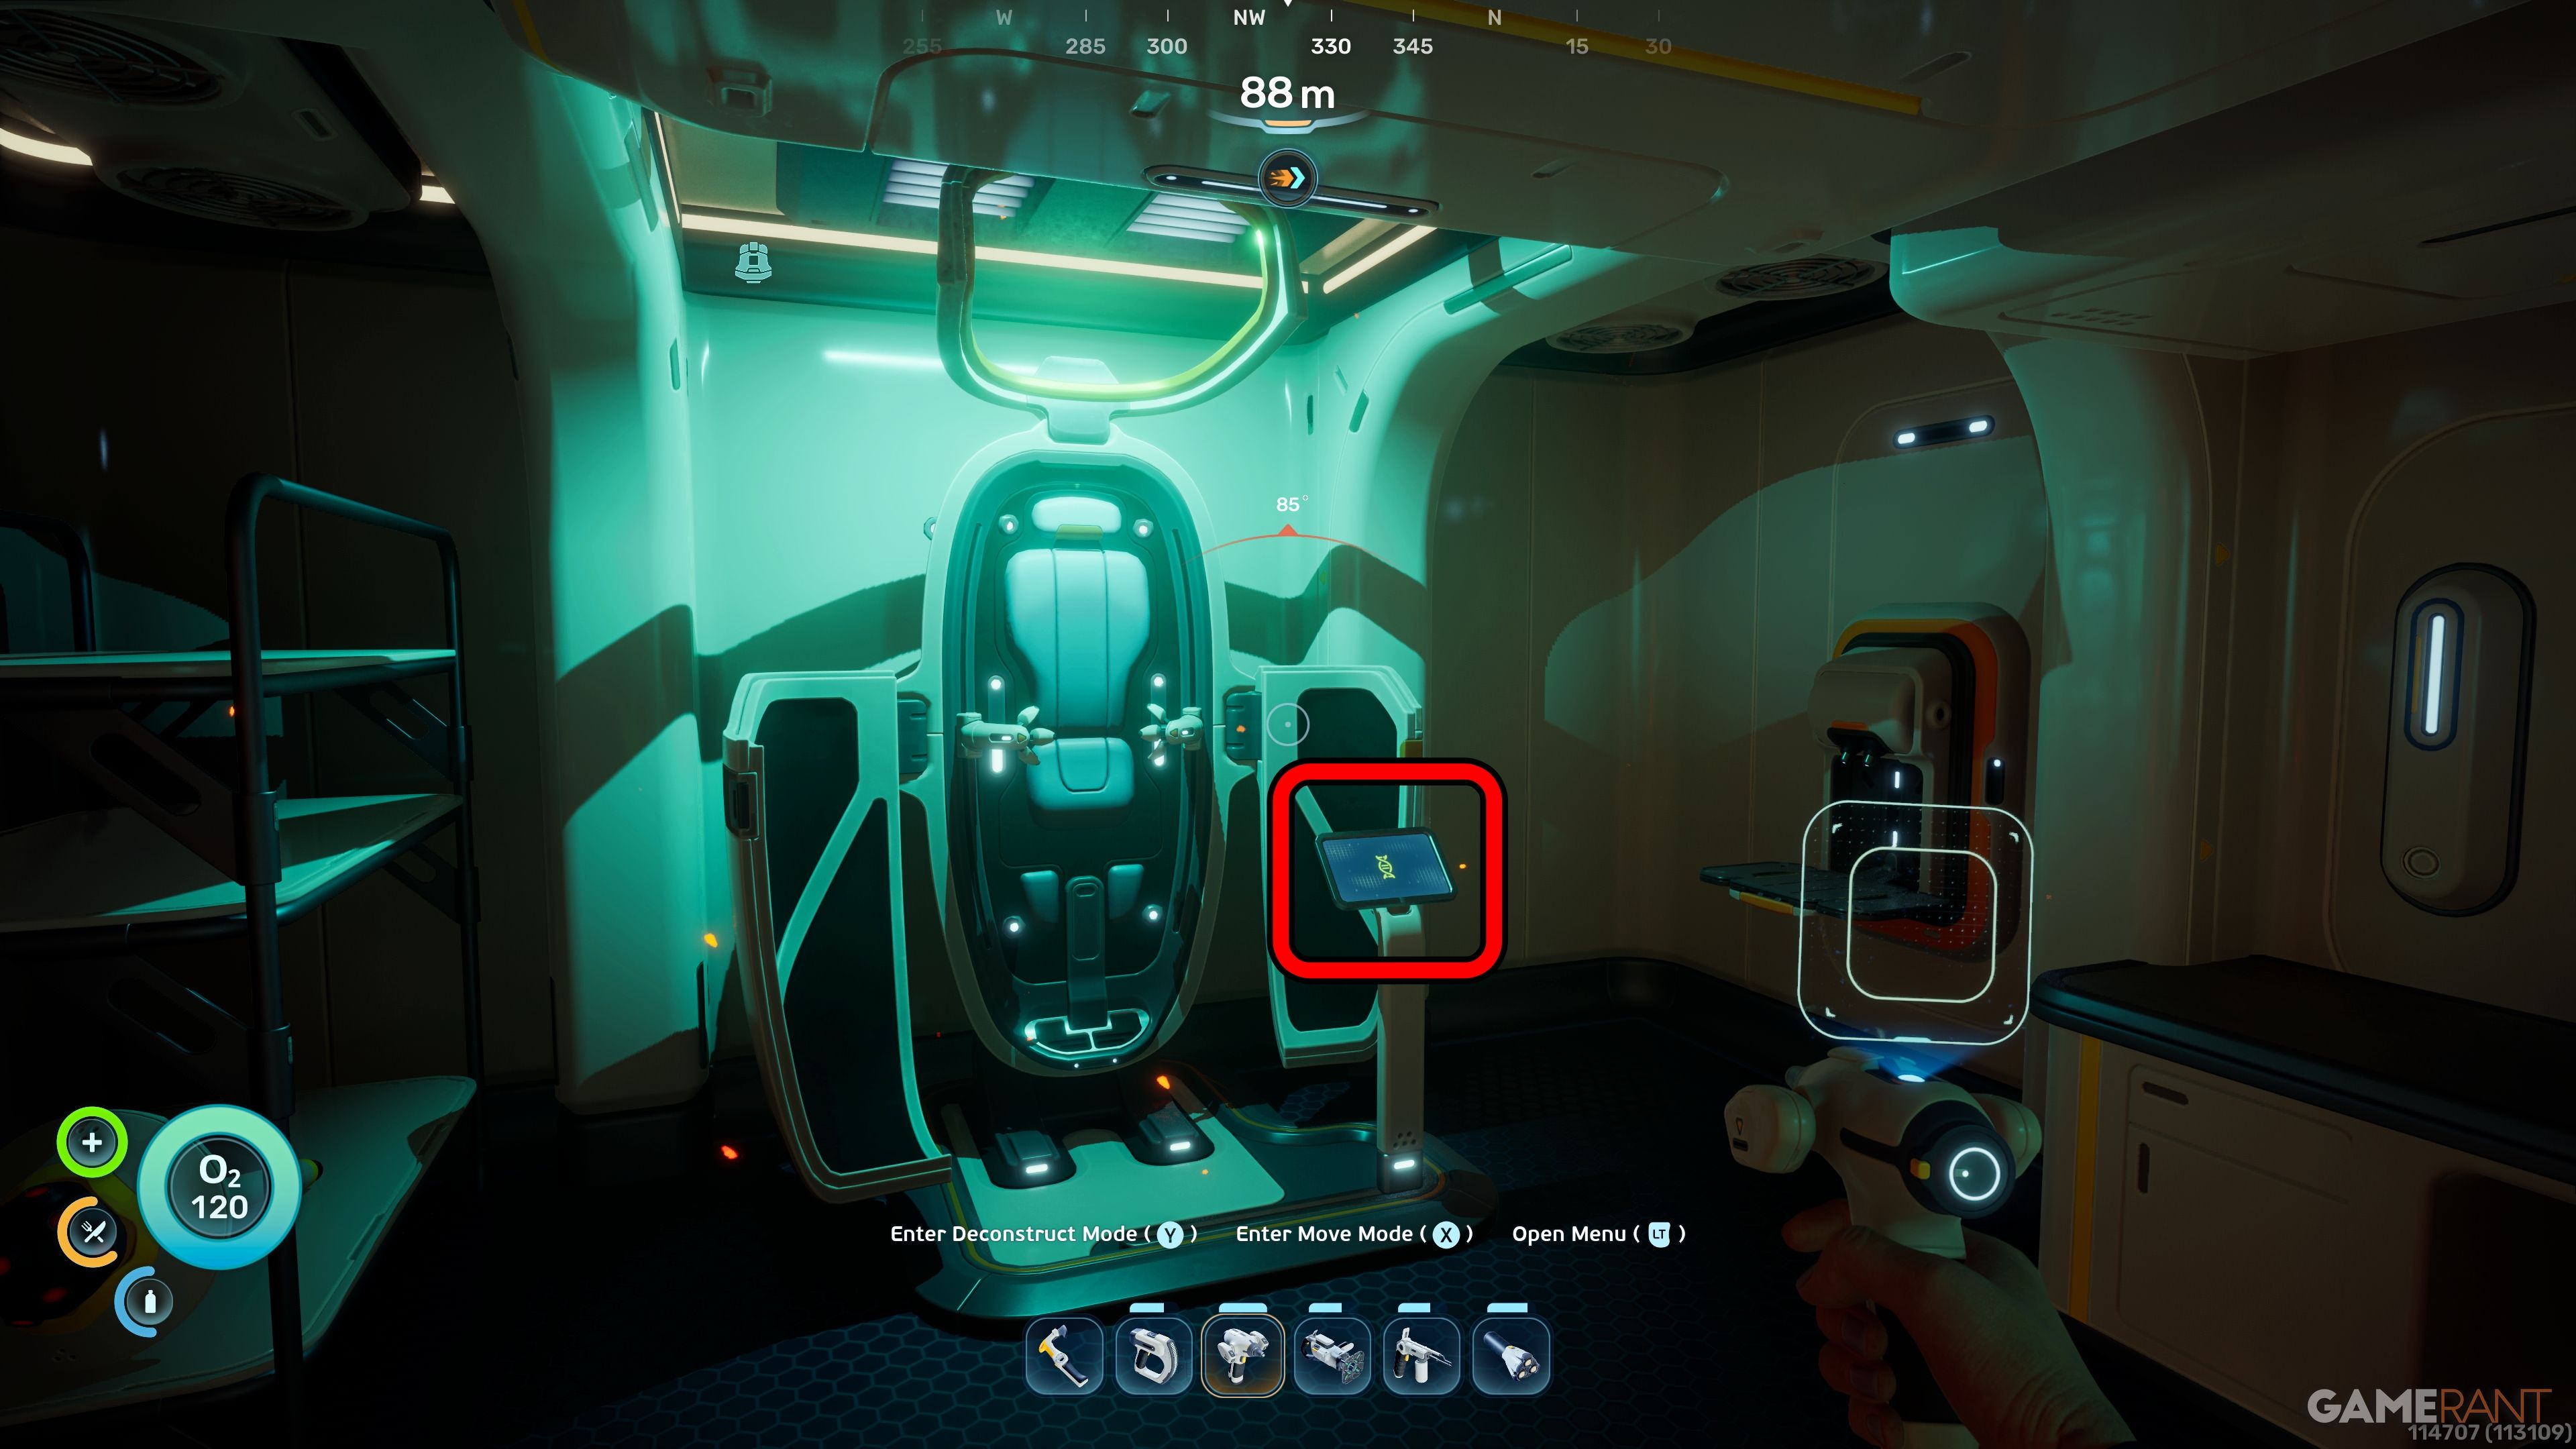
Go into the cave and descend around 70 meters. Then, turn northwest and enter the next room. While walking through the tunnel, check the left side – you’ll spot a light attached to a rocky shelf.

The entrance to the Salvage bunker is just below the ledge.
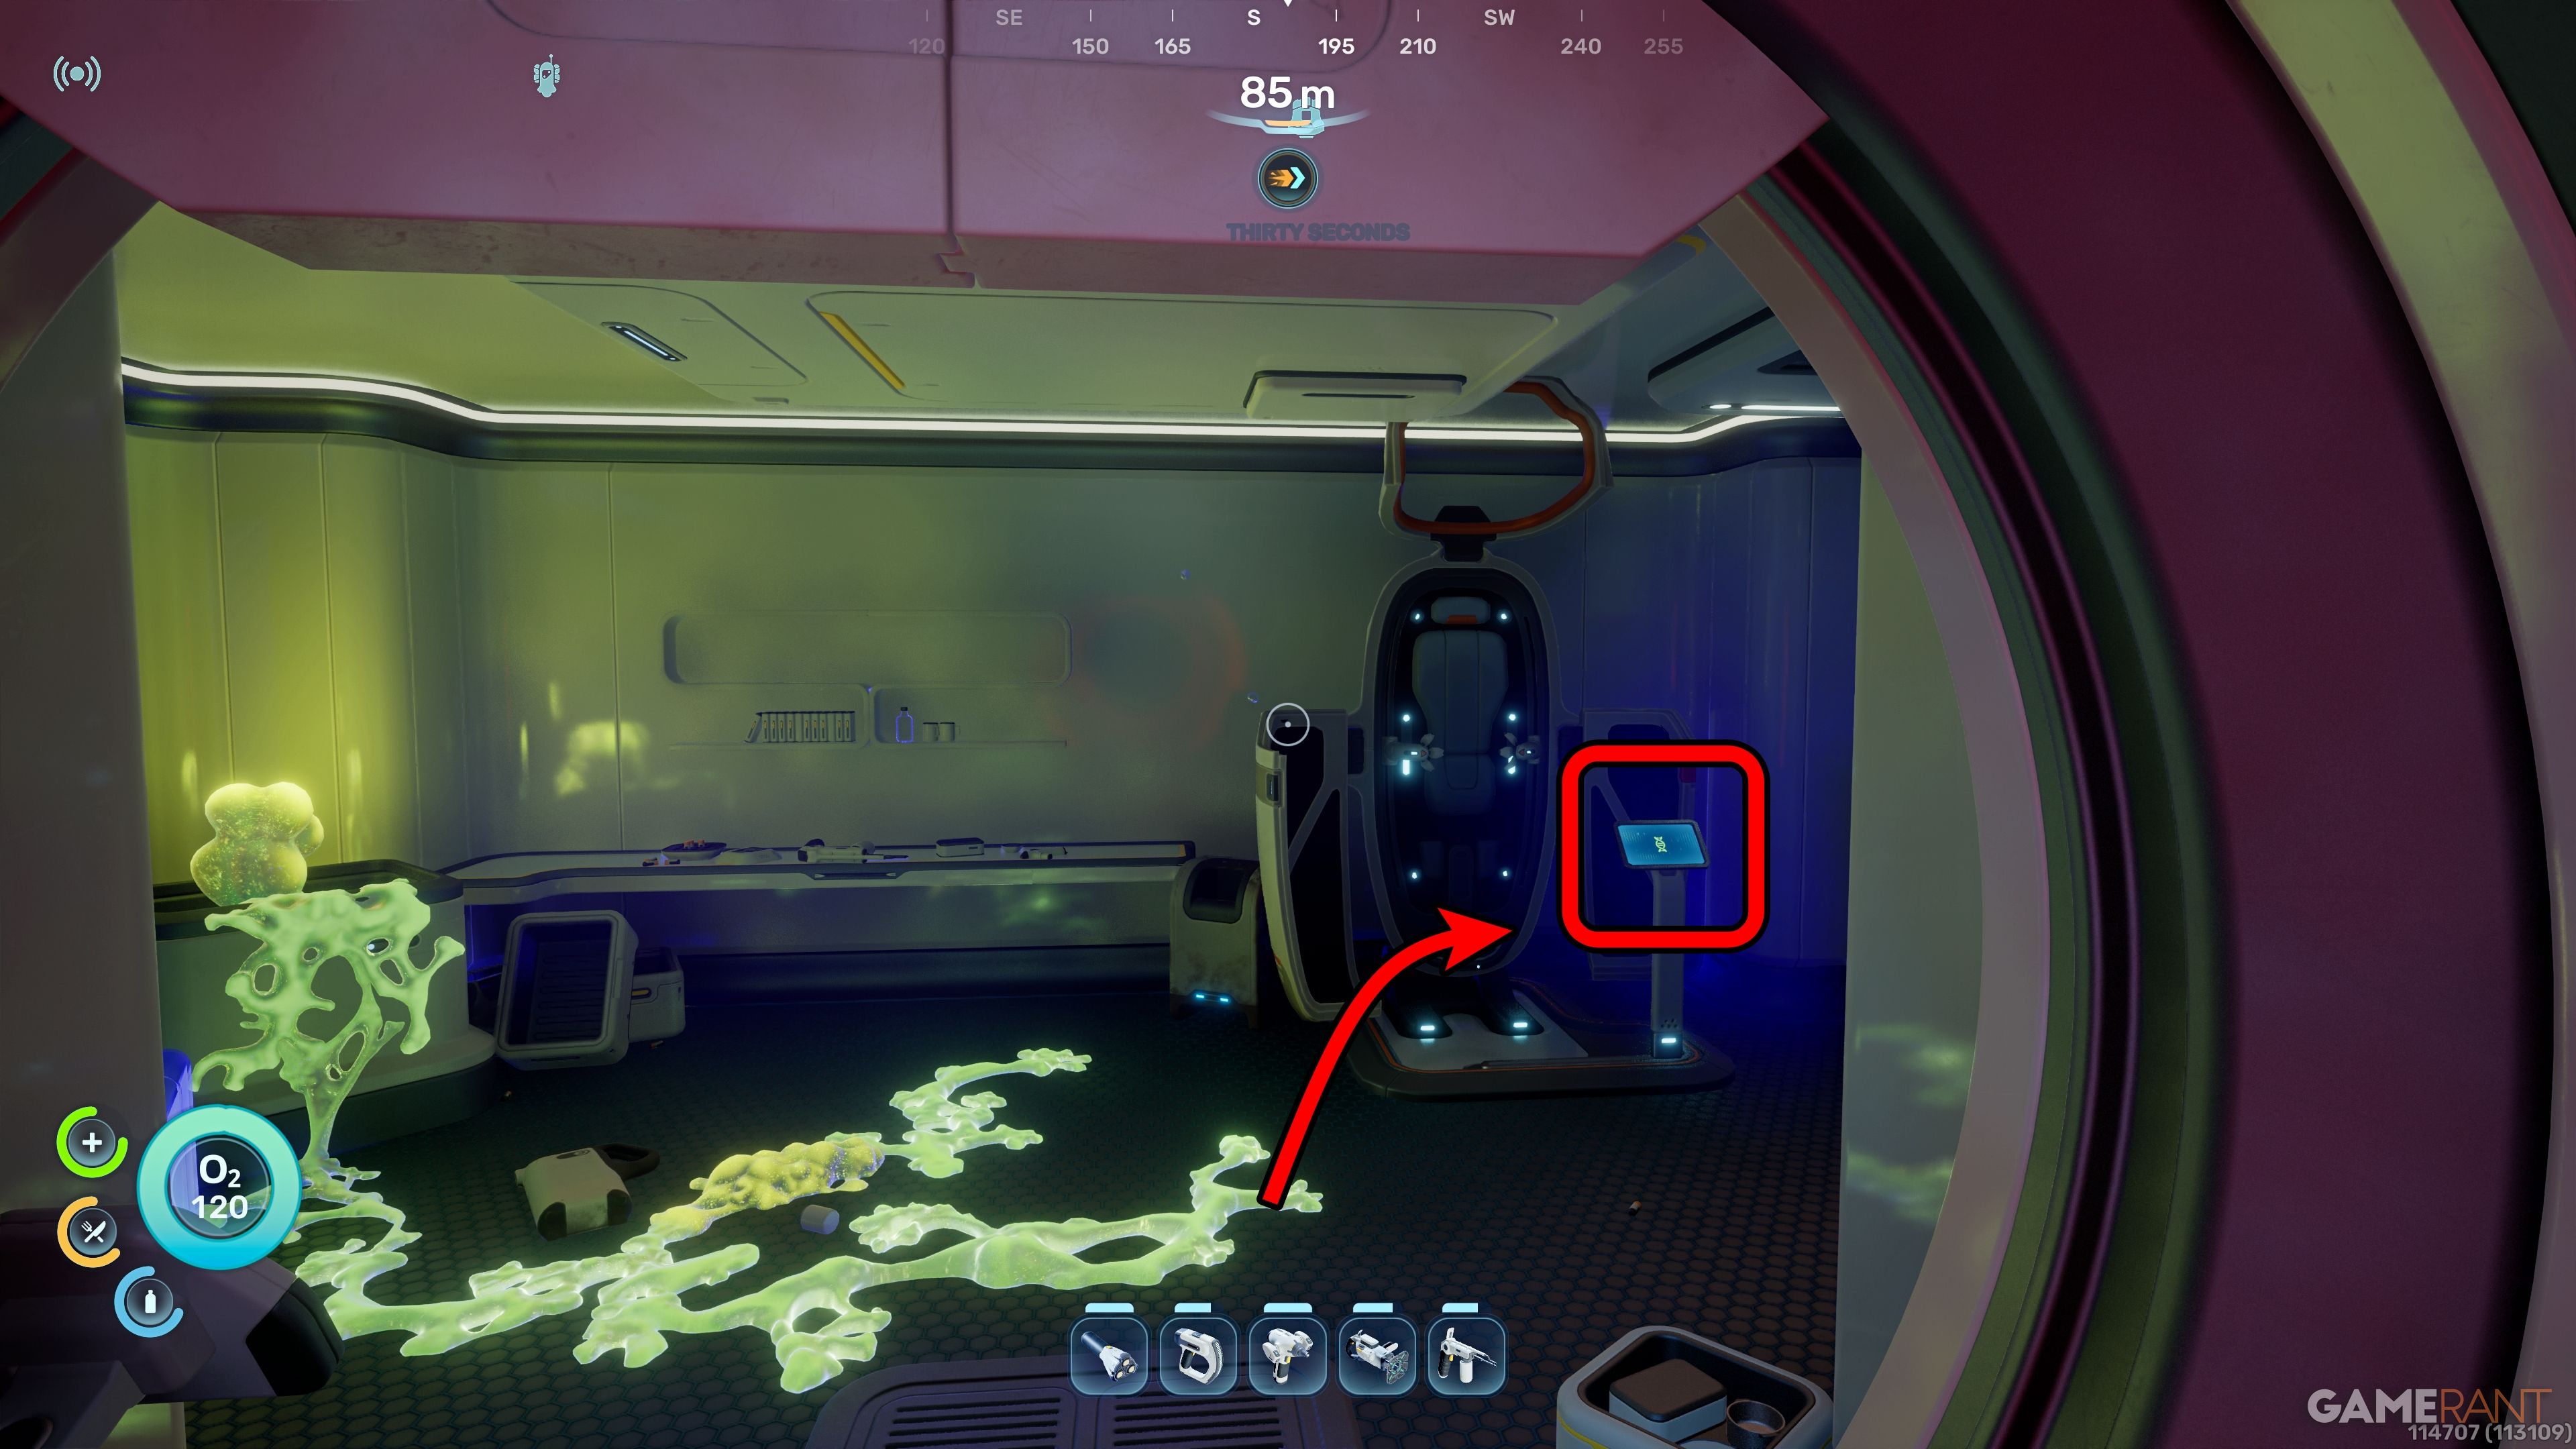
Enter the habitat, and you’ll see the Biobed, which provides an additional Quickbar slot.
Biobed Inventory Expansion 4 – Unauthorized Noa Modification Bunker (Great Jaw):
- Location: Colonist Bunker near the Great Jaw, 265m south-west of the Lifepod
- Depth: 85 meters
- Upgrade: Endurance – three additional basic inventory slots
This Biobed is much deeper than the ones you’ve seen before. You won’t have trouble with low oxygen levels right away, but it’s deep enough that quickly swimming back to the surface for air might not be possible in an emergency. Visiting with a Tadpole vehicle or the High Capacity Air Tank will make things much safer.
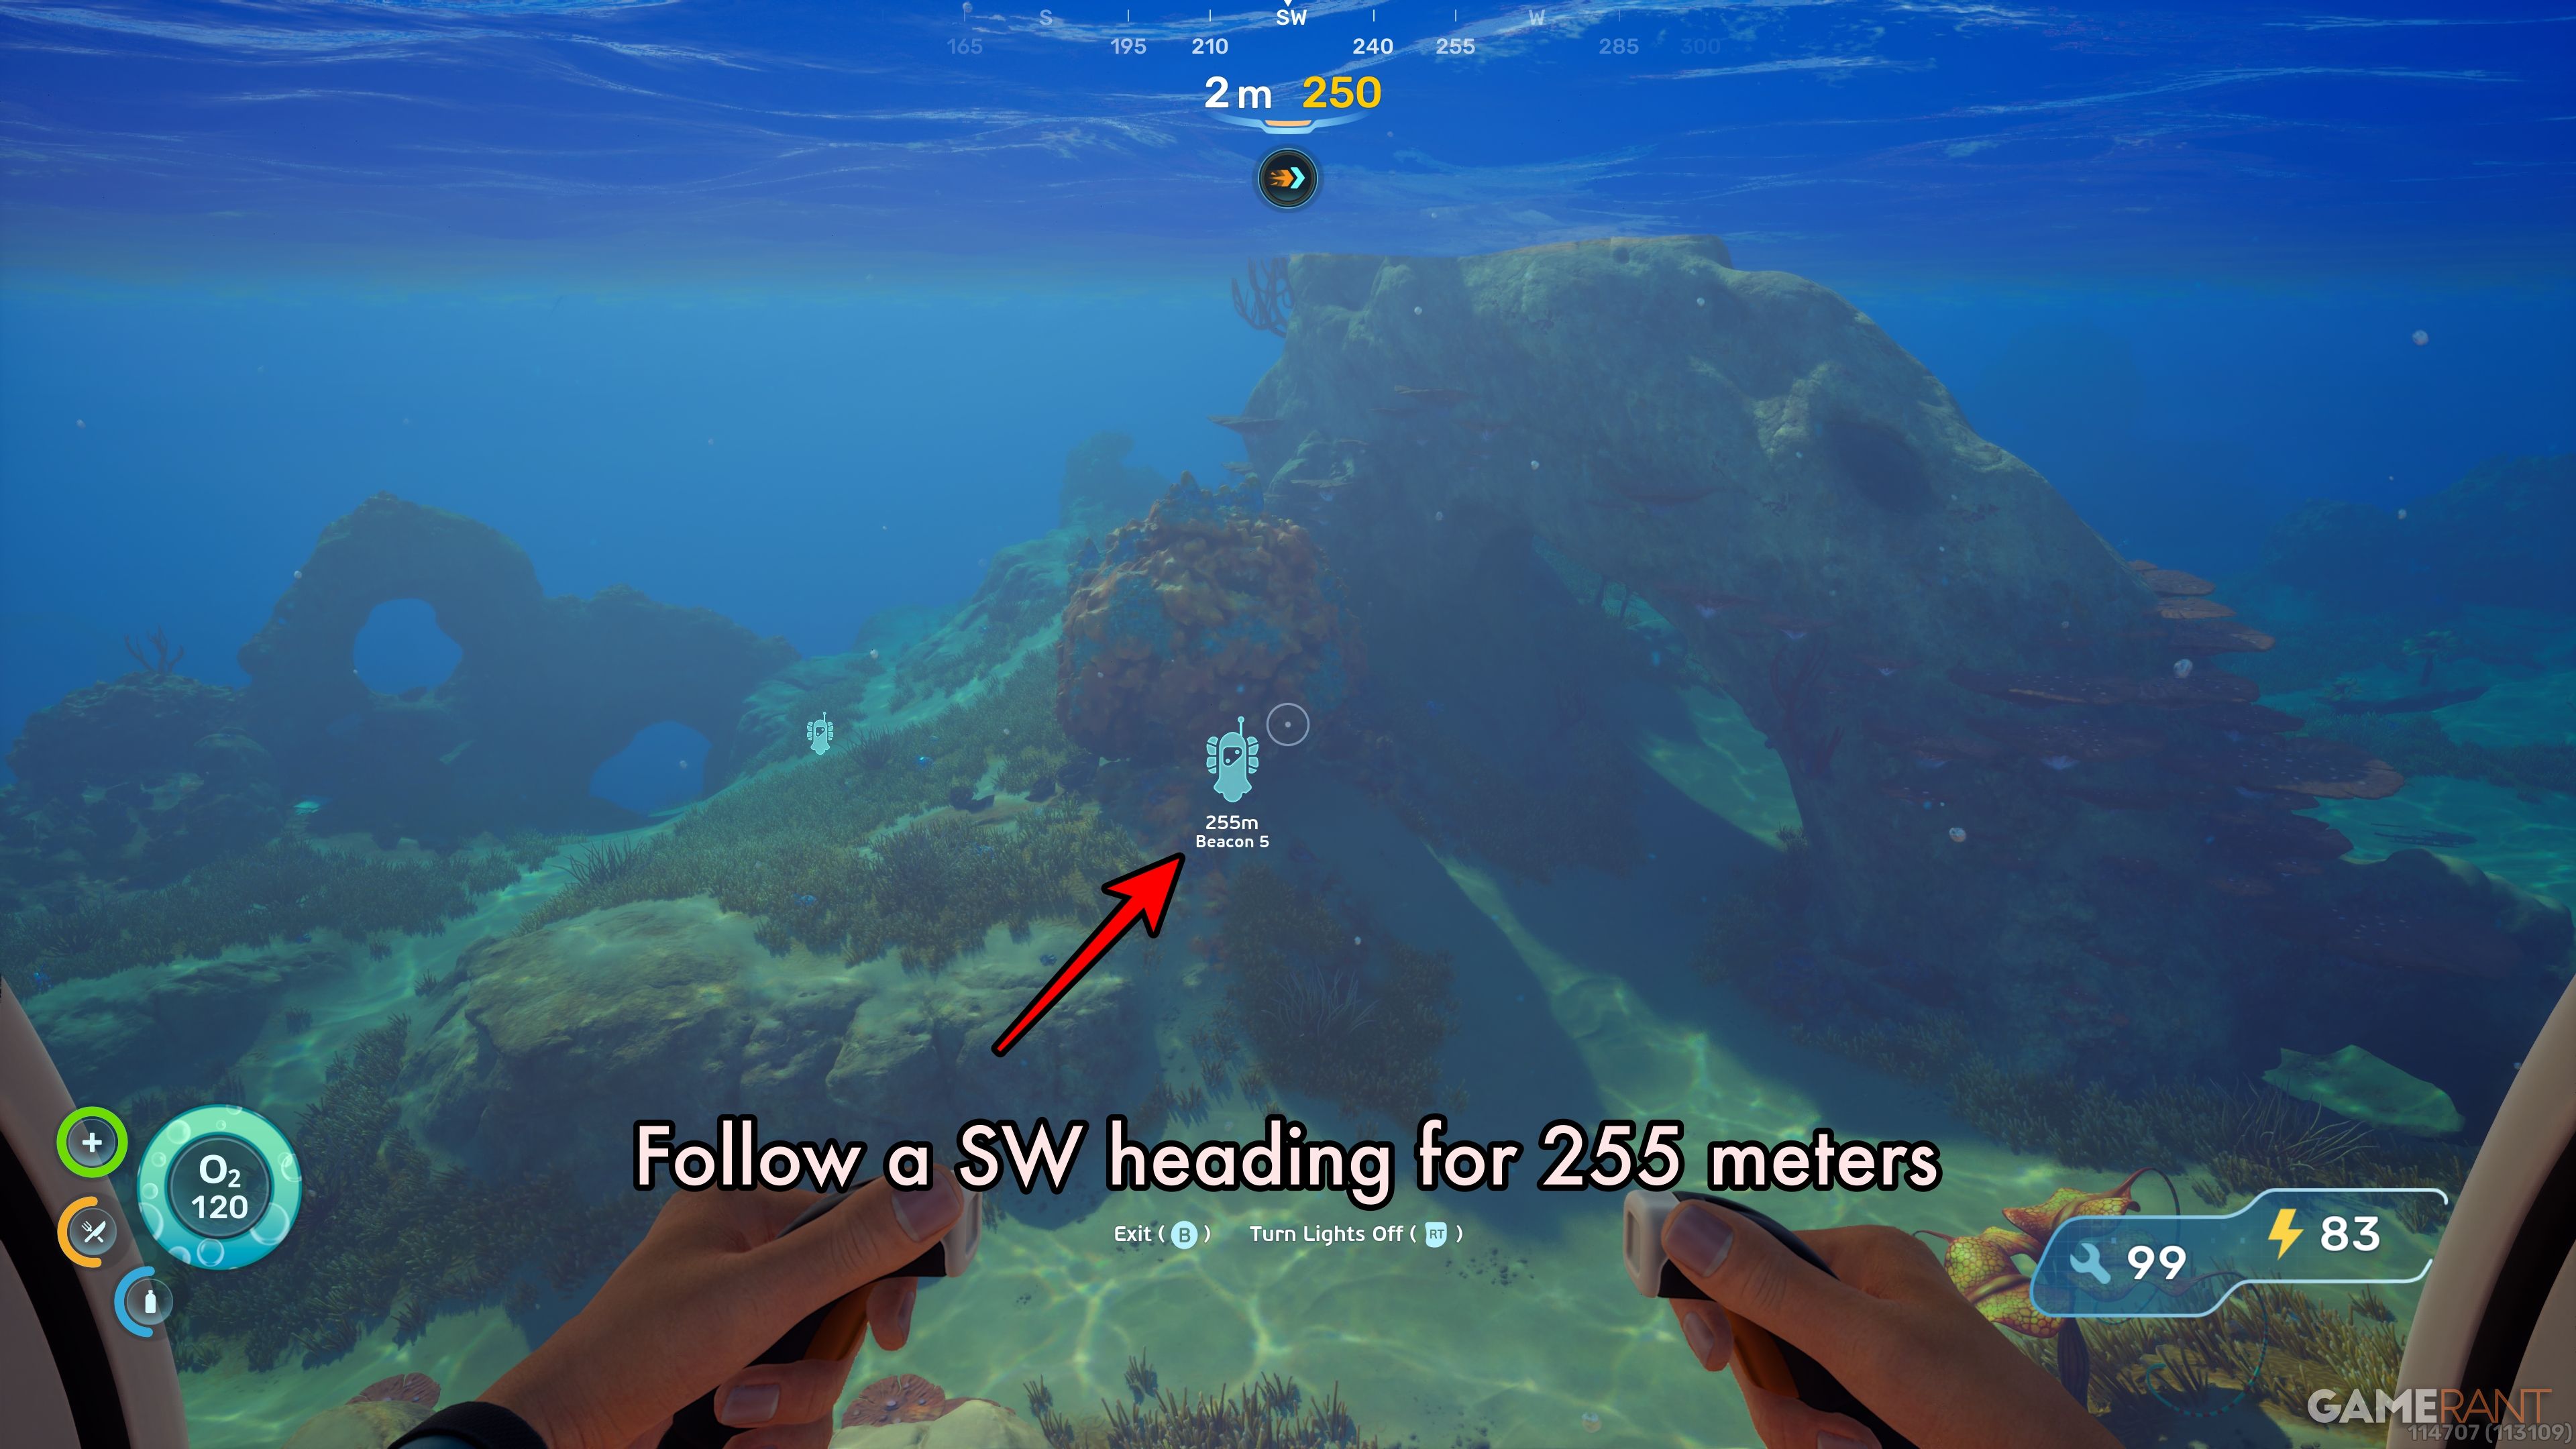
If you’re familiar with the Great Jaw Clam Leviathan – the large creature southwest of your Lifepod by about 350 meters – you’ll have a good idea of where to find this Biobed.
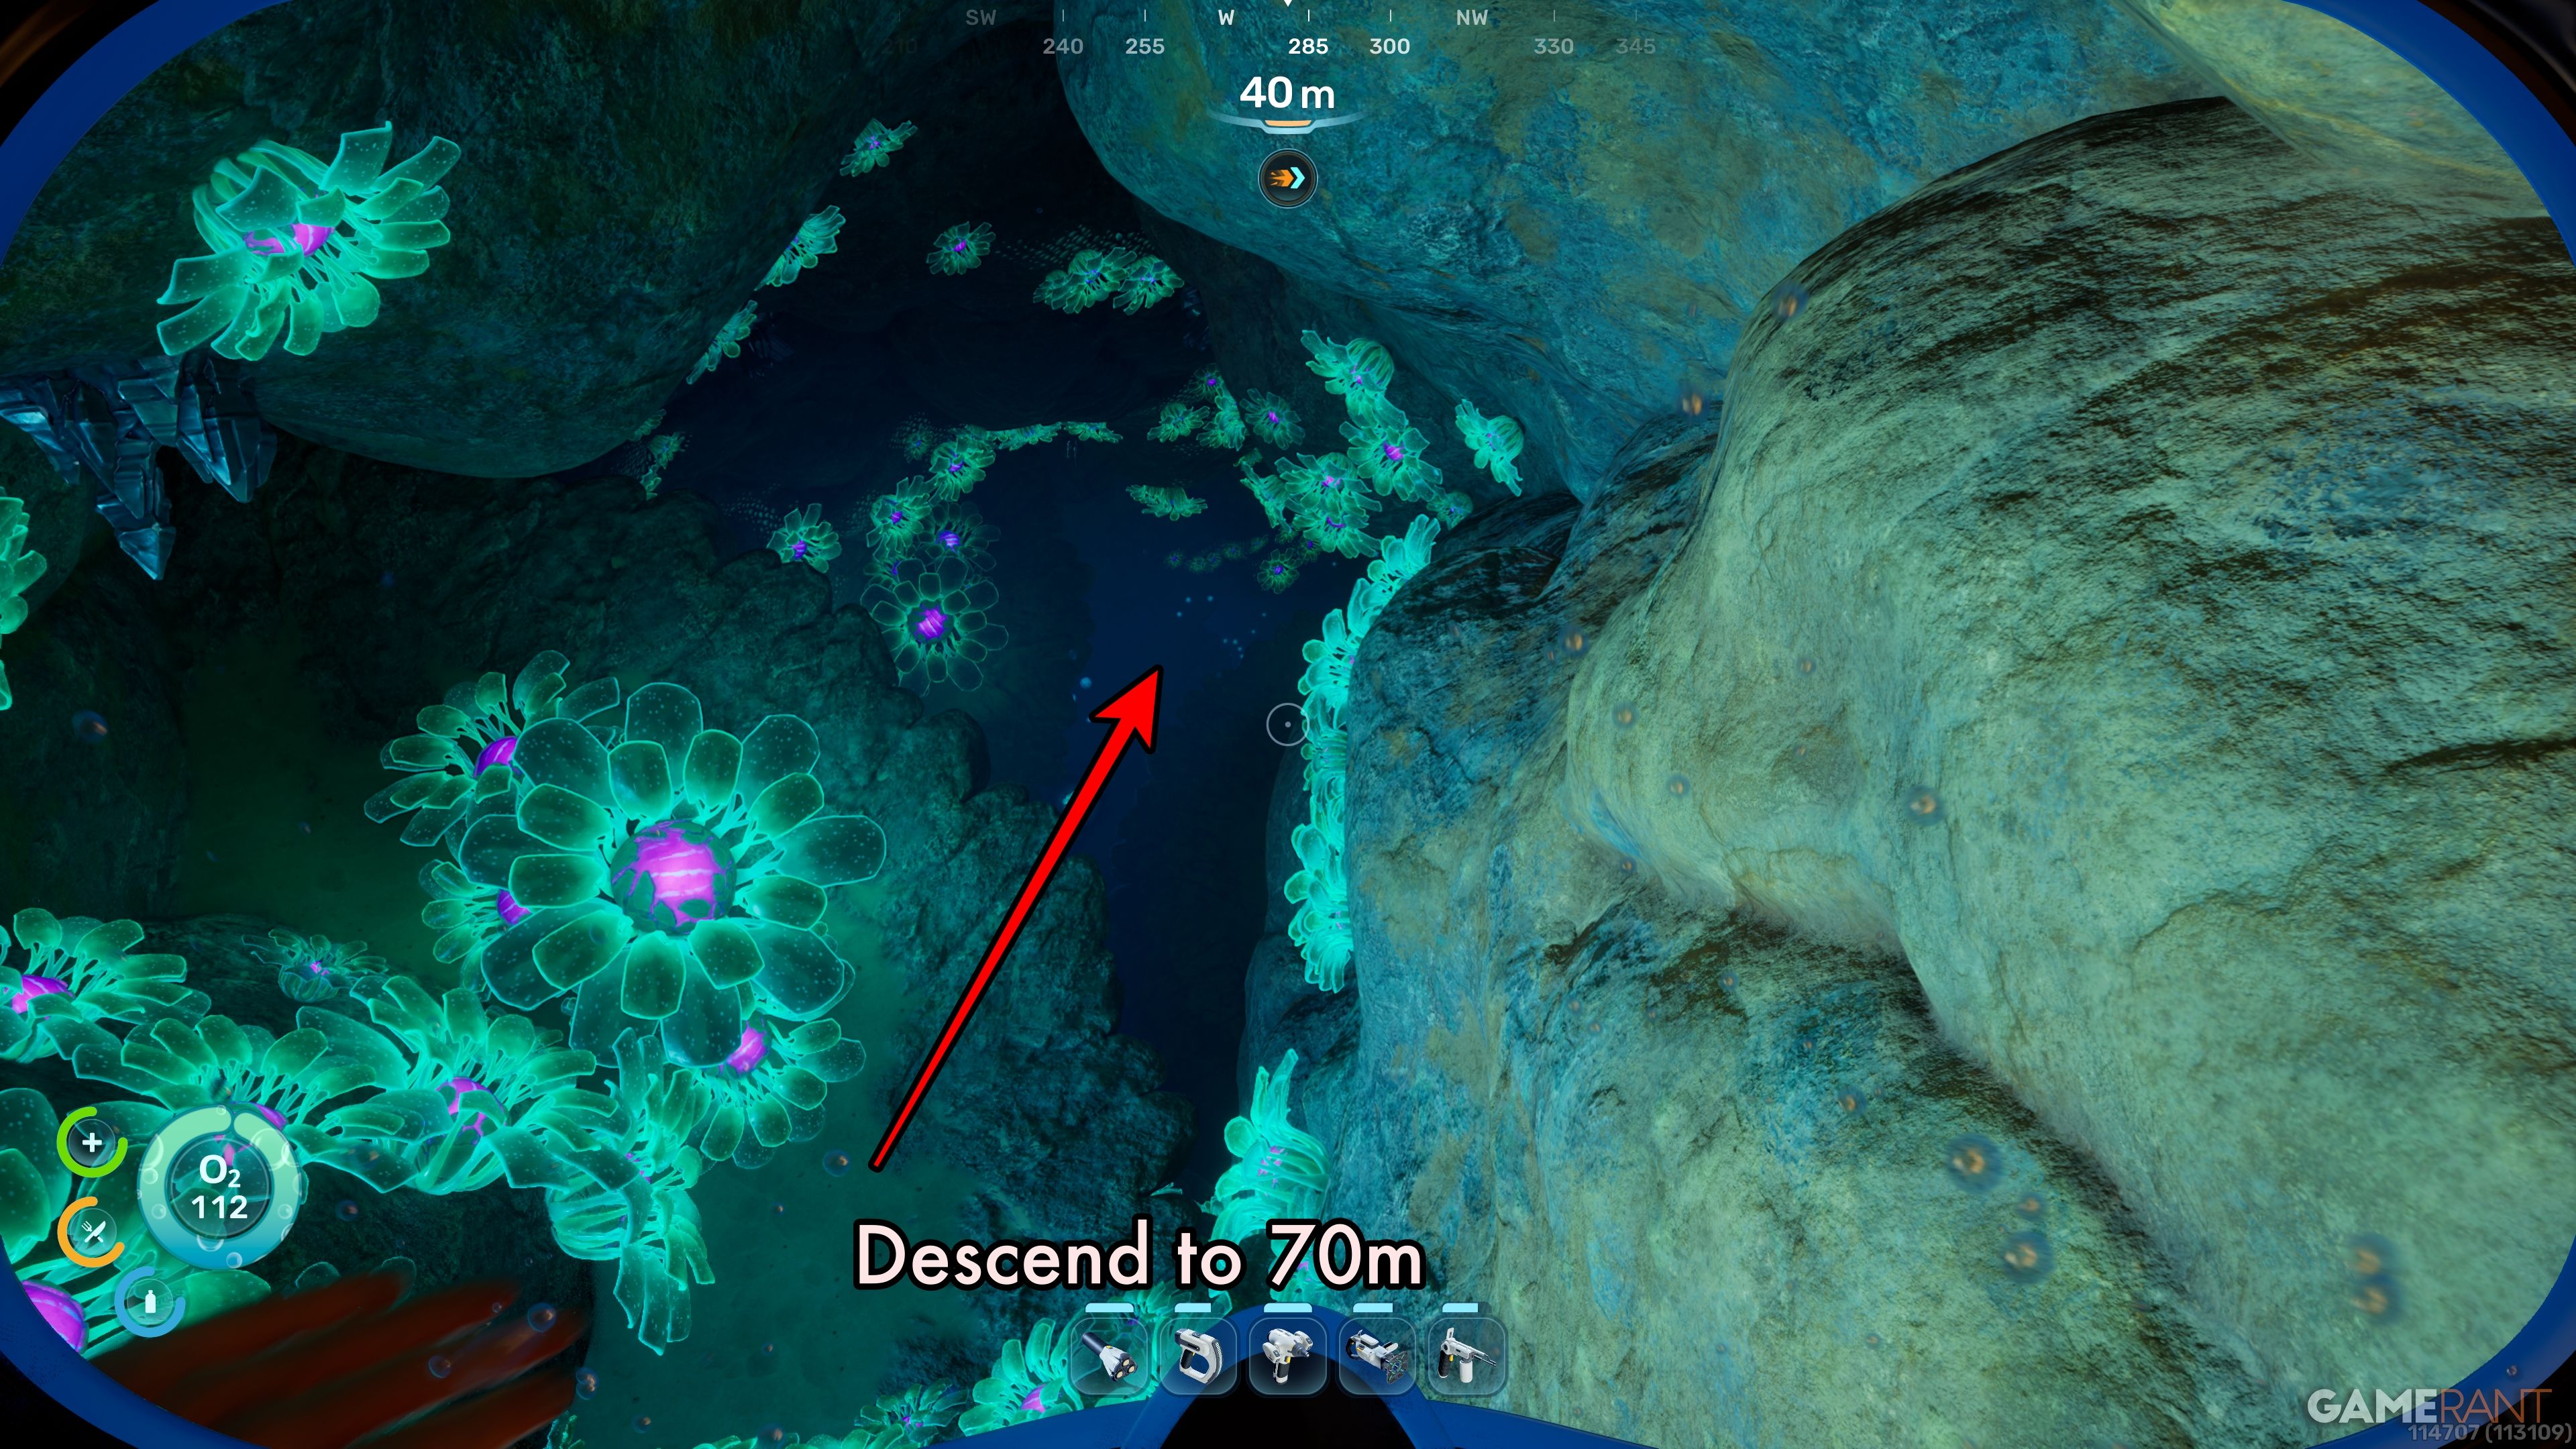
You can find it by traveling southwest from the Lifepod for about 255 meters, keeping a straight course.
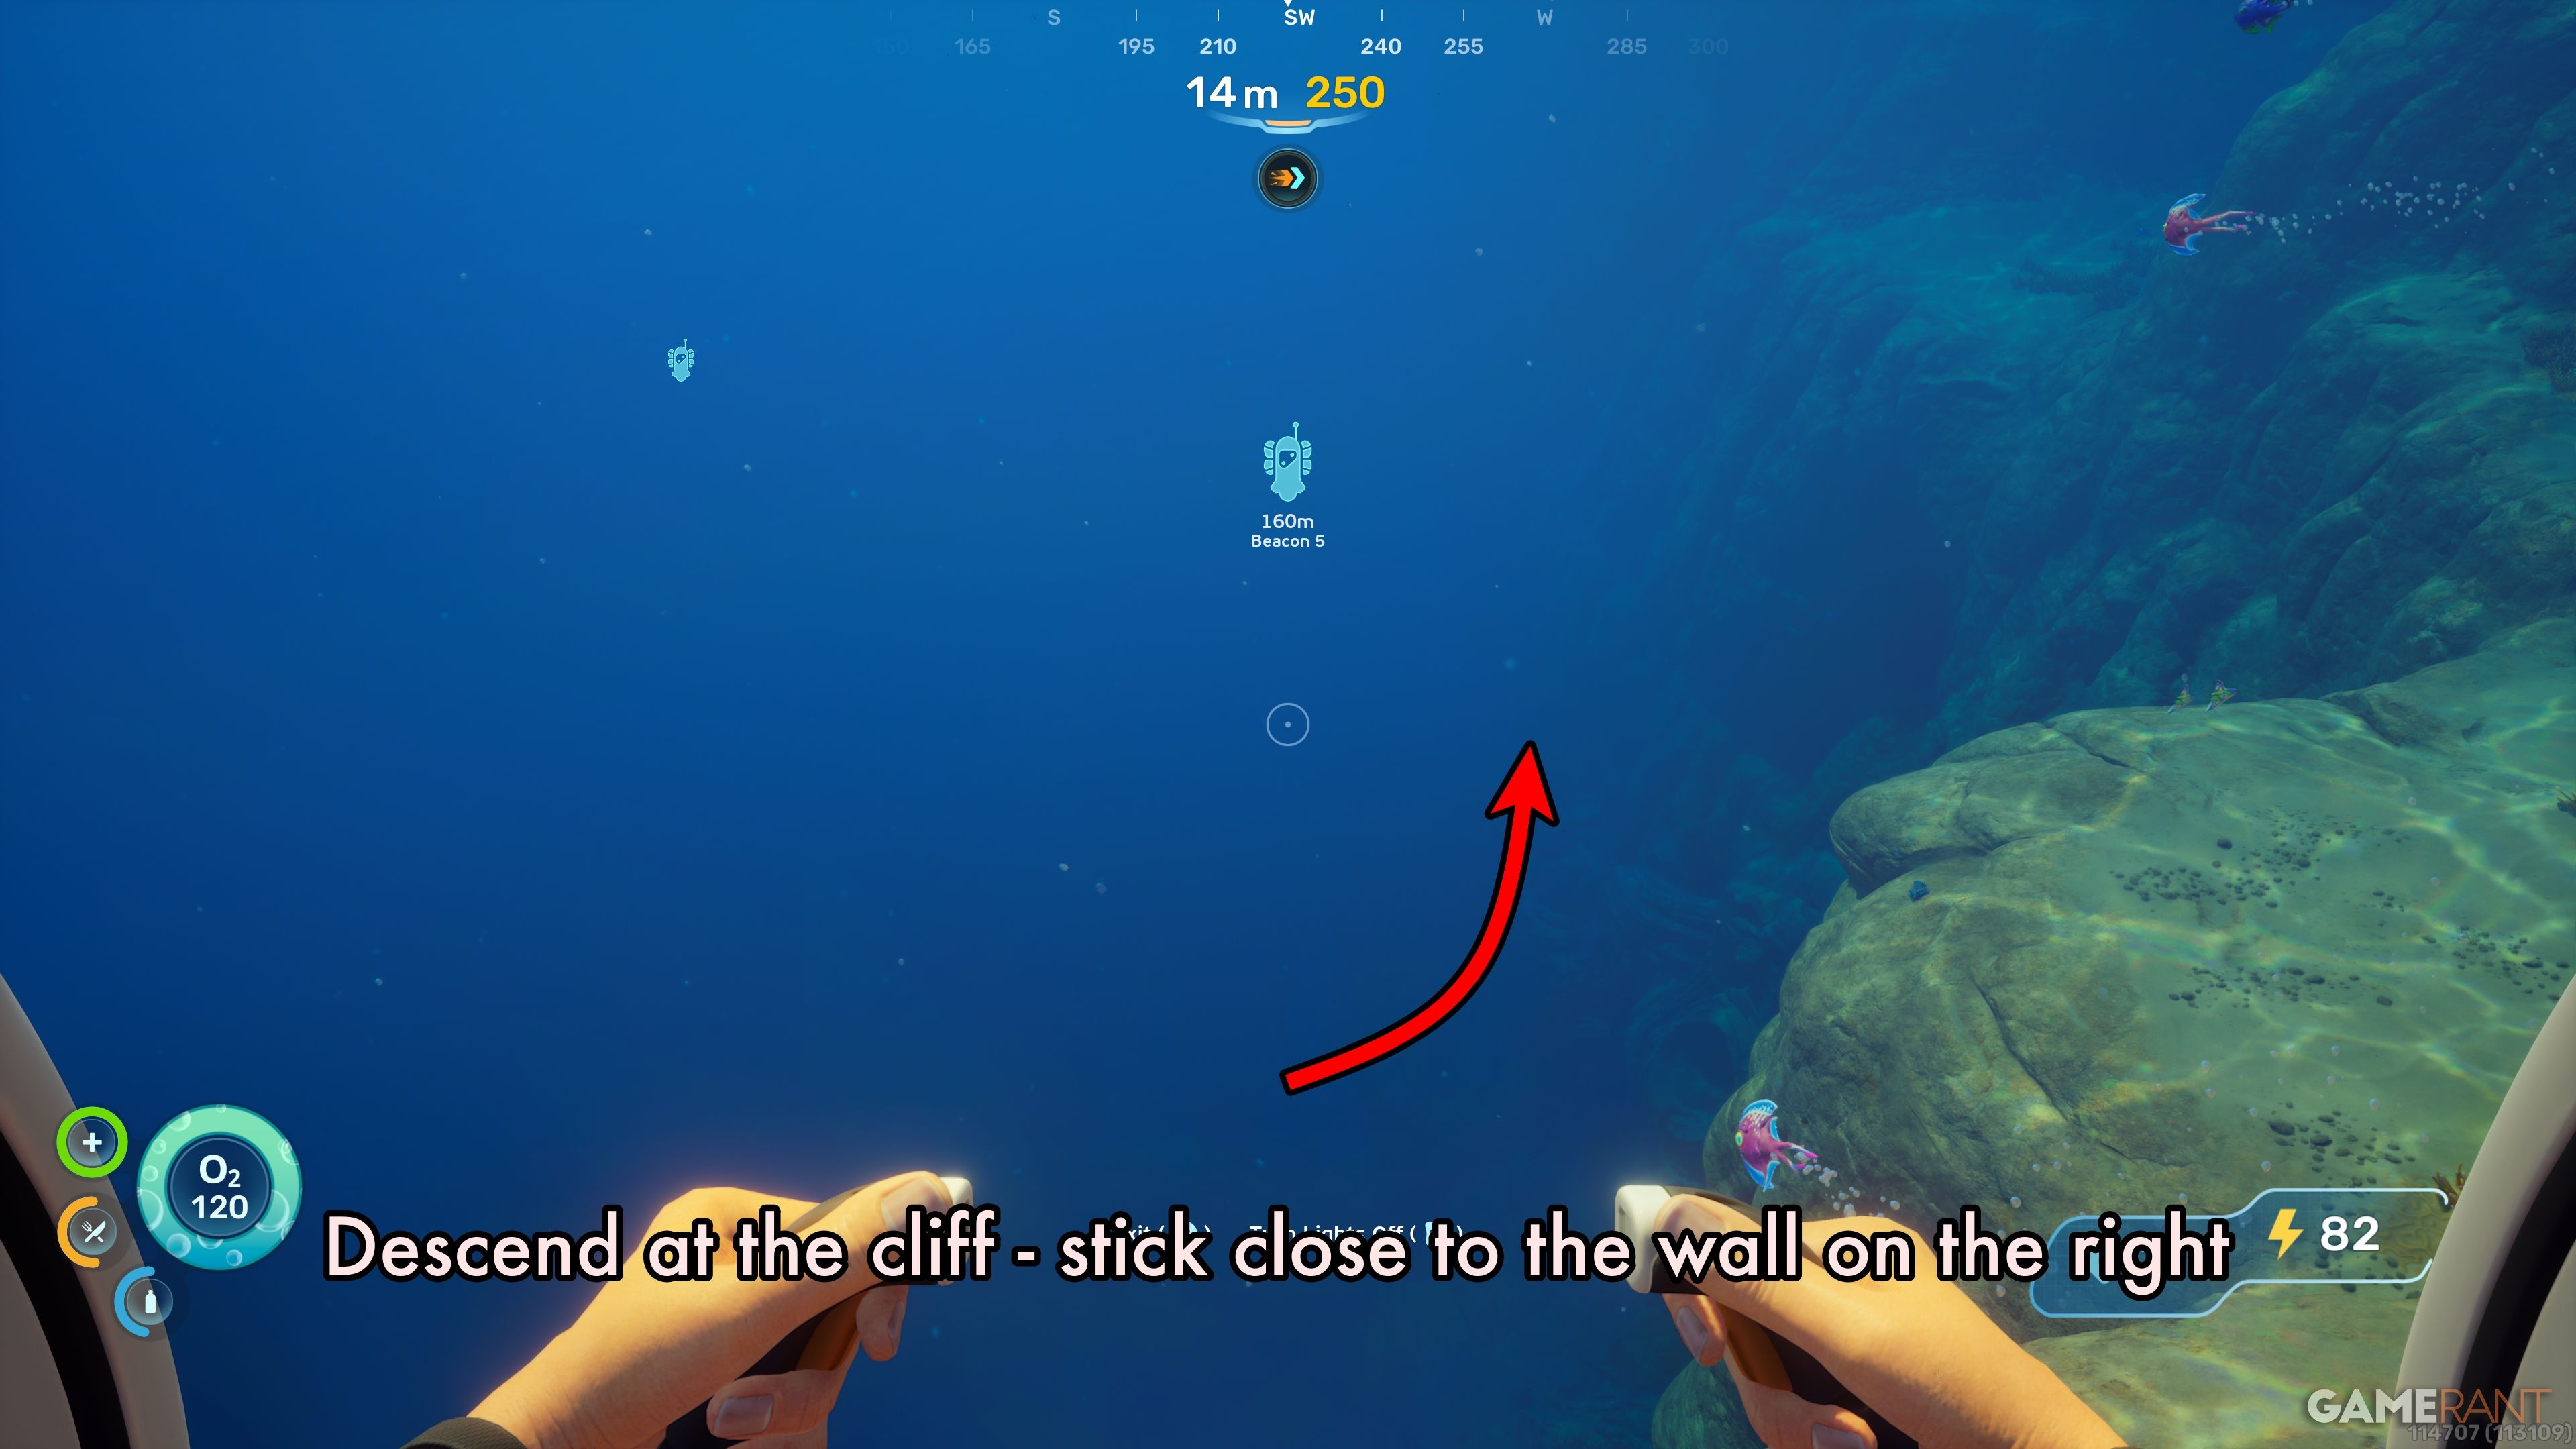
After about 100 meters, you’ll come to a cliff edge, which signals the end of the initial, shallow area.
As you go down, you’ll see a cliff wall on your right. You can use it as a guide to help you find your way.
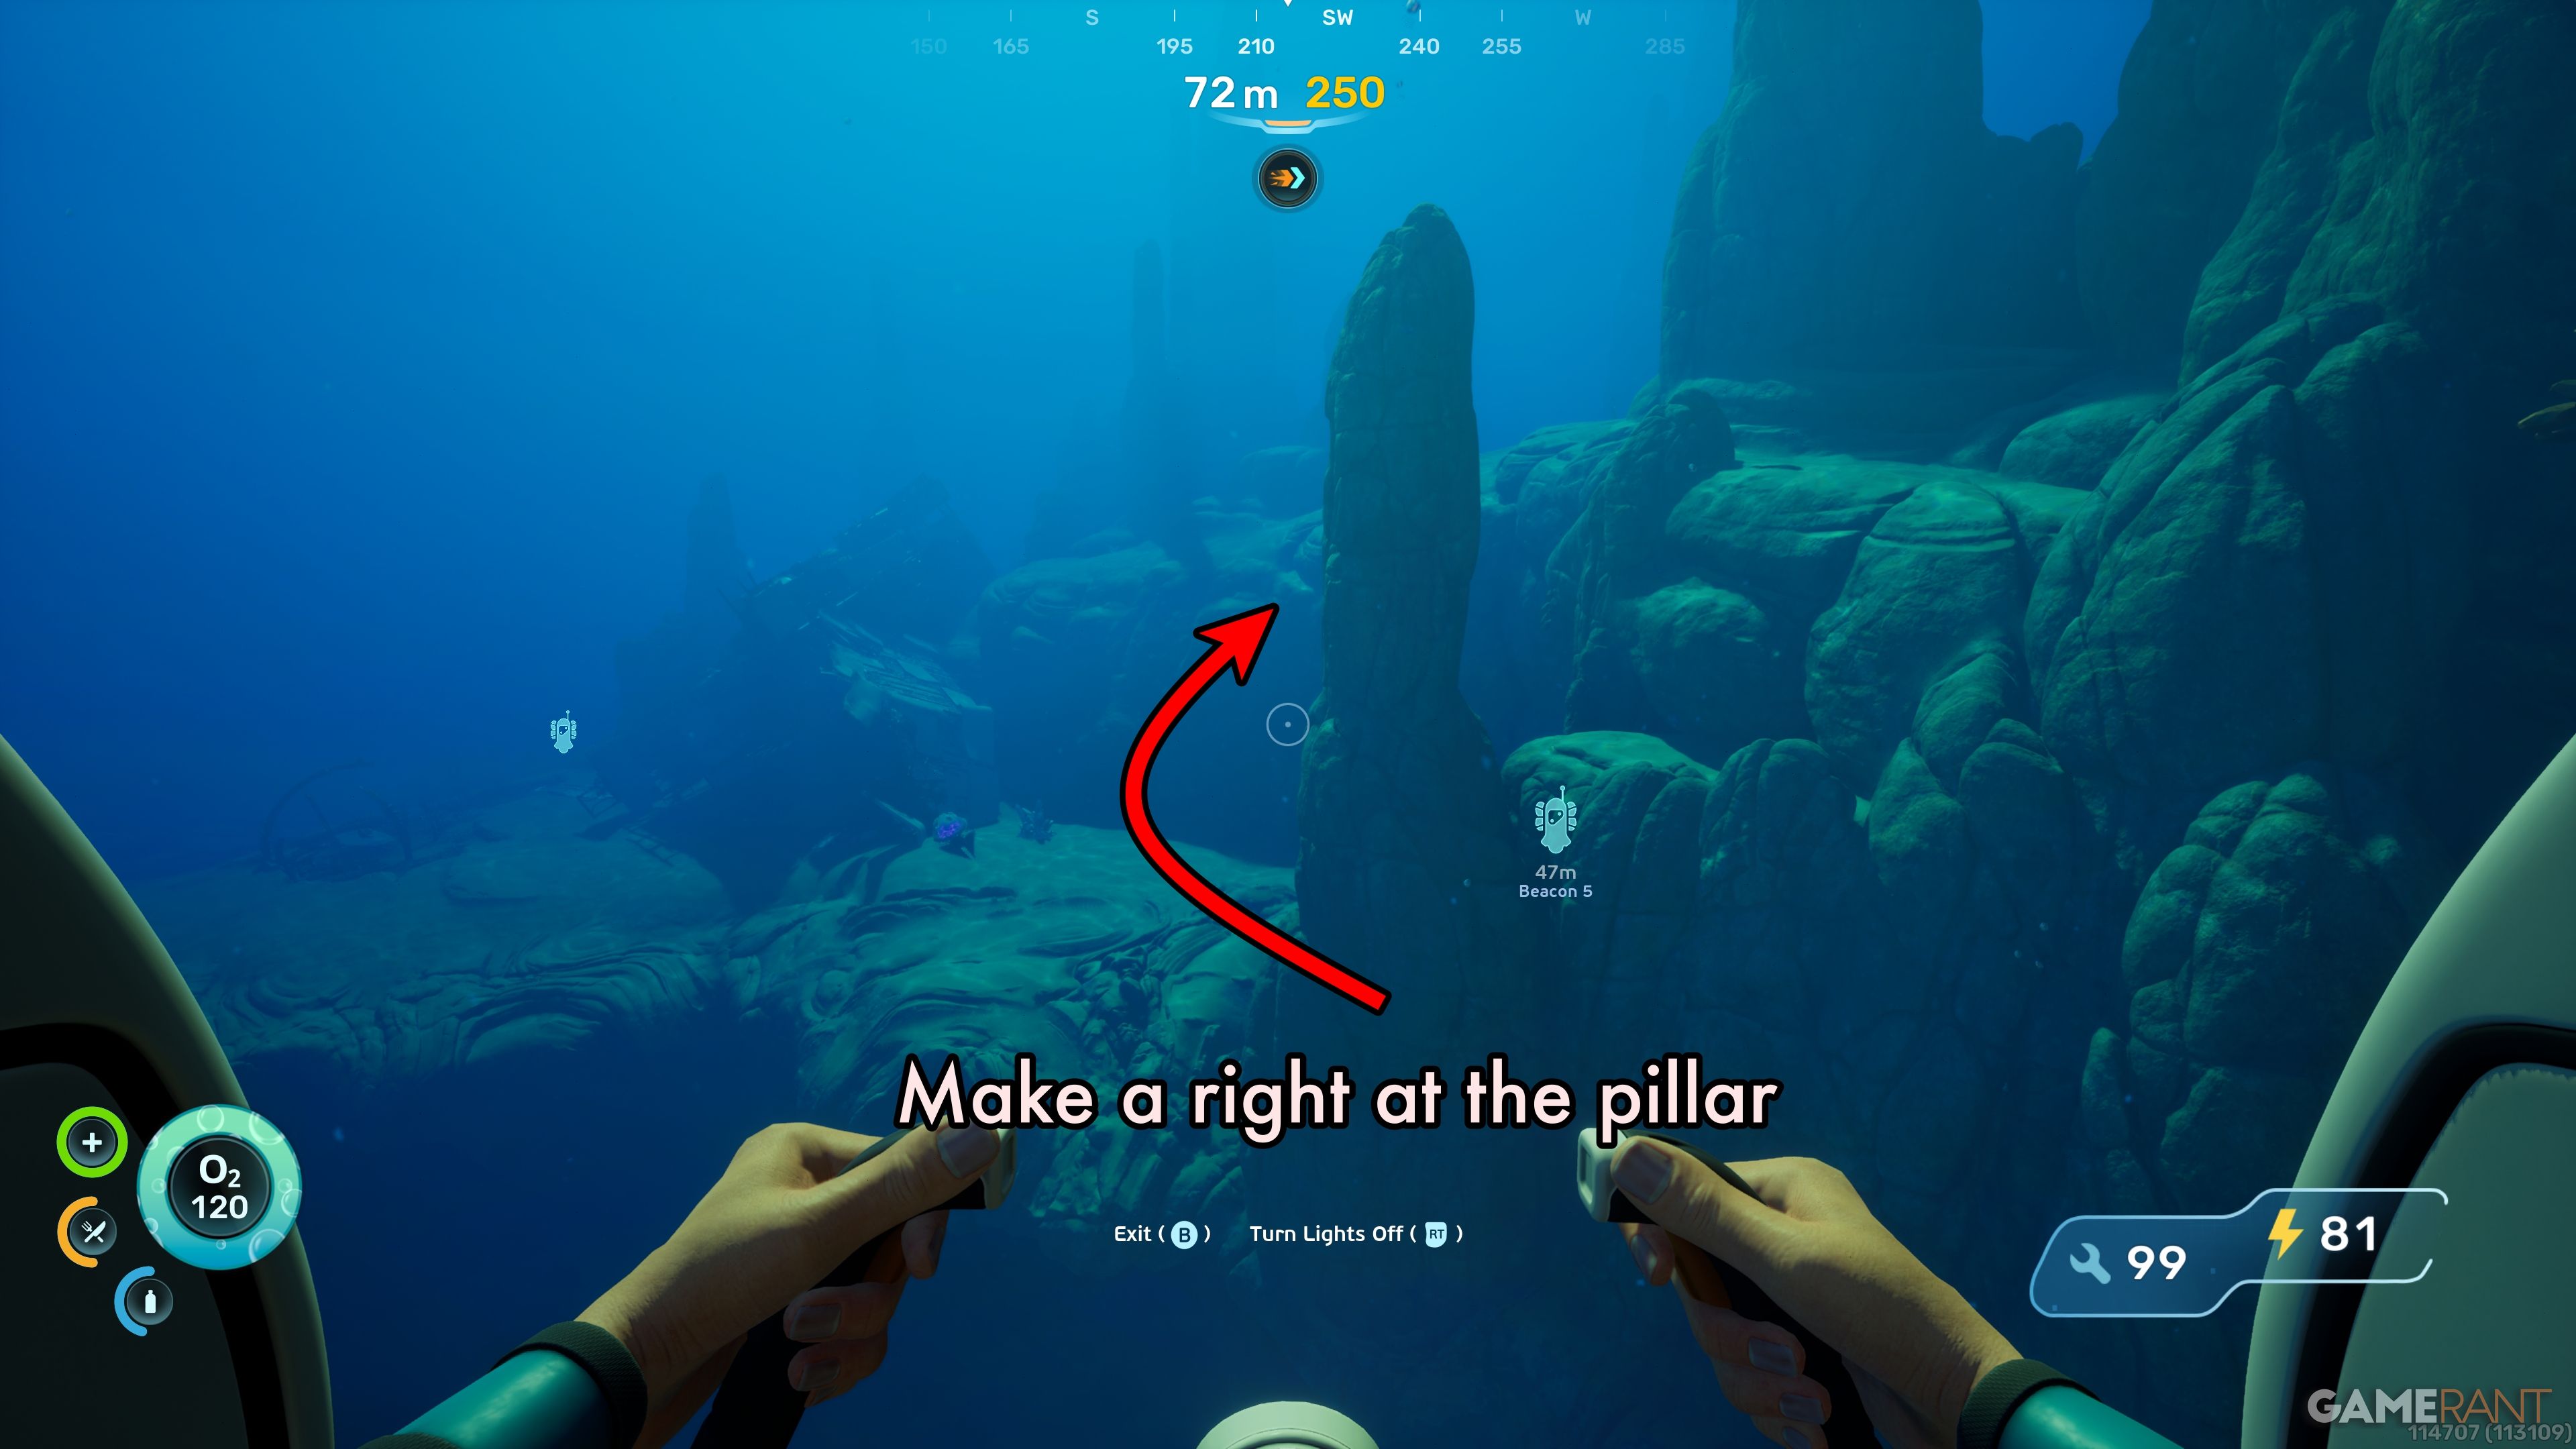
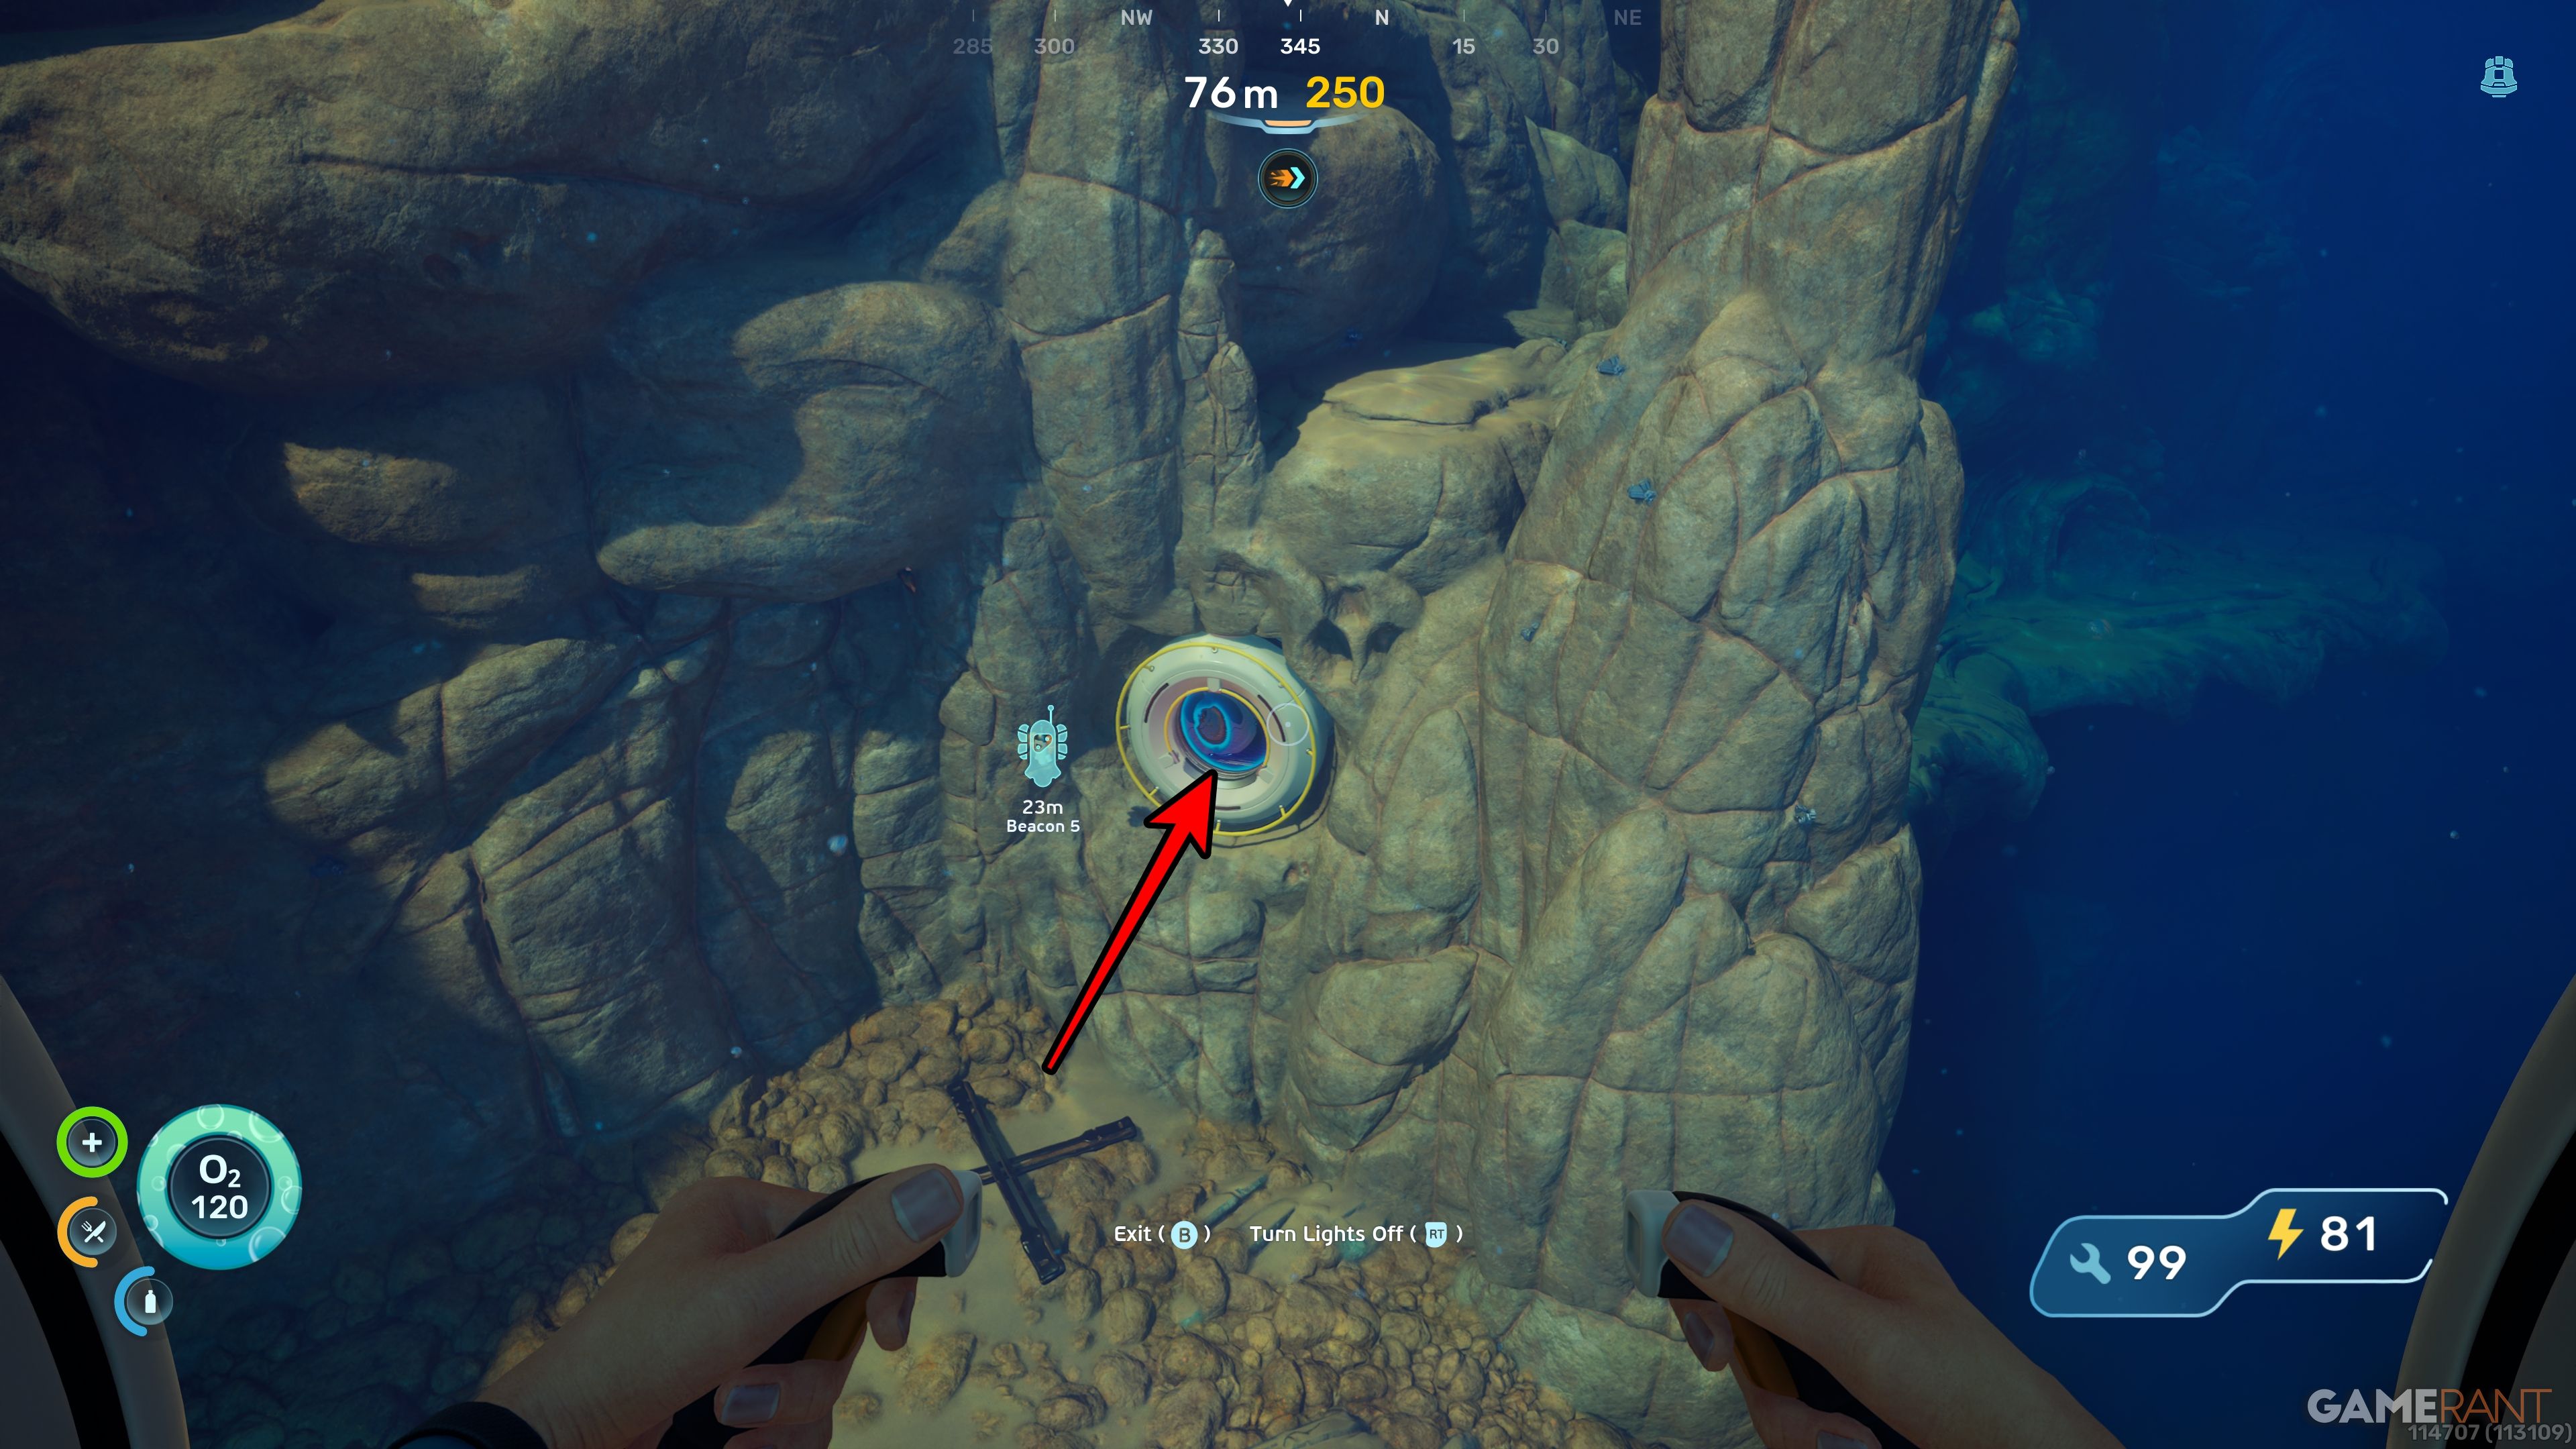
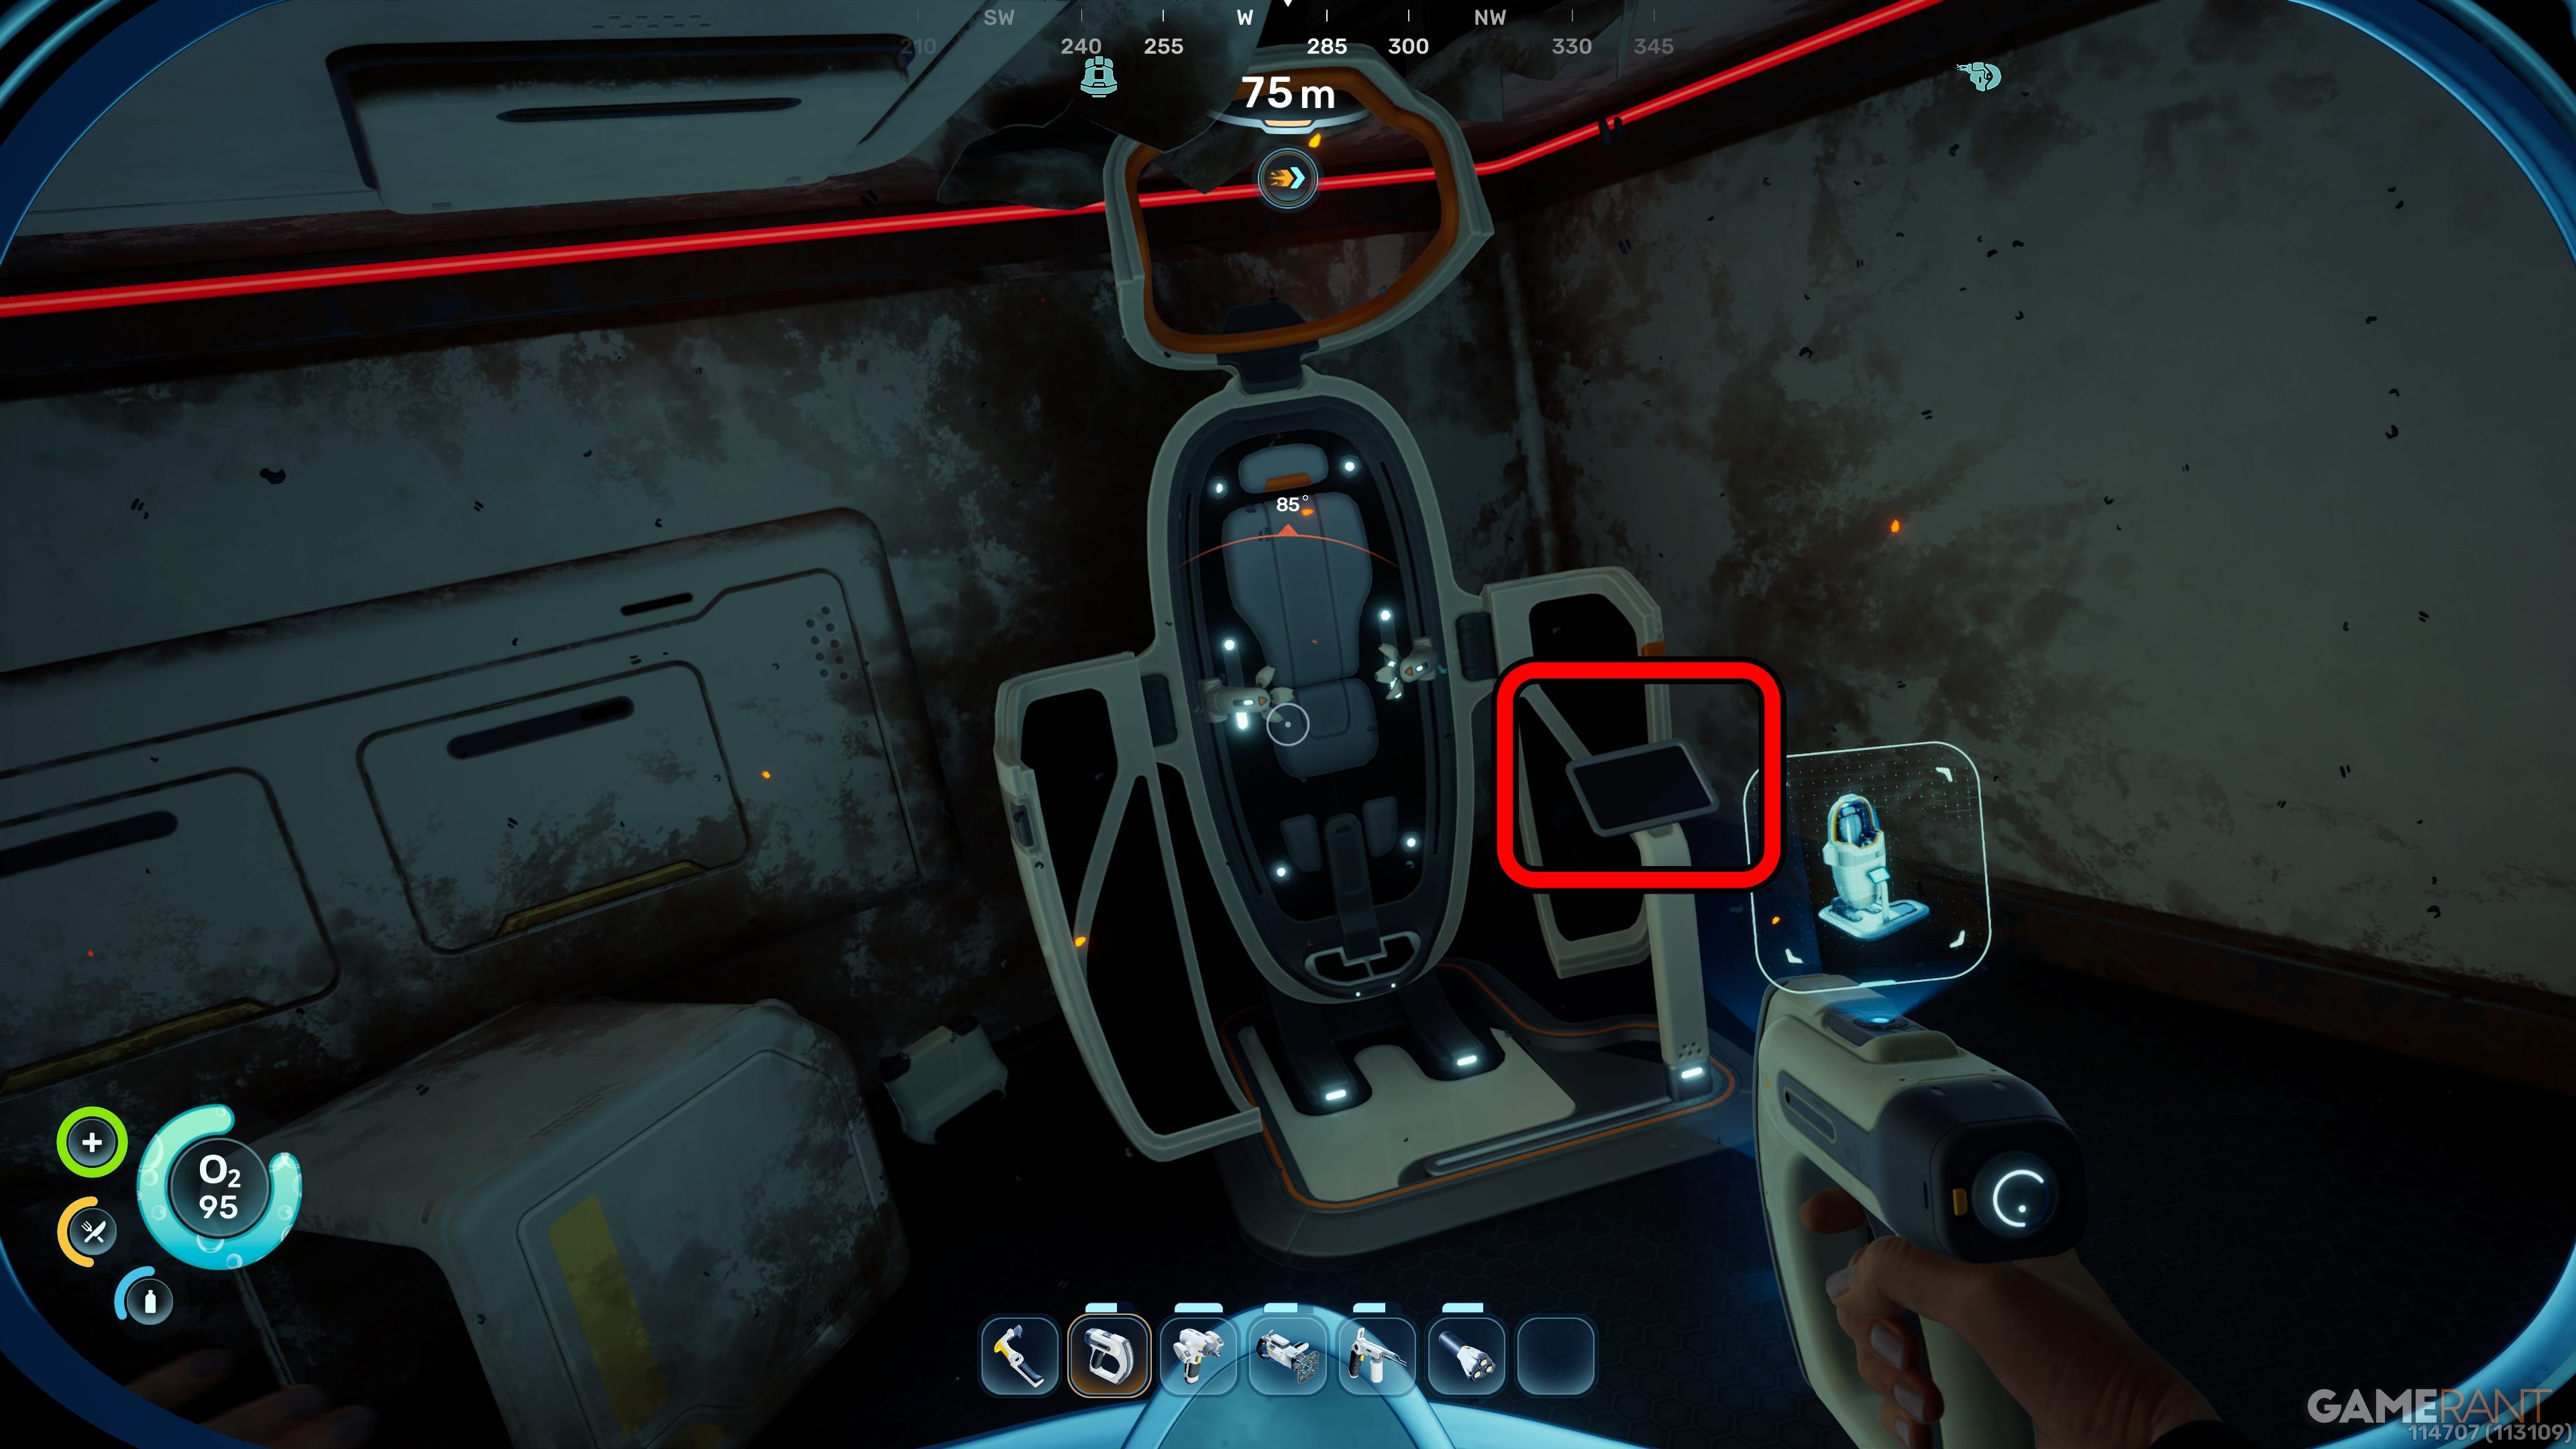
Walk along the wall until it ends. You’ll then see a rock pillar rising from the ocean floor. Turn right at the pillar to find the entrance to the Unauthorized NOA Modification bunker.
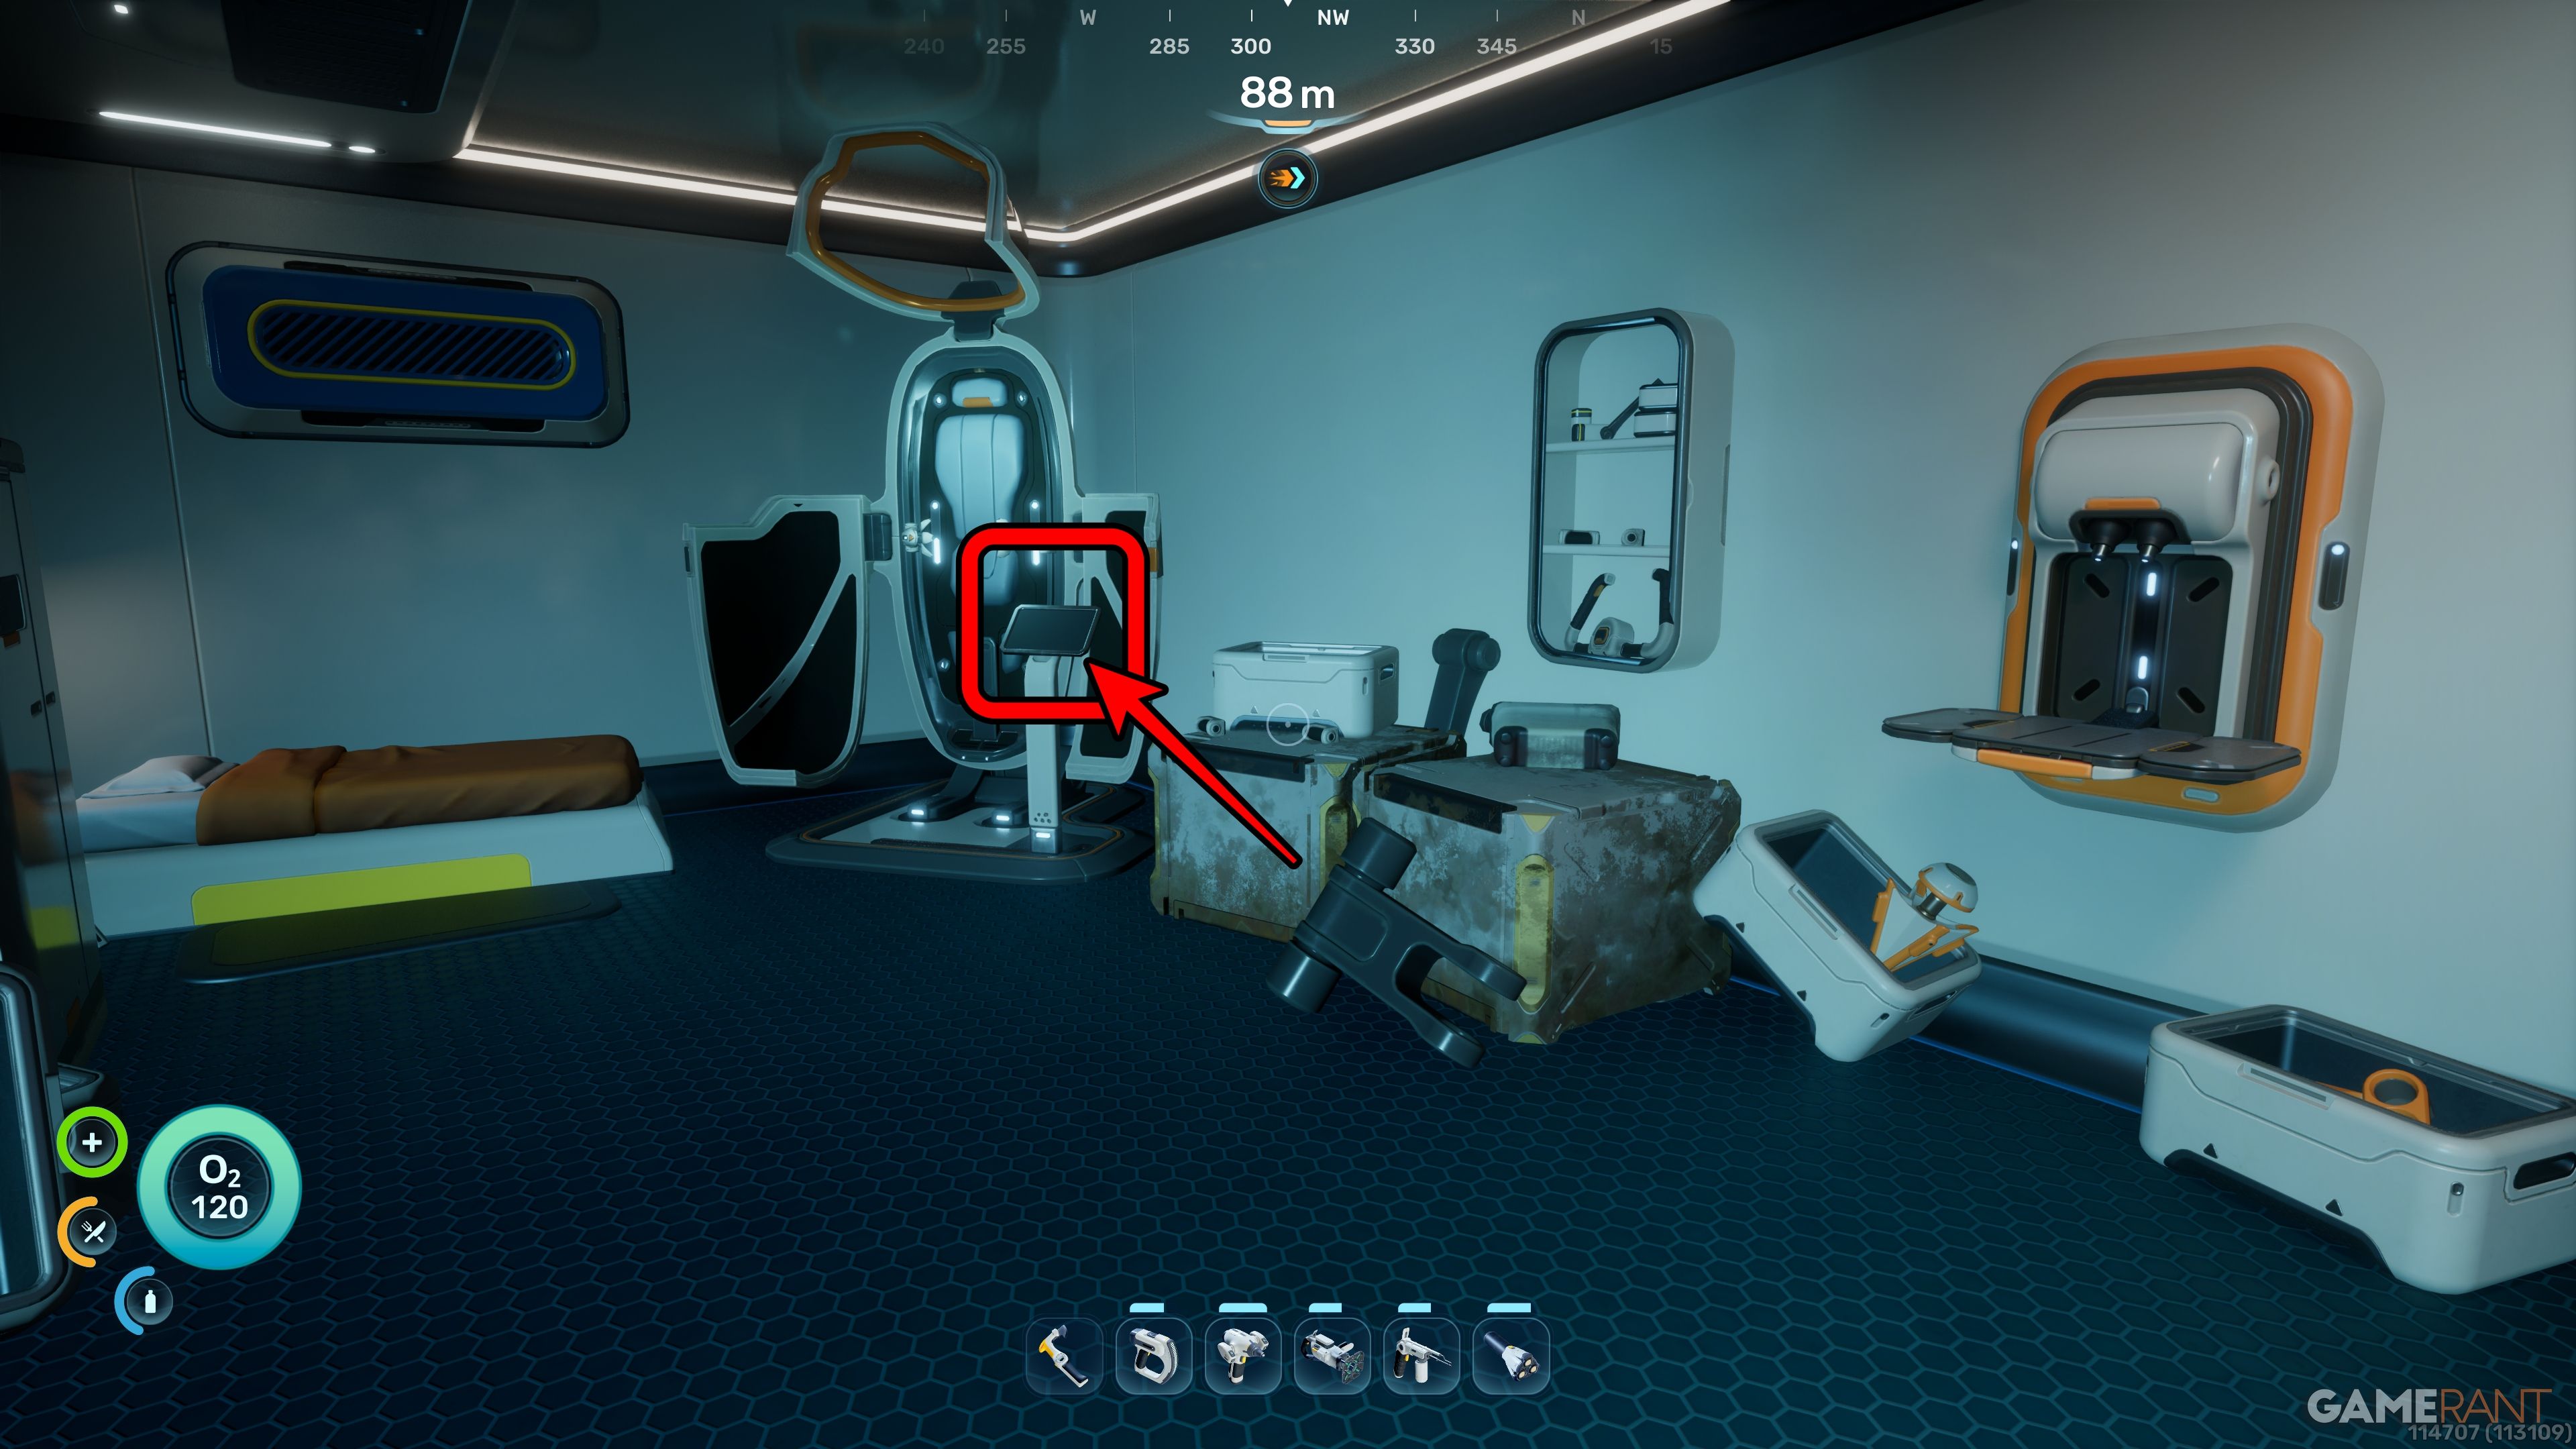
You’ll find the Biobed in the north-western corner.
If you happen to know where the Great Jaw is, that’s awesome! The entrance to the bunker is just around 100 meters north of it.
Biobed Inventory Expansion 5 – Sophie’s Retreat Bunker:
- Location: Sophie’s Retreat Bunker, Cave about 440 meters north of Lifepod — just beyond Wu “Wu” Lianghai building.
- Depth: Cave entrance is 45 meters. Bunker is 65m.
- Upgrade: Endurance – three basic inventory slots.

Starting from the Lifepod, travel approximately 440 meters north. You’ll come to the Old Habitat and Wu “Wu” Lianghai buildings. The signals from either of these buildings can help you find your way.
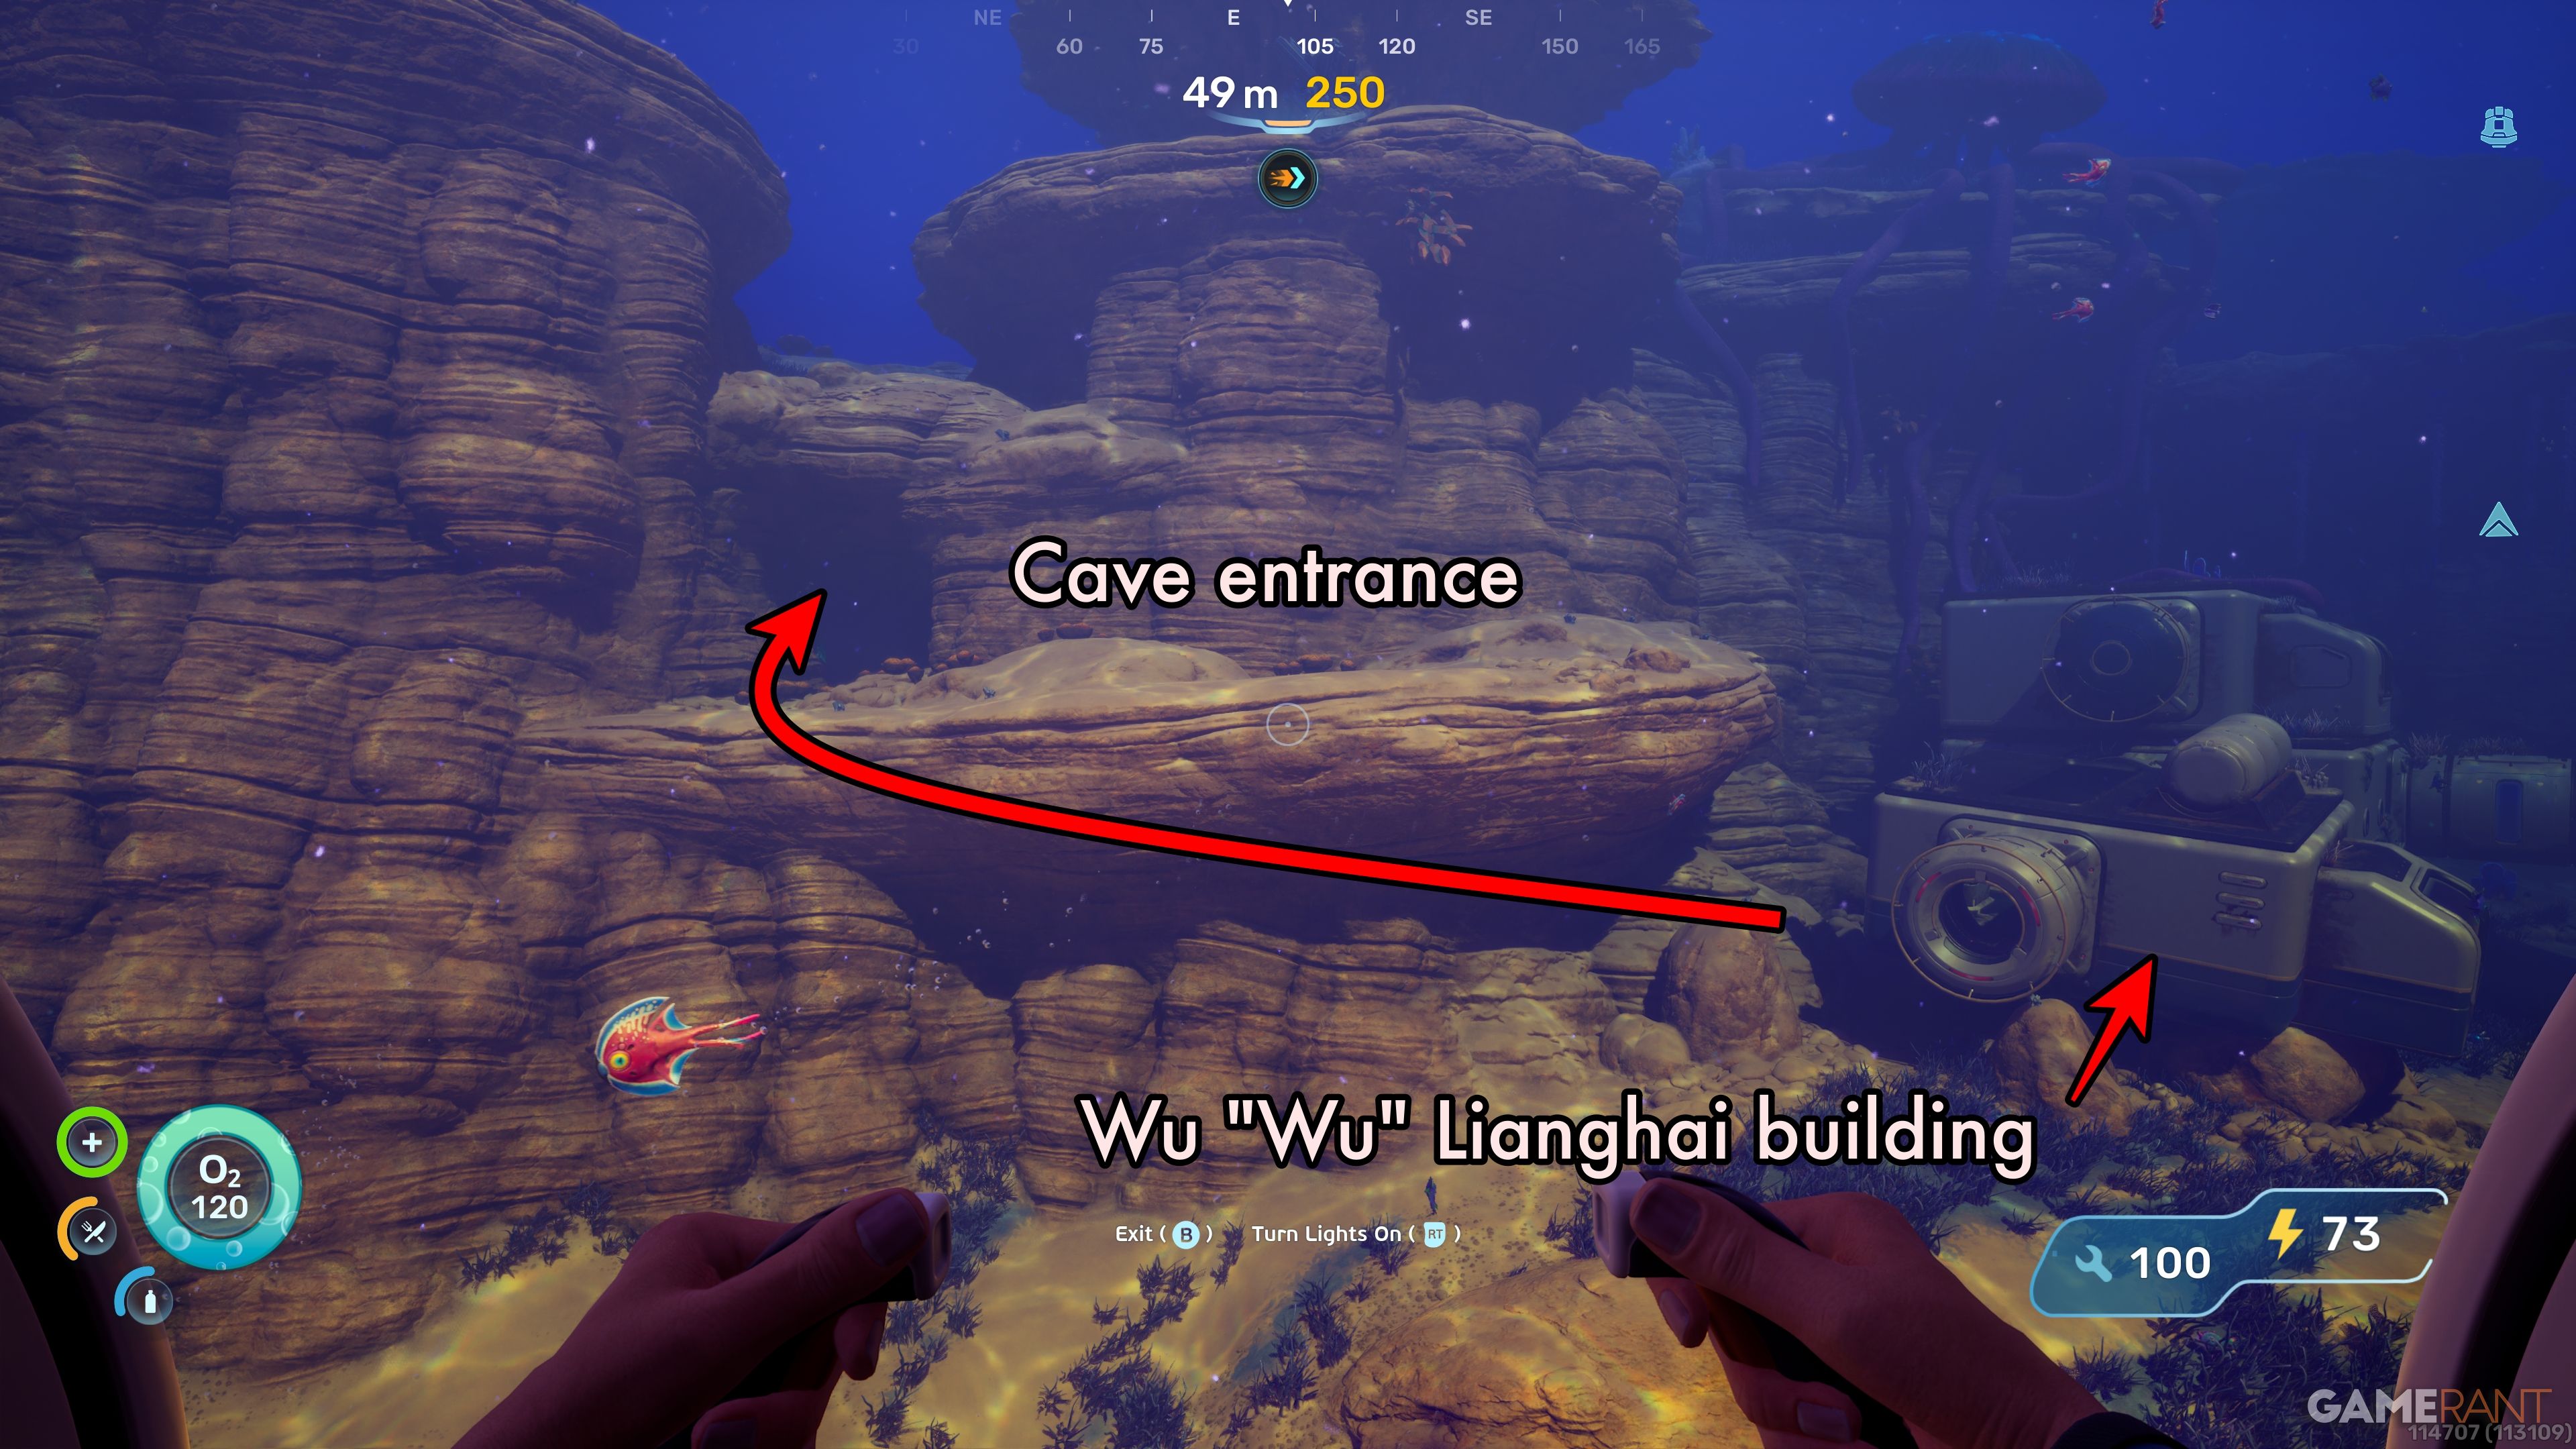
After you arrive at the buildings, walk forward about 30 meters and then turn right. You’ll find the cave entrance on a slightly elevated rocky area.
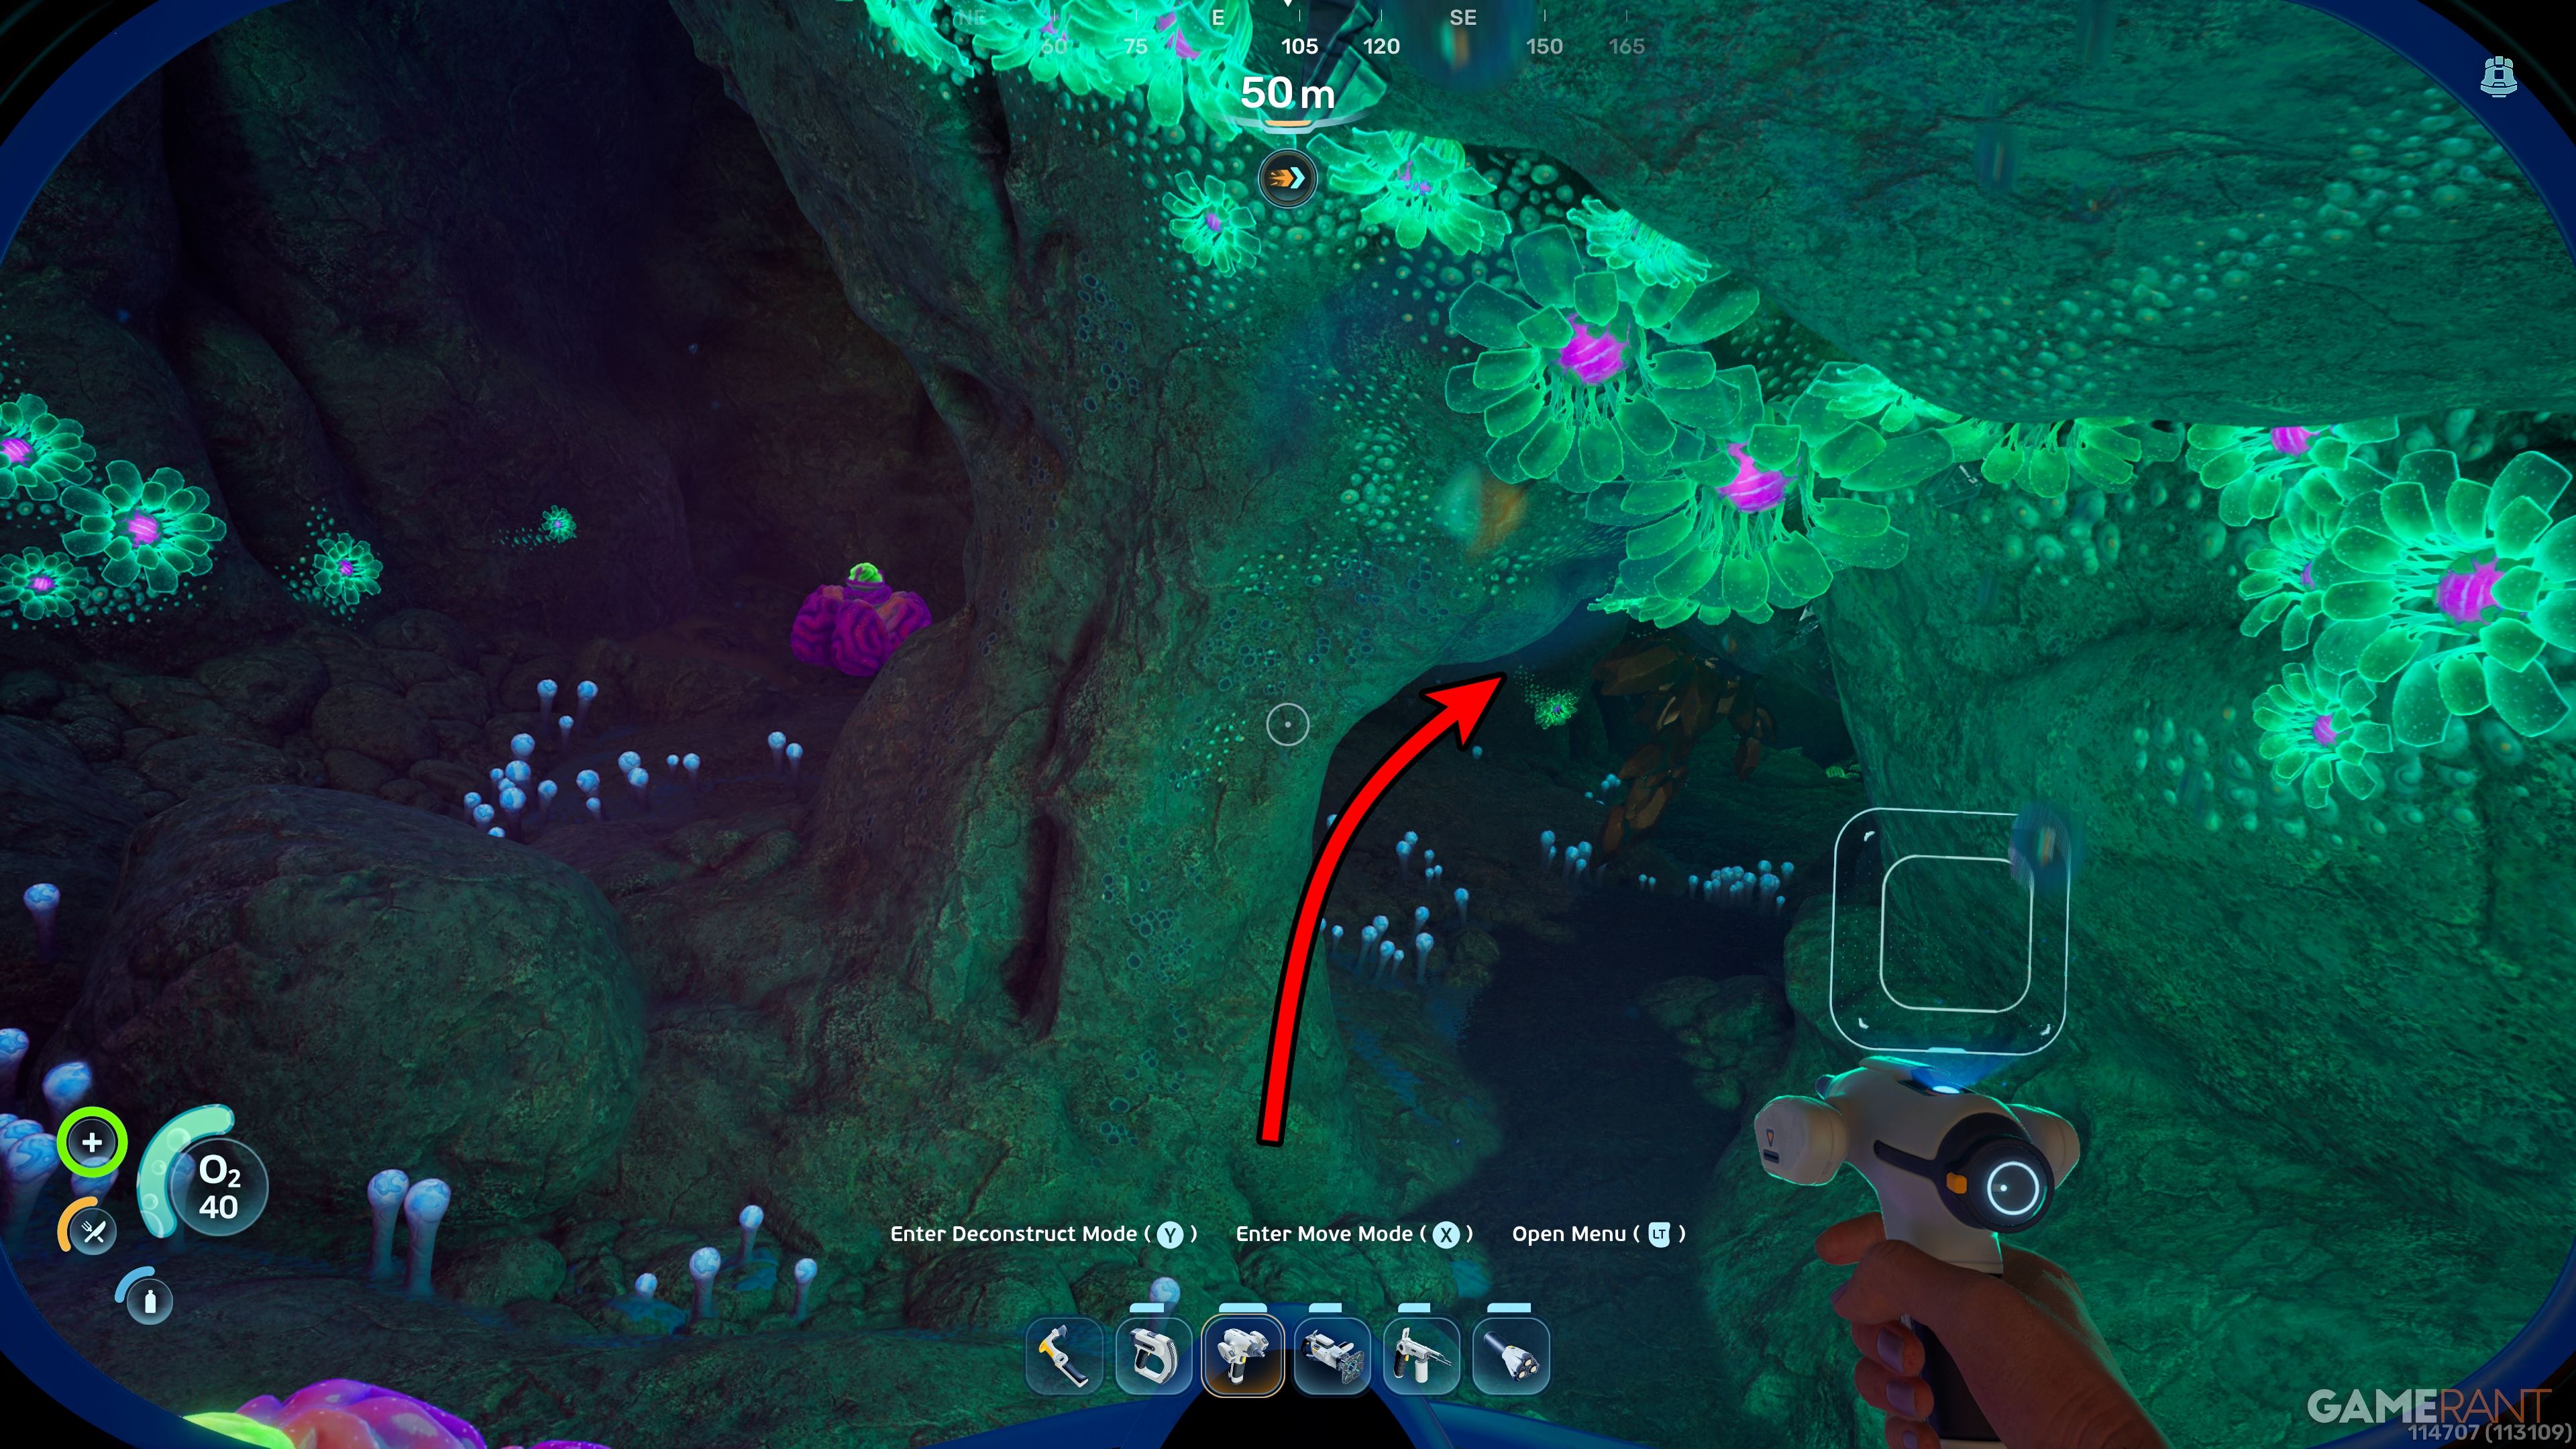
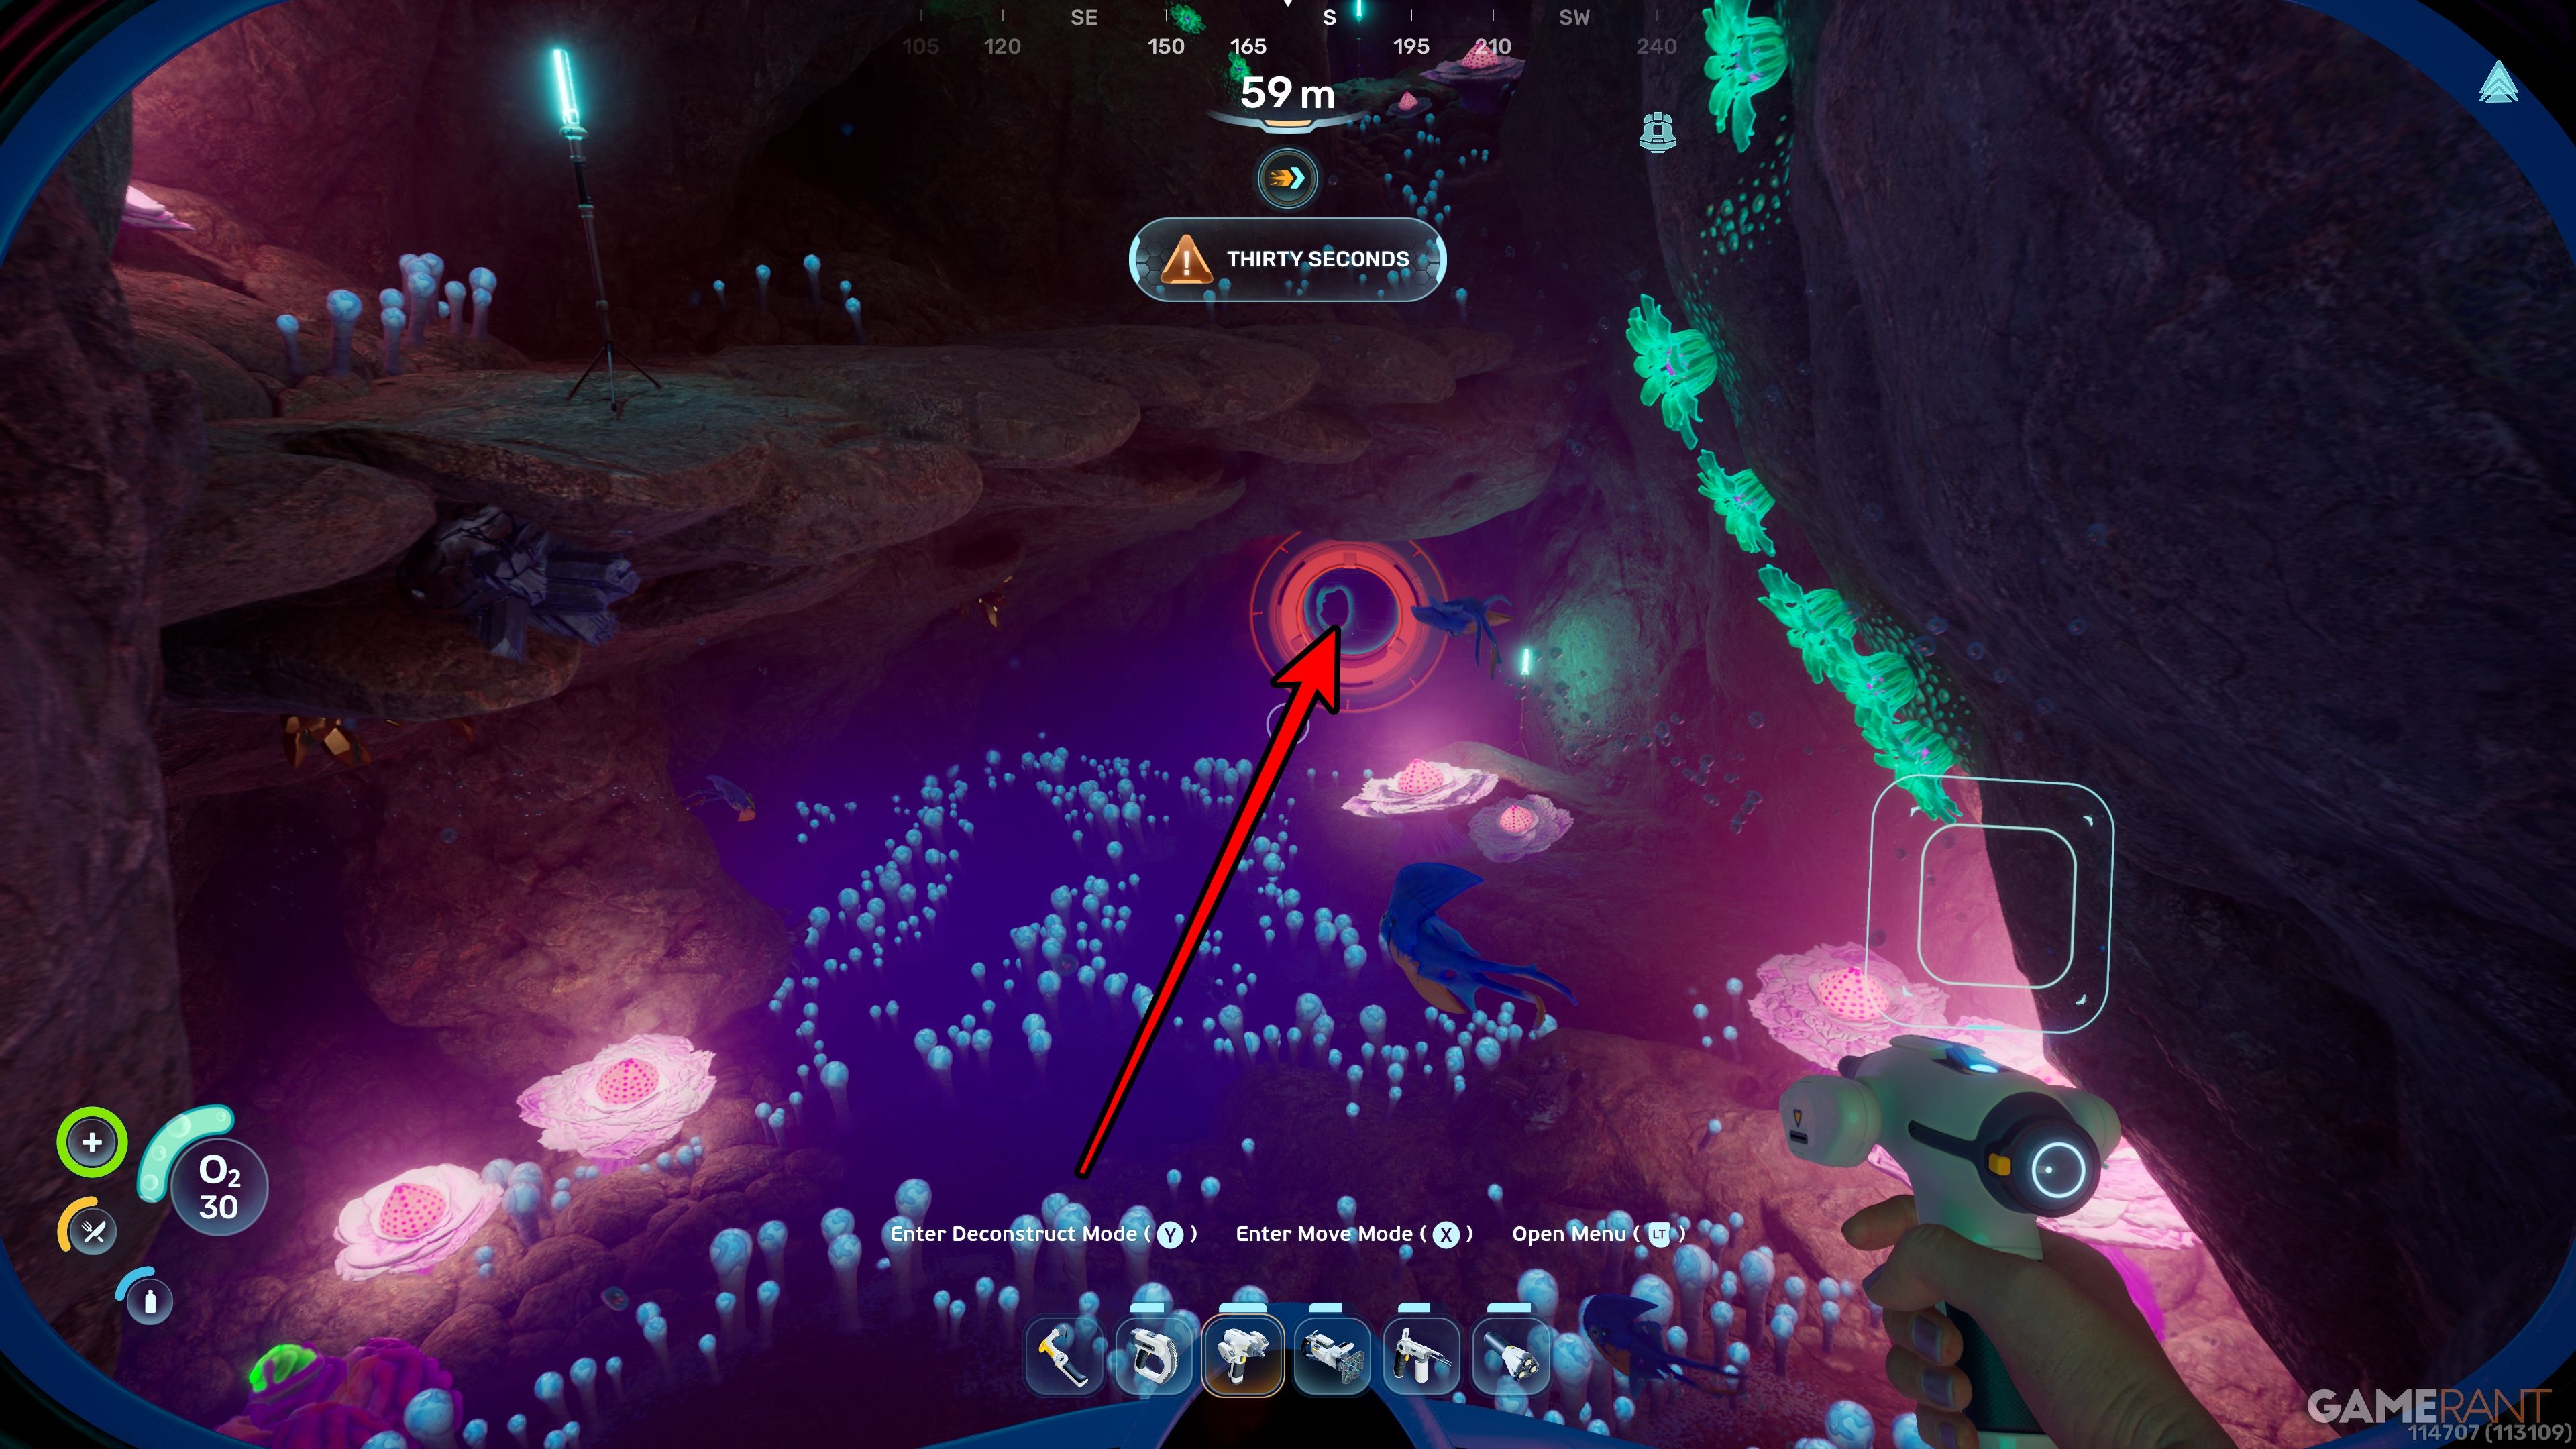
Go into the cave, and then follow the tunnels heading east and southeast until you find the entrance to the bunker – it’s a hatch.
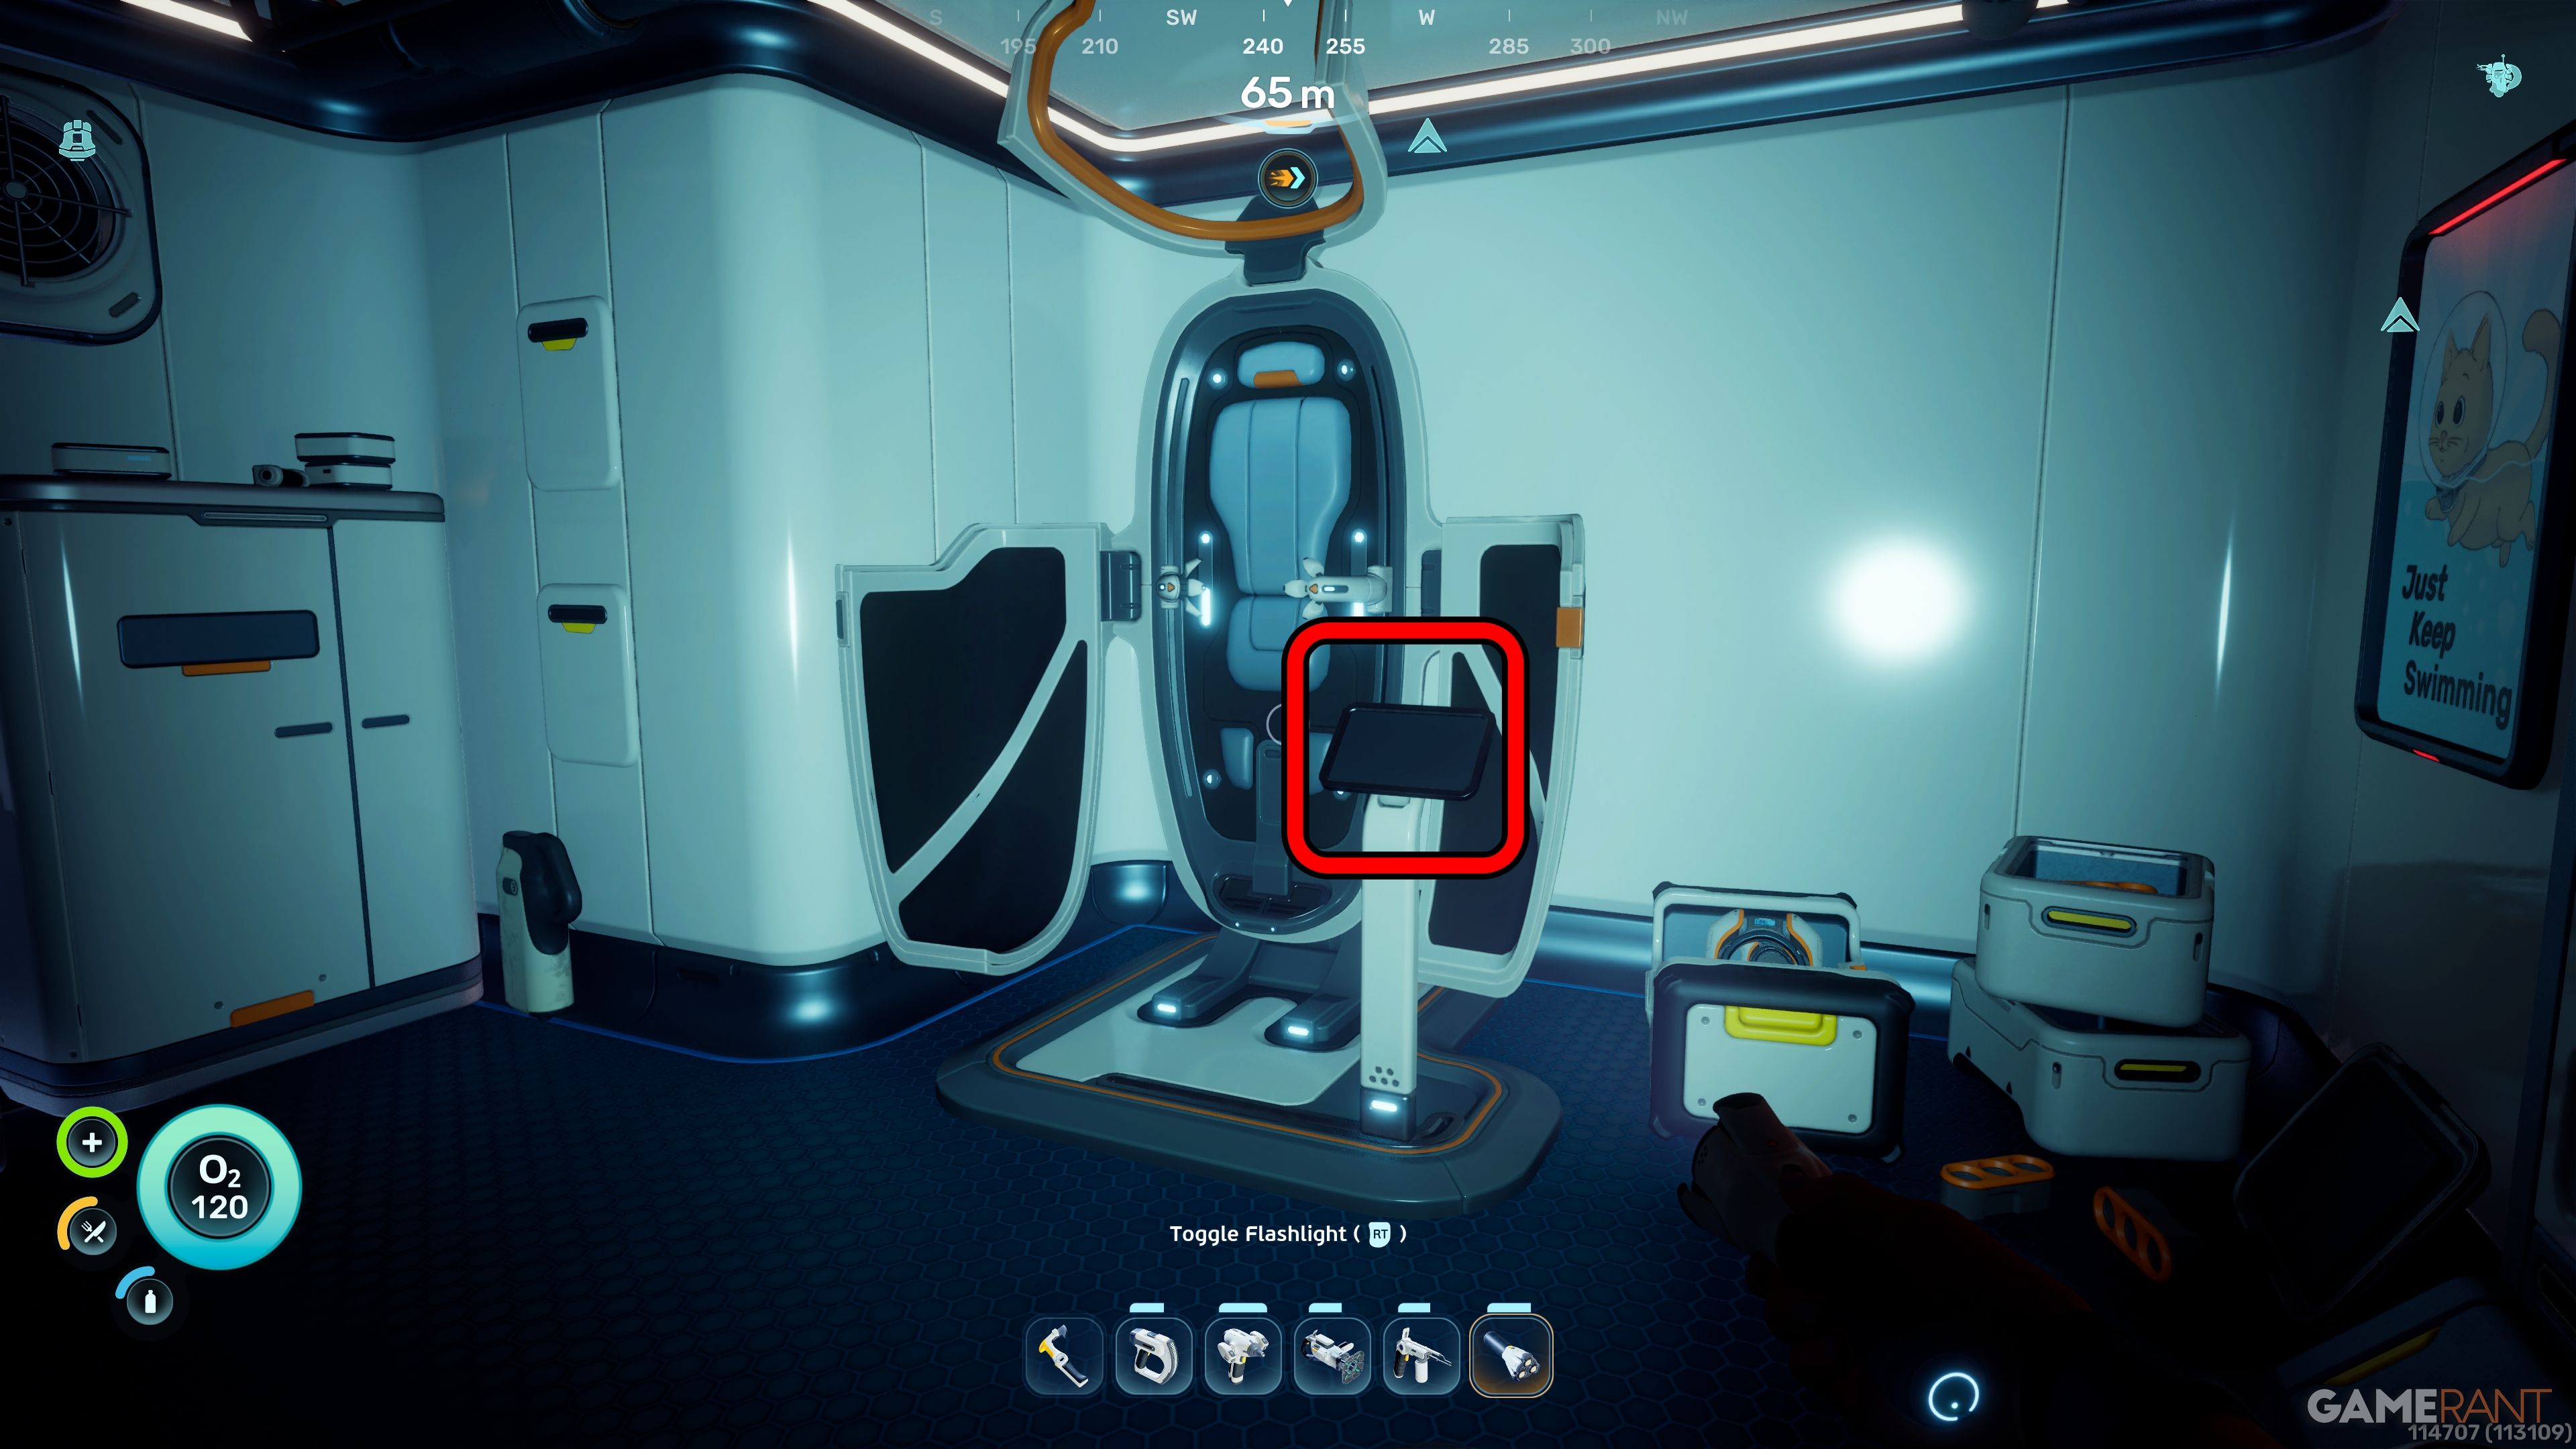
The Biobed is found inside. Interact with the screen to receive the Endurance inventory expansion.
Biobed Inventory Expansion 6 – Nahema’s Lab Bunker
You’ll need to unlock Heat Tolerance to enter the Graveyard, where you’ll find Biobed 6 and 7. Without it, the hot water will be fatal. The Tadpole vehicle and a High Capacity Air Tank will also make exploring much easier.
- Location: Nahema’s Lab Bunker, 355 meters south-east from the Lifepod, heading of 120 degrees.
- Depth: 90 meters
- Upgrade: Dexterity – one additional slot in Quickbar.
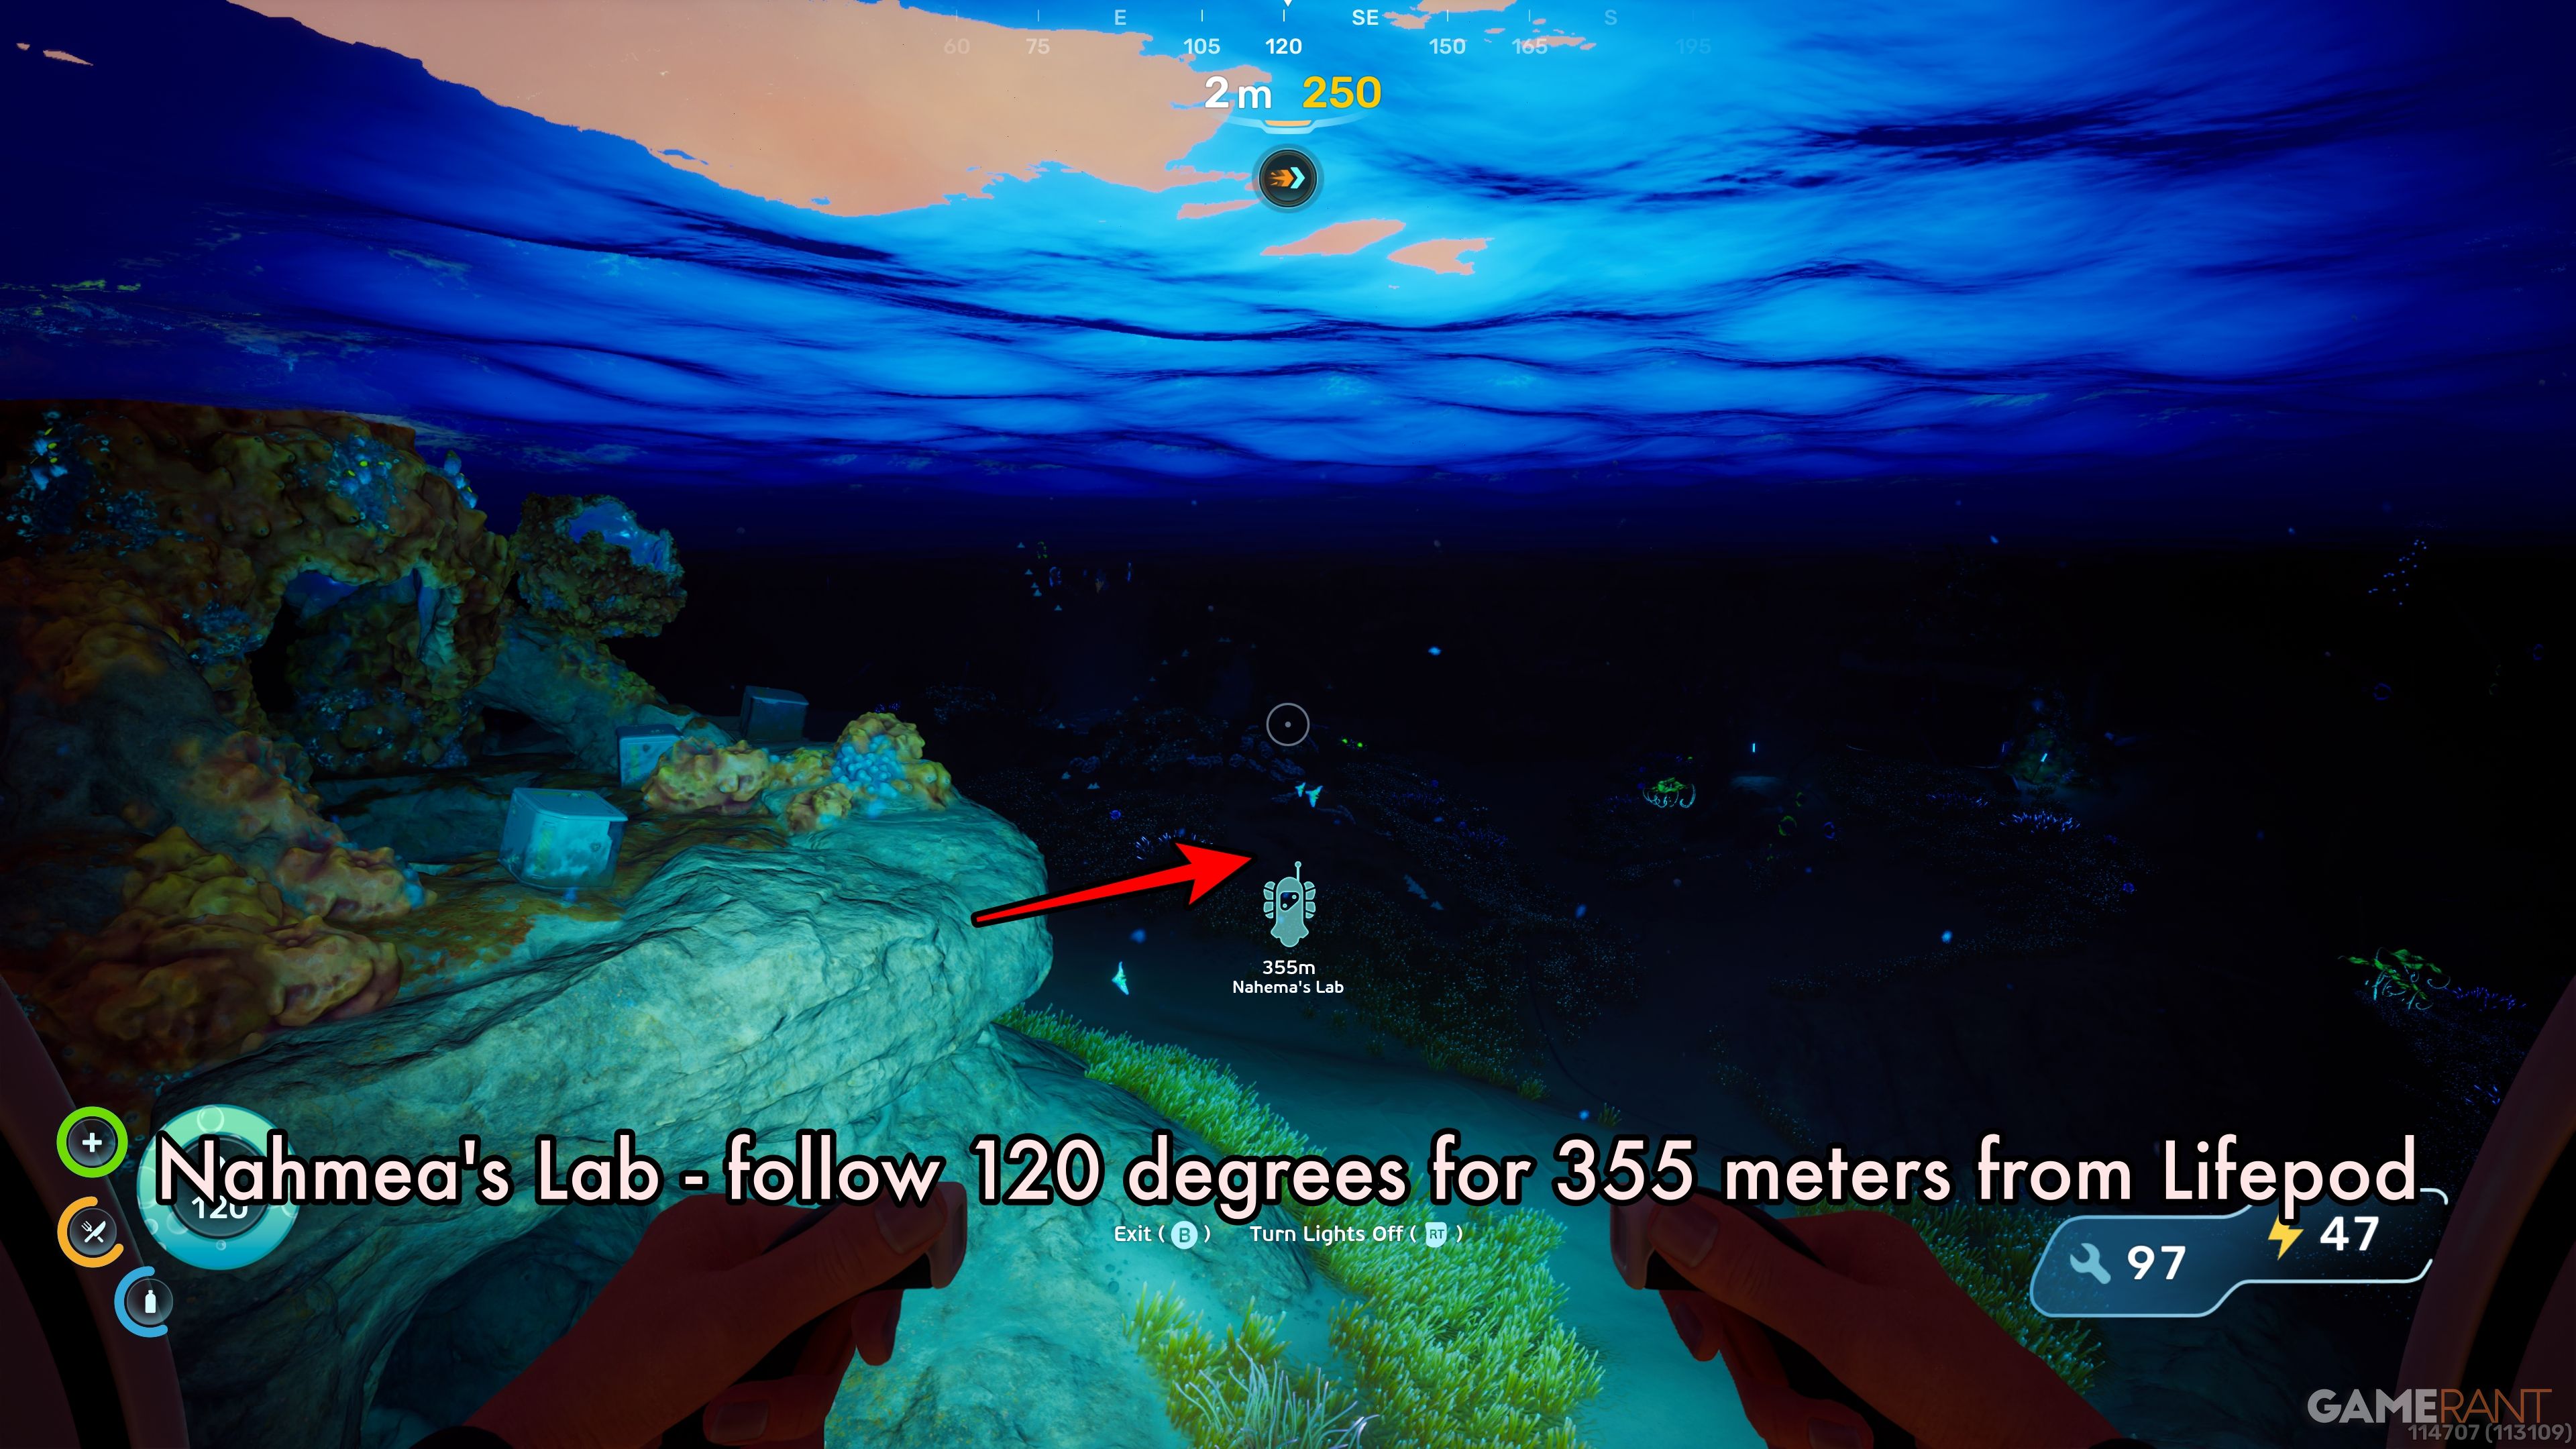
From the Lifepod, swim southeast (120 degrees) for 355 meters. You’ll enter warm water, so make sure you have the Heat Tolerance Adaptation active.
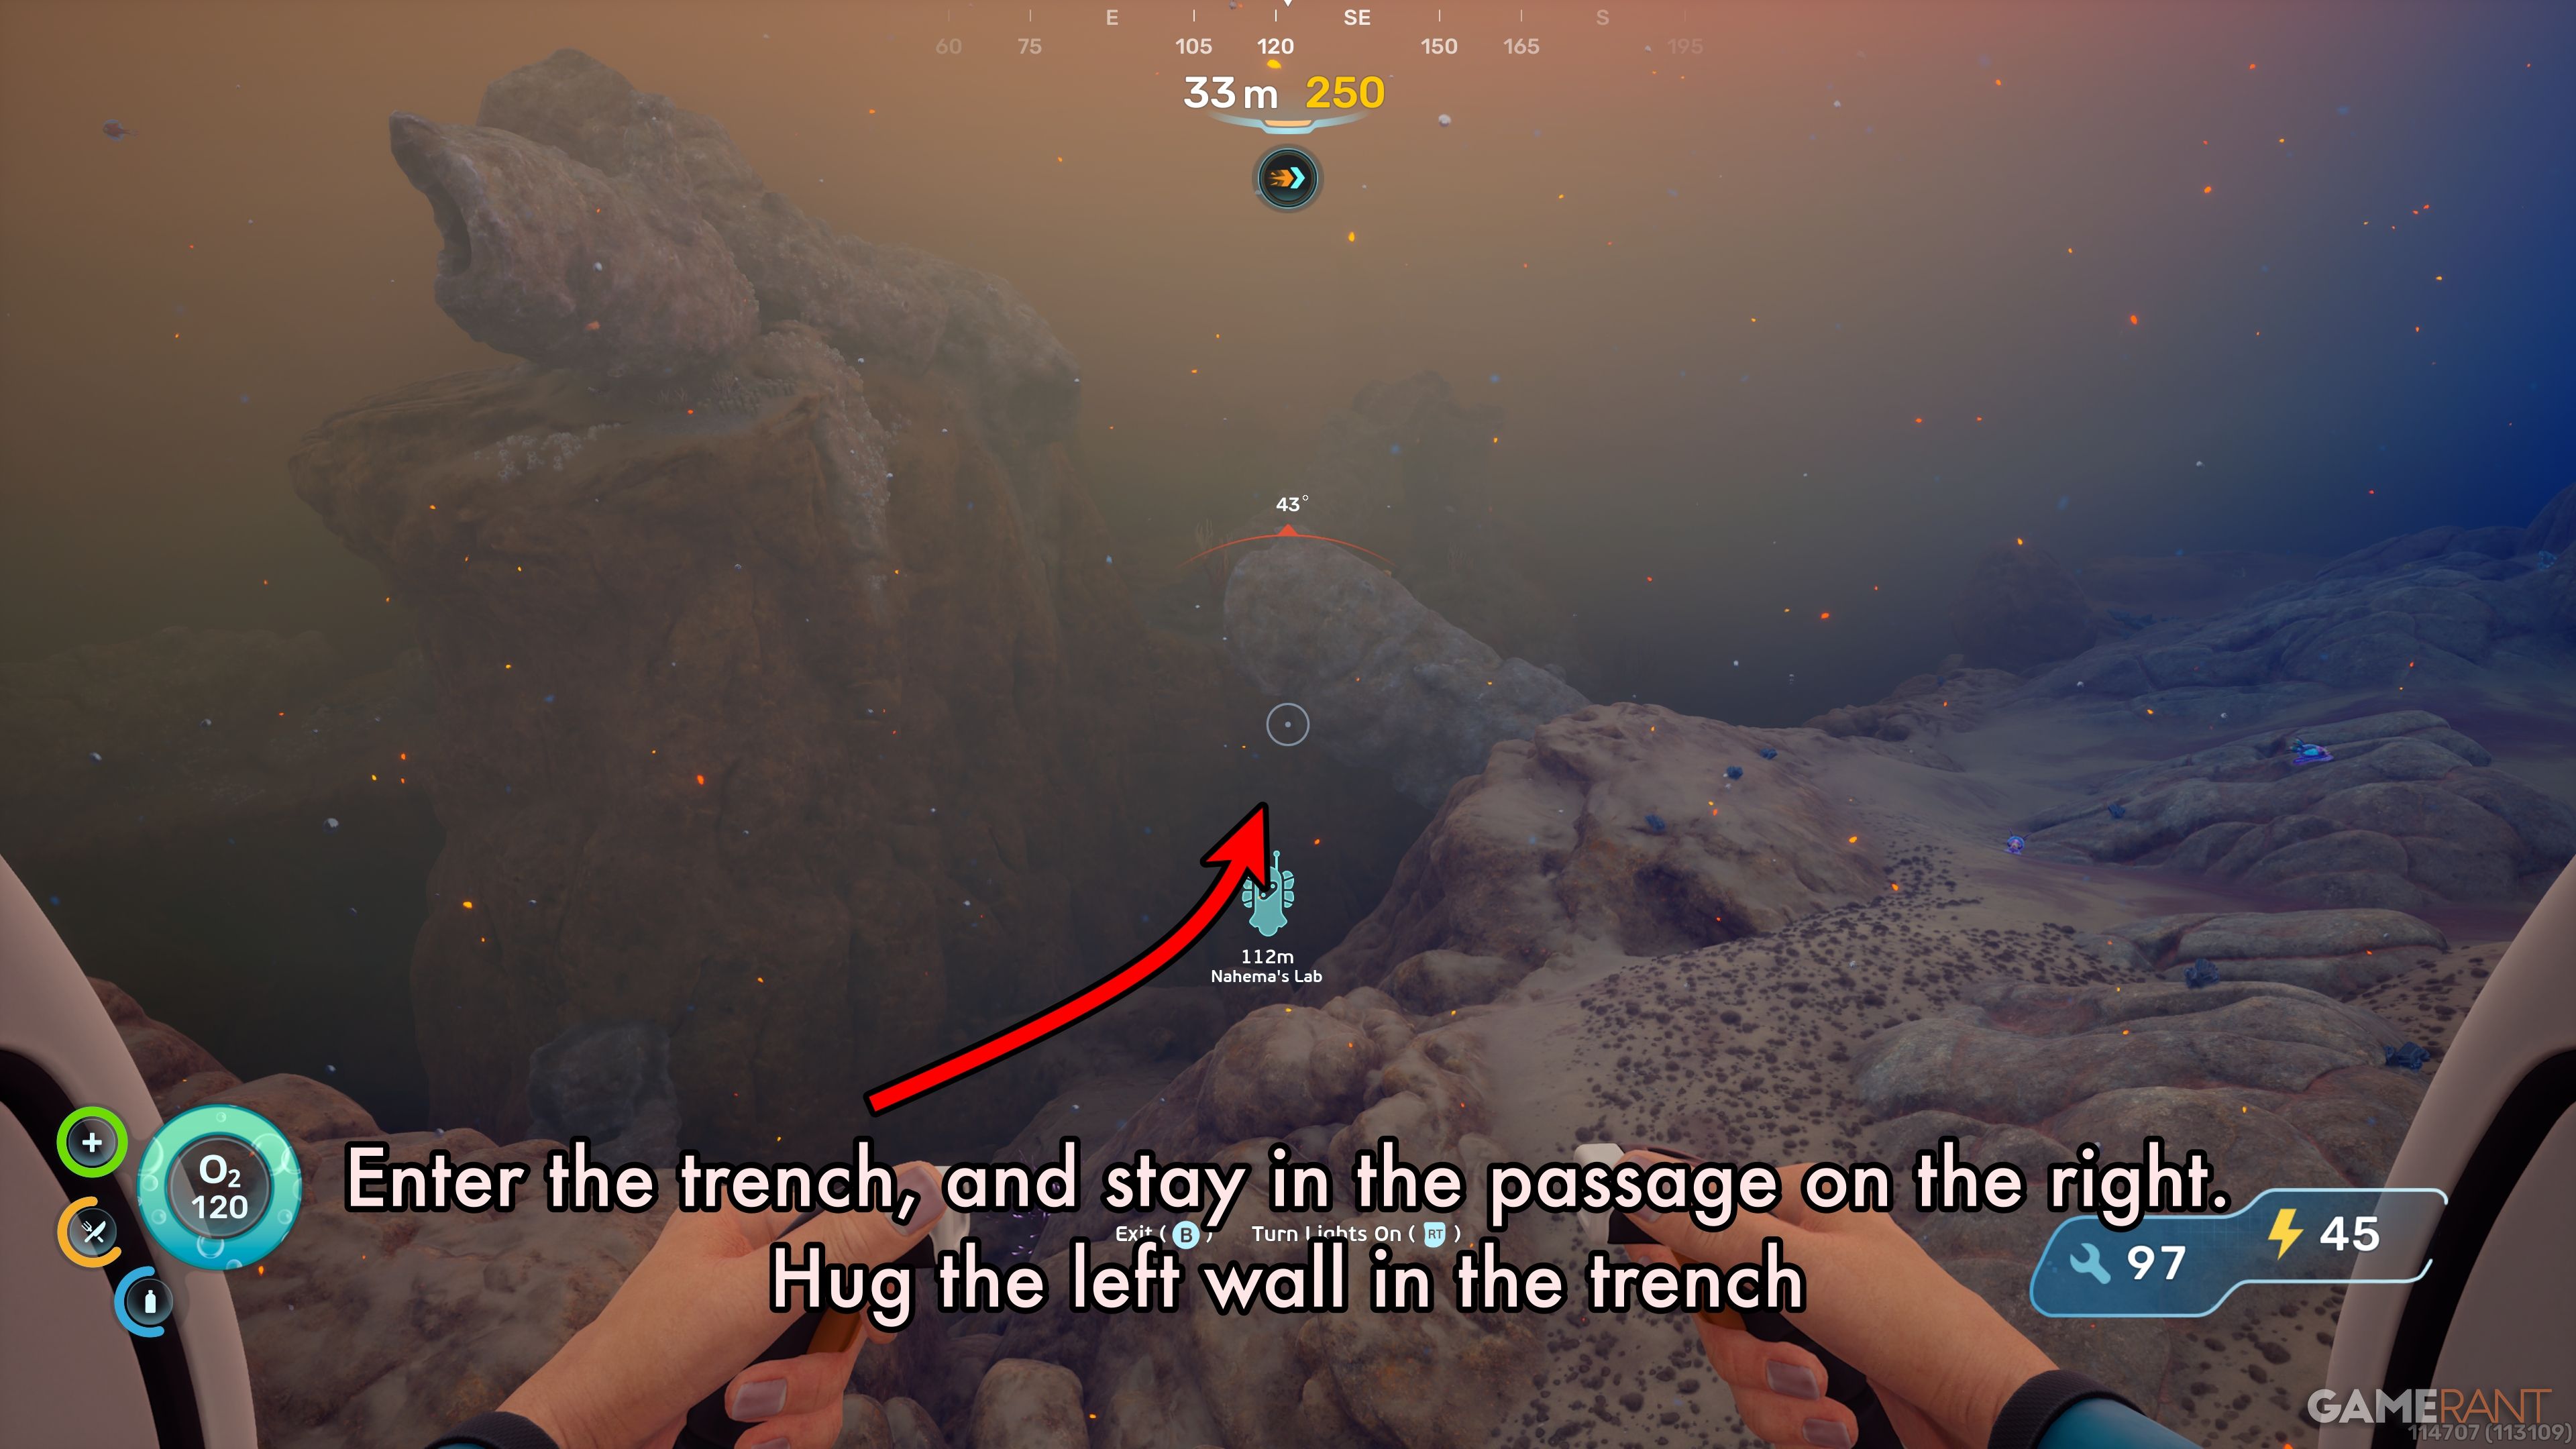
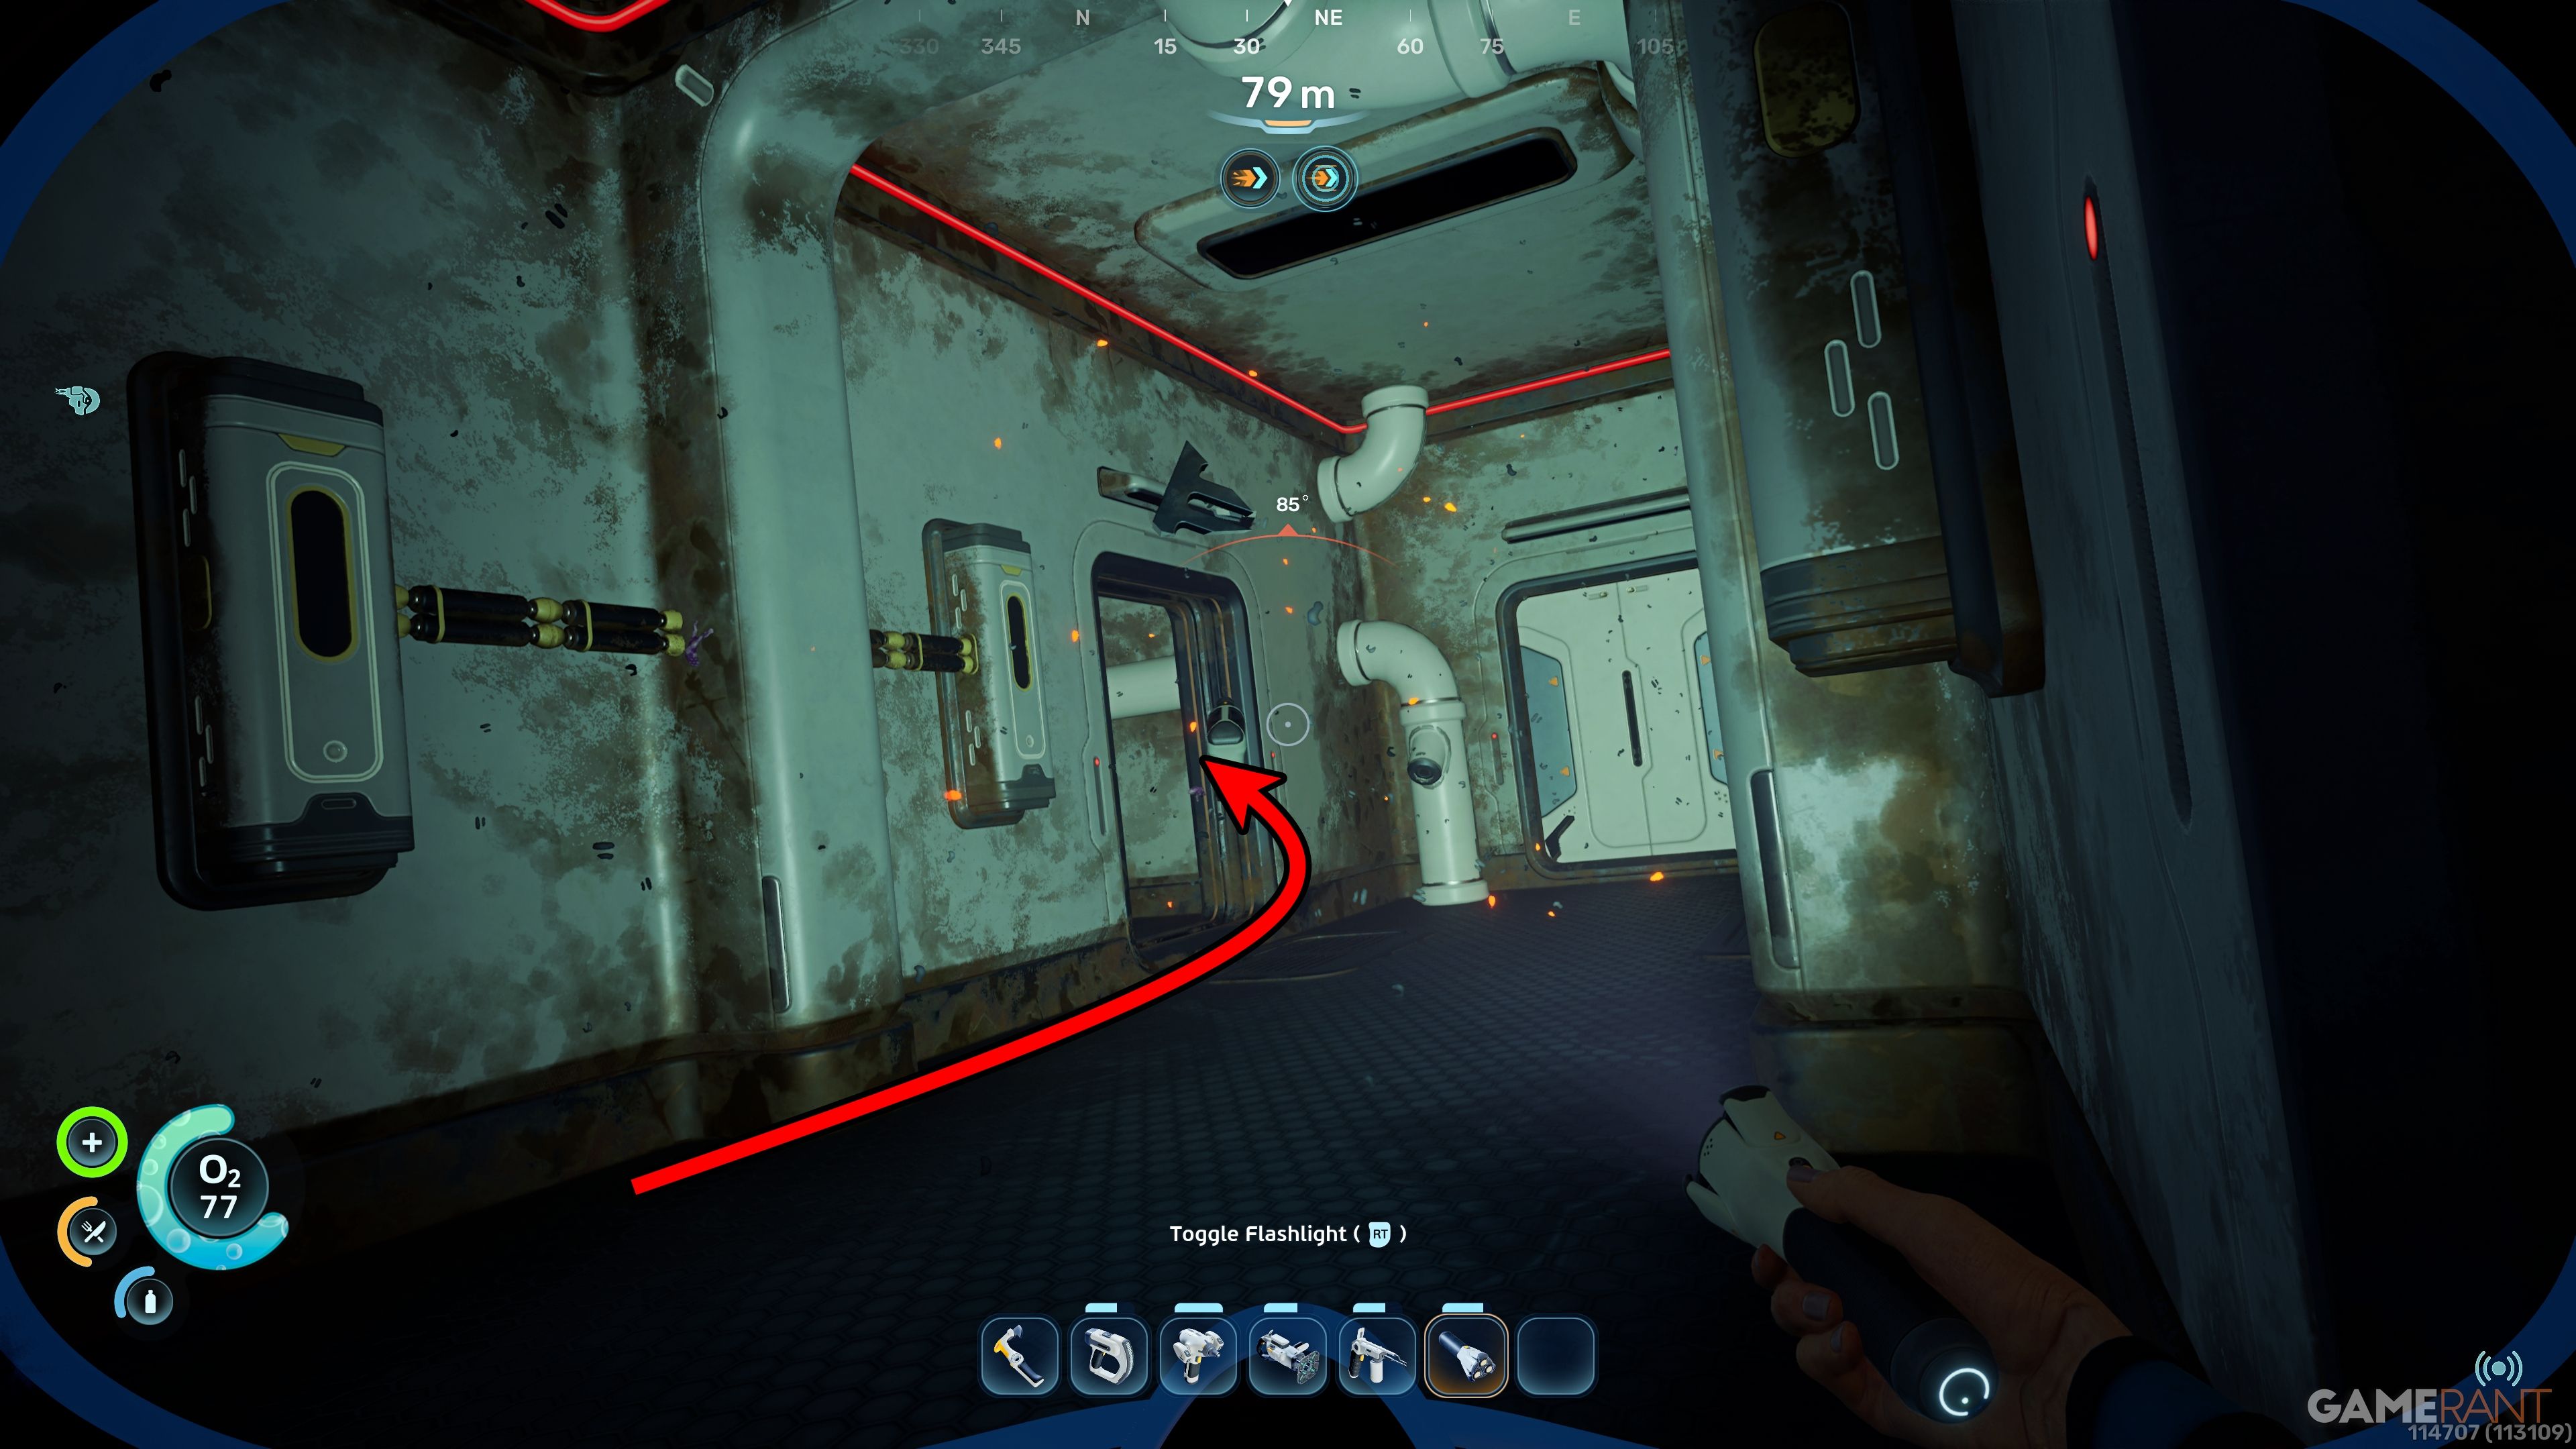
Okay, so after swimming about 250 meters, you’ll notice the water getting different. You’ll come to a big trench that splits into two paths. Definitely take the right passage, and as you go, stay close to the wall on your left – it’s part of the main plateau running between the two paths. That’ll keep you on track!
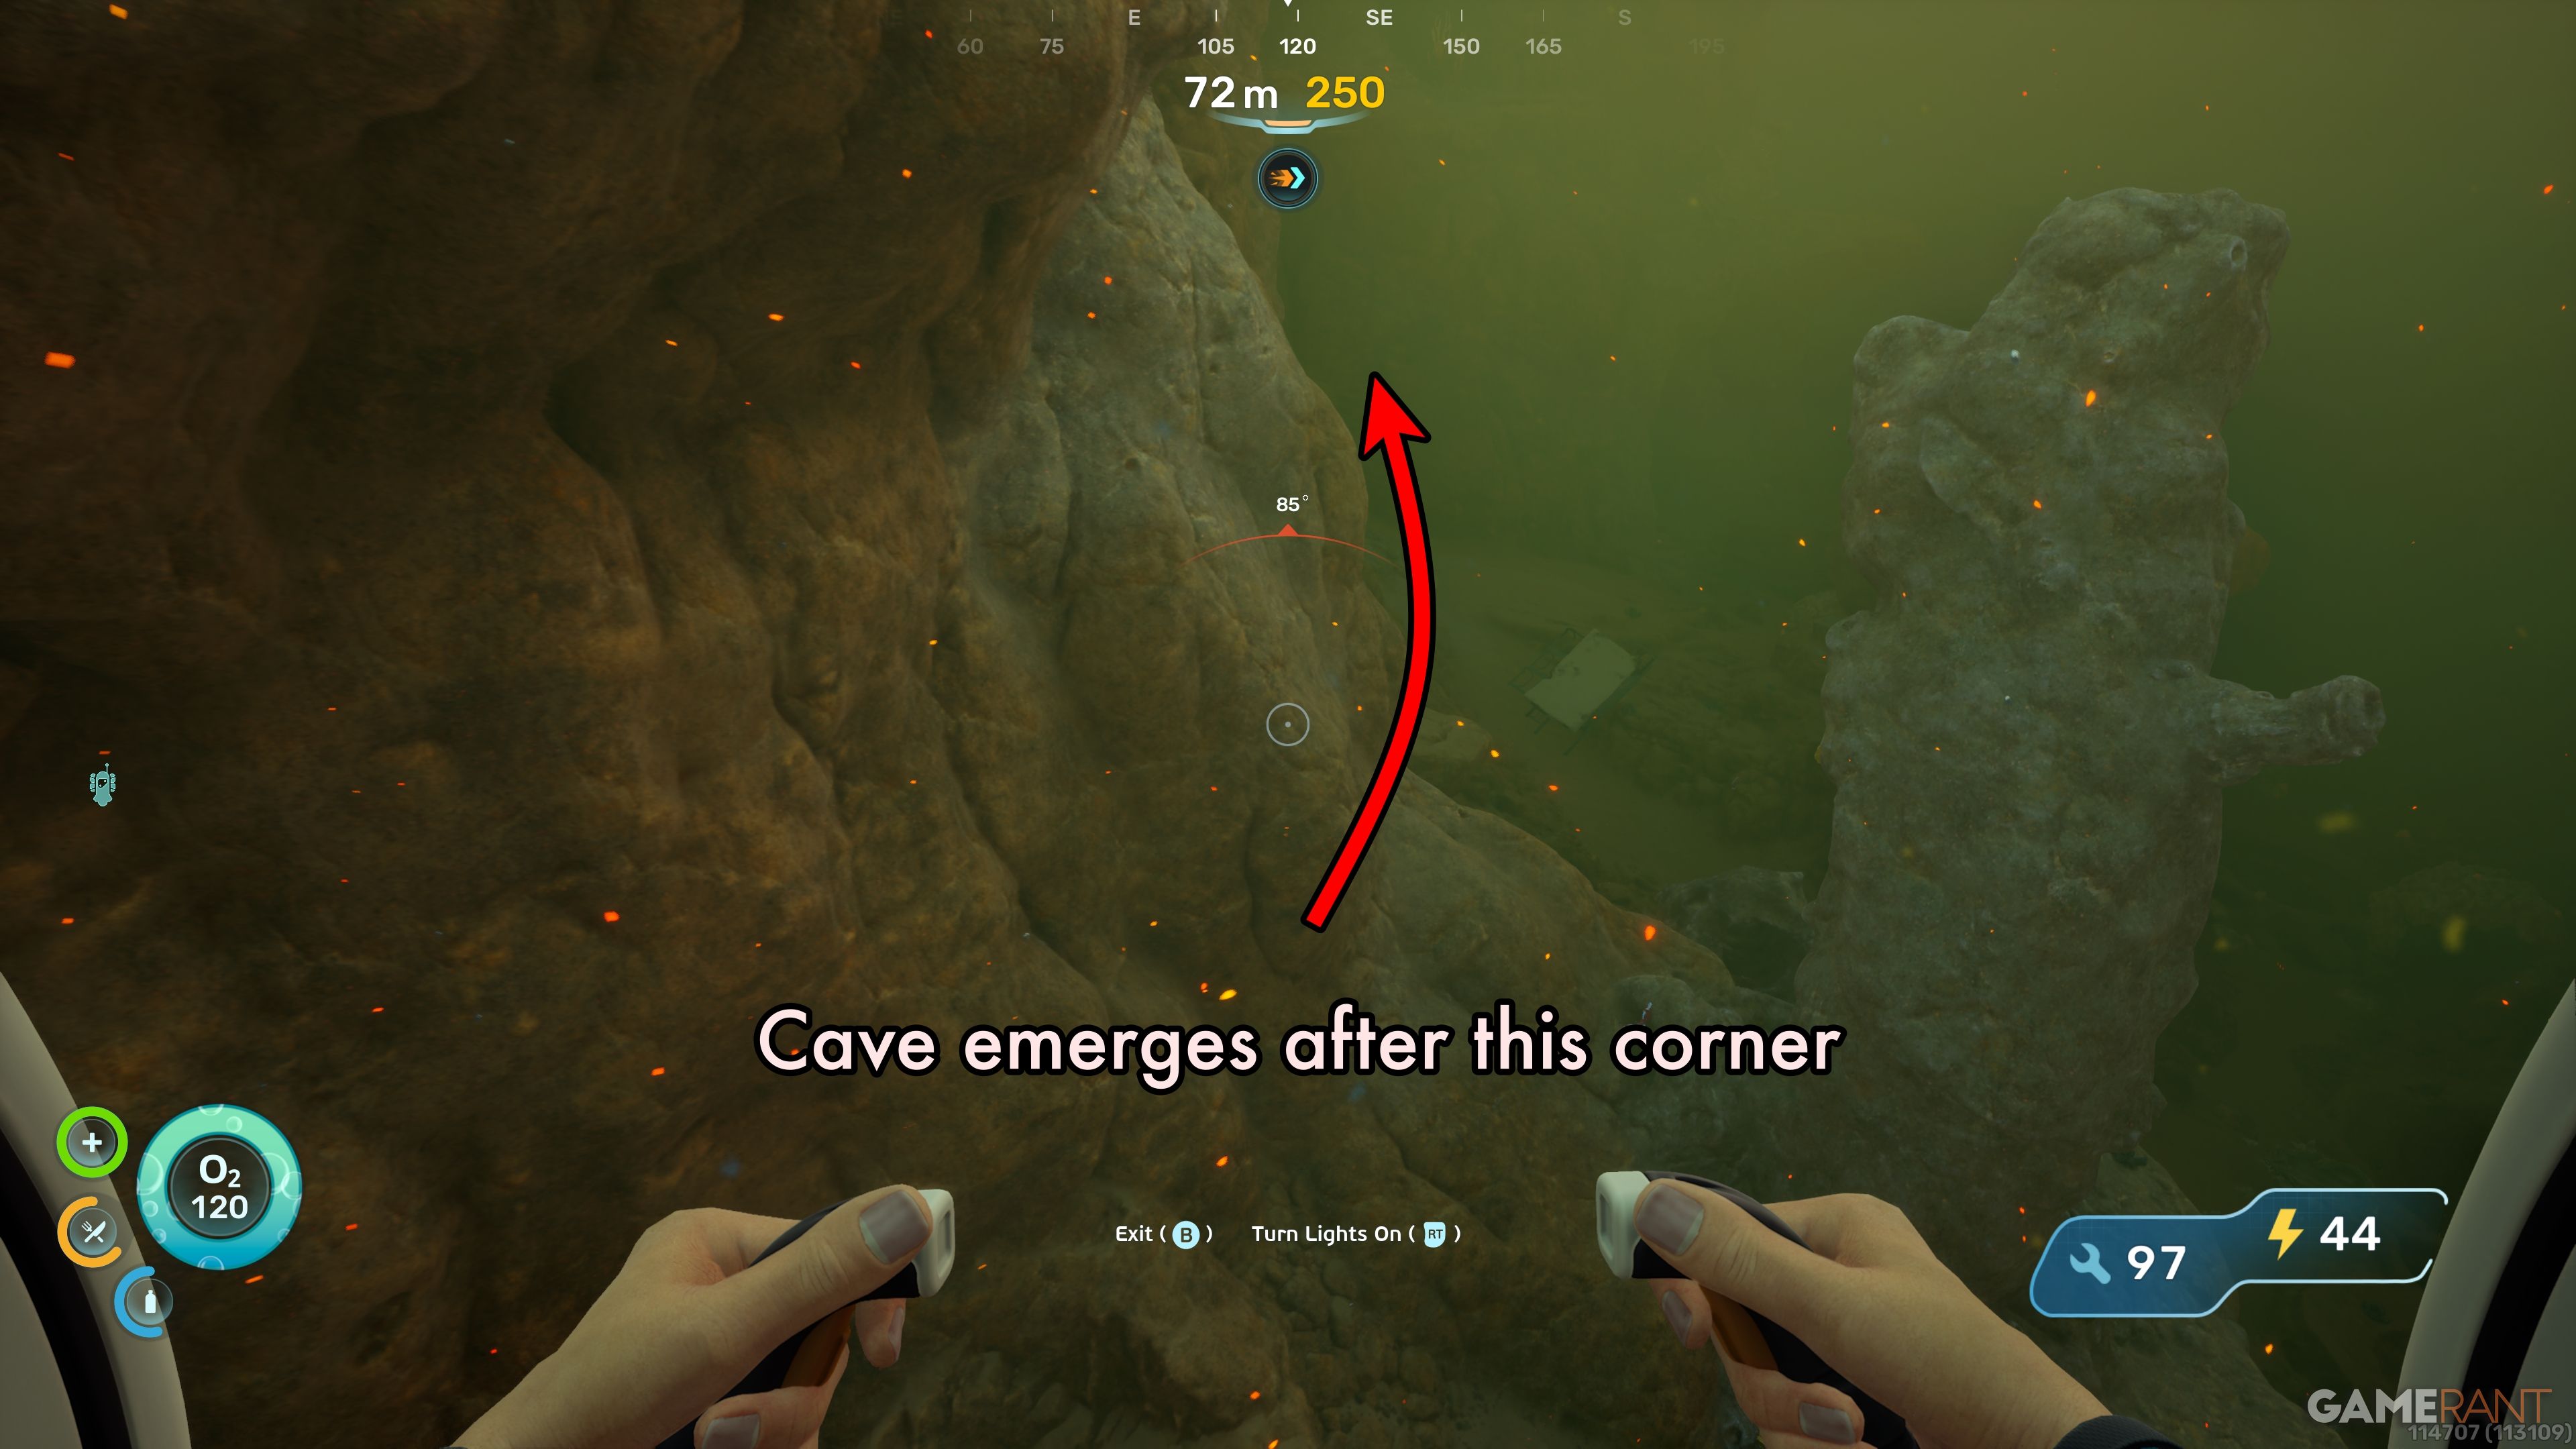
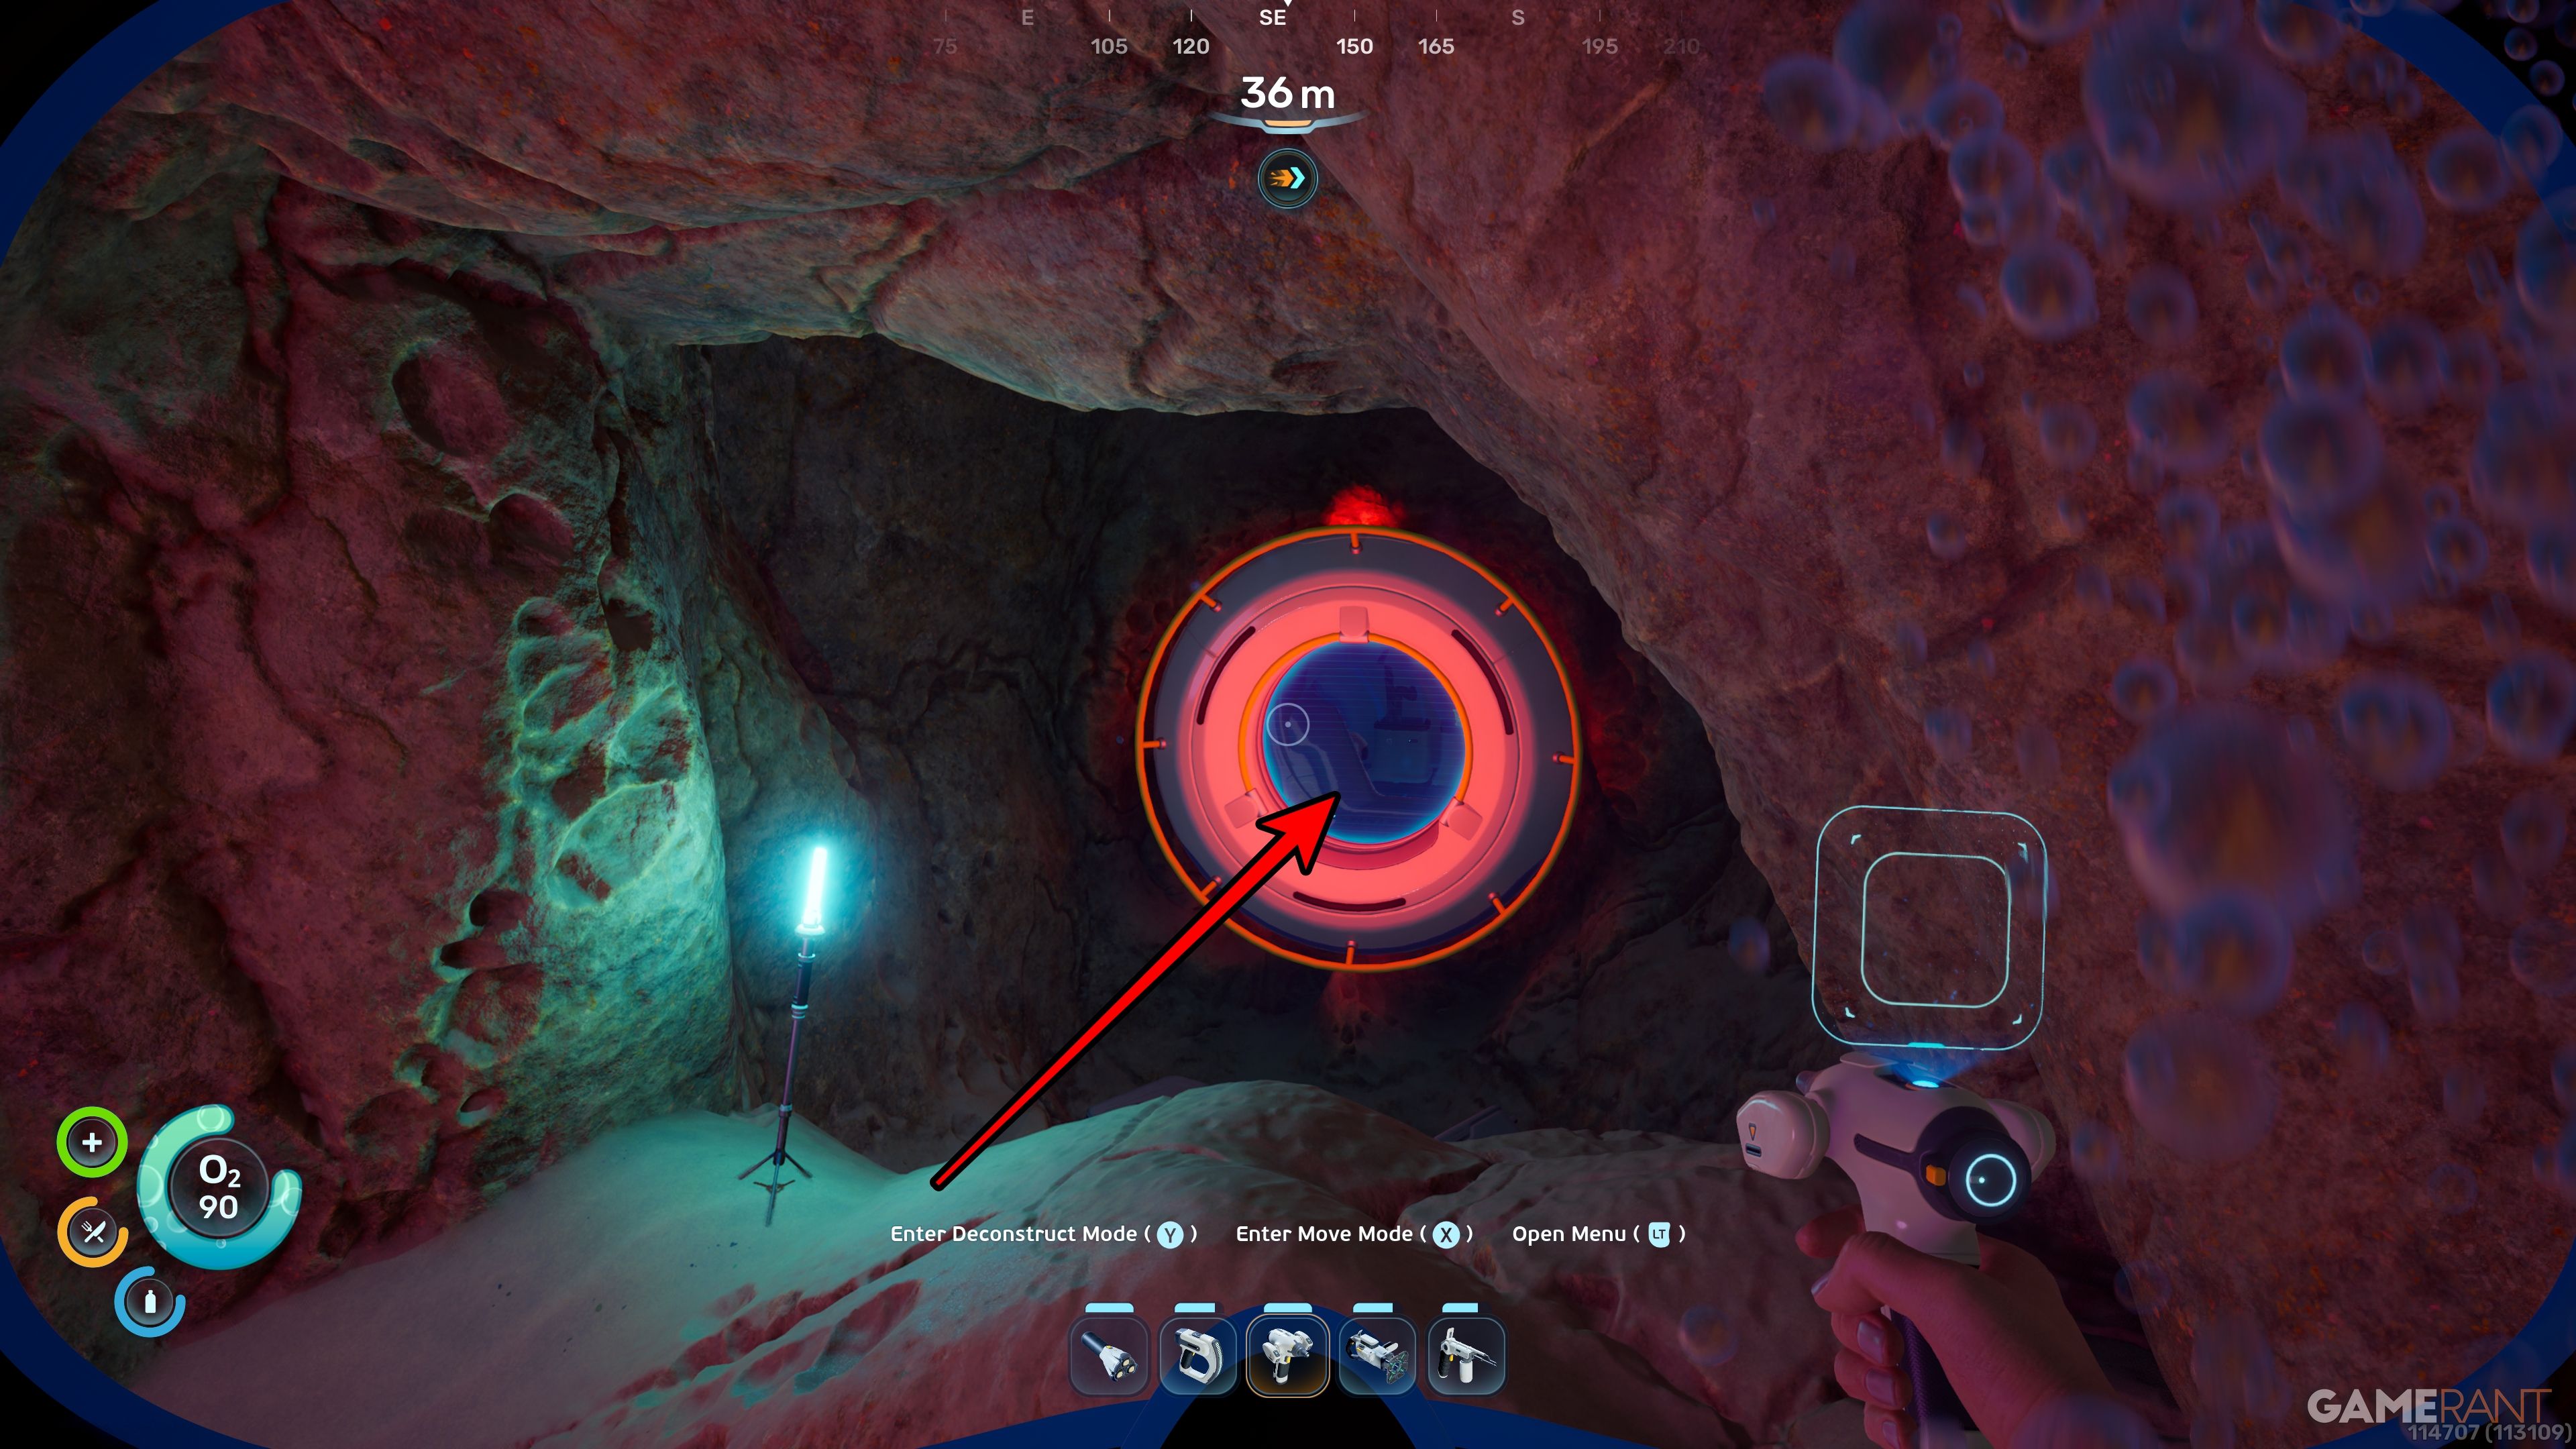
Walk along the wall until you find a small cave marked by a patch of grass. The entrance to Nahema’s Lab is inside.
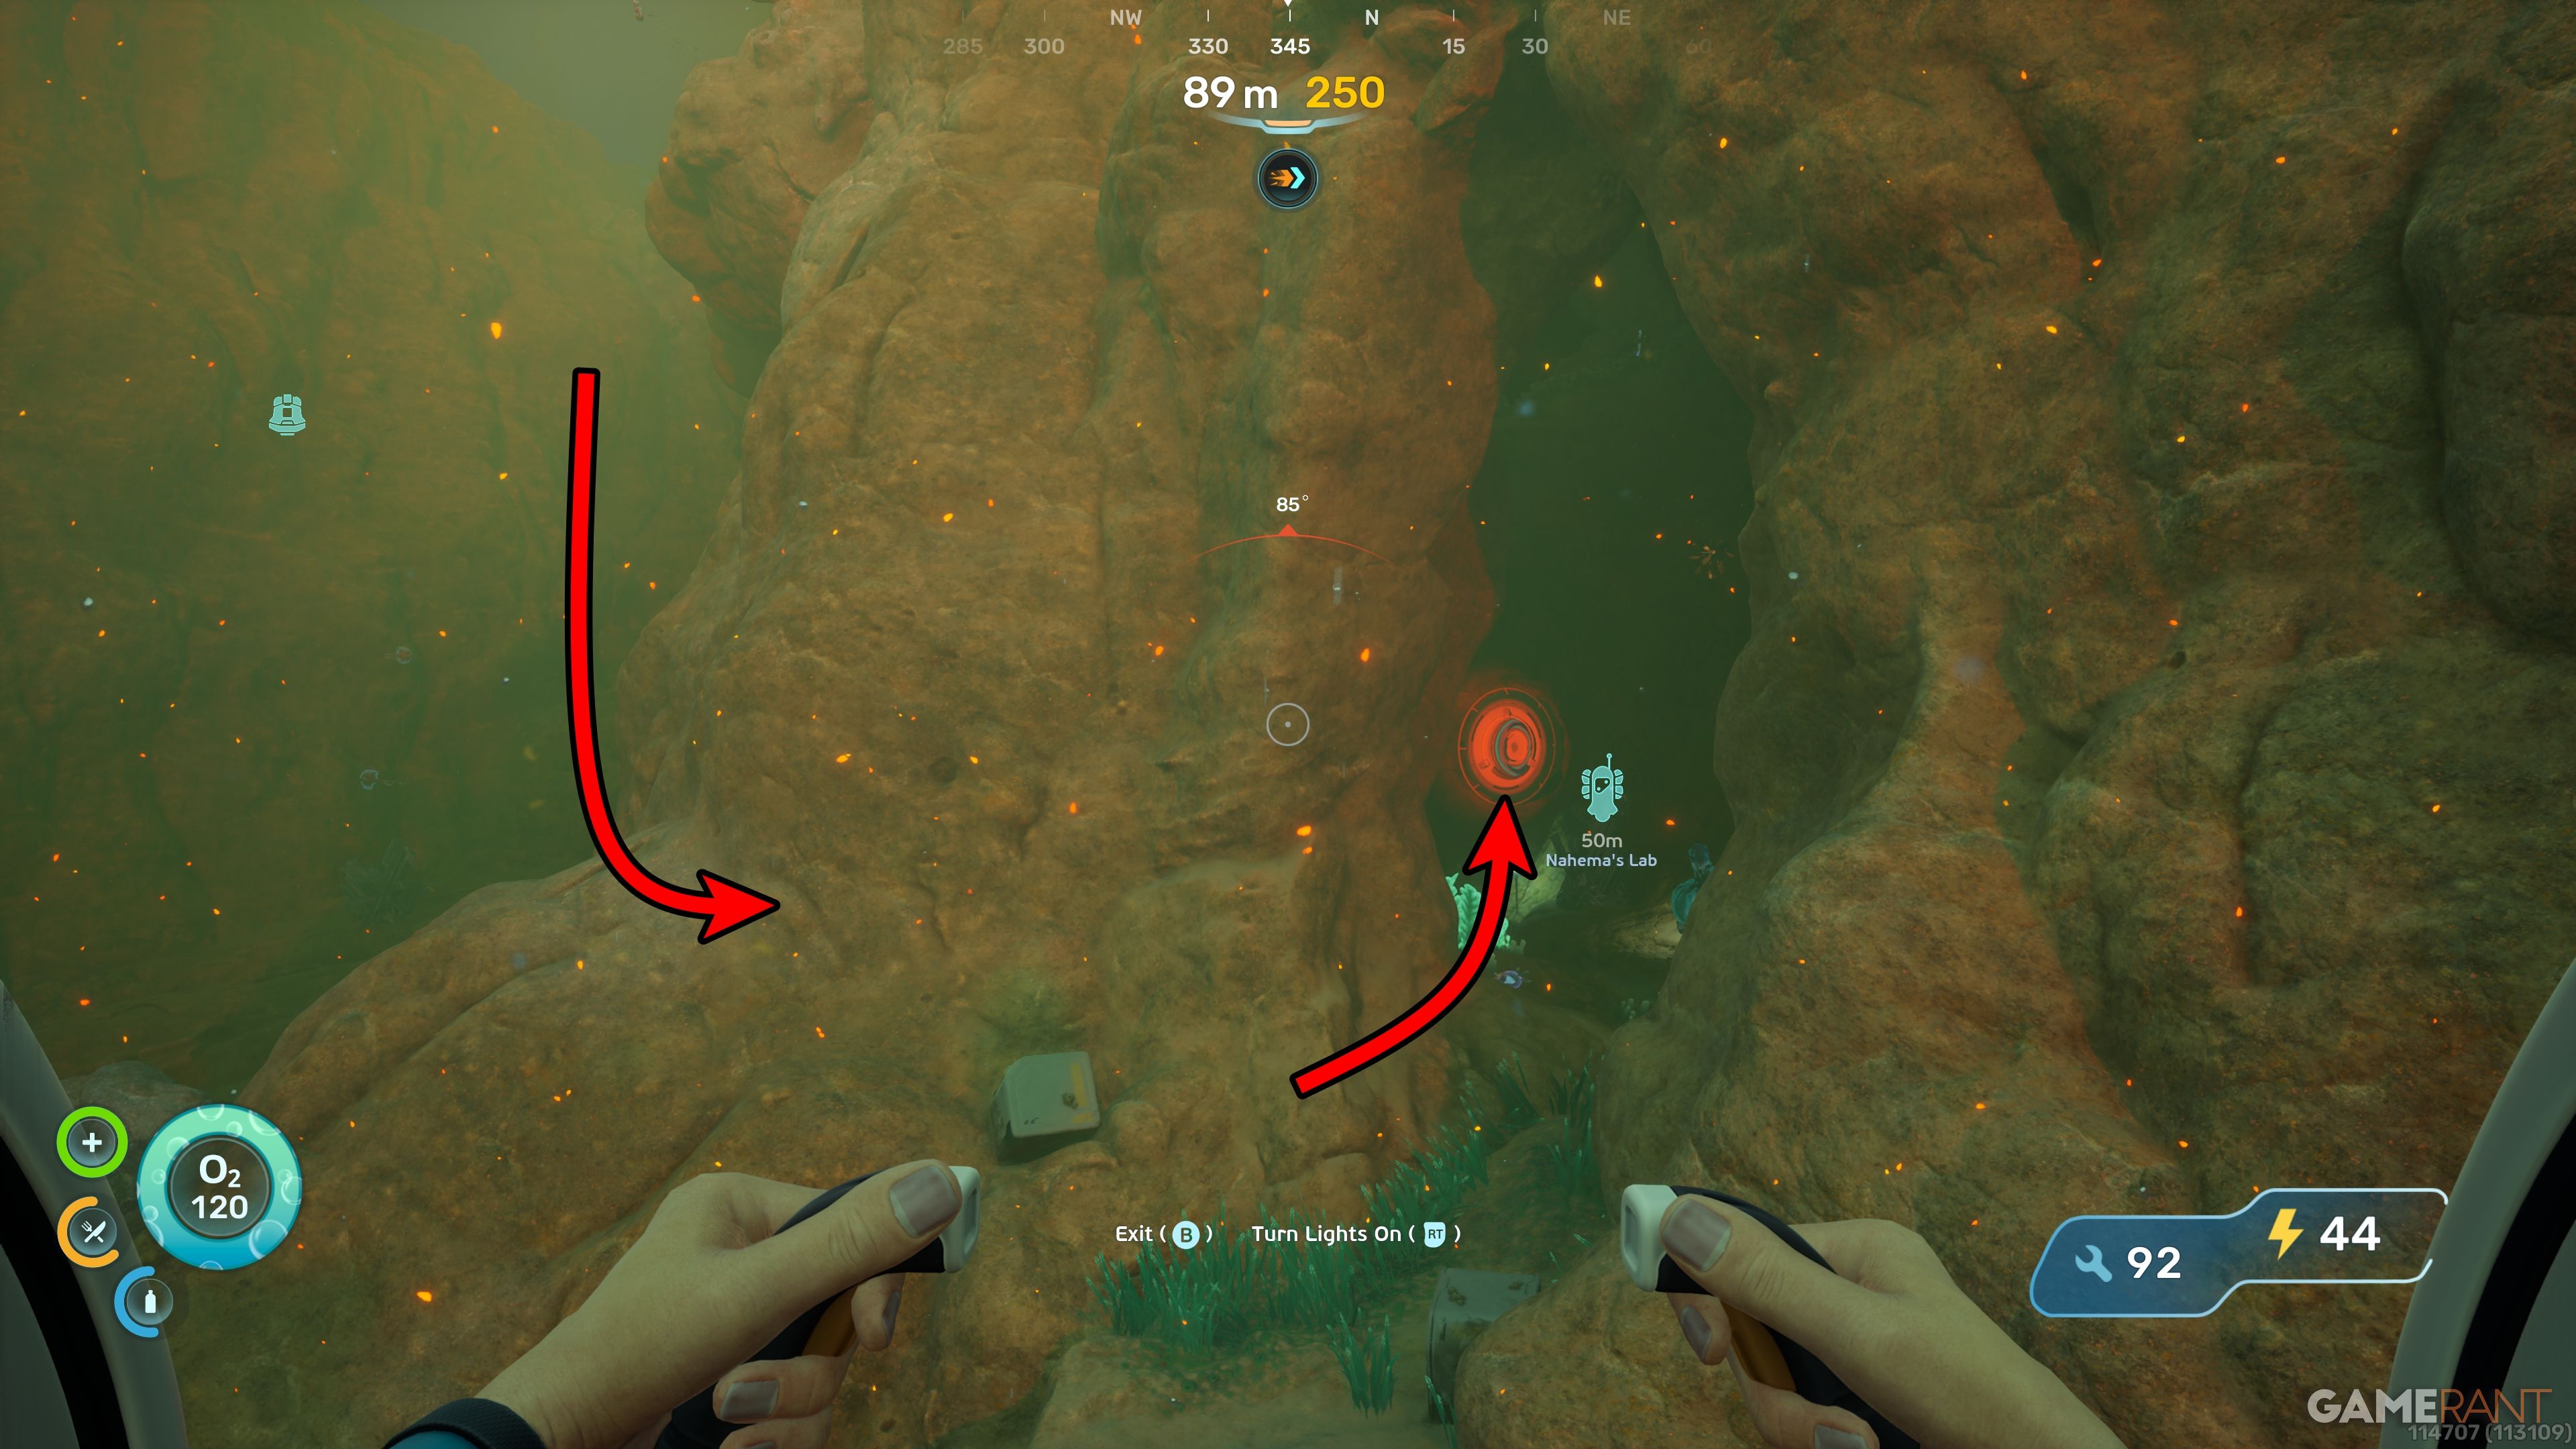
The Biobed is inside the lab. Interact with the screen to receive another slot on your Quickbar.
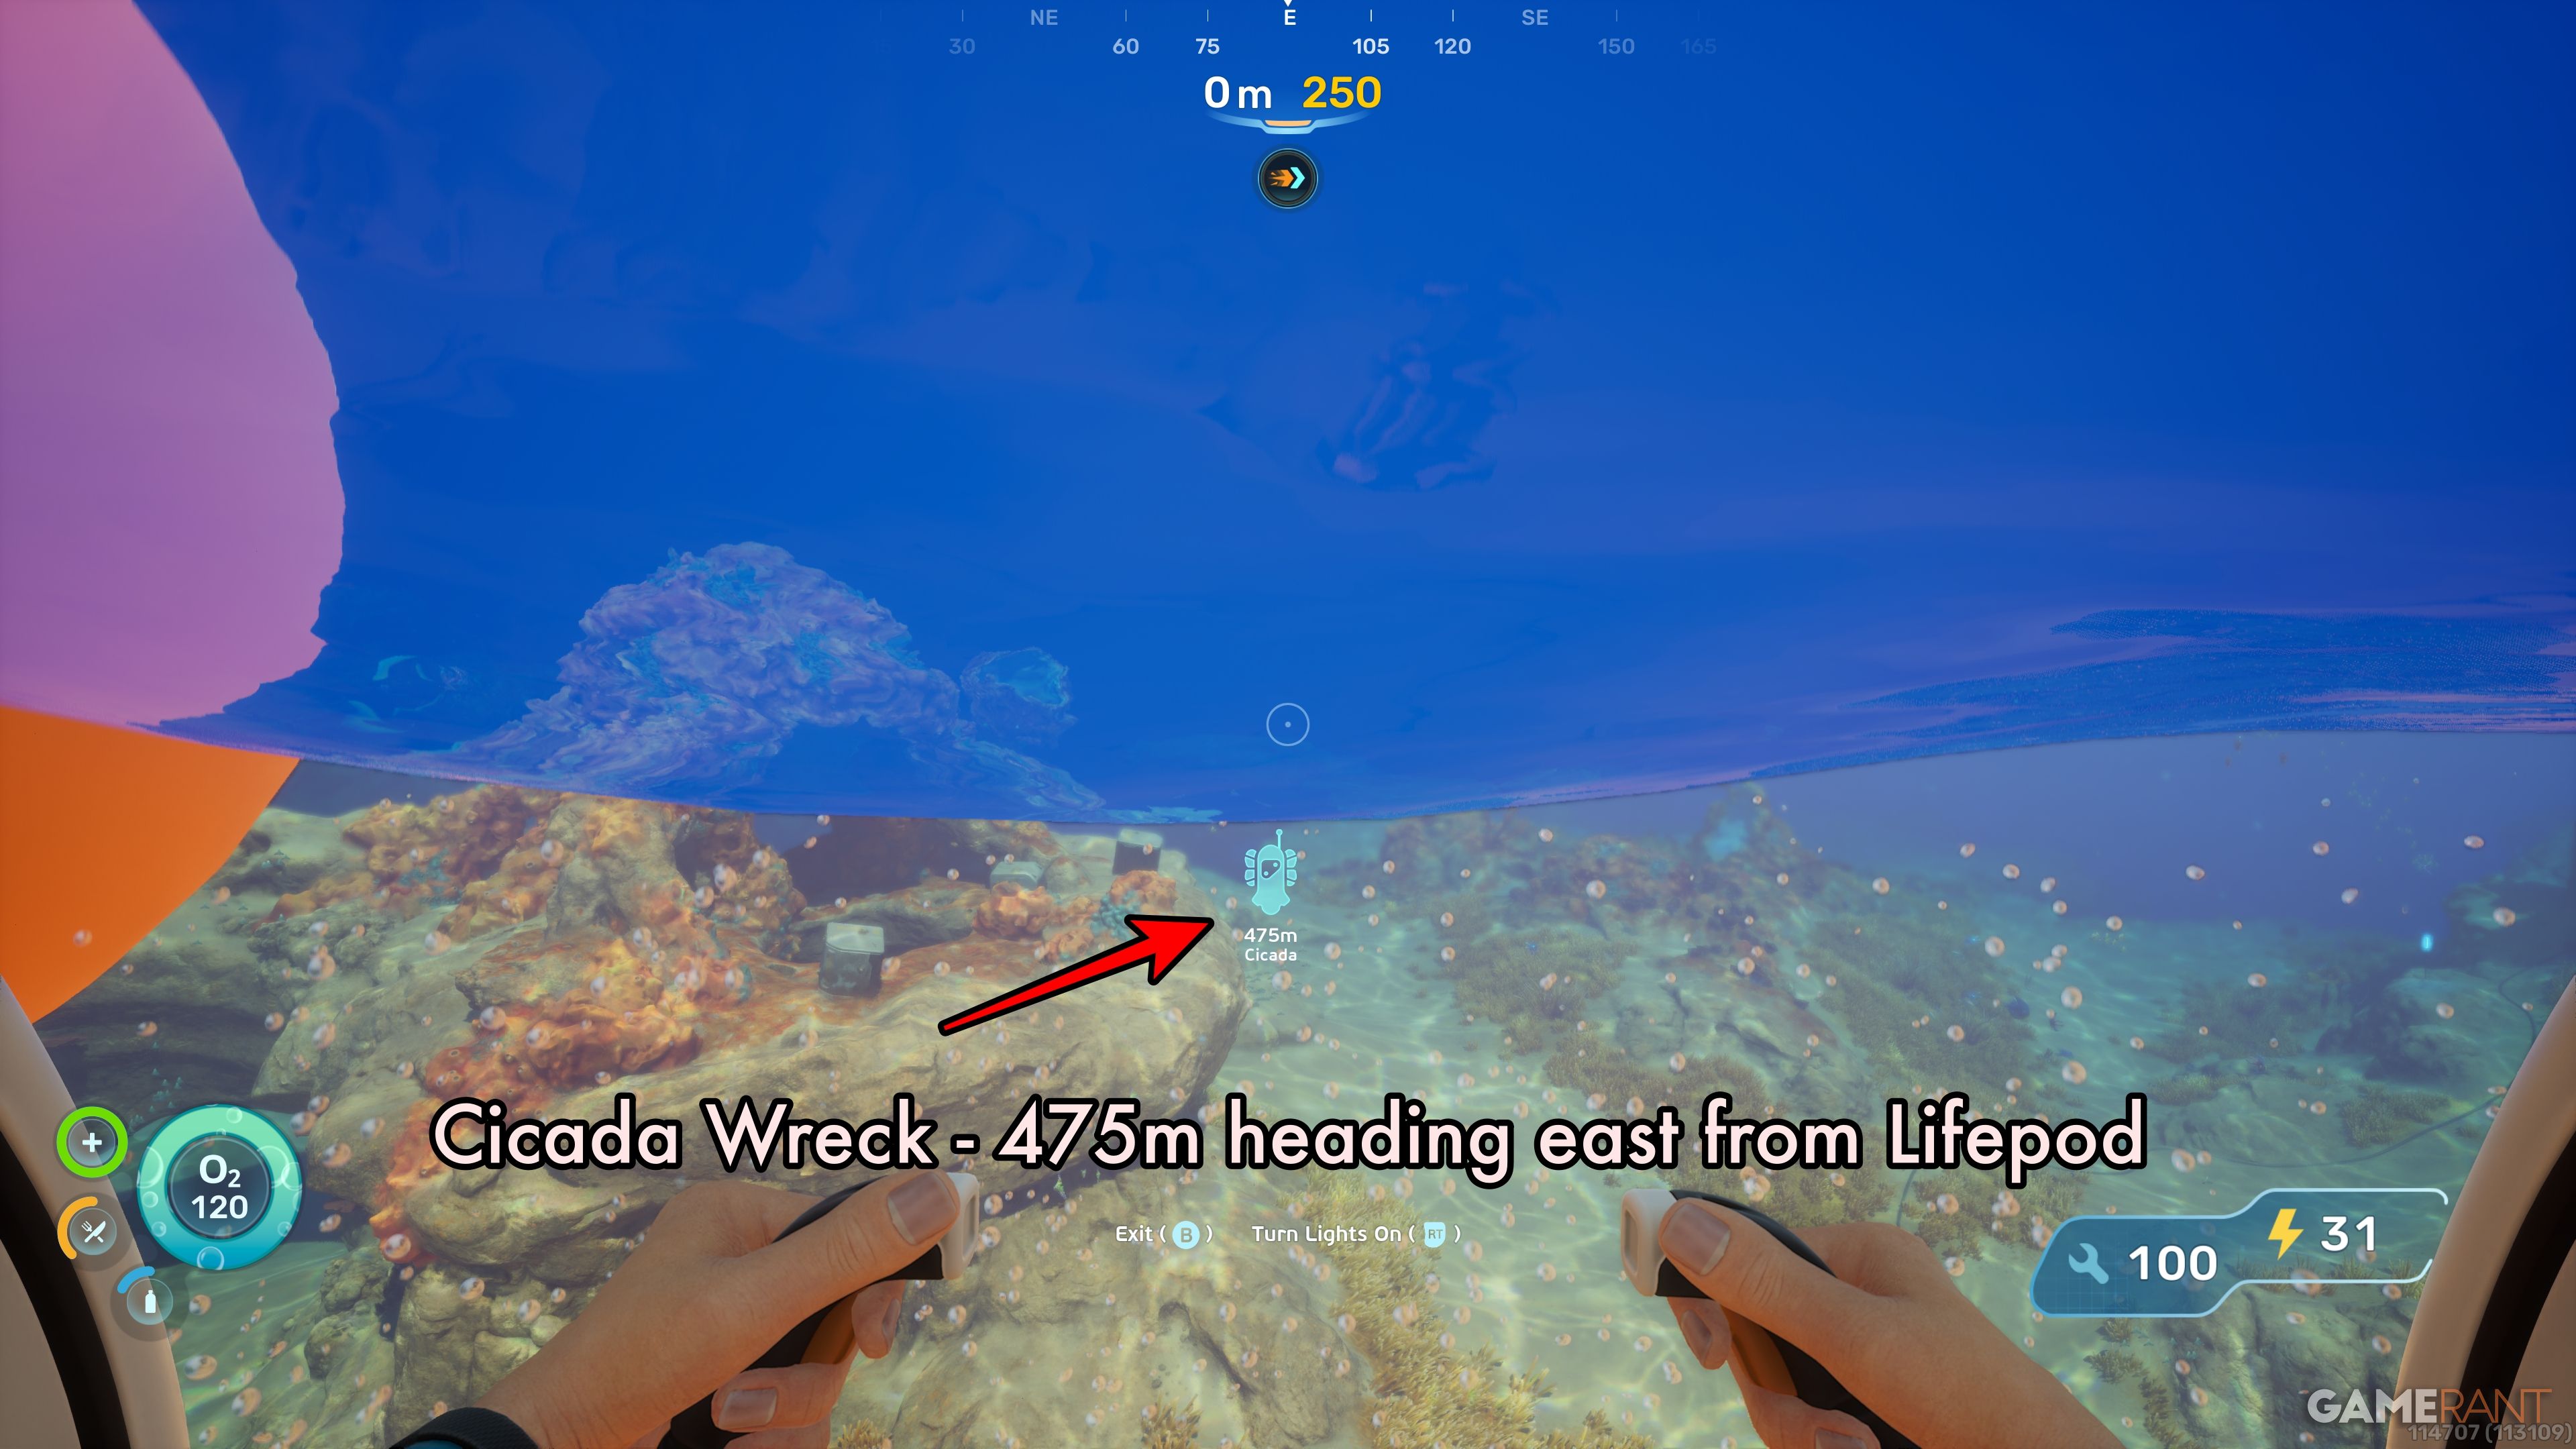
Biobed Inventory Expansion 7 – Cicada Wreck:
- Location: Cicada Wreck, near Tadpole Pens. 475 directly east.
- Depth: 75 meters
- Upgrade: Endurance – three additional inventory slots.
This last Biobed is also found in the warm waters of the Graveyard, and all the same safety measures from the earlier Biobed still need to be followed here.
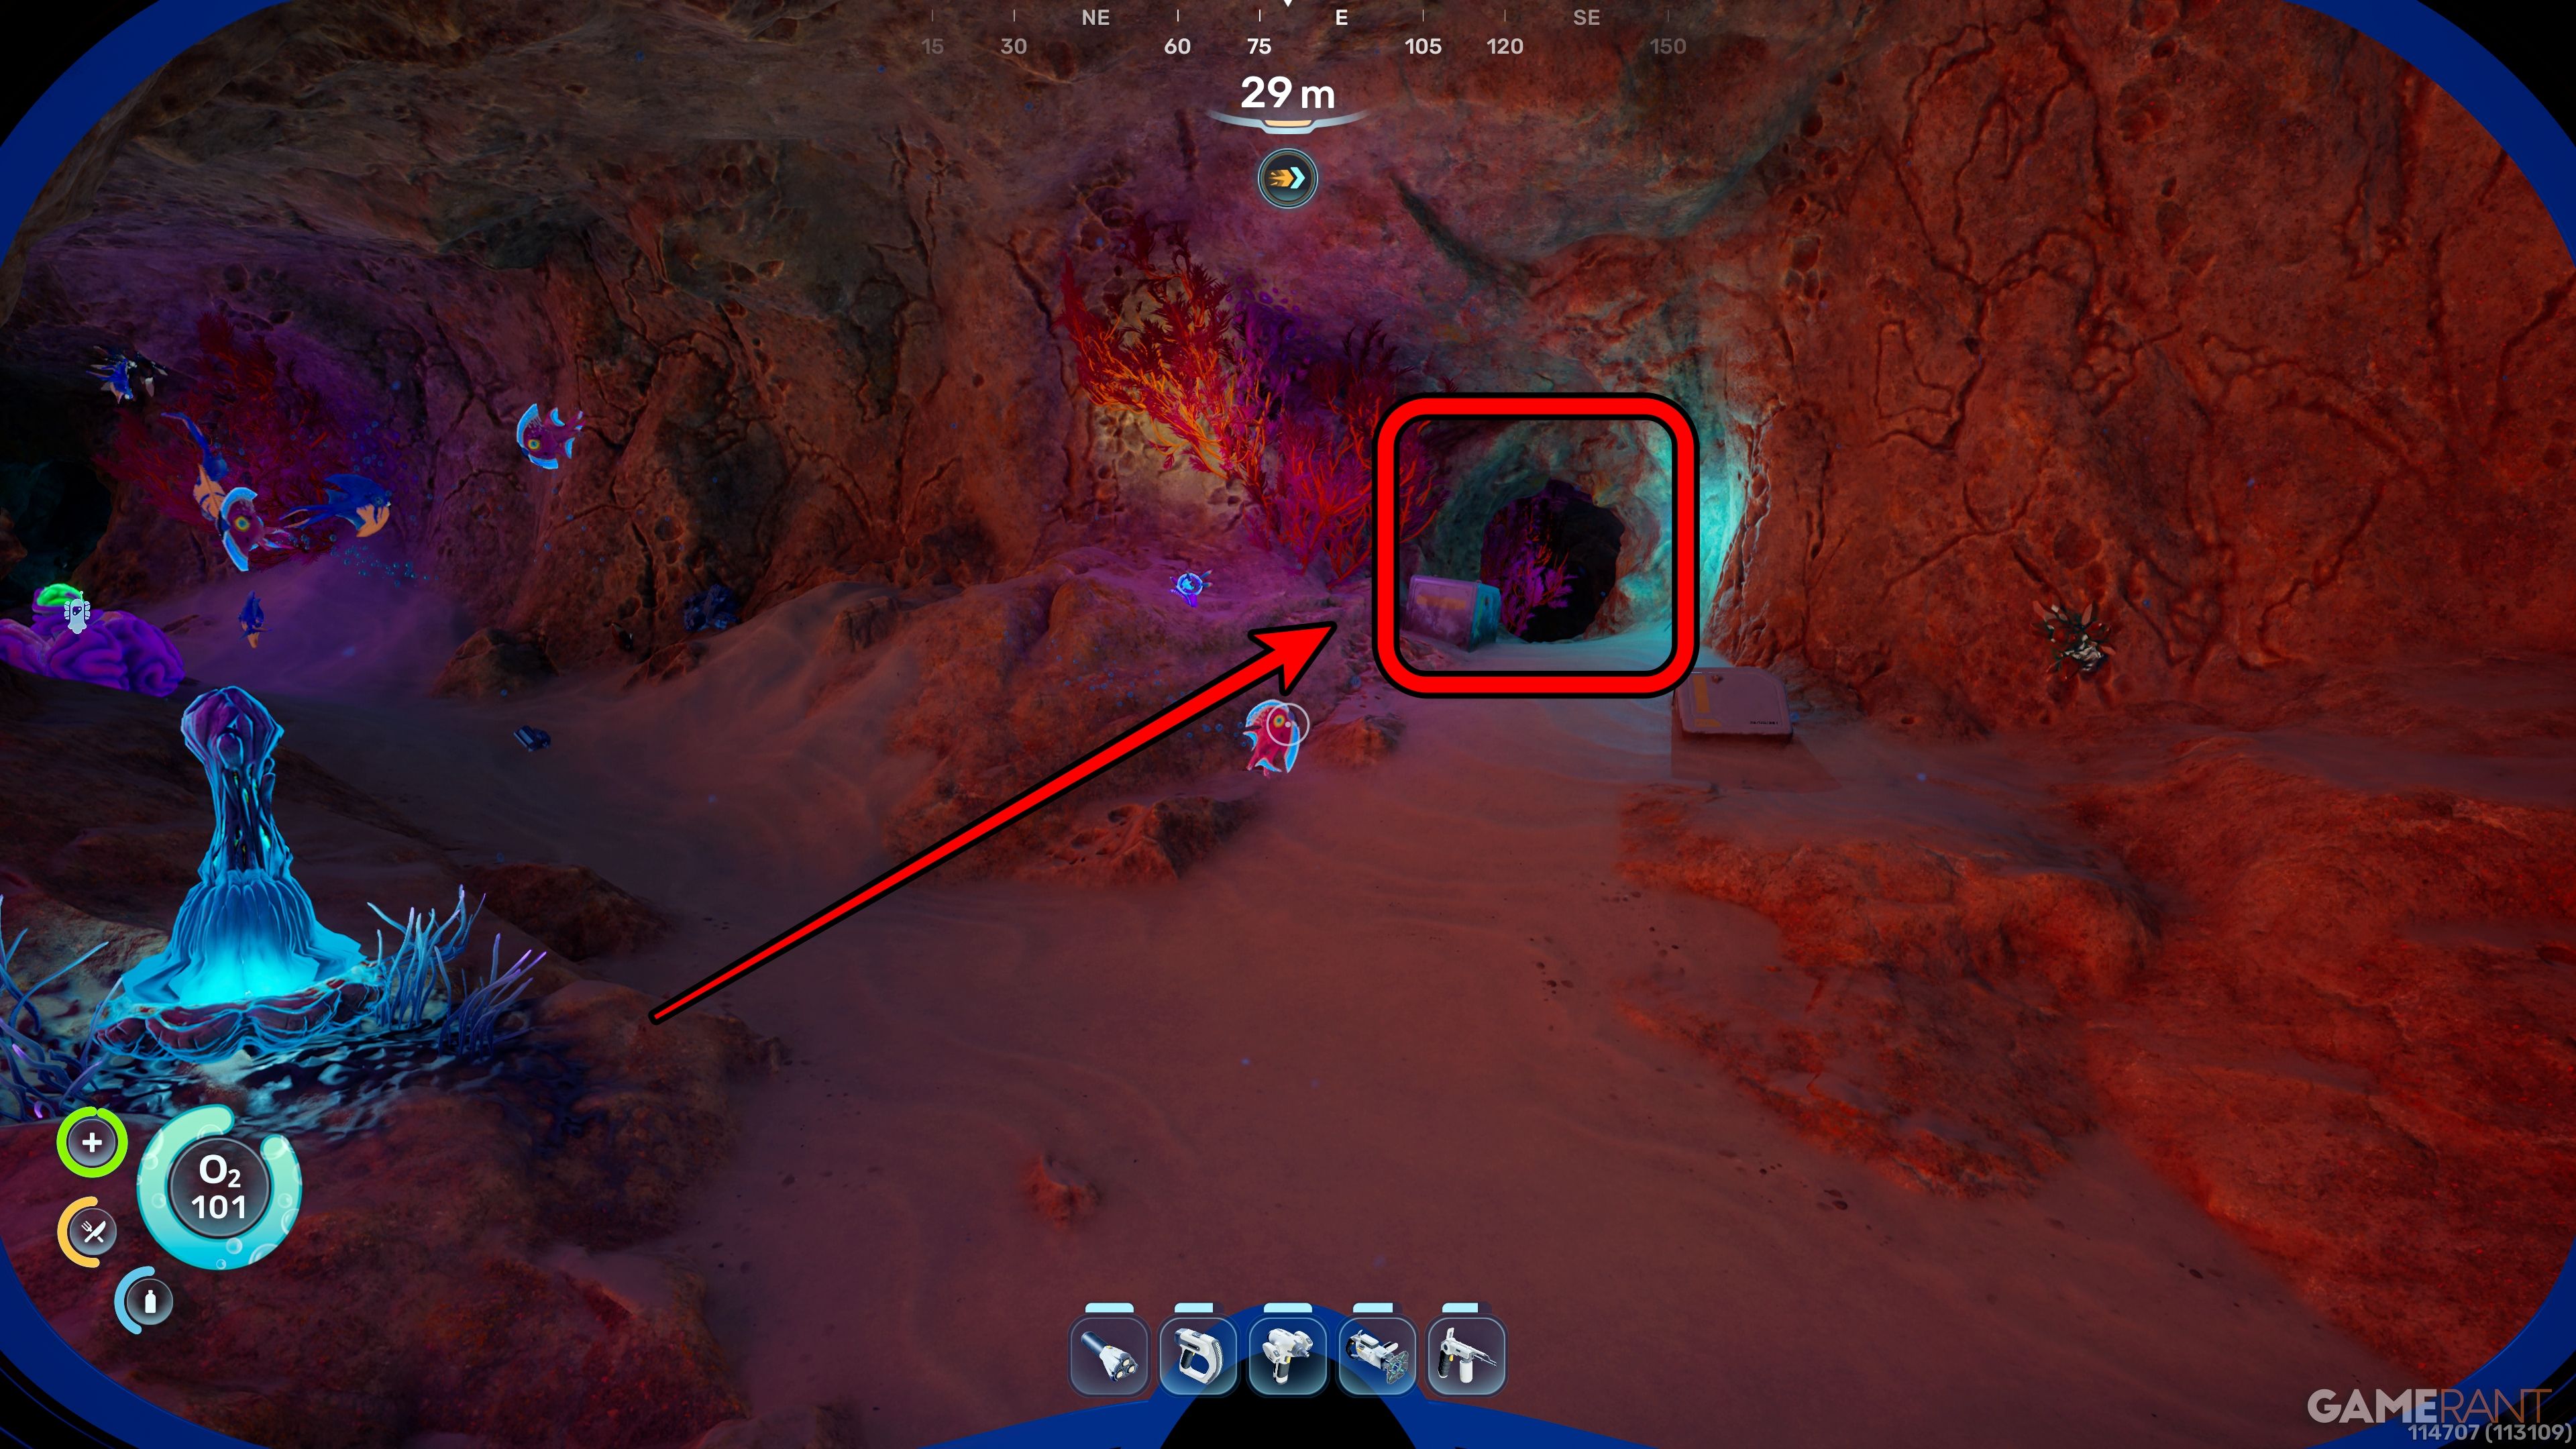
Starting from the Lifepod, travel east for 475 meters. After about 200 meters, you’ll notice the water temperature shift and the water will become yellowish and cloudy due to sulfur.
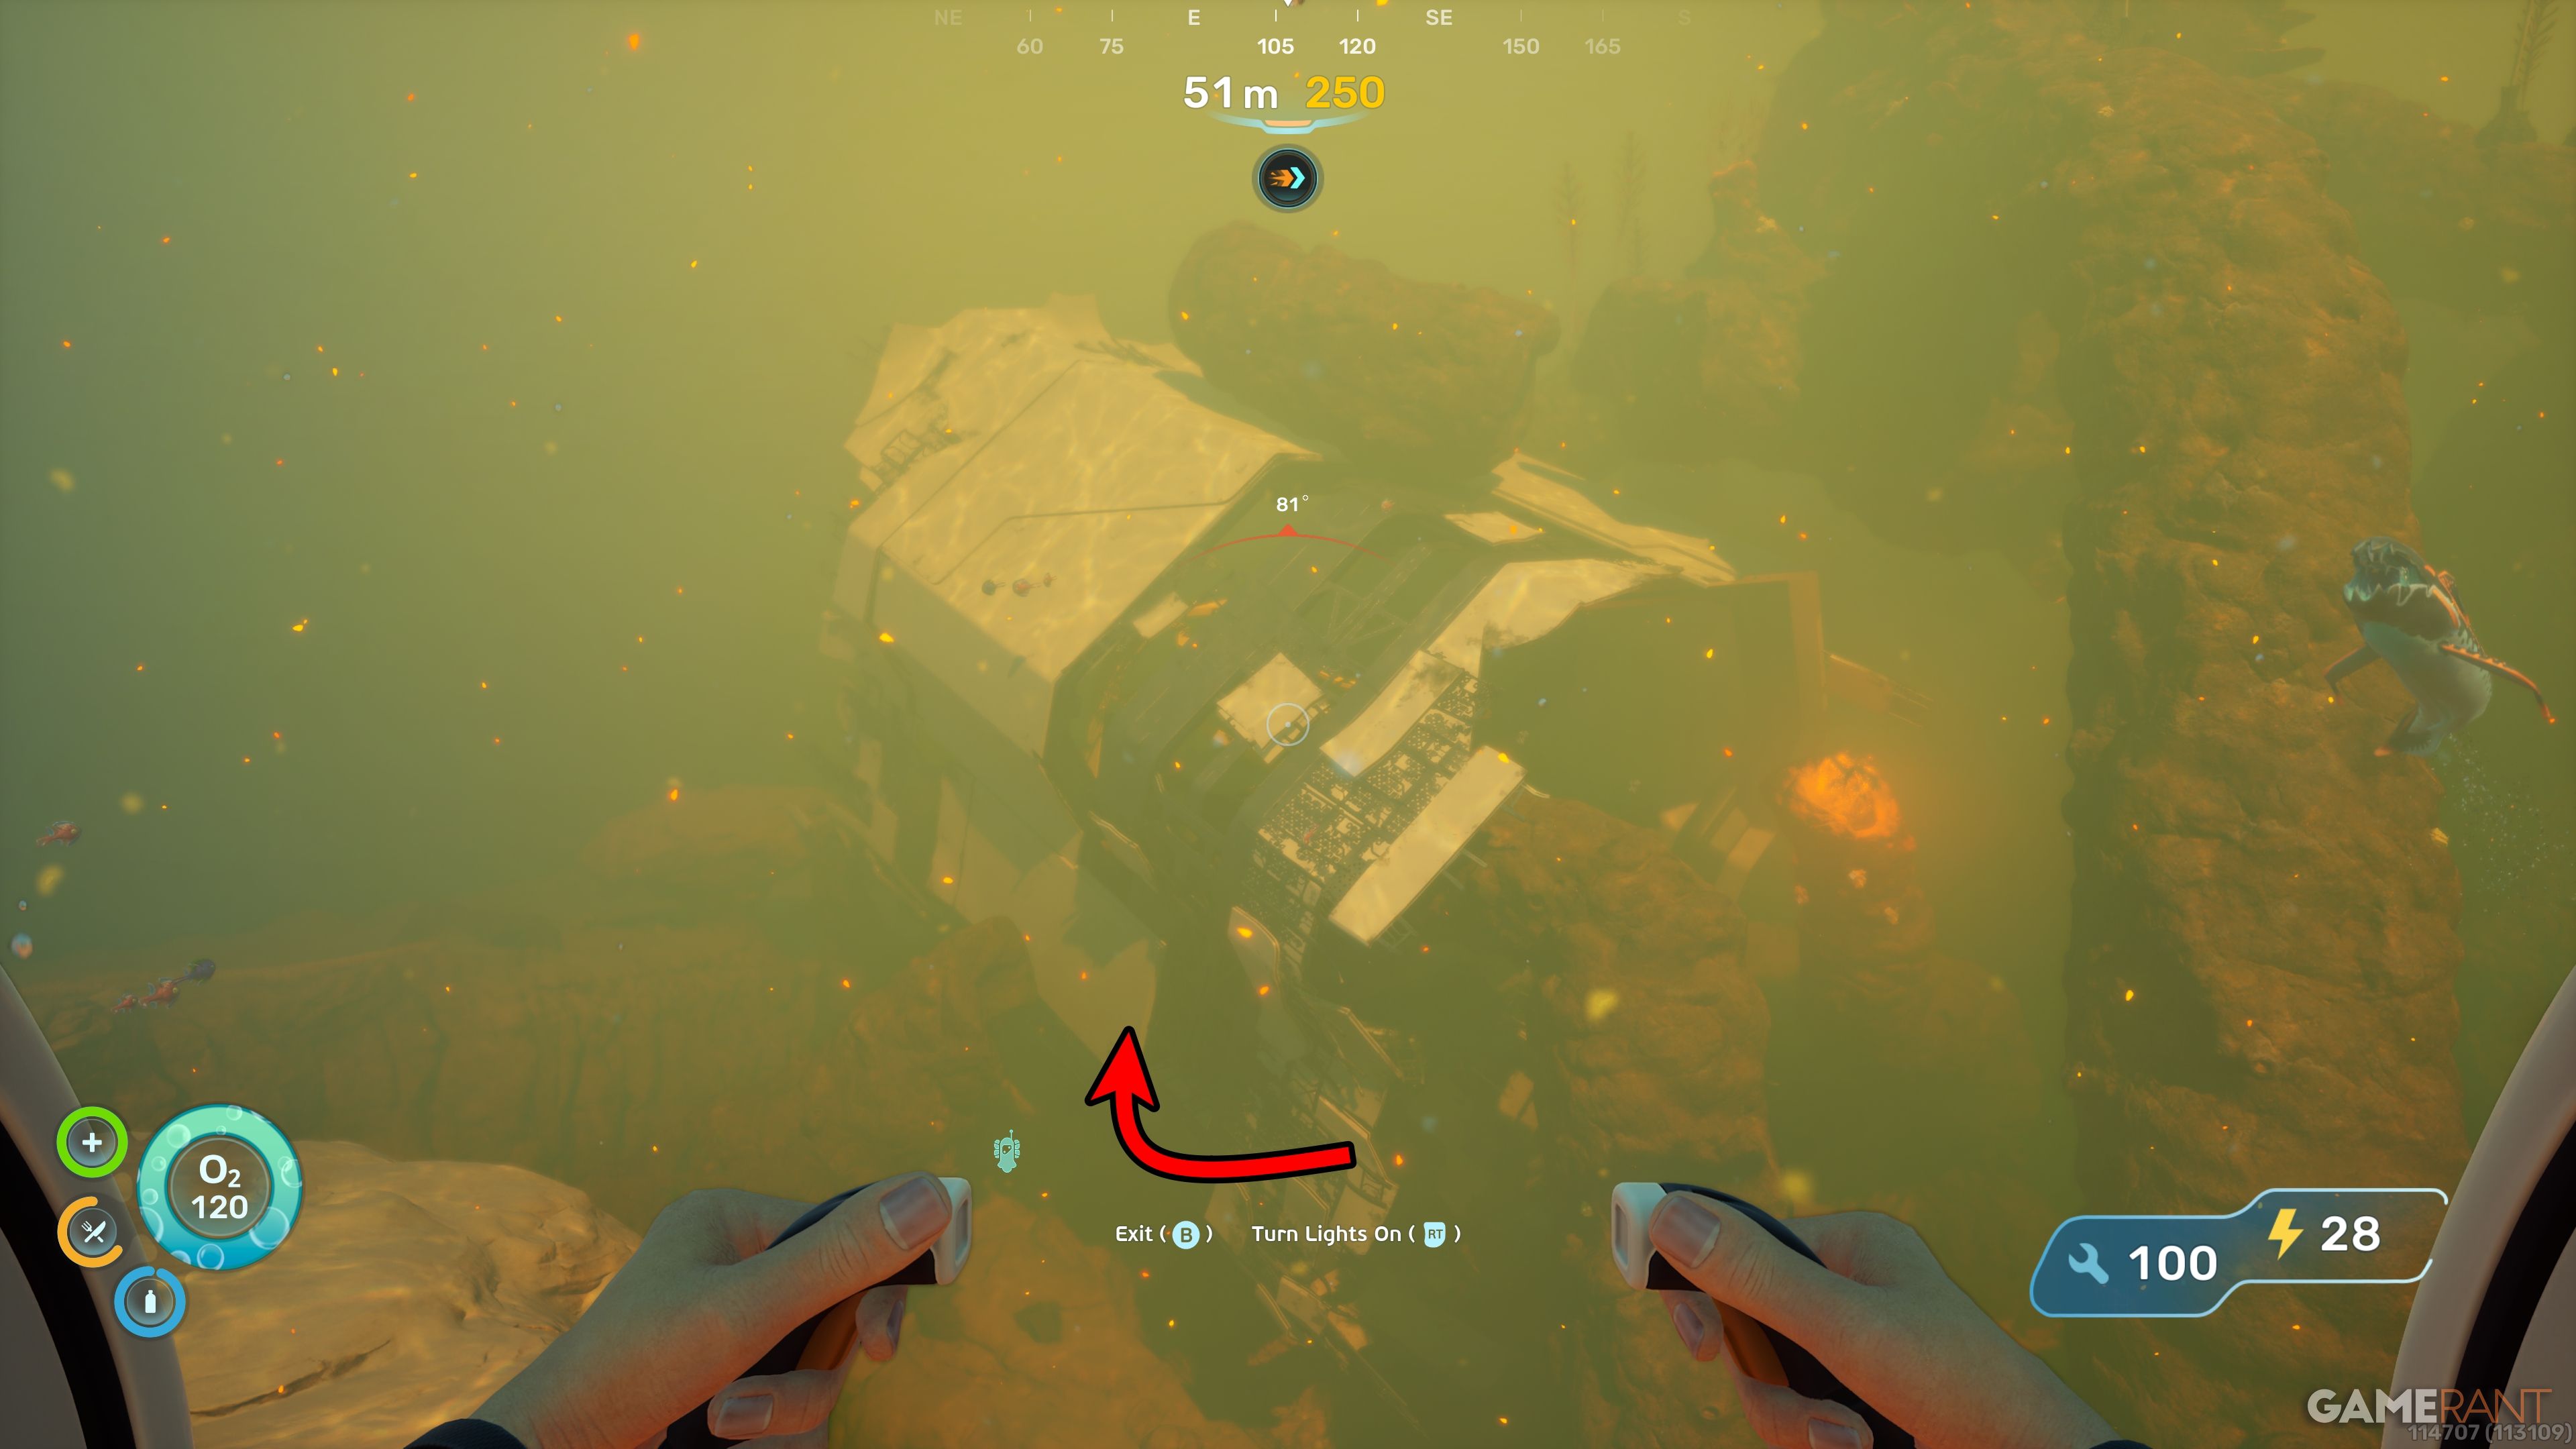
Head east, and you’ll eventually find the large wreckage of the Cicada, now tangled in a huge coral reef.
You should be facing the west side of the building – that’s the right spot. Walk up to it and look for a section where the outer panel is missing, revealing the frame underneath. You’ll find this just before a large rock pillar that’s leaning against the side.
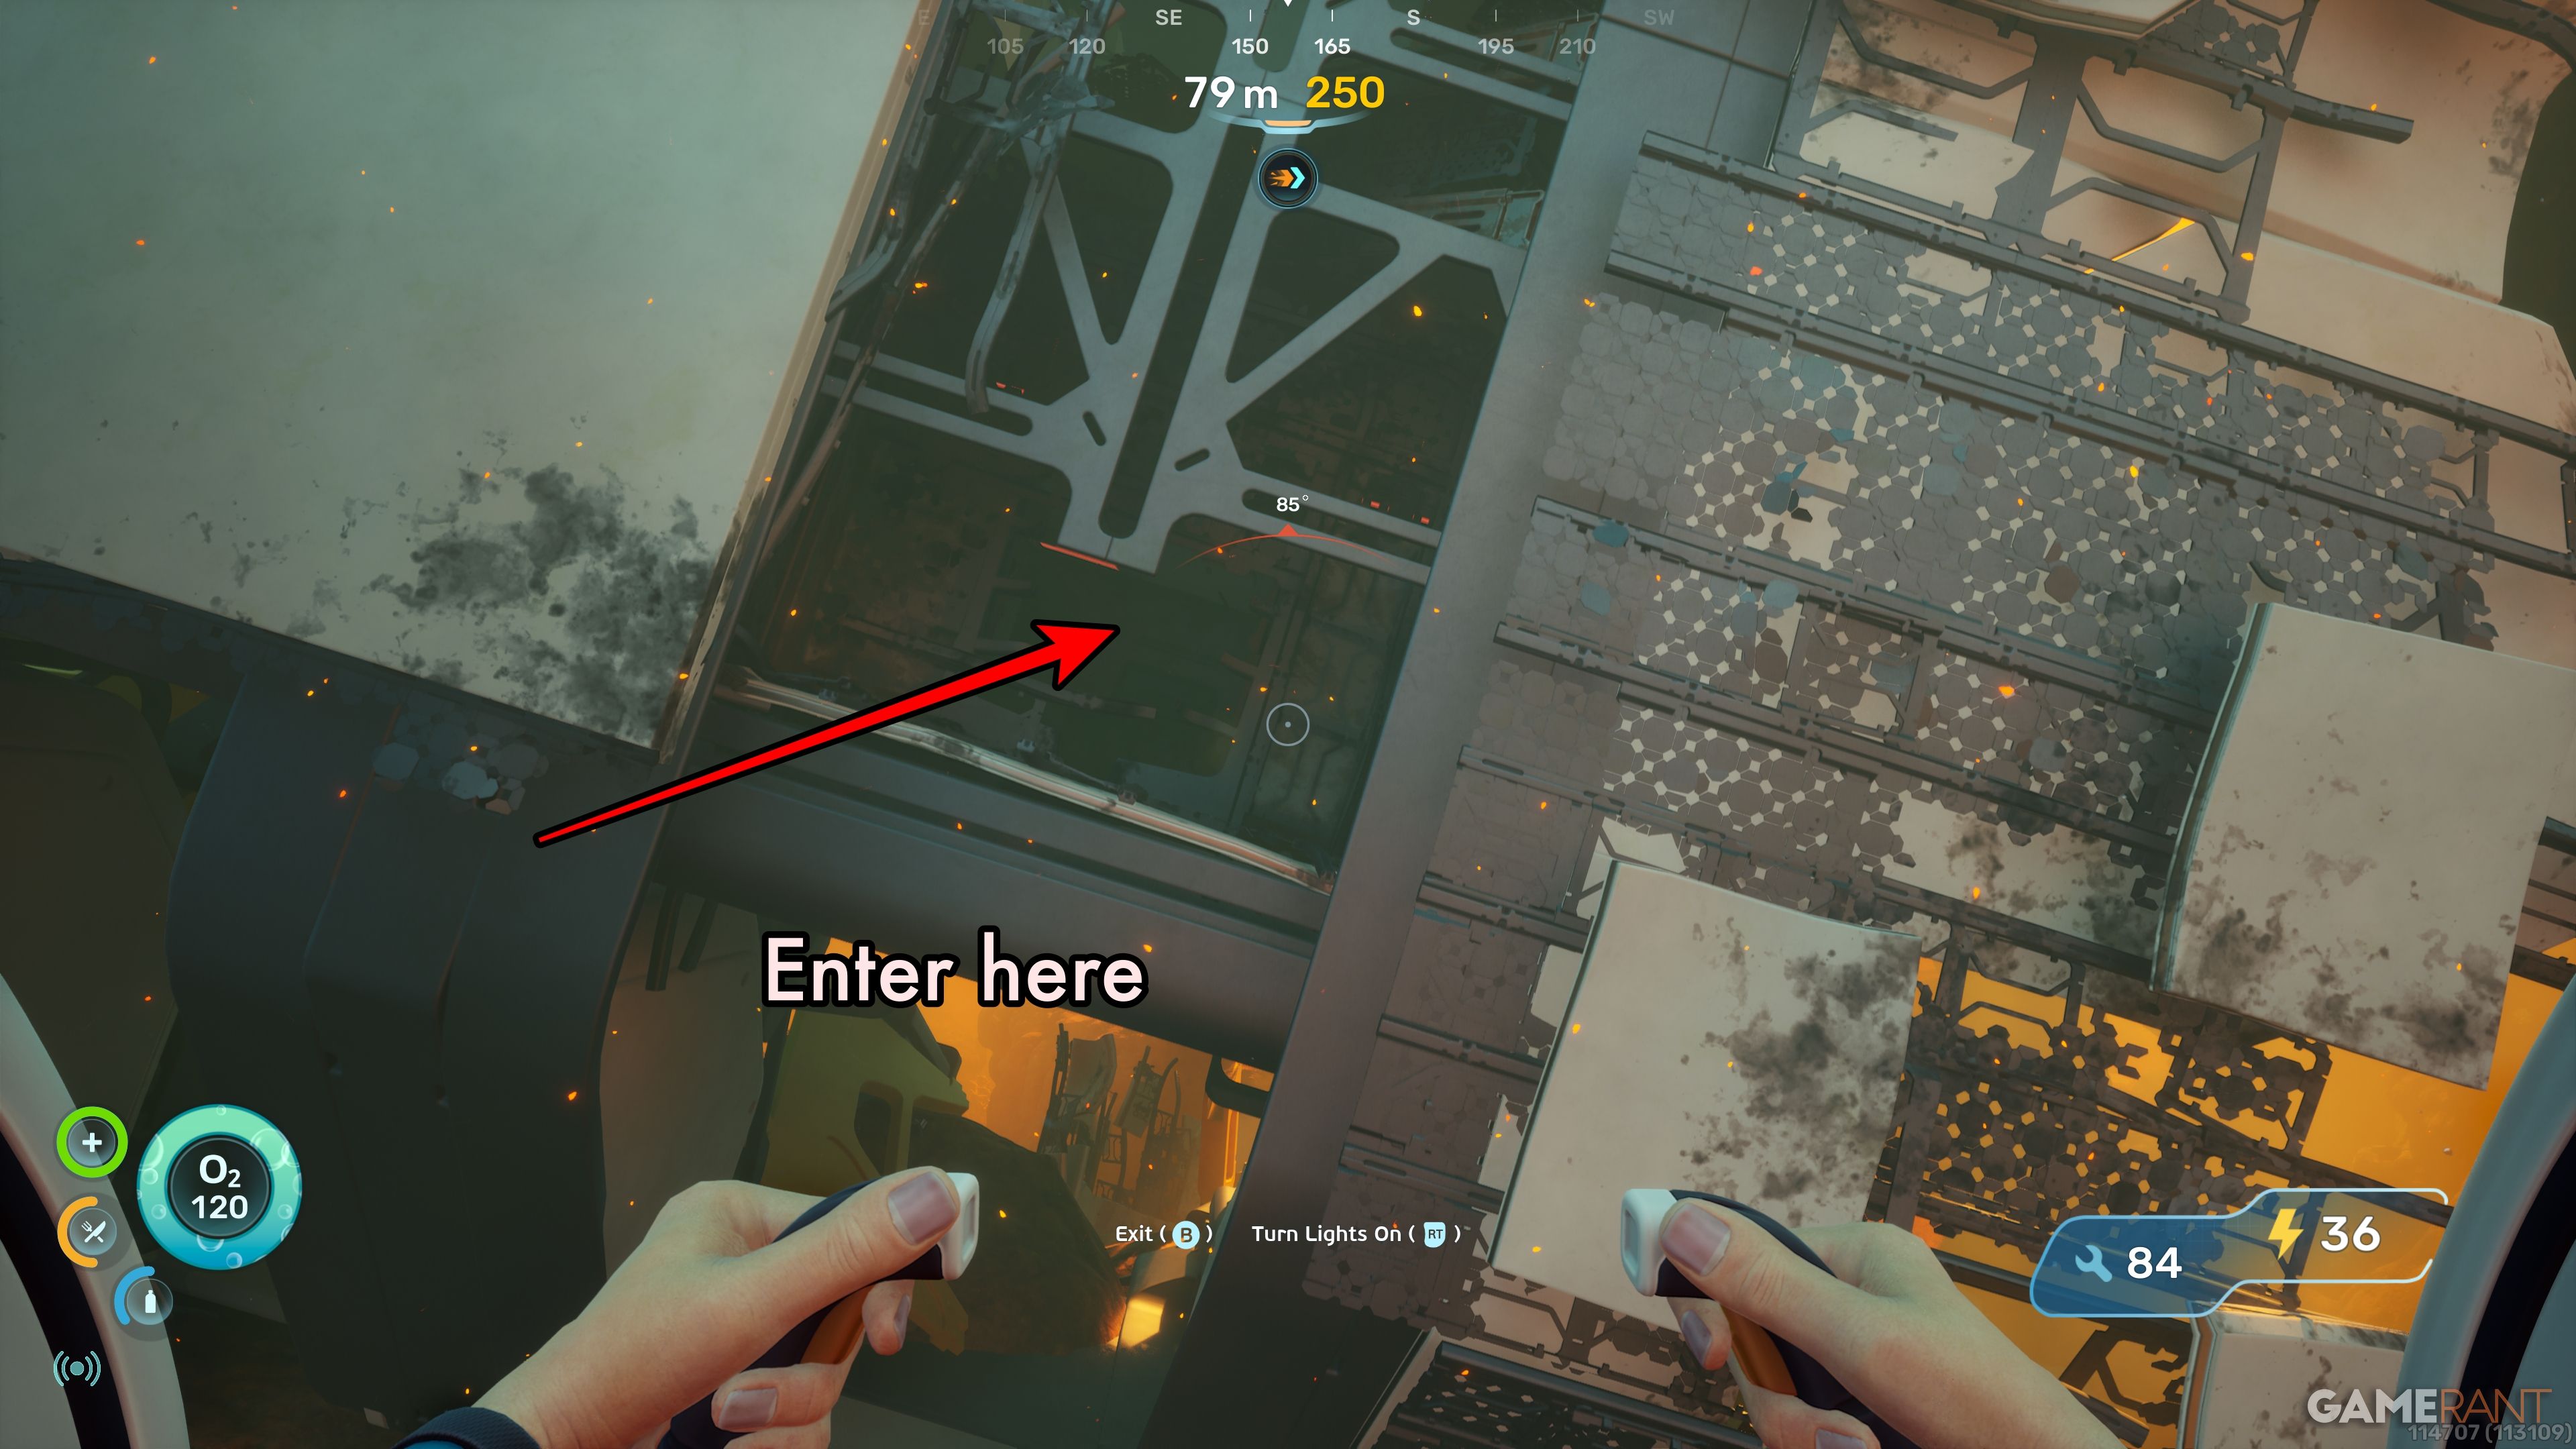
Head to the bottom of the exposed area, and you’ll see a small open section where you can enter.
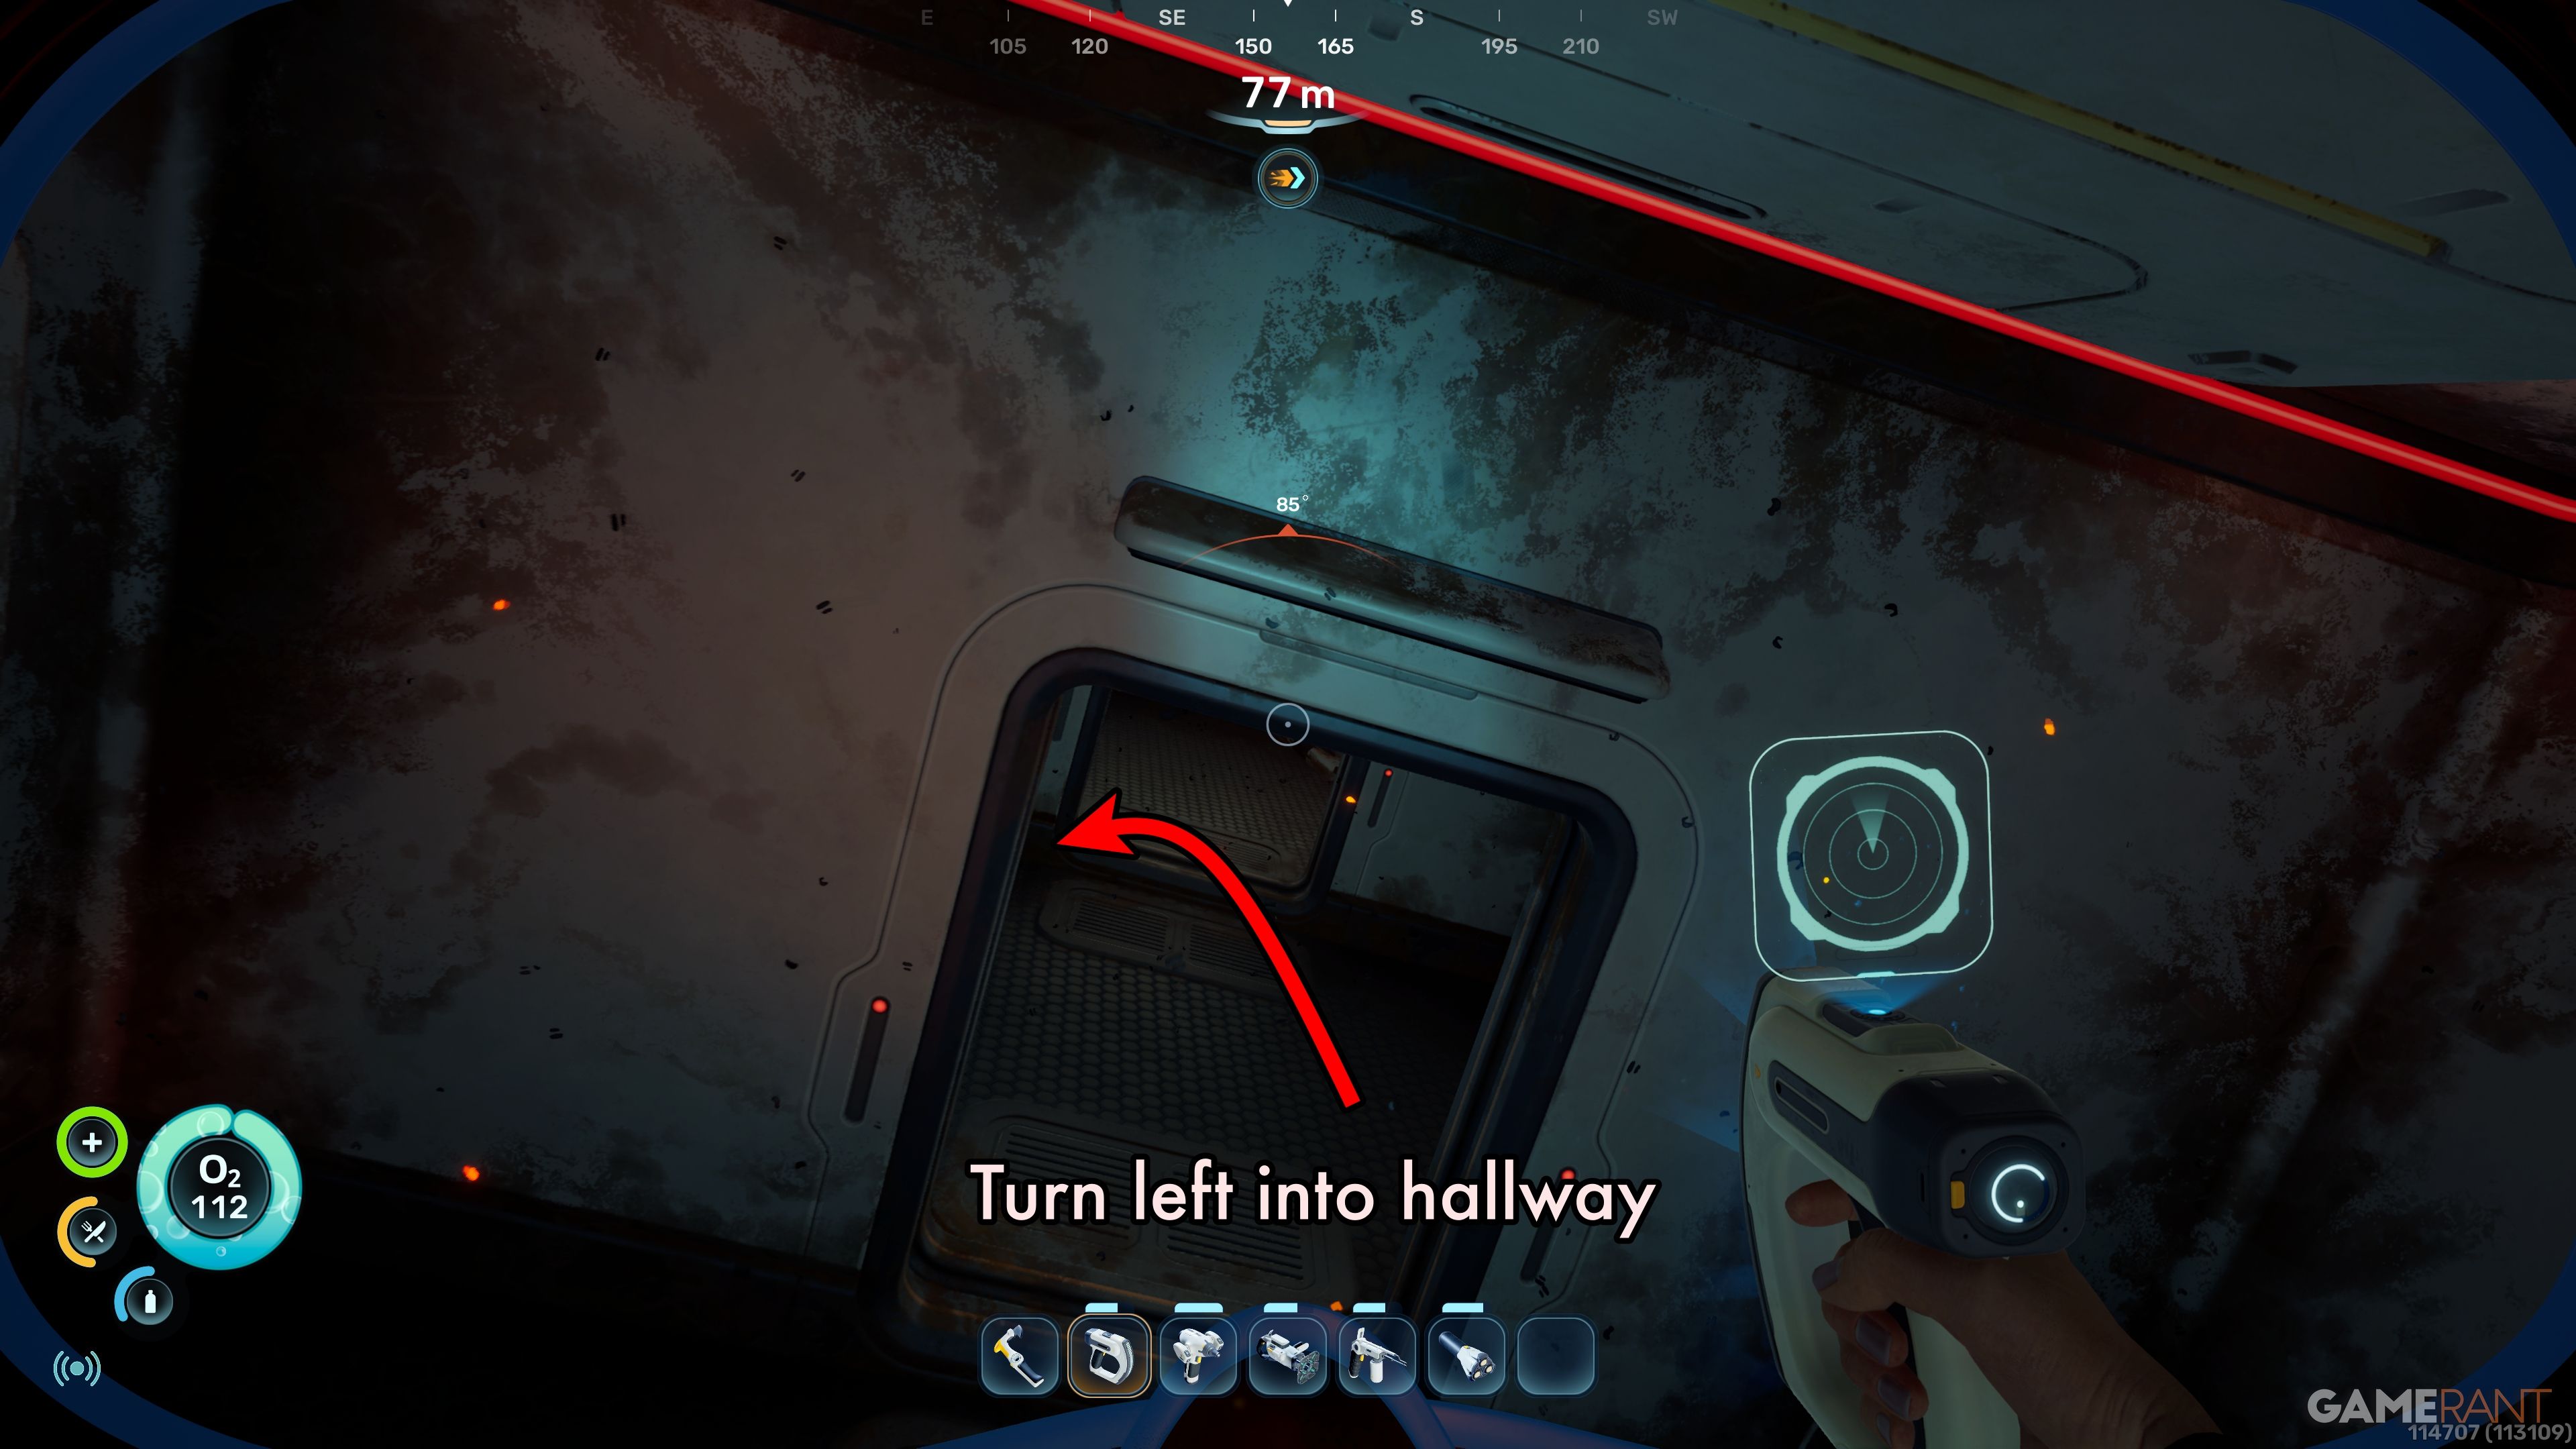
Go through the first room, then turn left into the hallway. Walk down the hallway and turn left again into the next room.
Once inside, you’ll discover the Biobed. Use the screen to get the last upgrade for your Endurance inventory.
Subnautica 2 Related Guides
Looking to find the rarest crafting materials in Subnautica 2? Check out this collection of guides!
- How to Get Atacamite
- How to Get Axum Bacterial Culture
- Where to Find Troilite
- How to Get Gold
- How to Get Lithium
Read More
- NTE Drift Guide (& Best Car Mods for Drifting)
- Diablo 4 Best Loot Filter Codes
- All Aswang Evidence & Weaknesses in Phasmophobia
- Conduit Crystal Location In Subnautica 2
- Where to Find Prescription in Where Winds Meet (Raw Leaf Porridge Quest)
- Forza Horizon 6: Find the Ohtani Treasure Chest Location
- Boruto: Ikemoto Has Already Hinted At Sasuke’s New Eye After Return
- Best Burst & Full Auto Builds for the M16A4 in BF6
- Deltarune Chapter 1 100% Walkthrough: Complete Guide to Secrets and Bosses
- Brent Oil Forecast
2026-05-23 12:09